|
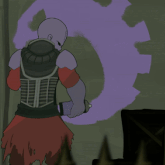
Well I wish my Ultramarines looked that nice, but at least here the first part of my oath for this month. I decided to leave the eyes because I am awful at getting pupils, and for the Chief Librarian I felt it was fitting, like he is in the middle of bringing fourth his powers.
|
 #
?
Mar 4, 2015 15:35
#
?
Mar 4, 2015 15:35
|
|


|

|
| # ? Jun 8, 2024 09:15 |
|
|
Cataphract posted:
These guys look dope, could we get some closeups? I'd love to check em out more. adamantium|wang posted:gently caress it, too lazy to take better pictures. Test combat squad is done: Uroboros posted:Well I wish my Ultramarines looked that nice, but at least here the first part of my oath for this month. Just pretend I quoted everything, there's some good poo poo on this page.
|
|
#
?
Mar 4, 2015 15:54
|
|


|
I'm going to do some cracked earth mars bases and I'll be using Agrellan Earth for the foundation. Does anyone have any tips for making sure it doesn't flake or peel away after drying? I'll be drybrushing at some stage so it needs to be fairly stable.
|
|
#
?
Mar 4, 2015 17:27
|
|
|
Miles O'Brian posted:I'm going to do some cracked earth mars bases and I'll be using Agrellan Earth for the foundation. Does anyone have any tips for making sure it doesn't flake or peel away after drying? I'll be drybrushing at some stage so it needs to be fairly stable. Seal it, dry brush, seal that.
|
|
#
?
Mar 4, 2015 17:38
|
|

|
adamantium|wang posted:gently caress it, too lazy to take better pictures. Test combat squad is done: These are a great example of the fact that you don't need crazy blending or advanced stuff to get some  mans mansA neat basecoat and a sharp highlight is what its all about
|
|
#
?
Mar 4, 2015 18:34
|
|


|
adamantium|wang posted:gently caress it, too lazy to take better pictures. Test combat squad is done: I think your blue has improved noticeably since you posted the earlier versions. The eyes look really good too.
|
|
#
?
Mar 4, 2015 18:56
|
|


|
Uroboros posted:Well I wish my Ultramarines looked that nice, but at least here the first part of my oath for this month. It would look a shitton better if you got some decent lighting and adjusted the levels so that the whites were actually white.
|
|
#
?
Mar 4, 2015 19:01
|
|

|
adamantium|wang posted:gently caress it, too lazy to take better pictures. Test combat squad is done: Crisp highlights, great contrast, super solid job dude
|
|
#
?
Mar 4, 2015 19:02
|
|
|
I ended up pulling the trigger on that airbrush starter setup you folks recommended, so I am anxious to get cracking with that. I'd seen in a couple videos of various youtube painters that they do their airbrushing in small office setups seemingly without spray booths (though I don't doubt they at least wear masks) but I'm still looking to get a feel for safety-sake--if you mask up while painting with an air brush is it generally A-OK a ways afterward then? I'm not planning on going hog wild with huge battalions or anything but I am cagey. In different news finally got around to ordering nuln oil and agrax earthshade to have on-hand for options and I was curious if anyone had a good bead on how some of the different paint line mainstay washes shake out between one another. The bulk of my painting supplies were started up with an army painter set and then later expanded a good deal with reaper paints and then I've got an ancient decade+ old big box of hexagonal citadel paints with the flip-tops (the taller thinner ones rather than the shorter broader ones.) From those, I've -still- got 'armor wash' and 'flesh wash' etc. but I've been primarily painting using army painter's Soft Tone / Strong Tone / Dark Tone washes when I've used them since I started painting again--I'm curious where things might match up.
|
|
#
?
Mar 4, 2015 19:28
|
|

|
spacegoat posted:dat gradiation... he gradiated top of his class...
|
|
#
?
Mar 4, 2015 20:00
|
|

|
You know, I'd *LIKE* my Ultramarines to look like those, but I just don't like painting enough to put in the effort.
|
|
#
?
Mar 4, 2015 20:37
|
|

|
thespaceinvader posted:It would look a shitton better if you got some decent lighting and adjusted the levels so that the whites were actually white.  Better?
|
|
#
?
Mar 4, 2015 20:58
|
|
|
nesbit37 posted:I'm certainly interested in whatever you have to say, but I think the main things I know I am looking for more info on is: OK, so to clarify, I don't do gravity casting with metal. That is coming on a future project, but I haven't pulled the trigger on that one yet. I'm sure you're aware of this, but that Oomo you picked up will NOT do metal, as it won't withstand the heat as far as I am aware. Mold Max 60 is the only RTV rubber from Smooth On that I know of that will stand up to the heat of liquid metal.  All of my metal casting thus far has been with centrifugal molds on a jury-rigged, umm, rig. This is a setup that most people are unlikely to have, so I won't really go into too much detail, unless someone really wants some info. Scales and stuff: I haven't really run into anything that is particularly difficult regarding scale - obviously, smaller can be more difficult, but it depends on the design of the model. You just have to really sit there and plan when you're looking at your master. It's something that comes with experience - "Oh yeah, I'm going to run into problems with that undercut. I'm going to have to rethink this..." Thin items are the worst - sometimes they restrict resin/metal/airflow, and sometimes they break when you're demolding. I've got some calvary I am casting in metal and roughly 50% of the models snap at the ankle every time. Fortunately, metal miscasts go back into the melter to try again. Resin casting: I use Smooth-On Mold Max 25 (RTV) and Smooth-Cast 321 (Resin). I buy the gallon containers directly from Smooth-On. I either have it shipped, or if I have a buddy in the area and he happens to be going that way, I'll have him pick it up. For metal, I order from a metal supplier - they have razor wire and armed guards and everything. I use 92A, which has about a 5% lead content. I should probably look into switching to 92-8 which is lead free. Ok, things to be aware of: Work in a clean area - My workstations tend to become messy with all the stuff I try to do. Eventually, it becomes a hinderance and causes you to lose things when you need them most, screw things up, and generally start yelling at yourself and inanimate objects. Keep your work area clean - clutter up the rest of the house. Master setup - Before I set up to cast anything, I look at the model and determine how best to cast it. Is it going to be a one part, two part, clamshell? Where are the vents going? How am I going to get resin to the model? Is there anythign weird about the model I need to accomodate? I cast a four-legged monster - it came out well, but it was a bitch to map out how I was going to cut that mold to remove the cast. Look for undercuts - they will be difficult to work around until you understand how the process works. Venting - Make sure your vents are high enough up on the model to allow for all air to escape. Think about vent placement before you even make your mold - look at your master and determine where the best placement for a channel and vents are. Equipment - If you're going to cast resin with any regularity or volume, you need the proper equipment. I highly recommend a vacuum pot and pressure pot. If you're going to choose, take the vacuum pot - you can get by with a vibration table instead of the pressure pot. I recommend both if you can get away with it though. Patience - Take your time. Do it slow and correctly the first time, or you're going to be doing it all over again. Think about your process - I hosed up a mold a few weeks ago by cutting an opening in the wrong side of the mold. I was able to salvage it, but I was on autopilot and wasn't paying attention and could have lost it and hours of work. Safety - Use safety equipment. When I cast with metal, I use safety glasses, thick gloves, and a respirator. This hobby isn't worth losing an eye over, or burns from dumping molten metal down your leg. Let me know if you need clarification or want to know more. Sorry it took so long - that splint was a bitch.
|
|
#
?
Mar 4, 2015 21:18
|
|
|
serious gaylord posted:Thats some real nice leather. If you don't mind me being super critical, theres bits of obvious banding where maybe you didn't break up the wash lines with stippling enough. You can see it most clearly in the picture furthest to the left. But apart from that I really like it. I was going to say that that's partially intentional due to the way the coat would get a lot more mud and dust on it near the bottom, but I totally see what you're saying here, and agree that it could use some more blending, thanks for the crit.
|
|
#
?
Mar 4, 2015 21:42
|
|

|
Uroboros posted:
Looking great dude. Your highlighting is nice and neat and aside from a couple of tiny flecks that you only ever notice when you take a picture you don't have any bleed over from one area to the next. Only things I'd think about doing would be to take a fine brush and apply a wash to some of the metals and maybe the face and robes to add some more contrast. Also add a bit more highlighting to the green on the staff and the bolt pistol as a whole and they'll both be better defined. You're at that point where your fundamental skills are solid, only place to go from here is up ") e: And thanks for all the feedback guys, I'm pretty pleased with how they ended up coming together. adamantium|wang fucked around with this message at 21:59 on Mar 4, 2015 |
|
#
?
Mar 4, 2015 21:55
|
|

|
adamantium|wang posted:Looking great dude. Your highlighting is nice and neat and aside from a couple of tiny flecks that you only ever notice when you take a picture you don't have any bleed over from one area to the next. Only things I'd think about doing would be to take a fine brush and apply a wash to some of the metals and maybe the face and robes to add some more contrast. Also add a bit more highlighting to the green on the staff and the bolt pistol as a whole and they'll both be better defined. Might you have a decent tutorial vid? Basically I've been going base, wash, highlight, edge highlight(for like the light blue and red). When it comes to the metal I did leadbelcher followed by a nuln oil wash, and then dry brushed runefang steel on there, are you saying I should do another wash after this?
|
|
#
?
Mar 4, 2015 22:05
|
|
|
I can't think of a video that shows what I'm on about off the top of my head, but I guess things depend a bit on how you're doing the wash. Are you applying it in just the recesses or going over the whole segment? Even though it might not pool over flat areas an acrylic wash will still tint anything it touches and darken whatever its sitting on. If you are putting a wash on the whole part I'd get a spare Marine and try washing after you've done all your highlights to see what effect that has on things, and then maybe go back again with a small edge highlight with your highlight colour if things are too dark. If you're not I'd go back one more time with a thinned down wash and stick it just into the deepest parts and joints to up the contrast. Right now I'm finding it pretty relaxing to get a 3/0 brush and painting thinned down Badab Black into all my armour grooves but I know that's not everyone's cup of tea  I picked up one of these on eBay pretty cheaply as well and its been helping a ton: I picked up one of these on eBay pretty cheaply as well and its been helping a ton:
|
|
#
?
Mar 4, 2015 22:20
|
|
|
berzerkmonkey posted:Casting stuff... Awesome, thanks. Very useful. I didn't think of searching for pewter ingots by 92-8 before but now that I am it is making it easier to find. I will be doing some casting with the oommo 300 plastic for now I think. I just #1 like the idea of metal casting and #2 think it will be a better material for making things like dollies where I want to be able to move them around at least somewhat before doing a final sculpt on top of them. For the air vents, can you have too many or is there a point where you just don't need them? From some things I have been reading it seems like you need them on just about anything that sticks out. So, for the below just as an example, should you have, say, one vent per spear tip and per helmet point? 
|
|
#
?
Mar 4, 2015 22:35
|
|
|
Uroboros posted:
A shitton, yes It takes very little work and it shows how good your painting is. You just need a steadier hand on the eyes, and maybe some highlighting on the lenses/gems and this is pretty perfect. Great work.
|
|
#
?
Mar 4, 2015 22:47
|
|
|
thespaceinvader posted:A shitton, yes Thanks, I think I might also need a couple new brushes...I have the citadel set, and after painting for the past 7 months I've been alittle rough on them. It doesn't help that Tigurius already looks like he is squinting as his eyes are little slits, unlike some other guys I've done. Looking at it this close up I am unsure what I should use on the red gems, I am already using a Mephiston Red with a little Wild Rider, so maybe I just need another coat. As for the Green on the staff, it doesn't really have the pop I was hoping, unfortunately Warpstone Glow is the only green I have. I was thinking of putting some Auric Armor Gold in the space in between, and maybe doing a very fine RuneFang Steel highlight on the green parts, thoughts? TheArmorOfContempt fucked around with this message at 00:07 on Mar 5, 2015 |
|
#
?
Mar 5, 2015 00:04
|
|
|
What colours you use is nowhere near as important as how you use them: https://www.google.co.uk/search?q=paint+gems&tbm=isch If you have red, white and yellow, you can mix the colours to paint red gems. If you have green, white and yellow you can mix the colours to paint green gems (and highlight green generally). Knowing where to put the shades and highlights on your gems really makes them come alive. It's the little details that really make the difference. And yeah, buy some better brushes, the GW ones are pretty poo poo, I gather.
|
|
#
?
Mar 5, 2015 00:20
|
|
|
Anyone know of a textured plastic siding with a texture like that in the below image? I'm not seeing anything like it in the plastruct catalog.
|
|
#
?
Mar 5, 2015 00:37
|
|
|
nesbit37 posted:Awesome, thanks. Very useful. I didn't think of searching for pewter ingots by 92-8 before but now that I am it is making it easier to find. You do know they sell sculpting dollies in 28mm right? Might save you some time. Also, a lot of sculptors just use wire at that scale. Hellbeard would be the expert on that. As for the venting, yes, more is better, but more is not always necessary. I would say that, depending on how you situate that example stand in the mold, you would only need one or two small vents. In my case, I would angle the stand at about 45 degrees with the spears opposite of the direction of spin. Then I would do a test spin and see what happened. With resin, you're going to need a lot of vents because you don't have that centripetal (?) force to push the metal into the tighter spaces. With resin, the incoming resin will displace air up into the spears, so all the spears would likely need venting. nesbit37 posted:Anyone know of a textured plastic siding with a texture like that in the below image? I'm not seeing anything like it in the plastruct catalog.
|
|
#
?
Mar 5, 2015 00:46
|
|
|
berzerkmonkey posted:You do know they sell sculpting dollies in 28mm right? Might save you some time. Also, a lot of sculptors just use wire at that scale. Hellbeard would be the expert on that. Yeah, I have used those 28mm ones before. These would be for 10mm. I don't now anyone that sells the so figure I need to make them.
|
|
#
?
Mar 5, 2015 01:08
|
|
|
This is the first mini I've actually finished in years and I'm quite happy with it. Would anyone like to give me some advice for next time? This is my first time using washes successfully and also my first time trying to use glaze medium for highlights. I left too much paint on the brush the first few times, I think I can do better next time. -or any tips on how to take better photos would be appreciated, too. Medium Style fucked around with this message at 01:47 on Mar 5, 2015 |
|
#
?
Mar 5, 2015 01:24
|
|
|
You painted that straight out of the gate after years of no practice and not having used washes successfully before? My only advice to you is to stay on good terms with whatever demon you signed a pact with. Those always come with hidden costs.
|
|
#
?
Mar 5, 2015 01:36
|
|

|
JerryLee posted:You painted that straight out of the gate after years of no practice and not having used washes successfully before? Well thanks, but key word is "finished". I had some junk models from years ago that I practiced washes on. This is the first model in a long time that I didn't abandon half way through. I did not word that post clearly, sorry. Medium Style fucked around with this message at 01:50 on Mar 5, 2015 |
|
#
?
Mar 5, 2015 01:46
|
|
|
Medium Style posted:This is the first mini I've actually finished in years and I'm quite happy with it. Would anyone like to give me some advice for next time? Just put my khador to shame...
|
|
#
?
Mar 5, 2015 02:26
|
|


|
Medium Style posted:This is the first mini I've actually finished in years and I'm quite happy with it. Would anyone like to give me some advice for next time? That's super tight, dude. You got a pretty good handle on red already from the looks of it, which is a problematic color for a lot of people. Some thoughts: * Did you highlight by mixing red with white? It sort of looks like it, and that's not a terribly great idea. You want to highlight with a brighter red, or orange; something like Reaper Triad colors is great for this very reason. * You can still see some red on the gold symbol on the shield. Should probably tidy that up. In addition, there's a bit too much black wash on the lower metal (grey?) half of the shield. * Consider doing a thin highlight of silver on the edges of the gold. Just where the highest points would be; it really helps give the gold more pop. Some purple wash in the recesses also makes it look more rich, but be sparing with that. As for photos: have at least two light sources, preferably three. One coming from to the left and the right, and a third on top. Diffuse the lights through either a thin sheet, or some vellum (tracing) paper, or even an empty bottle; use natural sunlight bulbs, or bright white LEDs. If you can, make a light box, they're easy to make and there's dozens of tutorials out there on how to do it.
|
|
#
?
Mar 5, 2015 04:40
|
|

|
Thanks! - Yes, I did mix red and white. My last attempt couple years ago at painting red Khador had orange highlights and I thought it looked more orange than red, so I tried something different. - I'll try to clean up the shield. I'm afraid that if I try to touch up the gold symbol I'm going to get gold everywhere, but I might as well give it a shot. - I'll do some silver along the edges of the gold. I was trying to make it look more bronze and less gold... any tips on that?
|
|
#
?
Mar 5, 2015 04:52
|
|
|
Medium Style posted:- I'll do some silver along the edges of the gold. I was trying to make it look more bronze and less gold... any tips on that? Short of using bronze paint, just brown washes with maybe a wash of black on top until it's dark enough to your liking.
|
|
#
?
Mar 5, 2015 05:52
|
|
|
Slimnoid posted:Short of using bronze paint, just brown washes with maybe a wash of black on top until it's dark enough to your liking. Putting Agrax Earthshade wash on Balthasar Gold makes it look completely bronze to my eyes.
|
|
#
?
Mar 5, 2015 05:57
|
|
|
Start with a really bright silver and use lots of layers of sepia wash.
|
|
#
?
Mar 5, 2015 06:03
|
|

|
Slimnoid posted:Short of using bronze paint, just brown washes with maybe a wash of black on top until it's dark enough to your liking. I've been using this for my attempts at bronze, although if you want the more polished look, you'll want to highlight up to gold+silver.
|
|
#
?
Mar 5, 2015 08:19
|
|

|
berzerkmonkey posted:You do know they sell sculpting dollies in 28mm right? Might save you some time. Also, a lot of sculptors just use wire at that scale. Hellbeard would be the expert on that. I've been looking for 6mm dollies, but that doesn't seem to be a thing. :P Guess it's just wires for me.
|
|
#
?
Mar 5, 2015 09:09
|
|

|
Not sure if this has been posted or not, but Wyrd have a painting competition starting in April, sign up ends 31st March - to be honest, it sounds kinda similar to our oath threads but with elimination. In a nutshell, you get paired up with someone for each round, models are judged and the highest scoring of each pairing goes through to the next round. There's some prizes up for grabs http://wyrd-games.net/community/topic/107060-iron-painter-2015/
|
|
#
?
Mar 5, 2015 11:01
|
|


|
nesbit37 posted:Yeah, I have used those 28mm ones before. These would be for 10mm. I don't now anyone that sells the so figure I need to make them. lilljonas posted:I've been looking for 6mm dollies, but that doesn't seem to be a thing. :P Guess it's just wires for me.
|
|
#
?
Mar 5, 2015 13:05
|
|
|
berzerkmonkey posted:Oh yeah - sorry. I know the skeletons I just had done were just sculpted onto a wire armature. I sent an email to Bob and ask him for a photo of what he uses and any tips he's willing to give. I'll let you know when I hear back from him. I think floral wires armature is most common at 6mm, but I've also seen some people making adjustments to exising minis by filing off details and modeling on top of it, and using those as masters. If I were to do it it would be 6mm Ming period Chinese, so it would probably not be suitable for CAD.
|
|
#
?
Mar 5, 2015 13:10
|
|
|
I have a clamp-on model with the light and everything but I wasn't able to use it. The magnification and extra light is great, but looking from the magnified model under the lens back to my paint pallet or water gave me headaches, it was just too extreme of a focus change. Oddly enough, I thought it would help with eye strain headaches so I didn't need to have my face so close to the mini.
|
|
#
?
Mar 5, 2015 13:43
|
|
|

|
| # ? Jun 8, 2024 09:15 |
|
|
I am adding Rough riders to a Vostroyan army, and since Attillans are discontinued I opted for DRK with a similar palette. I think they fit thematically but look a little off, since GW miniatures have such exaggerated proportions. BTW I also gloss all my minis.
|
|
#
?
Mar 5, 2015 15:25
|
|