


|
So the inverter machine that was in my booth, a Powcon 400SS, died Thursday afternoon, so on Friday they wheeled a Miller Dialarc 250 into my booth for me to use. I was amazed how with no change in my technique, I'm all of a sudden producing better welds on the pipe. I think that Powcon had been having some issues for a while without me realizing it. Now I just need to work on my restarts with the root pass and I'll be good to go. Yesterday I took the entrance tests for the shipyard apprentice program, which was reading, math, mechanical aptitude, inspection and measurement, and process problem solving. All of them were fairly easy for me, if I didn't get 100% I got drat close. Luckily for me the first people to get the interviews are the ones with the highest test scores. I found out the shipyard has 10-15 years worth of work already contracted on the books. This is good, because from what I hear, alot of the independent welding shops around here with the current U.S. economy don't have all that much work right now. A large portion of the welding there consists of open root V butts with ceramic backing welded with flux core. But, they also do stick, TIG, and pipe welding as well. AbsentMindedWelder fucked around with this message at 16:57 on Nov 2, 2008 |
 #
?
Nov 2, 2008 16:53
#
?
Nov 2, 2008 16:53
|
|


|

|
| # ? May 25, 2024 07:46 |
|
|
Busy weekend for me. Made 9 supports, hardly worth mentioning really, just some 1/4" square bent with a hook to hold up the downspouts. Made my fuller from the 11 dollar trailer hitch. The shank was 1 1/4" and my hardie hole is 1" so I had to draw out and grind it to make it fit. Cut the holes off, shortened the shank, started drawing.  Almost done, needs a little more adjustment.  Radius ground off, filed smooth.  You can see the shoulder better here.  I used it later in the day to notch the bends in this plant hanger.  I'm not really happy with the hanger, I hosed up the twist near the top a little, but the spirals on the feet are pretty good. Needs cleaning and painting.
|
|
#
?
Nov 3, 2008 04:10
|
|


|
Slung Blade - very cool. Also, that's quite an anvil. Did you guys happen to see this sword making video on youtube? http://www.youtube.com/watch?v=62iHEaE8uzI Very cool.
|
|
#
?
Nov 4, 2008 04:14
|
|

|
jovial_cynic posted:Slung Blade - very cool. Also, that's quite an anvil. I really only get burned in three situations. 1. pumping the bellows while holding a piece in the fire with tongs (basically unavoidable with charcoal), 2. holding a short punch without a glove (in this case I would suggest a handled punch or a glove for the duration of the punch, they make tongs to hold tools like that as well), 3. picking up something that is hot as hell. Test the potentially hot items with your knuckles since it'll minimize the practical surface area of any burns. Also, touching something hot with a glove on is a good way to get some sweaty leather to shrink up and grab you, at which point you'll just have to wait for it to stop burning you on its own time. Getting into the mindset that your gloves will protect you can lead to worse injuries in blacksmithing. I know a good deal of great smiths who eschew gloves while recommending that those learning do the same. I met one smith who said if you're gonna use anything, use Kaowool gloves for the tong hand, because they're far more heat resistant than leather, and they won't shrink up when they get hot, so you can just raise your hand and swing it at the ground to get the glove off if it does get toasty. My general philosophy is that I'm going to get burned at times, that is a fact, and I would rather get a bunch of small inconsequential burns on the backs of my hands than one serious burn somewhere important. If you think something might be hot, test it. If you think it might be cool, test it. If something flies out of the tongs while you're hitting it, back off and let it fall. There's no use grabbing for anything hot with your hands, and gloves will just encourage it. Slung blade, what kind of anvil is that? Good work, by the way. You get good twists by making a bunch of bad ones first, that's what I've learned. Actually, that's how you make anything good. Brush the scale off and you'll have a nice hanger.
|
|
#
?
Nov 4, 2008 06:10
|
|


|
Welding class, day 3, lab day 2. Today we did 6010 1/8th rod, horizontal welds. I did 4 joints, but I only brought home 2: (mine are the ones in the middle) 6 stringers, probably the worst effort of the night.  10 stringers, I'm pretty happy with this one.  How'd I do welding gurus? I used a left to right hand motion across my chest, and a slight whipping to deal with the fast freeze. The instructor seemed pretty happy with my efforts, asking when I was going to join the full time welding classes. If my company shits the bed and lays me off I am so there.
|
|
#
?
Nov 4, 2008 06:40
|
|
|
Not bad, toes have good fusion and heat looks about right. I would like to see some tighter and more uniform ripples however. The only other thing I can say is you want to work a little on bead placement when running multiple stringers. Each bead should cut the other bead in half. That is accomplished by running your next bead in the toe of the previous bead, and building consistency with you're whipping and pausing. That comes with time and practice. AbsentMindedWelder fucked around with this message at 06:54 on Nov 4, 2008 |
|
#
?
Nov 4, 2008 06:48
|
|
|
Dongsmith posted:this is cool as hell. I would just point out two things: 1. I would not wear gloves around power tools just as a general rule, since it's better to lose some skin than get your hand (and its bones) pulled into any workings 2. a glove is really unnecessary on the hammer hand, and will greatly reduce your ability to "feel" the the iron move under the hammer. If you're worried about the heat, you should use a longer handle and a lighter head, and also sack up. If you're worried about grip, melt some beeswax onto the handle and it will get nice and tacky. If you're worried about blisters, forge more. They turn to callouses.  gently caress yeah man. Personally, I like to use a welding glove on my left (tong) hand. It helps a lot, I use charcoal too, outdoors, and it gets windy as hell here. When you pour the last of the bag into the forge and it's 50% charcoal dust it kicks sparks out like a motherfucker, the glove helps to shield my hand while I hold the piece in the fire. Dongsmith posted:Slung blade, what kind of anvil is that? Good work, by the way. You get good twists by making a bunch of bad ones first, that's what I've learned. Actually, that's how you make anything good. Brush the scale off and you'll have a nice hanger. Thanks man, I've done good twists before, this time the heat just wasn't quite even and I misjudged it slightly. It's still acceptable I suppose. More experience under the belt never hurts. The scale's coming off tomorrow or sometime this week hopefully, as soon as I get some time to drill, prep, and paint it. The anvil is a 120 pound Nimba. http://www.nimbaanvils.com/ Cast steel anvil, the face is just slightly softer than I expected, (I've marked it a few times with my heavier hammer) but I've had it for more than a year now and I absolutely love it. I recommend them to anyone looking for a new anvil made in the US. Jovial, you're out in Washington right? Or Oregon or something? If you're in the market for a new anvil these guys are in Port Townsend WA. Good way to save on some shipping. (Mine was about $950.)
|
|
#
?
Nov 4, 2008 06:55
|
|
|
jovial_cynic posted:Slung Blade - very cool. Also, that's quite an anvil. Just watched it. I am in awe, that is fantastic. And is he using a log splitter as a power ram? What a loving awesome idea!
|
|
#
?
Nov 4, 2008 07:50
|
|
|
Slung Blade posted:The anvil is a 120 pound Nimba. Personally, I prefer my anvils older than dirt due to aesthetics and the sheer loving "Someone was hammering on this before the US civil war and now it is in my garage, this is so cool" factor, but all else being equal, stuff will look cleaner and straighter if it's made on a new anvil with a clean, flat face. I ramble because I am such a smithing nerd.
|
|
#
?
Nov 4, 2008 11:43
|
|
|
Slung Blade posted:Just watched it. I am in awe, that is fantastic. Blacksmiths are resourceful as hell.
|
|
#
?
Nov 4, 2008 11:46
|
|
|
Slung Blade posted:Welding class, day 3, lab day 2. I would use a smaller whip manipulation. It's hard to tell whether you're going too far forwards, or not far enough backwards without sitting there watching you. But basically like Dv6 says keep it tight. It looks like your weave went better. How were your results on that?
|
|
#
?
Nov 4, 2008 16:03
|
|
|
SmokeyXIII posted:I would use a smaller whip manipulation. It's hard to tell whether you're going too far forwards, or not far enough backwards without sitting there watching you. But basically like Dv6 says keep it tight. Weave? I didn't do any weave this time, just the 6010 stringers. (the practice plates were mostly used up, we were trying to use the last few unwelded joints left before we recycled them)
|
|
#
?
Nov 4, 2008 17:39
|
|
|
Dongsmith posted:Ah, I knew I'd seen one of those before. 50-52 isn't astounding hardness for a face (I think my 1841 W.F. must run around 55+), but honestly, antique anvils come pre-dinged anyways. I like that Nimba design, very little metal anywhere you don't need it. A thousand bucks will get you pretty much any new "light" anvil you could want, and a bit of searching would definitely find you a 250+lb Peter Wright or similar wrought anvil in decent shape. However, with a new cast anvil, and Nimba being top of the line, you can grind the face as many times as you want without running into wrought iron, and a well-practiced hand at the hammer will keep the half-moons from showing up in the first place. That's a fine anvil and one I'd be happy as hell to use. The only small problem I have with it is a lack of a shoulder and chiseling face. Easily solved with that chiseling plate that I had under the fuller at first, and I can use some angle iron backed up by a rod in the hardie for a shoulder, so it's not a big deal. But yeah, I love it and when I set up a proper shop I will be getting the biggest anvil Nimba makes for heavier work.
|
|
#
?
Nov 4, 2008 17:47
|
|
|
Slung Blade posted:Weave? I didn't do any weave this time, just the 6010 stringers. Oh okay, I assumed you did the 2nd from the top on the 2nd picture.
|
|
#
?
Nov 4, 2008 18:11
|
|
|
SmokeyXIII posted:Oh okay, I assumed you did the 2nd from the top on the 2nd picture. Nope, just the middle ones in both pictures.
|
|
#
?
Nov 4, 2008 19:53
|
|
|
Welding class, day 4, lab day 3. Vertical 7018, 3/32 rod. Not happy with the results tonight. I ran way too many beads doing it the wrong way, I mistook the instructor when he said do 3 passes, a root, a weave, and a cap weave. I thought he wanted us to do the weaves like you do the stringer beads, on top of half the root pass, and then the third on the other side, not so. I started doing both weaves across the whole joint, but I didn't have enough time to get decent at it. Next class is nothing but practice, we get to choose what we do. I'll be re-doing this type of weld so I can get better at it. This time, I did all the welds you see on these coupons.  
|
|
#
?
Nov 6, 2008 06:51
|
|
|
There are some good parts in your welds. Keep it up! Today was the first day of my TIG course. The instructor looked at my fit up said "put a bit of a land on it" and I welded out one joint with just a little bit of land, maybe 1/16" at the most. And it totally fixed my problems! It's tough to take a picture of the inside of a pipe to show off the root but I'll do my best on Saturday to get some shots to bring to welding show and tell ") The instructor said in a few days I'll likely be ready to test on my 6G Carbon TIG, and then I'll move to Chrome, and then Stainless. Chrome shouldn't be too bad since I've done a little work on it already. Stainless will be another trick all together though.
|
|
#
?
Nov 6, 2008 09:14
|
|
|
Slung Blade, except for the fact the weave isn't consistent, it looks good, especially for vertical. Practice makes perfect. If I were you, since you got a DC welder at home, I'd ask to take home some steel and rods for practice. So I started doing some TIG welding today. What a loving awesome process. I'm in love.
|
|
#
?
Nov 6, 2008 22:24
|
|
|
After reading the thread, I'm seeing tons of really awesome blacksmithing type stuff. My hat goes off to you guys, from the pros to the beginners. There was some mention of machining in the OP, but I didn't notice any later on (admittedly, I skipped a few pages.) So, question: I need a couple very simple parts machined. I've never worked with machinists, I have no what to even ask them. How do I find a machinist in my area that can make these few simple parts and won't charge me an arm and a leg, and what should I expect to provide? The parts I'm needing are, say, four or five ~3" round platters, with a few holes bored (I can tap them myself) and possibly a couple simple shapes cut out. Gotta be a perfect task for a robot, right? So, is the machinist going to want some digital spec file for this, or something? And if so, how do I go about generating it? I'm good with Illustrator.  To be honest, I don't even care of they're metal. Acrylic would be fine. I just figure that anyone who can machine a sheet of aluminum can do the same to a sheet of plexi. The only material requirement I have is that it can't rust or similar. The objects may get wet, and it may be brackish, at that. I'm in the Des Moines, IA area, if it helps at all...so, you know, if you're a machinist in the area, you should step forward about now.
|
|
#
?
Nov 7, 2008 03:52
|
|


|
Bad Munki posted:I'm in the Des Moines, IA area, if it helps at all...so, you know, if you're a machinist in the area, you should step forward about now. I know there's one machinist who used to read the thread, but I've only seen him post once in the last few weeks. I also know of an online machine shop, they have some software that you use to design the parts you need, then you submit them, pay, and then in a couple of days/weeks it shows up in your mailbox. I'm terribly sorry, I can't remember the link and nothing that I google comes up right. Maybe one of these other guys know. Short day today, went out at 12, back in at 5. Still managed to make one tool, prep another, and rivet, clean, and paint that plant hanger. Riveted + wirewheeled.  The tools I made.  This is a slitting punch, I couldn't find one available anywhere in town, and the online suppliers wanted 70 bucks. gently caress. That. So I took a cheap-as-free 5 dollar cold chisel and reshaped it. Pretty easy.  This is another hardie tool, very similar to that fuller I made last week, but for making much smaller notches. Made from bits I had laying around, half inch rod, and a small piece of scrap for a blade. I'm going to weld this up in class on monday.  I'll take a decent picture of that hanger once the paint dries, I sand it off, and clearcoat it. Slung Blade fucked around with this message at 01:58 on Nov 9, 2008 |
|
#
?
Nov 9, 2008 01:34
|
|
|
Nice plant hanger Slung Blade.Paraphrased Bad Munki posted:I need a part machined for me out of metal or plastic.
|
|
#
?
Nov 9, 2008 20:27
|
|
|
dv6speed posted:Nice plant hanger Slung Blade. Ahh, that's the link I was thinking of. Thanks dv6. Also, here's the hanger sanded and clearcoated. I really like the finish this gives, the paint flows into the imperfections and depressions in the steel and brings out character. 
|
|
#
?
Nov 9, 2008 21:33
|
|
|
SmokeyXIII, How do you do your restarts for the root pass on pipe? My root passes are perfect except for my restarts. What is odd is that I never had this issue with the open roots on plate.
|
|
#
?
Nov 11, 2008 00:17
|
|
|
dv6speed posted:SmokeyXIII, It's all in how you grind the stops out. Grind the where the roots stops to a feathered edge. And you should pause for just a half second longer when you reach the point of the feathered edge so it burns in nice. Make sure you grind it thin basically. I'm assuming you're starting back, and welding over some of your root before the tie in. Edit: 
SmokeyXIII fucked around with this message at 06:58 on Nov 11, 2008 |
|
#
?
Nov 11, 2008 06:42
|
|
|
Welding class, day 5, lab day 4. So I think I've got the hang of vertical welds now. Did these in the order they are numbered, #1 starts off lovely but seems to get better towards the end, 2's getting almost good, and 3 is pretty well perfect as far as I'm concerned. What do you guys think? #4 is a horizontal weld with 1/8th 7018, I only did one of those because it seemed pretty easy. Look alright?   This is the same set of coupons I did last week, we broke it once I filled up all the joints to use up the last set of edges, thus the giant craggy fault on the face. I'm sure you guys did / do that too in your classes. I took in some things to weld for myself, the instructor allows and encourages this. I was just using some leftover 7018 for this stuff. I redid the awful job I did on that tenon swage a few months ago. It should hold together quite well now.  Might need another stringer here...  And here's that little hardie tool I started on the weekend. I'll clean it up and radius the working edge sometime this week or on the weekend. 
|
|
#
?
Nov 11, 2008 06:56
|
|
|
Those welds are starting to look pretty good. You'll be able to pass a CWB test pretty soon I would think.
|
|
#
?
Nov 11, 2008 08:47
|
|
|
SmokeyXIII posted:It's all in how you grind the stops out. Grind the where the roots stops to a feathered edge. And you should pause for just a half second longer when you reach the point of the feathered edge so it burns in nice. Make sure you grind it thin basically. SmokeyXIII posted:I'm assuming you're starting back, and welding over some of your root before the tie in. I'll give your technique a shot tomorrow when I go into the shop. (We have off today for Veteran's day) Slung Blade posted:So I think I've got the hang of vertical welds now. Did these in the order they are numbered, #1 starts off lovely but seems to get better towards the end, 2's getting almost good, and 3 is pretty well perfect as far as I'm concerned. What do you guys think? Slung Blade posted:I redid the awful job I did on that tenon swage a few months ago. It should hold together quite well now. 
|
|
#
?
Nov 11, 2008 14:44
|
|
|
SmokeyXIII posted:Those welds are starting to look pretty good. You'll be able to pass a CWB test pretty soon I would think. Really? Awesome, thanks man. What exactly does that certification mean though, could I work in industry without getting an apprenticeship ticket or something? Because that would be great.
|
|
#
?
Nov 11, 2008 17:36
|
|
|
dv6speed posted:Weld 3 looks pretty good... I'd pay the bill. However, a slightly tighter weave would be nice. Thanks man. Does the left side of #1 look tight enough? I'll keep working on it.
|
|
#
?
Nov 11, 2008 17:44
|
|
|
Not sure how things work in Canada... but I'm assuming a CWB test is administered by the Canadian Welding Bureau, which is like the American Welding Society here in the USA. In the USA some employers will require you to be AWS certified. However just about every place that does code welding is going to give you a weld test at the company even if you are AWS certified. This is because they have to have a paper trail that says you are qualified to preform certain types of welds to meet traceability, legal, insurance requirements. That being said, having an AWS certification may still get you picked you over someone who does not when you apply for a job. Here in the USA, unless you work for a union, the way the apprenticeship program works is that you find a job in the field of welding, then enroll in the apprentice program and go to school while you work. So the chain events of would be, find a job, take a weld test at the job and start working, then while you are accumulating hours, you go to school. After so many hours of work and class you eventually get your journeyman papers. Welding journeyman papers in the USA are sort of like an AWS certification in that you don't need them to get a job, but it certainly makes you a better candidate. Now if you work for a union in the USA, unless you already have journeymen papers, or lots and lots of verified experience, you will most likely start out as an apprentice in the union. With that you are still working and going to school, and the journeyman papers the union gives you is the same as if you did the apprentice program non-union. That all being said, I have no idea how it works in Canada.
|
|
#
?
Nov 11, 2008 17:55
|
|
|
dv6speed posted:Ah-ha! Grinding the stops out are news to me. Makes sense. Grind stops too so you don't run your root into a big chunk of metal that it has no chance of blending in with. You grind the top just the same as the bottom and you dont really change your manipulation much, except that when you get to the top tie in once the root fuses in with the tack (assuming you use root tacks) you pause for just a half second and make sure the keep the rod pushed in. Slung Blade posted:Really? Awesome, thanks man. No, you still need an apprenticeship because in Alberta welding is a required trade. Technically you're not allowed to even grind on a weld without being an apprentice here. But it would mean the difference between doing welding as a first year, and being a broom operator for the first year. The CWB (Canadian Welding Bureau) is the government branch that certifies nearly all welding, inspecting, and welding engineering. So getting qualified as a CWB welder qualifies you to weld anything structural basically. Also each province has a separate branch with regulates welding of pressure components. In Alberta that branch is Alberta Boiler Safety Association (ABSA). So if you're a Journeyman you go to them if you want to get qualified to do pressure welds. They piggy back with ASME (American Society of Mechanical Engineers) codes in regards to pressure welding. B31.3 I think is the exact section for pressure piping in a processing plant. dv6speed posted:That all being said, I have no idea how it works in Canada. Apprenticeships are done by the government. The way to get one is to get a job with an employer as a welder helper, work for three months and ask them to sponsor you as an apprentice welder. Once they do you'll get your apprentice record book, and you use that book to record all your hours. Which is nice since you don't have to do your entire apprenticeship in one place. Welding is a 3 year apprenticeship here, and you have to work 1600 hours and go to school for 8 weeks each year of your apprenticeship. SmokeyXIII fucked around with this message at 21:29 on Nov 11, 2008 |
|
#
?
Nov 11, 2008 21:26
|
|
|
I have a question I need some professional help with solving. I got one of these as a graduation present and it has my name professionally routed into the blade. I like it and want to keep using it and don't want to have to hang it up. http://www.agrussell.com/product.asp?pn=DE-682&bhcd2=1226431632  Click here for the full 966x433 image. Well I took it camping and think I twisted the handle when it was stuck in a tree or something and now there is a mild S-curve in the bottom of the blade. The curve doesn't deviate more than 1 mm off of it's original straight edge.What I'm wondering is this something I can very carefully straighten out cold? It's high carbon stainless.  E: I'll get pics up asap michigan jack fucked around with this message at 22:53 on Nov 11, 2008 |
|
#
?
Nov 11, 2008 21:55
|
|
|
I wouldn't try to cold work anything high-carbon personally, especially if it's already tempered (which is probably is, or should be). That's a one-way ticket to fracture town. Though the fact that it bent at all concerns me. How thick is the blade? It seems awfully light for such a large blade. Can you take a picture of the blade edge-on so I can see exactly how bad the curve is? 1 mm doesn't sound too horrible. SmokeyXIII posted:No, you still need an apprenticeship because in Alberta welding is a required trade. Technically you're not allowed to even grind on a weld without being an apprentice here. But it would mean the difference between doing welding as a first year, and being a broom operator for the first year. The CWB (Canadian Welding Bureau) is the government branch that certifies nearly all welding, inspecting, and welding engineering. So getting qualified as a CWB welder qualifies you to weld anything structural basically. So if I were to apply somewhere, they would hire me and would have to sponsor me as an apprentice, but it means I could be welding "for real" a lot faster? Cool, sounds good to me. Thanks Smokey. Slung Blade fucked around with this message at 22:49 on Nov 11, 2008 |
|
#
?
Nov 11, 2008 22:46
|
|
|
Slung Blade posted:So if I were to apply somewhere, they would hire me and would have to sponsor me as an apprentice, but it means I could be welding "for real" a lot faster? Cool, sounds good to me. Thanks Smokey. They don't have to sponsor you, but odds are very good that they will before 3 months is up even. As long as you're a good employee and try your best they should. If after 3 months they're dicking you around and not indenturing you it's time to move to a new company, because it costs them nothing to apply for the apprenticeship other than some ink from a pen. It's actually called indenturing. They indenture you as an apprentice, not sponsor. The term comes from way back in the day when tradesman didn't typically know how to read and write, so instead of a signature they would take an imprint of your teeth in a piece of wax. Thus, indenture. 
|
|
#
?
Nov 12, 2008 03:05
|
|
|
I thought I'd experiment a bit and see about making a stand for a figurine or two at the upcoming craft-show at my work: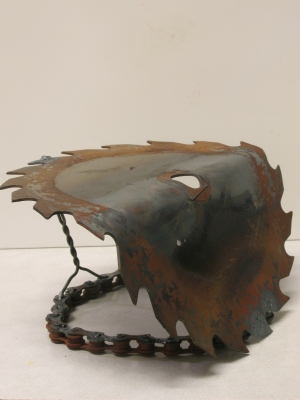 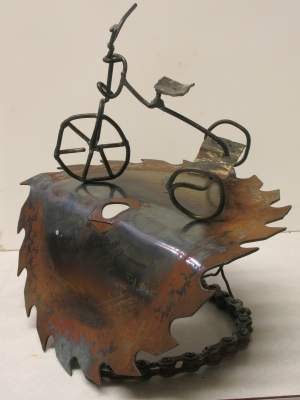 I think it's kind of cute.
|
|
#
?
Nov 12, 2008 04:48
|
|
|
You could probably get your work into a local art show too Jovial. It's pretty awesome stuff.
|
|
#
?
Nov 12, 2008 07:16
|
|
|
So the images aren't crystal clear (shakey hand, no auto steadying, couldn't use the flash because of reflection) but I hope you can get the idea.  Click here for the full 867x574 image.  Click here for the full 866x563 image.  Click here for the full 873x587 image.  Click here for the full 778x584 image.  Click here for the full 908x681 image.
|
|
#
?
Nov 12, 2008 07:23
|
|
|
Hmm, that looks pretty suspect to me. That looks like plastic deformation. If that were hardened steel, I would expect it to break and fracture before it would bow out like that if you were just twisting the handle. In my opinion, and keep in mind I'm just an amateur, it looks like it's either not hardened steel, or if it is, they didn't harden and temper it correctly. It looks fairly sharp, do you have some wood that you can do a little test for me with? Go carve the wood with the axe as if it were a knife, don't whack at it. See how well it works, if it starts to dull within 10 minutes or so, I would say that it wasn't finished properly or made out of the wrong material. Alternatively, if you have a file meant for metal (and don't mind marking up the edge a bit more), try to run it across the surface where the bulge is. If it skates across or doesn't bite very deep, it's hardened steel, if the file cuts easily, it's an indication that it's soft.
|
|
#
?
Nov 12, 2008 09:02
|
|
|
Chances are this is the result of gross abuse on my part. I have used this a hell of a lot since I got it and on big jobs that it's not meant for. Right now it is cutting through card material with ease and there has been a lot of use since it was sharpened last (which was actually the first time). I'm guessing that what I was doing was bringing the bottom corner (heel) down on something intentionally. Also, it may have impacted on some bullets (relatively soft copper coated lead) that were in a chunk of log that was being chopped. It could have been poorly tempered, and I'm not ruling that out. I'm thinking that I should run with the idea that it is properly tempered because I assume the fix would be more difficult than if it were just soft. Also, the well-tempered fix seems like it would also solve the poorly tempered fix. Assuming it is properly hard steel, what are my options? (keeping in mind that the head is fixed to the handle for good.) Maybe some kind of light pounding with a hammer made of really soft material like pure lead on a semi soft surface like the end of a piece of 4x4/log?
|
|
#
?
Nov 12, 2008 10:03
|
|
|

|
| # ? May 25, 2024 07:46 |
|
|
michigan jack posted:Chances are this is the result of gross abuse on my part. I have used this a hell of a lot since I got it and on big jobs that it's not meant for. Right now it is cutting through card material with ease and there has been a lot of use since it was sharpened last (which was actually the first time). I'm guessing that what I was doing was bringing the bottom corner (heel) down on something intentionally. Also, it may have impacted on some bullets (relatively soft copper coated lead) that were in a chunk of log that was being chopped. It could have been poorly tempered, and I'm not ruling that out. I'm thinking that I should run with the idea that it is properly tempered because I assume the fix would be more difficult than if it were just soft. Also, the well-tempered fix seems like it would also solve the poorly tempered fix. Assuming it is properly hard steel, what are my options? (keeping in mind that the head is fixed to the handle for good.) Maybe some kind of light pounding with a hammer made of really soft material like pure lead on a semi soft surface like the end of a piece of 4x4/log? Heat treating something like that might be a journeyman-level job even if you know the content of the steel, so I would find out the status of the finished piece and leave the metallurgy as it is. And besides, axes are supposed to have a pretty forgiving temper, if I remember correctly, due to the very forces you're putting it under. I'm sure the pioneers would have put the forged ones through pretty much the same kind of abuse, and if you had to re-heat, forge, and temper an axe every time you hit something wrong, you'd never get a tree felled or a log hewn.
|
|
#
?
Nov 12, 2008 11:55
|
|