


|
Something I rather like is that when you take down one of your enemies here, you also open up a new avenue for attack. As you might be able to see from the screenshots, both of their bases are connected in the back, so you are free to sweep around to the rear of the other to either hit from an unexpected direction or simply from two at once.
|
 #
?
Apr 19, 2024 21:04
#
?
Apr 19, 2024 21:04
|
|


|

|
| # ? Jun 5, 2024 10:44 |
|
|
Yeah this was a fun one, I like how you can relatively quickly get somewhat strong allies
|
|
#
?
Apr 19, 2024 21:59
|
|


|
Chaosbrain posted:Something I rather like is that when you take down one of your enemies here, you also open up a new avenue for attack. As you might be able to see from the screenshots, both of their bases are connected in the back, so you are free to sweep around to the rear of the other to either hit from an unexpected direction or simply from two at once. The Chad Jihad posted:Yeah this was a fun one, I like how you can relatively quickly get somewhat strong allies
|
|
#
?
Apr 20, 2024 00:06
|
|


|
The Grand Dukes - Part 5: The Hook and Cod Wars Mission 5 Starting Text "This is where we will stand tomorrow, my son, when Joan of Arc burns. Already they are dowsing the pyre with oil. This is to be no ordinary fire, you see; the flames must rise high for La Pucelle, as if they truly were the flames of Hell. For a long time she was a nuisance to Duke Philip. He never could understand her zealous wrath, her single-mindedness...and how she seemed to truly believe the words of fire that she spoke. Compared to him, the ruthless politician, she was another being entirely. But at this point, La Pucelle was not no Philip's mind. For even as Joan dealt defeats to the Burgundian forces in France, Philip had yet to deal with the escaped Jacqueline. In Holland, Jacqueline had found new supporters in the so-called 'Hooks', noblemen of low birth. For years, they had been fighting a civil war with the merchant class, known as the 'Cods'. Philip now had to walk into this mire of old grudges and blood feuds to finally defeat the elusive Jacqueline." 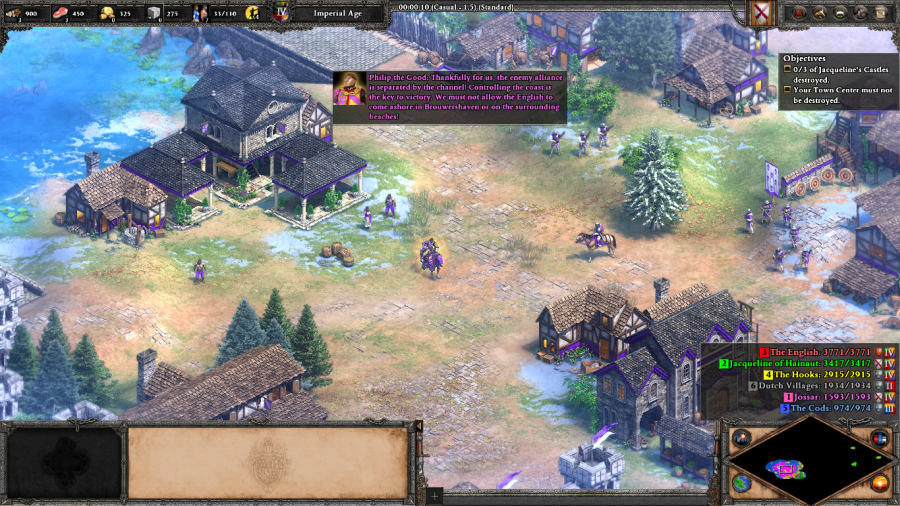 Philip the Good: Thankfully for us, the enemy alliance is separated by the channel! Controlling the coast is the key to victory. We must not allow the English to come ashore in Brouwershaven or on the surrounding beaches! Like last mission, this one involves us pairing up with an ally against Jacqueline and Humphrey. But this time, it's a bit less of a straightforward brawl. 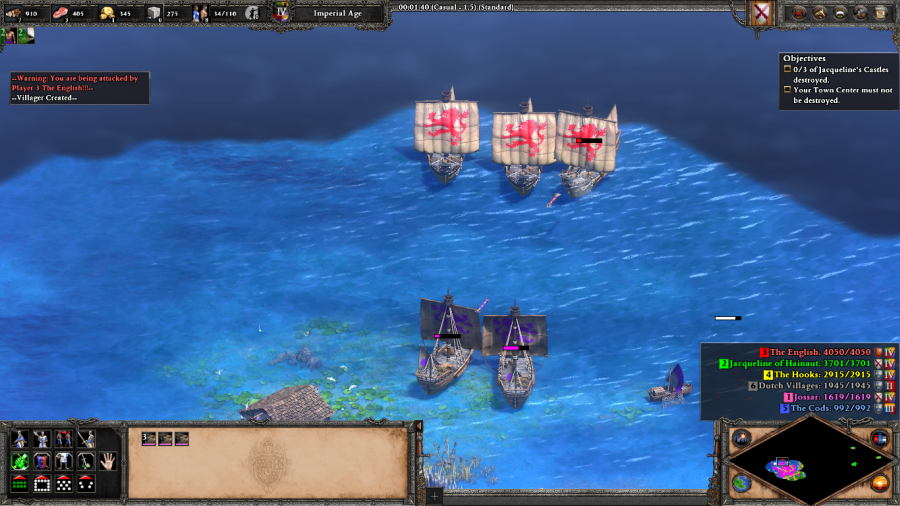 Humphrey of Lancaster: Stand strong, my beloved wife! My fleet is on its way to save you! Philip the Good: That cocky Englishman ran to England to hide rather than duel me... soit. I have bigger fish to fry. The English being located across the English Channel, are mostly constrained to attacking you with naval units in an attempt to create a beachhead into the Low Countries. They do still produce land units, but depending on how you play this scenario, you may very well never see them.  The Cods: The simple-minded Dutch nobles do not understand that times have changed and that they are backing the wrong horse. Help us bring the Hooks to their knees once and for all, and we will support your plans, Philip. Your allies, the Cods, start out mostly helpless and only really start to enter the fight once you liberate one of the seven Dutch villages from a garrison of Hook soldiers, at which point all of the buildings in said village switch to their control. The more villages you liberate, the more infrastructure they gain and the more useful of an ally the Cods become, at least in theory. 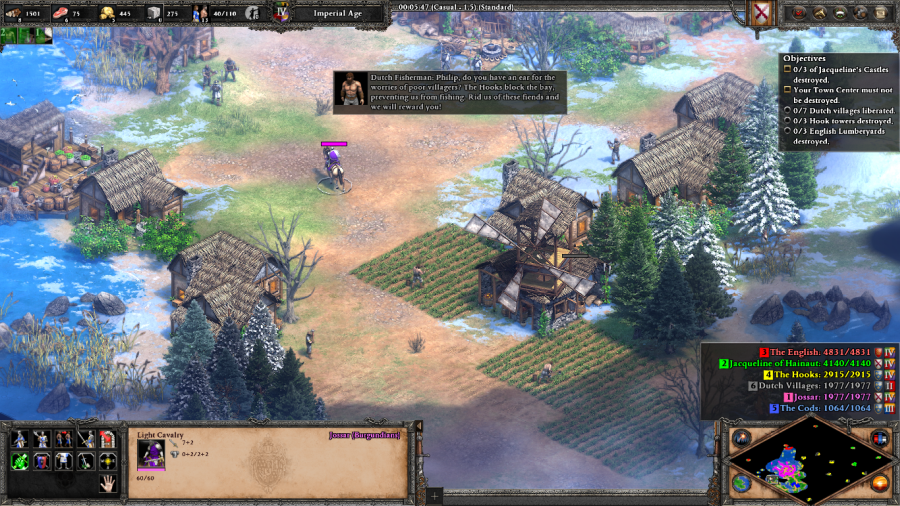 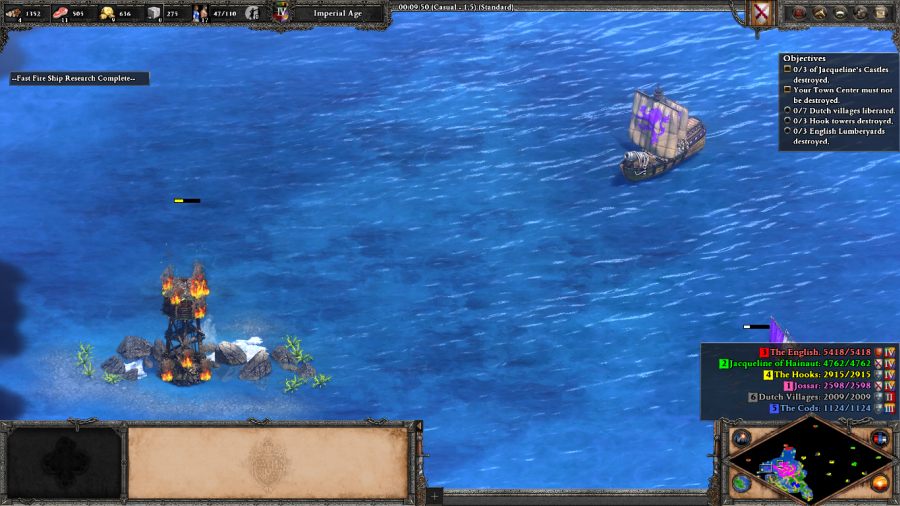 Dutch Fisherman: Philip, do you have an ear for the worries of poor villagers? The Hooks block the bay, preventing us from fishing. Rid us of these fiends and we will reward you! (after destroying the Hook towers) You are a generous duke, Philip. Thanks to you, we can go fishing again. As a token of our gratitude, we will share our catch with you from now on to support your army. Meanwhile, if you do some scouting, you can find this village off to the west which offers you a quest to destroy some Sea Towers in exchange for a constant tribute of Food throughout the rest of the mission. As the Burgundians, you really should never be low on Food anyway, but all the quest takes is a single Cannon Galleon blowing up the towers from range, so there's no reason not to do it. 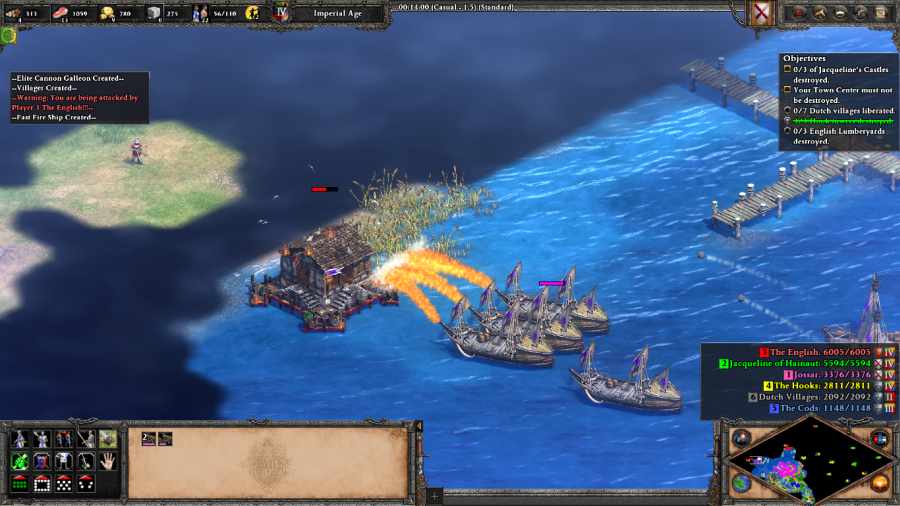 Philip the Good: My spies are reliable as always. They tell me of lumberyards on the English coast that are vital to the English. What are you waiting for soldiers? Burn them down! Protected behind a series of Docks and ships are a set of three Trade Workshops. Destroy them and England switches to Ally, freeing you up to focus on the land portion of the map. I'm able to grab the first one here before being distracted by other problems. 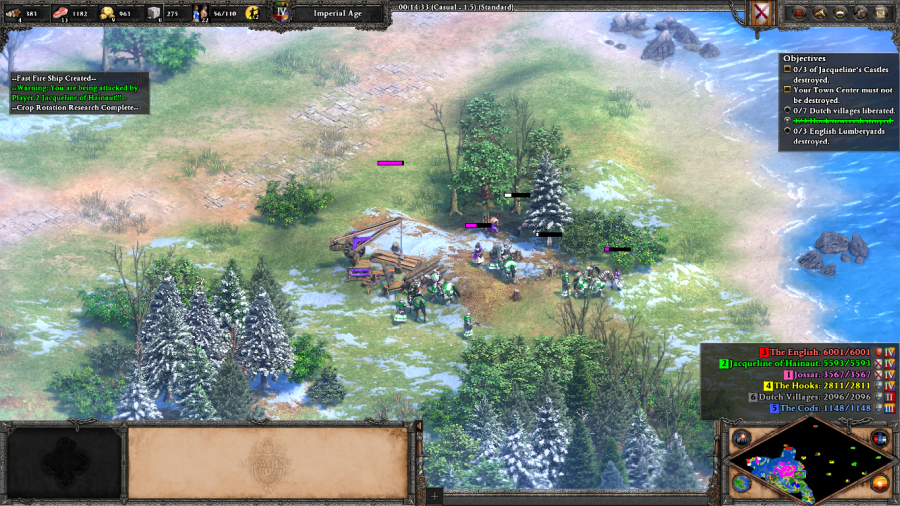 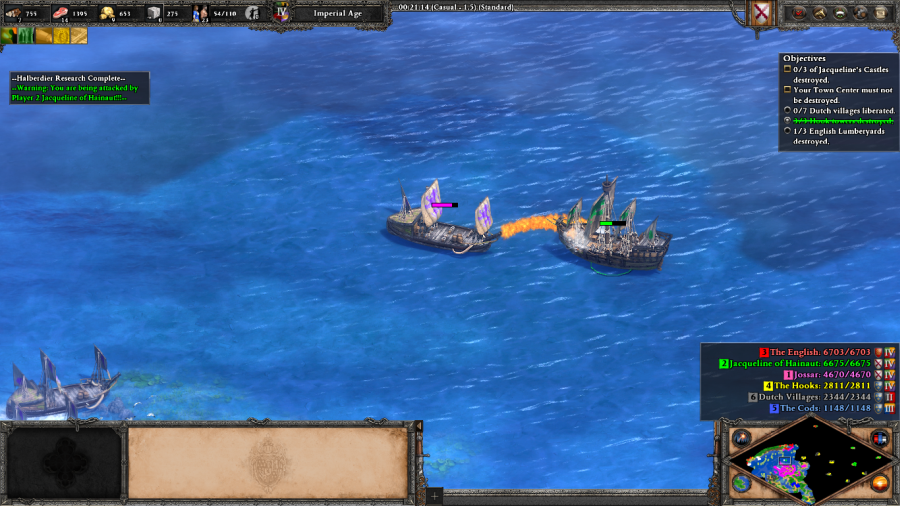 Jacqueline of Hainaut: You really thought that you could hold me prisoner, Philip? I told you I would not give up this easily! Namely Jacqueline and her forces. Jacqueline will send a couple of boats to attack you if she thinks that she can find a target of opportunity, but she mostly sticks to harassing you by land and can do some real damage to your economy if all you've been doing up until this point is focusing on the naval battle. Your starting forces should be enough to contain her until you're done with the English, but may require some luring of units toward Brouwershaven's Castle to soften them up. 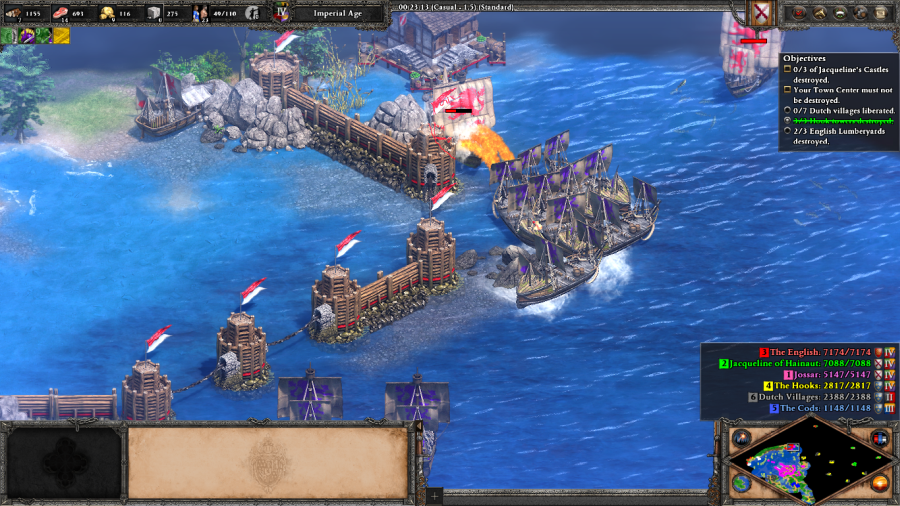 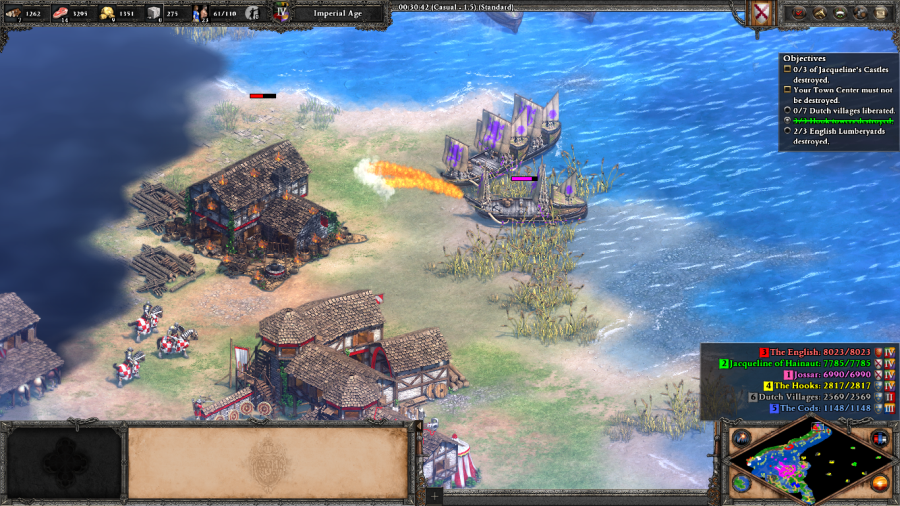 Philip the Good: Tres bien! The English lumberyards lie in ashes! Without regular wood supplies, Humphrey will struggle to build up enough ships to threaten us. And that's England knocked out of the fight. You can defeat them entirely and force the faction to resign instead, and doing so will get you an achievement, but it's really tedious and not worth pursuing unless you're specifically achievement hunting. 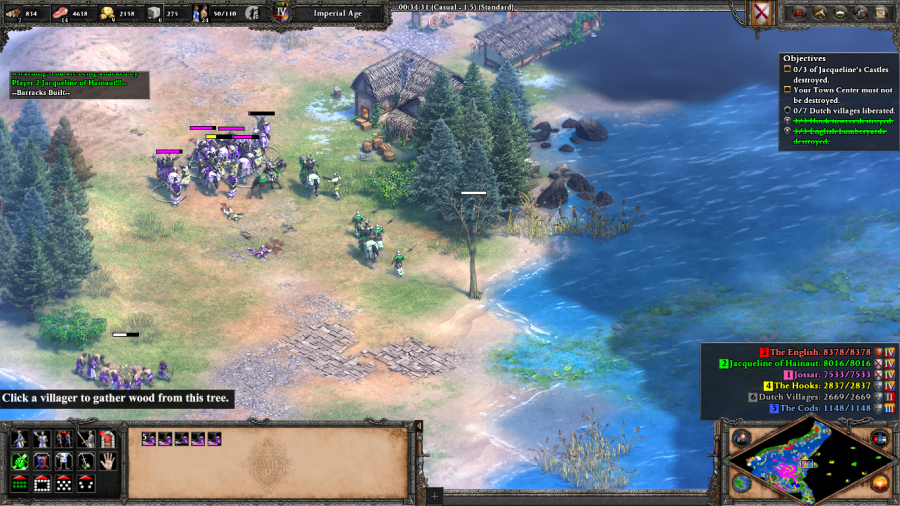 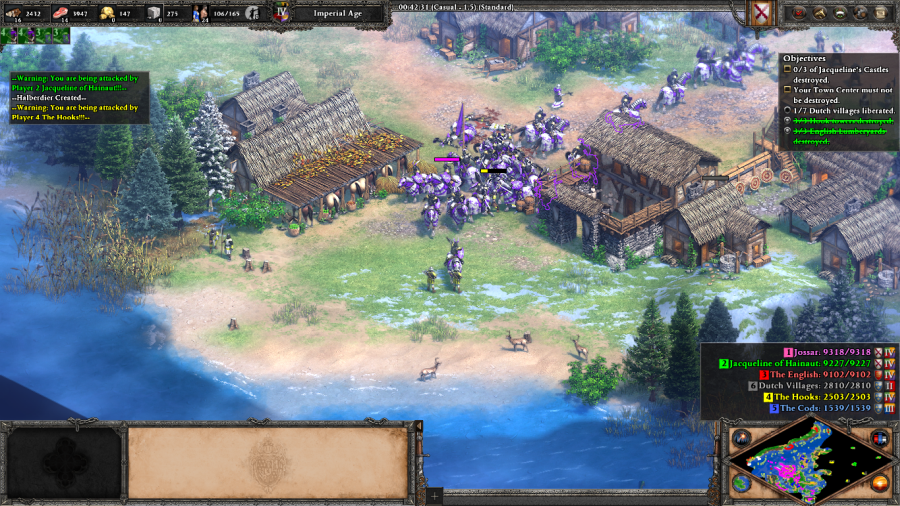 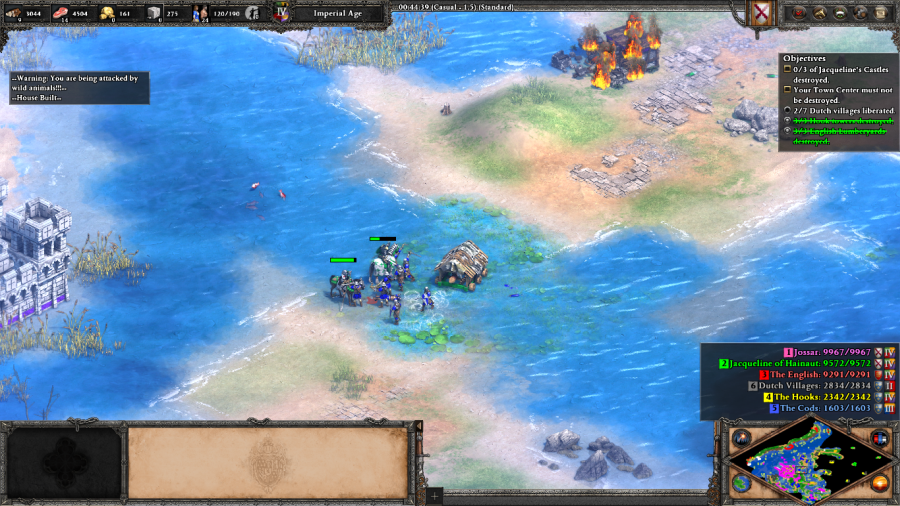 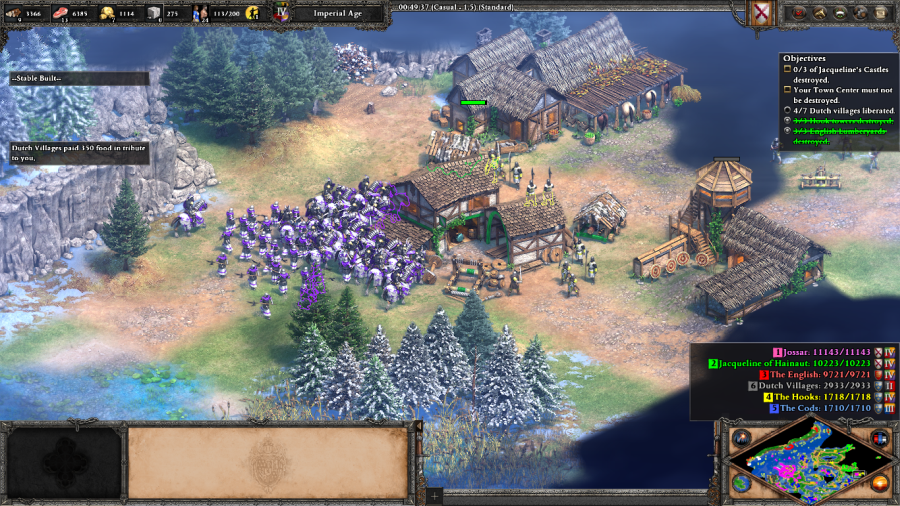 So begin the Hook and Cod Wars in earnest. Now that the English aren't harassing you by sea, feel free to build up and push out the Hook garrisons with a bit less pressure, but keep in mind that Jacqueline is still constantly trying to either bolster the Hook forces to make for a more difficult set of obstacles or go for an independent attack on your base when possible. The closer you get to Jacqueline's various bases, the more obvious the bolstering gets, with her buildings being directly incorporated into the furthest Dutch villages.  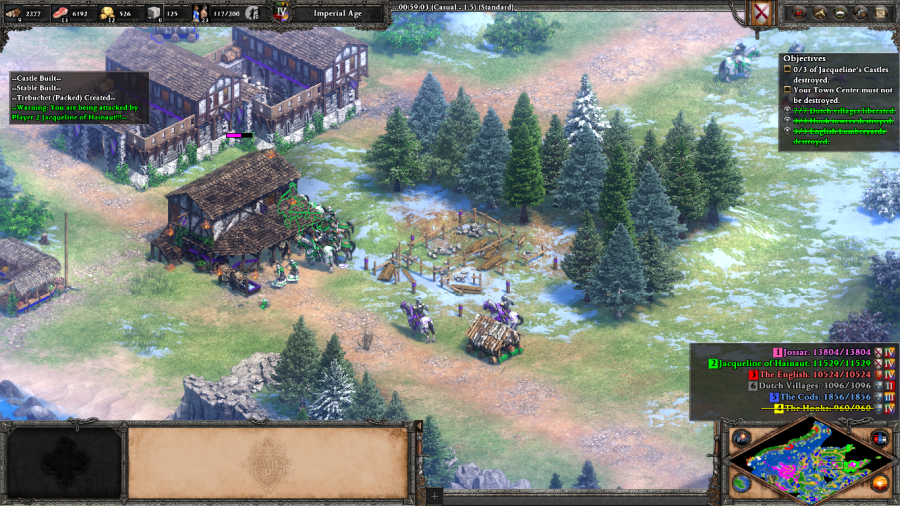 Eventually, with all of the minor villages liberated there's nothing left to do but attack the main cities. Rotterdam (the central city) felt like the toughest fight, at least in part because Jacqueline was counterattacking my base at the same time. But once you destroy the each of the cities' Castles, the rest of the individual city's buildings swap to your side. So after all was said and done, Jacqueline lost her most forward placed base while I gained one as a springboard for continuing on the offense. 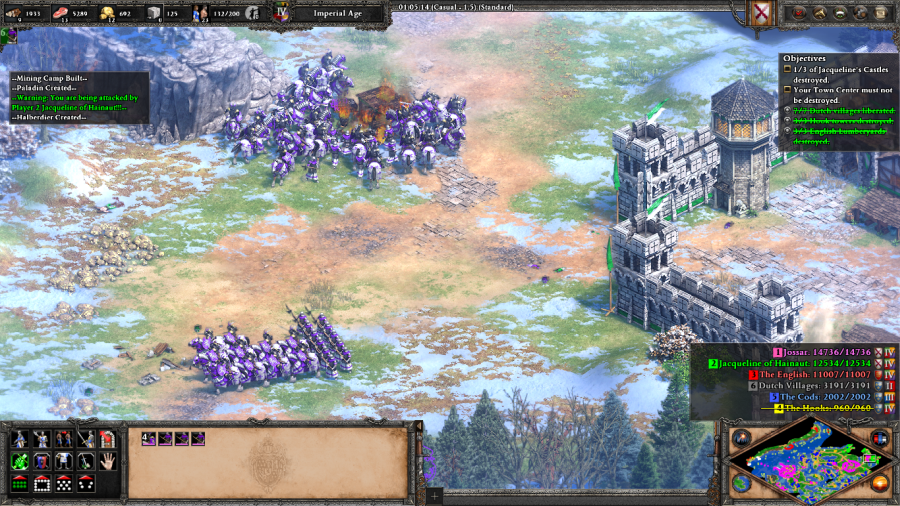 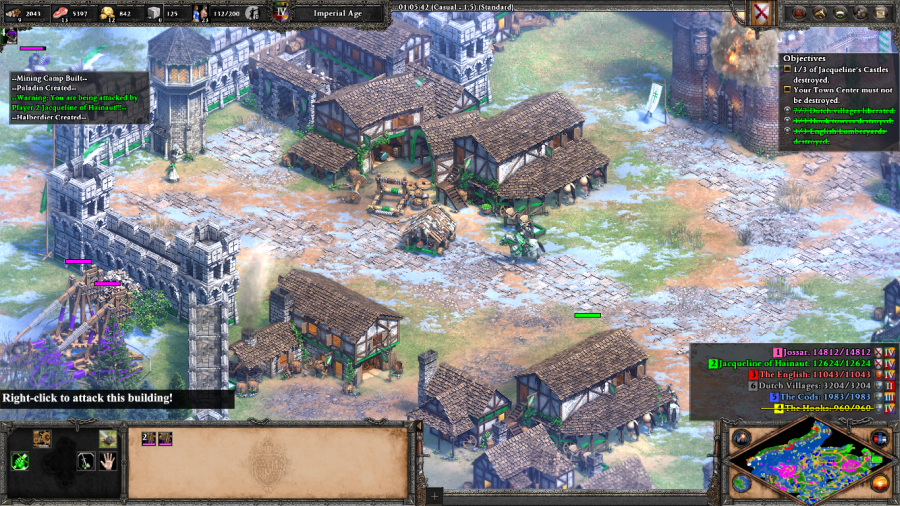 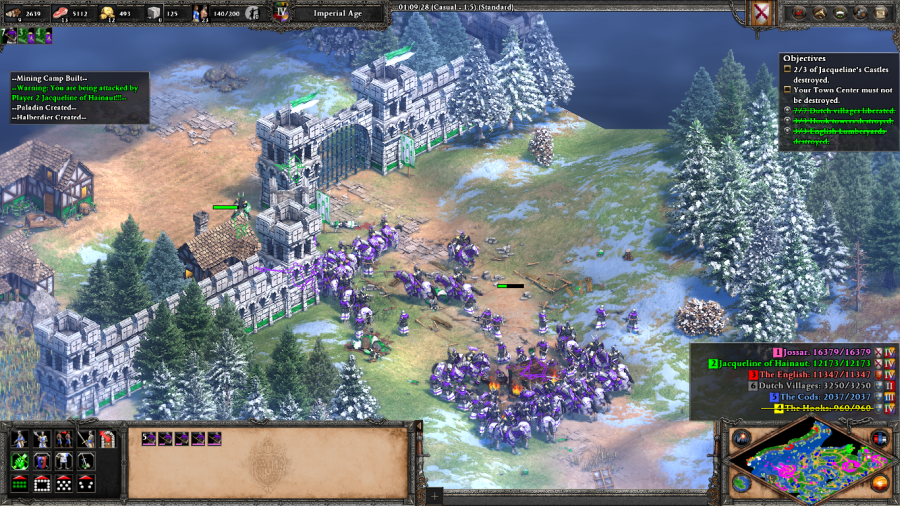 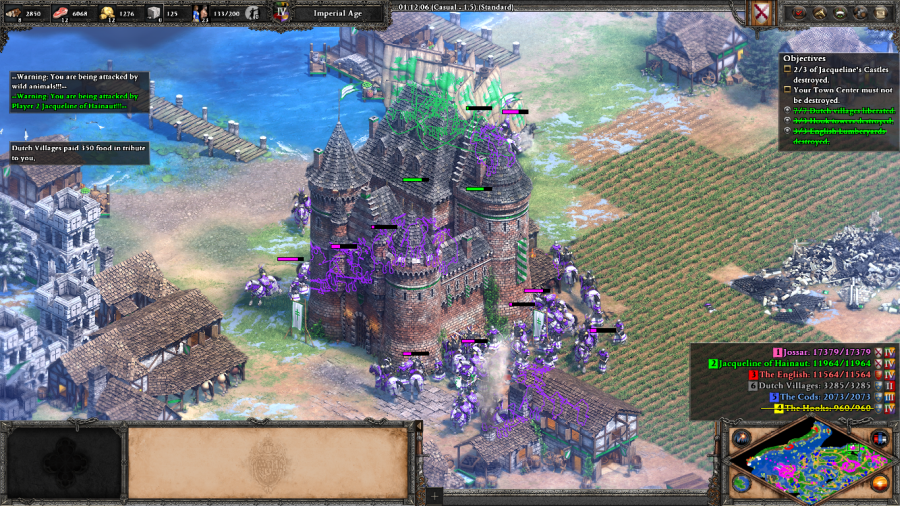 Utrecht (to the right) and Leiden (to the left) were pretty much just cleanup at this point, although it should be noted that Leiden is Jacqueline's port city, so if you find that she's sending out a few too many boats and it's ruining your water economy, it might be the first priority target even over Rotterdam. Jacqueline of Utrecht: Oh, I am deserted by everyone that I trusted! As I have found out, my useless husband spends time with other ladies instead of coming to my aid. No wonder you were victorious, Philip. Philip the Good: You were right, Jacqueline. As long as you live, you will not give up... but I do not wish to kill a fellow Burgundian. Let us talk, I think that we can come to an arrangement that serves both of our interests. Mission 5 Ending Text "In the end, it was the Pope that dealt the final blow to Jacqueline's dreams of power. As he dissolved her marriage to the Lord Protector of England, she was left without allies, and soon she was once again captured by Philip's forces. Philip gave her a peace treaty more amicable than she could have hoped for. She was allowed to keep her titles, but Philip assumed regency over all of her lands. Once the wife of the Dauphin of France, Jacqueline was reduced to a position of hollow prestige. For the first time, the Low Countries were unified under Burgundian rule; a strange situation, for a land so long defined by quarreling cities...but in the end, a change for the better. You see, my son, a land unified is a stronger land. When its cities no longer fight each other, their people can focus on the arts, on industry, beautiful architecture, and innovation... All of the things that we call civilization; all of the things that must be cast aside when one is called upon to pick up the sword... As for Philip... with his northern realms secured, he could finally turn his attention to France, and to Joan of Arc; the Maid of Orl�ans." Probably the best explanation we're going to get as to why the Burgundians are doing all this scheming, the ends that justify these means. Was hoping for a little bit more of a narratively satisfying ending for Jacqueline there, but I suppose that's how the history goes: after this she gives up on greater political ambitions, retires to her estates, falls in love with a local nobleman, marries him, then dies of tuberculosis three years later. This is a good hybrid scenario, which is always hard to pull off and gets points for that alone, definitely placing it above the last scenario. But otherwise I feel like there isn't that much more to say here. Extra Slides Mission 5 - Intro Slide 1 Mission 5 - Intro Slide 2 Mission 5 - Intro Slide 3 Mission 5 - Intro Slide 4 Mission 5 - Intro Slide 5 Mission 5 - End Slide 1 Mission 5 - End Slide 2 Mission 5 - End Slide 3 Mission 5 - End Slide 4 Mission 5 - End Slide 5 Mission 5 - End Slide 6 Jossar fucked around with this message at 23:50 on Apr 20, 2024 |
|
#
?
Apr 20, 2024 23:44
|
|
|
The Grand Dukes - Part 6: The Maid Falls Mission 6 Starting Text "Since the rise of the Maid of Orl�ans, the war had not been going well for England and Burgundy. In a matter of days, Joan had crushed the combined English and Burgundian forces at Orl�ans; and now, for a year, she had campaigned with the Armagnac army, bringing it victory after victory. Only recently had she suffered a setback, as her forces failed to take Paris from the English. She was not a warrior; at just nineteen years of age, she carried nothing but a banner into battle. Yet, her tactics and her fiery speeches that seemed to be the very word of God had made her the Armagnacs' greatest weapon. Philip resolved to put an end to her for good. His forces were laying siege to Compi�gne when word reached him that Joan and her loyal followers had snuck into the city to aid the defenders. This would be the day that the Maid of Orl�ans fell." 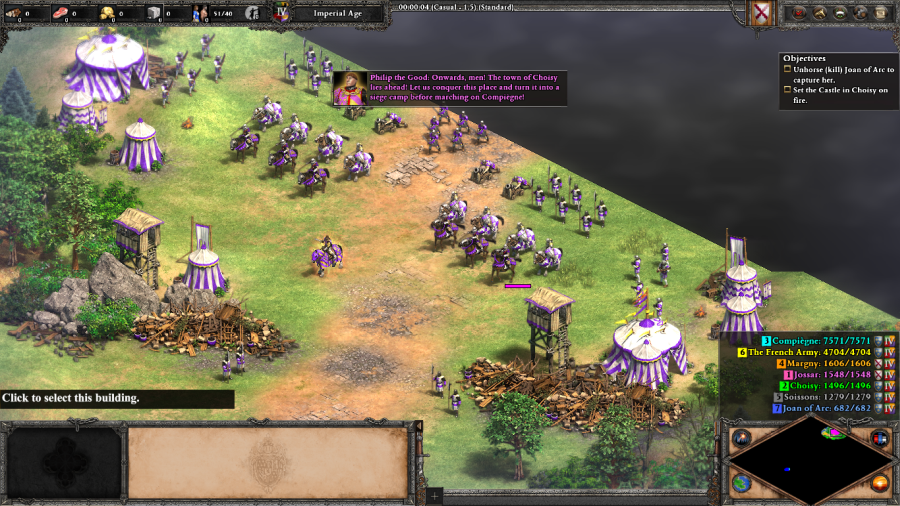 Philip the Good: Onwards, men! The town of Choisy lies ahead! Let us conquer this place and turn it into a siege camp before marching on Compi�gne! 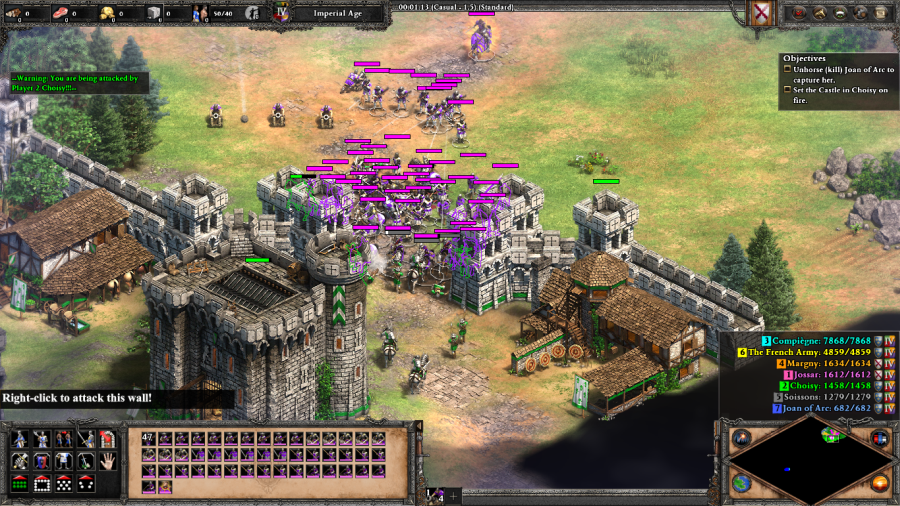 Philip the Good: Choisy is well fortified, but the town's castle is no match for our artillery! Prepare the cannons! (after reducing the Castle to 1000 HP) The town is ours! Quickly, establish a base and repair the damages. The French army will not remain idle once they learn of our success! This scenario starts with a short siege: have your units protect a set of Cannon Bombards from Choisy's garrison while you have them shoot at the castle. Then you get all of the city's buildings (including the Castle) and it transitions to a standard build and destroy. 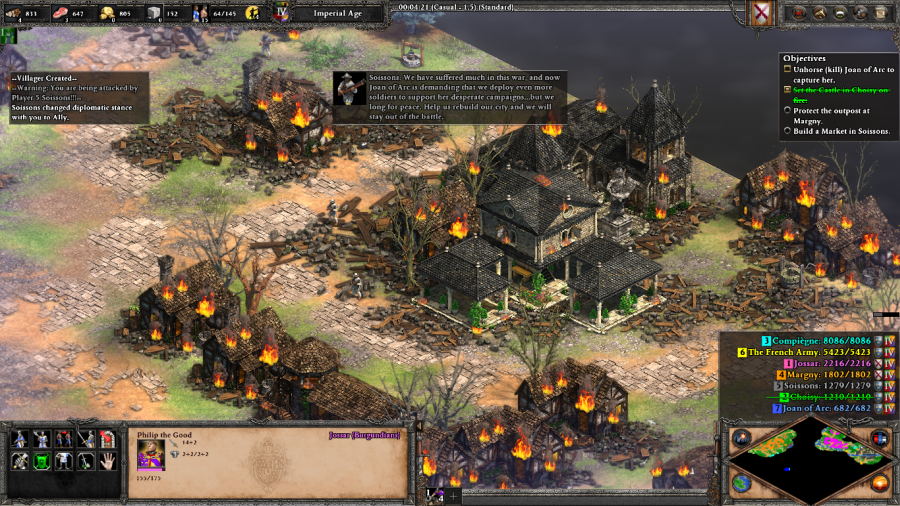 Soissons: We have suffered much in this war, and now Joan of Arc is demanding that we deploy even more soldiers to support her desperate campaigns... but we long for peace. Help us rebuild our city and we will stay out of the battle. (after building a Market in Soissons) Thank you for building a new market for us! You truly deserve to be known as 'the Good', Philip. To the east of your base is the city of Soissons, which contrary to what their dialogue implies is always neutral. Building a Market and allying with them is still useful because in addition to having an easily accessible trading partner, later on they'll sell you Spies for 1000 Gold, giving you near total visibility of the map. 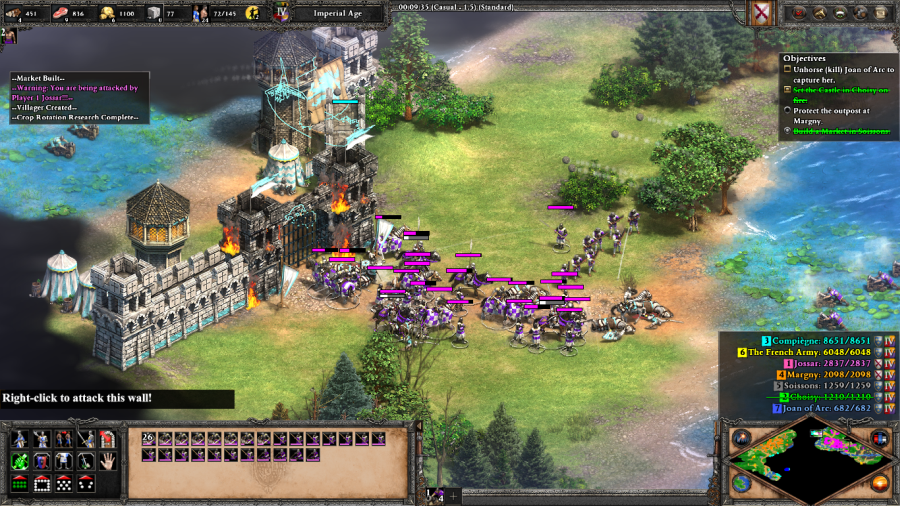 Philip the Good: Our outpost in Margny has been attacked by French soldiers for days. We should not allow our enemies to wipe out this base! 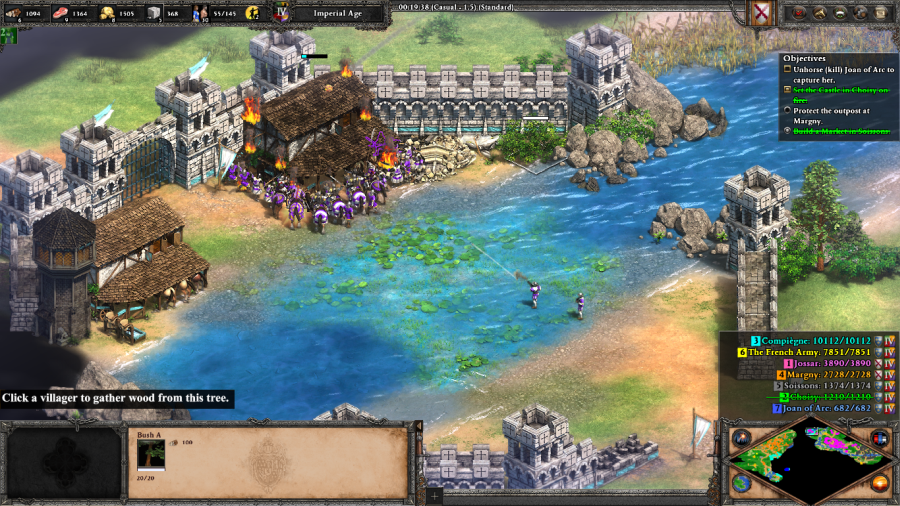 To the west of your base is a forward camp of Compi�gne, moderately well defended by units and static defenses. But not so much so that with careful planning you can't take it out with a small army continuing to protect your Bombard Cannons (or if need be by this point, some Trebuchets). Doing so frees the road up to the default ally that the game gives you, Margny, and relieves both you and them from being flanked.  Compi�gne will still send soldiers to attack both of you, but now there's only one chokepoint in each location, and their attacks are relatively easy to defeat. Note that for some reason, Compi�gne has access to a semi-unique Heavy Crossbowman in this scenario which looks like a Genoese Crossbowman but without the specific anti-unit damage bonus.  To the south of Compi�gne lies the French Army, which is a bit more of a threat. Let them build up too much and they'll send a full Imperial Age Franks army of Paladins and Throwing Axemen after you. It is possible to force the French Army to have to go through a really winding path instead of using their central access point to the fight by blowing up their main bridge with Petards, if you need to slow them down. 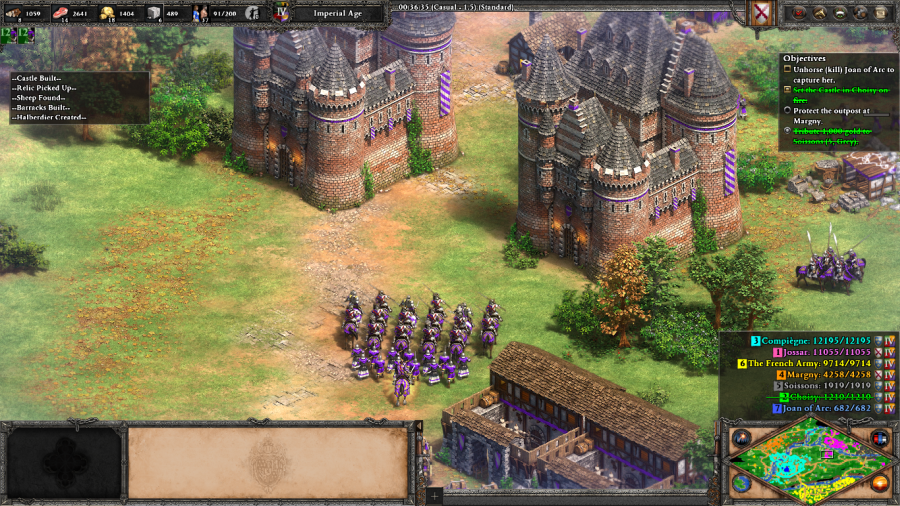 I create a massive forward defensive position in the primary path of both of my enemies and start building up a massive army, mostly focusing on Coustilliers and Halberdiers this time, as I figure I'm not going to win in a straight Cavalry fight against French Paladins, so better to get the charge off on them instead and then use bonus damage to clear the remnants out.   Truthfully, at this point I could have just set up for a alpha strike that broke into the back of Compi�gne and unhorsed Joan, but decided to go and defeat the French Army first. Why, you may ask? To which I answer:  ____________________________________________________   French Soldier: The Burgundians have reached Joan! Defend the Maid with your lives! (after Joan is unhorsed) Joan... oh non! La Pucelle has fallen into the hands of the insidious Burgundians! This is a dark day for France. It plays out pretty much the same way after grabbing the achievement anyway. Campaign complete. Mission 6 Ending Text "It was late at night when the soldiers brought Joan to Philip. Calmly, he instructed all of us advisors to leave his tent. As soon as they were alone, La Pucelle began berating the duke to his face. The Dauphin, she said, was chosen by God to be the savior of France. And he, Duke Philip, was a traitor to his country. She was a zealot, as I have told you, my son; for her, the world was black and white. The goals of the Burgundian duke were as incomprehensible to her as her righteous fire was to Philip. I could see them through a slit in the tent door: the Duke could barely hide his disgust for this peasant girl who talked down to him as if he were a mere commoner. Yet, he retained his composure. When she was finished, he let a long silence fall on the room. At last, he spoke in a low voice: 'If the Dauphin is indeed your beloved savior, Joan, where was he at Paris? Where is he now?' He did not allow her time to answer. 'The moment that I heard of your capture, I dispatched two emissaries: one to the English and one to your Dauphin, each with the same proposal: 10,000 ducats in return for La Pucelle.' 'I am a man of my word, girl. If the 'Dauphin has not abandoned you and wishes to set you free, I will allow you to return to your holy... mission.' 'But if not...' At that moment, two English soldiers entered the tent. With a look of almost pity for the young maiden, Philip nodded. The Englishmen grabbed her by the arms. As they dragged her out, the duke sighed and said: 'Alas, Joan, it is nothing personal. It is only politics.' There she is now; can you see? The English are tying her to the pole. For a short while, this girl was the symbol of French resistance. Now, her death will symbolize the final defeat of the Armagnacs. Watch my son: not the girl in the flames, but the men around her: the clerics, the inquisitors, the nobles of England and Burgundy. The men who decide the fate of nations. For them, for us, this is not the burning of a heretic, nor the downfall of a hero. It is, like all things, a means to an end." I really like this scene here, which is good, because man is it wordy for an AoEII campaign ending. Burgundy would later flip sides again, abandoning the English and sealing their fate in the Hundred Years' War in exchange for a deal in which some counties and cities were swapped, John the Fearless' murderers were prosecuted and the Duchy of Burgundy recognized Charles VII as King of France but Philip himself didn't have to pay homage to Charles VII. Philip reportedly hated having to do this, but swallowed his pride because he thought the French would pose less of a threat to Burgundian designs in the long term. In the end, none of this scheming mattered: Philip only had a single legitimate son, who died in battle in 1477, at which point the entirety of the French part of Burgundy was confiscated by the French crown directly. The part in the Low Countries got folded into the Habsburg family line (and thus the Holy Roman Empire) as part of a big marriage mixup on the part of said son's only daughter. The rest is history... though beyond the scope of AoEII. The only thing that really stands out about this scenario is how you can thread the needle to "assassinate" Joan, otherwise it's a standard build and destroy. This fits with my overall opinion on the Grand Dukes Campaign, where it's got a few points that set make it a very slightly above average experience to play through. Enjoyable enough, but I wouldn't come back to replay it. Extra Slides Mission 6 - Intro Slide 1 Mission 6 - Intro Slide 2 Mission 6 - Intro Slide 3 Mission 6 - Intro Slide 4 Mission 6 - Intro Slide 5 Mission 6 - End Slide 1 Mission 6 - End Slide 2 Mission 6 - End Slide 3 Mission 6 - End Slide 4 Mission 6 - End Slide 5 Mission 6 - End Slide 6 Mission 6 - End Slide 7 Mission 6 - End Slide 8 Mission 6 - End Slide 9 Mission 6 - End Slide 10 Mission 6 - End Slide 11 Mission 6 - End Slide 12 Mission 6 - End Slide 13 Mission 6 - End Slide 14 Jossar fucked around with this message at 18:27 on Apr 21, 2024 |
|
#
?
Apr 21, 2024 18:20
|
|
|
And that was the other evil campaign. A lot of blood, sweat and tears to get rolled over later.
|
|
#
?
Apr 21, 2024 20:26
|
|


|
The Hautevilles - Part 1: Guiscard Arrives Age of Empires II: Definitive Edition - Sicilians Theme Very well, then let us begin, the tale of an adventurous family.  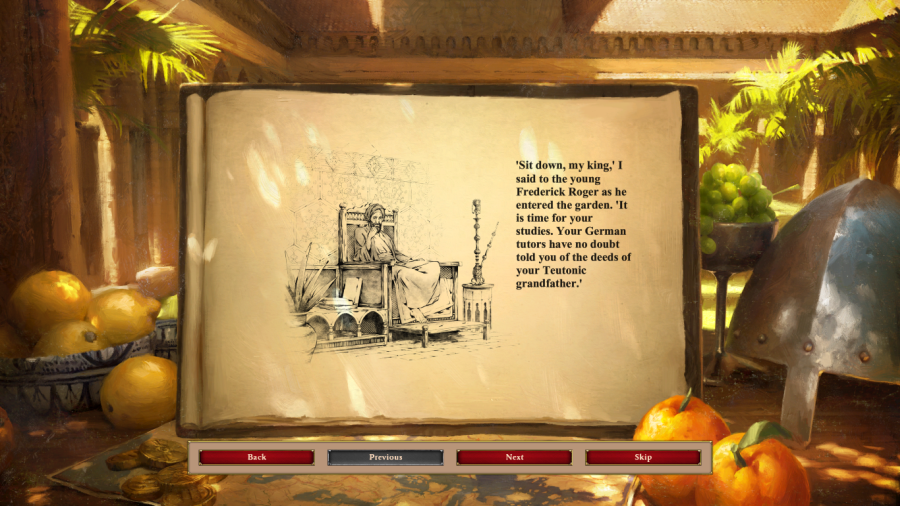 Mission 1 Starting Text "'Sit down, my king,' I said to the young Frederick Roger as he entered the garden. 'It is time for your studies. Your German tutors have no doubt told you of the deeds of your Teutonic grandfather.' 'I know that story by heart,' the boy king replied proudly. 'Indeed,' I said with a wink, 'but I will tell you of the other side of your family - for you are firstly a son of Sicily.' 'Ah, dear Sicily, a kingdom like no other: where three people were fused under the southern sun and formed the jewel that lies between East and West.' 'It was the Norman side of your family that made it all possible. Normandy was a cold, northern land of steel and chivalry. But it was also overflowing with the younger sons of minor barons - men aspiring to a greatness that exceeded the constraints of birth and station.' 'This story - your story - begins with your great grandfather's brother, Robert de Hauteville: a man of immense stature, with fair hair, broad shoulders, and eyes that all but shot out sparks of flame.' 'Robert was driven and possessed that incorrigible confidence that melts away doubts and allows ambition to keep pace with imagination. More cunning than any foe he faced, he was ever-vigilant to seize any advantage, win through any means, and remain unbound by the rules of lesser men.' 'You speak of him as a great man...but what did he do?' the boy king asked, his eyes now wide with childish enthusiasm. I answered: 'Robert was the first to unite all Italian Normans under a single ruler, but his origins were very humble.' 'He came from Normandy to Italy with scarcely thirty followers and sought fortune in this land that so often rewards those with the daring and brilliance to seize it...'" 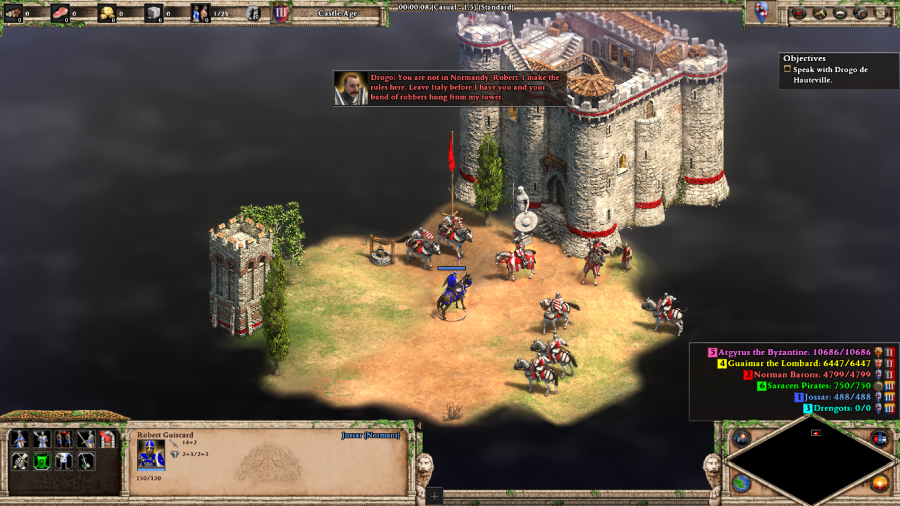 Drogo: You are not in Normandy, Robert. I make the rules here. Leave Italy before I have you and your band of robbers hung from my tower. Robert Guiscard: I did not come all the way from Normandy for this. If you will not give me the lands I deserve, I will take them myself! 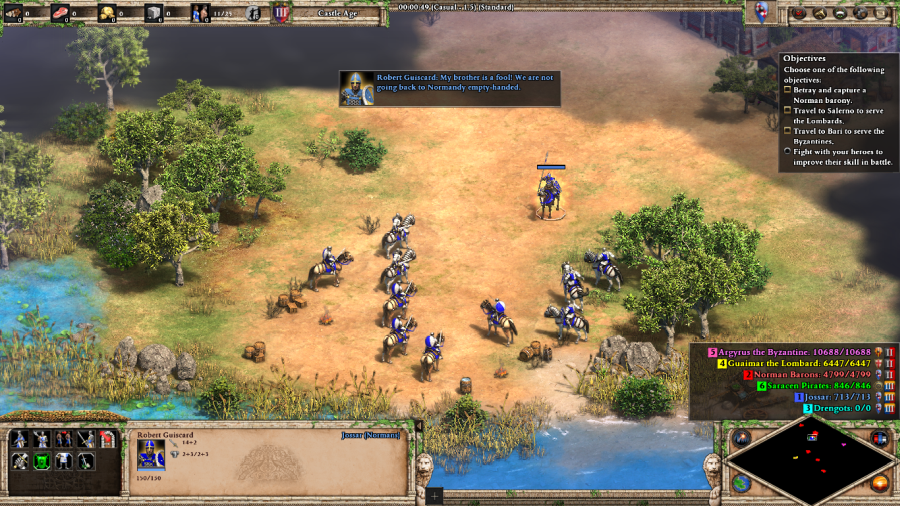 Robert Guiscard: My brother is a fool! We are not going back to Normandy empty-handed. After a short meeting with brother dearest (who tells us to get bent), our protagonist Robert Guiscard (cavalry hero unit) meets up with a bunch of Knights and Light Cavalry, which starts the scenario in earnest. As can be noted from the objective panel, there are a couple common themes to this campaign: first, hero units get bonus stats if they're constantly fighting, giving more incentive to throw them into the fray. Second, the overall missions are going to be fairly open ended. Here the options are between heading off to the Byzantines or Lombards to pledge our allegiance or betraying a Norman Baron in order to take over their holdings. 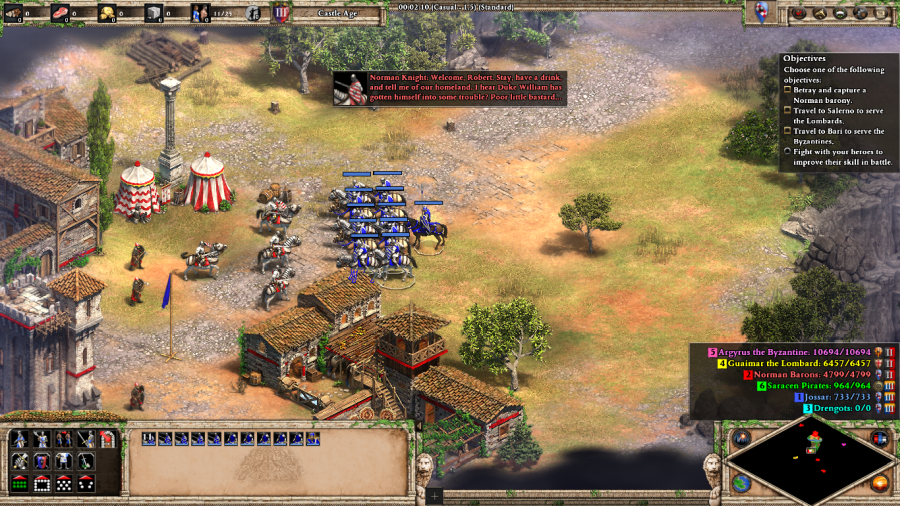 Norman Knight: Welcome, Robert. Stay, have a drink and tell me of our homeland. I hear Duke William has gotten himself into some trouble? Poor little bastard... (after betraying him) How dare you strike at my men, Robert? You will pay for this! Robert Guiscard: Normans, you came here because there is nothing for us in Normandy. Duke William is a bastard barely clinging to power there. Join me and you will be lords of Italy. Betray me and you will not live long. Given that we are in Italy, there is only one proper course of action, and that is to backstab the living daylights out of everybody on the boot. Taking control of any village, fort, or city, increases your maximum population limit, which is necessary as you otherwise can't expand it through any other means (although you can still lose a few individual buildings and stay at pop cap). Betraying the first baron also gives you a bunch of resources with which to build a couple more units, although only military at this point.  Guaimar: Norman, I could use more of your type to further my cause. Come to my castle and let us make a deal. (If you head to the Lombard Castle) It is settled then. You will defend my lands, fight my enemies, and pay tribute when I ask. That is the price of these lands I give you. (after a few seconds) Pay no mind to my soldiers in your fiefdom. They ensure that you will think twice before betraying me. The Lombards offer a deal to give me a town, including a few military buildings, some civilian structures, and some Villagers, which I take. In retrospect this was a bad idea not only because it stopped me from getting the mission's achievement (acquired if you ally with neither the Byzantines or the Lombards), but because as you can see Guaimar's obviously going to betray me and I let him set the pace at which the turnabout was going to happen. It did let me get civilian infrastructure without that much of a hassle earlier than I was expecting though. 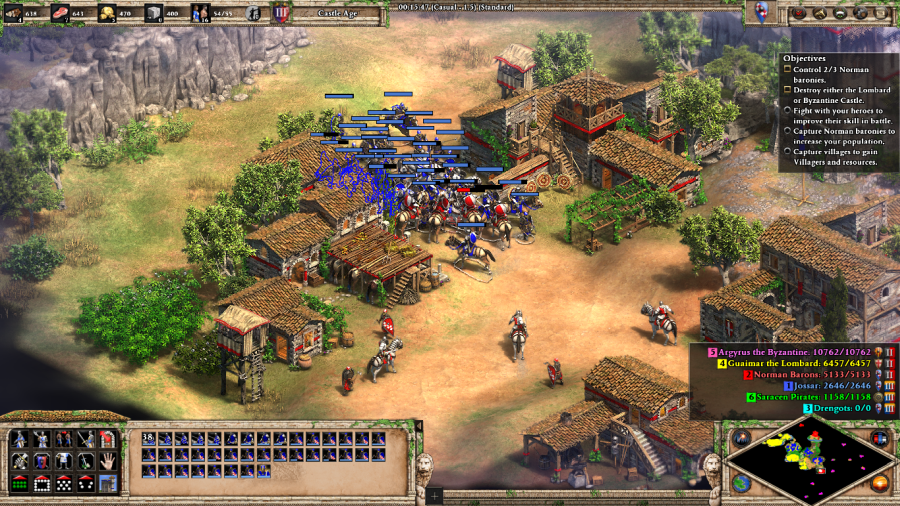 Norman Knight: Robert Guiscard comes! Protect your homes from this devil! But in the interim, it's back to grabbing all of the various Norman baronies to satisfy the mission objective and increase my pop cap. The more you start to snowball, the easier this becomes, although all of these are military based. The only way to build civilian infrastructure besides allying with one of the two major map factions is attacking one of them, grabbing that individual town's civilians, and becoming that faction's enemy instead. 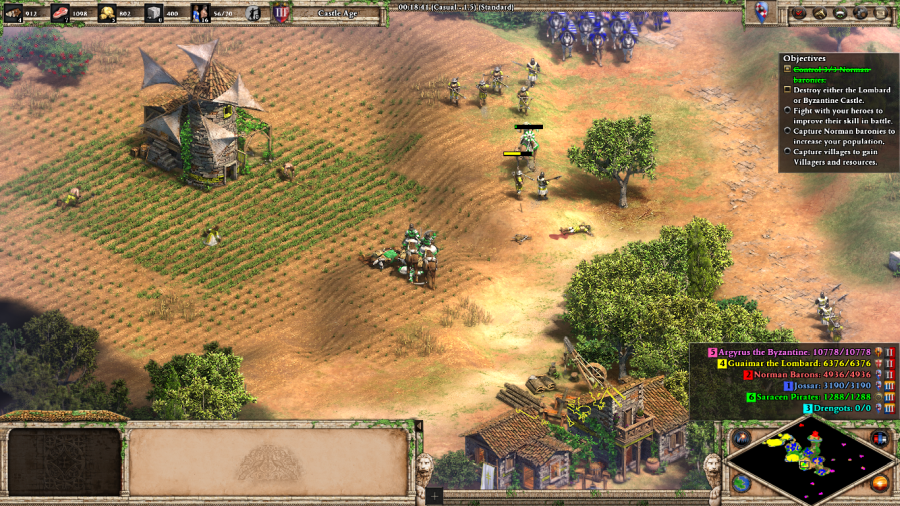 Guaimar: I did not give you land so that you could twiddle your thumbs and sit on your arse! My lands are being attacked! Defend them! The other two factions that exist on the map are a group of Saracen Pirates and the forces of a rival band of Normans, the Drengots. They attack everyone at random, although the nature of the map means that they will most likely be attacking the Byzantines/Lombards. The Saracens raided the Lombards at this point, requiring me to rush in and help defend Guaimar's outlying villages, but for some reason the Drengots never spawned. I'm not sure if that's just because I was only fighting on the Lombard side of the map, or a script broke somewhere, as is to be expected of a campaign that's trying to make itself as complicated as possible. 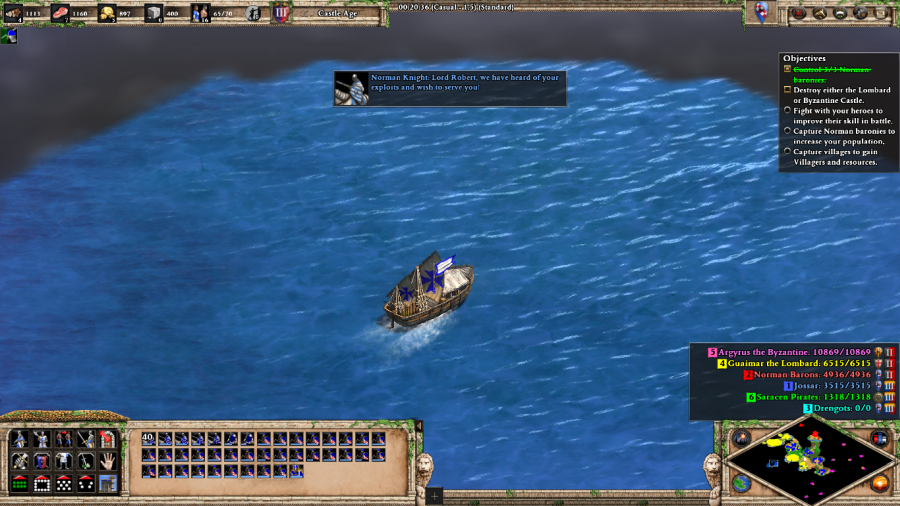 Norman Knight: Lord Robert, we have heard of your exploits and wish to serve you! 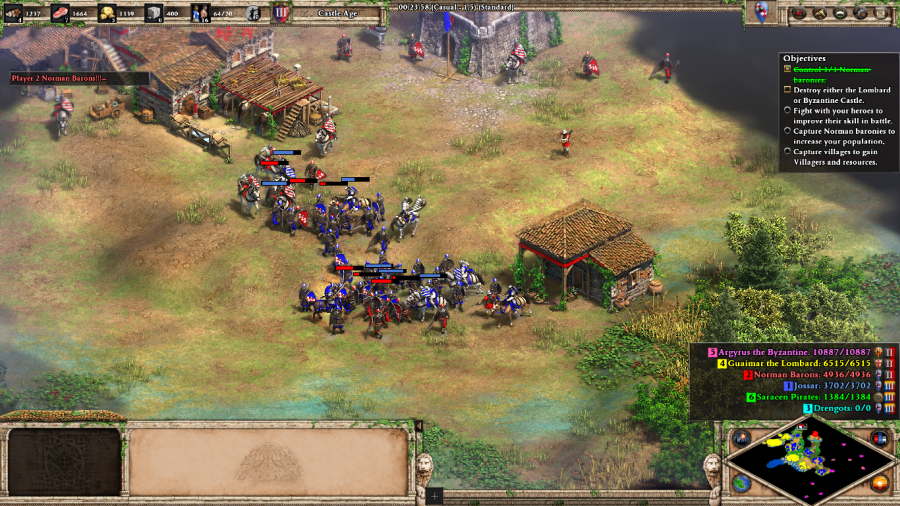 There are about... 3 Transports (maybe more if you take longer?) that show up over the course of the scenario with reinforcements from Normandy, fellow adventurers that have heard that Robert is succeeding in his conquest and want a piece of the action for themselves. There's only a few units in each boat, but it's a welcome boost to your manpower given the population cap. In my case, they're helping to fuel my conquest of the last few independent baronies.  Drogo: You dare defy me, Robert? I will run you through and hang your treacherous body from my ramparts! The final Norman Barony is almost a sort of miniboss compared to the two big factions on the map. It has two Cavalry heroes in the form of Robert Guiscard's brothers Drogo and Humphrey, is guarded by a Castle, and has a whole bunch of dudes present. This includes a ton of Monks, which I notice seem to be in the base of every major enemy in this mission, compared to the last campaign where I only saw them at the very end of the attack on Compi�gne, who love to convert your units at the drop of a hat. Fortunately, like the other baronies, you don't need to take down the Castle to take control of the base. But it does make it imperative that you finish the fight with the garrison units as quickly as possible. 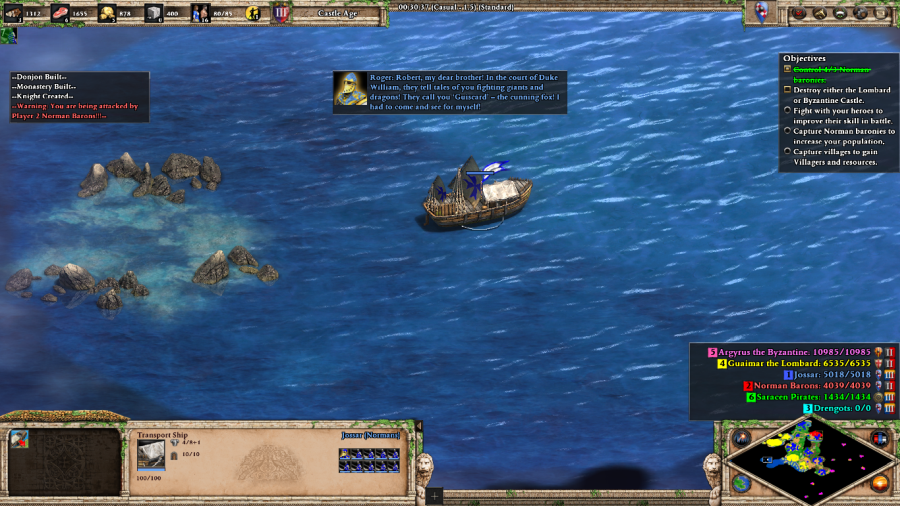 Roger: Robert, my dear brother! In the court of Duke William, they tell tales of you fighting giants and dragons! They call you 'Guiscard' - the cunning fox! I had to come and see for myself! Robert Guiscard: Do not believe every tall tale whispered in a bastard duke's court, brother. Roger: Things are changing in Normandy, Robert. Duke William has plans to conquer England, but I would rather fight alongside my brother here in Italy! 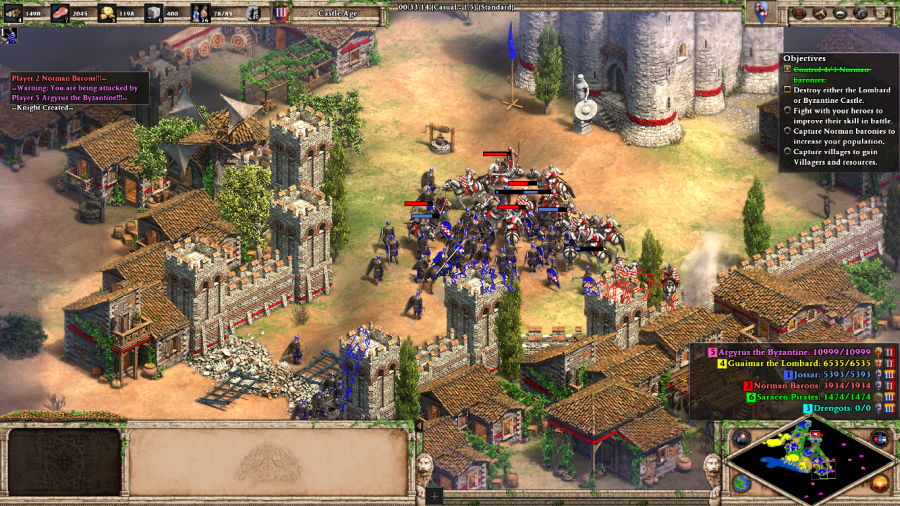 Drogo: You strike your own brother and dishonor our father's name! Robert Guiscard: Bury my brothers Drogo and Humphrey with honors. No one speaks of what we have done here. Is that understood? The second wave of reinforcements comes in, and it includes Robert's youngest brother Roger (also a cavalry hero unit). The comedic timing on this one was perfect: Roger lands on the shores of Italy and gets up to the Castle just after I've taken it and Robert's buried all the bodies. I'm sorry you had to hear about Drogo and Humphrey's deaths from me, younger brother, it's truly tragic, nobody could have seen it coming. 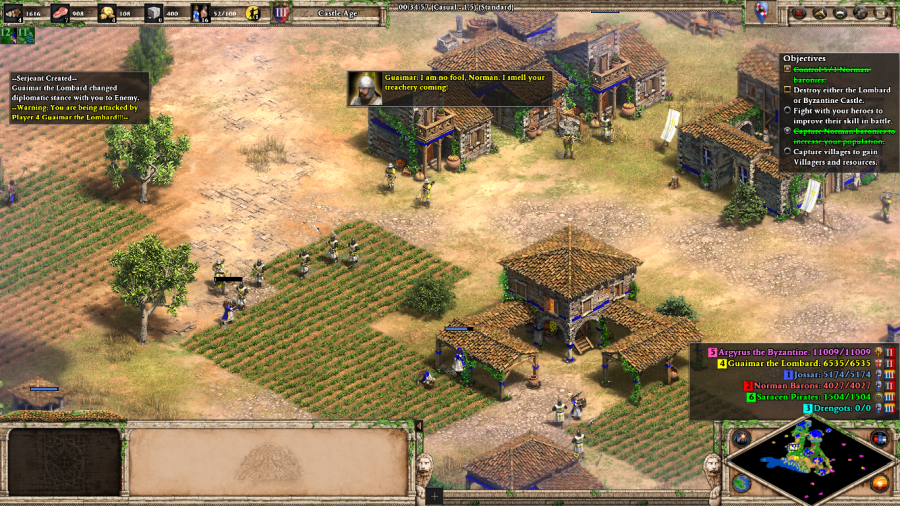 Guaimar: I am no fool, Norman. I smell your treachery coming! 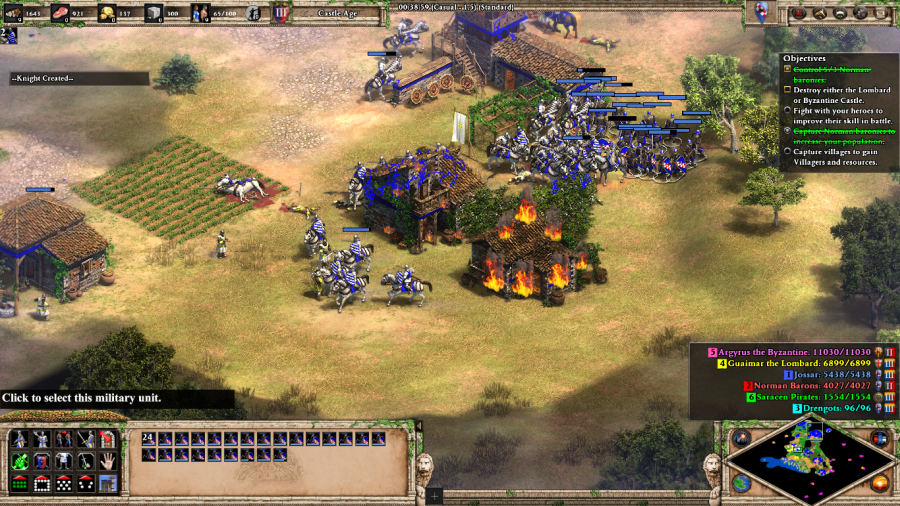 Capturing all of the Norman baronies is the trigger for the Lombards to betray you. The Byzantines are supposed to ally with you here, but I think I broke a trigger through my own messing around, so they just remain in the background for the rest of the scenario. I move the majority of my economy back to Drogo's Castle and rush forward to kill the Lombards and save the base itself. 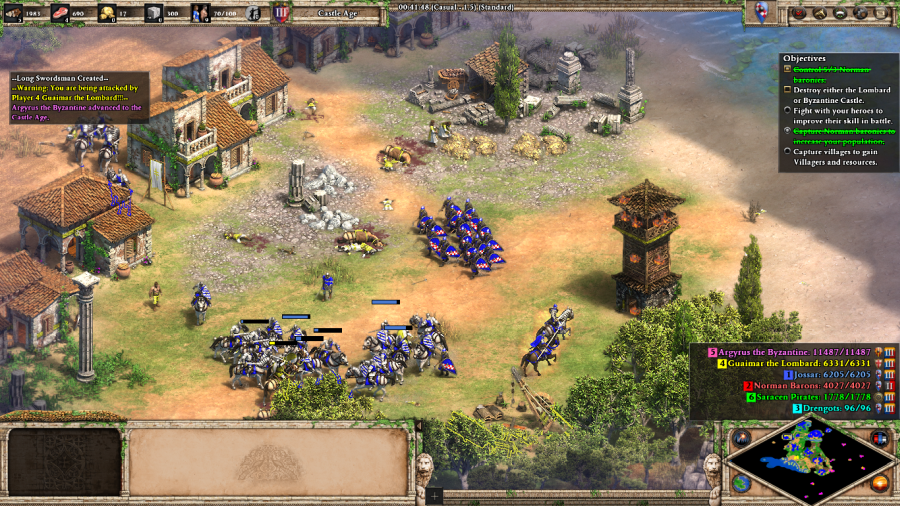 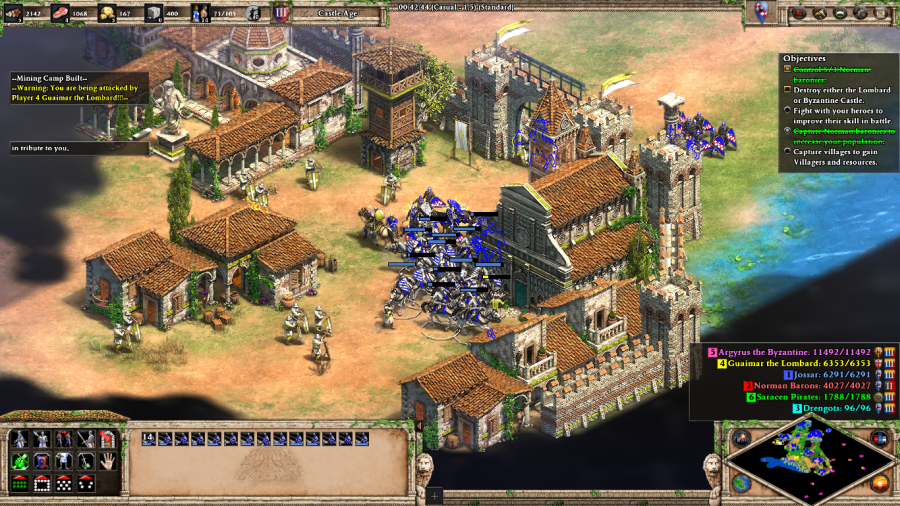 Since Guaimar's now my enemy, there's no reason not to kill all of the garrisons in his outlying towns and grab them and their civilian populations in order to increase my pop cap and further slingshot my economy economy ahead. 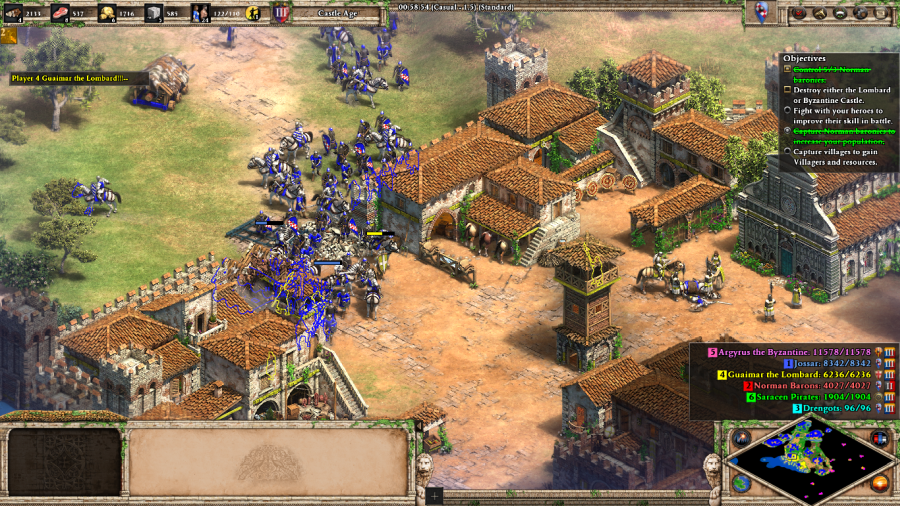 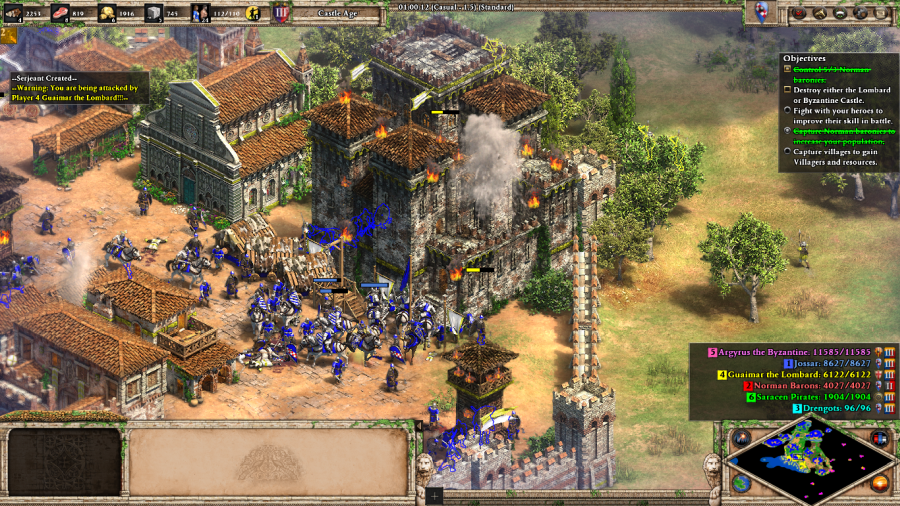 Salerno is difficult to assault without siege weapons, but get a few Rams up and it falls easily enough. If you're really stymied, this is about when the next reinforcement boat arrives, and it contains a pair of Trebuchets which can easily trivialize the final mission objective. I had the Trebuchets help in tearing down the Castle, but even without them it was already in the bag. Robert Guiscard: Salerno's power is broken, but the Lombards remain rebellious. I will take their princess Sikelgaita as my wife so that the people bend to my will. (after a few seconds) Normans, remember why we came to Italy. We will be ruthless, we will conquer, we will take and kill, and make a name for ourselves in this land like our fathers' fathers did in Normandy! Join me and I will lead us to greatness! Mission 1 Ending Text "'The Italians called Robert, "Guiscard": the cunning fox. In a few decades, he had brought all of Southern Italy to heel, but his imagination and his cunning would carry him across the horizon to new conquests.' 'Where did he go next?' The boy king nearly jumped up as he asked. 'That is a story for tomorrow...not even a king can learn all of history in a single day.' I remained in the garden as young Frederick Roger hurried off, a smile resting on my face. Already I could see in him the shadow of his forefathers. Perhaps, one day, this boy would eclipse them all." An exhausting scenario to recount, but in a good way. So much to do and I didn't even touch anything on the Byzantine side of the map! Kotyan's the only one getting the full "both sides of the coin" treatment unless I'm really inspired by any scenarios later on, though. Extra Slides Mission 1 - Intro Slide 1 Mission 1 - Intro Slide 2 Mission 1 - Intro Slide 3 Mission 1 - Intro Slide 4 Mission 1 - Intro Slide 5 Mission 1 - Intro Slide 6 Mission 1 - Intro Slide 7 Mission 1 - Intro Slide 8 Mission 1 - Intro Slide 9 Mission 1 - End Slide 1 Mission 1 - End Slide 2 Mission 1 - End Slide 3 Mission 1 - End Slide 4 Jossar fucked around with this message at 22:07 on Apr 21, 2024 |
|
#
?
Apr 21, 2024 21:57
|
|
|
The Hautevilles - Part 2: Roger in Sicily Mission 2 Starting Text "'Stories of Robert's successes in Italy inspired a Normandy broken by civil war. The Norman Duke William had not yet earned the title "The Conqueror" and was still a controversial young bastard barely clinging to power. Many Norman knights, bloodied by civil war and lured by southern riches, set out for Italy.' 'Robert's youngest brother - your great grandfather - Roger de Hauteville, was among them, but he was different. Where Robert was ruthless and cunning, Roger was patient and chivalrous. He was motivated by love.' 'Judith d'Evreux, cousin of Duke William, had stolen Roger's heart and the two wished to be married. Judith's father, however, would never entertain the thought of his daughter marrying a mere landless knight.' 'Roger had no choice but to go to Italy to prove himself worthy of the woman that he loved.' 'But Robert Guiscard, like his brother before him, expected Roger to make his own way in Italy, as he had done years before. He offered Roger no lands and no knights.' 'Fortunately for Roger, there was still a prize awaiting a man of his talents. An island - ruled by Muslims for two centuries, but now divided between rival emirs - Sicily beckoned.'" 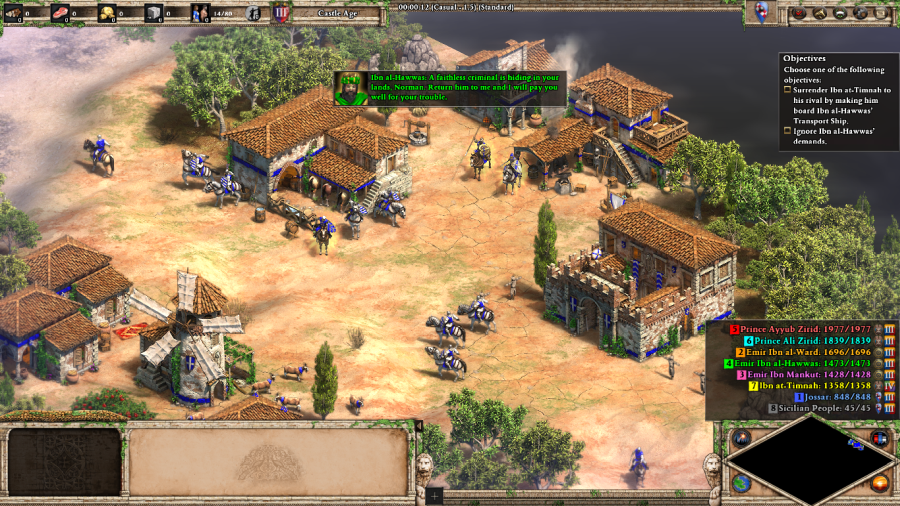 Ibn al-Hawwas: A faithless criminal is hiding in your lands, Norman. Return him to me and I will pay you well for your trouble. Ibn at-Timnah: Do not listen to him, Sayyid Roger! My head is far more valuable to you atop my shoulders! Ibn al-Hawwas: I will not forget this, Norman! You harbor criminals and I pronounce vendetta against you! Ibn at-Timnah: Shukraan, Sayyid Roger, shukraan! My followers are yours to command. Gather my supporters and march on one of the cities. The people are weak and if they see you kill an emir, they will submit to us - I mean you. (after a few seconds) You are indeed fortunate to have a friend like me, Sayyid Roger! I am a local to Sicily and know the positions of the enemy cities! You will still need to search for the emirs themselves, though... 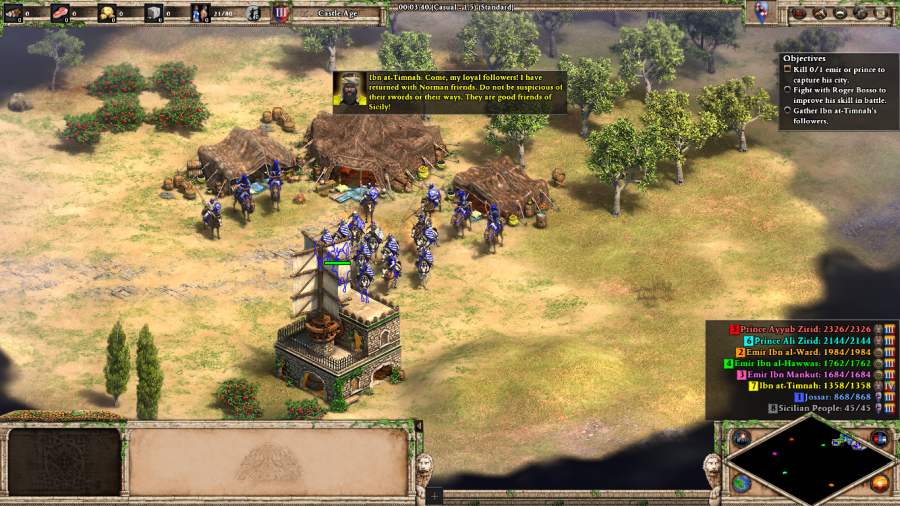 Ibn at-Timnah: Come, my loyal followers! I have returned with Norman friends. Do not be suspicious of their swords or their ways. They are good friends of Sicily! This mission starts with a choice as to whether to hand over a deposed local emir to his enemies or keep him around with the intent to eventually return him to power. While you are provided with a decent amount of resources for handing Ibn at-Timnah over, it's worthwhile to put up with him for access to Genitours, intel on the enemy bases, and his initial forces scattered around the eastern part of Sicily proper, which include some Berber units. 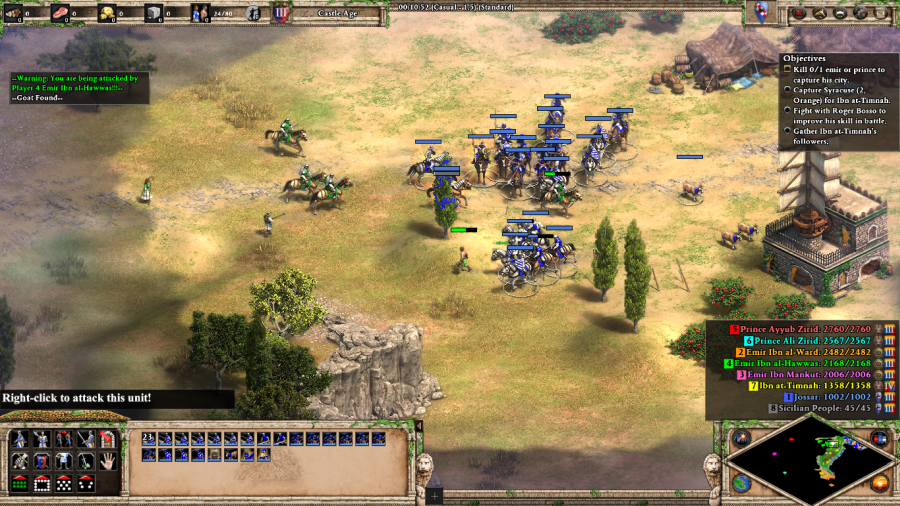 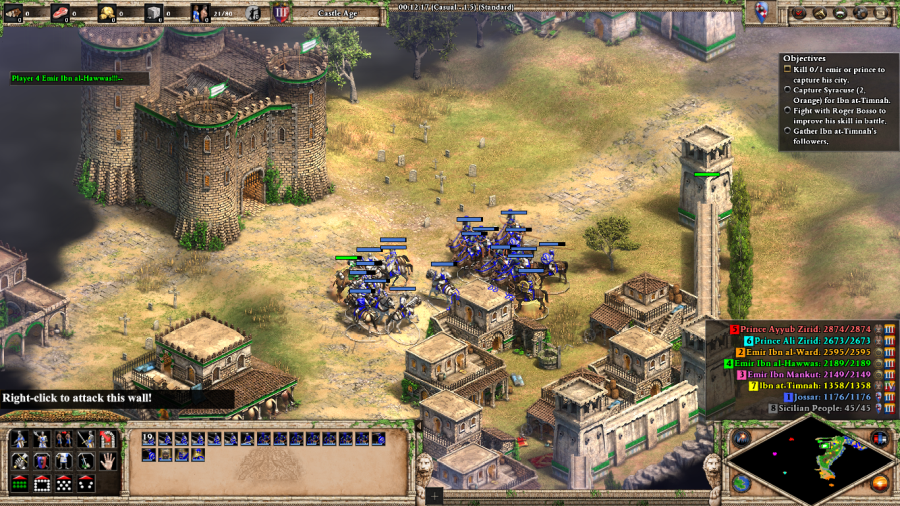 With that, I move on to the main gimmick of the mission: the goal is to kill all five hostile emirs and take control of Sicily. Similar to last mission, you start with a limited pop cap and killing the leaders gives you access to their cities, remaining units, and a higher pop cap. But the AI is extra dumb this mission and will do things like sending off the entirety of its garrison to die, leaving the Emir alone, or worse: sending him off to the front lines away from the protection of the city's Castle. That makes most of the core gameplay of this mission about figuring out how to get yourself into a position to perform an Emir snipe.  Robert Guiscard: Brother, my knights find no profit in putting down Lombard rebellions in Italy. There is little left to plunder. They want to conquer something, so make good use of them! (after a few seconds) I must go. Humphrey's son is causing trouble in Apulia. I should have killed him after his father died. Continue to conquer Sicily and I will make you count of the island. Ibn at-Timnah: Count? Sayyid Roger, inshallah, you will be king of this island, without your ungrateful brother! Roger: My brother is a fox. My day will come, but only if I am patient. Let us focus on taking this island before I worry over who will rule it. After about 20 minutes, Robert sends some reinforcements over from Italy. These are useful, but this and a future reinforcement conversation are mostly important from a story perspective, setting up the relationships between the surviving Hautevilles and foreshadowing most of the events of the rest of the campaign.  Ibn at-Timnah: I have a small favor to ask of you, Sayyid Roger. Restore me to my throne at Syracuse and I will be your most devoted ally.  Ibn at-Timnah: Shukraan, Sayyid Roger. I prove my devotion by conscripting these peasants into your army. Get out there, peasants! You will fight for the Normans or I will whip you! At some point if you go far south enough, Ibn at-Timnah asks you to focus on eliminating Ibn al-Ward so he can take control of Syracuse. Fortunately for me, Ibn al-Ward walked right up to my doorstep with a raiding force, allowing me to easily isolate and kill the enemy faction leader. Despite the incredibly bad vibes that Ibn at-Timnah gives off, he is good as his word, and in addition to the Eastern Swordsman units he gives now, will be a loyal and competent ally to you for the rest of the scenario.  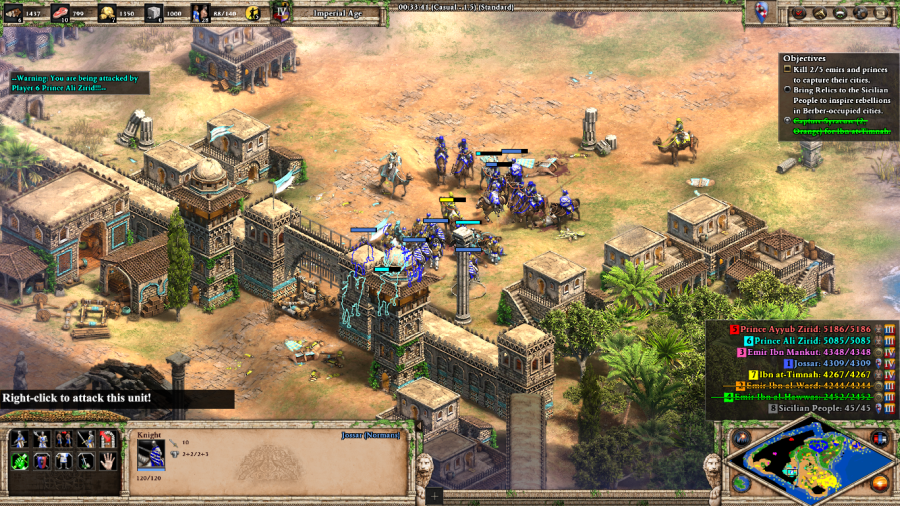 In this case, as soon as Ibn at-Timnah managed to organize his forces, he ran straight off to the next enemy and did just enough damage to Prince Ali Zirid's army to lure the Emir out of his base, at which point my Camel Archers and Knights finished off the enemy Emir. 3 down, 2 to go. 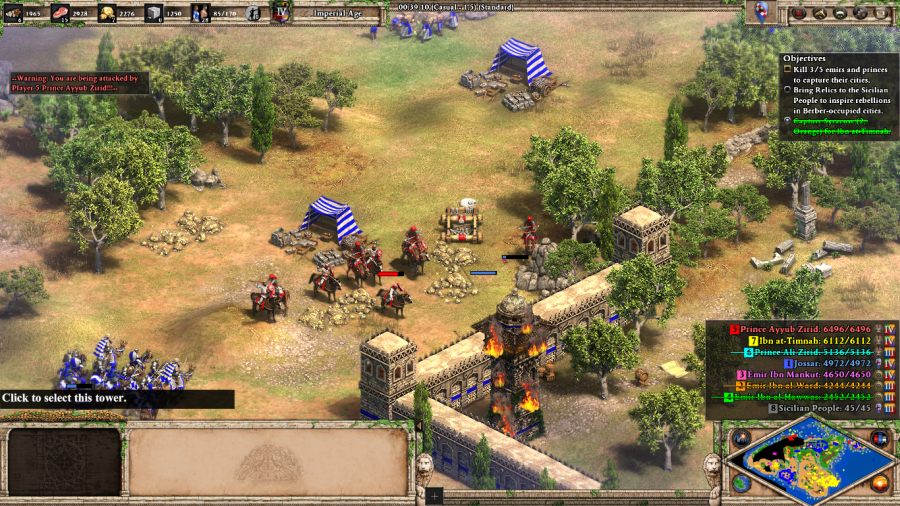 Of the remaining two enemies, Prince Ayyub Zirid is the biggest threat, even managing to get off the occasional raid on my base via land and sea. 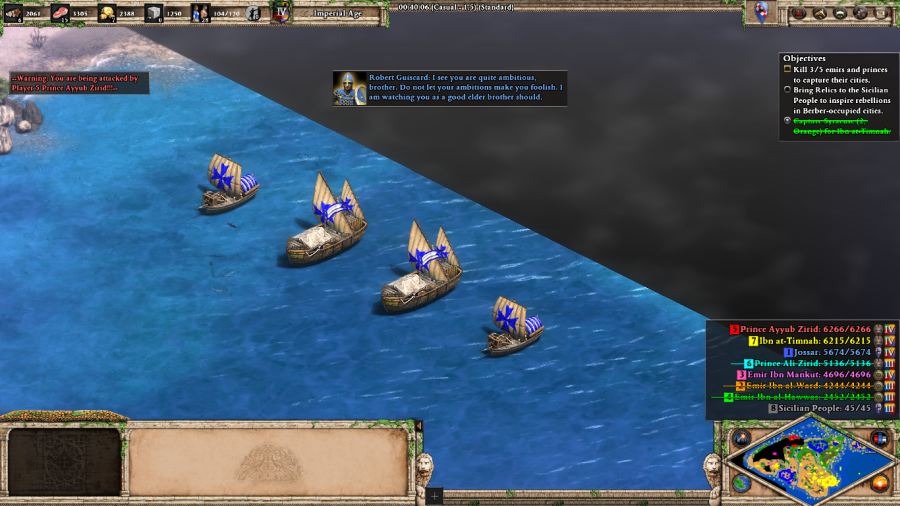 Robert Guiscard: I see you are quite ambitious, brother. Do not let your ambitions make you foolish. I am watching you, as a good elder brother should. (after a few seconds) I will return to Italy, brother. Soon I will call on you to watch over my lands while I march on Constantinople with Bohemond. Finish Sicily quickly! At 40 minutes, you get another batch of reinforcements and exposition from Robert. Unfortunately, these guys didn't make it to shore because they got caught by some of the aforementioned Prince Ayyub sea raiders. 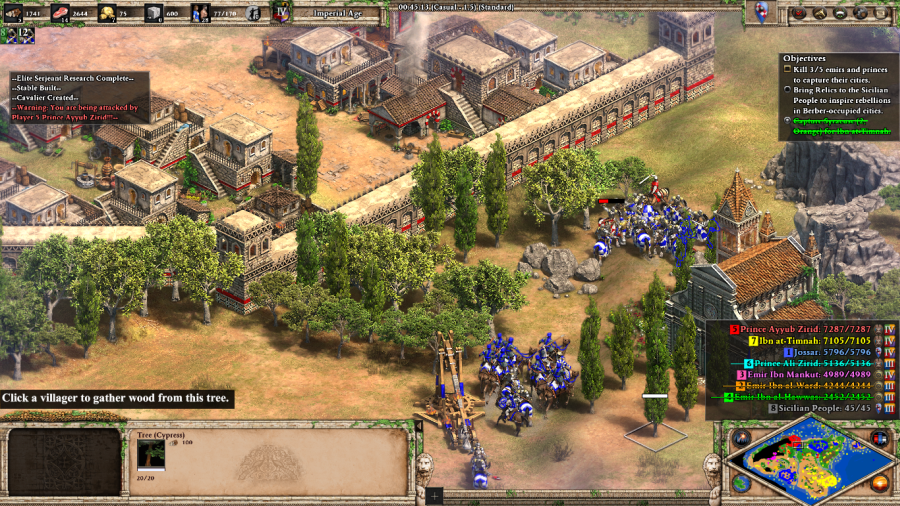 Roger: Three faiths: Catholic, Orthodox, and Muslim inhabit this island, but those in the west have been subjugated by the Berbers. If I show my tolerance of these faiths, the people will rebel against the two Berber princes (after dropping off a Relic in a Sicilian Monastery) Rise, Sicilians of Palermo! Repulse the Berbers! I have come to restore Sicily! 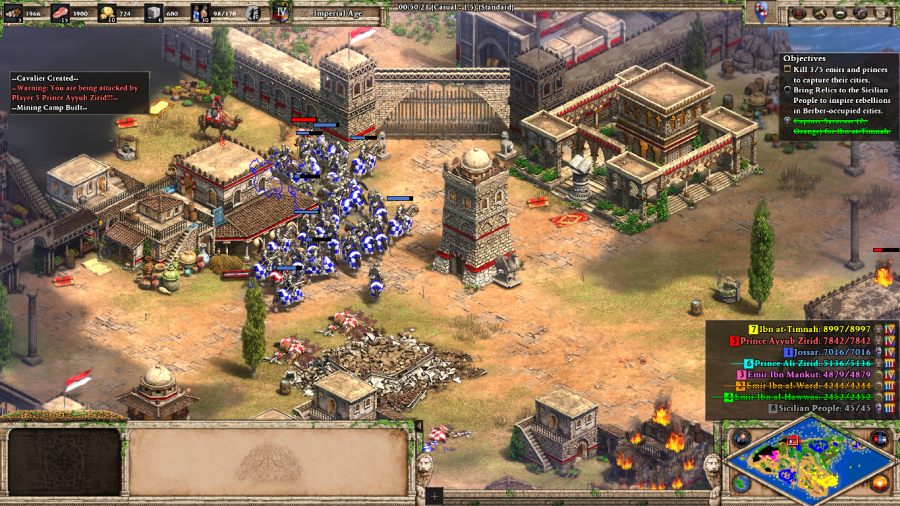 There's a side-quest where if you drop off a Relic in a neutral Monastery outside Prince Ayyub or Prince Ali's bases, the populace will rise up in revolt against them. Doing so for at least one of the enemy factions gets you an achievement, but the actual revolts tend to be kind of lackluster. In any event, I take the opportunity to start a siege on Prince Ayyub's base. Once the walls are broken through, it turns out that Prince Ayyub Zirid himself is just standing outside the walls of his Castle and is easily rushed down. 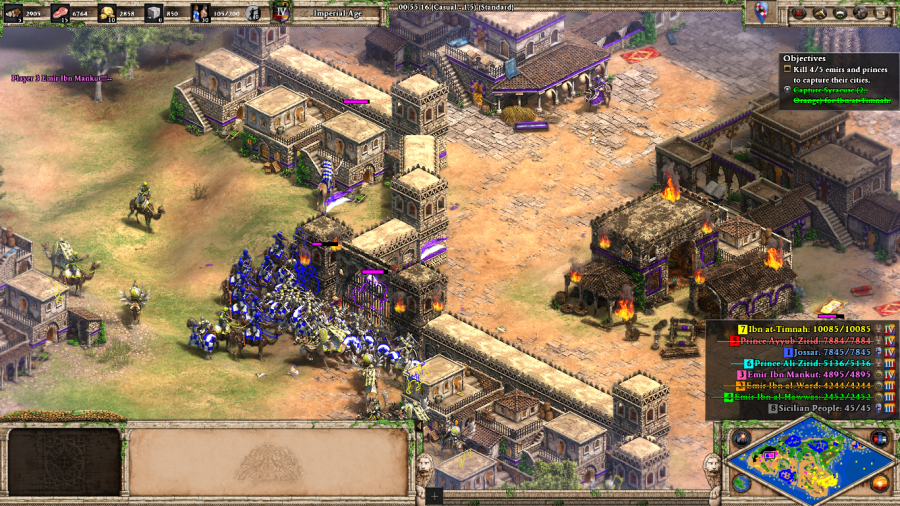 With all of the other enemy factions defeated, Emir Ibn Mankut doesn't put up that much of a fight, and I don't even have to finish breaking down the Gates of his city before he rushes to throw himself to his inevitable death. Roger: The people of this island - Christian and Muslim - suffered for too long under feuding emirs. God willing, I will build a new order here where Norman, Greek, and Arab live together in peace. Mission 2 Ending Text "'Sicily was a land fitting for a man like Roger: daring and ambitious, but also patient, chivalric, tolerant, and, above all, motivated by love. He married his beloved Judith and settled in a Sicilian court.' 'Roger Bosso - the Great Count, as your great grandfather would come to be known - was more than a conqueror. Adopting the ways of the island, he fashioned a new eclecticism that gave Sicily its unique character and strength.' 'I do not know these words,' the boy king said sadly. 'Forgive me, my king. What it means...is that the warm Mediterranean breezes, the cool marble colonnades, the bubbly fountains splashing among the lemon trees...these are marked on your soul.' 'You are shaped by this land where Catholic church bells and the Orthodox liturgy mingle seamlessly with the Islamic call to prayer. It is a heritage unlike any other, all thanks to your great grandfather.' The boy nodded. I did not think he could yet fathom just how unique his kingdom was..." I like the concept of this mission, and it's definitely full of character on the story side. But mechanically, it just can't escape the fact that even by AoEII standards the AI is completely brainless. Even setting the Emirs to have movespeed 0 and leaving them in their Castle courtyards would have been a better design decision. Extra Slides Mission 2 - Intro Slide 1 Mission 2 - Intro Slide 2 Mission 2 - Intro Slide 3 Mission 2 - Intro Slide 4 Mission 2 - Intro Slide 5 Mission 2 - Intro Slide 6 Mission 2 - End Slide 1 Mission 2 - End Slide 2 Mission 2 - End Slide 3 Mission 2 - End Slide 4 Mission 2 - End Slide 5 Mission 2 - End Slide 6 Jossar fucked around with this message at 15:29 on Apr 27, 2024 |
|
#
?
Apr 27, 2024 15:21
|
|
|
The Hautevilles - Part 3: Bohemond and the Emperor Age of Empires II: Definitive Edition - I Will Beat On Your Behind Mission 3 Starting Text "'What did my great grandfather do next?' asked the boy king. 'I know you want to hear more of Count Roger, my young king, but there are many lessons to learn from the other Hautevilles.' 'While your great grandfather was uniting Sicily, Robert Guiscard looked east to a Byzantine Empire reeling from its crushing defeat at Manzikert. He arranged for an Orthodox monk to claim that he was a deposed emperor in need of Guiscard's support.' 'Guiscard recognized, however, that he could not devote his full attention to such a campaign. The ceaseless feuds between Pope and Holy Roman Emperor would inevitably draw him back to Italy. He therefore assigned the command of the expedition to his eldest son, Bohemond.' 'Twenty years before, when Bohemond had been a boy, Guiscard discarded Bohemond's mother to marry a local Lombard princess for a momentary advantage. The first marriage to Bohemond's mother was ruled invalid by a compliant Pope, reducing Bohemond to a bastard.' 'By tradition, nothing of Guiscard's would pass to Bohemond, but this obstacle only hardened the warrior prince. He had all of the individual heroism, tactical brilliance, and religious conviction to inspire men to follow him to the ends of the earth and challenge even an emperor.' 'What Bohemond had not accounted for, however, was the power of a woman.'" 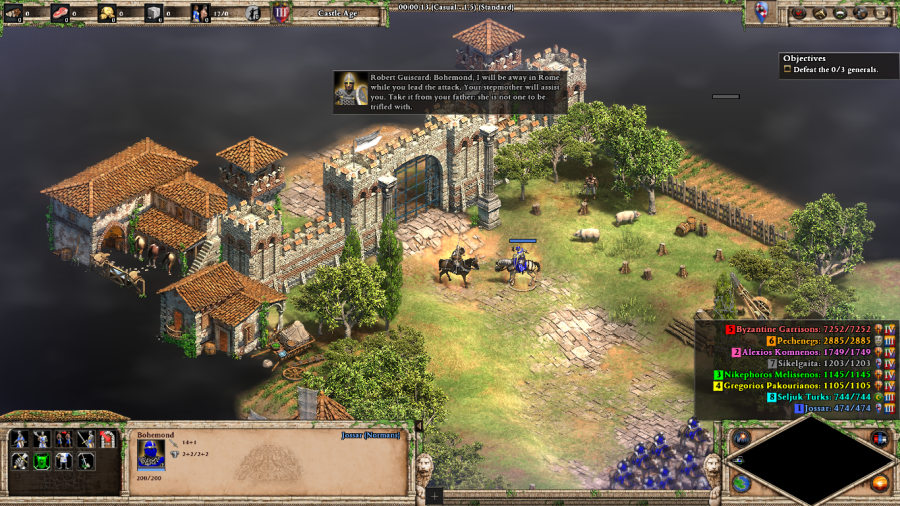 Robert Guiscard: Bohemond, I will be away in Rome while you lead the attack. Your stepmother will assist you. Take it from your father: she is not one to be trifled with. Sikelgaita: Oh Bohemond? Let me be clear: my son will succeed his father, not some half-wrought bastard such as you. I will keep the wealth of Apulia for my son so he can conquer the East after you inevitably fail. 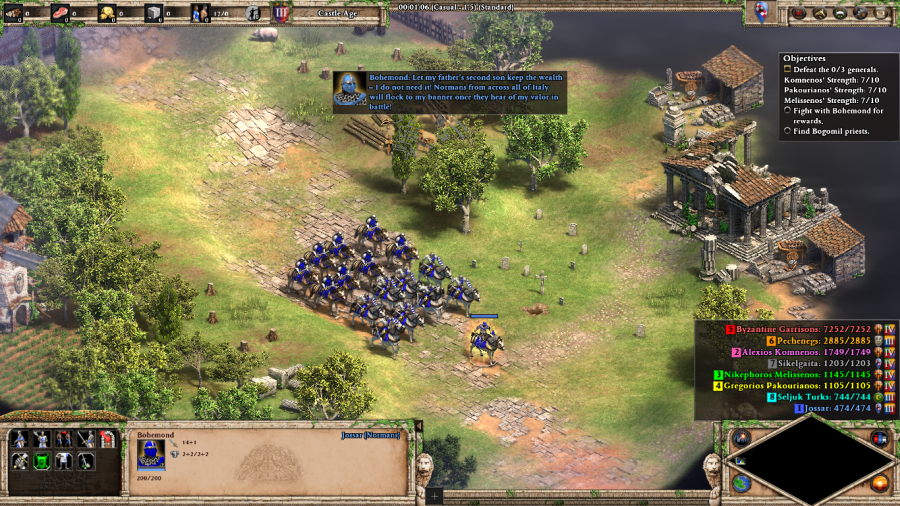 Bohemond: Let my father's second son keep the wealth - I do not need it! Normans from across all of Italy will flock to my banner once they hear of my valor in battle! 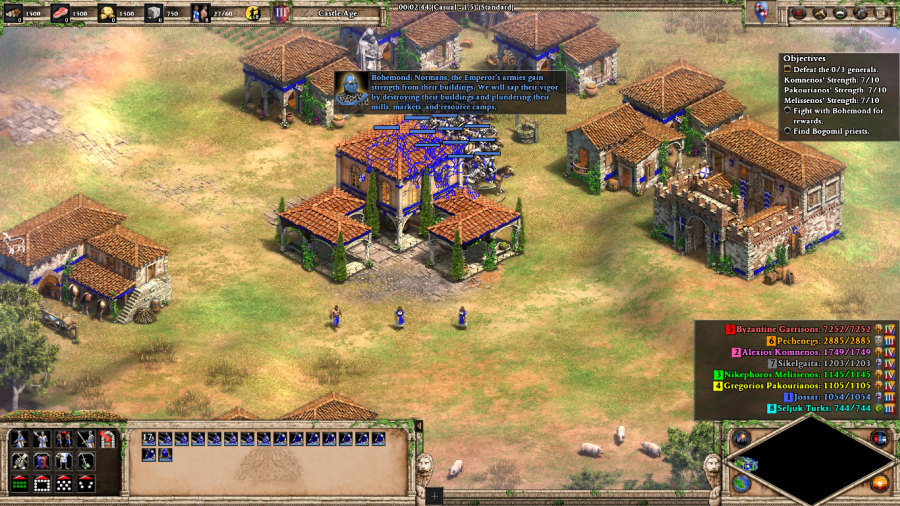 Bohemond: Normans, the Emperor's armies gain strength from their buildings. We will sap their vigor by destroying their buildings and plundering their mills, markets, and resource camps. (after a few seconds) But be warned: their armies will pursue us across every mile of their country. We will hit them hard and fast, and escape to raid elsewhere before they bring their full strength to bear. Bohemond's done a good high level overview, but let's give it a few more details: there are three wandering Byzantine armies that need to be destroyed in order to complete the mission. But the troops of the various armies have innate regeneration that makes it impossible to defeat them, as measured by the Strength counters to the right of the screen (starting at 7 on Standard, going up to 10 on Hard). Destroying each faction's military buildings lowers that faction's Strength value, lowering the HP regen and making it easier to defeat the army. Getting it to 0 is optimal, though as I'll demonstrate, in practice you can win by sheer force of numbers/micro once you get Strength values down to around 3-4. Destroying enemy resource buildings does not directly help with this process, but provides you with additional resources. Fighting with Bohemond himself can get you additional troops, but as with most of these missions I don't get the hero bonus to activate all that often, if ever. The game is nice enough to ensure that Bohemond respawns back west if he dies so that you always have access to the mechanic though. Sikelgaita: Oh Bohemond? I thought you said that you would be heroic and have thousands of knights flocking to you? All I see is a coward who hangs back and does not fight himself. I suppose your mother's weak blood is to blame... And yes, Sikelgaita will constantly taunt you for the rest of the mission. There's nothing you can do about it, but at least she won't actively assist your enemies. 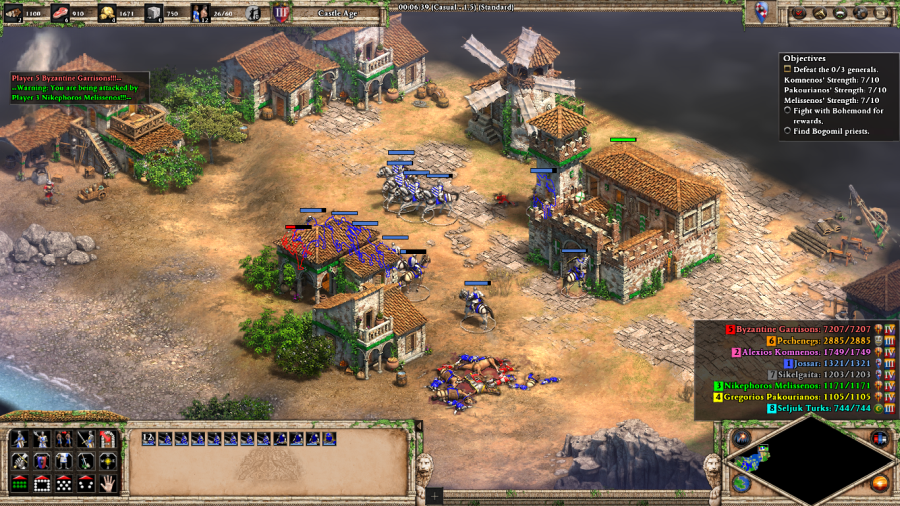 Alexios Komnenos: Who are you? I thought I would be fighting the great Robert Guiscard, but instead he sends some bastard knight. The fox must be scared of the Roman eagle! (after a few seconds) Run, Normans! You are too few to challenge the Roman Empire! 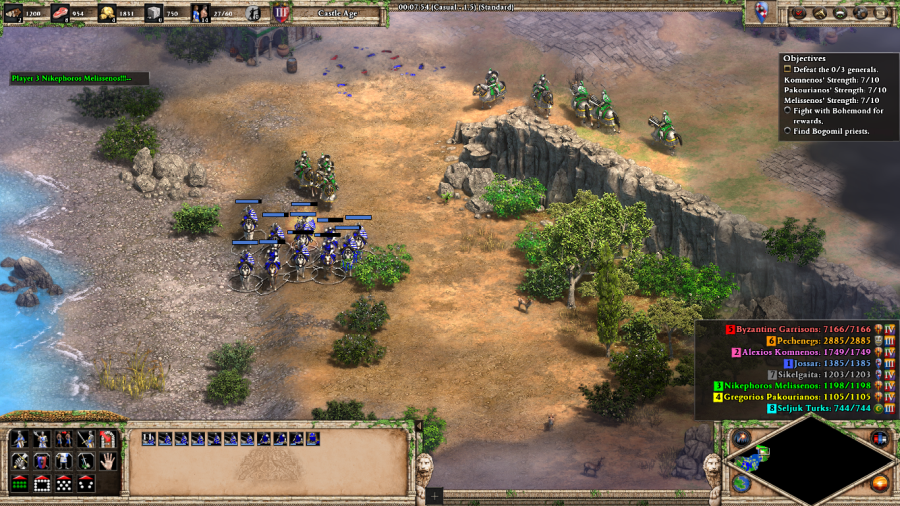 Alexios Komnenos: Such cowardly Normans! Stand and fight me! The Byzantines are pretty passive in this scenario: each big town has a small garrison and attacking the town itself immediately draws the attention of the local army. This is, by design, pretty easily exploitable. I do have a bit too few troops to take advantage of this right now though, so time to run back out and boom for a bit. You never do get too many, being limited to 75 units this map and an inability to build Castles outside of your starting one. 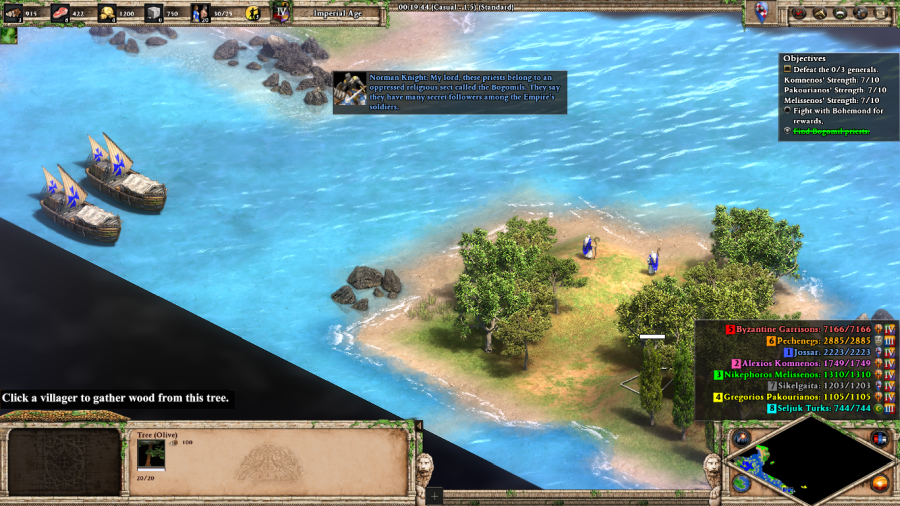 Norman Knight: My lord, these priests belong to an oppressed religious sect called the Bogomils. They say that they have many secret followers among the Empire's soldiers. (after a few seconds) For a small payment of gold at my lord's Castle, these Bogomil spies will report the locations and movements of the enemy armies for a limited time. Meanwhile, I send out my Transports to the surrounding islands. Scattered throughout these islands are a couple of Priests and Relics, with there being more free Priests and Konniks to recruit in the hills of the Byzantine Empire proper. Finding the Bogomils also unlocks the ability to research Spies if you find it necessary. 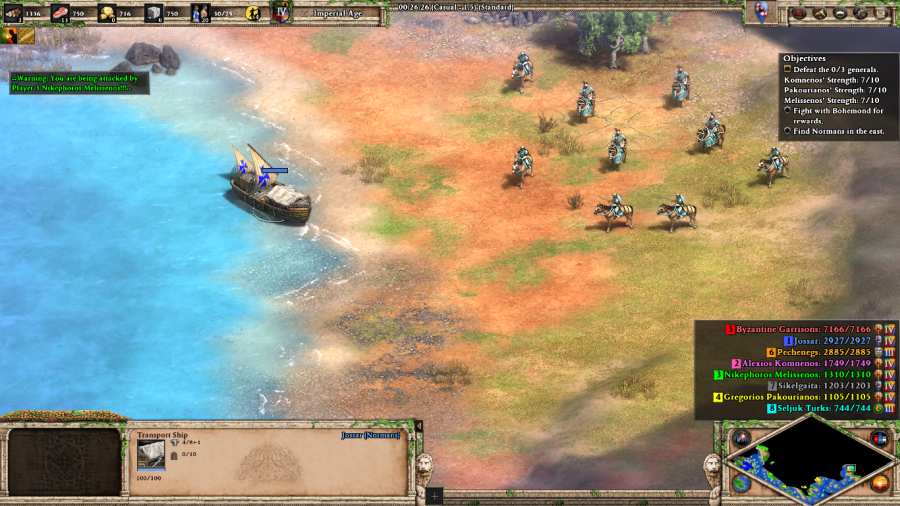 Norman Knight: My lord, a few years ago, the adventurer Roussel de Bailleul, who served with your father and uncle in Sicily, brought a Norman army to the east. They may still survive beyond the Seljuk Turks. Far off in the east of the map, there's a bunch of Seljuk Turks you can defeat in order to get some Paladins. I didn't have enough of a force to beat these guys up early, and by the time I did I no longer needed the bonus troops, but it's a nice way to get an early boost to your army with units that you can't naturally build. 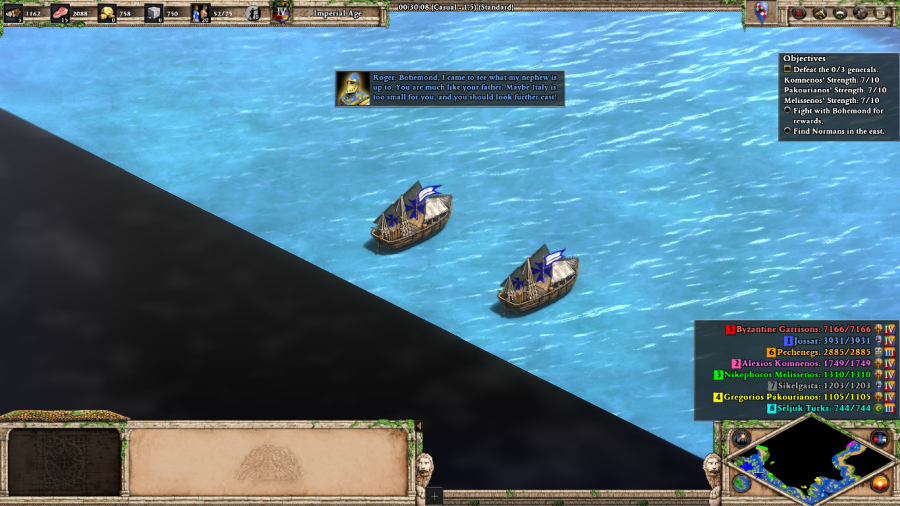 Roger: Bohemond, I came to see what my nephew is up to. You are much like your father. Maybe Italy is too small for you, and you should look further east! (after a few seconds) I will leave with you some knights. Take care of them - I expect them to return to Sicily in one piece with stories of your exploits. 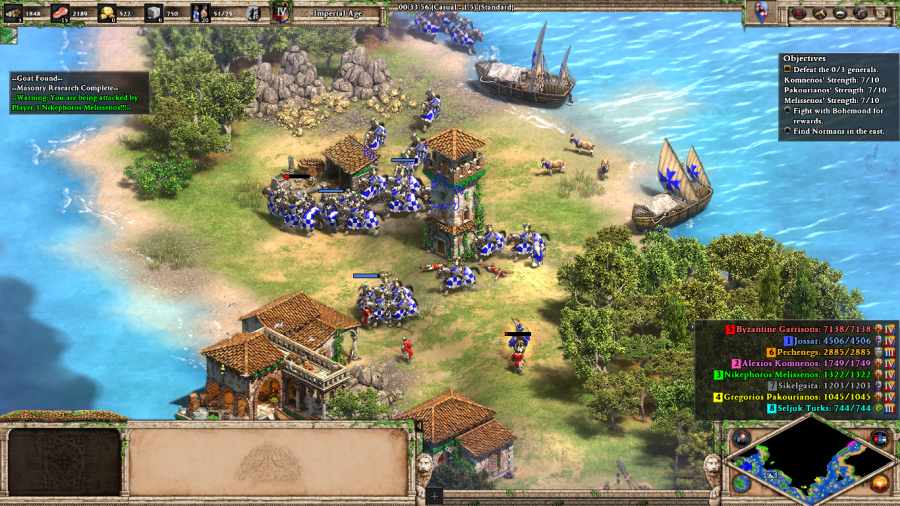 At 30 minutes in, Roger will send two transports full of Cavaliers, which is your encouragement to start getting a move on. After a quick stopover to grab an island full of resources, I send my troops off to the mainland to start the task of whittling down the Byzantines in earnest. 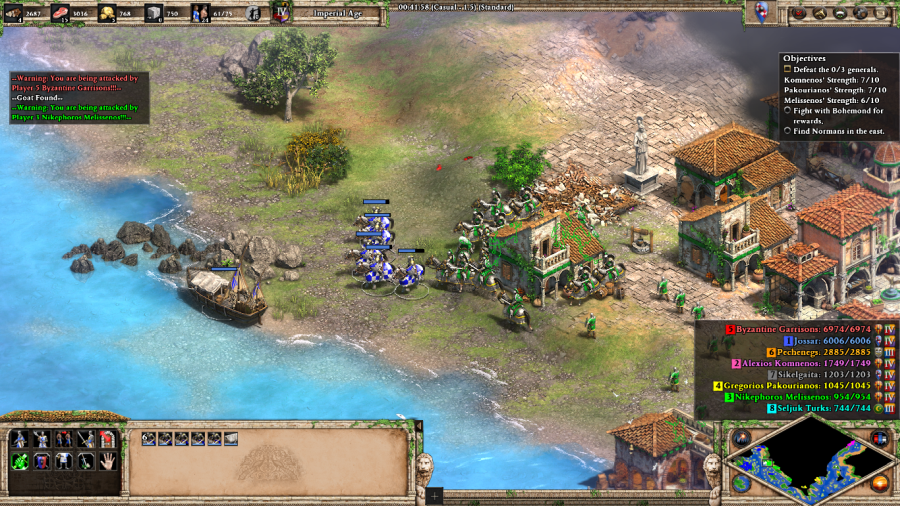 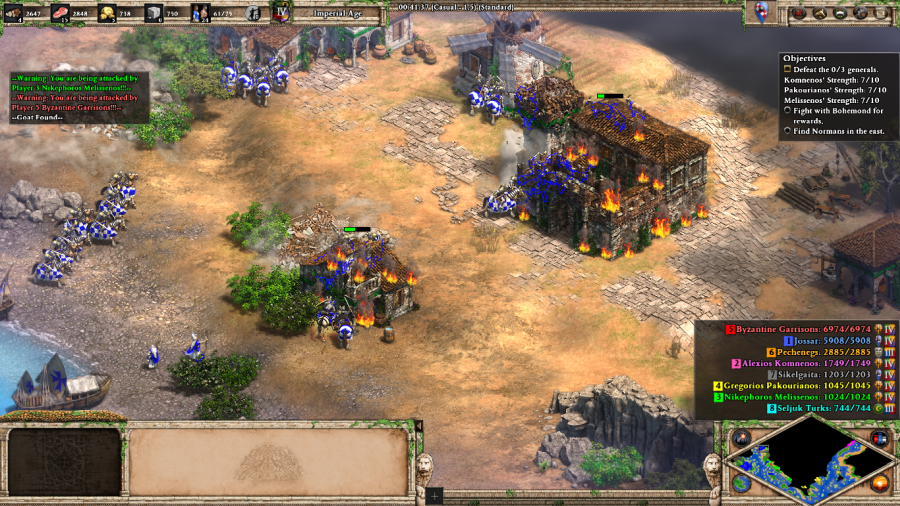 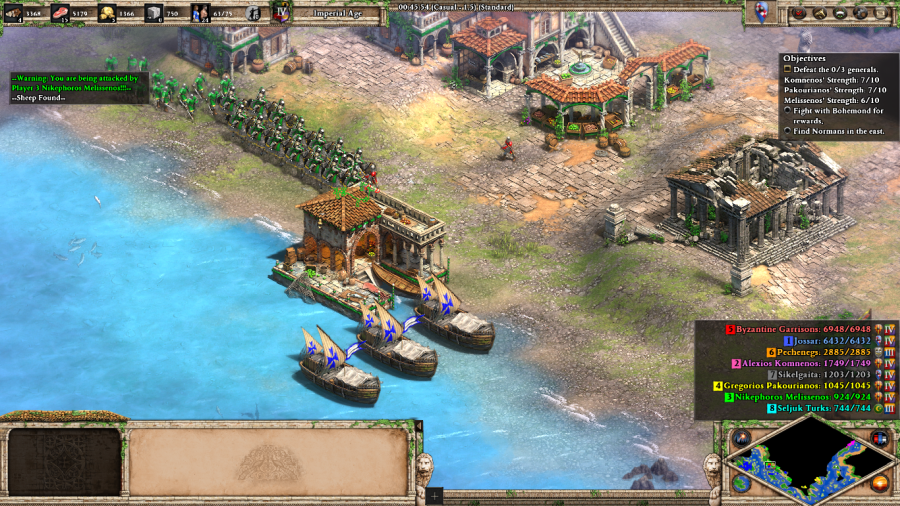 The first two armies follow a similar pattern - distract the locals with a small scout force that they chase across the map, while my main force rides in and wrecks a town. When the enemy army figures out what's going on and pivots, run back to the Transports and then repeat the process. 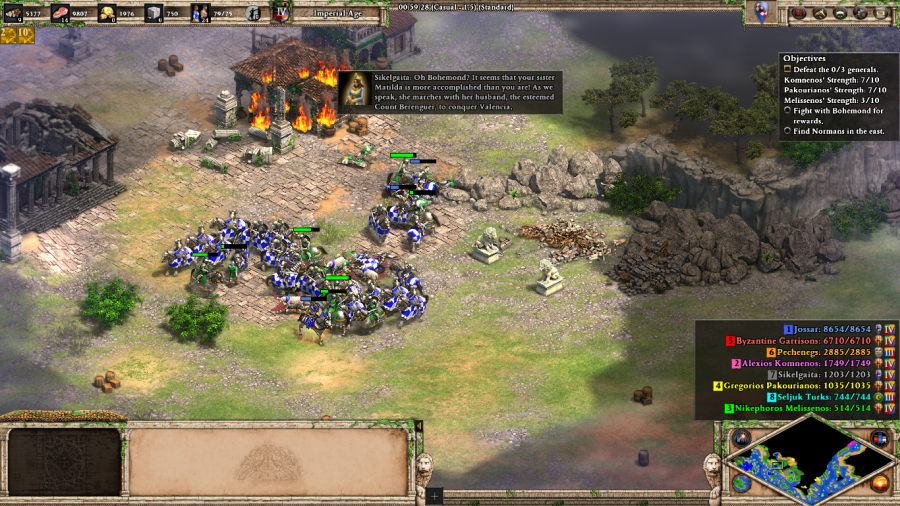 Sikelgaita: Oh Bohemond? It seems that your sister Matilda is more accomplished than you are! As we speak, she marches with her husband, the esteemed Count Berenguer, to conquer Valencia. (after a few seconds) Maybe after you fail, you can find employment there as one of the Count's squires. Probably not. After all, we've already beaten Count Berenguer back in El Cid 5. Anyway, I didn't really want to have the final showdown with Nikephoros' army here, but my troops got stuck in and with sufficient numbers it was better just to see things through to the end. Defeating this army also meant that I now had enough relative security to build a more permanent set of troop producing buildings on Greece, to make reinforcement logistics less complicated. Alexios Komnenos: My legions come from across my empire, Norman. I have other armies! 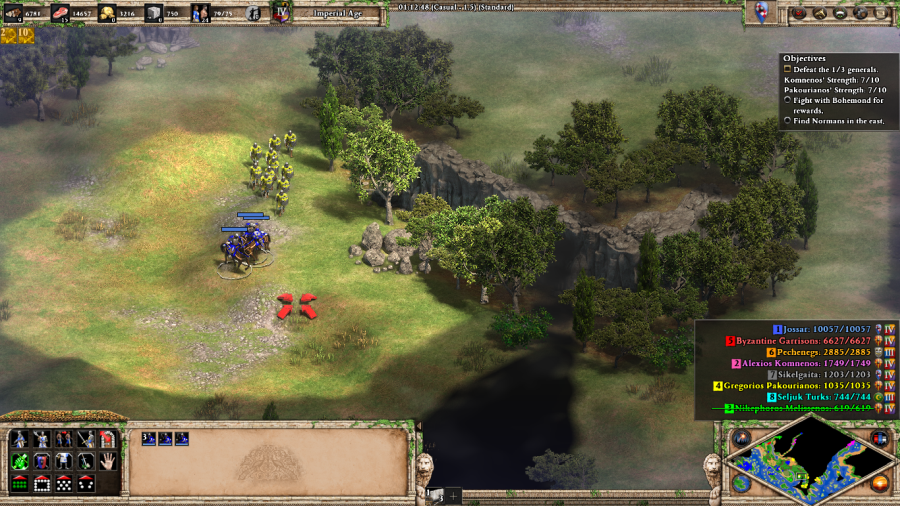 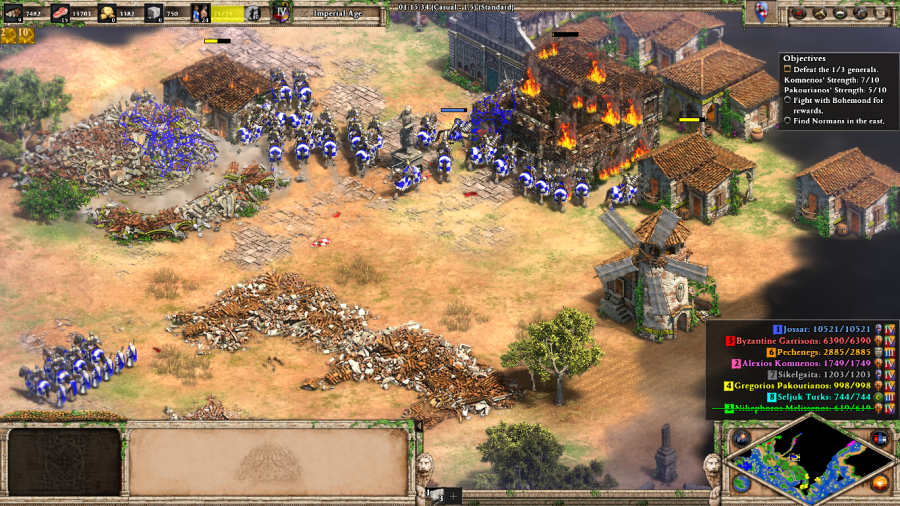 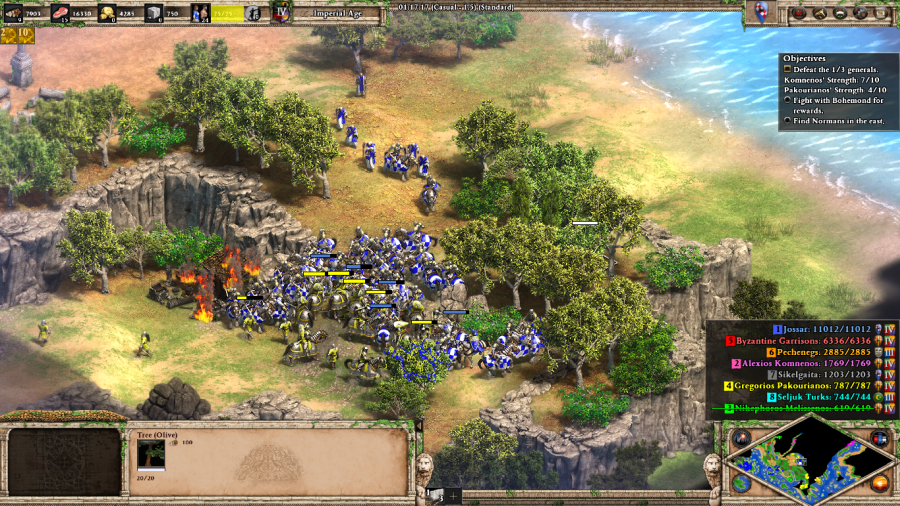 For the second army, lather, rinse, and repeat, using extra recruited Gaia troops where appropriate.  Pecheneg Chieftain: Norman, my hordes are hungry for blood and plunder. Destroy the Greek towers that block our way and I will unleash my hordes against the Byzantines!  Pecheneg Chieftain: The way is clear for us! Ride! Ride and leave no Greek alive! 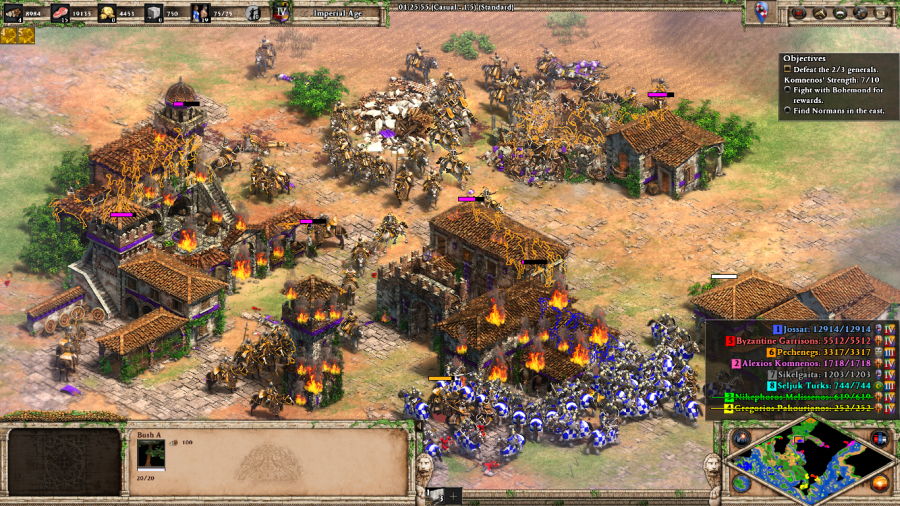 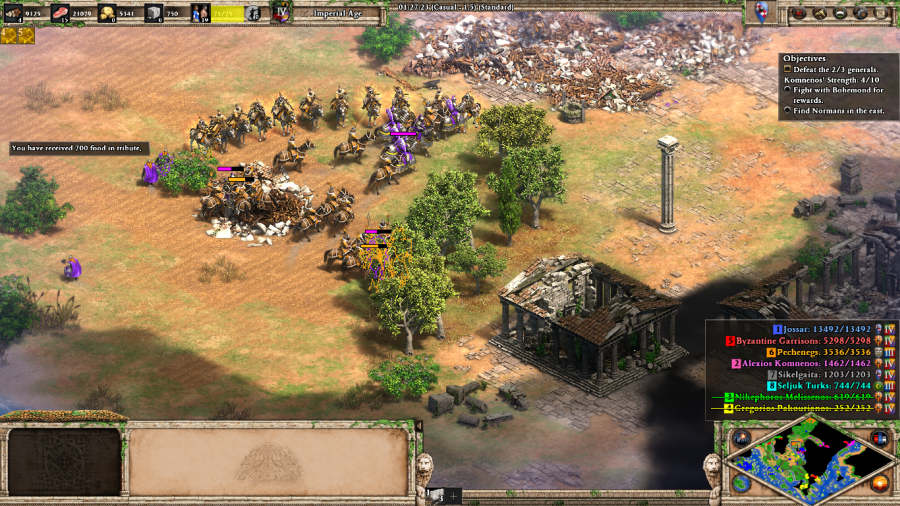 Go far enough north and this Pecheneg Chieftain will offer you a deal: destroy several towers owned by the Byzantine Garrisons and his forces will run rampant against the Byzantines. Do this too early and either you or the Pechenegs are likely to get caught out by a full strength army and annihilated in the process, but time the sabotage just right and distract the relevant army and the Pechenegs can pretty much wreck a Byzantine faction's strength and then the accompanying army all on their own. I had to spend a bunch of time tracking down the last remnants of Alexios' army that got stuck on terrain, but this marks the effective end of the mission. Alexios Komnenos: I am not yet finished, Norman! We will meet again! Sikelgaita: You may have defeated the Greeks, Bohemond, but believe me, I am not finished with you. My son will soon take the throne and you will never set foot in Italy again. Mission 3 Ending Text "'Robert Guiscard died suddenly in 1085 while Bohemond was stricken by illness, or, as some say, poisoned by his step-mother Sikelgaita.' 'Believing that Bohemond might die, the Norman lords had no choice but to elect Sikelgaita's son as duke, a decision further encouraged by Count Roger of Sicily's support for the weaker and more easily influenced son of Robert Guiscard.' 'The seeds of Count Roger's patience were beginning to take root, but Bohemond's story is not yet finished.'" I quite like this mission! A bit more satisfying to play as compared to writing about, but it's the sort of thing that feels like a training scenario on how to do proper raids in multiplayer. Extra Slides Mission 3 - Intro Slide 1 Mission 3 - Intro Slide 2 Mission 3 - Intro Slide 3 Mission 3 - Intro Slide 4 Mission 3 - Intro Slide 5 Mission 3 - Intro Slide 6 Mission 3 - Intro Slide 7 Mission 3 - End Slide 1 Mission 3 - End Slide 2 Mission 3 - End Slide 3 Jossar fucked around with this message at 04:07 on May 1, 2024 |
|
#
?
May 1, 2024 03:59
|
|
|
Ahh, the insufferable taunting of someone who is scared shitless of the idea that you might succeed and make them look stupid.
|
|
#
?
May 1, 2024 04:29
|
|
|
The Hautevilles - Part 4: Bohemond in the East Mission 4 Starting Text "'Bohemond never forgave Count Roger for siding with his younger brother, but other events would draw Bohemond away before he could threaten Norman unity.' 'As bands of knights and foot soldiers passed through Sicily on their way to the Holy Land, Roger arranged for Bohemond to linger amongst them.' 'Lured by the promises of lands and eternal glory on Crusade, Bohemond, too, set out for the east.' 'Bohemond re-traced the path through the Byzantine Empire that he had taken only a few years before while warring against the Emperor Alexios Komnenos. Now, however, he came to Constantinople as an honored guest, kneeling before his old adversary and promising to restore the Empire's territories in the Holy Land.' 'Bohemond, of course, shared his father's cunning, and had no intention of following through with such a promise. When the Crusaders besieged the ancient city of Antioch, Bohemond resolved that it should be his.' 'Mustering the cunning of his heritage, Bohemond told the emperor's men that the other Crusaders planned to assassinate them, causing them to return home.' 'He then bribed a local garrison commander to open Antioch's gates, but only after he had secured the sworn promises of the other Crusader princes that the first among them to enter the city would rule it.' 'Unfortunately for Bohemond and the Crusaders, a great Turkish army was on its way. Already worn down by eight long months of siege, Bohemond would need every ounce of his courage and his skill to survive.'"  Bohemond: Stay close to the walls, men! The Turks are trying to lure us out to be shot full of arrows! (after a few seconds) Never chase the Turks into the open. We will kill them at the walls. Now arrange the defenders! The Turks will attack again soon. There really isn't that much to say about this mission: It's another "large-scale defense of a city during the Crusades against an enemy horde" variant.  Bohemond: (before an assault) The heathen comes! Show the Turks our resolve! (after defending against an assault) The Turks run! Let them go. We have much to rebuild. After the first assault specifically, you get the following dialogue: Bohemond: Soldiers, we fight and die here while the Byzantine Emperor dawdles! Never forget this Byzantine treachery!  Norman Knight: My lord, we are running low on resources. Perhaps my lord can assault the enemy citadel. The garrison there guards the rich hills behind the city! (after conquering the citadel) My lord, we have access to the rich hills behind Antioch! We should send the villagers there at once! Just after the first assault, you'll get a suggestion to attack this passive enemy citadel that refused to surrender when the rest of the city did. This is about the right time to pull it off. Unless you have very good micro, it'll be too much of a distraction/draw on soldiers during the assault, but doing so now gets you several thousand resources and access to mineral piles to finish fully upgrading your army in time for the more difficult assaults. Did I say assaults? Norman Knight: My lord, the Emperor Alexios Komenos has retired with his armies back to Constantinople. They believe us already dead! Bohemond: He knows we are alive and he knows I command the city. He is a spiteful coward leaving us to die in the sand! So yeah, the Byzantine Emperor isn't coming to save the day, big surprise. This adds an additional assault to the counter, leaving two more to go.    Norman Knight: A peasant claims that the Holy Lance that pierced Christ is buried in this city. I am skeptical, my lord, but the priests say we should have Faith in this vision. (after a few seconds) At the very least, it will inspire the soldiers to fight harder, if only for a short while. My lord should be tactical in choosing when to reveal this Holy Lance.  Just before the second assault hits, you're given the option to research Faith, which if done will give your troops a sizable bonus to their stats for ten minutes. My recommendation is to either save it for the final assault, or if you're feeling gutsy, to use it as support for an alpha strike on the enemy general as an alternate way of winning the scenario. The second assault is a bit tense, but passes without much incident.   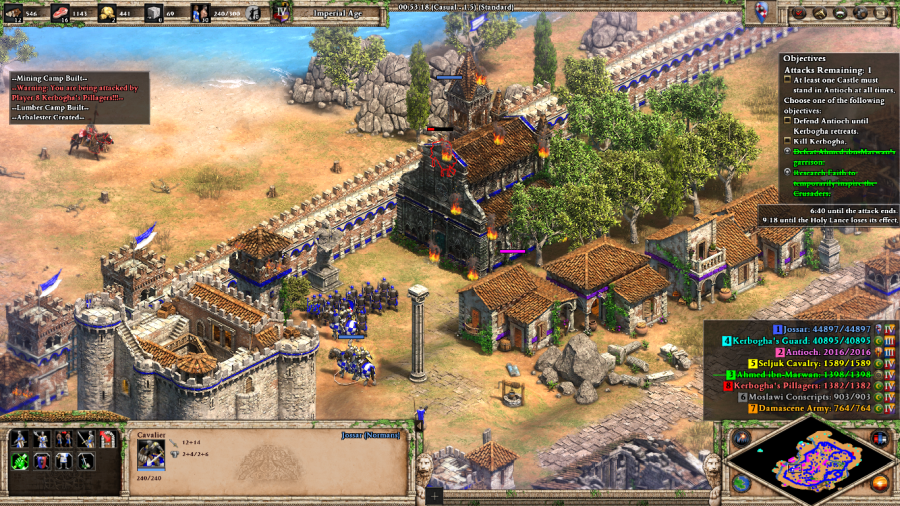 Norman Knight: (upon activation of the Lance) My lord, the Holy Lance has been revealed to the soldiers! They are inspired! The third assault is appropriately nasty, especially in the last three minutes or so, but with the Holy Lance buff popped, there isn't that much that the Turkish armies can do.   In fact, some of my Serjeant squads are so deeply inspired that they start running off and destroying random Turkish camps all by themselves. This is all that's out here, btw. With the exception of a couple extra Castles scattered around the map, it's just Tents, Fortified Towers, and Cavalry Archers for miles.  Bohemond: (at three minutes remaining on the third assault) The Turks waver! Hold on a little longer! (after repelling the third assault) The Turks run! They finally run! On to Jerusalem! You start the scenario with six heroes. If they're all alive by the end, likely because you shoved them in a Castle in the middle of Antioch and never looked back, you get an achievement. Mission 4 Ending Text "'While Bohemond did not inherit his father's lands, he did inherit his attributes and these won him a princedom.' 'But Bohemond was not done after conquering Antioch. He sought every opportunity to conquer new lands, but his fearless aggression led to him being ambushed and captured by the Turks.' 'His old enemy, the emperor Alexios Komnenos, even offered to pay Bohemond's ransom if the Norman prince was brought to Constantinople in chains. Once again, Bohemond bested his old enemy, tricking his Turkish captors into releasing him for a smaller ransom.' 'Years later, Bohemond again fought against the emperor, but was surrounded by the emperor's armies. He agreed to become a vassal of Emperor Alexios, but Bohemond's cunning had one last triumph.' 'So that the treaty binding Bohemond to the emperor would not include Antioch, Bohemond never again set foot in the city. He died in Sicily, leaving his son to succeed him in his hard-won eastern princedom.'" Specific to this scenario, I like the siege within the siege, but I dislike that all the various enemy factions that you have to defend against are perfectly coordinated in assaulting the city as a single unit, even if certain factions have different troops and a different assigned section of the wall to attack. Wish this worked a bit more like Saladin 6, with the enemy factions feeling like different armies that could be delayed or defeated. The game even mentions that they're supposed to represent several different squabbling warlords all bundled together under Kerbogha's command! Extra Slides Mission 4 - Intro Slide 1 Mission 4 - Intro Slide 2 Mission 4 - Intro Slide 3 Mission 4 - Intro Slide 4 Mission 4 - Intro Slide 5 Mission 4 - Intro Slide 6 Mission 4 - Intro Slide 7 Mission 4 - Intro Slide 8 Mission 4 - End Slide 1 Mission 4 - End Slide 2 Mission 4 - End Slide 3 Mission 4 - End Slide 4 Mission 4 - End Slide 5 Jossar fucked around with this message at 17:55 on May 5, 2024 |
|
#
?
May 5, 2024 17:45
|
|
|
This "Normans in Sicily and Italy" is something I had never learned about. I had no idea that around the same time as the Norman invasion of Britain there were Normans establishing a major Mediterranean presence.
|
|
#
?
May 9, 2024 15:45
|
|


|
The Hautevilles - Part 5: Wonder of the World Mission 5 Starting Text "'Our story is coming nearly to an end, my young king, but I have not yet even told you of your grandfather, he who first wore the crown that now rests upon your head.' 'It is a story that should sound familiar to you. Your grandfather's father, the great Count Roger, died when Roger II was only a young boy. Like you, he was raised by his mother in a cosmopolitan court, among Greek and Muslim tutors.' 'While such an upbringing meant that the young Roger lacked the martial confidence of his forebears, he instead gained skills for diplomacy and statecraft that would prove far more valuable.' 'At that time, Norman Italy was divided into two lordships: Apulia, ruled by Robert Guiscard's grandson; and Sicily, ruled by Roger. When his cousin in Apulia died childless in 1127, Roger claimed all Hauteville lands in Italy, forming the united Kingdom of Sicily.' 'But this growing power - and Roger's tolerance for people of all faiths - raised the suspicions of the Pope. Railing against the "half-heathen prince," the pope called a Crusade.' 'Roger's Norman vassals, led by his own brother-in-law, rose in rebellion, while a mighty German army headed by the Holy Roman Emperor himself marched down the length of Italy.' 'But Roger had grander ambitions than fighting Norman and German princes. He had a kingdom to build.'"  Emperor Lothair: Look at this 'baptized sultan' - too busy playing 'dress up' as a Saracen prince to come and fight a real man!  Robert of Selby: Your Majesty, we have pulled our forces from most of Italy, as you commanded. The peasants will surrender to the invaders and their lives will be spared. Shall we retreat to the island or hold our position in Calabria? This scenario offers two ways to play it. The first is as a wide-ranging brawl where you deal with a series of shifting alliances as you struggle to maintain your possessions throughout southern Italy and contain catastrophe while subjugating individual enemies and adding their strength to your own. The second is making the judgment call that this is all way too much to handle and accepting that nearly everyone on the map is going to be your enemy, retreating to Sicily proper to turn it into a fortified deathtrap and defend a Wonder for 400 years.    al-Idrisi: This wonder is more than a building, sayyid: it is the future! Men and women will look upon its walls and remember that here was where people of all faiths and cultures stood together in peace. No matter which playstyle you're committing to, you'd better make a decision on it quick, as after 10 minutes you'll start getting raided in Apulia via land and sea by everyone on the map, but especially the rival band of Normans lead by Ranulf Drengot. In my case, I chose to retreat to the island of Sicily and focus on defending the Wonder like I usually do.    Sicily isn't "safe" per se, as it will repeatedly be attacked by all of the enemy factions (the Italian Cities, Saracen Pirates, Ranulf Drengot, the Germans - who swap between the Emperor and a vassal of his halfway through the scenario as the Emperor gets bored and leaves, and the Byzantines if you don't bribe them with 500 > 1000 > 1500 gold). But as long as you build a bunch of Castles and send out the occasional Fire Ship to destroy Cannon Galleons, none of these pose a real threat to the core area where the Wonder is to be constructed and you can pretty much turtle until the mission ends. Mission 5 Ending Text "'Poets, scientists, and artists came to Sicily from both the Islamic and Christian worlds, welcomed with admiration and tolerance. The long gestating seeds of Count Roger's patience, planted in this most fertile soil, had finally awoken and flowered under King Roger and this bright kingdom under the sun.' 'As for the Holy Roman Emperor, he died in the mountains on his way back to Germany. His throne stood empty for many years, though his grandson, styling himself Henry the Lion, would lay claim to it.' 'Ultimately, it was your German grandfather who finally restored the Holy Roman Empire and united Germany and Italy.' 'You see, my dear Frederick Roger, in your name, you carry the legacies of both of your grandfathers. One, whom your German tutors adore, was, of course, the great Frederick Barbarossa.' 'But the other - half-Norman, half-Italian, but fully Sicilian - was most like you.' 'And that, my young king, is the story of how your family built the kingdom that you now rule.' The young king watched me for a moment. He stood up, thanked me for the lecture, and walked away. About halfway through the garden, he stopped and stood silent for a while, and then asked thoughtfully: 'Do you think...that I will be their equal? A new Guiscard, or Roger Bosso, or King Roger?' 'My king," I said, "in time, you will outshine them all.'" This is another one of those missions where there's a lot of interesting things going on under the hood... but the most practical way to win the scenario is ignore all of that and defend a Wonder for 400 years. Here's the twists and turns of the more active variant of this mission:
I was kind of relying on Hautevilles to pick things up for Lords of the West, but given my mixed feelings on the campaign, I'm left with mixed feelings about the expansion pack on the whole. Decent stories, but only average gameplay most of the time. Extra Slides Mission 5 - Intro Slide 1 Mission 5 - Intro Slide 2 Mission 5 - Intro Slide 3 Mission 5 - Intro Slide 4 Mission 5 - Intro Slide 5 Mission 5 - Intro Slide 6 Mission 5 - Intro Slide 7 Mission 5 - End Slide 1 Mission 5 - End Slide 2 Mission 5 - End Slide 3 Mission 5 - End Slide 4 Mission 5 - End Slide 5 Mission 5 - End Slide 6 Mission 5 - End Slide 7 Mission 5 - End Slide 8 Mission 5 - End Slide 9 Jossar fucked around with this message at 15:47 on May 18, 2024 |
|
#
?
May 18, 2024 15:36
|
|
|
Algirdas and Kestutis - Part 1: Family Affairs Age of Empires II: Definitive Edition - Lithuanians Theme Very well, then let us begin, the tale of the brothers in arms and crowns.  Off to Eastern Europe for the campaigns of Dawn of the Dukes.   Mission 1 Starting Text "You want to know how I ended up here, foreigner? You dare to ask such a question, as if we were equals? Very well. I will tell you the story, my companion in misfortune. If there is one thing of which we are not deprived in this bloody dungeon, it is time. I aimed for the throne � yet I ended up in this dark, moldy prison cell. Beyond these bars lies the land of my fathers: Lithuania. Its swamps, deep forests, and raging rivers are not exactly the heart of civilization , if you ask our enemies � which makes it all the more astonishing that they have tried, time and again, to subjugate it. It began when some... "chosen ones" felt called on to bring the light to Lithuania. They named themselves the Teutonic Order, and, under the banner of the cross, they promised deliverance � yet they brought only death and perdition. Lithuania is not easily cowed. Our ancestors learned how to fight by battling the forces of nature and the beasts of the dark, primeval forests. Every one of our soldiers is steeped in that same tradition. But the more that we resisted the crusaders and their god, the more ruthless they became. Slowly, we began to see their true faces. They called themselves holy warriors, but they were nothing more than robber knights � and a hundred years of pillaging our lands had made them masters of their trade. They razed our strongholds and torched our villages. Had Grand Duke Gediminas still been alive, he would have put this mob of greedy crusaders in its place � but a devious coup ended his life and left the throne to his useless son, Jaunutis. Jaunutis was weak, but worse, he was divisive when the land needed unity. He turned away from our old beliefs and accepted the Christian god. As he failed to control the domestic unrest, the Grand Master of the Teutonic Order saw his chance to subjugate Lithuania for good. However, Jaunutis' brothers � Algirdas and Kestutis � refused to stand idly by as their beloved homeland fell to the cross. They exhorted the disaffected princes to dethrone Jaunutis, who had barricaded himself inside of the Lithuanian capital of Vilnius."  Kestutis: Internal disputes threaten our independence! The Teutonic Knights rattle their swords while our useless brothers underestimate the threat. Let us put an end to this mischief, take the throne, and prove worthy of our father's legacy! Algirdas: This is how we will do it, my brother. Just keep the Order at bay, I will take care of our ineffectual brothers so that they might... understand that the affairs of government should not be in their hands. Jaunutis: Algirdas, Kestutis... rumor has it that you are taking up arms in rebellion? Father gave Vilnius to me, making it clear who he considered his heir. I will warn you this once - raise your hand against me and you shall die! Kestutis: You can not scare us Jaunutis. We have known you from an early age, and you have always been this pompous knee-high boy that you are evidently still today. You are all bark, no bite! For this first scenario of Algirdas and Kestutis, it's a real show of brotherly love. Both in the sense that in playing as Algirdas you're allied with your brother Kestutis, but also because the two of you are fighting against your other brothers Jaunutis and Narimantas, alongside the Teutonic Order. Kestutis keeps the Order occupied well enough, but will never break through them on his own, so all the decisive action in this scenario will have to come from you. After this introductory dialogue, you're given about 10 minutes to boom and get out of the Feudal Age before the enemies wake up. Algirdas himself is another one of those generic Cavalry heroes you so often get for these campaigns, though the game is nice enough to keep spawning him back in, in case you lose him.  Jaunutis: A curse on my envious kin! Is there nobody left with a sense of loyalty and decency? Narimantas: Do not grieve over it, Jaunutis! You can rely on me to teach these two ankle-biters a lesson! I will see to it that they whine like beaten dogs and beg for forgiveness before tomorrow dawns! (after another minute or two) Algirdas! Kestutis! Show yourselves if you are so bold, my defiant brothers! I long for a good fight! The game paints Narimantas as the more dangerous threat of the two Lithuanian enemies, and he is more aggressive with small groups of raiding parties, but Jaunutis is in the Imperial Age and isn't entirely content to sit behind the walls of Vilnius and cower. It's important to get a Castle up at around this area to stop them from running roughshod over the rest of your base, making sure to keep an eye out for especially nasty groups of units or Siege equipment. Kestutis: Religious affairs are dangerous, but they can also be a useful tool. Some of our subjects follow ancient pagan traditions, while others are committed to Christianity. Perhaps we can win both groups over to our cause. Algirdas: (upon construction of a Monastery) With our help, the new faith has prevailed in this village! From now on, its inhabitants will cede a tenth of their harvest to the Church and to us, their vaunted protectors. It's also at this point you're introduced to a side quest: there are six Lithuanian Villages scattered around the map. Build a Monastery in the village and it converts to the Christian Lithuanians' player, giving you a trickle of resources. Build a Shrine (a reskinned Monastery) in the village and it converts to the Pagan Lithuanians' player, periodically training their own troops to help out in the war effort. In my case, all I built was Monasteries as I valued the income trickle over there being a bunch of additional allied faction-controlled troops. Building a religious building in every village gets you an achievement.  Kestutis: Do not worry about the Teutonic Knights. I will assure that they do not cross our borders, but I will need the help of your soldiers to wipe out the Order's outposts, Algirdas.  Algirdas: The Order's raiding parties are on the run! I fear these robber barons will return in the future, but for now we should focus on liberating Lithuania from the rule of our ragged brothers! Kestutis: My soldiers captured construction plans for powerful siege weapons from the crusaders, but nobody in my ranks is skilled enough to understand them. Do you happen to have siege engineers capable of doing so? (after researching Siege Engineers) Excellent! Your engineers deciphered the plans that we had captured. We can now construct powerful trebuchets! Once Jaunutis and Narimantas are contained, the first order of business is to crush the Teutonic Order, which I do using a combination of Knights, Leiciai (Lithuanians' unique unit, knight variant which costs more food but less gold, has less armor but more attack, has higher speed, and has the ability to ignore armor on non-siege land units), Monks, and Battering Rams. Doing so is important, because it provides access to Siege Engineers, which Lithuanians normally don't get (and certainly not during the Castle Age!), researching which gives you Trebuchets.  Narimantas: I cannot believe it! My fortress - destroyed! My army - smashed! I have no choice but to withdraw after this shameful defeat! Kestutis: There he runs! Narimantas allegedly seeks refuge with the Golden Horde. What a pathetic idea! It will not do him any good. After you get access to Trebuchets, the rest of the game becomes a cakewalk: Normally you're supposed to leave Narimantas for last because he has the nominally stronger army and economy, but here I was able to just destroy everything dangerous from range and then vanquish the place with Knights and Leiciai.  Jaunutis: Men! How could Algirdas' soldiers make it into the city?! Keep this rabble-rouser away from me, you useless fools! Keep him away!  Jaunutis: What a dreadful betrayal! Flee, for the throne is lost! drat you, Algirdas and Kestutis! Kestutis: Let him go, Algirdas, he will not come back. I have heard that he seeks refuge in Moscow - may he rot there. We have more important things to take care of. Then repeat the process with Jaunutis in Vilnius. Unlike Narimantas who has to be defeated entirely, the game only requires you to destroy the city's Wonder, at which point you take over the rest of the city for what is intended to be the final battle against Narimantas. In this case, though, doing so just brings the mission to a close. Kestutis: Lithuania is ours! Let us rest and allow our brave men to recover from the fighting. We will meet at the court in Vilnius, my brother, for there is much to discuss. Mission 1 Ending Text "To seize power is one thing; to keep it is something else entirely � only a fool declared himself the victor after winning the first battle of a war. As such, Algirdas and Kestutis � the victorious usurpers � knew that their triumph could turn out to be short-lived. The two of them, however, were a different breed than most rulers of their time. Instead of quarreling as their brothers had done � and as most people expected them to, for who had ever heard of two men sharing power? � Algirdas and Kestutis agreed to rule Lithuania together. It was a remarkable move, and it showed that they cared more about the well-being of their subjects than personal power. This, of course, did not go unnoticed by the Teutonic Grand Master. He knew that he would have to contend with more formidable opponents from now on." The ability to unlock trebuchets in the Castle Age makes the end of this mission a little too easy, but it's overall a nice introductory scenario to the campaign. The bit with the Monasteries and Shrines provides an interesting choice on how to boost your offensive capabilities, and is probably the most unique part of the scenario, apart from the great characterization of the heroes. Extra Slides Mission 1 - Intro Slide 1 Mission 1 - Intro Slide 2 Mission 1 - Intro Slide 3 Mission 1 - Intro Slide 4 Mission 1 - Intro Slide 5 Mission 1 - Intro Slide 6 Mission 1 - Intro Slide 7 Mission 1 - Intro Slide 8 Mission 1 - Intro Slide 9 Mission 1 - End Slide 1 Mission 1 - End Slide 2 Mission 1 - End Slide 3 Mission 1 - End Slide 4 Jossar fucked around with this message at 13:22 on Jun 1, 2024 |
|
#
?
Jun 1, 2024 11:56
|
|
|
Okay, so which of the four brothers is gonna turn out to be our narrator?
|
|
#
?
Jun 1, 2024 17:14
|
|


|
Algirdas and Kestutis - Part 2: No Man's Land Age of Empires II: Definitive Edition - Tazer Mission 2 Starting Text "Come to the East! Do God's work and be rewarded, not only with nebulous concepts of "salvation" and "eternity" � but also with land and plunder! That was the promise of the Teutonic Order, and the reason that they could rely on a steady supply of battle-hungry knights: Christians of low noble birth who were easily tempted to try their luck in Lithuania. It was a scheme as ingenious as it was devious, and far from the holy mission that they spoke of publicly. After the Saracens ousted them from their "Holy Land" and stripped away their Middle Eastern estates, these crusaders now planted their iron heels on our backs to sate their lust for blood and plunder. When Algirdas was forced to deal with the defiant city-states of Ruthenia wreaking havoc on the Lithuanian borderlands, the opportunistic Teutons saw a chance to invade our homeland yet again. Believing that western Lithuania lay open while Algirdas was occupied in the east, they marched into our lands. They were not expecting to face Kestutis, who had stayed behind to hold the heartland; but Kestutis was expecting them and lay in wait, eager to teach these sword-swinging marauders a lesson."  Kestutis: I will once again deal with the haughty crusader bandits who foolishly invade our realm. I leave Ruthenia to you, Algirdas.  Algirdas: Neither the fanatical Order not the battle-hardened Ruthenians can oppose us if remain united and keep our ranks disciplined! Onwards! This scenario begins with your forces split in two. Algirdas to the east has more immediate access to forests, encouraging you to use his camp as the primary woodcutting gather point, leaving Kestutis to focus on farming. Both bases have okay mineral piles, but they're a bit forward towards enemy positions and need to be guarded as well as possible.  Bryansk: We survived the Mongol invasions and patiently endured the Tatar yoke for decades. You Lithuanians do not scare us! It's easier to start by chipping away at the Ruthenians, and Bryansk in particular, who is the weaker of the two. I cut off access to their gold pile relatively early on, which also serves to solve my immediate gold problems.   In response, Kursk tries to raid me and I have to move my forces back to defend against them and switch over to static defenses to hold the gold pile from Bryansk's reprisal assaults.  Teutonic Grand Master: Forward march! Let us give these unruly pagans a good drubbing. These unkempt swamp and forest warriors are no match for us! And in case that wasn't enough, the Teutonic Order starts their raids at the same time on Kestutis' base. These guys are pretty tough and I lose almost all of my initial troops on the western side of the map while repelling them. Those Teutonic Knights especially were no joke.  Tatar Refugee: Stop, soldier! Sheath your sword! We are Tatars, yes, but we come in peace and flee the khan with whom we feuded. Will you give us permission to settle here and escape his wrath? (after accepting) Our eternal gratitude is yours, Lithuanians! We will set up a camp within your realm and fight your enemies. After I finish dealing with all of the initial incursions, this group of Tatar refugees shows up. You can either kill them for their resources or let them settle in exchange for an ally and the ability to produce a bunch of free Elite Kipchaks at your Castles. I spare the Tatars, mostly because 1) resources are about to stop being a problem and 2) I can't afford the diversion in my attention that wiping them out would take. It's cool to see them wander across the map and set up a tiny town, too.  Bryansk: Alas, will our suffering never end? Continuing to resist is futile. We must submit to Algirdas and Kestutis. With a lull in the action, I'm able to build up for a proper siege on Bryansk. Kursk tries to send troops to intervene, but they're too little too late, and I've carved a path of destruction through Bryansk that suits my purposes and can back out to isolate and destroy the Kursk reinforcements. Defeating the Ruthenians doesn't require you to raze their cities to the ground, just destroy all of their Monasteries. Two of the three associated Monasteries are outside the city limits of both factions, but the third is just far enough inside the city that you have to make a proper effort for a knockout blow. Each one of these Monasteries also comes with a Relic, which is great not just for ensuring a solid gold supply, but ensuring that the Lithuanians' civ bonus that grants their Knights and Leiciai extra attack per Relic up to a maximum of 4 can be on full display. Defeating each faction also allies that faction with you, with them providing tribute every so often.  Unfortunately, things are not going so well on the Teutonic side of the map. My forces here are pushed all the way to the back of my western base, and if the Teutonic Order had sent a larger army, my static defenses would have probably crumbled entirely, losing me the base. Fortunately, they held, although it did mean that I was in the odd position of being short on Food until I could get the farms back up and running.  Kursk: Not long ago, a one-eyed khan burned our entire city to the ground. We will not allow such destruction to happen again! Stay away from our lands, Lithuanians!  Kursk: We admit defeat! Will you accept our surrender, Lithuanians? We will serve you now. Kursk puts up more of a fight, with an increased rate of streaming troops to defend the city compared to Bryansk and multiple strategically placed Castles, but by this point all the gold from the Relics has let me snowball beyond their capacity to deal with. That bit in the dialogue referring to a one-eyed khan is a call back to Nogai Khan from the Ivaylo campaign, although it's questionable as to whether you were responsible for the sack of Kursk in Ivaylo 5, or it was beyond the scope of Ivaylo's (ahistorical) involvement entirely.  With the entirety of the Ruthenians subjugated, it's time to turn to the Teutonic Order. If you were building up an army in Kestutis' base they could just march on the Teutonic Order directly, but wheeling around forces from the east involves conquering at least one of these river fortresses to secure a bridge.  Teutonic Grand Master: The Lithuanians dare to launch a counterattack! Send a rider to our brethren of the Livonian Order and request their support against this heathen rabble! Livonian Knight: We have received your message and are on our way. Together we will sweep the Lithuanians off the map like some bothersome flies! Teutonic Grand Master: (after the destruction of a Castle) The Lithuanians have conquered one of our fortresses! Which dark forces have they solicited to achieve this? Starting an attack in earnest on the Teutonic Order results in them sending out a summons to the Livonian Order. Unfortunately for them, the trigger on the Livonians' arrival takes long enough that I manage to destroy a Castle first. Doing so also grants all of the surrounding buildings to you, making your continued offense easier.  Livonian Knight: Attack! Make short work of them! Nobiscum deus! Lithuanian Soldier: The knights of the Livonian Order have arrived in the north! Our scouts say that they have even brought siege weapons! The Livonians arrive with a moderate size army to attack Algirdas' base back in the east. This is a sucker punch that's supposed to make up for the fact that up until this point, the east of the map has generally been easier to defend.  Teutonic Grand Master: Two of our fortresses have fallen to the pagans! They must be favored by the Antichrist himself. We have no choice but to retreat to Prussia... for now! I decide that it's more efficient to just finish off the Teutonic Order first. One more castle crushed and they resign.  Lithuanian Soldier: We have repelled the Livonian assault! The day is ours! But as it turns out, by the time I get by forces back over to my eastern base, the static defenses that I overbuilt to deal with Kursk and Bryansk's raids did most of the work for me. All that's left is to gloriously charge against a single Trebuchet to bring an end to the scenario. Algirdas: What a triumph! The wicked crusaders defeated and Ruthenia is subdued, but our success will not have gone unnoticed. The spies of the Golden Horde are everywhere... Mission 2 Ending Text "The Grand Master of the Order had greatly underestimated the resourceful brothers. It seemed that Algirdas and Kestutis were invincible whenever they joined forces. Exasperated, the Teutonic Order was forced to give up its invasion plans � at least for a time. The war with the Order was a long and bloody affair, but in the end Kestutis repelled the invaders. He was henceforth known as 'the Steadfast' for his stubborn defense and loyalty to his brother. Once Algirdas arrived to help, the brothers even managed to conquer several important Teutonic fortresses. But their quick triumph made steadfast Kestutis careless. During a skirmish, retreating crusaders captured and dragged him to one of the Teutonic border fortresses. Perhaps the crusaders even put chains on him, like those that we wear right now? I like to think that they did... but in any case, Kestutis did not remain a prisoner for long. With the help of a loyal servant, he broke a hole in the three-meter-thick wall of his cell while Algirdas distracted the crusader guards with a feigned attack. In the chaos that ensued, Kestutis left the castle on horseback, dressed as a Teutonic knight." Apart from the Livonian Order invasion awkwardly falling apart at the end, this was a pretty good scenario, balanced at the right level of difficult without being unmanageable. I didn't really organize the two part base all that well, but given that the theme of the campaign requires all in commitment to having Kestutis as an ally or otherwise be part of your forces it works, and players with better micro will find that they can do some very bold things in this scenario. Extra Slides Mission 2 - Intro Slide 1 Mission 2 - Intro Slide 2 Mission 2 - Intro Slide 3 Mission 2 - Intro Slide 4 Mission 2 - End Slide 1 Mission 2 - End Slide 2 Mission 2 - End Slide 3 Mission 2 - End Slide 4 Mission 2 - End Slide 5 Jossar fucked around with this message at 04:19 on Jun 2, 2024 |
|
#
?
Jun 2, 2024 04:09
|
|
|
This is a fun scenario, and the campaign as a whole is great too. Elite Leitis are very good units. Weirdly, when I played it the enemy AIs sent most of their attack waves to the wrong base, so the early game was quite hectic for a 1-sword AoE2 campaign. Once you deal with Kursk and get your relic bonus Leitis army going though, there's really nothing that can stand up to you.
|
|
#
?
Jun 2, 2024 13:33
|
|
|

|
| # ? Jun 5, 2024 10:44 |
|
|
Algirdas and Kestutis - Part 3: The Tatar Yoke Mission 3 Starting Text "With the crusaders licking their wounds, many expected Algirdas and Kestutis to finally clash over who should be the sole ruler of the country. Yet again, their unprecedented loyalty to one another kept the peace, allowing the brothers to focus on expanding their realm. To the southeast of Lithuania lay the city-states of the former Rus'. The Tatar yoke weighed heavily on these once-flourishing cities; one hundred years of exorbitant tributes to the Golden Horde had bled them dry, while the Khans built golden palaces on the banks of the Volga. With the Horde weakened by internal disputes, many of the oppressed cities welcomed the Lithuanians as liberators � but some where not so eager to simply replace one overlord with another. The inhabitants of the newly independent city of Kiev saw the Lithuanians as the greater threat and sought an alliance with their former Tatar masters � a move that Algirdas and Kestutis would not leave unanswered. The Lithuanian army marched south with determination, storming the principalities of Chernigov and Pereslavl in quick succession. The brothers aimed to face the Golden Horde and its allies on the steppe � a bold move, and a tremendous risk that none had dared to take before. Despite their internal squabbles, the battle-hardened Tatar mounted archers were still considered invincible � but Algirdas and Kestutis were determined to prove otherwise."  Algirdas: Kiev is not far away, but its garrison refuses to hand over the city. Stay here in Smolensk, my brother, to secure our advance. I will see to it that the Kievans change their attitude towards us. A brief pause for reflection before the scenario proper: the female Villager fishing on the bridge is an easter egg. Appropriately enough for a campaign regarding the love between two brothers, she is named Michelle in tribute to the deceased sister of a streamer, both of whom were long time fans of the game.   Kestutis: Do not worry about supplies, Algirdas. I will instruct my laborers to procure whatever is necessary to keep the flame of war burning - just keep the Golden Horde's raiders away from us! For this mission, you as Algirdas are on offense, starting off with an army and tasked to take Kiev. Kestutis mostly focuses on building an economy. He'll train enough troops to be not entirely helpless, but you are expected to come to his defense, as Kestutis' defeat marks a fail state for the mission. In return, he'll tribute resources (you can even direct what kind via taunts) and give you some villagers for your own economy/troop building production, which is useful as you cannot build Town Centers.   Golden Horde patrols consisting mostly of Mangudai and Light Cavalry are scattered throughout the map. They're not too difficult on their own, but they're mostly meant to complicate the scenario whenever they show up by giving your enemies extra troops in key defensive positions, and in some rare cases, attacking the home front if provoked.  Algirdas: The residents of Kiev have surrendered, leaving the city in our hands. Time is of the essence. We must strike quickly if we want to defeat the Golden Horde! Golden Horde Rider: So, Kiev fell to the Lithuanians... Algirdas and Kestutis are most unwise to take what rightfully belongs to the Khan... Kiev has a moderate size garrison of mostly Feudal Age units. The only really dangerous aspect here is that they have a relatively large amount of Pikemen who can threaten your Leiciai, so best to deal with those via your starting Crossbows. Defeating the entirety of the garrison transfers the city over to your control.  Bulgar Rider: It is time to go smash some skulls! Swing your flails and give them hell!  Kipchak Rider: Let the carnage begin! The Lithuanians will regret setting foot in our domain!  Tatar Rider: Ride, Keshiks, ride! Anyone foolish enough to venture into our steppes will earn nothing but a bloody death! Your primary opponents for the rest of the mission are the three subordinate hordes, the Bulgar Horde, which produces Knights, Konniks, and Cavalry Archers (but no siege), the Kipchak Horde, which produces Kipchaks, Light Cavalry, and Rams, and most dangerous of all, the Tatar Horde which produces Keshiks, Steppe Lancers, Cavalry Archers, Rams, and Trebuchets. These guys all attack Kiev from different directions and given the generally high amount of siege involved can't entirely be defeated by just shoving a bunch of static defenses up and calling it a day. This is encouraging you to use other aspects of the Lithuanians' army on defense like Skirmishers and spear units, rather than just spamming a ton of Leiciai.  Lithuanian Soldier: Tatar pirates plague the Dnieper River. If we drive away this blight, we could establish a trade route and send our merchant vessels to Smolensk. (after destroying the Golden Horde Docks) We sank all of the pirates' ships and destroyed their hideouts! Our boats can now safely navigate the river. The game gives you a side quest here to destroy 3 Golden Horde Docks in order to reestablish trade with Smolensk. Doing so gives you 1000 Gold and the freedom to send Trade Cogs up the river. Resources aren't at a premium in this mission, so it isn't that important, but it does stop the enemy ships from shooting at you while trying to make crossings over this part of the river, which is useful for the next side quest.  Lithuanian Soldier: Our scouts just discovered that three begs command the Golden Horde's forces. Slaying these commanders will throw their armies into disarray and make the fight much easier for us. (after slaying the Bulgar Horde beg) Qutlugh Beg fell to our blades. The Bulgar wing of the Golden Horde will now be much less of a threat.  Lithuanian Soldier: Demetrius is dead! Without their prince, the Tatar division of the Golden Horde will be a mere shadow of its former self.  Lithuanian Soldier: We have slain Haci Beg, the leader of the Golden Horde's Kipchak forces! Without his guidance, his followers can no longer carry out advanced maneuvers! Killing each of the various hordes' Begs limits them to a smaller selection of their total available roster, making them easier to counter. They're protected by Golden Horde Castles and some Golden Horde troops, but even then it isn't too hard to snipe them with enough Leiciai. Killing each of the Begs before defeating their associated horde unlocks an achievement.    After all that setup, the last 40% of the mission is fairly simple: sweep across the map with your now-full army, bulldozing all of the minor hordes in the process. Golden Horde Rider: How on earth did the Lithuanians overcome our invincible horse archers? Everyone, pull back and retreat to the Crimea! Mission 3 Ending Text "We often call members of the Golden Horde 'Tatars', but in reality the Horde consists of a multitude of Turkic people. Among its ranks are flail-swinging riders from Volga Bulgaria, Cumans from the Kipchak steppe, and Mongols from Siberia. Such a diverse crowd of people and cultures � all united in humiliating defeat at the hands of Algirdas! When the Lithuanian army moved south, crossing the Dnieper into Podolia, the begs of the Golden Horde scrambled to stop them. But it was to no avail. Armed with spears and swords, the Lithuanian soldiers broke the front lines of the Horde. The Tatars could not hold their formations and retreated in disarray, leaving their Khan no choice but to flee to the Crimea. The blood of horses and warriors slain by blade and arrow colored the dry grass of the steppe red. Algirdas' decisive victory established the Grand Duchy of Lithuania as a major power, bringing him both new friends and enemies." This is a scenario which has a bunch of side objectives/twists attached to make it seem more complicated than it is, but the core of it is a pretty standard build and destroy mission while facing counter raids from 3/4 different enemies with varied armies. I think it's pretty well executed, but that's about all I can add to the discussion. Extra Slides Mission 3 - Intro Slide 1 Mission 3 - Intro Slide 2 Mission 3 - Intro Slide 3 Mission 3 - Intro Slide 4 Mission 3 - Intro Slide 5 Mission 3 - Intro Slide 6 Mission 3 - End Slide 1 Mission 3 - End Slide 2 Mission 3 - End Slide 3 Mission 3 - End Slide 4 Mission 3 - End Slide 5 Jossar fucked around with this message at 04:33 on Jun 4, 2024 |
|
#
?
Jun 4, 2024 04:21
|
|