


|
Eurgh just had a pretty lovely experience loading 35mm onto a plastic spool in the dark bag. I've done it ~8 times so far and every time until now it's gone really easily but this time it just refused to feed, jammed, dog-eared etc. It was also quite warm so the bag got sweaty etc. Lost a few frames I think but the rest look OK, I also had the film slip twice it seems because I have two overlapped exposures on the roll.
|
 #
?
Dec 28, 2018 05:28
#
?
Dec 28, 2018 05:28
|
|


|

|
| # ? May 25, 2024 00:35 |
|
|
Blackhawk posted:Eurgh just had a pretty lovely experience loading 35mm onto a plastic spool in the dark bag. I've done it ~8 times so far and every time until now it's gone really easily but this time it just refused to feed, jammed, dog-eared etc. It was also quite warm so the bag got sweaty etc. Lost a few frames I think but the rest look OK, I also had the film slip twice it seems because I have two overlapped exposures on the roll. I loving hate plastic reels and don't understand how anyone uses them. Buy Hewes (they are the best, trust me) stainless steel reels, spend a little time practicing with a throwaway roll of film and you'll never look back. As an added bonus, unlike Paterson tanks, the SS tanks with plastic lids don't leak.
|
|
#
?
Dec 28, 2018 06:05
|
|

|
Just frustrating that loading the reel has literally been the easiest thing right up until now, either it's getting a little sticky or it was just the heat/sweat.   
|
|
#
?
Dec 28, 2018 09:07
|
|
|
eggsovereasy posted:I loving hate plastic reels and don't understand how anyone uses them. Buy Hewes (they are the best, trust me) stainless steel reels, spend a little time practicing with a throwaway roll of film and you'll never look back. As an added bonus, unlike Paterson tanks, the SS tanks with plastic lids don't leak. eeeeeh, dunno about that. maybe new plastic lids are less prone to leaks, but i have 4 4-reel tanks, with one being plastic and they all leak to some extent.
|
|
#
?
Dec 28, 2018 23:49
|
|

|
Understanding posted:eeeeeh, dunno about that. maybe new plastic lids are less prone to leaks, but i have 4 4-reel tanks, with one being plastic and they all leak to some extent. To be fair, mine did start to leak after 5 or 6 years, but you can just buy a new lid for 
|
|
#
?
Dec 28, 2018 23:56
|
|
|
I have plastic reels with the tiny little film guides. I like to think that using them helps me to learn patience. 
|
|
#
?
Dec 29, 2018 00:09
|
|


|
My reels are plastic with little guides and the only time I have problems is with 120 (god, 120 sucks with those itty-bitty guides). With 135 it's quite easy after you get the hang of it, I've done some 100+ rolls and lost one, early on... One thing to stay on the watch is the little metal ball bearings that sort of "roll" the film. If they're stuck/gummed up/whatever it will really gently caress up your film, make it hard or even impossible to load, so keep the nice, smooth and rolling by regularly checking on them and degreasing, physically unlocking them, etc... And yeah, my plastic tank leaks and it sucks, but good luck finding a metal tank for any reasonable amount of money around here.
|
|
#
?
Dec 29, 2018 16:09
|
|
|
Even the second hand paterson tanks on ebay go for almost new prices. Like, who in the hell would buy a used tank when for a few bucks more you can have brand new?
|
|
#
?
Dec 29, 2018 16:33
|
|
|
I've had the ball jam while loading 120 once and it took a small chunk out of the rebate of my film. Never force things. My Paterson tank has never leaked. If you have the current style with the thin black lid it won't leak if you press down on the center of the lid while pushing down the edges. Kind of like burping a tupperware dish.
|
|
#
?
Dec 29, 2018 17:34
|
|

|
My turn! Here's my technique with the small-tabbed plastic Peterson system: Before loading the bag, I roll the balls in their track a couple times to make sure they're free. For 120, I leave the tape strip on the film as I pull it from the backing paper, then fold the tape over the edge of the film (I've found when trying to remove the tape from the film it kinks or creases the edge, which gets caught in the balls or film track of the reel). Before loading the film I slightly curve the taped section backwards, to make it a bit straighter than the rest of the film. The taped edge now provides a handle that makes it easy to pull the edge beyond the balls and then I can start ratcheting. Fuji has thinner tape which makes this really easy, Ilford seems to use regular masking tape which is thicker and will "pop" past the balls. I've probably done about 100 rolls by now and haven't lost one, although early on I did have one or two that took a couple tries. As for 35 I've only done one roll from an old disposable a friend found and it seemed pretty easy. As far as leaky lids go, I warm the lid up in hot water before needing it, then it's easier to get a good seal on the tank. Periodically burp the air out as mentioned above. I can't say I never get leaks but they're definitely more rare, which is nice when doing C-41 because the blix stains everything it touches.
|
|
#
?
Dec 29, 2018 18:55
|
|

|
I'm very new to film and have a question about how to push film higher than a camera's ASA settings. The film I use is HP5+ 400, and the camera is a Canonet G-III QL. The highest ASA on the camera is 800. I wanna leave the digital at home NYE, and just take the Canonet, so I want to push to 1600. If I change the setting to 800, but then go a stop faster on the shutter speed, will that be as if I'm exposing for 1600? Then I just develop it as if it had been pushed/set to 1600?
|
|
#
?
Dec 30, 2018 23:00
|
|

|
Hocus Pocus posted:I'm very new to film and have a question about how to push film higher than a camera's ASA settings. You got it perfectly. You can also close the aperture one stop instead of upping the speed for the same result in amount of light.
|
|
#
?
Dec 30, 2018 23:48
|
|
|
Primo Itch posted:You got it perfectly. You can also close the aperture one stop instead of upping the speed for the same result in amount of light. Awesome, thank you!
|
|
#
?
Dec 31, 2018 01:56
|
|
|
Note that pushing is not exactly the same as simply compensating for exposure. Pushing 400 film to 1600 will give you quite different results to shooting 1600 film. For a start, you are going to get a lot more grain. For some people that's a positive. The other thing that's going to happen is that you'll get a lot more contrast at the low end. The black parts of your image are going to stay black - and if you are metering 400 film at 800, then there will be a lot of black parts. In these areas, where not enough light has hit the negative, the crystals won't have been activated and your negative is going to be clear. There's not a lot for the developer to work with. In the lighter areas however, you'll see the difference from pushing. The midtones and brighter parts will be lighter, but the shadows will still be about as dark as if you hadn't pushed it (and, bear in mind that you're one stop underexposed too). So, you'll get an image that's brighter in parts but falls off to black really loving quick.
|
|
#
?
Dec 31, 2018 13:40
|
|

|
Recommendations and/or thoughts on Canon FD gear? I'm looking to buy either a F1 or Ftb soon and would like to hear some pros/cons. F1 vs Ftb? (I'm not keen on the A-1 series as they seem too plastic and just don't do it for me). Is it worth searching out for a New F1 or is there no real appreciable difference? I have a 300 f/4L that I use on my X-T1, and I'd like to collect primes in the 24/50/85 lengths. I'll probably buy the body with a 50mm, are there any build quality differences between the f/1.8 and the f/1.4? While I don't want to spend it all on gear, I do have around $1500 CDN to toss at this project. L lenses are cool but those will eat a large chunk out of the budget. So what are the must-have absolute classics in FD mount?
|
|
#
?
Jan 2, 2019 01:21
|
|
|
Rot posted:Recommendations and/or thoughts on Canon FD gear? I�ve got a Canon Ftb + 50mm f1.4 if you�re interested.
|
|
#
?
Jan 2, 2019 01:31
|
|


|
holocaust bloopers posted:I�ve got a Canon Ftb + 50mm f1.4 if you�re interested. Cool! PM sent.
|
|
#
?
Jan 2, 2019 01:56
|
|
|
Rot posted:Recommendations and/or thoughts on Canon FD gear? Avoid. I didn't like the ergonomics of the bodies I've tried, the mount itself is rather troublesome to use. My biggest issue however is that the bodies are extremely light, so with even slightly large lenses you get a very bad weight distribution.
|
|
#
?
Jan 2, 2019 16:38
|
|


|
nielsm posted:Avoid. Yeah, if I was starting right from nothing I'd definitely do more research into other brands, but I'm somewhat invested in FD already with the 300 and adapter for my Fuji. Granted, the cost to switch over to another system won't be horrendous but I think I'll stick with Canon regardless. I'm mostly interested in the lenses themselves for use on my mirrorless camera but I'd like to get a body as well just for film fun.
|
|
#
?
Jan 2, 2019 16:52
|
|
|
Check out @lensclassics on Instagram. It's a person who collects old lenses and SLR's, but they have a particularly large amount of Canon FD stuff. Lots of the posts are pretty informative, and you could probably DM them if you had any specific questions. This is assuming you have an IG account of course.
|
|
#
?
Jan 3, 2019 15:28
|
|

|
SMERSH Mouth posted:Check out @lensclassics on Instagram. It's a person who collects old lenses and SLR's, but they have a particularly large amount of Canon FD stuff. Lots of the posts are pretty informative, and you could probably DM them if you had any specific questions. This is assuming you have an IG account of course. Thanks, this will be a good way to waste time at work.
|
|
#
?
Jan 3, 2019 17:31
|
|
|
The product of almost three weeks in the UK over the holidays (not including 700 or so digital shots). Two rolls of FP4+, four rolls of HP5+, and one roll of Fuji X-Tra 400. I�ve got a lot of developing to do! I�ll share anything that�s worth half a drat. 
|
|
#
?
Jan 3, 2019 20:30
|
|
|
Film scanner is finally up and running! Time to spend hours getting frames digitized
|
|
#
?
Jan 4, 2019 01:24
|
|


|
Anybody have any experience with intentional double exposures? I'm trying some on my SRT-100 using the rewind knob and button hack to hold the film in one place between shots which seems to be working ok. So far I've been trying direct overlays of images and textures and using pieces of tape to mask off half the lens at a time to glue two frames together split along the middle. The problem with the second technique is because the tape is so far in front of the film I think the split between the frames will be quite blurry but I don't see how I can do much about that.
|
|
#
?
Jan 4, 2019 05:13
|
|
|
I've done a few. It's kinda fun to try and plan it. Some cameras have a button to let you cock the shutter without winding on for deliberate double exposures, otherwise, disengaging the sprocket while you wind on works just fine. I don;t know about the tape over the lens trick though, I think it would probably work better if you had a piece of card inside the body over the shutter. This would obviously require taking the lens off between shots.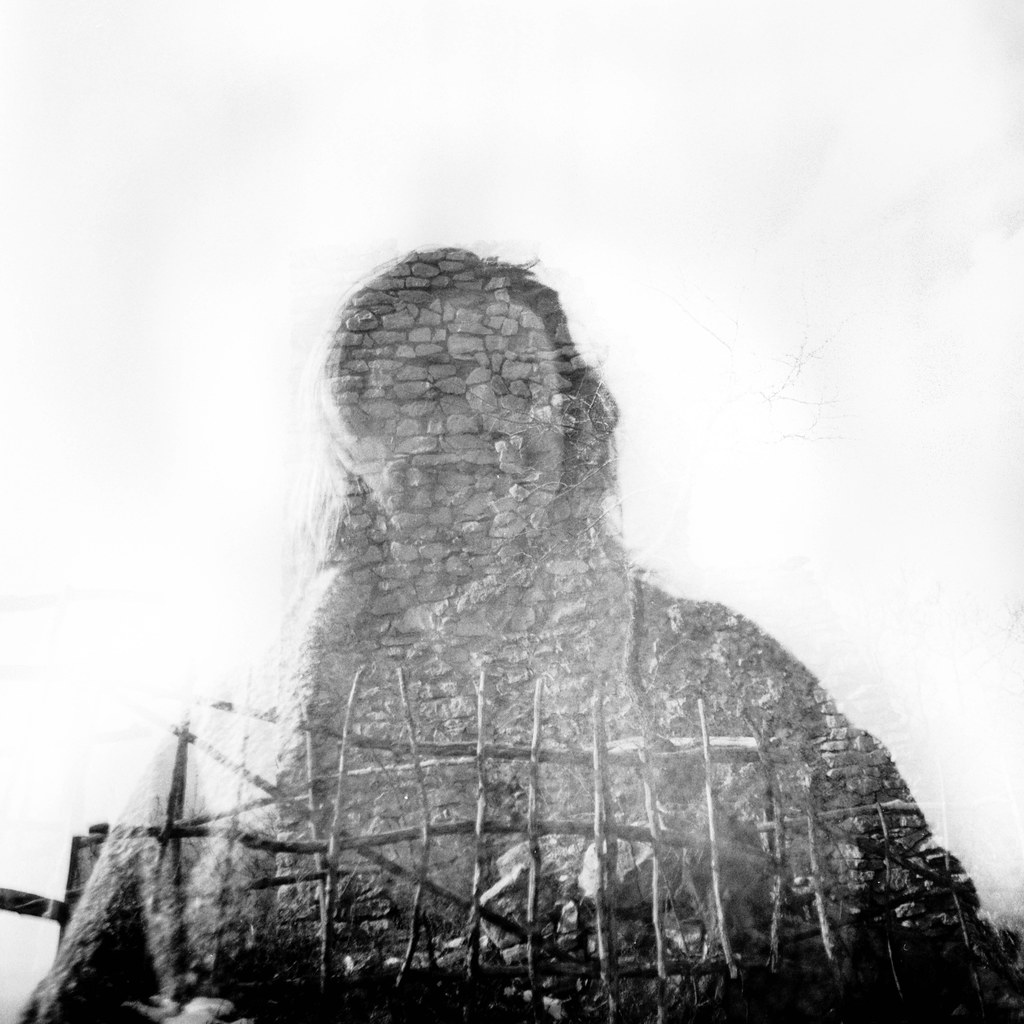 Arax018.jpg by Iain Compton, on Flickr This one was an accident, two different people on two different train carriages. 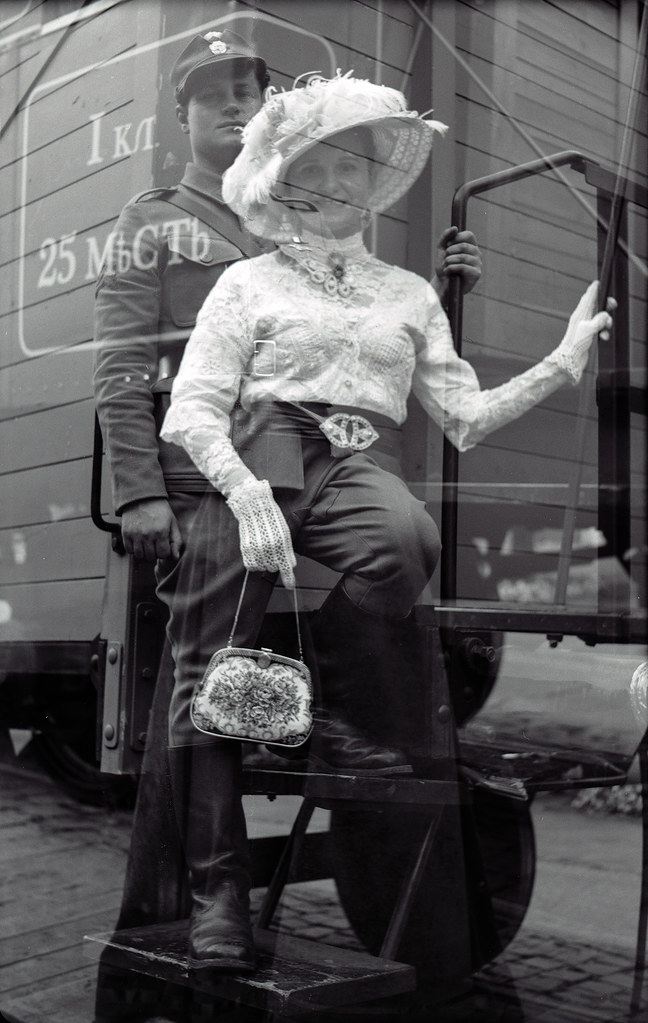 LegioVlak005.jpg by Iain Compton, on Flickr
|
|
#
?
Jan 4, 2019 05:41
|
|
|
Helen Highwater posted:LegioVlak005.jpg by Iain Compton, on Flickr
|
|
#
?
Jan 4, 2019 06:00
|
|


|
Helen Highwater posted:I've done a few. It's kinda fun to try and plan it. Some cameras have a button to let you cock the shutter without winding on for deliberate double exposures, otherwise, disengaging the sprocket while you wind on works just fine. I don;t know about the tape over the lens trick though, I think it would probably work better if you had a piece of card inside the body over the shutter. This would obviously require taking the lens off between shots. Awesome shots! Even some tape on the rear element of the lens would probably work much better. Maybe I can 3D print a rotating blocker of some kind that I can clip onto the rear element...
|
|
#
?
Jan 4, 2019 06:58
|
|
|
Helen Highwater posted:This one was an accident, two different people on two different train carriages. Holy poo poo. What a cool accident. Kinda reminds me of the spirit photography stuff that was in vogue around WWI.
|
|
#
?
Jan 4, 2019 09:30
|
|
|
Meh. I�m not too thrilled with how that Fuji 400 turned out. Any technique shortcomings aside, the grain with this stuff seems really coarse; even more so than the comparable Kodak film. I also struggled with underexposed foreground coupled with blown out sky in some shots.   
|
|
#
?
Jan 4, 2019 12:50
|
|
|
Was that self-developed and scanned? I ask because I hated the way 400H came out when I did some night shots with it and developed/scanned it at home. Avoided it completely for like a year. Then I tried it out again when I needed some 400 speed C41 film and my local shop was out of Portra. Turned out to be decent for use in daylight, at least with the way the lab scanned and color corrected it. Portra 400 on the other hand is has always done me right, day or night, lab or bathroom developed. But don't fully discount 400H... if it's all that's available... and you are shooting a subject that's illuminated by the sun.
|
|
#
?
Jan 4, 2019 14:51
|
|
|
Blackhawk posted:Awesome shots! Even some tape on the rear element of the lens would probably work much better. Maybe I can 3D print a rotating blocker of some kind that I can clip onto the rear element... Now that I think about it, Lomography do a thing that fits onto a Diana lens and masks the lens by 1/4, 1/2 or 3/4. I'm pretty sure that it will either just have a regular filter thread on the back or that it can be MacGuyvered onto something that's not a Diana.
|
|
#
?
Jan 4, 2019 16:04
|
|
|
Okay, scanner question time. I have some grainy images that I've been trying to correct as much as I can in LR. The film is tri-x 400 from at least 10 years ago. I developed it a few months ago. Is the grain from old film or the scanner?  img023.jpg by Peter Crain, on Flickr img023.jpg by Peter Crain, on Flickr
|
|
#
?
Jan 4, 2019 16:14
|
|
|
SMERSH Mouth posted:Was that self-developed and scanned? I ask because I hated the way 400H came out when I did some night shots with it and developed/scanned it at home. Avoided it completely for like a year. Then I tried it out again when I needed some 400 speed C41 film and my local shop was out of Portra. Turned out to be decent for use in daylight, at least with the way the lab scanned and color corrected it. Yeah, home developed and DSLR scanned. I still struggle a fair bit with negative color correction, so that may be part of my dissatisfaction.
|
|
#
?
Jan 4, 2019 17:14
|
|
|
President Beep posted:Yeah, home developed and DSLR scanned. I still struggle a fair bit with negative color correction, so that may be part of my dissatisfaction. Give us a raw uninverted scan to play with and let's see.
|
|
#
?
Jan 4, 2019 20:15
|
|

|
MrBlandAverage posted:Give us a raw uninverted scan to play with and let's see. Why the hell not? Anyone feel free to give it a whirl. https://www.amazon.com/photos/shared/elK_3iJ4Q5W-9I5SFLLeBg.KLNGrhmMaIgbQ9tMJu5jy1
|
|
#
?
Jan 4, 2019 21:39
|
|
|
President Beep posted:Why the hell not? Anyone feel free to give it a whirl. quote:Unable to join group. This group does not exist
|
|
#
?
Jan 4, 2019 21:55
|
|
|
poo poo. That worked earlier... Try this one: https://1drv.ms/u/s!AtBTxxMMLeBujRv4GMbwM4E2ND7L In the meantime, here�s my quick-ish attempt at an adjustment. I can�t tell whether or not there�s actually a magenta cast, bit it seems like the slightest nudge of the slider in the other direction makes everything look green. Idk. It was taken later in the day, so there was something of a sunset creeping in. 
|
|
#
?
Jan 4, 2019 22:18
|
|
|
President Beep posted:poo poo. That worked earlier... Try this one: I'm curious what the curve wizards in this thread will make of this one. I couldn't do anything that didn't look like absolute dogshit.  Yes the sky and tons of details are completely gone
|
|
#
?
Jan 4, 2019 22:27
|
|

|
President Beep posted:poo poo. That worked earlier... Try this one: Obviously it's not perfect but I don't have Photoshop on my work computer, so this was done in 2 minutes in Snapseed on my phone. Literally all I did was set white and black points for R, G, and B channels individually, with the B midpoint bumped up a tad, then set some points on the RGB curve for brightness. 
|
|
#
?
Jan 4, 2019 22:38
|
|
|

|
| # ? May 25, 2024 00:35 |
|
|
MrBlandAverage posted:Obviously it's not perfect but I don't have Photoshop on my work computer, so this was done in 2 minutes in Snapseed on my phone. Literally all I did was set white and black points for R, G, and B channels individually, with the B midpoint bumped up a tad, then set some points on the RGB curve for brightness. drat! That looks markedly better than how the majority of my adjustments turn out when I shoot film. Hey, at least I know where the issue lies now. Thanks for the example and process summary. I�ll use that as a baseline for future edits. Very cool indeed.
|
|
#
?
Jan 4, 2019 23:38
|
|