


|
watched the odometer hit 50,000 miles on the ST =)
|
 #
?
Sep 7, 2010 15:37
#
?
Sep 7, 2010 15:37
|
|

|

|
| # ? May 24, 2024 12:31 |
|
|
Rontalvos posted:My '80 750F, with the stock gearing (18/46) spins at about 6100rpm at 70mph. The internet says this should actually be 5200 or so. The Nighthawk isn't going to be a 1:1 comparison, but it should be in the same ballpark. It's 18/43 with mongo tires. According to a Cycle Guide test/review, top gear was 13.8 mph/1000 rpms, which works out to 70 mph/5072 rpm. Don't murder me, but my gauge cluster is...a cluster at the moment and I can't give you a real-world comparison until my speedometer gear is back on. Even then, I get tach jitters between 5 and 6k. I can say with some authority that at highway speeds I'm between 6 and 7K. I'll keep you posted. I agree that they rev higher than they ought to, and ordinarily I wouldn't care. But up until recently, every single one of those RPMs was transmitted directly to the crotch. My recent valve adjustment seems to have mitigated that somewhat. I would take published specs with a grain of salt--who knows what the measurement tools and methods were 30 years ago. I don't know where they got 131 mph for a top speed on this bike. I seriously doubt it would bust through 110 without exploding. And I'd need a GPS to verify it anyway, since the speedo was capped at 85 in those days.
|
|
#
?
Sep 7, 2010 15:49
|
|


|
Has anyone found a good way to secure some small, waterproof LED flashlights to the fork to use as auxiliary riding lights? Does this even sound like a good idea? I've read some writeups about making LED riding lights and, as soon as the word "lathe" or "angle iron" comes up, I get scared.
|
|
#
?
Sep 7, 2010 21:10
|
|

|
Radbot posted:Has anyone found a good way to secure some small, waterproof LED flashlights to the fork to use as auxiliary riding lights? Does this even sound like a good idea? I've read some writeups about making LED riding lights and, as soon as the word "lathe" or "angle iron" comes up, I get scared. Why not just buy some lovely fogs or something from pepboys and wire them to a relay/switch?
|
|
#
?
Sep 7, 2010 21:12
|
|


|
Radbot posted:Has anyone found a good way to secure some small, waterproof LED flashlights to the fork to use as auxiliary riding lights? Does this even sound like a good idea? I've read some writeups about making LED riding lights and, as soon as the word "lathe" or "angle iron" comes up, I get scared. Interesting idea, but from a car's rear view, most modern bikes already look like an alien invasion is underway. Not seeing the value add, unless it's an old-school dim head lamp. It's a catch-22. Mini LED flashlights of sufficient quality may as well be labeled STEAL ME. And if they're coming on and off the bike repeatedly, you have to consider stability and proper aim. This is why the writeups in question are talking about permanent mounts. Marv Hushman fucked around with this message at 22:26 on Sep 7, 2010 |
|
#
?
Sep 7, 2010 22:22
|
|
|
Marv Hushman posted:I wish I knew what soda blasting was...does it involve Mentos? I know this is from a while ago, but you may find this useful seeing what projects you are currently undertaking. Read and learn, then curse a lot for not knowing about it before you did that valve cover or those carbs.
|
|
#
?
Sep 7, 2010 22:24
|
|

|
frozenphil posted:I know this is from a while ago, but you may find this useful seeing what projects you are currently undertaking. Read and learn, then curse a lot for not knowing about it before you did that valve cover or those carbs. Awesome...double bonus points for low tech AND DIY. Sort of hobbled without a proper garage at the moment, so everything's twice as hard as it ought to be. I actually called a media blasting place to do the valve cover and they never called back. These people want jobs measured in square yards, not piecework. Thought twice and said screw it, it violates the moto prime directive of self-sufficiency anyway ") Thanks - when I do put this to use it'll be in conjunction with a full teardown of something.
|
|
#
?
Sep 7, 2010 22:47
|
|
|
One of those little cheap harbor freight compressors will throw enough air for long enough to do a carb or valve cover job if you need something small and portable. You may have to take a few breaks to let it catch up, but that's better than trying to make sand paper fit in those tight spots. The best part is that you just run some liquid over the baking soda to clean it up; no sand, glass beads, or walnut shells all over the place afterward as the baking soda dissolves.
|
|
#
?
Sep 7, 2010 23:32
|
|
|
Radbot posted:Has anyone found a good way to secure some small, waterproof LED flashlights to the fork to use as auxiliary riding lights? Does this even sound like a good idea? I've read some writeups about making LED riding lights and, as soon as the word "lathe" or "angle iron" comes up, I get scared. Yes.
|
|
#
?
Sep 8, 2010 01:16
|
|

|
So I've had an on and off issue with my brakes seizing up a bit since I bought my bike 2 weeks ago. Today they stuck on pretty hard and my engine breather was smoking pretty good as were my pads as I'm trying to make it home. At one point I noticed a very harsh jolt which I think (hope) was just a misfire but yeah, not fun. Get home say gently caress it these are getting swapped out and see this. Oh joy. You cant see it in that picture but the other side has a screw based pad holder which wasnt being used for one of the pads. I think this may have caused the pad to wedge and make things even worse. titanium fucked around with this message at 05:22 on Sep 9, 2010 |
|
#
?
Sep 9, 2010 05:20
|
|
|
titanium posted:So I've had an on and off issue with my brakes seizing up a bit since I bought my bike 2 weeks ago. Today they stuck on pretty hard and my engine breather was smoking pretty good as were my pads as I'm trying to make it home. At one point I noticed a very harsh jolt which I think (hope) was just a misfire but yeah, not fun. Get home say gently caress it these are getting swapped out and see this. When it comes to the front brakes, assume the PO had the IQ and attention span of a hummingbird and you will never be disappointed. Probably stating the obvious, but this bike should be grounded until a full rebuild is done on the caliper(s), even if it's a season-ender. The rust alone is a sign that the entire system is probably jacked.
|
|
#
?
Sep 9, 2010 06:09
|
|
|
Just did some normal maintenance - Had to add some air to the tires. Rocking it at exactly 36 PSI - Checked chain tension. Tightest part of the chain is still well within spec 1.8" - Cleaned and lubed the chain. I love my grunge brush!
|
|
#
?
Sep 9, 2010 13:00
|
|

|
Marv Hushman posted:When it comes to the front brakes, assume the PO had the IQ and attention span of a hummingbird and you will never be disappointed. Probably stating the obvious, but this bike should be grounded until a full rebuild is done on the caliper(s), even if it's a season-ender. The rust alone is a sign that the entire system is probably jacked. For sure. I dont have an air compressor so I cant pop the piston even though it looks like someone took a vice grips to yank it out before. I'd rather just get something cleaner so I've been hitting up local cheap xs's to see if they're willing to part out. Hopefully something will come up before the end of the season.
|
|
#
?
Sep 9, 2010 14:17
|
|
|
I did a silly thing. Driven 520 chain/sprocket kit, -1 off the front, alloy rear. Also had a full service, purring like a kitten. All the valve clearances were loving bang on, despite having 54000km. My mechanic was pretty surprised since he knows how much I beat on it, and also swearing a lot about how nuts my bike is.
|
|
#
?
Sep 10, 2010 03:19
|
|
|
My KTM vibrated so much that one of my rear indicators went all  So I bought some impossibly small LED ones and decided to relocated them up under the rear fairing and do a DIY tail-tidy. Before  After   Now I just need to replace that huge, burning hot stainless silencer/catalytic with a svelte, black italian SC Project one.
|
|
#
?
Sep 11, 2010 19:50
|
|

|
This morning I started to get the '04 998 ready for it's 12k service tomorrow. Since I forgot to take a fully assembled picture, here's one from back in July when I brought it home:  First, all the bodywork comes off  Shower injectors! 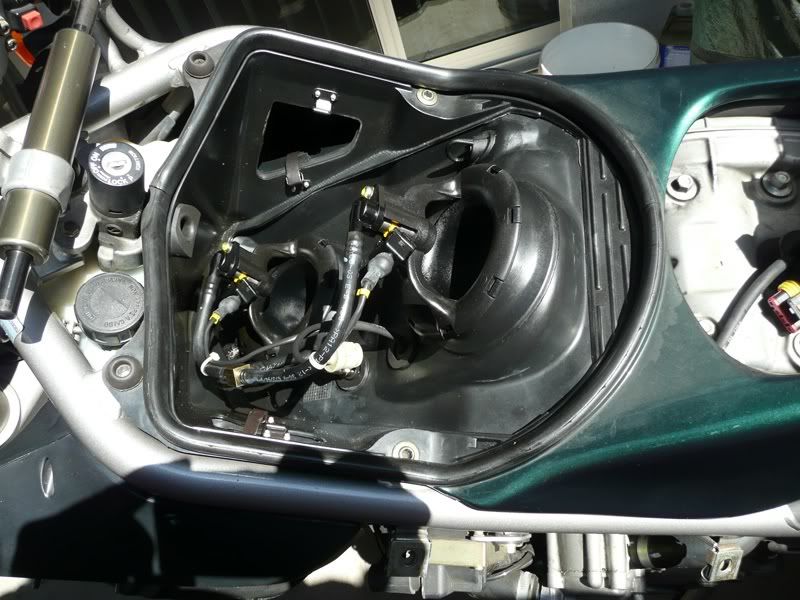 With the airbox removed i now have access to the vertical cylinder 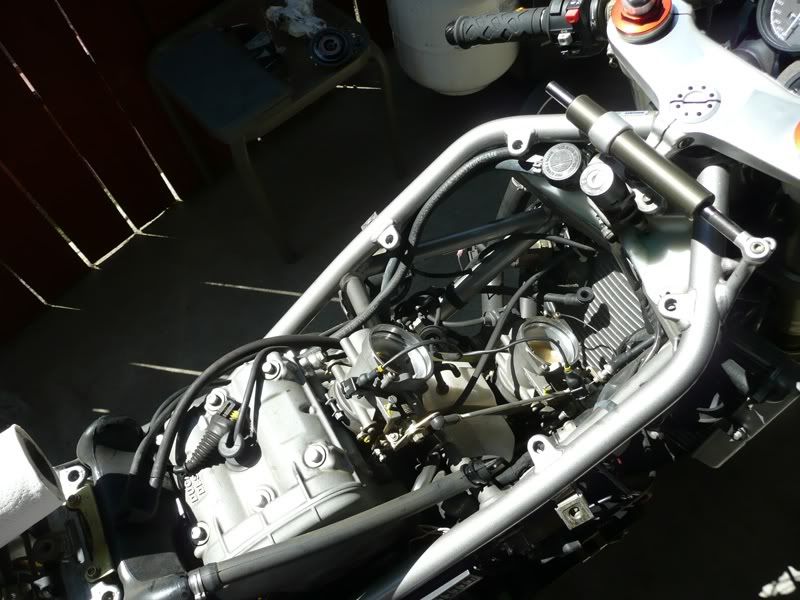 Front v-fairing and radiator gone and the horizontal cylinder is exposed. 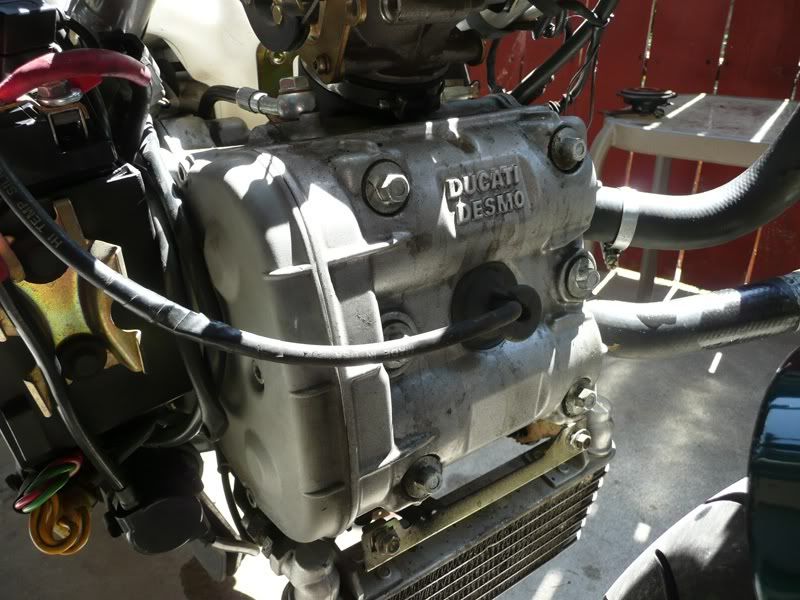 Tomorrow I'll take the battery and battery box off to access the belt covers, then it's game on. Valves, belts, fluid flush, oil change, air and fuel filters, suspension lube, check CO, synch and idle, change the plugs, connect up the diagnostic software, change the brake/clutch fluid, clean everything under the plastics, hunt down the intermittent ground on the tach, and generally give everything a once over. It's amazing how much dirt and grime can build up under the plastics on a bike that is spotless on the outside. This is my first time working on a 4V Ducati. It's way more difficult than my 2V Supersport but not that bad overall. The SS front cylinder can be adjusted without removing the fairings and the rear can be done once the shock is moved out of the way. Also, the SS's belts can be accessed with the bodywork in place with no obstructions. On the 998 you have to remove a lot of components to get access to the heads and belts but everything seems cleverly designed for ease of service. The good news is that the testastretta clearances can be measured easily once the valve cover comes off and the cams only have to come off if something needs adjustment. The earlier 916/996 desmoquattro required the cams to come out during every 3k mile valve check.
|
|
#
?
Sep 11, 2010 21:25
|
|

|
So wait, do the injectors just spray the gas into the throttle bodies?
|
|
#
?
Sep 11, 2010 22:16
|
|


|
Well the bedliner on my fender and headlight shroud dried enough to install. so I just put them on a took a some pics. I'm really happy with the results. I'm not sure if I should paint the forks or just get some of that 3M black reflective sticker.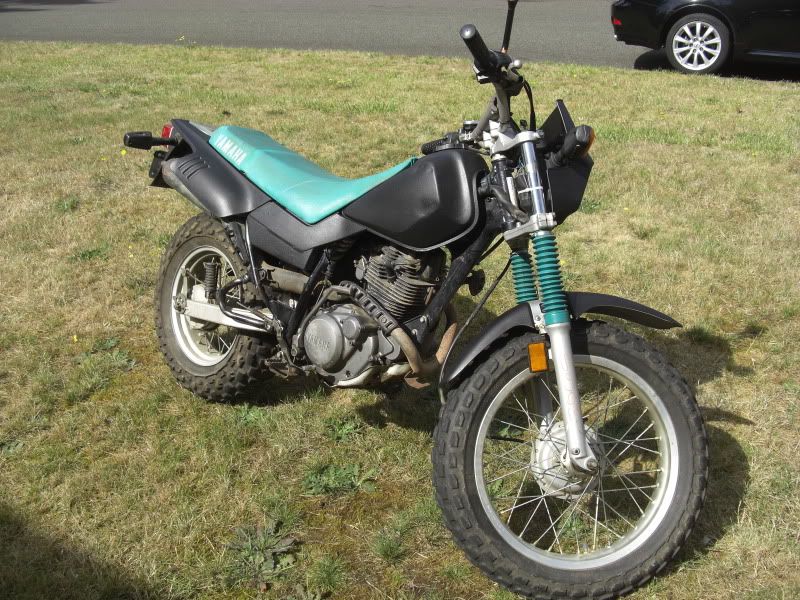 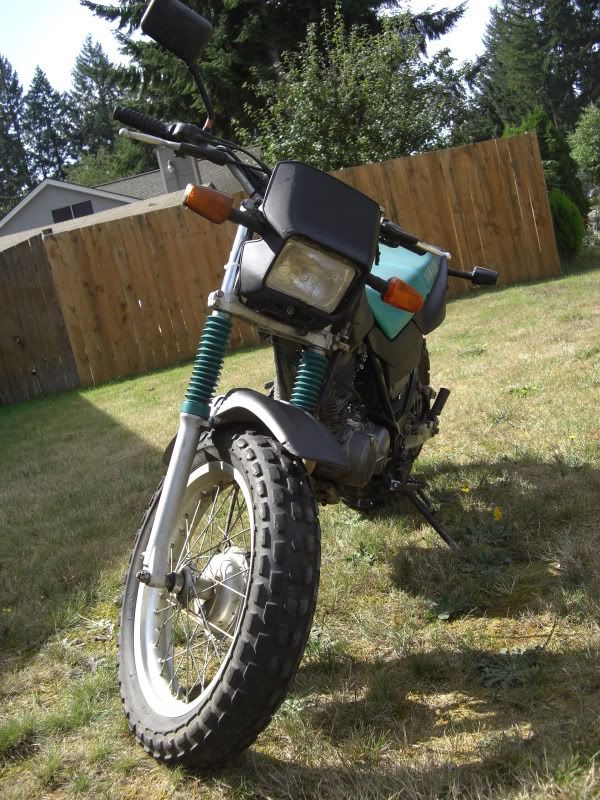 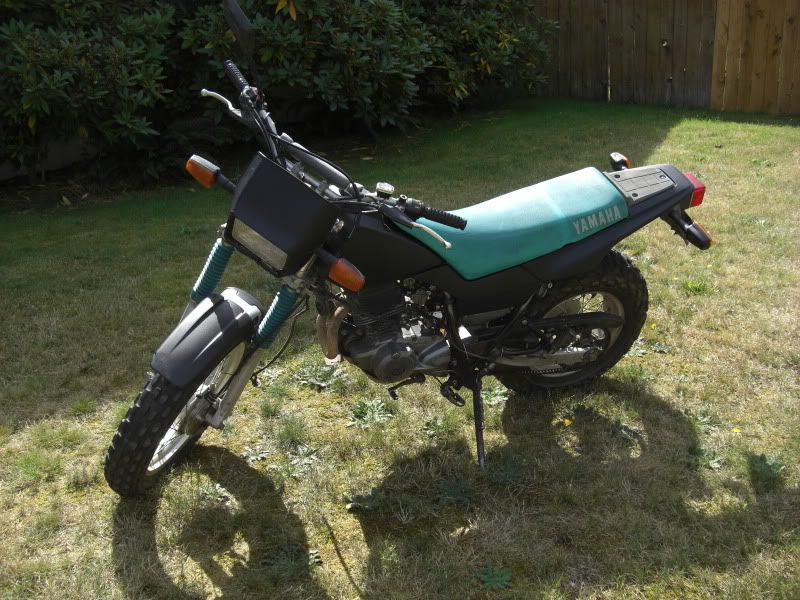
|
|
#
?
Sep 11, 2010 22:21
|
|

|
Endless Mike posted:So wait, do the injectors just spray the gas into the throttle bodies? Yeah, the injectors are suspended over the throttle body and spray fuel in from above. There are no obstructions until the butterfly valves in throttle body, and it gives good even atomization and airflow. It also makes diagnosing injectors easy, all you have to do is lift the fuel tank a little while it's running and stick your hand under the sprayer.
|
|
#
?
Sep 11, 2010 23:30
|
|
|
Bruinator posted:Yeah, the injectors are suspended over the throttle body and spray fuel in from above. There are no obstructions until the butterfly valves in throttle body, and it gives good even atomization and airflow. It also makes diagnosing injectors easy, all you have to do is lift the fuel tank a little while it's running and stick your hand under the sprayer. Hehe, that's cool. Can you hear the engine change as your hand changes the mixture? I rode in the rain today, while changing lanes going up a bridge I spun my rear on a slippery dividing line. It seemed to happen so slowly, I managed to think to myself "wtf is my clutch bad" then felt the rear end do a little dance. "Oh, almost high sided in dense traffic, nice". 
|
|
#
?
Sep 12, 2010 00:06
|
|

|
Bruinator posted:This is my first time working on a 4V Ducati. It's way more difficult than my 2V Supersport but not that bad overall. The SS front cylinder can be adjusted without removing the fairings and the rear can be done once the shock is moved out of the way. Also, the SS's belts can be accessed with the bodywork in place with no obstructions. On the 998 you have to remove a lot of components to get access to the heads and belts but everything seems cleverly designed for ease of service. The good news is that the testastretta clearances can be measured easily once the valve cover comes off and the cams only have to come off if something needs adjustment. The earlier 916/996 desmoquattro required the cams to come out during every 3k mile valve check. I guess the nice thing about the more frequent service requirements on Ducs is that they actually seem to have thought about how easy they would be to work on.
|
|
#
?
Sep 12, 2010 17:11
|
|

|
Booked it in for a dyno tune tomorrow, and front end rebuild on Wednesday. Powah.
|
|
#
?
Sep 13, 2010 13:15
|
|
|
I replaced the secondary rear master cylinder and left front caliper bracket on my ST1300, and also bled the front and rear brakes. The work went along pretty painlessly till I accidentally ran the front reservoir dry while bleeding the right front caliper... oops. It took forever to get the air out of the system after that, but I finally ended up with better pedal/lever feel then when I started. The only real "problem" I ran into was that the new left front caliper bracket wasn't exactly the same thickness as the one I took off, so I had to loosen the front axle and realign the wheel so there was room between the left rotor and the bracket again.
|
|
#
?
Sep 13, 2010 13:56
|
|
|
Mucho detail work on the carb innards to help sort out what can be refurbed vs purchased--there are no rebuild kits per se for Keihin VB42s, Keyster or otherwise. The bits have to be ordered a la carte, which gets spendy real quick. Glycerin, carb cleaner, Dremel, and git-tar strang to the rescue. I do go overboard, but some rust was unacceptably close to the circuits. Other components (e.g., the accelerator pump) were nearly frozen in place. Crud isn't an OE part--kill it before it multiplies, I say. My ear for Honda DOHC rumble has advanced to the point where I know when something's amiss--today, it was the #1 plug wire worming its way out of the boot. Never been a fan of the arrangement. Every other connection on a bike is kept intact with Molex, bolts, etc., and these things are twist and pray. There's gotta be a better way! Thank you, Crayvex Man, for the info. Updated tags for both bikes. Hours of sticker fun!
|
|
#
?
Sep 13, 2010 21:56
|
|
|
Now if I just spin this thing eleventy billion times, all the miles will come off the bike. Speedometer success at last. I don't know what demon spirit led me to believe this was difficult a few months back. Go/no go assembly + operation is easily verified prior to re-mounting the wheel. I was just under pressure trying to make a launch time and screwed up the original. Such things are best done at a leisurely pace. Improved teardown time dramatically just by adding shorter fender mount bolts that can actually be worked in without wedging them against the sidewall. 
|
|
#
?
Sep 14, 2010 04:02
|
|
|
Marv Hushman posted:Now if I just spin this thing eleventy billion times, all the miles will come off the bike. So now that you have a speedometer again, does the bike seem faster or slower? I also wonder how badly it suffers from overly omptismitic syndrome. At 85 mph on my 77's speedo I just seem to be going along with normal 70 mph traffic.
|
|
#
?
Sep 14, 2010 11:59
|
|
|
2ndclasscitizen posted:Booked it in for a dyno tune tomorrow, and front end rebuild on Wednesday. Powah. gently caress yes, 156whp. Chart to come.
|
|
#
?
Sep 14, 2010 14:00
|
|
|
2ndclasscitizen posted:gently caress yes, 156whp. Chart to come. Gixxer 1k?
|
|
#
?
Sep 14, 2010 17:16
|
|
|
Crayvex posted:So now that you have a speedometer again, does the bike seem faster or slower? I also wonder how badly it suffers from overly omptismitic syndrome. At 85 mph on my 77's speedo I just seem to be going along with normal 70 mph traffic. I learned to use the tach as a crude speedo, because at a few key intervals on the dial, rpm = 10(mph). At least with these instruments. The tach needle is dodgy anyway, and replacement is tough because of the integrated fuel gauge, which I don't want to lose since I worked my backside off to refurb it. Considered going with a Vapor unit for grins. I don't know if 10 wraps around a plug wire is more accurate than the mechanical spinner, but the gauge would be far less annoying. Short of that, maybe a test run with a GPS would prove out the speedo accuracy. I know I don't want to use the cop radar method again...
|
|
#
?
Sep 14, 2010 21:07
|
|
|
Z3n posted:Gixxer 1k? Indeedy. That loving EFI popped up again as soon as the tuner plugged the USB cable in, but we figured out what the problem was. The wire to the secondaries won't stay in the ECU block connector, so when we were pulling the PCIII, which sits on top of the wiring, out the wire was coming out of the connector. But got it to stay put and got it tuned. Such good fun riding it this morning. Did my usual gassing it up the inside of some cars at a funny corner on my commute, except unlike usual it resulted in a big wheelie down the road  Also, my bike is loving loud at full noise. EDIT: Graphs!  
2ndclasscitizen fucked around with this message at 03:50 on Sep 15, 2010 |
|
#
?
Sep 15, 2010 01:48
|
|
|
Well this is going to sound really lame, but I suppose everyone has to start somewhere! I took a wrench to my bike for the very first time this morning, albeit in the most trivial of ways. I was riding last week and noticed my flyscreen on my Bonnie was wobbling. On closer inspection, I found that one of the bolts holding it and the headlamp to the bracket had fallen off. I went to the hardware store this weekend, found the right size bolt and washer, and popped it back in pretty easily. I know most people would do that without even thinking of it, but as my first DIY "repair" job on a vehicle, I spent hours looking for diagrams of the headlamp, flyscreen, and bracket assemblies to make sure I wasn't loving anything up. Seems to be holding!
|
|
#
?
Sep 20, 2010 16:44
|
|

|
Congrats! 2ndclass, those graphs look fun ") Not my bike, technically, but adjusted the valves on my friend's dorsoduro yesterday. Everything went smoothly, most of them were just off the loose end of the spec, so they should tighten up nicely over the next 30k. Some of the valve cover bolts had already been chewed up from the factory.  Gear driven cams are pretty cool though.
|
|
#
?
Sep 20, 2010 17:15
|
|
|
Technically, it was yesterday.. But I lubed the chain and detailed the SV 
|
|
#
?
Sep 20, 2010 18:38
|
|
|
Marv Hushman posted:Mighty Morphin' Valve Cover Dying to know the process and materials behind this plz.
|
|
#
?
Sep 20, 2010 18:50
|
|


|
ari.gato posted:Dying to know the process and materials behind this plz. It was more hassle than I'd wish on anyone living or dead. - Determine what created the mess in the first place and try to plan accordingly. In my case, this piece was clear-coated at the factory and fell victim to the same crud that infests fork lowers. Add dead gas, oil, oxidation, maybe a can or two of spilled Old Milwaukee, and you have the sorry state you see in pic 1. - Bix spray-on remover got the majority of the clear-coat off. I later tried Rustoleum Aircraft Remover (yes, that's the name) but it made no appreciable difference. - Wet sanding with a 3M automotive assortment of fine grit papers pulled most of the the embedded black, stubborn clearcoat, and surface irregularities out of the aluminum. Couldn't get it all due to the shape of the piece and those stupid lines. I would have KILLED for a mid-80s CB650 valve cover--it's basically a 3D letter "H" with a set of screw holes. - Paint was all Rustoleum 500 degree engine paint: http://www.rustoleum.com/CBGProduct.asp?pid=372 2-3 coats of engine primer with surface flicking from a piece of superfine paper in between. Leave it alone for a day. 2-3 coats of aluminum silver, same gentle high-spot sanding in between. 2 coats of clear. Leave it at that and go away. I kept going and got an obscene chemical reaction that took me quite a while to correct. Could have been insufficient shaking of the can, I have no idea. - Fins and surrounding areas were hit with PJ1 satin black case paint. My local Honda dealer stopped selling it, so I had to order through Dennis Kirk. The original finish was completely worn off in spots. ----- Safety tips: - Don't go insane--70% of the thing isn't visible once the tank's on anyway. Still, it's that 30% that makes your motor look like rear end if it isn't addressed. I was pulling the cover anyway, so it was worth the effort. - Find some non-messy gasket sealing material that will not make you cry. - Unlike some high temp paints, this doesn't REQUIRE oven curing, but run time will help it along. I once painted a cover with paint that did require an oven bake, and ummm...yeah, not cool when your motor paint wipes right off.
|
|
#
?
Sep 21, 2010 03:40
|
|
|
SlightlyMadman posted:Well this is going to sound really lame, but I suppose everyone has to start somewhere! I took a wrench to my bike for the very first time this morning, albeit in the most trivial of ways. Haha! I remember this...the first time I changed my oil I must have looked at the service manual for hours and even checked online for step by step guides before doing it....then I forgot to replace the crush washer and it was leaking a ton of oil on my victory ride. It was still awesome 
|
|
#
?
Sep 21, 2010 03:44
|
|


|
Radbot posted:Has anyone found a good way to secure some small, waterproof LED flashlights to the fork to use as auxiliary riding lights? Does this even sound like a good idea? I've read some writeups about making LED riding lights and, as soon as the word "lathe" or "angle iron" comes up, I get scared. You know, I thought about this a little more and felt bad about my knee-jerk rejection of the idea a while back. Maybe it has some merit, maybe it doesn't, but for $8, who gives a flip? My implementation isn't ideal because I've got dinner plates for running lights anyway, but the germ of the idea may help you. My intent was not so much to prove you right, but to prove myself wrong. Know-it-allism is the first sign of old age... Bill of materials: (1) 2-pack of 3.5" LED flashlights, $2.99 http://www.harborfreight.com/3-1-2-half-inch-nine-led-flashlights-2-pack-97036.html (1) Weaver 1" see thru rifle scope mount set, $5 Wal-Mart clearance* (obligatory US content) The see-thru feature allows the light to be offset from the mounting surface, and for the hardware to be tucked away. The bottoms have holes already--consider them pilot holes for your fasteners and drill away. I just hung mine off the signal stalks, although they'd make more sense sitting somewhere on the fork lowers. The Weaver mounts clamp down on the center of the lights like they were made to go together. It is an absolutely perfect, rock-solid fit. They're built to withstand 44 Magnum cartridges going off in close proximity, so the odd pothole shouldn't present a problem. For the picky with extra scratch, these come in gloss and matte finishes, though I think you're limited to black and silver. Verdict: As aux lights, they do the job and can be flipped on (pre-flight) from a seated position when conditions call for it. They're not gonna put Hella out of business and won't extend your visibility 10x, but they do create a more noticeable front end at night.   * This particular set was for a Marlin 1894 lever gun, but it really makes no difference as long as they're for a 1" scope.
|
|
#
?
Sep 21, 2010 06:25
|
|
|
Marv Hushman posted:(1) Weaver 1" see thru rifle scope mount set, $5 Wal-Mart clearance* (obligatory US content) Brownells do them, and ship internationally (I live in one of the few places in the British Isles where we can still own scary, scary, evil guns. Brownells is my saviour.)
|
|
#
?
Sep 21, 2010 22:34
|
|
|
Q: How many Harley riders does it take to screw in a light bulb? A: Just one, but it's not the light bulb that's defective. My run/brake/turn module is no more. It has ceased to be. Its metabolic processes are of interest only to historians. I knew this when I did a walkaround this morning and noticed the right rear lamp out, but didn't want to believe it and swapped bulbs around, tried new ones, etc. Pulled the unit and everything is peachy, albeit with stock functionality. Interesting that a bulb cranked out in Hungary by GE back in the mid-2000s outlasted a sealed black box. To be fair, the thing has to be jammed into an area with almost zero free space, which is never good for electronics. 
|
|
#
?
Sep 22, 2010 04:56
|
|
|

|
| # ? May 24, 2024 12:31 |
|
|
Marv Hushman posted:
Thanks for the info! Gonna start getting ready to pain this weekend. One thing, what's surface flicking?
|
|
#
?
Sep 22, 2010 20:51
|
|