


|
Toast posted:That looks great, I really need to build something similar but I'm torn about putting in on wheels because there are very few places in my basement with a smooth floor. What do you about your table saw fence on wider cuts? I've seen the miter saw removable/dropout thing and definitely think I'm going to go that route given my smallish basement shop area. The fence goes to about 12" there, which covers a lot of cuts. I haven't had to do wider since I built it, I suppose I could move it to the portable stand or put a few sheets of 3/4" ply underneath to temporarily allow the fence extension to slide out. I got my stool top glued up last night which is 14", so I guess I'll have to figure it out to clean up the sides!
|
 #
?
Sep 3, 2020 14:12
#
?
Sep 3, 2020 14:12
|
|


|

|
| # ? Jun 3, 2024 21:15 |
|
|
Ranidas posted:The fence goes to about 12" there, which covers a lot of cuts. I haven't had to do wider since I built it, I suppose I could move it to the portable stand or put a few sheets of 3/4" ply underneath to temporarily allow the fence extension to slide out. I got my stool top glued up last night which is 14", so I guess I'll have to figure it out to clean up the sides! Fair enough! I keep looking at various builds and can never decide exactly which one to go for, I think I'll have to suck it up and build something stationary for now though.
|
|
#
?
Sep 4, 2020 00:41
|
|

 Generalissimo
|
Just an old timey video on how to make an axe handle the finnish way https://www.youtube.com/watch?v=TgbdWsmNu64
|
|
#
?
Sep 4, 2020 10:54
|
|

|
His Divine Shadow posted:Just an old timey video on how to make an axe handle the finnish way Oh wow thats fancy. I was making some mallets the other day and I just drove a big wedge down the center like Fred Flintstone: 
|
|
#
?
Sep 4, 2020 12:23
|
|

|
You have to drive the wedge with a rock because what if it�s the first mallet ever made?
|
|
#
?
Sep 4, 2020 12:34
|
|

|
So I finally finished adjusting all of the belts/knobs and table on my new (to me  ) Bandsaw! I am seriously geeking out about this thing. It can cut such fine slices its amazing. I turned this tiny piece of scrap branch into three "cubes" and an bunch of planks. It is scary to make those cuts with my hand so I used a stick, thats why they are not as straight as they could be. I'll have to figure out some kind of bar or clamp or something. This is perfect to make blanks for scroll sawing and the lathe out of random garbage wood! ) Bandsaw! I am seriously geeking out about this thing. It can cut such fine slices its amazing. I turned this tiny piece of scrap branch into three "cubes" and an bunch of planks. It is scary to make those cuts with my hand so I used a stick, thats why they are not as straight as they could be. I'll have to figure out some kind of bar or clamp or something. This is perfect to make blanks for scroll sawing and the lathe out of random garbage wood! 
|
|
#
?
Sep 4, 2020 22:26
|
|
|
Cutting rounds is always tricky; having just one flat surface makes it a lot easier. For such a small piece you could maybe just sand one side with a belt sander -- stick the sander in a vise upside-down, turn it on, and hold the piece against it. There's always the hand-sawing option as well of course. Congrats on your new toy!
|
|
#
?
Sep 4, 2020 22:47
|
|

|
Found at an estate sale. Are these any good/how much should I try and haggle off the $400 they want for it? It's a 612TH, the bed is surface rusty but it does power on.
|
|
#
?
Sep 4, 2020 23:18
|
|


|
Javid posted:Found at an estate sale. Are these any good/how much should I try and haggle off the $400 they want for it? Run a test piece through. It should hog hardwood, anything. I think that's a 12" planer/molder?, but it's way beefier than the table top versions. Also check, it's probably 240v if you have that and see if they have any molding knives for it (on the off chance). If you need one, that's a steal at that price just as a planer, Imo.
|
|
#
?
Sep 4, 2020 23:27
|
|


|
If it is in working order buy it for $400. For comparison from a different market. Although its been sitting at this price for over a year https://dallas.craigslist.org/dal/tls/d/woodmaster-12-planer-molder/7170085831.html
|
|
#
?
Sep 4, 2020 23:35
|
|

|
Javid posted:Found at an estate sale. Are these any good/how much should I try and haggle off the $400 they want for it?
|
|
#
?
Sep 5, 2020 00:12
|
|

|
It appears to be 240v yeah. I don't have access to that currently, but I haven't located a proper shop space yet so that's not a permanent problem. I wasn't finding any useful prices on google, thanks! e: The plug is one of these 
Javid fucked around with this message at 03:24 on Sep 5, 2020 |
|
#
?
Sep 5, 2020 02:01
|
|
|
Javid posted:It appears to be 240v yeah. I don't have access to that currently, but I haven't located a proper shop space yet so that's not a permanent problem.
|
|
#
?
Sep 5, 2020 03:54
|
|
|
Kaiser Schnitzel posted:Look at the nameplate on the motor-there�s a decent chance it will say �110/220� and you can swap some leads around in the motor and run it on 120V if you are at all electrically inclined. Somewhere I saw that those have 5hp motors which is getting a little big for 120v though. 3hp and up seem to be 220 only from what I have found.
|
|
#
?
Sep 5, 2020 05:47
|
|
|
the trick to cutting rounds is screw or glue them to something flat
|
|
#
?
Sep 5, 2020 14:35
|
|


|
Spookydonut posted:the trick to cutting rounds is screw or glue them to something flat What?! Use v-blocks you animal
|
|
#
?
Sep 5, 2020 15:58
|
|

|
That looks like a 6-20p so yes, it's a 20amp 240v plug. JEEVES420 posted:3hp and up seem to be 220 only from what I have found. 2 HP is 1500 watts, if you achieve 100% efficiency, which you're probably not. A 15amp 120v circuit is 1800 watts max and while most "15amp" plugs are backed by 20amp breakers you're still not supposed to push that number without changing out for 20amp outlets. The most real horsepower you're going to see on 120v is generally about 1.75. Any more than that and you risk blowing past 15 amps if you stall the motor which means you need to use a 20amp plug but for the most part no one bothers with that and they just jump straight to 240v. It is possible to run a 2+ HP machine on 120v so you might see 120v/240v on a specification plate I suppose, 30+ amp 120v plugs do exist, but all that does is raise the cost of the wiring and if you're running new wire why would you do 120v not 240v? You like spending more money on wire? Anything you see advertising more than 2HP on 120v, like shopvacs, is measuring peak horsepower which is essentially a bullshit number that's going to have an * next to it. Consequently if you're shopping for something like a shopvac and you want to compare relative power you need to look at the max amps drawn which isn't alway as well advertised.
|
|
#
?
Sep 5, 2020 18:39
|
|
|
So apparently bandsaws really don't like cutting round things. I've been trying take make slices of this branch (I want to make rustic ornaments) and it will do a few, but without fail the blade will jam up and twist after the third or fourth. I looked it up and apparently its kind of important to have a flat surface on the bottom for a bandsaw to work properly? Or do I have a bum blade? My saw goes to twice the thickness of this branch slice, but it seems to have a problem with it. When I bought it I assumed it was like a deli slicer for wood Maybe I just need a table saw too..... 
Rutibex fucked around with this message at 21:40 on Sep 5, 2020 |
|
#
?
Sep 5, 2020 21:37
|
|
|
Bandsaw have no problems cutting round things, you're probably creating a bind as you push it through by twisting in some way. A table saw isnt the easier way with that specific action without a sled
Harry Potter on Ice fucked around with this message at 21:56 on Sep 5, 2020 |
|
#
?
Sep 5, 2020 21:54
|
|

|
I made a sled jig thing specifically for cutting rounds. Leperflesh posted:Hell, that reminds me I've been meaning to make this post for a while.
|
|
#
?
Sep 5, 2020 21:59
|
|


|
Wow those are some beefy slices!  I guess it makes sense, I was just free handing it. I should make up a sled jig like that (only much smaller).
|
|
#
?
Sep 5, 2020 22:17
|
|
|
Rutibex posted:Wow those are some beefy slices! It doesn't have to be that fancy. Just a V with Miter rail to keep it straight. Something like this where you don't have to screw into the branch 
|
|
#
?
Sep 5, 2020 22:23
|
|
|
I suspect at least part of your problem is that when the blade grabs the round at the start of the cut, it tries to pull that part down and spin the entire piece. If you're just trying to resist that pull with your hands you're going to get inconsistent results, especially as the piece gets shorter and your attention starts to wander. The V-block jig would help with that.
|
|
#
?
Sep 5, 2020 22:58
|
|
|
So this seems like the best thread for this. I have a workbench in my garage � likely from when the house was constructed � 1953 � and it is not in the best shape. The top work surface and the lower shelf are likely from the same era, and were covered with some kind of tarred linoleum or something (hopefully not asbestos) The tar has worked its way into the wood and the rest of the linoleum will not come off without a fight. The whole thing is 92�wide x 28� deep x 36� high. The wood itself is beefy 1.5� thick, so I was thinking of sanding/planing it maybe, and reusing it, but that was before I saw how bad the tar infiltration was. So I�m not sure what to do now. I think my options are: 1. Trash it. Unbolt the planks and take them to the dump (might have to cut them to fit in the car. Replace them with ??? Maybe plywood sheeting or new planks, or get a whole new bench? (this will be some work as the metal frame is 100% welded, so no easy way to get to a recycle center. 2. Save it. Keep going to get all the linoleum off and sand/plane it somehow. 3. Cover it. Do the best I can and then cover it with some better surface and try not to think about it. Any thoughts? Advice?    
|
|
#
?
Sep 5, 2020 23:15
|
|

|
Babby's first half-blind dovetails. They came out ok. Lots of lessons learned: don't mark the tail length on the pin board end grain; don't clear the pin waste out the narrow opening; be super careful not to cut the pins too deep; make the half-blind wall thicker.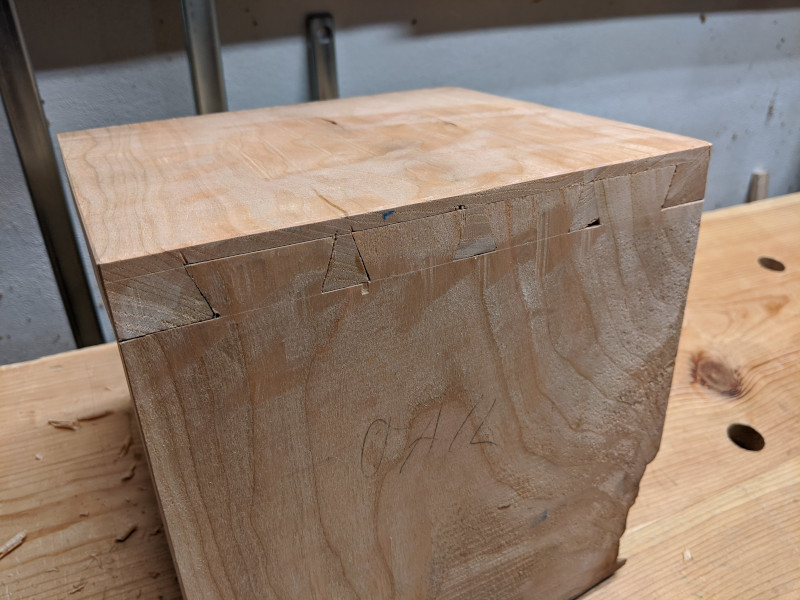
|
|
#
?
Sep 5, 2020 23:30
|
|

|
TooMuchAbstraction posted:I suspect at least part of your problem is that when the blade grabs the round at the start of the cut, it tries to pull that part down and spin the entire piece. If you're just trying to resist that pull with your hands you're going to get inconsistent results, especially as the piece gets shorter and your attention starts to wander. For sure, if you're free handing round pieces rotating "forward" as you go can make it a lot easier but if someone isnt comfortable with using a bandsaw already it isn't safe advice
|
|
#
?
Sep 5, 2020 23:37
|
|
|
Nostalgic Cashew posted:3. Cover it. Do the best I can and then cover it with some better surface and try not to think about it. This would be my recommendation. It wouldn't be hard to cover that with a sheet of 1/4" plywood or something similar.
|
|
#
?
Sep 5, 2020 23:50
|
|
|
Nostalgic Cashew posted:So this seems like the best thread for this. I have a workbench in my garage � likely from when the house was constructed � 1953 � and it is not in the best shape. The top work surface and the lower shelf are likely from the same era, and were covered with some kind of tarred linoleum or something (hopefully not asbestos) The tar has worked its way into the wood and the rest of the linoleum will not come off without a fight. The whole thing is 92�wide x 28� deep x 36� high. Get a paint scraper and go to town. You can take it down to where it's not gooey. At that point, I'd take a jack plane and take it down a bit more. Seems a shame to waste 1 1/2" yellow pine (at least it looks like it to me) bench top that's maybe got 1/16th to 1/8" penetration if that. That's nice lumber. I forget if it was G.E. Morris or someone else itt who specced a couple years ago how YP is like the ideal workbench material, equivalent to hardwood in density, I forget exactly all the pro's. The linoleum may well have asbestos in it, and Idk if the tar keeps it from going airborne. You'd probably want to ask someone that's experienced in remediation. I'd still try to salvage it. At least the top shelf you'd be working off of. The bottom one is just for storage, so you can cover it with something.
|
|
#
?
Sep 6, 2020 00:42
|
|
|
ColdPie posted:Babby's first half-blind dovetails. They came out ok. Lots of lessons learned: don't mark the tail length on the pin board end grain; don't clear the pin waste out the narrow opening; be super careful not to cut the pins too deep; make the half-blind wall thicker. They look pretty good to me. I'm always amazed how much they clean up when they are glued and sanded. Why wouldn't you mark the tail length on the pin board end grain? I usually wind up overshooting it slightly, but it's helpful to have it there. I usually add a cockbead which cleans all that up and allows for a little more slop fitting the drawer front too, but that's not always a viable stylistic choice. I think the depth of the half blind wall looks okay. I wouldn't go any thinner, but its always a trade off between a nice long looking dovetail and a chipped out drawer front. Cockbead again helps here, especially if the dwr front is veneered. The angle of your dovetails is much steeper than I usually cut but that's again purely personal taste IMO. I've never seen a dovetail of any angle fail from being pulled on too hard. Perhaps you hand dovetail cutters can help me solve a mystery. Very fine, narrow 'London' dovetails are a thing on English antiques. They look impossible fragile, but ime they aren't the part of a drawer that fails:  I have read that this wasn't purely a fashion/taste, but was done to make building drawers faster. Continental and post-colonial American work usually has much larger, steeper dovetails like the ones ColdPie just cut. The drawer I posted is from a probably late 19th C linen press of decent quality (solid mahogany, not veneered deal/pine like the really cheap ones) but nothing fine. Everything about it says 'handmade in a factory/sweatshop in the east end of London c.1880' and the guy building the drawers was likely paid piecework for them and had every reason to figure out how to make them as fast as possible. I've not cut a ton of half blind dovetails by hand, but I've definitely cut a few, and for me the time-consuming part is removing all the waste on the pin board, so it seems like tiny pins would make more work than fat pins? I usually cut pins first-maybe it works different if you cut tails first?
|
|
#
?
Sep 6, 2020 01:54
|
|
|
Mr. Mambold posted:I forget if it was G.E. Morris or someone else itt who specced a couple years ago how YP is like the ideal workbench material, equivalent to hardwood in density, I forget exactly all the pro's. It was me, and as per usual I was parroting Schwarz mostly while referencing us forest service documents. (Also a bit of personal experience as I have built a SYP roubo and used it for the last twelve or so years although not nearly as much as I should have) Tl:dr when people say "strength" they are often talking about surface hardness when what really matters is actual stiffness of the wood, e.g. the resistance for your benchtop to deflect under load. for thay, the pines classified under "southern yellow pine" are exemplary, and when budget is considered they are effectively unbeatable. That said, Schwarz's most recent book is freeeeeeee (as a thumb in the eye to the investment capital firm that owns his old work and won't sell it back to him) and everyone should read it imo.
|
|
#
?
Sep 6, 2020 02:28
|
|

|
GEMorris posted:

|
|
#
?
Sep 6, 2020 03:11
|
|
|
So now that it�s cooling off a little outside, I�d like to get my feet wet with woodworking (because what the gently caress else is there to do right now) I was thinking about starting with something like this, and I think I basically have all of the tools required other than a mitre saw. Now, a good mitre saw seems kind of expensive, so I was wondering if I could make due with this hand saw plus this mitre box instead? The mitre box only goes down to 22.5 degrees (compared to the 17 degrees called for), but I don�t think that would be too hard to compensate for?
|
|
#
?
Sep 6, 2020 03:23
|
|


|
If I was on a super strict budget and needed to cut miters and cared about the finish quality of my cuts I'd grab one of these and then make my own miter box.
|
|
#
?
Sep 6, 2020 03:32
|
|
|
That project only calls for two miter cuts, unless I'm missing something. It might take a few tries and some wasted wood, but you could do those with a handsaw.
|
|
#
?
Sep 6, 2020 03:44
|
|
|
GEMorris posted:If I was on a super strict budget and needed to cut miters and cared about the finish quality of my cuts I'd grab one of these and then make my own miter box. Dang great deal I've been needing a new one, thanks for sharing.
|
|
#
?
Sep 6, 2020 04:12
|
|
|
Harry Potter on Ice posted:Dang great deal I've been needing a new one, thanks for sharing. Nice saw.... Note, ships November 1, 2020.
|
|
#
?
Sep 6, 2020 04:30
|
|
|
Hadn't noticed the ship date, it's been a popular item on slickdeals. The original saw and box Rock posted will be useful in general and can probably get you close given the rough aesthetic of your example. Just go slow. You'll still use the saw later for rough stock breakdown in the parking lot at home depot.
|
|
#
?
Sep 6, 2020 04:40
|
|
|
Rock My Socks! posted:So now that it�s cooling off a little outside, I�d like to get my feet wet with woodworking (because what the gently caress else is there to do right now) A mitre box is just a guide for the saw. Since you only need 2 angled cuts it wouldn't be that hard to set up your own guide. Exact angle isn't that important in this piece so much as your angles need to be the same in both cuts. You could really do this with any saw though some might be a little easier or harder depending on the specifics. You'll probably want a crosscut saw for this project.
|
|
#
?
Sep 6, 2020 04:57
|
|
|
GEMorris posted:Hadn't noticed the ship date, it's been a popular item on slickdeals. Thanks- probably a dumb question, but what makes the home depot saw �rougher� than the one on slickdeals? This one on Amazon seems to be a similar design...would that work? I�m struggling to see how you would get good control with this handle type...maybe it�s something that makes more sense when you're actually using it? https://www.amazon.com/HACHIEMON-Ja...99367595&sr=8-5 Bouillon Rube fucked around with this message at 05:48 on Sep 6, 2020 |
|
#
?
Sep 6, 2020 05:37
|
|
|
|
| # ? Jun 3, 2024 21:15 |
|
|
Nostalgic Cashew posted:So this seems like the best thread for this. I have a workbench in my garage – likely from when the house was constructed – 1953 – and it is not in the best shape. The top work surface and the lower shelf are likely from the same era, and were covered with some kind of tarred linoleum or something (hopefully not asbestos) The tar has worked its way into the wood and the rest of the linoleum will not come off without a fight. The whole thing is 92”wide x 28” deep x 36” high. Option 1: scraper and heat gun, take as much off as you can then clean it up with a scrub plane. Option 2: flip those slats?
|
|
#
?
Sep 6, 2020 10:38
|
|

