|
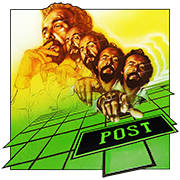
hmm i kinda like this one better. slight variation in math, much more interesting shape
|
 #
?
Feb 3, 2023 16:49
#
?
Feb 3, 2023 16:49
|
|


|

|
| # ? Jun 3, 2024 05:02 |
|
|
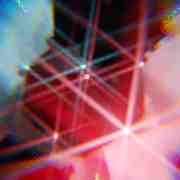
fart simpson posted:fractal friday???? imo this one works better in the context of the lighting and background. Like a weird sideways tornado
|
|
#
?
Feb 3, 2023 18:14
|
|


|
distortion park posted:imo this one works better in the context of the lighting and background. Like a weird sideways tornado yah i made the fractal first and thought it looked kinda tornado like and then made the scene around it anyway those are both quaternion julias. first one does a sin(x) only on the first axis before multiplying with c. second does a sin(x) on every axis
|
|
#
?
Feb 4, 2023 02:24
|
|
|
Songbearer posted:Does this make you a fractal then cause you're always pretty The camera cuts are MUCH cleaner in this one. Much easier to follow the action!
|
|
#
?
Feb 4, 2023 05:04
|
|


|
Is there some kind of reference document mapping UI components to the property names associated with them? Specifically, I'm trying to create a shortcut key for the "Background Images" checkbox in the camera properties, but I can't figure out the property name that I need to use to toggle it If someone can tell me the property I need that would help but it would be even better if there was some kind of document that just let me look it up myself for the future
|
|
#
?
Feb 4, 2023 06:35
|
|

|
Argue posted:Is there some kind of reference document mapping UI components to the property names associated with them? Specifically, I'm trying to create a shortcut key for the "Background Images" checkbox in the camera properties, but I can't figure out the property name that I need to use to toggle it here u go op https://github.com/blender/blender/tree/master/source
|
|
#
?
Feb 4, 2023 06:56
|
|
|
Argue posted:Is there some kind of reference document mapping UI components to the property names associated with them? Specifically, I'm trying to create a shortcut key for the "Background Images" checkbox in the camera properties, but I can't figure out the property name that I need to use to toggle it Not sure if there is a document that lists them all, but you can enable Interface > Python Tooltips to show the name. The info window in the Scripting workspace will also tell you what event happens when you do something. Or you could just right click on the checkbox and assign shortcut.
|
|
#
?
Feb 4, 2023 10:58
|
|


|
I'm on my annual Blender Kick and have come up with a fairly decent, if I guess trite amongst Blenderheads, gEoNoDeS animation. I'm struggling to make Eevee look good enough, and have got Cycles down to about 45 seconds per frame (Ducky3D was a godsend, as always) but still this takes literal hours even for a 10 sec animation. For animations, am I better off making Eevee take longer by cranking resolution up or continuing trying to speed up Cycles? I know at a point there's diminishing returns whichever way I go.  Here's a still (well, a cellphone pic of my monitor), the red stuff moves around Edit: 2060 set to Optix, i9600k, I think all boxes to use these are ticked NonzeroCircle fucked around with this message at 22:56 on Feb 5, 2023 |
|
#
?
Feb 5, 2023 22:40
|
|

|
looks sick how long do you want end result to be? if it�s just a looping thing or something maybe ten seconds is fine? i�d usually end up setting it all to go before bed and then overnight and while at work it did its thing i�d always make sure to go into task manager / details and setting the priority on blender to low so that my pc was usable for other things at the same time
|
|
#
?
Feb 6, 2023 02:25
|
|

|
ill be honest, 45 seconds per frame isnt very much
|
|
#
?
Feb 6, 2023 02:34
|
|
|
if you can afford upgrading to a nvidia geforce rtx 4090 that would go down to about 6 seconds per frame already
|
|
#
?
Feb 6, 2023 02:38
|
|
|
It's a 10 sec loop at 1024x1024, I'm just being picky I reckon. That task manager trick is a good shout though, I've been playing Dawn of War whilst waiting for stuff as it's pretty light on the PC
|
|
#
?
Feb 6, 2023 09:06
|
|
|
sinky posted:Or you could just right click on the checkbox and assign shortcut.  ... goddammit, thanks ... goddammit, thanks
|
|
#
?
Feb 6, 2023 09:54
|
|
|
NonzeroCircle posted:That task manager trick is a good shout though, I've been playing Dawn of War whilst waiting for stuff as it's pretty light on the PC another trick that�s worth while was changing the amount of CPU cores used in the render settings, I can�t remember where it was (render settings I think, not user preferences), the default setting is auto, which is all cores, and I changed it to leave a couple cores free all the time. of course render times are a little bit slower but it makes the machine very useable while rendering (not so much gaming) when combined with low priority (which I haven�t worked out a good way to go without having to set it every drat time I start blender you can also turn off some cores manually in task manager and achieve the same end goal but if you do it the way above then the settings stick and you don�t need to do it each time this trick overall can be used to set up a render in very low priority blender, and then open another blender instance as a not-as-low priority than the first, and work on a project while one renders in the background 😁
|
|
#
?
Feb 6, 2023 11:57
|
|
|
NonzeroCircle posted:It's a 10 sec loop at 1024x1024, I'm just being picky I reckon. mate if you want check out wfproductions on tiqtok? it�s the music I�ve made but also with some my photography/video and also 3d poo poo from blender. mixed with davinci i don�t expect you to like it necessarily but as someone who also does the music you might appreciate the multidisciplinary approach it�s a fun creative outlet at the very least
|
|
#
?
Feb 6, 2023 12:16
|
|
|
need some more help, i think this should be something basic so if i create a uv sphere and put the default checker texture on it, it looks the way i expect  but if i instance the uv spheres with geometry nodes and use the same texture, it gets all stretched  in both cases i'm using default settings and only tweaked the random distribution method. also changed scale in the second pic but the stretching happens no matter what scale i use. what am i missing? the only offscreen nodes in the image are the input/output
|
|
#
?
Feb 7, 2023 05:23
|
|
|
Argue posted:need some more help, i think this should be something basic ok. if you remove your "realize instances" node i think it will work the way your expecting it to. it should also work the way you are expecting if you only instance a single uv sphere. whats going on here is the shader is automatically using the "generated" texture coordinates if you dont plug in anything into the vector input of the checker texture. generated coordinates basically map to the bounding box of the entire geometry. if you only have 1 uv sphere in your geometry, then its bounding box is identical to the bounding box of your normal rear end uv sphere, but as soon as you create many uv spheres and realize them, then your overall geometry changes. so the generated coordinates are now changed because the geometry is bigger. the real way to do this is to not us generated coordinates for something like this, because then your textures will shift and slide around when you animate stuff or add more stuff to your geometry node tree. this is one reason why people use uv maps, to better control exactly this type of thing. unfortunately uv unwrapping in geometry nodes kinda sucks rear end right now and the uv spheres you create using the geometry primitive nodes will not come with a uv map attached to them. you can try creating your sphere or w/e separately, making sure it has a uv map, and then dragging it into your node tree as an object reference or something like that. you can also try uv unwrapping with the uv unwrap node like it seems you tried to do already. after you do this, in your material shader, you need to add the vector input associated with your uv map into the vector input of your texture. if you use the normal uv sphere this will be the texture coordinate node - uv coordinates. if you uv unwrap in geometry nodes, you need to save that uv map as an attribute on the face corner domain and then pass in that attribute to the material shader and use that
|
|
#
?
Feb 7, 2023 06:27
|
|
|
if you dont understand what im talking about i can whip up some screenshots later
|
|
#
?
Feb 7, 2023 06:28
|
|
|
okay I think I get it, that explanation helps, but i'm also not sure how this guy solved it; i was just following along with his tutorial and i mostly replicated everything he did except his rocks have normal noise while mine are stretched--i'm procedurally generating rocks by distorting uv spheres, so i think somehow i have to use generated coordinates? except he didn't do that at all so i'm stumped
|
|
#
?
Feb 7, 2023 08:04
|
|
|
i think you should figure out what vector you want to plug into the noise texture in your material shader. if you dont plug anything in and youre using generated coordinates, then things things will always distort and stretch and move around as you change your geometry nodes. that might be good enough, but if you're having stretching problems like this then you gotta figure out what your noise is referencing. i dont know what that other guy is doing but with generated coordinates on realized geometry nodes generated geometry, you will run into problems if you have more or fewer or bigger or differently distributed or whatever rocks. if your rocks are not moving, the easiest solution might be a geometry position node into the noise texture. this will use the position in world space, so this will not work well if your rocks are moving. if theyre not moving, it will work great
|
|
#
?
Feb 7, 2023 08:57
|
|
|
you dont need to use generated coordinates. all your noise texture actually needs is a way to map pixels to the noise function. generated coordinates are basically saying this intersection point of a ray and a geometry is at a given x, y, and z percentile of the overall geometry. given that 3-vector of percentiles like that, sample the 3d noise function there. right? thats why it stretches, because your bounding box of the whole collection of rocks is probably not a perfect cube. its gonna be longer on the axis that stretches but you can plug any other vector into there to sample your noise. world position of that point (geometry info node in shaders) is totally valid and it wont stretch the same way, because the world space itself does not stretch. but then your rocks noise texture wont move "with" the rocks, it will be like the world itself has some noise pattern and as the rocks move through it their texture will change. but it might be the easiest thing for you to use in this situation uv unwrapping is basically making a lookup table for every face corner of your geometry for the noise to sample from, and then interpolating between those for in between pixels you could also move all your rocks to world origin, or to world origin with offsets or w/e, store some info there as a vector attribute, then move them back to where they were originally. and pass in this attribute to your shader. thats sort of what instancing does and why your textures change when you realize instances theres all kinds of possibilities here. remember you are basically just defining a mapping to sample the noise field
|
|
#
?
Feb 7, 2023 09:13
|
|
|
tried to replicate your stretching problem and show my suggested fix 
|
|
#
?
Feb 7, 2023 09:29
|
|
|
object coordinates will also work. i think they might even be equivalent to the geometry position in this case? e: oh i remember what the difference is. object coordinates are in reference to the the object location transform. position is world space. so if your base object has no transform, as in the base object is located at 0, 0, 0, then they are the same fart simpson fucked around with this message at 09:34 on Feb 7, 2023 |
|
#
?
Feb 7, 2023 09:31
|
|
|
thanks! i used a texture coordinate node instead and now the rocks are consistent even when i move them so do i understand correctly that there's no use case for just using the default generated uv coordinates aside from making yourself suffer?
|
|
#
?
Feb 7, 2023 11:57
|
|
|
well you generally want to use them when you�re doing a bunch of vector displacement stuff because the generated coordinates �follow� the displaced geometry and the others dont. idk im sure some people use them more but i tend not to myself
|
|
#
?
Feb 7, 2023 12:13
|
|
|
echinopsis posted:mate if you want check out wfproductions on tiqtok? it’s the music I’ve made but also with some my photography/video and also 3d poo poo from blender. mixed with davinci Do you come up as wrproductionsnz? That looks like your style, cool fm synthwavy stuff? Or are you dj Wesley Fillipe? NonzeroCircle fucked around with this message at 23:30 on Feb 13, 2023 |
|
#
?
Feb 13, 2023 23:25
|
|
|
yeah it�s wfproductionsnz - sorry I deleted tiktok so couldn�t confirm the name but yeah that�s me. i�m not saying it�s great or anything but it is all me a lot of synthwavey ambientish whatever but also blender
|
|
#
?
Feb 14, 2023 01:18
|
|
|
Man if you ever need to bake PBR textures, note that Blender's baking features will produce incorrect results and silently fail in various ways from such offenses as "having node groups" or "mixing images or BSDFs in certain ways". Also somehow it can't bake metallicity. Meanwhile I bought my first ever plugin with SimpleBake and can confirm that not only it works but it has a sane user experience and is a billion times smoother to use. I am not affiliated with this plugin I'm just stoked about having bakes that work. Elukka fucked around with this message at 04:33 on Feb 14, 2023 |
|
#
?
Feb 14, 2023 04:25
|
|

|
https://youtu.be/EGIwcPA1_34 aww yiss this should be peanuts with blender these days, right or is there a certain je ne sais quoi about it
|
|
#
?
Feb 17, 2023 19:18
|
|

|
ive thought about that myself. people use the term ray tracing colloquially to mean forms of rendering that use paths of light, but "strictly", ray tracing, should refer to the older trad method, and NOT path tracing. semantics bullshit I suppose I think it'd be possible by turning off global illumination things, reducing bounces down. and also choice of materials. 100% glossy surfaces etc but haven't explored fully. can probably get raytrace plugin? I forget name of free one thats been around for ever echinopsis fucked around with this message at 19:42 on Feb 17, 2023 |
|
#
?
Feb 17, 2023 19:40
|
|
|
https://www.youtube.com/watch?v=p9xN7aJmcvI Eyes with or without emission? Given my character wears goggles I had a worry that maybe his expression would be unreadable under low light, so having them lit up gives him a more cartoony look while keeping them always visible but that doesn't quite fit the vibe of the visuals which have a semi-realistic look to them. Tough call, but so far out of the people I've asked I have 1 for and 2 against.
|
|
#
?
Feb 17, 2023 22:12
|
|


|
Songbearer posted:https://www.youtube.com/watch?v=p9xN7aJmcvI Actually that does look better. Also emission gives the option for the ol' "Can only see the eyes in a dark room" cartoon hijinks.
|
|
#
?
Feb 18, 2023 04:01
|
|
|
https://www.youtube.com/watch?v=G9ecjFgzk6M Hand/Eye/Face animations on the driver are nearly finished with just a fraction more of the project to do, then it's time to clean up the monster and in March hopefully work on scene lighting, particle effects and tidying up some of the older models. Driver's eyes are emissive but I made the goggles less transparent so they'll always be visible but won't look like they're popping through his goggles. Hands are a lot of work but are very fun!
|
|
#
?
Feb 28, 2023 15:02
|
|
|
https://github.com/dreamworksanimation/openmoonray how cool or irrelevant is this being open sourced? i report, you decide
|
|
#
?
Mar 16, 2023 02:52
|
|
|
is that a full dcc or just a renderer?
|
|
#
?
Mar 16, 2023 13:36
|
|

|
I'm making this and I was able to hack together those decorations on the stern but I can't figure out any good way to do something similar for the prow. I've tried various ways of having an object follow a curve but they just all seem to work poorly. The closest I've got is the bevel option on curves but it can't deal with sharp turns. Anyway here's a warhams space boat.
|
|
#
?
Mar 19, 2023 01:52
|
|
|
Elukka posted:I'm making this and I was able to hack together those decorations on the stern but I can't figure out any good way to do something similar for the prow. I've tried various ways of having an object follow a curve but they just all seem to work poorly. The closest I've got is the bevel option on curves but it can't deal with sharp turns. Not sure if I understand entirely, but did you try putting the curve modifier on the decoration you wanted to add? Apologies, you probably tried this already, but I may as well throw it out there.
|
|
#
?
Mar 19, 2023 04:20
|
|
|
Yeah, but I couldn't get any reasonable result from that for reasons I already forgot.
|
|
#
?
Mar 19, 2023 13:53
|
|
|
if they�re just decorations, why not use a displacement map?
|
|
#
?
Mar 19, 2023 14:38
|
|
|

|
| # ? Jun 3, 2024 05:02 |
|
|
fart simpson posted:https://github.com/dreamworksanimation/openmoonray let me know when shrek 2 goes open source
|
|
#
?
Mar 19, 2023 14:49
|
|