


|
Personally I like French seams. They're clean and durable and I think easier to do than flat-felled seams.
|
 #
?
Dec 9, 2023 17:50
#
?
Dec 9, 2023 17:50
|
|


|

|
| # ? Apr 28, 2024 22:57 |
|
|
French seams seem straight forward for how fancy their reputation is, except for curves, my busted spatial reasoning can't wrap my head around it, keep thinking I need to make concave curves convex and vice versa
|
|
#
?
Dec 9, 2023 18:49
|
|

|
cloudy posted:But they have their time and place. Maybe really nice, laying flat, smooth, decorative kinda places. But I'm not a professional so what do I know!! You are describing a quilt. Piecing a quilt top is really just lots and lots of ironing with extra steps.
|
|
#
?
Dec 9, 2023 19:51
|
|

|
True! I do kinda subscribe to the "iron open for precision in piecing, iron to the side for durability" though. It's so much easier to line things up nicely when ironed open though!!
|
|
#
?
Dec 9, 2023 21:22
|
|

|
So I've decided I wanted to learn how to make garments. I'm starting with a onesie for my boy, since I figure the garment quality doesn't matter that much, as long as it doesn't immediately disintegrate. Plus they're usually loose fitting so getting the measurements perfect isn't that big of a deal. I'm basically gonna follow this lady's tutorial: https://www.youtube.com/watch?v=ohfaVlbskWY For the side and armhole seams, I'm going to use my wife's sewing machine (b05 academy) and use its "overlock" stitch with to finish the raw edges. I gave it a spin on some pieces from an old t-shirt: 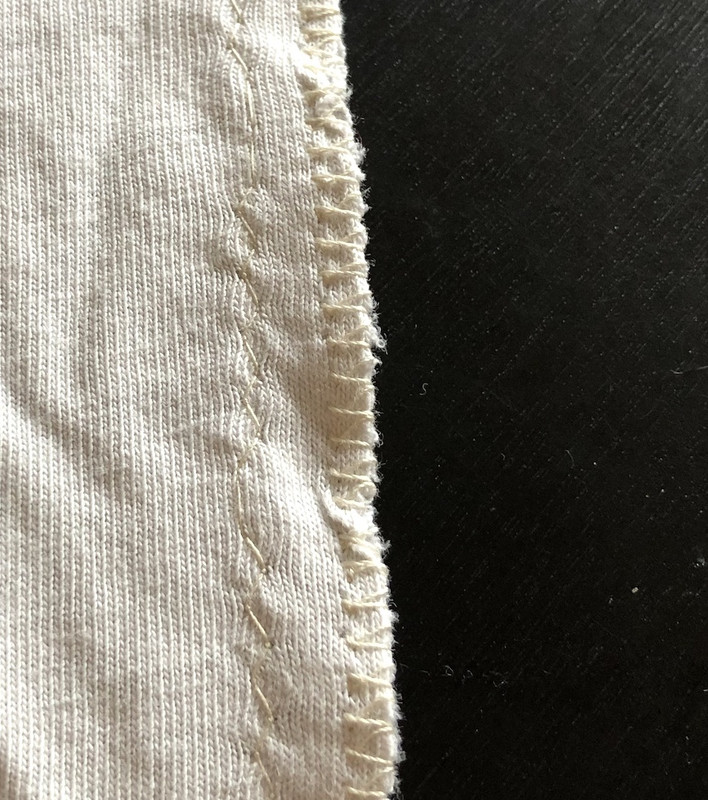 (I realize now I did the seam backwards, in an actual piece the right sides should be together but that's why I make mistakes with old t-shirts) I did a zigzag stitch at the seam allowance for my pattern (this is not a pattern piece here, just me messing around), then used the overlock stitch on the edge. I had two problems: It looks like the zigzag skipped a couple seams and the edge stitch tended to bunch up and pull away from the machine as I sewed it. Are the skipped stitches in zigzag just me not handling it properly and having the wrong stitch length/width and or needle? Same with the edge seam. Do I just play around with the width until I get it right? And is there much to be done about it pulling away? That was the hardest part, the piece kept wandering towards my left as I sewed so the edge kept on getting closer to the needle and at the end it skipped off the piece entirely.
|
|
#
?
Dec 18, 2023 21:07
|
|

|
Skipped stitches is usually a tensioning problem with the sewing machine relative to the fabric that you're using. It's always a good idea to do a few test seams on the actual fabric you're using to get the tension right. The manual for the sewing machine should explain how to adjust tension and will probably give some recommended tensions for different fabrics. It's also a good idea to get a fresh needle if the one you're using hasn't been replaced in a while.
|
|
#
?
Dec 18, 2023 21:56
|
|


|
Eeyo posted:Same with the edge seam. Do I just play around with the width until I get it right? And is there much to be done about it pulling away? That was the hardest part, the piece kept wandering towards my left as I sewed so the edge kept on getting closer to the needle and at the end it skipped off the piece entirely. Some of it is technique, sure. You gotta steer the fabric properly and that just takes practice. But knit fabric, especially stretch-knit stuff as used in many t-shirts, is just hard to sew. It's flimsy and tends to wiggle and pull away like that. You can try the stretch-and-sew technique for simple seams. But realistically something stretchy shouldn't be the first thing you try to make -- it's an extra challenge. You can practice on some plain woven cotton without any stretch in it. A cloth napkin or handkerchief would work, or you can buy some cheap muslin if you don't have any scraps. You could also cut up some old non-stretch jeans, though that's going to be significantly heavier fabric. Also, if you do want to do knit fabrics properly, you need to get a ball point needle so it doesn't shred the fabric. That might also be part of why you're skipping stitches.
|
|
#
?
Dec 18, 2023 22:14
|
|
|
Eeyo posted:So I've decided I wanted to learn how to make garments. I'm starting with a onesie for my boy, since I figure the garment quality doesn't matter that much, as long as it doesn't immediately disintegrate. Plus they're usually loose fitting so getting the measurements perfect isn't that big of a deal. Ballpoint or jersey needles solve a lot of knit fabric problems! Be sure you're using one. To help keep the fabric from wandering away, guide it with your hand (NEVER in front of the needle, always to the side) or a stiletto, and/or support it with either a stack of books to the side or pull out the extension table for the machine (yours kinda has one integrated but I don't like those much and would just use books instead) . You can also change the foot to one with a guide for the edge finish stitches and that will help keep them even. That and the right needle plus reduced presser foot pressure should help the edge stitches.
|
|
#
?
Dec 18, 2023 22:19
|
|
|
Lead out in cuffs posted:Skipped stitches is usually a tensioning problem with the sewing machine relative to the fabric that you're using. It's always a good idea to do a few test seams on the actual fabric you're using to get the tension right. The manual for the sewing machine should explain how to adjust tension and will probably give some recommended tensions for different fabrics. Yeah I'll play around with that next. The manual isn't very specific, just tells me the default tension, then recommends changing it based on whether or not the thread from the bobbin is on the topside or not. Sagebrush posted:You can practice on some plain woven cotton without any stretch in it. A cloth napkin or handkerchief would work, or you can buy some cheap muslin if you don't have any scraps. You could also cut up some old non-stretch jeans, though that's going to be significantly heavier fabric. I've taken a bunch of scrap leftover from when my wife made curtains, plus she probably has some pieces here and there. So maybe I'll try out a small project with the same finishing techniques but on that first. I did buy a jersey needle from schmetz so that's at least right. My wife quilts so she has quilting needles. effika posted:Ballpoint or jersey needles solve a lot of knit fabric problems! Be sure you're using one. The machine came with a foot with an edge guide:  I'm not sure what was causing it to pull away from the needle. I think it actually might have been the seam getting curved as it was sewed and then the edge pulling away from the guide because it was curving. I'll definitely try other ways to support the work as it's being sewed though. My wife usually uses the extension table but maybe she'd like something bigger when she's doing the quilting part.
|
|
#
?
Dec 19, 2023 01:19
|
|
|
Eeyo posted:I'm not sure what was causing it to pull away from the needle. I think it actually might have been the seam getting curved as it was sewed and then the edge pulling away from the guide because it was curving. Look on the top of the machine for a little semi-repressed knob with a slit in it, with a minus and plus sign on it/near it. (NOT the one on the side.) Turn it to the minus side a half turn and see how the knit fabric handles. I wonder if the presser foot pressure isn't set too high. That machine is the same form factor as many others; it's identical to my Singer HD series but I hope with better quality control. You'll see others on-line say to try a quarter turn, but for thin knits I turn the pressure WAY down, or use a walking foot and leave it only down a little. When I sew knits without the walking foot turning the presser foot pressure down helps a lot. Eeyo posted:I'll definitely try other ways to support the work as it's being sewed though. My wife usually uses the extension table but maybe she'd like something bigger when she's doing the quilting part. Do you want to be the best gift-giver? Get her a nice big extension table to make quilting easier! They have some cheaper ones on Amazon but you can get some nice big custom ones, assuming she likes this machine and wants to keep it around a while.
|
|
#
?
Dec 19, 2023 03:45
|
|
|
A protip I got from this thread for kids was to use glue stick instead pins to keep the edges together. It washes out later, but can really help keep things in place. A walking foot is another good idea.
|
|
#
?
Dec 19, 2023 06:21
|
|
|
crossposting from the 3D CAD threadSagebrush posted:It's pretty obscure but I think it's cool, yeah.
|
|
#
?
Dec 19, 2023 07:58
|
|


 since there are only a few really practical patterns, and the rest are kind of gimmicky and only used for occasional decorative work. And of course they didn't actually end up making more cams going forward, because the 1980s came along and so did electronic machines. The 6690 here was their first microprocessor-controlled machine, and you can clearly see the family resemblance.


|
Sagebrush posted:crossposting from the 3D CAD thread I love it when mechanical machines benefit from modern tech. That's a cool project!
|
|
#
?
Dec 19, 2023 14:39
|
|
|
Sagebrush posted:crossposting from the 3D CAD thread as a mechanical engineer interested in sewing machines more than the actual act of sewing, this is sick as hell
|
|
#
?
Dec 20, 2023 20:48
|
|

|
Ok so I had a weird idea of something to sew with my wife's scraps before I try a bigger project. I'm going to make a little decorative wine holder, so basically just a little bag to carry wine around so it looks fancier. Basic idea is it has a pentagon base, then 5 panels around the outside, finish the top rim with bias tape (since I'll be using that technique later anyway), then sew on some kind of handle. I made a model in some cad software and made the panels twist to give it a little flair. Most of that sounds straightforward, but I'm not sure the best way to treat the seams on the bottom. Here's a paper model I developed out of the pattern I made (so obviously no seam allowances): 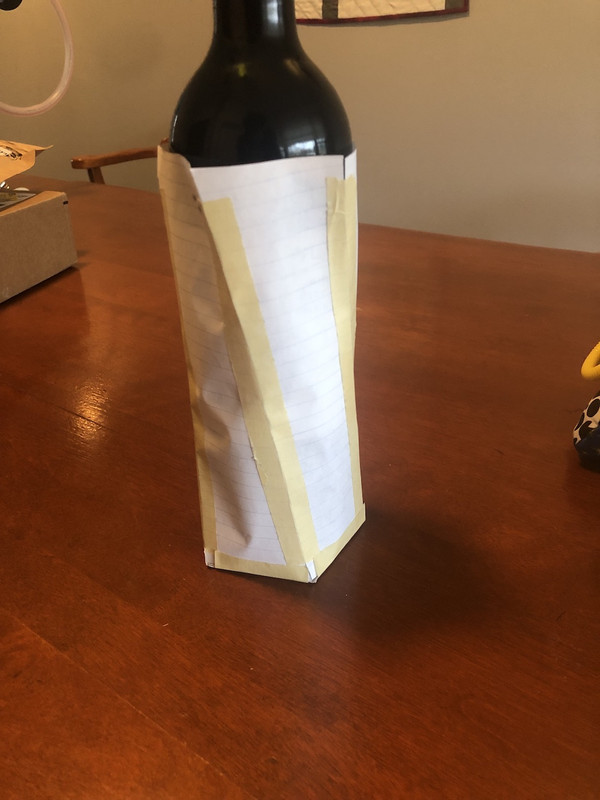 And then the pattern: So obviously just a standard seam allowance on the long sides, nothing on the top (since I'm binding it). On the bottom, it looks like a regular seam allowance will end up with some extra fabric on the corners of the pentagon. Would I just fold those up, or is there anything more fancy I can do?
|
|
#
?
Dec 21, 2023 17:40
|
|
|
You'll probably want some amount of interfacing on the pieces so that it'll hold its shape better and reduce bias stretching with the angled pieces (that gets cut without seam allowance, it'll make the seams too bulky). For the seam allowance itself, i would think maybe carefully trim and flat-fell?
|
|
#
?
Dec 21, 2023 19:04
|
|


|
Alright work in progress just using super basic stitches (straight stitch and my machine's "double overlock stitch"). Looks mostly fine so far! I didn't want to bother with facing fabric for a first attempt. It seems mostly fine at the base, the top is kinda flopping over. I bet if I can figure out a stiff binding that'll do a lot to give it a more distinct shape. I only sewed the wrong sides together once, so that's a good start. 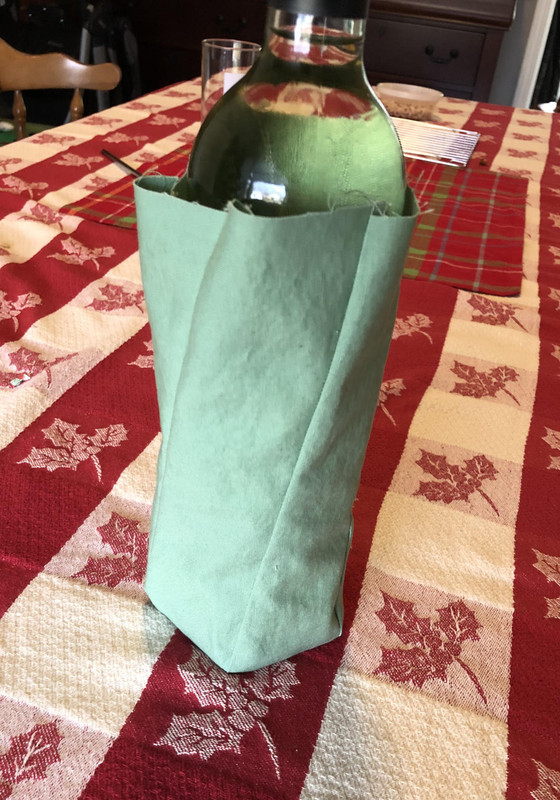 Now to finish the top with some binding and sew on a handle.
|
|
#
?
Dec 27, 2023 22:28
|
|
|
You probably don't even have to do any binding at the top, unless you want the effect. Just turn the "hem" down a few times, inside or outside as you prefer, and topstitch it.
|
|
#
?
Dec 27, 2023 22:32
|
|
|
Alright finished product. I didn't have a good plan for the handles or how to attach them. Just sewed a long piece with a zigzag stitch and tucked it inside out. Then I stuck it inside the binding and stitched over it a couple times. I think I'll have to study how tote bags are made and figure out a better handle method. 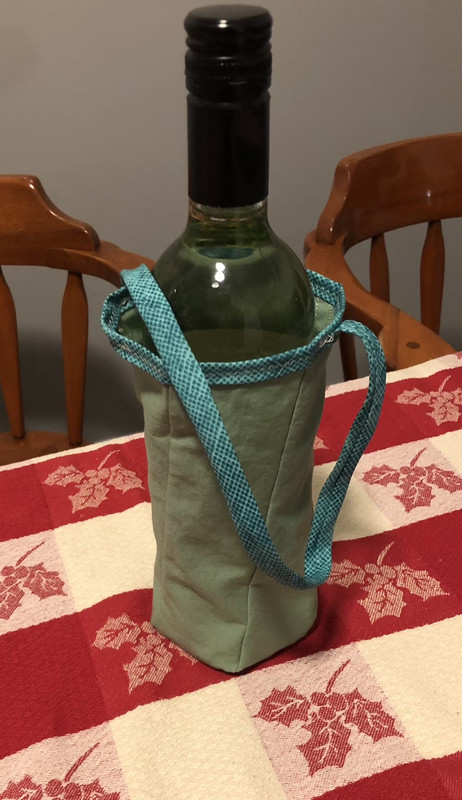 As a first attempt at sewing something it turned out pretty good. I might work on a version two and fix the problems I ran into.
|
|
#
?
Dec 29, 2023 04:50
|
|
|
Eeyo posted:Alright finished product. Hey not bad! I'd just have the handled stitched inside the lip with a big box shape of stitching. Checking tote bags is a great idea for inspiration. Make another with brown material and a zig zag top so it looks like a paper bag.
|
|
#
?
Dec 29, 2023 17:22
|
|

|
Alright finished up my first baby clothes. Just did a shirt since I don't have a snapper insterter.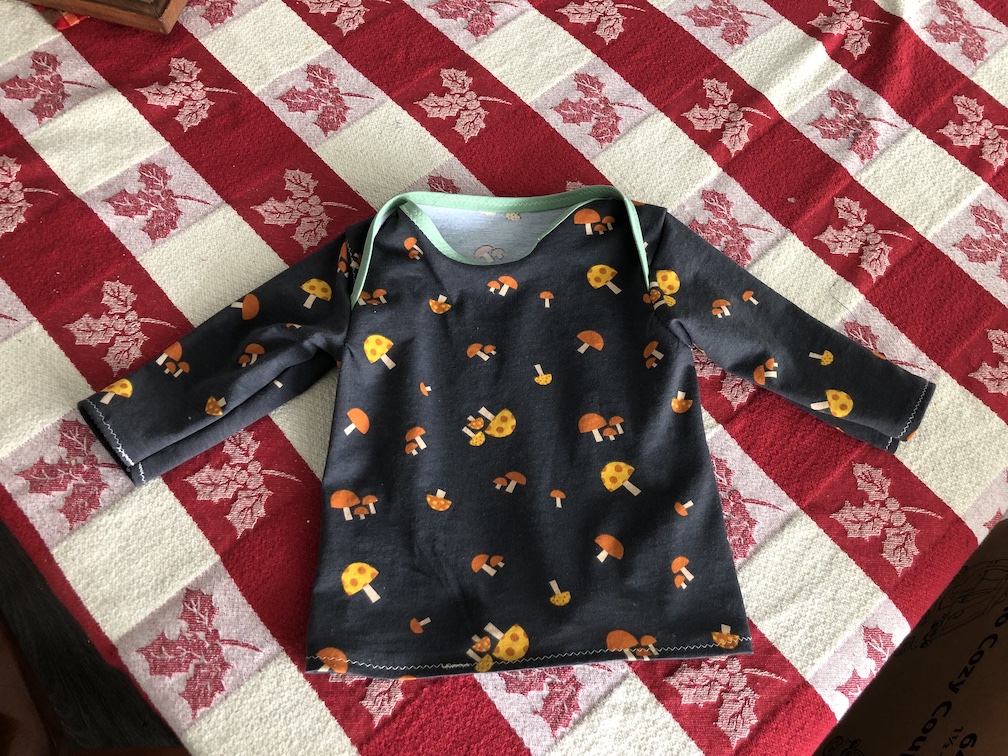 Thankfully it fits my boy very well! I hosed up the binding on the front a bit, had to go back and give it an extra stitch to make sure it was attached. The front had a strong curve so it was hard to apply it well. I hosed up the sewing on the shoulders a bit. I sewed the front and back pieces together first per the instructions, but that extra stitch shows up after I sewed in the sleeves. The instructions had me "baste" it, but I wasn't 100% sure what that meant. Getting the hem right was also a pain. I should have started/stopped the hem stitch at the side seam but there's a little section of double stitch at the front. Oops!
|
|
#
?
Jan 19, 2024 21:58
|
|
|
Eeyo posted:Alright finished up my first baby clothes. Just did a shirt since I don't have a snapper insterter. That's the good thing about baby clothes: babies don't care and they grow so quickly you'll make another soon! It looks lovely and I think you did a good job. Basting means using an easy to remove stitch that gets removed (usually) at a later step. It helps hold fabric together more securely than pins or clips with less bulk. Use a straight stitch at a longer length (like 3 or more) usually. Look up Kam snaps (brand name) for lead safe snaps, btw. effika fucked around with this message at 23:25 on Jan 19, 2024 |
|
#
?
Jan 19, 2024 23:20
|
|
|
I just bought my first sewing machine off ebay from goodwill. As far as I know it's "tested and in working condition". It's a Singer 328k, made in the mid-60s. I put in the starting bid for $30, figuring if it was worth more, someone would outbid me, and nobody did. Some cursory research indicates it's a reasonably heavy-duty machine, if a bit underpowered (not sure what that means, since those sound mutually exclusive). I'll know more when I pick it up. What are the first things I should check on an old sewing machine? I'd imagine cleaning and oiling it are a must, and I should anticipate replacing the motor belt. What should I expect using an old mechanical sewing machine? I have limited experience using cheap modern machines HolHorsejob fucked around with this message at 04:45 on Jan 29, 2024 |
|
#
?
Jan 29, 2024 04:42
|
|

|
What a beaut! Definitely get it serviced. I have an early zig-zag (1950s) Kenmore (I think it�s technically a Pfaff? I have the info somewhere or another) and I need to take it back in because the zig-zag/side-to-side tension is kinda hosed. The cord should be easy to replace if there�s any problems. Maybe look into getting a button-hole attachment/tool if you need one? Does that machine do anything beyond straight stitch? Some old machines have �cams� you insert for different stitches. I haven�t used my old machine in a while so trying to remember� the nice thing is, if you don�t have the instructions you can find PDFs (or buy them) of the original instructions online. It�s helpful for figuring out what the feet are for, or how exactly to thread it etc.
|
|
#
?
Jan 29, 2024 05:54
|
|

|
Crocobile posted:What a beaut! Definitely get it serviced. I have an early zig-zag (1950s) Kenmore (I think it�s technically a Pfaff? I have the info somewhere or another) and I need to take it back in because the zig-zag/side-to-side tension is kinda hosed. I did make sure to download the manual for it, so I do have that. I have options for getting it serviced, but I was hoping to do it myself since I'm pretty handy and it's expensive around here. A quick googling shows people paying $150-200 for servicing home machines in the SF bay area, hard to justify on a $30 machine. I'll probably get a few different feet to play around with. Button hole foot most likely, probably a zipper foot. This machine uses cams ("fashion discs") for different stitches, which appear to be available on ebay
|
|
#
?
Jan 29, 2024 06:45
|
|
|
I cleaned up and restored my Husqvarna up there ^ from a non-working totally frozen condition. The most important tools were a can of Gibbs penetrating oil (I'm sure you can use Liquid Wrench or PB Blaster or whatever you can find at the auto parts store) and a heat gun. If there are any stuck parts, get them nice and toasty with the heat gun -- maybe a hair dryer would work well enough -- so that that the old gummy oil starts to melt and the parts expand and loosen up a bit. Then hit the hot parts with the penetrating oil and let it soak in for a while. Gently move the mechanism around, not forcing it, rocking back and forth to get everything worked loose. Once it's moving smoothly, you can scrub out the gunk, wipe off the penetrating oil, and re-oil with proper sewing machine stuff. Do get a bottle of actual sewing machine oil! It's important. Be careful of plastic gears or other plastic components that might be old and brittle. If you force those, they'll crack. I had a couple of cracked parts in my machine I had to replace. Use fine steel wool and WD-40 or the same penetrating oil to take rust off any rusty parts. Once everything is moving, put in a needle and stitch without thread to verify that the feed works properly and that it's timed correctly. Check the stitch length settings and the zigzag if equipped. Also check the zigzag timing -- make sure that the needle doesn't start moving sideways until it's clear of the fabric/paper (above the lowered presser foot, basically). Wind a bobbin, thread it, set the stitch tension to somewhere in the middle, and make some stitches on real fabric and check that they're balanced. Adjust the tension if required. That machine probably has a bobbin carrier, so a good starting point for the carrier tension is about 20 grams, and then adjust the top tension from there. But honestly, an old machine like that, it's a solid chunky mechanism and if they say it's in working condition, it probably stitches just fine. Cleaning it up might be all you have to do. Sagebrush fucked around with this message at 07:27 on Jan 29, 2024 |
|
#
?
Jan 29, 2024 07:23
|
|
|
Sagebrush posted:crossposting from the 3D CAD thread The machine I just bought uses cheap plastic swappable cams, and I'm wondering how hard it would be to make replicas from photos using solidworks and a desktop cnc router. Sagebrush posted:I cleaned up and restored my Husqvarna up there ^ from a non-working totally frozen condition. The most important tools were a can of Gibbs penetrating oil (I'm sure you can use Liquid Wrench or PB Blaster or whatever you can find at the auto parts store) and a heat gun. If there are any stuck parts, get them nice and toasty with the heat gun -- maybe a hair dryer would work well enough -- so that that the old gummy oil starts to melt and the parts expand and loosen up a bit. Then hit the hot parts with the penetrating oil and let it soak in for a while. Gently move the mechanism around, not forcing it, rocking back and forth to get everything worked loose. Once it's moving smoothly, you can scrub out the gunk, wipe off the penetrating oil, and re-oil with proper sewing machine stuff. Do get a bottle of actual sewing machine oil! It's important. Sweet. I've been asking around, and this is broadly in line with everything everyone's been telling me. I'll especially keep in mind the bit about using penetrating oil to degrease/unstick anything that's seized. My biggest worries are missing fasteners and cracked plastic gears, but inshallah it'll just need some gentle love with a rag and some light oil to degrease
|
|
#
?
Jan 30, 2024 08:06
|
|
|
Here's a blog post of someone restoring this exact machine, with a lot of notes: https://danhopgood.wordpress.com/2017/10/26/singer-328
|
|
#
?
Jan 30, 2024 09:21
|
|
|
 GF picked up my sewing machine and brought it over! Looks like it includes the pedal and the cam for a zigzag stitch. I've only had time to turn the handcrank but so far so good! It moves smoothly, no clacking or rattling. Only parts with any visible issues are the spool pins. I'll know more when I open it up to oil it
|
|
#
?
Jan 31, 2024 05:10
|
|
|
The bottom hem on the little shirt I made is rolling up. Anything I can do to make that less likely?
|
|
#
?
Feb 1, 2024 03:23
|
|
|
Stitch closer to the edge. You can go back and topstitch it at 1/16" to tack that part back down. Sewing knit fabrics is tricky. I see that you used the zigzag stitch, as often recommended in this situation, because it can stretch along with the fabric where a regular lockstitch won't. For the edgestitch you can use a smaller zigzag to get closer, but you won't get right up to the edge. As an alternative, you can use a straight stitch and physically stretch the fabric out while you're sewing it. Pull it back from the presser foot about as much as you expect it to stretch in use, and keep that tension as you sew. The fabric will spring back afterwards, leaving enough play in the stitches that they won't break. You can look up YouTube videos on this "stretch-and-sew" technique. Sagebrush fucked around with this message at 03:57 on Feb 1, 2024 |
|
#
?
Feb 1, 2024 03:49
|
|
|
If you mean it's flipping up, try a triple fold hem instead of a double fold. Some jersey knits are just finicky. I've used that trick on hand knits before. Another stitch you can try is the triple straight stitch; it is two forward/one back (or vice versa) and is very stretchy. It will look like an absolute equal sign/triple equal sign/hamburger menu.
|
|
#
?
Feb 1, 2024 20:55
|
|
|
Yeah it�s folding up. It�s a regular double fold hem, but what was originally the bottom of the hem is now pointing up. I didn�t think much about it at the time but the fabric does curl a bit on the edges when I was cutting. I guess the other option is just do bias tape on the bottom, presumably that would be less likely to fold over itself?
|
|
#
?
Feb 2, 2024 05:54
|
|
|
Eeyo posted:Yeah it’s folding up. It’s a regular double fold hem, but what was originally the bottom of the hem is now pointing up. It should help some, yeah, since it will change the hand. Could just stitch it over the existing hem if you wanted or save it for the next one. The way that fabric is knit will always make it want to flip up (even ready to wear). A bit of steam and an iron can sometimes help as well, but who wants to iron a t-shirt?
|
|
#
?
Feb 3, 2024 01:43
|
|
|
Bit of a bump here for a specific buying question. I'm just learning the ropes at a local sewing room, so I'd like to buy a machine. I'm bucking the "try not to buy your first machine" / "try to buy thrift" advice because I'm at a point in my life where I'm okay with throwing a bit of money at the equipment question to avoid the time spent having to look around (which does not sound fun to me). Use case, besides the usual light duty sewing that I'd imagine most things can handle, are denim stuff and stuffed animals for the kiddo - which means thicker fabrics. I'd like to know I can sew faux fur (which I think more a matter of presser foot clearance than machine power?). At any rate, the Brother ST371HD ($190 on Amazon) was going to be my choice, but my local shop has a Juki 353z for $150, which seems like a nice price if it does what I'd like it to. It seems like Brother as a brand has a bit of baggage attached? Not as much as Singer, whose heavy duty $200 I see equal parts recommended and reviled. My teacher, FWIW, didn't give very specific recommendations, just saying whatever I buy in the $200-300 range is probably fine.
|
|
#
?
Feb 9, 2024 22:36
|
|


|
Boxman posted:Bit of a bump here for a specific buying question. I'm just learning the ropes at a local sewing room, so I'd like to buy a machine. I'm bucking the "try not to buy your first machine" / "try to buy thrift" advice because I'm at a point in my life where I'm okay with throwing a bit of money at the equipment question to avoid the time spent having to look around (which does not sound fun to me). Didn't see the Brother or that Juki listed on the PatternReview sewing machine reviews section, so I did some forums sleuthing there for you. Brother: People consider it, but are usually talked into the next step up, as that model is the equivalent of a modern Singer HD, and not particularly reliable. (I have a Singer 4432HD and I like it, but the bobbin tension was set wrong from the factory and it vibrates all its screws loose. It's taught me a lot about sewing machines!) Some suggested machines instead of that Brother model include the Brother XR9550 and Brother cs7000x. (& Brothers in the $500-700 range get really nice to use, especially for knits, so don't write them off completely.) Juki: Not a lot of forum traffic on it, which is odd for that group. The model (along with the refresh, the 355z) gets mentioned and then usually forgotten about in recommendation posts. I saw one person who had been using it for a long time without issue. Nobody seems to love it or hate it, which is a plus I suppose. Not flashy but seems to get the job done. Something to look for when choosing a machine: You will want adjustable presser foot pressure. Check the manual for each machine to make sure it can do that. You'll really want it when sewing knits, and especially when it comes to sewing fleece! effika fucked around with this message at 21:43 on Feb 11, 2024 |
|
#
?
Feb 11, 2024 21:29
|
|
|
effika posted:Didn't see the Brother or that Juki listed on the PatternReview sewing machine reviews section, so I did some forums sleuthing there for you. Thank you so much for doing some work for me! I really appreciate it (and any time you spend on my subsequent questions, haha). I appreciate hearing more negative anecdotes about that Singer. Honestly, that's the sort of nonsense I'd like to avoid. Feels like the sort of thing people are referencing when they shake their head and lament the company going downhill. Man, I hate that there's nothing out there on the Juki. Any machine I buy at this price point is going to have some failings, I'd like to know what they are, haha. I feel comfortable jumping to those Brother computerized machines, but I'm not about going to $500. It's the difference between an extra $40 or so and doubling the price of the machine. So, looking between these 3 Brother models. I assume "strong and tough" is a bit of a marketing gimmick, and that it isn't particularly more capable than the upgrade picks for things like layers of denim? Anything at this level should be fine for it? Similarly, sewing thick fabrics. Like I said, it's important to me to have the option of sewing fur, which can be bulky. I've seen on several machines the ability to lift the presser further than it normally rests in the "up" position - the manual for the CS7000X actually has a small section about "sewing thick fabrics" that mentions it, while the XR9550 does not. That being said, I could believe this is just a standard feature that doesn't really get mentioned. In terms of choosing between the upgrade picks, I'm sure something is different but Brother's website sucks rear end and their comparison tool breaks a lot. That being said, I see the CS7000X includes more presser feet, including a walker foot, which seems like it could come in handy, for a $10 increase. They also both have hardshell cases included, which is sort of nice over the ST, haha. None of the machines in question have adjustable presser foot pressure, from what I can tell, which is a bummer but also tells me it might not be quite as mission critical? I'm not married to the brands in question, by the by; if you have any recommendations at roughly that price point, I'd love to hear them!
|
|
#
?
Feb 11, 2024 23:08
|
|
|
I mean, $200-$300 for a new sewing machine is still well inside cheap plastic junk territory... If that's your budget, I think you should seriously consider the suggestion to buy used. Lots of machines are likely to come to on your local classifieds.
|
|
#
?
Feb 11, 2024 23:35
|
|
|
For denim, the right needle and luck is what you need until you get to the really expensive machines. The cs7000x seems to be decent at it per some reviews. The walking foot is REALLY useful and will make a lack of presser foot pressure adjustment less a problem. I'd go with that one over the other two models. Honestly, I'd buy my HD4432 again. It's one of the older China models with bad QC, and I hear the newer Vietnam plant does better. Box feed, adjustable presser foot pressure, extra lift hight when needed for the foot, comprehensive service manual easily found, plenty of good useful stitches, and does decently with thick fabric. Does the foot pedal suck? Yes. Do I have to screw the plastic case parts and the foot ankle back on periodically? Yes. Does the bobbin case slowly lose tension over time? Yes, but that's no different than the non-oem cases I've found for it (guess it's a design flaw). But can I get it to sew anything with the right needles and presser foot and some interfacing and trying a few tension dial settings? Usually! I just have to know that when it breaks, it likely isn't worth fixing. I got this machine for under $100 as an Amazon lightning deal in like 2015. If I was starting out now and had the money I'd get something better, knowing that the machine is disposable and put that money towards a nicer machine. If it turned out I didn't like the hobby I'd sell it to recoup some costs. You should check out some used ones for sure. A dealer might have something that works for you if you ask! effika fucked around with this message at 01:38 on Feb 12, 2024 |
|
#
?
Feb 12, 2024 01:31
|
|
|

|
| # ? Apr 28, 2024 22:57 |
|
|
Thank you for that extra context. There isn't a huge hurry here, I'm just experiencing some enthusiasm for a potential new thing and want to ride that a bit. Don't want to get too bogged down in analysis paralysis. ") At any rate, there's enough here to be making a decision if I just go with a newer machine, and I'll have the understanding that I'll either outgrow it or it'll just fuckin break on me. At any rate, there's enough here to be making a decision if I just go with a newer machine, and I'll have the understanding that I'll either outgrow it or it'll just fuckin break on me.I think the sewing room where I'm taking lessons has some used machines too. Couldn't hurt to ask about their suitability. I'm sure i'll be back. Thanks again!
|
|
#
?
Feb 12, 2024 02:38
|
|