


|
I've been doing some sewing on my own, mostly teaching myself as I go along. I just picked me up a shiny new hem foot for my machine, and was wondering if there was any graceful way to handle corners with the thing, or just leave a couple inches on each edge leading up to it and then go back and finish the corners with my regular foot? (I also got a spiffy clip-on adapter so I can use clip-on feet with my low-shank-feet-taking 70's Singer, especially since the sewing store I was at only had the hem foot in a clip-on version  ) )
|
 #
¿
Dec 30, 2009 01:15
#
¿
Dec 30, 2009 01:15
|
|


|

|
| # ¿ May 14, 2024 15:20 |
|
|
handbags at dawn posted:What I was taught to do was to cut the edge of the corner off, go to the end on one side, then start on the other side. I couldn't find a good picture but did find this drawing: http://books.google.com/books?id=Cq...page&q=&f=false Hmm...I think I get it. I was just now messing around with it on my machine, and the tutorials I'd found online had you finger-pressing the hem for a few inches, taking a few stitches, leaving the needle down, then trying to force the hem into the spiral. The way shown in this book looks a lot easier, and it'd be easier than "stitch with the hem foot up until the last inch or so before the corner, then miter the corner by hand" that was my idea until I saw your post. Thanks! ")
|
|
#
¿
Dec 30, 2009 02:46
|
|
|
Pickle Pie posted:So apparently this button is stuck, because according to every other machine ever, my machine is stitching backwards. Do you not have control over stitch length when it is going in reverse? If so, hopefully I can just unstick the button and be all set. It seems odd that there's no obvious reverse switch, so it may be that the button in the center of that knob is indeed the forward/reverse toggle and is stuck. You might try taking it to a place that services sewing machines and getting it looked over for any other issues that might need attention too. And that knob is indeed the stitch length control, going from B (or baste) to 24 as in 24 stitches per inch. I have a similar machine that I inherited from my grandmother. Lemme go try to take a picture of it... EDIT: Didn't get very good pictures of it, due to lovely camera. 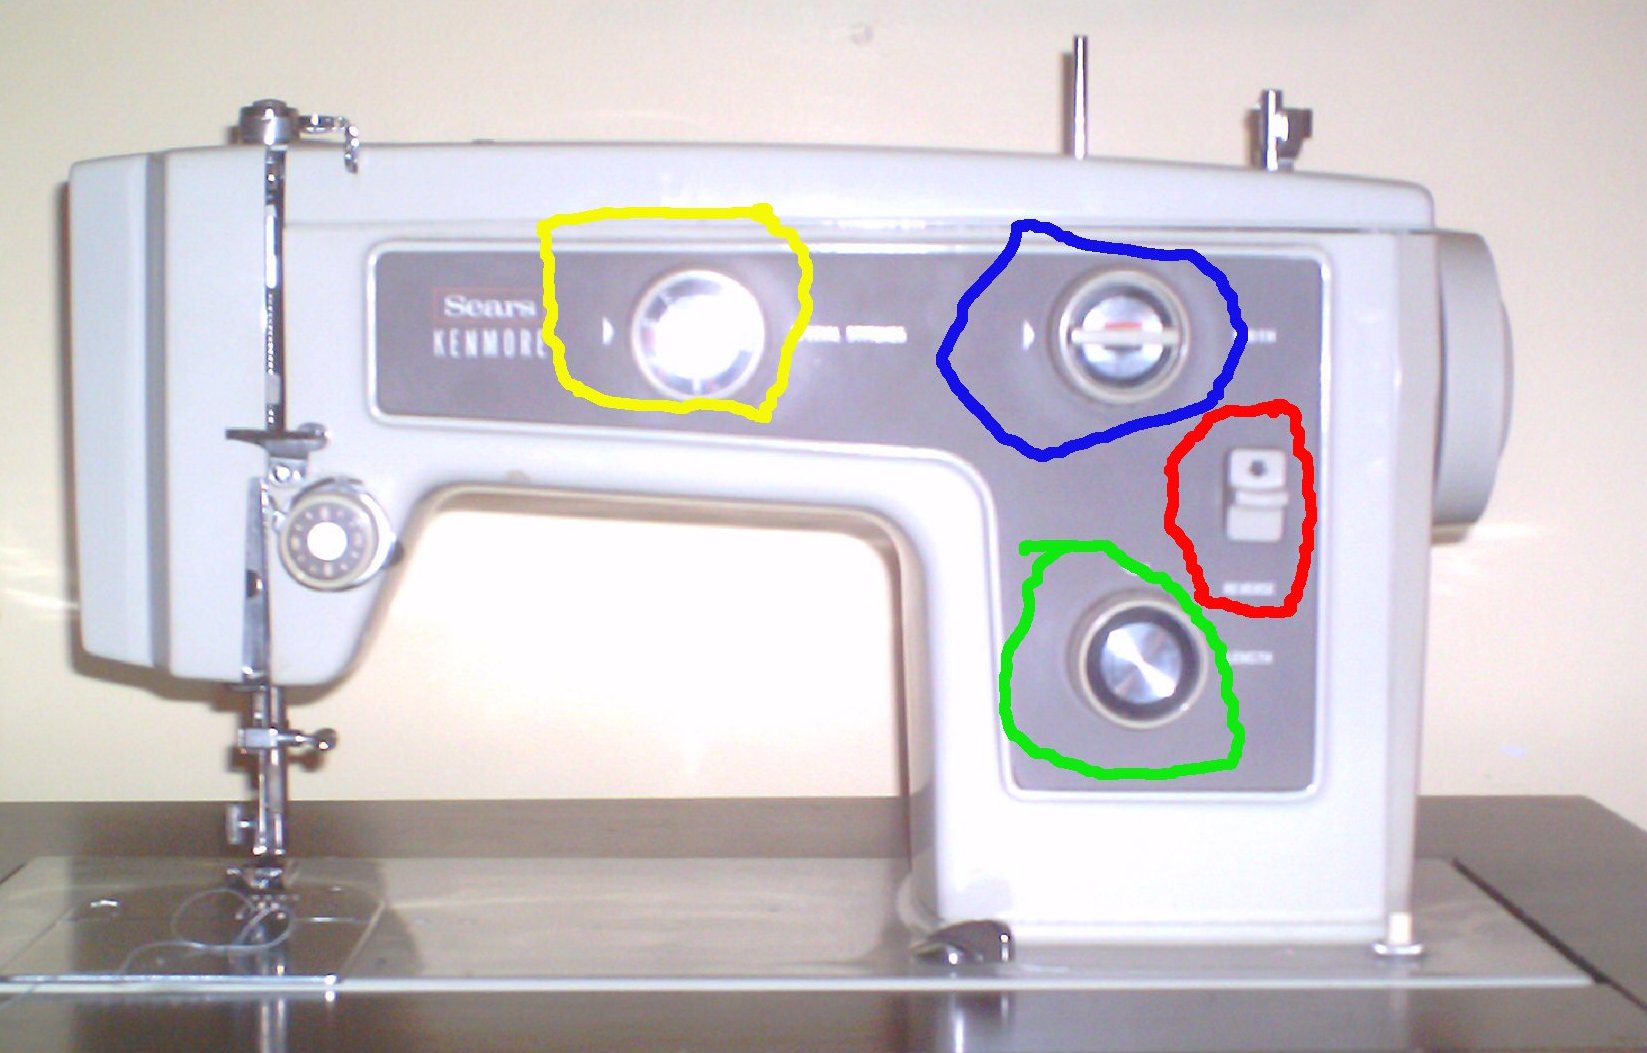 Click here for the full 1647x1053 image. Green circle is the stitch length control knob. Red is my reverse toggle. Press it to stitch in reverse, release to stitch forward. Blue is stitch width control and in the middle of the dial is a knob that controls the special stitches available on the machine. Certain stitches require either the red side or the black side to be on top. The stitch width dial controls the width of the zigzag stitch and the width of certain other stitches. The yellow circle controls which stitch settings are in use. My machine has straight/zigzag, blind hem, stretch stitches, semi-automatic buttonhole stitching, and one of my favorites for finishing, the pine leaf/serging stitch. The thing is a tank and I don't just mean in durability. It weighs a ton and the back of the manual has written in it "Christmas 1975". Mom also said this was the same machine used to sew her wedding dress. taiyoko fucked around with this message at 23:05 on Jun 19, 2010 |
|
#
¿
Jun 19, 2010 22:29
|
|
|
Brainbread posted:I guess I'll burn my cache on the way out. Private browsing, man, private browsing. Ctrl+Shift+P in Firefox. (Also useful for porn surfing or looking for birthday/Christmas presents for someone who also uses that computer.)
|
|
#
¿
Feb 27, 2012 22:15
|
|
|
What can I do to keep my neckline and armhole facings from looking like rear end? I made this dress (view C) , and although it doesn't look too terrible when I wear it, I can't help but notice the seams puckering on the facings, and the whole "why the gently caress won't they stay flat???" As it is, I want to remake it anyway and making sure it looks awesome contruction-wise is important.
|
|
#
¿
May 30, 2012 23:39
|
|
|
Another possibly stupid question about facings: The pattern I have has separate neckline and armhole facings, and is princess-seamed. Is it possible to redraft the facings into a combination facing? Or is this just a retarded idea?
|
|
#
¿
Jun 5, 2012 17:47
|
|
|
Well, I'm finally getting my rear end around to working on some projects I'd already bought fabric for...only to run into one snag just with the pattern. I got this pattern, and for view B in my size, it says 2 yards of 60" knit fabric. Well, I bought the fabric before the pattern, and so I only have a yard and a half. Also, I was going to modify it from a regular t-shirt style neck to a square neck, and I wanted to put some ruffles on it. Am I just plain screwed and need to go hunt down some more of this fabric? Can I do ruffles/binding on the lengthwise grain (the neckline binding is originally on the bias)? Edit: Just cut out the pattern tissue, and it looks like it may not be as much of an issue as I thought....the pattern as printed comes down to my loving knees! Definitely going to be shortening it up before I cut fabric. taiyoko fucked around with this message at 03:55 on Aug 14, 2012 |
|
#
¿
Aug 13, 2012 21:00
|
|
|
Looking at the manual for your model of machine, it seems you have a drop-in bobbin, and it specifies that you have to use their bobbins in it, as they're slightly larger than regular generic bobbins. The manual also has how to remove/reinstall the bobbin case, and it sounds like maybe you're just not getting it back in quite right. I'd suggest taking it in for repair if you keep having trouble with it.
|
|
#
¿
Aug 15, 2012 05:00
|
|
|
My wonderful friends are incapable of planning poo poo in advance. Because of this, I've been implored to make a vest for a friend of mine to be in a wedding on Saturday. My question is in the sizing. I'm planning on using this pattern, and my friend's measurements are 44" chest, 47" waist. The pattern envelope says that a 44" chest goes with a 39" waist. Should I just go solely off the chest measurement, or taper the smaller pattern with the right chest measurement into the larger size with the right waist measurement?
|
|
#
¿
Sep 7, 2012 06:18
|
|
|
Ashcans posted:You need to modify the pattern to accommodate his waist, otherwise you are going to end up making him look terrible when the buttons on the vest don't close and he looks like Chris Farley. I think that the best way to do this is actually with a French Curve or a similar tool, but basic idea is that you want to re-draft the pattern connecting the chest of the 44" to the waist of 47", and create a natural curve between those two. Ideally I would make a muslin and check the fitting before moving on. Welp, I did my best with not having a french curve to help make the lines nicer, I just hope that since I didn't have the chance to take the measurements myself that they're actually accurate, and that this thing fits him. All that's left right now is to press the whole thing, and add the buttons and buttonholes. At least it looks pretty decent, even though I closed up the sides with a small whipstitch instead of fighting with slipstitching it. Not like anyone's gonna be looking that closely at the side seams.
|
|
#
¿
Sep 8, 2012 02:56
|
|
|
I'll be heading up there soon. Unfortunately, I just found out the buttonhole feature on my machine is somehow hosed up and isn't actually feeding the fabric, so it sits there in one spot and stitches until it jams. gently caress this poo poo, I'm gonna safety pin him into it and everyone can get over it. Or if it turns out something sizing-wise went wonky, he can Chris Farley it. But yes, I will get pictures. Also, Unoriginal, that bag is amazing.
|
|
#
¿
Sep 8, 2012 14:34
|
|
|
Brigg posted:You can always make the button hole manually if your machine has a zigzag option (which Im assuming it does). Good to know! I didn't have time to gently caress with it, and he was still happy with it. In fact, my friends said that if it wasn't for the lack of buttons/buttonholes and lack of a tag, they'd have thought it was bought from a store. No close-up pics of the construction or anything, but here it is on the guy I made it for: 
|
|
#
¿
Sep 8, 2012 23:17
|
|
|
I have a small handbag that I take with me to conventions, because it's just the right size to hold everything I carry with me. Unfortunately, the strap on it is just too short, and I want to replace it. It's a simple webbing strap, and I've found a site that sells it in a color that should match, but what would be the best way to attach the new webbing? The current setup is that it's stitched in place on one end of the bag, and the other has a length adjustment slide. I don't think I can get my sewing machine into the bag enough to simply stitch one end in place like the original, at least not as firmly held. I can take pics if my description isn't clear enough.
|
|
#
¿
Aug 26, 2013 17:29
|
|
|
BANME.sh posted:My wife inherited some sewing equipment and she's trying to figure out what all the feet do using the internet (no user manuals available). She has most of it figured out now, but can anyone shed light on what these 3 feet do? Left is a straight-stitch foot. I'm pretty sure the center is just a regualar zig-zag/all purpose foot. The one on the right is a gathering foot.
|
|
#
¿
Dec 10, 2013 01:13
|
|

|
NotAnArtist posted:Some awesome stuff coming out of this thread! I know you don't think the drop is enough, but honestly I think it'd look stupid dropped further than that. But I'm not a fan of the "I just poo poo my diaper" drop crotch look. This shot of Justin Bieber is what I think of when I hear 'drop crotch pants' and why I shudder reflexively: 
|
|
#
¿
Apr 25, 2014 04:13
|
|

|
Does anyone else get nervous when getting ready to use a pattern they've drafted themselves? I'm making a costume for an indie film, and I've got my pattern as finalized as it's gonna get, but I'm afraid to actually cut the fabric with it because what if I got it wrong and don't have enough to redo it? Is that feeling just something that goes away with more experience?
|
|
#
¿
Oct 30, 2014 22:51
|
|
|
That's probably the reason I'm so nervous...I don't have the fabric to make a muslin. This is straight up 'draw it out onto paper, tada, pattern'. Thankfully it's meant to be rather loose-fitting, so as long as I haven't done the math too badly it should be fine.
|
|
#
¿
Oct 31, 2014 01:57
|
|
|
So my mom's asked me about making my niece an Elsa costume for Halloween as a surprise, using the Simplicity licensed pattern. She's 4 years old, turning 5 in March, and her measurements make her pretty solidly a size 4 for the pattern right now. How much should I anticipate her growing by Halloween? Just make it a size bigger?
|
|
#
¿
Jan 26, 2015 08:16
|
|
|
You could leave really long tails, not machine backstitch, then when you're done, use a hand needle to pull the top thread through to the bottom and secure the ends by hand.
|
|
#
¿
May 5, 2015 03:13
|
|
|
So we came across some fabric and a pattern that my mom had gotten ~20 years ago to make my sister and I some dresses with, and had never gotten any further than pinning the pattern pieces. We've decided we're going to make a dress for my 5-year-old niece now with it. The fabric is a decently thick crimson cotton, and I'm really not sure how to jazz it up a bit that doesn't make it look Christmas-y. Suggestions from the pattern include rick-rack, rosettes, and/or decorative buttons. The pattern:  The fabric: 
|
|
#
¿
Aug 7, 2015 21:17
|
|
|
babyturnsblue posted:Do that first, because I thought I would have to remove the sleeves too, and I actually decided against it. A jamming bobbin is usually a sign that something is wrong with tension. Try pulling out the bobbin, case and all and giving it a little jolt from the thread like you're trying to yo-yo it. It should release about an inch or two of thread. You'll need a screwdriver to adjust if it's too tight/loose, just a tiny bit at a time. If that isn't the issue, try adjusting the top tension, your manual should have instructions if it's not got an obvious dial somewhere. Also if you do a different project using much heavier/lighter fabric, then you'll probably want to test some scraps to make sure you don't need to change tension settings for them.
|
|
#
¿
Sep 26, 2015 02:01
|
|
|
What kind of machine do you have?
|
|
#
¿
Sep 27, 2015 04:10
|
|
|
I've heard good things about Spoonflower myself, though with one catch: if you have large areas of solid black, it's gonna come out more of a dark charcoal grey. Though, those reviews were several years ago so it's possible that they've found a method to get better blacks since then. Here's one person's comparison shot: 
|
|
#
¿
Oct 30, 2015 17:25
|
|
|
cloudy posted:So, I am going to try to make something nice for myself for the first time. Normally I just make Halloween costumes Depends on how much you care about obvious seams. You can cut one of each, baste the lace to the fabric and from there treat them as one piece, but what looks better, and is pretty important if your lace motifs are nice and thick, is the lace applique method.
|
|
#
¿
Nov 18, 2015 20:19
|
|
|
coyo7e posted:
Oh man, this looks like it might be the same one I have! Only, I need to figure out how to clean it all out and oil it because I'm pretty sure that's why the whole drat thing locked up on me mid-project once. I've gotten more confident at taking things apart and getting them back together, so it shouldn't be too bad I think. Downside is how it and its table weigh like a million pounds, but I guess that's why it gives much fewer shits about the kind of fabric you put through it. Also would like to find a straight-stitch plate for it for making doll clothes, since the zig-zag plate it comes with likes to eat the fabric when working with such tiny pieces and seam allowances.
|
|
#
¿
Dec 30, 2016 06:52
|
|
 and pictures of a sewing machine's manual
|
bolind posted:Wifey just got a sewing machine, but getting a selection of threads in different colors at the local sewing shop turns out to rival the expense of the machine. Any good online place that ships to Europe to get, say, the dozen most used threads in a decent quality? I don't have any recommendations, but I can say that I find myself busting out just basic black and white most often when I'm just repairing something. Maybe a dark blue for hemming jeans if you're short. Usually you'll want to buy thread with the fabric in hand for a project so that you can make sure they're a good color match.
|
|
#
¿
Jul 24, 2018 01:13
|
|
|
Sitting here in the break room at work and considering buying a yard of 100% linen to make my work masks because this cotton one is boiling me to death...but at least I have confirmation that the pattern is good for me. Wonky rear end nose wire too, because I was hand stitching it at 4 in the morning while watching an lp.
|
|
#
¿
Jul 26, 2020 23:32
|
|
|
A.s.P. posted:Anyone have experience lowering the crotch on a jumpsuit or pants by inserting a gusset? 🤗 I have seen old ads for jeans that had a diamond-shaped gusset in the crotch area so you could roundhouse kick in them like Chuck Norris, but that doesn't "lower" the crotch to make them drop crotch/saggy diaper look. Or if you mean "the distance between waist and crotch is too short, and it's digging in/giving me camel toe", you'll be better off drafting anew. Here's a pic taken from the Threads March 2018 issue on pants fitting that's relevant, "HBL" stands for horizontal body line, basically lines used to establish a reference. They suggest starting on the front pattern piece with one just above crotch level and perpendicular to the grain line, with two more parallel above at 3-inch intervals, then transferring them to the back pattern such that they would match at the side seam. The front crotch curve can be adjusted similarly to the pictured back if needed. 
|
|
#
¿
Apr 18, 2021 08:24
|
|
|
Pasketti posted:-snip- It looks great! What pattern did you use?
|
|
#
¿
Jul 15, 2022 22:24
|
|
|
StormDrain posted:Thanks! I built the frames and stretched jute and elastic webbing on it, so the bases are very light. That looks super amazing, is it a big money saver over buying pre-made, or is this more from the perspective of being less lovely to move to a new place in the future? I'm tempted to get something like this going for my place, except I probably need to get a sewing machine again...didn't have space in the car for my cross-country move for the one I had at my parents' house. I also don't think I'd ever get it done if I was hand-sewing the cushions.
|
|
#
¿
Aug 13, 2022 08:16
|
|

|
Yep, you read that correctly!
|
|
#
¿
Oct 23, 2022 00:55
|
|
|
Edgar Allan Pwned posted:how often do you guys make a muslin version of what youre creating? im tempted to have it for my first couple creations cuz im new, but is it something i should keep getting? It's probably more important for more tailored fits, or something form fitting, but for something like pajama pants I wouldn't bother. But because I'm not necessarily a smart person, I have often just yolo'd it even when a muslin would have been a good idea because I was a broke-rear end cosplayer who was already cheaping out as best I could on fabric without it being literal bargain-bin.
|
|
#
¿
Feb 14, 2023 09:53
|
|
|
I said come in! posted:I have a pretty specific question that i'm not sure anyone would be able to help with, this is likely a huge shot in the dark but here it goes; Trying to replace a lightbulb in a Bernina 1001, using a Lamsky BA15D bulb, and kinda guessing this might not be the correct size, due to its unwillingness to cooperate. Thinking maybe this isn't compatible? But am very unsure. Just a quick google looks like those are two very different bulbs that aren't compatible at all? 
|
|
#
¿
May 1, 2023 08:49
|
|
|
From low-quality scans of the original manual, it also looks like the machine came with a special bulb remover/inserter, but it doesn't make mention of the bulb part number or anything, and a second site has both the bayonet-style fitting and the screw fitting attributed to the 1001, so it could actually be the bayonet base type that you bought. So that style installs as "push up, and turn to the right as far as it will go". Could be a difference based on US vs UK version.
|
|
#
¿
May 2, 2023 01:38
|
|
|
You'll probably want some amount of interfacing on the pieces so that it'll hold its shape better and reduce bias stretching with the angled pieces (that gets cut without seam allowance, it'll make the seams too bulky). For the seam allowance itself, i would think maybe carefully trim and flat-fell?
|
|
#
¿
Dec 21, 2023 19:04
|
|
|

|
| # ¿ May 14, 2024 15:20 |
|
|
Without seeing the instructions, yeah, that raw edge seems awfully weird, but you could probably sort that out with some bias tape.
|
|
#
¿
Apr 15, 2024 13:30
|
|