


|
HelloIAmYourHeart posted:Finished a quilt I didn't even notice it was skewed until I saw the back, but then I was distracted by how cool the tie dye came out! I think it's great! I love the vintage vibe from the starbursts. I just started getting into quilting and foundation paper piecing like that. And if you like stars....Be sure to join the Carol Doak paper piecing stars Facebook group. They have a HUGE library of free paper pieced stars available.
|
 #
¿
Nov 1, 2023 20:11
#
¿
Nov 1, 2023 20:11
|
|
 It's for a friend's baby who is due at the end of the year.


|

|
| # ¿ May 14, 2024 02:28 |
|
|
Eeyo posted:So I've decided I wanted to learn how to make garments. I'm starting with a onesie for my boy, since I figure the garment quality doesn't matter that much, as long as it doesn't immediately disintegrate. Plus they're usually loose fitting so getting the measurements perfect isn't that big of a deal. Ballpoint or jersey needles solve a lot of knit fabric problems! Be sure you're using one. To help keep the fabric from wandering away, guide it with your hand (NEVER in front of the needle, always to the side) or a stiletto, and/or support it with either a stack of books to the side or pull out the extension table for the machine (yours kinda has one integrated but I don't like those much and would just use books instead) . You can also change the foot to one with a guide for the edge finish stitches and that will help keep them even. That and the right needle plus reduced presser foot pressure should help the edge stitches.
|
|
#
¿
Dec 18, 2023 22:19
|
|
|
Eeyo posted:I'm not sure what was causing it to pull away from the needle. I think it actually might have been the seam getting curved as it was sewed and then the edge pulling away from the guide because it was curving. Look on the top of the machine for a little semi-repressed knob with a slit in it, with a minus and plus sign on it/near it. (NOT the one on the side.) Turn it to the minus side a half turn and see how the knit fabric handles. I wonder if the presser foot pressure isn't set too high. That machine is the same form factor as many others; it's identical to my Singer HD series but I hope with better quality control. You'll see others on-line say to try a quarter turn, but for thin knits I turn the pressure WAY down, or use a walking foot and leave it only down a little. When I sew knits without the walking foot turning the presser foot pressure down helps a lot. Eeyo posted:I'll definitely try other ways to support the work as it's being sewed though. My wife usually uses the extension table but maybe she'd like something bigger when she's doing the quilting part. Do you want to be the best gift-giver? Get her a nice big extension table to make quilting easier! They have some cheaper ones on Amazon but you can get some nice big custom ones, assuming she likes this machine and wants to keep it around a while.
|
|
#
¿
Dec 19, 2023 03:45
|
|
|
Sagebrush posted:crossposting from the 3D CAD thread I love it when mechanical machines benefit from modern tech. That's a cool project!
|
|
#
¿
Dec 19, 2023 14:39
|
|
|
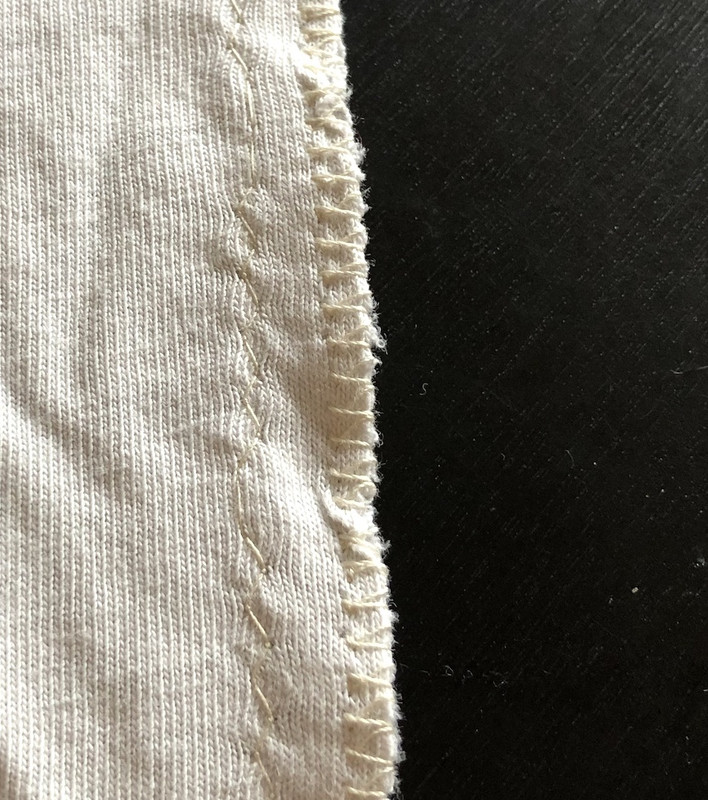
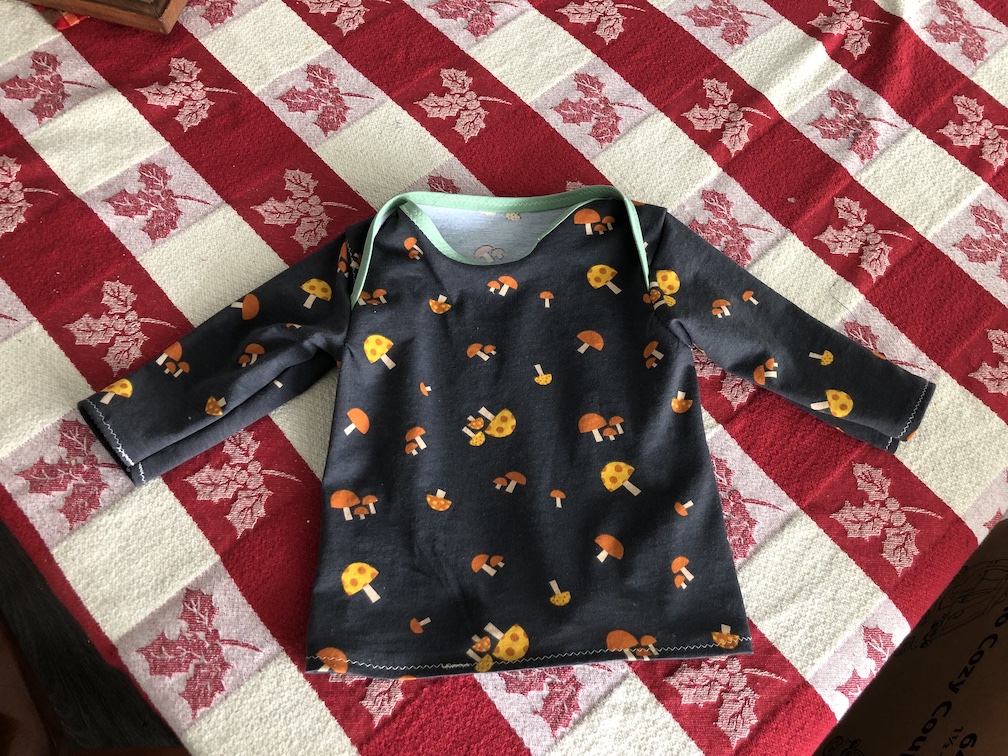
Eeyo posted:Alright finished up my first baby clothes. Just did a shirt since I don't have a snapper insterter. That's the good thing about baby clothes: babies don't care and they grow so quickly you'll make another soon! It looks lovely and I think you did a good job. Basting means using an easy to remove stitch that gets removed (usually) at a later step. It helps hold fabric together more securely than pins or clips with less bulk. Use a straight stitch at a longer length (like 3 or more) usually. Look up Kam snaps (brand name) for lead safe snaps, btw. effika fucked around with this message at 23:25 on Jan 19, 2024 |
|
#
¿
Jan 19, 2024 23:20
|
|
|
If you mean it's flipping up, try a triple fold hem instead of a double fold. Some jersey knits are just finicky. I've used that trick on hand knits before. Another stitch you can try is the triple straight stitch; it is two forward/one back (or vice versa) and is very stretchy. It will look like an absolute equal sign/triple equal sign/hamburger menu.
|
|
#
¿
Feb 1, 2024 20:55
|
|
|
Eeyo posted:Yeah it’s folding up. It’s a regular double fold hem, but what was originally the bottom of the hem is now pointing up. It should help some, yeah, since it will change the hand. Could just stitch it over the existing hem if you wanted or save it for the next one. The way that fabric is knit will always make it want to flip up (even ready to wear). A bit of steam and an iron can sometimes help as well, but who wants to iron a t-shirt?
|
|
#
¿
Feb 3, 2024 01:43
|
|
|
Boxman posted:Bit of a bump here for a specific buying question. I'm just learning the ropes at a local sewing room, so I'd like to buy a machine. I'm bucking the "try not to buy your first machine" / "try to buy thrift" advice because I'm at a point in my life where I'm okay with throwing a bit of money at the equipment question to avoid the time spent having to look around (which does not sound fun to me). Didn't see the Brother or that Juki listed on the PatternReview sewing machine reviews section, so I did some forums sleuthing there for you. Brother: People consider it, but are usually talked into the next step up, as that model is the equivalent of a modern Singer HD, and not particularly reliable. (I have a Singer 4432HD and I like it, but the bobbin tension was set wrong from the factory and it vibrates all its screws loose. It's taught me a lot about sewing machines!) Some suggested machines instead of that Brother model include the Brother XR9550 and Brother cs7000x. (& Brothers in the $500-700 range get really nice to use, especially for knits, so don't write them off completely.) Juki: Not a lot of forum traffic on it, which is odd for that group. The model (along with the refresh, the 355z) gets mentioned and then usually forgotten about in recommendation posts. I saw one person who had been using it for a long time without issue. Nobody seems to love it or hate it, which is a plus I suppose. Not flashy but seems to get the job done. Something to look for when choosing a machine: You will want adjustable presser foot pressure. Check the manual for each machine to make sure it can do that. You'll really want it when sewing knits, and especially when it comes to sewing fleece! effika fucked around with this message at 21:43 on Feb 11, 2024 |
|
#
¿
Feb 11, 2024 21:29
|
|
|
For denim, the right needle and luck is what you need until you get to the really expensive machines. The cs7000x seems to be decent at it per some reviews. The walking foot is REALLY useful and will make a lack of presser foot pressure adjustment less a problem. I'd go with that one over the other two models. Honestly, I'd buy my HD4432 again. It's one of the older China models with bad QC, and I hear the newer Vietnam plant does better. Box feed, adjustable presser foot pressure, extra lift hight when needed for the foot, comprehensive service manual easily found, plenty of good useful stitches, and does decently with thick fabric. Does the foot pedal suck? Yes. Do I have to screw the plastic case parts and the foot ankle back on periodically? Yes. Does the bobbin case slowly lose tension over time? Yes, but that's no different than the non-oem cases I've found for it (guess it's a design flaw). But can I get it to sew anything with the right needles and presser foot and some interfacing and trying a few tension dial settings? Usually! I just have to know that when it breaks, it likely isn't worth fixing. I got this machine for under $100 as an Amazon lightning deal in like 2015. If I was starting out now and had the money I'd get something better, knowing that the machine is disposable and put that money towards a nicer machine. If it turned out I didn't like the hobby I'd sell it to recoup some costs. You should check out some used ones for sure. A dealer might have something that works for you if you ask! effika fucked around with this message at 01:38 on Feb 12, 2024 |
|
#
¿
Feb 12, 2024 01:31
|
|
|
Eeyo posted:I’m running in to this with my wife’s machine (bernette b05 academy). I press the foot, it makes a humming noise but no movement, then when I depress it another hair it’s immediately in Oh hey that's the Singer HD4432 clone! Some good news, if they kept the foot pedal design: open up the foot pedal to find if there's a resistor knob you can adjust. It'll give you a little bit more room on the slow end before it launches into the stratosphere. Here's how (great channel, btw). The humming before sewing thing is a product of the AC motor these mechanicals use; a machine that uses DC current with servos and stepping motors won't have that problem as the power curve is different to get the motor moving. The motors will respond with less power, which the AC motors are not able to do. Once going the AC motor is able to slow back down pretty well, as you've discovered, but the DC motors get to start slow.
|
|
#
¿
Feb 12, 2024 14:56
|
|
 mode and goes way too fast.
|
You might also try some wash-away stabilizer with the trickier seams; French Terry just loves to be difficult. For the seam binding, just lots and lots of pins or clips is my advice. There's a special foot you can buy that's supposed it help but it didn't do much for me that pins didn't. You might also think about another seam finish that's less bulky (zig-zagged and the faux-overlock stitch have both been good to me with linen and flannel). Or zig-zag, press to one side, and top-stich, which is what I do when I forget to alter my seam allowances for easier flat-felling.
|
|
#
¿
Mar 4, 2024 01:59
|
|
|
Elmer's washable school glue (sticks or diluted liquid), when dry, don't gunk up my needles. I've been using it for years. You can also try Fabrisolvy, which is usually meant for embroidery, but I've used it for regular sewing too. I like to draw my buttonholes out on a strip of it, clip it to my buttonband, and then know exactly where I'm supposed to sew buttonholes! The extra stabilizer helps them look nicer, too. deety posted:While we're on stabilizer chat, a quilt kit I just splurged on says to use a lightweight stabilizer on the corners of a few bias cut edges. Would a wash away stabilizer be an okay choice for this? Would it mostly dissolve after I wash the finished quilt? You probably could, and it's probably dissolve, or you could go with something like a very lightweight iron-on interfacing instead. Wawak sells rolls of them in various widths and weights and I like snipping a bit off for seams. Though I've been foundation paper piecing my current quilt and love how I don't have to worry over bias stretching-- and if I am (like a big corner) I just tack it down with a glue stick.
|
|
#
¿
Mar 4, 2024 19:40
|
|
|
mobby_6kl posted:I wanted to shorten the sleeves on my western shirt but it has these snaps that I'd probably have to remove. Is it possible to do it non-destructively? I checked a few videos on youtube but it seems like they might get deformed pretty bad. It's not going to be worth it. Just accept that the snaps aren't coming out well, and the fabric may be damaged under them. Even if you did get them out, I'm not sure I'd trust them to go back in well. Once you've shortened the sleeve, pearl snaps are easy to install (I like them over buttons for many applications) if you get a few tools. The plier tool is fine, but if you find you like snaps getting a hammer & die or a table press from Goldstar Tools is the way to go. (If you can get a Snapsource Snapsetter kit, it's my favorite of the non-expensive tools. They went out of business though.)
|
|
#
¿
Mar 29, 2024 17:57
|
|

|
Boxman posted:An update! Thanks to effika's advice, I ended up going with the cs7000x, which has been really solid for me. The only time it's struggled is when I was trying to sew through, uhh...8 layers of cotton and 4 layers of interfacing. I'm glad the cs7000x is working out for you! Those are some great first projects.
|
|
#
¿
Apr 3, 2024 15:05
|
|


|
Boxman posted:Okay I'm working on my first project off a proper commercial pattern, and the...let's call them concise instructions are causing me some confusion. And there are some other complications / new things for me (I've never worked with batting). So, I have some questions that I'm sure are very basic but I'd love to make sure I'm doing it right before putting stitches down. Here are the instructions in relevant part. It's a shopping cart seat cover for baby, by the way. There's a thing called "fusible fleece" that they may think you'll use, and if the batting doesn't get sandwiched in between two pieces of fabric they probably assumed you're using that. To "apply" batting I'd probably make a sandwich of the outer fabric, the batting, and inner fabric, then baste it in place with safety pins, like a quilt. That brings us to... quote:
Yeah, some diamond pattern quilting would look great here, and you'd do with with the pieces flat/not sewn into a 3D shape. quote:
It would only get the top layer, yeah. You could use a butter knife to press it into the fabric and depending on the fabric it might or might not transfer well to the first layer, or poke some holes along the line periodically and then dot a water soluble marker or pounce some chalk in the holes. I'd probably just measure and use a ruler to add it to the fabric. What's the pattern company? Is it Green Pepper?
|
|
#
¿
Apr 4, 2024 23:57
|
|


|
Boxman posted:It's actually a Simplicity pattern. Old, though - I got it from my local sewing room, which operates as a non-profit. Someone donated this thing. And it has a liner, good. That should work. You can add some quilting, and I'd recommend it. Oh hey, the images all loaded for me now. The light diamonds hashed there are after they've "applied" the batting. What I think is going on is that you'll have two layers that get sewn inside-out and then the whole thing is inverted through the seat opening (See the end of step 2). That should hide most of your raw edges, and the ones that don't I suspect get covered up by the poofy bit later.
|
|
#
¿
Apr 5, 2024 12:10
|
|

|
Eeyo posted:I'm thinking of making a pair of pajama shorts, so taking the pajama pant pattern I already used and cutting it off short. You'd straighten out the inseam/outseam lines for like 1" at the bottom so that the lines are straight and easier to hem. It's hard to judge where everything will line up sometimes, so here's what I did the last time I did this: Figure out what you want the inseam to be, then draw straight down from that point 3" for both the back and front pieces' inseams and outseams. You'll have plenty of room to even out any uneven front/backs and still do a good hem. Before hemming, take notes on what you needed to cut off to even it out. You can then add notes to the pattern for next time, measuring where things actually wound up on each pattern piece from a known point (waist, crotch point, etc). Comedy option: Make pants, have someone help you draw around your leg at the point where you want the new hem, make your shorts, then transfer the information to the pattern pieces.
|
|
#
¿
Apr 14, 2024 03:38
|
|
|
Boxman posted:I forgot to update the thread! I finished that seat cover: It came out useful, and looks good! Making the smaller version to try it out was a great idea.
|
|
#
¿
Apr 15, 2024 17:08
|
|


|
Juki also makes a stand-alone buttonhole machine now, so add that to a serger you are mostly set up for garments, too! Enjoy that Juki. It's on my list of possible next machines when my current one bites it. I'm not entirely blaming my tools, but I will say this quilt I'm working on would have a more even stitch length and fewer accidental wanderings if I wasn't trying to shove it through the 6" harp of my current machine!
|
|
#
¿
Apr 17, 2024 21:59
|
|
|

|
| # ¿ May 14, 2024 02:28 |
|
|
HelloIAmYourHeart posted:I'm doing a scrap fabric quilt block swap, and here are the ones I made to send out. It's like looking through shattered crystals! Really cool.
|
|
#
¿
Apr 20, 2024 17:03
|
|
