
|
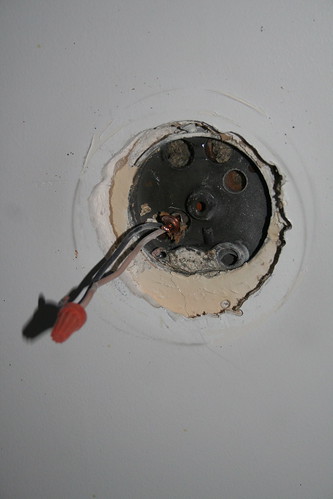
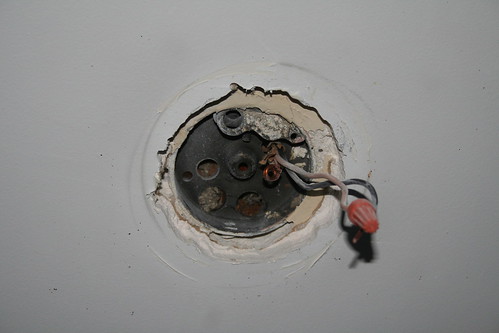
Local Yokel posted:Ok, I was going to give those old work boxes a go, but I've run into a hitch. Uhh, why do you even want to pull the box out in the first place? Ceiling boxes sometimes are supported with an arm that connects to the joists on either side. The box is attached to this arm through a large fixed bolt that pokes through the center hole in the box. Dominoes posted:What will happen if I make the crosscuts using the same technique as ripcuts? Half of every cut with plywood is "against the grain". The way plywood is made, every second layer they turn so that it's at a right angle to the 2 layers it's between, then they glue them all together. Doing this helps make plywood stronger and prevents warping. kid sinister fucked around with this message at 16:32 on Mar 19, 2009 |
 #
¿
Mar 19, 2009 16:28
#
¿
Mar 19, 2009 16:28
|
|

|

|
| # ¿ May 21, 2024 22:39 |
|
|
Dominoes posted:I completely forgot about that. Is using the ripfence with plywood safe? I did some googling and it looks like the concern with using the ripfence for crosscuts is misleading: The problem is using it for narrow pieces that won't be stable against the fence, not crosscuts. You nailed it. Having a sharp blade can help prevent kickback too. If you do happen to need to make a cut like that with a narrow piece, use pieces of scrap lumber, one to hold your piece against the fence and another to push it through the blade.
|
|
#
¿
Mar 19, 2009 18:01
|
|
|
El Kabong posted:What's a good way to hide the edges on this piece of plywood I'm turning into a coffee table? Buy a piece of edge trim, cut it at a 45 in the corners, pre-drill the nail holes and nail it on. You should be able to easily find a nice piece of half-circle trim in 3/4". If you can't find something the same exact width, get something wider than your table top, make the top edge flush then let the bottom edge lip over where it's hidden.
|
|
#
¿
Mar 24, 2009 17:43
|
|
|
ease posted:Nice solution, sometimes the simplest things are the least obvious. Be sure to use a high temperature paint for that hood.
|
|
#
¿
Mar 24, 2009 19:34
|
|
|
I'd use a reciprocating saw for a cut like that. Then again, I have a steady hand...
|
|
#
¿
Mar 25, 2009 22:42
|
|
|
Local Yokel posted:Where could rubber have come from in the plumbing system? Is this a hint that I have something wearing out further up the system? Rubber is a part of most cartridges, usually in the form of O-rings and washers. Did a piece of the cartridge somehow break off and get stuck inside? Do you have multi-turn valves on the feeder lines for that sink and not quarter-turn ones? Those types use a stem with a rubber washer on the end. To check that though, you'd need to turn off the all the water in your house before you take apart that valve.
|
|
#
¿
Mar 29, 2009 21:40
|
|
|
jackpot posted:What do I need to re-caulk my tub? I've got a leak around the faucets and handles and I'm going to do everything just to be safe. I know I've got to get it all out and clean the area, but what tools should I be using? Clean out as much existing caulk as you can right now, it will help the new stuff adhere and fill gaps better. You can apply a liquid caulk softener if you'd like, I've never used the stuff personally. Use a utility knife to cut it out and needlenose pliers to pull out any pieces that won't cut. They do make specialty tools for removing caulk, but I've never used them. Use a caulk gun to apply a new bead of caulk and smooth with your finger. Having paper towels on hand is nice in case you accidentally make a mess or get caulk where it shouldn't be. It has to be paper towels, TP isn't strong enough. Be prepared for this to take longer than you think. You could run into other things that you need to fix first before recaulking, like loose tiles, mildew, etc. Hopefully you have a second shower to use in the meantime for bathing. Then again, you are a goon...
|
|
#
¿
Apr 10, 2009 00:18
|
|
|
You know if it's giving you that much trouble, you could try unscrewing the shower head arm from the wall and replacing it. You can get a shower head arm for $10.
|
|
#
¿
Apr 11, 2009 17:18
|
|
|
jackpot posted:Easier said than done. I don't have access to where it attaches inside the wall; there's an access panel on the other side, in the bedroom, but it's meant for the faucets, only three feet high starting at the floor. The shower head arm is four feet above the highest point I can get to. I don't like the idea of unscrewing it, screwing in a new one, and having it leak like a bastard in a space I can't get to without tearing a hole in the wall. Actually, it's even easier than what you want to do. That's just it, you don't need access. The elbows for shower head arms are designed for this. In fact when your house was first being built, your shower head arm wasn't even installed until after the tile in your shower was put up. If you're worried about leaks, then use a shitload of pipe thread tape. It's possible that your shower head could be on there so tight that you could twist the arm's threaded end for the shower head right off the pipe. You could very well end up needing to replace the arm anyways, this was happened to me before. Don't go crazy with the wrenches, it's VERY easy to strip the finish right off the pipe or shower head. Your wife might not like that very much... You can use a rag in between the wrench and pipe to help prevent this. There's a trick you can use to help screw in the new shower head arm tightly without marring the surface. Simply insert a long screwdriver down the angled pipe, then use this to turn and tighten the pipe. edit: As for your other home problems, patching drywall is easy enough to do yourself, depending on the size of the hole. It just takes time, waiting for one coat to dry before you put up the next, etc. What are the symptoms for your sink? Is this a 1 or 2 tub sink? Does it have a garbage disposal? Does one side drain freely while the other doesn't? kid sinister fucked around with this message at 20:19 on Apr 13, 2009 |
|
#
¿
Apr 13, 2009 20:07
|
|
|
jackpot posted:As for the drywall, it's a 2x4 foot hole in the living room ceiling, where the plumber busted into it to see where the leak was coming from. For a hole that large, you're probably best off cutting edges of the hole back until it hits the ceiling joists with a utility knife. Drywall comes in 4 foot wide sheets, or 48 inches. That's wide enough to span 2 joists in the middle and lip up onto joists on either end, assuming you have joists 16" apart on center. Here's a quick and dirty summary of drywalling: 1. cut piece to fit 2. attach with drywall screws (just "dimple" the surface, they make special bits for this) 3. put up tape (you can use fiberglass tape here) 4. with 4" knife, cover screws and tape with drywall compound 5. let dry 6. sand flat 7. mix a second coat with a little water to make it thinner, apply with 8" knife for tape seams, 4" for screws 8. let dry 9. sand flat 10. if it needs it, apply a third coat, sand, let dry 11. paint A second set of hands really helps when attaching large pieces to the ceiling. Do you have a popcorn ceiling texture in that room?
|
|
#
¿
Apr 13, 2009 22:33
|
|
|
babyeatingpsychopath posted:Force it. It's not like it's going to get any more broken. If it breaks, it needed replacing anyway. No, don't force it. He could end up breaking off something and creating a leak inside the wall, then he really would need to call a plumber. A stuck handle is usually due to hard water buildup or a rubber washer breaking off and getting stuck in the threads. This is something you should be able to fix yourself. Do this: get yourself some screwdrivers of varying widths and maybe some hex keys and a wrench. Now the steps involved depend on the manufacturer and handle style, so this may require some foresight on your part on how to disassemble it. You already did the first step: turn off the water at the main. The next step is to turn on the water at the tub. This will relive the pressure and empty any water out of the valve. The third step should be obvious: plug the drain! You don't want to drop any screws down it. The next step is to take off the handle. If you have a knob-style handle, there should be a cap on top in the middle. Look for a little area on it to gently pry it up, the screw holding the handle on will be underneath. If you have a lever-style handle, look for a set screw on the side of the handle's base. After the handle, remove any cover or sheathe underneath. After that, remove the valve stem. Here's the tricky part, depending on how jammed it is and where. Some stems have 2 parts, with the central part spinning inside the outer part. You want to make sure that you're unscrewing the outer part. Ever so gently unscrew the stem from the wall. Now the fun part: figuring out what is keeping the stem from turning! This could be a couple things: hard water buildup, a piece of rubber jamming up things, something got stuck between the stem and faucet housing, or some brass or teflon just plain broke. Look inside the housing and see if you find any obstructions. If your stem is designed to be further taken apart, do that. If it isn't or you just can't get it apart, you may need to get a replacement valve stem. They're sold individually, so you won't have to buy a whole new handle assembly.
|
|
#
¿
Apr 18, 2009 18:47
|
|
|
Hello Pity posted:We have some heavy sliding patio doors. The slide along a runner on I presume some sort of bearings. Recently these have become grabby and feeling like they're grinding a little. A liberal application of WD40 sorted it out for a couple of weeks or so. However, it's doing it again and I'm assuming it needs some form of proper lubrication. It doesn't run on bearings, it runs on springloaded wheels. You can get at the wheels better if you lift the door off its track and remove it from the frame. Something probably got stuck between the wheel and its mounting. If the wheel is cracked, you'll have to replace it.
|
|
#
¿
Apr 24, 2009 02:15
|
|
|
jackpot posted:Got a leak in my new showerhead. An oh-so-loving-small leak, but it's there. I've got teflon tape wrapped around the threads three or four times, and it's wrench-tightened as far as I can go without putting all my weight on it. And still, drip...drip...drip. Every three seconds or so. So wrap it around 7 or 8 times. If that doesn't work, is the arm's threaded end nice and flush, without any burrs or missing bits? Did you forget the washer inside the shower head's socket? Is it flat and supple, or does it need to be replaced?
|
|
#
¿
Apr 24, 2009 02:19
|
|
|
That's called the diverter. Handles go on one of two ways. It appears your H&C handles have the little chrome cap in the middle. You pop off this cap and you unscrew the screw underneath that cap. The other way handles attach to stems is by set screws on the sides of the handles near the base. You may need some hex keys to turn those screws.
|
|
#
¿
Apr 26, 2009 03:51
|
|
|
skeetio posted:The concrete driveway has started to get weeds growing up through the cracks. I have hit them with Roundup, but I'm wondering what I can use as a more permanent solution, specifically some sort of sealant I can use that won't mess with the expansion and will do a decent job of repelling water and plant growth. Will something like this DAP sealant do the job? It sure will, but you'll need to remove whatever is in the crack first. If the expansion crack is too deep, they make a foam tubing to stuff in the bottom of the crack first, then you apply the sealant over it. Pay attention to the instructions with the sealant! If you apply it too deep, it will make big bubbles in the middle that rise higher than the concrete's surface. If you apply it on too steep of a slab on a hot day, your sealant could pour ever so slowly down the slope in the crack and pool at the garage or street before it sets. They make vertical sealants better suited for these applications. alucinor posted:I asked my landlord what we need to do with the heating system for the summer. He says just turn down the thermostats and that's all. But that means the hot water boiler is still going to be using gas all summer to heat the water that it's never called to use, right? Are you supposed to turn these off somehow? The landlord said no but I think he just doesn't want to deal with us. I can't find anything on the internet that says what summer maintenance involves one way or the other. Any resources or advice? As long as that hydronic boiler isn't connected to your hot water system in the rest of your house, you can shut off its gas and still keep hot water for showers and cleaning. Whether or not you need to comes down to that boiler's ignition system, and maybe some prep work when winter comes around again. It shouldn't heat the water if there's no demand. Still, it may still use a tiny bit of gas in the meantime, depending on which kind of ignition type it uses. If it uses a pilot light, then the boiler will always use a teeny tiny bit of gas to keep that pilot light burning so it can light the burner on demand. If it uses electronic ignition, then it uses electricity to make a spark which ignites the pilot which lights the burner on demand. Electronic ignitions shut off the gas themselves in the meantime. If you have a pilot light boiler and you decide to shut off its gas to save that tiny bit, do no just blow out the pilot light and assume it shut the gas off! That's one way to kill yourself/pets or make an explosion that makes the news. Shut off the valve for the whole boiler. If you do shut off the gas, you'll need to relight the pilot with a match once winter comes around again. There will be instructions written on the boiler's panels (outside OR inside) on how to do this.
|
|
#
¿
Apr 28, 2009 20:58
|
|
|
Elston Gunn posted:Can anyone give me some advice on drilling small holes in a quartz countertop to mount my dishwasher to. I'm assuming I will need at least a masonry bit, if not something more. If you still know how to contact the company that installed that countertop, ask them. You might need to step up to a diamond bit. Dominoes posted:Is a sabre saw a jigsaw or a reciprocating saw? A sabre saw is like a jigsaw, only bigger. kid sinister fucked around with this message at 17:56 on May 2, 2009 |
|
#
¿
May 2, 2009 17:51
|
|
|
joebob posted:I made an air soft target range using some pulleys to move my target down the range and to retrieve it. The problem is its too slow. Its super easy to move at the moment so how can I trade some of that ease for faster movement on the rope? Basically what is the opposite of a block and tackle? You could make it go faster with gear ratios. Basically make sure your rope is nice and tight in the pulleys, then attach a small gear centered on your close pulley, then use a big gear with a crank to turn the small gear.
|
|
#
¿
May 4, 2009 16:31
|
|
|
dinozaur posted:What do I do with 700 bricks? Build a shithouse.
|
|
#
¿
May 7, 2009 04:48
|
|
|
stubblyhead posted:I reached down in it yesterday afternoon. I was over elbow-deep, and just barely touching the bottom. What did you feel at the bottom? Did you feel any pipework?
|
|
#
¿
May 11, 2009 01:10
|
|
|
Are you really seeking legal advice from goons? Talk to a lawyer.
|
|
#
¿
May 16, 2009 22:11
|
|
|
ZentraediElite posted:My girlfriend moved in to a new apartment with less than desirable lighting around her doorway. I'd like to add either a motion sensor light or one with a photoelectric sensor since she will often walk home after dark. The owners might not be too keen about you messing with their property... Ask the office first. ease posted:So I guess my question is... is anything wrong, or is this just the result of an idiot leaving a mower parked on a slope with the throttle open? Or do I have some kind of carb issue like a stuck open jet? Nothing is wrong, it happens with our riding mower all the time. This is a problem with a lot of gravity-fed lawnmowers, where fuel will work its way into the cylinder if the mower is left to sit for an extended amount of time. Eventually it will fill the cylinder and it becomes difficult to compress. My dad got around it by putting a valve on the fuel line.
|
|
#
¿
May 19, 2009 03:30
|
|
|
ZentraediElite posted:I intended to do that. My question, however, was would I be able to do this work myself? No, not safely. The breaker box for that circuit is probably in a locked closet, or the box itself has a lock on it. That means that you couldn't turn the circuit off and safely work on that circuit.
|
|
#
¿
May 21, 2009 02:28
|
|
|
JediTalentAgent posted:Hypothetical: If I'm about to do something risky and I have some money in the bank that I to make make arrangements for in case of a worse-case scenario. In case something happens (killed, coma, etc.), I want certain key family members to be able to access portions of that money. Uhh, this is the DIY forum... Do this the right way and get a will.
|
|
#
¿
May 22, 2009 06:17
|
|
|
Warp Spectre posted:Had an accident with a cabinet door in the kitchen that left a pretty nasty crack running about 3/4 from bottom to top on both sides of the center panel and another on the back side of the frame that's sort of visible in the top photo. The entire fronts of most cabinets are real oak. In fact, the center panel is usually 1/4" oak plywood. That means that you should be able to fix it. First off, your pics aren't that good. Is that center panel actually bowed out? Do the pieces still fit back together well if you push on them, but they won't stay there? ease posted:I'd just try to find some stain that matches the stain on that door, and stain the exposed unstained wood. I doubt anyone will ever notice. You could try this first, as you'd need to stain first before gluing and bracing. I recognize that stain color as "Golden Oak". It's a very popular stain for cabinets.
|
|
#
¿
May 22, 2009 18:10
|
|


|
Back in college, a hung sheet or two sufficed just fine.
|
|
#
¿
May 29, 2009 22:53
|
|
|
Cross_ posted:Sorry if this is not DIY-ish enough.. Are you trying to electrocute yourself? Put it higher than the wall. If you already have access to the attic, then get yourself a waterproof can light that you can mount directly in the ceiling. Make sure you get one designed for a shower! Aside from the obvious electricity danger, the heat differential can sometimes make bulbs shatter, raining down broken glass when you're naked in the shower. Something like this: http://www.homedepot.com/webapp/wcs/stores/servlet/ProductDisplay?storeId=10051&langId=-1&catalogId=10053&productId=100058837
|
|
#
¿
Jun 3, 2009 02:45
|
|
|
Cross_ posted:I am torn between Huh? and Duh! Then untear yourself, because you want to do this the rear end-backwards way for WAY too much money. Pool lights cost around $150 apiece and their bulbs start at 100 watts. They take specialty bulbs that cost around $25 too. The one I linked to costs $20. Go to homedepot.com and search for "100058837". kid sinister fucked around with this message at 01:13 on Jun 4, 2009 |
|
#
¿
Jun 4, 2009 00:59
|
|
|
What are the wall surfaces made from, plaster or drywall?
|
|
#
¿
Jun 5, 2009 06:51
|
|
|
MaakHatt posted:My parents have a toilet that has a flushing problem. It's not a matter of water volume or whatever, I think there's just an accumulation of poo poo in the drain pipes. What can I use to clean it out (not Drano)? For reference, a small turd will clog the toilet and require a lot of plunging to get it going again. It's not a low-flow, it's an old school one, just looking for a product to use to clean out the pipes. You want a "pipe snake". Get one especially for a crapper, those kind are run through a short length of pipe shaped like a "J". They have this pipe to more easily make the turn in the bowl so you don't have to put your hand in the turd water! Be careful not to scratch the porcelain with the tip, at least not anywhere visible, scratches up inside the pipe are OK.
|
|
#
¿
Jun 8, 2009 22:35
|
|
|
neogeo0823 posted:My firey DIY project has hit a bit of a snag. I need to make an igniter. I was hoping to make something portable, so battery powered, and I can't use a BBQ lighter due to material and space constraints. The ideal device would have a button that I could push to create a small spark on command. How small does it need to be? Would a spark plug suffice? A gas BBQ pit lighter like you said might work too, or one for a gas range burner in the kitchen. Capacitors can be discharged, you know. If that battery has been dead a long time, then the capacitor might not even have much of a charge anymore.
|
|
#
¿
Jun 9, 2009 21:07
|
|

|
microwavedkat posted:I have ugly kitchen cabinets that I want to paint. They are this weird fake wood. I've tried taking a power sander to them to rough them up a bit so the paint (Kilz latex) will stick but it just makes them really really smooth. I tried using a rougher sand paper. No dice. Is there something I can put on there to prime them? I don't want to paint them all just to have it flake off in a week. You might be SOL. What kind of "fake wood" are you talking about? Is it particle board with a veneer face? Pictures might help.
|
|
#
¿
Jun 18, 2009 01:01
|
|
|
microwavedkat posted:its exactly that. i got the primer version of kilz but it scratches right off. I'll see if i can get some pictures up tonight Don't go overboard with sanding veneer. It's possible to sand right through it. Some of the newer, super cheap fake wood has veneer thinner than paper. If you don't want to replace the cabinets, you could always glue down a new veneer. Basically, you just pry off the old stuff, clean up the surface, glue on the new stuff, wait until dry and use a router to trim it back to the existing edges.
|
|
#
¿
Jun 18, 2009 21:44
|
|
|
Vaporware posted:I've got a problem with my new refrigerator. It's a GDL22KCWSS. I've got no cooling or lights in the refrigerator section, but the freezer is fine. That actually sounds like a loose connection somewhere and the act of you opening the door managed to wiggle it loose.
|
|
#
¿
Jun 19, 2009 18:18
|
|
|
kirvett posted:What would be the best way to connect a magnetic door sensor to a computer? Something like that might be X10-related. You might have better luck asking in SH/SC.
|
|
#
¿
Jun 21, 2009 05:44
|
|
|
IMJack posted:Are there any obvious problems I can look for in either the inside unit or the outside unit before I call an HVAC company? This is the first time I've had problems with this thing and I don't know where to begin or how much it's going to cost me. Sure there are obvious things to check. On the thermostat, turn the fan to on, wait a few seconds and go to the condenser outside. Look to see if the fan is spinning. One more thing you can check is the capacitors. Follow the electrical tubing from the condenser to the box on the side of your house. That box is a switch, and there are a few designs for these. Some don't have the arm to flip, but rather a bridge to pull out. Either way, turn off the power. Get yourself a 1/4" ratchet and take the corner panel off your condenser. Inside will be 1 or 2 capacitors. They're about the side of a soda can, possibly somewhat flattened. Look to see if any are leaking or "bulging" on the ends.
|
|
#
¿
Jun 28, 2009 17:42
|
|
|
Wait, is this the latchplate for the deadbolt? You're supposed to use the long screws for those and screw them all the way through the doobjamb into the framing. I'd use either wooden toothpicks or a wooden golf tee glued in place. The latter is nice in that you can use a hammer to wedge it into place.
|
|
#
¿
Jul 3, 2009 17:52
|
|
|
dwoloz posted:Neat, idea, I will try that, thanks Get yourself some cardboard, the non-corrugated kind, like from a cereal or soda can box. Unscrew the bottom hinge from the jamb, then cut yourself 5 or 6 spacers from the cardboard to fit that gap where the hinge was. It's usually easier to cut one to fit, then use it as a template. Once you got a few of these together, you should be able to fit them in between the hinge plate and the doobjamb. This should tilt out the bottom of the door enough, raising the latch high enough to catch. Add or remove spacers as necessary. You may have to adjust this in the winter, as the temperature change could make your house settle enough to make the latch not catch again. kid sinister fucked around with this message at 02:08 on Jul 5, 2009 |
|
#
¿
Jul 5, 2009 02:05
|
|
|
Local Yokel posted:Can I put a small shim under one of the hinge plates to solve this, or is there a more clever way? Also, can I make a shim from wood, or do I want something that will hold up a little better? You sure can. I like my cardboard method better as it's usually hard to cut a small shim out of wood without it breaking in half.
|
|
#
¿
Jul 6, 2009 15:49
|
|
|
Hobnob posted:Have you considered self-adhesive vinyl tiles? These are pretty cheap (<$1/sq. ft), pretty easy to install (and remove later) and don't look too bad. Also they're a lot easier to cut to shape than sheet vinyl, and a lot more forgiving of mistakes. Stick-on tiles don't work too well in wet environments, like bathrooms and kitchens. They aren't water tight and their glue isn't very strong, so any water that gets in the cracks will pop them up right away. I've seen linoleum with a raised tile pattern in it, in both sheet and precut tile forms. You might want to look into that.
|
|
#
¿
Jul 9, 2009 18:30
|
|
|

|
| # ¿ May 21, 2024 22:39 |
|
|
STFU Pumpkinhead posted:Do I need to install a panel between a dishwasher and electric stove? The counter I'm renovating had a jury-rigged quarter inch piece of plywood there as what I assume is a firewall, but is it required? The counter is supported on that end, so I assume the only purpose of the panel would be protective. Yes, you would need something there to act as insulation in between the two. Dishwashers are built to handle very hot water, but only on the inside and the pumps. Even then, they still can't handle the heat an oven can put out. You said that the counter was supported, but I would imagine that you could still use that board to help shore up the counter moreso.
|
|
#
¿
Jul 14, 2009 17:39
|
|