


|
Post your projects! This thread is for projects that don't deserve their own thread or you just don't feel like making and maintaining a thread of your own (ya lazy bastard). Feel free to post a short how-to or just pictures. Also this isn't limited to construction or related projects, anything is fine (like software or... um... knitting, I guess). To get things rolling, here's my *awesome* chalkboard I made this summer.  I made it to hug the wall to save space. That way, it can be put in places that are already �wasted� space (e.g. where a door swings opens). Perfect for a small apartment or dorm where you can't anchor a 4'x4' sheet of plywood to the wall.  To make the board, I made a frame out of 1x4 baseboard (glued and biscuited) to which I glued and nailed a thin 4'x4' sheet of 3/16� plywood subflooring (luan? can't remember the name). The top surface I sanded and painted with chalkboard paint, assuming that the fairly thick paint would fill in all the imperfections (which it almost did... almost). However, the surface is still quite rough (but usable). I would recommend doing something different, such as using a different material like tileboard (for a dry erase board) or sanding the wood smooth and applying a sealer before painting.  I made the stand from 1/2� electrical conduit (three 5' lengths), 1/2� conduit straps (eight total), some 3/8� threaded rod, and two 3/8 nuts . One length of conduit was cut in half and nut was driven into each piece (see pic). Now screw the threaded rod or extra long bolts into each nut. This allows the length of the legs to change. Reason for this being so you can easily set the board up and then extend the legs to put pressure on the floor and ceiling for support. P.S. Be sure to peen (  ) the nuts in place: i.e. use a punch to make indents above and below the nuts to keep them from slipping. ) the nuts in place: i.e. use a punch to make indents above and below the nuts to keep them from slipping. Now all you need are some blocks to place between the the legs and the floor and ceiling to keep from destroying your apartment and you're done! Somebody fucked around with this message at 19:49 on Sep 29, 2011 |
 #
?
Jan 8, 2008 01:34
#
?
Jan 8, 2008 01:34
|
|

|

|
| # ? Apr 20, 2024 02:02 |
|
|
Here's a quick and dirty picture-hanging project I found on Instructibles: It's basically 1/8" braided steel wire, some various parts that I can't remember the names of off hand, and some small neodymium magnets. Also, blurry cameras. The right side, with the thingy to adjust the tension. You can see the extra magnets hanging there, too: 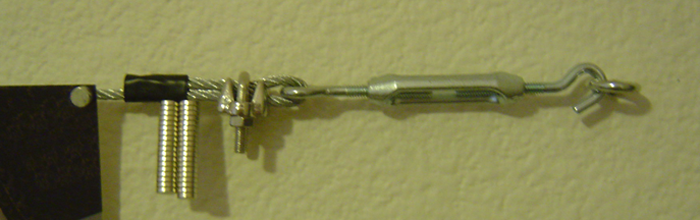 Left side, just a screw eye and clamp: 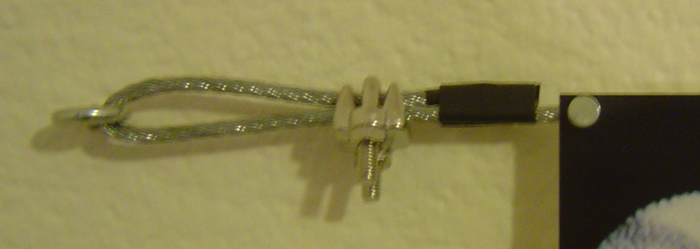 Overall picture of the finished project:  It was pretty easy to put up. I had the wire cut at Home Depot into equal lengths, and mounted the screw eyes straight to the drywall. Bonus picture - CD covers are fun to make for Mix CD exchanges! 
|
|
#
?
Jan 8, 2008 02:03
|
|

|
 I modified a Coleman lantern - I removed the incandescent night-light bulb and replaced it with an LED array.  Crude retrofit prototype - I think I'll try this again, find a better way to retrofit those cheap disposable lights with LED bulbs.
|
|
#
?
Jan 8, 2008 02:20
|
|

|
If you are poor and lazy like me, you can still have a sweet home theater lighting setup. No wiring, no cutting sheetrock. The electronics are available at x10.com for under $100, and the can lights are $15, available at some Home Depots. Step 1: Take your wall switch, and put it on the wall. They will transmit through most walls.   Step 2: Plug in your receiver (not shown, it's behind an antique radio), and set your lamp units' knobs to the correct channel. Now plug in your lights, and hide them behind your furnishings, potted plants, that sort of thing. You can have as many receivers on the same virtual circuit as you like, and as many wall remotes as you like. You can set multiple rooms too, and even control everything with your computer (too much for me, but it's capable if I wanted to).  Step 3: The X10 kit comes with a universal TV remove, which can also control your lights. The lights are also dimmable by any of the remotes. Calibrate it, and enjoy your new glare-free television viewing. Added bonus: keep it behind a fake plant or tree, and it casts cool shadows on the ceiling, giving your room a sort of upscale hotel ambiance.   Other projects: The hall table or whatever you call it. I bought this cheap at an antique show, because the marble top had broken during shipping. I had some leftover travertine from my shower project, so I stuck them on a piece of plywood and grouted them.  Floor tile. Loads of it. And it was cheap, too. Whenever you think you can't afford something nice, take a deep breath and keep looking. These were $1.29 a square foot. BTW, this looked horrible under the store's metal halide lighting, but installed in my house it looks awesome.  Kitchen cabinets, countertop, and backsplash. You may feel depressed when you watch home improvement TV shows. "Jim and Anne are on a budget though--this kitchen remodel has to stay under a tight budget of *only* $30k dollars! Let's see if our experts can help them out!" Ugh. The cabinets were pink. I scrubbed them down, used liquid sandpaper, BIN primer, and oil-based paint. Now they're shiny and white. The countertops were perfectly functional, but an ugly gray. I roughed them up with a sander, and stuck 25 cent 4"x4" tiles to them. I did the backsplash with the same tiles, and threw in a few Mexican talavera tiles to match the floor ($2.50 each). The grout is stainproof epoxy grout from Lowe's. It cost more than the tile, but I can't recommend it enough. Regular grout will get grungy over time and darken. Look in a restaurant, whether McDonalds or a 5-star restaurant--they ALL have black grout for this reason.  BaronVonBigmeat fucked around with this message at 05:34 on Jul 19, 2010 |
|
#
?
Jan 8, 2008 04:16
|
|

|
BaronVonBigmeat posted:awesome This is just incredible. You (AND LudwigVon Lugnuts) are a remodeling god(S). EDIT: 
EigenKet fucked around with this message at 07:55 on Jan 8, 2008 |
|
#
?
Jan 8, 2008 04:57
|
|
|
Three-Phase posted:
|
|
#
?
Jan 8, 2008 05:22
|
|

|
Cutty posted:Bonus picture - CD covers are fun to make for Mix CD exchanges! Did you make the image for the threadless shirt? Wish it wasn't only in baby sizes.
|
|
#
?
Jan 8, 2008 05:24
|
|

|
Didn't get as much done on the boat over Christmas as I wanted. Between weather, a 3 month old, and a 3 year old, there weren't that many usable hours. Was hoping to get started on windows, as it was, the roof didn't quite get done. Maybe spring.     I somehow didn't take a picture of the roof this time out, but it looks big enough to land a harrier on. We built it with a very slight camber, an inch in 8', the dream is that water will run off, and deck chairs won't be tippy. When we put the engines on, I'll make a proper step by step what we did and why it was wrong thread...2010-ish.
|
|
#
?
Jan 8, 2008 06:01
|
|

|
thewaablah posted:Did you make the image for the threadless shirt? No, I'm not that cool. I snagged both images from a Post Your Backgrounds thread not too long ago, and edited them to jewel case liner size.
|
|
#
?
Jan 8, 2008 06:02
|
|
|
Slo-Tek posted:Boatload of fun That's sweet, my flatmate and I were talking about building a small boat this summer, and took a look at some designs for small houseboats. Did you make or buy the pontoons?
|
|
#
?
Jan 8, 2008 06:05
|
|
|
Cutty posted:That's sweet, my flatmate and I were talking about building a small boat this summer, and took a look at some designs for small houseboats. Did you make or buy the pontoons? Everything is designed and built from scratch, by amateurs, and all wood, except for the copper plating on the bottom (and the fastners, and enough 5200 to build a a boat of nothing but glue). The pontoons are built from 4x8 3/4" ply.   
|
|
#
?
Jan 8, 2008 06:12
|
|
|
Slo-Tek posted:Awesome houseboat stuff Do you have links to the old threads you made about the boat project? I think it's one of the coolest things ever. Two questions if you don't mind answering them. First, how do you seal the copper to the pontoons so that water doesn't get between the copper and the wood hull. Also, how is the floor insulated and waterproofed?
|
|
#
?
Jan 8, 2008 06:17
|
|

|
Slo-Tek posted:Everything is designed and built from scratch, by amateurs, and all wood, except for the copper plating on the bottom (and the fastners, and enough 5200 to build a a boat of nothing but glue). Man, that's huge. If you don't mind, how many people are working on it, how much money have you put into it, and what are the rough (length, width, height) dimensions? Maybe you can make a starter thread and update it when it's done in a couple years. ")
|
|
#
?
Jan 8, 2008 06:25
|
|
|
EigenKet posted:This and what you posted in your thread are just incredible. Thanks! But that's not my thread. I did have a similarly massive project though.First, let's start with the "before" pictures.   Yikes. Let's review what I had to start with: * Peachy cabinets, only 32" tall * Cabinets way too small for 2 sinks, leaving zero room for any freaking drawers * Pink carpet * Vulgar tacky medicine cabinets, to make up for lack of drawers * Cheap unframed slab-o-mirror * Cheap faux-marble counters * 1970's fluorescent light * Incredibly stupid closet size there on the left--5' x 5'. Think about it. You have overlapping closet rods, so you don't get 10' total linear space for hanging things. You get...5 feet, maybe. And it prevents you from having enough room for a real set of sinks. Meanwhile, a huge expanse of wall on the left goes unused. Whoever drew up the plans for this house was dumb. What do we do about it? First, we start drinking alcohol. Then on a whim, we plunge in and go past the point of no return, in a project we're not entirely sure how to finish:   But luckily, it's not a structural wall, so putting up a new one is just studs and sheetrock:      More remote-controlled dimmable lighting. Very sexy, but I wasn't smart enough to do a google search for "remote dimmers" at the time. I got in the attic and ran wires through the wall. Good god, what a chore.  The bathroom:    Grouted and sealed, with new fixture handles:  The living room, minus pink carpet:  The new floor. This is laminate, designed to look like Merbeau or Brazilian mahogany or something.  A warning to potential rennovators: I bought my house from a middle-aged couple who were pretty proud of the money they spent. I nodded politely while signing papers, and didn't have the heart to ask them why their house couldn't sell. They spent a lot of money...on crap. If you're going to spend money, make it look right! Except for the travertine shower, I really have not spent gobs of money. Even that was under $1000. Before you start doing stuff, have a rough idea of what you want. There are loads of books on design and decor, and most of them suck. They're just random collections of pictures. If you're clueless about design, but want maximum results for your money, there is one book I will recommend: The Seven Layers of Design He breaks things down into seven parts so you know what's missing. If you've tried to make your joint look nice but something seemed missing, read this book. Once you read it, you will be much better at looking at a room and seeing what's wrong. (For example, lighting is one layer. Don't have all your light coming from one central fixture. Have half coming from the ceiling, and half coming up from the floor, or from the walls.) Other than that, find a book dedicated to homes that match your style. In my case, a book on Mexican kitchens, and a book on Tuscan homes. Copy their furnishings and/or paint colors. And get a book on home staging, people actually get paid to take non-selling houses and tart them up so they will sell. And remember, just because your wife/girlfriend thinks she has a knack for decor, doesn't mean that she actually does. Just like most men think they know how cars work, but they don't really. Blindly follow her advice, and you may end up with a jumbled pink mess like the house I bought at a discount price. BaronVonBigmeat fucked around with this message at 05:38 on Jul 19, 2010 |
|
#
?
Jan 8, 2008 06:31
|
|
|
SoylentGreen posted:Do you have links to the old threads you made about the boat project? I think it's one of the coolest things ever. Archive post http://archives.somethingawful.com/showthread.php?s=&threadid=1494209 The pontoons are held together with screws and 5200 marine adhesive, and that is enough for the most part to be water tight. The copper is mostly for decoration/hell of it, and it is held on with lots and lots of glue, and copper roofing nails, but the barrels should be watertight without it. In practice, of 12 watertight sections, two of them leak a little bit. However, wooden boats leak, and the lumber is supposed to not mind being submerged till forever, or your money back. With it open to the elements as it has been for the last few years, it'll get an inch or two in the wells every time it rains, but each section has an electric automatic bilge pump, so 10 minutes with a shop vac, and a sunny day has them bone dry again. Bonus picture of boat versus Tropical Storm Ernesto:  Cutty posted:Man, that's huge. If you don't mind, how many people are working on it, how much money have you put into it, and what are the rough (length, width, height) dimensions? Maybe you can make a starter thread and update it when it's done in a couple years. Dimensions: 48'x16'xReally high up when you are standing on roof beams with no railing. Original plan was to be 56', but we got tired of building sections, and some marinas charge extra over 50'. Starter thread is in the archives, from 2005, though here is the folks narration. http://reiheld.home.mchsi.com/boat.htm Slo-Tek fucked around with this message at 07:08 on Jan 8, 2008 |
|
#
?
Jan 8, 2008 06:55
|
|
|
BaronVonBigmeat posted:Thanks! But that's not my thread. "LudwigVon Lugnuts" is nearly identical to "BaronVonBigmeat" (both contain "Von"), you can understand my confusion.  it's been a long night. 
|
|
#
?
Jan 8, 2008 07:50
|
|
|
Building a Crib and Changing Table Ok so I come from a family that builds and fixes things. My father was a welder and a mechanic, my grandfather a carpenter. Now I learned to work with cars from my dad, and he used to do work on drag cars in the 60s/70s so I'm a pretty decent hand at that. Thanks to my dad I got comfortable with tools, loud noises and chemicals that may cause cancer in the state of California. I never learned anything from my grandfather about wood though. It always kind of scared my 'cause, well it just wasn't a car. My dad tried to work with wood when he was younger as I understand it, but it turns out that if it can't survive a good fire my dad probably shouldn't be around it. The only project he ever really completed was my crib, and he 'helped' my grandpa. That project however brings us around to our point, I have to build a crib. Every member of my family for at least the last few generations has slept in a crib that was built by some other member of my family, it's just the way it has to happen. Hell the bed I slept in till I got married was made by my great-grandpa. Due to some tragic twists of fate though I am now the last surviving male member of either my wife's or my family, unless you count my younger brother in law and most people don't. As an added bonus my wife asked my to build a changing table. So I had some wood, a bunch of tools, an abstract knowledge of carpentry and a mission. I'm a month and a half into the project and I've learned a lot that I didn't know and remembered a lot that I apparently picked up. I'll post some of the pictures. Crap, photobucket is down. I'll post the pics when it comes back up. So I started by going out and getting some red oak. It was a loving pain to try and find any that was over 2" for the crib legs, I finally found some rough stuff and had to cut and plane it. 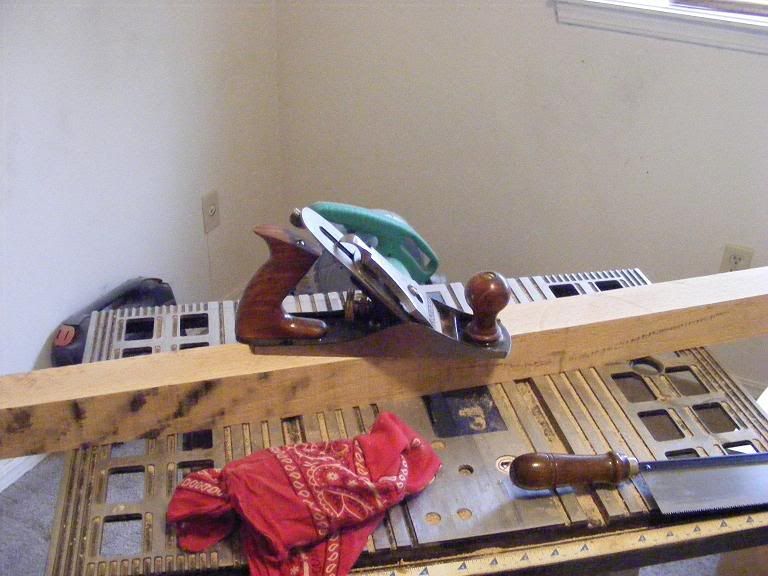 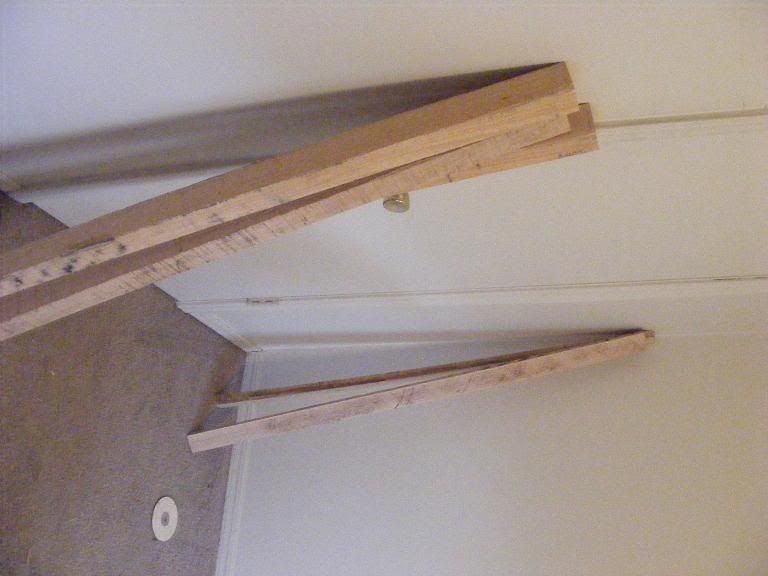 After that I started work on the changing table, because it is actually slightly more complicated. First I hand joined a bunch of legs. I have this router... thing, but I don't know how to use it and I have no bits with which to play around. So this was done with a hand backsaw on 8 different pieces of wood. Please note the empty bottle of Tums a pic or two later. 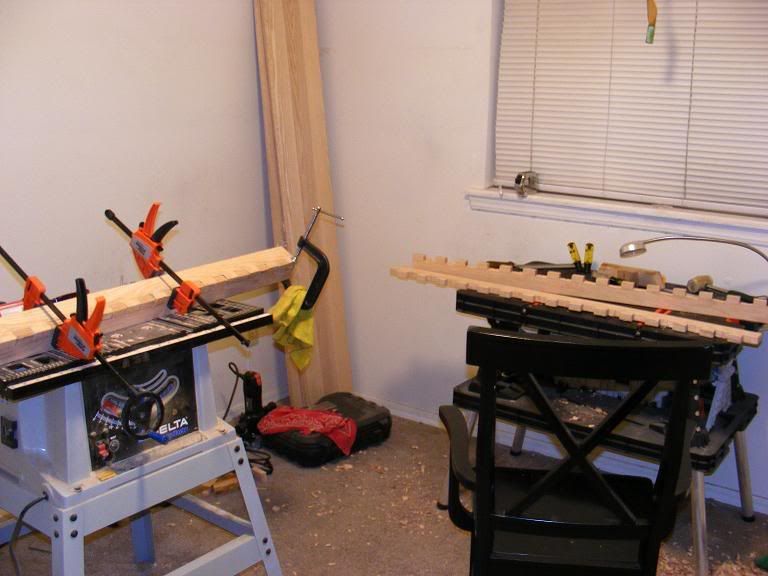 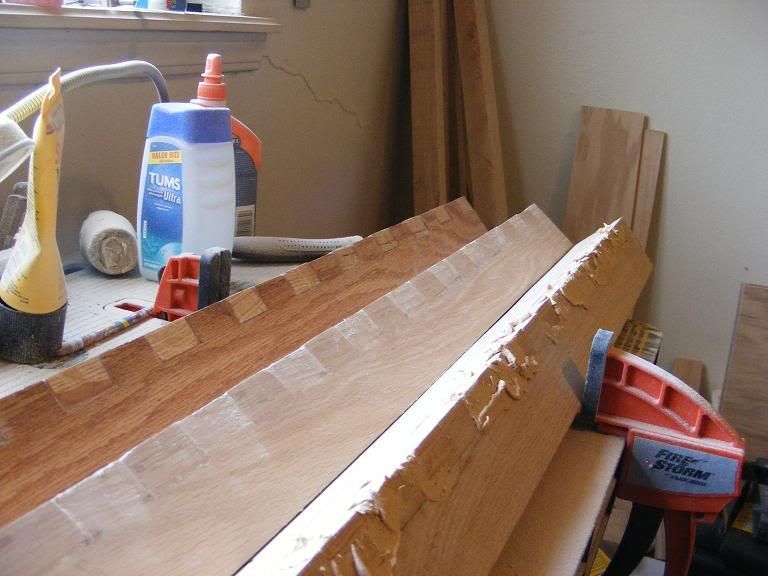 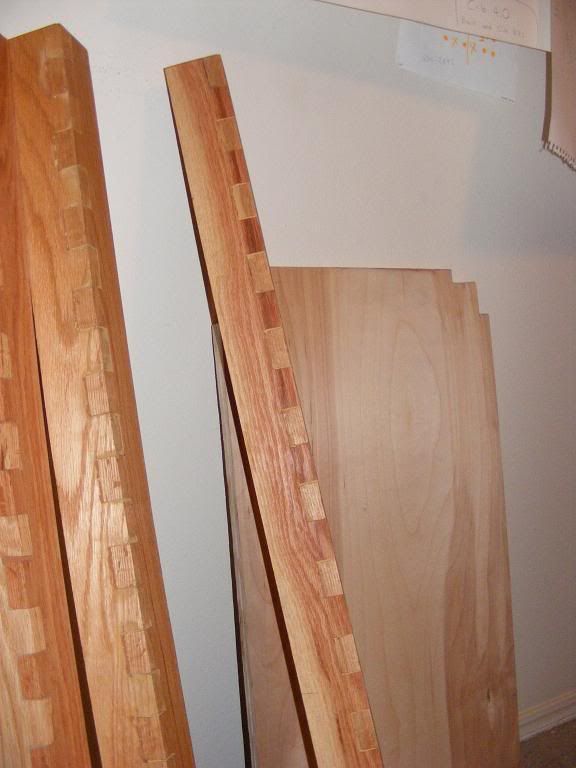 I'm going with a low gloss tung oil for the finish. UPDATE: 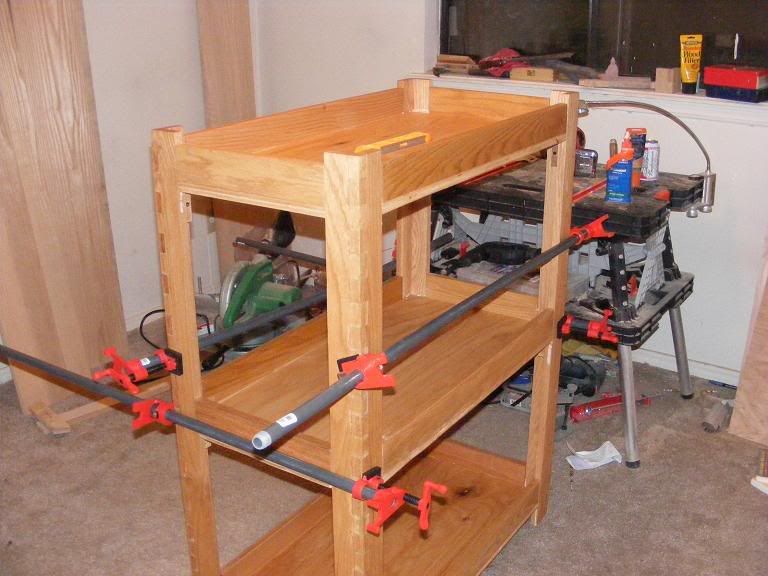 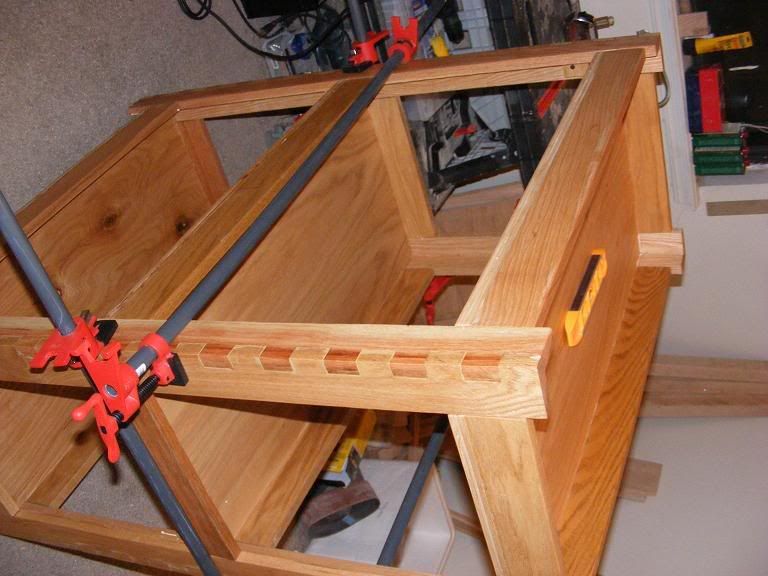  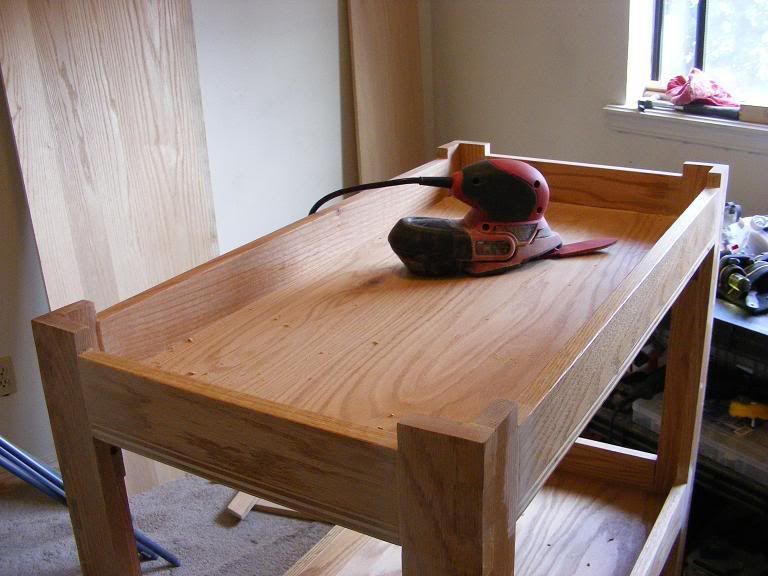 And The Crib 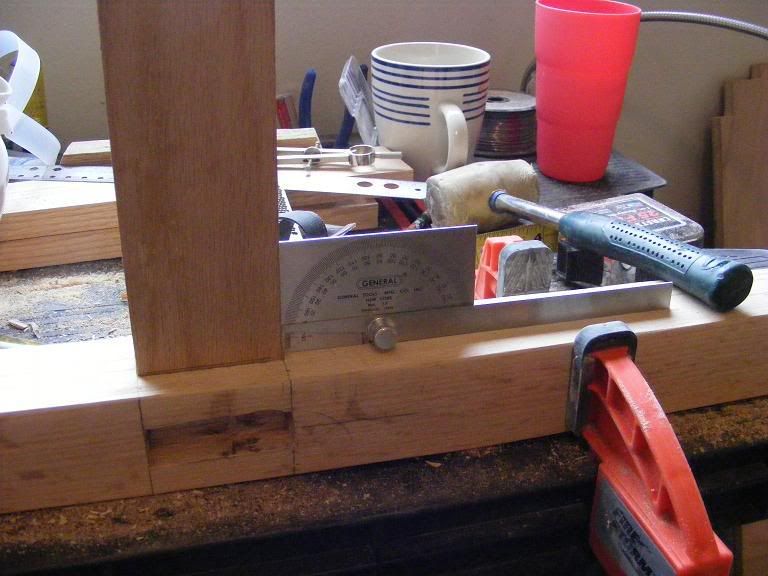 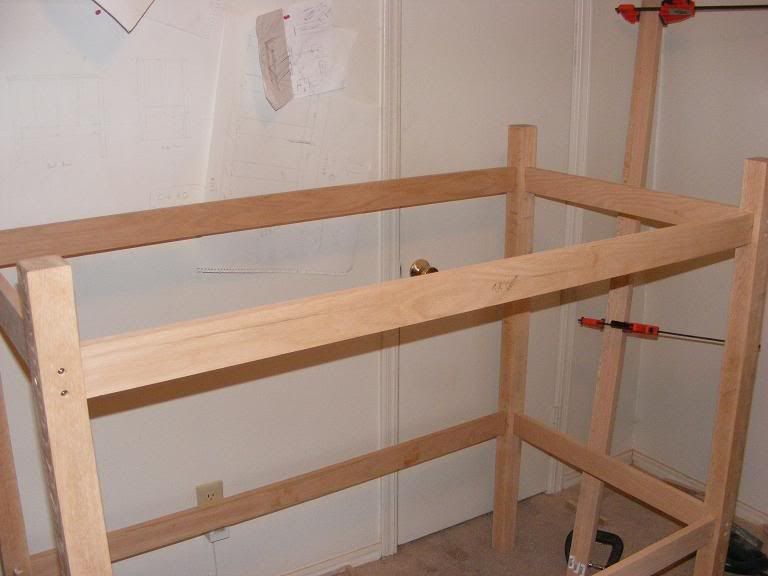 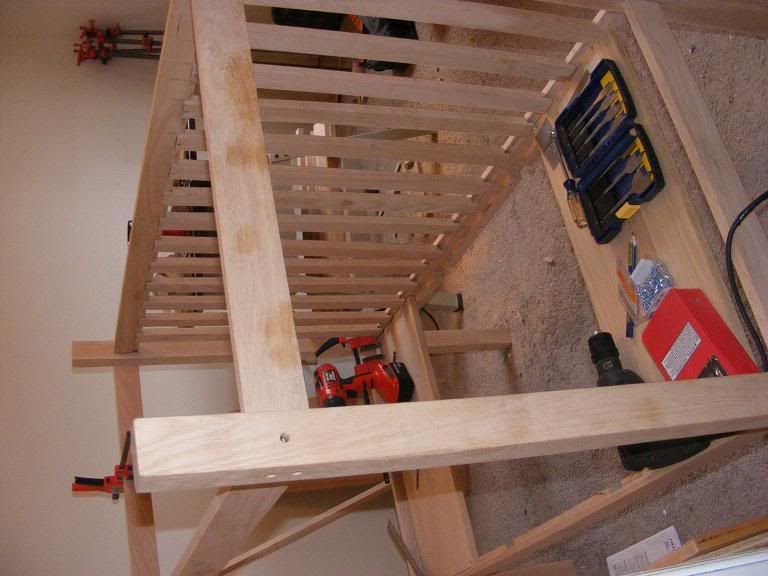 More to come. PrinceofNessus fucked around with this message at 21:12 on Feb 20, 2008 |
|
#
?
Jan 8, 2008 09:20
|
|


|
Here are some pictures from my fireplace renovation. I laid slate tile over the ugly-rear end marble, and built a new surround and mantel from scratch. Before:  I routed flutes and an inset in what will eventually become the front part of one of the pilasters:  Pilasters are up, and I'm experimenting with how to lay out the tile. The carpet is torn up because the hardwood floors were due to be laid as soon as the tile is done:  Crosspiece is installed, and I've started to lay the tile. Before laying tile, I used a power sander to rough up the marble to make sure the mortar would hold:  Tile is nearly done (you can see the last few custom-cut tiles hanging out ready to be installed). The thinset mortar didn't hold the tiles up well enough and they kept sliding down, so I had to cut some scrap MDF to the right length to prop them up until the mortar dried. You can also see the beginnings of the chair rail that I installed.  After finally adding the mantel shelf and lots of molding, grouting the tile and painting everything, here's how the project turned out:  Another angle. You can also see the sweet wood floor here, as well as the chair rail and wall frames I put up.  This project was just one of many that I've done in my new house. I'll try to upload some more pics of my other projects at some point. Extra bonus pic: now that I'm done renovating most of the house (I'll try to upload some pics of my other projects to this thread at some point), I'm working on building some furniture. I designed this bookshelf model in Google Sketchup (the design matches my daughter's existing furniture). Here's a pic of the bookshelf model. I'm about 75% done with building the real deal. 
threetee fucked around with this message at 07:33 on Jan 9, 2008 |
|
#
?
Jan 8, 2008 10:30
|
|
|
I have a carbon fiber bike frame that I'm going to give a new paintjob (usually they only have a laminant to make them shiny). The paint is mostly to hide the fact that it's a really expensive bike, but in my head it has turned into a much bigger project. I decided to make custom logos for it, and use phosphorescent paint for the lettering so I'm more visible at night. It's going to be way cool.
|
|
#
?
Jan 8, 2008 10:43
|
|
|
Here's my power amplifier. It's a Symasym 5.3 like here http://www.lf-pro.net/mbittner/Sym5_Webpage/symasym5_3.html but it's modified to use Toshiba 2SC5200 and 2SA1943 output transistors. The small transistors are matched MPSA92, MPSA42 and BC546. Capacitors are Rubycon ZL, Panasonic FC, Wima and Silver Mica. The input cap used to be a Jantzen MKP 8.6uF. But I managed to find Unitra Telpod 8uF oil caps so I'm using them instead. You can see that the old cap (big black cylinder) is bypased, and the new one (huge silver cylinder) is in it's place. It sounds better than any other amp I've heard. Here's one of the channels running  It doesn't look very good, but it's been through a lot. It was on fire a few times, and this board was used for testing so many components have been replaced.  This is the other channel    The board was made using old electronics magazines and a clothes iron. 
|
|
#
?
Jan 8, 2008 12:35
|
|

|
Our ongoing project is also a boat, only we live on it full time while we're doing all the building work. Hendrik is 103 feet long by 16 feet wide, built in 1933 and was used by the previous owners as a hotel for canoeing holidays (and came with 26 bunk beds in 12 tiny rooms).  We've got about ten years of DIY ahead of us, we reckon, but we're slowly doing one project at a time. Currently we're on small improvements before we take the hotel portion of the boat down to the hull in Spring, recoat the steel, lay on new insulation and build in the walls for the two bedrooms, two en suites, and living room. Currently, we're rebuilding the galley steps because two of the old ones rotted away underneath me, making them a bit hazardous to walk on. So we stripped back the old steps down to the metal framework and cut a new board down to step-size, but haven't quite drilled the holes and bolted them on yet:   And the other little project we're working on right now is an interior vertical passageway from the back captain's cabin up through the ceiling into the floor of the wheelhouse, which will be concealed by a cupboard in the wheelhouse. This way we can go up there without having to get wet or cold or put on shoes and a coat.  We've got the hole cut, but we need some stair steps welded on down below so we can actually use it. Even my She-Ra strength can't lift myself through with a rise like that...
|
|
#
?
Jan 8, 2008 13:02
|
|

|
nevermind
gum bichromate fucked around with this message at 19:01 on Jan 8, 2008 |
|
#
?
Jan 8, 2008 17:11
|
|

|
BaronVonBigmeat posted:If you are poor and lazy like me, you can still have a sweet home theater lighting setup. No wiring, no cutting sheetrock. The electronics are available at x10.com for under $100, and the can lights are $15, available at some Home Depots. http://mipsisrisc.com/rambling/archives/28 Goon built project about controlling X10 apps with the iPhone/iPod touch.
|
|
#
?
Jan 8, 2008 19:25
|
|

|
Komputernauta posted:awesome amp stuff just out of curiosity what kind of back ground do you have in electronics? I've been studying e.e. hoping to get a job in that kind of field. Also, do you have any books or websites you would recommend for people interested in building amps?
|
|
#
?
Jan 9, 2008 01:05
|
|

|
I'm studying mechanical engineering, but we had some EE lessons. I learned most of the stuff myself. Most of my resources are not in english though. This is a pretty good forum in english http://www.diyaudio.com/forums/showthread.php?s=&threadid=60918&perpage=10&pagenumber=1+ this is a very long thread about this amplifier. It's kinda hard to read. Lots of offtopics and no content posts, but there is interesting information there. http://www.sound.westhost.com/ is a really good website with lots of articles and projects. Project 3A from that website was my first amplifier. The book "Art of electronics" by Horowitz and Hill is also very good. The 2 best forums about electronics and audio I know are in polish. But this thread has some nice pictures of amps http://www.audiostereo.pl/forum_wpisy.html?temat=24587&all=1
|
|
#
?
Jan 9, 2008 02:19
|
|
|
  First one is an oil rig carrier, the second are, well.. fences.
|
|
#
?
Jan 9, 2008 02:57
|
|
|
quote:Awesome houseboats I think we need threads from both of you. I'd love to see more pictures and get more information on both restoring a houseboat and building one from scratch.
|
|
#
?
Jan 9, 2008 21:37
|
|
|
Since I haven't done anything worth posting about since last summer (short of maybe trying to fix up a 1980's-vintage scrolling LED sign), I'll just post pics of my homemade air conditioner again. Here it is in all its "portable" glory:  Four fans, two huge heatsinks (ostensibly for a computer but I can't see how they would fit in one), a 150-watt Peltier thingy, a custom-made box, and a car battery which drains in about 3 hours.  I worked in a greenhouse all summer, see, and one particularily hot day I said to a coworker "man I should just build a personal air conditioner". Of course word of that got around and it became a question of honour; I couldn't NOT build one after that. I brought it in once and used it until the battery died; it was totally worth it.  Anyways I don't recommend building one of these because it consumes way way way too much power for the amount of cold air it produces.
|
|
#
?
Jan 9, 2008 22:02
|
|

|
Being a hockey player all my life I collected a lot of broken sticks. After accumulating quite a few I decided to build something out of the scrap lumber. My first project was a small shelf, which I can't seem to find a picture of on my computer. After that turned out to be successful, I moved on to a coffee table. Here's the plan, I drew it up in TurboCAD  During production  Completion 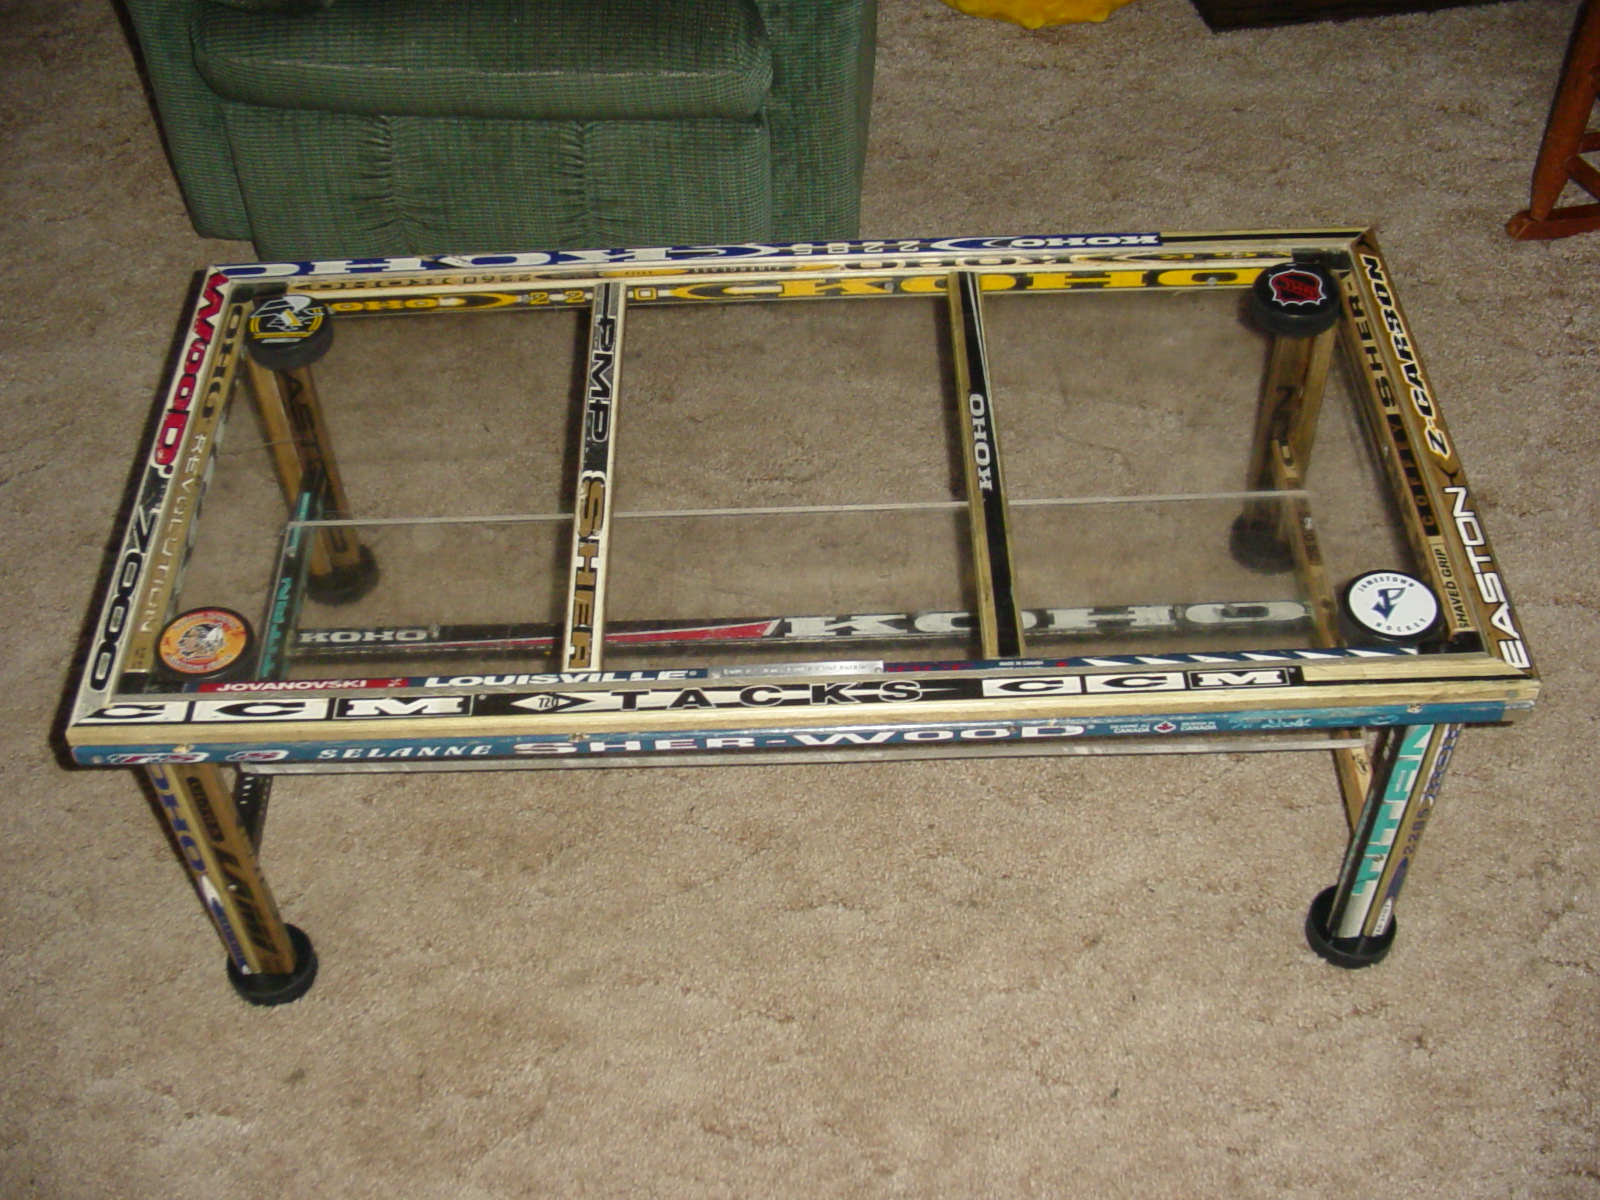 I was fortunate enough to have a friend who worked at my local rink, he was able to give me a piece of broken plexi-glass to cut the bottom shelf and top table piece out of. The glass is a bit thick for a table, and is used and has scuffs and scratches in it, but the combination of used sticks and glass from the rink give the table a very authentic hockey feel. If I ever make another however, I'm going to study up on some carpentry techniques in order to make more sturdy joints as it has a slight wobble when weight is applied to it (read: no feet on the table). SB35 fucked around with this message at 06:42 on Jan 10, 2008 |
|
#
?
Jan 10, 2008 06:37
|
|
|
goatse guy posted:I think we need threads from both of you. I'd love to see more pictures and get more information on both restoring a houseboat and building one from scratch.
|
|
#
?
Jan 10, 2008 11:43
|
|
|
squirrellypoo posted:We had one in Ask/Tell a few months ago, but it's probably in the Archives now. It was titled "Ask us about living on boats" or something close to that and featured our boat and pakchoi's canal boat. I spent last night reading through your blog, and... wow! Its a lot more work restoring a boat than i ever could have imagined! Mad props to you lot for doing it, and sticking with it through months of no hot water!
|
|
#
?
Jan 10, 2008 18:15
|
|

|
I have about a half a dozen sets of pistol grips in various states of completion and three rifle stocks that are in the works, from nearly done (needs a few more coats of finish) to an unshaped and uninletted blank. I need time and less kids. The good thing is the projects will keep.
|
|
#
?
Jan 11, 2008 00:57
|
|

|
I stayed up all last night sewing a custom band for my new Seiko watch. The original plan was to make the backing band of leather, but WalMart's craft section didn't have any and there weren't any suitable old boots at the Goodwill. Stupid small town with no Hobby Lobby. I did get the overstraps (a pair of Timex 10mm women's ones; if you do this, open the packages and compare lengths in the store -- they're not meant to be used in tandem, so the lengths aren't uniform), though, and I wanted it now, so I spent all last night sewing the backing band out of some twill suiting I had laying around. It looks so good I'm not sure if I even want to redo it in leather. It's a hair over 2" wide, and the ends meet perfectly on the other side, the latter happening purely by coincidence -- I meant them to overlap a bit, but forget about the seam allowance.  The edge stitching on the main part is black embroidery floss; everything else is fastened with Oxford Grey thread to match the fabric (mainly because I ran out of the heavy stuff). There's a bit of midweight canvas between the two layers of the backing band to give it more stiffness.  Note the snap between the straps that holds the whole thing together while I fasten the straps. It's really hard to get on without that, with three straps all trying to go in different directions. I got "long" straps on the reasoning that the regular ones in this width are made for tiny girly wrists; turns out I have tiny girly wrists. I use the 3rd or 4th-smallest hole out of 8 on these. Unfortunately WalMart didn't have any straps with stainless buckles, so the buckles don't match the watch.  Original plan sketch drawn up back in July or so when I first decided to get this watch. The leather MkII version will include a molded-over-the-watch protective cover attached by snaps. I'd make one for this version, but I don't think it'd work as well in fabric. Chillbro Baggins fucked around with this message at 07:43 on Jan 12, 2008 |
|
#
?
Jan 12, 2008 07:40
|
|
 Bad Angus! Bad!
|
I've inherited 6 of these chairs, plus a carver, four my Grandfather. It's most likely that he made then some time in the 1930's or 40's. The varnish finish isn't great, so I'm planning on stripping them and then restaining them or waxing them with a coloured wax. I also need to replace the seat material and add some padding. I stripped off the seat material on a couple of the chairs & there's about 6 layers under there, not all of which could be identified by my Dad, i.e. they're over 60 yrs old!
|
|
#
?
Jan 12, 2008 23:02
|
|

|
In preparation for several other projects which I have in mind, I found that I had to build myself a workbench. I set about it this weekend. I thought I'd get all fancy and use some clever joinery, which resulted in my having to do a lot of hand sawing.  All of the frame underneath the work surface is half-lapped, with dowels to make sure nothing spread out while the glue was setting.  Upon thinking about it while I was sawing, I wish I'd just cut half of the leg boards to the shorter length before gluing and screwing them last night. I really consider this to be the biggest error I made during the entire process. Here are the legs, halfway assembled.  And ready for the top to be installed. The higher parts inside the corners aid in screwing everything together, as well as supporting the top frame.  Here I've installed the top, which is 2 layers of 3/4" MDF on top of the 2x4 frame. The entire thing is fairly heavy, but not too much to shove around my workshop/back porch.  A front view. It's hard to tell in the smaller images, but the front board up under the top is a piece of quarter-sawn pine, which looks a little bit better than the rest of my $2 2x4s.  Here's a side, housing the cheapo vise I bought at Harbor freight last weekend, and bolted to the benchtop. 
|
|
#
?
Jan 14, 2008 05:26
|
|

|
async1ronous, is there a difference between the Japanese hand saws and the traditional western ones? I've got a standard little dovetail back-saw, but I almost got a Japanese saw when I was shopping. When I decide to expand my collection of saws I'd like to have an idea of which way to go.
|
|
#
?
Jan 17, 2008 19:29
|
|
|
PrinceofNessus posted:async1ronous, is there a difference between the Japanese hand saws and the traditional western ones? I've got a standard little dovetail back-saw, but I almost got a Japanese saw when I was shopping. When I decide to expand my collection of saws I'd like to have an idea of which way to go. Japanese saws cut on the pull stroke, instead of the push stroke like American/European saws, and don't require as thick of a blade (because a blade being pushed forward has to stay rigid while a blade being pulled back doesn't).
|
|
#
?
Jan 17, 2008 20:15
|
|
|
poeticoddity is entirely correct. The downside is that you can't put the work down below you and use body weight as much, but the upside is a much thinner cut, and, arguably, more control. I got that saw from Home Depot for about 20 bucks, it's the Marples brand, and is made in Japan. I like it.
|
|
#
?
Jan 17, 2008 22:51
|
|
|
I spent about $35 on a real japanese backsaw, and once you get used to them, they are great. You don't lean into it/put any weight on it at all - the saw does it all on its own. Flipside is I now need to make a bench hook that hangs off the backside of my workbench, so the pull stroke pulls it against the fence, instead of a traditional push fence/bench hook. Of all my hand tools, including my expensive planes, that little backsaw is my favorite. Thing cuts like a drat laser.
|
|
#
?
Jan 17, 2008 23:06
|
|

|

|
| # ? Apr 20, 2024 02:02 |
|
|
I looked at some Japanese saws when I was starting my project. I dismissed them then because I thought they would lack control in being so flexible, but I didn't realize that the saws cut on the backstroke. Speaking of, how do the Japanese saws measure up, control wise, to a backsaw?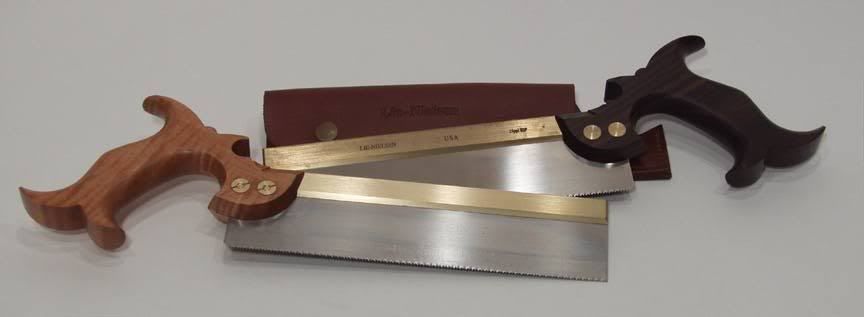 At this point of course I suppose it's entirely academic, as I'm going to invest in Japanese as well as Western saws.
|
|
#
?
Jan 18, 2008 10:26
|
|