


|
Slung Blade posted:I still want to try making damascus, but I don't know if I can get my charcoal forge hot enough. Maybe if I make a pile of fuel 2 feet high and get an 80 cfm blower... keep in mind that with welding, you don't want the steels to the point where they sparkle, that is too hot. it just takes a large hotspot with an insulating layer of coal around it and a slow, steady supply of air. You want to soak the metal so the inside approaches the same temp as the outside, and when it's the right heat the surface will look oily, like melting butter. Also: I would suggest wearing long pants at the forge, at least for beginners. Utilikilts may look good (to those of a certain, very goon-like taste) and allow free movement, but I'd rather burn my pants than my legs 10 times out of 10. Also wise to have a leather apron in case of splintering punches or free-flying cutoffs, though I admit that I forget to put mine on most of the time.
|
 #
?
Aug 20, 2008 17:31
#
?
Aug 20, 2008 17:31
|
|


|

|
| # ? Apr 18, 2024 05:46 |
|
|
Dongsmith posted:You want to soak the metal so the inside approaches the same temp as the outside, and when it's the right heat the surface will look oily, like melting butter. Really? Well that's good, I guess my forge can do welding heat after all then. I've often pulled metal out of the fire with large spots that look oily. I'll just have to leave it in longer to even it out.
|
|
#
?
Aug 20, 2008 18:13
|
|


|
Earlier this summer I caught up on several episodes of Mystery Science Theatre 3000. One night after work, I decided to try and build Crow T Robot from household items.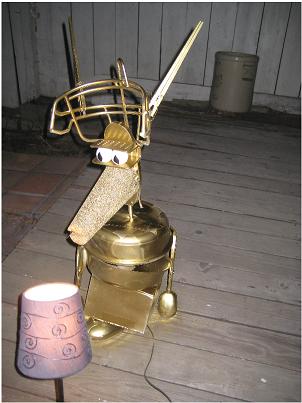 I ended up having a gold shadow of Crow on my deck out back.
|
|
#
?
Aug 25, 2008 03:55
|
|
|
I covered a few windows in my apartment with privacy film. I get light during the day and privacy at night, plus my cat can't destroy the blinds anymore. Cost about $20 at Home Depot, and there's really nothing worth seeing outside anyway. I didn't do the top half, so I can still see what the weather is like outside.
|
|
#
?
Aug 31, 2008 04:19
|
|

|
Hello Pity posted:
Sand pit, easy and cheap and the kid will love it. (Make a cover so it doesn't fill with cat poo poo.)
|
|
#
?
Aug 31, 2008 11:21
|
|


|
yaffle posted:Sand pit, easy and cheap and the kid will love it. (Make a cover so it doesn't fill with cat poo poo.) I was thinking a deck that would cover more than just the raised brick rectangle. It is hard to tell from the photo angle, but one that extends from the fence to the grass might be nice.
|
|
#
?
Sep 11, 2008 22:11
|
|

|
I'm just finishing my kitchen counters. We had a raised crappy bar that needed to go because it made for a really tiny 10" opening between the dining area and the kitchen. I don't have any proper before pics handy, but you can kind of see where it used to be - look for my half-assed drywall repair just under the lightswitch. Here's an in-progress, the yellow doors are really closer to the yellow-orange in the accent tiles in the next pic. 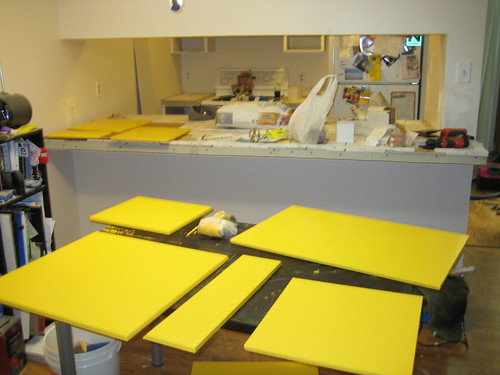 I built the new counter with doubled up 3/4" ply and hardiboard, then tiled the gently caress out of that fucker. 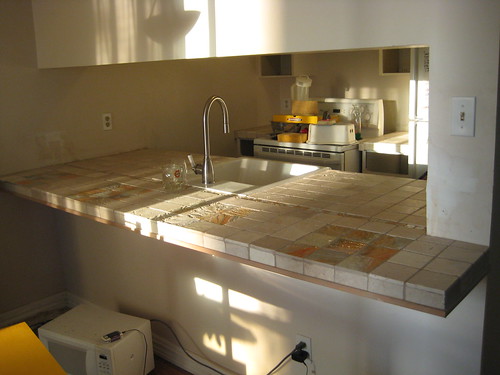 --It's not perfect, but it's looking a hell of a lot better than it did before. The tile is mostly tumbled marble so it still needs sealant once it's properly cured. Then I need to pull out the "gently caress-it just use whatever old outside-corner you have lying around" drywall bit and paint. Next week, tile floor in the kitchen and bathroom.
|
|
#
?
Sep 12, 2008 16:30
|
|
|
Bought an old r/c flying wing over the weekend. It was so nice looking, I had to at least get it, even if just for show. It is powered by a Cox Conquest 0.15, mounted on a combination muffler/engine mount. The engine felt loose and rattled when I turned it over with my finger. After some work on the bench, I got the crankshaft out, and found the rear bearing obliterated. I put in a call to Ron Young, a Cox Conquest specialist out in California, and quickly sent the engine to him for rebuilding. He can get these things spinning fast. Last night I pulled out some Novus Plastic Polish #2 and lots of rags to take the tarnished look off from the upper surfaces. Novus is magical stuff - the plane looks new and freshly waxed. What you don't see in the photo is the covering for the fuse cavity. It is a matching yellow with a canopy bubble and a tiny Snoopy figure. They look silly, so I'm going to take this opportunity to build myself a new cover and making it plain and smooth - with that, this plane is going to look like a UFO. Also needs lighter servos, a fuel tank and touch-up on a number of dings are scratches. I'm not qualified to fly this machine; still working on a trainer and simulator. It is a bit on the heavy side, with a fast engine (turns props >23krpm). Also, no landing gear - just skids on the bottom of the body and wingtips. I need to find somebody experienced enough to take it for a spin before the snow falls.
|
|
#
?
Sep 16, 2008 18:32
|
|
|
That plane looks like a great candidate for an electric motor. You would get more power and less pain in the rear end cox engine.
|
|
#
?
Sep 16, 2008 18:57
|
|

|
Daddy Fantastic posted:I covered a few windows in my apartment with privacy film. I get light during the day and privacy at night, plus my cat can't destroy the blinds anymore. Cost about $20 at Home Depot, and there's really nothing worth seeing outside anyway. I didn't do the top half, so I can still see what the weather is like outside. why not just close the blinds at night and have a view during the day?
|
|
#
?
Sep 17, 2008 18:45
|
|

|
greasyhands posted:why not just close the blinds at night and have a view during the day? I'm guessing it's because blinds are generally annoying and he also has a cat that destroys them?
|
|
#
?
Sep 17, 2008 18:56
|
|

|
Boogeyman posted:Another handy tip: when painting light colored trim in a dark colored room, put a plastic bag over the paint can and lid before hammering the lid back on. A trick my dad taught me- take a flathead screwdriver and hammer and knock 4 holes around the inside groove where the lid seats after opening it the first time. That way if you're pouring paint out or wiping the brush on the side of the can, either way the excess will mostly all drain back into the can. Also throwing an old towel or rag over the lid before securing just in case ")
|
|
#
?
Sep 18, 2008 03:49
|
|

|
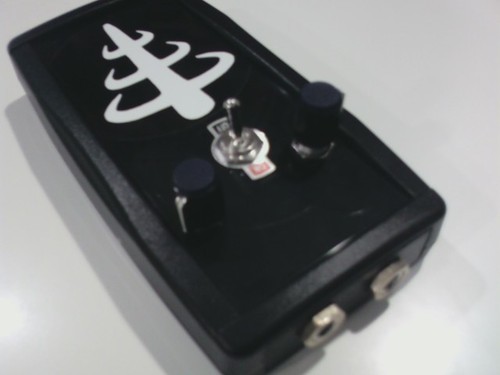 This is a Make crackerbox schematic (http://cachefly.oreilly.com/make/09/cracker_box_amp.pdf) in a head unit. Runs off a 9v battery and powers a passive 8ohm cabinet. I have a second of these, constructed combo amp style, and have been experimenting with plugging this head unit into that with pretty good results. Goes together pretty cheaply, too, which is nice. This is housed in a nice free project box I got as a sample, too. The decoration is courtesy of the band Racebannon, who I saw later in the evening and had free stickers. 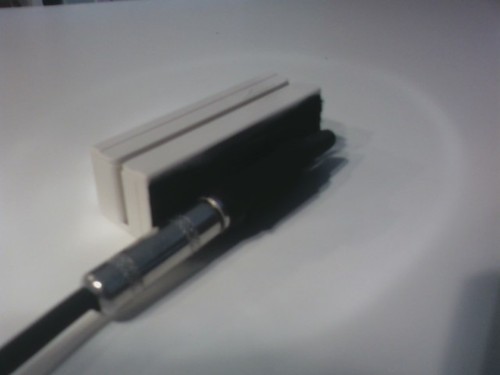 I read somewhere that credit card readers just use normal cassette-style tape heads, and so I figured that it might be possible to mod one to turn it into an audio signal. Turns out I read correctly -- I ordered one of these for 20 bucks from digikey, played with test leads and found the ground and signal pins, did a bit of soldering and added a 1/4" jack, and now I can plug it into an amp. The signal is low but even a small boost really makes it shine -- I've been using a Big Muff to increase the volume so it's clearly audible and it's been working well. The time from opening this up to getting it working was seriously about two hours, which was great. I'm in the process of putting together an Atari Punk Circuit, a simple two-pot synth. Hope to have it finished by this weekend.
|
|
#
?
Sep 18, 2008 18:39
|
|
|
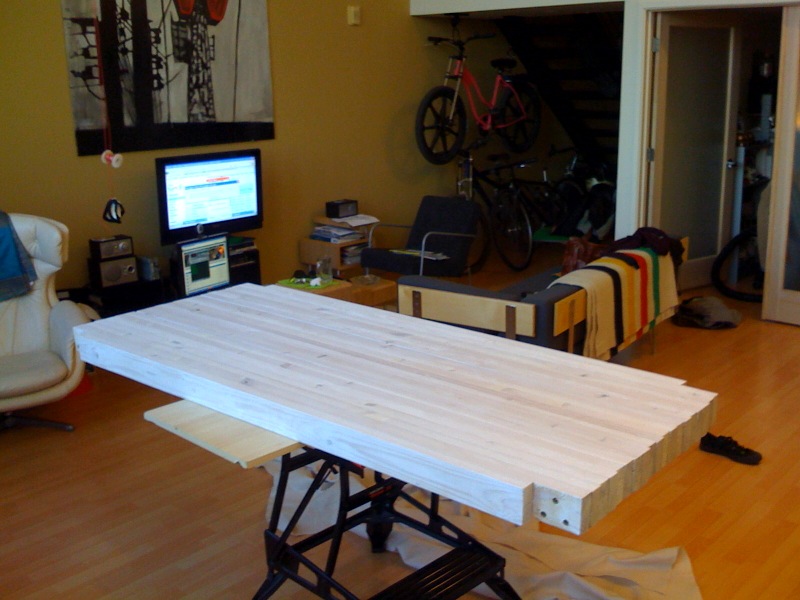
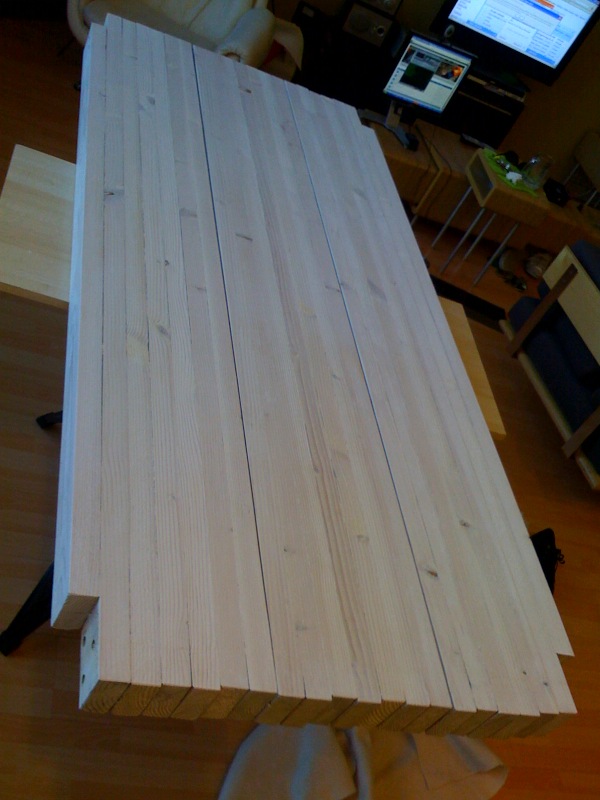
Started documenting this in the woodworking thread, which was probably a mistake since basically no woodworking techniques or tools were used in the making of this piece aside from a planer. Where I last left off: Blooot posted:Two layers of "white oak" stain later. Going to start laying on clear tomorrow. Onto some metal parts. 4x1.5" .125" wall hot rolled steel tube, some plate and round stock from online metals plus a few hours in the machine shop. Adjustable feet from Misumi (check these guys out -- awesome project supplies here http://www.misumiusa.com -- order a catalog, it is seriously amazing) 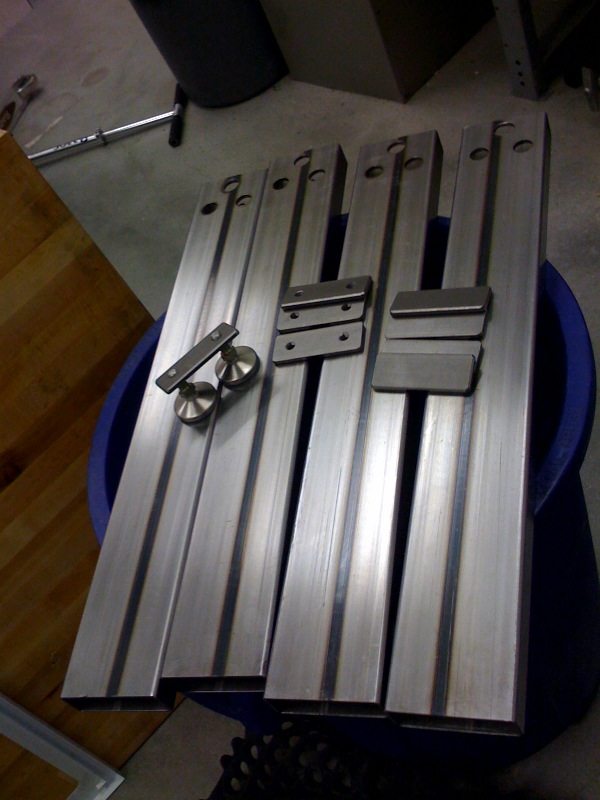  Get yer MIG on. Ran out of shielding gas half way through, so I switched to flux core -- which actually produced better welds due to its ability to penetrate deeper into the thick steel. 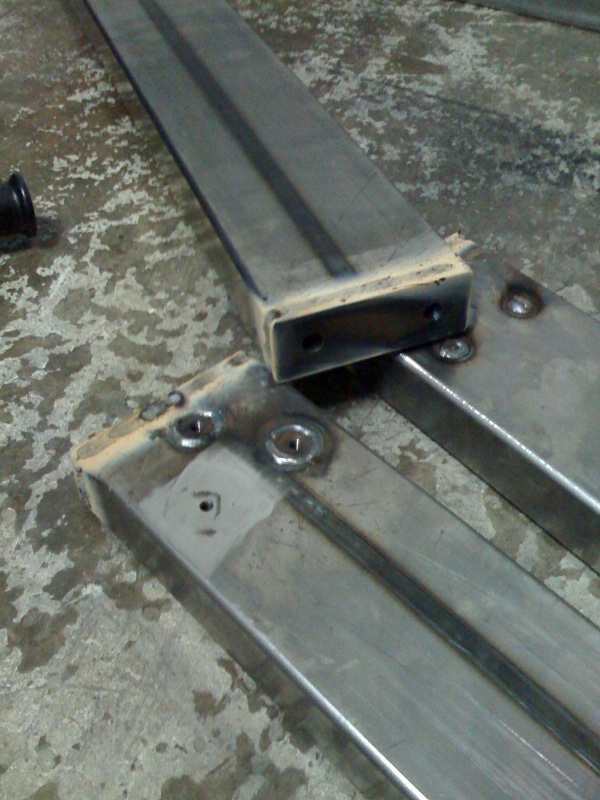 I spent another short evening grinding welds and the first full assemble happened! 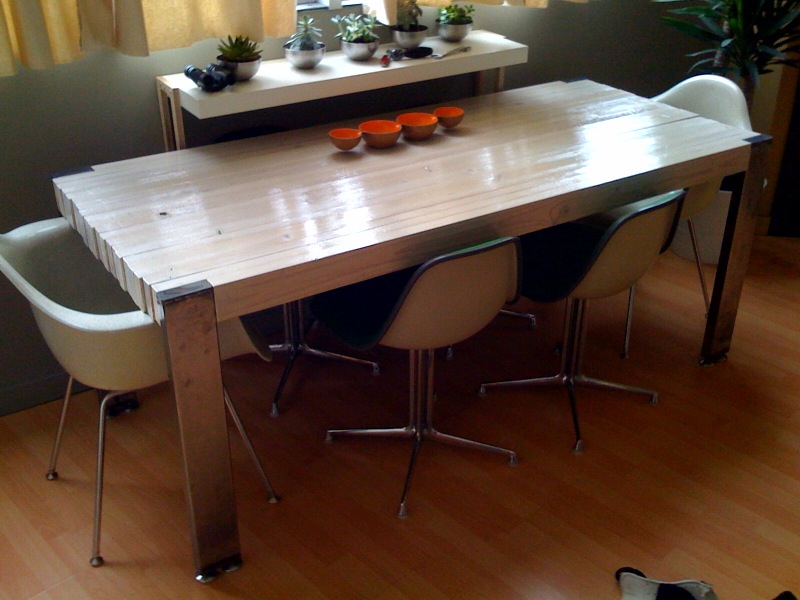 This is where I am at now. All I need to do now is finish the legs somehow (likely paint), and do final assembly where I square everything up and crank all the bolts down. Overall table dimensions 72x32x29.5, weighs ~200lbs -- solid! Seats 6 normally and hopefully 8 in a squeeze as we are planning on having friends over for a Canadian Thanksgiving dinner party as its debut event. Working on some other stuff for my apartment for then too, namely a chandelier, an ottoman and a stool. A sneak peek at a Chandelier component: 
|
|
#
?
Sep 20, 2008 20:34
|
|

|
Blooot posted:Wow man, that is a really nice table. Are you going to clean the ends off so they're straight, or leave the staggered look of the plank ends for character? Either way, I really like it. And that chandelier is pretty awesome too, can't wait to see it done
|
|
#
?
Sep 20, 2008 21:15
|
|
|
Thanks dude. Going to leave the ends all snaggletoothy -- nothing else on the table is highly refined so it works IMO. Plus it is easy, which I am always striving for.
|
|
#
?
Sep 20, 2008 22:03
|
|
|
Colin Ex Machina posted:
Now I want to rip apart a walkman and see if I can get the head to read my magstripe cards. Also that table/chandelier set is terrific. How did you mate the legs, are those threaded inserts you have welded into the top? I might have to steal that idea once I get my own place
|
|
#
?
Sep 20, 2008 22:06
|
|
|
mcrandello posted:Now I want to rip apart a walkman and see if I can get the head to read my magstripe cards. Also that table/chandelier set is terrific. How did you mate the legs, are those threaded inserts you have welded into the top? I might have to steal that idea once I get my own place I think the only difference between the heads from a walkman and the heads from a card reader, is that the heads from the walkman are going to be stereo. But they're basically the same -- just figure out which one the ground is and you're all set. Takes about two minutes and an extra set of hands is helpful. But yeah, a walkman head will read your stripes if it's hooked up proper. I got the card reader because I wasn't patient enough to come up with another case to fit it. But in like art music communities for a little while, there was a big thing where people would cover poo poo in magnetic tape from cassettes and run tape heads over it, or put tape heads on fingerpicks, etc. Was neat.
|
|
#
?
Sep 21, 2008 16:21
|
|
|
I built a lightbox for portrait photography out of PVC and made a backdrop with fabric, lighting was done with flood lights from lowes. Total cost was about 40-45 bucks. Here's some sample shots I've got with it so far. The setup    
|
|
#
?
Oct 3, 2008 20:06
|
|

|
 So, as part of a convention, I have this chair. It's supposed to be an "electric chair", with the added bonus of being a massage chair of sorts. We were using a car massage pad the first year, and now we wants to improve upon it. We were considering using pager motors in various positions (like on the wrists, etc). However, I'm fairly clueless in the electronics category (but willing to learn!). 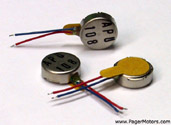 What would you suggest? The main thing I'd like to do is add fairly discreet vibration motors (IE: The giant car massage pad I want gone) to turn it into a large massage chair.
|
|
#
?
Oct 5, 2008 23:16
|
|

|
How has this thread been dead for a month? Lazy mother fuckers, that's how. Some poo poo around the house: Finally finished some pieces in time to host a Canadian Thanksgiving party (pics are a little old, but I did host it 2 weeks late). Laminated 2x4 dining table finished with paint for the legs and some aluminum spacers between the wood segments. This allowed me to trim in the table as flat as possible.  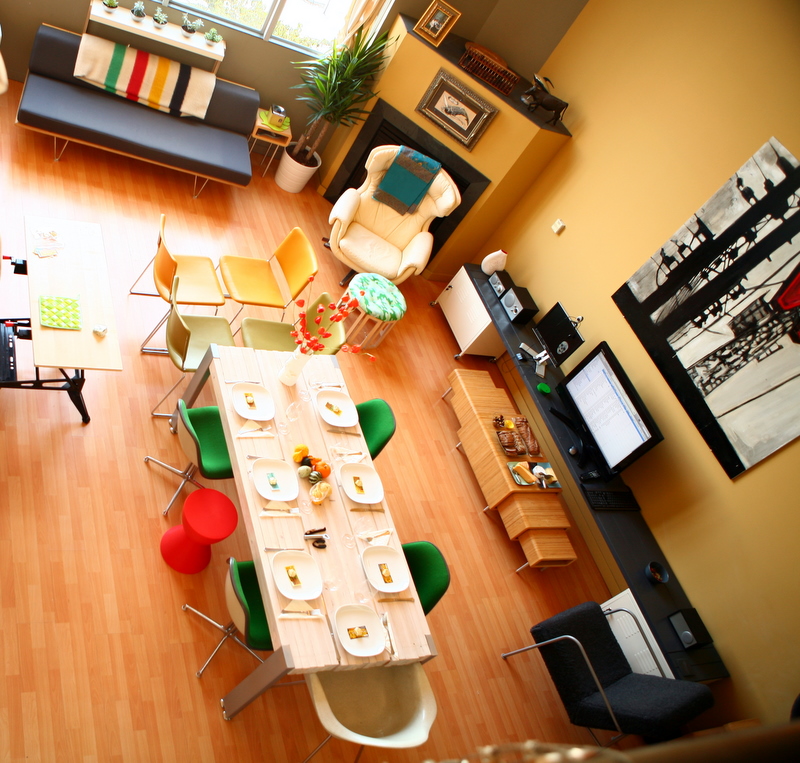 The layout of our apartment is wacky in these pics to accommodate 12 people eating together. Usually it is where the couch is. Also visible is the new chandelier turned Ottoman. My first shot at fabric anything. Pretty straight forward -- sewing with staples. The seat is a piece of 1/2 MDF that I cut on a bandsaw and then cut 1" dense foam to match to go on top. The fabric covered buttons were super easy to do to, which was a pleasant surprise. 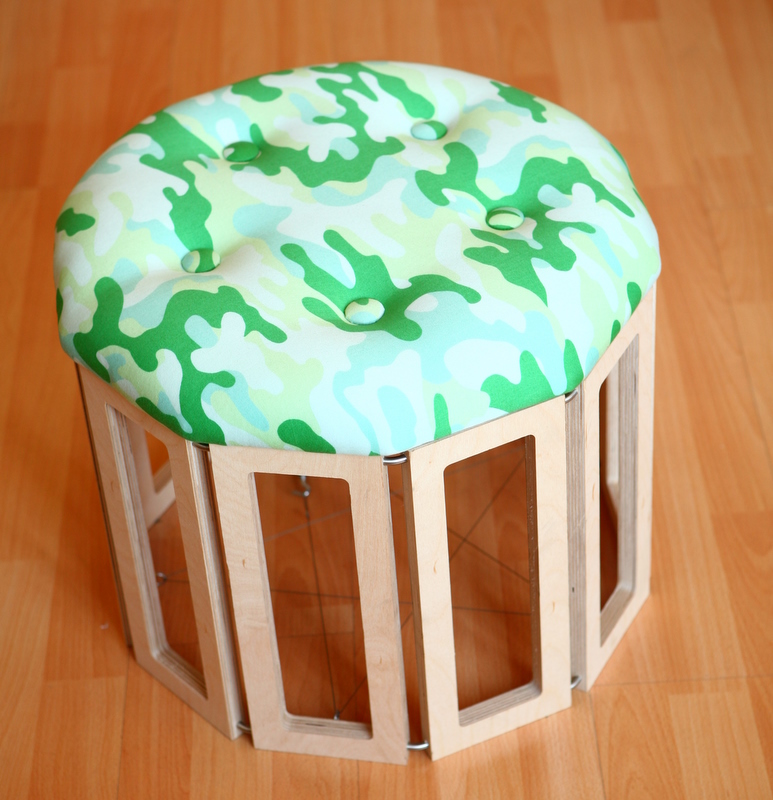 poo poo camera phone detail of the bottom fabric (red corduroy) and the attaching brackets. You can also see a closer look at the dining table and some decorative gourds. I also made a 5 sided and taller stool in the same manner.  Another quicky project was this badly needed entertainment center. I run my PC from the comfort of my couch and wanted to conceal it so I built this out of three 10' 2x6s ($10 for the wood and $20 to rent the home depot monster truck to get it home), some scrap 2x4 from the dining table and two $50 Ikea PS rolling cabinets. I modified the cabinets by not installing the back walls for better access, and on the left I removed half the inner deck panel to allow my tower to fit inside. All cabling is zip ties to screwed in cable tie mounts along the underside and nothing visible until you crouch down. Painted with a grey I mixed from cans of satin black and white latex. Start to finish time was 3 evenings. Cost approx $150 -- a new low budget record for me.  Back at the dinner party..... look at this, the guests aren't even using the new furniture! 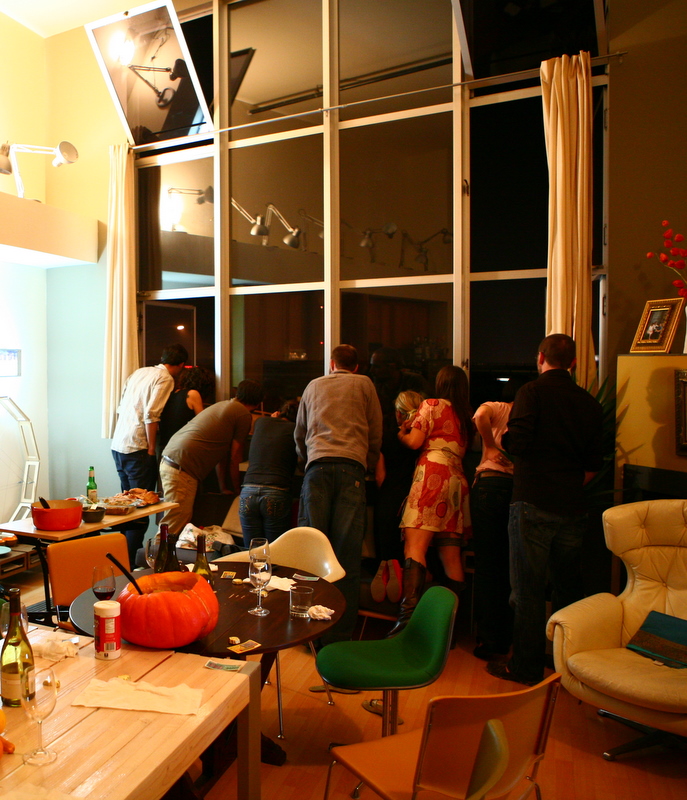 Oh snap! 
|
|
#
?
Nov 7, 2008 05:59
|
|
|
You scheduled a nearby DWB during a dinner party on top of making furniture?  Place looks great, jealous of all that space (posting from my 1950s brick American cape cod with tiny rooms). Place looks great, jealous of all that space (posting from my 1950s brick American cape cod with tiny rooms).
|
|
#
?
Nov 9, 2008 07:22
|
|

|
I'm not really sure this belongs in this thread, but I am so elated about outsmarting an animal that I'll post it anyway: I have 3 pet mice. One of them is a little shithead that likes to escape and run around and hide in inaccessible places. After spending an hour chasing him around and catching him (more than once) I decided to make something that would do it for me. I suppose I could have bought a mousetrap but this was more fun. The way this works you can probably all figure out for yourselves, but nonetheless: 1) Mouse goes in for delicious peanut butter and blocks an IR LED aimed at a phototransistor. 2) Phototransistor output switches a PNP transistor, which switches two SCRs. 3) One SCR is the input to a 555 timer circuit. This activates a piezo beeper thing every several seconds so I know that something is caught. 3a) The other SCR activates a DC motor. The motor winds up a length of floss (cheap but it works surprisingly well) to raise the door behind the mischievous mouse and trap him for good. 4) I find the mouse and revel in my victory before returning him to bleak captivity. There might have been an easier way to do this but this works OK. Here is the result of a few hours of work, in order to build a mousetrap that is indeed better: I made this stuff after the electronics. It's pretty self-explanatory. 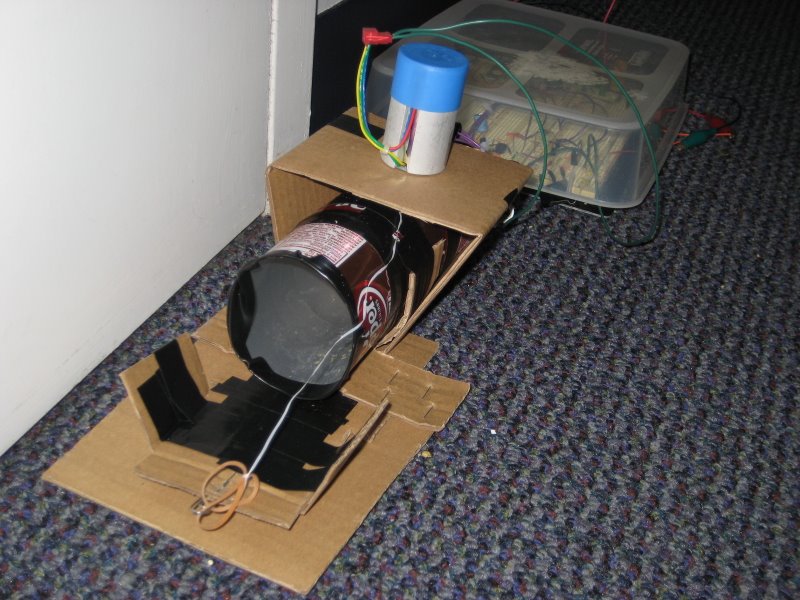  Inside view, you can see the LED and phototransistor: 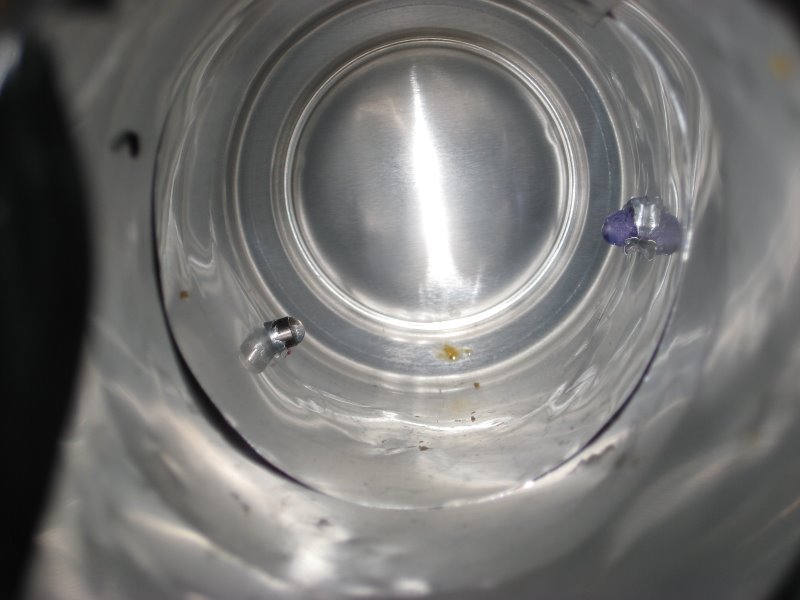 Electrical bits: 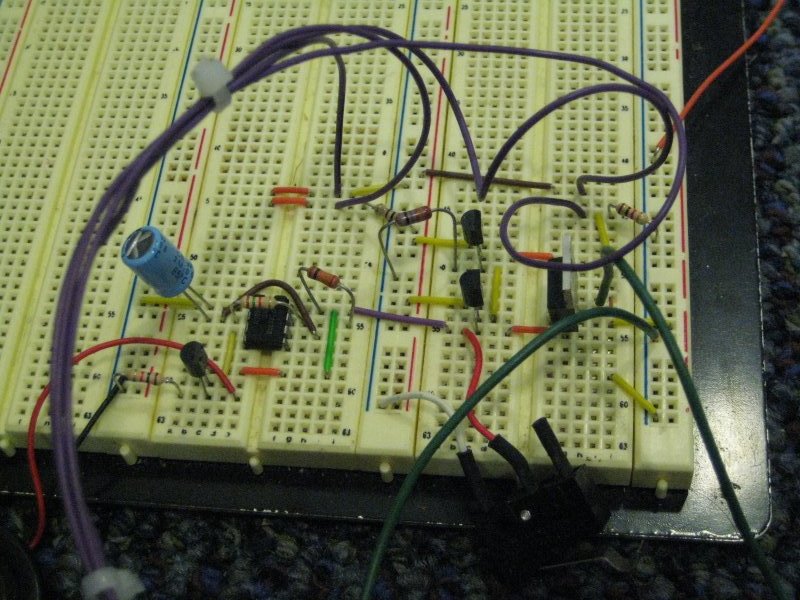 With door closed:  The offending rodent:  And so we have yet another victory of man over beast.
|
|
#
?
Nov 9, 2008 13:56
|
|
|
Some solid wood surfboards I've been cutting at work. The blanks are made from red cedar that was used in the fermentation tanks from some northern California winery. The wine has given the wood a nice deep red stain (and smell!) The blanks weigh in at about 100 lbs, the cut board about 70 lbs. The blanks have been just tack-glued together, and after I cut them they'll be broken apart, hollowed out and glued back together to be finish-shaped. The finished board (with fins and fiberglass/resin coat) will probably weigh about 30 lbs. Still heavy but definately surfable. Of course these things will probably never see the water, but still, it would be possible. finished cuts  a raw blank, setting up the machine to cut them 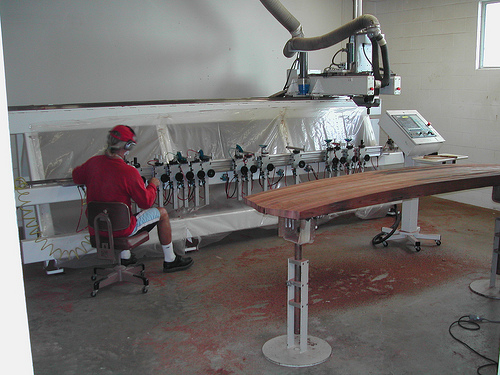 guys in the shop admiring a finished cut 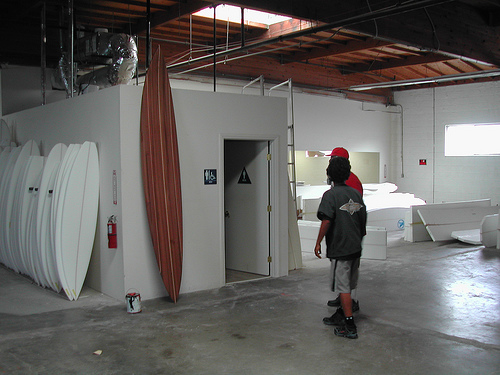 a few more photos here. http://www.flickr.com/photos/32298823@N04/sets/72157608837675368/ tylertfb fucked around with this message at 06:18 on Nov 11, 2008 |
|
#
?
Nov 11, 2008 06:13
|
|

|
That is one of the sexiest things I've ever seen.
|
|
#
?
Nov 11, 2008 14:38
|
|
|
Those surfboards are really great. Gotta love them robots! How do you break the glue apart, and how does it get hollowed out? I have to also ask what CAD package is industry standard for surfboard designers? Finally got around to working on my chandelier. Took it all apart and drilled another set of 40 1/4" holes in the wood pieces. I then cut down some 1/4" acrylic rod to make an approximate sphere (diameter is ~42") and plugged it all together. I then hung it up to keep it out of the way and think some more about where I was going with the project.  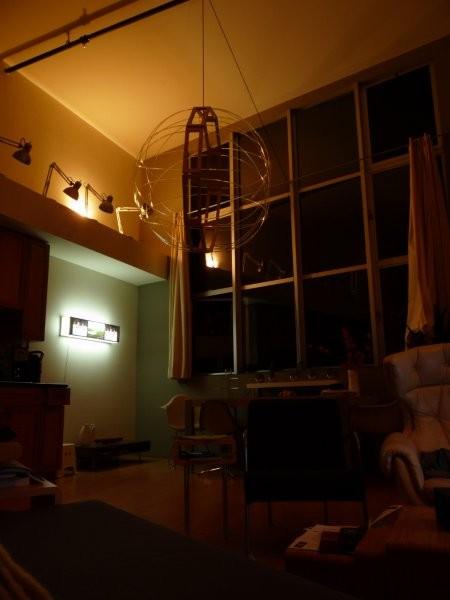 After noticing it was sort of lop sided, I decided to hang it using an assembly I built up when I first put the ring together. The original intention was to hang the ring horizontally, but after building the plastic sphere shape, I thought it'd be nice (and easier) to put it at a jaunty Saturn like angle. I lowered it to the ground and while moving it I broke one of the acrylic rods off in its hole. gently caress. I decided to then pull all the rods from the other side so I could repair that one. In the process I manged to break about 6 more rods. In contrast yesterday I built and rebuilt the structure a couple of times breaking only 1 rod. It reinforced my hatred of acrylic and burned me for not springing for polycarbonate or at least PETG. The whole thing needs to come apart again to re-drill the holes for new material. I went ahead and hung it up again anyway, with half the dome missing and a couple of broken rods -- looks promising. I like it with the core part, and will use it going forward through the repair, finishing details and lighting. 
|
|
#
?
Nov 14, 2008 08:22
|
|
|
That's really something Blooot. If you're going to put something in the tube in the centre for effect, may I suggest something like a cold cathode tube? The colour would really catch on the acrylic tubing and give it an awesome glow effect. Plus it would look like something out of star trek 
|
|
#
?
Nov 17, 2008 09:34
|
|
|
I also made a beer pong table! Painted as a hockey rink modeled after my colleges hockey team! I had ball returns, a backboard, shelves for empties, wheels to move it, a lock and a water cup hole. Sadly I graduated and no longer have a use for it so it is for sale. (my hosting)        A couple things I'd do differently are: reverse the shelves so that the 2 posts are under the table furhter and only 1 is in your way; make a spot for the water cup under the table and allow the ball return to go directly into the water cup; and, put on ball return on each side (i dont remember why they had to be on the same side anytmore). I think thats it. We put it up against a wall and printed up a huge poster with a hockey wall and fans on it as if we were in the rink. We also used cool unique rules like "if you get it in the other water cup (that you can't even see from the shooting end) you get a free shot" and "If the ball bounces off the backboard and into your own cups you have to drink them". There were others but i dont remeber them. We were the life of parties!
|
|
#
?
Nov 18, 2008 03:38
|
|

|
Cakefool posted:I also made another wedding present: Well I saw this and decided I had to have one of my own...  But I didn't have a spare hatchet so I used a pistol, radio, monocular and rosary beads with an MP5.
|
|
#
?
Nov 19, 2008 23:19
|
|

|
Chandelier update I got my replacement plastic (5/16" diam 1/16" wall PET-G tubing) in and finally got around to putting it together. I moved locations of the holes while I was at it. Raw wood  Plug it together with bent 2"x1/4" stainless dowel pins  This looks familiar  My handy tool for getting ropes and wires over the exposed pipe 18' up in the air. Soft frisbee on some thin wire.  Tensioning the wires with turnbuckles. [img] http://lh4.ggpht.com/_v2R_CrGkPN8/SS8yN6ohLAI/AAAAAAAADpM/04dAsTjsIWg/s640/P1010763.JPG[/img] Dome top done  And she's up!    Next up is getting the lighting figured out. Good idea on the cold cathode Slung Blade. I was initially thinking LED, but I'll look into it. I want to keep the power consumption low as I plan on using battery power -- avoiding running wires up to it.
|
|
#
?
Nov 28, 2008 01:00
|
|
|
Hi all, Pretty much finished our big backyard upgrade. Here are some pics: Before: My wife starting on the painting 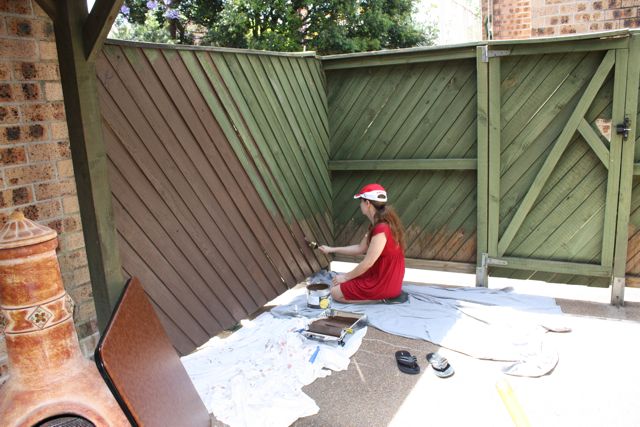 Before: the other corner of the backyard 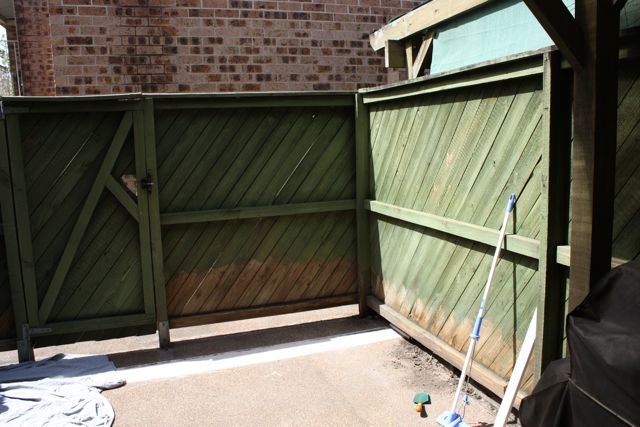 After: Same place as the first pic  After: Same place as the second pic  After: The whole backyard  All we are waiting on are some decorative pots for the plants, also still debating whether we should stain the deck to be darker.
|
|
#
?
Nov 30, 2008 10:10
|
|

|
Man, looking at Blooot's and RyanNotBrian's projects makes me really, really anxious to finish college so I can move into a house and make things like that. Great work all around.
|
|
#
?
Dec 1, 2008 21:06
|
|

|
Cool thread. I haven't done anything as of late, but a few years ago I modded a briefcase to fit my PC.     *edit* I eventually fastened the hard drive to the inside of the lid, and made a little vent for the power supply. It was getting mighty hot in there. Don't have pics of that though.
|
|
#
?
Dec 3, 2008 15:48
|
|
|
I started playing with molten metal, yay! 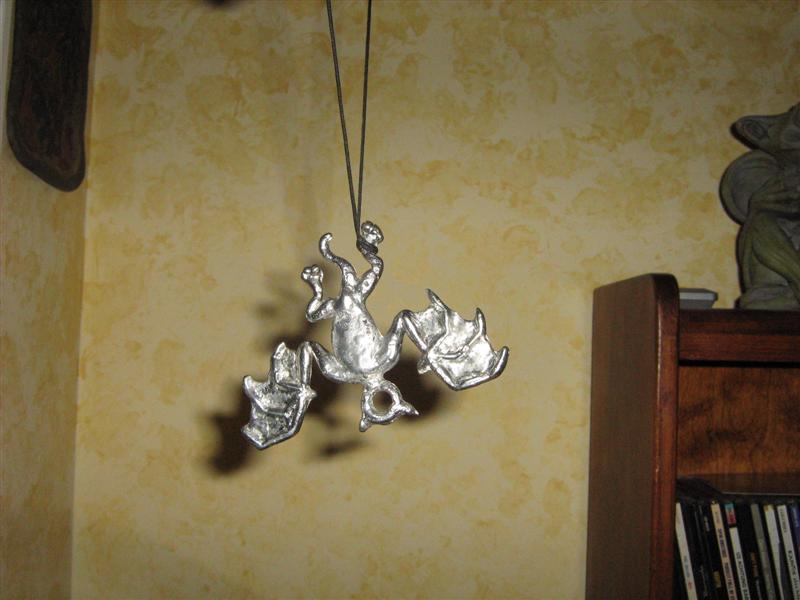 I made the original out of dollar-store playdough, then slathered Plaster of Paris over it, let it dry into a mold, cleaned out as much of the playdough as I could (the rest of which melts away nicely when the metal is aplied), and melted solder into the mold with a 100W soldering iron of death. So far I've used both leaded and non-leaded solders, and even tried pewter, which melts near the upper limit of the iron, and thus syrupy and hard to keep liquid. Still, I like pewter, and it's cheap (dollar-store figurines and knick-knacks from thrift shops are common), so I may invest in a proper furnace for it.
|
|
#
?
Dec 4, 2008 04:11
|
|

|
Blooot posted:Awesome Chandelier That's really amazing--are you an industrial designer, or just really creative and industrious? The shape of it reminds me of a sphere I made out of spring-steel a month ago. 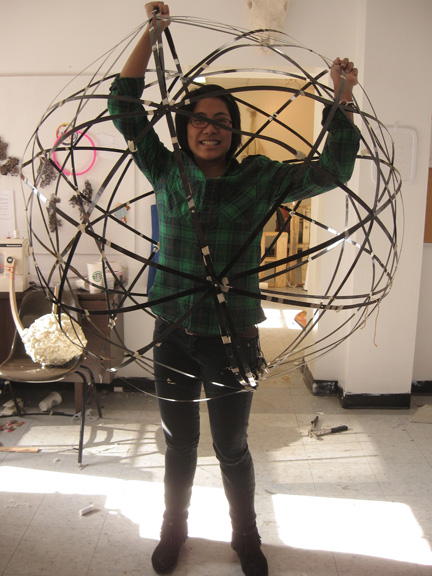 Of course, mine turned into an All-Terrain Human-Hamster Sweater-ball  My current project? A set of three lamps that look like crystals made of stained glass. 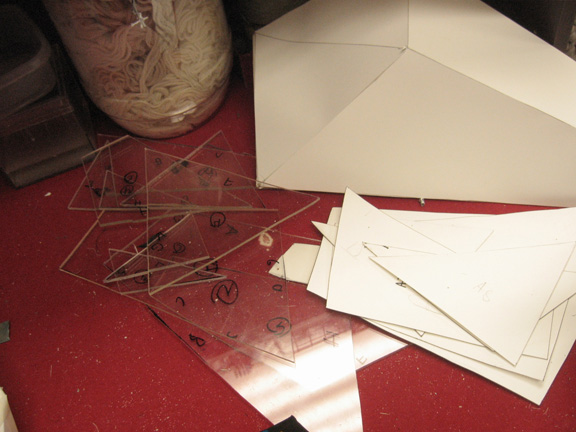 So I started by making some paper crystal models out of bristol. There's about 6-7 different structures, but most have been disassembled to trace them onto the plexiglass, some of which you can see here. I had no idea the plexi was going to be such a pain to cut and work with. 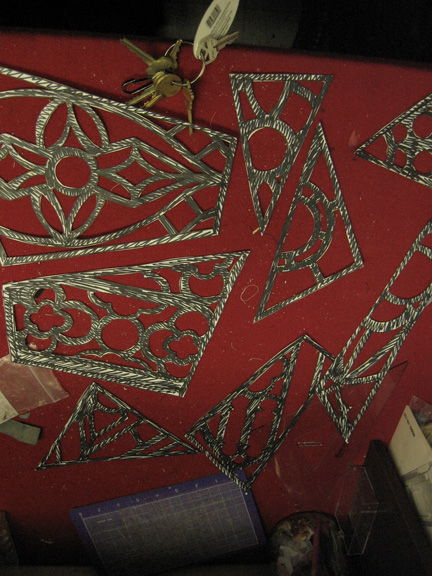 Drew out some stained glass designs for each face.  Awful picture, but I dyed a ton of china silk, it's got a beautiful shine to it, and it takes dye really well. Except for the red! I had to over dye it three times to get that deep color (first bath, Acid Red, second, Golden Yellow, third, MX Scarlet treated as an acid dye)  Cut that poo poo out. A sharp xacto is my best friend.  Build some plexi-crystals! 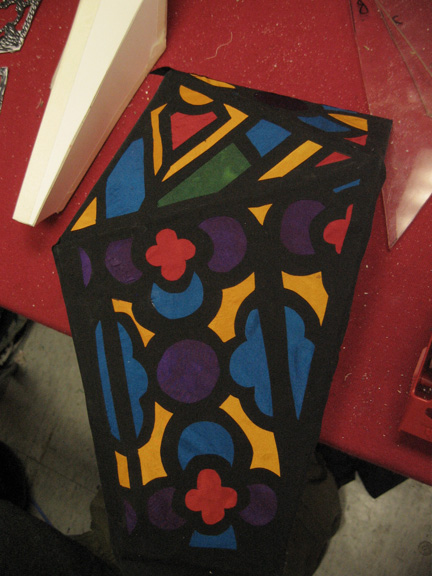 Start gluing that poo poo on. One 3/4 finished, only 11 more to go. I want to make 3 lamps of 3-4 crystals each. Due in 2 weeks. Ugh.
|
|
#
?
Dec 6, 2008 04:05
|
|
|
MaxIsBored posted:Cool thread. I haven't done anything as of late, but a few years ago I modded a briefcase to fit my PC. I made almost the exact same thing a few years ago. But I used a via Epia board and it had alot of empty space.
|
|
#
?
Dec 7, 2008 00:44
|
|
|
Goldaline posted:That's really amazing--are you an industrial designer, or just really creative and industrious? Thanks man. I guess the latter. I'm an engineer who's done lots of design and fab work; 5 years designing and building props for movies and now I design products for laboratory automation. I also have my own furniture line that is in licensed production. The wood in this piece was leftovers from when I was building it myself.
|
|
#
?
Dec 8, 2008 02:40
|
|
|
MaxIsBored posted:Cool thread. I haven't done anything as of late, but a few years ago I modded a briefcase to fit my PC.  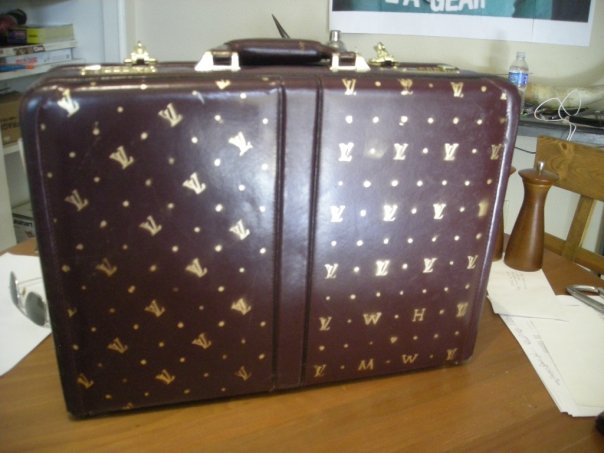  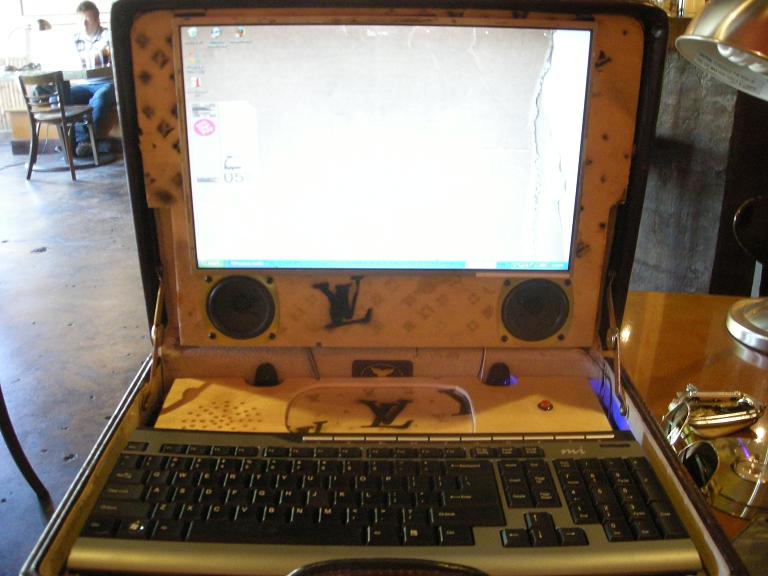 i did that too! last semester i rebuilt my old gateway laptop into a louis vitton briefcase. i got hit by a car while riding my bike, flew over my bars, crushed my spleen, and my computer was in my messenger bag.the guts of the computer survived, but the casing was smashed. dreg posted:I started playing with molten metal, yay! i have been working with molten metal too! i signed up for a foundry class in the engineering dept at my school. 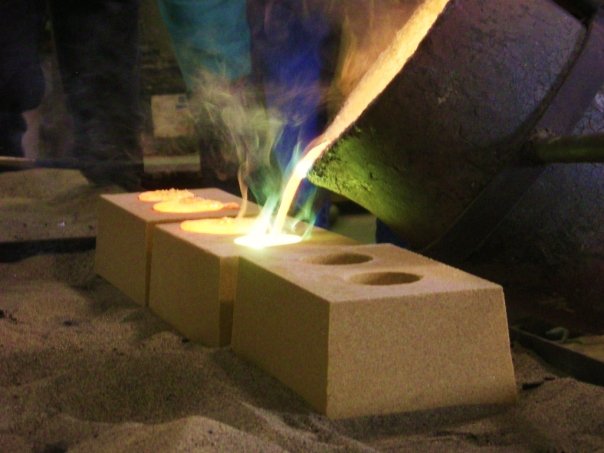   "couple of egg in a pan" made of copper  "bacon" made from aluminum for my final project in the class i will be casting a "banana gun." its a banana where the skin is peeled back to expose a 44 revolver complete with trigger and trigger guard. then, i will be hand painting the skin of the peel yellow and polishing the exposed gun pieces of metal. my hope is to produce a run of 100-200 of these, and to sell them at local Austin art galleries for like 10-30 dollars a piece. the funds will be used to pay for my dog's ridiculously expensive surgery.  anyway, my appointment to pour in the lab is tomorrow. so i hope everything goes to plan.
|
|
#
?
Dec 8, 2008 03:24
|
|

|
groucho posted:for my final project in the class i will be casting a "banana gun." its a banana where the skin is peeled back to expose a 44 revolver complete with trigger and trigger guard. Is this going to be full scale? You'd be better off making 10-20 of them and selling them for $400 each, a more realistic price for what you've described. Don't undervalue your work if it is any good. If it sucks, be honest with yourself and keep it out of galleries until you are ready.
|
|
#
?
Dec 8, 2008 17:11
|
|
|

|
| # ? Apr 18, 2024 05:46 |
|
|
groucho posted:i have been working with molten metal too! That's pretty neat stuff! Join us in the metalworking thread 
|
|
#
?
Dec 8, 2008 17:54
|
|