|
neat. I was thinking about getting one too
|
 #
?
Mar 31, 2024 21:08
#
?
Mar 31, 2024 21:08
|
|


|

|
| # ? Apr 30, 2024 04:10 |
|
|
I'm gonna get mine at 9/10 scale so when I slap my dick on it I can reach the full 4 inches
|
|
#
?
Mar 31, 2024 21:08
|
|
|
We need a new coffee table and I'm thinking of making one. I really like mission style furniture - does anyone have any recommendation for a book about mission style furniture and or plans for a mission style coffee table
|
|
#
?
Apr 1, 2024 16:23
|
|


|
Lang's Shop Drawings for Craftsman Furniture
|
|
#
?
Apr 1, 2024 16:35
|
|

|
My dad has been woodworking for decades, making various things for my parents� house and then some nice stuff for us. I think he�s been getting kind of bored and has started messing around because this is is latest.  I haven�t worked on anything for months but recently we�ve been doing a kitchen reno and my basement workbench has been covered in molding waiting to be installed as well as a thick coat of dust from the demo. It�s going to take a while to clean up enough to even remotely want to work on anything down there.
|
|
#
?
Apr 3, 2024 01:23
|
|

|
z0331 posted:My dad has been woodworking for decades, making various things for my parents’ house and then some nice stuff for us. I think he’s been getting kind of bored and has started messing around because this is is latest. That is magnificent. 
|
|
#
?
Apr 3, 2024 01:56
|
|

|
Amazing Also what's that below it? The part we can see looks pretty nice.
|
|
#
?
Apr 3, 2024 02:31
|
|
|
lol cute cabinet
|
|
#
?
Apr 3, 2024 02:38
|
|
|
It�s like if Krenov had a sense of humor
|
|
#
?
Apr 3, 2024 03:55
|
|

|
Kaiser Schnitzel posted:It�s like if Krenov had a sense of humor ...drat, yeah
|
|
#
?
Apr 3, 2024 04:57
|
|
|
Kaiser Schnitzel posted:It�s like if Krenov had a sense of humor Pretty apt, actually. He's taken a lot of classes with Krenov-trained folks but takes their whole vibe with a grain of salt. HappyHippo posted:Amazing He's done a couple tables that have nice curly maple tops - I think that's one of them. I don't have a picture of it. (I took this one when visiting last week.)
|
|
#
?
Apr 3, 2024 15:57
|
|
|
I finally made a shooting board. Gonna stop tearing out bits when I'm paring end grain now, for sure
|
|
#
?
Apr 3, 2024 16:27
|
|

|
I've got to make a new one, the one I have is lacking. I'm thinking of making the one in this video (really I should just make all of those): https://www.youtube.com/watch?v=eqWbgkl_ryM I was just using the shooting board actually. I've been trying to up my sharpening game, before I was making dust on the shooting board, now I'm getting actual shavings 
|
|
#
?
Apr 3, 2024 19:05
|
|
|
I've been flipping through Chairmaker's Notebook by Peter Galbert and he talks a ton about how much he uses a drawknife for making his chair parts. I bought a drawknife at a tool swap like 6 years ago, and this book finally convinced me to go sharpen it up and give it a try. One thing I've struggled with is quickly roughing out the cylindrical tenons on chair and staked components. I've tried saws, my bandsaw, chisels, nothing felt right. If you read my cabinet thread, you may remember this being an awkward step involving a chisel and quite a lot of effort. So I decided to try tackling it with a drawknife, like Galbert does, and yeah this definitely feels like the right tool for the job for me. I've only done about a dozen tenons with this technique, but I'm starting to get the hang of it. First I measure out how long the tenon needs to be, then use the drawknife to start the tenon about another 1/2" to 1" beyond that. I cut all the way around the part (here, a short stick for under the chair arms), taking a big chunk out of each face. Then I take a few finer cuts to clean up any big chunks of wood still sticking out. Then I grab the spokeshave and refine it into a circle, mostly working down by the shoulder to try to keep it from becoming tapered. Then I test the fit with the tenon-test-fitter thing I made. Even after only doing a few of these, it now takes me like a minute to get each tenon done, with pretty little effort. When I did the tapered tenons for the chair legs, I marked out the final tenon size into the end grain with a pair of dividers, then used the drawknife to rough out the taper before going to the Giant Pencil Sharpener to refine the tenon to its final shape. Worked much better & faster than any other technique I've tried. Very neat tool. I'm looking forward to trying it out on other tasks. 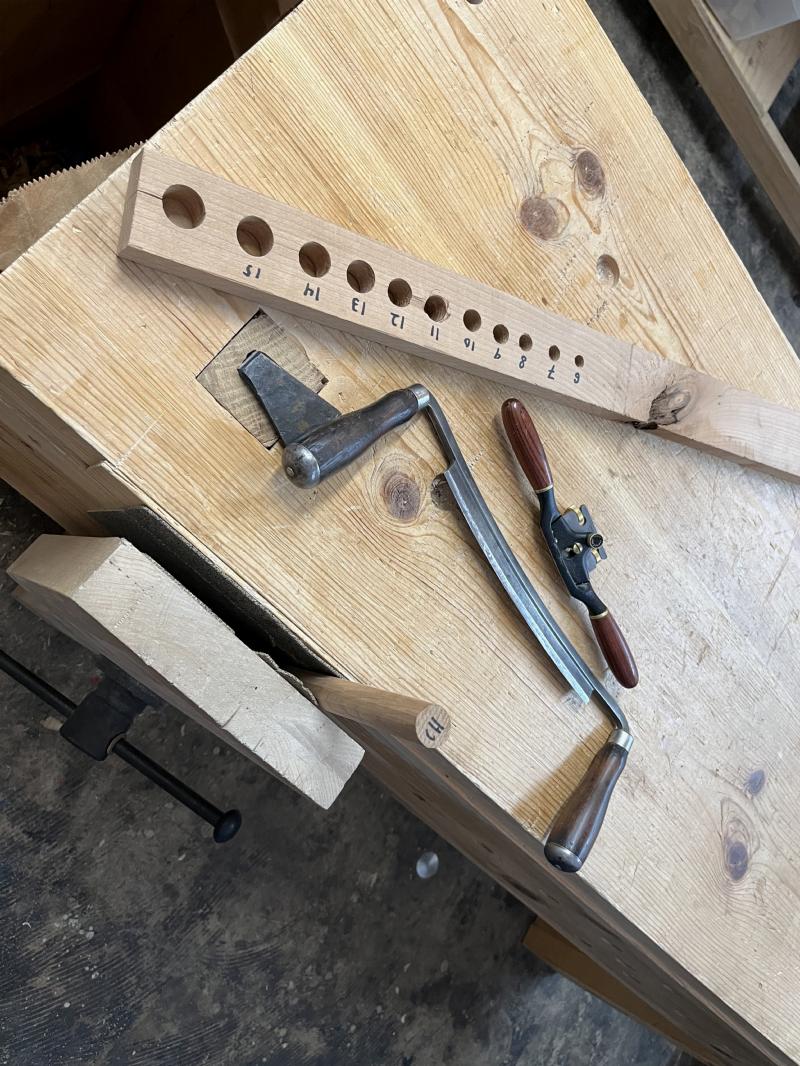 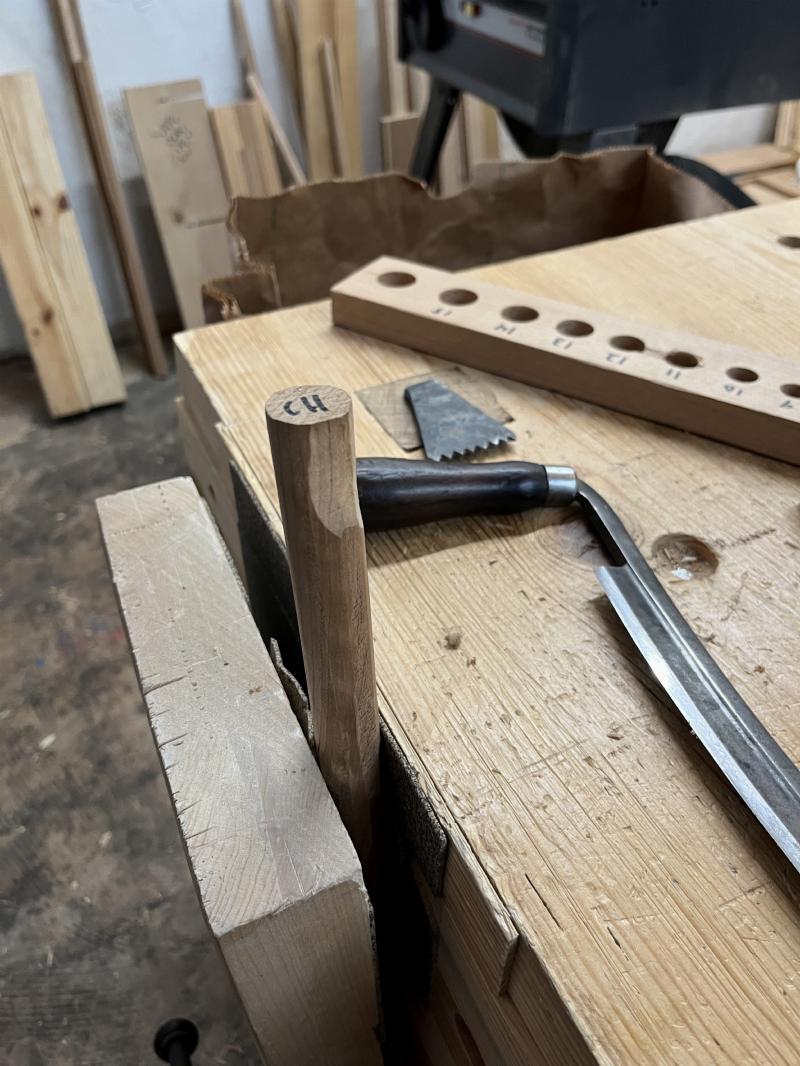 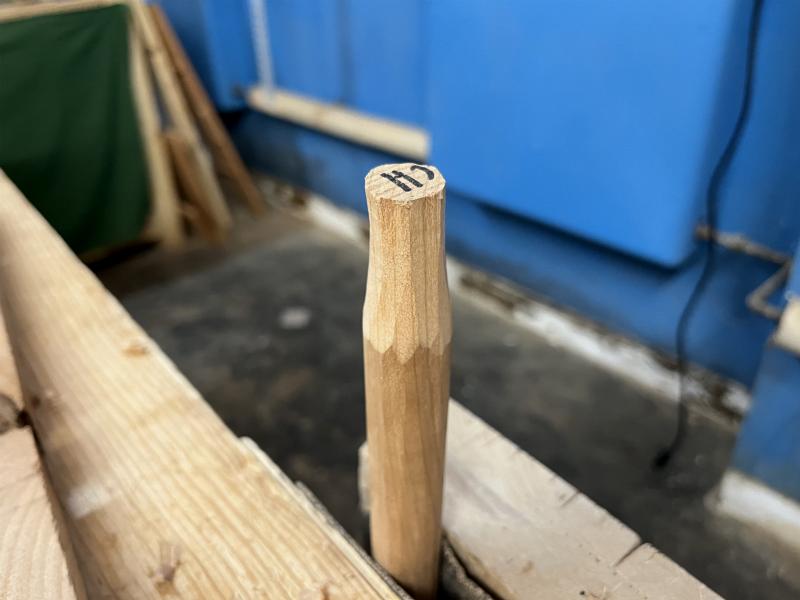 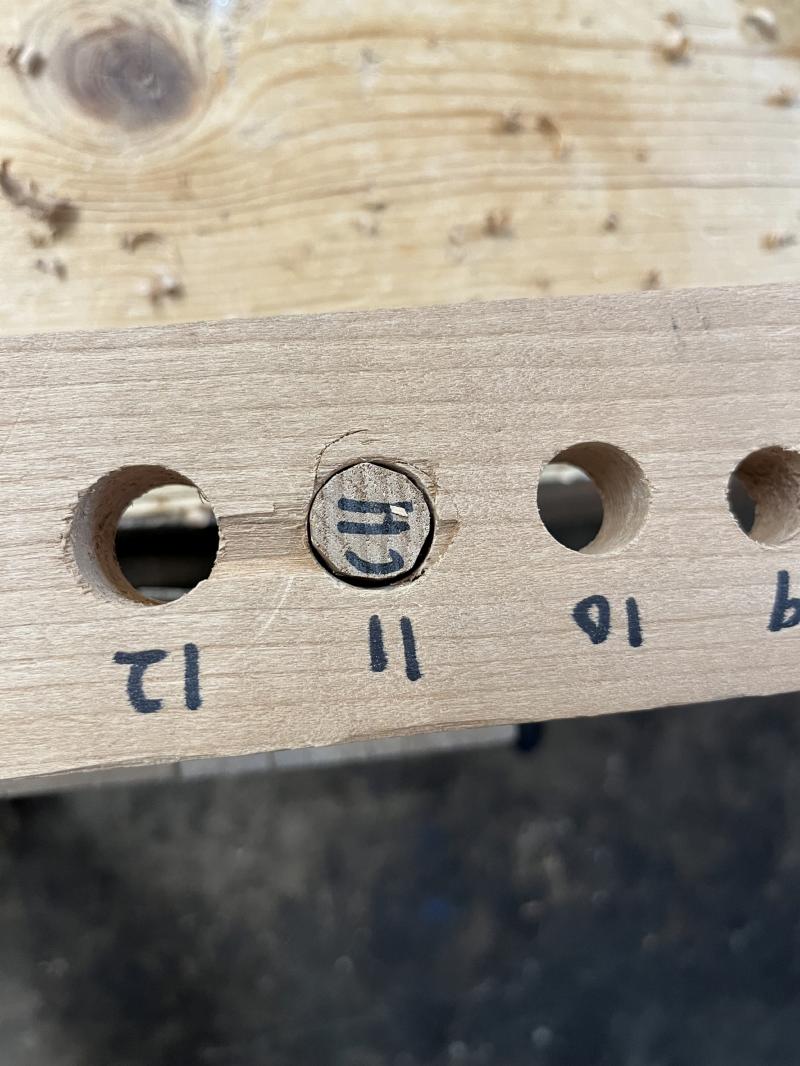
|
|
#
?
Apr 4, 2024 01:41
|
|

|
That is a lovely book. Well written and well illustrated, I've had a windsor chair on my project list for a number of years but still have not took the dive...I'm actually intimidated by the seat scoop. Although I think you or someone has posted about it in this thread that made it seem managable. Are you making a windsor chair or another stick chair for your collection?
|
|
#
?
Apr 4, 2024 01:57
|
|
|
Another stick chair. This is my 4th. I haven't made one I'm happy with yet, but I'm getting close. They're quick and fun to make, tons of design elements to play with, big & small.
|
|
#
?
Apr 4, 2024 02:58
|
|
|
I hate making drawers so god damned much That�s it I�m in the middle of adding drawers to a shop bench, I gathered all of my 1/2� ply scrap to make drawers, I�m having a miserable time gently caress drawers Half of these drawer sides have been salvaged from old projects or CNC tests, they will be the ugliest drawers ever I made four drawers for a little utility cabinet under my drill press a few weeks ago and had a great time Making 18 drawers for this workbench is a very different tale Sockser fucked around with this message at 03:14 on Apr 4, 2024 |
|
#
?
Apr 4, 2024 03:12
|
|


|
Back to the drawering, bored.
|
|
#
?
Apr 4, 2024 05:53
|
|

|
Has anyone built Rex Kruger's minimum timber bench? I'm finally thinking of upgrading from my current "clamp stuff to a chair or sawhorse" style to a proper workbench. I like his videos so I wouldn't mind tossing him $15 for the plans.
|
|
#
?
Apr 4, 2024 18:54
|
|


|
I posted this piece of wood a while backVim Fuego posted:I'm thinking of making a record cabinet out of this old tabletop. And I finally finished the cabinet. It's gonna hold the record collection, amp, preamp and the record player. I decided to lean in to the messed up finish on the piece. It's crazed, scratched, and stained which gives it a used look. I made the side panels and legs out of steel. I decided to rust the steel to give it a distressed look that goes with the old damaged wood finish. The sides are louvered panels for ventilation. I painted the inner surfaces and rusted the outer surfaces with a mixture of vinegar, salt, and hydrogen peroxide. The rust is coated with two coats of paste wax to stop it rubbing off on incidental contact. The front legs are intentionally rusted through to give the piece some dramatic tension.   
|
|
#
?
Apr 4, 2024 19:35
|
|


|
I hate it!  But if you love it then I am very happy for you, and it looks like it was a complicated build so congratulations.
|
|
#
?
Apr 4, 2024 20:59
|
|
|
I got the top half of my heron cabinet done. Well it was done a few weeks ago, I just finally took a picture of it, too large to get my photo backdrop out, it's just over 8' tall.
|
|
#
?
Apr 5, 2024 02:54
|
|
|

|
|
#
?
Apr 5, 2024 03:07
|
|
|
love a good heroin cabinet
|
|
#
?
Apr 5, 2024 03:13
|
|
|
This is delightful
|
|
#
?
Apr 5, 2024 03:34
|
|

|
Meow Meow Meow posted:I got the top half of my heron cabinet done. Well it was done a few weeks ago, I just finally took a picture of it, too large to get my photo backdrop out, it's just over 8' tall. That looks great! How do the shelves work? Like a half lap kinda thing?
|
|
#
?
Apr 5, 2024 16:12
|
|
|
Knowing Meows, it's probably some hidden mortise and tenon, possibly with internal spline barbs. Edit: what I am saying is that I am deeply jealous of his craft and everything he does looks amazing.
|
|
#
?
Apr 5, 2024 16:13
|
|
|
Kaiser Schnitzel posted:That looks great! How do the shelves work? Like a half lap kinda thing? All separate pieces, stacked very carefully. Don't bump it.
|
|
#
?
Apr 5, 2024 16:57
|
|
|
My guess is tenons that pass through the shelves
|
|
#
?
Apr 5, 2024 19:34
|
|


|
I'm gonna vote....dowels
|
|
#
?
Apr 5, 2024 19:54
|
|
|
Finally got these nightmares done: Probably one of the most difficult things I've made. Curved, veneered laminations are such a pain. I posted a bit about the lamination process before which I thought would be the hard part, but really that was just the beginning. First I tried cutting miters on the top of the cases to make a nice clean joint for the tops to the sides:  But because the laminations are a bit less than perfect, they weren't totally flat or square or anything and getting a perfect mitered joint was gonna be basically impossible, so instead I build a flat, square, jig to put them inside and then used a router to make a bunch of rabets etc. for the joints.   Because the jig was flat and square and that's what the router was always referencing against, it worked well and let me get straight, square, flat joints on a not very nice surface:  Epoxied them all together and CA glued on a solid oak edge banding, reinforced the top corner with some aluminum angle iron (probably unnecessary but it made me feel better)  The finish was neat and an interesting challenge. The sample the client had was sort a very flat metallic under a stain which highlighted the oak grain? A neat look, and something I've never had to to before. I couldn't find any metallic pigment locally at my normal paint suppliers so I ordered some fancy metallic paint from England and then diluted it with a water based stain base (it was latex paint) until I could spray it. I had tried brushing and wiping it but it always came out streaky. Before and after the metallic stain:  Then a van dyke brown glaze to pick up the grain and a clear dull topcoat:  Not something I'd really want in my own house, but it was a fun (and occasionally frustrating) challenge and I learned a ton about some funky finishes and bent laminations, so that was all good.
|
|
#
?
Apr 5, 2024 21:34
|
|
|

|
|
#
?
Apr 5, 2024 22:26
|
|
|
PokeJoe posted:I'm gonna vote....dowels I'm betting screws. Screws that are 40" long.
|
|
#
?
Apr 6, 2024 01:17
|
|


|
Skunkduster posted:I'm betting screws. Screws that are 40" long. at what point does it just become threaded rod
|
|
#
?
Apr 6, 2024 01:26
|
|
Kaiser Schnitzel posted:Finally got these nightmares done: Good poo poo, drat. Deceptively simple looking for the actual effort needed.
|
|
|
#
?
Apr 6, 2024 01:27
|
|


|
PokeJoe posted:at what point does it just become threaded rod It's a screw if the end is pointed and the is a drive. It's a bolt if the end is flat and the back is a drive. It's your rod if you try to polish it but have no drive.
|
|
#
?
Apr 6, 2024 02:45
|
|
|
Yeah they get some bar pulls so they'll hopefully look slightly less derpy and more  That Works posted:Good poo poo, drat. Deceptively simple looking for the actual effort needed.
|
|
#
?
Apr 6, 2024 19:36
|
|
|
So a goon sold me this cutting board a few years ago that I bought as kind of a wedding gift for myself, when my wife and I got married. We used it a few times and washed it carefully and it started checking almost immediately. No shade on the maker, they sent me some low viscosity super glue to try and fill the cracks and firm it up. Well being lazy I never got around to trying to sand it down and re seal it, so it sat in a drawer for probably two years. I just pulled it out after buying some new disks for my random orbital sander. The photos below are after going at it for a while with an 80 grit disk, but I wonder if it�s even possible to sand out the blotches from the super glue or if I will just have to live with it. I don�t know anyone with a drum sander or some other tool that might be able to take off more material. Should I just go at it a bit more and work up to 120 or 180 grit, put on some new beeswax/mineral oil and live with the blotches? Or could this be improved?  
|
|
#
?
Apr 6, 2024 22:54
|
|
|
Acetone will dissolve superglue. You could try using a q-tip on the blotches to see if it helps. You could also get a piece of scrap, drip some superglue on it, then go over it with finish to see if the blotch disappears (it probably will).
|
|
#
?
Apr 6, 2024 23:13
|
|

|

|
| # ? Apr 30, 2024 04:10 |
|
|
salt walter can dissolve superglue as well, albeit slower
|
|
#
?
Apr 6, 2024 23:17
|
|