


|
PMan_ posted:I'm now wondering if there are any books or magazines I should check out? In woodworking there are two basic camps... the neanders (as in neandertool) who use primarily handtools and those who use primarily power tools (sometimes called Normites as in Norm Abrahm). Of course there are many people like myself who in the middle. The neanders all swear by Fine Woodworking which is a fantastic magazine but you'll only need one years worth as they recycle articles worse than any magazine I've ever read and every project will either be Shaker or Mission style and use the same joinery techniques. I would say buy their books and forget the magazine. Personally I like Wood. They of course do some article recycling but they do a couple of interesting things... their projects use a variety of joinery, often unnecessarily complicated but interesting nonetheless; frequently their articles are part of a series so that each issue shows you how to make one piece in a suite of furniture in a certain style; and they include patterns for many projects. The British woodworking magazines stomp the American magazines but they can be difficult to find and expensive. Books I Own: my personal favorite: The Complete Woodworker's Companion by Roger Holmes I don't see this book mentioned often, its not from Taunton which is probably why but it shows you all the basics of woodworking through a series of projects that are accompanied by some of the best illustrations and photos of any woodworking book I've read. Illustrated Cabinetmaking: How to design and construct furniture that works by Bill Hylton Basically a textbook on furnituremaking. (in woodworking, furniture makers are called cabinetmakers) Understanding Wood Finishing by Bob Flexner For years it was the final word on finishing. There is another book out with a similar title and some differences in technique maybe but I've yet to go wrong with Flexner's book. He also dispels many myths about finishing. Traditional Finishing Techniques, a collection of articles from Fine Woodworking I don't even remember buying this book, maybe it was a gift, but it contains articles fleshing out the finishing process and a few things Flexner doesn't touch on. Some authors to look for: Tage Frid Franklin H. Gottshall (if you become interested in furniture)
|
 #
¿
Apr 24, 2008 15:44
#
¿
Apr 24, 2008 15:44
|
|


|

|
| # ¿ Apr 28, 2024 20:32 |
|
|
Maddman posted:Depends on the design. My first furniture project was two Shaker end tables which I managed with nothing more than a handsaw, drill, some Marples chisels and a circular saw. Those tapered legs look as good as the legs I made later with my table saw. I might have had a Stanley bench plane also, I don't remember. The first project you may want to consider is a workbench w/vise. It's tough working without some kind of basic bench.
|
|
#
¿
Apr 24, 2008 19:30
|
|

|
Pleads posted:What level of experience would be necessary for someone to try building their own bar? With some upcoming renovations in the basement I am trying to decide if it would be better to build it myself, or just find a pre-made one and fit it in to the decor. Ideally the bar is going to have a sink and a mini-fridge, though getting the wiring for the fridge shouldn't be too big a hassle since I have some electrician friends. There is a bar thread at the avsforum with a buttload of home bars and info. (Sorry I just hooked up a new computer and don't have the link handy) Pros: basic case construction, many companies cater to home bar builders with parts and accessories. Cons: depending on size, a bar may require a lot of cutting, a lot of finishing and a lot of fitting shelves; so it's not complicated work but with only basic tools it can be labor intensive. fake edit: http://www.avsforum.com/avs-vb/showthread.php?t=574277
|
|
#
¿
May 1, 2008 01:33
|
|
|
Sasquatch! posted:I have a (non-plunge) router, circular saw, jigsaw, miter saw. I'm guessing a table saw? Or a plunge router? Any recommendations on makes/models (in the vein of "good quality for a home hobbiest")? Table saw. I have a Delta contractor's saw with extension table. Delta and Jet are the top brands in contractor saws. If you want to save money and are willing to compromise on the finish, Grizzly makes dependable tools but their fit and finish can be a little rough. I would also recommend a set of Marples chisels and an inexpensive bench plane (a modern Stanley is sufficient just be prepared to put some elbow grease into tuning it). Learn the Scary Sharp method for sharpening the latter two and flattening the sole of your bench plane.
|
|
#
¿
May 13, 2008 05:57
|
|
|
Sasquatch! posted:Cripes, $1000 is way more than I was thinking, but I'll probably at least start looking toward table saws and see what's what. Thanks for the advice! If you really want to go DIY, one of my woodworking magazines had a story on a man in Mexico who turned out nice furniture using a tablesaw he built from scrap wood and a washing machine motor. I think his furniture was made from scavenged hardwood pallets.
|
|
#
¿
May 17, 2008 07:43
|
|
|
PMan_ posted:Does anyone know where I might find plans to build a stand for a "portable" table saw? Wood magazine has featured contractor saw stands several times. Here is one: 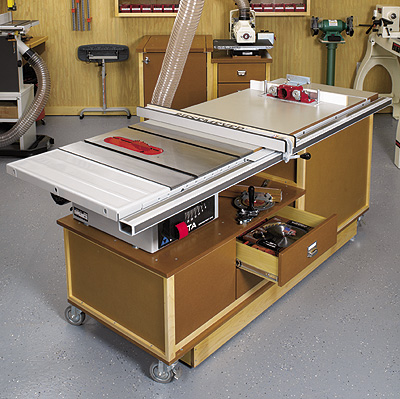 http://woodstore.net/mosaroce.html Another: http://www.shoptours.org/shop_tours/files/scott-engle.html The ultimate in portability though might be a Black & Decker Workmate. Alternately you can pickup one of the cabinet books I mentioned earlier and design your own. Basically you just want a cabinet that will position the saw about waist height and I would build it with lockable wheels. More for your saw: http://www.woodmagazine.com/woodworking-plans/tablesaw/versatile-panel-cutting-sled/ http://www.woodmagazine.com/woodworking-plans/tablesaw/tablesaw-miter-jig/ http://www.woodmagazine.com/woodworking-plans/tablesaw/tablesaw-rip-fence-saddle/ http://www.woodmagazine.com/woodworking-plans/tablesaw/shop-made-tablesaw-tenoning-jig/
|
|
#
¿
May 17, 2008 20:23
|
|
|
PMan_ posted:Now, I presume that most of this is made with plywood. I don't understand what's going on with the top, though. I don't think I need to do the "raised surface" that's going on there. It also looks like the lighter colored wood surrounding the top is just attached to it somehow, so I imagine that is "normal" wood like 2x4's trimmed down and not plywood. Two pieces for the top would be sturdier but not necessary if you brace the center, not so much because of the weight but you don't want any flex at all while cutting otherwise you might pinch the blade and see nasty things happen. The top on your picture looks like it might have holes for dogs (not the barking kind). http://en.wikipedia.org/wiki/Bench_dog wormil fucked around with this message at 21:21 on May 18, 2008 |
|
#
¿
May 18, 2008 21:17
|
|
|
Easy one, the best tablesaw blade is the Forrester II ($100-110), second best and about half the price of the Forrester are Frued blades (~$40). There are cheaper Frued blades but I would stick with the ~$35+ blades. For a really inexpensive blade I recommend Oldham ($15-20), available from Home Depot.
|
|
#
¿
May 20, 2008 17:01
|
|
|
MuppetPastor posted:1. I guess my question is where to begin. 2. try starting here: http://images.rockler.com/tech/RTD10311373AC.pdf 3. Tage Frid teaches woodworking, get all three volumes Also the books I recommended earlier in the thread. Yeah, raised panel doors can be simple or more complex. They can be done pretty easily with a good router/table or shaper and the appropriate bits.
|
|
#
¿
May 22, 2008 03:41
|
|
|
PMan_ posted:The problem for me comes in with the "handle" area. Yeah, clamps are expensive. Two options: 1. Harbor Freight, and 2. bar clamps, the type that screw onto black iron pipe. If I understand about the handhold, the tablesaw and dado idea should work. You can either make many small cuts or make a poor man's dado out of a bunch of cheap 7.25 circular saw blades, use washers as spacers. The trouble with using a single blade is that to do this safely you should clamp the board in place then raise the blade, you will probably have to build a jig to keep the board from moving front to back while allow it to slide sideways. I would buy half a dozen cheap blades then smooth it out with a chisel. If you have a drill press it might be easier to use that. Or you can just forget about the handhold and spend the time building your next project (probably what I would really do).
|
|
#
¿
May 28, 2008 16:57
|
|
|
i81icu812 posted:Dang, the 'build your own canoe' thread went off into the abyss of the archives. Anyone have the links to the canoe building sites saved? I think this link I saved from that thread. http://personal.eunet.fi/pp/gsahv/index.htm#XX1 and http://www.duckworksmagazine.com/
|
|
#
¿
May 31, 2008 03:12
|
|
|
Gorilla Salsa posted:I was wondering if someone can give me a quote on this little project I thought up. If you're looking for someone to build it for you then you should find woodworkers in your area and ask them for a quote. If you want to know how much it would cost to build from scratch, a few hundred dollars in lumber costs if you used a hardwood plywood. To get a more accurate estimate you need to write down the sizes of all the individual pieces and then either figure manually or use a sheet layout program like this to find out how many sheets of plywood you'll need. More cutlist programs: http://www.delphiforfun.org/Programs/CutList.htm http://cutlistplus.com/ For ideas on how to build it, I suggest the cabinetry books I mentioned earlier in the thread. This project is basic case construction (pocket screws or biscuits or dadoes). Recommended tools = tablesaw, router and biscuit joiner. To cover the front, I would recommend tinted Lexan or plexi since you need to cut small holes in it.
|
|
#
¿
Jun 2, 2008 07:04
|
|
|
Catenoid posted:How difficult would it be to construct a desk with curvilinear boundary, and what would be some of the structural concerns? Can you find a picture of a desk similar to what you want?
|
|
#
¿
Jun 4, 2008 00:07
|
|
|
Catenoid posted:I can't draw anything, but I was thinking a mollified crescent or section of an annulus. Corner desks look ghastly. A desk like this would be a tough project for someone starting out. You will need to learn how to glue up/form bend laminates of wood, veneer, and mortise at an angle; not exactly beginner woodworking. I suggest searching through some the New Yankee Workshop episodes. I imagine at some point Norm has made some similar projects that might at least give you an idea of what would be involved. I would also suggest some simpler projects first as woodworking is not completely an intellectual exercise, building a piece of quality furniture also involves muscle memory.
|
|
#
¿
Jun 7, 2008 05:54
|
|


|
Catenoid posted:How about a small bookshelf? And what would I need? Bookshelves are great projects. You might want to check out a few basic books like I list here: http://forums.somethingawful.com/showthread.php?threadid=2819334&userid=30468#post342729921 Bookshelves are put together using one or a combination of the following: Traditional dado joints, biscuits or pocket screws.
Wood magazine has an annual bookshelf issue where they make three styles of bookshelf from the same basic carcass. I can't remember if Fine Woodworking does a bookshelf issue or not. Plus there are tons of bookshelf plans on the web or you can read some books on case construction and design your own bookshelf. http://www.woodmagazine.com/ideas/mission-bookcase/ http://www.freeww.com/bookcases.html
|
|
#
¿
Jun 12, 2008 18:41
|
|
|
If you're going to cover the cat trees with carpet you might also consider waferboard or particleboard, both are lighter and cheaper than MDF. You can make the cuts with an inexpensive circular saw.
|
|
#
¿
Jun 15, 2008 00:27
|
|
|
maplecheese posted:I'm kinda leaning toward just renting the table saw for a day for $38. Well MDF wouldn't be my first choice for strength but if you're set on it then I guess you are already aware of the awesome amount of dust that will happen when it's cut. Make sure you use carbide tipped saw blades when cutting and predrill all holes. Also, don't rely on mechanical fasteners for strength. I've only built a few things with MDF, it's a joy to work with... so precise, non of the disadvantages of real wood but I rely on rabbets, dadoes and biscuits for strength and only use mechanical fasteners (screws) to reinforce traditional joinery and glue.
|
|
#
¿
Jun 15, 2008 04:18
|
|
|
Okay, if I understand what's going on then I think you're fine. The screws will be screwing into solid wood so they will hold. The problem with MDF + screws is this: MDF is basically dust and glue so side to side forces pull on the screw and the MDF just turns to dust around the screw and it falls out. But if your screw threads are going into solid wood then it's not a problem. If you're going to carpet it then I would just choose whichever sheet stock is cheaper - MDF or OSB. I built my cat tree from particle board which is basically sawdust and glue, it's what you find as shelving on those cheap metal industrial style shelves. I only used it because I had it laying around. The advantage MDF will give you is that it is heavy and your tree will be more stable, my tree tended to tip once my cat became full grown (but he was a big-rear end cat).
|
|
#
¿
Jun 18, 2008 04:20
|
|
|
maplecheese posted:Yeah, the only place where screw threads will actually be in the MDF will be to attach the shelf brackets... Just predrill the holes and put a drop of glue down the hole and it should hold. Make sure to use a coarse threaded screw, fine threads will pull right out. They actually make special screws for MDF but I've never seen them in a store.
|
|
#
¿
Jun 18, 2008 05:42
|
|
|
blackjack posted:1) What would be a light, but strong wood that I could use for this? Preferably something available at Home Depot that will take a stain well. Another commonly available wood that is easy to work, stain, attractive and strong is mahogany. I love working with mahogany, it's a great outdoor wood also. Walnut is a beautiful choice. Cherry is also nice but difficult to stain, not that it really needs stain. http://www.hardwoodinfo.com/species_guide/display_species.asp
|
|
#
¿
Jun 19, 2008 04:16
|
|
|
It's actually been a while since I've built furniture or anything better than carpentry work. So this week I started building a footstool. Not a very complicated project but it will get me back in the shop. I decided to use scrapwood from other projects so the legs will be made from an extra mahogany leg blank from a table project and the rails are walnut left over from another table. I don't know if they will look good together or not, I guess we'll find out soon enough. I've included a few pictures of my shop and of the stool coming together. My shop from the door, such as it is. This is basically a shed that is probably 30 years old and was built by two 14 year old boys. If you're wondering why it hasn't fallen down it's because there are approximately 8 tons of ringshank nails holding the bitch together. You can see the basic parts of the footstool setting on my tablesaw.  Another shot of my shop. I used to work up here everyday and kept the place clean and organized but the less time I spend up there, the dirtier it gets. These pictures are actually after I cleaned up. 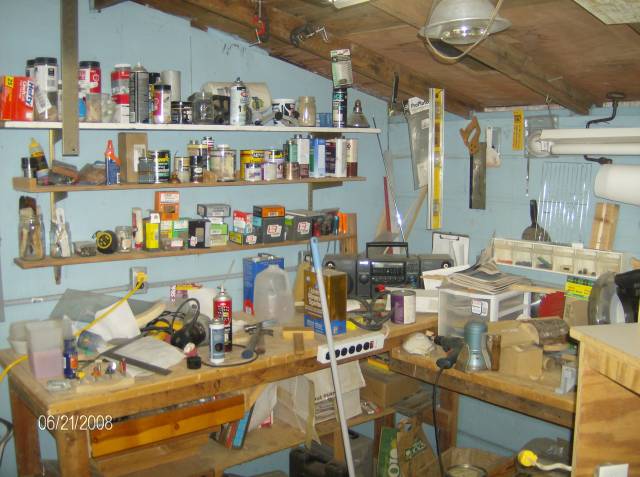 A shot of my rudimentary router table. It works but by all the gods if you can afford to buy a nice table or have the patience to build a nice table, it's worth it. I get by because I don't use my router nearly as much as I should. 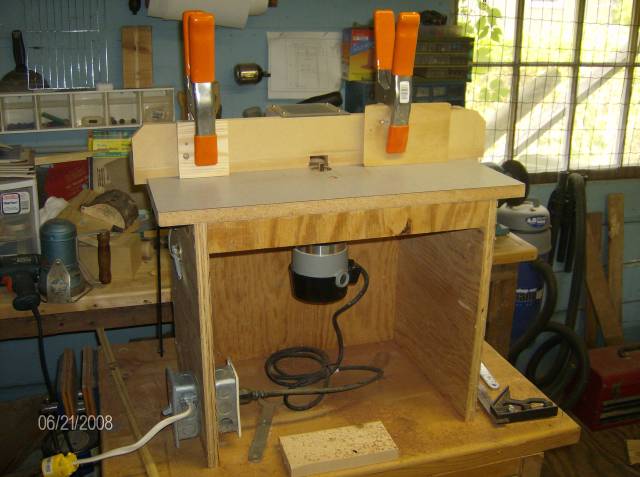 I hogged out the tenons on my tablesaw and will finish them on my router. 
|
|
#
¿
Jun 23, 2008 03:52
|
|
|
My router table setup and getting a squirt of Dri-cote.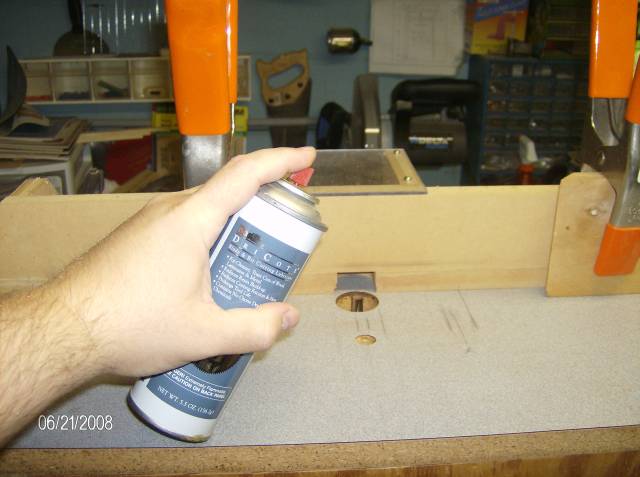 A helpful tip, cut your stop blocks at an angle so that sawdust doesn't build up between the block and the piece you are cutting. If you can tell, this stop block is cut at a 15 degree angle and you can see the little bit of sawdust in the corner but it will not affect my cut since the outer edge will touch the piece being cut. 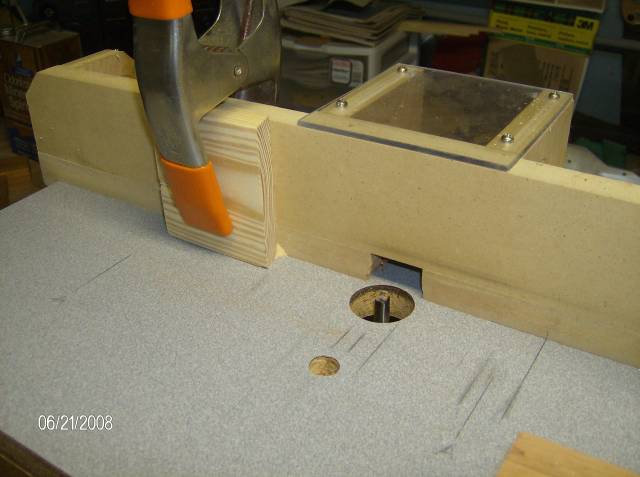 A mortise in progress. Unfortunately I didn't have a carbide bit the right size so I had to use a steel bit requiring many shallow passes.  Frequently your mortises will meet so you will have to cut the tenons at a 45 degree angle so they will not interfere with one another. Another good tip is to cut your mortises about 1/8" deeper than you need them to allow a glue reservoir; otherwise the glue could push your tenon back out of the mortise.   Someone borrowed my camera. This is Sally, a new addition to our family. The cage is her temporary home, after a day or two she will move to the white cage, Ratropolis, in the background.  The backside of my router table, the little port is just to deflect dust away from my face while routing. 
|
|
#
¿
Jun 23, 2008 04:13
|
|
|
maplecheese posted:Holy crap was that blade ever dull. On the rental saw? It would probably have been worth buying a cheap carbide blade just for the project. Pictures?
|
|
#
¿
Jun 25, 2008 07:58
|
|
|
The top must be heavy as hell.
|
|
#
¿
Jun 27, 2008 06:15
|
|
|
It reminds me of the huge workbenches we had in industrial arts (aka shop class) back in high school. I wish I had room for a bench that size.
|
|
#
¿
Jun 28, 2008 03:41
|
|
|
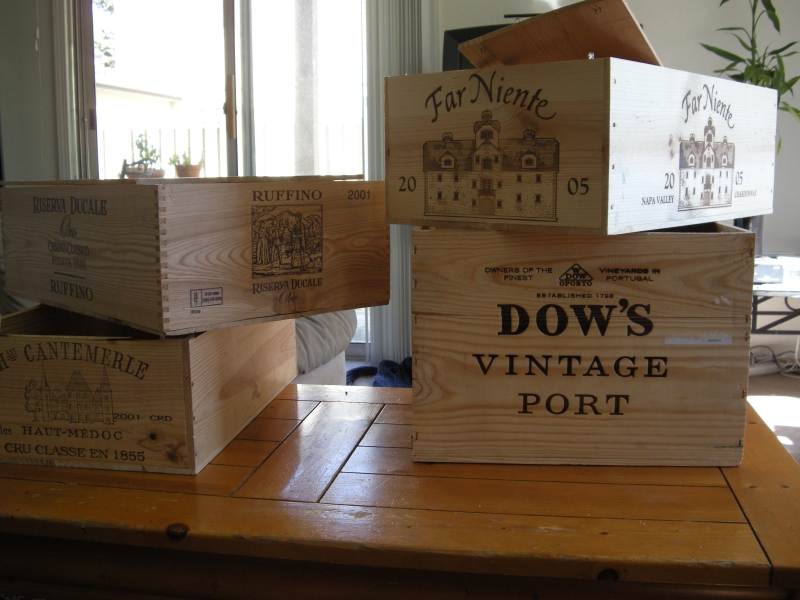
Vander posted:I have a set of wooden wineboxes from my job and I want to make them pretty. This thread isn't nearly busy enough so please stay. The boxes look like they are made of different woods so I would recommend an aniline dye for two reasons, 1) dye colors all woods evenly and 2) dyes are actually easier than stain. You can buy aniline dyes from local woodworking stores (probably other places) or order from online. The dyes can be mixed with water or alcohol, alcohol will dry very quickly but water will raise the grain of the wood (swell the fibers). I use dye like this: buy a cheap hand sprayer from the dollar store or Walmart and a quart of ethanol, mix the dye per instructions, spray the dye on the wood. If you don't get the dye on evenly wipe it with a rag but don't worry too much as dye is very forgiving. Even using alcohol you may get some raised grain (it will look fuzzy), simply sand gently with a fine sandpaper (220 grit).The dye soaks into the wood so you won't sand through the color as you would with stain unless you sand really hard. The box joint boxes like the one on the top left that says Ruffino are strong and will last a long time. Boxes that are stapled will not be as durable and I would not spend quite as much effort on them. I'm not sure about lids, you could just take the existing lids and put hinges on them, I'll have to think about it.
|
|
#
¿
Jun 28, 2008 18:40
|
|

|
Vander posted:My big concern is preservation. These boxes are pretty raw wood and they warp quick in the sun. The lids are the big victims, but more on that later. So will the dye make the wood last longer? Vander posted:Just a hand sprayer a la Windex? Vander posted:What about the art on the boxes? how can I sand the wood, but not damage the (I think) burned on brands? Long answer: The wood fibers will not all be the same length especially if the wood has been sanded before. When you expose the wood to moisture (rain, water based stain) the wood fibers will swell and give the wood a bumpy feeling, some of the wood fibers will stand up like hairs on your arm and make the wood look fuzzy. By using ethanol instead of water you will minimize the amount of swelling. Often it is recommended to preraise the grain by swabbing the wood with a wet sponge and allowing it to dry, then lightly sanding it smooth again. This technique minimizes the amount of sanding you will need to do after staining/dyeing. Another alternative is to use an all-in-one stain and polyurethane (e.g. Minwax Polyshade) but you will still have raised grain and you will be sanding polyurethane. Also each coat of Polyshade muddies the wood grain which is sometimes desirable when working with dissimilar woods but it will also muddy the burned in brands. Vander posted:I just about have to have new lids. Between the sun and just necessity of opening the boxes, I have less than half of the original lids, and even those are mostly split in half. I'll need to straight up make a couple lids. I'd also like to have them attached to the boxes if possible. I would fashion the handles from wood, either just buy them pre-made or make them by hand. Making handles isn't as difficult as it sounds and if they are imperfect it adds to the rustic feel of the boxes.
|
|
#
¿
Jun 28, 2008 20:20
|
|
|
PMan_ posted:My question is, can this actually be used for planing boards, as well as jointing, and how would it work for that as opposed to having an actual planer? Vander posted:No wood dye in my little town here. So let's talk about staining. My dad say it's easy- peasy. Is it? edit for spelling. wormil fucked around with this message at 02:42 on Jun 30, 2008 |
|
#
¿
Jun 29, 2008 19:42
|
|
|
PMan_ posted:To my novice eyes, it seems like using the jointer that way could flatten boards like a planer. This is what I tried to explain in my earlier post, a planer doesn't flatten boards, it reduces their thickness and makes opposite sides parallel. A jointer makes the boards flat and adjoining edges square. If you look closely at the picture you posted, the board he is jointing is cupped.  A planer will not remove cup, it will make opposite sides parallel but they will still be cupped. Now sometimes you can remove some cup with light passes but a planer is not designed for that. Here is a review of wood defects: 
|
|
#
¿
Jun 30, 2008 02:41
|
|
|
Nice job but where's the stogies?
|
|
#
¿
Jul 1, 2008 03:19
|
|
|
Hey, your rolling cabinet looks much better than mine, which my ghetto router table is setting on. At the time all I had was a circular saw, some 2x4s and some scrap plywood. The one thing I like about my cabinet though is it's heavy as hell. I made the top from 2x6 southern yellow pine, hand planed the sides and glued them together like a table top then hand planed the top flat. Next time, use your circular saw to cut off a factory edge of the plywood. Mark the factory edge with arrows and use it as your straightedge. You can use your Kreg jig to mount a face frame on the front and hide the crookedness. I need to go finish my footstool.
|
|
#
¿
Jul 5, 2008 04:03
|
|
|
TheChipmunk posted:Is the Mortise and Tenon a good way to connect the legs to the tabletop? I want the table sturdy and smooth - if it wobbles I shall blow it up with thermite. Mortise and tenons are the traditional way to join the legs and apron but you shouldn't use a m/t to join the top to the apron. If you're just building something inexpensive, especially with few tools, I would use another method. Check out this video: http://www.expertvillage.com/video/25980_table-build-lock-top.htm The table will be sturdy if you use sturdy materials and one of the several standard methods of table building. I would use plywood for the top and aprons. The legs can be built of plywood or solid wood but without the ability to rip wood, solid wood legs might present a problem. You could use 4x4 legs but that's overkill. Grayham posted:I highly suggest you build the top out of that oak glued and screwed to a 3/4" piece of MDF. It makes the desk much stronger and rigid.
|
|
#
¿
Jul 7, 2008 03:23
|
|
|
TheChipmunk posted:Wormil, what do you think of the Plywood Oak? Vander posted:Anyway, how do they look? And how can I go about preserving them? They look good. I like how they all have the same color even though they are different woods. Grayham posted:That's a good point. However, I've never had a problem with my desk for the 2 years since I built it. Maybe because it's got a several thick coats of polyurethane on the plywood (birch plywood in my case) or that it has always been in an air conditioned house.
|
|
#
¿
Jul 8, 2008 08:36
|
|
|
TheChipmunk posted:With a sturdy apron, should I use some MDF? You can. The MDF will make the top feel more solid but there are other ways of doing the same thing without adding as much weight. You can also add a center support that crosses the width of the table and supports the center. Also when using plywood for a top, the edges will usually be finished with strip of solid wood about 1.5" thick which gives the appearance of heft and stiffens the edges. I doubt any of that will be necessary on the smaller table. Just make sure the top gets fastened to the apron securely and the apron is secure against the legs and it will be solid. You might want to check out some of the books I mentioned earlier in the thread, they have diagrams on table building.
|
|
#
¿
Jul 9, 2008 00:38
|
|
|
TheChipmunk posted:Passed down tool that wasn't used a whole lot: TheChipmunk posted:I'm having trouble deciding how big the legs should be. note: your aprons should probably be 4-5" wide. This is your stability so don't cheat on the aprons. TheChipmunk posted:I also saw a design that used multiple boards - nailing them together to get a square leg. I don't want to use nails or many screws. I want to use as few as possible. wormil fucked around with this message at 05:28 on Jul 14, 2008 |
|
#
¿
Jul 14, 2008 05:24
|
|

|
Gnomad posted:Any of you woodworking guys familiar with the Shopsmith? Shopsmith makes quality equipment but it won't be for everyone. Its basically for people who lack the room for traditional equipment. I've spoken to quite a few people who loved theirs and a few who didn't. Used they are cheap for the same reason used exercise equipment is cheap, its not a reflection on the quality.
|
|
#
¿
Aug 29, 2008 21:50
|
|
|
Speaking of boats, there are a few groups around the net dedicated to building small boats from one or two sheets of plywood. I always wanted to build one and try it out. http://groups.yahoo.com/group/mouseboats/?yguid=116437271
|
|
#
¿
Sep 2, 2008 18:37
|
|
|
Not an Anthem posted:Anyone know a relatively easy setup for making wood CD racks? I need to hold hundreds of CDs and will just line them up on a wall. Lots of weight so I'll use wall studs which is fine. Wall studs would probably be cheaper but they will also be crooked and way overkill for a CD shelf. I have a DVD shelf with hundreds of DVDs that I built from spruce (your basic cheap white wood at Lowes) 1x6's (and held together solely with biscuits) and it doesn't even think of sagging. CDs are a little heavier but if you keep your spans within four feet there should be no problems. For additional strength you could use southern yellow pine. You can extend the span out to about six feet by putting a thin plywood back on the shelf and screwing it into the shelves, this will add incredible rigidity and I prefer this method over edge strips. http://www.woodbin.com/calcs/sagulator.htm As for putting the whole thing together, unless you have a lot of power tools or a woodshop handy, you'll probably just have to use screws. Another option, you could buy CD holder strips from Rockler and build this: 
|
|
#
¿
Sep 15, 2008 22:14
|
|
|
dv6speed posted:list Good list. Might could get away with a sliding, compound miter saw. The bigger they are, the more useful they are but also more effort to lug around. Jigsaws don't make much noise and are very handy for 3/4" lumber but don't buy a cheap one. I recommend Bosch. Chisels are a must and you don't need to spend much money if you buy a set of Marples blue handles. The sizes I use most are 3/8" & 3/4". Biscuit joiner or a Kreg jig. Both make putting things together much easier and faster when you don't have a lot of power tools. A Kreg jig is much cheaper, doesn't require clamps although you get better results if you use clamps, but leaves screw holes behind which can be filled. A biscuit joiner leaves no external sign but generally requires clamps to hold pieces together while they dry. Clamps, you'll never have too many but you can get away with just a few and I usually just buy them as I need them. Bessey are one of the top brands but you can get away with less expensive clamps. Look for clamps that are beefy. Inexpensive clamps tend to distort under load and will provide uneven pressure on your project. It's worth having a few Quick-Grip clamps. Glue. A lot is written about glue but for indoor projects it doesn't really matter. Even white Elmer's glue is stronger than lignin, the glue nature uses to hold fibers together. So white glue or yellow glue is fine; don't waste a lot of money on brand names. Maybe a good beginner's book, I list a few I like here.
|
|
#
¿
Sep 20, 2008 18:28
|
|
|

|
| # ¿ Apr 28, 2024 20:32 |
|
|
grover posted:I made several projects in the living room of my old apartment, using my coffee table as a workbench. That's hardcore. I used to just go out in the parking lot or on my back deck.
|
|
#
¿
Sep 21, 2008 01:19
|
|