


|
dyne posted:does anyone have any tips for staining and sealing a large desk? I'm more worried about being able to polyurethane a large surface and have it come out even and without brush strokes. I've made 2 desks before and using a little brush takes forever I don't think there is any shortcut with poly which is why I avoid it except for tabletops. Both lacquer and shellac will melt into previous layers but poly doesn't so each layer must be smooth before applying the next otherwise surface irregularities compound. Unless you can get it to flow smoothly, you'll have to sand at some point then gradually thin the poly putting on thinner and thinner layers. Its the only way I know of to get a nice smooth finish with poly. Lacquer is nearly as durable as poly but much more forgiving to apply. Lacquer is usually sprayed but you can brush it.
|
 #
¿
Sep 21, 2008 06:44
#
¿
Sep 21, 2008 06:44
|
|


|

|
| # ¿ May 14, 2024 18:30 |
|
|
Not an Anthem posted:Each shelf's load is going to be ~32.407lbs total, evenly, so 2 or 3 lbs/foot? Too much load for 1/2" wooden shelf. Even the most rigid woods like hickory, locust and SYP will sag nearly an inch under that load without some additional support. Even if you increase the shelf thickness to 1", you'll still probably have visible sag. If you attach a 1/4+" backer to the unit and run screws 6-8" apart through the back into the shelves, it should be plenty sturdy. That is in addition to attaching the ends of the shelves of course. The screws aren't an elegant solution but they are workable and simple if you don't have a shop full of power tools. There are other options (cleats, edge strips, brackets) but they take up more space; or dadoes which require more tools and experience. I attached my shelf to the wall with flat metal L brackets screwed to the sides and the wall. I put them inside and they take up a negligible amount of space. However, my shelf is supported by the floor and only attached to the wall for stability. Pocket screws wouldn't be a bad solution for attaching it to the wall.
|
|
#
¿
Sep 29, 2008 19:32
|
|
|
You can use strips or one large sheet depending upon the look you want. I had to go look to remember exactly how I built mine. I used edge strips but placed them in the back.  If you wanted to use dadoes, what you would do is cut dadoes into the back sheet to accept the shelves, that way they would be supported on three sides for a very strong and attractive shelving unit. The other methods accomplish the same thing with less elegance. You can use any wood you want but if you want 1/2" thickness you'll need either a planer to get the wood down to size or a manufactured product (plywood, mdf, etc). If you plan on running screws into the shelves edgewise you need a solid wood. If you use dadoes or edge strips, you can use any wood product. If you use MDF, don't rely on screws; use wood glue and/or biscuits. I used 1x6 (actually .75x5.5) white pine from Lowes for mine.
|
|
#
¿
Sep 29, 2008 21:07
|
|
|
grover posted:As for the backer, Get a sheet of 1/4" thick luan cut to the dimensions of your shelf (lowes/home depot will do this for free, btw), and nail it to the back using brads. ... Also, it makes it a lot easier to hang it, as you can screw through the luan into a stud I hate to disagree but with 33 pounds per shelf X 7 shelves = 231 lbs + the weight of the wood and hardware. Brad nails aren't going to hold and the backer will not be secure enough to support the weight. The shelves could fall forward leaving the backer screwed to the wall. I don't believe the brads will even be strong enough to prevent the shelf from sagging. He's safer using screws through the backer into the shelves and attaching the shelf to the studs using the case sides. Nothing wrong with running screws through the backer into the wall studs but I wouldn't depend on it. Not an Anthem posted:Ah you rule, thanks. Curious about your shelf- did you use screws or how did you set it up? I'll probably run to the local lumber yard tomorrow and see what prices are but I won't be able to work on it til this weekend. Looks nice! I used biscuits and wood glue. 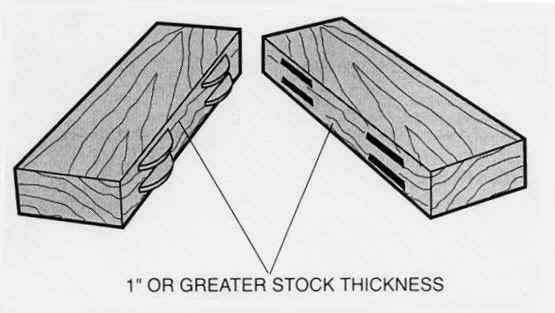 Pocket screws are also pretty sweet. 
|
|
#
¿
Sep 30, 2008 03:46
|
|
")
|
Can't help with Florida but if you are forced to mail order lumber, you can feel confident ordering from Wall Lumber. http://www.walllumber.com/
|
|
#
¿
Oct 11, 2008 04:35
|
|
|
Johnny Truant posted:Woodworking wooo! 1. Plywood 2. Shellac is alcohol soluble, not a good choice for a beer pong table. Recommend water based polyurethane. 3. table hinges, they sit flush with the tabletop 4. use table hinges
|
|
#
¿
Oct 17, 2008 04:02
|
|
|
Johnny Truant posted:I figured that just door hinges would be good. Do you think it folding into thirds would be less stable than just the halves, or is that really a big issue? It would depend on how it was designed. We had a few posts about designing a stable table earlier in this thread. Really considering the low price of commercial beer pong tables, I would just buy one.
|
|
#
¿
Oct 17, 2008 06:18
|
|
|
"[panic posted:"] The fence is too weak for serious woodworking and the saw will slow down cutting hardwoods; plus its too much money for the saw. These are probably as good and cheaper: http://raleigh.craigslist.org/tls/885381470.html http://raleigh.craigslist.org/tls/877532056.html If you want a real saw and have some dough, this is a good deal: http://raleigh.craigslist.org/tls/884215952.html http://raleigh.craigslist.org/tls/877652424.html Who knows that this is: http://raleigh.craigslist.org/tls/872635620.html I strongly suggest you check out Triangle Woodworkers. They generally have an auction this time of year where you can get some nice equipment inexpensively. http://www.ibiblio.org/twa/
|
|
#
¿
Oct 20, 2008 03:01
|
|
|
ChaoticSeven posted:Somehow I don't think nice square legs with double tapers will look quite right with this thing... I wouldn't rule out square or tapered. My choice would be trestle. Trestle works with anything and gives you the opportunity to show off some nice figured wood. Then again cedar is distinctive enough, a plainer wood like mahogany stained dark would detract less from the cedar. It is a coffee table correct?
|
|
#
¿
Oct 20, 2008 21:59
|
|
|
Johnny Truant posted:I'm just wondering why I've gotten multiple "Just buy one"s when this is going to be cheaper and I'll be able to make it look how I want, I don't see how that isn't as good as a "more sturdy" table when I could easily make mine sturdy enough. Beer pong is a fad and generally when I make furniture I make fine furniture. Usually you can't reproduce cheap furniture for less money, it just makes more sense to guy buy one. But if you really want a beer pong table that looks a certain way then there is nothing wrong with building one. ChaoticSeven posted:...found a nice cherry crotch piece. It has two legs, but they're cut close to the Y. So unless I cut them off even and flipped the piece upside down they wouldn't really show.
|
|
#
¿
Oct 23, 2008 03:43
|
|
|
ChaoticSeven posted:I need to learn how to sharpen chisels, too. Nice little box. Many people laugh at the idea but I use sandpaper on glass (aka Scary Sharp method) and its very quick, very easy and my chisels are sharper than the razor I shave with (really). I go up to 2000 grit and don't bother to strop with leather. I think mine our 600, 1000, 1500, & 2000; you can get those grits at auto parts stores. The glass is 1/4"x4"x9" and cost me a few dollars each from a glass company. It is also perfect for flattening the sole of bench planes.
|
|
#
¿
Nov 10, 2008 04:35
|
|
|
The Rigid looks like it has one built into the blade guard.
|
|
#
¿
Nov 13, 2008 05:50
|
|
|
PMan_ posted:Aha, I thought that was just a splitter. Guess that solves that, then. Maybe it is. I confess I don't know the difference. I took that stuff off my saw when I got it and never thought of it again. Fake edit: okay, I looked it up and remember Kelley Mehler talking about this and a few other safety features when he spoke at our woodworking club. But to be honest, even after reading and seeing pictures of one, it still looks like an improved splitter. Mehler also told us a about a blade brake that would stop a blade within like one rotation of coming in contact with fingers, making it nearly impossible to cut your fingers off. The downside is that it ruins the blade but I'll trade a blade for my fingers any day.
|
|
#
¿
Nov 13, 2008 18:31
|
|
|
Slugworth posted:The construction of the whole thing is essentially a piece of plywood onto which I screwed the leg/shelf assembly, and then glued the top boards on. Basically the plywood bowed down the middle, lengthwise. Would screwing some sort of brace into the bottom of the plywood suck it back down, or should I just let it stay bowed, and sand/plane the top flat? Well your big mistake was gluing the cherry flooring to the plywood. Plywood is a manufactured product built up from veneers with the grain of each running cross directional to increase stability. The cherry will expand and contract across the grain but not longitudinally. When designing furniture you have to allow for the wood movement or it will literally tear itself apart. In your case, the cherry is trying to expand and contract but the plywood won't let it so it forms weird shapes. Irresistible force meets immovable object. Keep it in a dry environment and it should return close to it's original shape. You can try a brace across the bottom but it will eventually find another way to relieve the stresses of expansion and contraction. If you sand it down, once it dries out you have a table with a dip in it.
|
|
#
¿
Nov 18, 2008 06:16
|
|
|
PMan_ posted:OKay, if I am finishing some red oak, I can use something like Danish Oil and then put a clear poly topcoat on, right? You can but there is no point to it. Danish oil is a mixture of oil based polyurethane and oil (tung or linseed). The only reason to use oil under poly is to darken the wood over time (accelerate patina), which linseed will do. But IIRC, most poly has UV inhibitors which will slow the darkening. It won't hurt anything but you're not really gaining much either. (and by linseed I mean boiled linseed which is not actually boiled but has metallic dryers added)
|
|
#
¿
Nov 19, 2008 09:31
|
|
|
PMan_ posted:Excellent, thanks for the responses. And that is a pretty nice looking table, BTW. This project I'm working on is a kid's rocking chair, so I didn't know if the oil and the topcoat of poly would make it more durable in the long run. I would recommend orange shellac. It will give you the richness of an oil but will be much easier to apply and it is non-toxic. Well from least durable to most goes something like this: wax oil danish oil ------------------------ shellac (alcohol soluble) consumer lacquer varnish polyurethane commercial lacquer All finishes benefit from a topcoat of wax for abrasion resistance. Oil gives a particular visual appeal to certain woods like oak, walnut & cherry. An oil/wax finish is the easiest to apply, easiest to repair, and many believe is the most visually appealing, although it requires occasional reapplication. Danish oil is a good choice when you need minimal resistance to humidity and abrasion. Too often people count out shellac which is a fairly tough finish, very easy to apply, very easy to repair and non-toxic (commonly used on food and children's toys). We gave our wood floors a topcoat of shellac to tide us over until we refinish them properly and it has held up very well. Shellac comes premixed in both blond and amber (other colors are available as flake). Varnish generally gives an amber (warm) tint as does oil based poly. Water based poly tends to give a blue (cool) tint although you won't actually see any blue. Lacquer is always clear I believe, unless tinted. Poly & varnish are the most difficult to apply and achieve good results, IMO. Mostly because new layers do not melt into previous layers and the finish nearly always requires multiple sandings to smooth and polish which is made more difficult because the finish is so hard. Lacquer is usually sprayed but can be brushed with good results. Shellac can be brushed on and no sanding is required to smooth and polish the finish. Danish oil and oil are just rubbed on.
|
|
#
¿
Nov 20, 2008 08:21
|
|
|
SnackinStarfish posted:I've decided I want to make my girlfriend a simple wardrobe for a Christmas present, and I need a few pointers before undertaking such a project. What tools do you have, what is your experience level, and what is your budget ($300, 500, 1000)? I would estimate that you're probably looking at a few hundred dollars worth of hard wood plywood minimum, significantly more if you use real wood, then add in hardware and tool rental. If you're goal is to save money, it's often cheaper to buy than to build especially if you visit some antique auctions or lower end antique stores. Wardrobes are built using fairly standard case construction. http://www.popularwoodworking.com/article/Classic_Wardrobe/ http://www.popularwoodworking.com/articleabstract?aid=12861
|
|
#
¿
Nov 25, 2008 16:39
|
|
|
^^^^^^ If I'm imagining your construction correctly I don't see any allowances for wood movement. Especially if the outside is finished and the inside isn't, the wardrobe will pull itself apart within six months. My father-in-law built some headboards using cedar tongue & groove with 2x2 cedar posts, finished only on one side and within months the things twisted and warped like crumpled paper.
|
|
#
¿
Nov 26, 2008 04:16
|
|
|
dreg posted:Sexy. You're making me want to go build something. I think it's been two years since I built a piece of furniture.
|
|
#
¿
Nov 27, 2008 09:09
|
|
|
Bigos posted:I am thinking of getting into woodworking and would like some advice, especially about what table saw to buy. I want to make furniture and the occasional home reno project. As much as I really want something inexpensive, quality is more important. I would rather wait and buy an expensive, good saw. Pman is right on about planes, more money equals better quality. But truthfully I use a $14 Stanley bought from Home Depot, it just takes a bit of tuning (flattening the sole and sharpening) to get good results. Every woodworker should have a block plane and a jack plane. Another hand plane that I regret not buying every time I start a project is a rabbit plane. You'll also want some good chisels. Marples blue handles are exceptional quality for the price and take a razor's edge. When it comes to tablesaws there are a couple of things to consider. First is the fence - you cannot do accurate woodworking without a good fence. A good fence should be able to handle a good whack without going out of alignment. A fence should also make it easy to use various accessories. Second is the motor. You'll see direct drive motors on cheap saws and you'll want to avoid these. Better saws have belt drives. Third most important is your blade, the Woodworker II is often recommended but there are other excellent blades out there. Among cheaper blades, Frued makes some excellent $40-50 blades. There are three general types of tablesaws: jobsite saws (like the Dewalt), contractor saws (not very portable but can be moved), and regular tablesaws (usually have a heavy enclosed base & more power). Top brands among table & contractors are Delta, Jet, Powermatic; next are Grizzly, Rigid, Craftsman (I'm probably forgetting a few). I use a Delta Contractor w/Unifence and 30" extension table. I really don't know much about that Dewalt saw or jobsite saws in general and it may be fine for testing the waters. I don't see the 16" rip limitation as that big a deal unless you're cutting sheets of plywood or making dining room tables. http://www.toolcrib.com/blog/category/tool-reviews/
|
|
#
¿
Nov 29, 2008 23:16
|
|
|
sky shark posted:What table saw recommendations do you guys have? What HP and price range?
|
|
#
¿
Dec 1, 2008 09:12
|
|
|
sky shark posted:Don't care / $1500 max. That said though, it should be a shop saw or contractors saw or similar since that's what the INCRA system was designed for. I could go all out and get a cabinet saw but this setup is probably going to wind up on wheels for moving around the shop. Well in that price range I would go full tilt with a 3HP 230v Delta cabinet saw with a mobile base. The downside is that a Delta or Jet are probably at the top or a little over your price range although you might get a deal from someone local. You could easily fit a Grizzly cabinet into your budget. If you want to save some dough or really want to stick with a contractor saw, any of the major brands I mentioned previously are within your budget. Here is a nice $800 setup from Delta. 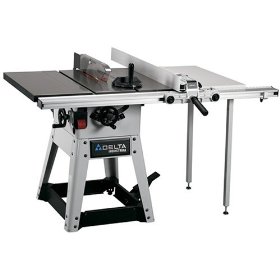 Or a $900 setup with a Biesemeyer fence. 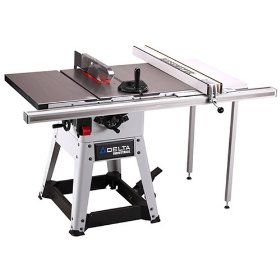 I have the Unifence and like it considerably and it does have some built in advantages such as being easily reverserable without having to realign. It has a thin face for thin materials and height off the table is easily adjustable. Not to mention its built like a brick shithouse and can take a pretty good whack without needing readjustment. On the other hand, there are a lot of shop made jigs designed for Biesemeyer. I wouldn't recommend a jobsite saw unless you really need mobility or have a very limited budget.
|
|
#
¿
Dec 2, 2008 02:15
|
|
|
iwannabebobdylan posted:What am I missing here? Does it balance no matter how much is in it? You and me both. I now know what to do with a random piece of mystery hardwood I bought several years ago. It's very hard and looks sort of like zebrawood. These would make good gifts. http://www.youtube.com/watch?v=fKIuczXLgTY wormil fucked around with this message at 16:56 on Dec 4, 2008 |
|
#
¿
Dec 4, 2008 16:52
|
|
|
"[panic posted:"] I'm not familiar with those chisels, they may be awesome or crap, sorry. They have a youtube video: http://www.youtube.com/watch?v=OeFCfmBIRKk It's always better to have a few very good chisels than a whole set of mediocre chisels. The most commonly used sizes are 1/4" & 3/8", then probably 3/4". Sneak a peak at his current chisels and try to guess which ones he uses most and what brand they are. Really good chisels will last most people a lifetime. Also there are two main types of chisels, bench and mortis The Marples are often considered exceptional value chisels. http://www.woodcraft.com/product.aspx?ProductID=111165&FamilyID=294 The Sorbys are swanky chisels but come with a swanky price tag. Also check out http://www.hartvilletool.com http://www.leevalley.com/wood/index.aspx?c=
|
|
#
¿
Dec 15, 2008 07:42
|
|
|
It sounds like quite a project. There is no perfect wood but any of the following are commonly available and would be superb choices: mahogany (there is a reason it is the most common furniture wood, easy to work, straight grained, stable, rot resistant; careful there are fake mahoganies), cherry (more difficult to work & finish but very beautiful), white oak (you want quartersawn for nice furniture), and walnut (gorgeous cool brown color; careful of the dust). Poplar is normally used for secondary wood that you won't see. There are other woods available, maple, ash, red oak, cedar, sassafras, sycamore, teak and a variety of exotic hardwoods; but the ones above are your best bet. Also, there is much fine furniture made with veneer. It saves on cost and makes construction simpler. Can't help with the tube handle things, might have to go custom made. The hardware is going to depend much on the style. Definitely want to see pictures when done.
|
|
#
¿
Dec 18, 2008 03:40
|
|
|
QuarkMartial posted:2) Dovetails: Is there an easy way to cut these by hand?  Just buy tools as you need them. Wood mallets are handy but you can build them yourself, they don't have to be pretty and it's a good way to use up scraps; mine are made from SYP. If you want fancier tools check places like Lee Valley, Garret Wade, Hartville Tools, etc. You should be willing to spend a little more on tools that cut and if you need to skimp, do so on non-cutting tools.
|
|
#
¿
Jan 5, 2009 19:20
|
|
|
Senor P. posted:I was wondering if there are any other books with more details on the mechanical properties of wood. Right now I'm looking at "Wood Handbook -- Wood as an Engineering Material" which is decent. http://www2.fpl.fs.fed.us/TechSheets/techmenu.html http://www2.fpl.fs.fed.us/publications/index.html
|
|
#
¿
Jan 8, 2009 15:17
|
|
|
So much angst, so little woodworking.
|
|
#
¿
Mar 5, 2009 14:28
|
|
|
laod posted:I have a delta table saw with cast iron wings that would very much like to rust. They came with a thick coat of machine oil on them which I cleaned up. For the time being I've just been wiping a much thinner coat of clean machine oil on them but a friend suggested wax as an alternative. The idea appeals to me but I'm not sure what sort of wax would be appropriate. Plain old bee's wax is the first thing that comes to mind. Any advice? I use TopCote, but I don't have much of a rust problem. Many people use Johnson's Paste Wax. I'm sure you already know to avoid any product with silicone as it will create problems with finishing, except for shellac.
|
|
#
¿
Mar 5, 2009 20:22
|
|
|
Jagtpanther posted:I want to build a bench from Schwarz's book, the English bench. He mentions buying 2x12's and ripping them into the 2x4's needed. I'm very happy to do this, but I don't have a bandsaw or a jointer/planer to make them happy. What do I do? Buy them first? But how do I know this is going to be a hobby I'm going to enjoy before I spend the money? Forget about making a fancy workbench as your first project, its a waste of time. You don't need to read books or any of that poo poo first just throw an old door on some sawbenches or build a simpler workbench. I think we discussed some plans earlier in this thread. Get some basic hand tools, good tools but don't go overboard, and start building projects. Take a woodworking class. Once you have some skills and if you still have all your fingers, and you get an idea whether you enjoy it then you can build up your shop. That old workbench can become an assembly table or finishing table and you can build a nice workbench. Years ago one of the woodworking mags published pictures of some gorgeous furniture built by a Mexican with woodworking equipment he built from pallets and washing machine motors plus whatever else he could scrounge. Skill always trumps tools, always. So learn the skills then bring your shop up to your level.
|
|
#
¿
Mar 9, 2009 00:08
|
|
|
Morris you're making an assumption that they don't use those tools because they are cheap, it is just as likely they don't use them because not everyone is infatuated with tools or woodworking. I don't disagree with you about the importance of benches but you keep building it up to the point where it kind of becomes a barrier to entry especially for someone with almost no experience who doesn't even know if they will like the hobby. You went to industrial design college so your approach to woodworking is going to be much more direct than the guy who wants a garage hobby on the weekends. So yeah, you need a good bench but you can't build a good bench without some tools and rough bench to work on. The same rough bench can serve for some small projects until you get some skills. I look back on the early projects I built and realize how much I've learned, the best bench in the world wouldn't have made those projects any better or even more fun to build. My shop is actually too small for a good bench so I built one on lockable casters that I can roll out of the way.
|
|
#
¿
Mar 10, 2009 04:47
|
|
|
$250 is too low for a tablesaw. You could probably get a miter saw in that price ranger but I find miter saws to be more useful for carpentry than woodworking. I would buy a good circular saw before buying a miter saw but then I tend to build furniture over small projects. Maybe split the $250 between a router and a circular saw (or miter if you don't think you'll use a circular saw). Make sure you have a good assortment of hand tools before loading up on power tools. You'll need a few good chisels (probably 3/8 & 3/4 to start, I use the 3/8 most of the time), a good hand saw, a bench plane, sanding blocks, clamps, etc.
|
|
#
¿
Mar 26, 2009 06:53
|
|
|
There are jobsite saws, designed to be portable which are sometimes also called contractor saws. Then there are contractor saws which are light weight but sturdy tablesaws. The former is probably what you are referring to. I personally wouldn't buy a jobsite saw for woodworking and would expect to pay $600-700 minimum for a decent contractor saw. As GE mentioned, you can also have a band saw centric shop. I don't think one is better than the other but the decision will affect what techniques you use. The tablesaw is much more versatile than the bandsaw but also takes up much more room; OTOH, the bandsaw is less intimidating. Handsaws are such a personal thing. I learned with english (push) saws and japanese style saws drive me crazy although the concept makes more sense. When possible I prefer a bow saw to anything else. With the blade under constant tension you can cut on the push or pull stroke. Whatever floats your boat really. What kind of projects will you be building?
|
|
#
¿
Mar 26, 2009 07:22
|
|
|
GEMorris posted:Ever notice how you rarely ever hear about how some total newbie cuts their finger off on a table saw? It is always some guy who has been woodworking for 30 years. The reason being, risk exposure. If you use an unsafe tool for an extended period of time, the chance of the tool getting you approaches 1. Yes and no. Obviously the tablesaw is an inherently dangerous machine but it's also relatively easy to use safely. What is true is that some people are inherently unsafe and get away with it for a long time, then they lose a finger and suddenly preach safety like it's the second coming. Also, a panel saw is better than a tablesaw for cutting sheet goods. GEMorris posted:it is $500 now, or your insurance deductible later, your call Really, enough with the tablesaw bashing.
|
|
#
¿
Mar 28, 2009 07:18
|
|
|
GEMorris posted:The guy is balking at $500 for a table saw and you are suggesting panel saw? grover posted:He was always always always careful. Yet, one day he got complacent, and lost his thumb. I get the point you're trying to make and I'm not saying that accidents don't happen but its false to imply that losing a finger is inevitable. Many, many, people use tablesaws (and joiners) safely all their lives without losing digits. Really I'd like to know what the poor guy was doing to lose a thumb. A fingertip I could easily see but a thumb?
|
|
#
¿
Mar 28, 2009 19:43
|
|
|
GEMorris posted:Link? We may be talking about two different things here, but the cheapest panel saws I know of are the Safety-Speed-Cut variety and they are still over $1k Google "panel saw". You can build one for several hundred bucks with the added ability to accept a router.
|
|
#
¿
Mar 29, 2009 00:55
|
|
|
GEMorris posted:...it isn't going to be any good. WildFoxMedia posted:Wow, I'm sorry guys - I didn't mean to start a bunch poo poo between you guys. Doesn't amount to much. At the end of the day you're going to use what you can afford just all hobbyists do and sometimes you have to improvise. I learned to woodwork in a school with a nicely designed shop with a full range of tools but that stuff isn't on the menu for home hobbyists; hence the tons of books about shop built jigs, equipment and the variety of kits available to woodworkers. Some woodworkers get so involved making stuff for their shop that they rarely make anything else.
|
|
#
¿
Mar 29, 2009 02:13
|
|
|
grover posted:Even the cheapest table saws have riving knives. They don't work, however, when you remove them and blade guard they're attached to. Which you have to for certain projects, but shouldn't just because it gets in the way/is annoying. I think new saws are required to have riving knives, correct? For many years saws came with just splitters which were usually immediately removed along with the blade guard. Mine sits on a shelf somewhere.
|
|
#
¿
Mar 29, 2009 02:27
|
|
|
mcrandello posted:Also anyone? I'm mainly concerned that all those through tenons might weaken the structure a bit. I agree with morris about the muntins lining up, they should be about 2/3rds the way down the front panels. Personally I would stick with standard mortise and tenons as I'm not sure about half lapping panels. All the problems with the through tenons can be solved by building standalone panels for each end, otherwise you'll need to beef up your corner stiles to 3x3 at least. Also, I would eliminate the through tenons on the backside as you'll want to maximize strength and it won't be seen. If you do put them through I would consider pegging them but I would probably do that part completely different anyway. It might be fine, I'd have to think about it some more though. You might want to review the book I recommended earlier, Illustrated Cabinetmaking (or something similar). GEMorris posted:...try some half-lap joints there rather than M&Ting everything. I'm having a hard time picturing this... half lap muntins on panels? Or do you mean rabbeting the back of the frame for the panel? And what the gently caress, do woodworkers have no life? It's Saturday night for gods sakes.
|
|
#
¿
Mar 29, 2009 03:35
|
|
|

|
| # ¿ May 14, 2024 18:30 |
|
|
For that matter, if the panels are sheet stock you could just glue false muntins on the front and it wouldn't matter. You could even do false through tenons. It depends on how much of a project you really want this to be. And wow, if you're cutting all those through mortises by hand you'll really hate mortise and tenon joinery by the time you're done. How are you cutting the tenons?
|
|
#
¿
Mar 29, 2009 08:48
|
|