


|
On the topic of books, The Workbench Book by Scott Landis is my favorite. There are no plans nor measured drawings in that book, so you aren't going to just crack it open and build a bench. What I like about it is that it is just plain interesting to sit down and read (not dry as hell like most WW books) and also makes you really think about the type of workbench that works best for you. If there was ever a bench that was used to make sawdust, it is analyzed in detail in that book. Everything from the monster Shaker benches to luthier benches to boat building benches to the ultra utilitarian Japanese benches. He spent time working with them and working with the people that use them on a daily basis to be able to write his book from a first hand perspective.
|
 #
¿
May 21, 2008 17:18
#
¿
May 21, 2008 17:18
|
|


|

|
| # ¿ May 4, 2024 23:21 |
|
|
PMan_ posted:Tell me about jointing without a jointer or ability to use hand planes. I attempted to set-up my router table for jointing, using a straight bit and those Rockler router table fence shims, but the results were...shall we say "mixed" at best. I don't know if I need more practice, or just to go ahead and get a jointer. You can use a guide board to easily get an edge square to the face of a board with a hand plane. You make a sandwich with a guide board (2), a spacer, and your workpiece (1). As you are planing, hold the side of the plane (3) against the guide board. For jointing two boards to be glued up on the edges, there is a method using a router that I've never tried, but seems interesting. You basically lay the two boards side by side, then run the router right up the seam cutting both boards at the same time. You wouldn't even need a straightedge since any side to side movement would be mirrored and the two edges will match up perfectly.
|
|
#
¿
Apr 7, 2009 07:47
|
|
|
meatsneakers posted:To keep the cut square, you just need to clamp a straight piece of wood or metal square channel and make sure you measure properly to the router bits edge. Or use a flush cutting bit with a bearing and lay whatever you are using for a straightedge exactly on the cut line. You'd probably want to rough out the hole with a jig saw first, then use the router for the final trim cut.
|
|
#
¿
Apr 7, 2009 15:08
|
|
|
ChaoticSeven posted:What I ended up with for my table is the 7518 Porter Cable 3 HP and the Bench Dog cast iron lift. These two combined are loving beastly. I don't have a fancy cast iron lift, but I also use the 7518 in my little home built router table and I will agree - it is a loving beast.  Someday, I would like to build a real pretty router table like this one: Holy poo poo! wormil posted:Some woodworkers get so involved making stuff for their shop that they rarely make anything else. I'm kind of guilty of this. When I make things for the shop, I like them to be nice, so I don't have a problem with using nicer lumber and experimenting with different aesthetic techniques. I learn a lot this way and make my share of mistakes. Fortunately, the only person that sees those mistakes is me. A prime example would be this box I made to hold my screws. It's mostly walnut with curly maple trim, ziricote handles, and ebony splines in the corners. The finish is tinted shellac. The learning experience here is that a wide top made of two edge glued boards tends to bow quite a bit.   I don't remember what kind of a jig I cobbled together to hold that screw box at 45deg to route those splined miter cuts, but it must have been a lovely one. You can see some gaps (white areas) in there where the box moved while I was routing the slots. I decided to remedy this problem by building a good jig. This one is made from ash with cherry trim and finished with tinted shellac. As you turn the handle, the threaded rod moves in and out pressing on the triangular piece and acts as a vice to hold the box I am cutting in place. The triangle piece is cherry, but I added a bloodwood strip to act as sort of a strike plate because the acorn nut on the end of the threaded rod would have dented the hell out of the cherry when I tightened the "vice" down. You can see by the three (visible) plugged holes that don't seem to serve any purpose that I had plenty of learning opportunities on this one.  The face of the "vice" piece is claro walnut veneer with curly maple trim. I haven't made another box since then with splined miters, so I have never actually used this jig, but it was fun to build.  If you're a bit confused on what this jig is supposed to do, check this out. Skunkduster fucked around with this message at 00:42 on Apr 12, 2009 |
|
#
¿
Apr 12, 2009 00:35
|
|
|
wormil posted:The PC random orbital sander flew apart one day while my wife was using it but she tends to use extreme amounts of pressure on things (she deformed the steering wheel in my truck) so I don't know what the gently caress really happened. I didn't click the woodworking thread expecting a good laugh, but this certainly did it for me. Do you have a picture of that steering wheel?
|
|
#
¿
Apr 22, 2009 06:24
|
|
|
Jagtpanther posted:Liberon Shellac Flakes - Blonde Dewaxed 250g It's not a necessity, but you might consider getting a cheap hand blender to grind up those flakes prior to dissolving them. It doesn't make the shellac any better, but will make it dissolve a lot quicker.
|
|
#
¿
May 7, 2009 05:42
|
|
|
ChaoticSeven posted:Those look real nice. I can't tell from the pictures, but are the sides of the box square, or are they tapered like the lids? What is the lid in the quoted image made from? Very nice work!
|
|
#
¿
Jan 1, 2010 06:24
|
|

|
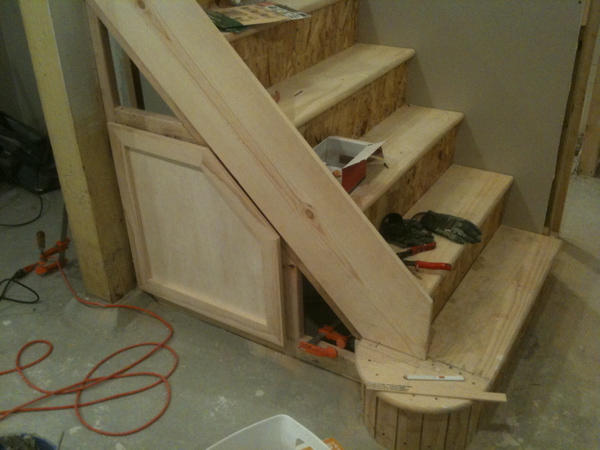
Bad Munki posted:Are you planning on installing that board over the stringers like that? It looks nice like that, but I'd be worried about people tripping over it when they take a right at the bottom of the steps. I agree with dv6speed on making your own router table. I made my own using two pieces of slick shelving face-glued together to make a very solid top, then just built an enclosed box base out of crappy plywood and included some little drawers to hold the collet wrenches, extra collets, and other accessories. The disadvantage is that it doesn't have the some of the features of a commercial base like a lift or a fancy fence. The advantages are that it cost about $10 total to build, is much quieter due to the enclosed base, and it does what I need it to. By just having one to use and get experience with, it gives me a much better idea what features I could use or don't need if I were to either build a fancy one or buy a commercial one somewhere down the road. ChaoticSeven posted:Other than those two little boxes, this is the first thing I've made with oak. I've always just written it off as uninteresting. I have to say it's now one of my favorite woods. I'm not much of a fan of oak, because, like you, I have always considered it a uninteresting wood. What made you change your mind?
|
|
#
¿
Jan 6, 2010 07:16
|
|
|
dyne posted:What are some of the woodworking forums are you guys going to? I've been reading a bit on the sawmillcreek forums. I used to read and enjoy the rec.woodworking newsgroup quite a bit. I say, "used to" not because it went downhill or anything, but because I got a new house a while back and haven't made much sawdust in the past few years. Some of the regulars there tend to be a bit opinionated and set in their ways, but they also tend to be extremely good at what they do and can be a fountain of extremely useful information. Just avoid using "cherry" and "stain" in the same post and that should keep you out of the deep poo poo ") When I first started visiting there, I asked some question or another about staining wood and got lit up by a guy named Larry Jaques. In a nutshell, he said, "Why would you stain one type of wood to look like another type when you could just use the other type in the first place? Wood is beautiful and smearing RBS all over it just hides that beauty." Like anybody else who has ever watched New Yankee Workshop, I just automatically assumed that the way to finish any woodworking project was to "stain and poly". Larry was a bit abrasive towards me, but I listened to him and bought Flexner's book, Understanding Wood Finishing and learned a lot from that. One thing I learned, and this is just my own perspective, is that pigment stain is a terrible idea unless you have a real good reason (matching, restoring) to use it. I learned to love shellac flakes and oils. I learned that RBS stood for "reddish brown poo poo". There was a guy named Tom Plamann that used to post there and his skills could put anybody to shame. I'm not sure what happened, but he took down his website and completely gave up woodworking to (please don't ban me for this because it is the truth) sell Mangosteen. I guess he isn't doing that anymore because now his site just goes to a list of mp3s. He'd talked about how he enjoyed making music on his computer, so I guess that is what he is up to now. Fortunately, his woodworking site has been archived. It is the religious equivalent of finding the Ark of the Covenant: http://web.archive.org/web/20060328020141/www.plamann.com/sys-tmpl/door/ After bringing Tom Plamann into the thread, I feel like I might as well be posting pictures of a used tampon, but I mentioned my $10 router table a few posts back and figured I'd post some pictures. Here she is in all her lovely plywood and spray paint glory.  I made some inserts in 1/4" diameter increments and keep them in the drawers. I mixed up some shellac and it left a stain.  This is the guts. A PC7518. I was kind of over excited when I got it, and did something unsafe that I probably shouldn't have, but I stuck a 3/4" straight bit in there and set the depth to 1.5" and ran a piece of 8/4 walnut through it. It cut through it like butter. In retrospect, I probably shouldn't have taken such a deep cut, but I let my excitement get the best of me.  This is the side view of the top and fence. The top is made from a chipped piece of shelving I got from Menard's for $4 or so. I cut it in half, rough sanded the adjoining faces, then glued them together with some hardcore 3M spray adhesive. My fence face looks all warped and twisted in this picture, but that is just from the camera. It is quite square. I hold it in place by clamping it to the edges of the table. I never said it was fancy or pretty. I just said it works. 
|
|
#
¿
Jan 6, 2010 21:23
|
|
|
Bad Munki posted:My notion is just to use a dado to make the massively overlapping rabbet. I'll just set the miter to 45�, position the fence so that the furthest right I can put the piece will make the inner-most cut, and work in towards that until my piece butts up against the fence. Is this correct? Your "massively overlapping rabbet" is actually called a "mitered half-lap". I'm not saying your method isn't correct, but if it were me, I'd go with one of these two methods instead. Here is an easy method to cutting them with a router: http://www.binkyswoodworking.com/MiteredHalfLap.html Here is a woodsmith video showing how to make a jig to get repeatable accuracy using just a regular table saw blade. One thing about that video to keep in mind is that your laps are going to be much larger than what they are cutting, so be careful in the placement of the screws of the jig. If you tried to use his jig to cut your laps, you'd run the blade right into one of the screws. http://www.woodsmith.com/issues/167/videos/mitered-half-lap-joints/
|
|
#
¿
Feb 2, 2010 08:55
|
|
|
WildFoxMedia posted:Ive never had luck using a circular saw in the past cause the cuts were so awful. But im thinking about picking up a set of Craftsman saw guides, or simply taking my 2' metal level and clamping that down and using that as a straight edge to make cuts. You don't need to buy any saw guides. You can make one yourself that is dead accurate very easily. Here is a front and top view of the guide. The dark brown piece is the fence your saw will ride against. Screw or glue it to some sort of sheet material (light brown in the drawing), then make a cut using the dark brown piece as a fence. That cutline is the purple line and the stuff to the right with the Xs all over it is waste material. That's all you need to do. Next time you need to make a cut with your circular saw, mark your line, then place the edge of your sheet stock (the purple line in the picture) right on that line and it will cut it exactly where you put it. It is one of the easiest jigs to make and is dead accurate as long as you are using the same blade to make your cuts that you used to make the jig. It also works great for routers. Skunkduster fucked around with this message at 18:33 on Feb 17, 2010 |
|
#
¿
Feb 17, 2010 18:24
|
|
|
Derek Dominoe posted:As far as I can tell, the plywood doesn't really serve a vital structural function; is there any reason I need to keep hunting for fir or will pine be acceptable? Spruce, pine, and fir are all pretty much identical. You'll be fine using any of them. Blckbuster posted:thank you, I found that one and also this article when looking today He is referring to the alignment pins. I'd guess he recommends against pounding them in because you might have a heck of a time getting them back out. For the actual wooden pegs, the diagram on page 2 says to hammer them in. Skunkduster fucked around with this message at 08:35 on Mar 1, 2010 |
|
#
¿
Mar 1, 2010 08:28
|
|
|
nobody- posted:Are there any special jigs or techniques used to get the edges of a piece of wood perpendicular to its face, or is it just something you get a feel for through trial and error? You don't need any special jigs to get an edge perpendicular to the face. Just a couple boards with parallel faces and a couple clamps. From way back on page 10: SkunkDuster posted:You can use a guide board to easily get an edge square to the face of a board with a hand plane. You make a sandwich with a guide board (2), a spacer, and your workpiece (1). As you are planing, hold the side of the plane (3) against the guide board.
|
|
#
¿
Mar 3, 2010 04:05
|
|
|
wormil posted:This is why I frequently recommend dye instead of stain, you avoid splotching and other common problems. I don't mean to come across like I am disagreeing with you, as you certainly seem to know your stuff, but I take an even harder stance in that I pretty much shun pigment stain altogether. I just don't understand the logic in building something out of pine then smearing it with "classic heritage walnut stain" when you could have just built whatever it was out of walnut in the first place and finished it with shellac, oil, varnish, or something along those lines. Any wood (even pine) is quite beautiful on its own. It doesn't need any help from stain. It just seems like there is this unwritten rule that the only way to finish a woodworking project is "STAIN AND POLY". I love Norm just as much as the next guy, but I have the feeling that stain and poly mentality came from New Yankee Workshop. I didn't mean for this whole post to be a lead in to an advertisement, but it was Flexner's book "Understanding Wood Finishing" that really opened my eyes and showed me that there are a heck of a lot of alternatives to "STAIN AND POLY". Shellac is where its at
|
|
#
¿
Mar 8, 2010 17:35
|
|
|
wormil posted:There are woods like poplar, maple, mahogany and birch that can be enriched with stains or dyes. I actually used a red mahogany stain on my mahogany table because I wanted a deeper, richer color. I think the most common use for stain/dye among hobbyists is to simulate patina or just darken the wood. That's why I'm a such sucker for shellac. With all the tints availabale, it can really deepen and enrich the color without messing up the natural grain. wormil posted:Dye also comes in non-wood colors -- red, blue, green, black. I have no gripe with dyes. My whole rant was against pigment stains. I have some maple burl offcuts that I have tried various (non dye) finishes on and none of them looked good. I've never used dyes, but I have no doubt that they would be the way to go for something like that. There are also a lot of guitars out there made from figured woods that look absolutely beautiful in their unnatural dyed colors. wormil posted:Stain and dyes have been around for a long time, far longer than New Yankee Workshop. Of course you are right. I was referring more to the mentality of, "I just built this piece of furniture, now I am going to stain and poly it because that is what you do with wood". That's where the NYW influence comes in. I used to think that way, too, because I thought that just how it was done and had no idea that there were other ways you could finish wood. I didn't have a clue about shellac, oils, varnish, or any other finishing method other than stain and poly. So that was just they way it was done. wormil posted:And yeah, I love shellac also but I made the mistake of using it on end tables. Not a good idea when you have a sloppy drunk relative. You speak the truth. As wonderful as shellac is, it does have some serious drawbacks in certain situations. I'll concede that sometimes poly is the way to go, but STAIN IS WRONG AND IF YOU ARE PUTTING STAIN ON YOUR PROJECT THEN YOU ARE WRONG BECAUSE MY WAY IS THE ONLY RIGHT WAY
|
|
#
¿
Mar 8, 2010 20:02
|
|
|
GEMorris posted:I pretty much hate Nahm and how he helped turn woodworking from a craft into a gimmicky sales pitch for more gimmicky and poorly constructed power tools the viewers did not really need. Are you saying that I don't need to fire a thousand brads into my project to hold it together until the glue dries? I need to rethink my whole philosophy now. I never caught many episodes of Woodwright's Shop, but when I did, I always liked that show. Roy would come out and say "Today, we are going to make a rolltop desk using an axe and a spokeshave" and, sure enough, 30 minutes later, he would have a rolltop desk he made using an axe and a spokeshave. Okay, that was a bit of an exaggeration, but it was pretty cool to watch him work.
|
|
#
¿
Mar 9, 2010 06:12
|
|
|
FidgetyRat posted:The first challenge is dealing with a few small knots. 2 are hollow about half-inch in diameter and need to be filled. The other few are slightly larger solid. My first idea was to drill out all the knots and replace their core with a circle of non-knotty pine. How do you plan to make these circles of non-knotty pine? You didn't mention what tools you have available. Since it is being painted, I would drill them out then either use a hole saw to make plugs (keeping the orientation of the plug grain the same as the board), or make the plugs out of a piece of dowel. For the larger knots, I would think you could just pry out any loose lovely parts of the knot that look like they might eventually fall out, then just fill it with wood filler. Another option I have seen people use (but haven't tried myself) is to fill the voids with super glue or epoxy. FidgetyRat posted:Second, I know pine has a tendency to cup-up a bit. Any advise to keep the ledge level once its mounted in place? Unless it is quarter sawn, it is going to cup to some extent. Cupping is a result of moisture exchange causing the wood to swell and shrink unevenly depending on the humidity. If the humidity in the room is fairly consistent year round, I wouldn't worry about it much. wormil posted:I met Roy at the state fair a couple of years ago and I really wanted to spend more time talking to him but he seemed to be in extreme pain. His face was distorted into an ugly grimace and he seemed very uncomfortable so I had mercy and decided to leave him alone. That makes me sad to hear. I hope it was just a temporary condition. He always seemed so energetic and had such a passion for his work.
|
|
#
¿
Mar 9, 2010 16:01
|
|
|
FidgetyRat posted:I'm hoping that a mixture of having all sides of the board primed and painted will prevent too much moisture exchange. Here I go again tooting the merits of shellac again, but I would recommend it as an undercoat if you are concerned about cupping. It is one of the best finishes for blocking water vapor exchange. You mentioned that you live in a mild climate though, so that might be overkill. You can get pick up a can or spray bottle of Zinsser shellac at any hardware store for under $10. It might not make any difference at all, but for the price, I'd do it just to be more on the "safe" side than the "sorry" side. FidgetyRat posted:I have the entire front of the board that can be nailed down to the stud below and 3 4" sections in the back. I think you meant to say "screwed down" FidgetyRat posted:I believe the boards are quarter sawn if the image I found is accurate. It had a bit of a U shape from the store to begin with. This isn't real pretty, but I made up a quick image. If you look at the end grain of the board and it looks like the top image, then it is quartersawn. If it looks like the middle image, then it is a regular board, which is fine. If it looks like the bottom image, it is firewood.
|
|
#
¿
Mar 9, 2010 18:02
|
|
|
Bad Munki posted:Don't people often use the cores for lathing? I mean, in most projects, yeah firewood, but that's not always true...one man's trash, and all that. I haven't done any work on a lathe since a brief semester in high school, so I can't say. I just made that firewood image up in reference to his 9.5" wide shelf. If you try to make a wide shelf out of a board like that it would be an exercise in long term regret.
|
|
#
¿
Mar 9, 2010 19:17
|
|
|
teknicolor posted:holy poo poo that is loving sexy, what wood is that? You took the words right out of my mouth. That is loving beautiful. Barn Owl posted:You'll have to make th piece between the rails out of a wide board. I'm not sure a planer would be all that easy going cross grained. I think you would end up with an exploded piece. Can you get an outfeed support for a t-rex? Instead of making it wider to match the grain direction, you could also just make it shorter so it doesn't contact the planer blades at all. Skunkduster fucked around with this message at 05:23 on Mar 12, 2010 |
|
#
¿
Mar 12, 2010 04:21
|
|
|
PipeRifle posted:Where, in short, do I start? I'd say with about 99% certainty that it is solid wood, but to be sure, you'd have to look at the end grain (the right and left edges of the desktop). Also take a look at that broken area on the bottom drawer. It will be pretty obvious whether it is veneer or solid wood. You'd start by determining what type of finish is currently on there. My first guess would be shellac over unstained cherry. Except for that leg. See how it is all blotchy? That's what happens when you try to use a pigment stain on cherry. I'm imagining the original builder smeared stain all over the leg, stood back and said "Whoa, this looks like poo poo. I think I should stop here and do some research before I gently caress the whole thing up." Then, he got himself some shellac and laid that down on the bare wood and ended up with a fine looking desk. You can find out if it is shellac by applying some denatured alchohol to an area and see if it dissolves the finish. If so, then it is shellac. If you want to do this RIGHT NOW in the middle of the night and don't have any denatured alchohol handy, you can go into your hooch cabinet and grab some 151 Bacardi or whatever the strongest stuff you have and try that. I've only used shellac on new construction and haven't done any refinishing, so maybe a somebody that actually knows something about refinishing will chime in and tell me I am completely wrong here, but the steps I would take if this were my desk would be like this. 1. Is it shellac? Yes. Go to step 2. No. Build a new desk. 2. Give it a thorough cleaning in a well ventilated area using mineral spirits or naphtha (both available in gallon jugs for a few bucks at any hardware store). I stress the "ventilated area" part because those solvents can get you high as hell and you won't even realize it until you stand up and try to take a few steps, then you will fell like poo poo have a pounding headache the next day. I learned that one from experience  3. Smooth out deep gouges and scrapes using 150-220 grit paper. You don't need to remove the existing coat of shellac because the new coats will bond with the existing coats and become one with each other. 4. Get some shellac flakes and denatured alcohol. I'd go with dewaxed orange from http://shellac.net/ShellacPricing.html. Then mix it up to a 2lb cut using this chart http://shellac.net/PoundCutChart.html. 5. Apply thin coats until it looks nice and uniform. 6. Present it to your ladyfriend and tell her not to spill any perfume or booze on it. Shellac can also be damaged from heat, so keep the hot crimpers and curling irons off of it as well. If water stays in contact with it for a while, it can form white splotchy areas (like the ring on your desk), so she should use a coaster if she is going to have drinks on the desk. I'm don't have my reference books with me right now, but I'm pretty sure shellac is impervious to acetone, so spilling nail polish remover on it shouldn't be a problem. Like I said, that's how I would go about refinishing it, but I am far from an expert at refinishing. Also, don't just print off my post and go to town. Take some time to do your own research on the web for information regarding refinishing and applying new finishes. Skunkduster fucked around with this message at 05:59 on Mar 23, 2010 |
|
#
¿
Mar 23, 2010 05:54
|
|
|
PipeRifle posted:Is there a way I could get this to a nice rich cherry or mahogany color from where it is now, without sanding down to bare wood and starting over? I'm pretty sure I know what color you are looking for, but despite what these mass producing furniture outlets advertise, neither cherry nor mahogany is that dark ruby red color unless you stain* it. Cherry is more of a light brownish pink and mahogany is more like a brownish orange. *By stain, I mean a dye stain (which you aren't going to find at your local hardware store). I haven't used dye stains, but they would seem to be the way to go to get what you want. I would strongly recommend against using a pigment stain (the poo poo you get from a hardware store). Cherry absorbs pigment stain unevenly and leads to a lot of blotching. Look at that leg and you'll see what I mean. It doesn't look that bad on the leg because it is a narrow piece with lots of detail, but if it was on the flat top that is made up from several different boards, it will look like hell. PipeRifle posted:I like the Ruby shellac on that site you listed, looks like it might mix with the orangey tones on there now and produce something interesting. Or terrible. We'll see! Also, I think I might see if I can find someone to cut me a custom glass top because wet things, perfume, other liquids and hot things like curling irons are EXACTLY what will be going on this. A glass top would be a fantastic idea. Shellac is a wonderful finish, but it certainly does have its weaknesses. You can certainly apply the ruby over the orange if you want to go that route. I normally use several different tints of shellac. For example, I'll get an idea in my head of how I want it tinted, then lay down that color. From there, I might use garnet, orange, yellow, or super blond for subsequent layers to slowly tint it to where I want it. "This looks kind of washed out...needs more vibrancy" (grab the orange)" . "Nice, but it could be a little darker" (grab the garnet). "The color is perfect, but it could still use a few more coats" (grab the super blond). PipeRifle posted:I see what the crucial missing element was in all of my searching, and I get your post now. I was thinking "SAND IT DOWN" could be step one, but I realize I need to strip first and then sand to prep for re-whatevering. I'll get some mineral spirits and a tiny bit of lacquer remover just in case and see which one softens 'er up better. From the ease at which a coffee cup can leave a white ring, I'm thinking it's currently sporting a thin coat of unsealed shellac, so it should be pretty easy to strip. No no no...you missed the point. You don't need to strip the old shellac off and sanding should only be used to smooth out the deep gouges. The beauty of shellac is that you do not need to strip off all the old stuff to add the new stuff. You want to avoid sanding as much as possible because A it sucks and B you will round over all the details. I've never stripped shellac on a large scale project like this, but I don't think it is just a matter of wiping it down with alcohol, then wiping it off and being done in an hour or two. If you are planning on staining (dye stain) it that ruby red color, you need to remove every trace of the existing finish off and take it down to the bare wood. Any existing finish that is on the desk will completely block the absorption of the stain and will end up being bright pinkish tan streaks and splotches in the middle of your deep ruby red. Since you want to change the color, there is an extra step I would add. Once you get it cleaned up with the mineral spirits, sand down the really bad spots. This will leave patches of bare wood. If you lay down the ruby shellac over that, it will be a different color over the bare wood than it will be over the existing orange shellac. So, what you do is use some orange shellac to cover the bare spots and blend in the edges with the existing shellac until you get a fairly even color, then start in with the ruby to tint it to that dark red shade that you are after. If it the color that I am thinking of, you aren't going to get it from shellac alone and will have to go with a dye stain. This will require that you completely remove every trace of shellac on the desk and get it down to the bare wood with a lot of sanding which will add a HUGE amount of work. Look at the profiles around the edge of the drawers and top and think about how much detail effort it would take to sand that to get it to the bare wood without rounding over those sharp edges. For what that would take, I'd rather just build a new desk from scratch. Like I said though, that's just how I'd go about it based on what I know from applying shellac to new projects. Hopefully, somebody with a lot more experience in refinishing will chime in here so it isn't a matter of the almost blind leading the blind. PipeRifle posted:I'll get some mineral spirits and a tiny bit of lacquer remover just in case and see which one softens 'er up better. Mineral spirits won't affect the shellac at all. That is what you use to clean the grime off. I believe lacquer remover will soften it, but am not sure. What you want to use dissolve shellac is denatured alcohol. Everything I've posted is based on the assumption that your existing finish is shellac. Based on the scratches, I'm pretty sure that it isn't an oil finish, so we can rule those out. If it is varnish or lacquer, I have no clue what to tell you. Skunkduster fucked around with this message at 19:10 on Mar 23, 2010 |
|
#
¿
Mar 23, 2010 18:14
|
|
|
Bad Munki posted:Try cherry. The last time I bought black walnut, it was about 20 cents a board foot thanks to a portable sawmill and a friend who wanted to get rid of some black walnut trees from his farm.  Needless to say, I picked up a shitload of it. I'm thinking my next big project will be a nice woodworking bench with a 4" thick solid walnut top. gently caress yeah! As for real world prices, we don't live too far apart, so my prices are probably similar to yours. I'd normally go to Vetsch Hardoods in Rochester (because they are close), but I haven't bought any wood in a few years so I'm not sure how much they are currently charging and they don't have a price list online. I have been to Root River Hardwoods in Preston MN, which isn't far from the MN/IA border. It is a great place, but kind of a long drive for me. You can pick through the piles to your heart's content. Anyway, their prices are pretty similar to Vetsch. All prices are 4/4 per board foot. quartersawn #1 red oak: 3.35 quartersawn S&B red oak: 4.40 bf (rift sawn is the same price...that seems odd) #1 walnut: 2.95 S&B walnut: 5.20 S&B Ash: 2.45 #1 and better Birdseye maple: 7.20 (so expensive, but so beautiful) S&B white hard maple: 3.40 (No prices for curly maple. If I remember right, Vetsch charged about 5.00bf for curly.) S&B cherry: 4.45 #1 cherry: 2.45 (I picked out a couple of spalted cherry boards and a couple of mildly curly boards from the pile - it all costs the same) Aromatic red cedar: 2.40 They have a lot more types of wood available as well as turning blocks, but dat is a fair to middlin' idea for da prices we pay up here in da great nort woods, you betcha. Looking at their "overstock" prices on kiln dried lumber is kind of tempting me to hop in the truck and go for a drive. MarshallX posted:God. drat. Ash might be an alternative worth considering. It is the stuff they make rake handles and baseball bats out of, so it holds up pretty well to wear and tear. From the price list above, cedar is a bit cheaper around here, but ash might be a cheaper alternative in your area. Skunkduster fucked around with this message at 19:22 on Mar 23, 2010 |
|
#
¿
Mar 23, 2010 19:02
|
|

|
I have a Grizzly G1148 15" bandsaw, but I don't have any experience with any other bandsaws. I guess I could tell you what I know about that particular model, but if you wanted to know how it compares to a similar Delta or Jet saw, I don't have the experience to give a well informed opinion. Edit: To be honest, I don't really use it that much, so my bandsaw expertise is overall pretty low. It seems like a solidly built machine and I haven't had any mechanical problems with it at all. I certainly don't have anything bad to say about it and wouldn't be inclined to tell people to avoid Grizzly tools. Skunkduster fucked around with this message at 17:10 on Mar 24, 2010 |
|
#
¿
Mar 24, 2010 16:58
|
|
|
wormil posted:Glob some stripper on there, scrape off the finish, sand, dye or stain, then finish with a spray lacquer or wipe on poly. Does staining after stripping work pretty well with lacquer? I've never used it. If it was shellac, the alcohol wouldn't exactly "strip" it, but "thin" it. You know my thoughts on stain so, needless to say, I have no experience. I'm just wondering if you can completely strip off a lacquer finish using solvents. In the scenario in my head, I'm imagining the result of stripping shellac would leave behind some shellac over the entire surface. Once it is "stripped", it would look good, but there would still be a lot of variance in the amount of shellac left on the surface which would have a huge impact on stain absorption. I guess I'm asking if you have ever tried stripping shellac and what your results were, and the same for lacquer.
|
|
#
¿
Mar 24, 2010 17:25
|
|
|
ChaoticSeven posted:Ahem. I'm assuming your drill press is not shown in this picture? I mean, you do have a drill press, right?
|
|
#
¿
Mar 24, 2010 18:19
|
|

|
Drill presses don't have a very large footprint and are amazingly useful. I wouldn't just count it out as an option.
|
|
#
¿
Mar 27, 2010 09:48
|
|
|
mincedgreen posted:1290 long, 185 wide and 870 tall. I wouldn't laugh at you, but I would ask to see some pictures of this aircraft hanger you call a kitchen  Seriously though, I believe I have a pretty good mental picture of what you want built and it seems like a pretty straightforward job for any cabinet shop. Nothing at all about it would be unusual or get you laughed at. It would be about as funny as taking your car to a mechanic and asking him to change your spark plugs. Which would not be funny at all, unless you drove a diesel. Then the mechanic would probably laugh you out of his shop. That was a bad analogy.
|
|
#
¿
Apr 6, 2010 10:00
|
|
|
PipeRifle posted:Still, now I have a lot of stuff left over that I can use on some other project! Well, don't keep us in suspense. Was it originally coated in shellac, varnish, or lacquer?
|
|
#
¿
Apr 7, 2010 16:39
|
|
|
Bad Munki posted:Sawzall: Pshaw "Sawzall" indeed. That there is a reciprocating saw. I bet you are one of those people that call a tongue and groove pliers a "channel lock" aren't you. Why I bet you even call a locking pliers a "vice grips" don't you, you jaw dragging plebeian? Oh, don't even get me started on needle nosed pliers. 
|
|
#
¿
Apr 8, 2010 19:02
|
|

|
After I hit "post" I thought about it a bit and both of those saws are technically reciprocating saws. I just hoped nobody would call me on it. I'm busted I was digging through some boxes of woodworking stuff a couple days ago and found this router base for cutting circles I made about 6-8 years ago. I think the last time I used it was about a week after I made it, so I had a moment of "what the hell is this thing?" when I pulled it out of the box. After a few seconds, I remembered what it was, but I was stumped on why I installed those two screws. I mean really stumped. I kind of set it aside (because I don't need to cut any circles at the moment), but kept it in mind. This morning, I looked at it again. I had my router in my lap and the jig in my hand and spent a good 5-10 minutes looking at it wondering what purpose two screws served. I built the damned thing, so I must have had a good reason for it, but for the life of me, they only seemed like they would get in the way. Then it hit me and I remembered exactly why they were there and they are there for a very good reason. Just for fun, I'll toss it out to see if you guys can figure out why I drilled and threaded those two holes and installed screws in them. The holes and threading go all the way through the plate, but that doesn't matter at all. They could only be drilled and tapped halfway though and still do the job they are intended to do. Skunkduster fucked around with this message at 19:46 on Apr 8, 2010 |
|
#
¿
Apr 8, 2010 19:29
|
|
|
Here is another view. It may not seem like it is much different, but it shows something that the first picture doesn't.
|
|
#
¿
Apr 8, 2010 19:39
|
|
|
Bad Munki posted:I don't know, but you said you built that part yourself? How did you go about cutting it? Are you still set up to manufacture such parts? I don't really remember all the steps. I'd guess I cut it sqaure to the length/width on the radical harm saw for the first step. I had a circle cutting jig made out of 1/4 birch ply, so I probably used that to round it off after rough cutting it with the bandsaw or reciprocating scroll saw. After that, it was just a matter of cutting the grooves and I probably did those on the router table. Then I drilled the holes and tapped them as an afterthought. I think the peg is just a nail that I cut off and smoothed with a bench grinder and sandpaper. I have some extra polycarbonate here that I bought specifically to make router bases. When you stop over to resaw that wood, maybe we can take some extra time and make a couple custom router bases as well. Edit: Looking closer at it, I probably didn't use my plywood circle cutting jig. It doesn't matter at all what shape the ends are, so I probably just used a compass to draw an arc and cut it close to the line with the scroll saw, then followed it up a belt sander to smooth it off. Skunkduster fucked around with this message at 19:59 on Apr 8, 2010 |
|
#
¿
Apr 8, 2010 19:54
|
|
|
Bad Munki posted:As opposed to some other kind of scroll saw? I guess if you had a tiny little band saw, it could be a non-reciprocating scroll saw.
|
|
#
¿
Apr 8, 2010 20:02
|
|
|
Bad Munki posted:I guess... If you do make it up here, you are going to be sorely disappointed with the temporary shop I have set up in my basement. Instead of laser robots, it is more like "Okay, set the planer over there on the floor and bring over the router table. No, put it on the left side of the bench, the cord doesn't reach when it is way over there. Don't unplug that one! That's for the droplight I have hanging from the ceiling vent so I can see what the hell I am doing. Yeah, unplug the bench grinder and plug it in there". I'm headed to bed soon (third shift worker), I'm figuring on later tonight or early tomorrow morning if nobody has guessed it. Skunkduster fucked around with this message at 20:16 on Apr 8, 2010 |
|
#
¿
Apr 8, 2010 20:13
|
|

")
|
A followup to that router base plate. The screws that come with the router to hold the factory base on are flathead screws that are countersunk into the base. For the circle cutting base, I needed to use roundhead screws and washers to mount it to the router. The purpose of the two tapped holes in the base is so I can have a place to keep the screws so I don't lose them.PipeRifle posted:Quick question: is there a trick to using paste wax? Right now I'm just rubbing my cloth (old t-shirt) along the top of the can until it builds up a bit, then gently rubbing it on the top of my desk. I read that "if you can see ridges, there's too much on", so I smooth it out until it's nice and even, I guess. You've never been in the army, have you? I don't really believe you can apply too much as you need to build up a thick finish to get a good shine. Scoop out a big blob of wax and smear it all over. It should turn clear and more liquidy as you rub it in. Don't worry about ridges because they will polish out very easily. Let that harden up for a couple hours, then go back in with a clean soft rag and polish out with a fair amount of pressure. Repeat the whole process a couple more times until all the grain is filled and you have a nice smooth surface then hit it with a car buffer to polish it up to a glassy finish. Pretty much everything GEMorris said, but I wanted to emphasize that you should be applying a LOT of wax with each coat. The way you are doing it will work eventually, but it will take forever and a day. Skunkduster fucked around with this message at 02:11 on Apr 10, 2010 |
|
#
¿
Apr 10, 2010 01:43
|
|
|
Boogabu posted:I got my copy of The Complete Woodworker's Companion by Roger Holmes in the mail the other day, and I feel pretty retarded. I also learned that there is a TON of vocabulary I'm completely oblivious to. Some I can get out of contextual clues like dadoes, and some I just sit there scratching my head until I cave and google it. I felt like I needed to calmly put the book down and find a class first. (It probably wouldn't have hurt.) I think that there are two "must have" woodworking books. One of them is The Complete Illustrated Guide to Joinery. This book is awesome because it covers pretty much every type of joint imaginable and shows several methods to create each joint depending on the tool you are using. I'd recommend that you pick this one up and refer to it when you come across an unfamiliar term instead of going to Google. Joinery is the core foundation of woodworking and I have not read a book that covers it better than this one. The other "must have" book is Flexner's Understanding Wood Finishing: How to Select and Apply the Right Finish. wormil posted:Speaking of books, anyone have a recommendation for more advanced kitchen cabinet building? My wife wants new cabinets and I'd like to add a few features beyond drawers and shelves. What features are you thinking of? Aside from making a lazy susan or a pull out cutting board, I can't really think of much you could add to kitchen cabinets.
|
|
#
¿
Apr 10, 2010 08:17
|
|
|
Boogabu posted:I think there's something about necessary maintenance, but they don't want people running shops out of their garage - kinda like I want to. :P You could use a bandsaw to rip it then clean up the edge with a plane. The only other quiet power tool I can think of is a drill press, but I'm fresh out of ideas on how to rip a board with one of those.
|
|
#
¿
Apr 27, 2010 11:55
|
|
|
Bad Munki posted:Anyone know of a good source for brass inlay? All I'm finding are, say, inlay guides made of brass. If you just want to do straight lines, ACE Hardware carries brass U channels (and maybe straight strips too). I picked up some 3/16" and 1/4" channels years back, then went to a lapidary and got a bag full of various different colored stones and some clear jeweler's epoxy. The plan was to smash the rocks up into tiny chips, then fill the U channel with the rock chips and epoxy, then inlay the whole works as a stripe going around a box that would look like this from the side: WOOD WOOD WOOD WOOD ==================== Brass strip ROCK ROCK ROCK ROCK ==================== WOOD WOOD WOOD WOOD If they don't have brass strips, you could just use a U Channel and flip it up side down. You're also going to want to make sure you have a straight router bit that matches the width of the inlay. Also, what is going on in your avatar? It looks like some science beaker that bubbles or something.
|
|
#
¿
May 18, 2010 06:13
|
|
|

|
| # ¿ May 4, 2024 23:21 |
|
|
Bad Munki posted:I was hoping to just have a 1/8" rounded-over strip between a couple pieces of wood, just as a highlight, so u-channel won't work for that unfortunately. I did some googling around, and I found brass inlay strips, bu it looks like they're all for going in flush, which isn't quite what I wanted. I guess my other option would just be to use wood inlay, which would be neat looking as well, I'm sure. Whichever way you go, you are still going to have to figure out how to round over the edges. I can't remember if you said if you had a router table, but if you do, you could get a 1/16" roundover bit and do it that way. I'm not positive, but I don't think that carbide bits have any qualms about cutting brass. For cutting the channels, I posted a simple jig earlier in the thread that will make dead accurate cuts if you are routing them by hand. Or you could use a router table, table saw, radical harm saw, or a grapefruit spoon. It's just another option. When using this jig with a router, it is important to not pivot the router because the center of the bit may not be an equal distance to every point along the edge of the base. Better off to just make a square base. Don't you wish you could just designate the area to be channeled out? On the subject of square bases, there was a neat idea I read in some book or magazine, but haven't built yet. The gist of it was that, depending on which straight bit you used, each corresponding edge would be a set distance from the center of the bit. Like, one edge would be exactly 4 1/8" from the center, so if you used a 1/4" bit, the edge would be exactly 4" from the edge of the bit. Another edge would be 4 1/4" from the center of the bit which would put it exactly 4" away from the edge when you chucked up a 1/2" bit. The other two edges could be cut to match up to 1/8, 3/8, 3/4, or whatever bits you use to cut dados and channels for inlays. If you built the base accurately enough, you could use a guide like I linked above and get dead on dados for four different bits by using one base and one jig. Bad Munki posted:The avatar is an airlock used during fermentation by homebrewers; there's a thread so check it out if you want to join in the fun. I am a cheap redneck that singlehandedly kept Anheuser Busch in business during the recession by my consumption of Busch Light. You can keep your hoity toity science projects far away from my piss water. Skunkduster fucked around with this message at 16:14 on May 18, 2010 |
|
#
¿
May 18, 2010 15:54
|
|