


|
I suppose this would go here. Not 100% CG, but this was an experiment in motion tracking, and fake environment reflections using a big panoramic picture I created from the front of my house. http://www.vimeo.com/1395386 Here's some images to play with if someone wants to give a go at multi pass compositing. I use After Effects, but it should be straight forward on any compositing software. Background:  Click here for the full 1440x810 image. Shadow (I don't know whats up with the white specs around where the wheels should be):  Click here for the full 1440x810 image. Diffuse:  Click here for the full 1440x810 image. Ambient Occlusion:  Click here for the full 1440x810 image. Reflection:  Click here for the full 1440x810 image. Reflection layer is a bit tricky. Make the reflection layer it's own composition with this layer and a copy of the diffuse layer below it. Set the blending mode on the reflection layer to "difference". This will cancel out anything that's the same from the diffuse pass, leaving only the reflection. Drop this in the main composition over top the background, shadow, diffuse, and ambient occlusion layer. I am new to 3D Studio Max, and have only really focused on rendering because my primary interest is adding CG to live action. I downloaded the car models from a site I found. If anybody is interested I'll look for the link.
|
 #
¿
Jul 23, 2008 19:34
#
¿
Jul 23, 2008 19:34
|
|


|

|
| # ¿ May 3, 2024 20:49 |
|
|
PowerLlama posted:
This is bad rear end. What kind of work? Compositing, CG??? I'm really excited to see the new season start. Also, with my car post up there, I assumed people would be combining the images in After Effects because that is what I did the video in, obviously since I posted still images people would jump to photoshop. I tried combining the images I posted in photoshop and I just don't get the same results After Effects gave me. Lesson learned, I guess Coke truly is better...
|
|
#
¿
Jul 25, 2008 20:58
|
|
|
1. This is the reflection precomp. (Just a fancy word for a composition that will be nested in another composition) Click here for the full image. 2. Change the reflection layer blending mode.  Click here for the full image. 3. Afterwards put the precomp in your main composition, and change it's blending mode to Add. Afterwards you can tweak the reflection layer's opacity and change the intensity of the reflection.  Click here for the full image.
|
|
#
¿
Jul 26, 2008 05:38
|
|
|
BonoMan posted:Just a quick note...the thick black lines on your texture absolutely destroy the work. They completely ruin it. Do you mean the thick black lines on the hood/headlights of the car, etc? or the outlines from the matting/motion blue or the CG car? The lighter outline of the CG itself can be taken away with settings, but if you were commenting on the model itself, yeah it's pretty basic. You're absolutely right as well, the shadow SHOULD be darker where the wheels touch the ground. Time to play around some more, once again thanks, I didn't even notice that before and now I can't stop noticing. Fake edit: I actually didn't model this car FYI, I found it online. I just match moved it, positioned it, and added a fake environment reflection that I made out of a big 360 degree picture I took out front of my house. bring back old gbs fucked around with this message at 16:14 on Jul 26, 2008 |
|
#
¿
Jul 26, 2008 16:12
|
|
|
^^ 3D Studio Max using VRay to render.I find it easier to render in passes with Mental Ray, but it just takes way too long to render image sequences with it.
|
|
#
¿
Jul 27, 2008 06:16
|
|
|
spottedfeces posted:Another shot: THe last two images you've posted are great, 100% improvement over previous renders. What are the trees in the background if you don't mind telling. Transparent images on a 2d plane, or are they CG trees? I've improved on my car match moving, I now own a shiny white Nissan 350z http://vimeo.com/1472198
|
|
#
¿
Aug 24, 2008 17:45
|
|
|
Alan Smithee posted:I'd be interested in seeing what links you've used, I'm trying to get into 3D for the same reasons and would love to see how you learned your pipeline http://artist-3d.com/free_3d_models/04vehicles_design.php Is a great site, and has some pretty high quality models for free. Nothing close to the quality you'd get buying a model for $100 or so but they do the trick for me. They've also got weapons, buildings, etc. Not just vehicles. http://www.turbosquid.com/Search/Index.cfm/FuseAction/ProcessSmartSearch/intMediaType/2/stgType/Free Is another site for free models. The site has models that are for sale as well. Their free models are mostly low quality. Not realistic enough to put in a real scene anyways. The biggest tip I can give you is learn to render in passes with whatever software you chose to use. I know 3Ds Max, but I wish I started on Maya because it seems to be more TV/Film oriented. Also research and learn how to do an Ambient Occlusion pass. It isn't very hard, but takes some time to render and adds tons of realism to your project. EDIT: About the render passes: I use a Diffuse pass for the basic colour of the object, a shadow pass for some depth, reflection pass takes care of realistic reflections, and the Ambient Occlusion pass adds some lifelike qualities to all the shaded areas. Go a few pages back, I posted still images from each of my render passes with a BMW car in my driveway. bring back old gbs fucked around with this message at 16:07 on Aug 29, 2008 |
|
#
¿
Aug 29, 2008 04:29
|
|
|
I got into 3D to do VFX. So far I haven't advanced very far past matchmoving, HDRI maps, and rendering but I started with 3Ds Max. I played with the Maya personal learning edition (Free on their site) and didn't like the interface. I went on to try 3Ds Max and found I could just jump in and do things easier. I'd recomend a Lynda.com or Digitaltutors.com DVD set, they're totally worth it. Get one that runs you through the basics of whichever software you plan on using. Like Sigma 6 said, sue the right tools for the right job, but don't think that there are tools that are completely wrong for any job. If you can troubleshoot and know your software there won't be any limits with whatever you chose.
|
|
#
¿
Sep 29, 2008 15:15
|
|
|
PowerLlama posted:My first commercial is up on youtube! I did roto on this mofo back in June. I've seen that on TV, great work! So does that mean the car was not CG? Or did you roto a CG car? I only ask because I remember making a comment in my head about how the car looked pretty decent for something that never existed.
|
|
#
¿
Oct 6, 2008 12:08
|
|
|
Cornlight posted:I am just using 3dsmax. I've got a similar question involving a pop can in 3Ds Max. My can is already made, but I'm trying to animate it crushing. I've converted it to an editable mesh, or polygon (I'm at work and can't check right now) . I have auto key enabled, which perfectly keyframes the actual movements of the pop can (Lifting and rotating) My problem is I want to animate the mesh points because I'm moving them to crush the can. The mesh points don't seem to be reacting to me setting keyframes for them though. What can I do to animate the deformation of this shape? I want to push some parts in, pull others out, squish it's height, and basically go from a full pop can to one that looks as it if were crushed in someones hand.
|
|
#
¿
Nov 14, 2008 14:38
|
|

|
Handiklap posted:A stack with Edit Mesh at the top can't have animated subobjects, so I'd assume that the Editable Mesh object is restricted this way too. Edit Poly (and Editable Poly objects) can have animated subobjects, though using morph targets would be a bit easier to control than keyframes for individual vertices and such. This is great, hopefully I can get this working correctly today. Thanks for the help. http://update.multiverse.net/wiki/index.php/Creating_Morph_Animations_with_3ds_Max I found this article relating to using Morph, but do you know of anything else I might like to read about the topic?
|
|
#
¿
Nov 14, 2008 16:29
|
|
|
Odddzy posted:I'm actually in the same program she is! seems like she finished already though and I have no idea how I could help here. If there is anything you would like me to ask be done (if it's reasonable) I could look it out. I could go and see the program coordinator but if she's gone from school I believe it won't be of use much. There are an assload of Goons currently on the search for this person, I'm sure any help you could provide would be appreciated by Melee Beats, who she scammed for $2000.
|
|
#
¿
Jan 2, 2009 22:03
|
|
")
|
cubicle gangster posted:Syntheyes is also very good. As good as boujou for quality of track i'd say, and much cheaper. I started with Boujou, and moved on to Syntheyes. I could customize my track much easier, and felt I had much more control with Syntheyes. That being said, I'll still throw a clip through Boujou if the other program is giving my wonky results since it's essentially a 1 button solution.
|
|
#
¿
Jan 5, 2009 17:26
|
|
|
Heintje posted:Here's a render with it working: I can't even begin to wrap my head around how you might have set this up, what software are you even using? Absolutely fantastic job though, the results you're getting are amazing. I'd love it if you did more status updates.
|
|
#
¿
Apr 26, 2009 13:47
|
|
|
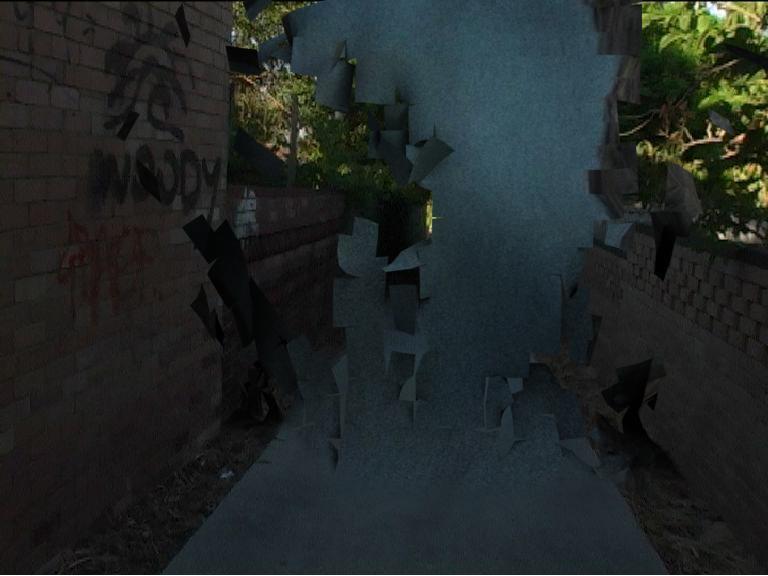
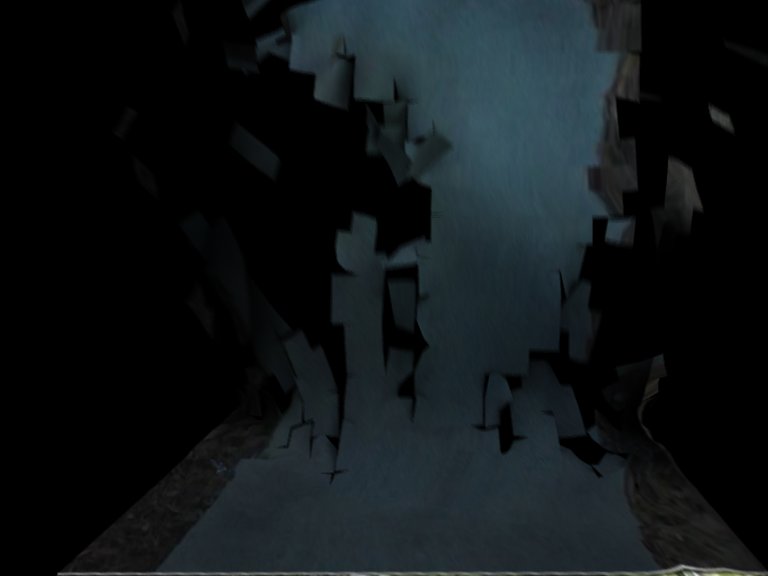
Ratmann posted:Started working on this 2 days ago at night, ran a long sim last night, here's how it's coming out, still needs quite a bit of work, but I'm just winging it not really planning what I want with it. That's really really cool, seems like the noise might jump up a bit high at the end, but I've only ever used Afterburn. I've been wanting to try Fume FX forever. I can barely get Afterburn to do anything useful with any consistency. It seems that when I finally figure something out, I change some fiddly little setting and the entire thing changes and I can't get back to where I was before. I've been screwing around with Rayfire lately and getting some fun results, probably nothing close to what Heintje can pull off with Houdini though. I'm looking to eventually make a little short and in it I want an actor to jump clean through a wall to tackle another actor running away. So far these are my results: Test 1: http://vimeo.com/5038294 Test 2: http://vimeo.com/5492115 Test 2B: http://vimeo.com/5071414 Test 3: http://vimeo.com/5501095 And if you're sick of looking at the side of my house: http://vimeo.com/5303263 I'd really like to improve my general knowledge of Max more than learning to model or anything like that. Just the ability to be able to render out different passes for exactly what I want would be great. Right now my method for rendering a mask for just one object in a scene is to select that object, and texture it with a flat black colour, then select EVERYTHING else in the scene and make it a flat white texture. There has to be a better way, like a way to flag an object, then single it out in the render options, so it just automatically gets its own render pass or something. One common theme you'll notice in those scenes is the interior of the broken wall is not textured, where the brick would be smashed, because I couldn't get the brick texture to match the real brick around the edges. I eventually just photoshopped a texture from a still of video for the texture on the brick that explodes out. In the future I think I'd plan my shot better and chose a location with a big cement wall, instead of brick because in the end I just don't think that's just what brick would do if it were smashed right through. Might just pass if it were cement though. bring back old gbs fucked around with this message at 01:04 on Jul 9, 2009 |
|
#
¿
Jul 9, 2009 00:51
|
|
|
Ratmann posted:As for Houdini vs Max(with rayfire, fume, afterburn, TP, PFlow, Krakatoa), uh I'll write something long about this later... Yessssssssssssssssss, please do this. Not CG, but I just found this on the internet: http://news.bbc.co.uk/2/hi/uk_news/8138012.stm It's a Lamborghini on fire and the smoke plumes coming off seem like they would be a great reference to look back to for any artist looking to mimic real life. I'll be using it when I jump back into Afterburn.
|
|
#
¿
Jul 9, 2009 17:19
|
|
|
Ratmann posted:I have made FIRE! That's great, what did you use to do it? I love the "liquidy" look. like it's weightless. New proof of concept today, tearing up concrete in front of my place. Still a work in progress. http://vimeo.com/5587977
|
|
#
¿
Jul 14, 2009 11:18
|
|

|
Handiklap posted:Yeah I figured 4 was a bit underpowered. I've got 4 in my desktop at work (dual 1.6ghz quad xeon) and I've been feeling that for a while now. I was leaning towards 8; we can go from there if necessary when we do the second box. The work is a bit of a combination between mechanical and architectural. All max+vray, everything you'd see in a public park; playgrounds, shelters, turf, benches, etc. Exterior setups for the vast majority of the stuff. I just built a new system for around $1200 Canadian. Processor: Core i7 920 2.6GHz RAM: 12GB OCZ Motherboard: Asus P6T Power Supply: Corsair TX 750W 500GB SATA HD, Radeon 4650 The video card will be upgraded eventually, I just needed something to tie me over. This thing is amazingly fast running Windows 7 64-bit, and Max 64 bit, but I'm upgrading from a Pentium D805 machine with 3GB of ram. I don't know if that helps you any, but the i7 system is definitely in your price range. http://vimeo.com/5554230 I simulated and rendered this in a few hours the night I built the thing, I couldn't have simulated the destruction on my old machine, it would have crashed. The rendering would have also taken days. Instead I banged that out in a few hours spread over the night. The Task manager also makes me smile when I look at it.  Click here for the full 861x509 image.
|
|
#
¿
Jul 14, 2009 19:00
|
|
|
Handiklap posted:dual i7 xeons. This is a waste of a quote, but I didn't know such a thing existed. I need to research more outside of the personal computing realm.
|
|
#
¿
Jul 15, 2009 03:10
|
|
|
http://vimeo.com/6004232 I had the ground part done for a while but I decided to try and bang out a basic energy blast/fireball. The idea is for the thing to fly and hit the car at the end, I've found a pretty nice Chevy Impala model online so that's a bonus. This is just a work in progress.
|
|
#
¿
Aug 8, 2009 13:13
|
|
|
Travakian posted:Understanding it's a WIP, but... I couldn't tell you what's wrong with the smoke. I'm still puttering around Afterburn's interface so everything I do is hit or miss right now. I really like it at the beginning when it's bright but then the trail gets too dirty/smokey. It's probably a density issue. I've got a technical question: I want to render afterburn smoke along with motion blurred particles. I do not want my afterburn particles blurred, just the white streaks that are coming off. Is there a way to disable motion blur on a per object basis? Or is there a way to render my scene so that my afterburn smoke comes out as straight unlit black and my particle streaks in pure white so I can mask them out later? I want it to look like the white streaks are actually travelling through the trail, not just layered on top like it currently is. As for that car, it's real in the plate. What I meant was I had found a nice CG model I can cut in when it's supposed to get hit
|
|
#
¿
Aug 8, 2009 19:37
|
|
|
cubicle gangster posted:Vray rt has been around for a while - the exciting thing about siggraph was it working on nvidia CUDA. A question about that video: I immediately noticed how his version of Vray rendered. He had the little square dealies to from top to bottom, left to right, rendering his image one by one. Whenever I render with Vray, the squares just seem to render willy nilly wherever they feel like. Is there a way to control the priority of what Vray renders first? EDIT: And for the dreamers, can anybody attend SIGGRAPH? Are certain parts invitation only, or is it all just a big tech show open to geeks? I'd kill to get to go to SIGGRAPH, and NAB. bring back old gbs fucked around with this message at 01:55 on Aug 11, 2009 |
|
#
¿
Aug 11, 2009 01:44
|
|
|
cubicle gangster posted:The manual for it is online here: I was reading this yesterday, but I've still run into an issue with VRay and the MTLWrapper material. I'm having trouble making it mimic the Matte/Shadow material. I had a render working well in the scanline renderer, you can see below the fragments leave shadows on the ground plane, and little ramp thing where there is a matte/shadow box.  Click here for the full 2026x1140 image. So that's great, but I want nice motion blur so I switch to VRay and use VRayMtlWrapper on the ground plane and the ramp, and end up with this:  Click here for the full 2026x1140 image. The parts that render flat black are where two VrayMtlWrapper objects overlap, here's the checkerboard so you can see:  Click here for the full 2026x1140 image. And my material settings:  Click here for the full 373x834 image. I've had the Affect Alpha box checked, and unchecked and saw no difference, in this screenshot it was checked. Gangster, do you see what my problem is here? I don't want anything to be flat black when it is behind an object with a VRayMtlWrapper, and I'd like the ground plane to have shadows while still being transparent, like the default scanline renderer does. It seems like it should be working after everything I've read here: http://www.spot3d.com/vray/help/150SP1/mtlWrapper_params.htm bring back old gbs fucked around with this message at 15:37 on Aug 27, 2009 |
|
#
¿
Aug 27, 2009 15:27
|
|
|
cubicle gangster posted:nm, er, Reckon you could upload a stripped down scene with just the 2 ground objects and a cube to show the issue? Something is up, but I cant tell from the renders. I'll have a play around see if I can see it. http://www.filesavr.com/etststrippeddown Here's the ground, ramp, and wall. Thanks so much for taking a look at this, it means a lot. Heintje posted:^^^^ ooooh this is going to be fun. I got in at Framestore for FX work I want your life.
|
|
#
¿
Aug 27, 2009 20:40
|
|
|
mashed_penguin posted:Absolutely true. The easiest way in is to be living somewhere that has enough studios to have more of a demand for Jr positions. LA, San Fran, London, Vancouver, Sydney etc. Once you get that first job it is much much easier finding the second and it only gets easier from there. Industry wide recessions, writers strikes etc notwithstanding. I work in Toronto, I know there are studios here, they just all seem very small, and I don't think my skill set is even high enough to get an internship right now. I'm a graphic designer, so I work with some guys who know 3D, but I'm learning Max right now at home, and they use Maya at work. I don't know why I picked Max up so easily, but I just can't get into Maya.
|
|
#
¿
Aug 27, 2009 23:51
|
|
|
cubicle gangster posted:nm, er, Reckon you could upload a stripped down scene with just the 2 ground objects and a cube to show the issue? Something is up, but I cant tell from the renders. I'll have a play around see if I can see it. Okay, I fixed my matte issue, I need to set it up in the Render settings, not with a MtlWrapper apparently. My new issue is selective motion blurring. I've got a particle system I do not want to render with motion blur, but it needs to move around and through objects that do have motion blur. Can I set it on a per-object basis with VRay? I can go to my object properties and uncheck motion blur, and play with those settings, but they never work.
|
|
#
¿
Sep 1, 2009 02:07
|
|
|
EoinCannon posted:I don't think vray can render motion blur by object I'm sure I can, I just can't wrap my head around how to tackle it. I've got a smoke trail (Afterburn) hitting a wall, and chunks that explode out of the wall and through the smoke trail. I've got the wall chunks set as matte objects so the smoke trail renders normally, and the wall chunks appear cut out from the smoke trail. I can then render the wall chunks on their own without the trail and comp them together and it looks great. My issue comes from wanting the smoke trail to have no motion blur at all, while the matte chunks that fly in through the trail have motion blur. Is there a way I can set up a specific group of objects to render a velocity pass for, but ignore my Afterburn system? Pflow is the particle system I'm using if it matters. Thanks for putting up with the noob questions guys, I'm at work and don't have a copy of Max here so I can't do a test on my own yet.
|
|
#
¿
Sep 1, 2009 09:55
|
|
|
cubicle gangster posted:Vray motion blur issue - go to the vray properties in the object, uncheck 'use default mblur samples' and lower the samples to 0. I can see where the option is, but it seems that when you set the mblur samples of a PFlow operator to 1, it just changes itself back to 2 as soon as I click anything else. I just tried it with a Superspray too, it just reverts back to 2 samples immediately. Very frustrating. CubicleGangster, and EoinCannon thanks for all your help so far, I've got my matte issue resolved and that was my biggest problem. I'm going to keep plugging away at the blur thing. I enabled the Frame Buffer for the first time today and played with that, but I couldn't get After Effects CS4 to do anything useful with the .RPF files. Does combustion handle it better? I think I've got a learning edition somewhere... Back to the books. bring back old gbs fucked around with this message at 02:20 on Sep 2, 2009 |
|
#
¿
Sep 2, 2009 02:17
|
|
|
cubicle gangster posted:Works as expected my end. That's nuts, I changed the EXACT same value, PFSource instantly changes back to 2, but PFSource->Event 01 will stay at 1. Maybe I need to select them both at once and change the value. That's the only miniscule difference I can see comparing your window to mine. I'm using VRay 1.5 SP2, and Max 2009, could it be a version issue? Thanks a lot for the pointers, really. You can't get specific help like this on big CG forums. bring back old gbs fucked around with this message at 12:18 on Sep 2, 2009 |
|
#
¿
Sep 2, 2009 12:16
|
|

|
cubicle gangster posted:Cant see why, i'm on vray sp2 and max 2008. Thats really odd. I just played around with it, and I think I'm just encountering a bug, if I type 1, press enter, then immediately close the window my changes take effect, if I click anything else in the window other than Close, my mblur settings revert. It turns out I probably did have it working a bit last night, but in the tests I'm doing right now there is a moving camera, and that adds motion blur to the entire scene even when one object's motion blur should be turned off. It works perfectly with a still camera, but since I'm camera tracking I guess there's just always going to be some blur. EDIT: The slight motion blur isn't really perceivable, and actually matches my plate nicely. Here's a quick test I threw together last night. After Effects since there's been lots of comp talk lately. Thanks again. Masked:  https://wi.somethingawful.com/84/848f13d59f3fdbfbb0d2861c44d65198719f78e4.jpg https://wi.somethingawful.com/84/848f13d59f3fdbfbb0d2861c44d65198719f78e4.jpgBricks:  https://wi.somethingawful.com/0c/0c5c5c40a630b40f158706931263b2b81aab66b2.jpg https://wi.somethingawful.com/0c/0c5c5c40a630b40f158706931263b2b81aab66b2.jpgComp:  https://wi.somethingawful.com/af/af47f4c99f79fc0efef2f832572c83ead595ff33.jpg https://wi.somethingawful.com/af/af47f4c99f79fc0efef2f832572c83ead595ff33.jpg
bring back old gbs fucked around with this message at 18:54 on Sep 3, 2009 |
|
#
¿
Sep 2, 2009 20:00
|
|
|
Ratmann posted:Getting there, though It needs shadows on the environment to look more convincing, better integration. And the smoke needs a lot more motion, it's kinda boring.(I've no idea if you wanted critiques but I'm doing some stuff at home in this sorta vein so It's on my mind) That's so awesome. I definitely want critiques, but that was just a placeholder to make sure an afterburn system would work. Shadows are my next hurdle, I'm having difficulty rendering shadows without the object that's casting it, but I'll get it.
|
|
#
¿
Sep 3, 2009 22:37
|
|

|
Odddzy posted:Yes, I posted the room previously and all I did was the textures... Nobody in the industry is ever going to hold your hand, man. You know you should take the black at the end out, but you didn't change it before you sent it to be reviewed and criticized. Did you simply not care about your final product? This is what I'd think as an employer. Decent start, you're miles ahead of any modeling I could do. Definitely put some motion in your outdoor scenes. A simple dolly forward past a foreground object adds lots of depth to a scene. In the model rotation, have him rotate once far away, as he does now, and then cut to another rotation of him semi-close-up (chest and head) to keep it from getting boring. 2 rotations max, anybody can pause a video if they missed a detail. One last thing, and I hate to call you on this because it seems to be a sore point, but get into the habit of saying "Yes, that could have been improved. Thanks." instead of the rambling point-by-point rebuttal you posted. It is pointless. He criticized the points he thought could be improved, you can explain your reasoning until you're blue in the face, but an opinion is an opinion and in a real employment situation you wouldn't even get the chance to defend your choices. Just take the criticism, and get back to working on it. If you think this forum can get rude, spend a week posting your reel on CGSociety. bring back old gbs fucked around with this message at 18:06 on Jan 15, 2010 |
|
#
¿
Jan 15, 2010 17:13
|
|
|
Ah, just throw more particles in, works for me: http://vimeo.com/10044475
|
|
#
¿
Mar 10, 2010 15:27
|
|
|
Fffffffuck Panick, I was all proud of my sculpt and then I saw the robot head you made. That is so fantastic. Really intricate. I had a week off of work, so I started trying to learn ZBrush. I specifically want to use it for hard surface robots and vehicles. This is the first thing I've made that I am starting to like.   I can't figure out how to get Imgur to show a small thumb nail and link to the full size image, I hope these aren't too big. EDIT: And an alternate I decided not to go ahead with... 
bring back old gbs fucked around with this message at 05:24 on Apr 24, 2012 |
|
#
¿
Apr 24, 2012 04:54
|
|
|
PAnick posted:
Thanks for the kind words, and the big writeup. Everything's explained nicely, I had a detail question though: How do you get such sharp cuts in between your panels/hydraulic tube things? I would have assumed it was a bunch of sub tools. Is it lots of masking + HPolish? That's how I am doing it but it would be a nightmare on something as complex as yours which is why I thought it was different pieces. I've attached a pic with some areas circled that I thought would be very hard for me to do. I know some stamps are used for little bits but I mean specifically all the panels that seem to be at 90 degree angles with sharp as heck corners, how do you do those? 
|
|
#
¿
Apr 25, 2012 00:46
|
|
|
SVU Fan posted:You can get amazingly sharp edges and corners using Zbrush's newish Clip brushes. The basic workflow for hardsurface that I've been shown is just extracting the shapes from your basemesh, adding grouploops for more topology where you need it, then using trim dynamic to get the basic angles and planes, then use the clip brushes for the really sharp parts. This is the method being taught to me right now by a Gnomon DVD I bought. Make a "muddy" mesh, and retopologize new sections piece by piece adding creases to the hard edges. It really does work quickly and looks great. I don't know how I'll pose anything with a million subtools, but I'm still in the stage where I'm learning my brushes/interface and getting comfortable with a tablet. Posing/Rendering isn't even remotely a priority for me right now. It looks like Panick did that amazing mech bust with a single blob of clay, not multiple parts, which I am very curious about.
|
|
#
¿
Apr 25, 2012 18:48
|
|
|
Only semi-related to this thread: Is conceptart.org broken for any of you guys? I've tried viewing it for the past few months and every artist gallery returns a PHP error. People have asked about it on the forum and got no answer. I thought it was because I kept opening it on my iPhone but it's broken on my desktop machine as well. Is anybody from here connected over there? What's the deal?
|
|
#
¿
Apr 26, 2012 23:33
|
|
|
An update on the robot head I was working on:  I've cut the darker brown panels off into separate subtools, the lighter parts are the underlying sculpt I'm using to retopologize. I'm really starting to get the hang of the interface. Getting the zsphere to attach to the head for retopology was a bit messy the first few times though. I ended up creating a bunch of extra ztools by mistake and the mesh selection dialog box got really crowded. Is there a way to clear the ztool list? EDIT: Oh ZBrush, won't you ever let me get to bed on time? More Robot heads...    Thanks to SVU Fan, Panick and Sigma6 for the quick replies and tips. It's been helpful. I recently bought this: Zen of Zbrush (http://www.daz3d.com/i/3d-models/-/zen-of-zbrush?item=11462) and Zbrush Hard Surface Techniques 2 (http://eat3d.com/zbrush_hardsurface2) Are there any other guides for this sort of thing? I like absorbing all the different techniques, and I don't mind paying if the content is good. bring back old gbs fucked around with this message at 06:28 on Apr 30, 2012 |
|
#
¿
Apr 28, 2012 22:35
|
|
|
I made this in ZBrush last week: And slowly cut it up into different subtools and made it this:  Almost time to start on the neck.
|
|
#
¿
May 11, 2012 03:20
|
|
|

|
| # ¿ May 3, 2024 20:49 |
|
|
I started on a new robot. I'm making an entire body this time not just the head. Here is where I'm at so far. This is just the rough sculpt before I cut it into subtools. The legs are the weakest at the moment, I haven't done much other than scratch some panels in. They will be much slimmer in the end. I need to discipline myself to work on the overall model and not work on sections at a time.  I've been learning a lot from this, the influence is pretty obvious: http://www.daz3d.com/shop/zen-of-zbrush/ EDIT: I cut the legs off and mirrored the arms. My .ZTL file is ~800MB is that too much? Seems a bit large but I have no reference for how big a standard Zbrush file is. 
bring back old gbs fucked around with this message at 08:25 on May 21, 2012 |
|
#
¿
May 21, 2012 01:34
|
|