


|
I just want to say gently caress zBrush's UI. It is worse than most open-source software, and thats saying something.
|
 #
¿
Jun 22, 2009 21:43
#
¿
Jun 22, 2009 21:43
|
|

|

|
| # ¿ May 14, 2024 01:40 |
|
|
Odddzy posted:Why all the hate? Mudbox I can dive in and everything I need is like right the gently caress there. zBrush might be the same way but I can't tell because there are 50 million menus and poo poo. I can't even find where to check my brush settings and figure out why it isn't using pressure sensitivity (or maybe it is, but just not for brush size?) I have some learning to do 
|
|
#
¿
Jun 23, 2009 00:04
|
|
|
Alan Smithee posted:So I just came back from Gnomon Live in Hollywood (I volunteered so I got a free pass) Man I idn't think I could like him any more than I already did but that is totally awesome.
|
|
#
¿
Jun 29, 2009 13:27
|
|
|
The Merkinman posted:Considering I got laid off from my job of doing (among other things) Archviz, and I've been out for months still with no job, yeah, don't go into that field right now. yes but at the same time this:  Click here for the full 640x480 image. is part of your portfolio so I don't think a poor job market is the only thing holding you back. It looks like you've been working on it since you last linked it, though. You really ought to trim the old piles of poo poo (sorry, but Computress there does not belong in anyone's portfolio, ever, for any reason) you have in there and really polish the new pieces.
|
|
#
¿
Jul 19, 2009 08:08
|
|
|
Hinchu posted:I'm not going for the look of the Tin toys. As for the bead, it is a bit of ornamentation along the seams of where the various pieces would meet together, to help ease the transition. My idea is that everything would be put together with rivets. I'm not really done with the riveting as of yet, because it's hard to keep it attached to the geometry as I tweak stuff. It doesn't look like rivet/weld construction, it looks like you're gluing tubes and dots to your model. Get some better photo ref that is closer up to a weld. Here is an article on welding with some good photos: http://www.mig-welding.co.uk/gasless-mig.htm And then here is wikipedia on rivets: http://en.wikipedia.org/wiki/Rivet and here is a link to some rivets: http://www.rta.nsw.gov.au/environment/images/heritage/4301052b9.jpg Right now your rivets are not round enough, it looks like you flattened a sphere. You might want to look into a different kind of rivet, too. The welding is just floating on top and not at all mated to the metal - you might consider taking this into zbrush and sculpting the welds, I don't think you're going to quickly model some good welds without a sculpting app.
|
|
#
¿
Jul 20, 2009 06:12
|
|
|
I'd be down if the subject allows me to learn zBrush since my bitch rear end needs to learn it. I do too many spaceships and lasers and mechanical sci-fi geegaws at work so something with some organic shapes would be neat.
|
|
#
¿
Jul 20, 2009 21:10
|
|
|
I'm all for a vehicle. I'll probably do something like this: With a bunch of cloth so I can practice my sculpting, unless someone has a better idea for a military vehicle with cloth. I really don't care what we do so long as I can shoehorn in learning zBrush since I need to do that. cubicle I'm not sure what you mean by "hard object" - if you mean difficult, there are certainly difficult military machines out there. And most of them are not soft-surface models ")
|
|
#
¿
Jul 21, 2009 17:56
|
|
|
gently caress all open source software. They pretty much universally have terrible UI, poor documentation, and their communities are exclusively hobbyists who hate professional software because it is made BY THE MAN who has the audacity to GET PAID for their PROFESSIONAL LEVEL TOOL. I wouldn't hate open source software if the people who build and use it didn't treat it like a religion, or take it as some personal assault when you say things like "The Gimp is not a professional level image editing tool because it does not support CMYK" and respond with "WHO CARES PRINT IS DEAD YOU SHOULD BE MAKING WEBSITES." (Gimp supports CMYK now I believe, but back when I was in college it didn't. And I had a number of printing projects I did in Photoshop.) I haven't used Blender, I hear nice things, but I know Max. I use Max professionally. I don't need Blender. It doesn't do anything that Max doesn't do for me. The advantages of Open Source are largely negated by MAXScript and our amazing tech art department. And I never have to hear someone say "Max is amazing and without flaw!" like what happens with Open Source software. Hell, I've had meetings with Max developers who have straight up asked "what is broken and how do we make it better for you?" which will never happen with Open Source, because Open Source doesn't have to care about things like "being commercially viable." I don't believe there are any studios using Blender in a production environment for games, films, TV, or advertising, which means there is no one using it. FLX you have a couple of issues there. First of all that is terrible geometry that won't resolve correctly - you should attach some of those edges so you don't have any concave shapes. The smoothing issue you have there is caused by two things. First, the terrible triangulation caused by the giant n-gon with the concave shape. Thats why it is all triangular and ugly. Then, it is vertex smoothing between those points and blending along those ugly edges because it is all one smoothing group, and the left side is pointing left, and the right side is pointing right, and its trying to average between those two. either make the top-most edge (the one defining your giant ugly n-gon) a hard edge (I'm not sure if XSI uses "smoothing groups" like Max or "hard edges" like Maya. Make the n-gon a separate smoothing group if it uses smoothing groups). Adding a bevel will help but not eliminate that problem. You can also help that problem by fixing your n-gon so it is a nicely tesselated quad/tri-based surface. A non gouraud shader will help for render time, since right now its doing vertex lighting which is part of the problem, but that will only partially help hide the fact your geometry is really bad.
|
|
#
¿
Jul 22, 2009 21:56
|
|
|
The Merkinman posted:I have a question about 3ds Max. Granted I've used it for quite some time, but I'm not even sure if what I'd like is possible. What is the reason you're doing this, out of curiosity? It's done all the time in realtime rendering for speed reasons but I didn't realize it had other applications.
|
|
#
¿
Jul 25, 2009 19:54
|
|
|
heeen posted:I have a problem with blender: it creates a new uv coordinate for each vertex. Observe: On a very basic level isn't this how it is done? Doesn't every vertex need UVs, and doesn't every smoothing group/hard edge need it's own corner vert? I know Max, Maya, etc, hide that poo poo and let you work with it as one vertex, but when it comes time to export that poo poo to a non-proprietary format it all gets turned into a bunch of verts/UVs on top of each other, rather than some complex sharing markup language.
|
|
#
¿
Jul 26, 2009 03:29
|
|
|
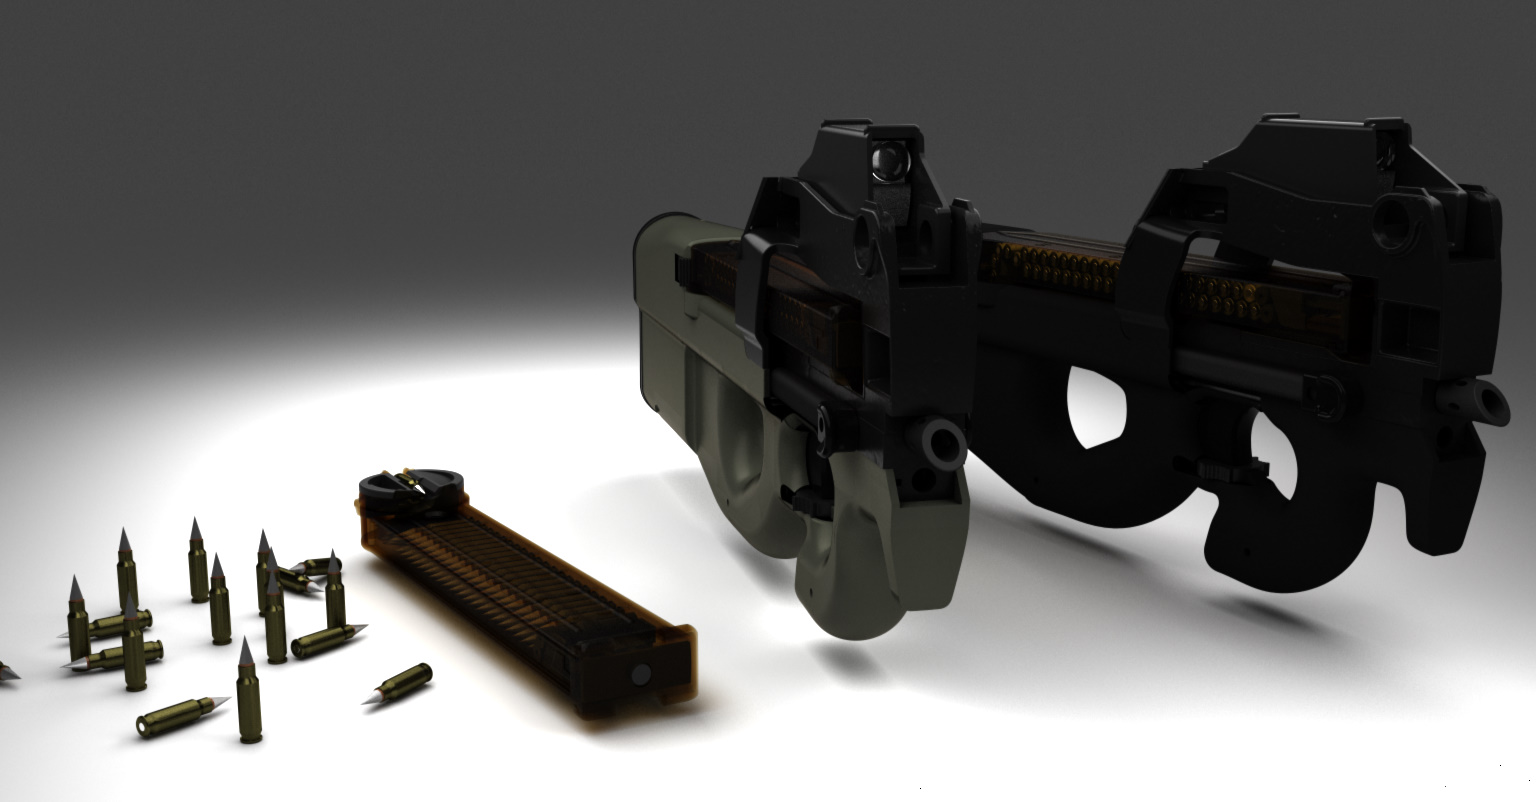
HOB V2.0 posted:Hey guys. Those P90 renders are way too dark. It looks like you got the curves on it right which is good because 90% of people's first gun models are blocky tracings of a side view. Do P90 bullets really come to a point like that? I thought they fired standard 9mm pistol rounds. I agree with everyone else that you shouldn't do too many guns for your portfolio but at the same time if you're actually good at it there are positions for people who make guns...I have one Also the notion that "some studios are left leaning and will think you are a gun nut" when every action game has a billion guns is kind of retarded, in my opinion. I wouldn't tell people you own guns during an interview if you do, but showing an attention to detail and knowledge of the subject is a bonus.
|
|
#
¿
Jul 27, 2009 20:31
|
|
|
So I decided I was going to model a 40k dreadnought. Spent about 2 hours surfing the internet/masturbating/blockout out the proportions. I'm sure I'll see poo poo I need to change on the morning (my loving dreads are at work so I need to bring one home) but here's a turntable if anyone wants to tell me how much of a loving hack I am. https://www.ghostscape.com/proportion_test.mov edit: https://www.ghostscape.com/proportion_test2.mov The legs still seem off. I need to check the underside proportions on the real model which I won't have until tomorrow. Sigma-X fucked around with this message at 06:40 on Jul 28, 2009 |
|
#
¿
Jul 28, 2009 06:02
|
|
|
Ratmann posted:https://www.3d-palace.com Yeah I'm aware they have a dreadnought tutorial but its not like I need to learn Max and their proportions are hosed up.
|
|
#
¿
Jul 28, 2009 07:24
|
|
|
Odddzy posted:Is that only the general layout of the beast or are you going to build on what is already on the turntable? It's a block model "mannequin" that I'm going to dress up as / replace with the high poly model, if that makes sense. It's strictly a proportions guide, so that when I'm building the high poly mesh and have tunnel vision on the leg it doesn't get built out of scale with the rest. When I don't do this and don't have/have poor orthographic concepts to work off of I tend to get the proportions wrong in relation to each other. After I build a high poly mesh I'll build a low rez mesh and unwrap/texture it to be a game rez mesh, but I'll probably be pretty lenient with the specs as this is supposed to be a fun project for me and not the exact same poo poo I do at work. Yeah if this was the whole model it would be pretty poo poo. There are a couple of holes I haven't capped while cutting poo poo I was gonna start progress on the foot last night but Zack Parson's new book came from amazon (I had forgotten I had ordered it) and it is really loving engaging, so I spent from 10:30pm-4:00am last night going cover to cover and am now loving exhausted.
|
|
#
¿
Jul 29, 2009 15:00
|
|
|
olblue posted:The free one or the commercial one? The free one is basically a load of boxes thrown together to show a basic modelling workflow and the other one is this one - if you want I can send you that second one to use as a reference if it would help. Been working on that Dreadnought tutorial and refining it for about 6 years now on and off :/ Its like a scratch that never goes away. The free one, I haven't seen the ven dread tutorial, although I remember you posting that video in the warhammer thread a while back. I don't know if you're offering to send me the mesh or the video, but I'm not interested in either. I don't feel the tutorial would be very helpful as I've been doing this professionally for a couple of years (GO BUY RED FACTION GUERRILLA SO I CAN BUY FOOD) and having the mesh would cut a lot of the stuff I'm trying to improve (like eyeballing proportions) if I had a copy of the mesh. I do appreciate the offer, though.
|
|
#
¿
Jul 29, 2009 21:45
|
|
|
Still need to do a detail pass on these and obviously the tops are unfinished, but I'm lazy. I'm modeling the legs straight but rotated them into the rest pose of the proportions model I posted a turn around of a while ago. About 3 hours of real work and about 3 hours of surfing the internet: 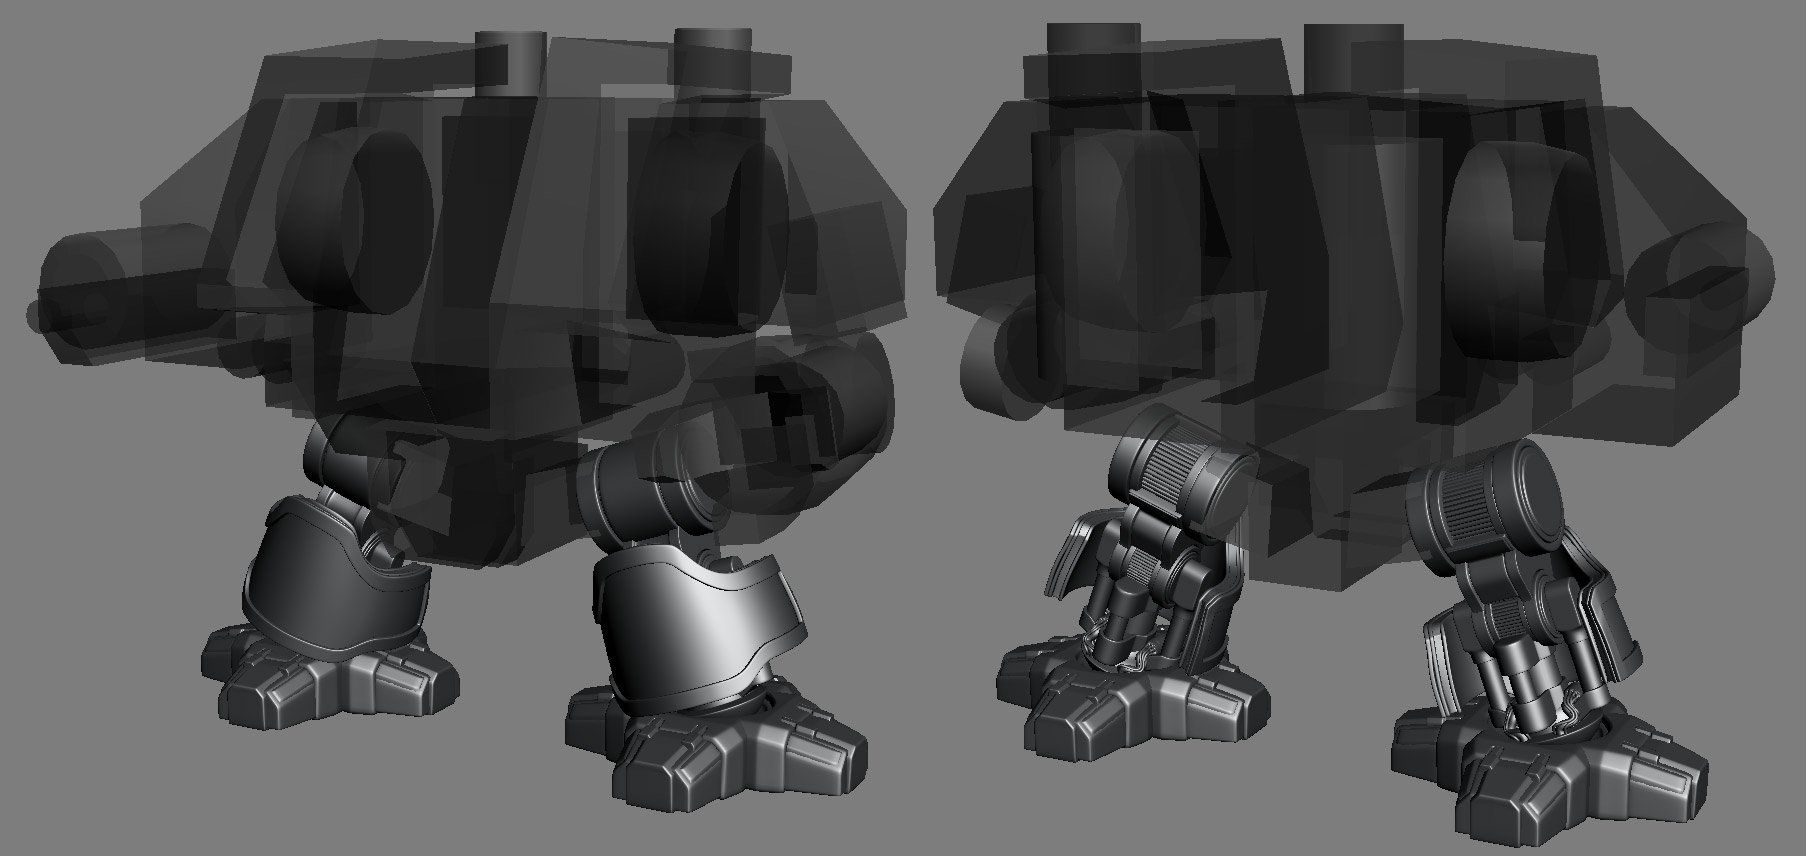 Click here for the full 1806x856 image. Pro-tip: adjust the shape of your complex shinguards before breaking out the details and trim parts, rather than adjusting them 4 loving times after the trim is created. Thank god for modifier stacks. I'll be taking the bland as gently caress shinguards into zbrush to sculpt cool poo poo once I figure out what that cool poo poo is.
|
|
#
¿
Aug 7, 2009 13:27
|
|
|
sigma 6 posted:^^^ That's pretty crazy. Didn't know squids could change color. What is your goal for your game engine? Teaching art students how to use it to preview assets? Making full games? Collaborating with a programming department to make actual games? I don't see why you wouldn't use UE3 for everything - it has a strong rendering pipeline, a bunch of shader tools, and is used by a million studios. You don't need the full engine license, there are plenty of mods making mods with new character models, scripting, etc.
|
|
#
¿
Aug 12, 2009 15:02
|
|
|
sigma 6 posted:We are meant to have a game prototype as a goal for the curriculum. The problem is that it is left up to each campus to use an engine of their choice. Most campuses use UE3 but we have run into problems with support from them. Also, the guy who knows most (very little) isn't willing to go to any forums for help etc. Do the game software dudes actually write any of their own engines? Back at RIT, my alma mater, they had a 2d programming course followed by a 3d programming course, and the gist of it was that both courses would teach the students how to make a 2d engine and 3d engine - they used certain libraries (DirectX .x model format, for example) that had some existing support tools that made it easier to have artists interface with the software than having the students write tools, but the programming students were still getting some harder level stuff than just game logic. The 2d engine would get recycled into the 3d engine and then after that students usually had a pretty good base to build something for a self-study project (I'm forgetting the term we had where basically you could earn credits for self study, but the 2d/3d professor would basically sponsor you for that, and some folks even got co-op/internship pay for it). The engines they were building at the time didn't require advanced shader support that would be beneficial to an art student, but getting that added to the curriculum wouldn't be that hard, especially if you guys are on a semester schedule (RIT did 10 week quarters). Have you considered Source at all? If you're looking for support Source and UE3 are probably the most heavily documented and supported. I'd like to be of more help but to be honest I don't know poo poo about Unity or Cryengine. I'd stay far away from Ogre, though, and you've had negative experiences with Torque. As for your knowledgeable guy not going to forums to get assistance - is he a professor? If so, he should be fired. Is he a student? He should be failed. Seriously, if he isn't engaging the internet for assistance he's not going to find much help. The reality is that in an actual work environment, outside of the documentation that comes with UE3/Source/etc, he'll have to ask people how to use poo poo, and sometimes will be writing the documentation on stuff himself. In-studio tools are not user friendly and easy to learn, typically. edit: Rass, gently caress pdfs. I'm not reading it and a lot of hiring folks aren't going to be interested either. The rest of the world uses HTML, and they have a web connection.
|
|
#
¿
Aug 13, 2009 17:25
|
|
|
Hazed_blue posted:Wow, I'm on top of the world right now. Not only did they use the screenshot that I made of Duff Goldman (shown below) to introduce the episode, but they also showed the in-game footage of my character running around near the end of the episode. what is the story behind this? Episode of what?
|
|
#
¿
Aug 28, 2009 23:01
|
|

|
cubicle gangster posted:The topo side doesnt really bother me - theres not too much to remodel/simplify, it's more the process going from the high to low version. It'll take the displacement. Whatever data exists at rendertime is the data it will project, so if you had an animated displacement map you could render it out at any frame, etc. For what you want to do, build a low poly mesh, sit it exactly on top on your high poly mesh, set up some UVs (either totally unique, or with the the 2nd-Nth duplicate/mirrored poo poo moved out beyond the 0-1 window in a full unit, IE put it in 1-2.). Next, put a projection modifier on the low poly mesh, add the high poly poo poo (max won't add groups you have to open all your groups first it is a cock sucker) to the project modifier, adjust your cage (by default it will generate a horrible mess, reset that, use the push slider, adjust some verts manually if need be). Once thats set up, with the low poly selected, open up the render to texture menu, make sure "use projection" is checked, make sure the UVs are correct (sometimes it will want to autounwrap them instead of using existing) and add the various maps you want to render out. Make sure you set up paths for them - the render window won't show them. Then mash the render button and watch as it renders out a complete map in the window. Check your files, realize you hosed up your project, and repeat
|
|
#
¿
Oct 12, 2009 18:02
|
|
|
huh, didn't know it didn't work with vray. Of course, we don't use vray here so it never really came up You can use mental ray if thats better than scanline. If you're going to bake normals for dynamic lighting and lightmaps, bake ambient occlusion maps instead of lightmaps (requires mental ray). Baked lightning and normals together looks really weird most of the time. Also I'm not sure what your target platform is but if you're trying to make a virtual walkthrough of an architectural scene in whatever engine on PC you could go a lot higher polycount and get a better bake. 260 triangles for a couch is like Wii specs for a couch belonging in a full level.
|
|
#
¿
Oct 13, 2009 16:07
|
|
|
sigma 6 posted:Thanks. How does the lightmap get fed into the material? I have never heard of Maya doing this, so is this just a Max thing? There is a "lit and shaded color map" in the transfer maps menu so maybe that is it . . . hmm. This is a game engine thing (usually). Rendering out lightmaps is done for static objects, and is frequently handled in an engine - Source, UT3 both handle this. I don't believe Cry Engine does because I believe they do fully dynamic lighting for their environments, but I might be wrong. Typically you build a new set of UVs (usually the second, but depending, again, on the engine/object/etc) that has all the faces in an area/map/etc uniquely unwrapped. Then you render out the lighting information to this map, and multiply it down over all of the objects, so a full-lit image will show the diffuse clearly, etc. There are methods to get this to work with normal maps, etc, but this is static lighting solution. You could use the regular UVs for an object if it is unwrapped uniquely, but that is rarely a good idea since a fully unique unwrap (which lightmapping requires unless your lighting is mirrored/tiled as well) is usually a bad idea for environment assets. Additionally, you typically want to keep the lightmaps as few and as small as you can. There are animated light maps/projectors that can be used for certain effects as well - in the lightmap posted earlier, those fans could be made to look like they were rotating by animating the parts of the lightmap that they are in. Baking lightmaps winds up costing memory, as you have another texture call, but it is very fast for lighting and allows you to get complicated lighting effects like Ambient Occlusion, reflected light/radiosity, etc, since its all rendered out offline. Lightmaps are old tech but they're still very useful. However, with how many games are doing dynamic lighting nowadays (open world games with day/night cycles, destruction-based games like [shill]Red Faction Guerrilla[/shill]) they aren't as useful as they used to be. The "lightmaps" you see people rendering out that are AO bakes being overlaid on the diffuse aren't providing real ambient occlusion, either, but thats another topic and I think its been covered in this thread before.
|
|
#
¿
Oct 15, 2009 19:31
|
|
|
AuntJemima posted:http://www.thinktanktrainingcentre.com/ Dude if you are in Vancouver go to Vancouver Film School their 3d program looks dope as gently caress and the student work I've seen from there is amazing. I only checked out the first reel for a minute and it wasn't anything amazing. I'm sure you could go there and get a good education if you busted your rear end outside of school, but the same could be said for any other school. To be honest I've never heard of that place before. sigma 6 posted:Thanks DefMech and Sigma X: It "should" be but we don't have ambient color maps passes in a game. AO maps are rarely used as a separate map in games (I don't know of any actual games that use them) as if you want real AO you typically do it as a realtime screenspace effect. Some people may call it a lightmap (if you are rendering a skylight pass in Max scanline and using that for AO/GI then you'll be saving out a lightmap) but that isn't what it people are talking about when they talk about lightmapping. Some questions: sigma 6 posted:Why would you need separate UVs? Why not use the same UVs as you would for any other map? The geometry should have the same UVs for diffuse color, normal maps etc. Why would lightmaps be different? The geo has the same UVs for diffuse, normals, etc, because those maps all directly affect each other and all the data there corresponds directly with the data on the other maps, even when tiled, flipped, etc. The lighting on those flipped, tiled, etc, parts will almost always be different however. The lightmap is unique for each instance of a mesh - lets say you have 20 pillars, they may all be using a tiling cylinder map on all of them, but they will need unique lighting, etc. sigma 6 posted:Sounds like this is just lighting baked into a texture map so you get things like bounced light and static lights added to the texture. How does the engine know how to do this? Does that mean the shaders apply it in the engine and how? Sounds like any engine which supports dynamic lighting would make lightmaps moot or at least not so important. Yes, this is the idea. If the engine is lighting all of the world geo dynamically, then yes, they are unimportant. However, dynamically lighting the world geo is expensive as gently caress, and if the world geo/lighting itself isn't dynamic, then there is no point in lighting it dynamically. For example, most of the world geo in Dark Sector, Gears of War, etc, is all static, so they bake the lighting in. They still have normal maps and such because they still have some dynamic lights in the environment, but the base lighting is static and baked. Lightmapping is a quality+speed thing. However, something to consider - most engines that do baked lighting like this do it through the editor themselves, like UE3, so you usually don't have to worry about this stuff. sigma 6 posted:Does Unity support dynamic lighting? I am looking forward to finding out how this works once my school gets it.
|
|
#
¿
Oct 16, 2009 15:55
|
|
|
Georg LeBoui posted:The cups smooth in exactly the same that I wanted them to, since I actually started with one cup first, then extruded it upwards and outwards. Then I cloned that cup, attached them all to one mesh and connected them together to form the body. So maybe there's a fault in that, I'll do some more tests once I get back to the office. Are you sure you welded the verts? In the unsmoothed one there are white lines for your edges that go from 1 to 2 pixels thick, indicating that there are actually multiple edges there. If you feel like posting the mesh I can take a look at it in case you've got something totally loving goofy going on. Also, try this - convert the unsmoothed mesh to a edit mesh, then back to edit poly. I've seen a mesh go loving ridiculous once or twice in edit poly (I forget how to duplicate the scenario) but basically it wasn't welding the verts but was pretending it was. Also try running an STL check (drop the modifier on the unsmoothed mesh) to look for weird poo poo.
|
|
#
¿
Oct 21, 2009 06:58
|
|
|
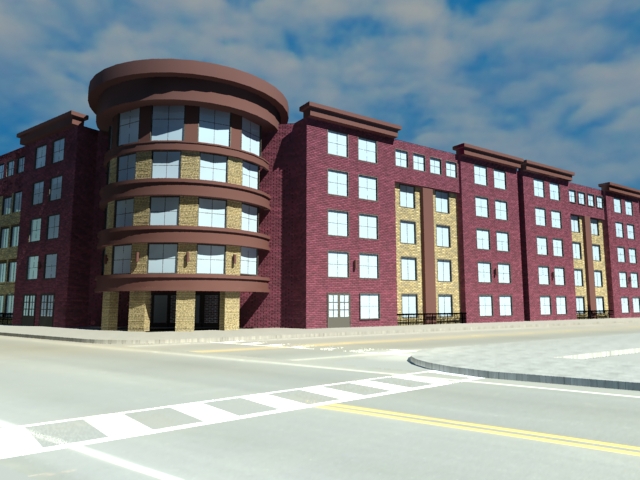
The Merkinman posted:Problem Not sure why my windows aren't reflecting the images I have set up. I have a few planes facing the buildings, textured with a panorama. Your window trimmings look very flat and uninteresting, are they actually modeled out? Same with the door trim. Typically these come out far enough that given the right light angle they'll cast strong shadows that help to define the shapes. The building has no trim where it meets the pavement or the fences. The curb is a straight extrusion and has stretched UVs. The windows seem to be in stretched - don't vary the sizes of the panes like you're doing. I'm assuming you're aware that the lightning looks terrible and the materials look very WIP since they're nearly flat colors.
|
|
#
¿
Nov 4, 2009 06:47
|
|
|
That is mind boggling. I think the "I haven't done any modeling in years, but I was formally trained not to mesh smooth" is the best sentence I have ever read.
|
|
#
¿
Nov 4, 2009 15:49
|
|
|
Ratmann posted:http://www.gamesindustry.biz/articles/report-ea-will-close-pandemic-studios-today My favorite part is that this morning at like 7amPDT I saw this on Kotaku, with a line in there saying that the rumor stated that Pandemic employees would be notified at 11amPDT. EA seems to lay off their staff every Christmas. I understand that layoffs are a necessary evil at times but EA seems to schedule this stuff around this time specifically. Two years ago they let go of EA Chicago and I believe they did another studio or two last year too. ceebee you could probably build a low poly for that and bake out your procedurals to diffuse/spec when you bake your normals out.
|
|
#
¿
Nov 18, 2009 00:21
|
|
|
Ratmann posted:To be honest, it's the way of these industries, games and VFX, usually after a big show or 2 end there's a nice exodus of people being "laid off", meaning their contracts end. I'm pretty sure most, if not all, of those people were not on contracts that didn't get renewed.
|
|
#
¿
Nov 18, 2009 02:30
|
|
|
Ratmann posted:On the vein of posting cool stuff: can we  things that involve tits and tongues together please things that involve tits and tongues together please
|
|
#
¿
Nov 24, 2009 21:51
|
|
|
mashed_penguin posted:My supe walked past at the point when the poop goes on the tongue. He asked for the link There are like 3 people at my company that would probably give a gently caress but considering I have a hallway-facing monitor I worry about these things. edit: goddamn that video is a pro click zone Sigma-X fucked around with this message at 05:29 on Nov 25, 2009 |
|
#
¿
Nov 25, 2009 05:18
|
|
|
Fool Circle posted:What would be the best way to quickly model some ribbed cabling like the black part of this in Maya? I'm pretty new to the software, having only started using it on this college course, so sorry if this is really really easy. I don't know poo poo about Maya but in Max if you wanted to model this you'd do this: Max a spline for the cable (this is assuming you want some bends). Set it to renderable (you could also loft a circle down it, I suppose), and tweak the settings so the edgeloops are about equidistant. Drop an edit poly modifier on the top. select an edgeloop running around the thing, use ring and loop to select all of them. Extrude/Bevel/Chamfer as needed. Profit. If you did it this way in Max you'd also be able to reposition the cable by dropping down the stack. Realistically though you could do this just as easily for anything that isn't a super-closeup by just making a renderable spline and having Max autogenerate UVS, then drop a texture on it. Unfortunately I don't know poo poo about maya maybe someone who has used it in the past 4 years could translate this process into the right buttons
|
|
#
¿
Nov 29, 2009 22:15
|
|

|
sigma 6 posted:Thanks but the objective here is to retopo a zsphere based sculpt. Then why would you bitch earlier about trying to nail the likeness? The woman's face is considerably wider, giving a very round cross section from the front, whereas you've made her face much more V-shaped. You've put her eyes too deeply back, she has a very flat face. Your eyes are off - the round part is much too centered, with her eyes there isn't the mirrored shape you've got on each eye. Her nose is completely loving different - her nose doesn't come to a point like yours does and her nostrils in fact dip slightly below the middle of the nose, which they don't on your mesh. All of these are important parts for nailing the ethnicity of the person, and you're missing them, making this sort of hybrid, vaguely european caricature. Additionally, you've made her mouth smaller than her nose (it isn't, look at your ref) and you've completely hosed up the ears, when the ears are easily one of the more defining features of a face, since they allow for so much uniqueness. If the point is just to retopo a zsphere based sculpt, then why bother trying to hit a likeness at all or post one? Especially if she's pissed at you because you've used her likeness without permission before?
|
|
#
¿
Dec 15, 2009 03:06
|
|
|
Travakian posted:A few pages ago I asked about (in Maya/MEL) using a locator to manipulate y-positions to 'dip' things; I got that sorted, but I'm looking at the next stage of what I want to do and I really can't get it sussed. I don't do any scripting but it seems like you could set up a some set-driven-keys (that's the maya term afaik, in Max they're wire-parameters) parameters, so you wind up with a variable like is_rotated_90 and when it is at 100% have them rotated 90 degrees. Then you could have the proximity of the influencing object add towards the 100%, but never subtract to it. This seems like it would be easier to futz with than trying to access the rotation directly and constrain it because that would require some goofy math, whereas here in your scripting you can just have it continue to add towards 100% IDK I'm not a maya user or a scripter but set-driven-keys seems like something useful to use.
|
|
#
¿
Dec 19, 2009 21:45
|
|
|
GrazoTheClown posted:I don't like too many lights, my bendy straw looks alot more "dramatic". Max default lights look really dramatic its true
|
|
#
¿
Dec 31, 2009 23:23
|
|
|
The + and - keys by backspace (not the numpad+) They will also change size as the object is scaled. Also their techincal term is gizmo. you can find some controls for them in customize->preferences.
|
|
#
¿
Jan 14, 2010 22:31
|
|
|
Odddzy posted:WIP! 'Modelisation' is not a word. Why do I care about the polycount of that scene, anyways? Didn't that brass room get posted with better lighting here once before? Was that your work that got posted or is that an art test or something? Why does it slowly saturate? The model is more interesting in the wires,because the flat lighting and muddy materials bleed out the detail. The character has the best lighting because it is both moderately dramatic/interesting (despite being a fairly basic 3-point it looks like?) and it is static as the pedestal rotates, which makes for some interesting lighting and shows off the model more nicely. I can't see your first character because you've zoomed out to make sure I can see the top of the light pole for your pedestal. I don't give a gently caress about the light, I'd like to be able to see the character. The second outdoor scene never is shown textured. WIP work isn't that interesting. The texture resolution on the first outdoor scene looks out of whack, with the road being very blurry and farther away things being much sharper. Maybe try subtle camera movement on the outdoor scenes to make them more interesting? Bonus points for wind, etc. If there isn't movement I don't know why this is video and not a still image? Overall your environments are incredibly boring to look at - add some dramatic lighting. Right now you've got them incredibly flat. Finally, and perhaps most important, who the gently caress are you and what kind of position are you looking for? There isn't a strong subject/industry focus for the reel and I never see a name or anything. Introduce me to you at the beginning briefly with a 2-second FIRSTNAME LASTNAME, DESIRED POSITION, and give me your info including URL and e-mail at the end, along with any notes regarding the scenes, like 'dong, poop schmear, and banana peel models courtesy of Professor Winky" or whatever. I'm assuming the 30 seconds of black at the end are the credits, etc. You have 50 seconds of content and 30 seconds of credits - you really want a better content to credits ratio. I could critique the individual pieces more harshly but A) I don't know what you are trying to do, and B) I can't see them well because that video is tiny as hell.
|
|
#
¿
Jan 14, 2010 23:28
|
|
|
DefMech posted:Not sure where you saw it, but that's a French word. Its on the titles for one of the wireframes. I've seen it used in English context a bunch by other people, didn't realize it was French
|
|
#
¿
Jan 15, 2010 08:42
|
|
|
Odddzy posted:Ok, so let me recap what you just said : I know you said you were going to 'iron out' the black, but my point was that 40 seconds of credits on black is a bad idea, so if you're trimming it as part of the ironing, that is good. I'm blunt, and I'm probably arrogant, I'll admit. Understand that you can always do better. Nothing any artist does is perfect. Your art director will always have critique and demands. It is exceptionally rare that any artist on my team goes into a crit/review meeting and comes out without a bunch of critique. You are always learning, or at least you're always given the opportunity to learn. Peer feedback is one of the best ways to accelerate that learning. Nobody is going to give a flying gently caress about you unless you demonstrate 'Wow!'-generating skill. No HR guy or Art Director is going to give a gently caress about the reasons as to why your reel doesn't grab their attention. There are literally thousands of students graduating every year and if you can't demonstrate more talent and skill than most of them you're not going to get a job. As an artist, the most important thing to understand is to not make excuses when someone offers you critique. You don't have to take it all to heart or make changes around all of it, and certainly not all of it is correct or good, but consider it. Think about what would make someone say that, and realize that as an outsider they have a drastically different view of it than you do, and this can be very beneficial - they see things you don't see, they don't see things you see, and they give you fresh eyes on it. I don't dislike you. I don't become a better artist by putting you down. I want to see you succeed. This is why I'm saying things that aren't easy to hear. They aren't fun to say, either - this is why your mom is never going to give you helpful feedback. The reality is that I doubt your demo reel is going to get you hired by anyone, much less anyone you'd really want to work for, in its current state. I think with a week's worth of re-lighting and adding some very basic camera movement, you could significantly strengthen your reel. Ultimately I think it needs a stronger focus on a specific discipline and more pieces in that discipline, but with what you have right now and the goal of getting an internship soon, you're best served by polishing what you have. And yeah, I post (well, haven't in a while) on CGSociety, polycount, game-artist, etc, and I'm certainly not the harshest critic. But the harshest critics are the ones that are most beneficial to you.
|
|
#
¿
Jan 15, 2010 18:49
|
|
|
Odddzy posted:It's ok, you have hit the nail on lots of the stuff that was in the reel. It was just blatantly saying ''modelling isn't a word'' and harsh affirmations that set me in a bad mood. You ARE right on the stuff that was said, it's just the way of saying them that felt kind of provocative. So you modeled the road on the untextured street scene and textured the road on the textured street scene? You mean only the part with the asphalt and possibly the sidewalk/concrete, or am I misunderstanding this? Those are very small portions of those scenes that barely demonstrate a knowledge of the tools, much less anything eye-catching or skillful. Those are far from The Most Stunning Road In The World, and unless you are literally making The Most Stunning Road In The World, those are not the sort of assets you would want in a portfolio. Those pieces would not have taken someone familiar with the modeling tools or photoshop more than 20 minutes each, and that is being generous. It is certainly possible to make an attractive, stand-out, portfolio-capable road, but you would want something strongly textured, with a lot of wear and character modeled into it. You've got little better than a flat plane. If 90%+ of what is in the scene isn't yours, especially if it isn't the focal point, I wouldn't put it in your reel. Anything less than full ownership of a discipline (modeling, texturing, animation, lighting - and all of these had better be the most impressive part of the shot, IE if you're doing textures they had better not be worse than the modeling, etc) is probably not worth putting in your portfolio. If we cut those two scenes, you have your character, and you have the texturing/lighting on the brass scene. That really isn't enough for a reel. It's better to show less, but more impressive stuff, but you probably need at least 3-5 pieces. Especially since the brass scene isn't all your work, which means you only have 1 modeling piece being shown. Something to recognize is that your school projects are for learning, and your portfolio pieces are for demonstrating what you have learned. Very rarely are you going to get a piece that you submit for a class that also belongs in your portfolio. Mentioning that the character was modeled and textured exclusively in zBrush is probably a good idea - in general, breaking down your pipeline is good to demonstrate which software/aspects of software you're familiar with.
|
|
#
¿
Jan 15, 2010 21:17
|
|
|

|
| # ¿ May 14, 2024 01:40 |
|
|
ambushsabre posted:Sorry to but into this thread kind of late, but I have some general questions that I know you guys would have good answers for. I've played with 3d before, but never reached a level where I could show anyone my work and not run away in shame. I'm in my later high-school years, and I've pretty much decided on a CS major. Is it to late to start 3DCG? I mean, I only want to do it as a break from programming over the summer, but is this even a really viable thing to do? I don't have access to any really good tools like Zbrush or anything Autodesk. I just think it would be a neat thing to spend some time with, so how would I get started on this path, but only as a side hobby? Get some software, google some tutorials for the software. There are free programs like Blender out there, and there are trials of pretty much any piece of 3d software out there. I'd recommend doing whatever you have to do to get some professional-grade software, if only because there are so many more tutorials for 3ds Max than Blender, etc. Once you know the high-level concepts, moving from software to software is easy, but you might as well learn a piece of software you'll actually use. As a highschool student you ought to qualify for student licenses of software, check out studica.com or journeyed.com or whatever the kids are using nowadays. I didn't start messing around with 3d software until I was 19, didn't get serious about it until I was 22, and didn't get a job doing it until I turned 24. I also never went to school for it, so I learned on my own, working on game projects with friends to get a handle on the technical side, and working on personal projects/art to get a handle on the art side. It is never "too late" to start anything, it isn't a race, and you aren't going to miss out on something if you start a year later or two years later or just futz around with it until you figure out what you really want to do when you're 20. Getting your work to a high level of quality will take a long time (years to get to professional level), but the same can be said of any skill, including CS. You shouldn't be ashamed of showing your work, you should only be ashamed of ignoring critical feedback. Everybody makes terrible poo poo when they start out, and its important to make as many different kinds of terrible poo poo so you can learn all the pitfalls and fuckups. The worst thing you could do is not show your work and refine your poo poo until you've become so attached to it you justify all your mistakes and bad ideas when someone offers critical feedback.
|
|
#
¿
Jan 18, 2010 22:32
|
|