


|
The best way to sand aluminum is to use scotch brite pads sanding in one direction (no swirls or up down left right) then wet sand with sand paper. They have different colors to indicate grit. I usually cant find any finer than the green which if I remember correctly is like 320 grit so I then sand with 500 -> 1000 -> Wet 1500 -> Mothers aluminum polish for a mirror finish. Youll want to spend some time with the 320 as it won't load up like sand paper and will do a pretty good job of evening out/taking out the scratches.
|
 #
?
Aug 2, 2008 05:16
#
?
Aug 2, 2008 05:16
|
|


|

|
| # ? Apr 25, 2024 08:12 |
|
|
RealKyleH posted:Thanks! Sounds like a lot of work. I'll probably just do the sensor/speaker mounts to a near mirror finish. Since were on the subject, how is a brushed finish done? Is a wire brush used or something less aggressive like a scotch brite pad? Also, after the final polishing step for a mirror finish do you need to apply any coating to protect it from oxidation? It would suck to do all that only to have it turn dull gray.
|
|
#
?
Aug 2, 2008 06:14
|
|

|
I'm more into the vessels/containers/small scale sculpture, but the same principles apply to most of the jewelry work I've done. RealKyleH: The few rings I have made were cast using investment/the lost wax technique and a centrifugal casting machine. In short, I would carve the initial ring design out of wax, then sprue to a base inside a steel cylinder. A plaster-like substance (investment) is poured into the cylinder, then vaccumed to remove any air bubbles that may have formed. I tend to let this set for at least 48 hours, although waiting that long most likely is not necessary, just long enough for it to dry. You want to place the cylinder in a kiln for burnout (literally burning out the wax or whatever other material or object you have decided to cast) to create the hollow mold roughly 8-12 hours before the time you want to cast, sometimes longer depending on what material you are burning out. The important thing to remember is that the mold must still be hot from burnout at the time you want to pour, as casting into a cold mold will cause cracking and then all hell breaks loose. The centrifugal casting machine itself -- let's see if I can describe this accurately. Think of a spinning see-saw. On one side we have our mold sitting with a small ceramic crucible at the open mouth. On the other side is a weight acting as a counterbalance. As dv6speed mentioned with his dentist friend (who I am assuming uses the same technique) we are working with such a small amount of metal all that is required to melt it is an oxy-acetylene torch. Put your casting grain/scraps in the crucible, melt, flux, skim, remove the heat and close the lid. Our little balanced see-saw then spins on it's axis, slinging the metal into your mold. Let it go for a couple of minutes, and you're done. Stand the cylinder on it's end and let the fresh cast cool so the metal isn't red-hot anymore, then you can quench in a bucket of water and wash away the investment from your object. Cut off the sprues/button of excess metal and get to cleaning! That wasn't short at all now was it... Apologies if my descriptions are lacking/slightly incoherent. Going on very little sleep right now. After the school opens back up for the fall semester I'll take some pictures of our equipment. Unfortunately a writeup on sinking and raising will have to come later this weekend, as it's almost 5 in the morning and I should probably get some sleep tonight. That's too bad, because raising is where my real passions lie. I could stand and hammer for hours. Anyways, while I'm at it I'll throw in some pics of my work. Also: Slung Blade posted:Good lord man, post, post. I want to see pictures of everything. Just thought I would point out that I may well be the only female in this thread. ") We need more chicks that know their way around a shop... We need more chicks that know their way around a shop...One last thing, Brekelefuw: if you give us some idea of exactly what you are wanting to add, I'm sure we can throw some ideas on technique your way. As a music nerd myself (alto, tenor and bari sax for 8 years) you have my interests piqued indeed.
|
|
#
?
Aug 2, 2008 11:02
|
|

|
EigenKet posted:Thanks! Sounds like a lot of work. I'll probably just do the sensor/speaker mounts to a near mirror finish. Its really not, you just sort watch a TV show and do it. You'll sorta figure out what you need to do to make it go decently fast and come out decent after a while. A brushed finish is industrially done on a finishing machine. Finishing machines are one of those many other machines you'll see in machine shops that we don't even have time to mention. There are many kinds. For you at home this provides some great info on both polishing and brushed finishes: http://academic.evergreen.edu/projects/biophysics/technotes/fabric/finish.htm Aluminum oxidizes almost instantly. Aluminum oxide is extremely hard and has a very high melting point. It is often used in sand paper. Normally you clear coat or anodize aluminum because it scratches extremely fast, not because it oxidizes like steel. (Although certain things, like methanol for instance, will cause salts to form on the aluminum.
|
|
#
?
Aug 2, 2008 11:45
|
|
|
EigenKet posted:So if I wanted to solder a piece of aluminum to a piece of stainless I'm S.O.L.? Oh well, I guess that's why we have pop-rivets. I would recommend brazing over soldering in your case. Unless you take your project to a professional, which isn't a bad idea in this case, it will require a bit of research into the techniques and materials needed. You'll also want to do some practice joints first. Also, preheating is almost certainly going to be required. If you do this, please make a post telling us how! I spent about 15 minutes looking on google for useful information but my attention span ran out before I found anything worthwhile. Edit: I will ask how to do this at some welding forums I belong to and see if I get anything useful. Edit2: Keep an eye on this thread for useful info: http://www.hobartwelders.com/weldtalk/showthread.php?p=332337#post332337 TantricPenguin posted:We need more chicks that know their way around a shop... AbsentMindedWelder fucked around with this message at 12:05 on Aug 2, 2008 |
|
#
?
Aug 2, 2008 11:50
|
|

|
dv6speed posted:Edit2: Keep an eye on this thread for useful info: http://www.hobartwelders.com/weldtalk/showthread.php?p=332337#post332337 Wow, that's more involved than I want to do. I was wanting to attach a ss-washer to an aluminum strip but I'm going to rethink that now. Thanks for the info, those papers were quite interesting to read. I never would have guessed that iron and aluminum react to for an brittle intermetallic compound and that is the reason bonding them is so difficult. Of course, if you're NASA you just coat the stainless with titanium and braze away! Metal working is such a fun subject.
|
|
#
?
Aug 2, 2008 20:00
|
|
|
Give that thread about a week. There are lots of real professionals there, including people who work in the aerospace industry. While googling, I did find some techniques that involved adding brazing alloy to the separate pieces (Kind of like tinning with soldering) without titanium. However, not enough info to tell you what to buy and how to do it. When NASA brazes a joint, they have to know the exact properties so it doesn't fail when they go up in space. When you make a joint for most of the projects you encounter, that's not the case, and there may very well be simpler methods to braze the joint, that will work for your application. That being said, if you can rework your choice of metals to be all aluminum, or all steel, that would be a much better idea. Drilling and tapping threads and using hardware may be another option too. Edit: That NASA paper listed in the other thread is a fantastic example of the indirect benefits the space program has had to industry. Even though you don't go up in space, NASA has effected all of our lives in a positive way. Edit2: I bought some 6013 electrodes today. I've used only 6011 so far and wanted some electrodes around that have less penetration. I'll try them out in a day or 2. AbsentMindedWelder fucked around with this message at 20:30 on Aug 2, 2008 |
|
#
?
Aug 2, 2008 20:14
|
|
|
TantricPenguin posted:Just thought I would point out that I may well be the only female in this thread. Ah, apologies for being a sexist presumptuous bastard. But please, post some pictures of your work when you get time, we all appreciate them.
|
|
#
?
Aug 3, 2008 05:58
|
|


|
I tried out the 6013 electrodes today. I like them... alot more slag, alot less spatter, and a little less penetration then 6011. I'll lay down some more practice beads a little bit later I think. My mother had a cheap metal kitchen stool with 3 welds that broke that she asked me to fix. The thinness of the metal meant that my arc welder doesn't have a fine enough current control. The fact that 3/32" is the smallest electrode I have doesn't help either. So of course I brought out the oxy-acetylene rig and had those 3 joints welded up in no time. I'm finally starting to get good with using the separate heat source and filler metal. I can't wait to apply those concepts to TIG welding. Oh, and stay tuned within in the next week or 2 for info and pics on mixing up molding sand, making molds, and some pictures of some castings.
|
|
#
?
Aug 5, 2008 16:38
|
|
|
In an earlier post, I said that "building up a plate" is the best way to practice running solid, pretty beads. This goes for any welding process your are working with. Basically you just keep running beads right next to each other. Make sure to chip/clean off all slag before making subsequent passes. One piece of plate will get you very far... as you can see in the second picture, after you fill up the plate, you just turn it 90 degrees and keep on going. In these pictures, I was using 3/32" 6013 electrodes with an AC stick welder set at 90 amps. I did this for about an hour today, and made some good improvements. Unfortunately the last picture I took didn't come out very well, and of course, that was the pic with the best looking beads.  
AbsentMindedWelder fucked around with this message at 02:39 on Aug 6, 2008 |
|
#
?
Aug 5, 2008 23:13
|
|
|
TantricPenguin posted:One last thing, Brekelefuw: if you give us some idea of exactly what you are wanting to add, I'm sure we can throw some ideas on technique your way. As a music nerd myself (alto, tenor and bari sax for 8 years) you have my interests piqued indeed. Right now the thing I want to do is be able to make nice looking finger rings, braces in sheet and rod form, and any other cosmetic accents I can think of. To make rings right now I just take brass rod stock and use a bending jig to get it to the radius I want, but my shop doesn't have very many radii to choose from so I end up getting it close and then using a pin guage and a vise with soft jaws to work the rod to the final shape. It is pretty sketchy and time consuming to do. I also noticed on some very high end trumpets, the maker puts silver highlights on the edges of his brass sheet braces. I have been brainstorming how to do this cheaply and easily without having to buy/make a plating machine and I think doing some very fancy solder tinning where I tin a design on the brass, but I don't know how to control the solder so it doesn't just flow everywhere. Maybe it is too crazy an idea...
|
|
#
?
Aug 6, 2008 00:49
|
|
|
Brekelefuw posted:I think doing some very fancy solder tinning where I tin a design on the brass, but I don't know how to control the solder so it doesn't just flow everywhere. Maybe it is too crazy an idea... That being said, I always thought plating was done by liquid chemicals, and electricity, I don't think that's too complicated of a machine to make. Got some pics of the types of parts you are trying to figure out how to make? I'm not very familiar with trumpets.
|
|
#
?
Aug 6, 2008 01:10
|
|
|
dv6speed posted:Solder will only flow to clean fluxed metal. So, if you can do a really careful job with your flux application, perhaps using tape or something as a mask, it might be crazy enough to work. In fact, leaving masking tape on the metal while soldering, will make the tape catch fire, but should do a fine job of preventing solder flow to the parts you don't want. I thought of using tape, but I also thought that once it set on fire it might not block the solder from flowing a bit. I used tape to create a line when I was scratch brushing the bell of my trumpet. It worked pretty well as long as I was super careful because the brass wire of the brush tears the tape. A plating machine isn't hard to make, but getting the chemicals and figuring out how to plate only certain parts of a piece is more hassle than it is worth to me right now.
|
|
#
?
Aug 6, 2008 02:08
|
|
|
Brekelefuw posted:I thought of using tape, but I also thought that once it set on fire it might not block the solder from flowing a bit. Update on brazing aluminum to stainless steel New info came into that thread I linked to earlier. It is in fact possible to do this without a NASA laboratory. Heres what you need: 1. Silver brazing alloy 2. Silver brazing flux 3. Aluminum-silicon brazing alloy with 5% silicon 4. Aluminum brazing flux 5. Oxy-acetylene torch. If the work pieces are small enough air-acetylene or air-MAPP might work. First, as in any soldering or brazing operation, cleanliness and proper fluxing is of the utmost importance. In fact, an acid pickle solution isn't a bad idea to use before fluxing. Don't forget the acid pickle won't work if the metal is greasy/oily. Step 1: Clean the stainless steel Step 2. Use the silver brazing alloy/flux to "tin" the surface of the stainless steel. Step 3: Clean the silver brazed stainless steel, and the aluminum Step 4: Use the aluminum-silicon alloy/flux to braze the aluminum to the stainless steel that has been tinned with silver brazing alloy. Step 5. Clean up the acids/fluxes and profit. This works because the aluminum-silicon alloy has a lower melting temp then the silver brazing alloy. However, they aren't that far apart, so you have to work fast and carefully.
|
|
#
?
Aug 6, 2008 02:34
|
|
|
dv6speed posted:Pictures Looking good man! It looks like you've gotten then hang of keeping your puddle and manipulation consistent. Now your next step is working on making your beads not have gaps between them. Go go mspaint.  The point of doing build up welding is to... build up... the base metal to a bigger thickness. Therefor you need to ensure that all areas of your weld are uniform in the amount of metal deposited. The easiest way to get good results is to put down a really straight, big fat, pretty, first pass. Then treat the following passes as a fillet weld (2F assuming you're doing your build up in the flat position) into your first weld pass.
|
|
#
?
Aug 6, 2008 04:27
|
|
|
I made a monkey tool tonight. Had to cut the bar in half first (I'll be making another one soon), and I have a vice, but nowhere to mount it. So I used my chop saw's clamp to hold the bar while I was drilling. 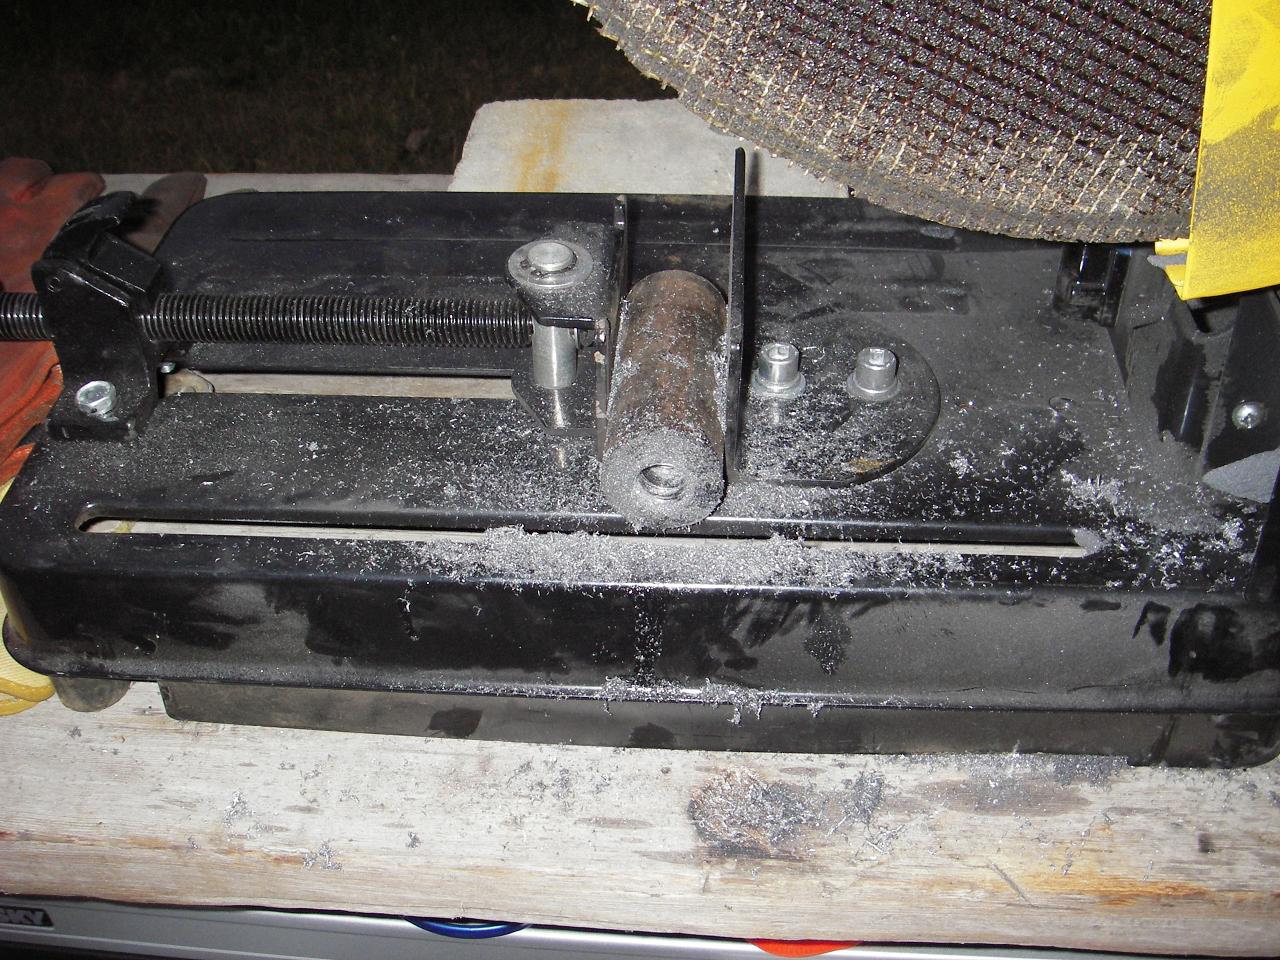 Click here for the full 1280x960 image. And kept drilling. And drilling.  Click here for the full 1280x960 image. Then I did a little filing.  Click here for the full 1280x960 image. Perfect? gently caress no. But hey, not bad considering I don't have a lathe or a drill press. Regardless, it doesn't have to be perfect, it's just meant to form the shoulder ledge of a tenon.
|
|
#
?
Aug 7, 2008 05:02
|
|
|
Slung Blade posted:I made a monkey tool tonight. That's a nice hole for not having a drill press!
|
|
#
?
Aug 7, 2008 12:32
|
|
|
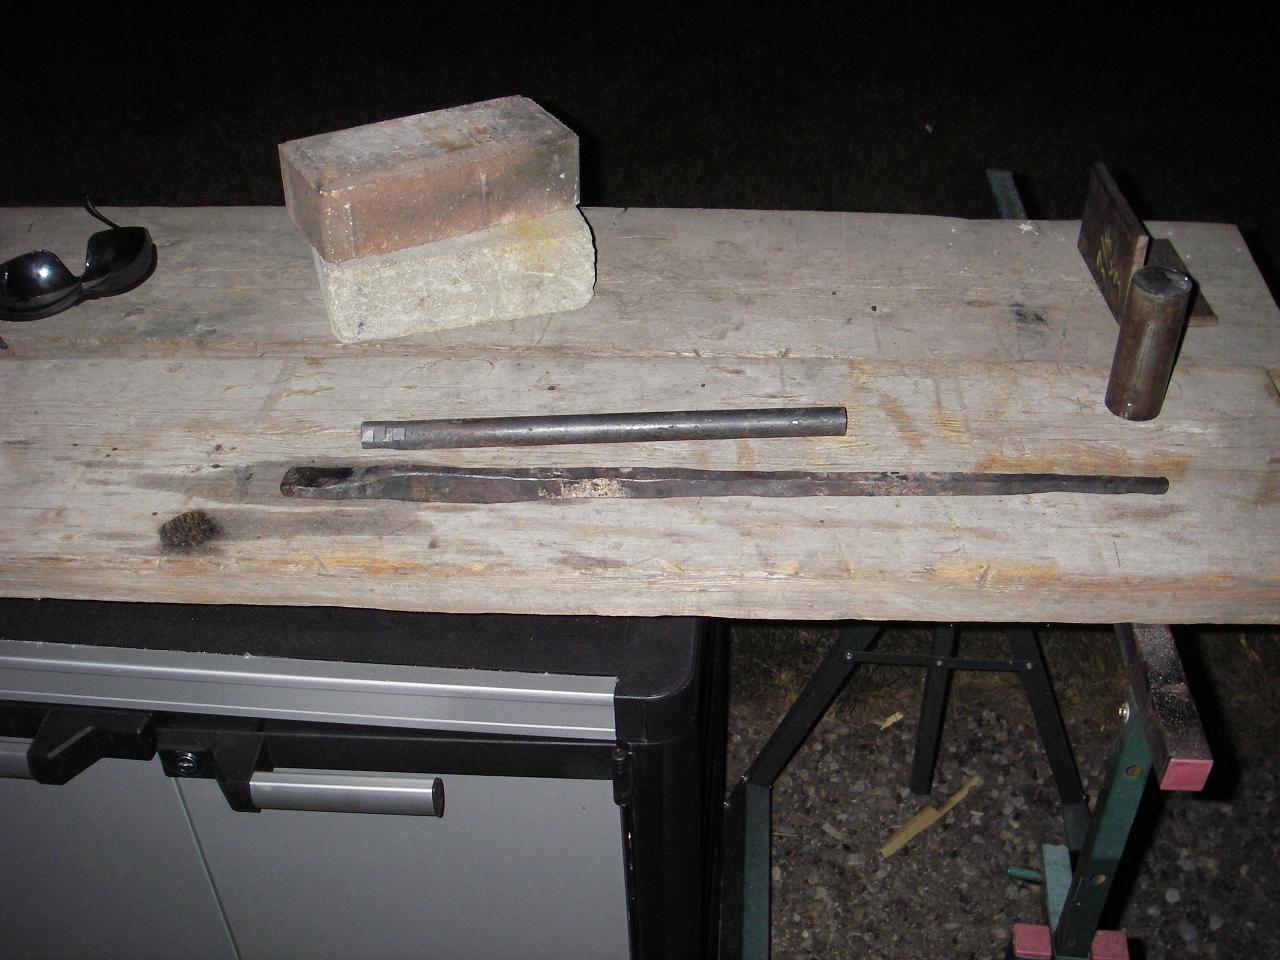
dv6speed posted:What is a monkey tool? Remember that tenon maker I posted earlier? Well that thing is meant to form square stock into a short round piece, so I can join things together using the tenons like rivets. Tenon makers do a decent job, but they leave a taper where the steel transitions from square to round.  #1 shows unformed square bar stock. #2 is after using the tenon maker on the heated square. Note the taper leading from round to square. #3 is after treating the shoulder with the monkey tool. The monkey tool is placed on the end of the round part and hammered into the taper. This flattens out the shoulder and leaves a nice flat area for when you join two pieces. Otherwise you'd have an ugly taper leading into a hole. They have to be fairly heavy because you're hammering them onto very hot stock, and they have to be able to take a fair amount of heat without deforming. The tenons also sometimes try to mushroom out inside the monkey tool, so you have to be able to hit the edge really loving hard to break it loose. If one ever did get stuck for good, all would not be lost, I'd just have to cut the tenon and re-drill the hole. I'll be using all these tools for a project I hope to have done this weekend, I'll take pictures and show you how everything works. Also, thanks! I was pretty proud of how straight it is considering my lack of precise equipment.
|
|
#
?
Aug 7, 2008 16:49
|
|
|
HOORAY! I haven't been in the DIY forum in a while, and just ran across this thread today. Fun! I'm mostly an oxy-acetylene guy, specializing primarily in small scale sheet metal welding, producing the fun stuff you see in the welded figurines thread in SA-Mart. That started out with me trying to figure out what to do with a bunch of extra automotive sheet metal I had sitting around. In the case of the figurines with the oxy-acet torch, laying down beads is out of the question. You just melt the sheet together using coat-hanger wire as filler, and voila! It's probably akin to melting plastic together, really. I also bang around on a couple of arc welders; I've got a little 100 amp AC welder, and a 295/195 amp AC/DC welder. I've got a TIG kit for it as well, plus a high-frequency attachment, but I haven't gotten around to buying an argon tank yet. I really haven't decided if I want to try my hand at TIG at all, or if I'll sell the kit instead. TIG consumables are pricy, aren't they? How quickly does one typically go through them? And how much gas is generally used in TIG? I suppose if I had a TIG setup, I'd weld different things... but at the moment, since I'm just making figurines, I can't really see an immediate need for TIG. But who knows... I've got a Datsun 510 that I need to fab up some parts for, so maybe having one around will be handy.
|
|
#
?
Aug 8, 2008 06:57
|
|

|
jovial_cynic posted:HOORAY! I haven't been in the DIY forum in a while, and just ran across this thread today. Fun! I still have my Mr. Stabby pen holder on my desk at work. In fact, I think that was what prompted me to learn more about welding/metalwork in the first place. So thanks man.  If you enjoy oxy/acetylene welding, you'll probably enjoy TIG welding, they're quite similar, except with TIG, you don't have to gently caress around with balancing the 2 gas pressures. The TIG electrodes last quite a long time, they're somewhat pricy, but considering they're not actually going into the weld, they hold up pretty well from what I've seen. If you have welding rod for O/A welding, you can use the same stuff for TIG. Argon gas can be a little pricey, I think my local shop charges 60 bucks to fill my tank, and my tank was around 250 bucks to buy initially, but I'll have it for life. I still haven't used my own machine yet, but according to the welding shop, the tank is good for 4-6 hours of continuous welding (I think).
|
|
#
?
Aug 8, 2008 07:31
|
|
|
jovial_cynic, If all you plan to work with is standard mild steel, then you really don't need the TIG, your O/A rig and your AC/DC stick welder will do the job fine. If you want to do any special welding, such as really thin material, or odd metals like aluminum, then TIG is a good idea. The real question is, how well will that TIG kit and High Frequency attachment actually do on aluminum? That being said, if you like O/A welding, you will love TIG welding. They are very similar, in fact O/A welding is often suggested as practice before you start TIG. I can't speak to the cost of consumables as I have never purchased any for TIG. TIG uses the same filler metal as O/A. I don't see the argon being a large expense. The TIG process should be cheaper then the fuel/oxygen costs of the O/A process. In fact, if that stick welder and TIG kit of yours let you do small enough current settings and fine adjustments, you could weld your figurines with it, and probably have more control over the weld then with O/A. Edit: Out of curiosity, I will call my LWS (Local Welding Shop) tomorrow and get a price quote on an argon cylinder and how much it costs to be exchanged. BTW my LWS doesn't do filling, only exchanges. AbsentMindedWelder fucked around with this message at 07:54 on Aug 8, 2008 |
|
#
?
Aug 8, 2008 07:48
|
|
|
Slung Blade posted:If you enjoy oxy/acetylene welding, you'll probably enjoy TIG welding, they're quite similar, except with TIG, you don't have to gently caress around with balancing the 2 gas pressures. The TIG electrodes last quite a long time, they're somewhat pricy, but considering they're not actually going into the weld, they hold up pretty well from what I've seen. With the small scale welding that I do, the balancing of the gasses is actually not an issue. If you do it long enough, you can almost do it by ear, since the change in pressure creates a different sound. As for rods... ha. I'm using coat-hanger wire. ")
|
|
#
?
Aug 8, 2008 15:58
|
|
|
If you are steady with the torch for dc welding steel 1-2 tungstens will last a very long time. TIG welding is pretty cheap in terms of cost to use. IIRC its like $35 to fill up my 80CF (the 5 feet tall ones) bottle. You can get cheap tungstens on eBay but they're usually in packs of 10 which will take a very long time to go through. I got my bottle and regulator(flow meter) cheap on craigslist but you can get them pretty reasonably on eBay as well. If you wan to buy locally Harbor Freight sells both of those items.
|
|
#
?
Aug 8, 2008 16:03
|
|
|
 Click here for the full 1280x960 image. Part way through a new set of tongs. 3 hours previous, those 2 bars were identical. I really, really need a power hammer.
|
|
#
?
Aug 9, 2008 06:47
|
|
|
Yesterday was a fun metalworking day. In the afternoon, I went up to Trevose, PA to Harbison Walker Refractories. I now have 50 square feet of 8lb density 1" thick INSWOOL ceramic blanket, and 55lbs of VERSAFLOW 60 castable sitting in my garage now. That is plenty of material to make a crucible furnace and a forge with plenty left over. Now I just need to finalize the measurements on how big of a furnace to make with it. I'm thinking 9" ID. A buddy of mine stopped by my place in the evening with his coal forge and 160lb anvil of his, and made a throwing knife out of a railroad spike. This was my first live blacksmithing demonstration. I had a chance to beat a piece of red hot rebar to see what it's like, which was fun. The forced air for the forge was being supplied by a small shop vac. The hose was about 1.5 feet away from the pipe you see in the picture. The forge is actually an old ex-charcoal grill. 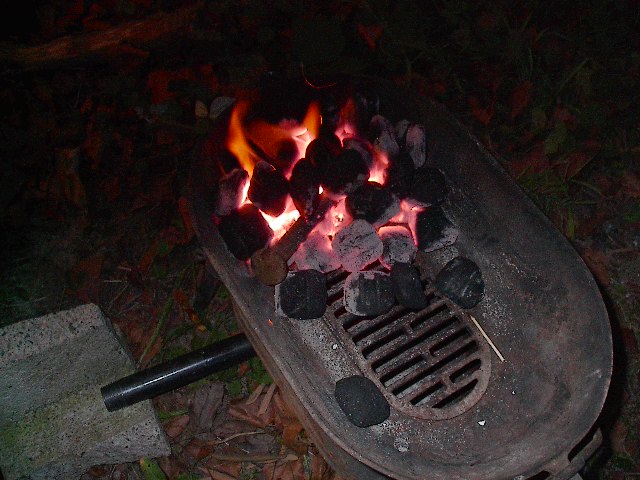 
|
|
#
?
Aug 9, 2008 17:10
|
|
|
Looks good man, but does he always use briquettes? There's sulphur and all kinds of impurities and filler that they introduce to the steel. So what did you think of the blacksmithing? Will you be doing it on your own someday?
|
|
#
?
Aug 9, 2008 17:57
|
|
|
Slung Blade posted:Looks good man, but does he always use briquettes? There's sulphur and all kinds of impurities and filler that they introduce to the steel. Blacksmithing is awesome, I've always wanted to do it, and will surely do it. I'm particularly interested in bladesmithing. In fact, even though I don't have an anvil yet, since the refractories I have are applicable to both a crucible furnace and a forge, there is a chance I will make both at the same time, since it'll be easier to work with the castable all at once.
|
|
#
?
Aug 9, 2008 18:07
|
|
|
dv6speed posted:No, he said he'll be using different kinds of coal. He's just starting himself and is only using the charcoal briquettes for practice. Glad to hear it, always nice to see more people get interested in it. I want to do bladesmithing someday too, but I need more practice at the basic stuff first. I use lump charcoal personally, it's basically pure carbon. Plus it's relatively environmentally friendly, as it's renewable. (Plus there aren't any people to buy coal from here  ) )I would sure like the higher heat offered by coal though. Can you get your hands on a 4 inch diameter round steel rod about a foot long? Because those make pretty decent anvils. Turn it on its side for a "horn" and leave it standing up when you need a flat face. If nothing else it would be good excercise.
|
|
#
?
Aug 9, 2008 18:14
|
|
|
I have 2 knife making books laying around somewhere what I need to look for, I believe by Wayne Goddard, if I remember right. I still want a full sized anvil however, as I'd like to be able to smith larger things too. The buddy who came over with the forge and anvil happens to be a goon as well. Perhaps he'll come out of the woodwork.
|
|
#
?
Aug 9, 2008 19:03
|
|
|
dv6speed posted:I have 2 knife making books laying around somewhere what I need to look for, I believe by Wayne Goddard, if I remember right. I still want a full sized anvil however, as I'd like to be able to smith larger things too. If you're looking for a new one: http://www.centaurforge.com/departments.asp?dept=141&gclid=CLf3qI6sgZUCFSBciAodcVvO1w http://www.ratholeforge.com/ http://www.nimbaanvils.com/ http://euroanvils.net/ http://www.oldworldanvils.com/ I would have been fine with a used one, but there weren't any for sale around me when I was in the market. I'd love a 2 or 300 pounder someday though, so I'm keeping my eyes open.
|
|
#
?
Aug 9, 2008 19:07
|
|
|
Another busy day, though it was mostly just simple decorative rods for the garden. Click here for the full 1280x960 image. 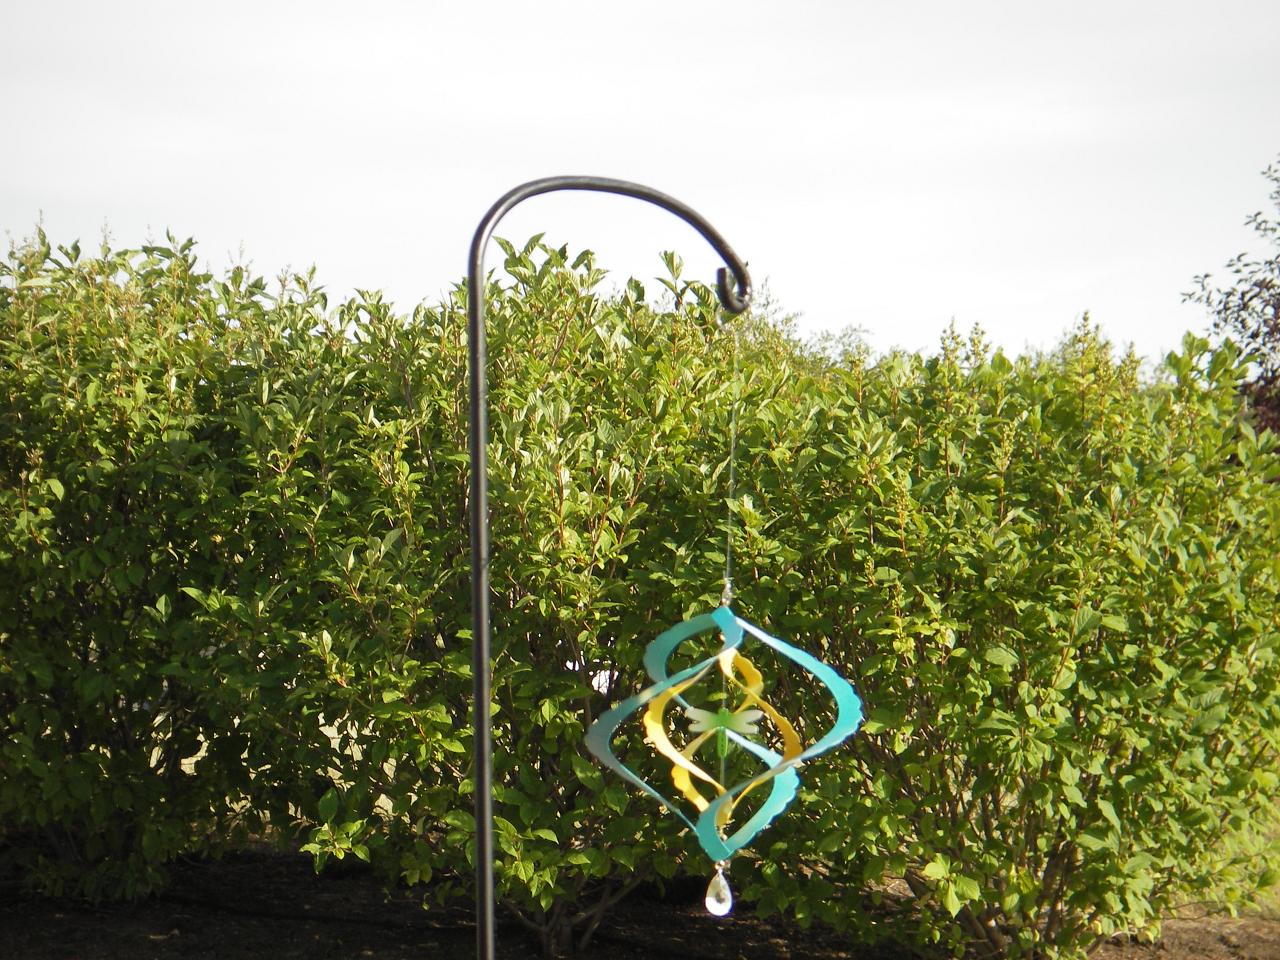 Click here for the full 1280x960 image. I'm really proud of this little guy, the curve is pretty much perfect. 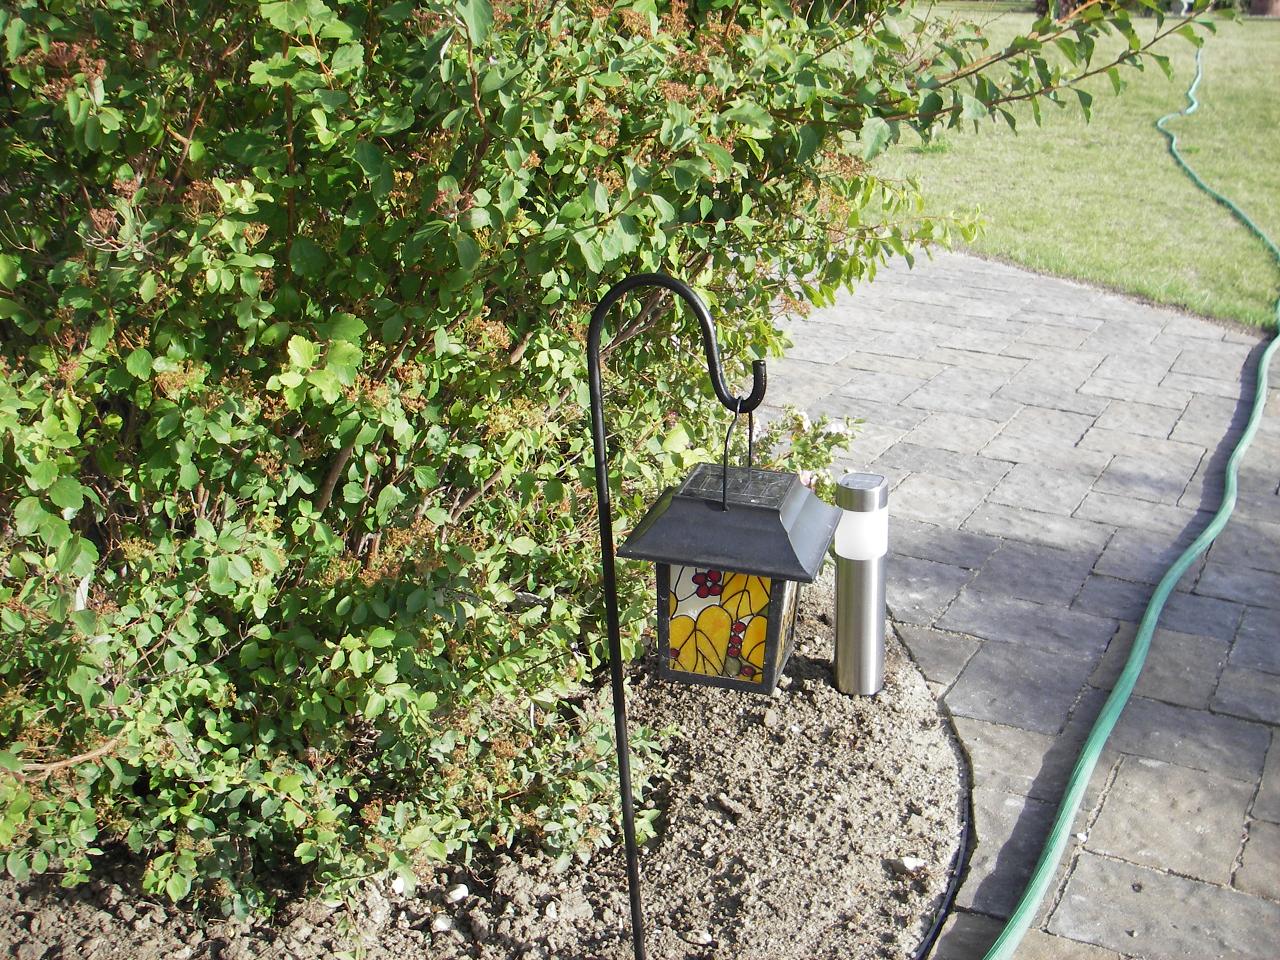 Click here for the full 1280x960 image. This one turned out pretty good as well.  Click here for the full 1280x960 image.  Click here for the full 1280x960 image. Hopefully the disco ball will keep robins out of our saskatoon berry bush hedges.
|
|
#
?
Aug 10, 2008 04:30
|
|
|
I purchased an anvil today. Last night a gentleman responded to a WANTED ad on craiglist that I posted. It is made by the "Trenton" company. The weight is still unknown as I haven't weighed it yet and can't find any markings, but it's estimated to be between 120-150 lbs. I got it for $50. I made a coat hanger out of a railroad spike today, but we will have to wait a few days to get a picture of it cuz I'm having some camera issues. 
|
|
#
?
Aug 11, 2008 00:36
|
|
|
dv6speed posted:It is made by the "Trenton" company. The weight is still unknown as I haven't weighed it yet and can't find any markings, but it's estimated to be between 120-150 lbs. I got it for $50. Holy man, what a bargain, good find. How's the rebound? does it feel springy when you hit it? Going to polish it up and repaint it or anything?
|
|
#
?
Aug 11, 2008 04:35
|
|
|
It has good rebound, and the ring test showed there were no cracks. I'm going to clean it up with a wire wheel. Don't know about painting it tho. I may just keep a thin coating of oil on it (except the face) to prevent rust. I think I can see the words "solid wrought" which means this would be forged wrought iron. This is the second time I place an anvil wanted ad on craigslist. This time around, I got the email about this anvil the same day as posting the ad! It came from a truck driver who runs a small auto shop on the weekend. It used to be his dad's, who used to work at a scrap yard. So that probably means someone sold this anvil for scrap at one time, and it was saved by the guy's dad. Which reminds me... my buddy got a no-name import 160 lb anvil from the scrap yard. It's worth going to your local scrap yard and giving them your phone number in case they see any anvils come through there. The first ad I placed, some woman wanted $450 for an old lovely cast iron anvil... yeah right! She tried to sell that anvil to buddy too. Both of us told her it is only worth it's scrap value. AbsentMindedWelder fucked around with this message at 12:45 on Aug 11, 2008 |
|
#
?
Aug 11, 2008 12:31
|
|
|
That's great DV6. I wish the scrap yard close to me sold scrap to consumers again, the bastards started only accepting metal and not selling it. The jerks  So what are your plans for a forge?
|
|
#
?
Aug 11, 2008 16:53
|
|
|
Slung Blade posted:So what are your plans for a forge? It will have 2" worth of Inswool, something like a 1/2" layer or so of Versaflow 60, and a coating of ITC100. The exact same refractory combination my crucible furnace will be getting.
|
|
#
?
Aug 11, 2008 17:18
|
|
|
Brekelefuw posted:I also noticed on some very high end trumpets, the maker puts silver highlights on the edges of his brass sheet braces. I have been brainstorming how to do this cheaply and easily without having to buy/make a plating machine and I think doing some very fancy solder tinning where I tin a design on the brass, but I don't know how to control the solder so it doesn't just flow everywhere. Maybe it is too crazy an idea... Oh! I'm sorry I haven't checked in sooner! What you are wanting to do is called solder inlay. Basically, you have to "carve" out a depression of the design you want on the metal you are working with. Etching works really well also, and is easier to get more detail, but most people aren't set up for that. Anyways, it's pretty simple. Just take a dremel or flexshaft and carve out the design you want to be inlaid. 2 or 3 mm shaved off is sufficient. Pool solder in this area then clean it up and you're done. I usually use much more solder than necessary then sand flush until the design shows back up. Here's an example of what you can do with this: (Not my work.) http://cageycrafters.invisionzone.com/uploads/1194455233/gallery_1_1_27911.jpg
|
|
#
?
Aug 13, 2008 16:08
|
|
|
Working on a window cage for a friend. My loving work lights burnt out and I didn't get as far as I wanted, but I got a fair bit done. I need to bend 2 more bars for horizontal support, drill some holes, and rivet it up.  Click here for the full 1280x960 image.  Click here for the full 1280x960 image. 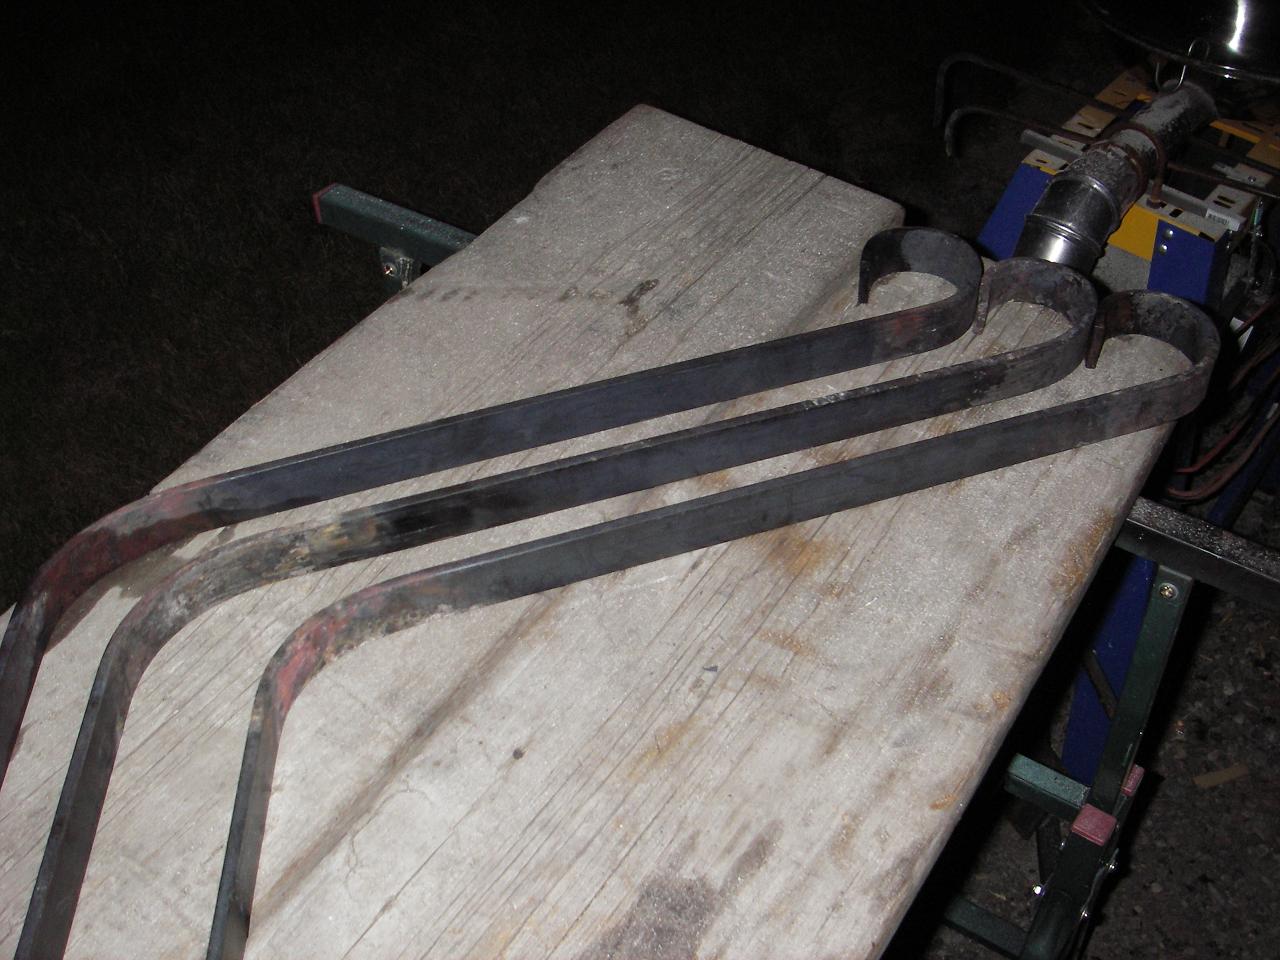 Click here for the full 1280x960 image. Also, when I replaced the 50 cfm fan with a 70 cfm fan, it improved the performance of my forge, but not nearly as much as I thought it should have. I drilled 2 more 1/4" air holes in the blowpipe tonight and it improved the heat by at least 50%, it was pretty incredible. I think I may have to drill 2 more and see if I can get carbon to fuse 
|
|
#
?
Aug 14, 2008 05:37
|
|
|
I wanted to post some of these last night, but waffle wasn't working, but at least I got more done tonight.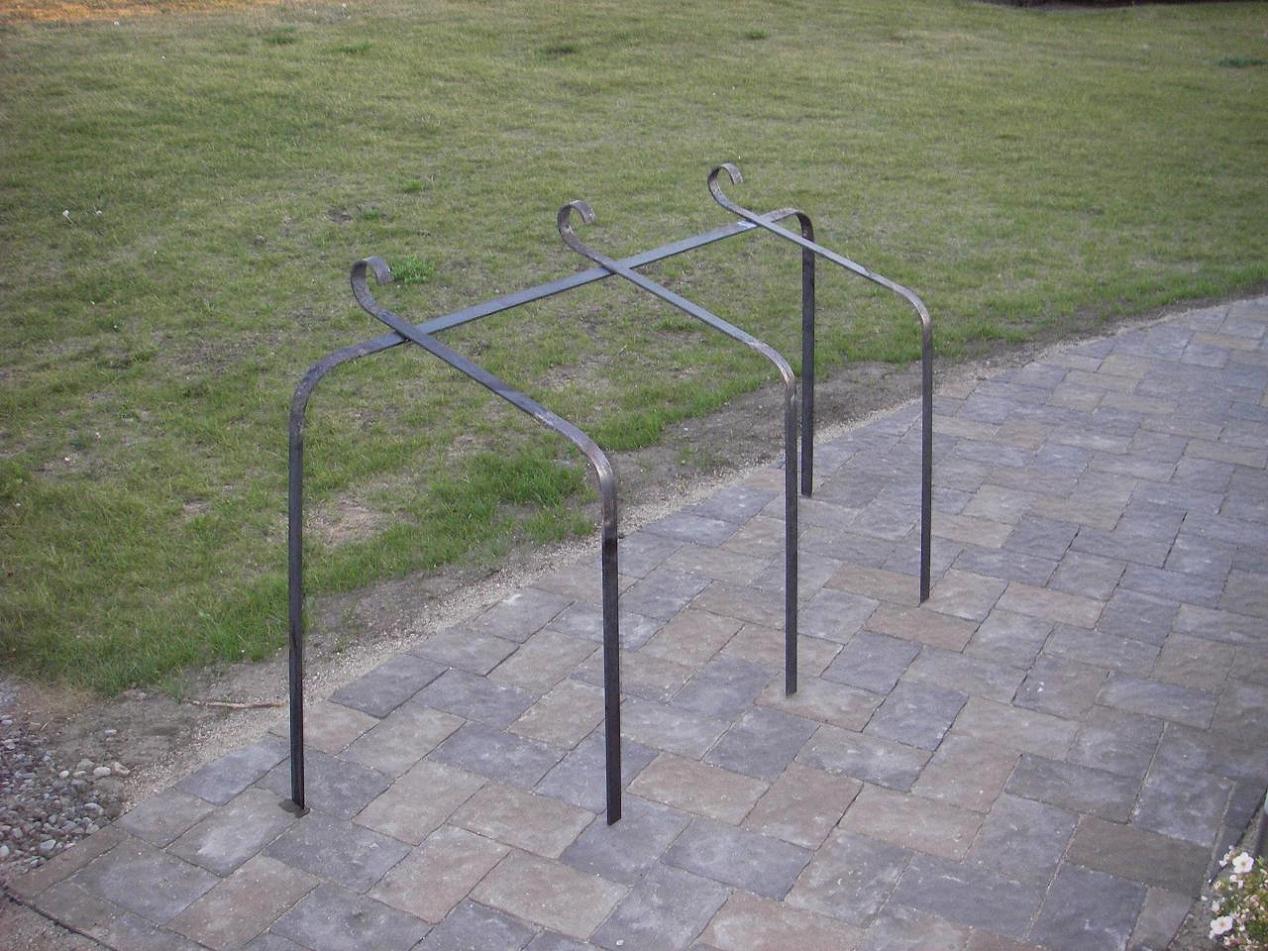 Click here for the full 1268x951 image.  Click here for the full 1268x951 image.  Click here for the full 1268x951 image.  Click here for the full 1280x960 image.  Click here for the full 1280x960 image. 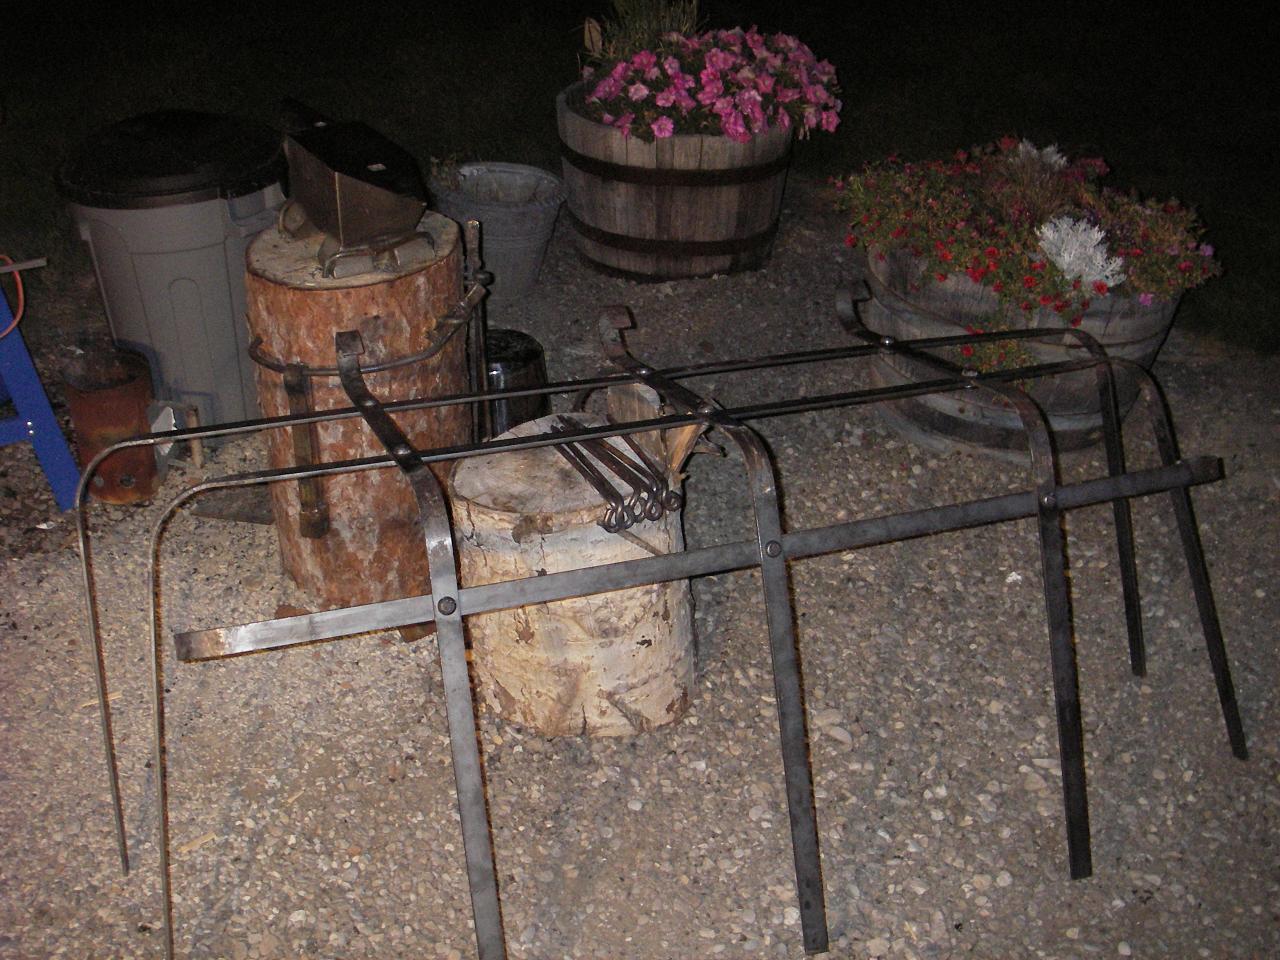 Click here for the full 1280x960 image. If it looks a little uneven, it's supposed to be, as the window well it's going into tapers down as it gets farther away from the house. Took way longer than I was hoping and I'm not quite done yet. I need to drill 14 more holes to put the spikes in, and then the lockholes. Then I need to clean it, prime it, and paint it Do you guys think really strong millscale needs to be removed before I paint? I usually do, but I don't know if I have enough time before I deliver it tomorrow.
|
|
#
?
Aug 16, 2008 07:13
|
|
|

|
| # ? Apr 25, 2024 08:12 |
|
|
Slung Blade posted:Do you guys think really strong millscale needs to be removed before I paint?
|
|
#
?
Aug 16, 2008 10:16
|
|