


|
I'll give ya a cool 100 bucks, hell make it 150, you handle freight to ca??Ambrose Burnside posted:Any special rules for grinding and buffing titanium? Do I need dedicated belts n wheels (I remember vague rumblings about 'contamination')? This is gonna have to evolve into tumbling titanium soon, anybody have any experience with that? It finishes up nicely with fine wet/dry paper, light grinding on alox wheels seems okay but watch the sparks and dust, and goddamn poo poo heats up like a mofucker, that's all I got 
|
 #
¿
Apr 19, 2016 09:30
#
¿
Apr 19, 2016 09:30
|
|

|

|
| # ¿ May 3, 2024 01:57 |
|
|
His Divine Shadow posted:One of the originals and the new part: Consider setting up the lathe as a shaper, and indexing the chuck around in 90* increments to nip out the corners? It'd be a bit more fiddly than just doing a single keyway, and still fairly slow, but it'll work and save on most of the filing. https://www.youtube.com/watch?v=HR1pvQYFFck&t=303s
|
|
#
¿
Dec 29, 2017 14:29
|
|
|
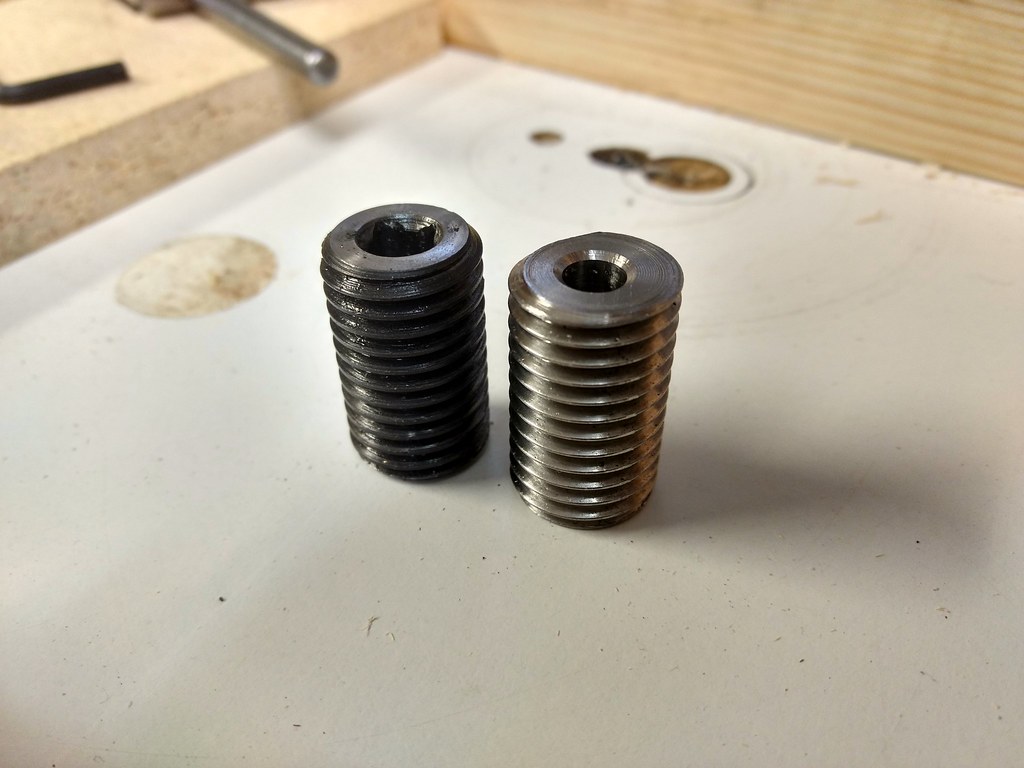
Figured I'd see what I can do with some some random ~1/2"-3/4" hardware and 1.5" 6061 slugs that were laying around. I think one of these 3/4"-10 s.s. grub screws will be getting bored out and turned into the male thread.  Face some slugs, drill/tap 1/2"-13 .500" deep, stick one on a threaded mandrel and take a few bites at 22.5* steps   Could take some finer steps, or file it pretty close to a true radius with some elbow grease, but I think this is probably good enough for now    Once the second half is caught up to match, I figure flip them over in the chuck and re-bore for some magic threads 
|
|
#
¿
Jan 27, 2018 12:03
|
|
|
Finally got a chance to finish this thing up! Spin up the second quasi-hemisphere, and a few other bits to get started.  Some complications, mostly because I'm stubborn and wanted to use one of those shiny 3/4"-10 stainless setscrews for the main thread- my only matching tap was a taper tap, so thru holes only really, and def. no shallow blind holes since you don't reach full thread depth for 7+ turns. Also the lathe doesn't want to cut less than 11 tpi, so single pointing 'em was out. Decide to make a threaded bushing to press into a matching bore.  Finish the donor screw first- remove threads for .400", leave .375" of nice thread, step drill thru to 1/2", leaving about .06" wall at the narrow end. Plenty of meat for this one. Pick out a slug of brass for the female thread, it should run really nicely on the rolled stainless threads without galling up. Bushing is ~.900" OD, .405" long, with a generous bottom-side OD chamfer to make install easy, and the topside OD left sharp. Final installed thread depth will be ~.025" longer than the male stud, to ensure things seat on the mating faces instead of bottoming out on the screw. Once the thread assembly is happy and all is deburred, move on to finishing the shells. Put 'em back on the same 1/2" threaded mandrel and finish all OD work you may have forgotten (grooves, etc) before the next step!  Drill out 1/2"-13 threads to about .62" deep to form the bottoms of the storage cavity at either end. Happily rediscover a reground ball-ish end drill from a previous project, so they even look real nice down in there  Bore .400" deep for a snug slip fit to the screw, we're gonna zap it in with loctite 609 so it wants a ~half thou to not squeeze out, ideally.  Final step- skim a thou off the face to confirm all is square and the mating surface is unbruised, then pull it, degrease both parts with acetone, loctite and press home.  While that's curing, finish up #2. Matching drill op, but the bushing dia. is a bit larger on this guy.  .400" deep by ~.901" dia, should still have at least ~.13" of meat at the thin corner down there, if my eyeball facets on the outside aren't too far off print.  Nip a quick chamfer with the compound on the drilled/bored bottom corner, it'll try and hide a sharp wire edge and you know someone's gonna stick their finger in there. Blue sharpie makes it easy to confirm it's gone, what with all the reflections. Leave the top edge of the bore sharp. Confirm bushing fit, and pull/loctite/press when satisfied.  Set it aside for ~15 mins to chooch, and go get some coffee. Mmmm, coffee. Okay now go pop it back in the lathe. Because we left the bushing standing proud of the mating face by ~.005" with some sharp corners on purpose, and that's because we want to skim a thou or two off the assembly as a whole. So get things running true, and do it.    Looks good, but does it screw??   Hell yeah, it sure does.   It closes up pretty drat good, the seam is "there" but blends in nicely, and the coarse threads and stainless/brass combo means it shoudn't get stuck closed, even if you crank the wrong way. Just gotta make sure the faces are wiped clean when it goes together so they don't scratch. It's certainly not the way to make hundreds of them, but for a nice one-off G-job it should do the trick. e: shame on an IGA posted:Well, might as well share the spreadsheet from my apprenticeship when I had to manually cut hemispheres all the time Yeah this works drat well, I prefer to blue up after stepping to see progress and use single cut files though, as I hate getting much emery/grit near a (good) lathe unless I can help it. Lathespin.gif fucked around with this message at 12:24 on Feb 10, 2018 |
|
#
¿
Feb 10, 2018 12:02
|
|
|
iForge posted:i decided on a tool post and bought a small starter kit of insert tooling to mess around with. I have a bunch of HSS to use as well. The tool post cross slide nut will require modification to fit my lathe but I can have that done easily enough. Hey looks like I'm a little late here, but imo the BXA / 200 series is probably too big for a ~12" swing machine? You don't really need the >1/2" shank capacity for most things, the added bulk of the larger post/holders will eat into yr work envelope, and you may run into issues bringing smaller tools up to, or larger shank tools down to centerline. Personally I'd go with an AXA / 100 series until 14"+, although I'm not a south bend whisperer so maybe I'm wrong in this case? Aloris is sweet as heck but phase II/etc aren't bad for the money and totally usable, if a bit squishier. Definitely stay with the wedge lock over the piston type, too. And save the lantern holder somewhere, you'll likely want it someday. And get at least a couple spare 1/4" or 5/16" HSS sticks, they're only a couple bucks per and super flexible for all kinds of work. You can't afford to not have a couple on hand for that weird job that just came up https://www.amazon.com/HSS-cutting-tool-blanks-set/dp/B0002EXRWW/ Lovely old piece of iron ya got there
Lathespin.gif fucked around with this message at 11:30 on Apr 4, 2018 |
|
#
¿
Apr 4, 2018 11:05
|
|
|
Sagebrush posted:my new apartment has one of those glass stovetops and it is making me acutely aware of the unflatness of the bottom of my cast iron skillet. should i surface it with a fly cutter y/n Grab it in a four jaw and face it that way, if you can clear the handle swing?
|
|
#
¿
Jan 14, 2023 10:35
|
|
|
I don't have fully arbitrary pitches available, but I do have an HLV tumbler and some change gear options, pretty good odds I can find it in there. Send it my way?
|
|
#
¿
May 15, 2023 17:50
|
|
|
Leperflesh posted:I'm struggling to find a mate for this screw. It is a "slotted raised countersunk" steel machine screw from a tool (a folding drawknife) made approximately the mid 1890s (pat. 1891) in Boston by JS Cantello. I'm restoring an old tool and I'm well aware that perfect is often unattainable or stupid expensive, so closest match is acceptable... the previous owner just jammed a too-long wrong screw in to replace the lost or broken one and backed up with a square nut which is kinda cool but I'd rather have the right screw if I can find it. Leperflesh posted:This kindly goon has volunteered, we're making arrangements via PMs! Thanks, Lathespin.gif! Your username instills confidence. Hey so this mystery screw showed up yesterday, here's what I've got so far   It's steel, pretty soft (less than 40hrc), threads cut with a die. Fair amount of galling and wear on the shoulder. 60* threadform, main diameter at basically .249", pitch is... 24tpi, which I have on tap, sweet. Nice sized root, flanks are a lil rough but over .024" wires I get about .257"-.259". Looks like a vintage 1/4"-24 UNS to me!   The countersink angle looks pretty steep, by eye a fairly close match to a center drill so ~60*, maybe 70*? Drill a scrap slug to .257", mill off half a diameter and set compound to bore at 30* for a quickie gauge.   I guess 60* it is.  That's it for tonight. To do: -pick a threading tool and hone the tip radius to match the root, as the cutters I've found so far are either too sharp or too blunt -pull material, there's some 3/8" bar drops in 1045, O1 and maybe 4140 around here somewhere. Leaning 1045, I think? -find a ~.050" slitting saw & arbor for the screw slot, 1/4" 5C collet and block, etc. -do it e: found one more pic. So hey for anyone playing along at home, you can gauge thread pitch directly with whatever known fasteners or taps you have handy, just ignore the diameters and mesh them with a backlight and take a peek. Here's a 1/2"-20 tap with a 1/4"-20 screw, for example: 
Lathespin.gif fucked around with this message at 10:29 on Jun 1, 2023 |
|
#
¿
Jun 1, 2023 10:13
|
|


|
Leperflesh posted:
Yeah I have some stainless bar too, but I figured it wouldn't match character with a vintage tool as well as carbon or alloy? Some options I dug thru:  For stainless we have 304 (but too shiny), 15-5 and 17-4 (both probably a nice fit, but again too shiny). For steels I'm pretty sure this 4140 is annealed, if it was prehard it'd probably be the one. O1 would be good, even if overkill. Decided to roll with the 1045, the grade 8 bolts would be a solid choice too but more work to prep. I thought I maybe had one lil' piece of 1144 lurking in a drawer, but no luck today. Threading tool is prepped, tip radius stoned just smaller than the sample. I should really make up a phone mount for my scope, this handheld focal length thing sucks   Running the spindle in reverse and cutting on the backside, so I have easy compound clearance to the chuck for the taper. Using a cheapo ccgt for aluminum, they leave a nice finish in harder stuff if you're gentle with them.  Didn't feel like trying for a disappearing thread today and angering Crom with my hubris, so a .050" thread relief groove to minor diameter it is. Stone a radius on the tool corners to help keep the stress riser ghosts away.  Blue it up, sanity check for alignment  Looks good, dial for 24tpi and take a scratch pass, confirm pitch  Solid, take 1-3 thou passes with the compound until it starts to look like a thread, once it gauges about .256" the threadform is done. Surf a tiny triangle file through it under power, break them sharp crests, wire brush etc.  Part off, switch to 1/4" collet and face to length, chamfer the corner heavy and start filing in the dome     Almost done now, just needs a slot. Mill time.  A reground .051"? That'll do.  Touch off top of screw, down 1/2 of .048" blade + 1/2 of the ~.372" screw head diameter to set Z, touch off the cut and feed in ~.070". Was gonna do .050" but it looked like it wanted a bit more, idk?  A quick deburr under the scope and a final spin with some 800 grit for the head, and that's all folks!  So it's still in the white and just wetted down with some WD40 for now so it won't flash rust, but it does have those 45 points of carbon- I could give it a torch ride and an oil dip, see about hardening it up a bit and tempering it back? Or just mail it out as-is and you can do whatever finishing you're into or just run it, it's all good.
|
|
#
¿
Jun 2, 2023 08:40
|
|
")
|
 The first part gives you all the zeroes you need for diameters and shoulders and such, best to flip it and make a spare before you break setup, especially when you need to swivel the compound around. Goobering up a thread pass and scrapping a part sucks, but needing to first switch setup to go back and cut another blank is basically the worst. Plus in this case it's an odd-duck size and maybe has two handles, I figured an extra is good! Length looks pretty solid from here, could have made the threads maybe half a turn shorter but need to bottom out on the head before running out of threads, and I wasn't sure if they'd seat any differently in the taper. Looks like ~2/3 of the shoulder will engage so yeah should be good! Overall I think I made them a couple whiskers longer, I figured you can always file or grind them shorter to match when fitting if needed. Mcmaster and MSC do still have 1/4"-24 taps and dies available, in case you need those or someone else wants to go into business here! What a sweet tool, wow. A lot of nicked fingers and shavings in there. I love those handles, talk about character! Are you restoring this to put it to work? Also you shoulda mentioned spring wire earlier, I'd have tossed in a couple lengths!   Brass is an odd alloy choice for a spring, I'd def. recommend phosphor bronze instead if you don't want to use steel or stainless wire.
|
|
#
¿
Jun 10, 2023 18:56
|
|
|
Leperflesh posted:I foster cats in collaboration with our local cat rescue org, Community Concern for Cats, so I decided to throw cash at RAINN. holy poo poo yr redacted info  man I really needed that today, thanks! I'll pass it on, hell yeah  
|
|
#
¿
Jun 10, 2023 19:47
|
|

|
gently caress YES IT FINALLY HAPPENED     https://www.youtube.com/watch?v=P3ALwKeSEYs
|
|
#
¿
Jul 22, 2023 20:20
|
|
|
Alan steel in Redwood City is great and everyone should check them out, and there�s another big supplier in SJ that�s not metal supermarkets but I always forget the name.
|
|
#
¿
Aug 18, 2023 22:29
|
|
|
ryanrs posted:Go to Alan Steel, open M-Th. They have a good selection of offcuts for $2/lb. Useful stuff like 2-3 ft lengths of square tube, etc.     
|
|
#
¿
Aug 19, 2023 06:34
|
|
|
You got a sketch? I think I have a couple ~1.25" slugs in 1144 or some other non-mild steel, would need to poke thru the bins For copper tube even aluminum would likely be 100% fine until you dropped it or bonked it with a tool or something Lathespin.gif fucked around with this message at 07:28 on Jan 26, 2024 |
|
#
¿
Jan 26, 2024 07:23
|
|
|

|
| # ¿ May 3, 2024 01:57 |
|
|
Collets for sure over a chuck, so deformation won't be a problem with thin tube walls. Form tools in stainless will want all the support you can get, 304 tubing tends to be nasty. Got a 5C?
|
|
#
¿
Apr 19, 2024 10:12
|
|