

|
Remy Marathe posted:Straightening a photo- This might be obvious to everyone but me, but before I was shown it I'd straighten pics using transform/rotate. I did it by eye before I learned about the rulers, but even with rulers using rotate leaves a skewed square photo with the background colors at the corners, which you then have to crop out anyway. Adobe Camera Raw is easier. Just use the "straighten" tool, draw a line on any line you want to be horizontal or vertical and it straightens and crops automatically (if you want, it won't crop if you tell it not to."  Click here for the full 1183x766 image.  Click here for the full 1183x766 image.
|
 #
¿
Jan 31, 2009 23:54
#
¿
Jan 31, 2009 23:54
|
|


|

|
| # ¿ May 5, 2024 10:53 |
|
|
poopinmymouth posted:Soft light seems to allow the affect without you "seeing" it. One thing I dislike is when your methodology is apparent. Overlay might work in some cases, but I found I had to back off the layer transparency till it basically looked like the soft light method. When I sharpen in a similar way, I find that hard light and overlay both have harsh halos, and, as you say, you have to back off so far you might as well use soft light.
|
|
#
¿
Feb 3, 2009 01:38
|
|
|
poopinmymouth posted:How do you white balance properly in Photoshop? WB in Lightroom is so easy, you can easily warm or cool the WB, or use the eye dropper, OR use the presets. Is there a similar option in photoshop? I normally WB for my subject, and I guess I could re white balance for background, and send that to photoshop too, then mask them together, but I'd love it if there was an actual tool that replicated easy WB within photoshop. I know it gives you more control technically, but I've never been able to white balance properly within photoshop, but can very easily do it in Lightroom. Camera Raw is the easiest way I've found. Similar to LR I'd guess, with a temperature gauge as the most straight-forward.
|
|
#
¿
Feb 18, 2009 02:58
|
|
|
FunkyJunk posted:Maybe true, but then he's got to use craptastic Vista on it. There's more to a computer than its speed. I have to use that lovely OS at work, but there's no way in hell I'm going to use it when I get home. The "apple tax" is worth it at twice the price IMO. I've yet to find a problem with Vista64. Not to mention that CS4 actually takes advantage of 64 bit processing. Buy a new system and you'll never notice any of the "problems" of Vista.
|
|
#
¿
Mar 3, 2009 22:26
|
|
|
evil_bunnY posted:He suddenly disappeared when challenged to show his own work didn't he? Fire away! I'm going to venture a guess that his refusal to show his work, a consistent stance, did not motivate him to stop posting, but rather the fact that it was always an argument. Mind you, started by him, usually, but still, always an argument. His staying away on that basis is admirable.
|
|
#
¿
Mar 4, 2009 19:35
|
|
|
He's not even posting and it's turning to a bitch fest. Maybe that's why he's not posting. As for not posting his shots, if one doesn't want critique, one doesn't post ones shots. Seems simple to me. His arrogance certainly put him in a place where he didn't seek critique here, but that's his call. His presence casts its shadow on us even now. That's the true sign of greatness, right?
|
|
#
¿
Mar 4, 2009 22:34
|
|
|
spog posted:You can learn from my mistakes: I wanted to do a bunch of prints, so I took 5 representative samples and had them printed at 4 different shops. I examined the prints and picked the shop that gave the closest to what I considered 'accurate' colours and then sent the big batch to that shop. So, Ken Rockwell made your prints?
|
|
#
¿
Mar 12, 2009 13:40
|
|
|
SeXReX posted:I load my photos into Windows live gallery and hit auto fix, if I don't like the results I hit undo and do it myself, the few options available are enough to fine tune photos, besides, why waste your time on the computer when you can get it right on the camera. LOOKOUT EVERYONE!!!!! TROLLLLLLLLLLLLL
|
|
#
¿
Apr 22, 2009 19:25
|
|
|
Man_alive posted:The day was rather clear, and the light was good, I have only really had issues with the halos that are appearing on the people's heads. http://tricks.onigo.net/guides/2005/09/chromatic-aberration-step-by-step.html
|
|
#
¿
Apr 24, 2009 15:08
|
|
|
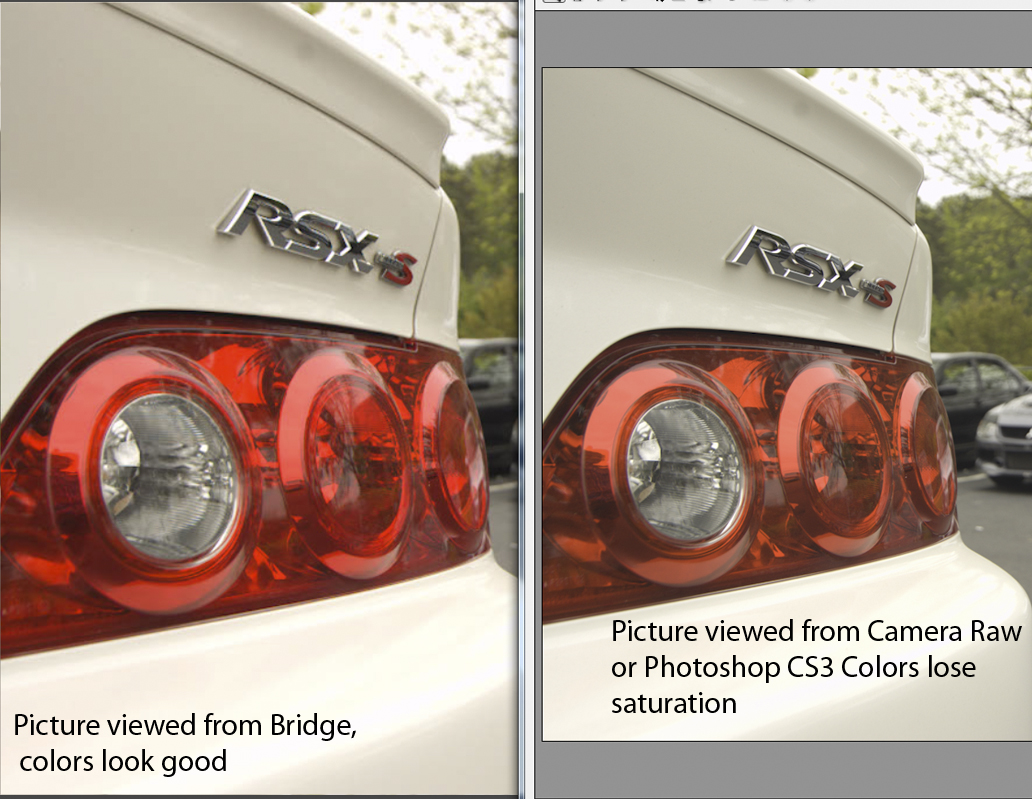
the posted:Hello, i'm hoping one of you may have an easy fix for this issue. When I view my pictures in Adobe Bridge the colors look great, but when I open the same picture in Photoshop CS3 the pictures lose some saturation. If I save the file and re-open in bridge, it looks great again. (i'm going through this since I just got a new PC and monitor) You know that Raw has sliders that adjust the picture on import, right? It's not just zeroed out and left like it is in Bridge. To me, the picture on the right looks like it has some sharpening, maybe some exposure compensation not just saturation. Looks better to me, generally, than the one on the left.
|
|
#
¿
Apr 24, 2009 19:22
|
|
|
TsarAleksi posted:It might be helpful to know that shooting at 50 doesn't actually help you pull from the shadows-- in fact it might be hurting you. Because it's not a native ISO in the 5D2, shooting at 50 actually reduces the dynamic range and should be reserved for when you absolutely must use it because of shooting with strobes or a large aperture. This has been my experience as well. ISO 50 is for when I need longer shutter speeds, but no other purpose. ISO 100 is the "base" and has the least noise/broadest dynamic range for the 5d.
|
|
#
¿
Aug 21, 2009 00:50
|
|
|
Bottom Liner posted:reposting this from the wedding thread to hopefully get a suggestion tonight: Flash. Can't think of any other way that wouldn't be more intrusive.
|
|
#
¿
Oct 24, 2009 02:47
|
|

|
InternetJunky posted:I'm a beginner and I would love some advice on post-processing for the following picture: Have you thought about using local contrast? Duplicate layer, high pass filter, mask out all but the bison, set to hard light for blending.
|
|
#
¿
Mar 10, 2010 19:50
|
|

|
SynVisions posted:Heavenly HDR Wallpaper is right Why that looks just like one of woot fatigue's carefully crafted images. I'm sure he's kicking himself he didn't just do it this way instead of his method of meticulously ensuring quality and accuracy.
|
|
#
¿
Apr 28, 2010 01:12
|
|
|
BeastOfExmoor posted:Got the Photoshop CS5 trial today and decided to run it through it's paces. Pretty happy with it so far. Predictably it does a lot better with open space then with details, but it saves a lot of time over cloning. I preordered the upgrade version, so I'm just patiently waiting.
|
|
#
¿
May 1, 2010 16:37
|
|


|
Maverique posted:I'm glad I'm not being totally unreasonable. To be honest I didn't shoot that particular image, my friend did, and he did so on a tripod. It's on f/8 and 800 ISO, he took a bunch of that particular lamp/wall combo and that was the one that was sharpest coming out of the camera (all shot in sRAW on a 5D Mk II). It's just like you say, it should be tack sharp contrast, all lines in the stone pretty define and clear as if they were on film, but I don't know if that's even reasonable to want. f/8 on what lens? Why sRaw instead of raw? and why ISO 800 if shot on a tripod? One result of higher ISO is more difficulty sharpening. Reshoot that at f/5.6, ISO 100 and see if your sharpness is better.
|
|
#
¿
Jan 2, 2011 02:29
|
|
|
Haggins posted:That's just silly. All you have to do is be a real jerk and you'll remain behind with plenty of access to your files. Yeah, given the post, I think he's ok for rapture purposes.
|
|
#
¿
Jun 5, 2011 11:50
|
|
|
GWBBQ posted:It lost too much detail in the clipped highlights to be salvageable. Her skin is all blotchy and her jawline and mouth have that ugly oversharpened look to them. To expand on this: No part of those settings are ideal for sharpness. 1/15, unless shot on a tripod, is prone to motion blur, and even then, subject movement can kill sharpness. f/11 is not as sharp as f/5.6 because of diffraction. ISO1600 is going to be hard to get large sized, really sharp images from an A33.
|
|
#
¿
Jun 7, 2011 10:40
|
|
|

|
| # ¿ May 5, 2024 10:53 |
|
|
Syrinxx posted:Paintshop Photo Pro X3 is the Amazon gold box deal today. Is this worth looking at if I already have Lightroom 3? Eh. PSP is really good, and is a knock off of PS, but if LR does what you need, don't bother.
|
|
#
¿
Aug 10, 2011 20:09
|
|