


|
I've started working on another kit again since I used to enjoy this stuff when I was a teenager and have kinda missed it over the last ten years. I'm definitely benefiting from having a lot more patience than I used to, but the one thing that's causing problems is decals. I have a vague feeling that I used to know a trick to make them not look like poo poo but I'm damned if I can remember what it was. Is there one? I'm cutting them as close as I can but the 'transparent' parts of them is still fairly visible once they're stuck on and makes them look pretty rubbish. This seems to be especially the case when sticking them on matte surfaces.
|
 #
¿
Sep 9, 2009 11:52
#
¿
Sep 9, 2009 11:52
|
|


|

|
| # ¿ May 4, 2024 06:59 |
|
|
Thanks a ton for the advice re: decals - that's very helpful. This might be a more difficult question but does anyone have any idea where I might be able to buy 1:24/25 scale model car kits either in the UK or that will ship to the UK of 1935-1955 era cars, particularly American ones? This is the sort of thing I'd like to build, but it seems AMT isn't around any more and while there are some for sale on ebay, not many will ship to the UK. I know Trumpeter have a few slightly older car kits but most manufacturers seem to be focusing on more modern vehicles.
|
|
#
¿
Sep 13, 2009 12:00
|
|
|
Danger - Octopus! posted:There's a few older cars here if you go through all the pages. Pretty sure I spotted a few 50s sports cars in there.. if they appeal. Thanks - that's one of the sites I've been looking at, and was where I came across the Trumpeter ones that I quite like. It's not quite what I'm after but definitely close. MarxCarl posted:AMT is still around or back really as Round 2. Not a huge selection. They've got an online shop, but I'm sure if you ask they'd be happy to tell you who carries them in the UK. You might also want to look for Lindberg, they seem to have several classic cars. That's cool - I didn't realise AMT was still around (after a fashion). I'll have to see if they have a UK distributor as Google turns up nothing. Lindberg basically has exactly what I want, but I haven't been able to find much in terms of UK distributors either. Edit: Found something, searching specifically for some of those Lindberg kits. If anyone is interested this site seems to have a fairly good selection, albeit of mostly older kits.
|
|
#
¿
Sep 15, 2009 10:11
|
|
|
Thank you very much for the offer but I'm not really into military stuff - just classic cars/bikes or vintage utility vehicles. So if you have anything else that fits that criteria then I definitely would be interested ")
|
|
#
¿
Sep 22, 2009 11:17
|
|
|
Danger - Octopus! posted:For people ordering from the UK, I have had very good experiences with Models For Sale. Having ordered from these guys as well now, they definitely seem pretty good. I've been having a go at one of the Trumpeter kits, a Pontiac Bonneville convertible. Quite a nice kit apart from some really fiddly fittings that don't quite align which is always immensely frustrating. It's also the first time I've tried adding the wiring to the engine after finding some useful links online - but still very much a work in progress: 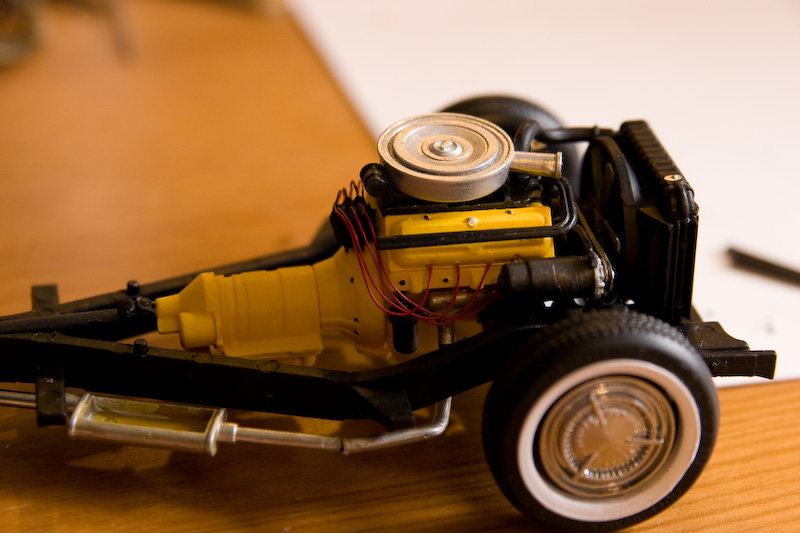 I've been having some real problems with painting the body though. I've tried using Humbrol acrylic sprays and more recently Hycote acrylic sprays, and both have the same problem - the paint when it sprays on always has quite a 'gritty' kind of texture to it, it's really far from smooth and this is after putting down and sanding several primer coats. I can smooth it out then polish it no problem, except that I have to sand it a lot to get it smooth and the amount of sanding always means that I end up sanding through to the primer coat on the raised detail, which is hopeless. I don't remember ever having this problem with enamel sprays, but I can't really find many enamel sprays for sale any more - at least not in any kind of range of colours. Is there a trick to using acrylics that I'm not aware of, other than warming up the can and making sure it's well shaken?
|
|
#
¿
Nov 16, 2009 14:31
|
|
|
Bloody Hedgehog posted:The "trick" these days is you basically need an airbrush to make it look perfect. The finish won't be perfect straight out of the airbrush, but the initial finish will be far smoother so you won't need to sand and buff as much. Rattle-cans are convenient, but you'll never get as nice a finish as with an airbrush and a gentle buff. Enamel sprays were nice too, but the enamel is a lot thicker than an acrylic and you lose a lot of detail when you use them. Yeah - I figured an airbrush would do a much nicer job but can't really justify getting one just yet.. maybe if I stick with it. I guess the thicker spray was why the enamels I used gave a good finish - I don't particularly remember losing detail but I imagine you're right. Certainly not mirror-smooth like some people manage to achieve (how?) but decent enough. I don't miss having to wait a week or more after spraying to be able to do anything though!
|
|
#
¿
Nov 16, 2009 16:10
|
|
|
How viable are the super cheap airbrush/compressor kits for just laying down solid colour? The only reason I'd really want an airbrush is for that purpose i.e. I don't need it for detail work. I assume the super-cheap airbrush+compressor kits on ebay suck, but I don't know in what way do they suck - can they still paint a solid coat okay or are they likely to not work at all? I'm thinking of this or this sort of thing. I have a hard time making sense of the different types of airbrushes/compressors available at different price points.
|
|
#
¿
Dec 16, 2009 09:23
|
|
|
Thanks for the airbrush advice - the Tamiya kit looks like it could be a decent option for what I'm after. I've been using spraycans up til now but have been pretty dissatisfied with them - which may be partly the way I'm using them, but the uneven pressure and small can sizes has made it pretty hard to get a decent gloss coating. They're definitely cheaper in the short term but I figured if I could get a relatively inexpensive airbrush then it wouldn't take too long to pay itself off. I'll hold off for now though - I'd like to follow Bloody Hedgehog's advice and save to get a decent one, but sadly this is only one of many hobbies and I find it hard to justify the cost right now. Thanks for warning me off the ebay ones though - I don't really feel that inclined to deal with new headaches
|
|
#
¿
Dec 16, 2009 22:52
|
|
|
EvilMuppet posted:What are you painting? Model cars? Yep. Just finished this most recent project, but I hosed up the paintjob on it several times trying different brands of rattle cans and lost a lot of the surface detail unfortunately. The last attempt would've been a great finish if not for the dust in our house. I'm still pretty happy with it since I haven't done a kit in about 10 years before this. 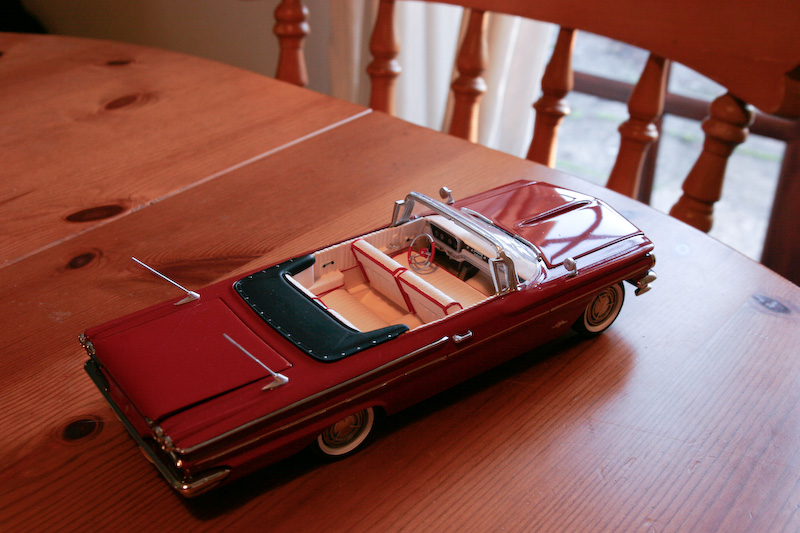 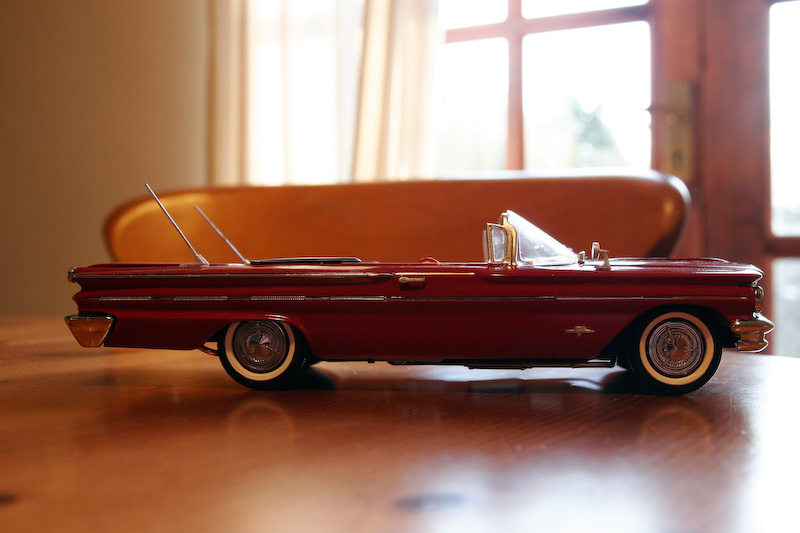 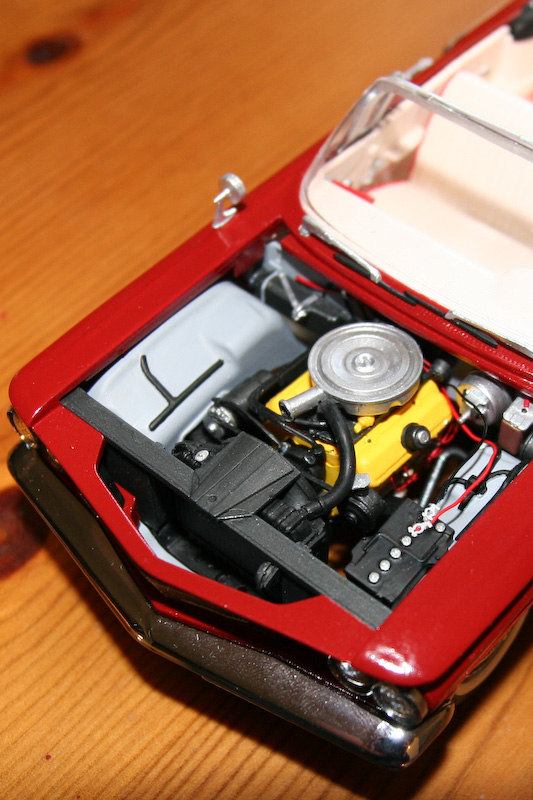
|
|
#
¿
Dec 20, 2009 17:55
|
|
|
I had no intention of building more model kits any time soon but then stumbled across this and well now it's in the post. I plan to light it and build a wooden cabinet to house it as a diorama. Has anyone here done much diorama building? I did some very rough mocking up in photoshop and want to aim for something a bit like this, using a couple of figures from Reaper minis, plaster or similar for the sea floor and using overhead lighting through a painted perspex screen to give an 'underwater lighting' feel:  The main thing I'm not 100% sure of at this point is how best to do the background. Does a curved background look better? Or just stick it straight onto the walls of the box that I'll build? I figure some kind of curved background would be better than having obvious corners, but not sure whether it works best to curve the entire thing (as in image one of the diorama area, viewed from above) or to have a partly curved background that meets the side walls partway (as in the second image). Has anyone done that kind of thing before?  
|
|
#
¿
Sep 4, 2017 01:34
|
|
|
Yeah, I'm willing to commit that much space to it. I haven't really kept too many of the models I made and don't have any on display at the moment other than a Warhammer rat wheel thing, so I'm happy to make this the one that I keep around. I was anticipating it being big though - the sites I looked at listed the finished length as about 14 inches, so by the time I add space around it that does certainly add up, and you're right that I wouldn't want to shrink the surrounding area too much. I had a look at the addons - I wasn't sure about those since if I do it as a diorama it will already be harder to see interior details that the photoetch kit adds. Do you think they would be visible if it's already maybe a few inches behind glass? The lighting kit looks interesting - I'll have to make a decision between going for that or just wiring it myself, which gives me more flexibility but also adds a bit more work in terms of working out where and what lights to use.
|
|
#
¿
Sep 4, 2017 02:02
|
|
|
Did he use the lighting kit or do it himself? I can't find a ton of info on the lighting kit so having a hard time deciding whether it's worth picking up. It seems expensive for a few LEDs and resistors (especially with shipping to NZ) and wonder how much the cost is just down to the fact it saves you having to work out where/how to wire it. When you say it's a 'drop in' Bloody Hedgehog, what does that mean? Does that mean it includes mountings etc for the LEDs so you don't have to spend time building those as well?
|
|
#
¿
Sep 4, 2017 07:47
|
|
|
Awesome thanks heaps for that, it really helps to get a clear sense of what all you're getting! Looks like a nice kit, but also stuff I can source locally a lot cheaper so I suspect I'll go that route.
|
|
#
¿
Sep 4, 2017 09:31
|
|
|
Jonny Nox posted:http://www.boxdioramas.com/sheperd-paine/ That link isn't working for me but I'm guessing it's this book? Thanks for the recommendation - it looks fairly cheap to get a copy so I might pick one up.
|
|
#
¿
Sep 5, 2017 21:21
|
|
|
Yeah that site looks amazingly useful - I was getting a 500 error before but it's working now, so looks like a great resource for addressing some of the stuff I want to do. I figure while I'm waiting for the model kit to arrive which will take a few weeks I can start with the woodworking of making the cabinet, which will then let me start experimenting with diorama backgrounds and overhead lighting to at least start getting a feel for what does/doesn't work. I'm surprised that there seem to be practically no underwater dioramas there though after looking through the various artists' work, and none that I could see that use a painted background to create depth. Google didn't turn up too much either so it might just be a case of trial and error.
|
|
#
¿
Sep 6, 2017 00:08
|
|
|
My Nautilus model arrived. Starting with painting the cabin components. They are super tiny - I had a few attempts at the piano (as did my wife who is a better detail painter than me) but still not totally happy with it - but at the distance it will be inside the cabin and inside the diorama I think it will look fine. My wife's painting on the globe came out particularly well.  Reference wine: 
|
|
#
¿
Sep 23, 2017 10:53
|
|
|
SkunkDuster posted:Crossposting my HELLMOCK from the Hi-Mock Challenge Thread. drat, that is fantastic! Did a bit more work on the Nautilus cabin. Felt that it looked a bit spartan as it was so added a rug, side table and book as well as a couple of N-scale figures. Also cut out the right-side hatch door so that it looks like the engineer is bursting in to warn about the impending/occurring squid attack.   Also did a lighting test to check out where we want to position the LEDs and decided to definitely go for angled lighting like this. 
Kerro fucked around with this message at 09:21 on Sep 24, 2017 |
|
#
¿
Sep 24, 2017 09:18
|
|
|
Yeah it may be too bright - it's a bit hard to tell since it will be behind a fairly intricate cabin window, and then since it's going to be part of a diorama behind another sheet of glass. It's one of the challenges I hadn't really thought about it but is quickly becoming apparent - I have to finalise the lighting very early in the build since it will all be sealed inside the main hull, but won't be able to see the final effect of it in place until much later in the process. I'll try the suggestion of sanding the LEDs a bit - that sounds like a really good option to illuminate things a bit more evenly as well.
|
|
#
¿
Sep 24, 2017 23:13
|
|
|
Bloody Hedgehog posted:You can also use wax paper to diffuse the lighting, and use a single or multiple layers of it to get different diffusions. I might give that a go - my gut feel was that I liked the idea of somewhat directional lighting as I feel it creates a more dramatic mood, but the more even lighting might work better for actually being able to see the interior detail, and have less issues with potential reflection off the glass. I guess it wouldn't be too hard to replace the ceiling panels if I cut them out since they're just thin squares anyway. Maybe I should just try both and see which looks better.
|
|
#
¿
Sep 25, 2017 02:33
|
|
|
Ensign Expendable posted:Forcing myself to finish off the PzI command tank, before I get distracted by something else shiny on the shelf. I'm loving the weathering job, it looks spot-on to me. Particularly on larger flat surfaces (like the front panels of the tank in your model) I struggle to get a good effect - are there any particular guides or techniques you can recommend for getting the kind of result you have?
|
|
#
¿
Sep 25, 2017 03:42
|
|

|
I've run into a bit of a challenge with the Nautilus project. The base kit comes with these super awesome complicated cabin windows that look like this: They look great painted up, but make it really hard/nearly impossible to see any of the detail inside the cabin. Particularly because we are building this as a diorama and want to capture some of the drama/sense of action of the giant squid attack, the people in the cabin reacting (and just be able to see all the work that went into painting and lighting the cabin) we're considering replacing the window with something with higher visibility. Obviously this won't look as cool, or perhaps as structurally sound, but the trade off will be that hopefully you won't notice as much because the cabin will draw the eye more instead. This is a super-rough mock-up of the idea we had in mind, so the final version if we go this route will be much more in keeping with the design of the rest of the model i.e. more even rivets, tighter joints, more detail around the latches/hinges that we've built etc. but we came up with a couple of possible ways of doing it based on a protruding flat glass window. Basically thinking of either some kind of side-latch/hinge connected to a riveted window frame, like so:  or like so:  (this one doesn't look as good cos it would need to be crafted a bit tidier and painted which we didn't quite get round to) Which then looks much better with the cabin behind it (again, with better glass - we took no real care handling the clear piece so it's already very scratched/dirty.  We'd probably keep the standard window on the back side so that you can see the frames of it looking through the cabin - since it's a diorama it will only ever be viewed from one angle, so the asymmetry of that probably works fine and gives a cool backdrop for the cabin. I feel like it's not a perfect compromise and loses one of the rather awesome features of the original model (the fancy windows which even come with precut masks for painting) but maybe a worthwhile trade-off given the benefit. I don't know whether anyone else has ever done any crafting of windows for scale models and has any ideas, as I've never really tried anything like that before.
|
|
#
¿
Sep 26, 2017 23:16
|
|
|
Unfortunately it's not just the leading in the glass (which does show up reasonably clearly with the masks - see: http://www.culttvmanshop.com/assets/images/aztekdummy/adnaut03.jpg) but the fact that the window is made up of tons of tiny panes of fairly thick styrene. We tested visibility just with the windows unpainted and you still really can't see very well at all.
|
|
#
¿
Sep 26, 2017 23:38
|
|
|
I haven't but I don't think it would help an enormous amount. Here's our copies of the windows - unfortunately we'd already masked them so you can't see how clear they are, but the fact that each of those little tiny black stickers is a separate window, each of which is on a slightly different angle is enough to substantially distort and minimise any vision through into the cabin even if they were crystal clear. I wish there was a way to keep the original windows and improve vision but I just don't see it happening. I spent some time building an alternate window frame, a bit more carefully this time around and I'm liking how it looks. It's definitely nowhere near as cool as the original but will allow a really clear view into the cabin, and I think once the whole thing is treated with the rust effects paint that I'm intending to use I think it will actually blend in really well with the rest of the model. Worst case scenario I can always retrofit the original windows if I modify them slightly.  The only other option I could see would be if I could very carefully remove just the middle-outer octagonal section of the original windows and replace just that with a flat panel, but I'm not sure how to cut clear styrene like that without it cracking.
|
|
#
¿
Sep 27, 2017 08:46
|
|
|
Yeah I think you're right that I should keep the original window. It does just look amazing so any replacement will be really lacking by comparison. I guess there's no real saving the cabin without, as you say, having something rather contrived. I guess one nice thing about the original window is that it does kinda invite curiosity about the interior and trying to view it from different angles to try and see what all is going on in there. Oh well, back to solving how to mount the LED lights.
|
|
#
¿
Sep 27, 2017 23:37
|
|
|
Thanks for all the ideas and suggestions on window options. I think I'll end up sticking with the kit window and just accept that the cabin will be a bit less visible. I'm not really keen on the idea of opening/popping it out from time to time as I want it to stand alone as a static diorama so happy enough to just do that I think. Not much progress on the Nautilus itself as I've turned my attention for now to the electronics. Since these can't be altered once the hull is glued together (which is pretty much the next step) I want to make sure that all works first. I intend to have 8 internal LEDs and 12 overhead LEDs to create a blue/rippled lighting. Since I don't trust my circuit design skills one bit even just for an LED array I wanted to test it out first before putting the LEDs actually in place so that's what I've done. Thankfully it worked first time as my diagnosis skills are even worse than my design skills, so now I can move onto something I feel more confident about - constricting the hull and mounting the internal lights. I expect this next stage of the build should come together fairly quickly. 
Kerro fucked around with this message at 00:06 on Sep 29, 2017 |
|
#
¿
Sep 29, 2017 00:03
|
|
|
Nautilus progress: completed the internal wiring, and ran a quick check to make sure that everything still worked out after fitting the LEDs in place, which thankfully it did. I'm going to redo the circuit based on advice from a friend who knows his electronics much more than me, to replace the resistors with 1W ones just to make sure there are no heat/lifespan issues there. Then I sealed the whole thing up, did a bit of gap filling (not much, this kit is fantastically well made. Is this the new standard for kitsets these days, or is this one just particularly good?). Then just attaching the external details and the very fiddly photo-etched railings. Some of these will need straightening a bit once it's all done but I figured no point doing that now since they'll likely get bent a bit while painting due to using a brush to apply the rusting solution. Next step, undercoating and spraying some shadows into the recesses.   
|
|
#
¿
Oct 2, 2017 20:42
|
|
|
That looks great, it makes such a difference to have the lighting. I don't know if it's still the case but I remember a lot of those licensed scifi kits being pretty poor quality but that's looking really good with the painting and weathering that you've done. We've started building the diorama base for the nautilus now and working out how to build the sea bed and rock columns that we want. I don't know if anyone else has tried it before but we've found this papier mache clay stuff to be amazing to work with. So much lighter and less brittle than normal sculpting materials that we've tried. Kerro fucked around with this message at 21:22 on Oct 5, 2017 |
|
#
¿
Oct 5, 2017 21:19
|
|
|
Depends a bit what you have in the way of tools - and also is it 1:24? A drinking straw sounds pretty large for most common truck scales (although maybe a cocktail straw would be about right). If you have a Dremel, then you could either buy solid plastic cylinder and drill them out or heat up a bit of spare sprue and stretch it to the desired thickness and drill that out instead (that's mostly what I used to do for making exhaust pipes/gun barrels/etc).
|
|
#
¿
Oct 12, 2017 01:01
|
|
|
Yeah that's why I liked working with it so much. Once you get the hang of it you can make all kinds of shapes/lengths/thicknesses
|
|
#
¿
Oct 12, 2017 02:12
|
|
|
Nautilus progress: Base-coated in silver, and sprayed on some preshading.  Then it was time for the Modern Masters rust effects. This stuff turns out to be cool and pretty interesting, but also completely uncontrollable. I'm not sure yet if I'm totally sold on it - it definitely ended up more rusty than I had in mind, but the effect I'm getting as I'm toning it down I'm really quite liking.  Initial application and just starting to oxidise  After initial oxidation  Dulled it down a bit with some pastels  Then a coat of matt varnish. Woah, that completely changed how it looks  Dulling it down again with pastels, and doing a light wash into the panel lines + some light drybrushing of the rivets - only on the bottom left corner of the hull at this point (where the rivets are visibly lighter - you can see the difference between this and the above-the-middle areas that are still have far more contrast). This is starting to get pretty close to the effect I was hoping for. A bit more blending and detailing and I think we might get there! Also started on the squid 
|
|
#
¿
Oct 12, 2017 03:19
|
|
|
More Nautilus. Pretty much finished the sub itself now - a very slow/careful process of removing the window stickers and cleaning them (thankfully which my wife did most of - she's better at the really precise stuff) and spent some time working on weathering. Feeling pretty happy with the final result. It's hard to capture the cabin view in a photo, but it looks pretty damned good and thankfully all the wiring and internals held together through the various stages of painting etc.  Next step is to build the diorama scene. Planning on doing the basic shapes with tinfoil and then covering those with papier mache clay which can then be sculpted further with a dremel once hardened if need be. Just getting a rough sense of how we might lay it all out 
|
|
#
¿
Oct 15, 2017 09:57
|
|
|
Yeah I'm glad I kept the windows too, thanks for that advice! The diorama does look kinda huge out of context but the sub is actually 2/3rds of the length of that base, so it will definitely dominate the diorama once it's done, and much of the rock formations etc will become more background. As for placing it, we're planning on building a standing box to house it in so won't need shelving. Where that will go once it's complete, that's yet to be determined 🙂
|
|
#
¿
Oct 15, 2017 19:37
|
|
|
punchymcpunch posted:thats amazing, and for some reason the tiny paint pots are my favourite part Yeah they look awesome! Is that just some painted clear sprue? Greyhawk posted:
That's so cool. I'm really hoping that once my daughter is old enough that she wants a dollhouse so that I have an excuse for making tiny poo poo like that with her.
|
|
#
¿
Oct 23, 2017 20:56
|
|


|
Greyhawk posted:Fun fact: I was "blogging" about an (abandoned) doll house project on a scale modeller board and I kept getting personal messages by guys about how cool that is and how'd they themselves would never dare tell about their dollhouse projects for fear of appearing not "manly" enough, so they'd only talk about cars and planes and ships and giant robots even though they'd rather like to show off their new doll house kitchen. It was pretty sad. Man that's kinda depressing. And a little surprising - I kinda figure by the time you're building tiny anything there's not much risk of appearing 'manly' so would've hoped people would just let themselves enjoy what they enjoy.
|
|
#
¿
Oct 24, 2017 23:43
|
|
|
 Manly submarine update: covered the rock pieces in papier mache so they're starting to look a bit more rock-like. We loosely positioned the Nautilus in the scene to get a sense for positioning and scale. I think I'm pretty happy with this. We intend to paint the rocks a dark grey-blue, which combined with the fact that this will all be inside a box that blocks light from 5 directions will lead to a pretty dark background - so the Nautilus should pop out nicely with the lighting on it. I ordered a bunch of tiny plastic plants from AliExpress which look like they should work well to paint and use as aquatic foliage, and a couple of shark models from Reaperminis to complete the scene. Next step is to attach the rocks to the base and then papier mache the base to blend it into the rocks. I've also been working on building the display box, but that's not super exciting so haven't bothered photographing that.
|
|
#
¿
Oct 25, 2017 05:30
|
|
|
Nautilus progress: We finished modelling the base, and now just have to wait for the clay to fully dry so that we can then start painting it, and then detailing it after that. The intention is to darken things up a lot, with a dark blue/grey tone for the rocks and a slightly brown-tinged grey for the sand. I've got the overhead LED array done now and created a perspex layer with patterning to create an underwater effect, so took a couple of photos showing the base with the lighting as a bit of a test. I also got the wood for the box frame now which you can see in the first picture. I also put in a temporary backdrop until we get the proper one printed. With bright overhead fluorescent lighting (workshop lighting):  With no external lighting: 
|
|
#
¿
Oct 30, 2017 09:00
|
|
|
Nautilus progress: Display box nearly done. I won't bother posting pics until it's done in here since this is not the woodworking thread, but it's looking nice (and huge). We've been working on the base for the diorama. Holy crap, I should have anticipated this but it is taking a long-rear end time to do all the washing, drybrushing and detailing (and we've barely started putting in the larger plants, just the algae/rock-growths so far). That said, I'm pleased with how it's starting to look - a long way from the original tinfoil at this point! I'm glad I'm not trying to one-man this though given the time involved. Once the bulk of the base detailing is done then the end will well and truly be in sight.   
|
|
#
¿
Nov 8, 2017 09:19
|
|
|
^^ I haven't tried that range, but speaking of Vallejo, has anyone had any success with their washes? I've tried all kinds of things to get a nice effect from them, but most of them (the light grey seems to be the worst offender) seem to leave an almost gritty, concentrated residue in recesses and patches even on flat surfaces. I'm wondering if I'm doing it wrong or if they're just not that good compared to the likes of Citadel. The Nautilus base is complete! 
|
|
#
¿
Nov 25, 2017 09:42
|
|
|
Well we got there eventually - the Nautilus is finished (if we resist the urge to continue tinkering which I am very much trying not to do at this point). It is exceedingly hard to photograph unfortunately, even in daylight, but this is what I was able to get. The darker shot done at night-time makes it look like the lights glow through the hull all over the place, which they do very faintly but nothing like they appear in the photo. Unfortunately it was something we discovered too late in the build to do anything about it otherwise we would have coated the inside of the sub pieces in black paint to try and mitigate it. That said, it is barely visible in the flesh unless you're looking for it. Overall pretty satisfied with how it all turned out, and again although we couldn't get it on camera, the cabin looks fantastic through the windows so glad we stuck with the originals!    
|
|
#
¿
Dec 17, 2017 23:48
|
|
|

|
| # ¿ May 4, 2024 06:59 |
|
|
I need to get a new airbrush compressor as the one I have is pretty crappy and inconsistent and is putting me off using it. What's my best bet for $150USD or less? It's to go with a Paasche Talon brush.
|
|
#
¿
Jul 28, 2018 00:55
|
|