


|
Click the image to view it on a black background (easier on the eyes). IC 2944 is an emission nebula which is situated in between the Southern Cross and the Eta Carinae Nebula. It is sometimes colloquially referred to as the Running Chicken Nebula because that's what it somewhat looks like in widefield images of this intricate region. The cluster of bright stars near the middle of this image are the Cr249 open cluster. The bright star up the top is Lambda Centauri, after which this region is named. 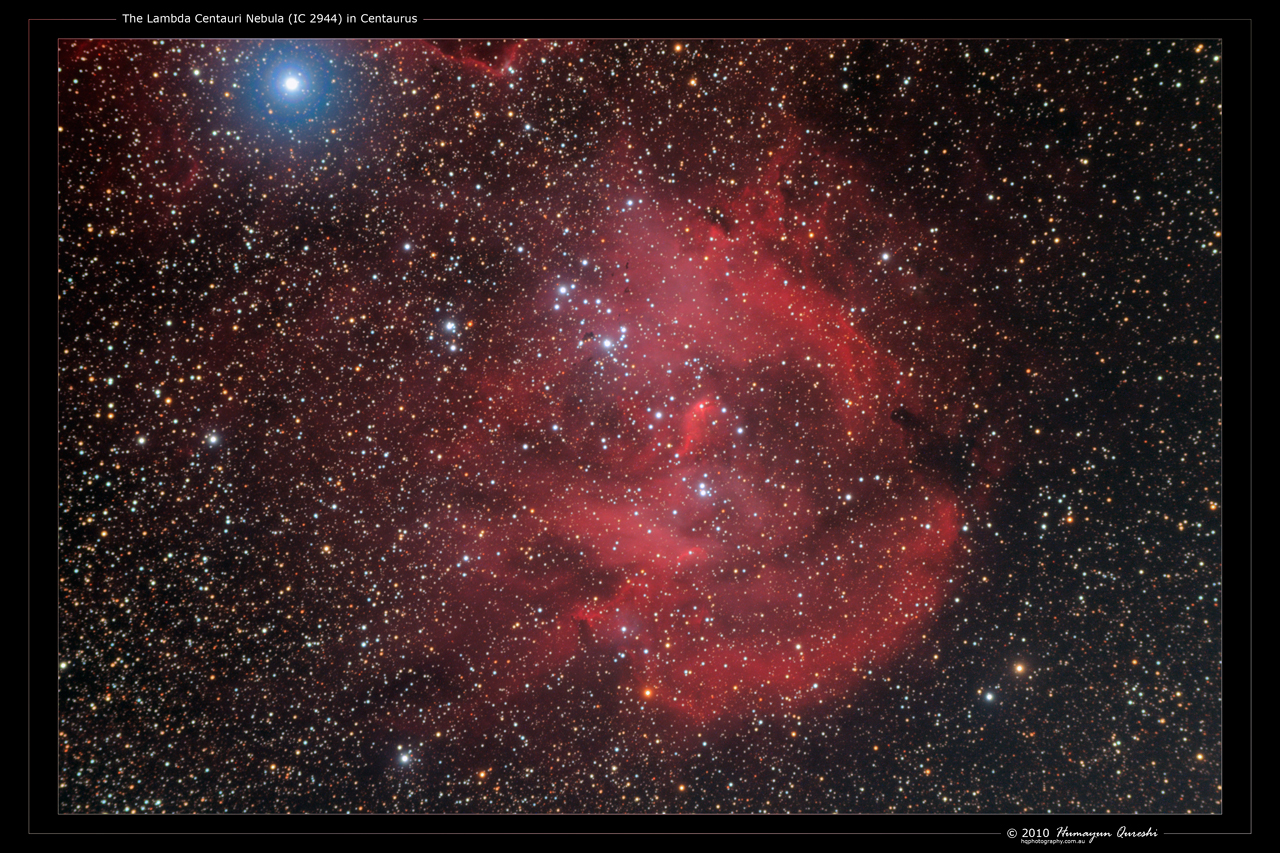 H
|
 #
¿
Jul 7, 2010 11:48
#
¿
Jul 7, 2010 11:48
|
|

|

|
| # ¿ May 2, 2024 01:23 |
|
|
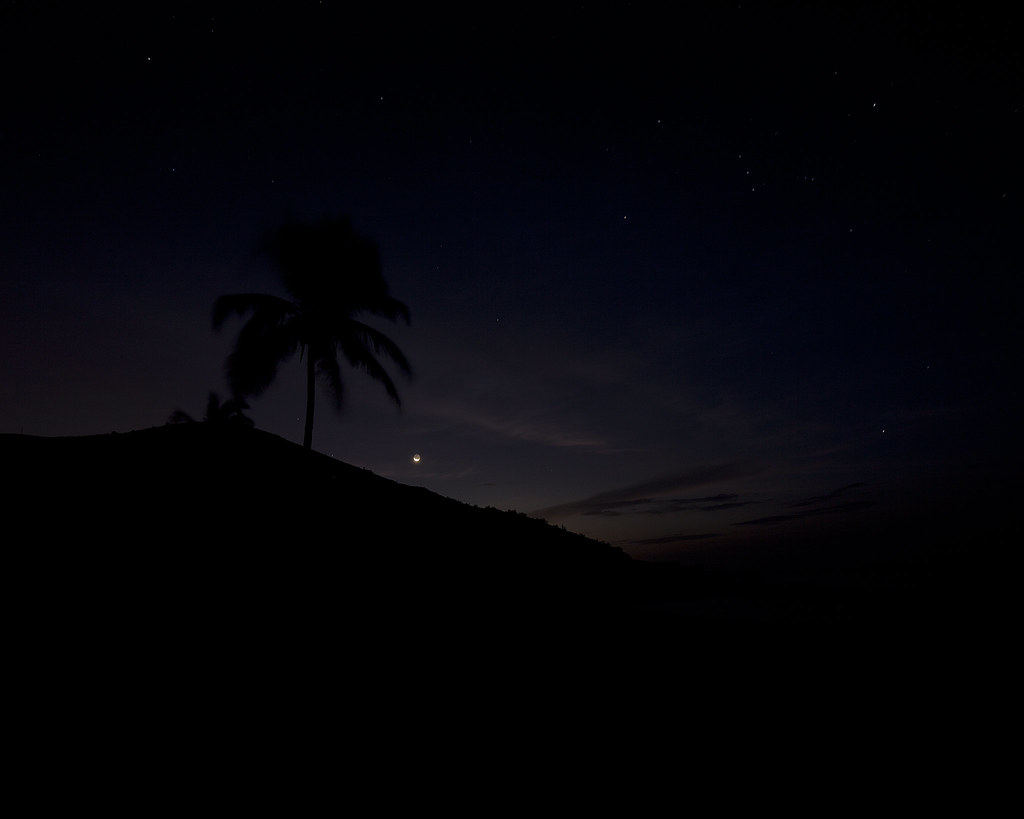
Four's a Conjunction! Well, OK, technically it's two for a conjunction, any more is a massing... Venus, Saturn, Mercury and Mars (and a few stars) put on a little light show as part of the conjunction of August 8th, 2010. Venus is the brightest planet in the overall picture. Saturn is just to the right of Venus, and Mars is the bright planet above Venus. This trio forms a triangle. Finally, Mercury can be found as the brightest planet just above the brightest clouds. Shot half-way between nautical and astronomical twilight, somewhere between Manar and Braidwood, New South Wales. Click on the image to view on a black background. Canon EOS 5D Mark II, Canon EF 17-40mm f/4L USM 30s f/5.6 at 17.0mm iso3200  H
|
|
#
¿
Aug 11, 2010 10:58
|
|
|
The Constellation of Scorpius Click the image to view on a black background. Target: The Constellation of Scorpius Date: Saturday, July 18th, 2009 Time: First image: 11:33 PM Time: Last image: 01:33 AM Location: Mangrove Mountain, NSW, Australia Camera: Canon EOS-40D (modified: Baader UV/IR filter) Lens: Canon EF 24-105mm f/4L IS USM (stopped down to f/5.6) Focal length: 24mm Mount: Losmandy G-11 (Gemini) Guiding: Meade DSI-C through Orion ED80 Exposure: 20 x 300 seconds (1 hour 40 minutes) @ ISO-400 (RAW) Software: IRIS: Calibration, registration, stacking, stretching, gradient removal; Adobe Photoshop CS3: post-processing and framing 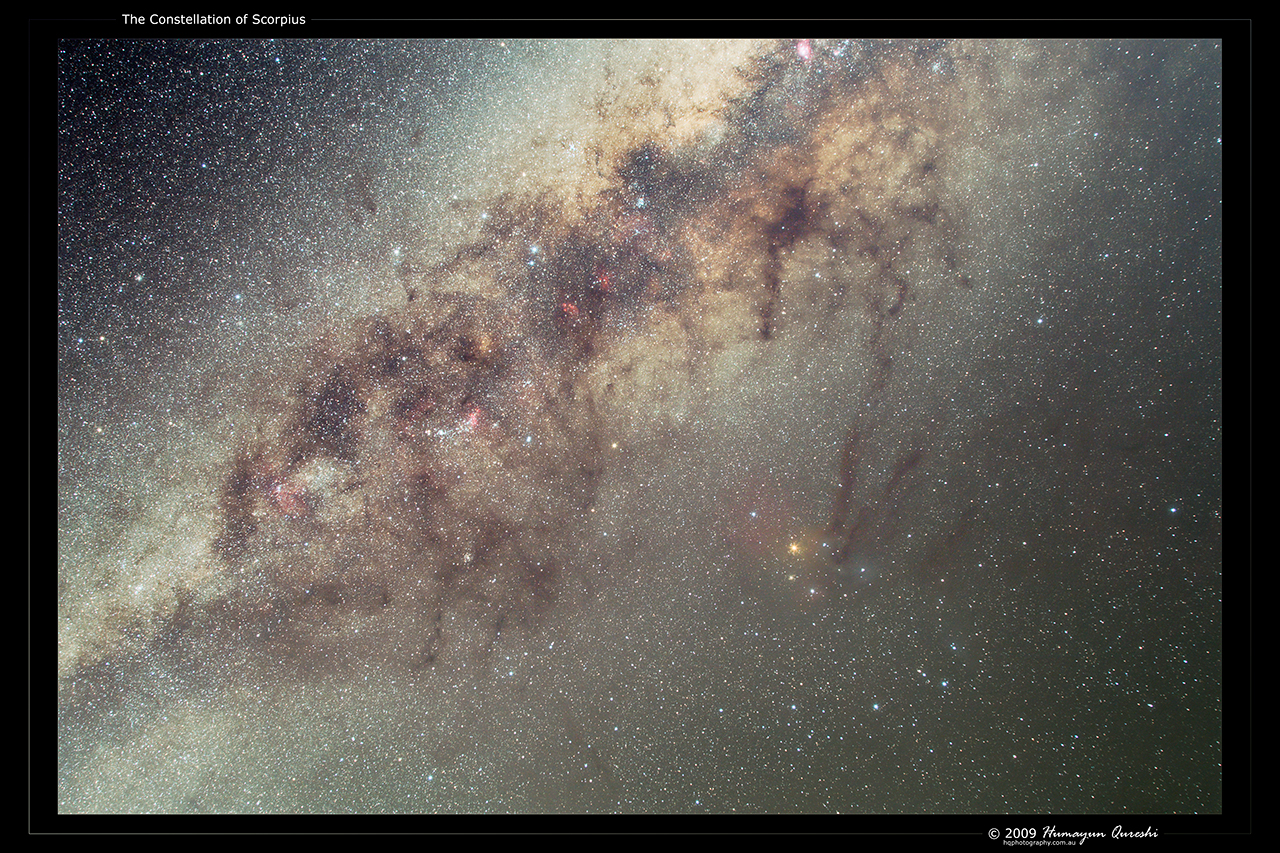 H
|
|
#
¿
Aug 15, 2010 18:34
|
|
|
Because you're only shooting with a camera lens, flat frames are a simple task. Once you've taken your light frames, simply load MS Paint or Photoshop, create a new document set to pure white and set it to full screen mode. Point your camera perpendicular to the screen, set it at its lowest ISO possible (typically ISO-100), ensure your focus hasn't shifted since your light frames. Take a test exposure using the same f/-ratio, of say 1 second and check the histogram on the camera. What you're ideally after, is a peak on the x-axis of somewhere between 1/3rd to 1/2-way across. Once you've got the ideal exposure, take between 16-25 flat frames, giving you an SNR of 4-5. Move the camera between each exposure, even if it's just a centimetre up, down, left or right. This will help with creating a proper flat field as any irregularities between exposures will be taken care of by median combining the flats. Once the flat lights are done, put your lens cap on and take 16-25 flat dark frames of equal exposure length. The idea is to median combine your flat darks to create a flat master dark which is then subtracted from each flat light frame. Once calibrated, a master flat field can be created by median combination. These little things make an enormous difference to the final composition. You can read more about the technique I use on my deviantART page: octane2.deviantart.com H Instrumedley posted:How do you eliminate heavy vignetting? I'm using DeepSkyStacker. octane2 fucked around with this message at 18:53 on Sep 13, 2010 |
|
#
¿
Sep 13, 2010 18:49
|
|
|
It's probably a bit late now, but, you may be able to take a bunch of dark frames in the approximate temperature as the original shooting conditions. This technique is used for astrophotography (I'm an astrophotographer). Take between 16-25 dark frames to give you an SNR of 4-5. Use the software provided with your camera, to convert the RAW images to TIFF's. Use Photoshop's stacking feature to median combine the 16-25 images. This will form a master dark frame. You then load your light frame and use the Image > Calculation > Subtract feature to subtract the dark frame from your light frame. This should remove the majority of the hot pixels. Everything else will need to be cloned out by hand. Note: this may alter colour balance and other aspects of your image. Anyone who's decent at Photoshop will be able to re-balance the image to match the original. If you like, send me what you've got and I'll see what I can do. Let me know if you're interested. Feel free to read about the procedure in my journal over at octane2.deviantart.com -- scroll down to the bit on The Black Art of Astrophotography. H Nondo posted:I could use some help. octane2 fucked around with this message at 15:50 on Sep 15, 2010 |
|
#
¿
Sep 15, 2010 15:47
|
|
|
Planetarium software for Windows: I use a combination of Starry Night Pro Plus 6, and, TheSky6. Free ones for Windows include Stellarium and Cartes du Ciel. For the iPhone: SkyVoyager and SkyGazer. I got both for free last year in celebration of the 40th anniversary of the lunar landing. Free ones for the iPhone... Planets is very basic and shows you the solar system objects. All my astrophotographic planning and preparation is done with Starry Night Pro Plus 6; it also controls my Losmandy G-11 Gemini. H Cyberbob posted:I thought I saw Sirius in the twilight last night, but apparently it was Venus, as it was way too bright to be Sirius..
|
|
#
¿
Sep 16, 2010 09:01
|
|
|
Choicecut, The Losmandy G-11 is an absolute dream to use. If you get one, make sure you get the Gemini system with it. I've had mine since 2006. Or, if you hold off for a bit, Gemini Level 5 should be released soon. Has a new interface. Looks schmick. No doubt I'll be upgrading to Level 5 once it's released. The ETX might resolve Hartley, but, will not be any good for imaging. It's close to an f/14 system from memory. Way, way too slow. Couple this with the fact it has plastic gears which are very, very imprecise; you will have such poor tracking accuracy (along with long exposure time) that the endeavour will be an exercise in futility (not to mention frustration). But, for the Moon, it should be fine. Need any more info about astrophotography, gimme a yell. I've got an FSQ-106N and an STL-11000M that have been waiting since April to be used properly. :cryface: H Choicecut posted:Fantastic dude, nice freaking picture. I am going out tomorrow (cloudy skies tonight) to try and catch Hartley with my celestron 20x80's. From what I gather, it should be north-east just below Cassiopeia and to the left of Preseus (I live in Ohio). I am also picking up an etx-90 PE this evening from a trade deal and may try to see it with that. Not sure if I will be familiar enough with the scope to find it though. I am going to try my first bit of astrophotography with this scope and a D60. Still need to get the t-mount though. I have been saving for months to get a good mount like a Losmandy G-11 or the new Ioptron mount with an Orion 80mm APO and the Orion guidescope package. I am still a ways off before I have enough and lucked into a trade deal for the etx90PE (With lame tube graphic
|
|
#
¿
Oct 16, 2010 17:54
|
|
 ). Figure it will be a good learning tool and I will have a nice portable scope in my lineup. Anyway, nice capture!
|
J, M33? That's a pretty difficult target. It's really hard to get good images of this spectacular island universe. You've done a pretty good job on it. For us, down here, we're going through a La Nina episode. It's been cloud/rain for the last 2 months, and, it's forecasted to last well into March next year. I've got my FSQ/STL/G11 sitting there doing nothing. Depressing. H Jekub posted:I modified my Canon 1000D, replacing the built in IR cut filter with a Baader BCF filter to provide better sensitivity to HA emission, amongst other things, here is the first quick test image.
|
|
#
¿
Nov 15, 2010 15:14
|
|

|
Beautiful, beautiful. Love Orion just dangling there. Got more, closer to sunrise? torgeaux posted:This is sometimes wayyyyy too dark, sometimes perfect.
|
|
#
¿
Nov 29, 2010 13:14
|
|
|
Click the image to view a 50% resolution version. Captured over 6 nights, totaling 10.5 hours of exposure. Luminance: 187.5 minutes Hydrogen alpha: 160 minutes Red, Green and Blue: 93.75 minutes each Hydrogen alpha blended into luminance at 64% opacity. Target: The Eta Carinae Nebula (NGC 3372) in Carina Date(s): 8th, 9th, 16th, 29th, 30th and 31st January, 2011 Location: Manar, NSW, Australia Detector: SBIG STL-11000M at -20 degrees Celsius Telescope: Takahashi FSQ-106N Focal length: 530mm Mount: Losmandy G-11 (Gemini) Guiding: Self guiding through SBIG STL-11000M Exposure: Hα+LRGB (160 187.5 93.75 93.75 93.75); total: 10.5 hours Exposure: Hα and L bin 1x1, RGB bin 2x2 Software: MaxIm DL 5: Image capture, and autoguiding, calibration, registration, stacking, stretching; PinPoint LE: Plate solving; Adobe Photoshop CS4: post-processing and framing  H
|
|
#
¿
Feb 27, 2011 04:22
|
|
|
onezero, jadias, Jekub, Thanks, gents. I've owned this immaculate camera/scope combination (marriage made in heaven) for almost a year and have only just finally got around to using it for the first time. To see colour on the screen after combining all the monochrome frames was just awesome. Phanatic, Jekub basically explained it all. But, just a little more info: As Jekub mentions, the sensor is thermoelectrically (Peltier) cooled. Noise in a sensor doubles or halves every six degrees Celsius change in temperature. It is therefore important to maintain equilibrium. The STL-11000M gives me the ability to maintain a setpoint temperature. The system I have can go down to -50 degrees with water cooling. I think that's a bit overkill and isn't necessarily required, unless you're living in very arid and hot conditions. As for the second part of your question, regarding self-guiding: the mount that I use is computer controlled and tracks at sidereal rate (compensates for the rotation of the Earth). However, there is no such thing as a perfect gear. Even in $20,000 mounts there are residual mechanical imperfections; you might have a dust particle or some other mechanical imperfection in the gear, so that when it meshes with the worm, it might not give you smooth sidereal motion -- there might be a jump. This is where autoguiding comes into the fore. Typically, a secondary scope with a secondary detector is set up either on top of the main imaging scope, or, side-by-side (I've found side-by-side to be a nuisance, as you need to very carefully balance the centre of gravity on the mount). After you've finished doing your polar alignment (telescope pointing precisely at the celestial pole -- this is another topic in and of itself -- I sometimes take up to 2-3 hours to get this precise), you slew to your target, and, in the guidescope lock on to a star. You run autoguiding software which monitors the star's motion; if there's any aberrant movement (due to seeing or mechanical imperfections), the software then sends negative feedback to the mount, which then makes a slight adjustment so that the star maintains a round shape in the final exposure. The STL-11000M has the advantage of having a second sensor in the one housing which means you can do away with a second telescope and second camera, thereby reducing the weight on the mount. You need to choose a guide camera/sensor exposure that isn't too short (you end up chasing the seeing) or too long (imperfections can creep in). Typical seeing in Australian skies is 2-2.5 arcseconds, and, therefore, I usually stick with a guide camera exposure of 2-2.5 seconds. That is, every 2-2.5 seconds, the mount is making minute adjustments to maintain a pinpoint star. It is a bitch of a hobby, that requires a lot of dedication, standing around in freezing temperatures, hoping the weather and equipment cooperates. I spent six nights capturing that image. This is the longest I've ever exposed on a single object. I plan on making multi-image mosaics in the future to capture extended objects. If you have any further questions, feel free to ask. H
|
|
#
¿
Feb 28, 2011 12:41
|
|
|

|
| # ¿ May 2, 2024 01:23 |
|
|
That is superb. The lighting in this image is such that the composition appears to look 3D-rendered. I really dig that. I try to photograph my landscapes in the same way; that the light in my images resemble lighting in paintings rather than photographs. I also like the simple elegance in the design of that building. With the top level somewhat resembling the ground floor. The whole thing looks like a cylinder, side-on. What building is it? Where is it? Also, may I ask what body/lens you used for this? There was no EXIF info. H asteroceras posted:
|
|
#
¿
Mar 9, 2011 09:57
|
|
