

|
Can't remember if I posted this on SA since I finished the commander... And I'm reasonably sure I only posted these on EOW too.   Gratuitous army shot 
|
 #
¿
Oct 5, 2009 22:24
#
¿
Oct 5, 2009 22:24
|
|


|

|
| # ¿ May 17, 2024 20:28 |
|
|
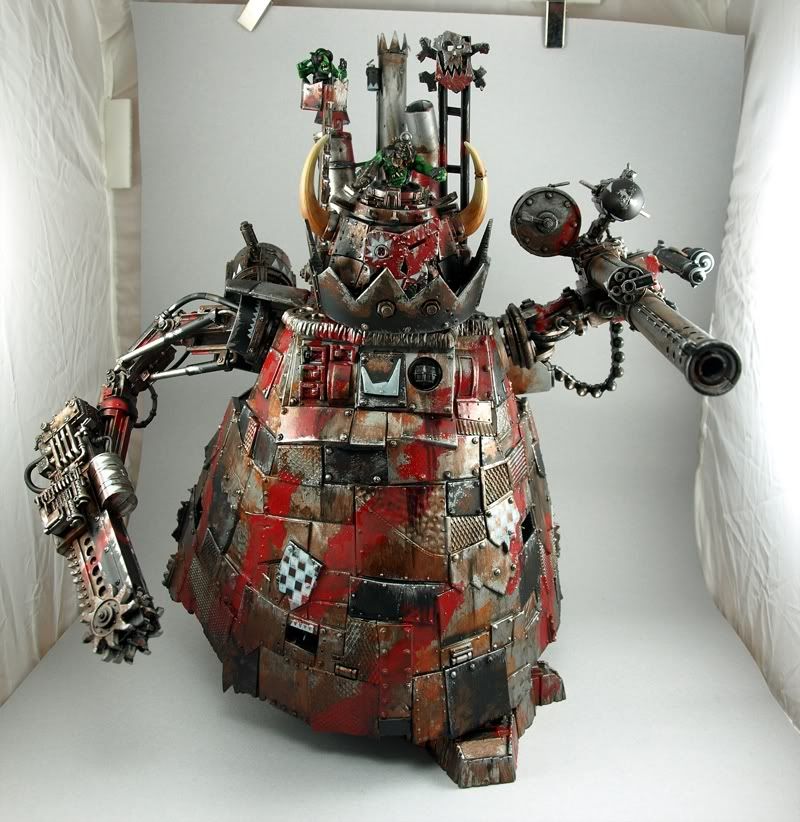
 Hacking up a battlewagon. Lots of the bits aren't glued yet which is why there's demented half-wheels at the front. Now, when I started this build I knew I'd end up with the standard deffrolla arms not fitting. Do these arms (from grabba klaws) look a bit weedy for the rolla? Obviously I still have a lot of plates and rivets still to do on the rest of the wagon.
|
|
#
¿
Nov 9, 2009 00:04
|
|
|
Iron Squid posted:I soaked some minis overnight (again) in Simple Green to take off the awful white priming job I did on them. There's still some black primer left on in the cracks and crevices that my toothbrush can't reach. Should I worry about that, and if so what tool do you use to remove that hard-to-reach primer? It really won't matter once you redo the primer.
|
|
#
¿
Dec 10, 2009 21:50
|
|
|
I ended up randomly looking at dremels on Amazon today after one of their eerily prescient recommendations emails linked to one. I'm pretty sure the closest thing to hobby stuff they know I have is Dawn of War... Anyway, I ended up looking at this Silverline hobby tool because it's a poo poo load cheaper than a dremel, and I figure I will want to be magnetising Tyranids in the near future. Has anyone used one? Also, as a PSA I should mention that the Warhammer thread is now in TG if you are looking for it. Yes, TG, not TGD, although presumably that will get fixed.
|
|
#
¿
Dec 11, 2009 21:26
|
|
|
Angryboot posted:Gah I need to get a god drat airbrush. Basecoating is taking forever and I still have 9 terminators left > There's a version of that compressor with a reserve tank for slightly more which I got, the one you linked will be OK but I think you might regret not coughing up a few more bucks for a tank if you end up doing more than basecoating. You can get a bit of a "pulse" on the spray if you run straight off the compressor. Plus it is bigger and therefore superior  Similarly, the brush is single action. Fine for basecoats but again, if you think you'll be experimenting with other techniques, get a double action one - they can do everything one that will and more. Also, buy more than one brush when you get your kit, you'll almost certainly gently caress up one brush before you learn to clean them properly.
|
|
#
¿
Dec 11, 2009 21:35
|
|
 Stupid Christmas and saving up for other stuff.
|
Angryboot posted:Should I get the 100 PSI package instead or should I stay with the 30-40 PSI models? The bigger ones are for heavy duty spraying of cars and stuff and will make one hell of a din, so definitely not. Stay with the small ones. Had a quick look at the HF site and I don't think they have the tank-included version I'm on about. I can't suggest another vendor as I'm in the UK, so obviously bought mine from a place over here. I'm possibly being overcautious, you ought to be able to buy a tank separately later if you want. Sounds like the silverline tool may be worth a look, cheers.
|
|
#
¿
Dec 11, 2009 22:09
|
|
|
Stick your models down onto something with blu-tack/white-tack, it looks like you're holding them to prime. Lots of people use box lids, I prefer 1" cross-sectioned bits of wood because you can arrange the guys in a line that's nice and even for spraying over. The primer has pooled quite a bit, as well as the other things people have mentioned that might be from holding the spray on the mini. Don't point the can at the model and press, start spraying off the minis and then move the spray fairly quickly across the group of models.
|
|
#
¿
Dec 11, 2009 22:33
|
|
|
poo poo I am on the internet when I should be painting. Not done yet, needs more tidying, catching the missed bits and brass accents adding. Don't mind the shiny bits, there's some gloss down to protect powders and inks - the matt varnish spray I use tends to dissolve those.   Most of the freehand checks and stuff were done with those Daler-Rowney FW inks that Fix pimped. They are pretty good for small details like checks because they stay wet on the palette/brush for much longer making it easier to keep a point, and have stronger coverage than paint thinned to the same consistency. It's sorta like the out of the pot convenience of GW washes, but for freehand details.
|
|
#
¿
Dec 21, 2009 20:34
|
|
|
I'm pretty sure metallic paints are made from axle grease, pan scourers, and the snot of demonically possessed elephants. I've just painted the metals on 7 of the 8 stormboyz on my desk, and it's going to take a while to summon the will to do the last one. After that, I get to do all the fiddly straps and tubes, hooray.
|
|
#
¿
Dec 30, 2009 19:28
|
|
|
Dr. Lenin posted:Can someone post a good rust tutorial? I'm throwing together a squad of nurgle bikers and need them to look ugly as sin. If you want proper corroded looking stuff, do paint chips with really dark browns or black, not metallics. Exposed metals start rusting very quickly, only fresh chips will be shiny. You could try sponging some chips onto some of the bigger surfaces on the bike - http://migjimenez.blogspot.com/2009/11/sponge-chippping-and-rust-stains.html The engine and stuff I'm not so sure about, probably still use metallics since they'd be chromed. Possibly sponged rust spots could work to show the coating blistering and failing. Maybe try undiluted ink to get an oily finish - I've used Windsor & Newton Nut Brown on a few pistons and things on some of my vehicles. The sponging suggestion is a bit experimental btw - it works great on tanks and stuff, but I'm not sure how well it'd translate to something smaller.
|
|
#
¿
Jan 2, 2010 22:26
|
|
|
Lazy EOW crosspost of completed stormboy mob. These three were finished a few weeks back but never got posted:  These have been done over the past few days:   This is the whole mob: 
|
|
#
¿
Jan 3, 2010 01:53
|
|
|
Fyrbrand posted:Shallow your orks are pretty much much my favorite but if I could offer some criticism it would be that your bases are a bit bland for those awesome models. I think you need to start with a darker base coat and use more contrasting colors when your drybrush. I'd also suggest static grass for some color but that probably wouldn't fit the urban scheme you seem to have there. I think you're probably right and there's two main areas I'm going wrong in. The base coat is Adeptus Battlegrey, which is the darkest shade GW do. It's the colour I used when I started the army, and has been used throughout for consistency. A few of my more recent models have ended up randomly using VMC Black Grey which is a touch darker, and those do look better. When I can face repainting 60-odd bases it I should probably go back and try a thickish wash of that and redrybrushing. The other main issue is that I don't do enough to pick out the 'hero' rocks and rubble on most bases (compared to the rusty debris which I'm generally very happy with). Usually a put a very subtle greenish/brownish-grey wash on them so they're a different colour to the surrounds, and I think those need to be stronger in colour and density because I do it before the drybrushing so the colour gets dulled even more. I probably should do some grass, some of the bases for my (still) incomplete deffkoptas use grass so it would fit in fine with the overall scheme.
|
|
#
¿
Jan 3, 2010 14:43
|
|
|
Practice, drink far less caffeinated drinks, practice, relax and breathe slowly, practice, sit comfortably, practice, brace your hands against each other and the table or your chest, practice. If you haven't painted for a while, give it a day or so to get your brush control back before you do anything fiddly. Also you can sometimes get a fresh paint splurge off with a damp brush if you deal with it Right loving Now when it's wet, I use a flat hog bristle brush for it an it works maybe half the time, but be careful you don't take existing dry layers off, especially on metal minis! Prevention is better than cure though.
|
|
#
¿
Jan 4, 2010 23:47
|
|
|
Rambling irrelevant grampa story follows. All this POISON PAINT stuff reminds me of why I moved from enamels to acrylics back in the day. This was some time in the 80s, when most people used enamels because all the minis were tin-lead alloy so even unsuitable types wouldn't melt them, reasonable brands like Airfix and Humbrol were available in pretty much every toy shop, and what the hell were acrylics anyway? There were no acrylics aimed at mini painters. So the young me (I guess around 10) is sat up in his bedroom dabbing away on orcs and knights from a collection of random manufacturers (Citadel, Ral Partha, Essex, Prince August...) with a collection of equally random matt and gloss paints, without using undercoats, and cleaning my brushes in an old jam jar full of turps or white spirit. This became increasingly murky until it got replaced after about 3 months when I could finally persuade mum or dad to get me a new bottle from the DIY shop. When the lid was on the turps jar I was probably harming myself by filing bases flat and inhaling powdered lead instead. I'd got into D&D and miniatures because of my cousin. A year older than me, he was an excellent mini painter and all round artist (he went on to art school and eventually became a tattoo artist at an acclaimed London studio). Anyway, sometime in our enamel painting heyday, my cousin had to have a horrible scouring and adenoid removal operation done to his nasal passages because of a chronic allergy to cat hair. Naturally, they gave away all their cats, and the specialists asked if there were any other potential irritants he was exposed to; Apparently, if you're allergic to anything, huffing white spirit is a bad idea. After very little research my aunt and uncle replaced all his enamels with Tamiya model paints. This started a kind of whirlwind of paint replacement by the parents of all the D&D kids in our area, because every single nerdy kid has to have some kind of sniffly allergy or other. Mine was household dust. Every D&D kid in the three main schools near our town suddenly went from years worth of accumulated enamel shades to a bare minimum set of unsuitable acrylics (primaries, black, white, green, brown, and metallics if you were lucky), and screw you if you wanted more colours, obviously you don't need them because the Tamiya pots are MUCH bigger. It did suck since Tamiya paint is really lovely to use on 25mm minis when there's no internet to shout at you about thinning. In retrospect it's also pretty hilarious since I think most Tamiya acrylic is in an alcohol-based medium anyway. If they'd really thought about it they should have got us off the lead-based minis too. Fortunately we got the first Citadel Colour releases a while after that, and Humbrol started doing their acrylics. Then Citadel started their plastics so I got to inhale glue fumes all the time. Awesome!
|
|
#
¿
Jan 5, 2010 21:15
|
|
|
It'd be really cool if some of you magnet abusers could put together a FAQ for what size magnets you use for different things (I'm guessing metal hive tyrant arms will need stronger magnets than a plastic space marine). It'd be really useful to have some stuff about that added to the OP, or any links to good articles on it.
|
|
#
¿
Jan 13, 2010 13:53
|
|
|
Fyrbrand posted:Also here is a new vindicator I finished: This is really sweet. Decals are hateful things, I ended up scraping the ones on my vindicator and razorback off again. I've replaced them with the new metal bits from the Crimson Fists tank emblems pack, these are pretty drat nice, and currently the castings are still very clean with not much filing required.
|
|
#
¿
Jan 18, 2010 13:56
|
|


|
Cakefool posted:Trygon has a tail right? Have a large access hatch thrown back & edges torn apart, majority of trygon through the hatch, tail wrapped around a large beam/column. Build the base up about 25mm in depth. I saw some guy's Trygon where he had it smashing through an overhead gantry. Don't have time to find it again right now, think it might have been on Warpshadow. Gravitas Shortfall posted:I was planning to make my own spores out of hollow styrofoam eggs but this almost makes me want to give up the idea. TBH, I think that's kinda the level of effort I'd want to put into a scratchbuilt mycetic spore. It is just a blob with some tentacles and that doesn't seem like it's going to be interesting to make at all, and unless you make the bestest scratchbuild ever you're going to be far less inclined to use it once the official model is out.
|
|
#
¿
Jan 20, 2010 14:18
|
|
|
The Saddest Robot posted:Unfortunately I'm at the spot where I am recognizing all of the mistakes and flaws in my paintjob and am tempted to strip and start over. As has been said, don't. It looks fine and the carapace highlighting is really nice. Let it be for now and paint something else, you'll come back to it and realise it's fine. As well as that, I find that stripping something you've almost finished really does not help motivate you to paint it again. I stripped nearly finished Ultramarine tac, terminator and assault squads ~11 months ago to repaint them as Crimson Fists, took me until the Christmas break to get beyond the base coat, and still none of them are anywhere near finished. All the Tervigon stuff people are doing is going great. Makes me really itch to start mine, but I promised myself I'd build the 40 or so termagants littering my desk first. Mass Effect 2 isn't helping with that.
|
|
#
¿
Feb 1, 2010 14:00
|
|
|
Fix posted:Not sure how I feel about these little projects, but I was bored of painting sisters so I started in on some terrain bits to replace the crap I've got on my board right now. If this is supposed to be a trench gouged by a crashing craft, then it should have a much less pronounced trench at the end where it first touched the ground, and huge build-up around the end where the big chunk came to rest. Maybe one of the smaller chunks could have been done stuck through one side of the trench or with its own forked mini-gouge. As it is, it all looks too perfect and even, like somebody has built some earthworks around some scrap. Sorry, it's maybe a bit late for that feedback. I would have mentioned this when I saw the earlier WIP shot but it wasn't at all clear what was going on then. The ruin looks like a good start, so does the tank.
|
|
#
¿
Feb 2, 2010 13:54
|
|

|
PaintVagrant posted:
Oh god I am popular at spacemen. Just dived back to find a few things I remember liking: http://forums.somethingawful.com/showthread.php?threadid=3210214&userid=0&perpage=40&pagenumber=16#post368424019 (BL in non-nid shocker) http://forums.somethingawful.com/showthread.php?threadid=3210214&userid=0&perpage=40&pagenumber=15#post368176366 http://forums.somethingawful.com/showthread.php?threadid=3210214&userid=0&perpage=40&pagenumber=12#post367763614 (I think there is a mass shot of all Fix's Sisters too which looks awesome) http://forums.somethingawful.com/showthread.php?threadid=3210214&userid=0&perpage=40&pagenumber=12#post367763900 Bonus Ork:  I assembled 36 Termagants this weekend. Kill me now.
|
|
#
¿
Feb 8, 2010 00:40
|
|
 FIND POSTS OF COOL FINISHED STUFF AND POST EM SO I CAN QUOTE EM IN THE OP
|
Rapey Joe Stalin posted:I went with aartifolk.co.uk who charged a fortune for postage. If you are in the UK then find out if there is a HobbyCraft near you. They do the FW inks, and other good stuff like series 7s. I end up buying a ton of random poo poo any time I go there.
|
|
#
¿
Feb 27, 2010 19:24
|
|
|
Glue epic Rhinos on so it looks like your vypers are flying really high. Serious answer: Flying bases are a great opportunity to really go to town. My stillunfinishedafter15fuckingmonths deffkoptas have little bits of ruined building on their bases.
|
|
#
¿
Mar 6, 2010 16:58
|
|
|
  70-80% complete. Interesting build so far, because of the design it's being kept in sub-assemblies for painting purposes more than I would usually do. Beer, those bases look really nice wet. I'm sure you've posted it before, but what is your mud mix? Have you considered adding any freehand details like checks and dags or glyphs to your orks by the way? Your painting's really neat and your metal wear effects are great, a bit of freehand detailing could really lift these guys up a notch.
|
|
#
¿
Mar 7, 2010 01:42
|
|
|
Beer4TheBeerGod posted:That looks great. I like the rivets; what's your technique? Cutting and gluing plastic rod until I go insane from the repetitive work and the fumes. Pick thin circular rods (less than 1mm thick, I mostly use 0.5-0.7mm) for your basic rivets, and slightly larger hexagonal rods for nuts and bolts (1.5x to 2x the thickness of your circular rods). You can also get square rods to use as square bolts or washers, but it's roughly as much work to cut square bits of thin plasticard. Cut slices of rod carefully with a sharp knife. Change blades if you haven't for a while, if you're using a dull blade this kind of cutting is very prone to shearing, giving rough edges that are impossible to remove from these tiny objects. Lay the rod flat on your cutting mat and cut straight down with an even pressure. You want to get rivets as flat as you can but you don't need to be perfect, these are ork rivets. Go slowly at first, after a bit you can get a rhythm going. I find it easier to keep straight if I edge the rod under the blade for each cut rather than moving the knife. If you cut a rivet too thick don't try and cut it in half or whatever, it's a waste of effort, keep going down the rod which is easier to handle and faster. Cut at least twice as many as you'll think you'll want for the section you're working on: I guarantee you will use at least 50% more than your initial guess. Rivets tend to ping off as you cut, sometimes I put a little 'goal' made of half a blister pack next to where I'm cutting to catch the wild ones, usually I forget to dig it out and just cut next to my model. If you don't wear glasses get some eye protection: You won't blind yourself with rivet shrapnel, but you will remember it for a while! Oh, and you can also drill holes to represent rivets/bolts that have dropped out. Make sure they're in a line with other rivets so it's clear it's not a half-assed bullet hole. Some people suggest using the kind of hole-punch that's supposed to be used for making holes in leather belts and straps to make rivets to glue on. This is probably quicker and less fiddly than cutting rods, but I have yet to see a model using this technique that didn't look like it was covered in Lego studs. Can't say I'm ever likely to try it. Dunno if Cakefool or any of our other resident looney riveters have anything to add to that. Also I'm trying out weld lines on this build, which is just a thin sausage of your choice of putty laid along a joint and then stabbed into place along both edges with something pointy but a bit blunt like a cocktail stick. quote:I start with bestial brown, drybrush with snakebite leather and solar macharius orange, then flood the whole thing with devlan mud. After I ring the base with scorched brown I hit the model with dullcote, then use water effects on the base to get the final result. I was meaning more what's it made out of before painting and effects? Just sand on PVA or is there something more in there? The surface looks more smooth in some places than others so I wondered. Might just be the photo or the water effects doing that I guess. quote:My freehanding sucks, but I might try to be more adventurous in the future. I had a tentative plan of keeping the troop units a solid color, and using checks and other stylish stuff on the elites and other boyz. The problem is that the same focus that keeps the paint jobs clean also makes it impossible for me to be happy with any freehand work I do. I already spend way too much time on each model. You could also just vary weapon colours: Red boyz with all-gunmetal weapons, yellow boyz with brass bits on weapons etc. Orks tend to go best in either dingy poo poo-covered blacks, greys and browns, or bright primary colours (probably poo poo-covered too). Not sure I'd use purple unless I was trying to make some flamboyant freebooters or something like that. Rapey Joe Stalin posted:Without assistance my GUO may end up like this, and that would make Papa Nurgle sad. Greater daemon of mushy peas.
|
|
#
¿
Mar 7, 2010 15:53
|
|

|
The other thing you can do is get a box of fantasy orcs and go for a Snakebite mob in varying shades of brown. This will also give you some moon-hat heads you can use on your next batch of yellow/bad moon boyz. The fantasy orc boys fit together in exactly the same way as the basic 40K ones so it's just a bits swap to do this. Edit: actually you clearly already know this because you are using fantasy bits anyway, duh.
|
|
#
¿
Mar 7, 2010 16:33
|
|
|
Beer4TheBeerGod posted:  Only crit would be that because the rolla is so massive, the overall structure is very front-heavy. I'd suggest adding stuff at the back, sticking the little riser bits on top of the walls might be a start. I think that's a chem-plant tank isn't it? Can't remember what else is in that kit, anything like a smaller tank that could sit in a corner the back, or does it have any girder bits that might makes a decent rollcage? Whatever you think would add bulk or draw the eye really. PaintVagrant posted:I am not going to buy a stompa. I am not going to buy a stompa. I am not going to buy a stompa.
|
|
#
¿
Mar 8, 2010 13:56
|
|

|
 Still needs some tidying up. If I ever meet the person who decided every spotlight in 40K was going to have a grill over it, I'm gonna stab them in the eye with a 000 brush.
|
|
#
¿
Mar 15, 2010 02:16
|
|
|
Fast_Food_Knight posted:Bit late to the party but I wanted to chip in that everyone who has issues with white primer coverage should try Army Painter white spray, it's got a fantastic smooth even cover in one coat. Anyone with fuzzyness issues either sprayed in too hot/cold weather or didn't shake the can properly. It's probably the best white primer I've tried, excellent coverage, can be a bit tricky though because it goes on thick very easily if you try doing too much in one go.
|
|
#
¿
Mar 17, 2010 13:51
|
|
|
Hell Diver posted:Maybe where you come from cowboy, this here's the loquacious part a'town. Apparently it's this: Armour: Base 1:1 Regal Blue/Chaos Black Highlight with that plus Fortress Grey Highlight with Fortress Grey Highlight with 1:1 Fortress Grey/Skull White Gun casings: Base 1:1 Chaos Black/Codex Grey Highlight Codex Grey Highlight Codex Grey + Bleached Bone Highlight Bleached Bone
|
|
#
¿
Mar 22, 2010 20:23
|
|


|
That Halfords primer is really dicey poo poo in my experience. Sprayed on two occasions with the same can of grey, equivalent weather conditions, same level of shaking/swirling. First occasion, test spray on five sacrificial snap-fit gaunts, absolutely fine. Second occasion, spraying Space Hulk Genestealers, a bunch of horrific powdery knob cheese. (They still stink of dettol)
|
|
#
¿
Mar 26, 2010 16:34
|
|
|
Barry the Sprout posted:I'm looking for comments and criticism on my April oathed Wolf Lord. He's going on my diorama, so he's my first ever attempt at kitbashing, the backpack is missing at the moment as it's still in the post. It was pretty fun to do, I will probably try doing more in the future. That head is like Ron Perlman with a quiff and excessive facial hair. Awesome. The wolf tail on the storm bolter looks a bit big for the weapon. I'd lose the thing, there's enough WOLFWOLFWOLFWOLF on it already.
|
|
#
¿
Apr 2, 2010 18:44
|
|


|
Product review: craftlite Energy Saving Daylight Bulb 20W ES I normally use Phillips 60W daylight bulbs in my desk lamp and the second lamp I use with it when I can be arsed to set up my lightbox. I've been down to one bulb for a while and not found any replacements so I took a risk and picked up one of these bulbs in Hobbycraft. Generally my opinion of energy-efficient bulbs has been that they're poo poo for painting: Super yellow, take as much as half an hour to get to full brightness, and their "equivalent to xxW tungsten" claims are usually exaggerated by something like 50%. I was therefore rather skeptical about these bulbs, and decided to get a 20W (100W equivalent) instead of the 11W (60W equivalent). This bulb completely trashes all my preconceptions. It's an incredibly pure white, the Phillips bulb in my other lamp looks quite yellow in comparison: I'm not completely sure that's the best thing but I'll take it over the normal colour of EE bulbs. The bulb reaches full brightness within a second of being switched on. It's also incredibly bright - it probably is genuinely equivalent to a 100W tungsten. The only real downside is the spiral is a bit long so it will stick out of a standard desk lamp slightly; that probably wouldn't be a problem with the 11W one though. And there you go. I have written a gushing post on the internet about light bulbs.
|
|
#
¿
Apr 7, 2010 18:44
|
|
|
It was at Hobbycraft, for Five English Pounds. Checking the packaging there is no further info about the manufacturer beyond the brand name, so no clues for finding US stockists. PV, I think you did some ogres (for Hordes?) at some point with tartans on them. Do you have any pics about? I'm about to paint some kommandos I kitbashed ages ago, some with fantasy orc kilt/tunic legs so I could use some demotivation ") EDIT: I mentioned my bulb quest to one of the guys in our local GW the other day and he mentioned getting a halogen lamp with a magnifier from Argos and really liking it. Looking at their site there is one for �24.99 that is probably it. Shallow fucked around with this message at 19:37 on Apr 7, 2010 |
|
#
¿
Apr 7, 2010 19:33
|
|
|
PaintVagrant posted:http://s49.photobucket.com/albums/f281/BBivona/Miniature%20Painting/Trollbloods/ Oh, Trollbloods not ogres. Look at my terrifying ignorance of non-GW games. Cheers dude. Well that's bolstered my confidence a fair bit, the orc bits are a lot less wrinkly than the surfaces you pulled of some nice tartan on.
|
|
#
¿
Apr 7, 2010 20:13
|
|
|
I can't believe you spent a page mistakenly discussing navel-knees, Blood Angels are obviously a carefully timed Easter release. Also that Farseer is looking fantastic.
|
|
#
¿
Apr 8, 2010 14:35
|
|
|
Fyrbrand posted:Do this one or gtfo. Assembling/painting a warwalker by the same guy here: http://www.games-workshop.com/gws/content/article.jsp?catId=cat1300045&categoryId=400035§ion=&aId=1100014 EDIT: In the same blue scheme.
|
|
#
¿
Apr 8, 2010 16:45
|
|
|
Rapey Joe Stalin posted:For those of you who practice the mystical art of sticking-plasticard-under-feet to avoid the sunken effect when sanding bases, what do you do with the metal ones ? I leave the whole tab on, glue the plasticard scraps onto the base at the edges of the slot, just where the feet will stand, and then glue the model in. Sort of like PV's slot heightening but just under the feet. If the tab sticks above the surface of the base a lot, I might file it down a bit. It's fiddly though, I've been meaning to try option 1 for a while, it's probably a better way overall.
|
|
#
¿
Apr 10, 2010 10:50
|
|
|
Hmm let's see who's on the list of exhibitors for that show here in Sheffield next week. Not heard of Black Scorpion, lets have a look at their website and see what kind of stuff they ma-    http://www.blackscorpionminiatures.com (Also lots of other piratical fantasy, non-fantasy pirates, and FAT MEXICAN)
|
|
#
¿
Apr 11, 2010 16:43
|
|
|
It's pretty much that thing of doing flat poses because they can be cast in a single piece. Shame really, I'd be likely to buy some if they were more easily convertible multi-piece models.
|
|
#
¿
Apr 11, 2010 17:11
|
|
|

|
| # ¿ May 17, 2024 20:28 |
|
|
I think you're all missing the vital point that they make orc pirates. Oh god what is all this poo poo:  That waaagh banner is actually blurry in real life, honest.  Wagon started in December, burnas bought and assembled a million years ago but only now painted. This reduces my backlog of assembled+primed+unpainted orks by approximately 0.5%
|
|
#
¿
Apr 11, 2010 19:24
|
|