


|
Does anyone have any recommendations for focus stacking software for macro work? I don't have (and won't buy) Photoshop. Helicon Focus looks neat, and it's only $30, but I don't know what else is out there.
|
 #
¿
Dec 9, 2011 03:07
#
¿
Dec 9, 2011 03:07
|
|

|

|
| # ¿ Apr 29, 2024 18:38 |
|
|
seravid posted:I tried CombineZM and Zerene Stacker. I shoot by hand so they didn't produce any usable results, but they got (surprisingly) close. I imagine they'd be great for tripod work. Hmmm. I'm hoping to shoot by hand as well for insects. I'm a total macro novice, so I'm guessing it's not easy to get a tripod with a macro rail set up to glide in on an insect. I'll definitely try a demo before I buy any software to see if it works for handheld shots.
|
|
#
¿
Dec 9, 2011 03:57
|
|
|
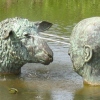
 Paper Trail  The head of a red wasp  Eye of a common anole (lizard)
|
|
#
¿
Jan 29, 2012 21:09
|
|
|
I'm pretty happy with how this turned out.
|
|
#
¿
Mar 9, 2012 06:39
|
|
|
Honeybees in my lemon tree 
|
|
#
¿
May 8, 2012 05:50
|
|
|
spongepuppy posted:I had the good fortune to acquire a set of Nikon PB-6 bellows late last year. It was the first time I was actually able to afford them, and I've been hooked on high-magnification work ever since. I mostly use old enlarger lenses, but I'm experimenting with old LOMO microscope lenses too (with limited success). I'd love to hear more about what you do for specimen prep and lighting. I bought Zerene earlier this year and I've been using a 100macro lens on 150mm of cheap bellows. I think it hurts me that I am using a crappy rail and it's hard to make fine enough movements to end up with overlapping focus in my stack. The shot below has those bands of out-of-focus regions. It's a live critter, not studio, but still not as good as I would hope for 30 stacked shots. I am slowly talking myself into a StackShot, but I don't know if the rest of my technique is up to it. I've been reading the photomacrography.net forums, but there isn't really any good intro material that I can find on things like lighting.  For scale, this is a picture of the same moth with my pinky in frame. 
|
|
#
¿
Mar 2, 2013 05:56
|
|
|
spongepuppy posted:tips Thanks for the info! The enlarging lenses are cheap on ebay so I'll scoop one up to try it. I'm probably going to pick up a stackshot in a month or two as well. I'm using a manfrotto 3278 flash bracket, which works great for hand holding but it's ideal for working on a tripod since the camera tilts if I want the flash arm to be off-horizontal. It might be ideal to stack those friction arms on though...
|
|
#
¿
Mar 2, 2013 20:12
|
|
|
spongepuppy posted:I've got a Nikon 10X/0.25 CFI BE Planachromat lens on order at the moment - it should give me better image quality, and without the need to use the bellows. Cost was $75US from opticsplanet.com. The enlarger works great. Pretty sweet for a $20 lens!  Spider on leaf by Graniteman, on Flickr  Spider on paper by Graniteman, on Flickr I ordered a 4x infinity corrected objective, too. It's back ordered 30 days or so, but I'm also looking forward to playing with that. I think a higher magnification would require the stackshot.
|
|
#
¿
Mar 12, 2013 06:18
|
|
|
spongepuppy posted:The Nikon CFI 10x BE PLAN arrived today. No time for a proper test, but I did locate one tiny victim for a quick resolution test: Nice! My 4x arrived yesterday, but I bought the wrong drat step down adapter. I have to wait another few weeks for a new $2 RMS->M58 adapter to ship from China. Correct me if this is wrong, but my understanding is that your 10x and my 4x are both at their nominal magnification on a 160mm tube lens. I'm not sure that's right though, since you say on a 135mm tube lens you get 7x where I would have guessed 8.5x (135/160). In any case, I was planning to put my 4x on the front of a 100-400 L as a tube, so I could then move the magnification up and down. Plus the only other longish lens I have is a 100mm macro which seems too short. In related news I spent five hours re-working my garden to plant all native species that are supposed to attract bugs.
|
|
#
¿
Mar 24, 2013 16:43
|
|
|
While I wait for my adapter, here is a spider taken with my enlarging lens today Spider on paper by http://www.flickr.com/people/93703706@N07/ Feedback is welcome! I see some halos on the legs, especially near the top. I think that may be a byproduct of the pmax stacking?
|
|
#
¿
Mar 25, 2013 05:14
|
|
|
alkanphel posted:Or you can go hardcore like this guy: John does amazing work. I really recommend following him on Flickr.
|
|
#
¿
Apr 3, 2013 17:58
|
|
|
Finally got some time to play with my 4x microscope objective.  Random honeybee on honeysuckle  Edit: I just bought some ping pong balls to use as diffusers with the microscope objective. I think it made a great improvement over my folded white paper tent in the first shot above.  Edit 2: Last spam from me. Just another shot with this ping pong ball.  Graniteman fucked around with this message at 00:57 on Jun 5, 2013 |
|
#
¿
Jun 2, 2013 21:04
|
|
|
spongepuppy posted:These are fantastic. I've done some fairly crap stacks with my 10x so far, but I hope to do some good work soon. Thanks! You do some great work so I appreciate the comment. What do you do for backgrounds? The black ones are presumably just flash only but you have some nice gradients. I've just used white paper for mine.
|
|
#
¿
Jun 5, 2013 18:54
|
|
|
mAlfunkti0n posted:What is the cheapest way to do macro? I see the reverse ring, etc... Currently I have a 50mm 1.8 and Tamron 17-50 2.8, and a 70-200L on the way. Any of these lenses good when reversed? The reversed 50 would work well. You can put it on the end of a cheapo bellows to get some ability to change magnification, too. http://www.amazon.com/Fotodiox-macro-bellows-Canon-Cameras/dp/B003EDTG8W You can also get an old Nikon film enlarging lens from Ebay (50mm, f/2.8, $20-40) and reverse that on the end of the bellows and you can do some pretty serious high magnification stuff if that's what you are into.
|
|
#
¿
Jun 5, 2013 20:54
|
|
|
spongepuppy posted:Random household objects. Fruity coloured paper gift bags are quite good, because they stand up by themselves. I just shot this using my DVD case for "A Bug's Life." I'm not loving the reflected green light but I'll know better next time.    edit: I switched my pro flickr account to the free one and now apparently Lightroom can't replace images. They get deleted and re-uploaded. I hope they bring "replace" to all flickr users because I use that a lot 
Graniteman fucked around with this message at 17:14 on Jun 10, 2013 |
|
#
¿
Jun 9, 2013 02:26
|
|
 .
.
|
spongepuppy posted:^^^ This is great Let's talk about post processing for a second. I like how you process your shots and I've never seen a good description of a workflow so I just make it up as I go. Here's what I do for these 2-5x macro / microscope objective shots. My workflow for normal photography is very different than this focus stacking workflow.
I do all of my regular photography editing in lightroom with almost no filters. But I find that these filters work well for macro and if I am going to go into photoshop eventually I may as well avoid having a bunch of virtual copies and extra tiff files in lightroom.
|
|
#
¿
Jun 11, 2013 18:38
|
|
|
spongepuppy posted:My workflow is basically the same as yours - the only difference is in the sharpening side of things:
|
|
#
¿
Jun 13, 2013 04:28
|
|
|
 I tried to clean it with a 20% rubbing alcohol solution and it still had pollen and crap on it. I need to keep trying more stuff I guess. Graniteman fucked around with this message at 16:00 on Jul 12, 2013 |
|
#
¿
Jul 12, 2013 15:53
|
|
|
seravid posted:Critters are great at keeping themselves clean. You know, when they're alive Officer I never seen that lady before in my life. I was nowhere near the place where she got whacked!
|
|
#
¿
Jul 12, 2013 17:05
|
|

|
seravid posted:Bad move lying to the coppers (that fly's a dude Officer I swears I thought he was a lady, and was over a day old! I guess I'm obviously more into the photography than the etymology. How can you tell it's a male?
|
|
#
¿
Jul 12, 2013 17:59
|
|
 )
)
|
No insects were harmed in the creation of these particular images Cropped image of a small pollenater (2mm) shot at 1:1  Honeybee at 1:1  Random moth in my house. About 2:1. 
|
|
#
¿
Jul 22, 2013 22:43
|
|
|
Crane Fly
|
|
#
¿
Aug 6, 2013 05:08
|
|
|
I took a few shots today with a raynox DCR-250 on a 100mm macro. Butterfly on Yarrow  Fly spongepuppy, after some of your posts here I bought a Lomo 9x 0.20 off of ebay. I either bought the wrong lens, my copy is jacked up, or (most likely) I don't know what I'm doing. I get really terrible contrast. I forget how far I set the bellows, but if I screwed that up would I get crappy performance? This is my first stab at a finite objective. I've used infinite objectives with pretty good success before.
|
|
#
¿
Oct 7, 2013 00:13
|
|
|
spongepuppy posted:Blacking out the silver trim ring helped, from memory... From reading more about it I think it's the fact that I'm using one of those cone shaped M42 - RMS adapters. Apparently I missed the note that they universally cause lovely glare if you don't line them with black flocking material. I am just going to buy a flat adapter and put it on my bellows instead. Thanks for the tipoff. I have been checking around and haven't seen any Lomo 3.7x objectives on ebay. It sounds appealing. I recently switched to a full frame setup and my infinite objective doesn't fill the frame anymore unless I push the tube lens to 300mm or more. It's more magnification than I want most of the time so I am going to try to find something more around 3-5x.
|
|
#
¿
Oct 9, 2013 20:29
|
|
|
Loving my new stackshot. I'm hoping to assemble a shooting stage over the holidays this month. Just some wood and rails bolted together so I don't have to keep putting things together and breaking them down every time I want to shoot. Fly
|
|
#
¿
Dec 9, 2013 07:05
|
|
|
PREYING MANTITS posted:That is awesome! That stackshot thing looks really interesting, can't wait to see what you can do with it fully set up! Thanks! But I have to say that I think the stackshot is more about convenience than enabling new shots (at least at ~10:1 magnification or less). I have a cheap $50 adorama brand macro rail which I have used to do focus stacking images. It's hard to turn the knob by hand just enough to move the plane of focus, but it can be done. The shot below was by hand.  But 10:1 is really the limit of what I can do by hand. I just can't make finer adjustments than that. And I do screw up 1/3 of shots by hand because I turn the knob too far at least once and end up with an out of focus band. And as you know from your excellent carpenter ant shot you don't need focus stacking to get great macro images. Just for a particular kind of high magnification shooting of static (often dead) subjects where you want the most possible depth of field.
|
|
#
¿
Dec 10, 2013 21:02
|
|
")
|
InternetJunky posted:I would love to see what kind of lighting setup you guys used for these, they are stunning shots! I don't have a photo I can show for a week while I travel but I'll try to explain my own ghetto lighting rig. I got a $10 four-armed "helping hands" thing from the electronics store. Basically four flexible bendy arms ending in alligator clips. Arm 1 holds the fly by just clamping the wings. Arm 2 holds a sheet of black background material positioned behind it. Arm 3 holds half of a white styrofoam coffee cup over the fly so that it is pretty close and sort of envelops it a bit as the main diffuser. A flash is on a $12 knockoff eBay friction arm, positioned to shoot down through the cup. Arm 4 holds a sheet of aluminum foil under the fly to bounce back up some of the light from the flash. The foil is sort of shaped like a bowl I guess. I try all kinds of lighting setups though. I have lots of pingpong balls cut up in various ways which work well for extremely even lighting. Right now I think styrofoam cups are my favorite. Good light transmission and easy to cut into shape.
|
|
#
¿
Dec 12, 2013 06:05
|
|
|
InternetJunky posted:Thank you both for describing/showing your setups. I've tried home-made diffusers in a bunch of different configurations and I've never been able to achieve such nice smooth lighting as what you guys had in your shots. No matter what I try I still get very harsh lighting. If you post a picture of a setup you don't think worked well maybe we could offer some tips. We can at least offer useless commentary that will make us feel good about ourselves.
|
|
#
¿
Dec 12, 2013 19:01
|
|
|
William T. Hornaday posted:Is anyone here using focus stacking, or is everyone mostly just using tiny apertures and a buttload of light? I figure the latter is easier for things that aren't inclined to sit still for very long. Spongepuppy and I have mostly posted focus stacked images. I use zerene stacker. I haven't done any focus stack shots in the field (live subjects). Hand held I do 1:1 or 2:1 at about f/11-16.
|
|
#
¿
Dec 13, 2013 15:12
|
|
|
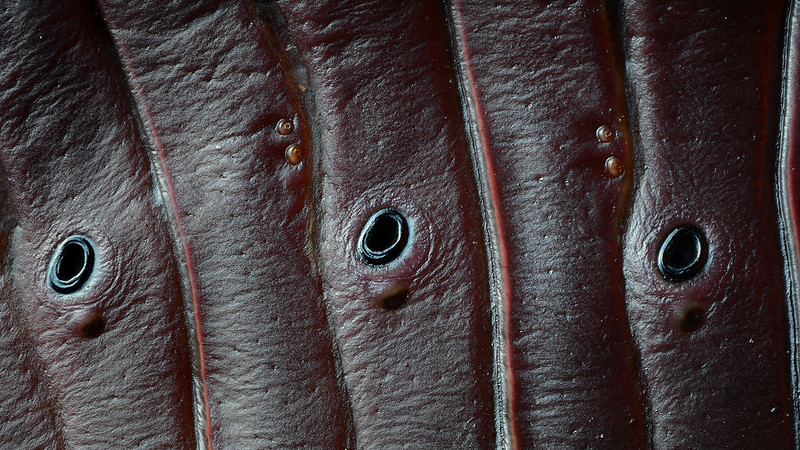
spongepuppy posted:Content! pretty fantastic. Are those the spiracles (insect body breathing holes)?
|
|
#
¿
Dec 16, 2013 21:21
|
|
|
I built my little macro table thing! I'm pretty happy with it. There are a few things I want to tweak, but overall I love the convenience and control it gives me.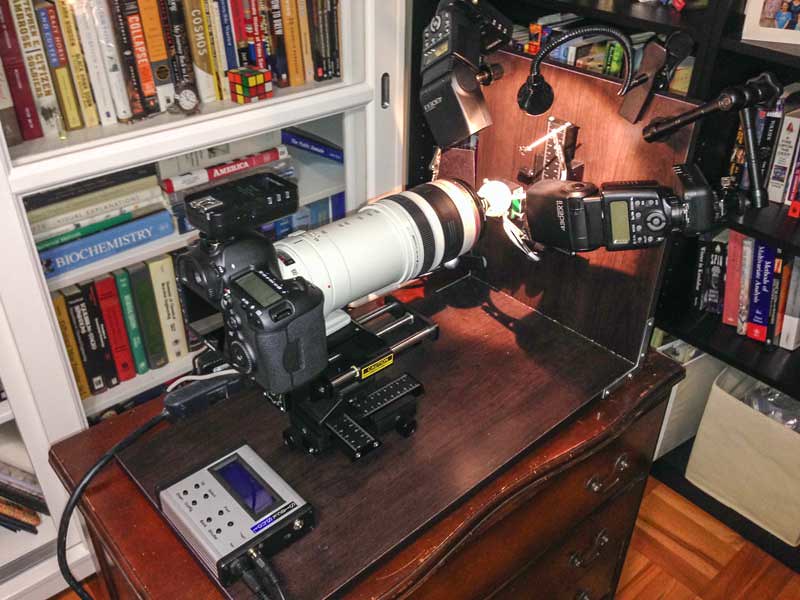 I've been rolling with hacked together garbage for the last couple of years, but adding pieces slowly. Now I have it all mounted together on a couple of bits of shelving and it's really convenient. Those knock-off friction arms for positioning the flashes are really handy. Shot of an antenna from a beetle I found this weekend. This is about 15:1.   edit: to anyone seeing this and thinking you really need this much crap, you don't. Check my flickr feed. Most of that was done with way less stuff. You need one reversed 50mm lens, one flash, one pingpong ball to cut into a diffuser, one $50 macro rail, one tripod, and some tape to hold stuff in place, plus patience to fiddle it around until it works. All of the other stuff I have here is more about making things easy than making things possible. You can do the super-magnified stuff with a $70 microscope lens on any cheap ~150mm lens that fits your camera. I'm using a $1500 telephoto because I have one for other types of photography, but it's not needed. Also, I agree with Mr. Despair re: flashes. Lighting is critical. I'd make the same trade (cheap flipped 50 with flash is better than a true macro lens and ambient light in most cases). Graniteman fucked around with this message at 06:12 on Jan 7, 2014 |
|
#
¿
Jan 7, 2014 06:06
|
|
|
BioTech posted:Please explain how you move past 1:1, because it just doesn't click for me. The best site for this high magnification macro is photomacrography.net. It's got a lot of really world-class macro photographers posting there about setups and techniques. I learned basically everything there. Here's the FAQ thread you may want to start with. http://www.photomacrography.net/forum/viewtopic.php?t=12147 But it's not super easy to learn exactly how to make it all work, so here's the sum of what I've learned for my current best setup. Many/most microscope objectives don't give good quality on a camera because the optics are just designed for a totally different setup. Some objectives work really well, and they often sell for a fortune on ebay. But if you know the good ones there are cheap objectives to be had! My setup is two objectives: Nikon CFI BE Plan 10x / 0.25 $53 Nikon CFI BE Plan 4x / 0.1 $72 available here (seems to take a couple of months to ship both times I've ordered). These objectives are infinity-corrected, meaning you have to stick them on the front of another lens (focused at infinity). You will get the rated magnification on these two lenses with a 200mm "tube lens." More focal length = more magnfication, less focal length = less. If you use a shorter tube lens you can actually get very sharp results, for optical reasons I don't fully understand (same N.A. but less magnification = more resolving power I think). Testing at photomacrography.net has shown that the quality of the tube lens doesn't seem to have any visible effect on the quality of the image (all driven by the microscope objective). So you can get any cheapo 135mm from ebay. But I use my 100-400mm lens which is nice because I can adjust the focal length pretty finely across the full range I might want to use. The microscope objectives I listed have RMS thread. You want a RMS adapter. Here's a $16 RMS to M52 (52mm filter thread) adapter. Avoid the cone shaped adapters since they give you lots of internal reflections unless you fiddle with internal black flocking. Generally people get the best results if the objective is as close to the tube lens as possible. Be careful that if your tube lens front glass is curved you don't scratch it by threading the RMS adapter on (only happens with super curved tube lenses). If you are shooting a crop body then you can use a 100 mm tube lens no problem. I am shooting full frame and the tube lens has to be above ~300 mm to fully cover the sensor with my setup. I do shoot at 130mm sometimes but I have to crop out the edges because of severe (black) vignetting. At >1:1 magnification you will probably need to focus stack. I think Zerene Stacker is the best software. $100 but very much worth it (photoshop focus stacking does not work nearly as well, but I do use photoshop for some smart sharpen action. See earlier in the thread for some discussion between me and spongepuppy on post processing). To focus stack you will also need a macro rail. I used the ~$50 adorama X-Y stage with good results up to ~8:1. But you have to turn that drat screw knob super freaking carefully. 2-4x is pretty easy, above that becomes tough (hard to tell the difference between turning the knob the right amount and not turning it at all). A stackshot automated rail is a super nice to have thing, but it's $500 and can only be used for high magnification macro. I love mine, but it took me a year to decide I was really into this enough to buy one. You will also find that the viewfinder image is very dark through this setup. The microscope objectives are basically always "stopped down" to the final aperture, so you will need a focus aid light light. For some reason the $10 Ikea LED lamp in my picture above is the most common in these setups. There are lots of other little details you pick up. I think we all tinker with lighting modifiers non-stop (ping pong balls, shoot through paper, coffee cups, milk cartons, aluminum foil). Using different kinds of backdrops. The details of how you prefer to post process. Spongepuppy does great work and has a similar workflow to me so if he wants to chime in to correct / add anything I'd like to hear it too. Graniteman fucked around with this message at 17:39 on Jan 7, 2014 |
|
#
¿
Jan 7, 2014 16:19
|
|
|
InternetJunky posted:So just to be clear, you have an objective screwed on to the front of your 100-400, right? How does this get past the minimum focusing distance of the 100-400? Can I do the same with my 600 to get crazy magnification results? Yep, the objective is screwed on to the front of the 100-400. The thing about these tube lenses (like my 100-400) is that they are they are focused at infinity so the min focus distance doesn't factor in. The light rays coming out of the back of the microscope objective are parallel (i.e. they are "infinity corrected" objectives) so you need to put a lens behind them which is focused at infinity to collect those parallel light rays and focus them on the camera sensor. Note that older objectives are often "finite" objectives where the light rays converge, and you don't need a tube lens. For example many old objectives work if you just put the objective 160 mm from the image sensor (on bellows or extension tubes). Most newer objectives are infinity focused though. Both can give you very high quality you just need to know what kind you have. The specific objectives above require a tube lens. Basically you should be pretty careful in researching microscope objectives and get ones that are known to work well for photography like this. Random objectives are probably not going to be great, even if they are great on their original microscopes. If you are lucky and patient and know what you are looking for you can find good stuff on ebay, but I'm not patient. You could use your 600mm but it would probably get pretty sketchy. The deal is that these optics are designed around an assumed focal length for the tube lens (200mm in my case). The further you go from that 200mm the further you get from the design basis and generally the worse the resolution gets. In some cases people have found objectives that tolerate getting fairly far off that design basis and still give good results, but often you get crazy C.A. or loss of resolution. There are threads all over the forums I linked about people testing new objectives they find in different ways (it's a popular hobby with these folks to hunt for "hidden gem" objectives I guess). For example, some 10x objectives works amazingly well at 100mm on a crop sensor body as a 5:1 objective. Many don't work when "pushed" that far. So using your 600mm is pretty far out of "spec" and it probably wouldn't work great. Also note that the resolving power of an objective is related to the N.A. (numerical aperture, the microscope terminology for aperture). It's fixed for these objectives, and a wider NA means more resolving power at the designed magnification. If you push the magnification with a longer focal length tube lens the NA doesn't change, so I think you lose resolving power as you increase magnification, and at some point you stop gaining anything even if the optics work perfectly on the longer tube lens. Most people on the forums seem to use old 135mm tube lenses since they are cheap, common and a little less than 200mm (which gets you a little more resolution for a little less magnification). So like I said it's kind of complicated (and while I know some stuff, I'm not a real expert) so that's why I just posted "these are the things I have which I know work, and are easy to get." Graniteman fucked around with this message at 17:41 on Jan 7, 2014 |
|
#
¿
Jan 7, 2014 17:39
|
|
|
SybilVimes posted:It's probably getting close to time for them to switch to a new mount again since it's been like 20 years since they did last. EF->FU
|
|
#
¿
Feb 4, 2014 23:28
|
|
|
Common pill bug spongepuppy, how are you preparing the food coloring and now the asprin? I'm imagining you are dissolving it and letting the solution dry on a glass plate or something to form crystals.
|
|
#
¿
Feb 17, 2014 06:09
|
|
|
Anti_Social posted:nice things I appreciate the kind words. I think that pill bug shot is my favorite that I've done so far. This weekend I caught a fat spider in my compost bin and gave him the glamour treatment. It has more of a pedestrian feel than the pill bug though. Getting the lighting just right is tough. There's a lot of crap to cram in around a tiny subject to get the light the way I want it, and I don't usually quite get there. I need to look up more lighting diagrams and try to replicate it at tiny scale to see how it works. 
|
|
#
¿
Feb 26, 2014 06:21
|
|
|
Alpenglow posted:What was your lighting setup here? It's glamourous. I based it on something I've seen described as "museum exhibit lighting" by another macro photographer (John Hallmen). Two flashes, both flashes elevated to about 75 degrees. One is at 45 degrees off center in front to the left. The other is 45 degrees off center behind to the right. Both heavily diffused by shooting through half styrofoam cups, which reduced the effect of the flash positioning more than I wanted it to. The lighting looks fine, but not quite the look I was going for. I also had some aluminum foil underneath the spider as a reflector to get some reflected light back up into the deep shadows.
|
|
#
¿
Feb 28, 2014 16:53
|
|

|
 beetle face  Spider in Lemon Tree Flower  jumping spider
|
|
#
¿
Apr 13, 2014 18:39
|
|
|
800peepee51doodoo posted:This is a loving dope picture but whats the deal with the soft glow effect? Is that intentional or is it an artifact of the type of shot/lens/whatever? Thanks! I think you are talking about the kind of glowing highlights. The center of the spider was pretty overexposed, almost to blown highlights. I think maybe the focus stacking did something funny with the highly exposed white scales. Basically, I don't know what happened, but I was happy with how it looked. This was "standard" ping-pong ball diffused lighting (you can see the reflection in it's eyes of the microscope objective poking through the center of a cut up ping-pong ball). edit: it appears to be a focus stacking artifact that's most pronounced when the foreground is light and the background is dark. In this case it's white scales on a black body. http://www.photomacrography.net/forum/viewtopic.php?p=135042#135042 Graniteman fucked around with this message at 03:52 on Apr 15, 2014 |
|
#
¿
Apr 15, 2014 00:46
|
|
|

|
| # ¿ Apr 29, 2024 18:38 |
|
|
Carpenter bee at 6.25:1 Carpenter bee
|
|
#
¿
Apr 28, 2014 05:39
|
|