


|
I just wanted to chime in and say that Shapeways is my new favorite thing in the whole wide world. I'm really not sure how I didn't know about it before this thread, but it's opened up a whole new world of nerdy movie and TV prop replica possibilities to me. It'll take a little while to recover from Christmas and save up the money to get my first print done, but I've already uploaded a prop piece that I've been sitting on for *years* as a 3D model. I never really could figure out how to produce to my liking in physical form, and now it's going to be as simple as throwing the cash at it. loving amazing.
|
 #
¿
Dec 26, 2010 16:28
#
¿
Dec 26, 2010 16:28
|
|


|

|
| # ¿ May 2, 2024 13:51 |
|
|
Super.Jesus posted:Very cool prop stuff Shapeways helped me bring a replica of a somewhat obscure Stargate SG1 prop to my workbench. (NERD ALERT) Telchak's Cube was something I always wanted to make. You can get replicas of dozens of other common props pretty readily, but nobody ever made one of those cubey things. I found some nice close-up photos from a prop auction way back in like 2005, and was able to model one face of the cube with excellent accuracy. The problem from there was actually producing one. I'm not a sculptor, laser cutters weren't quite up the the task, CNC wasn't an option for me at the time, so I ended up just shelving the whole project for a lot of years. Last year, after learning about Shapeways, I was able to re-jigger my old Lightwave model into the proper format for them to process. For around $50 and a couple weeks of waiting I finally had a physical item to work with. A quick open-faced mold and a quart of resin later, and I had a full set of cube sides...that are still waiting for me to get to work on them one of these days. Here are the casts all hastily taped together, with a CD in the one pic to give a sense of scale. It's almost exactly 8 inches (20-ish centimeters) square. 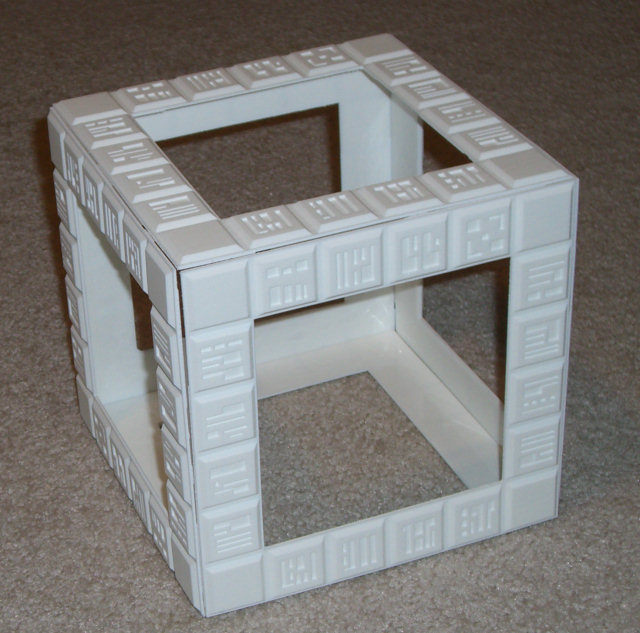 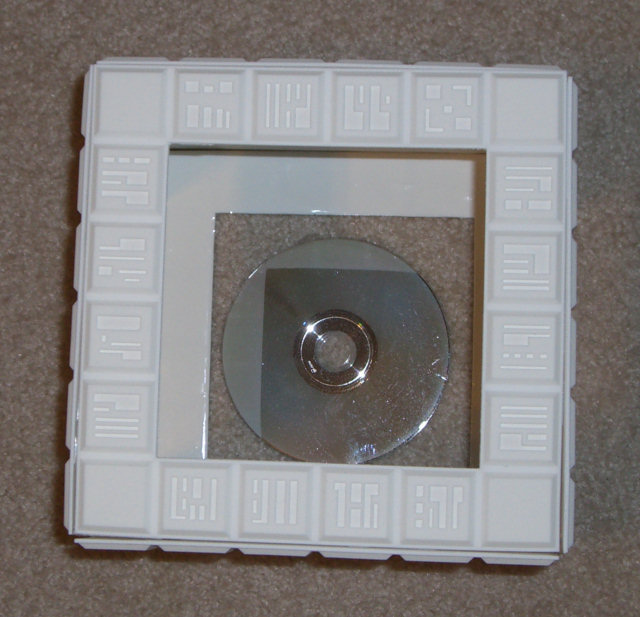 So yeah, Shapeways loving rocks. This piece is crisp and sharp, and no CNC machine I could afford to use would have been able to reproduce all those recessed symbols like the 3D printing process can. Well worth the effort and cash to get it manufactured. I'll probably even get around to finishing it someday!
|
|
#
¿
Jan 23, 2012 23:36
|
|
|
Mathhole posted:Just out of curiosity, why did you make 4 walls that had to be stuck together instead of having all 4 walls be one piece? It is important that it can be taken apart again? Super.Jesus pretty much nailed it - $$$. Having one face of the cube printed was about $54, so it would have cost over $300 to have an entire cube made. With a small $50 resin/rubber kit from Smooth-On, I was able to mold and cast copies of the single master for far less money. The polyurethane resin is also a much stronger material than the Shapeways basic white plastic for something this thin. By doing it this way, I also have the option of producing a basically infinite number of cube sides if I ever feel the uncontrollable urge to square off with MGM's intellectual property lawyers.
|
|
#
¿
Jan 25, 2012 03:01
|
|
|
Mister Sinewave posted:
|
|
#
¿
Jan 29, 2012 01:54
|
|

|
I don't own a 3D printer, so I have no idea about quality here, but Inventables has all of their filament on clearance right now - some rolls as low as five bucks. https://www.inventables.com/categories/materials/3d-printer-filament insta posted:had* Wow, that went fast. Disregard! Acid Reflux fucked around with this message at 18:16 on May 8, 2015 |
|
#
¿
May 8, 2015 15:55
|
|
|
Been trying to keep up with this thread and failing miserably, so pardon me if this has been discussed at all recently - but I think I might want one of Monoprice's Prusa i3 clones. The reviews are positive, and it seems like a fairly good platform overall. Are there any show-stopping caveats to these machines that I'm overlooking? I've got plenty of CNC/g-code/why-is-this-crap-so-finicky experience, and absolutely no fear of tinkering with stuff if needed.
|
|
#
¿
Jan 28, 2016 01:43
|
|
|
Heh...somehow I completely missed where you mentioned the brand, even though I have been reading about your experiences. I found it after a bit of review and promise to read more carefully in the future. ") Anyway, I appreciate the feedback. I'm about 98% convinced to order one when my tax refund shows up. I expect a beer or three will win over that last 2% when the time comes. Anyway, I appreciate the feedback. I'm about 98% convinced to order one when my tax refund shows up. I expect a beer or three will win over that last 2% when the time comes.
|
|
#
¿
Jan 28, 2016 18:49
|
|
|
Not printer related, but relevant - I got 1lb of melted paraffin wax to autoignite on my (electric) kitchen stove during my first attempt at DIY machinist's wax. Turns out that a candy thermometer does not work well for that particular application. I was ready for it though, because I anticipated the possibility, and had both the pot lid and a fire extinguisher close at hand. Only needed the lid, thankfully. After that little fiasco I sacrificed my deep fryer for science and made a couple of lovely, not-at-all-burning batches of wax. In hindsight, the very moment that the possibility of flaming paraffin even entered my head should have been the same moment I decided not to try it, but hey, you can't make an omelette without melting some wax. I think.
|
|
#
¿
Aug 17, 2016 22:01
|
|
|
Tax refund: imminent. Do I still want a Maker Select V2, or this fancy new Maker Select Plus doohickey gadgetron they have now?
|
|
#
¿
Feb 6, 2017 20:54
|
|
|
biracial bear for uncut posted:Unless your tax refund was pathetically small, I'd advocate holding off on buying one of the Monoprice printers until May of this year, some new models will be coming out then that you may want to get. Well, not pathetically small, but I have other stuff I'm shopping for too, and I've been eyeballing that V2 for months now. It pretty much checks all the boxes on my list and it's cheaper now than it's ever been. I was more curious as to whether or not the extra bells and whistles on the Plus were worth the price difference between the two, and if the Plus is mature enough to even bother with. Maybe I should have put that all in my previous post. 
|
|
#
¿
Feb 7, 2017 03:17
|
|
|
Short version of a not much longer story: a friend of mine won a printer kit at a mini maker fair event thing. Since he already has two working machines, and he knew I was in the market for one, he decided I ought to have the kit. So yeah, I'm the (dubiously) proud owner of a TronXY X3 now. The price was right in any case. 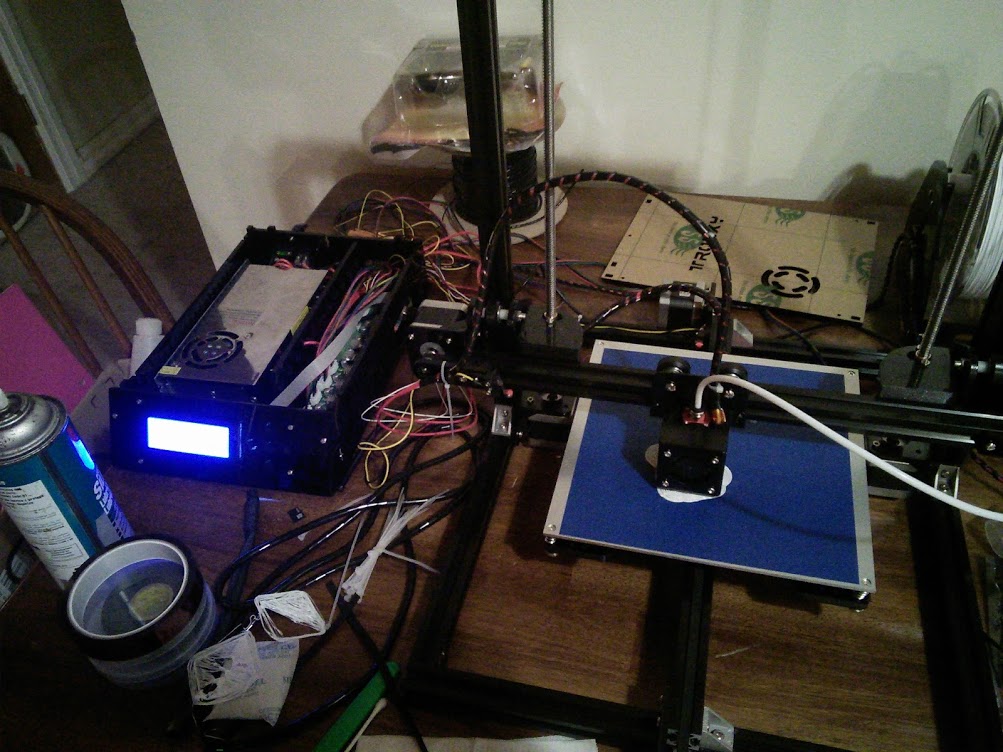 (Those are my first two test prints in the lower left of the picture. I have since conquered first layer adhesion.) (I'll also finish cleaning up that wiring at some point. Promise.) It's...a cheap 3D printer. Good thing I like to tinker with poo poo. I have plenty of experience with hobby CNC machines, so getting this put together wasn't as much of a challenge as it might have been otherwise, although most of the hardware is the Chinesiest of Chinesium. Not a single washer in sight, really lovely T-nuts, lots of acrylic parts, and the brackets that hold up the Z axis are themselves 3D printed. The frame is solid though, it's kind of hard to gently caress up 2020 extrusion. Heated bed, Bowden extruder, V6 clone hotend, and a pretty big build volume at 220x220x300. I probably won't be testing those boundaries anytime soon. What really surprised me was the pair of four-start ACME screws that drive the Z axis. The lead nuts are brass, and while they're not anti-backlash, there doesn't seem to be any appreciable slop in them. That probably comes later after the steel screws have a chance to wear them down. I've already decided I don't much like the Melzi board that drives it, nor am I a big fan of the Repetier firmware and software. I'll stick with printing from the SD card. I just wish I could get the loving thing to eat the Marlin firmware so I can try it out...no amount of swearing so far has convinced the board that it wants to be re-flashed, and I am not new at microcontrollers. I might take my chances with one of the cheap eBay RAMPS kits, it can't be any worse than this. Can it? After a few false starts - and virtually everything I know about 3D printing is from following this thread for so long, so thanks to every last one of you - I've actually figured out how to make it do something other than drag a blob of extruded material around the table while I fumble through the terrible menus looking for "Stop Print". Other than the requisite test cubes, I've managed to get it to spit out a sort of ugly but still serviceable replacement fan shroud for the hot end. Seems some folks have designed a good handful of upgrade parts for this machine, so I'll try various ones while I continue to figure out settings. I can't say I'd recommend buying one of these as a first printer, and I'm glad I didn't have to pay for it, but I'm definitely not disappointed that I have it. I think it has some potential, and other more experienced people out there seem to be having pretty good luck with them.
|
|
#
¿
Mar 4, 2017 03:57
|
|
|
Megabound posted:My top recommendation would be a small bin you can keep near your printer otherwise you'll end up with a desk covered in scrap filament and failed parts.
|
|
#
¿
Mar 19, 2017 03:21
|
|
|
torpedan posted:I eventually removed it from the top of the printer because I didn't like having a big chunk of mass sitting up that high on the frame. I just mounted the spool topside on this Chinese printer of mine earlier today, and it's really showing in the surface of the print that's running right now. The 2020 frame is reasonably stiff, but having an extra couple of pounds up there is obviously amplifying every little jiggle. It'll be coming back off shortly.
|
|
#
¿
Apr 9, 2017 04:08
|
|
|
Here's something odd I haven't seen: The print that's running on my machine right now is popping at the extruder - in two specific spots on each layer. Like clockwork. It might happen a couple of millimeters away from the previous layer, but it's basically the same place every time. It's a brand new roll of eSun PLA+, like I unsealed it and loaded it just to do this print new. Unless they installed a drop of water at regular intervals from the factory, I'm pretty sure that's not the problem. The only thing I can think of, is that I have my retraction set a little more aggressively than usual. Is it possible that I've gone a bit too far, and it's actually making a little air pocket in the hot end? It's really only doing two retractions, as it moves between the taller points on the model. e: I think I just confirmed that. It's at a point where the tall parts are connected now, and it's laying a continuous bead with no more gaps. It was happening on an inside perimeter so it's no big deal anyway. Just thought it a bit strange. I'll back the retraction off some before I run anything else. Acid Reflux fucked around with this message at 19:59 on Apr 25, 2017 |
|
#
¿
Apr 25, 2017 19:51
|
|
|
mewse posted:everything was going great until my heat block fell off
|
|
#
¿
May 5, 2017 16:08
|
|
|
^^ dammit CapnBry, you beat me to this with the same concept. :pRevol posted:This only happens at the very, very first material to come out of the nozzle. If your printer behaves anything like mine, adding some pre-run gcode that extrudes material before the nozzle even starts to move over the build plate might help to alleviate your problem. Mine reads: G92 E0 ;zero the extruder G1 F200 E10 ;extrude 10mm of filament (change this to whatever works best for you) G92 E0 ;re-zero the extruder Running that before it starts to print the brim/skirt/whatever on mine really makes a difference. Between the usual retraction at the end of a print, and the plastic just oozing out of the hot nozzle while the machine is heating up, the melt zone of the hot end can end up pretty empty. It needs to not only fill back up with material, but it also needs to be primed and purged to get the air out of it. This might not be the solution for you, but certainly won't hurt anything to try it.
|
|
#
¿
May 7, 2017 14:56
|
|
|
CapnBry posted:
I think I'll give your method a try, I've been noticing that the simple extrusion doesn't seem to work as well with higher temperatures. It's usually a bit of a wash since I always run a couple of skirt lines too, but sometimes I still have to reach in there with something and un-gloop the nozzle before it starts the actual first layer. I think some of it has to do with my cheap Chinese hot end though...no matter what I use for a nozzle, the material frequently seems to want to curl back in a particular direction rather than just drop out straight, which leads me to believe that the PTFE liner might not be quite concentric to the barrel. It's not a show stopper by any means but it is a bit annoying. Still trying to decide if dropping the cash on something like an E3D V6 might be worth it.
|
|
#
¿
May 8, 2017 17:21
|
|
 I used to just do a little extrude just like your GCode but there seemed to be a little variability in how much was needed depending on how much oozed out at the end of the last print or if the last print was canceled or if the extruder sat hot & idle for a little while. If it extruded too much it might stick to the nozzle and drag it to the print. It is definitely a good start though and is much more reliable for me than the skirt, without using any additional bed space. Although the skirt is also good for testing bed leveling-- drop down a 25mm cube with a 5 line skirt 75mm distance and you should end up with a skirt that is solid all the way around.
|
biracial bear for uncut posted:Splurge on a Smoothieboard knockoff and configure the firmware in Notepad.
|
|
#
¿
May 20, 2017 14:31
|
|

|
Anyone have a favorite method of splicing partial rolls of PLA together? I see one horrifyingly expensive retail product and then a whole bunch of kludges. Not that I'm above kludging at all, I'm just a little surprised that there isn't something cheap and Chinese available for this, or at least not that I've found so far.
|
|
#
¿
Jun 2, 2017 19:16
|
|
|
Sagebrush posted:It's a huge pain. I have only once successfully spliced two rolls together, and it required a lot of carving and sanding of the join to make sure that it was smooth enough to not jam. That seems like the easiest solution in the long run, unless what you're printing needs to be able to retract quite frequently like what I'm working on now does.  I'm going to try a manual splice just for giggles sometime this weekend to see how it turns out. As long as it feeds past the drive gear, the parts I'm printing should withstand a bit of slight over- or under-extrusion with no ill effects. As long as the diameter of the join is "close" enough it should be OK. Worst case, it fails miserably and I just suck it up and print fidget spinners or Pokemon or some other drat useless thing with the leftovers. I'm going to try a manual splice just for giggles sometime this weekend to see how it turns out. As long as it feeds past the drive gear, the parts I'm printing should withstand a bit of slight over- or under-extrusion with no ill effects. As long as the diameter of the join is "close" enough it should be OK. Worst case, it fails miserably and I just suck it up and print fidget spinners or Pokemon or some other drat useless thing with the leftovers.
|
|
#
¿
Jun 3, 2017 13:55
|
|
|
peepsalot posted:Stranded wire in a screw terminal is not a suitable power connection.  (source: the Facebook printer group I am no longer a part of, consisting largely of people who loudly advocated this practice)
|
|
#
¿
Jul 14, 2017 15:00
|
|
|
ASSTASTIC posted:I know some people have used hairspray, but I'd prefer to use something less messy.
|
|
#
¿
Jul 19, 2017 20:13
|
|
|
The only things I've ever returned to Amazon were two rolls of Hatchbox PLA. Pretty much waterlogged right out of the box, spit and sputtered out of the nozzle like I'd been soaking it in a bathtub. Different colors too, both rolls were just garbage. I'm not going to judge the whole company on such a small sample size, and I know a lot of people have great results with their stuff, but it hasn't really compelled me to try them again.
|
|
#
¿
Aug 19, 2017 23:04
|
|
|
Can you post a screen shot of what the supports look like? Better yet, if you don't mind sharing the STL, I'm sure there are are several of us who wouldn't mind taking a look at how it's behaving inside a slicer. Understandable if you don't want to do that though.
|
|
#
¿
Aug 21, 2017 14:59
|
|
|
Which version of Cura are you using? These screen shots are from the latest, 2.7, and it seems to be handling the supports OK. I'd try a test print for you, but one of my printers is in pieces right now and the other had a nozzle jam in the middle of a job last night that I haven't cleared yet. I am mostly unhelpful.   
|
|
#
¿
Aug 21, 2017 16:17
|
|
|
My afternoon plans fell through, so I un-shmootzed my shnozzle and started printing. I didn't adjust any settings from the last thing I made, so it may very well come out like raw rear end - kind of worried about the sharp little overhangs on the coin faces - but it's in progress. Gonna be a couple of hours, will post the result when it's done. Unless it looks like raw rear end. e: Already rear end-like, that 15% support density I had set is too low and the edges are curling away from it. Gonna drop the temp a bit, raise the density, and start over. e2: Goddamn thing clogged up again. Time for machine maintenance, no test print from me right now. Sorry! Acid Reflux fucked around with this message at 17:52 on Aug 21, 2017 |
|
#
¿
Aug 21, 2017 17:27
|
|
|
The change from the 15.x to the 2.x version of Cura seems really daunting at first since the interface is quite a bit different, and I was really resistant to the switch for a long time. In reality I had my head wrapped around the newness within a couple of hours and wished I'd done it a lot sooner. It's still not as robust as Simplify3D, but it's also not $150 and it does a drat fine job on most things. Since I know you're all on the edges of your seats wondering how my clog is going, I was probably overdue for a nozzle change, and all seems right with the world again now that I've done that.
|
|
#
¿
Aug 21, 2017 18:36
|
|
|
Bed height/leveling without an automatic sensor is just a matter of getting a feel for it. There are tutorials all over the place on how to use a regular piece of printer paper to get your gap right. That's all I've ever done and it's always worked just fine for me. You'll want to have your machine heated up to working temperatures, both the nozzle and the bed if yours is heated. The thermal expansion of the various materials makes a big difference when you're talking about tolerances in fractions of millimeters, and your nozzle gap on a cold machine will be measurably different than when it's up to temp. If the environment your printer is in is fairly stable, you might not have to mess with the bed/nozzle much after you set it. If you live in a place like I do where I might see 20-30 degree temperature swings throughout the day, you might have to check and adjust it a little more often. I've just gotten into the habit of checking it before every print, only takes 30 seconds and ensures I'm set right. I wouldn't particularly mind having a good autolevel system, but it's more work to install it and get it running than I'm willing to put into it. If it ain't broke, etc. (e) Since I'm an editing fool today...  
Acid Reflux fucked around with this message at 20:25 on Aug 21, 2017 |
|
#
¿
Aug 21, 2017 20:12
|
|
|
Kea posted:My printer is a delta and they are apparently more of a pain in the rear end to level, ive levelled it to the center more or less but one side of the plate is a little high and one side is a little low. Oh, gotcha. I have exactly zero experience with deltas, but yeah, I know they're more difficult to level. Sorry for spewing a bunch of info you didn't need!
|
|
#
¿
Aug 21, 2017 20:26
|
|
|
Jestery posted:I'm mostly worried about the motors heating up but if you are quite certain it isn't a worry I'm about to third my printing times Stepper motors are a lot more durable that people give them credit for. Even the cheapest of cheap NEMA 17 motors should be able to handle an operating temperature of ~100C, and quality brand name ones with a higher insulation rating can safely run much, much hotter. You're far more likely to burn up a cheap driver trying to push too much current than you are to actually damage a motor with heat.
|
|
#
¿
Aug 26, 2017 18:09
|
|
|
NPR Journalizard posted:I have an i3 knockoff using SL42STH48-1504A stepper drivers, and im trying to update it to marlin 1.1.5. Well, I have updated it to marlin 1.1.5 and now I need to find out some info so I can correct the steps per mm for all axis, because they are way off, especially the z axis. Are you confusing the motor with the driver? SL42STH48-1504A is a motor part number. A driver is the electronic widget that a stepper motor connects to. What type of control board does this printer have? That'll help to identify the actual drivers, which will dictate what the microstep value is. (It's probably 1/16)
|
|
#
¿
Aug 29, 2017 14:40
|
|
|
Those are commonly referred to as a "four start" lead screw. ACME threaded stuff is usually 1-, 2-, or 4-start for stuff like this. Just an example for comparison's sake, the Z axis lead screw on my CNC router is a 3/8" diameter, 12 threads per inch, 1-start (single set of threads).
|
|
#
¿
Aug 29, 2017 16:27
|
|
|
Jestery posted:if the answer is bugger off and measure ur threads I am fully ready. but if someone knows off the top of their head that would be greatly appreciated If you haven't got it sorted out yet, that's the same hot end that comes with the TronXY machines and the mounting screws are M3, 0.5 thread pitch. Should be able to get whatever you need right off the shelf at any decent hardware store.
|
|
#
¿
Sep 4, 2017 01:48
|
|
|
biracial bear for uncut posted:99.9999999...% of people in any product group on Facebook are utter morons so that checks out.  I keep trying to convince people in the non-brand-specific groups that it's a pretty good idea to at least mention what printer you're using, and what material you're trying to print with. A dozen posts every day with nothing but a blurry picture and "Why does my first layer look like this?" Well son, it might be due to some easily changed software settings or bed adjustments, but it's probably because you're an idiot.
|
|
#
¿
Sep 14, 2017 14:46
|
|
|
Assuming that a given printer's frame is square, you can level the X carriage by just measuring each end's distance from the top of the frame, or whatever's a good reference point on your printer. I keep a metal ruler by mine just for that purpose. It can be really easy to knock one side out of alignment if you're fiddling with it when the steppers are off.
|
|
#
¿
Sep 15, 2017 12:18
|
|
|
I've tried Tamiya's liquid cement on PLA, also no go. I'll have to find my tube of acrylic cement and see if that's got any of the appropriate nastiness in it. On the other hand, the $15 3D pen I nabbed off Amazon the other day showed up this morning, and I was actually a little shocked at how firmly it bonded two pieces of scrap together. I really didn't expect that much strength from a couple of small plastic weld beads. Also ordered one of the $15 Monoprice pens that CloFan linked to, as backup for when the first cheap one inevitably tries to burn my house down.
|
|
#
¿
Sep 27, 2017 04:21
|
|
|
SEKCobra posted:I looked at the original, but it costs like twice what the knockoffs cost, I'd assume that those shouldn't be much worse considering they use the same working principle? There are lots of reasons why a proper Prusa Research i3 costs so much more than the Chinese knockoffs, not the least of which is the technical support and customer service. A Prusa brand machine will Just Work�, and if for some reason it doesn't, they'll be right there working with you until it does. Conversely, trying to get faulty or missing parts replaced after you buy your NEW 2018 i3 MAKER PRUSA REPRAP 3D PRINTER PLA ABS CIA KGB MI6 BEST DEAL kit will probably just end in frustration. The CR-10 is pretty universally lauded as a good printer. It's big, it assembles easily, and generally produces good prints right out of the box. It's not perfect and does benefit from some upgrades, but it's been the sweet spot in the market for price/build volume/performance for quite a while now. They sell like hotcakes and owners are very fond of them overall. (e) Should have hit refresh. Acid Reflux fucked around with this message at 16:07 on Sep 28, 2017 |
|
#
¿
Sep 28, 2017 15:54
|
|
|
Kea posted:...perhaps I was just lucky and got a "good one" but 3d printing has been pretty much painless for me so far. This is the real problem, you never quite know what you're going to get. Most of these cheap kits have very spotty quality control. My first printer kit, a TronXY X3 that a friend of mine won in a contest and then graciously (cough) gave to me, was pretty OK out of the box. It's really heavily modified now and prints quite well. I could probably still tune it better and raise my print quality some more, but for now it's as good as I've ever needed it to be. I bought a second one a couple of months later, really to use as a parts kit for a custom build, but I put it together anyway to use in the meantime until I got ready to actually do some building. It's...not great. One of the lead screws has a little bend to it, the extruder driver on the control board was DOA (I did manage to squeeze a $40 credit out of the vendor for that one which went straight toward an MKS Sbase controller), the build plate is a little concave, I'm not sure the frame is really square, a lot of the hardware was too short...just an endless stream of problems. It still prints like absolute poo poo, even with all of the nice upgrade parts I made for it on the other machine. Ostensibly it's the exact same kit from the exact same factory, but the difference between the two initially was literally the difference between being able to print, and not.
|
|
#
¿
Sep 28, 2017 22:25
|
|
|
That is super extra wickedly cool. I'm warming up the printer right now to get started on one. I've picked up two cheap 3D pens in the last week to use as little parts welders, and from what little I've played with them, I had already decided that wrangling the filament was going to be a pain in my rear end. I'll let you know how it turns out, thanks!
|
|
#
¿
Oct 3, 2017 17:21
|
|
|

|
| # ¿ May 2, 2024 13:51 |
|
|
 I had to leave the house for a bit, so I've just now started printing the rest of it, but this part fits like a glove. A bit of a lucky break that one of my pens happens to be identical to BMan's. E: This thing is friggin' brilliant! BMan, it's not much, but I tossed you a few bucks on Thingiverse. It may be the most functional thing I've printed since I got my machine. I'm going to make a couple of extra spools for easy color switches. 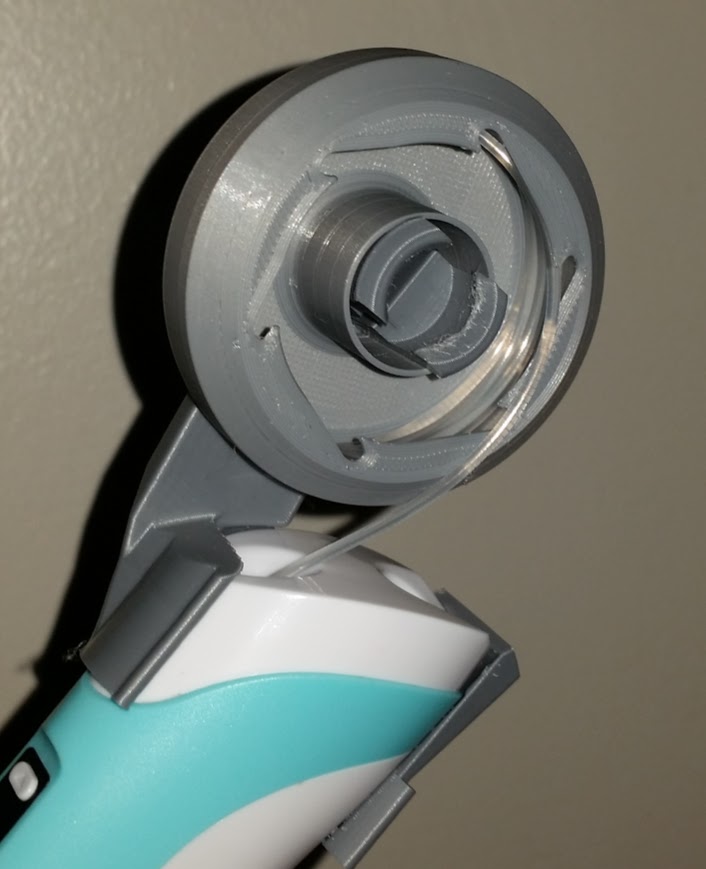
Acid Reflux fucked around with this message at 22:27 on Oct 3, 2017 |
|
#
¿
Oct 3, 2017 19:19
|
|