|
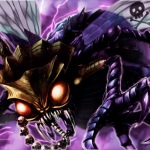
Update 103: How Not to Design a Boss Fight � Part 1: The Wake-Up Call Oh boy. Where do I even begin with this? Let�s start with the positive. I absolutely love the aesthetics of the boss fight. The Abyssal God has my favorite design out of all the post-game bosses in the entire series. The music that plays in the fight is fantastic and really fits the boss. And the presentation of the fight is something no other Etrian Odyssey game has really matched, what with the impactful transition from the first phase to the second. That moment of silence upon taking down the first phase, followed by the change in soundtrack from Scatter About to Calling That Detestable Name, all while the camera slowly pans up and you realize just what mess you got yourself into. All of that could have made for a memorable and fantastic experience had the fight been designed well. Unfortunately, that is where the positive impressions end. Now we must dig through the negative, and oh my god Atlus, what the hell were you even thinking with this fight!? Alright so you�ve made it to the very end. Only one thing stands between you and beating the post-game. The Abyssal God is the final Okay so this game was released in Japan on April 1st, 2010. For a long time, there hasn�t been much documentation on how this boss operated aside from like one part of the fight, which had a fixed pattern that most people knew about. The rest of the fight was a complete mystery, but there was one thing that people agreed on regarding the boss. It wasn�t worth fighting fairly and you were better off cheesing it. Now I decided to take a look at the Abyssal God�s AI myself to see if that those complaints were unfounded or not, and I finished extracting the AI on February 1st, 2017. So almost 7 years after the game was released. Unfortunately, I�m sorry to say that those complaints were justified, as I was horrified at what I found. The Abyssal God is quite frankly, one of the worst designed bosses in the entire series, and that is not something I say lightly. But let�s not get too ahead of ourselves here. Let�s just break this down one by one. The Abyssal God has two phases you have to go through. Let�s start with the first phase.  Abyssal God Level: 80 HP: 10000 STR: 87 VIT: 71 TEC: 85 AGI: 63 LUC: 72 Exp: 0 Item Drops: N/A Description: N/A Damage Resistances: Slash: 10% Strike: 10% Pierce: 10% Fire: 10% Ice: 10% Volt: 10% Ailment Resistances: Sleep: 10% Confusion: 10% Plague: 10% Poison: 10% Blind: 10% Curse: 10% Paralysis: 10% Bind Resistances: Head: 10% Arm: 10% Leg: 10% Other Resistances: Death: 0% Petrification: 0% Stun: 10% Skills: Magma Ocean: Uses the Head. Deals 350% Fire damage to the entire party. Has an action speed of +0. Has an accuracy of 150. Ice Tempest: Uses the Head. Deals 350% Ice damage to the entire party. Has an action speed of +0. Has an accuracy of 150. Proton Thunder: Uses the Head. Deals 350% Volt damage to the entire party. Has an action speed of +0. Has an accuracy of 150. Regenerator: Uses the Head. Revives a Tentacle on the map, restoring 1000 HP to the Abyssal God, and increases its damage resistances by 20%. Has an action speed of -3. Flags: Kaishaku Block: Prevents Kaishaku from activating against the Abyssal God. Oh, were you hoping to make things easier on yourself by taking Kaishaku to bypass its Instant Death immunity? Too bad, all of the Abyssal God�s forms specifically has a flag to stop that skill from going off entirely against it, making that skill completely detrimental to have for this fight. Anyways... The first phase only has these three skills which can kill your entire party if you don't defend against them properly. A Hoplite with all three Anti skills or a Zodiac with all three prophecies are required for this portion of the fight. It uses them in a specific pattern depending on how many tentacles you've killed. If you've killed all eight, it'll start off the fight incredibly weak, with only 2000 HP remaining. And the less Tentacles it has remaining, the more damage it takes. Now at the end of each turn, the Abyssal God has a chance to use Regenerator to set you back a bit. When it uses Regenerator, it'll recover 1000 HP, but also increase its damage resistances a bit. Though it can't be used if all 8 Tentacles are alive. The attack pattern also changes to the one listed in the table below. 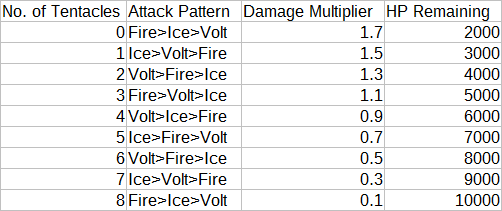 This table is a simplified version of its behavior, so here�s the actual AI script in full: Abyssal God�s AI Script (Phase 1) posted:If turn count is at 20 or above: This phase is also on a time limit, as once you get past 20 turns, it will stop following any patterns and attack the party randomly. Which means that it effectively becomes enraged and you're completely screwed if you aren't close to killing it, so turtling through the fight to whittle it down is really not an option. But that shouldn't happen unless you went straight into the fight without killing any tentacles. It doesn't really matter if you fight the Abyssal God without killing any tentacles or killing all eight, nothing much changes in the end. Though if it takes you more than 20 turns to kill this form, quite frankly, you'll have much bigger problems to worry about. But I'll get into that later. Anyways, this part of the fight is mainly there to make sure you solved all of floor 25's puzzles, as it is nothing more than a roadblock. The real fight starts after you killed this form.
|
|
|
|

|
| # ? May 13, 2024 21:45 |
|
Update 104: How Not to Design a Boss Fight � Part 2: Welcome to the Cthulhu Casino The Abyssal God's 2nd phase is a bit unique in that it has 2 separate forms, each with a different set of skills (technically.) The defensive form, and the offensive form. For the record, this phase of the fight does not care about the amount of Tentacles you�ve killed. So killing all 8 only gives you an advantage over the first form. Anyways, let�s take a look at the defensive form first, as this is the form the Abyssal God starts out with in this phase. 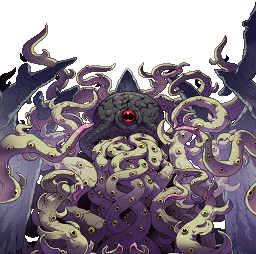 Abyssal God Level: 80 HP: 60000 STR: 87 VIT: 71 TEC: 85 AGI: 63 LUC: 72 Exp: 300000 Item Drops: Darkstar Bead - 100% Drop Rate. Unlocks the Ameno Habakiri. (Ultimate Katana. Must be restocked.) -Black sphere so dark that it personifies fear itself. Description: A being that traversed space and time through an otherworldly sea. It awaits its awakening... Damage Resistances: Slash: 25% Strike: 25% Pierce: 25% Fire: 25% Ice: 25% Volt: 25% Ailment Resistances: Sleep: 10% Confusion: 10% Plague: 10% Poison: 10% Blind: 10% Curse: 10% Paralysis: 10% Bind Resistances: Head: 10% Arm: 10% Leg: 10% Other Resistances: Death: 0% Petrification: 0% Stun: 10% Skills: Nameless Wall: Does not use a body part. Whenever the Abyssal God gets hit with a physical attack, it performs a counterattack on the person who attacked it. Counterattacks deal STR-based Almighty damage and deals 4 times the damage the Abyssal God took. Has an action speed of +60. Cannot miss. Mist Curtain: Does not use a body part. Whenever the Abyssal God gets hit with an elemental attack, it performs a counterattack on the person who attacked it. Counterattacks deal STR-based Almighty damage and deals 4 times the damage the Abyssal God took. Has an action speed of +60. Cannot miss. Chaotic Beckon: Uses the Legs. Deals 100% STR-based Pierce damage to the entire party. The Abyssal God is then healed for twice the damage it dealt. Has an action speed of +3. Has an accuracy of 150. Spurting Fumes: Does not use a body part. Whenever the Abyssal God gets hit with a physical or elemental attack, it attempts to inflict Petrification, Sleep, Confusion, Plague, Poison, Blind, Curse, and Paralysis on the entire party, each of which has a 6% chance of landing. Both the Plague and Poison components tick for 500 damage. Has an action speed of +60. Abyssal Offering: Uses the Head. Heals the Abyssal God and dispels all debuffs. Has a healing power of 4500% (Heals it for 11475 to 11480 HP.) Has an action speed of -3. Stance Change: Changes the Abyssal God's form to the offensive one. Action speed depends on the skill the Abyssal God tries to cast. Not actually a skill, just a command the AI tells the Abyssal God to follow. Flags: Kaishaku Block: Prevents Kaishaku from activating against the Abyssal God. Yes, it is level 80, not 99. The thing was meant to be fought around level 80. And yet even parties who grinded up to 99 could not take this thing down because this boss fight is that badly designed. So not only is it really resistant to every attack that doesn�t deal Almighty damage, it has counterattacks to deter you from attacking it even more. One for physical attacks and one for elemental attacks. Oh and it has another counterattack for both of those kinds of attacks, and that one is one of the worst ones to deal with since it inflicts every single ailment on the entire party! 6% may seem like a small number, but it�s rolled for 8 times, so in actuality, that skill has a 39% chance of inflicting one ailment on a party member. Oh, but if your TEC and LUC stats are lower than the Abyssal God�s and the RNG isn�t in your favor, that chance can jump up to 21% per ailment, meaning that this skill has an 84.8% chance to inflict at least 1 ailment on a party member. Chaotic Beckon is the only direct attack it has, and it drags out the fight for a bit longer since it also heals the Abyssal God. Oh, but speaking of healing, here�s the worst move in the entire fight to deal with. Abyssal Offering. Look at just how much it heals for! It heals for just under a fifth of the Abyssal God�s maximum HP! And as a kicker, it dispels all debuffs on the Abyssal God as well! Oh and the Abyssal God has the ability to change forms throughout the fight, but I�ll go over that skill later. By the way, I had an ulterior motive for posting those AI routines for the bosses and FOEs in the post-game. Did you notice how simple those AI routines were? Even Elder Dragon�s AI script was fairly easy to understand. Well, now take a look at this monstrosity. Abyssal God�s AI Script (Defensive Form) posted:NOTE: Every time the Abyssal God changes forms, a counter gets set to 0. This counter increases with the amount of actions the Abyssal God takes (Each counterattack from a counter skill counts as an action.) When the counter reaches a specific number, the Abyssal God will change forms as soon as possible. The only exception to this is when its HP is above 76%, as it is scripted to only change forms at specific points in the fight. However, other factors can also force the Abyssal God to change forms early. Don�t worry if your eyes glazed over or if you didn�t understand all that. I�ll go over it in detail a bit later. Now let�s take a look at what the offensive form has in store.  Abyssal God Level: 80 HP: 60000 STR: 87 VIT: 71 TEC: 85 AGI: 63 LUC: 72 Exp: 300000 Item Drops: Darkstar Bead - 100% Drop Rate. Unlocks the Ameno Habakiri. (Ultimate Katana. Must be restocked.) -Black sphere so dark that it personifies fear itself. Description: A being that traversed space and time through an otherworldly sea. It awaits its awakening... Damage Resistances: Slash: 100% Strike: 100% Pierce: 100% Fire: 200% Ice: 200% Volt: 200% Ailment Resistances: Sleep: 10% Confusion: 10% Plague: 10% Poison: 10% Blind: 10% Curse: 10% Paralysis: 10% Bind Resistances: Head: 10% Arm: 10% Leg: 10% Other Resistances: Death: 0% Petrification: 0% Stun: 10% Skills: Demon Rage: Uses the Legs. Randomly hits the party 8 times, dealing 180% Strike damage per hit. All buffs are dispelled on the party members that are hit. Has an action speed of -10. Has an accuracy of 120. Rising Claw: Uses the Legs. Deals 300% STR-based Slash damage to the entire party, and has a 30% chance to Stun the targets. Has an action speed of +0. Has an accuracy of 120. Chaos Tentacle: Uses the Legs. Deals 5000% STR-based damage to one party member. Always targets the party member with the lowest HP. Has an action speed of +10. Has an accuracy of 150. Primitive Burn: Uses the Head. Deals 150% TEC-based Fire damage to the entire party, and decreases their physical and elemental damage output by 80% for 4 turns. Has an action speed of +0. Has an accuracy of 120. Foul Glacier: Uses the Head. Deals 150% TEC-based Ice damage to the entire party, and has a 30% chance to head bind the targets. Has an action speed of -10. Has an accuracy of 120. Dark Lightning: Uses the Head. Deals 150% TEC-based Volt damage to the entire party, and has a 20% chance to Confuse or put the targets to Sleep. Has an action speed of -10. Has an accuracy of 120. Stance Change: Changes the Abyssal God's form to the defensive one. Action speed depends on the skill the Abyssal God tries to cast. Not actually a skill, just a command the AI tells the Abyssal God to follow. Flags: Kaishaku Block: Prevents Kaishaku from activating against the Abyssal God. This is where Abyssal God mainly attacks, and all of its skills are deadly to deal with. However, this is the time where you really need to actually attack the Abyssal God, as its damage resistances aren�t nearly as absurd as the defensive form�s damage resistances. Demon Rage deals so much overall damage to the party, and as insult to injury, it completely erases any buffs on the targets. Rising Claw is a really strong AOE that has an annoying extra effect. No, Chaos Tentacle does not have an extra 0 in the amount of damage it deals. It really deals that much damage. And it goes after your weakest party member to boot, so unless they�re double stacking Pierce Amulets, they�re good as dead. The Abyssal God also has access to elemental AOE nukes, although it�s a lot more feasible to survive being hit by these. On the other hand, they have some extremely nasty extra effects. Primitive Burn places a debuff that reduces your party�s damage output by 80%. This is by far the highest attack reduction debuff in the entire game. Any damage dealer that gets hit with this debuff is pretty much out of the fight until that debuff wears off. You pretty much need an attack buff up to shield you from that. Foul Glacier will pretty much shut down any supports it hits due to the Head bind it inflicts. But Dark Lightning is by far the worst move to be hit by, as it inflicts both Confusion and Sleep, both of which can be game ending to be hit by. Oh, and it can also switch forms. For the record, the defensive and offensive forms count as entirely different monsters. In fact, from a technical standpoint, the Abyssal God changing stances counts as summoning an entirely new monster. This only matters in the case of inflicting disables, since accumulative resistance essentially gets reset entirely every time it switches forms. Which is a very small comfort considering that it has a 10% resistance to most disables, but at least ailment classes aren�t hung out to dry. Anyways, here�s the full AI script for the offensive form. Again, don�t worry if you�re having trouble taking it all in, as I�ll go over them in detail in a bit. Abyssal God�s AI Script (Offensive Form) posted:NOTE: Every time the Abyssal God changes forms, a counter gets set to 0. This counter increases with the amount of actions the Abyssal God takes (Each counterattack from a counter skill counts as an action.) When the counter reaches 6, the Abyssal God will change forms as soon as possible. The only exception to this is when its HP is above 76%, as it is scripted to only change forms at specific points in the fight. However, other factors can also force the Abyssal God to change forms early. Now the Abyssal God follows an attack pattern for the first part of the fight, which I�ll list out here. Turn 1: Nameless Wall Turn 2: Mist Curtain Turn 3: Chaotic Beckon Turn 4: Spurting Fumes Turn 5: Abyssal Offering Turn 6: Stance Change (Change to Offensive form) - Demon Rage Turn 7: Rising Claw Turn 8: Chaos Tentacle Turn 9: Primitive Burn Turn 10: Foul Glacier Turn 11: Dark Lightning Turn 12: Stance Change (Change to Defensive form) - Abyssal Offering Then it loops from the beginning, The Abyssal God will follow this pattern to the letter and never deviate from it... when it's above 76% HP. When it falls below that threshold, that�s when the fight goes to hell. I promised an in-depth look into its AI, and you�re getting it now. Strap in everyone, we�re about to dive into an utter shitpile. Let�s take a look at what the defensive form has in store first. quote:NOTE: Every time the Abyssal God changes forms, a counter gets set to 0. This counter increases with the amount of actions the Abyssal God takes (Each counterattack from a counter skill counts as an action.) When the counter reaches 6, the Abyssal God will change forms as soon as possible. The only exception to this is when its HP is above 76%, as it is scripted to only change forms at specific points in the fight. However, other factors can also force the Abyssal God to change forms early. Oh joy, a hidden mechanic that isn�t communicated to the player at all! Not only that, in order to make use of said hidden mechanic, you need to completely violate the concept of common sense to make use of it, since you�re risking getting hit by counterattacks when the Abyssal God is in its defensive form! quote:While HP is below 51%, 29% chance to shift to offensive form and follow this routine: Oh and as an added gently caress you, it can also switch forms randomly. Making it extra unpredictable. Fun for the whole family!  Anyways, I�ll skip over the between 100% and 76% parts of the AI for both forms, since I basically covered those in that attack pattern I just talked about. quote:From 75% to 51% HP: By the way, did I say �risking getting hit by counterattacks?� I meant you will get hit by counterattacks because this eldritch rear end in a top hat reads your inputs! I repeat, the Abyssal God reads your inputs! Oh and by the way, there�s absolutely NOTHING stopping the Abyssal God from switching to one form, and then IMMEDIATELY switching back on the next turn! Picture this, you�re waiting for the Abyssal God to get out of its defensive form. It finally goes into offensive form, and then on the next turn, you have your damage dealers attack. Only for the Abyssal God to go right back into defensive form, and oh look, it just used one of its counterattacks because it read your inputs! Now your damage dealers are most likely dead. Woe to you if you used a multi-hit attack, because even if the person who triggered those counterattacks died, the counterattacks will just spread to the rest of your party! But wait, there�s more! Look at those last two lines. If you don�t trigger the counterattacks, the Abyssal God will use Abyssal Offering. You have to attack it to stop it from using Abyssal Offering. Again, this isn�t communicated to the player all that well and no sane player would think to do this because it violates common sense! And even if you do try to do so, you�ll have to choose between a party member dying, or risking letting the Abyssal God heal itself. A classic damned if you do, damned if you don�t situation. And even if you do try to attack, you have that 1% chance of getting hosed over and having it use Abyssal Offering anyway! Now if you thought �why not just have someone equip a really weak weapon and just have them attack the Abyssal God, making it so that its counterattacks do nothing? Wouldn�t that solve all these problems?� HAHAHAHAHAHAHAHAHAHAHAHAHA! I�ll admit, if you came up with that tactic on your own, you�re a smart cookie. Unfortunately, Atlus outsmarted you on that front. quote:From 50% to 26% HP: Look at all those Spurting Fumes checks. LOOK AT THEM! Thought to exploit the Abyssal God�s input reading behaviors? Guess what, now you�re punished for doing so because Spurting Fumes doesn�t care about the amount of damage you dealt. quote:From 50% to 26% HP: And as an extra dosage of gently caress YOU, if even a single party member has one buff, guess what, you get to eat even more Spurting Fumes checks! And there�s no way to dispel all buffs on the party easily, so this check is nearly unavoidable considering how important buffs are in the game! quote:From 50% to 26% HP: And just in case you were wondering, not attacking Abyssal God during this phase is NOT an option, because it will give you the middle tentacle and cast Abyssal Offering if you don�t trigger a counterattack. quote:From 25% HP to death: The Abyssal God thankfully lets up on those Spurting Fumes checks when it is this weak in defensive form. Unfortunately, now triggering the counterattacks are no longer nearly guaranteed to stop it from using Abyssal Offering. Because gently caress you. And for the record, the Abyssal God�s AI does regress if it heals past a certain threshold thanks to Abyssal Offering. So if it goes off in this phase, say hello to Spurting Fumes hell all over again! Oh but remember, we still have the offensive form to look at! quote:NOTE: Every time the Abyssal God changes forms, a counter gets set to 0. This counter increases with the amount of actions the Abyssal God takes (Each counterattack from a counter skill counts as an action.) When the counter reaches 6, the Abyssal God will change forms as soon as possible. The only exception to this is when its HP is above 76%, as it is scripted to only change forms at specific points in the fight. However, other factors can also force the Abyssal God to change forms early. Oh yeah, that counter and random chance form change nonsense also occurs for the offensive form. And the Abyssal God reads your inputs while changing forms! No time is ever safe. quote:If HP fell below 76% on the last turn, shift to defensive form and follow this routine: Also knocking it out of the predictable phase will cause it to switch to defensive form, halting the momentum of the fight and starting input reading hell. Nothing you can do about that, I�m afraid. quote:From 76% to 51% HP: Funnily enough, the offensive form has a second attack pattern that pretty much went entirely unnoticed by the community until I dug it out of the AI. Namely because the chaotic nature of the fight made it difficult to track everything. Now keep in mind that during this portion of the fight, the Abyssal God is still capable of changing forms randomly, but at least this part of the fight is predictable. quote:From 50% HP to death: This part of the fight is not. Well, not entirely anyway. The Abyssal God acts randomly here, however, it�s fairly merciful in this portion. If an extra effect from an elemental attack tagged at least one of your party members, it won�t cast that skill again until the debuff or disable wears off. And part of its behavior is predictable, so it�s not acting entirely randomly here. In all honesty, the offensive portion of the boss fight isn�t that well, offensive, from a game design standpoint. It honestly could have made for a decent boss fight on its own. It�s really the whole form changing gimmick and everything the defensive form does that utterly fucks up this boss fight. It adds so much needless annoyance and setbacks that makes it so easy for the Abyssal God to wear you down and ultimately cause you to lose. Oh, but I�m not done talking about the Abyssal God! You see, there�s actually a reason the defensive form tries to waste your time! Just like the first phase, this fight is actually on a soft time limit! After 40 turns have passed, the next time the Abyssal God goes into its offensive stance, it goes APESHIT! The Abyssal God will permanently switch to its offensive form and use far stronger versions of its offensive moves. (Except for Demon Rage, which oddly enough, gets weaker.) Said moves get the following changes: Demon Rage: Power increases from 180% to 300%. Accuracy increases from 120 to 300. Number of hits decreases from 8 to 2. Rising Claw: Power increases from 300% to 600%. Accuracy increases from 120 to 300. Chance to Stun increases from 30% to 40%. Chaos Tentacle: Power increases from 5000% to 8000%. Accuracy increases from 150 to 350. Action speed increases from +10 to +100. Now targets a random party member instead of the one with the lowest HP. Primitive Burn: Power increases from 150% to 300%. Accuracy increases from 120 to 300. Damage debuff increases from 80% to 90%. Foul Glacier: Power increases from 150% to 300%. Accuracy increases from 120 to 300. Action speed increases from -10 to 0. Chance to inflict Head bind increases from 30% to 40%. Dark Lightning: Power increases from 150% to 300%. Accuracy increases from 120 to 300. Action speed increases from -10 to 0. Chance to inflict Confusion and Sleep increases from 20% to 40%. Demon Rage bizarrely enough, gets weaker. Sure the individual hits deal more damage, but the number of hits decreasing from 8 to 2 decreases the overall damage done to the party, and this move coming out is the only time you�ll get a breather during this part of the fight. Rising Claw basically becomes an AOE kill move in most circumstances, and the extra chance to Stun can be a game ender. Chaos Tentacle gets far far more deadly. Not only does it deal even more damage, it becomes the fastest attack in the game! Nothing, and I mean nothing aside from priority will be able to move faster this attack at this point. Oh and as a kicker, it no longer goes after the party member with the lowest HP. Instead, it goes after a random party member, making it extra unpredictable! On the bright side, it�s provokable now, but that�s a very small comfort at this point. The elemental attacks become just as strong as the dragon breaths, on top of their extra effects getting even stronger. And Foul Glacier and Dark Lightning get a speed boost as well. Getting hit by these will set your party back massively, assuming that they even survive the attacks in the first place. Oh and the �pattern� for this phase? Why don't you take a look for yourself? quote:15% chance to cast Demon Rage (Level 2). (Standard targeting.) You are completely and utterly hosed if the Abyssal God goes full enrage mode and you aren�t close to killing it. Do you see why people don�t bother playing fair when fighting this thing!? Fighting fair essentially means gambling at the Cthulhu Casino, where the deck is massively stacked in the house�s favor! But if you really want to fight it fair and square, well, you�re utterly crazy, but allow me to give you some advice on what your classes can do in this fight.  Well buffs are generally nice to have. Too bad the 50% to 26% portion of the 2nd phase is an utter gently caress you, because you don�t have a good way of wiping buffs off of your entire party all at once. Well buffs are generally nice to have. Too bad the 50% to 26% portion of the 2nd phase is an utter gently caress you, because you don�t have a good way of wiping buffs off of your entire party all at once.     You�ll obviously need dedicated damage dealers of some kind. You�ll obviously need dedicated damage dealers of some kind. Healers are nice to have. Just hope that Abyssal God doesn�t take the Healers are nice to have. Just hope that Abyssal God doesn�t take the  Probably the only class that I would say that is a must-have, due to how big of a safety net they can be. Unfortunately, even they have limits against the monstrosity that is the Cthulhu Casino. Probably the only class that I would say that is a must-have, due to how big of a safety net they can be. Unfortunately, even they have limits against the monstrosity that is the Cthulhu Casino. Considering that Accumulative Resistance resets every time the Abyssal God switches forms, this isn�t an entirely bad choice to bring. However, the Abyssal God�s 10% resistances to all disables will still make it tricky to lock it down consistently. Considering that Accumulative Resistance resets every time the Abyssal God switches forms, this isn�t an entirely bad choice to bring. However, the Abyssal God�s 10% resistances to all disables will still make it tricky to lock it down consistently. If you have been using a Farmer in your party throughout the entire game, just give up and resort to a cheese party. If you have been using a Farmer in your party throughout the entire game, just give up and resort to a cheese party. Well if you have a dedicated Warrior Might party, you don�t really need help. Otherwise, Shoguns just fall under dedicated damage dealers. Well if you have a dedicated Warrior Might party, you don�t really need help. Otherwise, Shoguns just fall under dedicated damage dealers. Ironically, this probably the one time Yggdroids are genuinely useful, as several of their skills counter the Abyssal God�s shenanigans. In a vacuum, anyway. You probably didn�t invest in the Yggdroid�s skills too much because they were too situational and bizarrely designed. And even then, just because their skills are actually useful, doesn�t mean that it�s easy to capitalize on them due to the nature of the Cthulhu Casino. Ironically, this probably the one time Yggdroids are genuinely useful, as several of their skills counter the Abyssal God�s shenanigans. In a vacuum, anyway. You probably didn�t invest in the Yggdroid�s skills too much because they were too situational and bizarrely designed. And even then, just because their skills are actually useful, doesn�t mean that it�s easy to capitalize on them due to the nature of the Cthulhu Casino.Unfortunately, I can�t give you more concrete advice, as your party composition itself matters far more than the individual classes you bring. You really need a fantastic party composition to even stand a chance against this monstrosity.  I believe that�s enough evidence to reach a verdict. Your decision, my court? I believe that�s enough evidence to reach a verdict. Your decision, my court?           GUILTY! GUILTY! It has been decided. For the crime of being a- let me see here... �A $%!##!*@ designed video game boss�, you are hereby sentenced to death! Your sentence shall be decided by my own kingdom. Oh, I do hope they choose the one where I get to personally witness your execution myself! It has been decided. For the crime of being a- let me see here... �A $%!##!*@ designed video game boss�, you are hereby sentenced to death! Your sentence shall be decided by my own kingdom. Oh, I do hope they choose the one where I get to personally witness your execution myself!I�m going to hold one last vote in the entire Let�s Play. How the Abyssal God will die. You will get to choose one method that will get to be used to slay this crime against good game design. The methods in question will be cheese methods and will not be fair fights. No quarter shall be given to this abomination. The Royal Guillotine: Rose sets out to execute the Abyssal God herself, with MEGAQUEEN overseeing the process. The Firing Squad: Charlotte and Rose take a squad of Shoguns to give the Abyssal God the fate it deserves. The Electric Chair: Smith and his fellow Yggdroids from the Deep City will exterminate the Abyssal God themselves with pure mechanical power. Overthrow the Queen: Or disregard all of the above and overrule the queen�s methods. She�s clearly gone mad after all. The Abyssal God will be taken on fair and square, with you voting for the party that will take it down. I can�t guarantee that this LP would have an ending if this choice was picked, but sure, why the hell not? Pick one choice and put it in bold. The fate of the Abyssal God is in your hands, my audience. Araxxor fucked around with this message at 23:30 on Nov 22, 2017 |
|
|
|
We've given Alice her time in the spotlight and now it's time to let the other oddball, clunky class shine as well! Yggdroid Supremacy!
|
|
|
|
Nothing ironic about Yggdroids doing well against the Abyssal God if they were made to fight it. Electric Chair!
|
|
|
|
Jesus, that AI file reads like Scott Steiner's taunt to Samoa Joe sounds. (TW: 141-2/3%) Come to think of it, this is a time to embrace the crazy.  v v v Nice catch. dont be mean to me fucked around with this message at 07:14 on Oct 27, 2017 |
|
|
|
Dr. Fetus posted:*Utter bollocks* Christ this is worse than Ur-Devil. I didn't even know it was possible.  (It's in bold)
|
|
|
 That sure is an AI script there. Yggroid army.
|
|
|
|
|
As tempting as it is to see the depths of despair that can be wrought by trying this fight conventionally, I NEED to see an ending to this magnificent LP. Therefore, BEEP BOOP YGGROID ARMY OF DEATH.
|
|
|
|
The Firing Squad.
|
|
|
|
The guillotine was my execution of choice in my own playthrough, but I'm gonna vote for The Electric Chair because I'm honestly rather curious how it works.
|
|
|
|
I vote for the firing squad But can't we see all 3 of them? All the cheese methods.
|
|
|
|
Firing Squad
|
|
|
|
This AI script is brought to you by the phrase: "But wait! There's more!" Bring on the Electric Chair!
|
|
|
|
Electric Chair The robot kingdom did say to leave it to them afterall.
|
|
|
|
Tug Bot still needs a chance to shine. Electric Chair.
|
|
|
|
What is the Guillotine anyway? voting Electric Chair anyway, but I kinda want to know what the Guillotine is.
|
|
|
|
Let�s go with the Electric Chair.
|
|
|
|
I'd love to see all three, but if we absolutely must have only one Firing squad
|
|
|
|
Talow posted:What is the Guillotine anyway? Gladiator/Ninja and Royal/Hoplite, I think.
|
|
|
|
Blademaster_Aio posted:Gladiator/Ninja and Royal/Hoplite, I think. Ahh. Alright. Guess I'll try to work it out from there.
|
|
|
|
Gotta go with The Electric Chair. I've never been able to use Yggroids well, and seeing them destroy a boss would be the best. We might even get to see Tugbot again!
|
|
|
|
The Electric Chair, mainly because it honestly sounds more fun.
|
|
|
|
Dark Flame Master posted:We might even get to see Tugbot again! Welp, Electric Chair it is
|
|
|
|
Whichever method is the most patently absurd overkill. Not that, with a AI routine and horseshit attacks like that, you really get overkill per se, but whatever stomps it into the ground with the utmost of dominance.
|
|
|
|
Blademaster_Aio posted:I vote for the firing squad This post in its entirety.
|
|
|
|
The Electric Chair followed by whichever other method is the most absurd.
|
|
|
|
That breakdown of the AI script has finally answered a question that I've had for like a decade or something since the last time I tried to fight the Abyssal God legitimately, when my best attempt to do so ended after I seemingly got locked into a loop of pushing him below 76% in offensive stance only for him to spam Abyssal Offering every turn back to full health in defensive stance, and repeat. I had thought that you were intentionally supposed to just defend and re-buff during the defensive phase in order to prepare for the next offensive phase, because of the three separate counter abilities (totally called the input reading too, but it was pretty egregious so I imagine everyone did). This ended up really confusing me because how are you supposed to kill the boss when it heals to full if you can't drop it in a single offensive phase? Turns out you were supposed to intentionally suicide party members into it's counters, I guess! That, uh, that's... not really a solution. I ended up with a one-round Firing Squad as my weapon of choice so I guess I'll vote for Guillotine this time.
|
|
|
|
The Royal Guillotine
|
|
|
|
I think we all know there's only one real answer. ALL the cheese strats!
|
|
|
|
Blademaster_Aio posted:I vote for the firing squad This
|
|
|
|
what the gently caress  All of the above, I guess.
|
|
|
|
|
|
|
|
Let's see the strategy to fight it in a longer battle. First off, equip all party members with the Ribbon accessory to prevent all status effects. Make two characters elemental damage dealers and two physical so that if the boss switches to defensive form at random, only two of them will be killed. The fifth uses the weak weapon trick. Equip one representative from the elemental and physical damage dealers each with final attack + phoenix materia combo so that they immediately get back on their feet after being counter cheesed. Whoever has the lowest Max HP should probably be the one with the weak weapon and have a final attack + revive materia combo. Seriously though, what the heck?
|
|
|
|
let the lovely robots redeem themselves. ELECTRIC CHAIR
|
|
|
|
I know how the latter two options go but I'm not sure what the first option refers to, so Guillotine please.
|
|
|
|
what the gently caress atlus. Why would you think this was a good boss. Guillotine if we can't just have all three, please.
|
|
|
|
Can we have all three?
|
|
|
|
OP's choice because you deserve to be done with this loving game ASAP
|
|
|
|
The Electric chair. Yggdroids were made to kill deep ones, so it's time for them to finish the job.
|
|
|
|

|
| # ? May 13, 2024 21:45 |
|
Well. Thank you for the explanation.
|
|
|


