

|
kastein posted:Also, nice setup. I might have to put one together for parts off of my free Taiwanese bridgeport. You may want to go for the 55 gallon drum version of this. Or the bed of the 5 ton version.
|
 #
?
Mar 24, 2016 01:35
#
?
Mar 24, 2016 01:35
|
|


|

|
| # ? Apr 27, 2024 11:49 |
|
|
Did this involve any scotchbrite or is it straight into and out of the electrolysis bath and rinsed off?
|
|
#
?
Apr 5, 2016 00:44
|
|


|
That one is straight out of the bath and rinsed in hot water with a soft plastic scrub brush. I can cut the time down by a lot and have started doing so if I lightly finish with scotchbrite. Been slacking on updates but things are trundling along. I'll need to put together an effortpost.
|
|
#
?
Apr 5, 2016 15:37
|
|
|
Sorry for the lack of updates. Things have been happening. Lots of things in the electrolysis bucket, lots of painting. Now that the bed is ready to go and the misc bits hanging off the bed are clean/painted/oiled it was time to get the lead screw back on:  It's starting to look like a lathe again. Note the clean and painted head stock. I'm real happy with all of that - the bearing surfaces are in great shape. But it's time for some new oil wicks. They are round sprung jobbies and need to be pre-soaked in the Velocite #10. Figure I may as well just fill up the tube they came in and let them chooch for a while.  Installed in the head stock you can see they are quite proud of the bearing surface.  Fortunately there are holes in the casting that you can put small allen wrenches through to hold the wick down during spindle installation.  I've just returned from picking up a new belt (the last thing I think I'll need for the project unless the brass in the compound is too bad to get the slop out) and hope to get much of the head stock reassembled today. The spindle needs to be pressed back in so I'll be temporarily re-installing the tail stock to use the quill for this purpose.
|
|
#
?
Apr 9, 2016 20:02
|
|
|
sexy
|
|
#
?
Apr 9, 2016 20:09
|
|

|
at the date posted:sexy
|
|
#
?
Apr 9, 2016 20:11
|
|
|
Sharpie witness mark on the spindle so I can line the key up with the bull gear. Did the same on the gear itself. Bull gear, pulley and thrust bearing in place after lubing the head stock bearings with more Velocite #10. Inside of the pulley has super lube on it. And, yay....I remembered to put the belt on. That's as far as she goes by hand.  Nasty old tailstock back on to use as a press with a beat up dead center and a couple of fender washers.  Right in to 005 per the spec.  Now on to the back gears. Of course I realized I'd forgotten to prep the back gear handle which needs to be installed along with the shaft and eccentric that actually holds the back gears in place. So now I'm waiting on the tank again........ It will be nice to get all of these small parts back together, because it's been a while and I don't want to have to go back to scrutinize "before" pictures to figure out what's what. Once this is done I'll take things assembly by assembly. Not sure which is next, but I may clean up the 3-jaw chuck so so I have something to put on there to make it look more "lathey".
|
|
#
?
Apr 9, 2016 21:33
|
|
|
I see all your sharpie marks but what thing are you lining up with the other thing? I don't see any spots in the gears or whatnot. What's got to be lined up? It's not like it has valve lifters or something.
|
|
#
?
Apr 9, 2016 21:57
|
|
|
slap me silly posted:I see all your sharpie marks but what thing are you lining up with the other thing? I don't see any spots in the gears or whatnot. What's got to be lined up? It's not like it has valve lifters or something. I should have taken a picture of that. The bull gear (that big one to the right of the pulley) has a keyway on it so it can drive the spindle. It's not permanently attached to the pulley (what your electric motor is driving via belt). There is a little tab that you line up with one of two holes on the right of the pulley and push in. It throws a piece of rod in there to connect the two.  When you engage the back gear lever the back gears mesh like this:  If you leave the bull gear tab in (connected to the pulley) everything locks up. Some people incorrectly use this when they are trying to get a stuck chuck unthreaded, but that's a good way to take a chunk out of the back gears or bull gear. When you release the bull gear from the pulley by pulling that tab out you are now taking power from the tiny gear on the far left of the pulley (it's part of the pulley assembly) through the big gear on the left of the back gears (deep reduction) and transmitting the power to the bull gear (now detached from the pulley) through the small gear on the right of the back gear assembly which drives the spindle more slowly. Notice in the first pic there is an oil plug on the pulley. That's because the pulleys are moving at a different speed than the spindle when you're in back gears so it's yet another "plain bearing" interface that needs to be lubed. Conventional wisdom is to use silicone grease in there since it's nearly impossible to get any metal chip contamination. I started out using silicone for assembly but I'm not sure if that's going to be my long term plan. If it is I need to find a zirk fitting that has the same threads as the oil plug/screw. Some further explanation:  
|
|
#
?
Apr 9, 2016 22:47
|
|
|
Oh sweet, a cheap and easy transmission. Nice.
|
|
#
?
Apr 9, 2016 23:06
|
|
|
The eccentrics and shaft that connect the bull gears turned out to be a pain in the rear end, both because I forgot how they went together and also because I needed three hands to do it. But they're in. Many already painted guards later:  (yes that is a drift pin holding the cover on.....don't judge me, it's one of the first projects that will be done on this lathe once it's up and running)  And I'm way too pleased about this. The drive screws came out (the things holding the data plates on), things were cleaned and painted and the same drive screws went back in:  Holy poo poo, I have a completed head stock.
|
|
#
?
Apr 11, 2016 02:16
|
|
|
Looking nice! I'm jealous of the guys don't have to deal with cutting and glueing flat belts.
|
|
#
?
Apr 11, 2016 14:52
|
|
|
looking great!
|
|
#
?
Apr 11, 2016 17:16
|
|

|
Back from more traveling, and I got the apron apart and cleaned. The hard part was removing the wheel. This is the first taper pin I had trouble with. I gave it about 6 whacks and it was obviously bucked. So I ground the small side off and used a better/more fitting punch and it came out easily. Lesson learned: you better whack the poo poo out of these things and use the right size flat punch. Tapping around on them is likely to just mushroom the end. Go big and get it done the first time. I checked these before I bought it, but it's nice to see and confirm that when clean the half nuts show basically no wear at all:  Finished part of the wheel polished with some DIX compound and a rag wheel on my drill, everything else painted. I'll need to let this dry at least overnight before I reassemble. 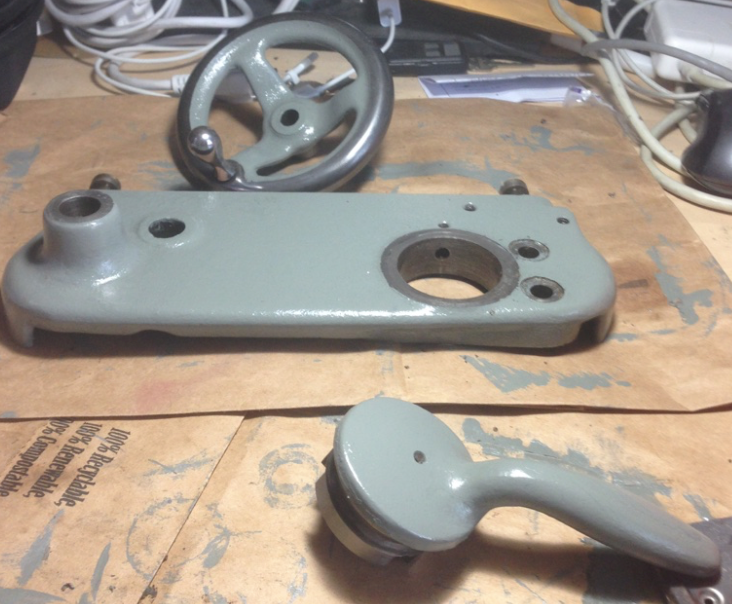
|
|
#
?
Apr 24, 2016 22:11
|
|
|
This thread is great, I love the work you're doing. Once I get a place of my own (hopefully with a garage), I'll be beginning my search for some old machinery to restore and get to makin' chips and makin' mistakes. I'll probably set up a small casting setup, and smelt brass and aluminum into ingots for milling and lathing practice. Re: pins: I've had similar experiences with the taper pins on my AR-15 front sights. Big heavy hammer, very solid work surface that won't soak up impact energy, a properly sized punch, and the boldness to give it a good solid whack.
|
|
#
?
Apr 25, 2016 03:14
|
|

|
We are long overdue on a progress update...
|
|
#
?
Jun 1, 2016 15:40
|
|
|
AbsentMindedWelder posted:We are long overdue on a progress update... Yes, yes. I'm hopefully going back to this project today/tomorrow. I'm just finishing another errant Porsche that happened to end up in my driveway. It's nearly ready to go and I've found it a new home. She's running, but still need some suspension work (the inner tie rod ends are terrifying).
|
|
#
?
Jun 2, 2016 17:12
|
|
|
GENTLEMEN. Welcome back to the shop. Today/tomorrow from 3 months ago didn't happen. It happened again starting yesterday. Behold, we have the middle back together:  The brass chevrons you can see on the end are supposed to be on both sides. They have felt wipers in them.....everything is felt on this thing. I'm missing one as well as the screw so I'll have to track that down. Also, the brass nut that the cross feed screw goes into is pretty loose. As I checked before I bought it, you can back it off and bring it back in accurately, but it's super sloppy. eBay to the rescue.....these are available for like $38. For now I'm going to run with it, because it takes all of 3 minutes to disassemble to the point of replacing it. The last major assembly to deal with is the tail stock:  It's looking horribly out of place. Also, the new Chinesium Aloris-clone tool post I bought isn't going to fit as it came out of the box:  Turns out this is typical and expected. Going to bring the compound and tool holder down to a buddy with a milling machine and we'll figure out if this is a machine operation or just a "find something that fits and thread it" job. Note, I didn't cheap out. That's Bostar PRECISION right there.
|
|
#
?
Sep 27, 2016 00:54
|
|
|
Motronic posted:
mill it down with your lathe!!!  Actual reply, that's pretty normal. One suggestion though stone the crap out of the cutouts after you mill them. If there's any kind of high points it *can* cause the toolpost to wobble on a tiny scale. shalafi4 fucked around with this message at 01:14 on Sep 27, 2016 |
|
#
?
Sep 27, 2016 01:11
|
|


|
Don't feel bad, you will still have your South Bend running before mine. (probably)
|
|
#
?
Sep 27, 2016 01:13
|
|
|
You can hack the T-nut with a saw, it doesn't need to be perfect.
|
|
#
?
Sep 27, 2016 01:16
|
|


|
sharkytm posted:You can hack the T-nut with a saw, it doesn't need to be perfect. I wish it was that easy, but it's also too tall. And I have none of this stuff in the shop. If it cant' be done with some manner or grinder (air, wheel, angle) a sawzall, or a welder I'm pretty much done. This is my first real metalworing tool so I'm screwed. I totally understand how this gets easier as you go along, but I'm not there. I'm still contemplating that horizontal band that has a cooling pump on it........ Motronic fucked around with this message at 02:09 on Sep 27, 2016 |
|
#
?
Sep 27, 2016 02:06
|
|
|
Motronic posted:I wish it was that easy, but it's also too tall. Oddly enough "milling" it on the lathe was only half a joke... you actually can cut the channels on the lathe
|
|
#
?
Sep 27, 2016 02:09
|
|
|
Yeah, flip through that "How to Run a Lathe" manual you've got and you'll see a whole pile of weird techniques for doing unusual operations on a lathe equipped with centers or a four-jaw chuck.
|
|
#
?
Sep 27, 2016 02:39
|
|


|
shalafi4 posted:Oddly enough "milling" it on the lathe was only half a joke... you actually can cut the channels on the lathe I have no doubt this can be done from what I've seen (ridiculously in the "if all you have is a hammer....." kinda way).......but just give me a chance to get *one* working and in spec first under my own control. You will have plenty of opportunities to make fun of me later.
|
|
#
?
Sep 27, 2016 02:59
|
|
|
 I think the largest part of the tail stock is almost done. Yummy. Also, the compound and tool holder were dropped off elsewhere to be dealt with.
|
|
#
?
Sep 28, 2016 00:49
|
|
|
Didn't bother with too many "in process" shots of this because it's totally obvious and easy to take apart. I've got a tensioning handle for the belt drive cooking now, and I believe that's about all I need before I set this things up. I'll also need to figure out a chip tray for that. Then we've got a couple of chucks to clean, a 3 jaw and a 4 jaw. I can only imagine what I'll find inside of those. The tool holder base should be done long before I make it to this point. I figure at that point I'll be spending a few hours triple checking torque on things and going through the lubrication and hand turning until I'm satisfied enough to apply power.
|
|
#
?
Sep 28, 2016 20:57
|
|
|
Whoooo...talking to myself some more! Left early Friday morning on travel but had Amazon drop this poo poo off to my buddy who made the new block for the tool holder for me:  He dropped it off today and took into consideration my concern for paint on the top bearing surface. He was being an overachiever.  I think it turned out quite nice. No more excuses.....this thing looks like it has all it's parts. I've got a second coat of paint to put on one side of the last thing (a handle for the belt drive) and then it's time to mount this thing. 
|
|
#
?
Oct 3, 2016 22:57
|
|
|
I'm still here!
|
|
#
?
Oct 3, 2016 23:07
|
|
|
at the date posted:I'm still here! Yup, I'm watching, it's amazing work!
|
|
#
?
Oct 3, 2016 23:09
|
|


|
Also watching. I'm enjoying it
|
|
#
?
Oct 4, 2016 00:08
|
|


|
Talk some more about the history of this glorious paint color you use 
|
|
#
?
Oct 4, 2016 01:01
|
|
|
Still here... Envious of your time.
|
|
#
?
Oct 4, 2016 01:45
|
|
|
I can almost smell the cutting oil in the air and imagine the chips falling off.
|
|
#
?
Oct 4, 2016 12:58
|
|
|
Motronic posted:I wish it was that easy, but it's also too tall. Late to the party, but you could have used a grinder as long as you kept one side factory fresh so it would still seat as intended on the underside of the t-slot.
|
|
#
?
Oct 6, 2016 22:14
|
|


|
We have three very similar South Bend lathes in my school shop that are from about the same era (post-war) according to the serial numbers on them. The ways, tailstock, carriage and gearing on the end are the same, but ours have the motor down below and no external belts. Thanks to Mike Pence and our lack of school budget, one is in decent shape, one sort of works and the third we rob for parts. Nice little lathes when they're in good condition. E. Just noticed the lack of quick change gearbox too. Kirk Vikernes fucked around with this message at 01:59 on Nov 6, 2016 |
|
#
?
Nov 6, 2016 01:55
|
|


|
It's time for an update. I've just spent entirely too long in the shop figuring out how to reassemble and align the motor drive. The best information I could find was a blurry PDF:  The dimensions on figure 2 weren't terribly helpful, since you may remember I put a continuous serpentine belt on it. I had the adjustment turnbuckle all the way in and things still weren't quite right, so the motor assembly is kinda inward towards the lathe:  .....which I suppose is okay and potentially good for when the belt stretches. But I assure you that the belt I put on there is 100% the smallest you can get away with and I wouldn't suggest it for anyone in the future. For purposes of documentation, it's this one:  I managed to cock up the alignment and ran out of adjustment for the motor pedestal and had to pull the spindle off about a dozen times, ending in pulling the entire thing and drilling holes 1/2" further to the left as I'd already bolted down the lathe. I also don't have any cotter pins of the proper size for the tensioning handle so some paper clips are substituting at the moment. In the end, I believe I have the alignment very close to correct and I've even got some adjustment in both directions should I need to move it:  Turning by hand makes the belt always run towards the left of the cog it's on on the rear spindle. My guess is that it's slightly out of square, but I'm not really sure how to fine tune that at the moment. I also can't find the electric motor to main pulley belt at the moment, so I'm going to look around for it. Even if it's shot, it's at least a good starting point for sourcing another (or did I already buy another one? I can't remember). So here she is all bolted down:  I think I'll work on power tomorrow. I really don't like they way this was previous set up, which was using what looked like cut up extension cords with one going from the motor to the switch on the lathe, and then another leg coming out of that switch with a plug on it. I'm thinking of something more like 1/2" or 3/4" liquid tite conduit (that flexible gray stuff) in a single run from the switch to the motor and potentially a small junction box on the motor to feed it and to pull off a run of some nice 12/3 SJOOW as a power feed.
|
|
#
?
Nov 26, 2016 00:55
|
|
|
It's a thing of beauty. I don't anything about metal lathes really but I've done a couple of old wood lathes and hope that someday I run across a bargain metal lathe for restoration. But hell, I can barely afford wood lathes, all the tooling for a metal lathe would bankrupt me.
|
|
#
?
Nov 26, 2016 06:57
|
|

|
Working on some wiring now. Anyone have any idea how old this motor is? I can't find much on it based on the model number: But I just noticed it's got Gits oil fittings on each side for the bearings. I can't imagine it's as modern as I originally assumed.
|
|
#
?
Nov 26, 2016 21:42
|
|
|

|
| # ? Apr 27, 2024 11:49 |
|
|
From the font on the plate and the fact that it says "capacitor" instead of "condenser", I'd guess that is no more than 30 years old.
|
|
#
?
Nov 26, 2016 21:49
|
|