

|
Alright, I'm interested. I've done the overall planning thing before for Combat Mission, and that seemed to work out fairly well. I tend to be a very much all/nothing commander, preferring very cautious defense until throwing absolutely everything at a critical point of attack. I enjoy arranging things in pretty patterns and then being very angry when it all falls apart. So I'll take any level of leadership role.
|
 #
¿
Mar 6, 2017 17:45
#
¿
Mar 6, 2017 17:45
|
|


|

|
| # ¿ May 3, 2024 14:49 |
|
|
ProfessorCurly in the roll20 chat.
|
|
#
¿
Mar 6, 2017 20:06
|
|
|
I'll put my name up for it, I've done overall command of things in other goon games but not WWI specifically. Assuming I can't vote for myself, I'll vote for my dad.
|
|
#
¿
Mar 6, 2017 20:56
|
|
|
Can you move in marching order over a bridge/do bridges count as roads, or is it a thing you have to advance over more slowly? Similarly, if crossing a road-ford, does the road part take priority as far as moving with marching order?
|
|
#
¿
Mar 7, 2017 15:00
|
|
|
I'll be a staff officer for now, since we have lots of people and not too many commands to start. I'll jump in if necessary. Besides, I'm more of a timetables kind of guy.
|
|
#
¿
Mar 7, 2017 18:22
|
|
|
Loel posted:Commander's intent: We've been instructed to be aggressive in our defense, so here are my goals. Taking Stethoscope (Zone 3), or preventing its conquest, is the priority. If we cannot hold here, commander's intent is to form in Zone 4 in good order. I'll post something when I get home for the timetable stuff.
|
|
#
¿
Mar 7, 2017 21:54
|
|
|
Timetables These movements are measured from the board edge of appropriate entry. This assumes that both we and the Germans are starting off the table. These therefor represent the maximum distance that the lead chit should be moving (more or less). Table 1: Armored Car Movement (Road)  There are 3 paths, which I've labeled AC 1-3. AC1 is the southern route, AC2 is the central route and AC3 is the northern route using the forest road. Lines indicate where the back edge of the lead chit will be. Turns indicate what turn that chit would be arriving. So 3 Turns: AC3 indicate that if our first AC company took the northern path, it would arrive at that line on turn 3. Things to note: 1. The armored cars can reach Chemin Cruex in 4 turns. 2. It will take 5 turns to reach Stethoscope using either AC1 or AC2. 3. We can be in position to cover the M1 ford in 5 turns. Table 2: Enemy Cavalry Movements (Marching Order)  These represent the leading edges of enemy cavalry entering the board in marching order and moving at full speed along the roads. Because of the bridges they have to cross moving from La Dand, they will necessarily be moving single file. Things to note: 1. They can arrive in Stethoscope on Turn 4. 2. If we don't check their movement, they can be at the M4 crossing on Turn 5, and cross in force on Turn 6. 3. Stethoscope represents all of their interior lines. It is the crossroad of the map. They must take it to advance further at any speed. Table 3: AC + Enemy Movements  Here are the movements plotted together. We can see then where and when likely meeting engagements will occur. Things to note: 1. They can reach Stethoscope before we do. They can be in the town on Turn 4, while we are still on our approach. 2. However, they will be in marching formation to do this. Therefor, they are not a threat at this point, or on turn 5. 3. If they don't rush all out we can establish ourselves in the town before they do - so they need to be extremely aggressive to accomplish this. 4. Turn 5 could result in a huge bumbling mess as we both are in the town, but unable to shoot. Us, because we're moving, and them because they are transitioning from marching order to battle order. 5. If they start at their bridges, instead of the board edge, or have extremely mobile brigades that don't need to use marching formation (like we do), then we would be walking into a major, major ambush on turn 5. Table 4: Chit Example w/ Sight  The outer circles on our roads represent the spotting range of potential lead AC chits. I have posted a potential formation for them. Things to note: 1. Armored Cars on the AC1 route will be able to spot potential trailing enemy companies on the 4 o'clock road. 2. If they use the Purple Route/advance along the 2 o'clock road we would not be able to detect them until we bumble into them on Turn 5. 3. If their force is around five companies, they can all make it into the town and again we won't be able to see them no matter where we are.
|
|
#
¿
Mar 8, 2017 03:32
|
|
|
Note from Roll20: even if we're both moving, and thus unable to shoot, on Turn 5, we can still get into accidental melee if we are bumbling around in the town. I'm gonna take a wild guess and say that armored cars, in melee, in a town is a quick way to get a lot of guys Franz'd. Keep that in mind.
|
|
#
¿
Mar 8, 2017 04:34
|
|
|
Potential Enemy Plans - 2 Enemy Brigades Case 1: The Central Thrust  2 German Cavalry Brigades: One enters from northern board edge, one enters from Red Road. On turn 5, the Cyan brigade sets up in battle order in Stethoscope - moving half, so are eligible to shoot on that turn. The Red Brigade can either deploy into battle order to also defend Stethoscope, or perhaps they can leave a lane open somehow and allow the Red Brigade to simply keep moving forward in Marching Order. If the Red advance doesn't slow, then they arrive at the M4 crossing on Turn 5, are across in full force by Turn 6, and will be deployed on our side of the crossing in good formation by turn 8. This could result in them holding Stethoscope and a secure beachhead across the central river by the end of Turn 8. Case 2: The Northern Bypass  2 German Cavalry Divisions: One enters from the northern board edge, one enters from Red Road. On turn 4 the Red Brigade arrives in Stethoscope. On Turn 5 it deploys into Battle Order within Stethoscope. Meanwhile, a separate cavalry Brigade enters from the northern board edge. But instead of advancing on Stethoscope it turns north, wrapping around Taillis Nord and advancing along Uptop Road. An enemy cavalry division to do this will be across the M1 Crossing in good battle order by Turn 8, and will be in solid defensive position by Turn 9. Alternatively, they could keep pushing and be on the far side of the woods by Turn 10 in Battle Order, but not a good fighting formation. The larger point is they could theoretically bypass Stethoscope, which has the potential of allowing them to deploy reinforcements from roads further up the map at some point. Case 3: gently caress Stethoscope  The northern bypass could set itself on our side of the M1 crossing by turn 8, as before. The Southern Thrust can be across the M7 crossing on Turn 9 in battle order and decent formation. Alternative cases where the enemy only has 1 brigade can still follow these paths, and I believe these to be the most likely avenues of approach that they would use.
|
|
#
¿
Mar 9, 2017 18:28
|
|
|
Do we need to have eyes on the enemy entering these critical locations to trigger emergency reinforcements? Do we need to see them enter Foret de Effyaders on turn 1 to get the Belgians to enter, or are there miscellaneous scouts and locals who will alert those forces regardless of where we are?
|
|
#
¿
Mar 10, 2017 03:42
|
|
|
3 of our guns are currently in range of theirs. We can maybe get 3-4 of their guns in the bombardment. However we also need support in the south. Can artillery split fire?
|
|
#
¿
Mar 26, 2017 06:10
|
|
|
To illustrate what I think my_dad is proposing: 3 of our guns can counter-battery their indirect artillery right now. We can cover 4 of their guns with the barrage.  That leaves 5 of our guns that can cover the german artillery and 2/3's of their machine guns in the south by doing a barrage like this: 
|
|
#
¿
Mar 26, 2017 16:27
|
|
|
The southern infantry attack can have their artillery and 2/3's of their machine guns covered by 5 companies of artillery. The northern german attack can have 2/3 machine guns and there brigade commander covered by 3 companies worth of artillery fire. However, our troops will be advancing to contact in the first turn, assuming the germans don't make a general retreat. 4 of their long range indirect fire guns can be covered by the 3 of our own guns which are in range to shoot at them, or at least get touched by the bombardment. Taking out the machine guns could greatly aid our forces in the north achieve their charge. Of course, their heavy artillery is close enough to contribute to that directly as well. I'm personally of the mind that taking a shot at their heavy artillery both achieves the long run goal of depriving them a major breakthrough asset and also contributes to the current assault by reducing direct-fire from their big guns at our cavalry.
|
|
#
¿
Mar 27, 2017 20:25
|
|
|
Foret de Effyaders Conjecture 1: The Germany Infantry brigade we spotted across the ford acted on contingency orders when it was fired on by my dad's artillery. It advanced on the Horse Artillery, killed it, then stopped. Therefore, it is likely not across the ford yet. Action: Shell the crossing points at the road and/or ford. Available Force: the 4 northernmost guns can reach the road and ford with adequate coverage. ------------------------ Conjecture 2: The enemy force did not stop and is across the ford, occupying our own trenches in northern Foret de Effyaders. We haven't seen them since, so they can't have kept advancing south. Luckily, we also have some rallied infantry between the enemy's potential location and our artillery park, and they also don't know the exact location of it anymore. Action: Shell our trenches in northern Foret de Effyaders, then once ammunition is expended, assault it with the 21st infantry brigade. This has the added advantage of potentially breaking up or disrupting an attack from those trenches on our position. Available Force: All of our artillery can presently attack our trenches in northern Foret. The 21st infantry brigade is fresh and ready. Goal: Reestablish control over the northern road crossing. --------------------------- Conjecture 3: The enemy force didn't stop, is across the ford and kept moving west. Their advance must be checked immediately before they establish themselves firmly into the western edge of Foret de Effyaders. Action: Use our two reinforcement brigades to advance in battle order to Foret de Effyaders with orders to charge at any opportunity. Available Force: 2 infantry brigades can enter nearby from the northern map edge, and follow the road to their destination. Goal: Check the breakthrough that the Germans could have achieved if their remaining infantry brigade continued across the road, and kept moving west, before it establishes itself in a key beachhead location or wrecks havoc in our backfield positions. --------------------------- Taking these things together: We have 5 fire missions left. One shot as a hail mary against advancing germans that could be crossing the road. 4 missions against our trenches in the north of Foret de Effyaders. After the bombardment, the 21st Infantry Brigade charges those trenches, with the intent of recapturing them from any remaining enemy forces. At the same time, our reinforcement infantry brigades arrive and move promptly toward Foret de Effyaders. If they encounter enemies, they charge immediately. If they reach Foret de Effyaders and do not encounter enemies, one moves directly east along the road and files in next to/assists the 21st infantry Brigade in its assault. The second will advance to the center of the map and take positions somewhere in the middle, to help guard the artillery and potentially take up positions against a front assault. --------------------------- The Southern Brigade: I believe the southern infantry brigade should advance until it can cover the southern board edge where we suspect there to be an enemy bridge with rifle fire, then self-entrench in that location through the night to act as an anchor against potential sneakiness coming that way during the night. With luck this will result in us reestablishing our hold on our side of the M-river and solidifying it before morning. Whether we can hold against their artillery in those positions is questionable, but better they have to use their artillery on those forward trenches than allow them to move their artillery forward unhindered and attack positions further back. Those are my thoughts on the night turn. 
professor_curly fucked around with this message at 04:06 on Mar 29, 2017 |
|
#
¿
Mar 29, 2017 03:03
|
|
|
I can take the new artillery brigade probably.
|
|
#
¿
Mar 29, 2017 14:51
|
|
|
Assuming I get control of the new artillery Brigade, Lenoon, how about we split things up here. Since you're already on the field, focus a bit more on softening up the trench for our attack on it. Then when my artillery comes in, I'll drop shells on the empty areas between the woods and the ford, to disrupt any counter attack or guns that've set up on our side of the ford. Does that sound reasonable? Loel - not that I've seen. I'm personally against it, I would like to see the southern division entrench itself further forward and sit tight.
|
|
#
¿
Mar 29, 2017 22:48
|
|
|
Actually Lenoon your artillery plan has given us a thought. The last time we saw the german Super-Brigade, it was in a very odd formation, and looked like it had been kicked into contingency orders by my dad's horse artillery. Let's run with that assumption being true for a moment. That means the only germans left in Foret de Effyaders are those scattered remnants from the brigade we nearly wiped out. What if the last known location of those brigades with an artillery barrage, while at the same time hitting the road and ford as best we can. Then the 21st immediately charges north, to try and wipe out the remnant germans and occupy our northern trench. After that, we dig in and have our artillery lay down suppressive fire along the road and ford crossing/the empty areas as necessary to disrupt the germans if they try to cross in the night. Our reinforcement brigades come in and fill in the line next to the 21st/reinforce it as necessary.
|
|
#
¿
Mar 30, 2017 00:40
|
|
|
So I've talked with Loel and mllaneza, they've both agreed to this. . Here is my proposal. On Turn 34, we saw the German Super-Brigade marching like this:  In some form of Marching Order, moving along the road. Then my dad's horse artillery shot at them. On Turn 35 our spotter plane saw this:  They adopted battle order, and faced the horse artillery. The horse artillery were then promptly destroyed by indirect artillery fire. Now it seems likely that the German Super-Brigade is still there in battle order, having been knocked off its orders to follow contingency orders. This is reinforced by the fact that we never saw it again. Since a formation of that size is unwieldy, and since we never caught sight of it again, that would indicate a knowledge of our sightlines I don't think the Germans have, or extreme luck if they did move it across the ford already. Moreover, if they were in the trenches just north of 21st Brigade, our northernmost companies would still see them. The Super-Brigade is so big it would more than fill that trenchline up if they were there. With that in mind what I propose is that 21st Brigade immediate charges north. 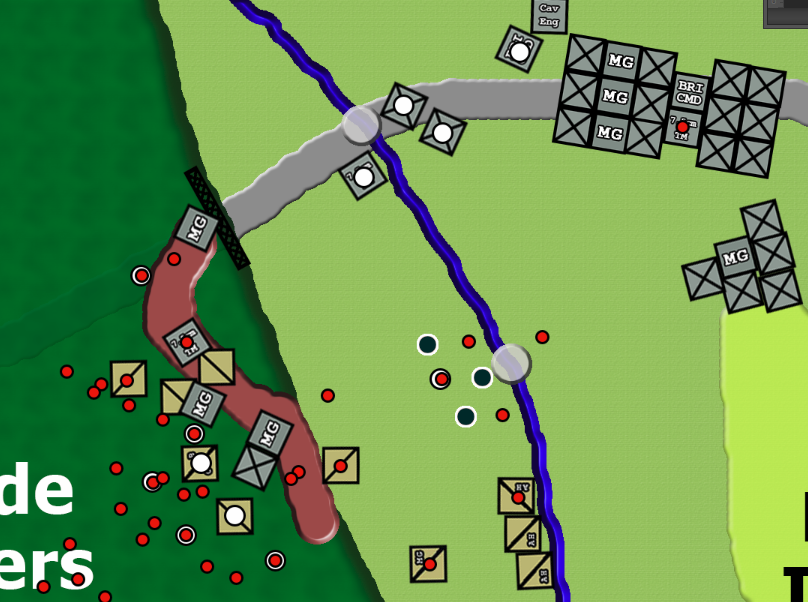 If my guess is right, then the only Germans left in Foret de Effyaders are 3 machine gun companies and a single infantry company. Since we know where they are, we spend 4-5 artillery guns to hit these locations on the first turn. We might get some friendly fire, but probably worthwhile to try and suppress the machine guns before they can fire. I've mapped it out. If that super-brigade is still there, they can just get a few units across the M1 crossing in 1 turn. They cannot get anyone across the ford in 1 turn. Therefor the remaining guns can preemptively bombard the road with no loss in efficiency. The 21st can dig in the northern trenchline, with orders to charge any germans they see along the way. If the Super Brigade does cross along the road or ford it should run straight into the 21st Brigade in the trenches/woods. Then Lenoon's interdiction artillery that he has planned (focused along the road and ford in this case, because we know that's where they have to be coming from) can pick apart the Super Brigade if it tries to cross, and then run straight into the 21st. If there are more Germans in Foret de Effyaders then we still get a solid round of artillery bombardment on the trenches, and we still cut their range advantage significantly by charging in at night. We might lose the 21st Brigade, but we have 2 reinforcement brigades coming right behind it to finish the job if necessary.
|
|
#
¿
Mar 30, 2017 05:29
|
|
|
If it all goes wrong I'll take responsibility for it.
|
|
#
¿
Mar 30, 2017 05:53
|
|
|
Actually, I think the best use for Barracuda, if he can get those cavalry reinforcements, would be for him to do an audit of the river and try to see if there are any new bridges being built/shoot up engineers that are trying.
|
|
#
¿
Mar 30, 2017 15:18
|
|
|
Agreed. I was going to set up in the north behind Foret de Effyaders as soon as possible to continue the bombardment of the road/fords after your guns ran out of ammo.
|
|
#
¿
Mar 30, 2017 17:26
|
|
|
Would you like me to post my plan, then you post your plan and then we have someone pick?
|
|
#
¿
Mar 30, 2017 21:28
|
|
|
Here's the short version of my plan: Based on our sightings last turn, the Super-Brigade is probably still where it was. I've traced out how it can move once they give it new orders, and moving at full speed it'll still be in a strung-out formation no matter which way it goes. We can advance in a wider/more combat ready formation.  So my plan is that our artillery drops on the last known position of those German remnants first turn, while the 21st Brigade charges north full of piss and vinegar. The spare guns (3-4 depending on how sure you want to be hitting things in the trench) can drop on the road/ford where the enemy brigade will be moving. After the first turn the artillery can focus entirely on hitting the road/ford area, laying it on thick while the 21st Brigade digs into those northern trenches. This should savage any attempted crossing and the 21st should be able to handle any stragglers that make it through.  The reinforcement brigades will move in to either support the 21st Brigade's position or finish up what it started. Then we spread out to cover the river front and prepare to hold there through the rest of the night. ... Really looking at it, the choice is whether or not we want to advance our Reinforcement infantry brigades to support/clean up after the 21st or do we want them to preemptively dig in further back. EDIT: There is also a variant of the plan discussed with my dad, where we bring on my artillery and an infantry brigade first. Lenoon uses his ammunition to bombard the rear-areas where the Germans might be moving troops up, then my artillery sets up and bombards the trench for a few turns so that we have time to get 2 infantry brigades ready to charge at the same time. However, the coordination of this at night is dicey. professor_curly fucked around with this message at 00:44 on Mar 31, 2017 |
|
#
¿
Mar 31, 2017 00:33
|
|
|
Basically yes. My plan is we send the reinforcements forward, my dad says leave them back and have them build a back line. I want to aggressively defend the ford, he wants to build a line further back.
|
|
#
¿
Mar 31, 2017 00:59
|
|
|
Basically, my dad and I can't be left alone in the Roll20 for more than an hour, because our ideas become increasingly beautiful and terrible to behold. I think this started out as a plan to maybe move Lenoon's artillery forward and to counterbattery on that trenchline SW of Stethoscope full of artillery. Then we started iterating on that line of thought. Now we're saying shove 2.5 brigades and some engineers over the south, counter-battery the hell out of the center and then either take Stethoscope, advance to La Dand or both why not aim for the sun boyos.
|
|
#
¿
Mar 31, 2017 03:07
|
|
|
Ya nevermind, the travel times kill it. It'd be daylight before we got anywhere good with this idea.
|
|
#
¿
Mar 31, 2017 03:25
|
|
|
Loel, end this madness. Operational goals, what are they. Do we conservatively hold a line further back? (My Dad's plan) Do we aggressively contest their crossing at the river? (My plan) Do we gamble it all on a counter-attack across the ford? (gently caress it) ----- Corollary, do we want to take a risk and attempt to counter-battery their artillery line around stethoscope?
|
|
#
¿
Mar 31, 2017 03:52
|
|
|
8th Infantry Division Artillery Enter from the northern map edge, as close to the destination point as possible. Move with all speed east until I meet the road, then deploy in a dispersed formation, light guns in front as indicated above. Unlimber in those positions. Support the brigade in front of me. Provide direct fire where possible, with help from the infantry liaison who will be setting up next to us. If it will not interfere with the support mission and is possible with the rain/other effects, entrench in these positions. If the 21st Brigade has been destroyed/driven back from their positions: 5 Turns before dawn, begin executing the following indirect fire mission with all remaining indirect ammunition, with alternating Heavy (Blue aura) and Light (yellow aura) guns:  If the 21st Brigade has not been destroyed/driven back from their positions: 5 Turns before dawn, begin executing the following indirect fire mission with all remaining indirect ammunition, with alternating Heavy (Blue aura) and Light (yellow aura) guns:  Conditional: Fight to the last man. We hold them here or we don't hold them at all. professor_curly fucked around with this message at 06:17 on Mar 31, 2017 |
|
#
¿
Mar 31, 2017 06:11
|
|
|
Tevery Best posted:While we wait: I am in the process of updating the banners, so if anyone does not currently have a banner that reflects their actual command and wants one, please quote this post. I'm in charge of 8th Division's artillery, so that might need something or other.
|
|
#
¿
Mar 31, 2017 20:28
|
|
|
I'll probably limber up on the last turn and move back a bit since they're almost certain to spot me here.
|
|
#
¿
Apr 1, 2017 00:52
|
|
|
I'm assuming if they're pouring this many dudes across in the north they're going to be bringing up their guns closer as well. I'm thinking about it still though.
|
|
#
¿
Apr 1, 2017 00:54
|
|
|
It gained us valuable intel and probably disrupted them long enough for us to actually get something going for this defense, so I think it was worthwhile.
|
|
#
¿
Apr 1, 2017 01:09
|
|
|
Effyaders will be a word spoken only in hushed tones after I'm through. I will turn it into a funeral pyre for whatever Militarist Huns decided they were going to challenge the might of the British Artillery.
|
|
#
¿
Apr 1, 2017 04:58
|
|
|
my dad posted:However, we do know one extra thing: The enemy will be notified if a commander suddenly loses phone contact. And since there's only one way for that to happen, we just sent them the message "We have someone in your back lines" I think our aggression throughout the game will amplify this as well. We haven't been timid - indeed, we still aren't being timid. All they know is that we have a solid wall in front of them at Effyaders and that we've been throwing Brigades at them for literally two days.
|
|
#
¿
Apr 1, 2017 16:45
|
|
|
Eighth Division Artillery Immediately begin executing the following fire plan. If there is a request for supporting fire from the Infantry in front, prioritize the Supporting Fire. Support in the manner which will be most effective, ammunition is no consideration. Use it or lose it. Ordered Fire Yellow Aura - Eighteen Pounder Blue Aura - Sixty Pounder 3 Turns on the following pattern:  2 Turns on the following pattern:  3 Turns on the following pattern:  3 Turns walking fire between these two points:   1 Turn on the following pattern:  pre:Standing Orders Override Ordered Fire to support friendly brigades? Yes Minimum number of fire missions remaining to use Supporting Fire 1 Break off automatically when enemy companies are Spotted within Stay Where You Are Fight Where You Are Die Where You Are When multiple requests for support are received, favour requests from Nearest brigade When two brigades issue requests for support Support one brigade with all guns
|
|
#
¿
Apr 2, 2017 01:18
|
|
|
Lenoon. Your time is now. 
|
|
#
¿
Apr 3, 2017 01:15
|
|
|
Eighth Division Artillery Order Conduct the following fire mission for two turns:  Where blue aura represents 60-pounder cannons, yellow represents 18-pounder and orange represents guns from Lenoon's artillery brigade. Turn 3: Limber Turn 4: Move Back to the trenches that have just been dug behind us in the pattern shown below. Turn 5: Continue moving/begin unlimbering as soon as possible. Turn 6: Continue moving/begin unlimbering as soon as possible. Turn 6+: All guns go on overwatch/start supporting the brigades to the east of me.  This position is ideal. They can't counter-battery me because it would require setting up their guns in Effyaders, which they can't shoot out of. They have to exit the woods to attack me. I'm in a trench with a bit of wire already. Let them try to cross the open ground in front of me if they dare. pre:Standing Orders Override Ordered Fire to support friendly brigades? Yes Minimum number of fire missions remaining to use Supporting Fire 1 Break off automatically when enemy companies are Spotted within Stay Where You Are Fight Where You Are Die Where You Are When multiple requests for support are received, favour requests from Nearest brigade When two brigades issue requests for support Support one brigade with all guns professor_curly fucked around with this message at 17:24 on Apr 4, 2017 |
|
#
¿
Apr 3, 2017 04:54
|
|
|
I would personally go all out with the counter-battery this round of turns. I think they aren't going to move, and if they don't you can just about kill all of their heavy guns. At that point, our defensive trenches become much more tenable. I worry that less intense barrage might leave some alive and we'll miss our opportunity.
|
|
#
¿
Apr 3, 2017 16:46
|
|
|
I think we're already getting all we're going to from this backline stuff. I'm personally tempted by bringing them back across to our side of the river, digging a new trench under the safety of covering artillery fire and holding there. If we take out their howitzers, it'll be difficult to shift and the enemy may not come that way. However I'm not opposed to charging La Dand as such. I just think that those guys might be more useful dug in where our artillery can help protect them, even if they get fatigued out. I was more on board with charging to La Dand earlier, because now we've probably made the Germans paranoid enough that they are walking everywhere in Battle Order. Meeting a Bosche brigade in battle order somewhere bodes poorly, but I think with artillery nearby and trenches dug we can hold the southern river crossings.
|
|
#
¿
Apr 3, 2017 21:36
|
|
|

|
| # ¿ May 3, 2024 14:49 |
|
|
lenoon posted:
I had some time so I measured this out for you on our map in Roll20, only 5 of the guns can actually hit those howitzers, and one of those is just barely able to do it. That means for this bombardment you actually have 3 spare guns that can be doing something else. It also means that you're not able to dump as much firepower onto the howitzers, so you might want to lay it on for longer. You said you didn't have time for roll20 stuff, I hope you don't mind I measured this out for you.
|
|
#
¿
Apr 4, 2017 04:32
|
|

