


|
It seems like an imbalance that Knife Guy's game seems to just give you random junk and even a Mid-Mushroom isn't a good prize at this point in the game, but it's still (in theory) a source for absolutely free Red Essences, which could (in theory) totally chump all of the boss battles remaining in the game assuming you have way too much time on your hands and somehow could stand playing the game for hours. Not that there aren't much easier ways to break the game over knee, either...
|
 #
?
Jul 15, 2018 08:32
#
?
Jul 15, 2018 08:32
|
|


|

|
| # ? May 2, 2024 05:55 |
|
|
I do enjoy that the game is fair, the Sprites in his juggling do go from hand to hand, so if you're perceptive enough can see if the ball is going in front of or behind the red ones before he stops.
|
|
#
?
Jul 15, 2018 10:47
|
|

|
FeyerbrandX posted:I do enjoy that the game is fair, the Sprites in his juggling do go from hand to hand, so if you're perceptive enough can see if the ball is going in front of or behind the red ones before he stops. Yeah, unlike just about everything in the casino this one isn't actually random.
|
|
#
?
Jul 24, 2018 00:12
|
|
|
Episode 38 - Look The Other Way  As promised, it's time to show off the Grate Guy Casino! There's only 3 games here, but you can get some good stuff. There's blackjack, which... is just blackjack. You bet a frog coin every time you play, so if you're really good at blackjack (or have save states) you can win some serious coinage here. There are also slots, which I realize now, we did not actually show off this time. The slots cost 10 coins to play and it functions exactly like the other "slot" games from Bean Valley. The 3 blocks will spin and you have to stop all 3 of them on the same symbol to win a prize. You can even win a frog coin! The real jewel of the casino lies with Grate Guy himself. If you talk to him a few times, you can play "Look the Other Way". It's a very simple game, he will look left or right and you have to not look in the same direction he's looking. Straight up 50% odds. You can win some nice prizes like rock candy and red essence, but the biggest prize comes from winning 100 times total: the Star Egg. The Star Egg is basically a reusable rock candy, but it only does 100 damage instead of 200 damage. Still, it's easily the most powerful item in the game and makes AoE magic pointless to use. At the same time, winning 100 times is a pretty arduous task and I don't blame anyone (Jackie included) for not wanting to do it. One last stop in Monstro Town before we continue to Nimbus Land. It's time to get rid of the shiny crystal we've been holding on to! Inspecting the previously locked door with a shiny crystal in your inventory unlocks the door. Beyond it lies Culex! Culex is probably the hardest fight in the game, as he is joined by 4 crystals (with HP ranging from 3500 - 800 HP) who each get their own turn. Pretty much everything can do AoE spells (like the dreaded Petal Blast). Needless to say, we're not quite up to the task yet and I'll go over battle tactics later when it's actually go time. It's finally time to explore Nimbus Land, the land full of suspiciously familiar looking cloud people... But as usual, something here isn't quite right. Before we can get any serious investigating in, it's time to gear up at the wonderful new item shop! We'll get to fun plot stuff next time, I promise.
|
|
#
?
Jul 24, 2018 00:59
|
|
|
The stuff in Nimbus Land had enough to give me a chance at beating Culex. I barely survived the fight at that level and got real lucky at dodging attacks and freebies, slowly whittling down those crystals.
|
|
#
?
Jul 24, 2018 03:23
|
|

|
So, is this LP still alive?
|
|
#
?
Sep 16, 2018 10:24
|
|

|
Carbon dioxide posted:So, is this LP still alive? They're still posting on YouTube 
|
|
#
?
Sep 16, 2018 17:03
|
|

|
Carbon dioxide posted:So, is this LP still alive? ikanreed posted:They're still posting on YouTube Sorry I've been quiet for so long and I've let this thread get really behind. Without getting into details, both my personal and professional life have been crazy for the past couple of months. I've been trying to at least keep getting the videos up on YouTube on a somewhat regular basis but even that has been tricky at best. The SA updates take a lot of time to write up and scan / clean up the player's guide images and I didn't want to just toss up something I wasn't proud of. I definitely still plan on finishing out this LP here and I really, really hope that things will die back down in a few weeks and I'll be able to get caught up. It was never my intention to let things slip as far as they have and I'll try to be better about it in the future.
|
|
#
?
Sep 18, 2018 17:52
|
|
|
That's fine man, take all the time you need. ")
|
|
#
?
Sep 18, 2018 18:29
|
|
|
Episode 39 - Read the Room My life has finally calmed down a bit so I'm going to try and get caught up on posting these updates. We get some time to walk around Nimbus Land a little bit and there's a lot of details I absolutely love about this town. All of the people have these very floaty walking animations and the beds are made out of clouds. It really makes this town feel not just like a city on the clouds, but a city made out of clouds. After learning the secret to Mallow's We also get a chance to show off the Lamb's Lure item! It's absolutely adorable, and it's handy in a pinch, but the lack of exp and coin rewards from enemies you use it on keeps it from being OP. There is also a chance it will fail, so it's a fun little item but not exactly a cornerstone of our arsenal. Below is the scan for the guide's bio on Valentina and Dodo. The more I look at Valentina's design, the more confused I am about what exactly is going on there. She definitely has a bird for hair, but her face is frog-like and her body is completely humanoid (well, except for her waist being to thin to hold any internal organs). Oh, and I guess in Japan they put cherries in martinis? 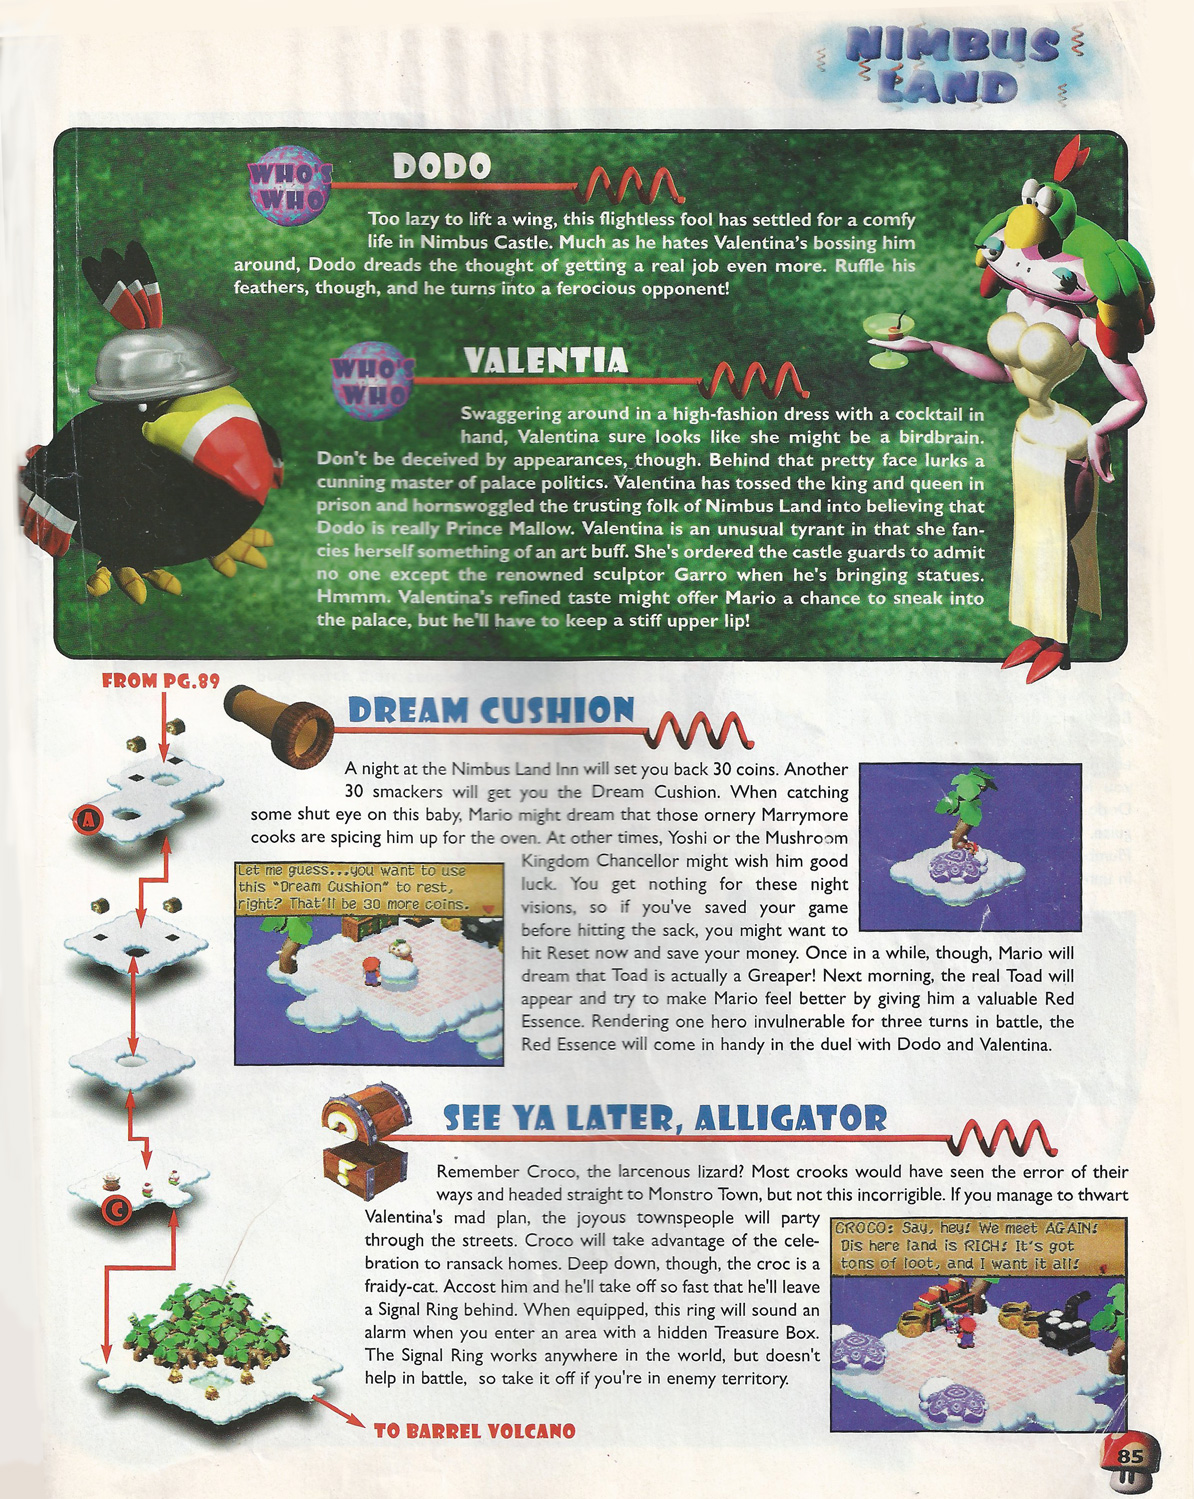
|
|
#
?
Oct 23, 2018 16:09
|
|
|
Episode 40 - Watering Eggs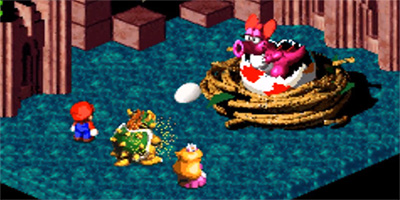 Before we do anything else, it's super important to talk to the NPCs in this room. Not only do we get the key we need to proceed through the dungeon, but another guy just hands us a flower jar! With our wonderful collection of items in hand, we can take out the Heavy Troopa guarding the middle door. Beyond is another boss fight! Where Shy Away is... watering... a giant egg? This is a world where an Italian plumber has a vertical standing jump of about 15 feet and there's an entire city of cloud people living in the sky... I guess that's not the weirdest thing we've seen in this game. In any case, we get to fight As a side note, I enjoyed Birdo's cameo in this game and always kind of hoped she'd play some sort of larger role in the game (much like Yoshi). Alas, it was not to be... We don't quite get to confront Valentina about her villainous ways, but next time we'll definitely show her and Dodo what for! EDIT: I forgot to include the scan of Birdo! Silly me. 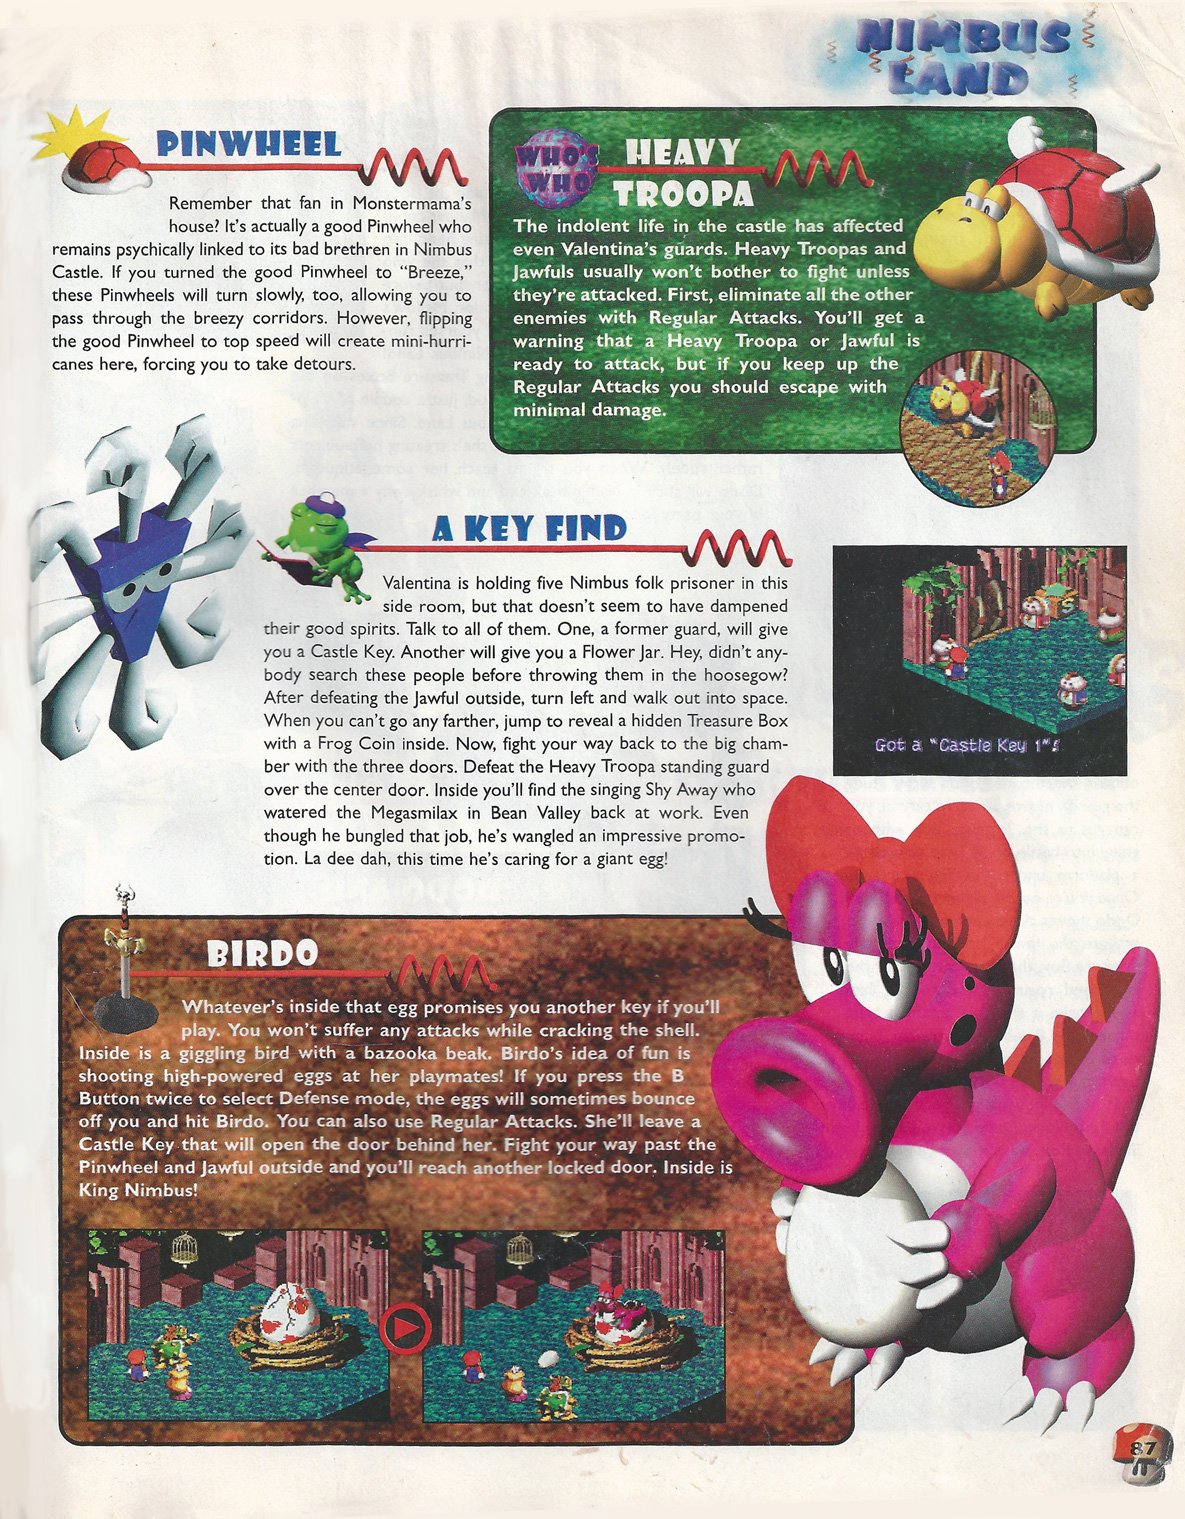
Ceraph fucked around with this message at 17:27 on Oct 23, 2018 |
|
#
?
Oct 23, 2018 17:13
|
|
|
... Wait, according to that guide page, the fan in Monstro Town affects the speed of the fans here? I never knew that.
|
|
#
?
Oct 24, 2018 22:07
|
|
|
Unless someone can confirm it, I'mma say the magazine is bullshiting. I distinctively remember the fans alternating between breeze and hurricane at regular intervals.
|
|
#
?
Oct 27, 2018 21:33
|
|

|
I think it only controls one particular fan that you need to get past to get a chest, but it's been some years since I played.
|
|
#
?
Oct 27, 2018 22:05
|
|

|
Episode 41 - "Sincere" Thanks Like I promised, it's time for a little boss battle! We finally show Valentina what for, but first we have to get through Dodo. Twice. The first Dodo fight in the episode can be skipped if we hit him while the Super Star was still active. Once we get into the fight proper, Dodo will take one of your party members out of the fight. If you lose the one on one with Dodo, then you lose the entire fight, so this is still very important. If he grabs Toadstool, it can lead to some sticky situations. I like how you have to wait a few turns for the missing party member to come back, kind of like a "meanwhile..." kinda thing. Other than Dodo kidnapping a party member, there's nothing special about this fight. Valentina is a pushover and doesn't have anything you need to watch out for. We also cleared up the confusion around the missing invisible chest in the palace. After you clear the dungeon, the chest that was visible in the corner outside the throme room gets restocked, but then turns into an invisible chest. The guide does a poor job of explaining this particular nuance. There's still a few things to take care of around Nimbus Land. If we go into the building on the far right of town, we see Croc pilfering goods from a house! In his haste to abscodnd with the goods, he drops a Signal Ring! At this point (and since we're using the guide) it's completely useless! It will chime when you get close to an invisible chest, but there's only one left at this point. There's also an invisible path leading off from the right side of town to Fly Away. If you talk to him, he gives you a fertilizer! Now that we have both the fertilizer and the seed, we can get some of the best items in the game! But... that's something for next episode. Before we go, though, we circle back to the chests we missed and get the Rare Scarf! If you put it on Toadstool, it boosts her regular and special defense and it's a pretty good choice to keep on her from here on out.
|
|
#
?
Nov 9, 2018 22:54
|
|
|
Episode 42 - Seed and Fertilizer Heading back to Rose Town now that we have our seed and fertilizer, we can talk to the lonely old man who lives behind town. The path that leads to his house was not actually open when we first went to Rose Town and I'm not entirely sure when exactly it opens up. It's not really worth talking to him until we have the seed and fertilizer, though. For our troubles, we get the Lazy Shell! And... the Lazy Shell! One of them is a heavy Troopa shell Mario can use as a weapon, and the other is... well presumably also a Heavy Troopa shell, but it's armor. The armor should go on Toadstool and never come off. It devastates the wearer's attack and speed stats, but provides 120 defense and basically makes them unkillable. Toadstool will now survive almost any attack and can revive / restore the party if things go south. With our wonderful new items in tow, we head into Barrel Volcano! First off, I just have to say that the music here is so groovy and I love it. There's not a whole lot of enemies we need to watch out for here. The magmus should be your first target because they will use Valor Up and increase their defense significantly on their first turn. The Corkpedite is also an interesting enemy in that it has two targets (its head and body). If the head is taken out, the body will use the Migraine attack, which is a one-shot attack that self destructs in the process. Also it's worthwhile to note that you should absolutely, definitely, never use fire attacks in the volcano. Just puttin' that out there.
|
|
#
?
Nov 9, 2018 23:33
|
|
|
Episode 43 - Volcano Dragon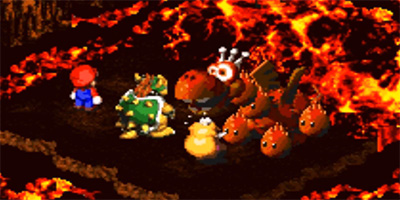 Barrel Volcano is on the longer side of dungeons, but we do sort of get a halfway point. Hinopio runs a... well everything in the middle of the volcano. I have to wonder how he has enough customers to keep up running two shops and an inn, but the rent is probably pretty cheap inside an active volcano. We can pick up some armor upgrades for Mario and Bowser while we're here, though. It's no Lazy Shell but it's a nice upgrade. Well except for Bowser, who gets 3 more defense... Also there's another Nintendo franchise cameo in Hinopio's shop! There's some figures of ships in the back and they're from the F-Zero series. Not having really played the F-Zero games, I can't speak to what their names are, but I'm assuming one of them is Captain Falcon's. There's not much else to do in Barrel Volcano except take down the boss and claim another Star Piece! The Czar Dragon waits for us at the heart of the volcano. As you might expect, a dragon in a volcano does fire attacks, is immune to fire damage, and weak to ice damage. He also has attacks that cause sleep, so it's a good idea to have at least one of your party members equipped with an accessory that blocks sleep. The only other gimmick to this fight is that once Czar Dragon is defeated, he comes back as Zombone! I feel like coming back from the dead is more of a Phoenix thing than a Dragon thing, but who's really keeping track. Anyways, there's not much different about the second phase of the fight. You can use a Pure Water to instantly kill Zombone because he is technically an undead enemy. Incidentally, I honestly have no idea what the significance, if any, of the name Czar Dragon is. He doesn't seem particularly regal or Russian... Below are the scans for Hinopio / the fire equipment and Czar Dragon:  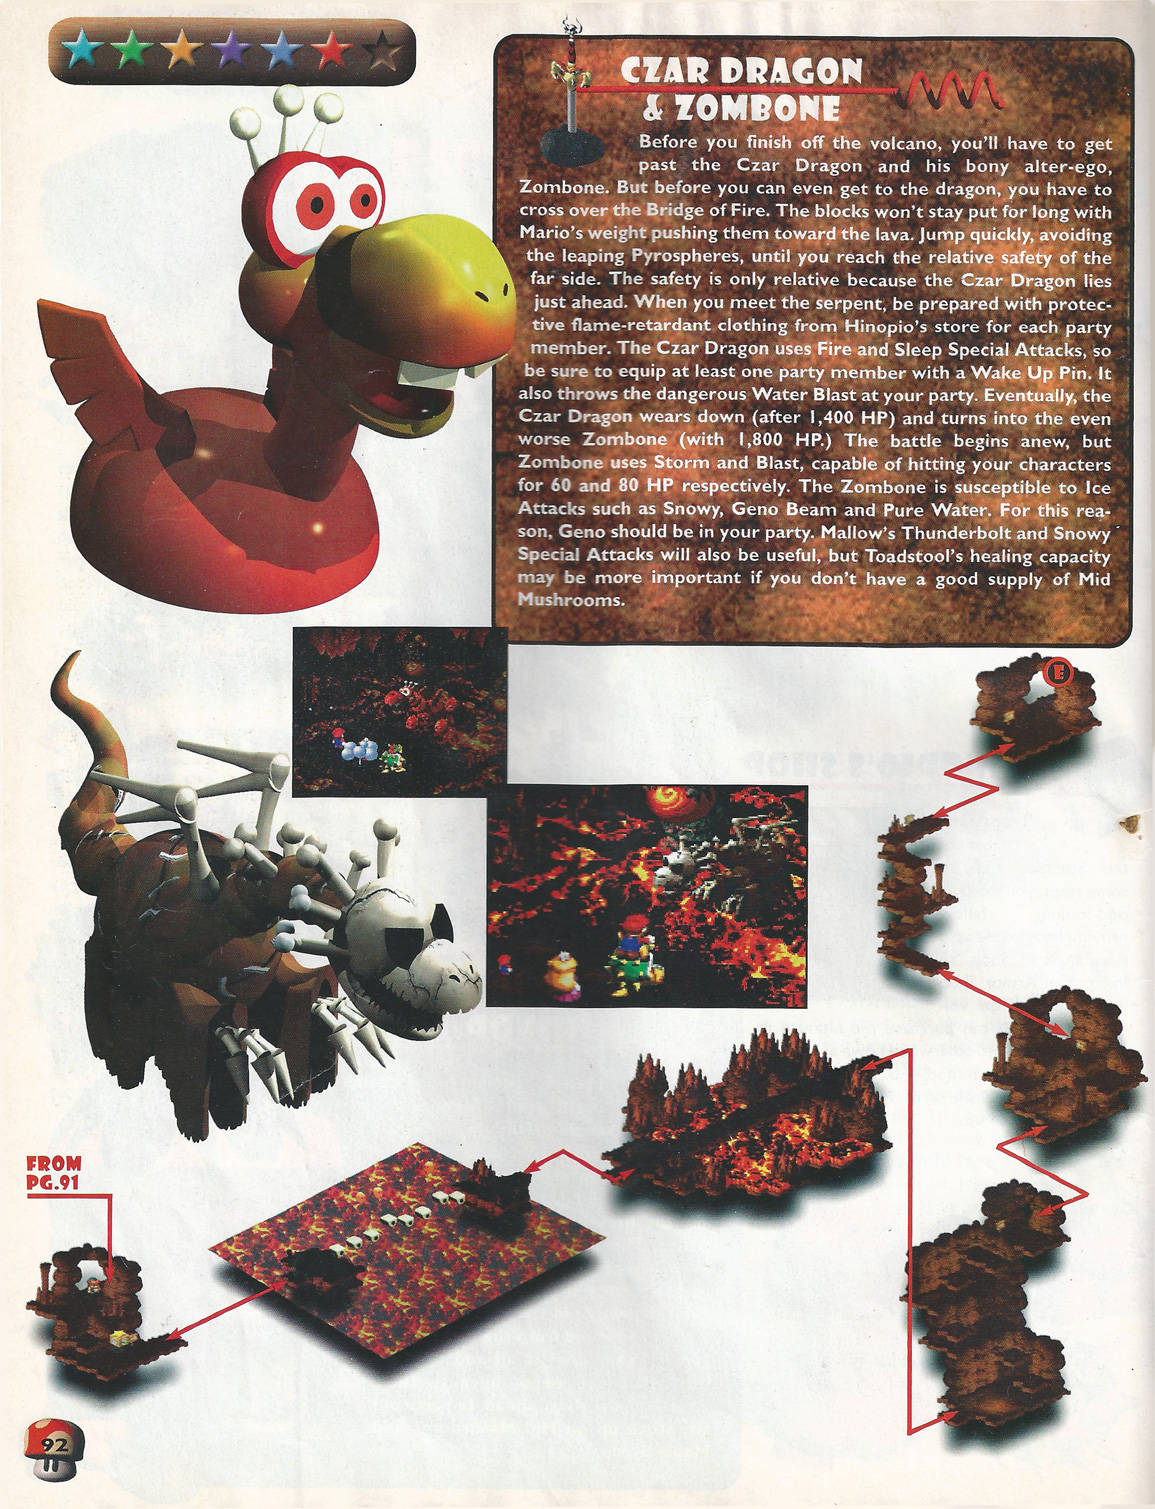
|
|
#
?
Dec 24, 2018 19:28
|
|
|
Ceraph posted:Episode 43 - Volcano Dragon This works better in my native language than in English but it still kinda works in English: You can't spell "Stalactite" without "tit" and tits hang, so stalactites hang from the ceiling.
|
|
#
?
Dec 24, 2018 20:35
|
|
|
Carbon dioxide posted:This works better in my native language than in English but it still kinda works in English: Bahahaha, I'll have to remember that one. We also got this one from YouTube: "StalaGmites are on the Ground StalaCtites are on the Ceiling"
|
|
#
?
Dec 28, 2018 19:34
|
|
|
Stalagmites rise mightily from the ground Stalactites cling tightly to the ceiling
|
|
#
?
Dec 29, 2018 04:01
|
|


|
Episode 44 - Ride the Bus Rarely has a game instilled such unbridled fury in my child self than the arrival of the Axem Rangers. We've been working toward this star for so long only to have it snatched out of our grasp at the last second! It also doesn't help that I was young and foolhardy and rushed into this fight without saving. And then promptly lost because I underestimated the breaker beam. The Axem Rangers fight can be tricky if you go in unprepared. With 5 different targets, some of them making multiple attacks per turn, you can get quickly overwhelmed. And if you happen to finish off the last Axem Ranger without your party being in tip top shape, you can get blasted by the breaker beam after they switch to phase 2. Giving Toadstool the Lazy Shell definitely mitigates that risk and she's honestly pretty untouchable from here on out. Beyond that, targeting pink first, then focusing on green / black and leaving red / yellow for last is a good order. With the Axem Rangers defeated and the 6th star piece actually in our possession, it's time to bring the fight to Smithy! How you ask? By riding the bus of course! It was a bit of a mystery to us at the time of recording this episode, but I've since learned that the "JB" on the side of the bus just stands for "Jugem's Bus". Jugem being the Japanese name for Lakitu. Another mystery solved!
|
|
#
?
Jan 22, 2019 22:15
|
|
|
The noise means your washer is out of balance. Usually caused by either really small loads (i.e. one sweater) that all bunch on one side during spin, or mismatched loads (i.e. one very large item, and a handful of smaller) that don't balance well. Also yes, Peach is a powerhaus!
|
|
#
?
Jan 23, 2019 17:48
|
|
|
Episode 45 - Pipe Haus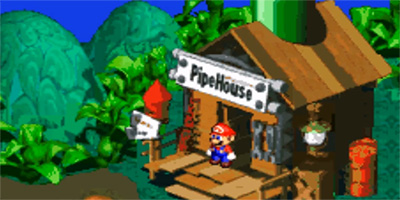 The beginning of the end starts here! After making a loop around what is apparently the known world, we are finally back at Bowser's Castle! One awesome detail about this dungeon is that enemies will flee if Bowser is in your party. It's not guaranteed and not every enemy will run away, but basic enemies like goombas and paratroopas have a pretty good chance of getting scared and running away. I just absolutely love the fact that they took into consideration what happens when you bring Bowser to his own castle. This is a pretty long dungeon, so it's nice that they put Croc as a shop near the beginning. The first major obstacle is six mystery doors. Two of them have puzzles, two of them have battle gauntlets, and two of them have action sections. Unfortunately the doors are random, so you don't have a lot of control over which ones you do. The action sections are by far the hardest. The battle sections are pretty easy (or at least if they're not, you're gonna have a bad time later). The puzzles are also pretty easy, so it's a bit of a toss up between which ones you want to hope for. Just as long as you don't get action sections. Also one last note, we were confused about what the Freshen Up does in this episode. It's actually an Able Juice that gets applied to the whole party (cures status ailments). It sure would be nice if the in game description said anything even remotely helpful, though, huh?
|
|
#
?
Feb 6, 2019 06:09
|
|
|
Episode 46 - Robert Omb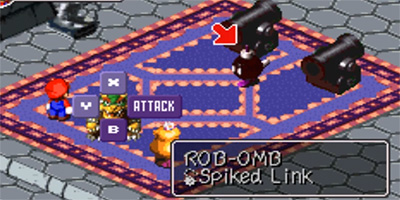 Unfortuantely we already used up both puzzle doors in the last episode. All that's left from here are action and battle doors. The guide claims that the battle doors are the shortest, but honestly it takes a while to get through the entire gauntlet of enemies. Swapping Mallow in for some of the earlier fights where he can one shot the entire fight with some AoE magic is not a bad idea. There's some pretty good items scattered around the action sections, but whether or not it's worth it to go out and pick them up is debatable. And I guess also directly correlated to how good you are at getting through them. The jumps are really tricky and you only get 10 tries for all 3 sections, so just ignoring them is honestly not a bad strategy. I promise next time we'll make some real progress on this dungeon!
|
|
#
?
Feb 15, 2019 21:32
|
|
|
Episode 47 - Exor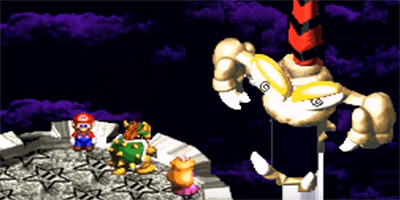 Time to keep heading through Bowser's Keep! We've got a few minor bosses to get through before we finally make it to the giant sword sticking out of Bowser's Keep. First up: Magikoopa! Magikoopa is a fairly easy boss. He summons other monsters to fight with him, like Bahamut. The monsters he summons go down fairly quickly. Just keep wailing away and he'll go down in no time. After the fight, Magikoopa does us a solid and spawns an infinite golden coin chest. At this point, we now have infinite money without having to resort to exploiting the good townsfolk of Seaside Town. We get one last chance to upgrade our equipment from Croc before heading on! Next up is something of a gauntlet of fights. In addition to the regular enemies that roam the halls, we have a mini boss before the actual boss. Boomer guards the... uhmmm... elevators leading up to the boss. Again, Boomer is nothing special. He changes colors halfway through the fight and that's about it. His only real purpose is to trick you into wasting FP before the actual boss. Speaking of the actual boss, it's Exor time! Through this entire game, we're led to believe that Smithy is the giant sword sticking out of Bowser's Keep. It is actually a being known as Exor, who is something of a gatekeeper to... well, wherever Smithy is from. He's no slouch either. There are 4 targets during this fight. His two eyes and Once Exor is defeated, he opens up a portal to that strange dimension and sucks us in! But it's fine, we can just jump right back out, so no biggie. Here's the scan of Exor and Boomer's page: 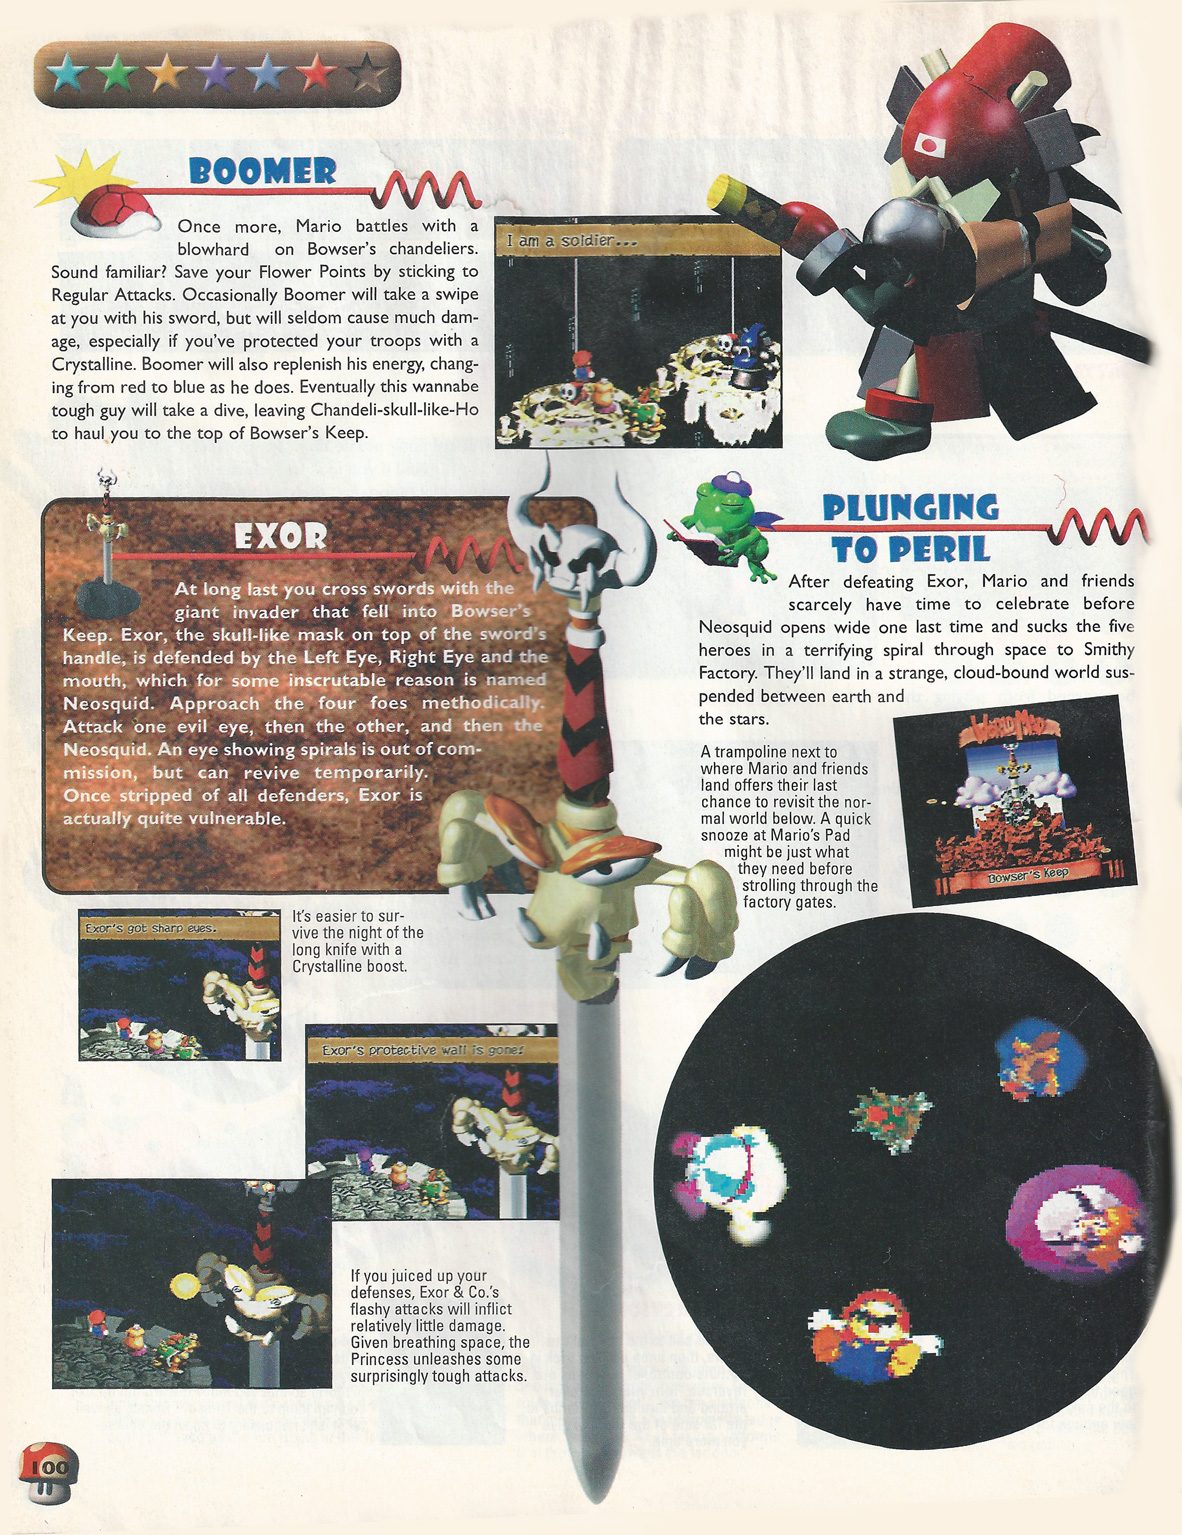
Ceraph fucked around with this message at 16:09 on Mar 14, 2019 |
|
#
?
Mar 14, 2019 16:05
|
|
|
Episode 48 - Culex Time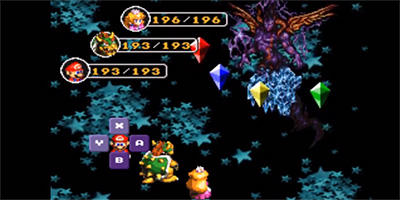 Before we return to the strange dimension Exor sucked us into, we make some pit stops to tie up some loose ends. It's finally time to fight big bad Mr. Culex himself! We went into this fight without really intending to finish it so we didn't prep as much as we probably should have. This is one fight where I would seriously consider swapping Bowser out for Mallow. His AoE attacks and high magic defense are both extremely valuable in this fight. As it is, Bowser is going to spend most of his turns dead on the floor. That or give Bowser the safety badge and hope Mario can withstand the hits instead. With Mario being immune to elemental damage and Toadstool with the Lazy Shell we don't have to worry about them too much. If you don't have rock candies (and if there's any fight you want to bring them to, it's this one), you definitely want to focus the Wind/green crystal first. Not only does it have the lowest HP (800) but it also heals enemies. After that we just went in HP order to cut down his damage output as quickly as possible. Here's a handy little chart of the HP of all the enemies in this fight: wind/green crystal - 800 water/blue crystal - 1800 earth/yellow crystal - 3200 fire/red crystal - 2500 culex - 4096 It's a super long fight, but with the crystals out of the way we just have to chip away at Culex's huge health pool. Can I just say how much I love the fact that they play the FF6 victory music when you win? For our troubles, we get the Quartz Charm! It not only prevents instant death, but it increases offense and defense by 50%. It's easily one of the best accessories in the game. Next time we rematch Master Jinx and actually check out the final dungeon!
|
|
#
?
Mar 14, 2019 16:14
|
|
|
Ceraph posted:Can I just say how much I love the fact that they play the FF6 victory music when you win? Isn't that Final Fantasy IV music?
|
|
#
?
Mar 14, 2019 23:15
|
|
|
Episode 49 - Hiphopanonymous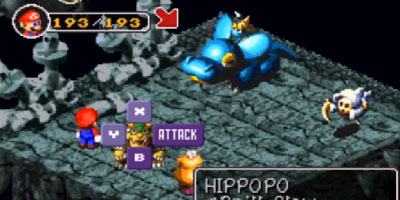 I'M ALIVE! And I have a shiny new update to boot. Today we take care of the last of the overworld clean up and finally head into the last dungeon of the game: The Factory. The last thing we take care of top side is the final confrontation with Jinx. After having taken down Culex, Jinx is a pushover by comparison. He still has some instant kill moves and a decent HP pool, but our team is well equipped to handle it. Our reward is the prestige and honor that comes from being the sensei of the Mario Style Dojo (I love that the sign outside changes to an M). As a more tangible reward, we also get the Jinx Belt! This boasts 12 speed, 27 attack, 27 defense, and prevents instant death. Overall, it's a pretty great accessory. The Factory itself is just a great example of a final dungeon. The visuals and the music are very tense, and do a great job of driving home the fact that the entire game has been building up to this. I love how different it feels from the rest of the game as well. Every other place we've been has been fanciful and exciting and fits the aesthetic of Mario perfectly. The Factory is another dimension, though, and it feels so completely alien to the rest of the world. One thing that does fit with Mario, though, is the nuts and bolts platforms. These were lifted from Super Mario Bros 3 but were changed mechanically to fit the more deliberate pacing of Mario RPG. Instead of turning constantly while on them, they move only when you jump. This is a great compromise that doesn't force too much platforming prowess out of an RPG player, but is a wonderful reminder that this is still a Mario game. There have been a lot of little touches like that throughout the game (like the donut platforms) and they're all great. The first boss (of many) that we encounter in The Factory is Countdown! He's.... he's a clock! That's his gimmick. It's crucial to focus on the clock face, as it can toss out some serious heals. Mario's jumps are useless on the clock face, but can do good damage to the Ding-A-Lings (It's so hard to say that sentence with a straight face). Just keep the clock face on lockdown and Countdown should go down easy. Factory Info: 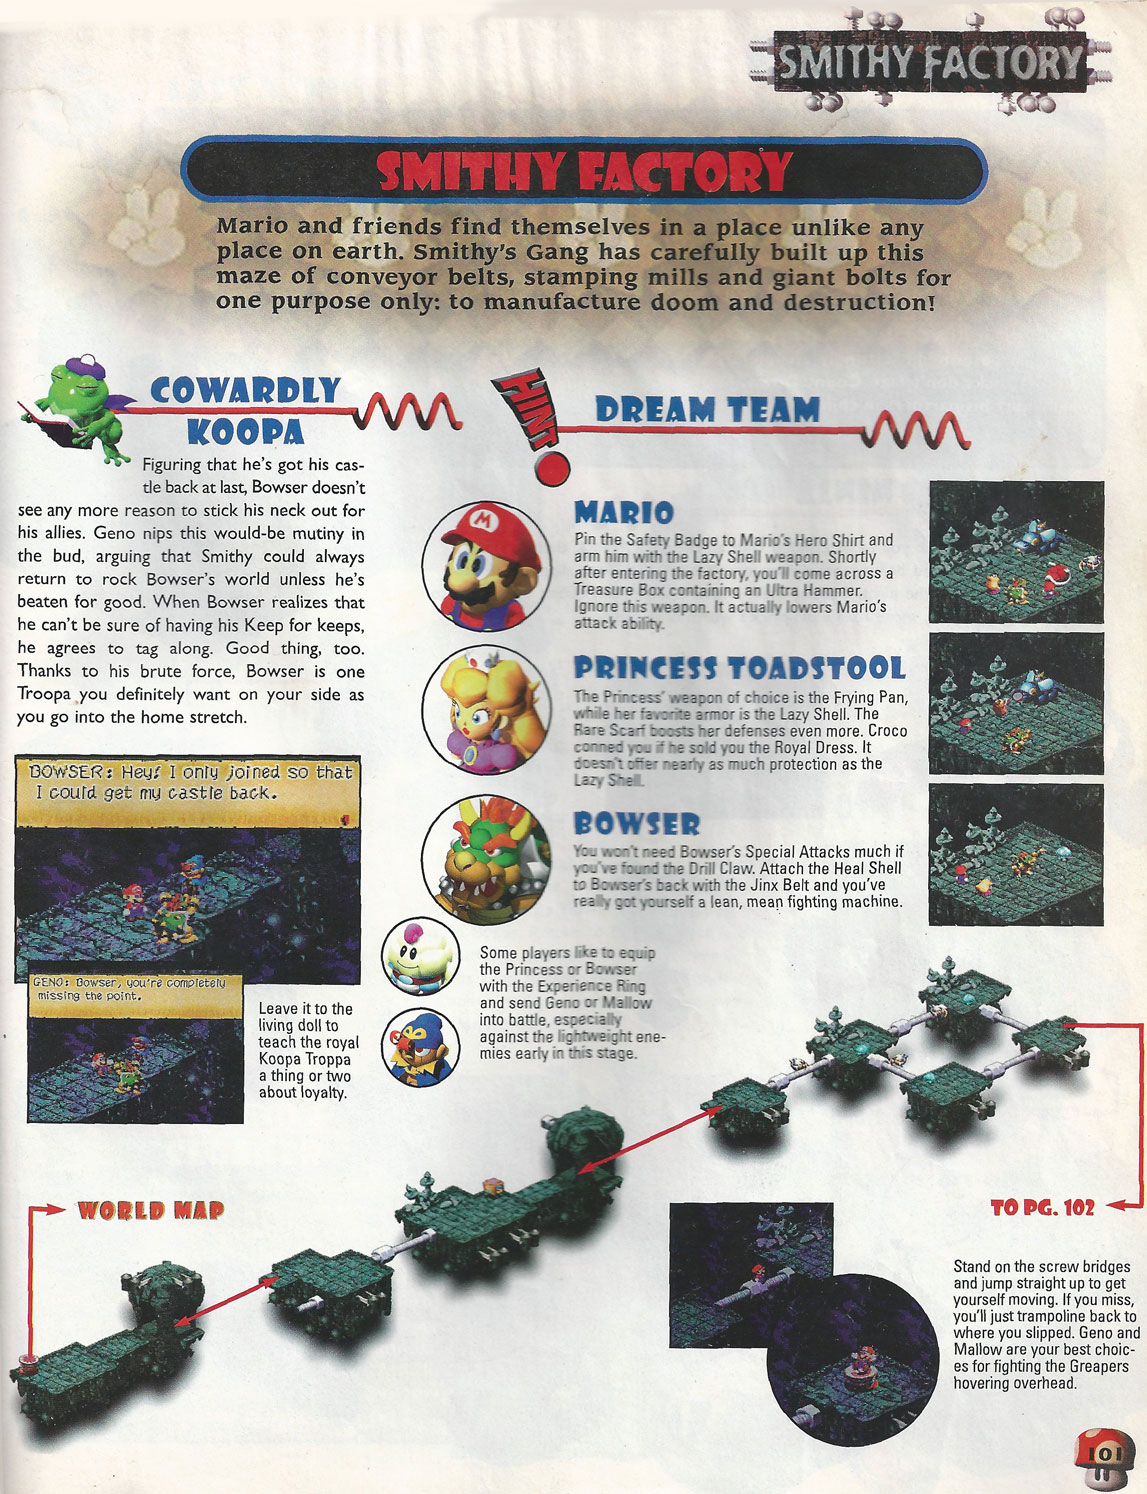 Countdown: 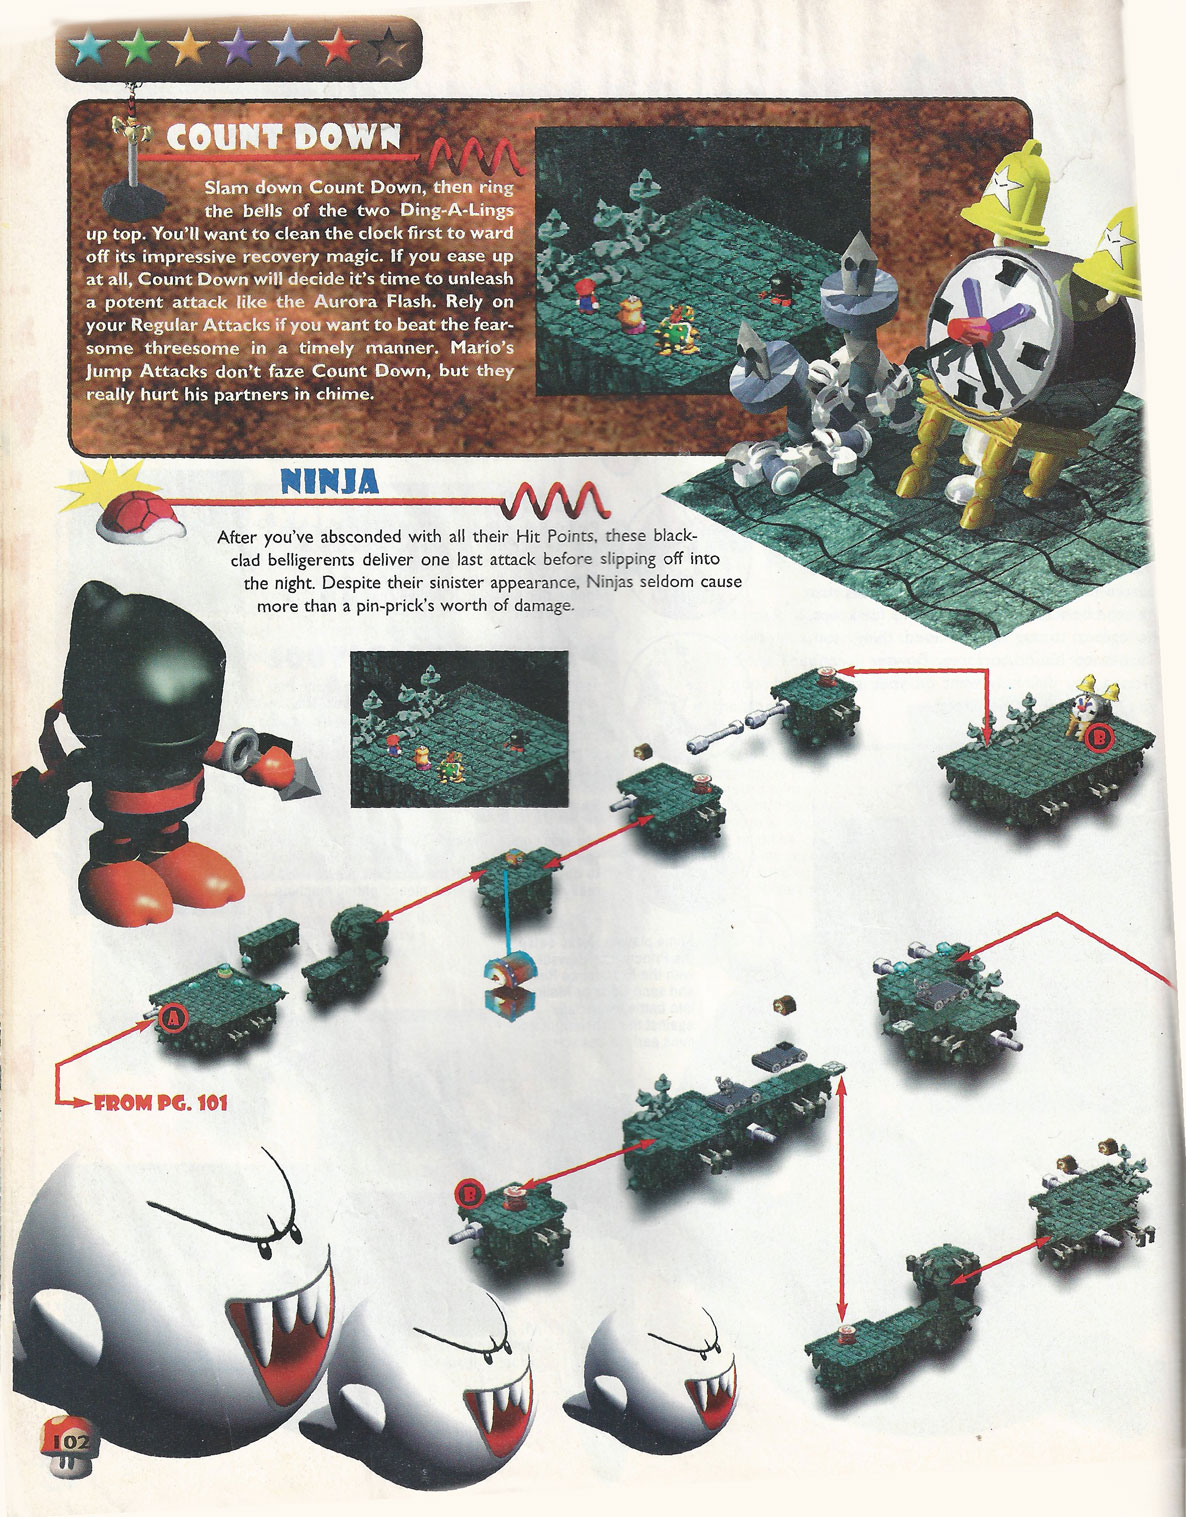
|
|
#
?
Jun 18, 2019 21:59
|
|
|
Carbon dioxide posted:Isn't that Final Fantasy IV music? You are 100% correct. Both the battle music and the victory theme are from Final Fantasy IV.
|
|
#
?
Jun 18, 2019 22:05
|
|
|
Episode 50 - Remember Monster Rancher?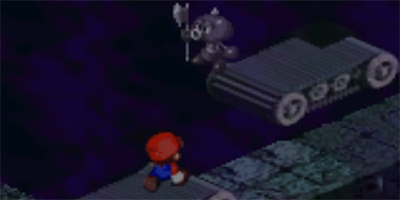 A wild update appears! I'm taking a vacation this week for the first time in like 2 years, so I figured why not finally finish this thread? We're so close! We keep trucking through the factory, and we start to see where it gets its name. Smithy is mass producing enemies, which makes for an appropriate final level from both a mechanical and thematic standpoint. As far as game design, it makes this dungeon more of a drain on your resources than previous dungeons. You can get stuck in a pattern on some of the infinite spawn screens where you're just doing fight after fight. They even mass produce previous bosses, which is terrifying until you realize how much stronger you've gotten. If you are running low on items, you can restock on some max mushrooms and royal syrups from these enemies. The Axem Rangers can drop Max Mushrooms, and the Ameboids can drop Royal Syrups!
|
|
#
?
Oct 1, 2019 13:37
|
|
|
Episode 51 - Poor Bowser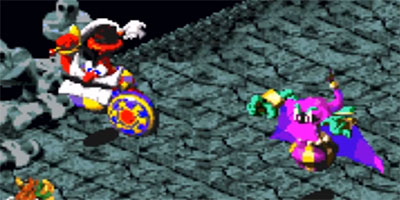 The last episode was a little lacking in boss fights, but now it's time for a gauntlet of bosses! ... Sort of. First up: Domino and Cloaker! Domino and Cloaker have a bit of an interesting fight mechanic. When one of them is downed, the other will retreat to a giant mechanical snake with a brand new HP pool, so definitely focus on one or the other first. The other interesting part of this mechanic is that the snake they run to depends on who is left standing. Domino will ride Earthlink, while Cloaker rides Mad Adder. The guide recommends taking out Domino first, but I'm not sure I agree. While Domino is easier to take down, just take a look at the stat difference between Mad Adder and Earthlink: Mad Adder 1500 HP 150 atk 70 def 90 M atk 180 M def Earthlink 2500 HP 220 atk 120 def 5 M atk 10 M def Mad Adder has 1000 less HP than Earthlink, so I would say focus down Cloaker and then blast through Mad Adder as quickly as possible. No special drops or anything from this boss, so let's move on! Before we can fight Smithy himself, we have to fight our way up the corporate ladder. We encounter 3 factory workers along the way (Clerk, Manager, and Director), with each one having a heartwarming encounter with one of our party members. The "bosses" themselves are chump change, but the scenes between them are great, especially Bowser's. Bowser gets the short end of the stick this entire game, and I've never felt so bad for a serial kidnapper. Also noteworthy, the haiku he says at the end is different in the Japanese version. The translation is: why does everyone say Mario Mario my heart is so sad I kinda like the one they changed it to personally. I like to think of Bowser as waxing poetic instead of just actually being depressed. scan for Domino and Cloaker: 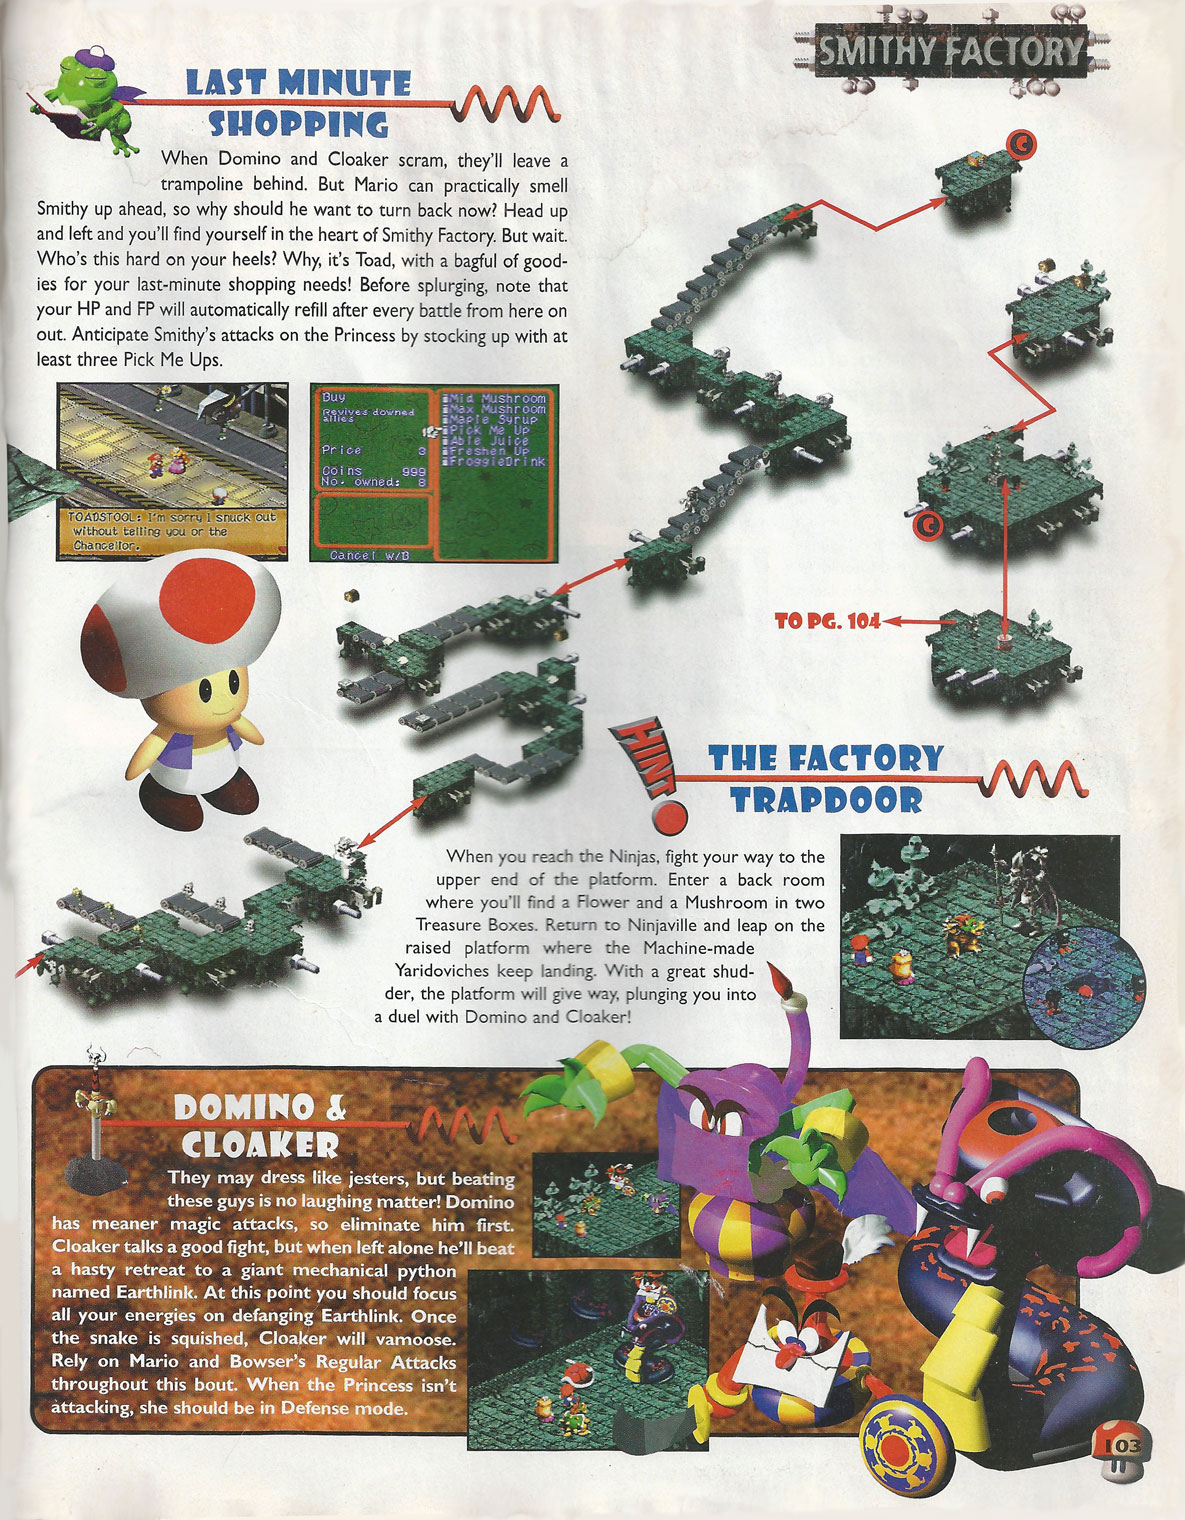
|
|
#
?
Oct 1, 2019 15:36
|
|
|
Ceraph posted:Episode 51 - Poor Bowser I always felt like this fight was a retread of knife guy and grate guy.
|
|
#
?
Oct 1, 2019 16:27
|
|
|
ikanreed posted:I always felt like this fight was a retread of knife guy and grate guy. Thematically they are very similar, but with a lot less personality. I appreciate that mechanically they mix it up with the whole Mad Adder / Earthlink thing, though.
|
|
#
?
Oct 2, 2019 19:22
|
|
|
Bowser's haiku was one of my favourite moments of the entire game, now that I think about it. This game was so funny without being self-conscious, it was great.
|
|
#
?
Oct 2, 2019 21:07
|
|
|

|
| # ? May 2, 2024 05:55 |
|
|
Episode 52 - Nostalgia Intensifies There's one more mini boss fight before Smithy: The Factory Chief and Gunyolk. At this point in the game, they should be no trouble. Gunyolk can use the Breaker Beam from the Axem Ranger ship, but it's not nearly as devastating as the last time around. There's just one thing left to do. Take down Smithy and save the Mushroom Kingdom! As expected of the final boss, Smithy has many different forms you need to get through. In stage one, focus on the Smelter first. If you've been saving up Rock Candies or other multi-hit items, now's the time to use them! This phase of Smithy only has 2000 HP, so it shouldn't take too long to make it to stage two. Smithy's true form has... uhh... several forms. When you do enough damage to his head, it will change shapes. There are four different forms it can take: normal, tank, mage, and chest. The normal head is fairly well rounded. The tank has high attack and defense. The mage has low defense and deals high AoE magic damage. The chest can deal a lot of different AoE status effects. Using Ultra Flame for the chest and the tank heads is a pretty good call (the chest is weak to fire, and the tank is neutral). Just keep pumping out damage on the head and the body and use all the items you've been bogarting and you should make through this fight without much trouble. If you fought Culex earlier, this should be no real problem. The ending cutscene for this game is just so wonderful and appropriate for this game. There's nothing particularly mind blowing from a story telling perspective, but it fits the tone of this game so well. It's just so happy and uplifting and silly and I can't get enough of it. This game has been such a journey. Every place that we've visited has been so crazy, fantastical, and unique, and looking back on it all at the end of the game just feels so bittersweet. The journey to get here was so amazing it's hard not to miss it, despite the feeling of accomplishment at making it to the end. Thank you all so much for sticking it out with me through over 50 episodes and 2 years! I apologize for how long it took me to catch up here. Life got crazy, and then the idea of catching up became daunting and I let it slip further and further. In any case, we've finally reached the end of Super Mario RPG! It's been a wild ride, thanks for coming along with me! Oh, one last thing. Here's the Smithy scan! 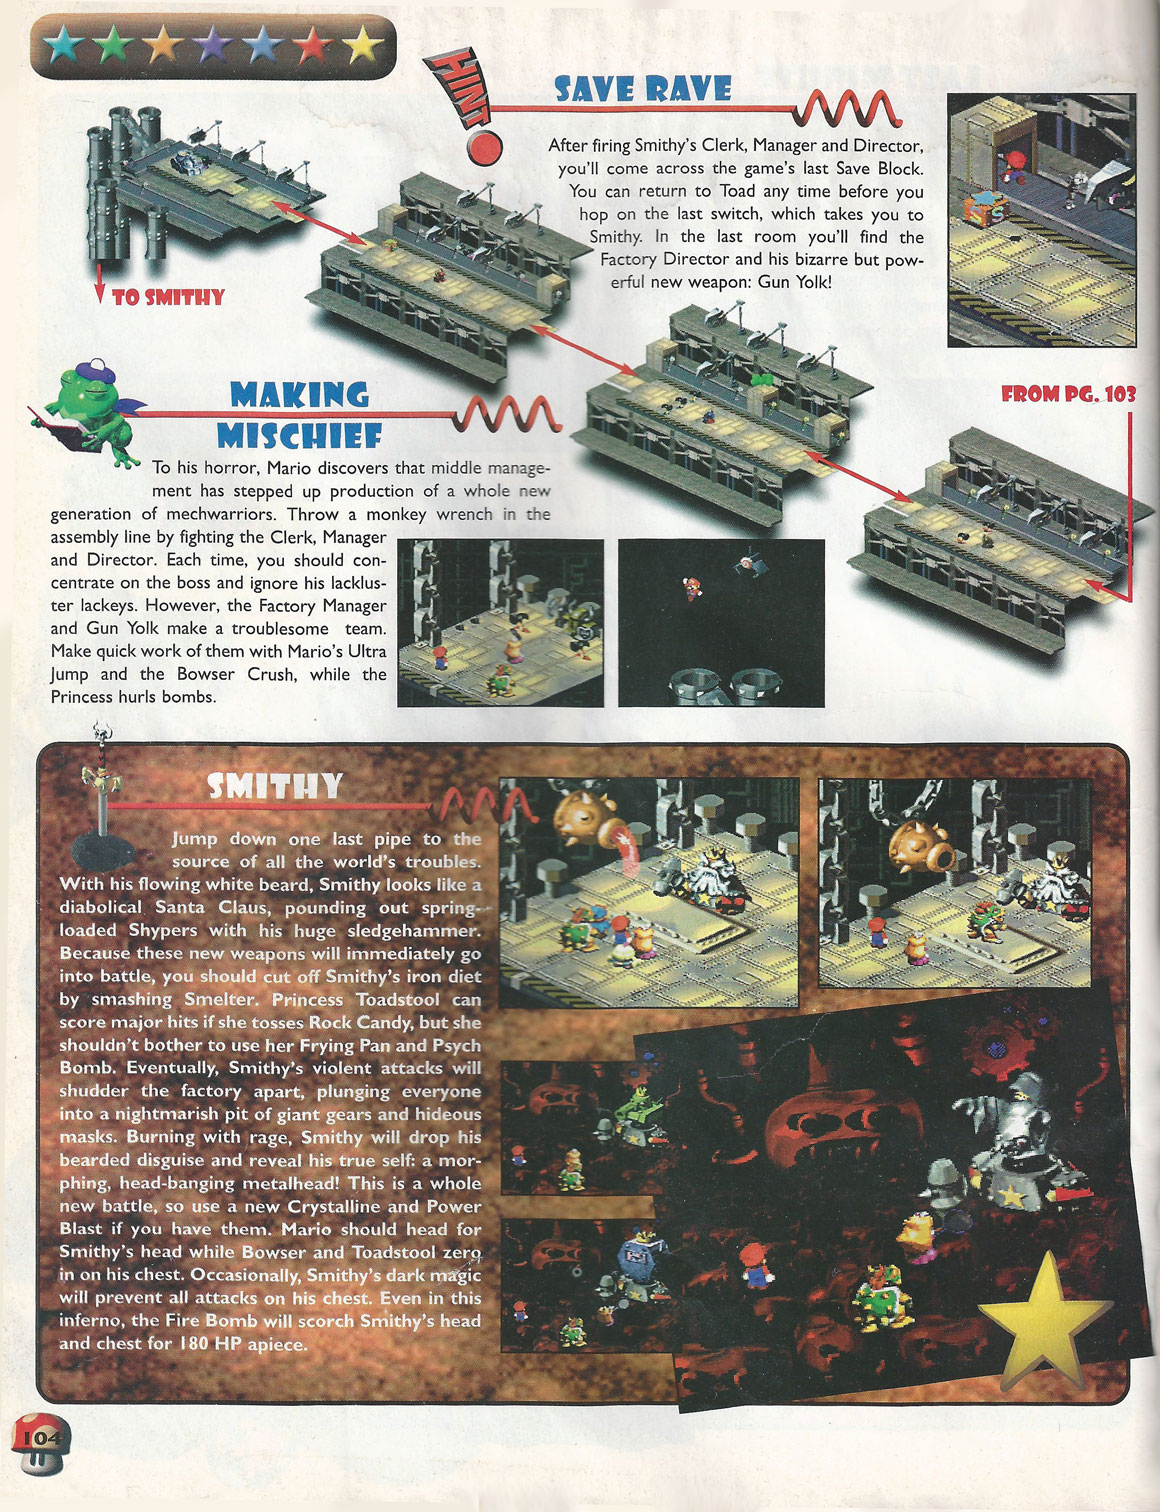
Ceraph fucked around with this message at 04:12 on Oct 4, 2019 |
|
#
?
Oct 3, 2019 16:34
|
|