


|
AKA "A rotary and its supports vehicle" In support of my entry into the TM2TW3 rally and also attempting to force myself to continue to stay active on SA, it's about time I started a thread on both long-term projects. The primary focus will be on a 2006 Mazda RX-8. This specific one is the reason my wife and I met. It was a graduation present she bought herself. There is some serious sentimental value attached to it and thus, it will never be sold and I am also incredibly reluctant to turn it into a rally-x car. Up until last summer, however, it has been a daily. 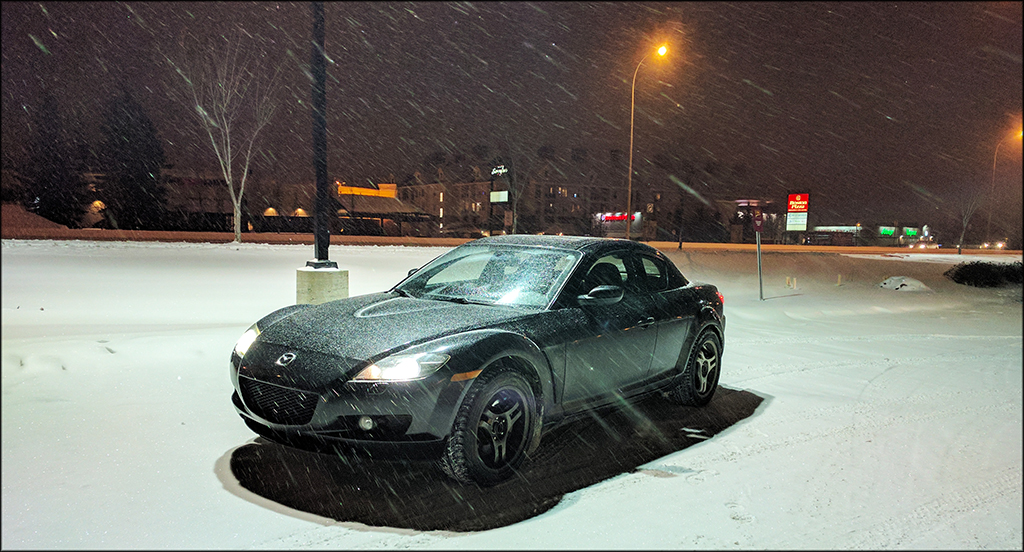 It will continue to be driven year long. Yes, those are Super Advans from my old FC being used as winter wheels. They fit perfectly (17x8 +35) and I spent way too long tracking down a set to not use them. The second vehicle is the counter-jinx to the Mazda Renesis side exhaust ports and rotor side seal failure. (More on this later.) 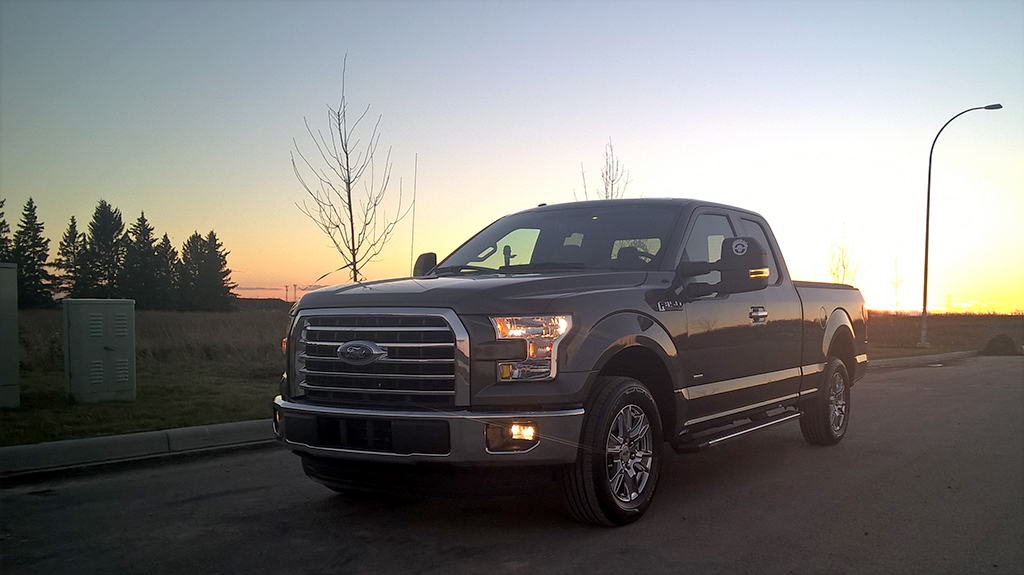 A 2015 Ford F-150 which as it turns out is basically a unicorn due to its specific options. Those being 3.5 EcoBoost, rear wheel drive, max tow package, e-locker and bench seats. I figured that if I have something that can tow the 8, it should never leave me stranded. It's worked out pretty well so far. So what are the goals for each? RX-8 Short Term
F-150 Short Term
So what's the deal with RX-8's anyway? Mazda's last rotary has somewhat of a reputation. The good: It's a long wheelbase NC Miata that seats 4. The bad: In order to pass emissions, Mazda moved the exhaust ports. This added additional heat to the rotor side seals causing premature failure. The factory ignition coils also don't last past 30k. Oh, and the oil injection system is computer controlled and was tuned incredibly conservative initially. Mazda hosed up pretty good with the 13B-MSP. Despite all of this, it made 180rwhp in a 3000lb package equipt with a Torsen LSD. The similarities between it and the GT86 are there. Especially the complaints about the chassis not having enough power from the factory. What about this one? It's almost stock. I've made a few posts previously over the years on some maintenance. At 80k km, the factory ignition system was removed and replaced with GM LS2 coils. 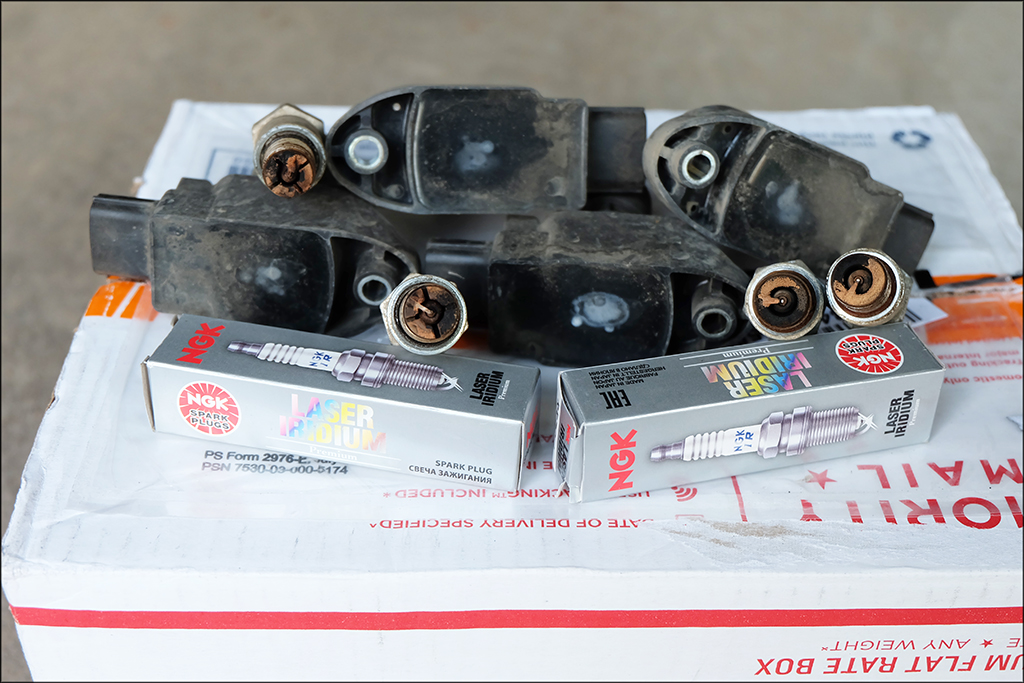 This is what a dead ignition looks like. At 90k km, the factory clutch pedal bracket welds snapped. This is an incredibly common problem on all RX-8's and has allowed some people to buy these cars for very little money. Cars listed with broken transmissions often just need the pedal bracket welded back up. This is a factory replacement bracket from Mazda seam welded preventing future problems.    At 100k km, the factory shocks were long overdue for replacement. They were so badly blown that each one was compressible by hand. The car was basically riding on just the springs. 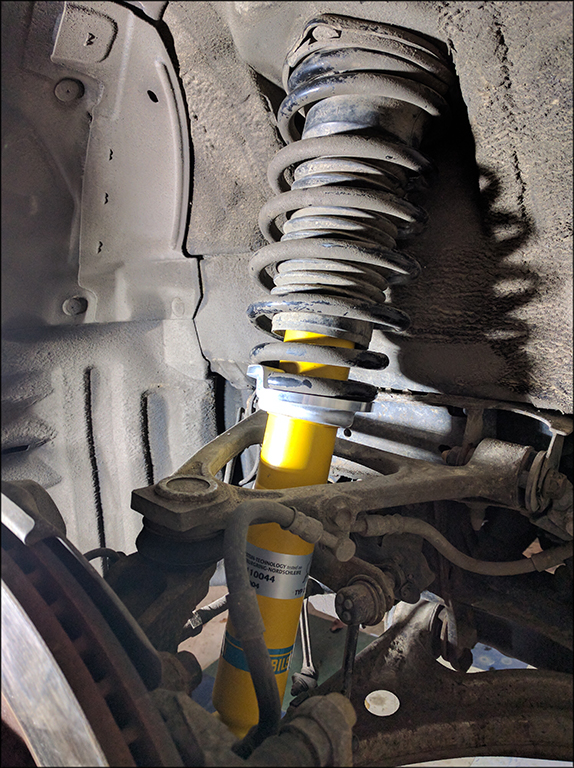 There are now Bilstein B6's at each corner. Factory springs for the moment. I am in love with this combo. Next up was a seafoam treatment. This one is a point of contention and I'll be honest. Based on how hard it is to clean the carbon off of rotors by hand mechanically or with a 4000psi pressure washer, I am doubtful this worked. It made some serious smoke, however. Step 1 is unplugging the eccentric shaft position sensor. I prefer to get at it from the top by removing the air box and reaching down between the AC compressor and crank pulley. The reason for disconnecting this sensor is that it is the only way to disable fuel and spark while still allowing the car the crank over.  Step 2 is connecting some tubing to the factory lower intake manifold ports. (With the correct restrictor nozzles in place, these two ports allow for super simple water injection additions.) 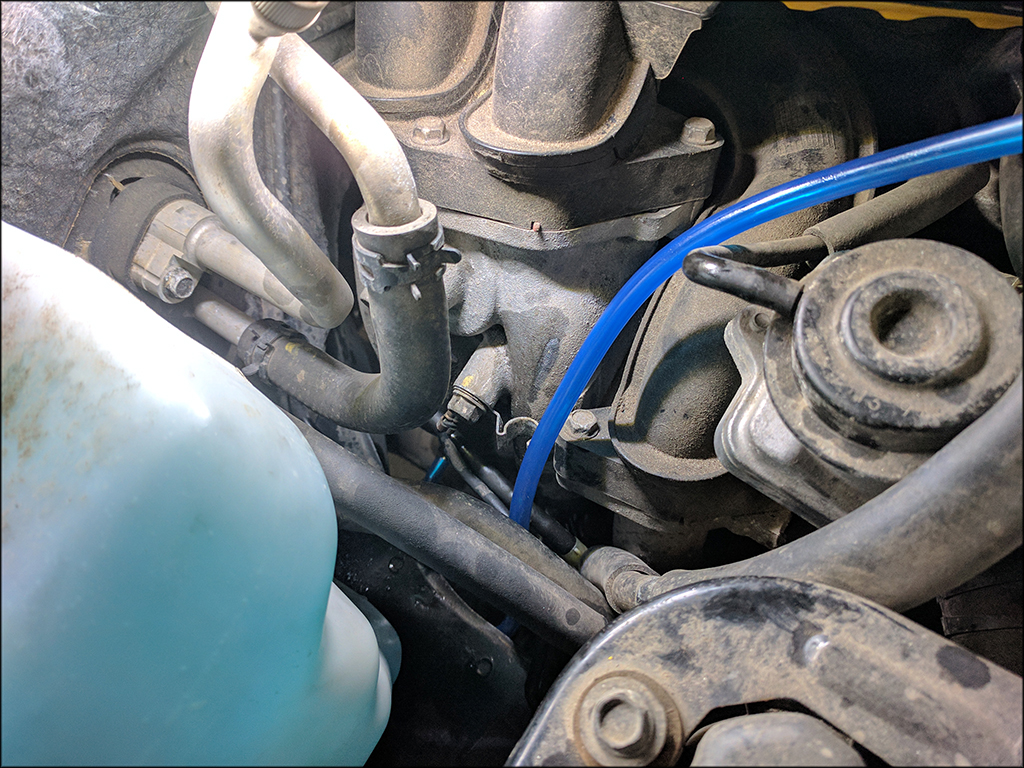 You can just make out the blue tubing in the bottom left connected to the rear LIM port. Step 3 ??? Step 4 Profit, wait, no, SMOKE! 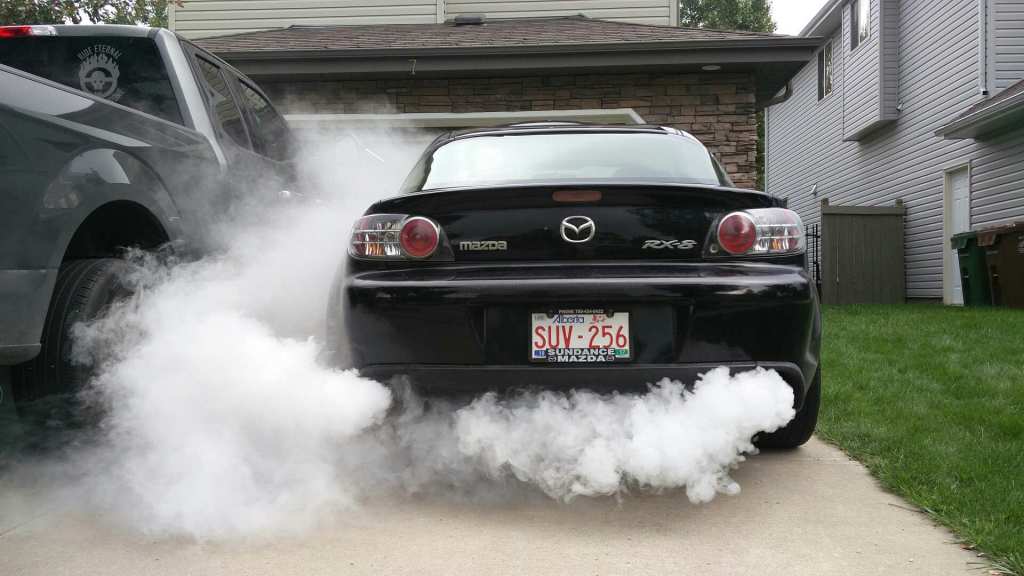 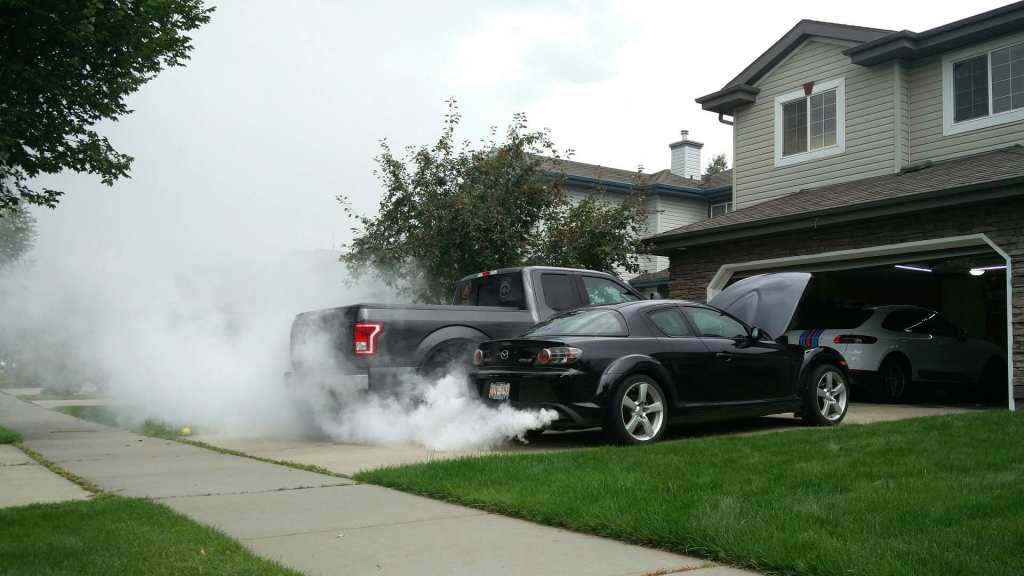 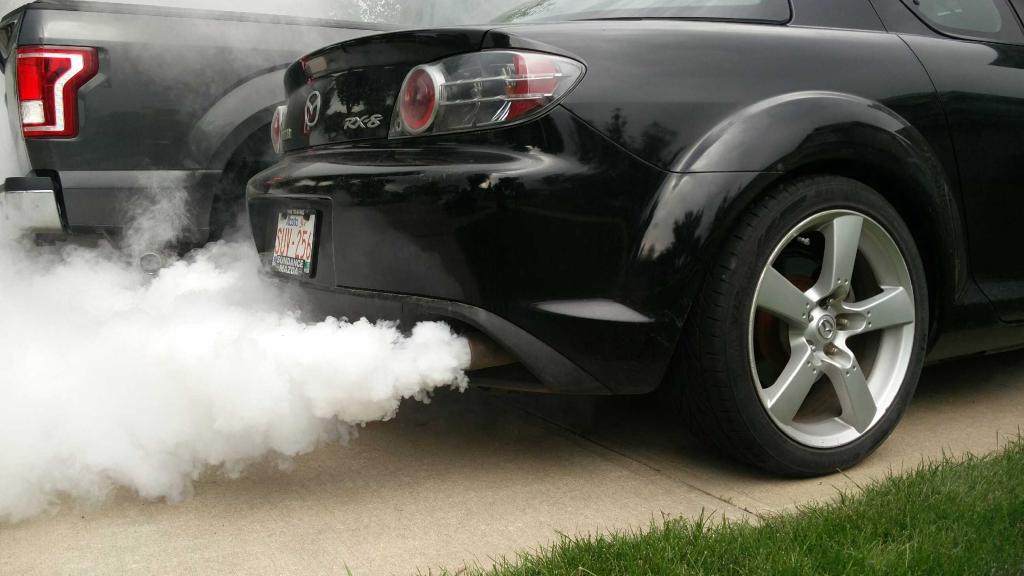 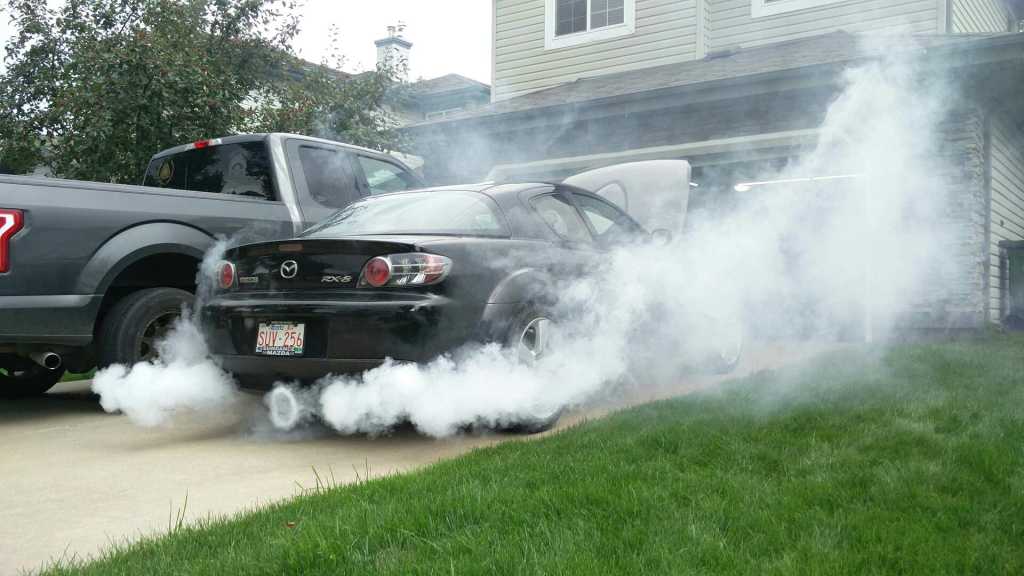 I am way prouder of that smoke ring then I should be. This brings me chronologically to now, with the 8 having 111k km on it. Sitting in the garage is a Megan Racing cat delete pipe since from the factory catalytic converters like to clog up due to the oil injection. Once that clogs, the additional backpressure and heat accelerate side seal failure significantly. Additionally, without the cat, it will shoot fire like all proper rotaries. The exhaust system bolts are soaking in seafoam deep creep right now awaiting their removal tomorrow morning. The factory muffler with the cats removed sounds quite good and isn't too loud. There's a hint of rasp and bark to it but nothing crazy. The car is also starting to exhibit significant axle hop on even soft launches, which indicates bushings are getting worn out. Replacement poly differential mount bushings have been purchased and are awaiting installation. Complete poly bushing replacements for both the front and rear suspension will be ordered from energy suspension next month. I am also hunting for a pair of dead engine mounts for an arts and crafts project.The factory engine mounts are oil filled and the rubber holding that oil in likes to crack when exposed to the elements and time. If you drain the oil and replace it with 90 shore urethane, you can make some decent replacement mounts for cheap. I have the 2 part urethane already. If I don't find a set of engine mounts soon, I'll remove the ones from the car one at a time over the course of a weekend. Additionally, I should order new brake lines soon. The factory rubber lines are original. (The pads are Hawk HPS which were replaced at 65k.) Yesterday I won an auction on Yahoo Japan for a factory miniDisc head unit. Hopefully, it will arrive before the TM2TW rally so that I can bring my Eurobeat collection with me. I also have a Tactrix Openport 2 OBD2 interface cable on the way to work in conjunction with my copy of MazdaEdit. This software allows me to edit all the factory ECU parameters and disable CEL codes. Like the one that will be generated by not having a cat. I can also bump up the oil injection rate and play around with the deceleration fuel trim tables to try and blow up the factory muffler. You mentioned something about slamming something? In my twisted mind, I think of pickup trucks as high COG muscle cars. They're body on frame, have big engines and can be RWD. Since I am surrounded by Brodozers, I must lower it. It also helps my dog get into the truck easier and makes the bed more useable since I no longer will have to lift things up into it. Currently, there is a 7" wheel gap between the front tires to fender lip and a 9" wheel gap between the rear. The footprint is already 3" wider than stock in the summer thanks to a set of Method Roost wheels: 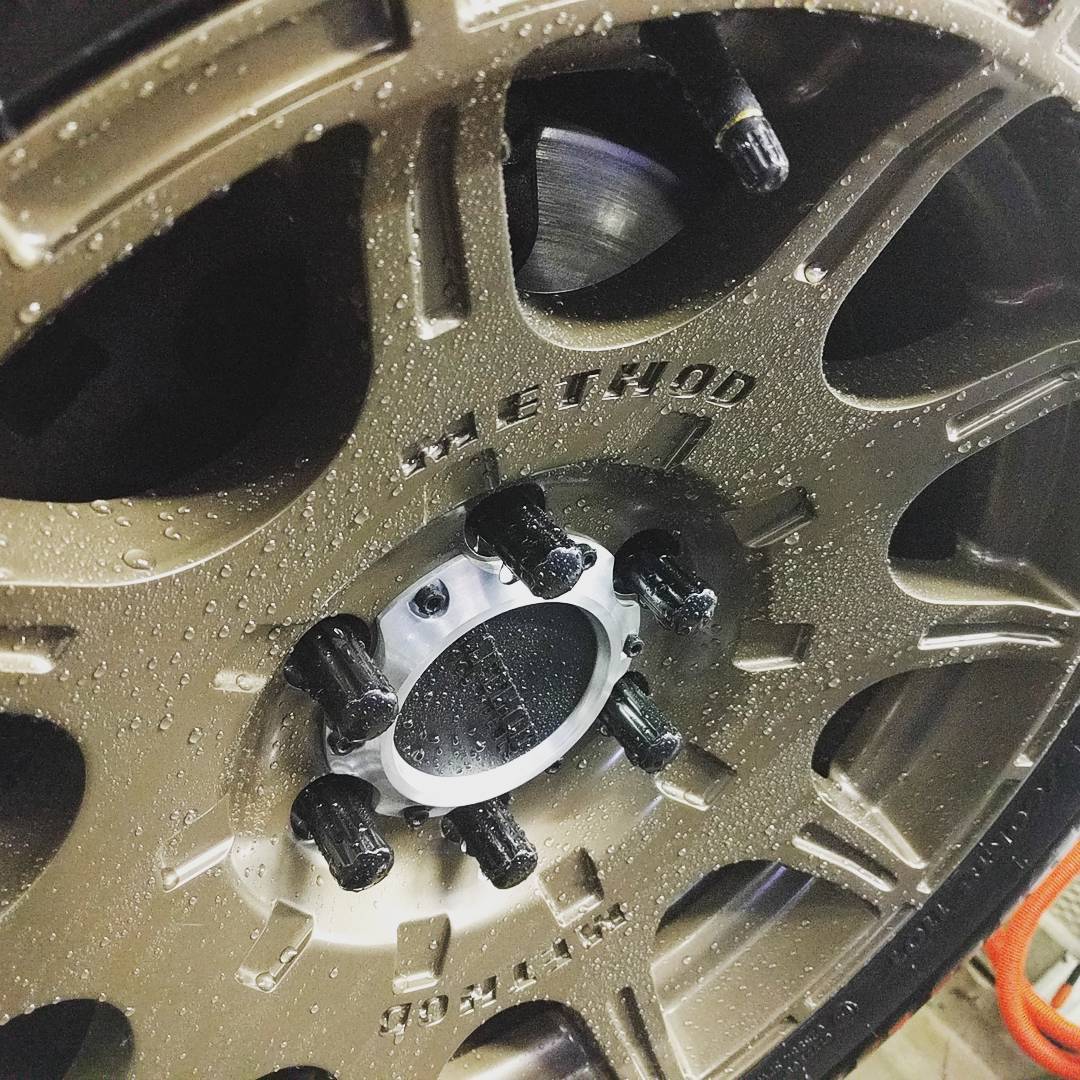  That qualifies as cheeky, right? I plan on taking a two-step approach to lowering the truck. I already have lowering spindles and an axle flip kit. Problem is that in support of the axle flip, I need a single piece driveshaft. This is due to the overall length required is now shorter and the input shaft bottoms out in the transmission and that the factory carrier bearing and it's related angles get totally messed up. Additionally, A C-Notch is required to regain useable suspension travel. So in the meantime, I have a Ford Performance lowering kit ordered (which is really just a rebranded GroundForce kit). This includes lowering shackles for the rear, which in conjunction with removing the factory spring/axle spacer block, nets a 2-2.5" drop and 1.75" lowering springs for the front, gets me started. I'll be combining that with Bilstein B8's next month. I could have done everything all at once but then I would have had zero funds to spend on the 8. So stay tuned for continued updates! Edit: Images rehosted. McTinkerson fucked around with this message at 03:46 on Apr 11, 2019 |
 #
¿
Apr 14, 2018 05:56
#
¿
Apr 14, 2018 05:56
|
|


|

|
| # ¿ May 10, 2024 07:41 |
|
|
I would like to dedicate this post to Seafoam Deep Creep. You have my undying love. The following was completed in Fifteen minutes. Not a single bolt or hanger was difficult. This car has lived in Alberta it's entire life and has been driven through every winter as a daily up until 2017. It was still driven through the winter of 2017/18, just not every day. 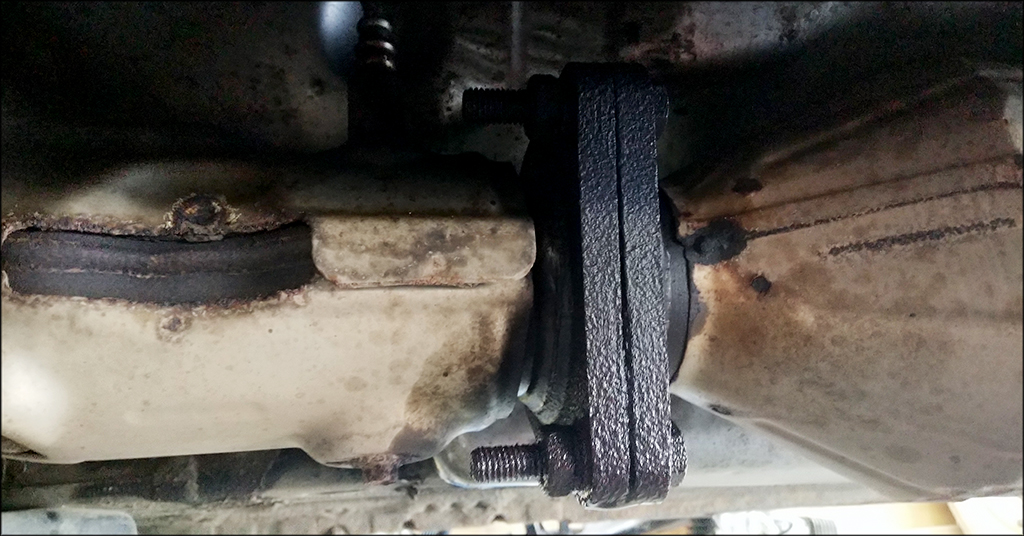 Header to Cat flange, soaked in seafoam. (17mm nuts and bolts for reference)   Ditto for the rear O2 sensor and mid-pipe flange. (22mm head on the O2 sensor, open-ended wrench was all it took. No extensions to break torque required.) Motorcycle cable lube works incredibly well on the rubber hangers.  This thing is heavy. Best guess, 20kg or so. Maybe a little more. Zero broken bolts or nuts.No visibly cracks or holes anywhere.  Front O2 and factory header looks fine, definitely got toasty. I obviously fired the car up on open header. This summoned over both immediate neighbors, terrified all pets and children and unfortunately required shutting it off sooner rather than later. Or else there would be video. It was glorious for the 30 seconds it was running, however.  Old and busted vs new hotness. 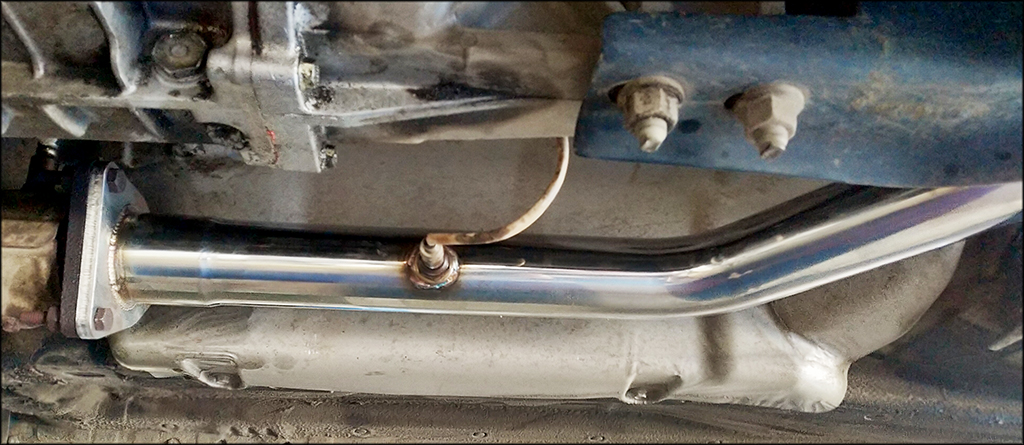 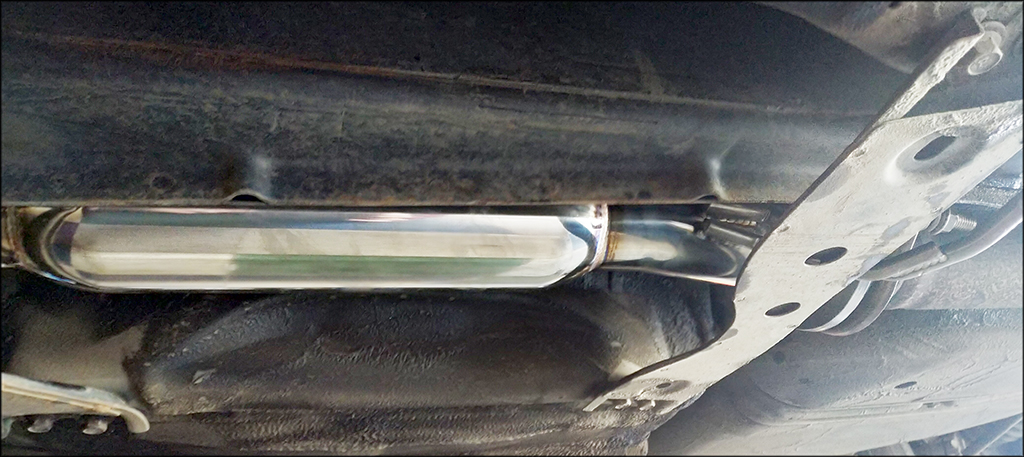 New pipe is in and everything lined up perfectly, leak free. Now to go rip this thing around while shooting flames on every shift. Further developments: MazdaSpeed CAI acquired. Used but that's A-OK. Edit: Images rehosted. McTinkerson fucked around with this message at 03:53 on Apr 11, 2019 |
|
#
¿
Apr 17, 2018 02:59
|
|
|
the spyder posted:Have you read about the Speesource RX-8's - the factory intake is tuned so well that they left it stock on their track cars. It's made me question CAI's on 8's ever since. I am 100% convinced that the AEM/MazdaSpeed CAI will lose me power over the stock intake. The reason for it is engine bay thermal management. With the removal of the stock airbox and the eventual relocation of the battery to the factory washer fluid reservoir location, I hope to be able to reduce engine bay temps by allowing the radiator fans to work more efficiently in conjunction with a vented hood. Currently, the battery and air cleaner box direct all the air down and out through the bottom along either side of the engine. On the subject of the Speedsource RX-8's, I will post my Sevenstock 13 pictures once I get some more time. Pretty sure I have pictures of the whole fleet.
|
|
#
¿
Apr 19, 2018 23:29
|
|
|
Powershift posted:I have similar fitment on my f-250, although i run them through the winter and have a rock chukin tread, but it has basically sandblasted the inside lip of my fenders. Trucks with factory 20s get those barely noticeable plastic fender flares. If it was me, i'd just get a roll of that 3m clear film, and run it round the painted portion of the inner fender. That is an excellent idea. I've had the wheels for two seasons now and the inner fender lips so far show no signs of sand blasting, however I should do this anyways. Minor update, no pictures yet. Summer wheels are back on the truck. I lost a center cap some time last fall. Need to order a replacement. Stainless braided lines are ordered for the RX-8 and the MazdaSpeed CAI has been cleaned and is awaiting installation. In support of the JPS livery, I want to paint the factory wheels. Top two choices thus far are Duplicolor Metalcast gold or Duplicolor Effex Black with a gold rim tape lip. Should be able to make some more progress this weekend. Planning on CAI installation and getting at least one wheel painted.
|
|
#
¿
Apr 25, 2018 16:24
|
|
|
Home ownership is fun! Zero time to work on any vehicles this past weekend. Did get a little bit completed throughout the week, however.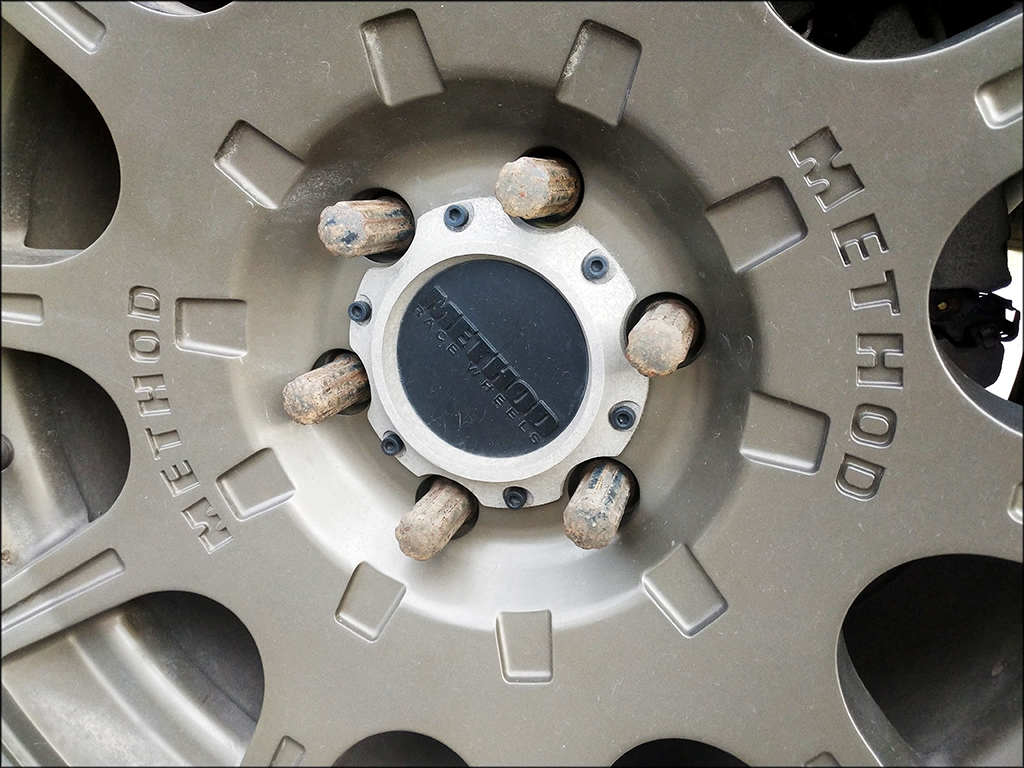 These were the lugs I bought with the Method wheels two years ago. They have been through one winter. What the gently caress? They were supposed to be powder coated. 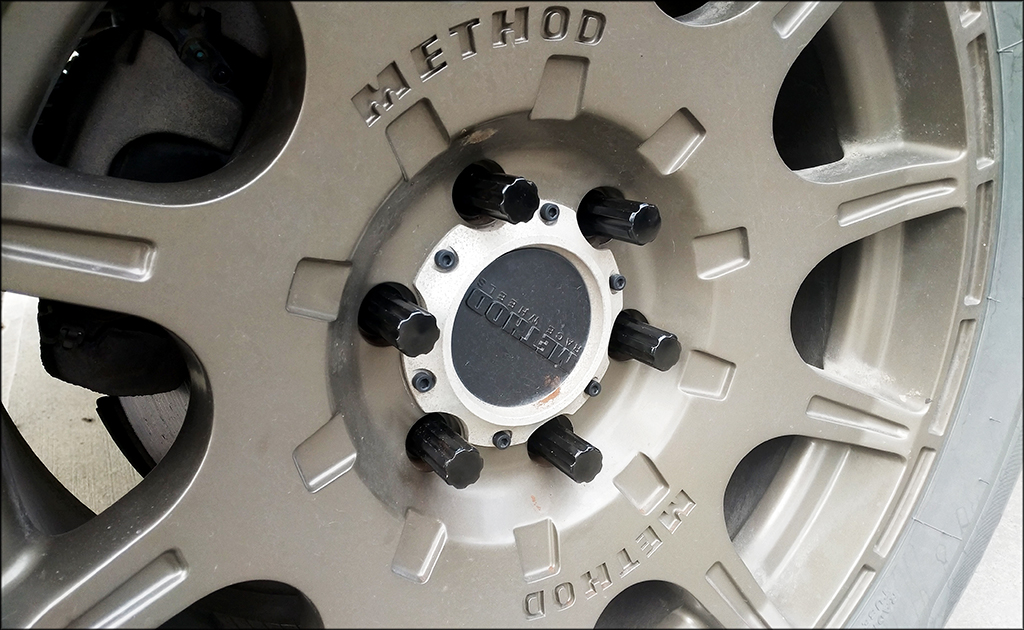 These are the new set ordered off eBay for half of what the previous set cost. 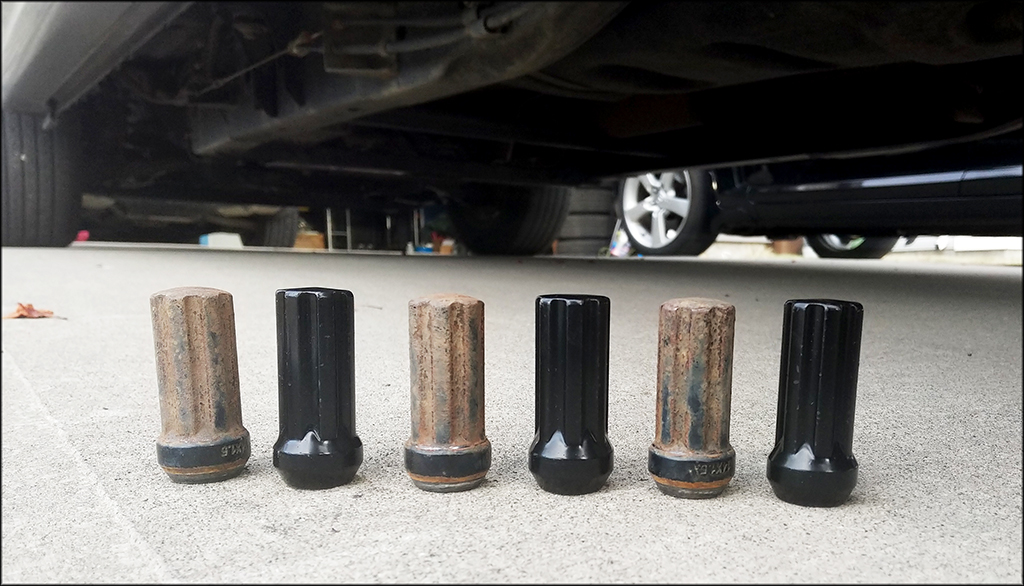 Old vs new. I will never be giving ProComp money again. 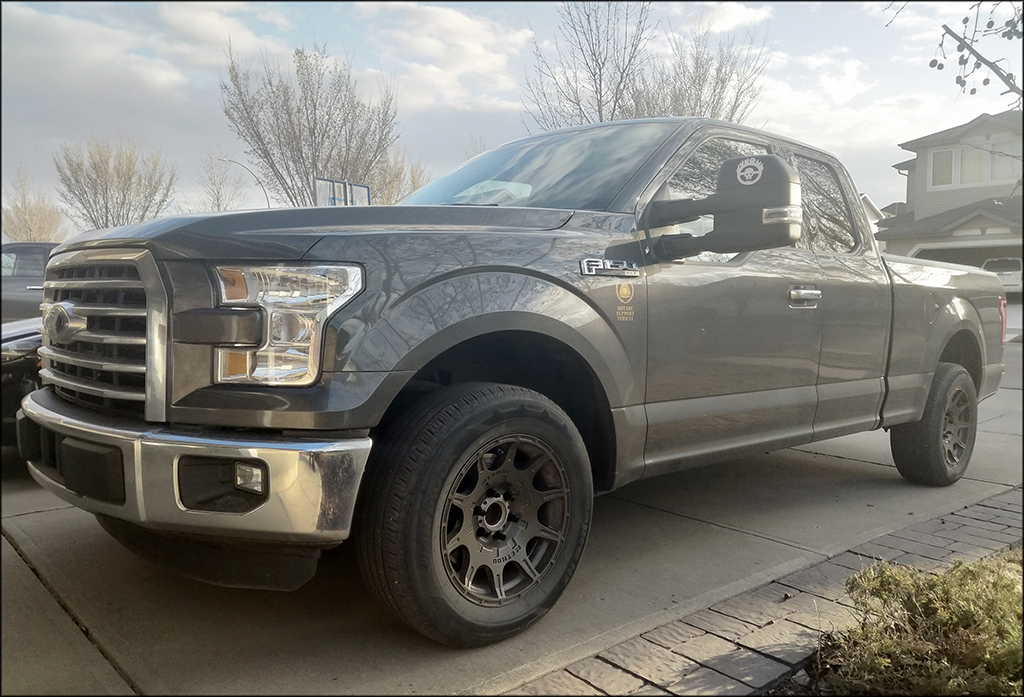 I also cannot find a place to order a single center cap in Canada...eBay has nothing and Method will not sell directly. 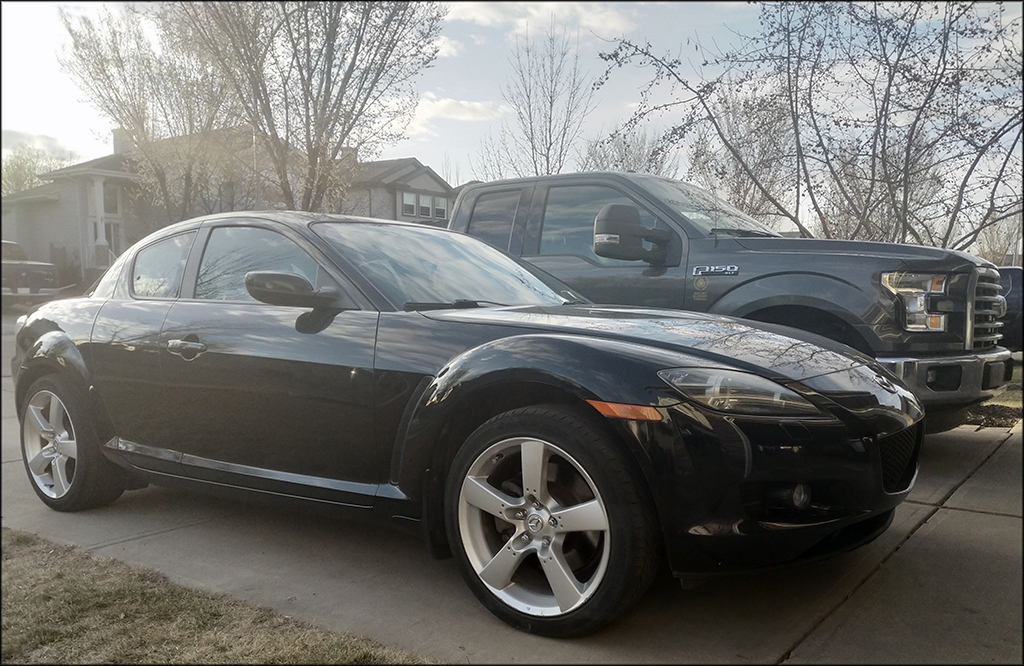 Summer (aka stock) wheels are also back on the 8. Maybe I'll have time to paint a pair of wheels this weekend. DoritoPower is coming over on Saturday and we're doing a full cut and polish on the paint in prep for the JPS livery. Does anyone know where I could find vector files for the JPS crest/garland logo? 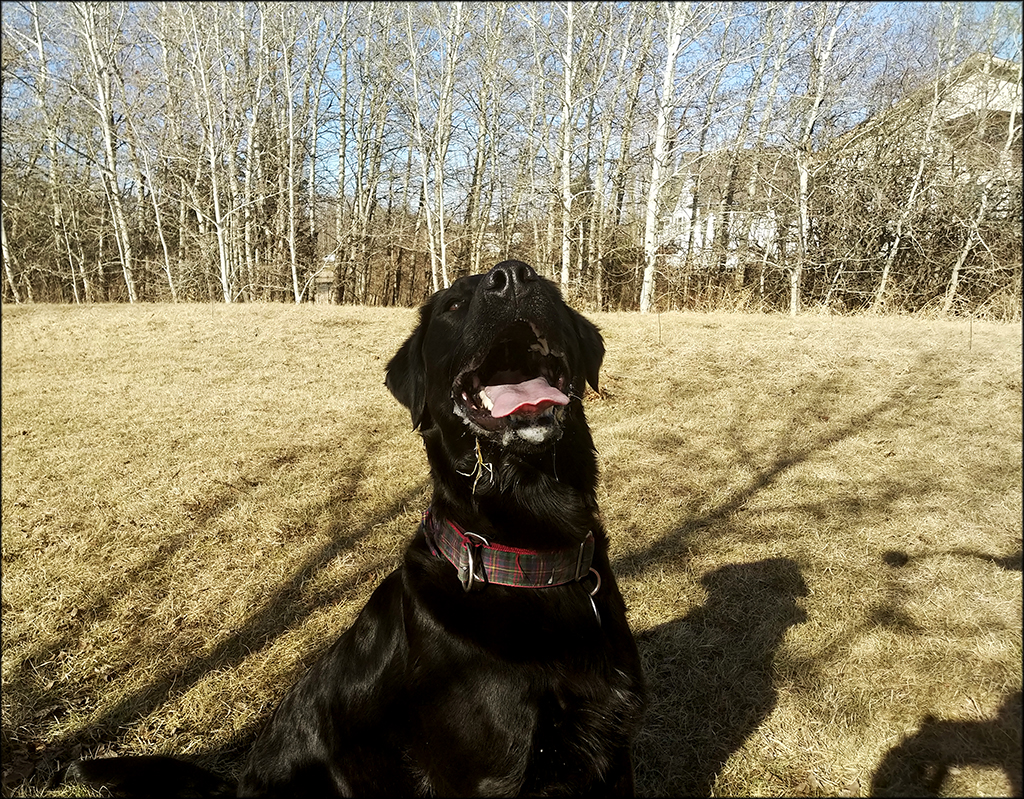 Clarke really wants to know. Edit: Images rehosted. McTinkerson fucked around with this message at 03:55 on Apr 11, 2019 |
|
#
¿
May 4, 2018 03:51
|
|
|
iwentdoodie posted:I thought those lug nuts were corks at first and got very confused. Yeah, it is absolutely reddiculous how bad they are. ProComp didn't care when I sent them the pictures either. RX-8 update: Paint work has been delayed due to DoritoPower having access to a lift in under a month which will save both of our backs significant stress. All recalls on the 8 are now also completed. Passenger side airbag and new fuel pump assembly installed by Mazda. Turns out that while it's only the fuel pump cradle outlet pipe that needs replacement, Mazda gives you an entirely new assembly. So I got a free new fuel pump. The to do list now is as follows: 1) Complete removal of air pump assembly. This will require the creation of a block off plate for the exhaust manifold fresh air injection point. Luckily I kept Sweet Chili Heats original hood. 2) Installation of the Mazdaspeed CAI. This requires removal of the front bumper making it a 4-ish hour job if I take my time. 3) Paint the factory wheels gold. Problem is which gold? Going to try and paint one wheel this week with metalcast gold and see how we like it. 4) Install the poly differential mount bushings. This is apparently a royal pain in the rear end due to the location of the bracket and the usual bushing removal shenanigans. 5) Install the full energy suspension front and rear bushings kits. Ugh.
|
|
#
¿
May 6, 2018 19:34
|
|
|
Ask me how I added 15 hp to the RX-8 in 5 minutes. Been saving this one for a while now. 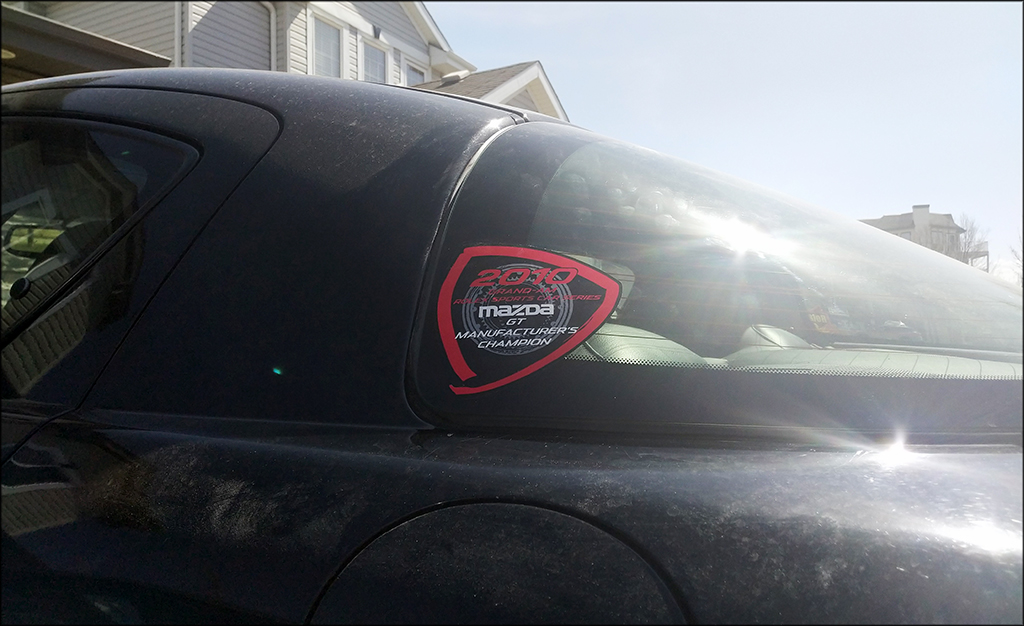 The last Sevenstock 13 souvenir.  Rotary13B1 will also be getting more money from me soon. Overnight parts from Japan showed up:  Buyee / Yahoo auctions Japan is loving dangerous. This was $5. I almost bought another set of 17x8 Super Advans for $100. No, I did not forget a zero... The plan is to only use the miniDisc player and MD bezel trim piece. Also going to retrofit a Bluetooth unit to the factory radio as well. Tuning cable to allow modification of the factory ECU has arrived:  All the bushings!  I am currently planning on painting each part gold that is getting new bushings... McTinkerson fucked around with this message at 03:56 on Apr 11, 2019 |
|
#
¿
May 11, 2018 02:32
|
|
|
I am not sure if the radio component of this unit can be modified to shift the FM band. I don't particularly care, however, since Mazda was smart enough to build the unit in a modular fashion. So the CD player, Radio, and MD player are all different physical units. All I have to do is bolt-in the MD unit and replace the blank bezel with the MD version. I already have the entire Eurobeat / Initial D soundtrack spread over a dozen miniDiscs, so I think I'm good. A little more progress was made this weekend. I made a mistake last year and assumed that all synthetic GL-4 gear oils are created equally. That is not the case. The Aisin transmission in the RX-8's HATES Amsoil. It also hates Royal Purple and barely tolerates Motul. Mazda Factory oil, Idemitsu or Redline only. So in went Redline MT-90. Group wisdom indicates that this should suffice. I was also able to carve out enough time to paint two of the factory wheels.     Duplicolor self-etch primer, Duplicolor Wheel Gold, Duplicolor Effex Clear. The Effex clear is drat near impossible to photograph if you don't hit each wheel with a full can. Under direct sunlight, you can see tiny rainbow flecks.   The rest of the time this weekend was spent keeping this little monster busy. Edit: Images rehosted. McTinkerson fucked around with this message at 03:59 on Apr 11, 2019 |
|
#
¿
May 14, 2018 02:00
|
|
|
the spyder posted:Good color choice. Almost immediately after switching to Amsoil, 4th gear would grind above 4k rpm and second gear would grind above 6k. The syncros were very very unhappy. Seat Safety Switch is correct on the Effex getting blown out when used over top of any other metallic paint. I'm planning on hitting the stock chrome wheels on the F-150 with a can of Effex each before next winter, which should work much better and also be fabulous.
|
|
#
¿
May 14, 2018 14:24
|
|
|
mekilljoydammit posted:... since I have no idea where to start with radio stuff, is there any combination that would let me have a bluetooth connection from my phone to the RX-8 radio without it looking like poo poo? I'll be adding one of the eBay Bluetooth units that piggybacks off of the 6 disc CD changer head unit inout to mine when I pull it to add the miniDisc unit. I'll let you know how it works out and if it is worth it. In other news further reenforcing that us rotards have significant masochistic tendencies, as soon as the RX-8 was back on it's newly painted gold wheels ( pictures will be added later today ) with fresh transmission fluid, the Secondary Shutter Valve (SSV) finally got stuck. I was waiting for this to happen since the car has 112k on it and Mazda like all other manufacturers vents the crank case into the intake. The SSV is as a portion of Mazdas version of VTec that they have been employing on all N/A rotaries since 1985. Including in a slightly modified form on the LeMans cars. So I will be cleaning that tomorrow, reality willing.
|
|
#
¿
May 20, 2018 19:14
|
|
|
Brigdh posted:Did you have a good test for that? I'm wondering if I need to do mine (not looking forward to doing it) Mine is stuck open right now, which creates a constant 1-second interval ticking at idle. It also affects idle quality significantly. It wants to stall if the revs drop too quickly since there is way more air going into the engine than there should be. RX-8 Club has a pretty good write-up in the DIY section that has been refined over 10+ years. ( https://www.rx8club.com/series-i-do-yourself-forum-73/diy-troubleshoot-intake-valves-174009/ ) It might also be my VDI valve stuck, I was planning on cleaning all of them and I should probably add a catch can while I'm at it to prevent the issue from ever occurring again. Here is what the 8 looks like now with it's newly painted shoes:   Gold Chrome pinstriping vinyl is ordered to start on the JPS livery. Edit: Images rehosted. McTinkerson fucked around with this message at 04:00 on Apr 11, 2019 |
|
#
¿
May 20, 2018 20:14
|
|
|
Good news and bad news time... It's not any of my intake valves or their respective solenoids which are stuck/failing/broken. Every single one of them moves freely and the solenoids all check out. It's the purge valve solenoid. Which was already replaced in 2015. I remember doing some homework when it failed the first time and there's no way to delete it, so looks like I'm ordering another one. I'll have to check and see what the warranty is like on it. I suspect that it has expired. Still going to start pulling the front bumper in support of the Mazdaspeed intake installation. Air pump and injection tube is now fully removed as well. Passenger side of the engine bay has much more space now. Edit: Phone posting errors removed McTinkerson fucked around with this message at 23:01 on May 21, 2018 |
|
#
¿
May 21, 2018 21:11
|
|
|
Seat Safety Switch posted:Is it the evap purge valve? I have a spare Subaru one lying around here and I'm pretty sure it also fit an NA Miata when I was looking at it last. It is the evap purge valve. The part number is Z504-18-741A, which based on cross reference is what miatas use as well.
|
|
#
¿
May 21, 2018 23:11
|
|
|
Megapost incoming. E/N bullshit first: I have hesitated on posting this and still feel like poo poo but gently caress it; I was laid off on June 5. My project canceled and the entire department shut down. Which is why I dropped out of TM2TW3. I at this point am not employed. Luckily have another 2 months worth of expenses covered. Two interviews lined up next week (both second interviews for both positions.) and am still actively hunting. This does mean that I am basically on a spending freeze. I have been "working" 50+ hours a week upgrading (skills, certs, portfolio, etc.) and job hunting. Some progress on the fleet was made none the less. These will be in chronological order. So where did we leave off? Oh yeah, the purge valve solenoid. Pick N Pull to the rescue (courtesy of Row52). Mazda used the same solenoid from 1996 to 2008. Four Protege5's donated theirs for $12 all in. A single new aftermarket one is $80.  All passed the resistance test.  So in the "newest" one went. I have since cleaned the engine bay. Ticking went away and idle has been restored. As long as this one lasts as long as the aftermarket replacement purchased two years ago, I'll be ecstatic. Next up were the brake lines ordered back in early May. Togue Tuning out of Ontario has a house brand of stainless braided lines that were $120 shipped to my door. A solid $20 cheaper than any competitor prior to currency conversions. I did not get a single picture of the old lines or the new front ones...I am really bad at taking pictures. Primarily due to time constraints and focusing so much on the task at hand that I just plain forget. (SeatSafetySwitch wasn't joking when he's called me the ADHD poster child in the past.) So here are the new rear lines. 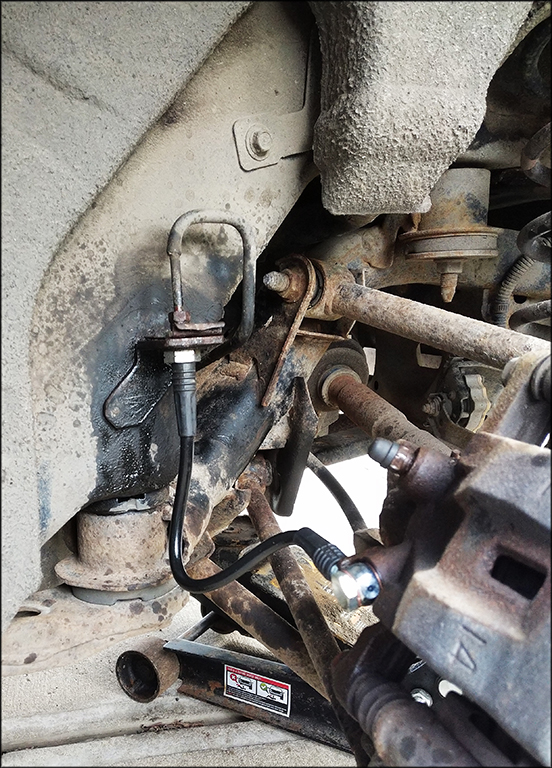 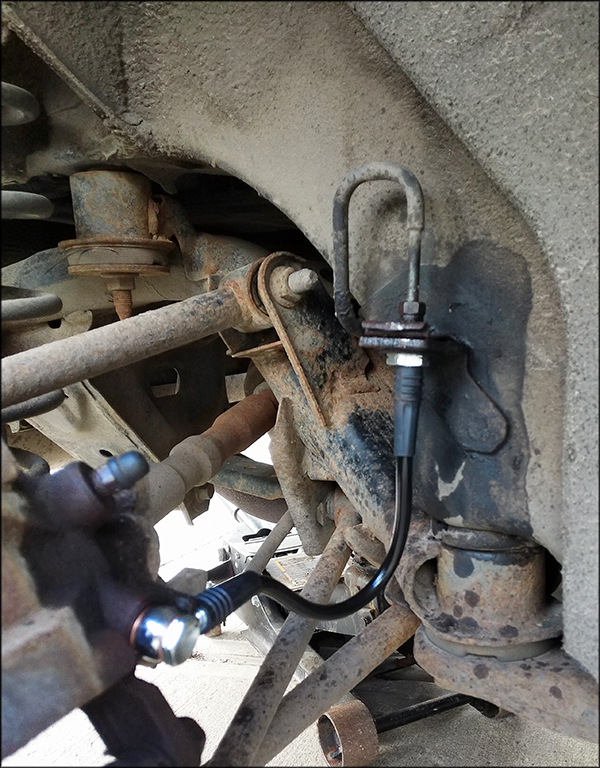 Brakes feel noticeably firmer. Old fluid in the lines wasn't as bad as I was expecting either. They were however original with 112k km on them. Following the brake lines is/was the Mazdaspeed/ AEM intake. This required removal of the front bumper cover. Of which I once again do not have pictures, so I'll just link to the AEM installation instructions for those curious. ( https://www.aemintakes.com/instructions/AEM-21-485_inst.pdf ) 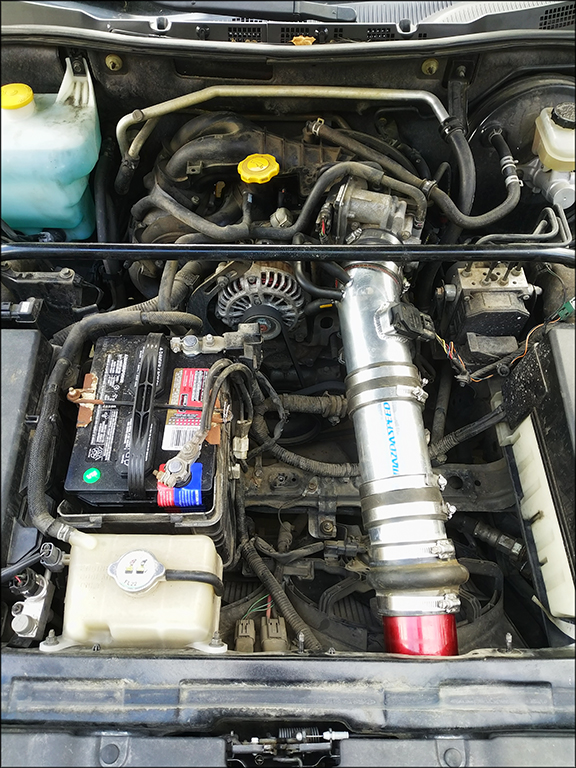 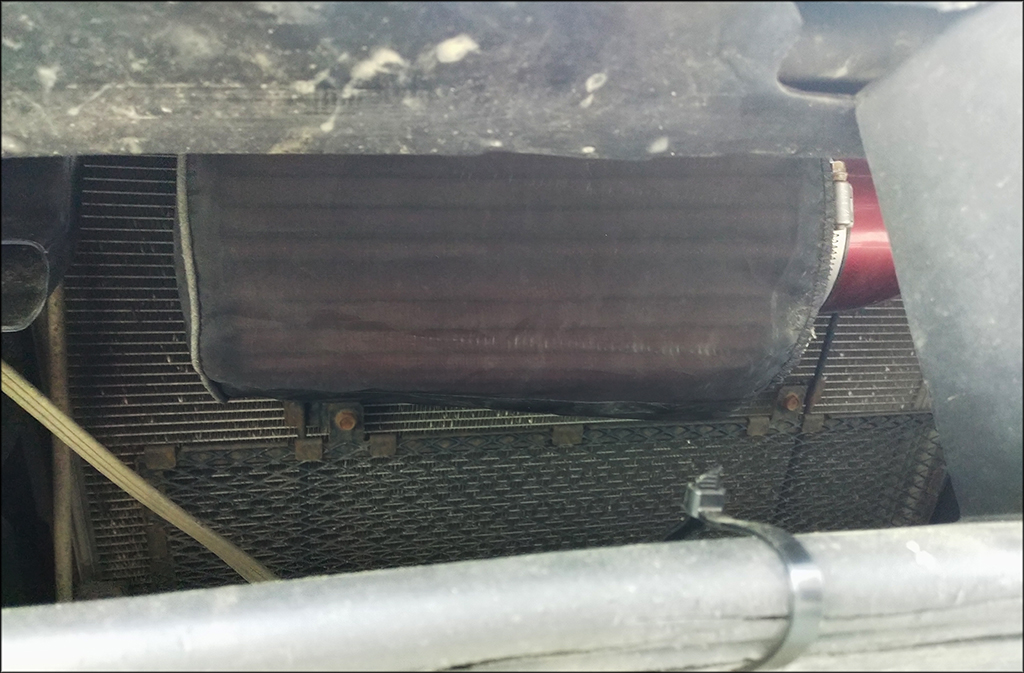 The goal of this part was primarily heat management. The factory airbox block/re-directs all radiator airflow down and under the engine. Now the driver's side fan is not blowing directly onto the bottom side of the airbox. On its own, this does very little, however in conjunction was a vented hood, temperatures drop measurably. I have probably lost a few HP across the entire rev range right now since the factory airbox and variable fresh air duct are so well engineered. The intake now sites behind and underneath the front bumper impact bar. The plan is to move the battery up to where the factory washer fluid reservoir sits by "upgrading" to an Oddysey PC680. This will happen at the same time as the Sohn OMP conversion. What's next...of yeah, Dorito Power has access to a shop. It's pretty sweet. He is also really good at detailing cars. So we spent a weekend cutting and polishing.  The paint from 10 feet isn't bad but once you get within 5 feet, it's rough.   Fender is before (left), hood is after (right). I also added pinstriping:  It's JPS time, ladies. In addition to Dorito Power being an awesome detailer, he's a drat good photographer. These were taken immediately after we finished on Sunday.       I have since replaced the chrome lug nuts with black ones. Clarke isn't sure what to think of the wife's choice in music: 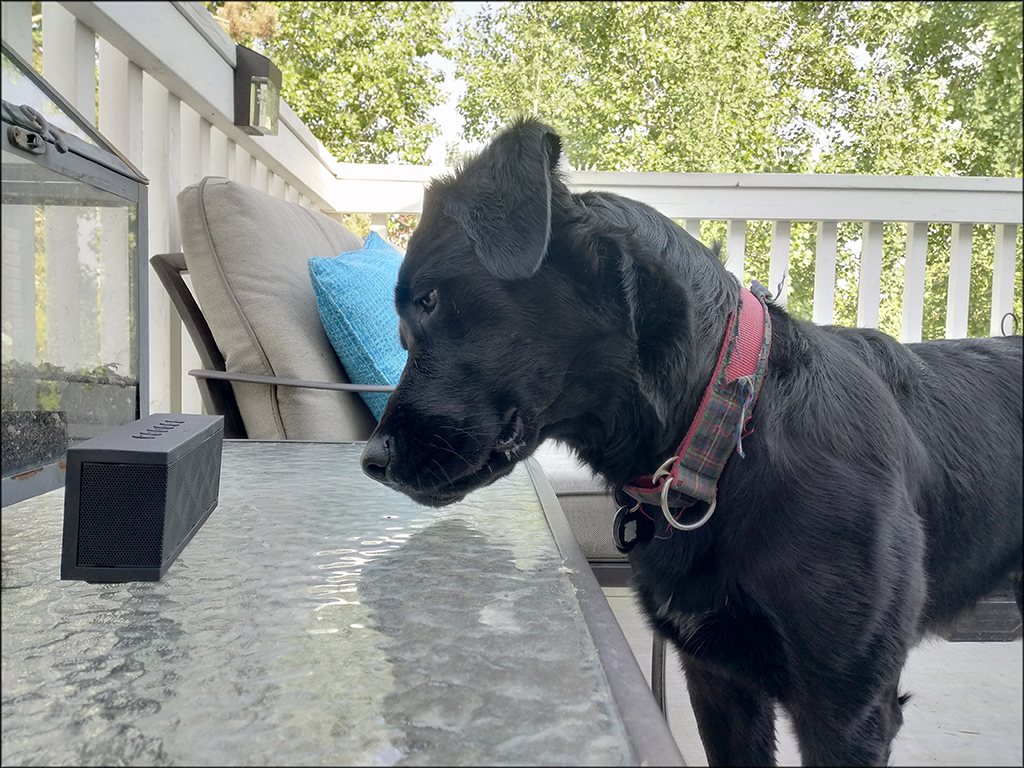 But he seems to like mine: 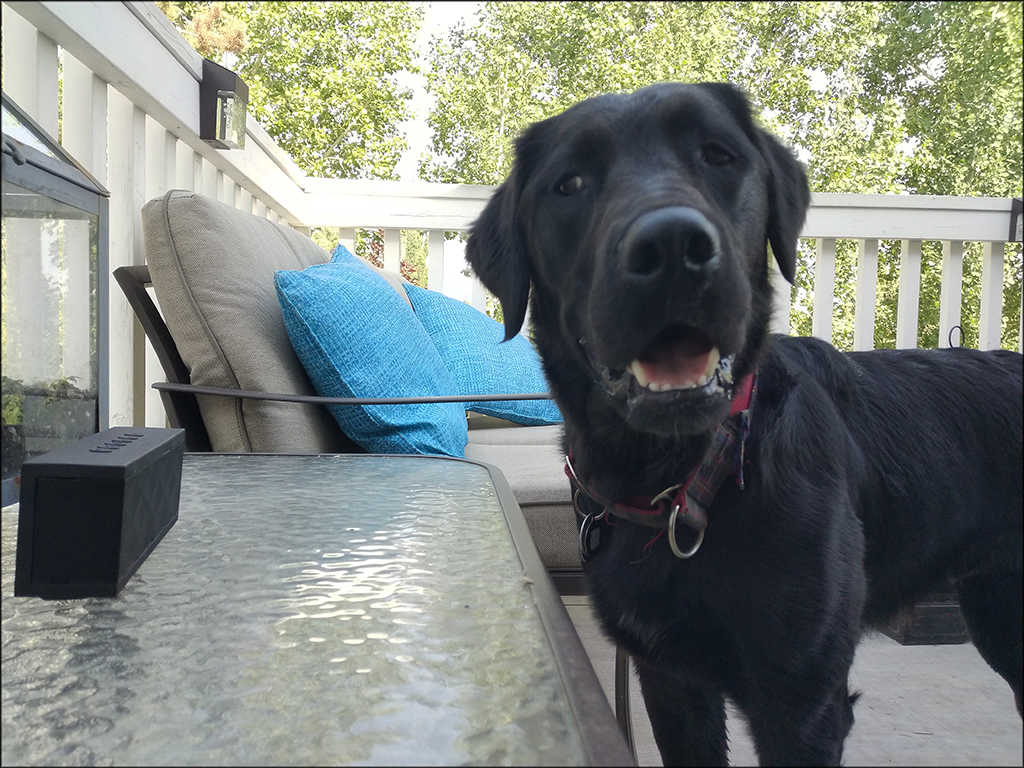 Oh yeah, I used the truck for truck things:  Then I broke it. By lowering the rear end end by 50mm / 2".  This is what we start with. Stock ride height. Front wheel gap is 7" and rear is 9". So how do you lower something with leaf spring? Lowering shackles.  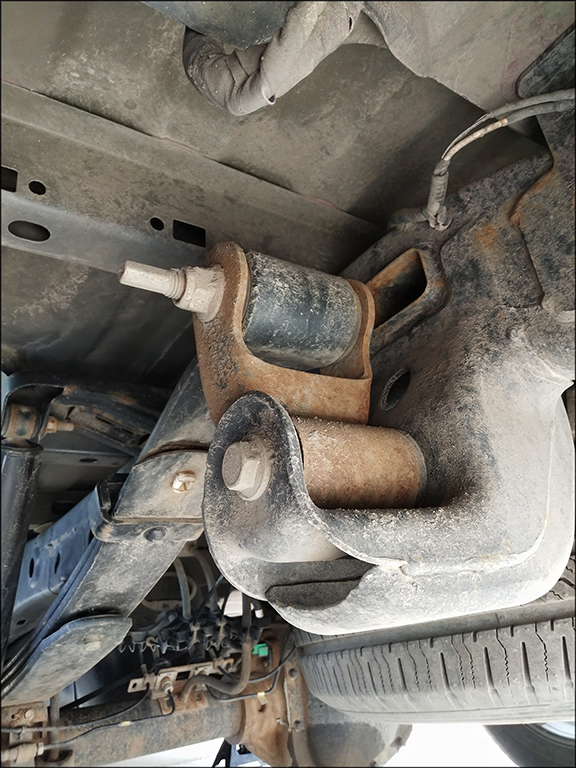  The passenger side went incredibly smooth. The driver's side, however, did not. Turns out the truck isn't entirely symmetrical.  The top shackle bolt doesn't have enough clearance to come out and go back in. I had to disconnect the rear shock, jack up the truck as high as I could go and lower the rear axle as much as possible.   It's all good now. New front wheel gap:  New rear wheel gap: 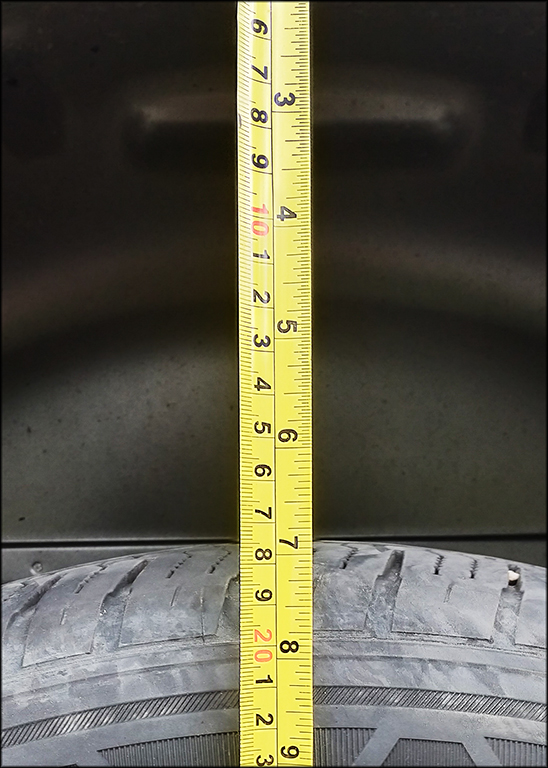 This is merely the beginning as far as breaking the truck. The front is getting new LCA's which lower it 3" along with 2" drop springs. The rear is getting an axle flip, Caltracs, and a rear sway bar. The axle flip lowers the rear between 4-6" inches. I'm shooting for an additional 5" to level it out. Napkin math also indicates that the static safety factory after the lowering in conjunction with the 3" wider track width of the wheels should allow me to Auto-X this thing. That concludes all current progress. Next up: Bushings! All of them on the RX-8.... 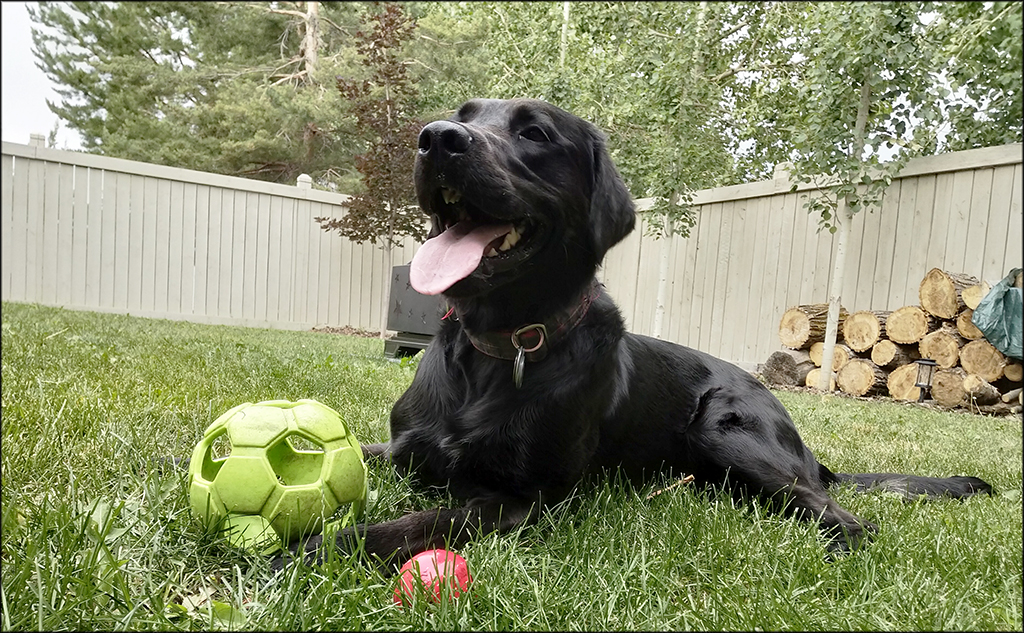 Edit: Images rehosted. McTinkerson fucked around with this message at 04:04 on Apr 11, 2019 |
|
#
¿
Jul 4, 2018 10:51
|
|
|
Crunchy Black posted:Is Clarke named for the cloth ( noticed the collar) he looks like a good boy. Oddly enough, he is not. He's Superman. (And my wife and I are working our way through the alphabet. Our cats are named Artemis and Bravo.)  He's a good boy and due to the self-fulfilling prophecy of his name, has limitless energy.
|
|
#
¿
Jul 5, 2018 23:40
|
|
|
Seat Safety Switch posted:Oh hey, it's that Soundbot speaker everyone loves. Isn't that thing kickass for $30? It's awesome. It was the "sound system" for Sweet Chili Heat and was semi-capable of not being overpowered by the beehive. cakesmith handyman posted:Lowering shackles look sketchy as gently caress (I know they're probably not), JPS RX8 going to look fantastic. These shackles are beefier than the Ford Performance units (which are just rebranded Ground Force). So far so good on the lowered rear end end. My Heat tape finally showed up, so the intake was insulated. I'll get some pictures this afternoon. My garage PC finally poo poo the bed (RIP Intel E8500). Getting the new one (it's only 8 years old instead of 16) up and running now. Then it's finally time for diff mount bushings on the 8.
|
|
#
¿
Jul 15, 2018 19:23
|
|
|
Hoooly poo poo, it's been an interesting few weeks. I am now once again gainfully employed doing what I enjoy (SCADA systems admin/development) with a little bit of a pay bump over the previous job to boot. Logically, I bought myself a present to celebrate:  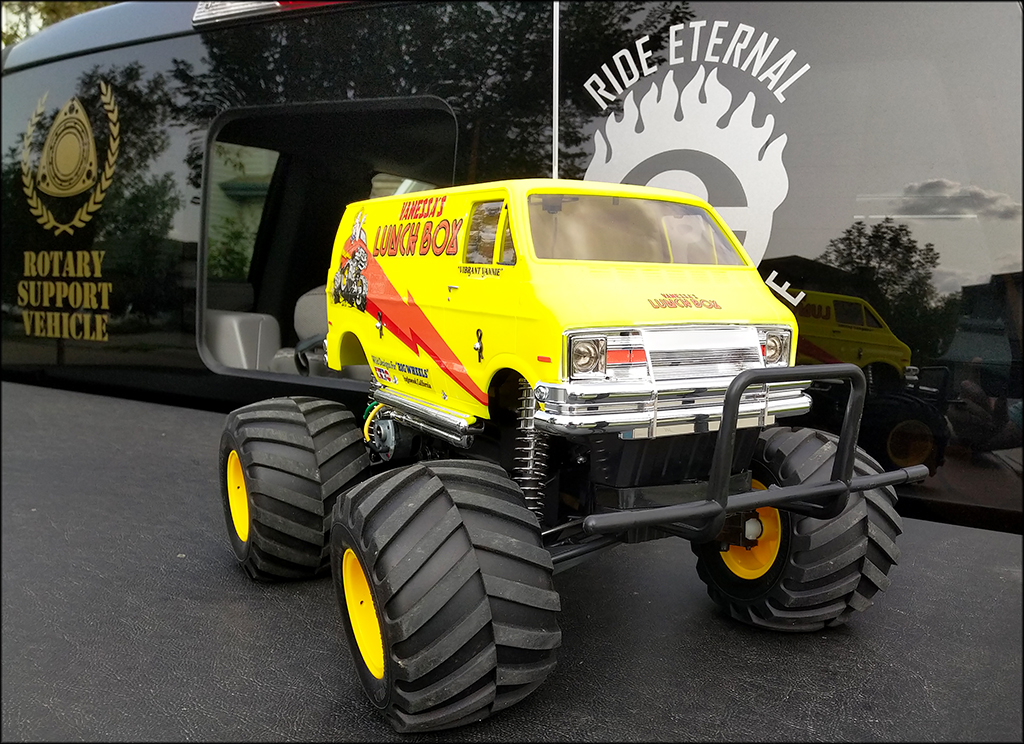 The re-issue of Tamiyas Lunchbox from the 80's. I am planning on putting together a proper post together in the R/C thread if there is interest. What about the vehicles? Well, I still had all these parts sitting around that required installation. There are now less of them. Like the diff bushings.  Replacing these is a royal pain in the rear end. The easiest way is to drop the entire rear subframe. Since I do not yet have a set of MaxJax, that is not happening. Instead, this poo poo is going to take place "in situ". How? 1) Remove all bolts holding #12 in place. 2) Remove all bolts holding #11 in place. 3) Lower 11 as far as it will go. 4) Twist #12 to free it from the subframe mounting ears. 5) Once freed, twist #12 as required counter-clockwise while pulling it out through the driver's side wheel well cursing like an 8-year-old with tourettes who was just babysat by a group of sailors. 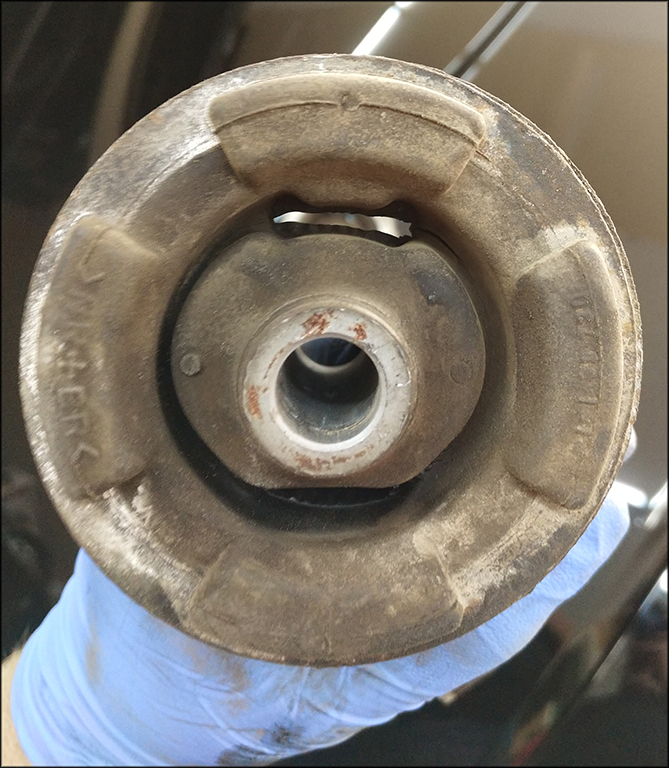   It was tough to get a picture but the driver's side bushing was two pieces. That crack extended all the way around.  I obviously had to torch the fuckers to properly vent my frustration with the difficulty of removal. However, due to the fact that the stock bushings have a metal sleeve and their size prohibiting the successful application of my small gear puller, I needed to farm out the removal. As luck would have it, my local indie auto shop has a hydraulic press and pressed out the old ones and pressed in the new ones for a case of beer. New bushings are in and ready for carrier installation.  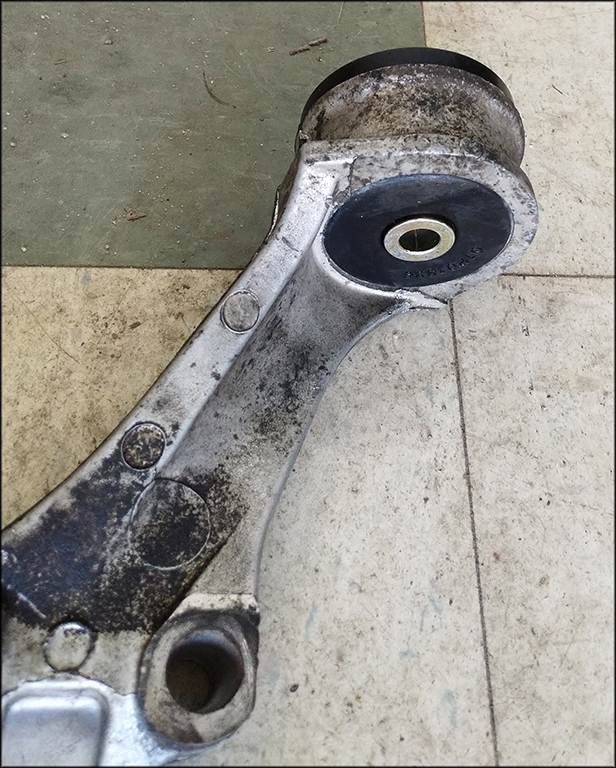 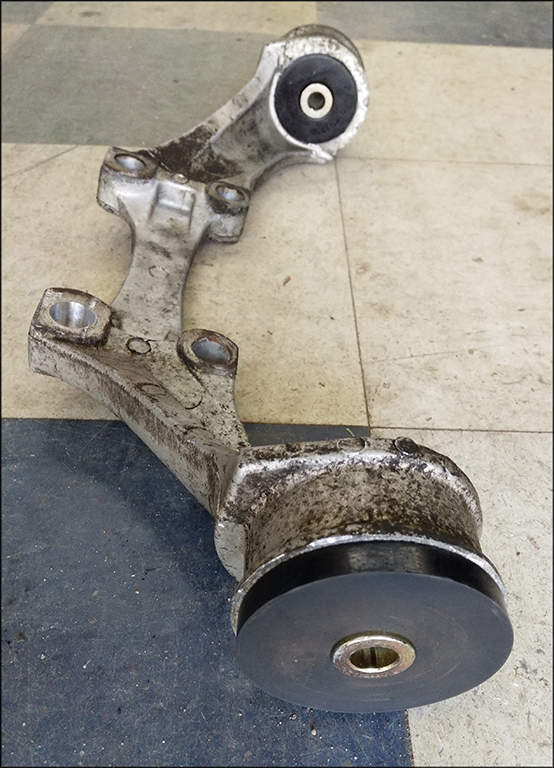 As usual, installation is reverse of removal. And just as much of a pain in the rear end. This time though, it was getting the new bushings lined up with the subframe mounting ears. Exhibit A of the difficulty:  DoritoPower came over and gave me a hand aligning the carrier/diff while I threaded in the bolts. It is all buttoned up and the car feels much better. There is still a little bit of wheel hop left. It is significantly less though. I suspect the remainder is being caused by the worn out engine mounts and potentially, sagging rear springs. The final update is the addition of a small ultrasonic jewelry cleaner for the usual fouled spark plugs that plague all rotaries. 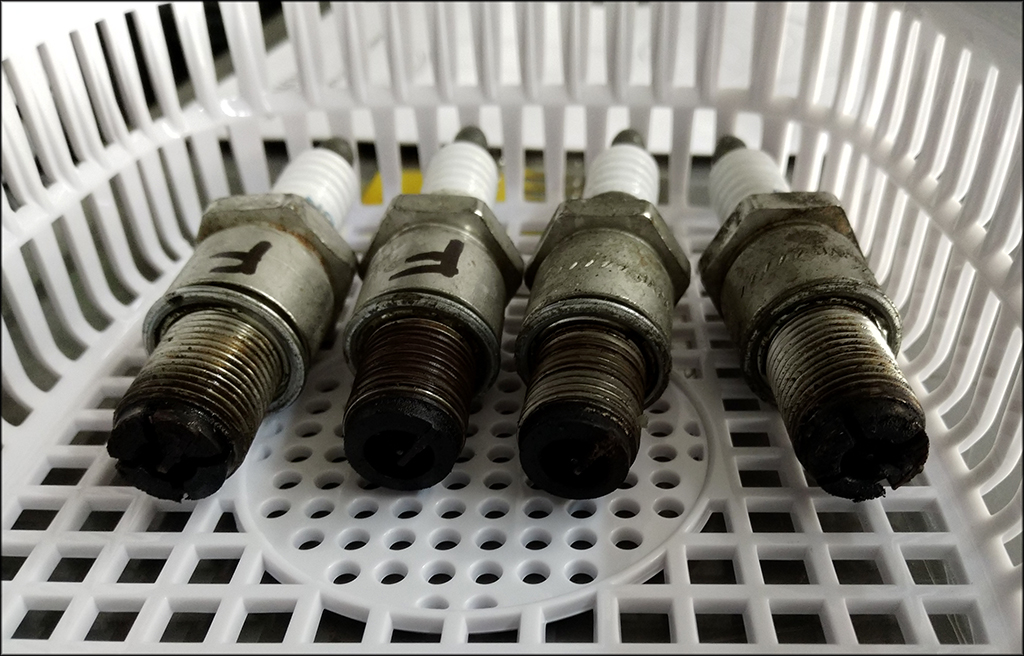 These plugs have about 10k km on them.  Ready for the 42k Hz bath in 50% simple green.  This is what they look like the next day.  This is what the cleaning solution looks like afterward. The plan is to clean the plugs with every oil change, this should prevent me from having to throw new plugs at the engine every 30k km since they are iridium and physically last much longer than that since I can now clean them correctly. That is it for now. It is going to take a while to replenish the emergency funds after my 2-month long unemployment so there will be very little new parts purchased. There is still the full energy suspension poly bushing master kit to install, along with the stainless braided clutch line and miniDisc player though! As well as a special Japan only dealer option which I have been saving... Edit: Images rehosted. McTinkerson fucked around with this message at 04:07 on Apr 11, 2019 |
|
#
¿
Aug 5, 2018 19:03
|
|
|
Work has been insane. Apparently, there is no happy medium in my life, so this is more of an anti archive bump than anything else. I did move over my Yokohama iG51's to the method wheels. Selling the OEM chromies to fund replacing the blown shocks at all corners. I desperately want to get some work done this weekend. Hopefully, I can make that happen.
|
|
#
¿
Oct 6, 2018 02:42
|
|
|
Progress on the F-150 has been made. Let's say 80% maintenance and 20% upgrades. Once again, a giant thank you goes out to DoritoPower for letting me use the shop for this as it was just above 0C when this work was completed and the truck does not fit in my garage with the factory bumpers. As discovered when I dropped the rear end end of the truck, the rear shocks were blown. I rolled 92k km and I suspected that the fronts were as well or at the very least, not far behind. [Narrators voice: "They were."] 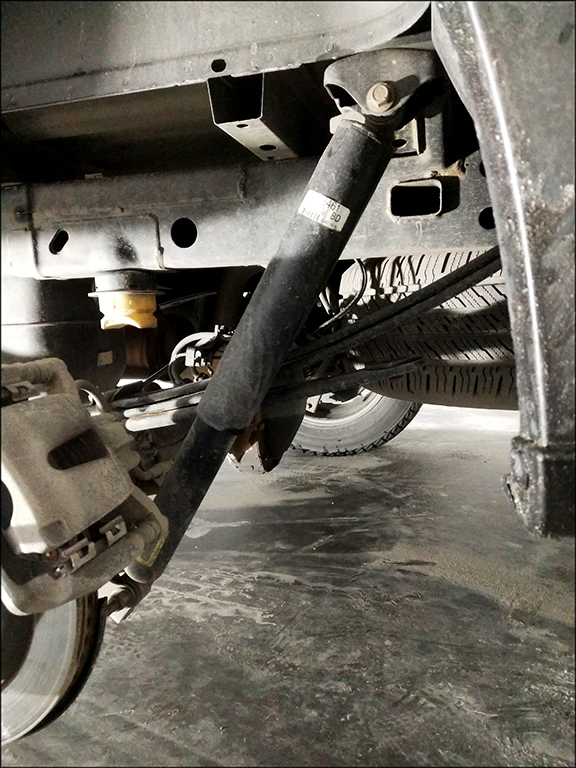 Exhibit A of what a blown shock looks like. Kudos to Ford on the quality of their labels and adhesives though. Once completely removed, I could compress them by hand without any effort and they stayed compressed. This behavior applied to all four. 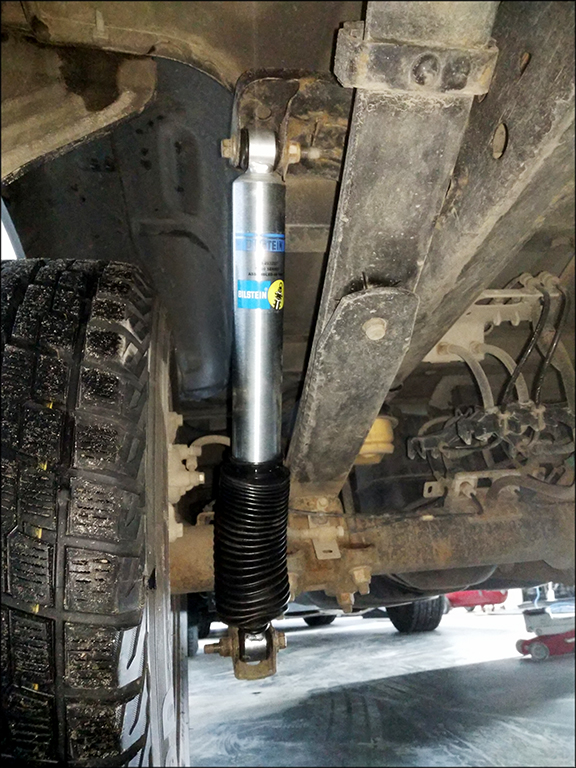 Shiny new shocks, courtesy of Bilstein via Rock Auto. These are the B8 5100's. Came with the dust boots, which I haven't seen before. All of my previous shocks have required them to be purchased separately.  New B8's for the front as well. Pictured are: -Bilstein B8's -New Moog top hats -Crown suspension 2" drop springs (Which Crown claims are 10% stiffer than stock. These are also intended for the 4x4 model.) -The OEM lower spring perches. The spring perches are a source of annoyance. Ford does not sell them separate from the shocks. No aftermarket manufacturer offers them either. You must re-use them. This meant that I could not pre-assemble the front units and have them ready for installation. Installation was relatively straightforward. 1) Undo the three top hat nuts 2) Undo the two bottom shock mount bolts from the underside of the LCA 3) Unbolt the ABS sensor mount and brake line bracket from the spindle 4) Unbolt the top sway bar linkage nut 5) Undo the top balljoint nut from the spindle 6) Whack the spindle with a BFH to remove it from the upper balljoint 7) Remove shock assembly Installation is reverse of removal. Except for the following:  I did not notice the rubber thread protectors after I "installed" the front passenger side assembly. Removing them in-situ was aggravating. 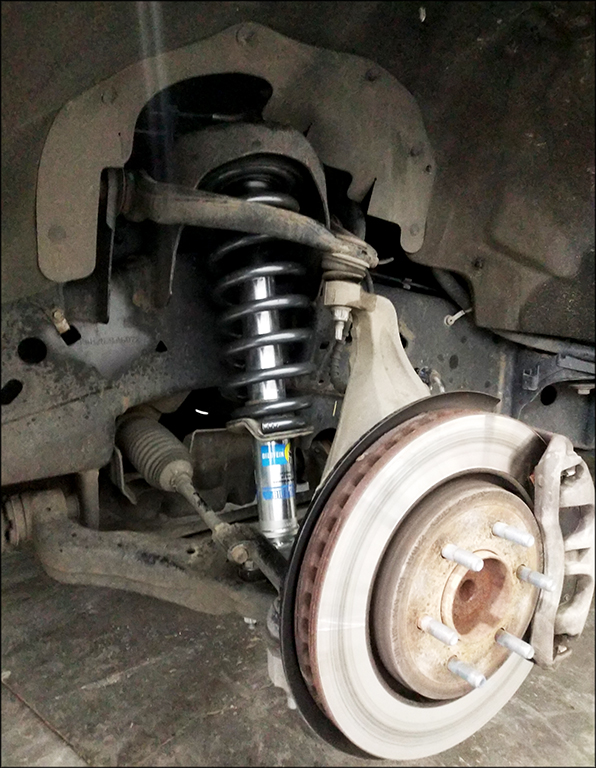 Drivers side assembly installed. As usual, I am light on the imagery. Once again fuelled by time constraints.  All done. 2" / 50mm drop all around, which means that the factory rake is back. It really looks like it needs a meaty set of drag radials out back now. (Plus another 3" drop overall.) For reference - Before / OEM 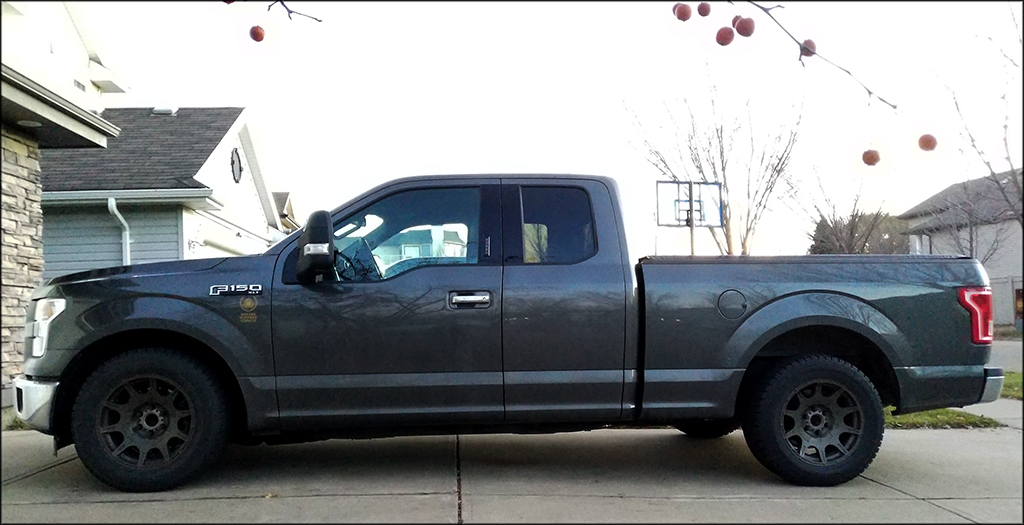 As it sits now. The verdict on the ride quality & handling difference with the Bilstein B8 5100's vs stock: Holy poo poo. It is incredible. That is all.  Clarke still likes the ride as well. Edit: Images rehosted. McTinkerson fucked around with this message at 04:09 on Apr 11, 2019 |
|
#
¿
Oct 20, 2018 23:35
|
|
|
Another truck post incoming. I swear there is more rotary content coming! I rolled 93k km on the F-150 and a letter from Ford Canada showed up indicating that my local dealer now had the parts necessary to complete the recall on my door latches freezing in the winter. I figured while it was getting worked on and I was getting close to the end of the power train warranty I should get them to take a look at the engine since there are a few TSB's which could apply. Little did I know how right I was. The mechanics' comments paint a picture. 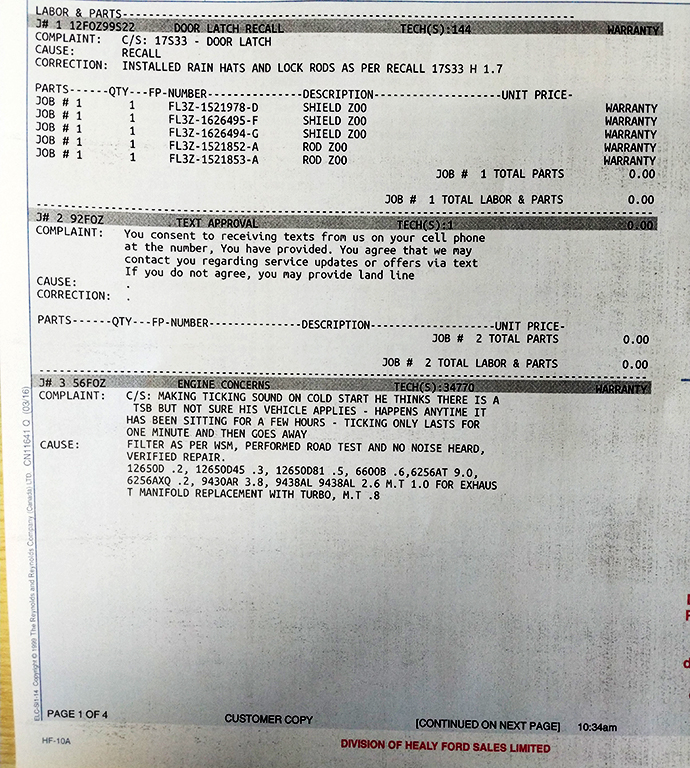 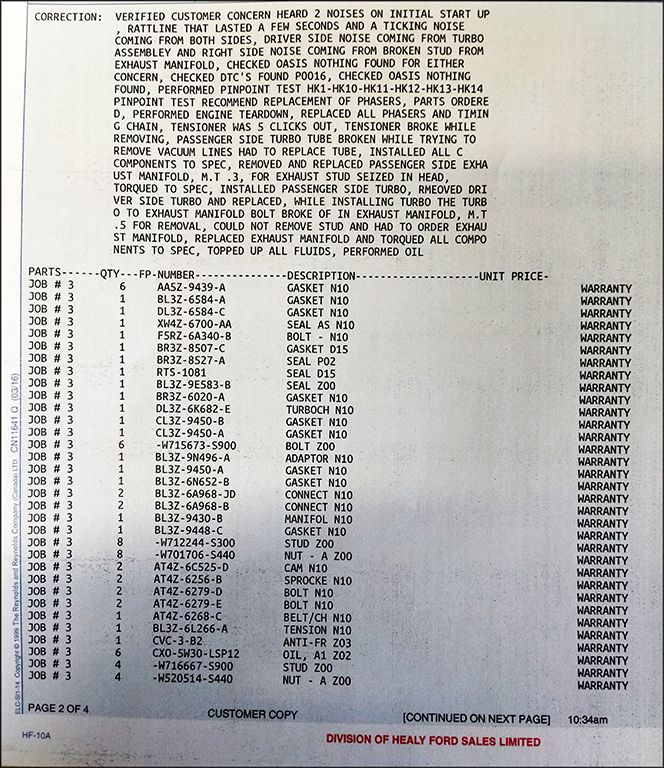 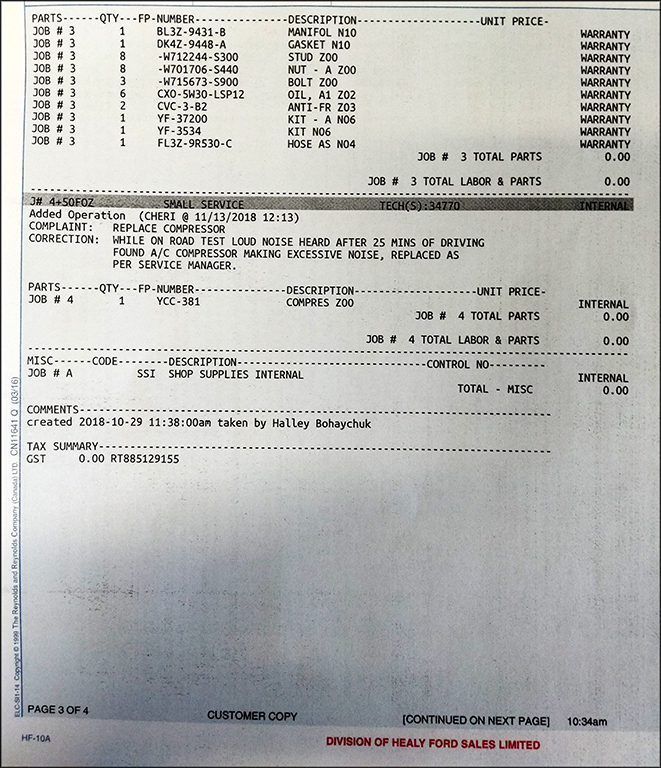 The service manager said there were tears. Edit: Images rehosted. McTinkerson fucked around with this message at 04:11 on Apr 11, 2019 |
|
#
¿
Nov 16, 2018 05:18
|
|
|
I'm going to have to go back regardless, there's a noticable exhaust leak on the passenger side manifold. Significantly louder than before. The revs also dip down to 500 and it stumbles when I'm stopped with my foot on the brakes. I have started working on the RX-8 again. Hover mode had been engaged:  I am dropping off the Super Advans to get media blasted, straightened and re-powder coated after work tomorrow. The existing powder coat on the rear wheels is flaking off along the lips and they no longer hold air. Then there is this: 
|
|
#
¿
Nov 19, 2018 05:41
|
|
|
The F-150 is scheduled for another look at the dealer for December 3. While I was there, I dropped of a six pack of Innis & Gunn for the tech apologising for how much of a nightmare that job was. The service manager apparently has never in his entire career seen a customer do such a thing. The Super Advans are dropped off for a nice heavy metal flake gold (Prismatic Powders Spanish Gold). Should be ready in two weeks. I snagged a set of new H&R lowering springs for the 8 off of eBay for $200 with free shipping thanks to some coupons. All the dies for bushing removal have showed up as well, so this weekend is when poo poo is getting done. Then there's the steering head for the wife's CB400F that are chilling in the freezer...
|
|
#
¿
Nov 23, 2018 21:35
|
|
|
The H&R springs for the RX-8 have arrived. I was also able to spend an hour working on bushings. I have the rear driver's side upper later link removed. It's ball joint is still good. Zero play, no odd resistance around it's range of motion and the boot is still in great shape. Bushing is removed and ready for the poly unit. The winters haven't been kind to the factory finish, so they all will be getting a coat of Corroseal and metalcast gold that is left over from the wheels. The F-150 was also given another round of diagnostics. The waste gate actuator on the passenger turbo that was not replaced is sticky, which is affecting the ECU's timing relearning process. This can as per Ford take up to 1000km (unless the service manager is full of poo poo). The tech did confirm that as part of the TSB, you must reset the ECU which clears all timing and ignition memory, so it sounds plausible. There is also a revised version of the waste gate actuator...so it'll be going back once that is in stock. Clarke now also has an 8 month old brother from another mother (and father) to keep him entertained and help burn off all of that energy. Apparently, I just hate spare time to work on my vehicles...
|
|
#
¿
Dec 6, 2018 04:50
|
|
|
Minor updates & anti archive bump. I'm switching hosting providers, so the images will be broken for a little bit. It's -29 outside and -5 in my garage, so continued bushing replacement is on hold for now. Work is OT heavy at the moment, so it's possible that progress will continue to be glacially slow. Also, I hate replacing bushings. Edit: Spelling.
|
|
#
¿
Feb 3, 2019 23:30
|
|
|
More of an anti archives bump than any progress. Spend the month of March in Thailand and Vietnam which also meant that prior to that I had to complete double the work so I could even leave the office. Thailand knows how to have fun with vehicles, holy poo poo. Now I'm dying of whatever weird strain of flu my coworker brought back from South America and I still can't get my rear end into the garage.
|
|
#
¿
Apr 8, 2019 00:08
|
|
|
Bajaha posted:Can I ask for the images to be rehosted or the links fixed? Nothing's showing up for me. Ask and ye shall receive. All images rehosted save for the last two...not sure where those took off to. Edit: What is everyone opinion on instead of JPS doing Suntory Boss Coffee instead? Basically this but in gold chrome instead of white:  Limited other sponsor decals. Maybe NGK and possibly Hario Japan? McTinkerson fucked around with this message at 04:20 on Apr 11, 2019 |
|
#
¿
Apr 11, 2019 04:16
|
|
|
Further slow progress on the RX-8 today. All rear suspension links have now been removed from the car, all old bushings removed and the hard parts corrosealed and painted. New bushings are going in tomorrow and the links all re-installed. I also was able to get one of the new H&R springs installed in the rear. I have memories of doing the full poly kit installation in my FC but I did not remember it being this slow and painful.
|
|
#
¿
May 5, 2019 22:10
|
|
|
Vehicle work is on hold due to home renovations taking significantly longer than expected. Who knew replacing 1200sq/ft of flooring would be time consuming? Plus new baseboards and casings, etc. What this does mean is that there are a lot of parts sitting in my garage waiting to be installed. Such as a full 3"/6" DJM drop kit for the truck (which is already sitting 2" lower all around). New Bilstein 5125 shocks for the rear post axle flip. Oh and my coworker gifted me his Vespa ET2 50 that needs an engine rebuild. (There is a Malosi 70cc big bore kit BNIB under the Vespas seat).
|
|
#
¿
Jul 6, 2019 19:37
|
|
|
Powershift posted:Can you get away without a notch with a flip kit on that thing? Suspension travel will be just over 7 inches after the flip. I do plan on a mini c-notch in conjunction with hydraulic bumps and something similar to the raptor frame rails cross brace though.
|
|
#
¿
Jul 7, 2019 23:27
|
|
|
Progress update: Front suspension bushing replacement continues. Drivers side arms are removed and ready to have their bushings replaced. Same goes for that corners damper / spring. On track to have the front end completed over the course of this week an hour at a time in the evenings. With picture proof!
|
|
#
¿
Jul 22, 2019 14:36
|
|
|
I'm taking a page from a fellow RADL member and role model. Picture dump with comments added as time allows. Edit: Images now have commentary. In support of the imminent lowering of the F-150, something has to be done about the rear axle to exhaust hoop clearance. After the axle flip and replacement of the bump stops with shorter versions, the factory hoop would slowly be crimped on full suspension up travel. Enter the longest muffler Magnaflow makes. 30" body, 36" overall length.    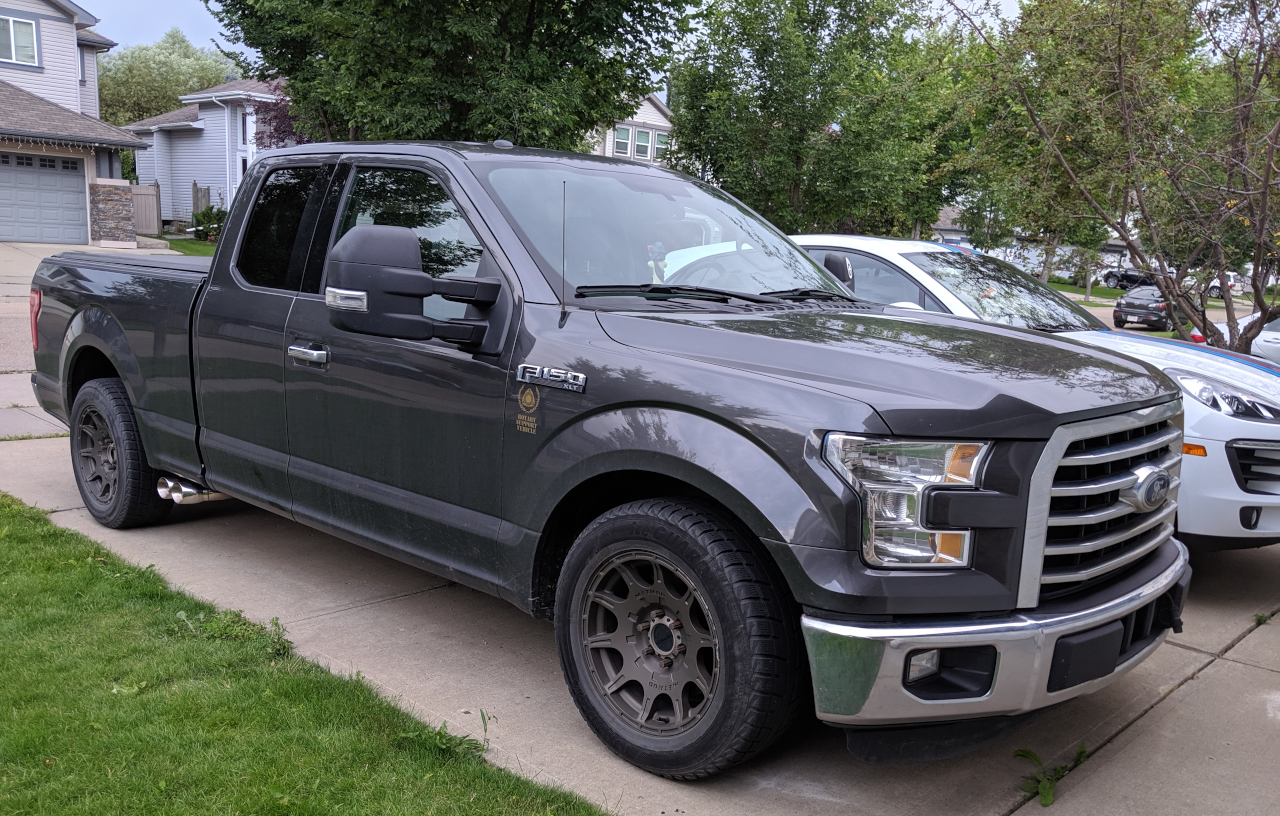 https://www.youtube.com/watch?v=mfaXojzdyro I am incredibly happy with how it sounds and since there is no longer any exhaust after the cab, problem solved.  The Mexican domestic market badges finally showed up as well. These will be going on at the same time as the lowering kit. 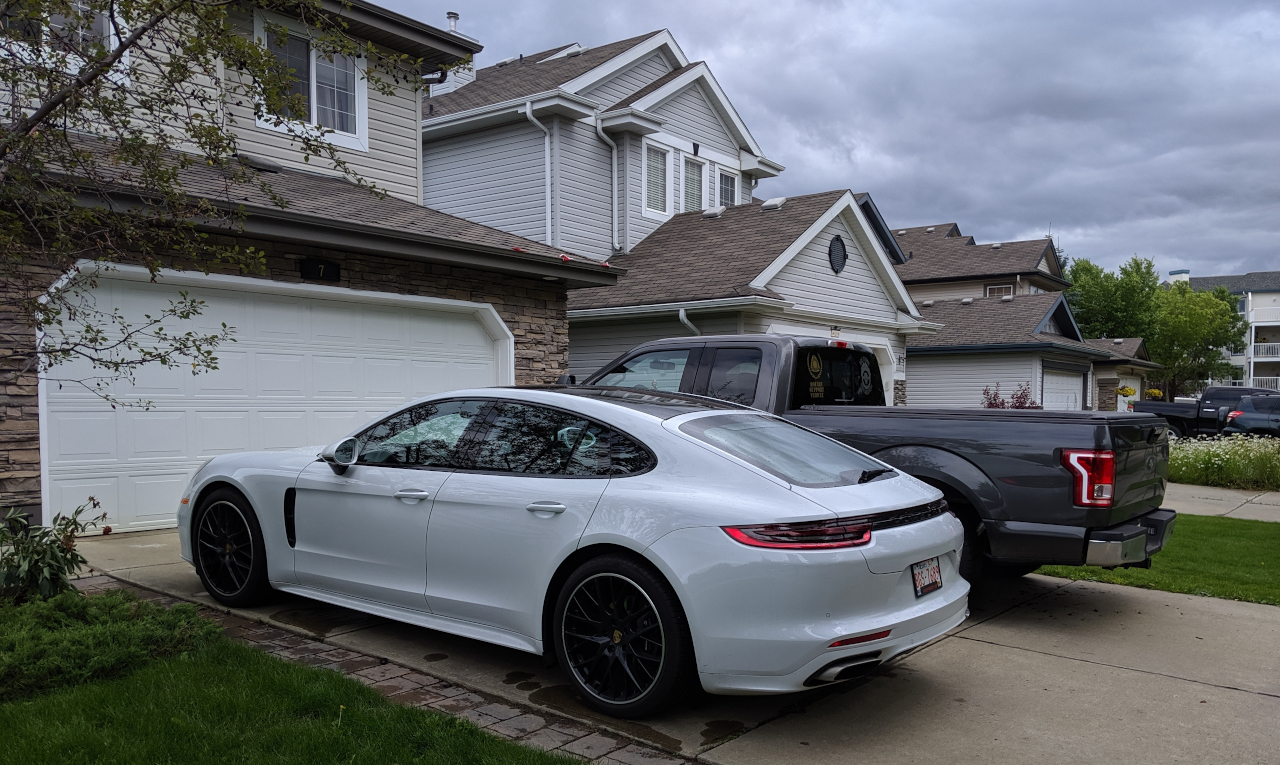 The Macan hit 20k km and was due for an oil change, the local dealer hands out fantastic loaners, I will give them that. it was tough giving it back... (Still burning through the referral bonus gift cards, which is why the dealer is still doing the maintenance. 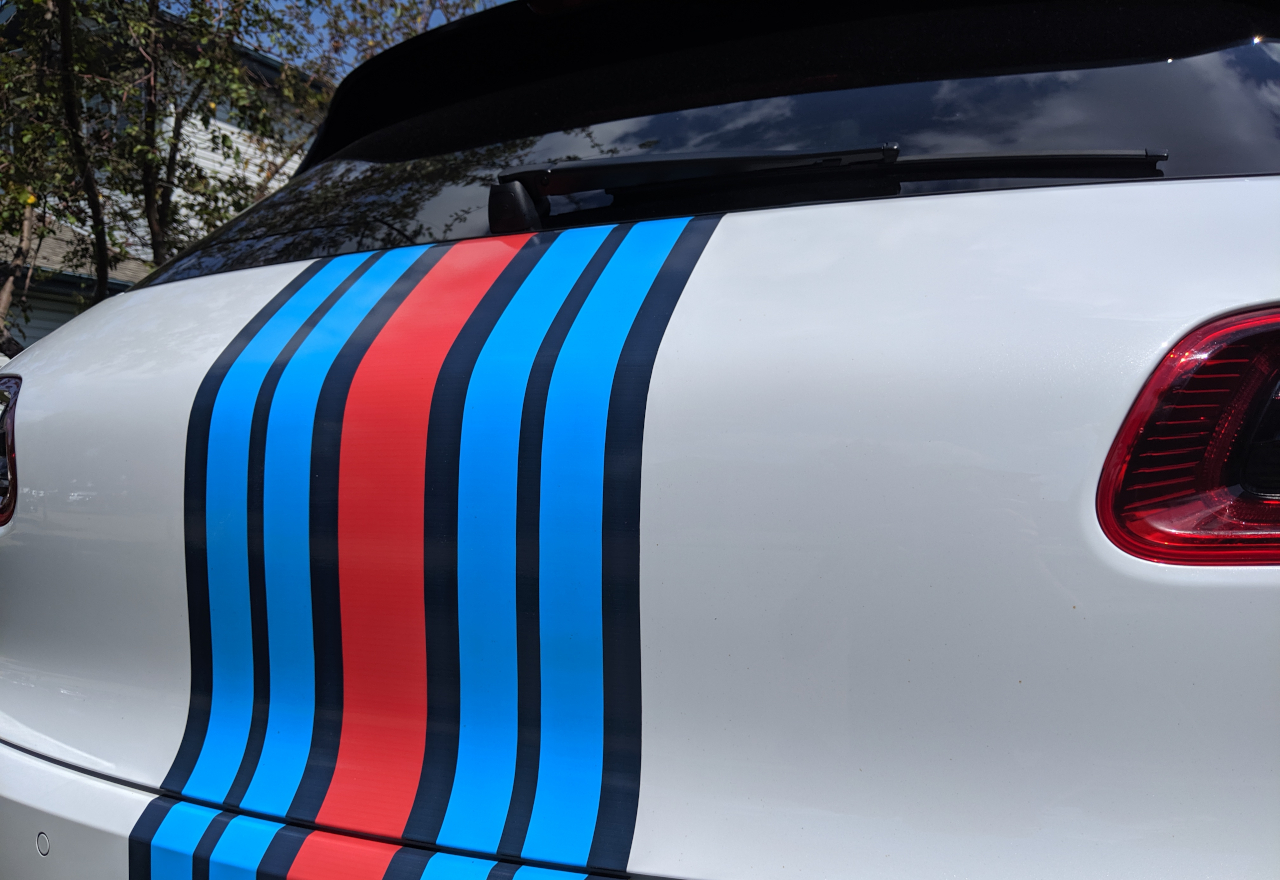 Superior German adhesives indeed, one of the letters fell off! So I guess they all go. 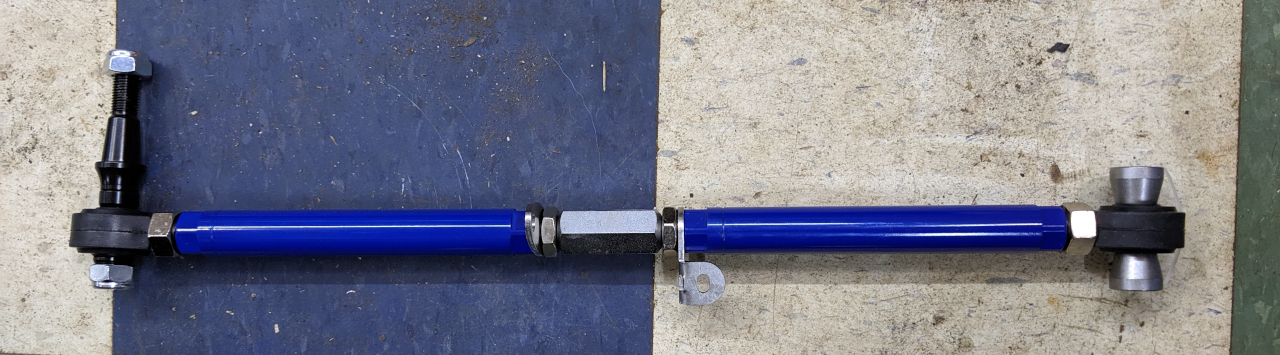 The rear camber arms weren't salvageable, enter Phase 2 Motortrends camber arms. Cheaper and better built than Megan Racing or any other JDM manufacturers. 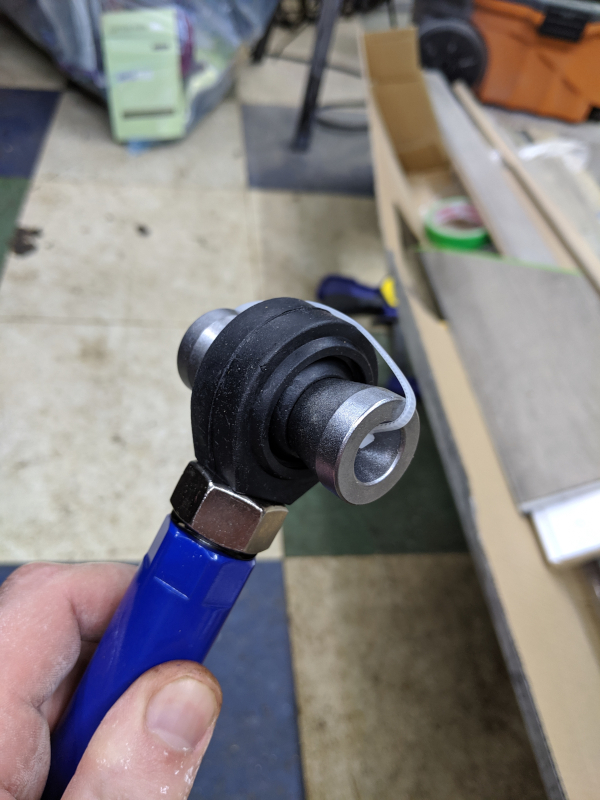 Teflon coated heim joints! 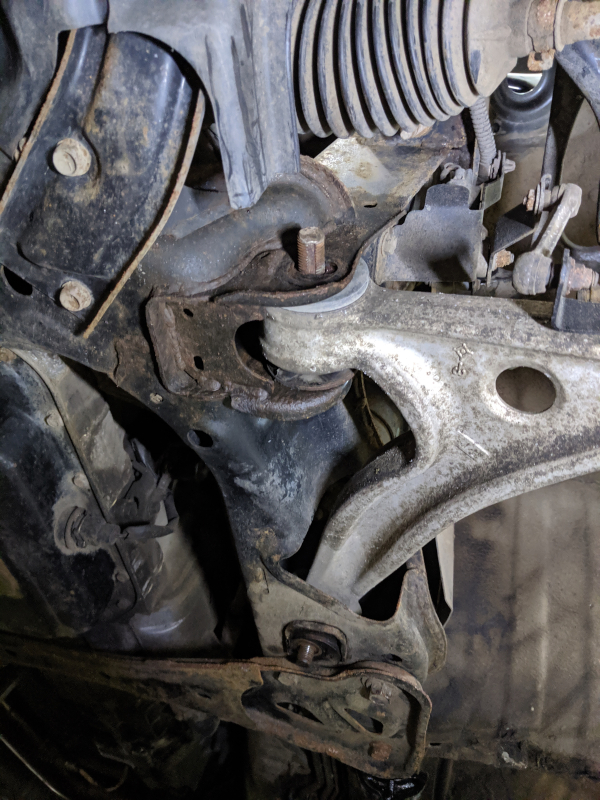 Both the LCA camber bolt and caster bolt have completely seized to the bushing sleeve. They have become one part of corroded steel. 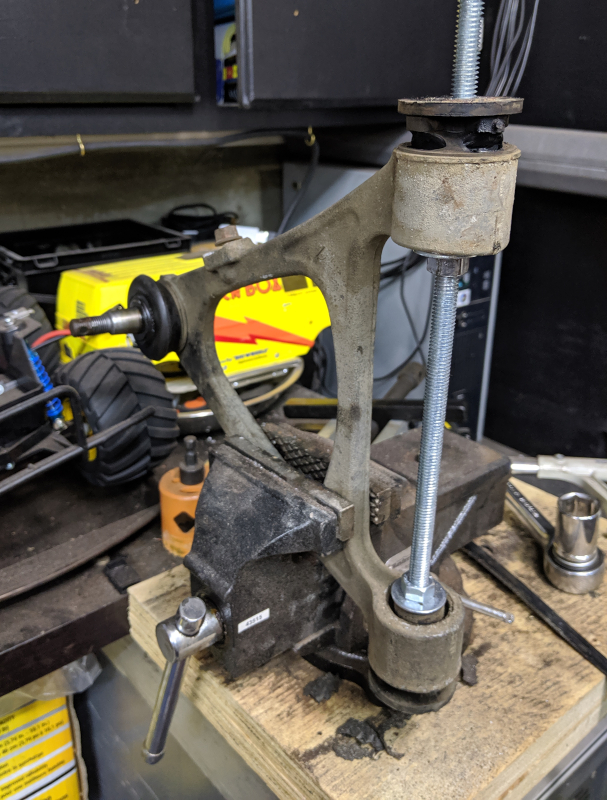 Removing bushing sucks.... 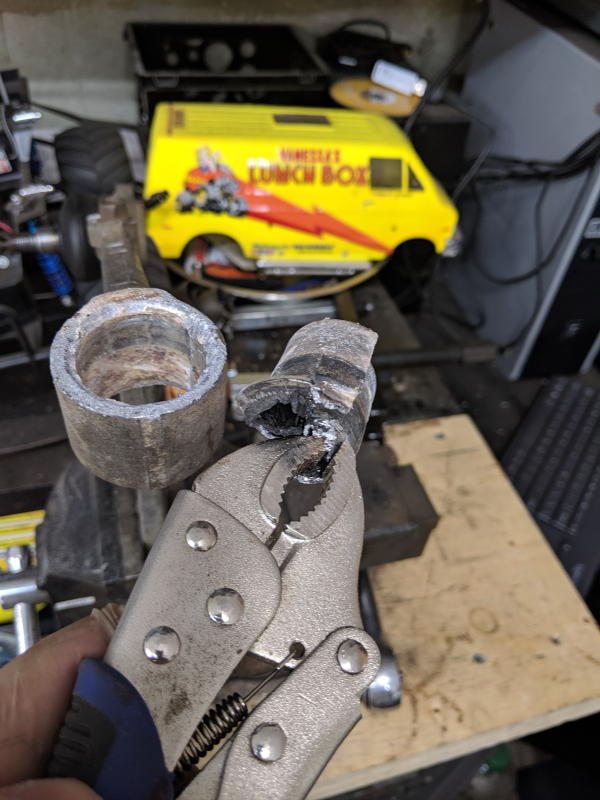  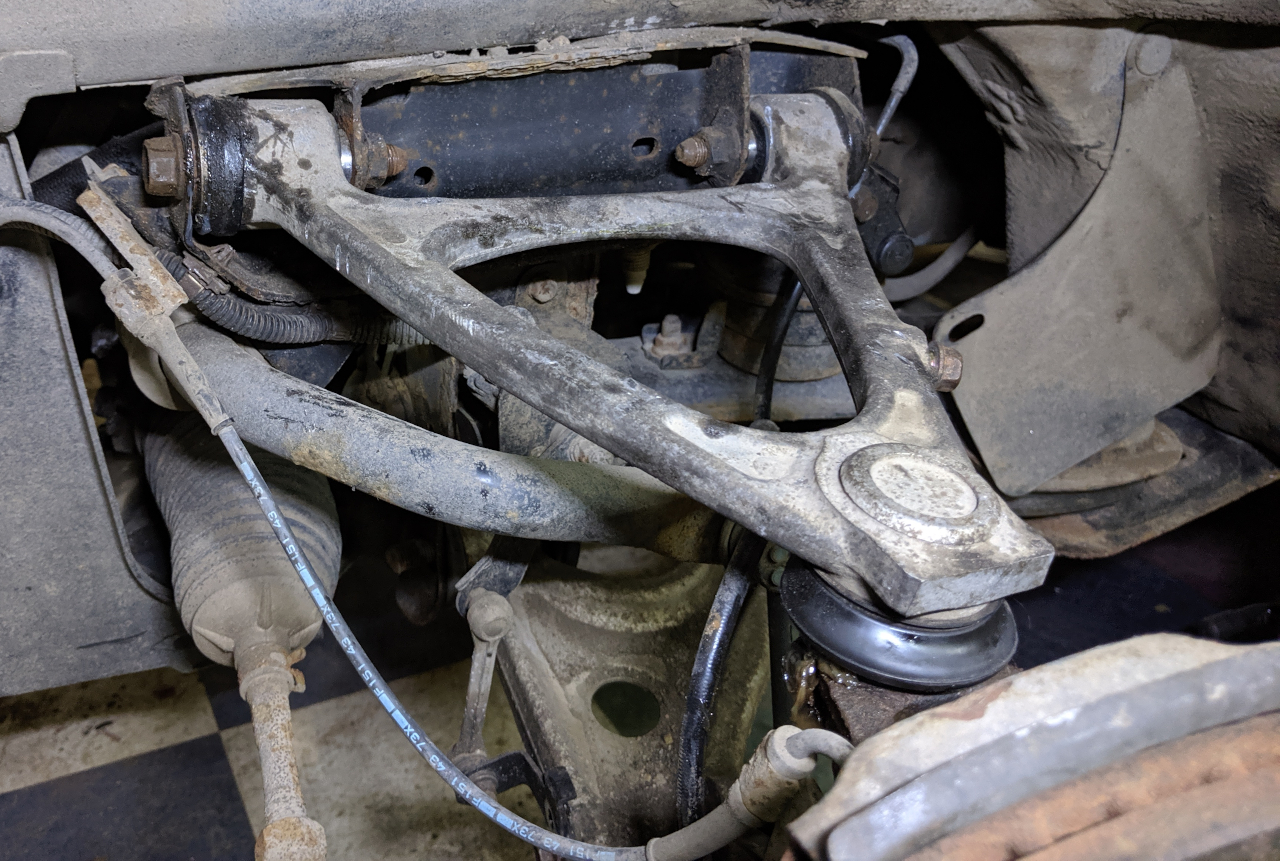 Drivers side UCA installed with new poly bushings. 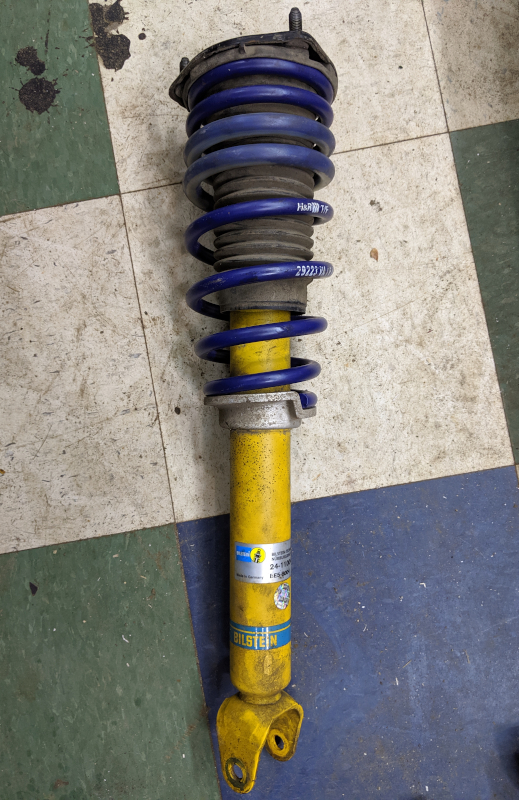 H&R springs installed on the front shocks. McTinkerson fucked around with this message at 02:30 on Aug 12, 2019 |
|
#
¿
Aug 1, 2019 04:54
|
|
|
Wrar posted:Martini, my dude. Aye, Martini. Boosted, not stirred. Further progress, however still excruciatingly slow. Every time I work on this thing, I want to burn it to the ground due to how corroded and seized everything is. DoritoPower helped remove (sawzall out) the LCA bolts and get the back half of the car buttoned up. Passenger side UCA bushings are removed and new poly versions installed. UCA is back in the car and bolted up. So what is left to do in order to start driving it again? Remove the passenger LCA and drop both off at the same shop I used to press out the diff bushings. Then toss in the new poly units and bolt everything back up. All followed by an alignment and it's all done! Sounds easy right? Yeah, based on how long it's taken up to this point, I might not even have to dig out the summer wheels....
|
|
#
¿
Aug 12, 2019 02:46
|
|
|
Pre-Mega Post: Drove the RX-8 to work today. I love this thing so much and all the pain was worth it. Actual progress post to follow.
|
|
#
¿
Sep 12, 2019 22:35
|
|
|
Finally getting around to updating the thread. We left off with getting the RX-8 suspension completed. So let's go back in time a little.  This is what calcium chloride does to camber bolts that are 4 years old.... 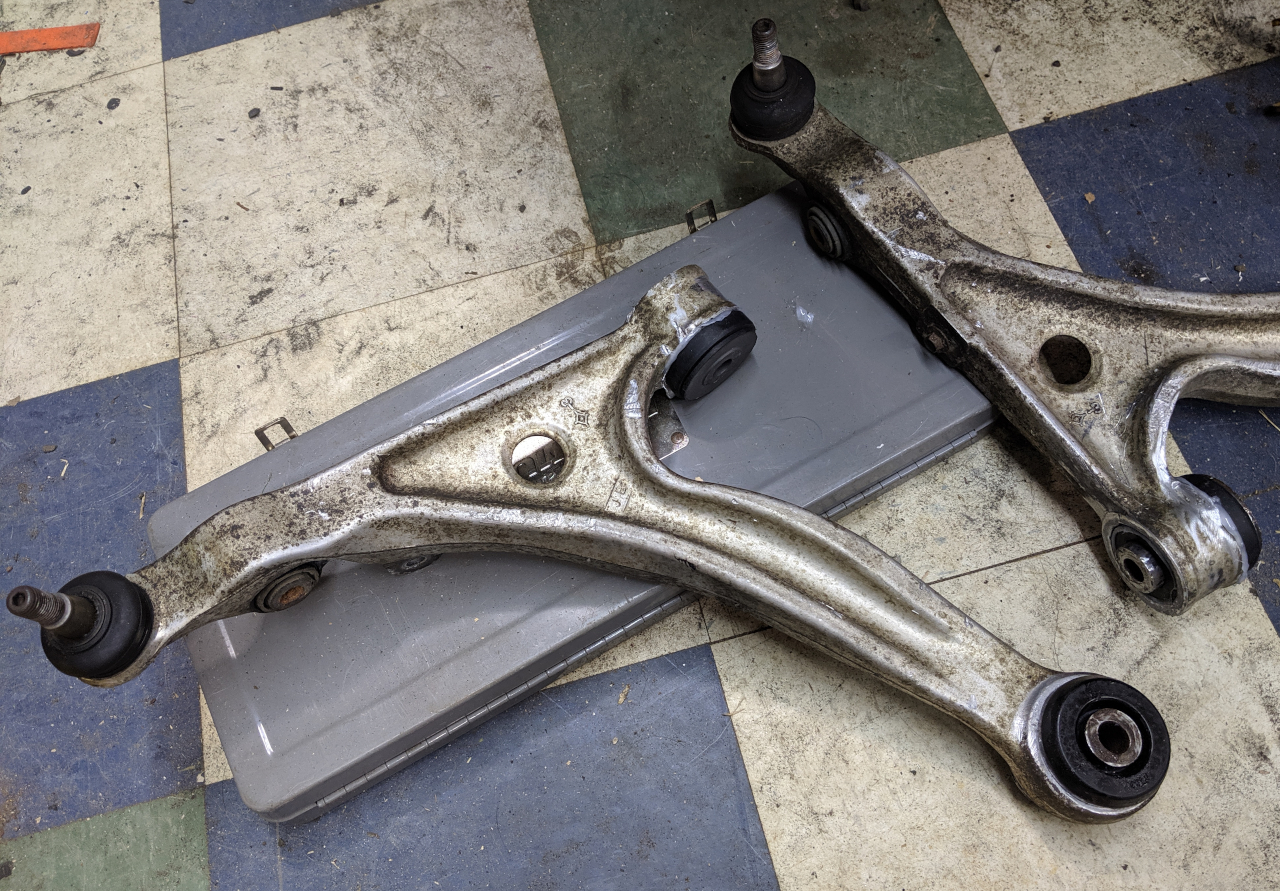 New bushings pressed in to the factory LCA's. Oddly enough, I could not find a single aftermarket LCA. There are plenty of UCA's with heim joints, full adjust-ability, etc. but no lower control arms. Hence the need to fight with the factory ones. 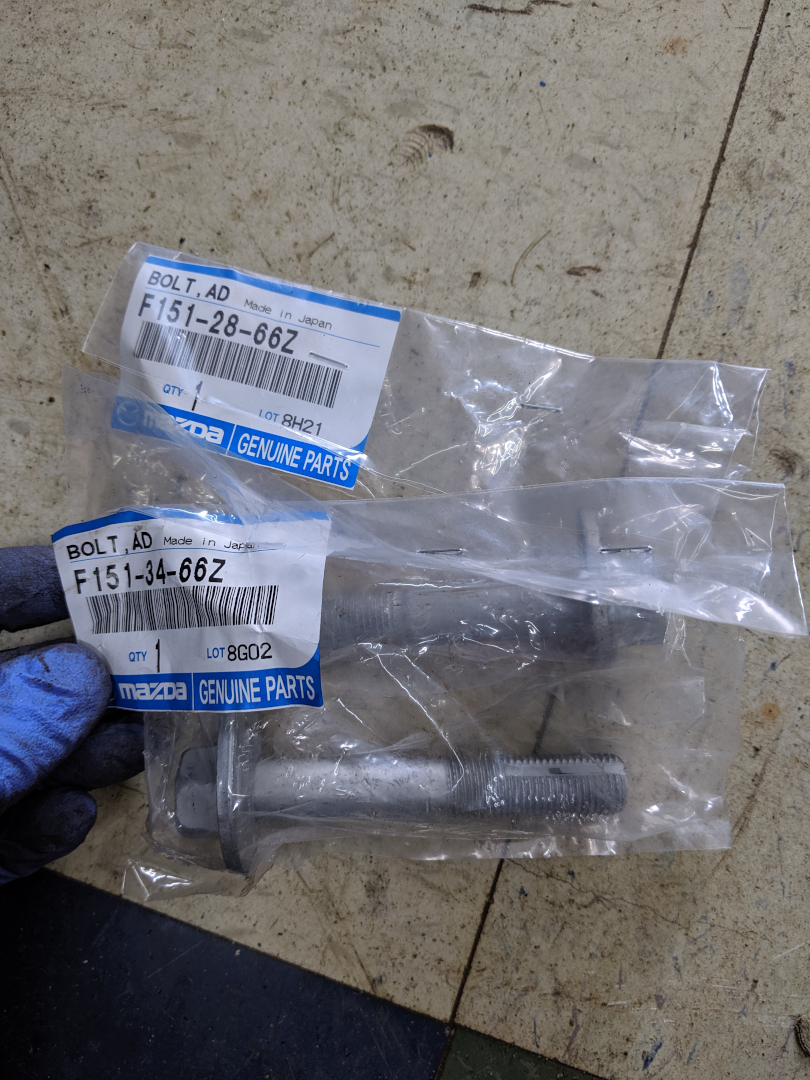 Factory fresh camber bolts. The were given a liberal coating of anti seize prior to be installed. 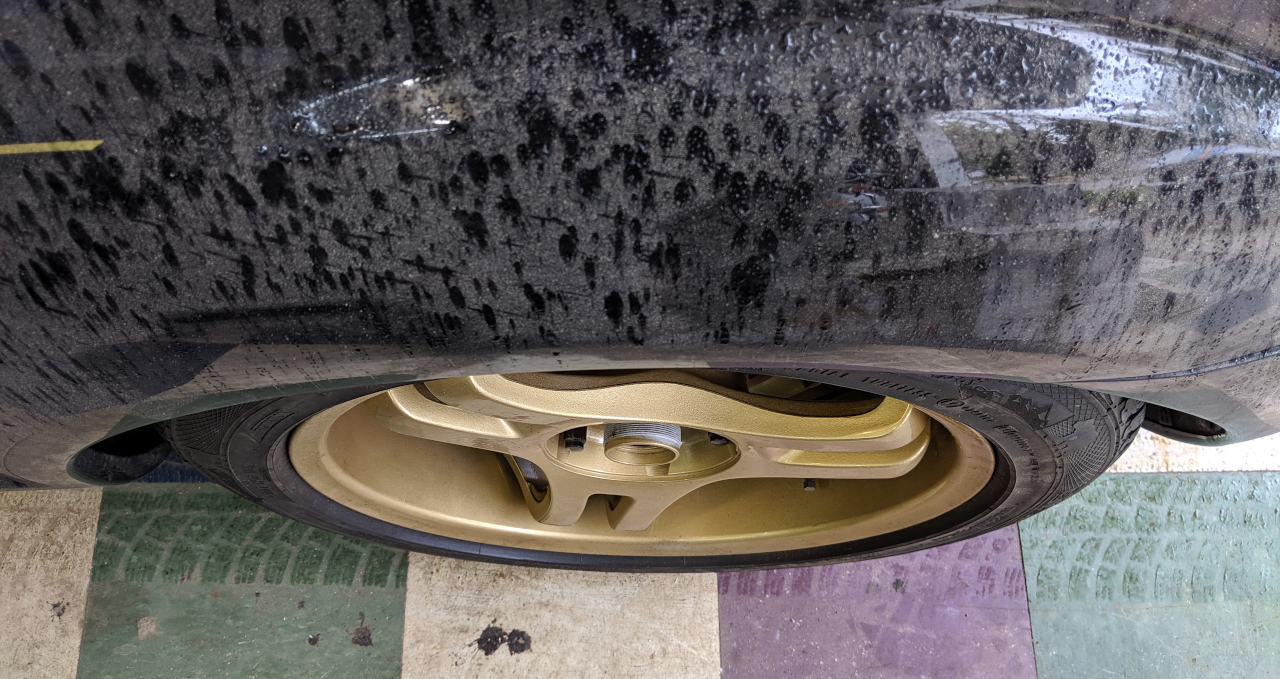 I think further adjustment was necessary regarding alignment parameters. 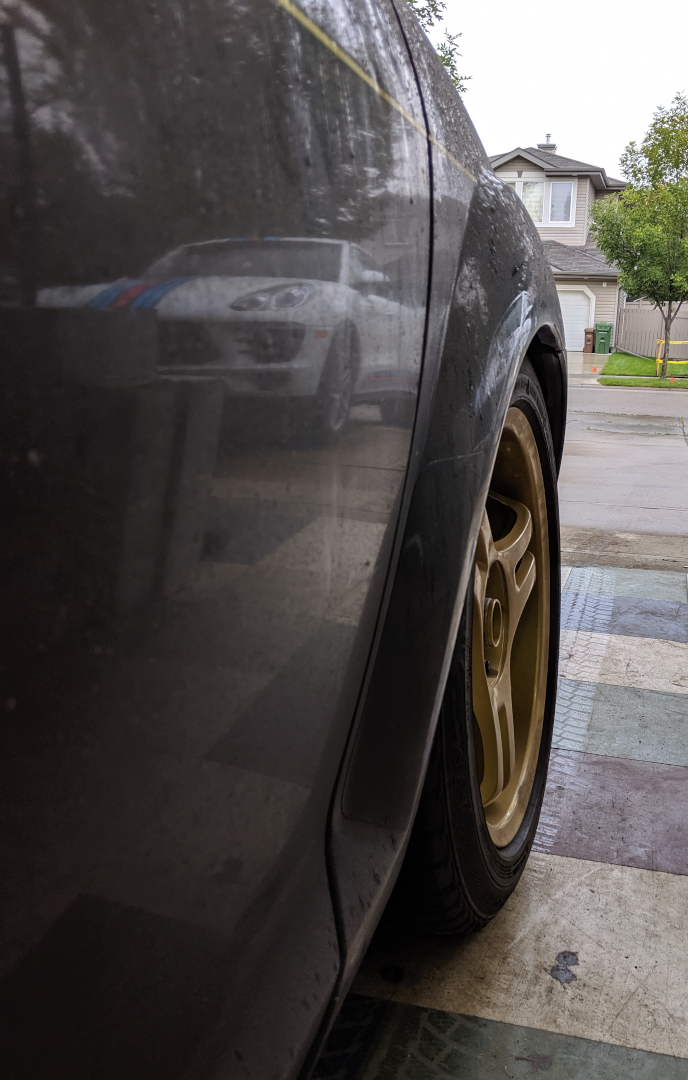 It also needed a wash. Reflection isn't to shabby though.  Last year when the car went up on jack stands, there was still snow on the ground. Hence the winter wheels. They're 17" and there is maybe 5mm of clearance between the barrel and caliper. 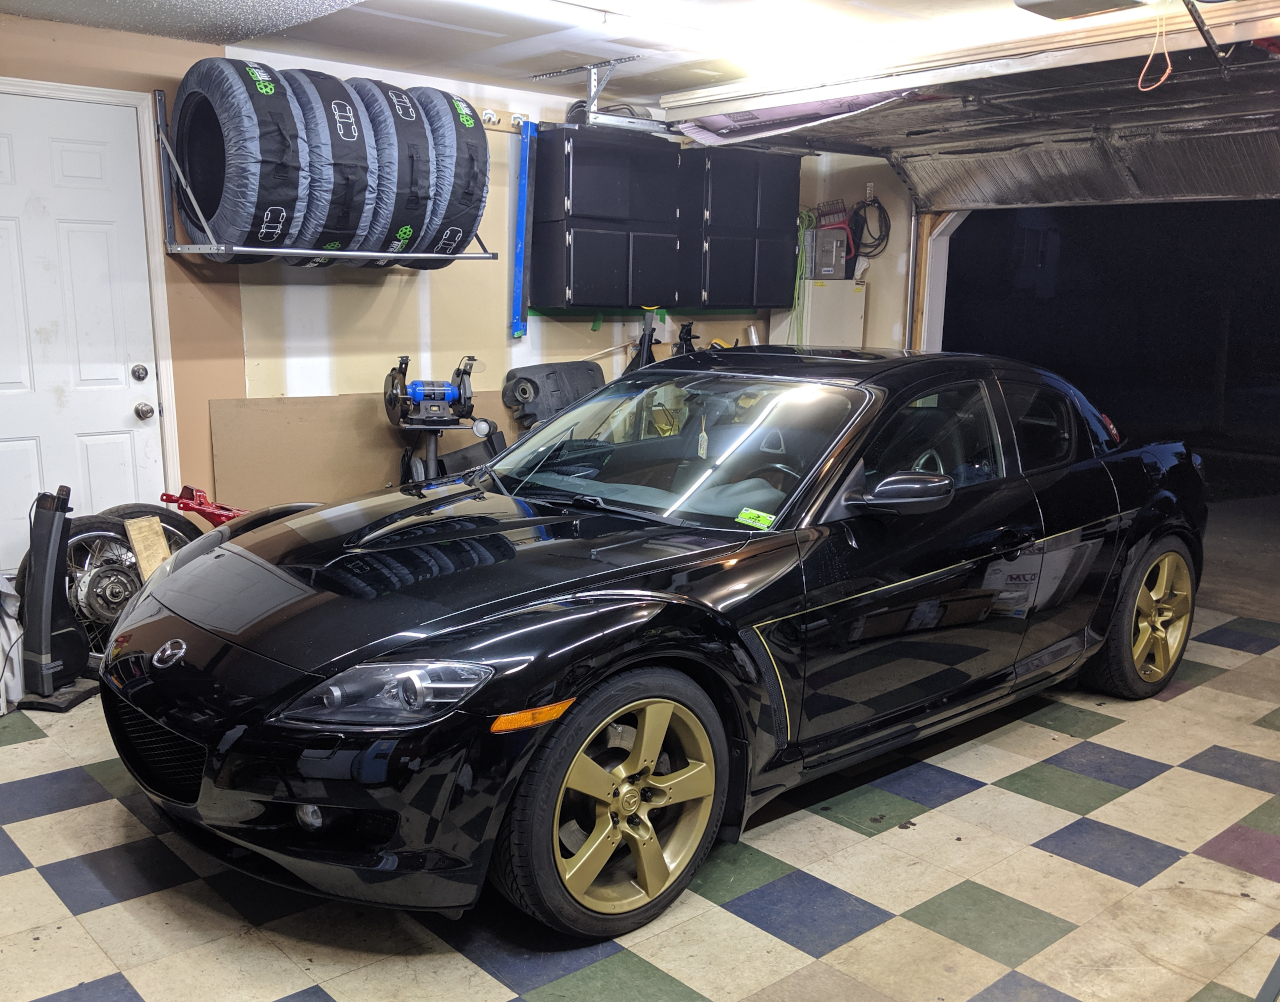 At this point, it was the end of August and I couldn't burn off the winter tires, to on went the factory wheels with summers. And with that, the suspension work on the RX-8 was completed. One vehicle down, one to go. 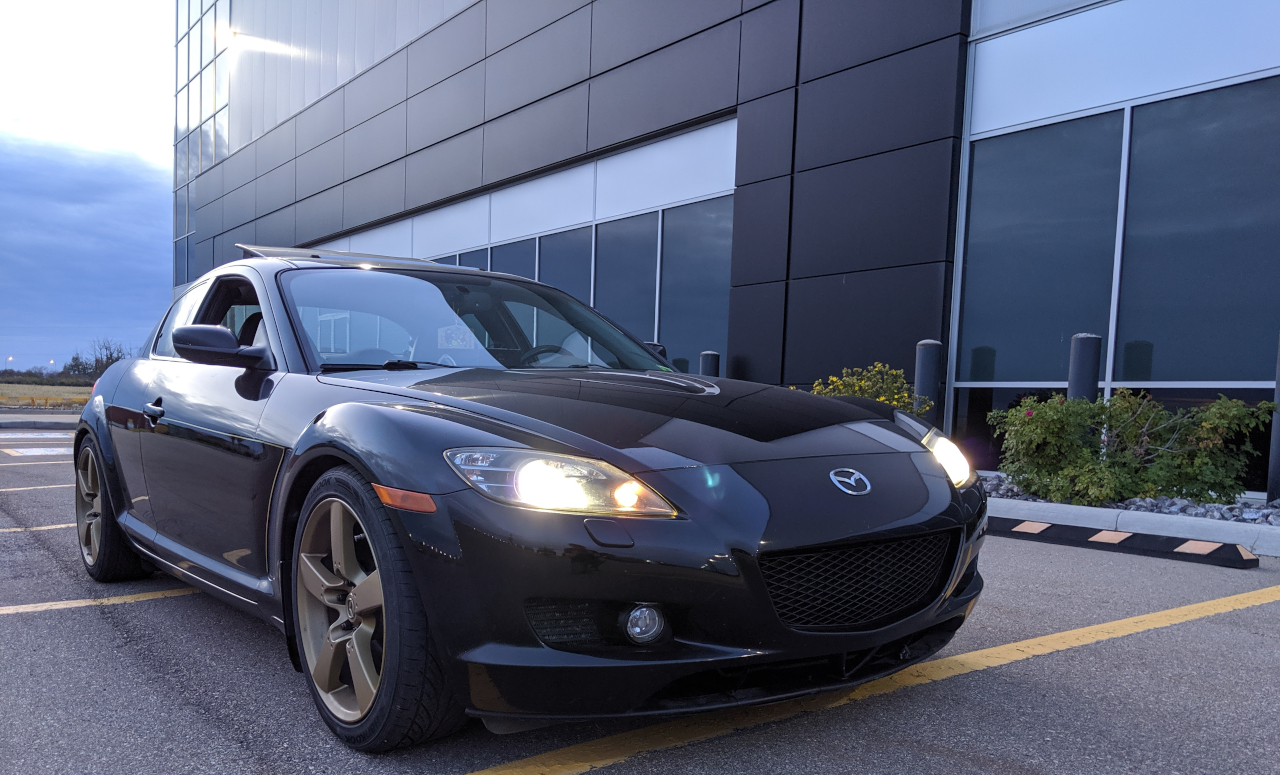
|
|
#
¿
Oct 28, 2019 02:42
|
|
|
With the RX-8 complete for now, it was time to install those DJM and Bilstein parts that have been sitting around in the garage for close to a year. Except that DoritoPower bought a future drift missile over 800km away and need the rotary support vehicle to do it's thing.  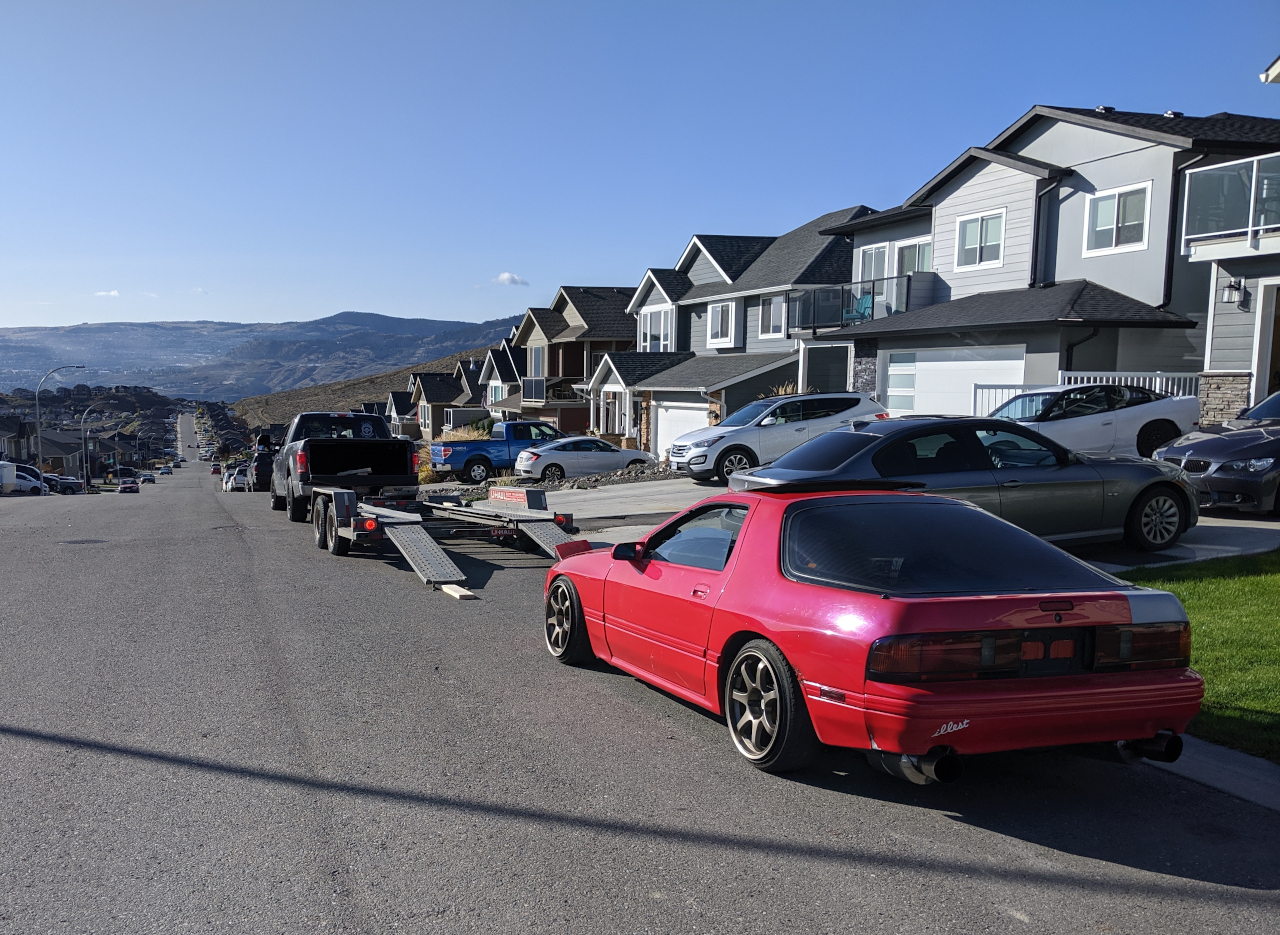 FC's have gotten expensive in Canada and this was the only decent deal he could find. Over 800km away. 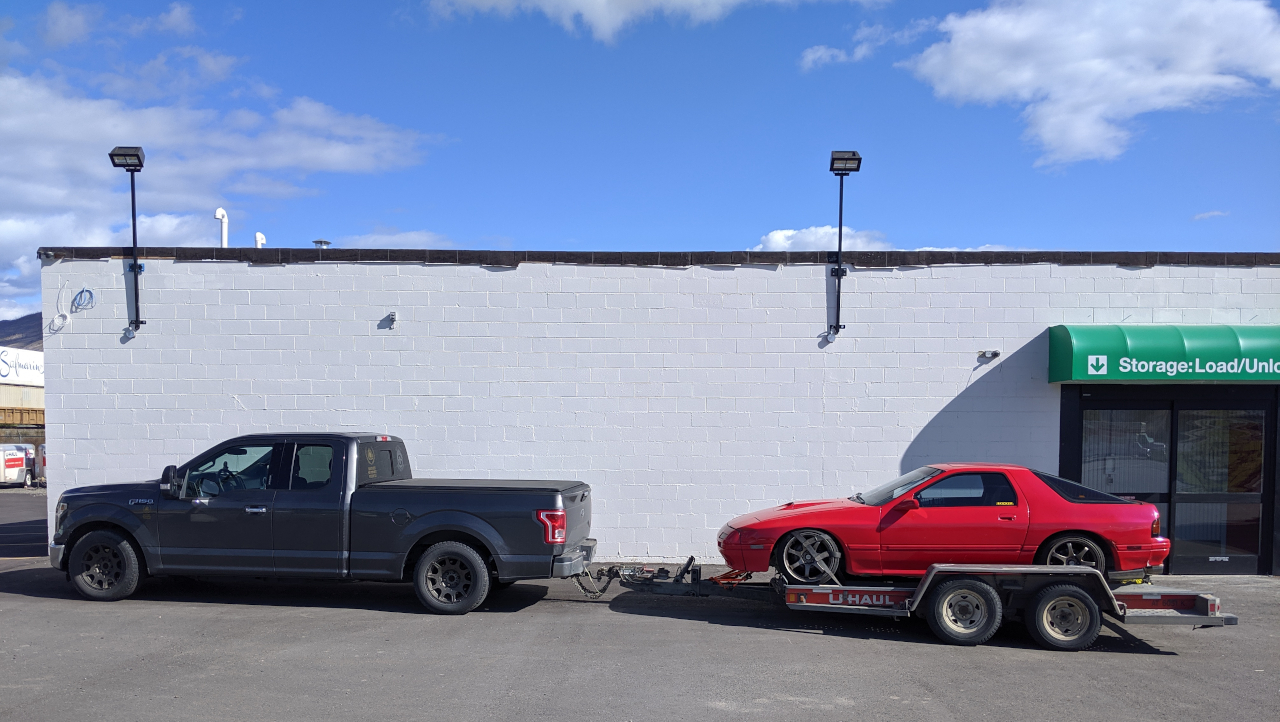 Since the trip was going way to smooth, the rear drivers side trailer tire decided to pick up a roofing staple in Kamloops, BC somewhere between the motel we were staying in and the sellers house (~10km distance max). This is why everyone should be like DoritoPower, he bought the roadside insurance on the trailer rental. Total delay leaving town, just shy of four hours. 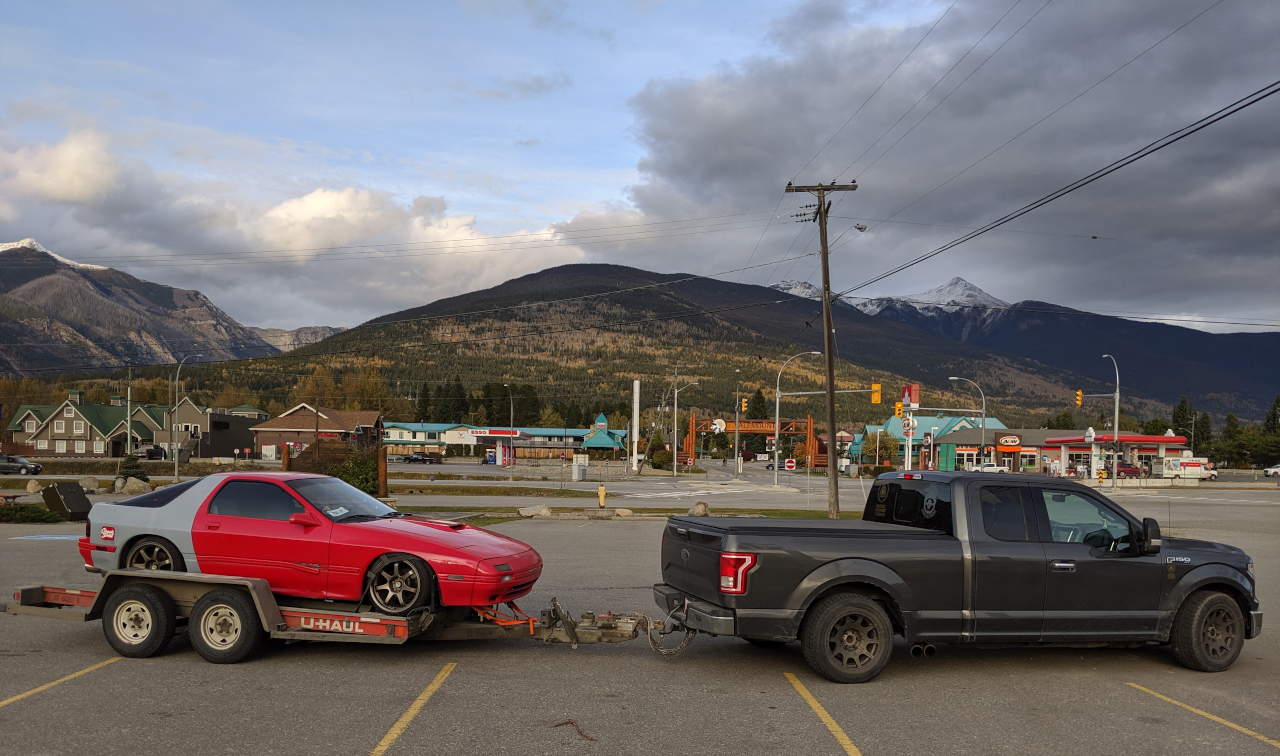 Had to stop and stretch our legs on the way back in Valemount, BC. 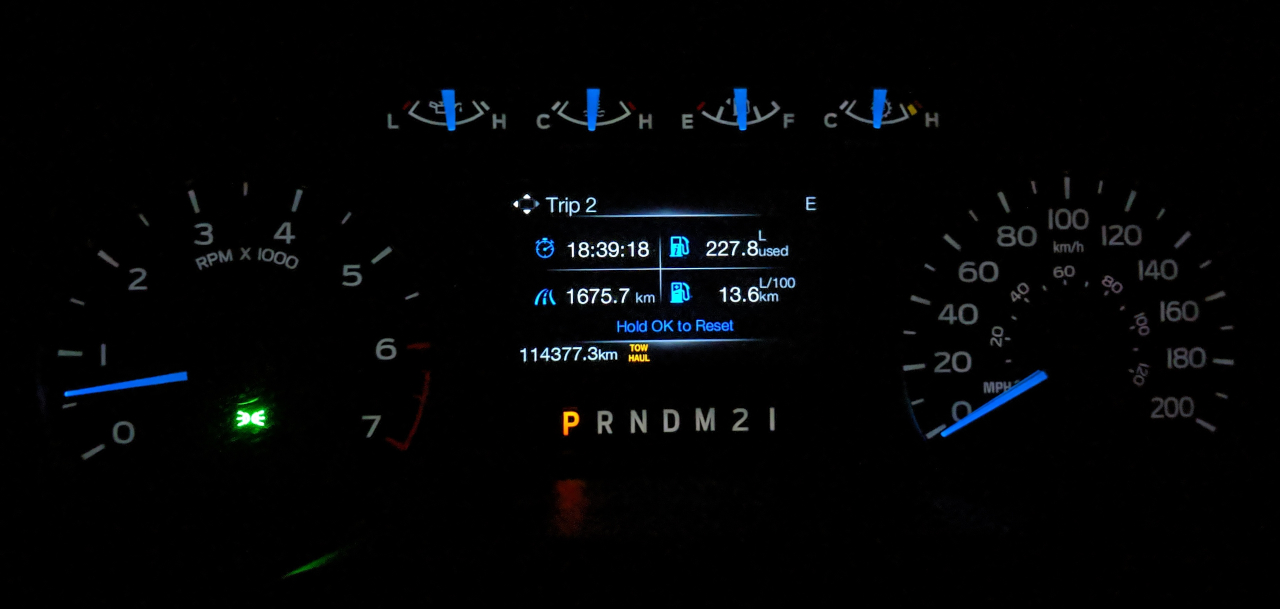 We made it back to Edmonton around 0100, I think. Just like Sweet Chili Heat, it gets better fuel economy being towed on a trailer than moving under it's own power. I am continuously trying to convince DoritoPower that he needs a thread of his own. Between his FD, his hawk eye wagon, his Aristo and now the turbo FC drift missile, he's properly AI.
|
|
#
¿
Oct 28, 2019 03:07
|
|
|
Slowly getting caught up with the present. On October 19, 2019, the final phase of "The Lowering" could commence. Massive image dump incoming. I will add commentary as time allows.  This is the truck with 2" lowering springs and a a 2" drop shackle.  Current front air dam ground clearance courtesy of the last bastion of Canadian air travel soda.  The rear wheel gap causes my physical pain whenever I see it. This is with a 2" drop already. 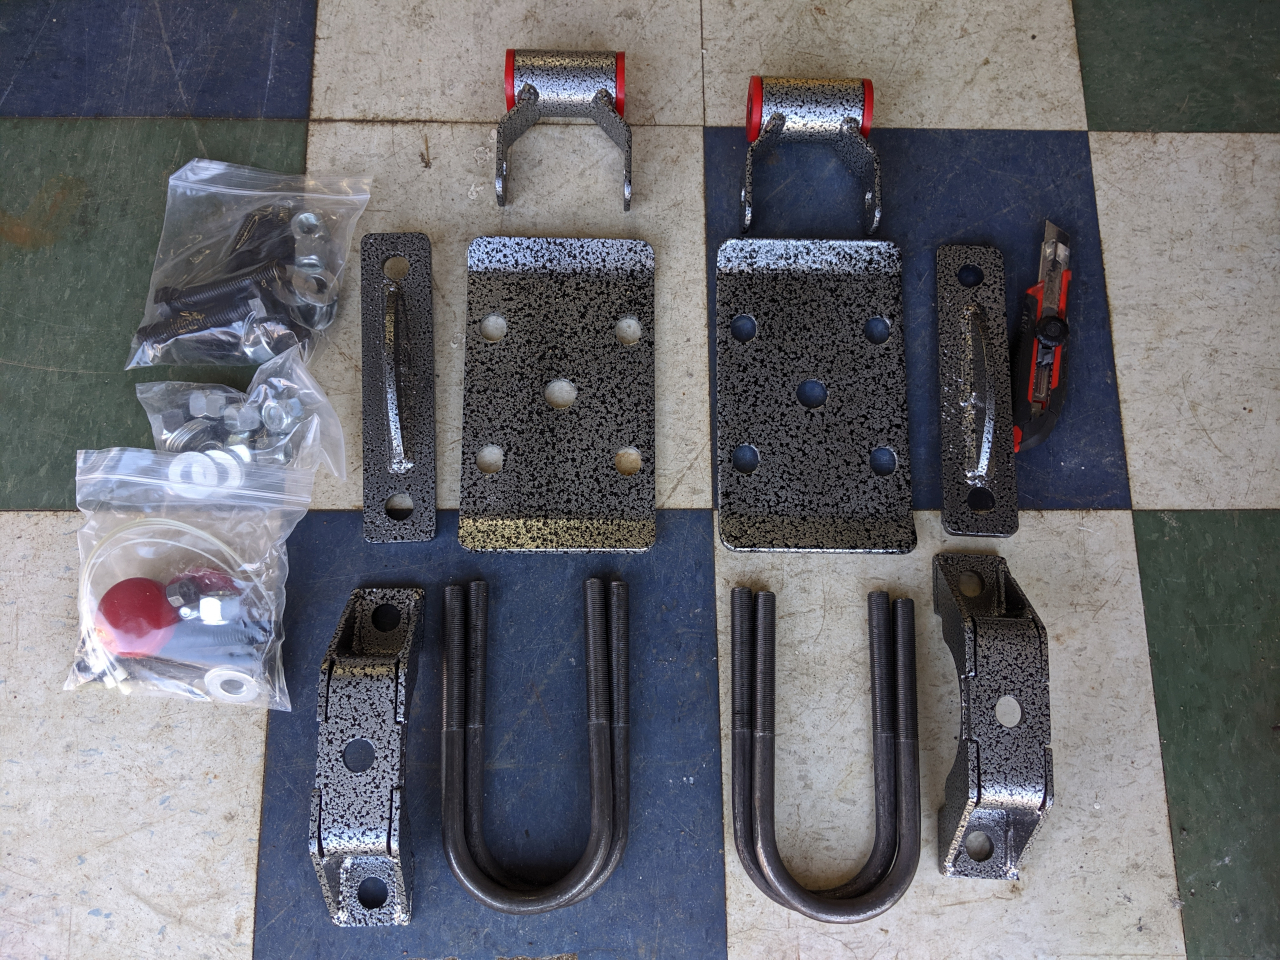 The rear axle flip kit from DJM. Left to right: Grade 8.8 bolts and stainless nylock nuts, bump stops, axle clamp brackets, spring plates and U-bolts. 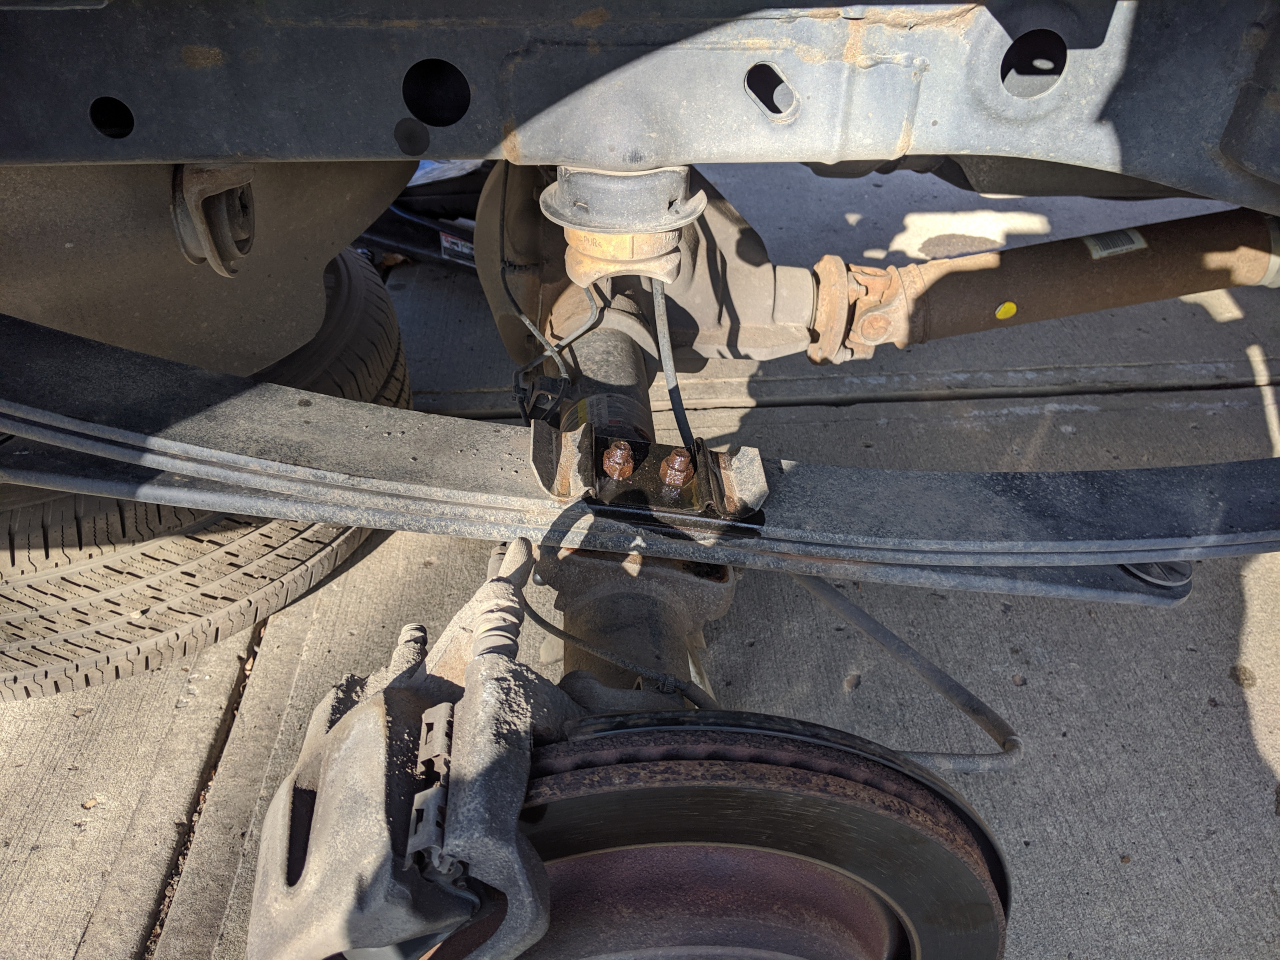 The usual time crunch lack of pictures apply. The factory U-bolts run left to right and have been removed. The spring plate is sitting on top of the leafs with the leaf pack/alignment bolts/nuts soaking in seafoam deep creep. The factory bump stops are massive in comparison to the new ones from the flip kit. 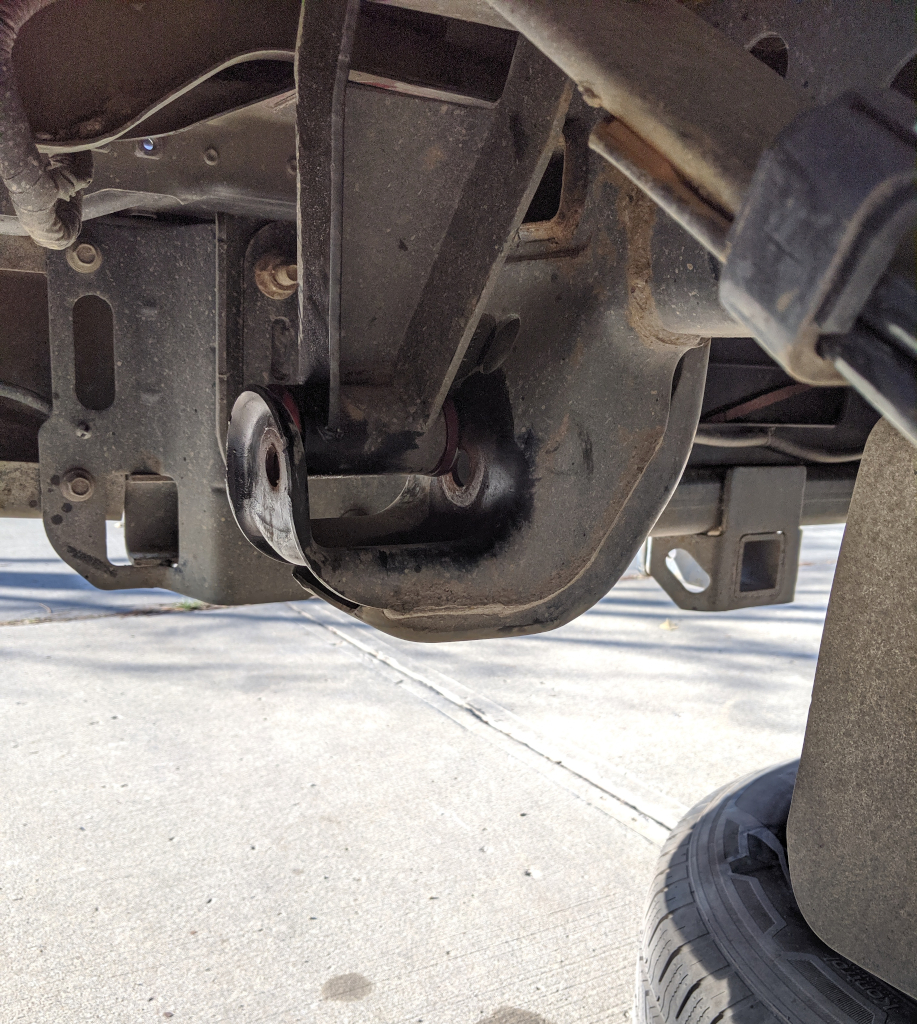 All rear shackle bolts had to be cut out. They were removed just over a year ago for the 2" drop shackle. They should not have been seized inside the bushing sleeves but just like the RX-8, it seems that is a constant in my life now.  In order to move the axle above the leaf springs, the passenger side leaf has to be disconnected. The other option would have been to disconnect the diff from the driveshaft but given the state of all fasteners up until now, I didn't want to chance breaking the flange bolts. The springs bolts are significantly larger and less likely to round off, snap or otherwise deform.  The flip kit consists of three components. The new rear shackles, axle to spring alignment/mounting bracket, spring to axle clamp u-bolts. The lower clamp bracket has holes in it that sit in the spring pack bolt heads.  Passenger side bolted together. The axle clamp brackets use the factory spring mount plate as the pinion alignment method. Depending on how the two bolts are tightened, it rotates the axle. Equal gap front to back is 0 degree pinion angle. the new bump stops also buy back some of the suspension travel lost. The new Bilsteins are universal units with 7.6" of travel. Ford runs the parking brake cable in front of the passenger shock. The flip kit does not have provisions for bolting the cable bracket back in place. There is a bolt from the clamp bracket provided that allows strategic use of zip ties.  The new U-bolts protrude as far down as the factory shock mounts. I might trim them, I might leave them. 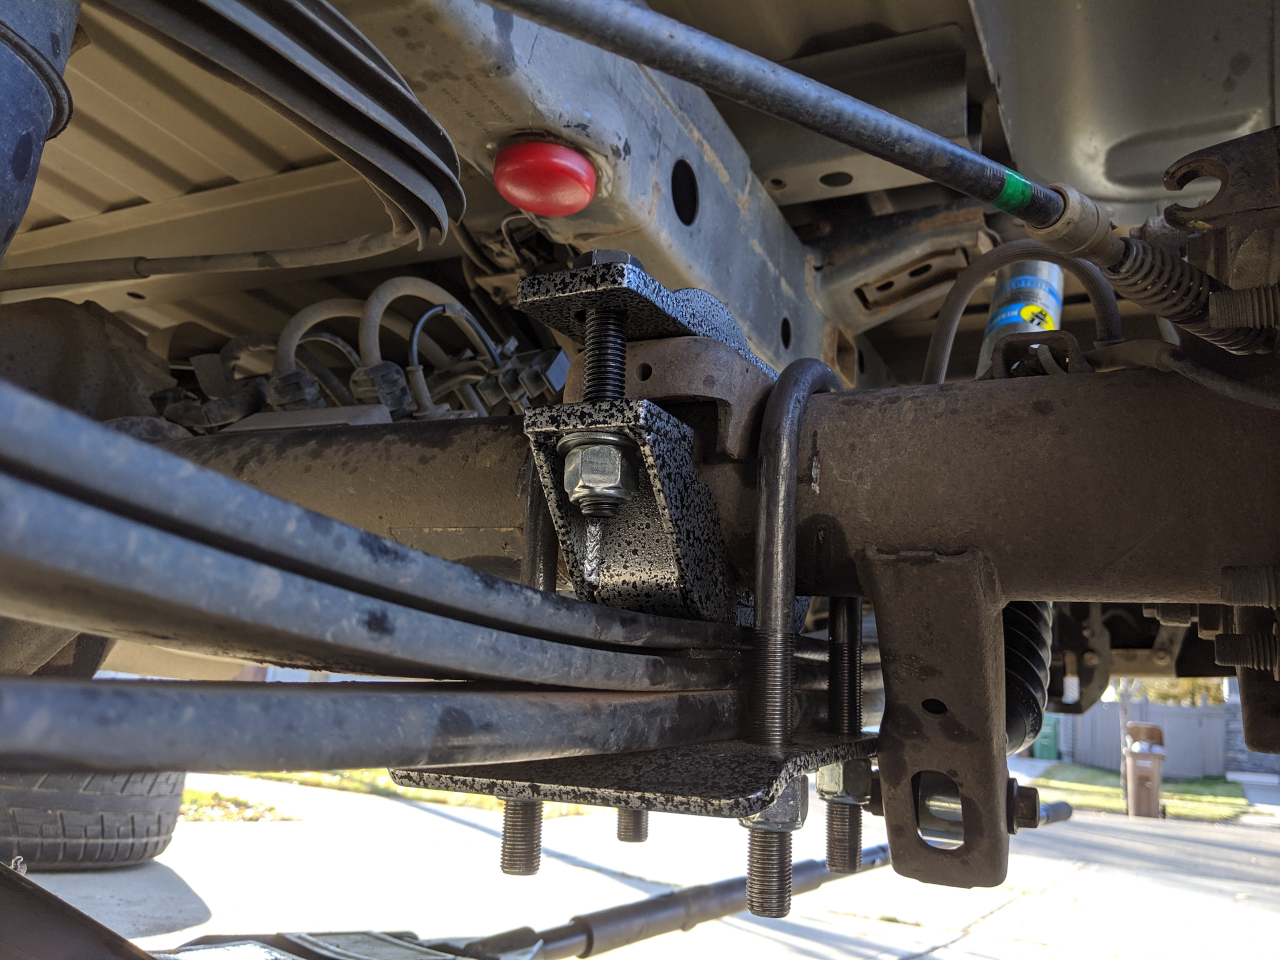 A better shot of how everything fits together on the drivers side. 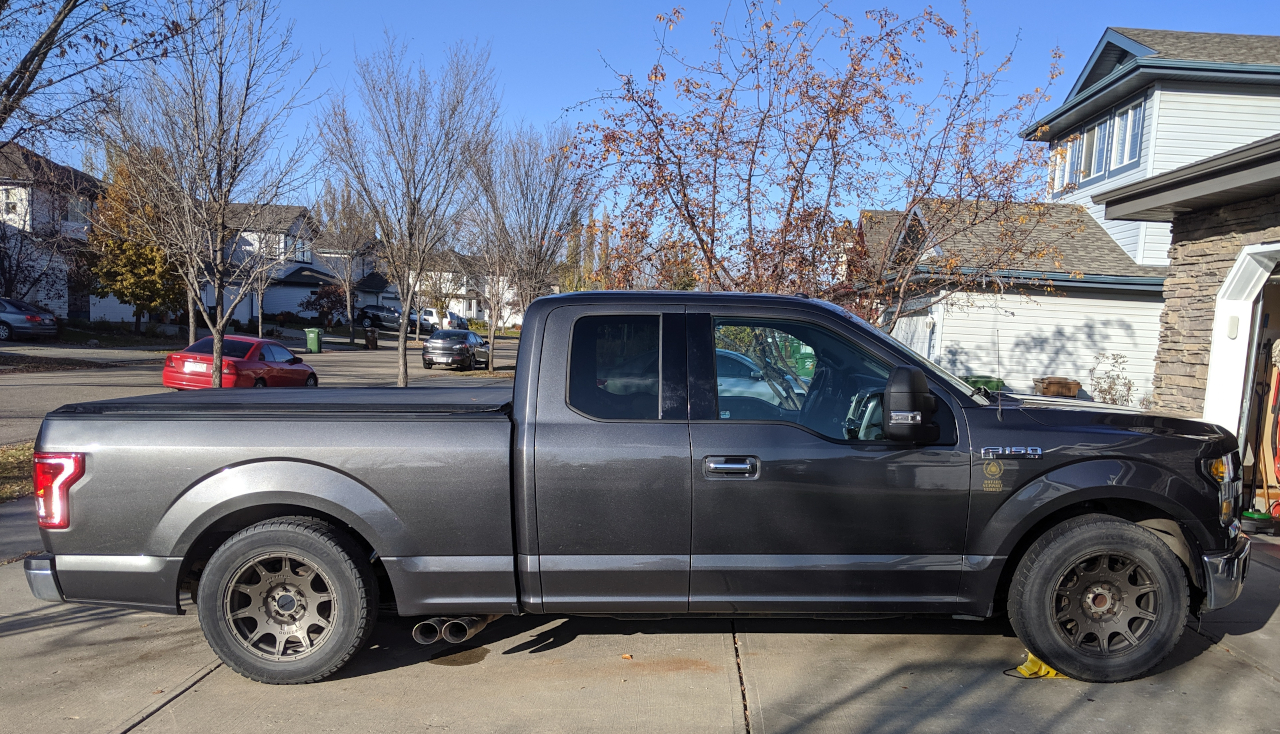 New ride height in the rear (with the gear) after the flip kit installed. 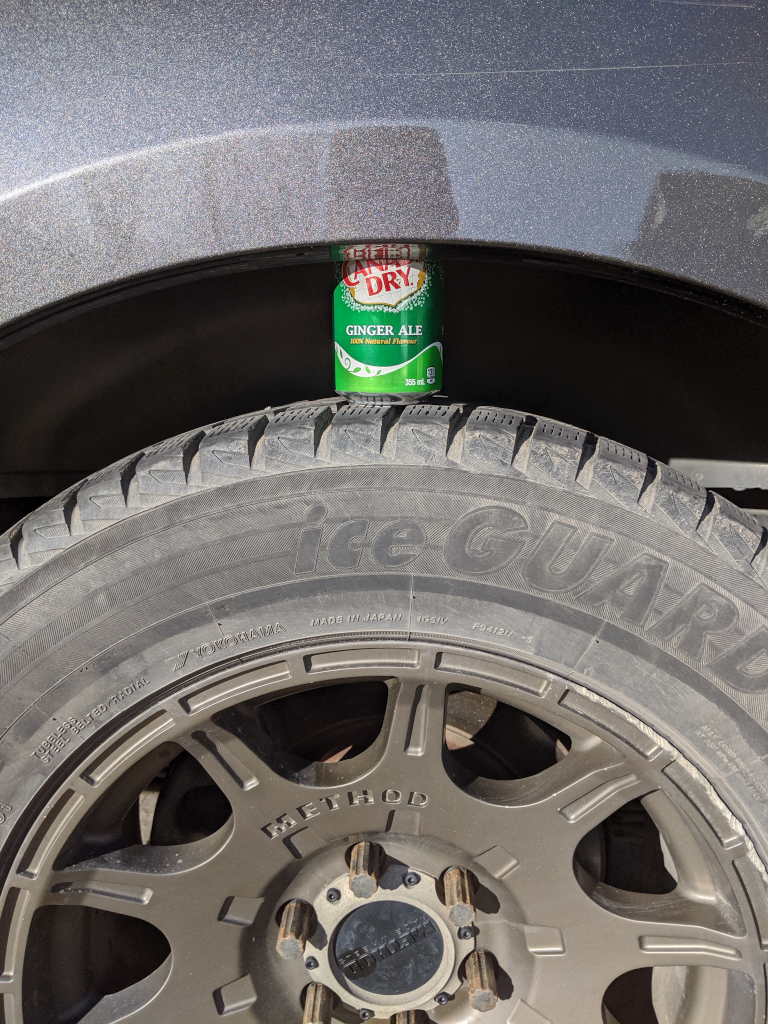 This is a much better wheel gap. 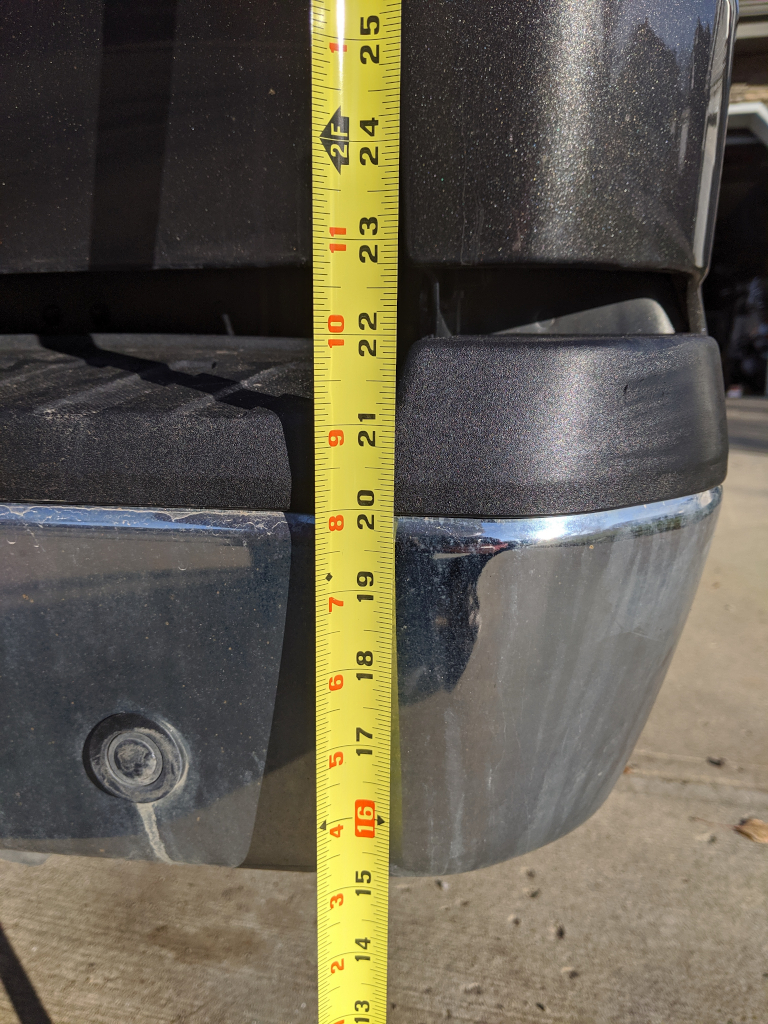 New rear bumper height. Still within provincial regulation height and the bed is now much more usable. I now drop things down into it instead of lifting things up. 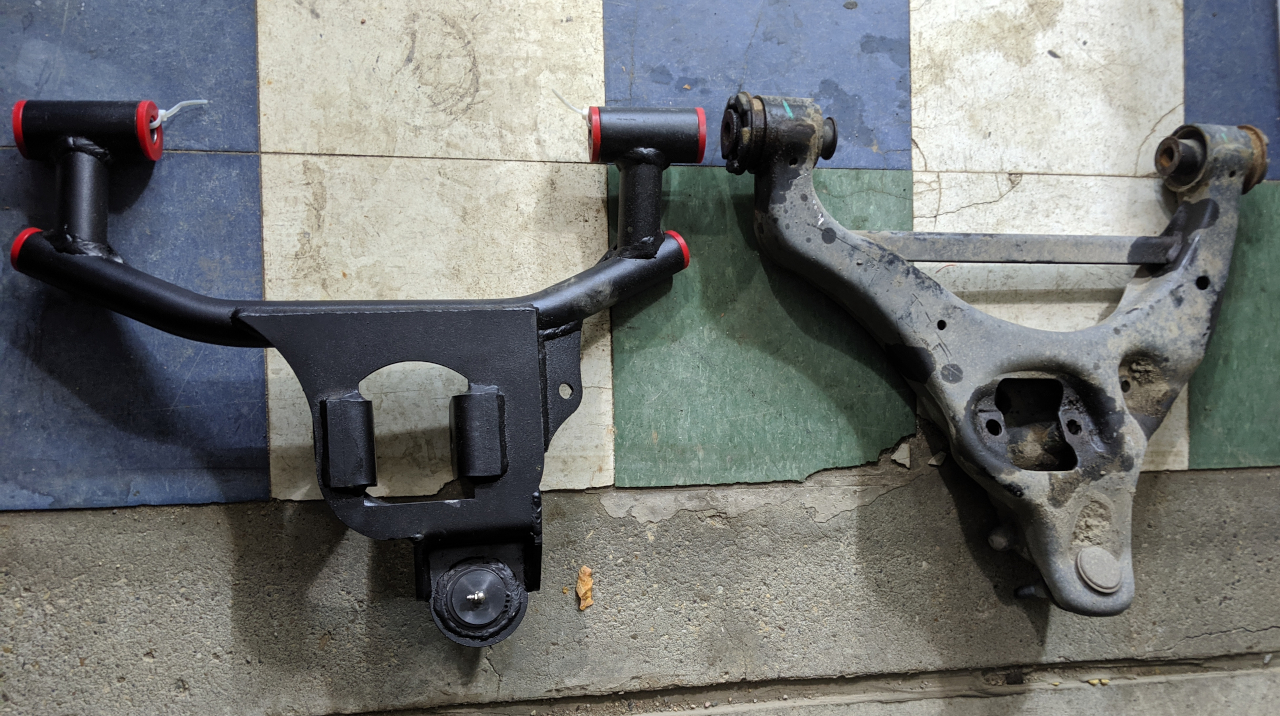 New control arms vs factory. Lowering is achieved through lowering the shock mount and ball joint location. 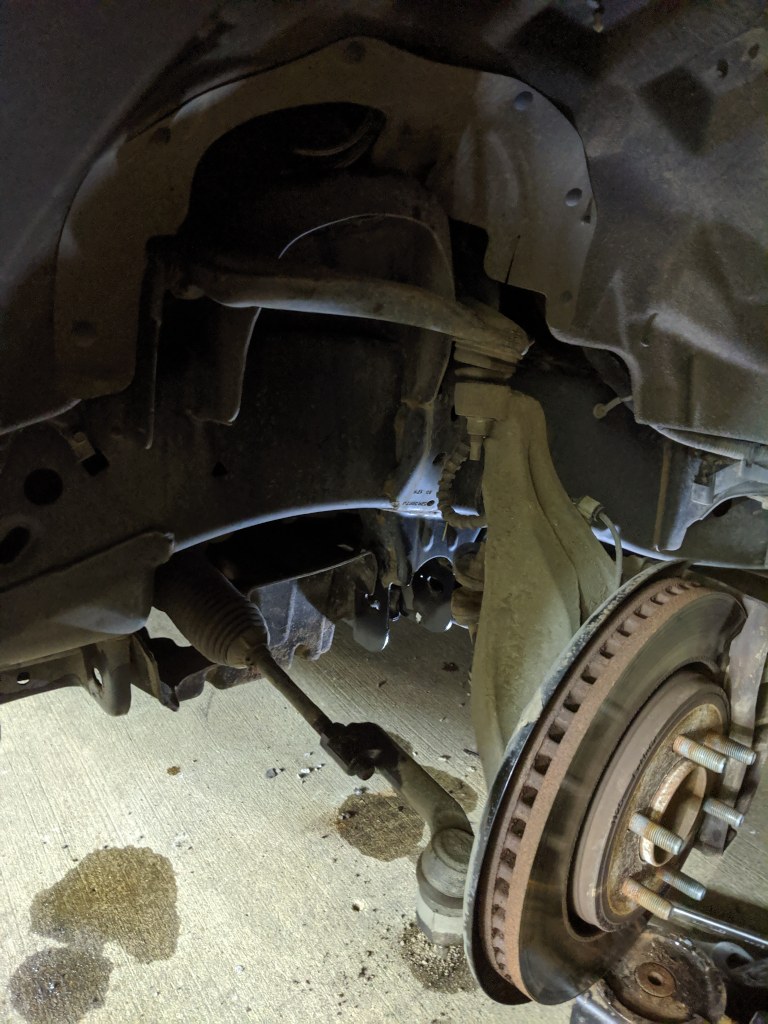 Something is missing here... 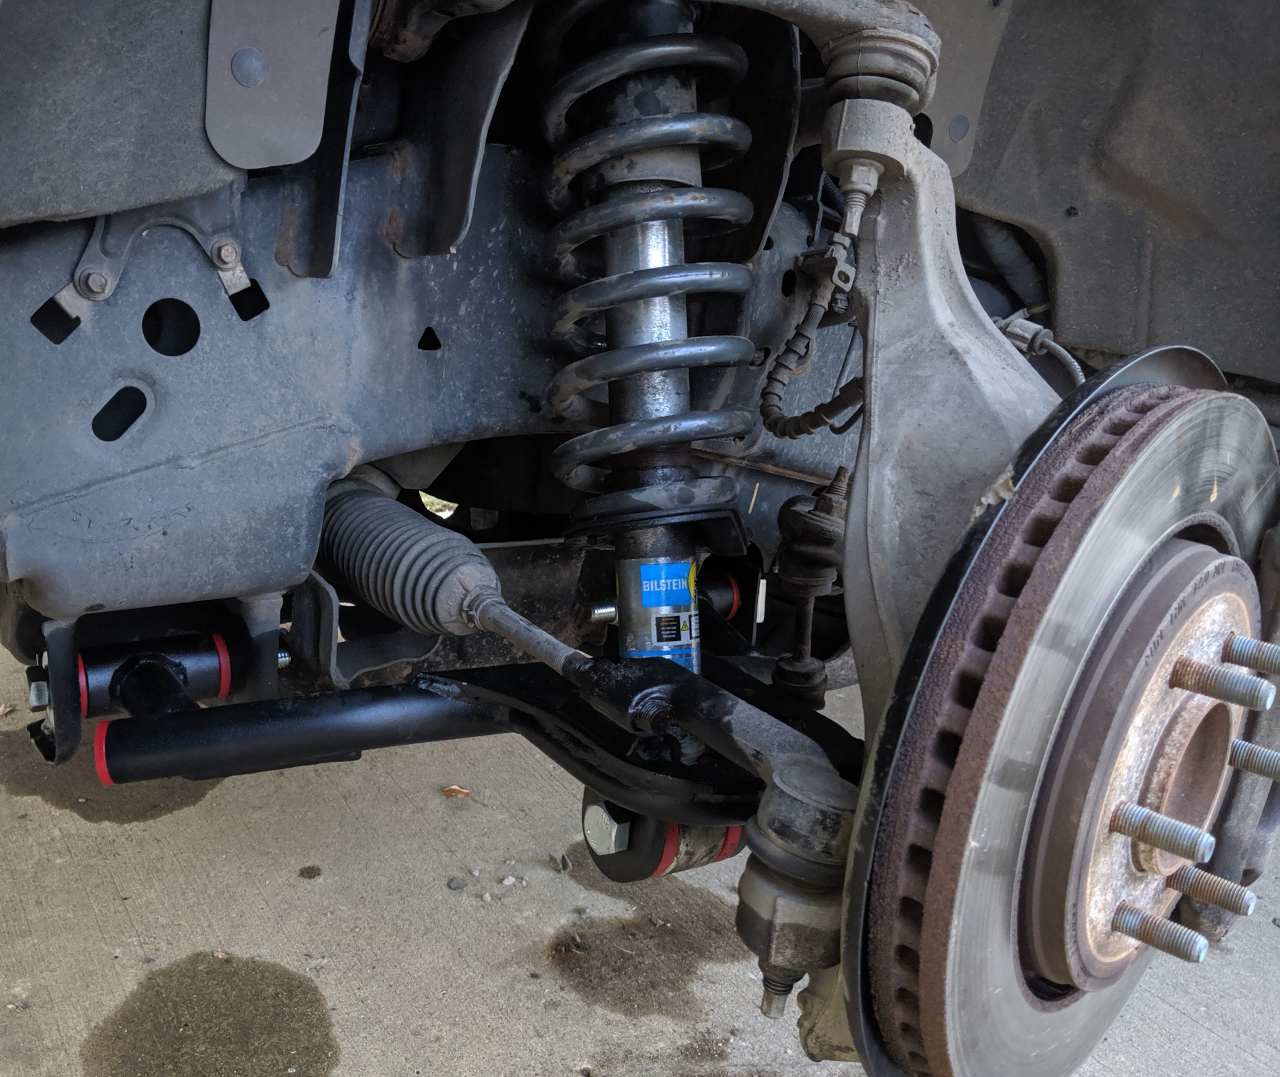 That's better. 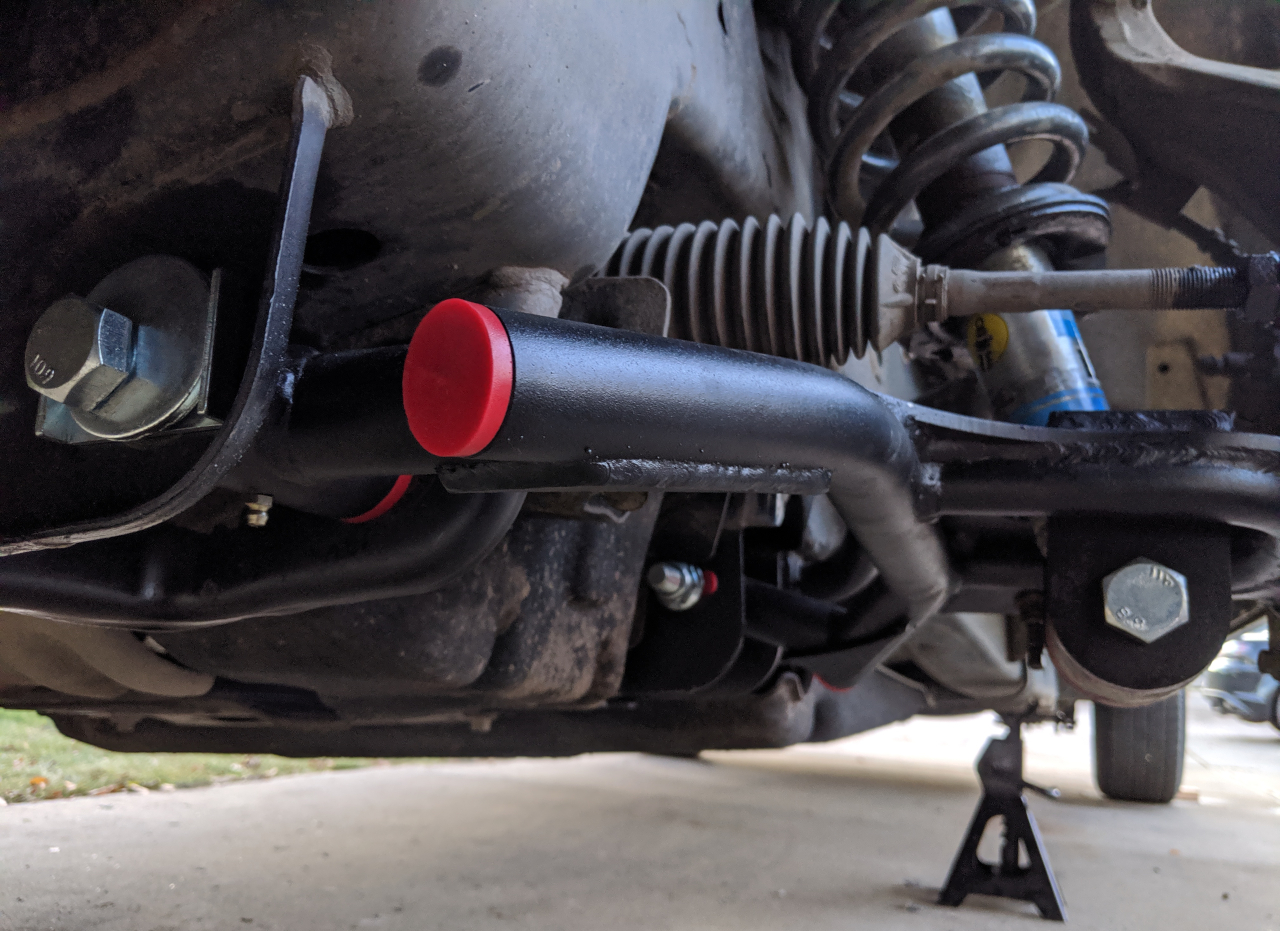 New Moog alignment bolts. The new LCA has zerk fittings for all bushings and ball joints.  The front end is now lowered 5". I might have gone to far. https://www.youtube.com/watch?v=_mFxUIH5IaE Edit: Comments added. McTinkerson fucked around with this message at 03:57 on Nov 17, 2019 |
|
#
¿
Oct 28, 2019 03:54
|
|
|
Powershift posted:Around here the problem isn't the snow, it's what's under it. The kit allows infinite drive-line angle adjustment due to the clamp bracket design. (Also added this into the comments of the post in question.) The shop I took it to for its alignment made the final angle adjustments. It is within 1 degree of factory spec. I also had to raise the front up since with a 5" front drop there were some issues. The truck couldn't drive onto any alignment rack into the city. The steering rack boot rubbed on the LCA at full lock under compression and the rake was back to factory. Luckily, the Bilstein front shocks have 2" of adjustment in them. Not so luckily, the top hat/shaft nuts were seized like every other fastener. I dropped the front units off at a local shop for disassembly since they have a caged spring compressor and shock shaft vice grips. Good thing I did. Apparently the drivers side shaft decided to make a break for freedom from the body upon disassembly and may or may not ended up in the ceiling... Due to insurance reasons, the shop declined to let me take pictures. They also threw out the shock parts. Apparently, the shaft seal let some of that wonderful calcium chloride in and things got ugly. Bilstein North America also had that specific model on back order continent wide. (I wonder why?) Enter a two week delay and the truck up on jack stands. Could have been worse, it could have failed while I was on the highway. Everything is back together now. Front is raised up to maximum height with the shock adjustment. Which is still a 3" drop in the front.   Steering rack boot to LCA clearance is good. I could use shorter swaybar end links however. I will leave them until the spring. Then I'll decide of I want to lower the front half and inch which will still keep the rack boots happy.  Factory rake is eliminated. Overall 3" lower. Front fender TDC to ground 32.25", rear 32.5".  There is still hope that the air dam will survive.  The lowering is concluded. For now. The front allows another 1" and if I install the factory 4x4 spring spacer, the rear goes down another inch as well. Lowering the rear any more will absolutely require a c-notch and I will have to shorten the rear driveshaft. Edit: I totally forgot, I also will need new adjustable upper control arms if I lower the front any more. Best front camber is -3 degrees with stock uppers at a 5" drop. McTinkerson fucked around with this message at 21:13 on Nov 17, 2019 |
|
#
¿
Nov 17, 2019 04:36
|
|
|
Project status update! Truck is good. Lowering continues to be awesome. I desperately need traction bars though. It axle wrapped bad in stock form, now it's really bad. Going to try and enter the truck in some winter rally-x and ice lapping events next year (January through March). Black Friday sales have come through for me as hoped and I now have Versatuner for the RX-8. The stock ECU is now my bitch. Flat foot shifting, launch control, full ignition and fuel control as well as oil injection rates are now fully open for modifications. Who wants to start a betting pool for how long the factory muffler lasts?
|
|
#
¿
Dec 2, 2019 01:07
|
|
|
sharkytm posted:Six braps. Let's find out! First off, let's start with the canned tune for modified intake and exhaust. Then bump down the rad fan enable temperature setpoints from 97->88 and 101->95   Now it's off to load this into the ECU and start tweaking fueling and ignition tables. Maximum Rice Crispy Mode� to follow soon. Edit: Oh dear... 
McTinkerson fucked around with this message at 23:45 on Dec 14, 2019 |
|
#
¿
Dec 14, 2019 22:46
|
|
|

|
| # ¿ May 10, 2024 07:41 |
|
|
Factory RX-8 muffler is still alive. Rice crispy mode is at 80%. Reason for it not being at 100%: Positive that there's a bug in the latest version of Versatuner for the S1 RX-8. The decel fuel cut table doesn't work. Need to get more datalogs to prove it and forward them to the Versatuner devs. AFR's go full lean whenever I let off the gas in gear above 3k rpm and the fuel flow goes to 0. Which is factory settings based on coolant temperatures. Except I have the fuel cut table set to cut fuel above 9800rpm. So something isn't right. For now, the lowest engine load ignition and fueling tables have been properly massaged. So I can get burbles, pops, bangs and fire on command by playing with the loud pedal. However, can not get them automatically when in gear decelerating with the throttle pedal at 0. I need to get a gopro stuck to the back bumper regardless because above 6k rpm, it's toasty back there. As for the F-150, lowered life is great. Zero drive-ability issues except for one. With the rake reduced to almost zero, the weight balance has shifted rearwards. This has made the axle wrap worse and wheel hop above 50% throttle from a stop is a guarantee. Timeline on traction bars will be accelerated to as soon as financially possible. Edit: Versatuner table screenshots added.     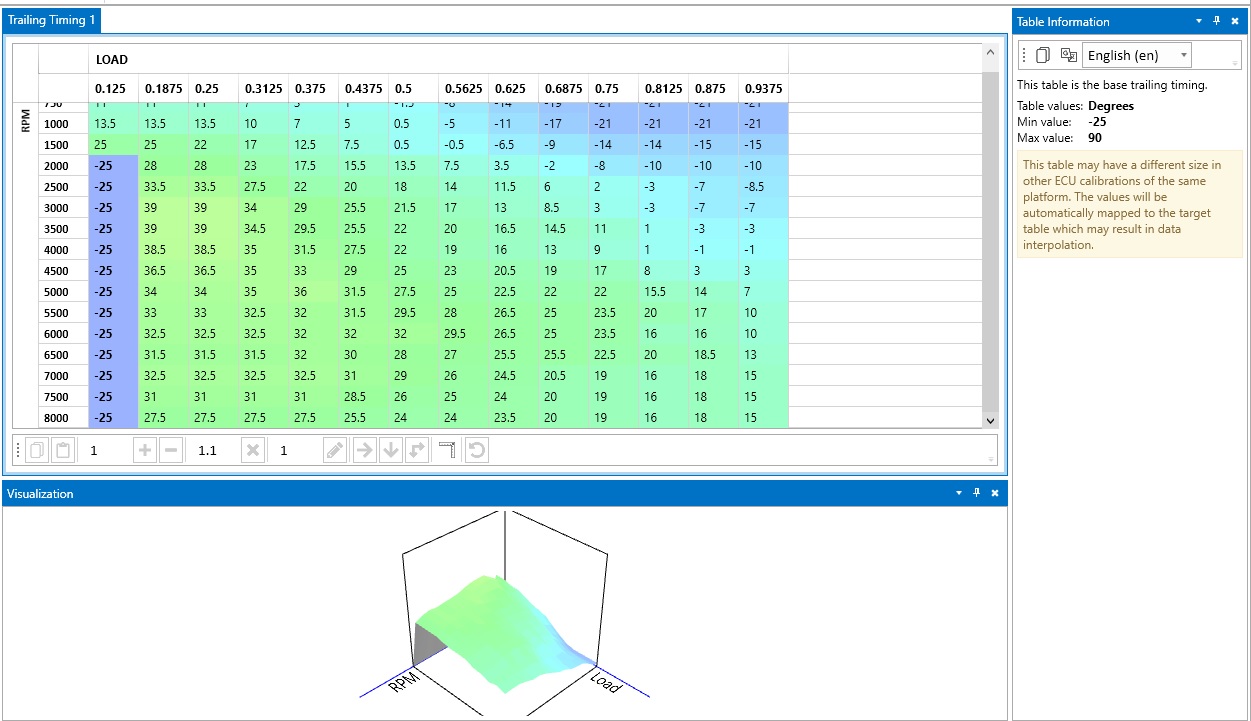
McTinkerson fucked around with this message at 23:33 on Jan 26, 2020 |
|
#
¿
Jan 26, 2020 23:22
|
|