


|
StormDrain posted:Floor and doors done. That lizard skin looks nice. I was thinking about that for the scout floor, but wasn't planning on any carpet on top. How's it feel to the touch? is it going to scrape elbows/knees working on it?
|
 #
?
Sep 13, 2021 21:30
#
?
Sep 13, 2021 21:30
|
|


|

|
| # ? May 6, 2024 10:14 |
|
|
I wouldn't have it as a top coat. They sell a topcoat for it, idk what that is or what the ceramic coat is like either. I'm not expecting a heat problem, so I'm not going to use it. As you can see it's flat, and it's rough. I've been thinking on what I can do to cover this in the meantime. I'm potentially going to do a full dynamat layer on top, or scrap carpet as a front floor mat so I can climb in and out without scraping it with my heel every time. Edit, bedliner and a schutz gun are a heck of a lot cheaper too. Or this dynadeck stuff seems like a good floor choice.
|
|
#
?
Sep 13, 2021 23:42
|
|

|
Mustache Ride posted:That lizard skin looks nice. I was thinking about that for the scout floor, but wasn't planning on any carpet on top. How's it feel to the touch? is it going to scrape elbows/knees working on it? OK I went and gave it a test now that it's cured and honestly not so bad, still flat and wouldn't use as a finished product but not as rough as I thought. Also spent about an hour clipping off old wire wrap and putting new stuff on, you sent me the best tool I had for it. So thank you! 
|
|
#
?
Sep 14, 2021 05:43
|
|
|
Idk how well it would work on that style loom but I've found stitch removers to be excellent for removing loom and tape. https://www.amazon.com/Dritz-638-Deluxe-Seam-Ripper/dp/B0001DSIVY/ref=mp_s_a_1_3?dchild=1&keywords=stitch+removal+tool&qid=1631616419&sr=8-3
|
|
#
?
Sep 14, 2021 11:48
|
|


|
Thanks man, I'll look at their top coat. Once you get it out on the road (hopefully soon!) I'd be interested in how well it keeps noise down.
|
|
#
?
Sep 14, 2021 13:27
|
|
|
Reposting from the what did you do today thread. I put a solid 25 miles on the Binder. Made a round trip to wash the windshield and rinse it off, got lunch, and back home where it died as I was reversing it. IR temp gun had the fuel bowl at a toasty 145° F. I picked up a starter heat shield and put it between the carburetor and the thermostat/upper rad hose neck and things seem to be better, I put the bulk of the miles on after that. I was in a lot of conditions that have caused it to die in the past, warmed up and hot and then stopped at a light for a while using little gas where the bowl just boils off, and I got home without issue. I also took a minute to check the carb settings, I had the dash pot way too low, idle was being set by the fast idle cam, not the dash pot where it should. Then I set the idle again, then set the fast idle cam and straightened a section out that had bent and it wasn't lining up. Tuned the mix screws according to the vac gage. Having the dash pot set right does make a noticible difference when I drive, it's a bit smoother when I let off the pedal. Tomorrow I'm going to try to tailgate with it. I'm nervous! I'm sure I'll get there. I'm not fully sure I'll be able to get in to park. I hope I get back. The starter has started sticking which sucks. Not sure if that's from heat or just the fact that it's old and I've been abusing it this year.
|
|
#
?
Sep 26, 2021 01:20
|
|
|
Today's theme is planning ahead. I just ordered a u joint for the steering shaft because the rag joint doesn't fit. Now I knew it didn't fit. I didn't want to buy the u joint. My plan had been to make a new lower mount for the column that would accommodate the rag joint by extending up further. I even cut the column to match that plan. I've now decided I don't want to fabricate that piece, I just can't quite figure it out. So now I'll be welding that section of the column back on lol. I'll have to paint it to look nice too I think, really the column could use a touch up but I didn't want to try to figure out what paint to get. Here's some photos for reference.   As you can see with this box the joint has to do the hokey pokey with the body. Put one end in, put another end out. Let's end on a better note. I don't know where I got this idea, maybe from yall? I need a kick down rod that is not made by anyone and I haven't seen any for sale. Easy enough to bend one. Easier still to use a section of copper nickel brake line to make a 3d template. I actually think I nailed it on the first try. I wish I could alchemy it into steel! I do need to seek out bushings for each end for the real deal, confirm size, I think 1/4", and work out securing it. I could probably cut a channel and put a small C clip on it. It's the copper piece with my thumb on it. It worked just fine despite how weak the copper tube is. I'm pretty happy because I've been needing this forever and really unsure how I was going to do it.   I did some super minor things too like mount the high beam switch and put foam on a light holder. I have some other loose ends to pick up but I'm waiting on stuff to come in the mail. And I didn't feel like starting bodywork on my fenders yet, since it'll eat up some space.
|
|
#
?
Oct 2, 2021 05:46
|
|
|
The steering shaft U joint came in and I definitely should have used this from the beginning. Of course when I ordered it I didn't know the joint would end up where it did, so oh well. My dad painted right across this before and the paint is not adhered to this rubber well, but not so loose I could just peel it off. Annoying! I will have to spend an afternoon peeling it off, because I cannot stand the way it looks. The view from inside. The u joint fits comfortably in the steering tube with one exception, the set screws stick out too far. That was easily fixed with a visit by a cutoff wheel though. I have to slide this mounting plate down just a little bit, 1/4" or so, all of the holes are oversized and this should be easy.  Next up, welding the steering column back together that I cut! I at least got to use these little clamps that I bought last year. I was able to weld this up no problem.   I even got it aligned straight! I sprayed some aresol primer on it just to protect it. Next time I mix up epoxy I'll sand this down and spray it again. I also am going to have the paint matched and spray the whole thing, it could use a refresher. I know it won't happen for a while though, so rattlecan primer it is for now. That's all for a couple of weeks I think. I hope my wheels get here soon so I can move the car around. My wife would appreciate a wintertime parking space too. Things I'm waiting on: Wheels Radio Shifter boot Transmission gaskets All ordered, all in the aether. Things I can do in the mean time: Fender bodywork Install the steering column Get paint matched Fix rust on the convertible top bow Finish the kick down rod See yall in a month!
|
|
#
?
Oct 11, 2021 17:10
|
|
|
It's a little late now but for moving cars around in the garage, those little $10 harbor freight dollies punch way above their weight. You can set a car on 4 of them and roll it around with no problems. I even went over garage seams. Like this: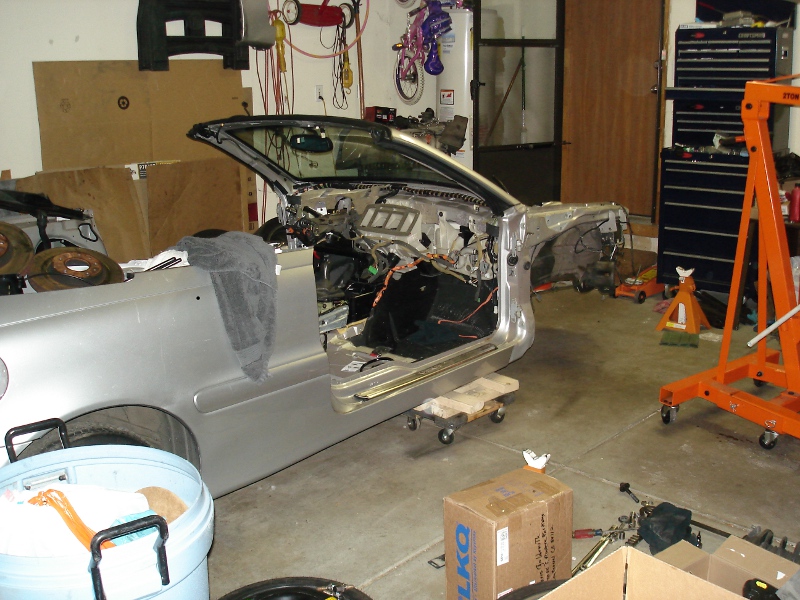 I've used them on complete cars too, not just stripped ones.
|
|
#
?
Oct 12, 2021 22:53
|
|


|
Oh dang that's legit. I have been considering wheel dollies but I ain't got no wheels. I can put the rear ones on still and dolly them. Also the issue of the cracks and elevation changes in the garage. It's heaved quite a bit, from a peak in the middle down about 2" to the sides and around 4" to the back wall.
|
|
#
?
Oct 12, 2021 23:25
|
|
|
LloydDobler posted:It's a little late now but for moving cars around in the garage, those little $10 harbor freight dollies punch way above their weight. You can set a car on 4 of them and roll it around with no problems. I even went over garage seams. Like this: I've used them, seems like safe weight limit is around 2500 pounds. I cracked one with my 2700 pound Comet. YMMV, of course.
|
|
#
?
Oct 13, 2021 04:00
|
|


|
I have several sets of the HF furniture (wood as pictured) and vehicle (metal) dollies. The casters are junk but they do work pretty well for the price. Anything over 3000lb I would definitely go with the metal ones, 2500+ is pushing it on the wood ones. Biggest issue is getting the wheels to point the direction you want to be rolling, I use a big pipe wrench to pre-rotate them when pushing heavier cars.
|
|
#
?
Oct 14, 2021 10:27
|
|

|
Weekend goal, get the car on its wheels and move it over. Result, halfway there. I gave up on my wheel order and found some in stock, and was notified they'd be here on Saturday, but it was delayed to today. Until that delay was shared with me I did a lot to get the car tidied up. Brakes, bled. Used my pressure bleeder, I had a hard time keeping pressure and realized I didn't tighten some connections on my rear brakes, so I accidentally bled it to the rear axle, which made the rest a breeze. I put power steering fluid in the reservoir, but I haven't run the motor since I didn't have the shifter hooked up. A huge success was bending up a new kick down rod. I picked up some bushings for it, and used my copper template and I think I nailed it. I need to clean it, paint it, and add some kind of retainer for it, like a c clip or something. Kickdowd rod in the center, the raw steel 1/4" rod.   Fender back on.  And testing my wheel fit. Perfect fit I think!  Now to hop back under and take connect this shifter. I'll take the wheels and tires to get mounted during my week.
|
|
#
?
Nov 7, 2021 22:17
|
|
|
 Fender on for a better full car reference.
|
|
#
?
Nov 7, 2021 22:29
|
|
|
And let's set it down too. Discount did a good job and mounted my weights inside, and used nice valve stems and caps! Thanks guys! The addition of the front bumper and supports and hood should bring the front down just a bit. I really do like how full this looks already though. I'm also very happy with this wheel choice.
|
|
#
?
Nov 9, 2021 18:57
|
|
|
I found some time to dink around yesterday. I cleaned up and sprayed sound deadener inside the two front fenders. I never thought I'd do this but I had a bunch leftover. They say this stuff is good inside and out so I hope this dulls some road noise. If not at least it's heavier, and feels more solid. I'll topcoat it with some satin black.  I also drained the transmission and dropped the pan. The old cork gasket was crispy, and definitely leaked. The other leak is from the gear selector seal, which I learned is a right pain in the rear end to remove so I left it for another time. Also it was dripping on me constantly and I was too frustrated to deal with it. To remove the levers you have to remove a nut inside, slide out one lever, remove other stuff, then another nut and slide the other lever out. Two seals to replace here. Right now I can see the nuts, and I have no hope of getting them to turn or being able to finagle them. I'll have to remove what to me looks like "serious automatic transmission parts" and 8pm on a Saturday was not the right time to start that. I did find a walk through by someone online who did this job, and they documented it very well except they skipped right past what I think is the hardest part in one step! All the stuff here has to go.  The nuts are somewhere in this gap, behind and around this Phillips head screw. I gotta get the car up higher to work on this too. 
|
|
#
?
Nov 28, 2021 18:27
|
|
|
ooof... after reading through this thread, my need for an IH/old 60-70's truck has gone through the roof. that color is beautiful. can't wait to see more 
|
|
#
?
Jan 1, 2022 05:59
|
|
|
 So I guess no pics today but I did get back to work. I pulled out the selector unit, a few tubes, and had access to the gear selector nuts. As usual getting it apart was easy. There's a steel thing (detent pin) in a hole with a spring behind it to mark each gear selection. It took about three songs for me to get it back in place and the mechanism under it properly. Just an absolute son of a bitch that turned out to be the second hardest. The selector unit has a vacuum solenoid on the back that was so tight it held the unit in place when I removed it and took some serious creativity to get it back together. I couldn't get a wrench on te solenoid to remove it either, that would have easily saved me about a half hour and a lot of hand pain of overhead work and finagling. The other annoying part, the kick down lever fits inside the gear selector arm, and has an o ring with it. That o ring did not come with the seal, so I had to get a new one at Ace Hardware. Which reminds me the seal itself was a son of a bitch too, there wasn't any room to drive it in, I got creative with a large pair of vice grips to push it in. Here, a pic of the diagram for reference.  Great news in the end tho as I don't yet see any leaks, the car started pretty easily too. I took the lid off the carb and put fuel in the bowl, which helped. A bit of cranking at first but it caught and ran well. So that's done I think. Next steps are to reconnect the shift lever and center console, and get it off jackstands so I have more room in the garage. Then maybe prime the fenders and bodywork. Which I'm now going to call working on my summer body.
|
|
#
?
Jun 6, 2022 02:00
|
|
|
Seeing a trade name like 'Cruise-O-Matic' makes me irrationally happy.
|
|
#
?
Jun 6, 2022 14:47
|
|

|
What up it's ya boy. I been doing a lot of other rewarding projects and living my best life while I rebuild car excitement. I went to Alaska on a boys trip, camped on a beach accessible only by boat! It was amazing. I built a couch from scratch, and upholstered it too. Now I'm back on the car stuff.  OK so big deal here I can get to the car. I need to put the center console in so I can connect the shifter. To do that, I also needed to cover a hole on the floor pan that was for transmission filling. Also run speaker wires. That's all done, I fabricated a little sheet metal cover and sealed it with a rubber sheet. I cut new rubber for under the console, using the old torn up pieces as a pattern.  This was left over from te inner fender skirts on the pickup. I also used a new rubber shift boot and it's nice! Exact replica of the original.  Well I got it all together and put fuel in the car and started the car. Park, works. Reverse, works. Neutral, works. No drive. The shifter is stopping short of drive and won't go into the more exotic drive modes like D2 or D1. So I must have made a mistake putting it back together. It really just stops short on the shifter like it's binding up. I can fix this but like my last update I really want to have a full day in case I run into issues. Now we're in a wait for next Saturday. In International news, I drove out to Golden on surface streets to see if it's running OK, and got a beverage at a local spot, and it did wonderfully. It went so well I drive back in the Interstate, getting it up to... Interstate cruising speed. No issues at all! I actually think it's possible to drive this places that punctuality matters! I've got a bit of a haul ahead of me but a lot of paths and side quests to go. That helps ease the pain a bit on a big project. I also noticed that when I revved the engine the lights got brighter, which means my alternator must actually be working which is huge news. I thought it was wired wrong. Next up, transmission repair, prime and bodywork on the fenders, repair the rusted convertible bow.
|
|
#
?
Aug 14, 2022 23:20
|
|
|
This continues to be an excellent project, thanks for the update!
|
|
#
?
Aug 18, 2022 11:12
|
|


|
Decided today for a boost I'd do something more enjoyable than the job I really should be doing. What I should be doing is dropping the transmission pan and fixing the shift linkage poppet so I can get into drive. Instead I sanded and primed the fenders. One fender had a little kink in it from the drivers side door hitting it. Because it has a reinforcement piece in the back I couldn't hammer it back out, so I brought out the stud welder and pulled it as much as I could. I also managed to put a hole in it from welding a stud on too long. So I welded the hole back up and added material on the end to straighten it up. It came out nice and also I ended up blowing more holes in it and filling them. End result was close enough for a minor amount of body filler. This is black epoxy primer. I'll put the body filler over this. The smooth solid color really helps bring out the imperfections. I noticed a couple of dings on the passenger side that I didn't notice when I sanded it.     This wasn't the end result, I took this pic and decided to fill it a little more with the welder and blew through it and started over basically, the end result was pretty good. 
StormDrain fucked around with this message at 23:21 on Aug 28, 2022 |
|
#
?
Aug 28, 2022 23:19
|
|
|
Those look great man
|
|
#
?
Aug 29, 2022 13:55
|
|
|
Mustache Ride posted:Those look great man Thanks! I found three drips of epoxy onto it, boo. The product data says I wait a few days before dry sanding so I'll let it cure all week before I deal with it. I'll spread some body filler and try to smooth out those drips as I sand it. Drips are so difficult to remove, I should look for a metal block to use and keep it flat. Edit: a nib file is what I was thinking about! StormDrain fucked around with this message at 16:25 on Aug 29, 2022 |
|
#
?
Aug 29, 2022 16:23
|
|
|
Yeah looking great! I love pulling on the metal like you did there. Can't wait to see more improvements
|
|
#
?
Aug 30, 2022 03:10
|
|

|
All right I took a couple of days off work to rest and work on this! Also some stuff from a week ago that I never posted because imgurs app sucks. Nib filed off some drips  First round of body filler, and me reminding you how long these fenders are.  Thursday I bit the bullet and started backed up on this transmission that wouldn't go into gear.  I learned something this time, loosen this crossmember so I can reach the back bolts of the pan easier! Also allowed me to remove a vacuum valve from the back which made replacing a servo thing easier.  OK I found the issue quickly. When I put this part back in I dropped it. And in that process I bent this rod slightly, and it wouldn't push back in. Real dumb dumb stuff. https://i.imgur.com/WFsSScu.mp4 I was able to gently straighten it. It was a very concerning and anxious job. Here's the part loose.  And success! It shifts and drives. I pulled it out and put it back in the garage tighter to one side so I could work on it. I learned one thing... Here's it running just for the sounds. https://i.imgur.com/E3MSkBQ.mp4 So the one thing was that the power steering didn't work. Considering it's all new I was upset! I was seeking a new part and decided I should take the old one off to see what's up. I found two rocks stuck in the pump outlet. I am just hoping that's as far as the got. One was fully blocking the opening to these pressure hose. So that's cleared but I ran out of time today to test it. I spent a couple of hours sanding on these fenders. First a quick run with the random orbital and then block sanding by hand. I applied a little more body filler to areas I didn't see before, and will block them again maybe tomorrow. Then another two coats of epoxy primer to seal this all back up since I went through it in a couple of spots. And I just like it as a solid base.   Body filler! You put on a pints worth just to turn all but a shots worth into dust. It's worth it to have a nice smooth top though. There were some dings and some waves that should dissappear, and the top of the fender to me should be really straight and flat. That's all for now! It was a huge success and it felt nice to move it even just a little. I can now in theory put a second car in the garage, just in time for fall and winter. StormDrain fucked around with this message at 05:01 on Sep 25, 2022 |
|
#
?
Sep 25, 2022 00:03
|
|
|
StormDrain posted:Here's it running just for the sounds. quoting this so i can see what it was (you gotta use url tags not img tags on mp4's) e: yeah that sound proper, although a little quiet. stock exhaust?
|
|
#
?
Sep 25, 2022 00:51
|
|

|
Raluek posted:quoting this so i can see what it was (you gotta use url tags not img tags on mp4's) Ah weird it worked in the app as img tags. It's reproduction stock exhaust. These have goofy long 6" diameter round mufflers with integrated hangers. I had the choice of stock, louder and loud. I went with stock! It's meant to cruise. If it makes some noise it's good but I'm not trying to be a menace. Edit: it's amusing and I'm happy that when I'm seated a solid 9 feet ahead of the exhaust that it's so much quieter,
|
|
#
?
Sep 25, 2022 03:48
|
|
|
StormDrain posted:Ah weird it worked in the app as img tags. i think the phone app cheats and embeds stuff that otherwise doesn't work on the normal forums yeah for just cruising, especially with no top, it sounds good. i have a tendency for wanting louder, but honestly it's more about the tone of the sound than the volume, and yours sounds right.
|
|
#
?
Sep 25, 2022 04:13
|
|
|
That all looks great, way better than I could do. I suck at body work. For the imgur complaint, try quickimgur instead of the official app, it's much much better (doesn't fail 48 billion times trying to upload... And once you figure it out, much faster to upload and copy links to clipboard) and I've been using it ever since I discovered it.
|
|
#
?
Sep 25, 2022 07:50
|
|

|
Hrmm is that an ios app? I'm an android user. A couple things I wanted to share but forgot. 1: The body filler tear off board is a must. Having fresh sheets and a little pallet is great for mixing body filler.  2: guide coat is awesome too. Just a really weak black paint that dries fast and is compatible with the primers. It doesn't work on the black epoxy obviously, but it's not needed since it gets lighter when you sand it. It works really well on this white body filler though. Spray on a light coat of black and you can see the high and lows really easily. And just keep going until it's gone or you see metal on the high points. I also was doing some mental math, these two fenders are perhaps 1/5 of all the body. This is going to take a while. I think I can isolate the doors as another step, and then I'll have to do the trunk, and the entire rear of the car in one go since I don't want to leave it as bare metal spots for multiple weeks.
|
|
#
?
Sep 25, 2022 19:55
|
|
|
What the hell, I went to find it on the Google Play store to post a link and it's gone. It's an Android app, listed as both quickimgur and QuickIB, and I don't know what happened to it. The link is still on Google web search but it errors when I try to open it. Edit: here's the developers thread on it on XDA devs. https://forum.xda-developers.com/t/app-5-0-quickimgur-a-lightweight-imgur-client-focus-on-upload-and-get-link.4016047/
|
|
#
?
Sep 25, 2022 21:44
|
|
|
Made a few mistakes, or more charitably I learned a couple things. First of all, last week one of the last mixes of body filler didn't have enough catalyst. It never fully hardened and was a real bitch to sand. It gums up the paper right away. I should have just wire wheeled it off because it all had to go. After I got all at done, I was prepping it to prime again, and of course I noticed a ding on the front of one fender and realized one of the spots I hit before needed more attention. So another slight setback. This time I mixed it hotter with more hardener so I could take care of it faster. Here's that ding. A piece of trim ends here and a headlight ring meets it. I considered it might be hidden but I don't want to come back here later. That also allows me to justify more body filler and not pulling it with my dent puller. It's pretty minor anyway.  OK so let's take a break. I built Homer's spice rack for dispensing paper. Should have done this first since I spent so long cutting paper this past few weeks. Just a dowel, some 1x6 and an old hacksaw blade I scrounged.  Time for another mistake. I started spraying this epoxy and it was not covering nearly as well but it was also really wet. I stirred it... With too short of a stir stick. I thought it was fresh enough that it wouldn't have separated much, and it was pretty black on my stick. So from now on, it's full mixer on the drill time.  The worst is it was so wet it's doing this waterfall thing. So I just hung it all up and I'll block sand it off next weekend. Not worth putting a second coat over this suspect coat.  Ah well. Next week is another week and I am not in a hurry. I want it to be nice.
|
|
#
?
Oct 3, 2022 03:39
|
|
|
StormDrain posted:Made a few mistakes, or more charitably I learned a couple things. I hate that. It always feels so awful literally taking 2 steps back to go one step forward again. I've done it with catalyzed polymers but last time it was an entire 80lb sack of mortar on my house that I'd had sitting for a few months and thought I could get away with using. Yeah, it never got past "I can stick a screwdriver in this pretty easy" level. It took me hours to scrape all that crap back off the wall to the point that new mortar would actually stick. Ever since my first awful gummy epoxy project and that first mortar disaster, I mix just a little heavy on the catalyst and buy new mortar if it's been here more than a week or 3.
|
|
#
?
Oct 3, 2022 06:52
|
|
|
I hit it with 120 grit today and it gets really gummy, so I have to sand it off. I ordered some 80 grit to really make headway because this grit gets filled up way too fast. I'll be buying a detail sander and a straight line air sander too. It's time to get real.
|
|
#
?
Oct 10, 2022 00:16
|
|
|
kastein posted:...an entire 80lb sack of mortar on my house that I'd had sitting for a few months and thought I could get away with using. Yeah, it never got past "I can stick a screwdriver in this pretty easy" level. It took me hours to scrape all that crap back off the wall to the point that new mortar would actually stick.... Thank you for a very helpful 'thing I learned today!'
|
|
#
?
Oct 10, 2022 21:18
|
|

|
Live thread! Live!
|
|
#
?
Apr 23, 2023 00:36
|
|
|
Ahaha I will I swear it. All of my time and effort and money have been going to a master shower and toilet room remodel. Current status:  The weather is warming up and it won't be long before I can take all the storage off the car and get back to it. I've stockpiled sandpaper and a new sander too.
|
|
#
?
Apr 23, 2023 00:44
|
|
|
I'm getting the fever again. Car fever. I just wrapped up my bathroom project at my house, just waiting on a contractor to install a shower enclosure and a tinter to add a safety film to the window glass. Final electrical, plumbing and hvac passed, so it's just down to the final final. Next up I'm going to paint the garage white, jts currently an aged drywall yellow mostly. I just got a little sprayer for cheap to knock this out real dirty. I have a lot of lights to add to the ceiling. And I want to devise a pvc pipe curtain track for the perimeter to make this a cleaner spray booth. I'll also devise something for air intake and exhaust. I'm thinking a couple of box fans in and out with filter media should do it. I'm making some choices on a supplied air respirator as well, looks like a hobbyair 2 is in my future with a full face mask. What I'm not as certain on anymore is if I'm going to paint it black. I'm a little partial to it since that was the original color, however it's in my nature to explore options. The interior will be a turquoise blue grey. I'm also kinda digging guardsman blue. Of course I'm not even limited to period correct but a guy has to have some boundaries to facilitate selection. 
|
|
#
?
Jul 13, 2023 05:44
|
|
|
|
| # ? May 6, 2024 10:14 |
|
|
And here's how the bathroom turned out, by the way.  I have a different green paint to put up this weekend. This one was too bold.
|
|
#
?
Jul 13, 2023 05:47
|
|