


|
If it makes you feel any better, entrenchment is a big force multiplier, not to mention that infantry-on-infantry combat already favors the defender. Though I guess the UPRA has more than just infantry, and those non-infantry units are probably where the majority of their offensive punch comes from. Oh, and if I remember correctly, this game has a zone of control mechanic that means enemy units can't simply bypass and encircle your units through a one- or two-hex gap, especially since they also have to cross the river and that takes a lot of AP. Except, y'know, for that division that's already across the river.
|
 #
?
Sep 17, 2018 22:49
#
?
Sep 17, 2018 22:49
|
|


|

|
| # ? May 8, 2024 08:34 |
|
|
Zone of Control goes both ways. The enemy 4th... motorized recon could complicate the 34th's supply situation and path of retreat. I think the initial plan was to contest the first crossing, counter attack anybody who made it through, and then fall back to the desert. Anything that threatens our ability to get whole units out is a major problem. Entrenchment is great, but you can only entrench so much in a field. Also I don't know if troops start the scenario fully entrenched or not. Edit: reminder to future self: Default Max Field entrenchment: 125% (5 turns?) Plains: 100% (4?) Desert: 0% habituallyred fucked around with this message at 08:27 on Sep 18, 2018 |
|
#
?
Sep 18, 2018 07:08
|
|
|
Unless we can do anything about 4th recon, we should pull out. Armoured cars will easily beat our infantry without AT.
|
|
#
?
Sep 18, 2018 07:21
|
|

|
Tevery - a few questions. Can we get a looksee at the individual enemy units - what subformations each has and the like according to our recon. Second are the supply depots in suburban terrain like it looks like? Will have to wait and see what the enemy does but in all likelihood the northern part of TF3 is going to be cut off and destroyed, I don't see any way to extract them at this point but the rest of the troops should be able to escape. We should focus on using engineers and artillery to destroy the second line of supply depots - we might be able to get the southern forward one as well but its touch and go.  Tias posted:Unless we can do anything about 4th recon, we should pull out. Armoured cars will easily beat our infantry without AT. If they push forward by themselves they will be vulnerable to a counter-attack especially if we can put some artillery on them. AC are much weaker on the defense and if we can attack them with tanks it will be a slaughter. The key thing I think is going to be an elastic defense, if you continuously pull back so there are two hexes between you and and enemy infantry unit they can move up next to you but will not have enough AP left to launch a decent attack. They could still attack but it will be at a big advantage to us. Finally one thing to bear in mind is that Deserts stop you from entrenching to any real effect. In a non-desert hex you will gain entrenchment every turn you are still to a max of 2-3 turns which helps a lot with reducing casualties. Saros fucked around with this message at 11:29 on Sep 19, 2018 |
|
#
?
Sep 19, 2018 11:26
|
|


|
Saros posted:Tevery - a few questions. You will be given an overview of enemy units when your actual turn starts - by then your recon data may change, so I want to wait until that point. Supply depots should work like suburban terrain for combat purposes (to represent them being somewhat fortified).
|
|
#
?
Sep 19, 2018 13:32
|
|

|
Is the Turn order: UPRA Romano Awfulia(Us) Sheikh Awfulia or UPRA Sheikh Awfulia Romano Awfulia ?
|
|
#
?
Sep 19, 2018 19:30
|
|
|
You go second.
|
|
#
?
Sep 19, 2018 19:36
|
|
|
Right, promised rulesing. Supply Units need supply to operate effectively. They won't die from lack of supply, but they WILL become essentially ineffective. Lack of supply causes units to lose Readiness (in short, low Readiness = bad in combat and has less Action Points to spend) and Action Points (yes, having low readiness and low supply double-dips into your AP). Supply is not binary. Being in range of supply or out of range of supply does not immediately mean the unit is or is not effective; supplies are measured in specific amounts and you need to both produce and deliver it. Supply consumption of a unit depends on its exact subformations - tanks consume more than infantry, for instance - but I do not want to go into specific numbers, you do not need to know them. Units carry their own supply, typically enough for two rounds where the unit does not fight and does not receive any new supplies. In fact, the default flow of supplies is tuned around making sure this buffer is maintained, you can order HQs to stock more supplies or you can order supply flow to specific units to be reduced. This has obvious effects on the buffer we just mentioned. If a unit (typically HQ) has more supplies than it can carry, it will be reduced to 1 hex of movement per turn. Even if a unit is cut off for more than that and has 0 supply banked, it does not become ineffective immediately. Troops need to consume 50% of their supply requirements in order to not lose readiness at all. If at no supply, they lose up to [40%] readiness a turn (if I understand the manual right, it is written in a very... confusing way.) Manual posted:After supplies have been delivered over the supply network all units consume supply in order to keep or raise readiness. Troops consume 50% their supply requirements to not lose readiness. Max readiness loss if no supply to consume is a percentage of [40] and also their supply consume setting is set to the percentage of this basic upkeep need that was provided. No supply at all will the result in a Supply Consume stat for the unit of 0, making it very vulnerable Moreover, if you start the turn at less than 100 readiness, you will consume extra supplies in order to get back up. Just the first 10 points will cost you 50% of your supply requirements; the other 50% will go to recover up to [30] more readiness points. Bottom line: units recovering from combat consume a lot more supplies and it may pay off to withdraw them if they are away from supply sources. Supply is typically produced in cities and flows from there to whatever HQ is assigned to the city. (In this scenario, and probably in scenarios to come, it is also produced in a variety of other places, such as the supply depots, which are 100% my addition to the scenario.) That HQ then passes it on to its subordinate HQs and units. Every link in the chain causes distances to be recalculated.  This is how far the supply may flow from a typical HQ in (mostly) open terrain. Supply "pays" for "movement" much like a unit would. On open ground, it moves like a [Wheeled vehicle]. This means it must pay [20] AP per hex, and it can flow out to [250] AP away. However, it starts to dry up a lot sooner. After [100] AP, only 75% percent of required supply makes it to the destination. After [150] AP, this goes down to 50%. After [200] AP, it's down to only 25%. After [250] AP, no supply can reach the destination (unit or HQ). Remember - this applies to supply being produced in cities as well! (And to replacements, incidentally.) (The white and blacked dashed lines do not match up with the interface 100%, but I didn't want to complicate this first example - they are there to make the situation clearer to colour-blind readers.)  Let's consider another example. Here, we can see terrain impacts the movement of supply. In difficult terrain, supply typically moves like a [Horse-mobile] unit. This is favourable to you - wheels move faster in the open, horses deal with terrain a lot better. It still means it cannot go as far as it would in open terrain. There are, however, two exceptions. On (rail)roads, supply only pays [1] AP per hex to move. This allows it to go extremely far, as long as you remain close to the network. Crossing a river without a bridge, however, costs a monstrous [150] AP. But supply does not flow in a straight line, it always follows the path of least cost. If you look closely, you can see that the hexsides on the eastern edge of the city are both rivers - but supply just flows around them and a unit on the other side would still be well-supplied.  Units always draw supplies from their HQ. As you can see, although the unit is just as close to the HQ as it is to the city, it supplies itself from the HQ. Stacking Every unit in the game has a Weight. The Weight of a unit is a sum of the Weights of its subformations. If a subformatioon is destroyed, the unit becomes "lighter". This Weight has a few implications, including unit transportation on horseback or with trucks, but right now we are concerning ourselves with what is called Stacking. You can have any number of units in a given hex. However, once their combined Weight goes above [100], they get penalties to attack and HP in combat. (I can't find just how big those penalties are right now, but rest assured they are significant, and percentage based. If losses in combat cause the unit to go below the stack limit, penalties disappear immediately.) When attacking, you also need to mind the stack limit. However, it becomes less strict if you attack from several directions. If you attack across a single hexside or two hexsides, the stack limit is still [100]. If you attack from three, it goes up to [150], four is [200], five is [250], all six is [300]. You also receive a percentage bonus to combat if attacking from several directions, so keep that in mind! There is also a separate stack value for air or artillery attacks; I believe it is identical to land stack values and has identical effects. If you just dump all tubes of your entire corps on a hex, the bombardment will become less effective. Stick to one or two regiments per bombardment. Moreover, stack values are remembered until the end of the turn. You cannot launch an attack with 100 Weight of units, then bring in another 100 Weight of units and launch a second attack. Penalties will still apply. The weight of your units at their current full TOE with the attachments you have chosen is as follows: - Infantry Regiments: 39 (43 if mounted) - Guerrilla Groups: 30 - Cavalry Regiments: 45 (41 if with better tanks, because those have fewer horses) - Task Force HQ: 40 - Romano HQ: 70 - Engineer Regiment: 30 - Artillery Regiment: 66 - Rockets: 4 Action Points By default, a unit has 100 AP to spend each turn. This may get reduced due to a variety of factors, typically supply. Action Points are used to move and fight. Every subformation has a movement type (Wheels, Foot, Horse, Artillery etc.). Some units can substitute their movement type for that of other units (e.g. Horses can tow artillery or carry troops). When a unit enters a hex, all subformations pay as much AP as the one that has to pay the most to enter that hex; the cost depends on the subformations' movement type and what terrain is in the hex. In order to attack an enemy, your units must have at least as much AP as it would cost to enter the hex you are trying to attack. These Action Points are not spent - this is merely a check to see if you can launch the attack at all. Combat is divided into rounds where both sides shoot at each other (please please please please don't make me go into more detail, that way lies madness). The attacker must pay 10 AP to initiate every round of combat and continues to do so until out of AP (no choice is involved, but you can set a percentage of losses that will cause you to call off the attack early). The combat then ends immediately. The defender does not expend AP, but also does not initiate any rounds - so there is no situation where attackers run out of AP and just sit there and get hammered, once the attacker decides it's time to call it a day, the combat ends. If the defender has left the hex, the attacker may move in at no cost in AP. (This does not apply to units that did not participate in the combat.) Zone of Control I will mostly let the manual handle this one, since it's actually fairly on point (bold text added by me): Manual posted:ZOC
|
|
#
?
Sep 20, 2018 20:45
|
|
|
 The UPRA forces have commenced their assault!  In the north, an enemy division arrives after having crossed the Ful. We were not prepared for this and they surge south, threatening to cut us off. Meanwhile, more forces either cross the river or mass in preparation for crossing.  Further south, there is a flurry of activity behind enemy lines, but you can hardly tell what exactly is moving. There are some crossings here as well, although less aggressive. 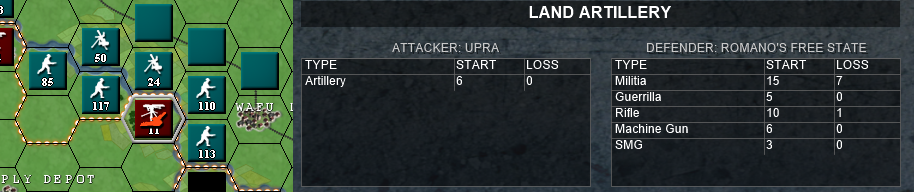 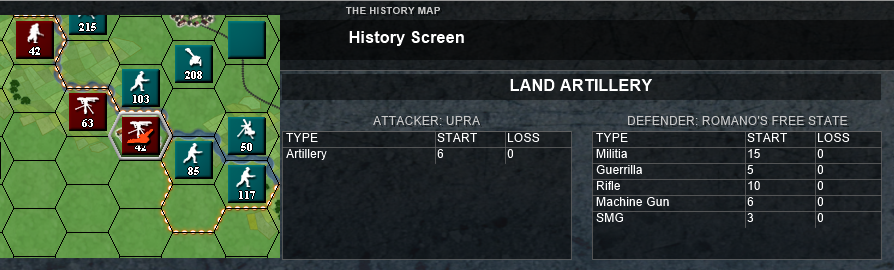 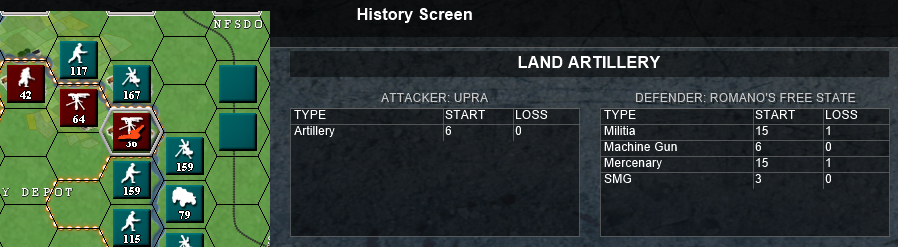 Three of your regiments - 8th, 30th, and 34th - come under UPRA artillery fire. The casualties range from negligible to moderate, but your lines are disrupted to a significant degree.  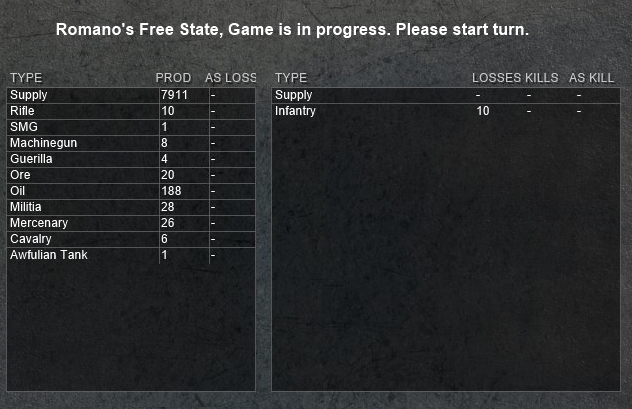 Right. This could have gone a lot worse. Let's take a closer look at your situation. 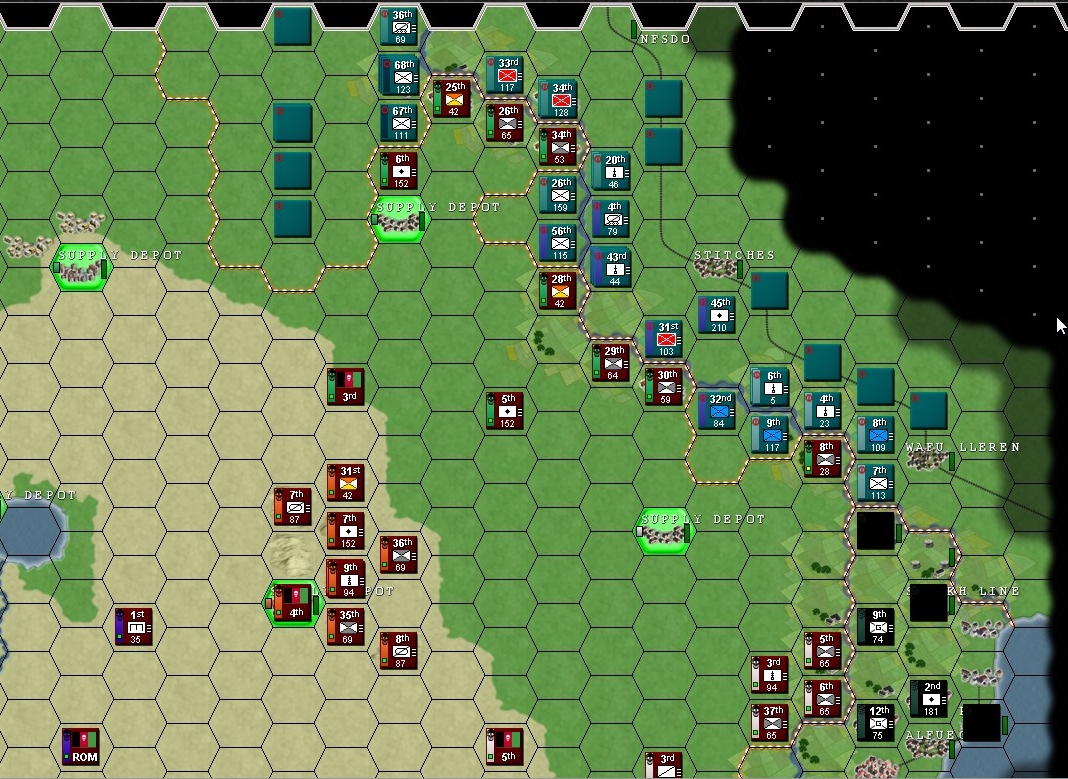 Task Force 3 has been caught off guard. The northern flanking division was a particularly severe shock. Their positions are defensible and well-entrenched, however, and they have been able to severely delay enemy crossings. Task Force 4 is standing by and ready for action. Note that its two cavalry regiments have been given armoured cavalry icons to reflect their better armour component. TF4's two infantry regiments (35th and 36th) are also mounted to allow for faster movement. 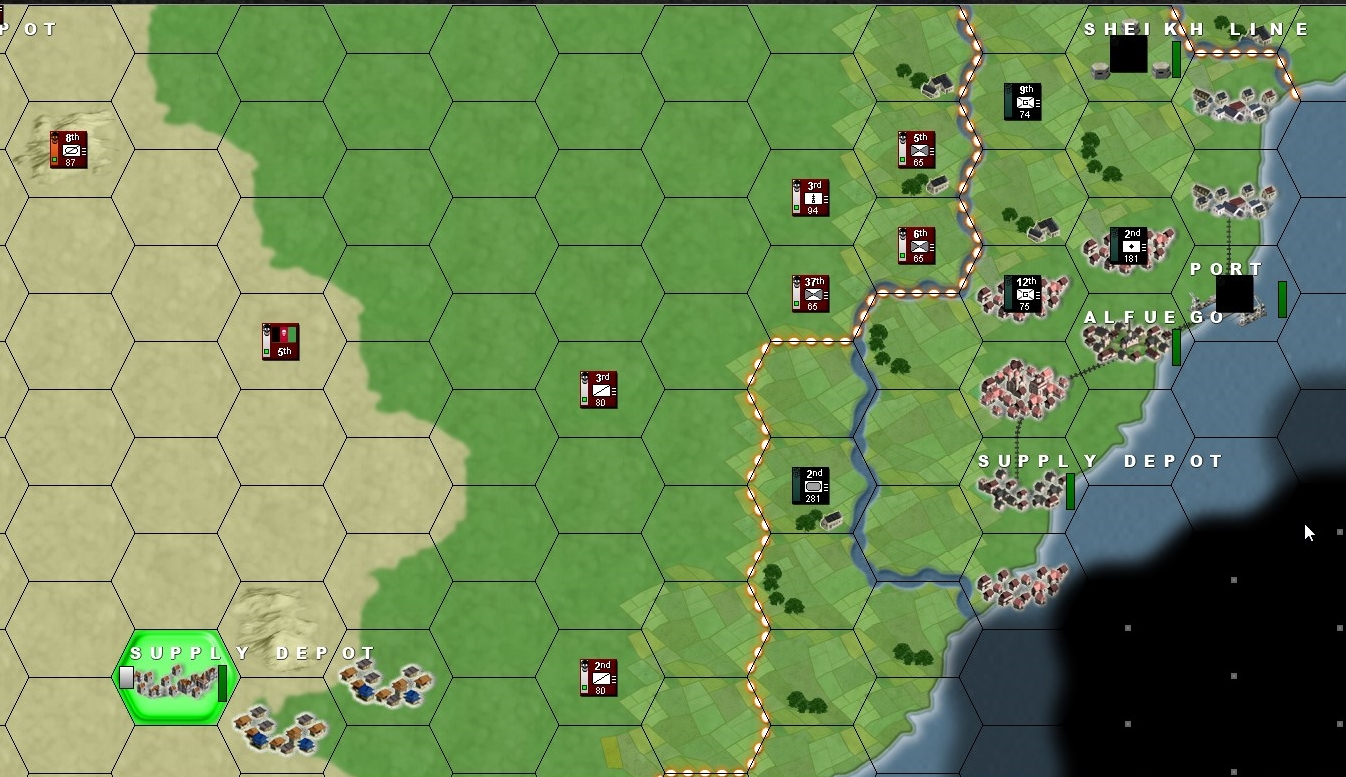 With Task Force 5's artillery shifted to the river line, your troops are content to just contain Sheikh's loyalists in Alfuego. This does preoccupy a number of your formations, including two cavalry regiments positioned to prevent a breakout by Awfulian armour. 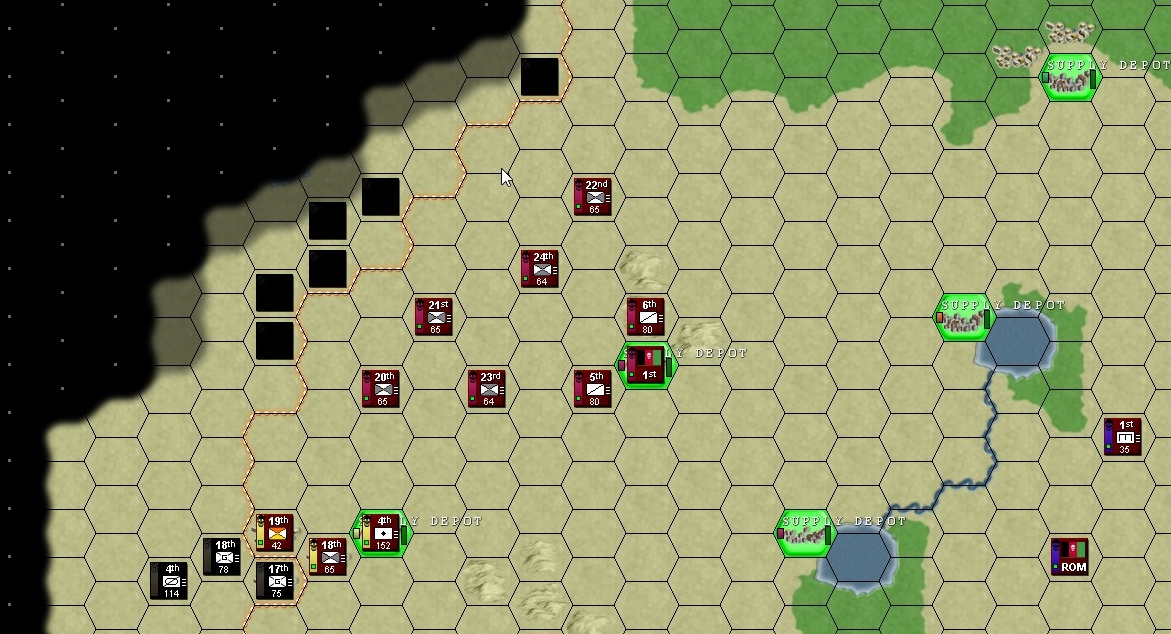 In the northwest, Task Force 1 has set up positions in the desert to protect the western border from Awfulian incursion. Reconnaissance reports a number of Awfulian units in the vicinity, although it is hard to tell if they constitute a real threat. Elements of Task Force 2 hold a supply depot and a small town a little further south. 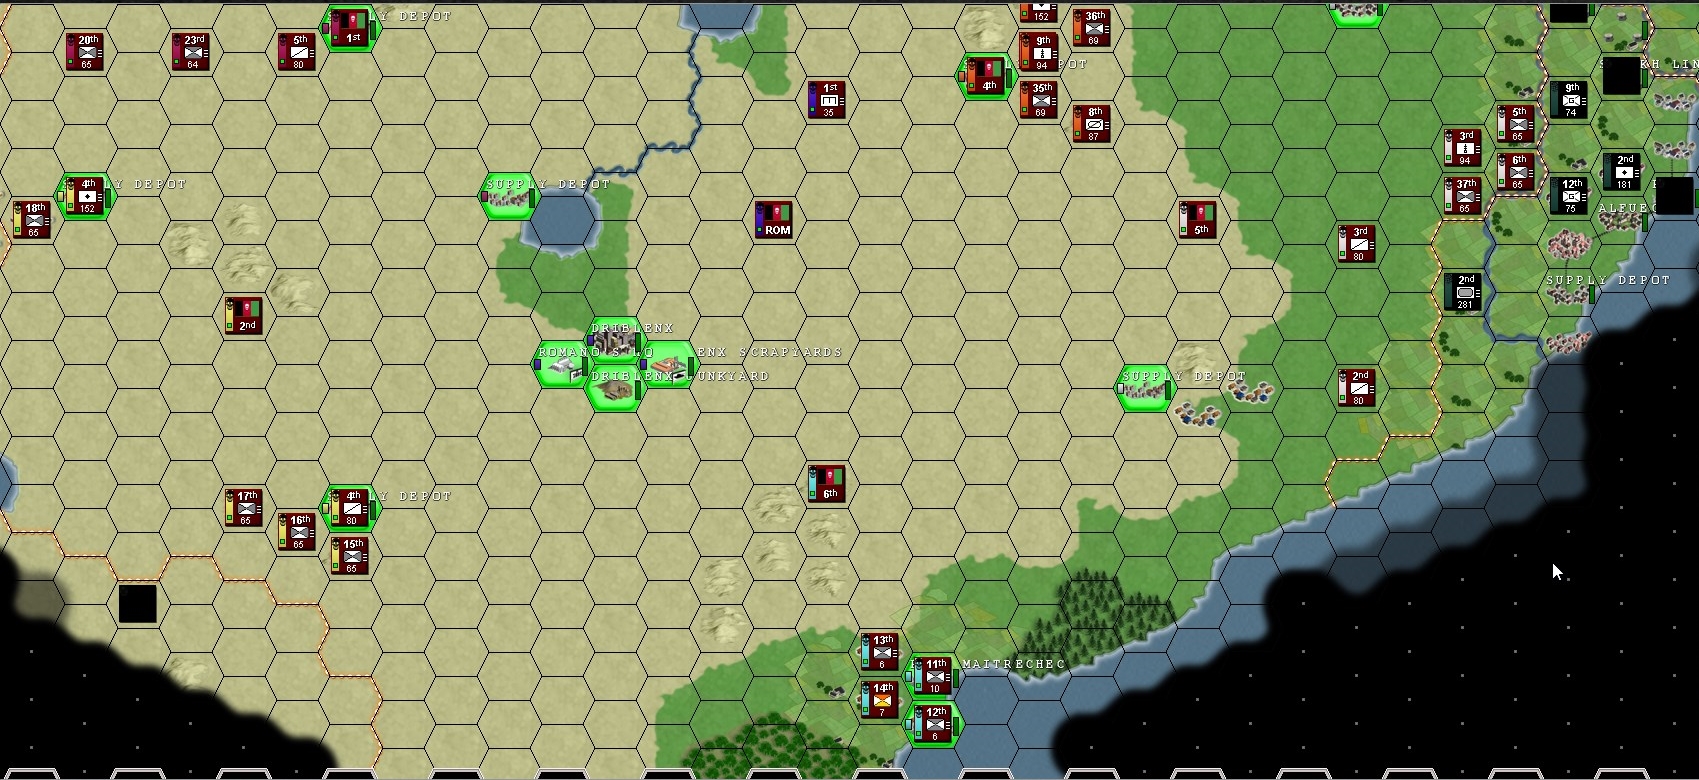 In the south, aside from the already-mentioned Alfuego front, there is the smaller Task Force 6 forming around Maitrechec. Port Maitrechec is a vital lifeline for your soldiers, one of your two main sources of equipment (aside from the junkyards and weapon stockpiles of Dreblinx) and your principal source of fuel (of which you have precious little). Losing it would be quite a setback. Task Force 2 has a wide frontage to cover, protecting your soft underbelly from Awfulian incursions. Enemy Forces Here are the enemy regiments you have seen so far: UPRA  UPRA operates a number of cavalry regiments. Your scouts estimate their size at 2-11 Cavalry, 7-8 Machine Guns, 3-4 Horses and 1-2 Armoured Cars. 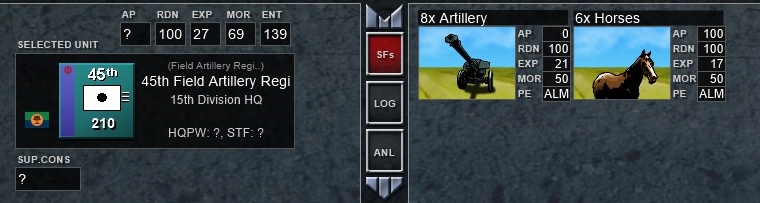 UPRA operates horse-towed Field Artillery Regiments much like your own. Your estimates of their size vary between 7-8 guns and 5-6 Horses.  UPRA infantry is notable in that they seem to follow the same basic organisation structure, but some of their troops use Oceanian or Vakanian equipment. An UPRA infantry regiment appears to have anywhere between 8 and 44 Rifles, 1-3 Anti-Tank Guns, 1-8 Horses, and 4-15 Machine Guns. 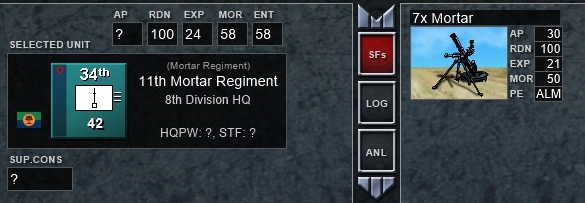 UPRA has mortar regiments separate from larger-bore field artillery. They appear to contain 1-7 Mortars each. Separatists of Aw-Fulia 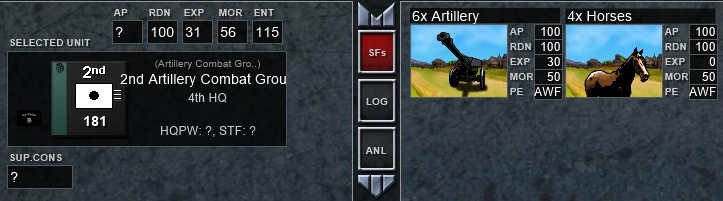 The Sheikh appears to have Artillery units, again, similar to yours. The one you can see has 6 Artillery and 4 Horses. 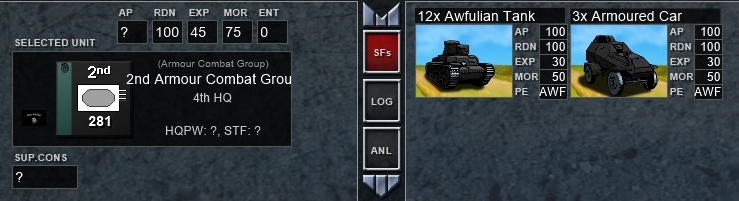 Awfulians also seem to like creating large concentrations of armoured units. You can see one such group, scouts report 12 Awfulian Tanks and 3 Armoured Cars. 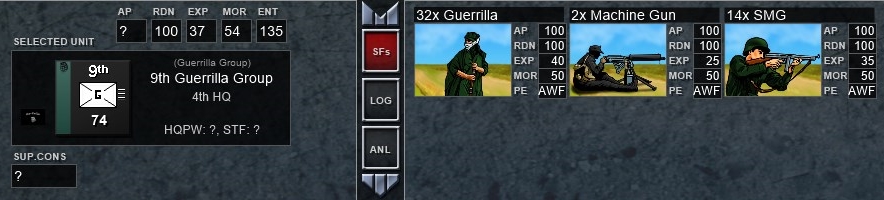 Awfulians use Guerrilla Groups as standard infantry forces. Your estimates of their size vary from 29-34 Guerrillas, 2-5 Machine Guns, and 8-14 SMGs. 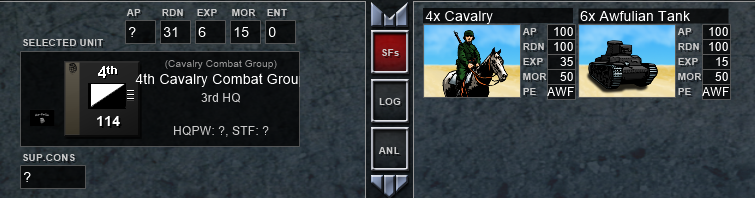 The Awfulian force attacking Task Force 2's western supply depot includes a cavalry formation. Which, according to scouts, is made up of 4 Cavalry Units and 6 Awfulian Tanks. General Overview 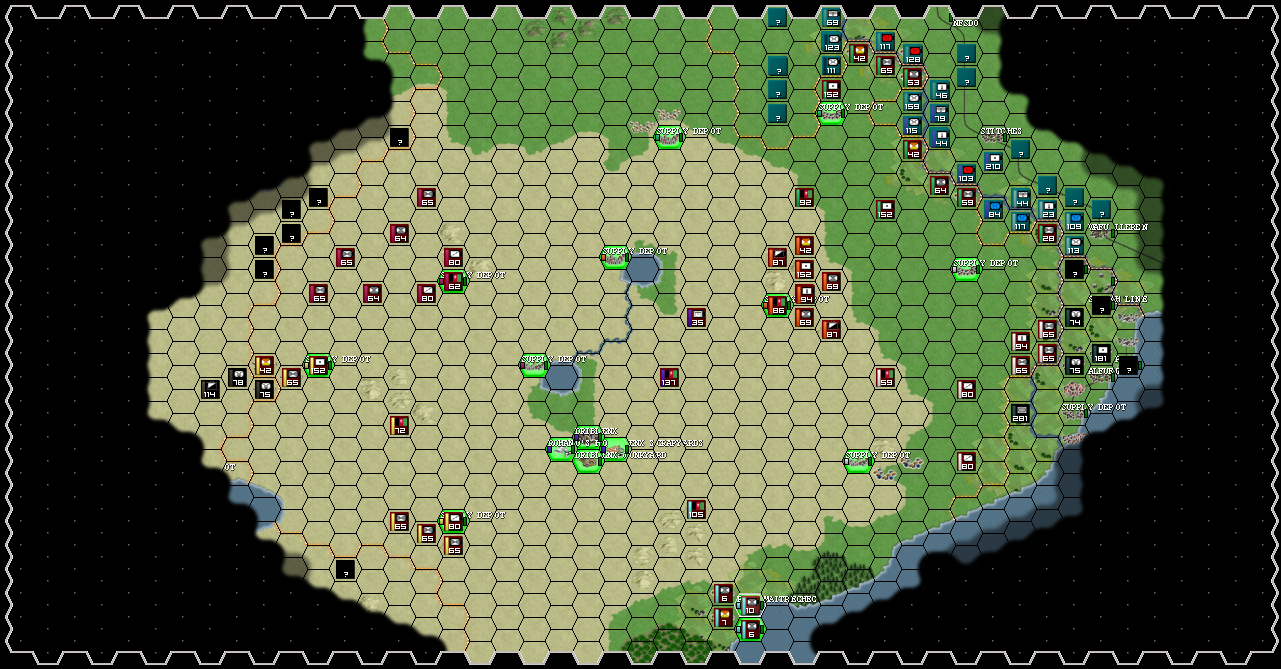 You have 48 hours for your orders.
|
|
#
?
Sep 22, 2018 23:45
|
|
|
The only thing we can reasonably do in the east is fall back. There are far too many people. The blokes at the North end will need to die to delay the enemy. Ideally we should burn our forward supply depots to prevent the enemy from using them. Is that a possibility?
|
|
#
?
Sep 23, 2018 06:41
|
|

|
Engineers can damage structures directly. Artillery can attack an empty [u]enemy held hex[u], or just miss enemy units in the hex. Plain old combat will also damage the hex. Edit: whoops big mistake underlined habituallyred fucked around with this message at 07:18 on Sep 25, 2018 |
|
#
?
Sep 23, 2018 08:18
|
|
|
 Trying to figure out how many forces are arrayed against us in the north. Planning on swapping the 20th Infantry Reg. with the 19th Irregulars, but probably won't have the movement to do that this turn. Might not have the entrenchment for it next turn. Remember that I have no anti-tank stuff outside of my Awfulian tanks. Nuisance bombardment on the enemy, no followup planned. 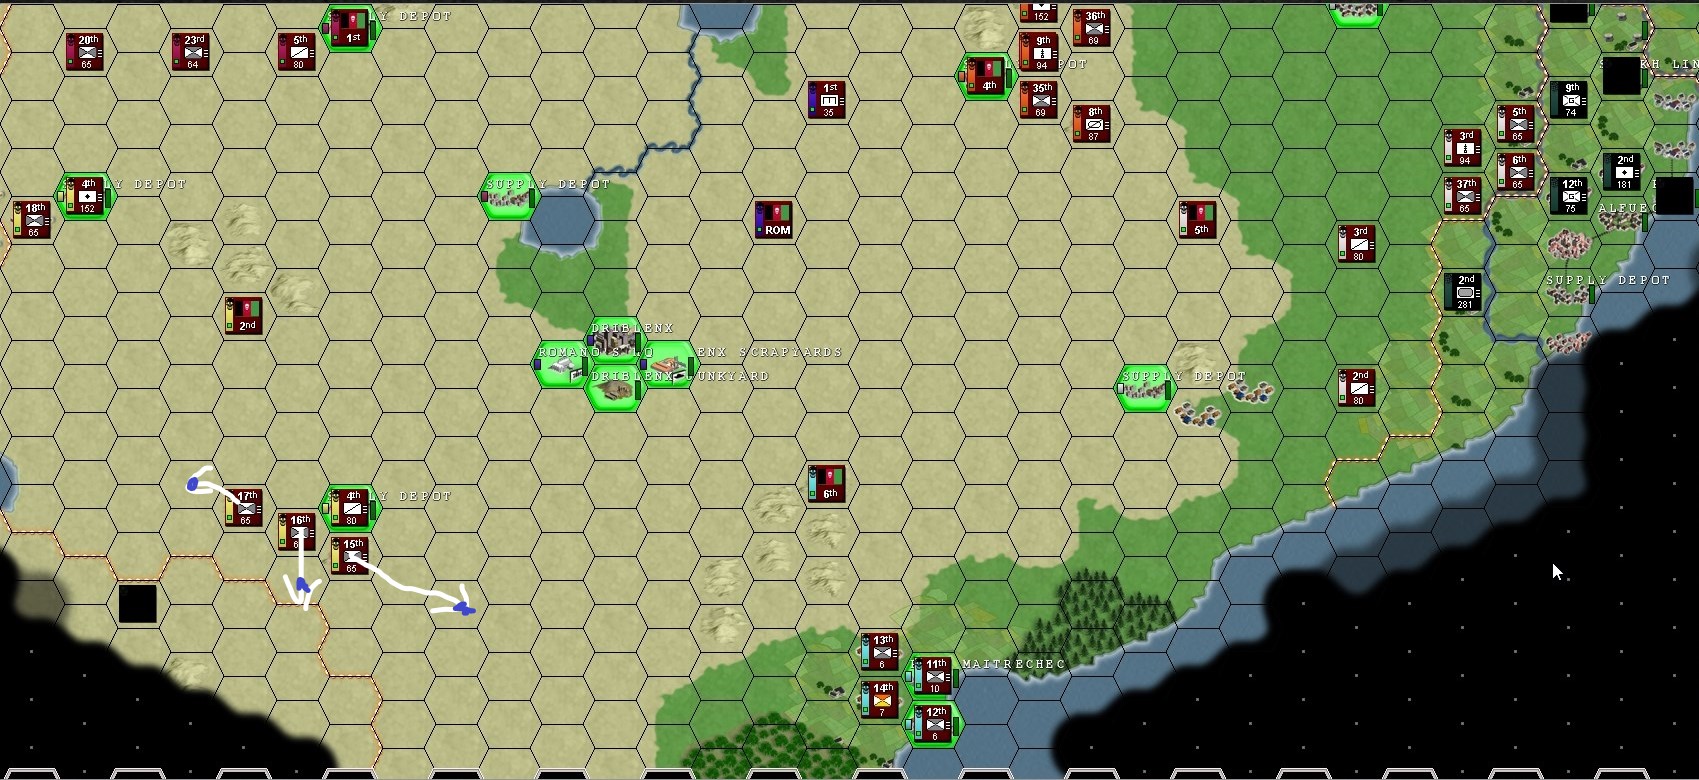 Doing some scouting down here as well. If nothing shows up I will dispatch the 15th to the UPRA front. Open to revision of these orders if I missed any obvious mistakes.
|
|
#
?
Sep 23, 2018 20:15
|
|
|
I'll post more detailed map orders later tonight as I will be traveling today, but I am giving at least a vague orders so there is something to go on if everyone is finished before me. Sothern cavalry flank needs to just contain armor unit, and they can just stay as they are currently. Northern flank is to retreat in orderly fashion to our depot, fortify it and remain there until further notice. Thry should try to position themselves so that strongest units are position toward UPRA lines. Hopefully Awfulians will try to take ground and will become a roadbump for the UPRA.
|
|
#
?
Sep 24, 2018 07:36
|
|
|
TF 3/4 Orders Fall back and consolidate as best as possible. I'm setting up to bombard the supply depots with the artillery after they fall and if the river crossing div gets brave I can hopefully give them a bloody nose. Switch 3rd TF to priority for reinforcements. If 35th Infantry can't reach its intended destination move it to stack with the 7th armor cav. Request for Romano  -Extend the hill line along the marked hexes by building cheap/fortifications. -move the supreme hq closer to the front where tf 3/4 will be fighting so we can reinforce from it. ---------------------------------------------------- All commanders the UPRA have AT guns with their infantry, this is super bad as it means any attack with our tanks will likely fail. Preserve tank units for counter attacking isolated units or enemy cavalry/armored cars. Also HQ only give max combat bonus to 3 hexes. After that its 4/80%, 5/60%, 6/40%, 7/20% TF 5 I cant help you much i'm afraid, fall back slowly and you may need to move to shore up my southern flank.  Literally the only places that matter at all are circled in red, the rest is just empty territory we can give up freely and burn down the supply depots as we do. Yellow line are terrain anchored defensive lines and white are fallback positions where we can skirmish from. To destroy supply depot we have to ask romano to send our only engineers or have artillery bombard the hex. I estimate one full round of arty bombardment from our units will do about 80% damage to a depo but you can only bombard once the enemy takes it so set it up like I have been with arty 2 hexes back from depo that you expect to fall so you can immediately bombard it after the enemy take it. If it's not destroyed it will repair over time. Saros fucked around with this message at 14:54 on Sep 24, 2018 |
|
#
?
Sep 24, 2018 14:15
|
|
|
Jesenjin get your orders in!Tevery in Discord posted:I'm going to go to bed now, so Jesenjin can consider this a soft deadline extension, as in, he still has time to post until I get up and start going about updating, but if he posts after I start updating, I might end up not taking his orders into account.
|
|
#
?
Sep 25, 2018 09:33
|
|
|
 Task Force 1 spreads out to cover more terrain and support Task Force 2. In the process, you get a slightly more accurate fix on one of Awfulian units - it appears to be a Guerrilla Group. 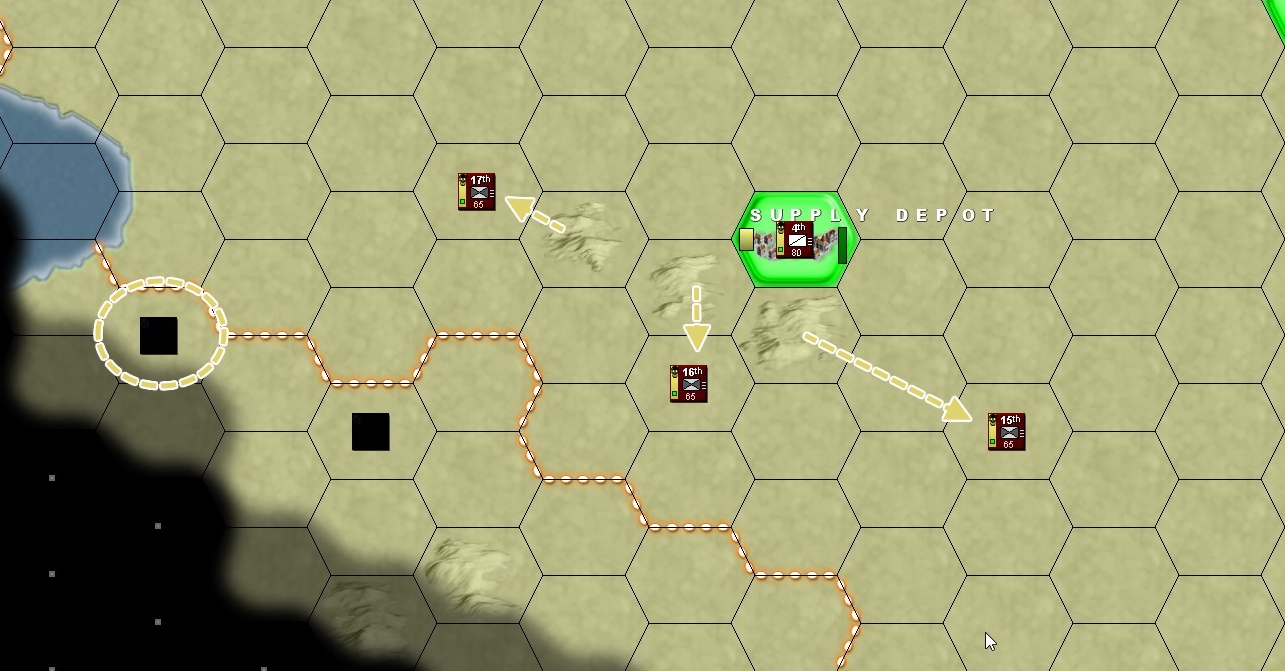 Task Force 2 does similarly around the southern supply depot. Scouts report another Awfulian unit deployed further west, around the lake. 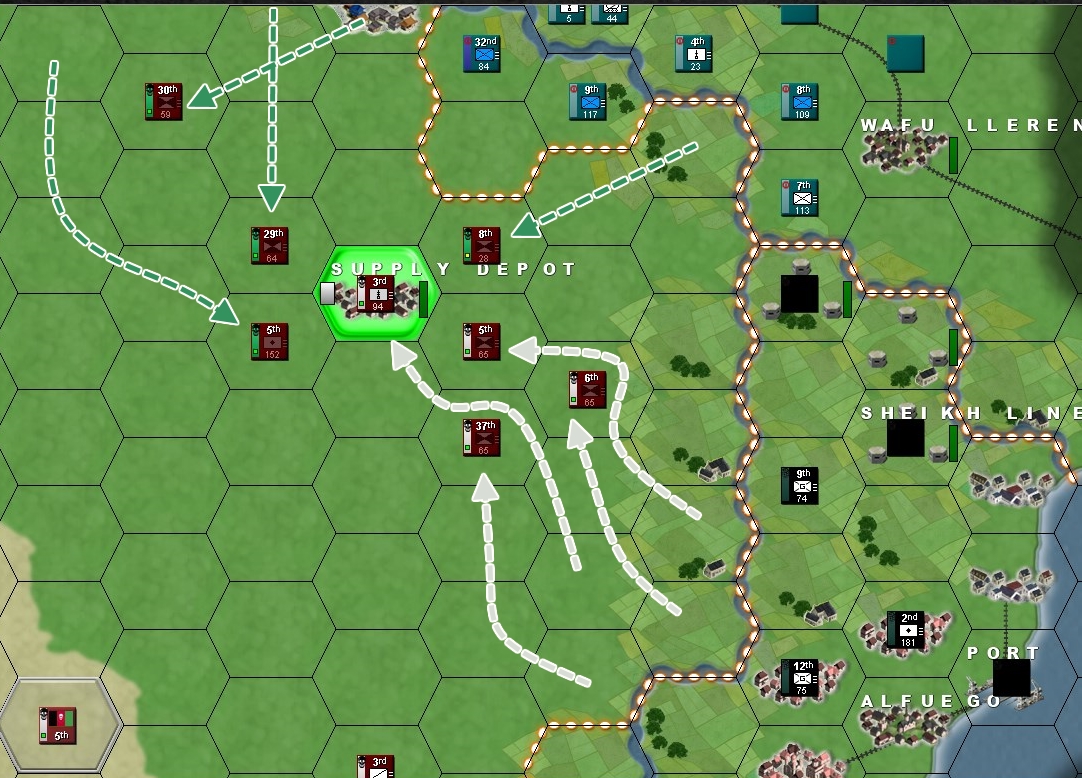 Your forces in the east, closer to Alfuego, redeploy away from the Ful river and start entrenching around the nearest supply depot. Only TF5's rocket artillery has enough movement to actually get to the depot itself, however. 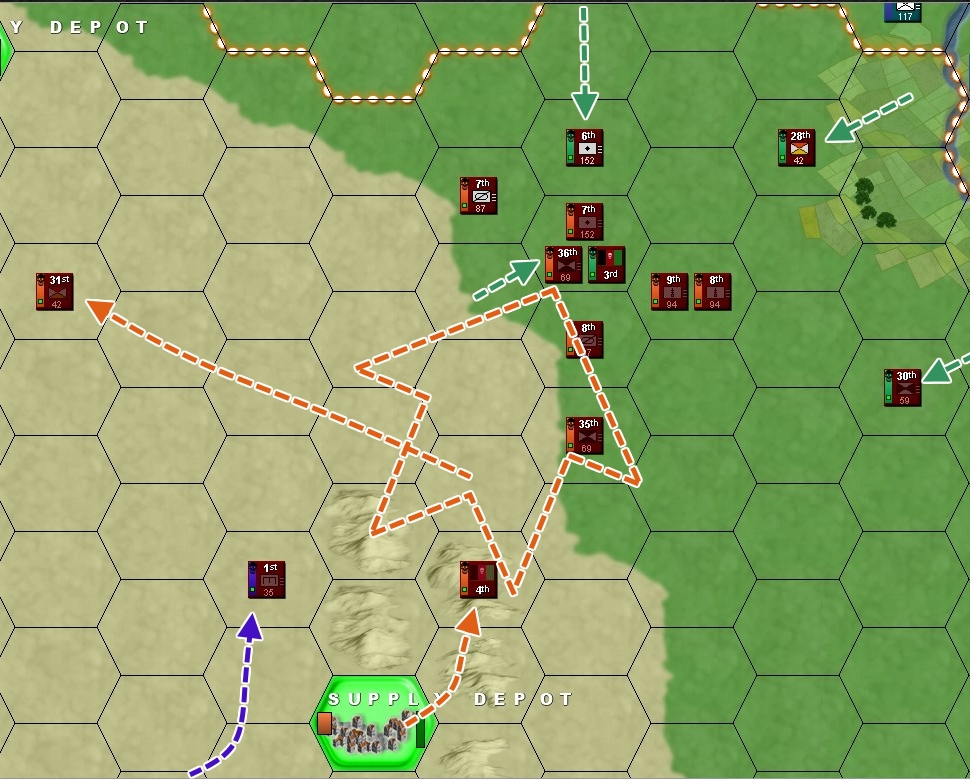 TF4's reserve forces spring into action and head north to reinforce TF3 before the enemy flanking force can deal too much damage. Hopefully, you can confront the UPRA forces here and win, or at least buy enough time for TF3 to escape. Romano's engineers are moving north to start fortifying a new defence line. 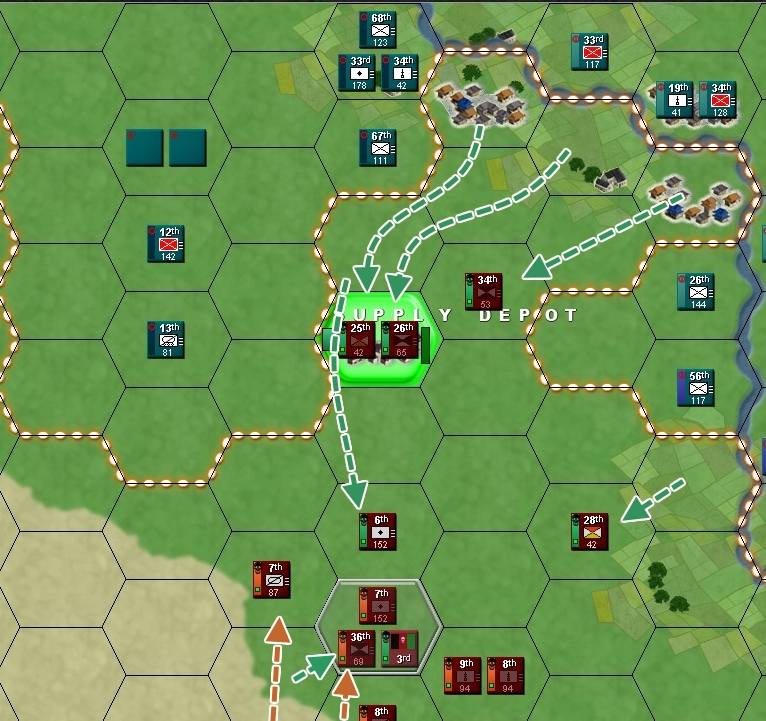 The northern brigade's regiments retreat out of the forming encirclement and towards the supply depot. Artillery is positioned to destroy the depot, should it fall. Intelligence reports are streaming in about the enemy units at the tip of the spear coming in from the north. 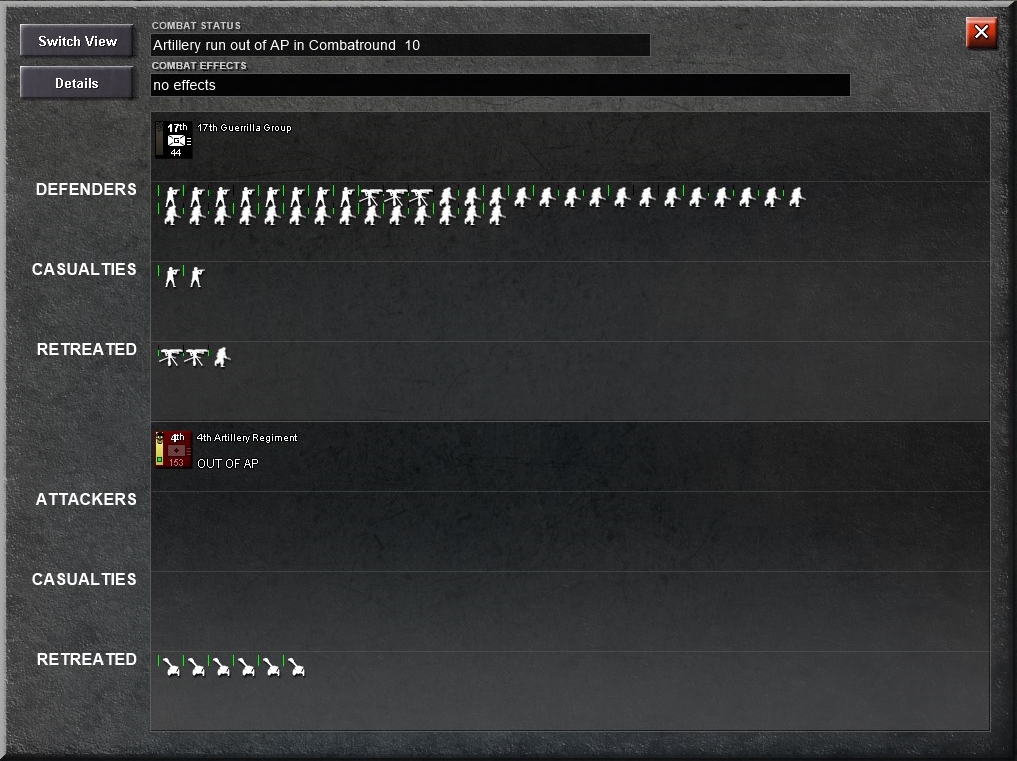 TF2's artillery barrage harasses the Awfulian guerrillas in the border town. The effects are minor, but should dissuade them from trying to shift you with infantry attacks. Situation at the end of turn: 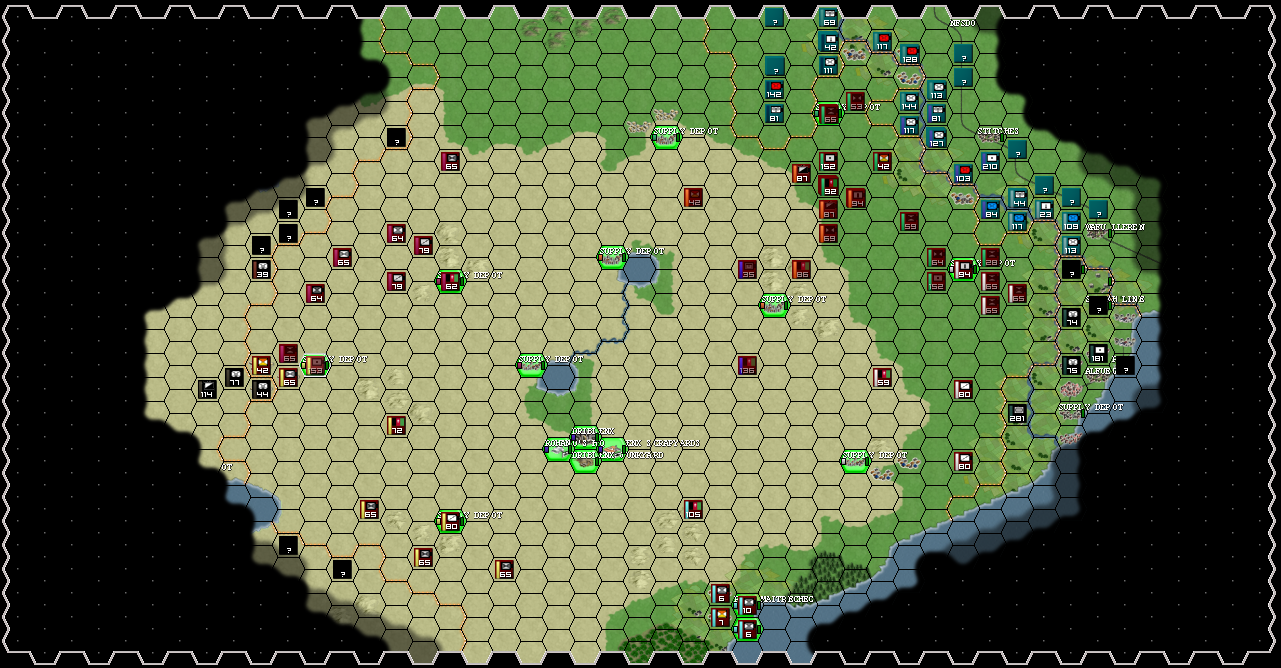 Also, I believe someone asked to see your HQ commanders. I can't find who it was, but here you go:        The turn is passed to the Separatists of Aw-Fulia.
|
|
#
?
Sep 25, 2018 12:31
|
|
|
thank you for using Train Nazi for Saros
|
|
#
?
Sep 25, 2018 12:49
|
|


|
The face you make when your new regime has no trains. In other news - gently caress. I misremembered the cost for horse-mobile units moving over plains and ended out with my infantry regiments falling short. Resulting in the Armored cav sitting on their lonesome and the artillery out in the open. Hopefully the bad guys cant see enough detail to take advantage of this.
|
|
#
?
Sep 25, 2018 13:41
|
|
|
Thank you for the commander update. Makes a lot of sense to make them all roughly equal.
|
|
#
?
Sep 25, 2018 19:48
|
|
|
Saros posted:The face you make when your new regime has no trains. truck nazi wins by default!
|
|
#
?
Sep 25, 2018 22:03
|
|
|
We have no trains!? Pack it in, guys. We have nothing to fight for.
|
|
#
?
Sep 26, 2018 06:42
|
|
|
Looking forward to the debates between horse nazi and boat nazi.
|
|
#
?
Sep 26, 2018 11:18
|
|
|
Sorry I couldn't have given more detailed orders, my laptop went Kaput on me while traveling... At least my vague orders were done as I have imagined it.
|
|
#
?
Sep 26, 2018 16:59
|
|
|
November 18, 1928 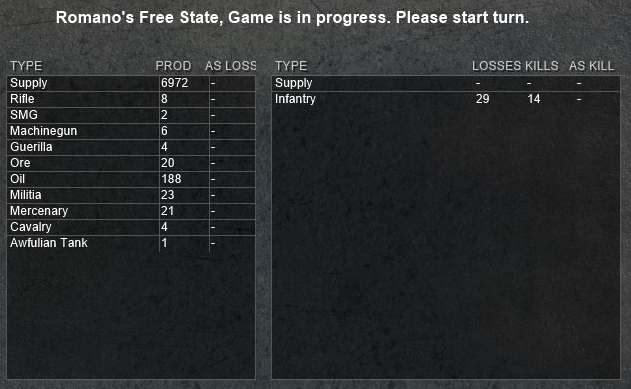 New troops are constantly being recruited, but most of them for Task Force 6. Meanwhile, you've taken some quite serious losses this turn - although you gave some back. 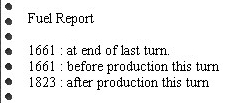 The fuel situation is far from perfect, but you still have some reserves.  I have ordered additional shipments of oil to Maitrechec. It will happen at the expense of other supplies. I don't suppose it will fix the situation in the long term, but... I have ordered additional shipments of oil to Maitrechec. It will happen at the expense of other supplies. I don't suppose it will fix the situation in the long term, but...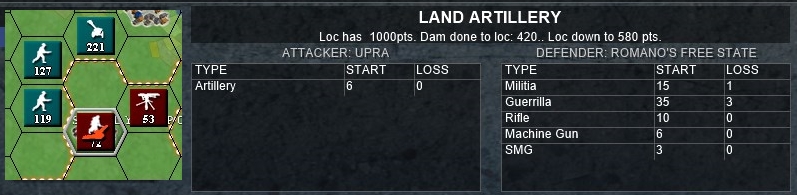 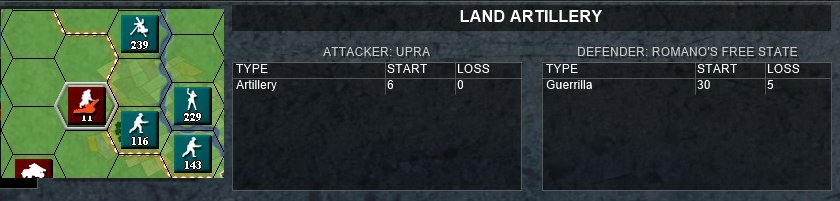 The 28th Guerrilla Group and the units in the northern supply depot come under artillery fire. It is not very effective (units in the depot are at 95+ readiness now). The 28th suffer a lot more, since they are caught in the open (63 readiness), but the enemy simply lacks AP to really punish you as you retreat. 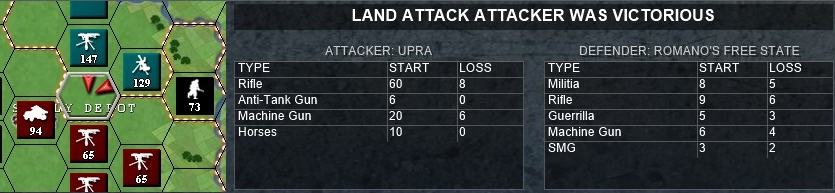 Two UPRA infantry regiments rush the weakened 8th Infantry Regiment and shatter it. It's been rendered pretty much ineffective (sub-50 readiness).  Awfulian forces arrayed against Task Force 1 push onward. They're mostly infantry, but there is an armoured spearhead on your right flank. No combat yet, but that's some aggressive manoeuvring.  Task Force 2 reports a huge number of Sheikh's troops rushing towards their positions from the fog of war. They have at least one cavalry group and a ton of guerrillas. You are seriously outnumbered here. 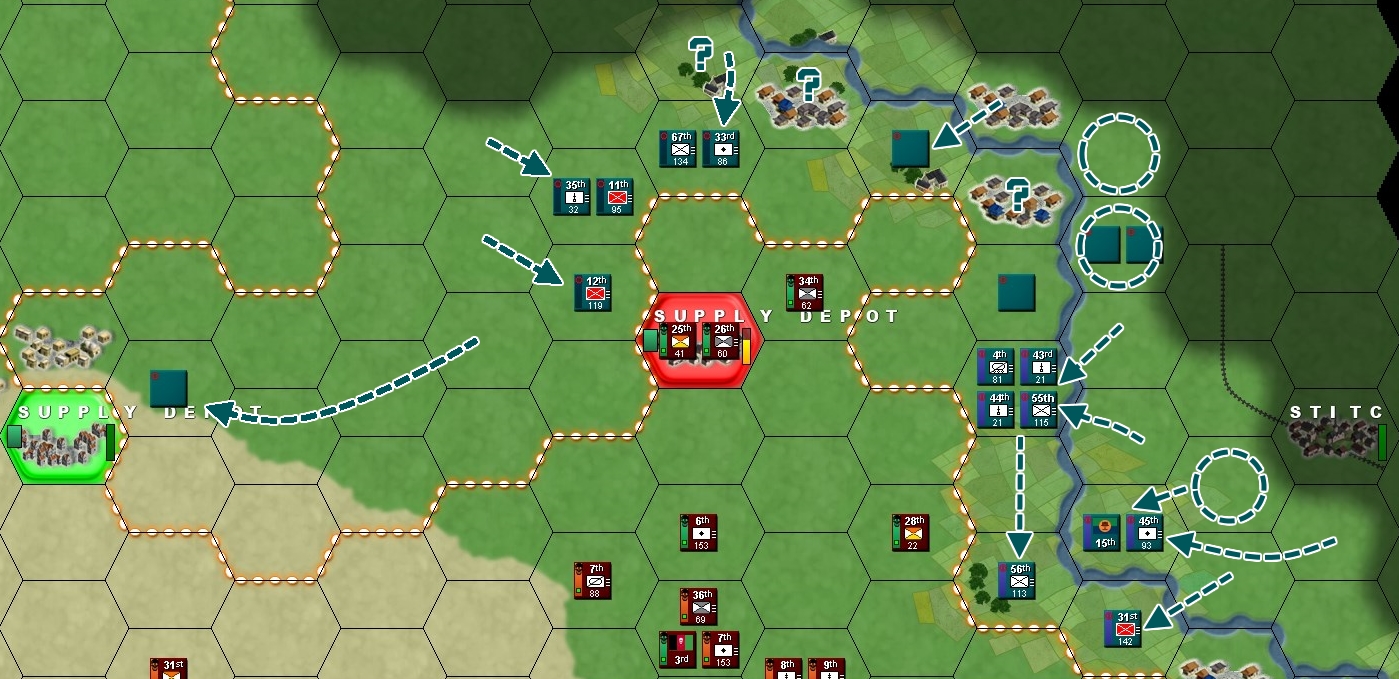 Up north, more and more UPRA troops cross the river (the question marks mark places where you had seen units in the History screen, but can't see them anymore). Again, you are losing ground, but not troops. A cavalry regiment is making a break for your western supply depot. The rest of their troops are keeping standoff distance. 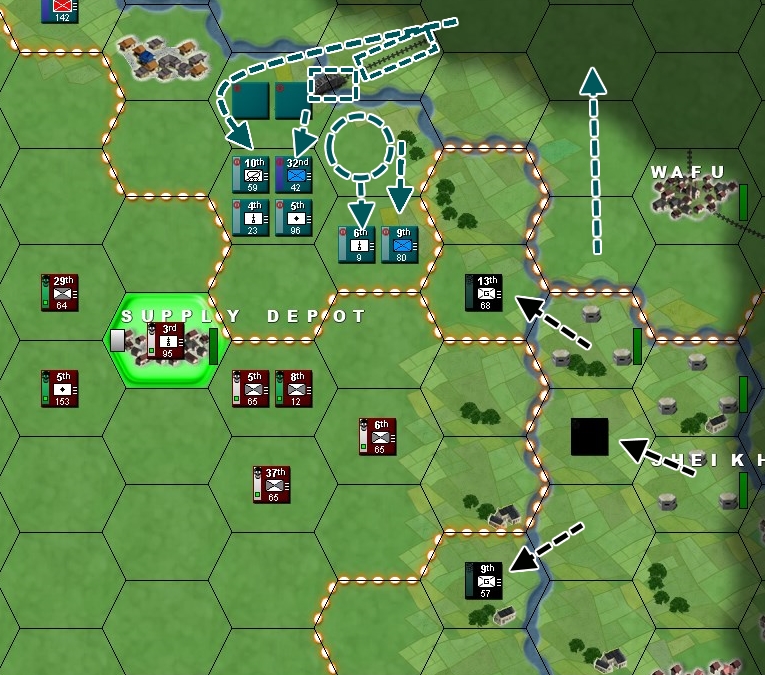 Awfulians are crossing the river and snatching up territory you abandoned while pulling back. UPRA forces have built a bridge across the river and their troops are flowing across it (most of them after they beat up the 8th Regiment). 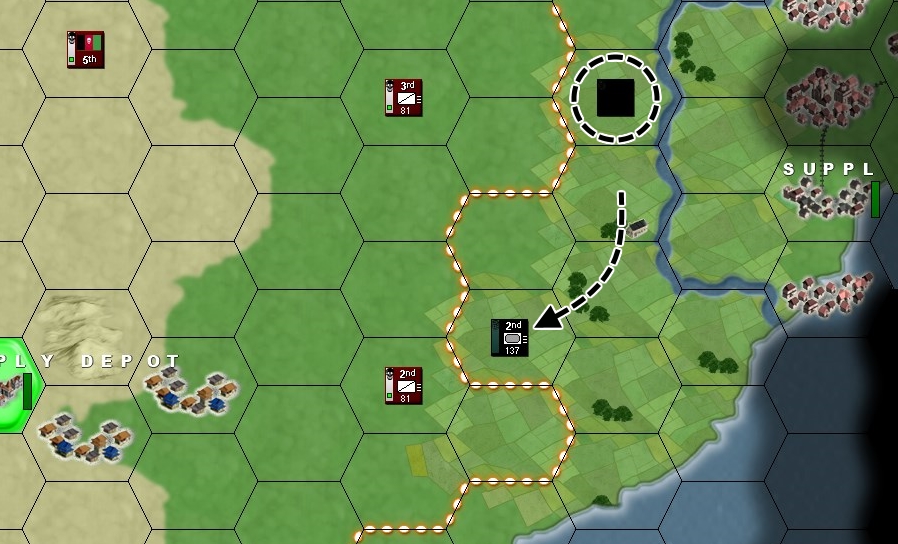 Forces from Alfuego cross the river in the south as well, brushing against your defences.  Task Force 6 is still slowly building up - slower now that it has to share priority with TF3. Situation overviews 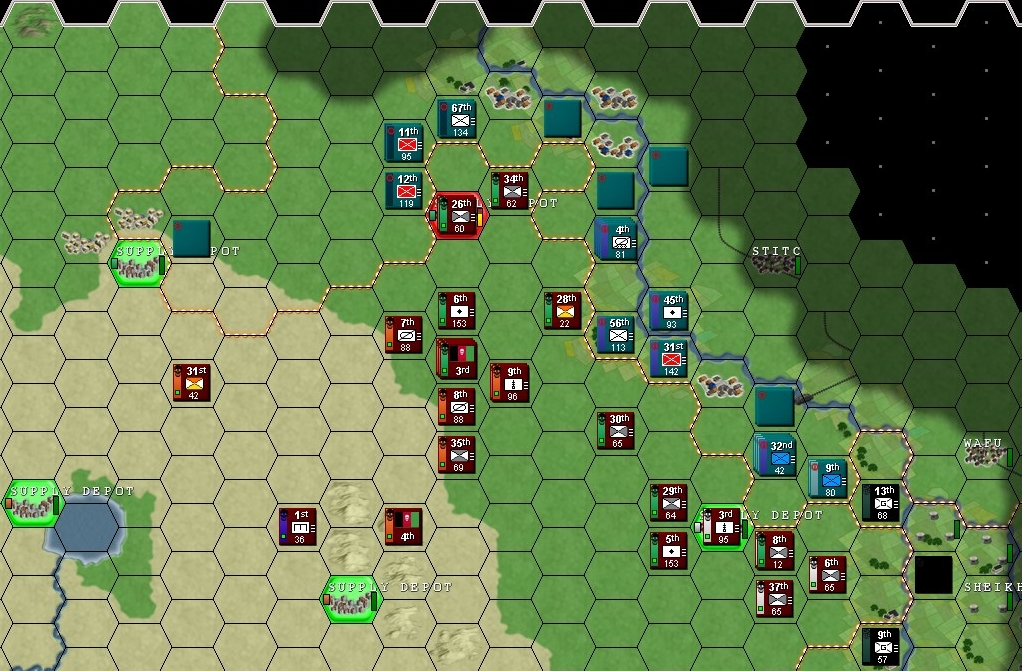 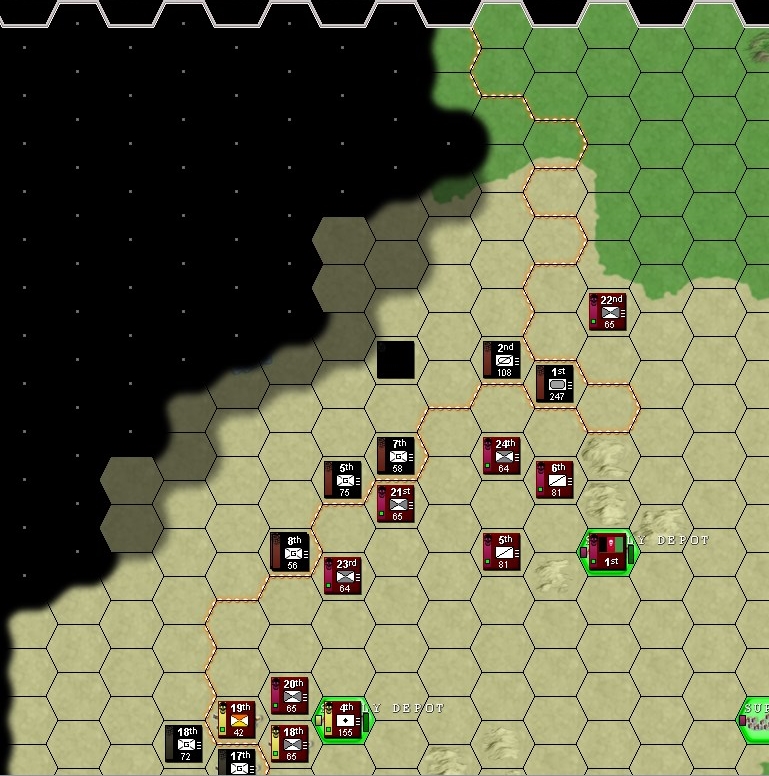  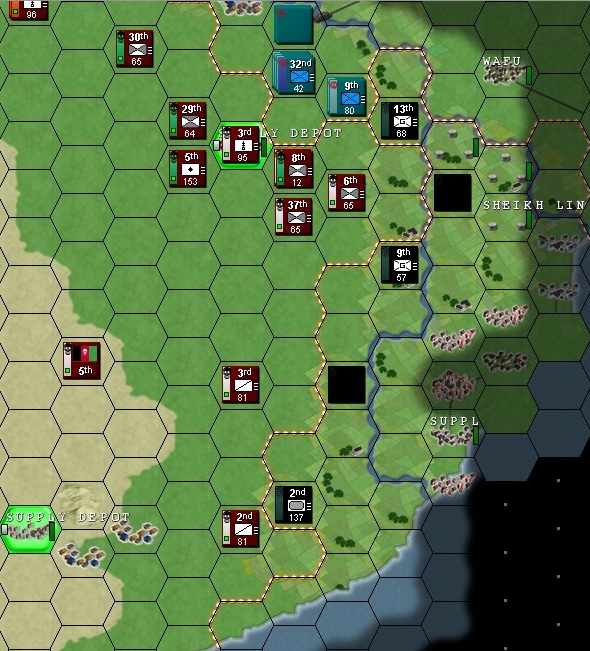 AO map 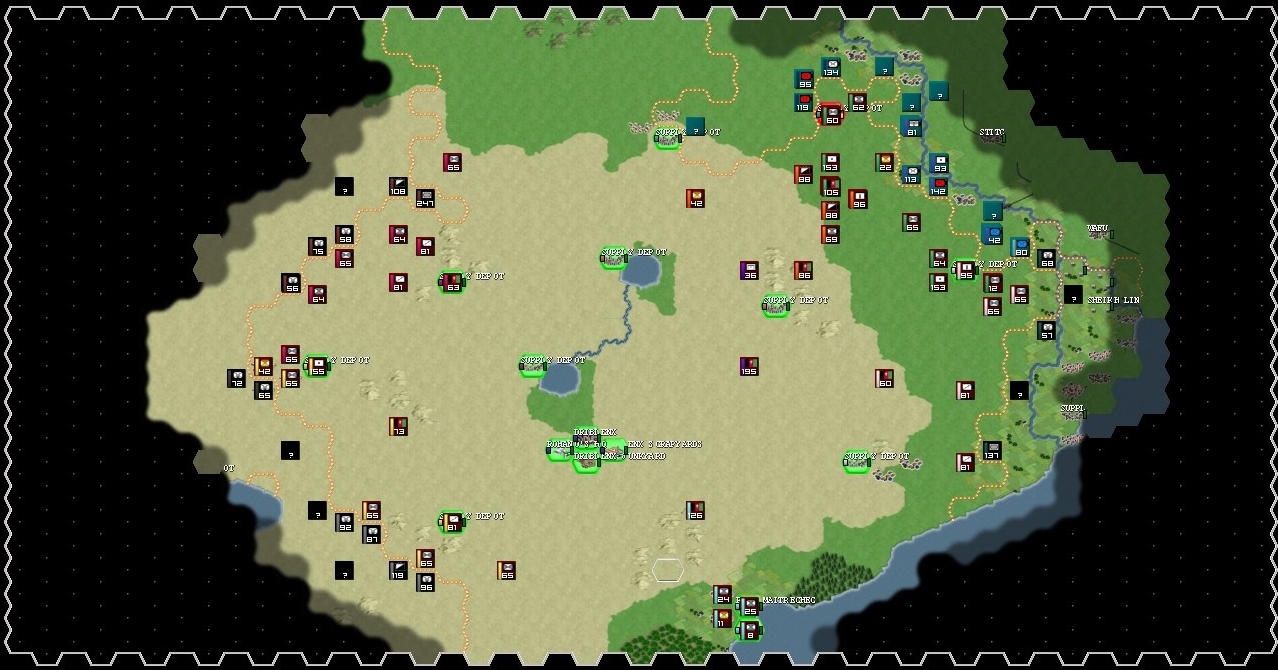 Intelligence Report UNIFIED PEOPLE'S REPUBLIC OF ALMAIN Cavalry Regiment - 2 currently in sight - 11-12 Cavalry, 1-8 Machine Gun, 4-5 Horses, 2 Armoured Car Field Artillery Regiment - 3 currently in sight - 3 Artillery, 1-8 Horses Infantry Regiment - 8 currently in sight - 7-40 Rifle, 1-5 Anti-Tank Gun, 1-6 Horses, 4-16 Machine Gun Mortar Regiment - 5 currently in sight - 1-5 Mortar SEPARATISTS OF AW-FULIA Artillery Combat Group - currently none in sight - last seen 16 November - 6 Artillery, 4 Horses Armour Combat Group - 2 currently in sight - 6-12 Awfulian Tank, 1-2 Armoured Car Guerrilla Group - 10 currently in sight - 8-49 Guerrilla, 2-7 Machine Gun, 6-16 SMG Cavalry Combat Group - 2 currently in sight - 4-8 Cavalry, 6 Awfulian Tank You have 48 hours to input your orders.
|
|
#
?
Oct 2, 2018 17:45
|
|
|
 Jessejin we have a good chance here to make the enemy hurt. They have heavily stacked this hex with valuable artillery, if we move up our artillery together and blast the hell out of it we have a good chance of blunting their advance and costing them some expensive artillery. Jessejin we have a good chance here to make the enemy hurt. They have heavily stacked this hex with valuable artillery, if we move up our artillery together and blast the hell out of it we have a good chance of blunting their advance and costing them some expensive artillery. I'm going to have to pull the other green units further west as they are outside of effective range of their HQ [3 hex] for now. I'd say using your infantry to form a line on the supply depot is the best bet for this turn, just make sure to have at least one infantry in the supply depot hex to protect my artillery from direct attack. Saros fucked around with this message at 18:55 on Oct 2, 2018 |
|
#
?
Oct 2, 2018 17:52
|
|
|
I agree Saros. We were extremly lucky that my rocket arty suriveved, or rather that it wasn't attacked at all. This is definitely a situation to use our one off knock-off Katyushas. I reckon 5th and 37th infantry should get into the hex. Two reasons, first, to have more meat for protection, and secondly, so we punp up the chance to damage the depot. Orders: So if you all agree, my southern cavalry (2nd) should retreat two hexes toward supply depot, while 3rd cavalry should retreat only one hex toward west, no more. My 5th and 37th infantry should advance and occupy supply depot, 6th infantry should go and occupy hex directly south from the supply depot. Rocket artillery division (or brigade, dunno what is their realistic size) number 3 should break all hell loose (ie. fire like there is no tommorow) on our enemies overstacked hex, as designated by saros. E: Editing order on advice from Saros. Jesenjin fucked around with this message at 19:33 on Oct 2, 2018 |
|
#
?
Oct 2, 2018 19:12
|
|
|
Imo you should try not to end up in the open in range of the enemy arty with those nasty mortar units around, could send that spare infantry to the hex south of the supply but otherwise sounds good. [E] UPRA infantry rgt have 30 rifle, 3 AT guns and ten MG. That's a hell of a formation and we are going to need massive local superiority, artillery and three hexsides to attack from to beat even one alone. Saros fucked around with this message at 19:22 on Oct 2, 2018 |
|
#
?
Oct 2, 2018 19:17
|
|
|
Edited as per advice from Saros. Orders are still in old post to minimize confusion.
|
|
#
?
Oct 2, 2018 19:37
|
|
|
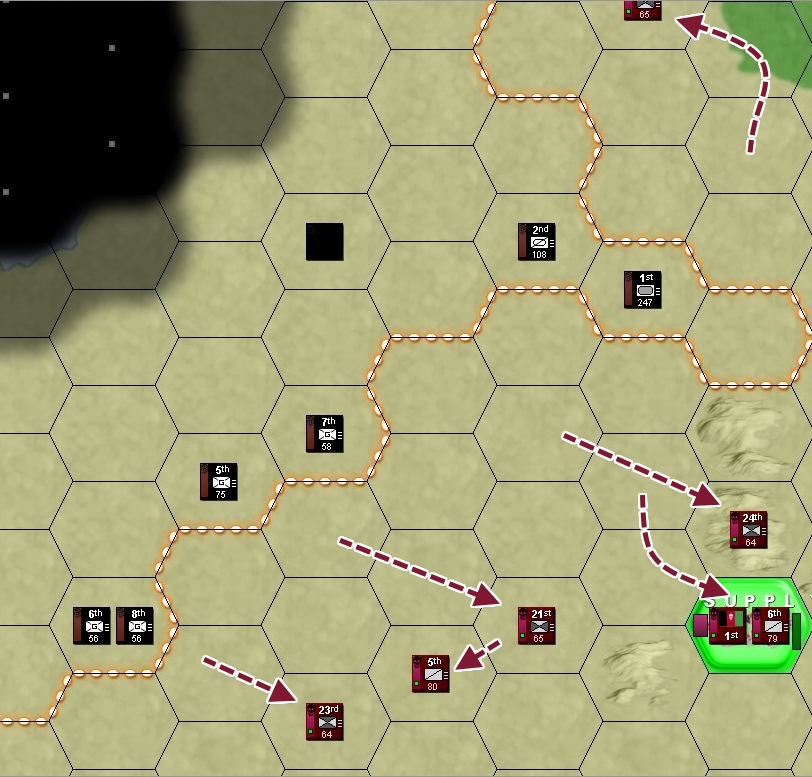
TF 3 & 4 Orders -All HQ and field arty to switch to 25% retreat. -Rocket launchers to switch to 100% retreat. -28th and 25th Guerilla to switch to 25% retreat. -31st Guerilla switch to 100% retreat. -26 and 34 infantry switch to 100% retreat. -Move HQ first. 3rd HQ stays put.  Move as shown. Red arrows are artillery strikes. Southernmost strike is to be conducted alongside the rocket launchers. Should be clear enough I hope. [e]  3 HQ stays put and 4 HQ tries to get into the same hex as 3 HQ. Red arrows are arty bombardments. 28th Guerrilla moves to cut enemy line along the river then tries to escape back to our lines, I expect it doesn't have enough AP to move three hexes but worth a try - priority is cutting the supply flow from the enemy bridge. End result:  Saros fucked around with this message at 12:57 on Oct 3, 2018 |
|
#
?
Oct 2, 2018 20:49
|
|
|
Honestly that middle part around the 3rd HQ is a clusterfuck and I have no clue who goes where. Here's a zoomed-in version of that area, it should help make it all clearer.
|
|
#
?
Oct 2, 2018 21:03
|
|
|
 Moved out of starting spots to gather intelligence last turn, guess I should have assumed the worst. Some moving into defensive positions in the north. The 22nd is moving to disrupt enemy supply lines, hopefully before they run out of food themselves. Ending up so close to the enemy cavalry is a risk, but at worst they will be diverted from the main line of attack. Might have to blow the fuel budget if those enemy guerillas get frisky.  Intelligence from last turn tells us that enemy cavalry is driving toward the 2nd HQ and screening an enemy supply depot. The 19th guerrilla group will move to disrupt this or to reopen our line of supply next turn. Another nuisance bombardment should discourage enemy movement in that area. I have confidence that the southern supply depot can hold out, if contact with HQ can be maintained, and we hold at least one of the frontal hills. Edit: habituallyred fucked around with this message at 19:18 on Oct 3, 2018 |
|
#
?
Oct 3, 2018 04:23
|
|
|
Habit you're giving up your only rough terrain, the hills far too easily. The effect of terrain is absolutely massive in ATG, doubling or even tripling your effectiveness on the defense. Look at the artillery bombardments for example, units in the open are wrecked and left hardly able to move whole those in defensive terrain shrug it off like it's nothing.
|
|
#
?
Oct 3, 2018 10:48
|
|
|
I could argue that no amount of defensive bonus will let us weather these odds head on. Or that even the mightiest fortress on a mountain peak is useless without supplies. But I suppose down south is the safest place for me to get flanked. And that the foe could quickly divert their cavalry unit to backline clearing. Final orders, edited into previous post.
|
|
#
?
Oct 3, 2018 19:24
|
|
|
 You leave some space between yourselves and the enemy. 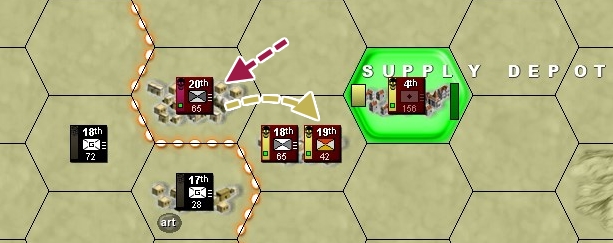 In the town, your regiments reposition, but the enemy remains passive. 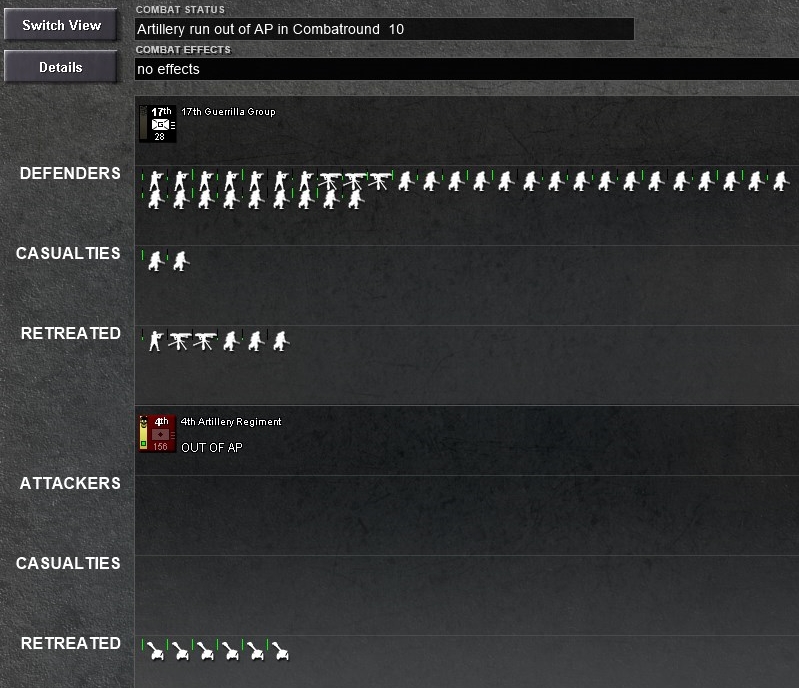 The artillery keeps them honest. 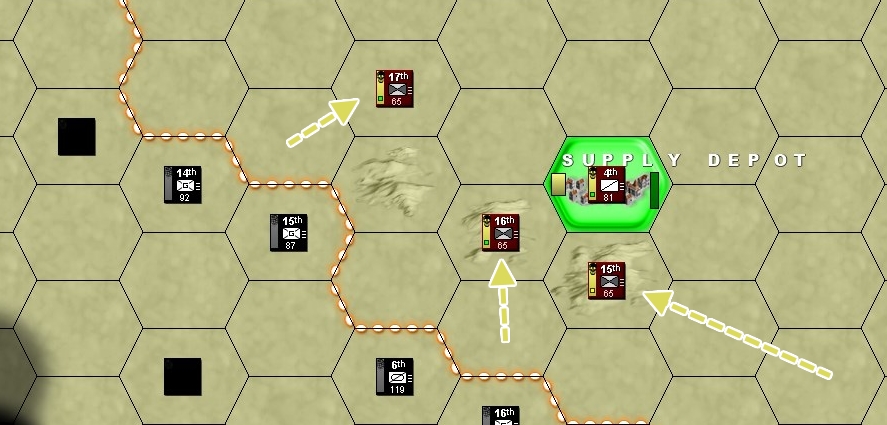 Your men return to hold the hill line. Keep me updated on developments here. We cannot allow this supply depot to fall into enemy hands, it is far too close to Driblenx. If the Awfulians continue their assault, I will send in engineers to demolish the depot.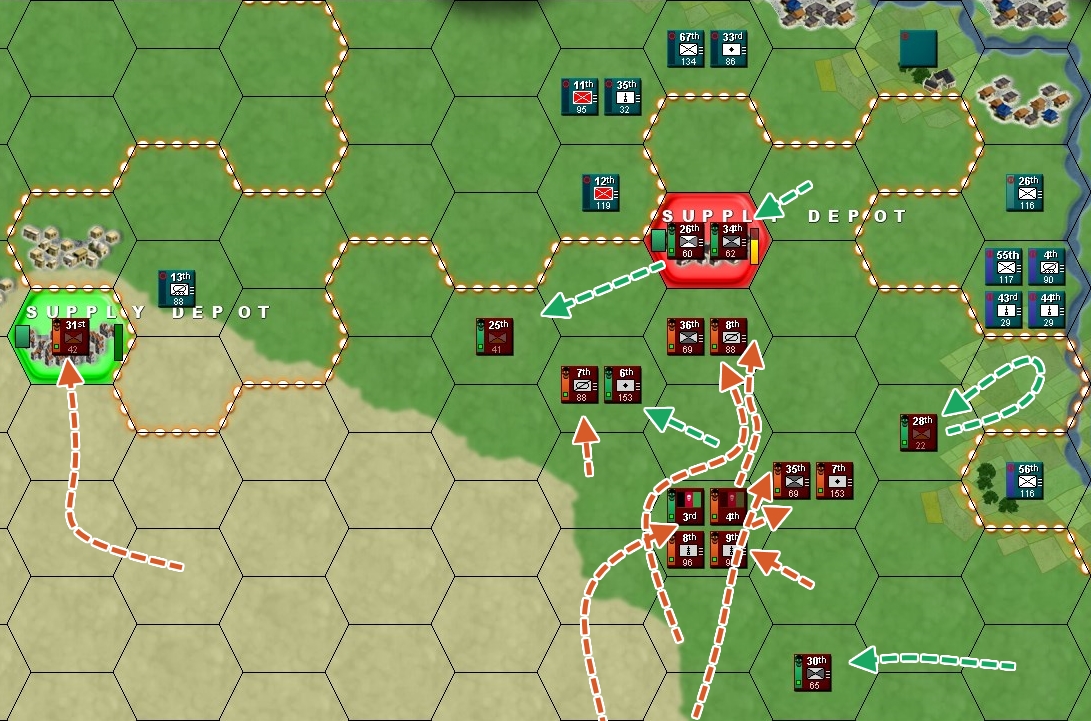 This part was difficult, so I'm hoping I did everything right. The two guerrilla units move to threaten enemy supply lines, but having to avoid enemy patrols slows them down quite a bit and they don't reach their planned positions on time.  The 7th Artillery Regiments barrages the UPRA forces crossing the river. The results are moderate. I missed screenshotting the barrage against UPRA's 12th, which appears to have been comparable in terms of casualties, but far more effective in eroding enemy readiness.  You consolidate your positions in the east and establish a stopgap line between the supply depot here and the positions TF3 and TF4's HQs hold. Romano's engineers take positions and begin working on fortifying the Hill Line. 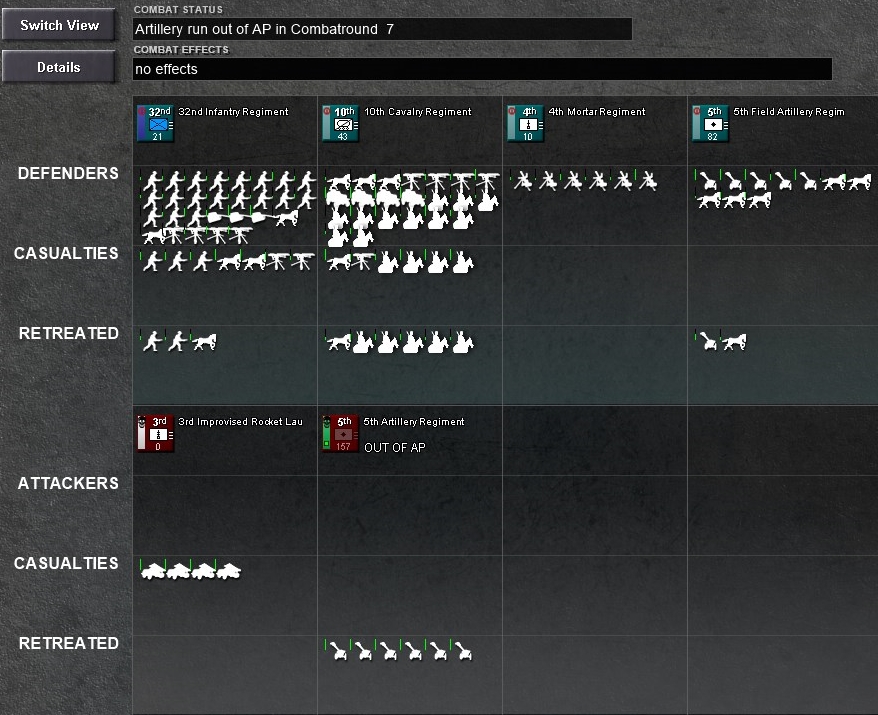 The big bombardment is... less deadly than hoped, but still very effective. According to your reports, the two non-artillery regiments have lost a ton of readiness and should need a turn or two to pull themselves together. 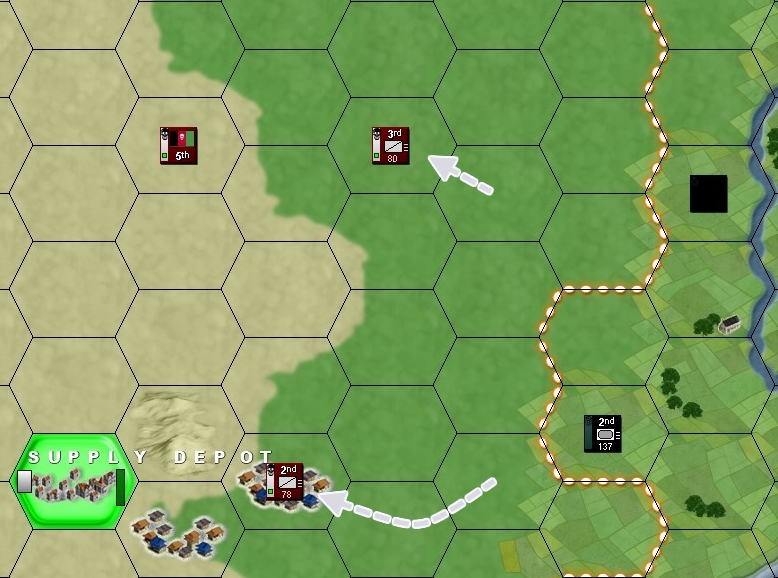 TF5's cavalry withdraws to maintain standoff distance from Awfulian troops. End of turn overview 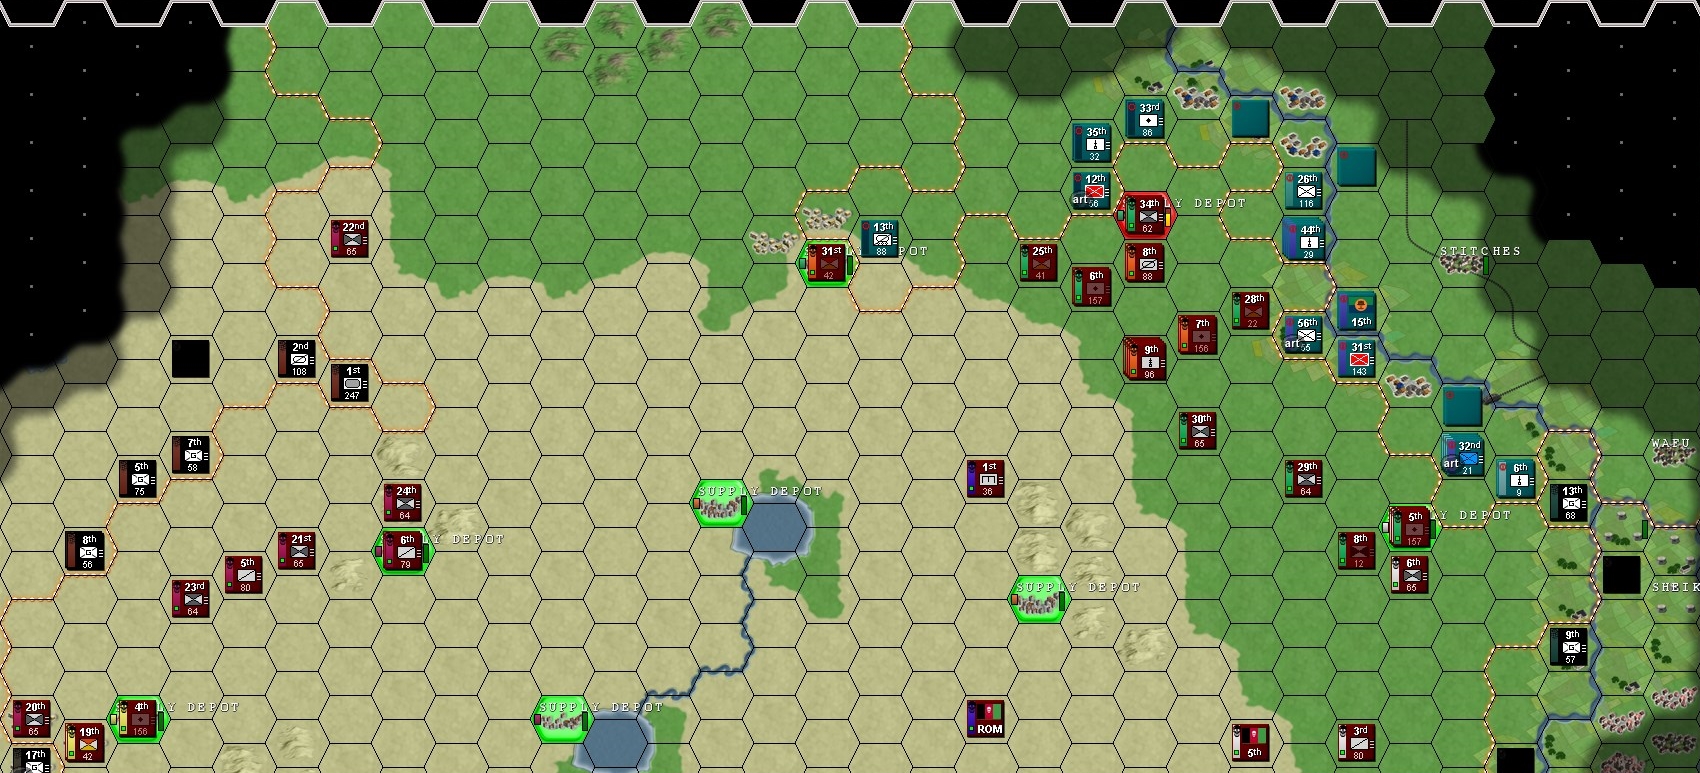 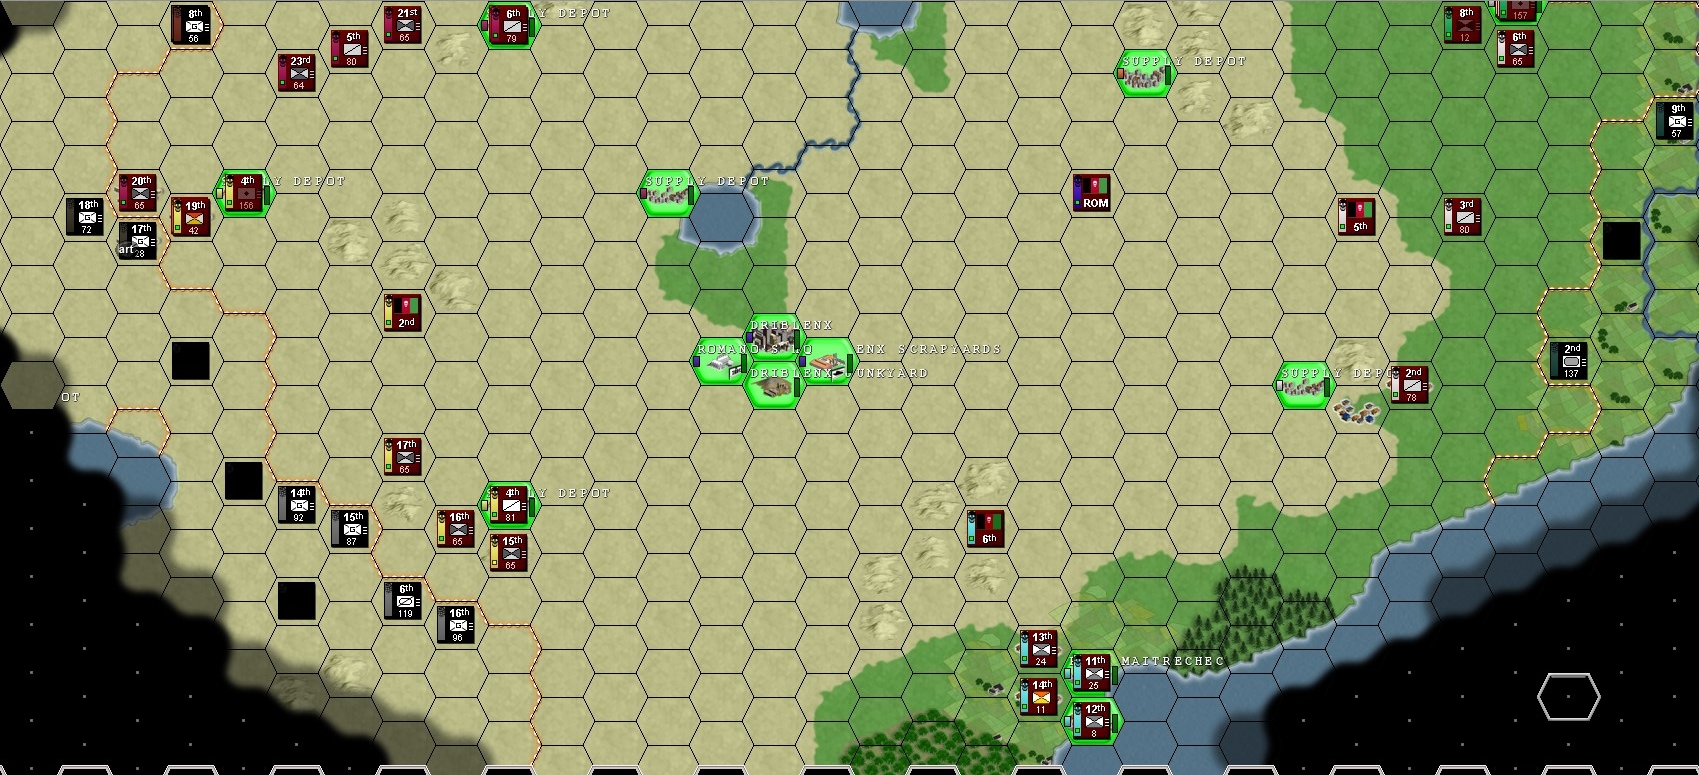 Map at end of turn 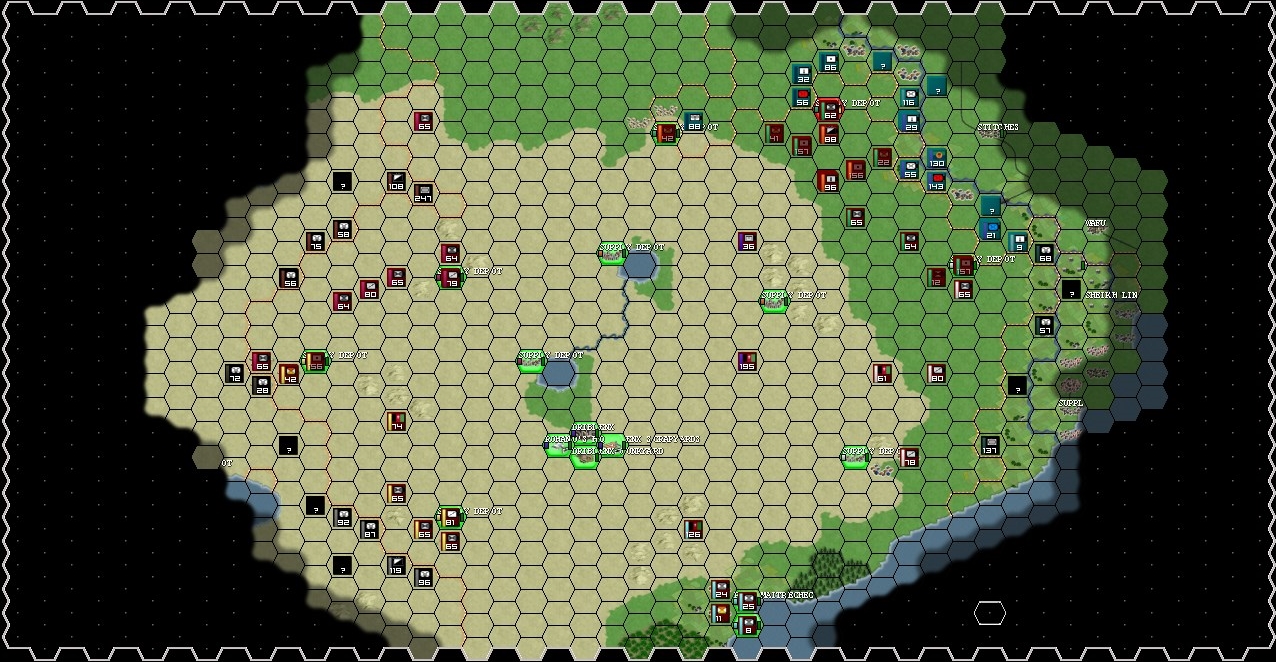 The turn now passes to the Separatists of Aw-Fulia.
|
|
#
?
Oct 4, 2018 16:28
|
|
|
 It appears you took a bunch of hits this turn, but gave almost as good as you took.  The fuel situation is bad, but stable. Before we proceed with reports, gentlemen, some news. We got some UPRA newspapers with today's oil shipments:quote:
I wouldn't put much stock, or hope, in that effort. I've been around Awfulians, fought with them, fought against them, all this long enough to know they are people who enjoy warfare. They delight in crushing their enemies, in burning, pillaging, in mindful, astounding destruction. The Memeli, meanwhile, are aristocratic idiots who would parade a soldier until they can flog him to death for having the audacity to wear down his boots, but not give him live rounds to train with. We will have to resolve the Sheikh and his people ourselves. Only an idiot hopes others will win his wars for him. 28th Guerrilla gets caught without entrenchment or terrain protection and is pummelled by enemy artillery.  A massive overland assault soon follows. Your fighters are mercilessly hunted down in small villages and hiding spots where they sought shelter. By your count, over 300 are listed as missing in action, even more KIA or wounded. The leftovers rout. 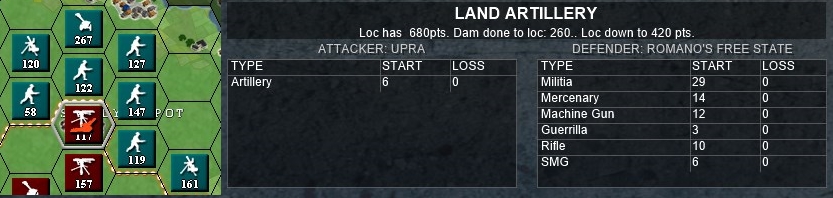 Some shells fall onto your regiments in the northern supply depot, but they are far too few to cause any real destruction. 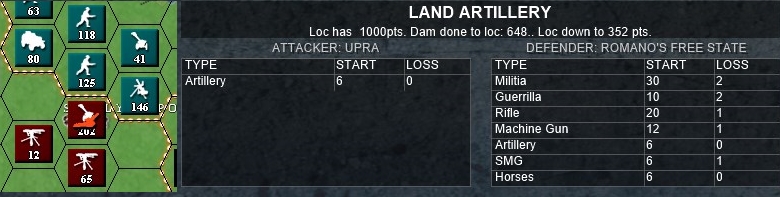 Enemy artillery opens up in reply to your bombardment last turn. It is no more effective than you were. 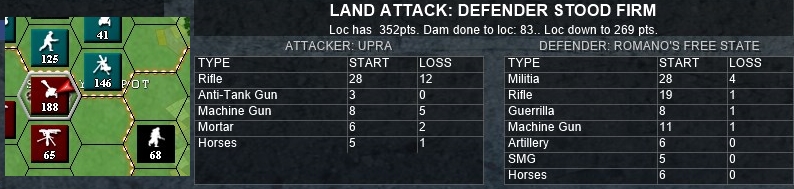 It looks like UPRA overestimated the results of the bombardment, as they attempt to rush your positions soon after. The attack goes in piecemeal and gets chopped up by your machine guns. Just like in 1917. 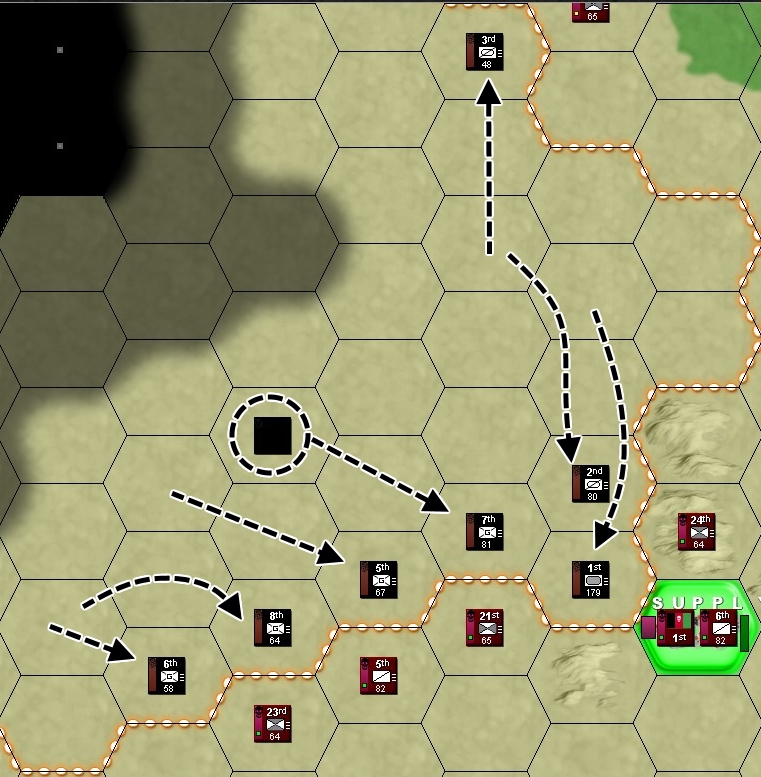 An enemy cavalry regiment moves up to check on your flankers. The rest of their force, spearheaded by a powerful armoured formation, rushes against your supply depot. 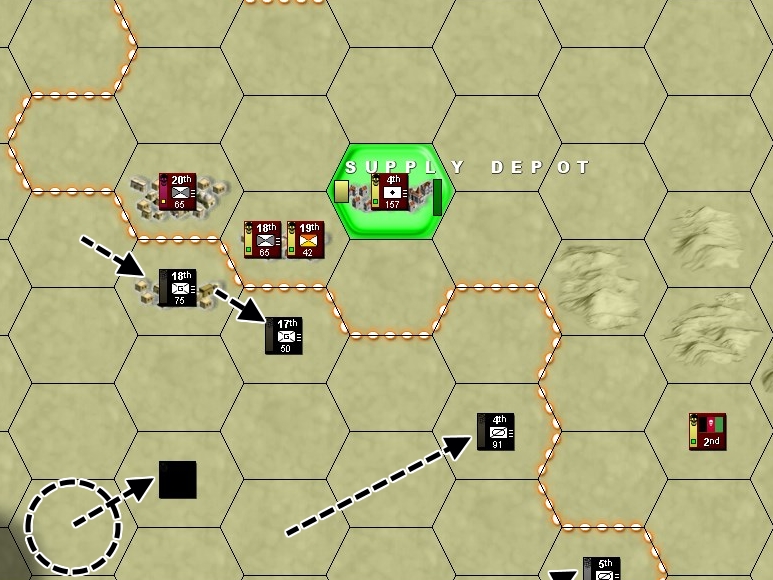 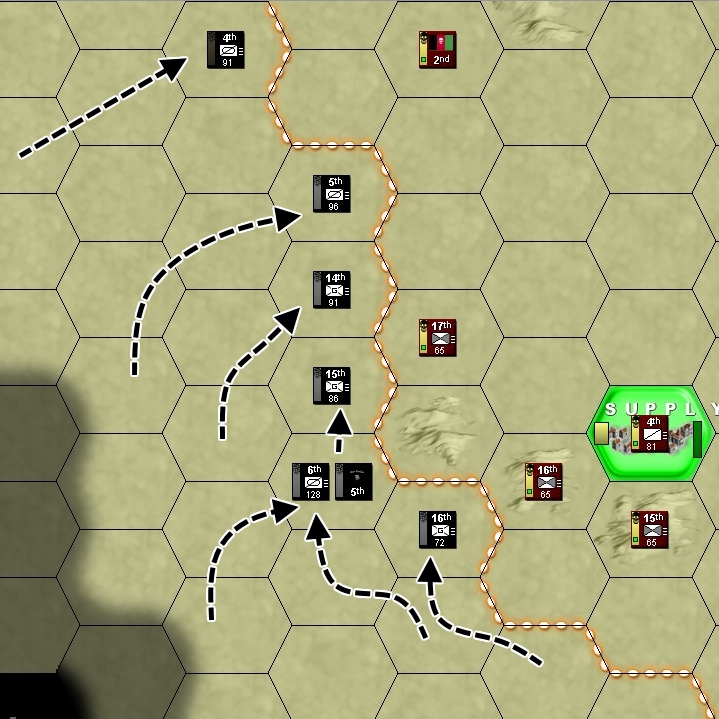 Enemy forces near the southernmost supply depot begin an intricate dance and try to get around your northern flank. They come uncomfortably close to TF2's HQ.  You do spot one of their HQs, however. El Smiguel... Little is known about that man, aside from the fact he is a formidable enemy. Supposedly he was with the Sheikh ever since his wrestling days. A good candidate if you are looking for hands to die at.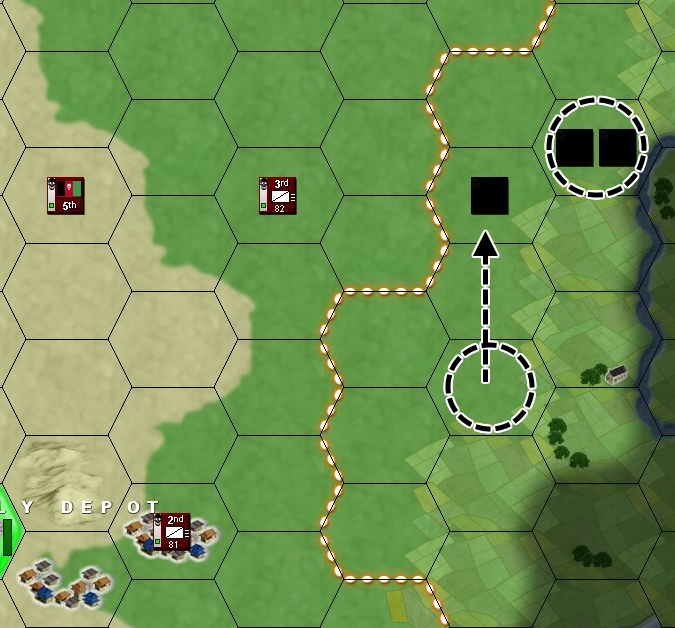 Awfulians make limited movements in the south. It appears some more of their units have crossed the river. They do not seem to have a solid plan of attack against any specific position of yours. 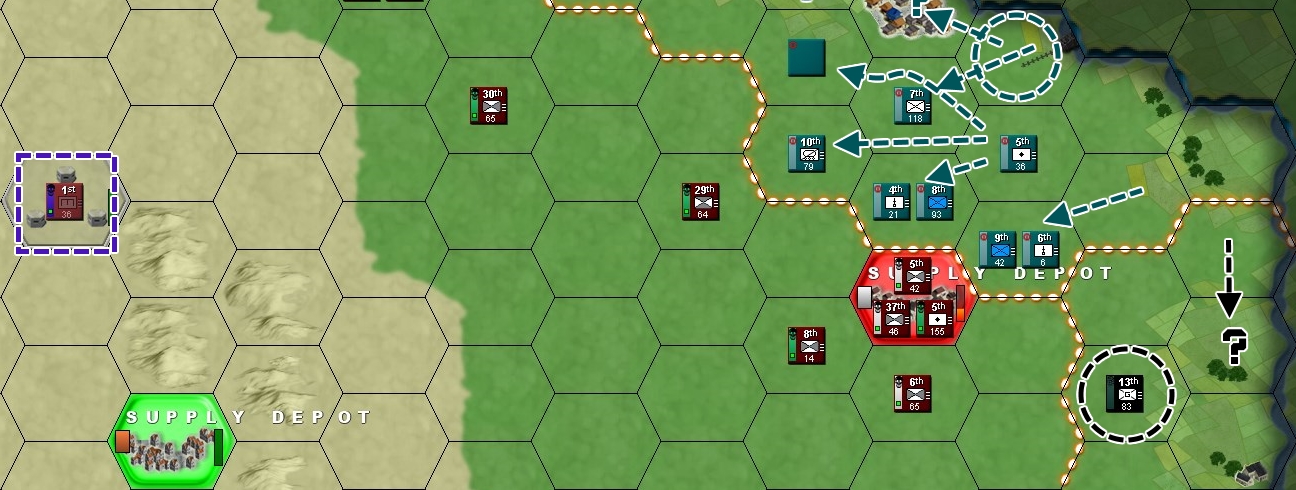 The enemy push out from their bridgehead and establish a line closer to you. Aside from that failed attack on the depot, they appear strong. Awfulians in Alfuego do little. Your engineers report that the first part of the fortification line has been completed. We lack materials for further construction, however. To facilitate it, I ordered salvage groups and materiel shipments to provide us with more concrete, steel, and barbed wire at the expense of tank replacements.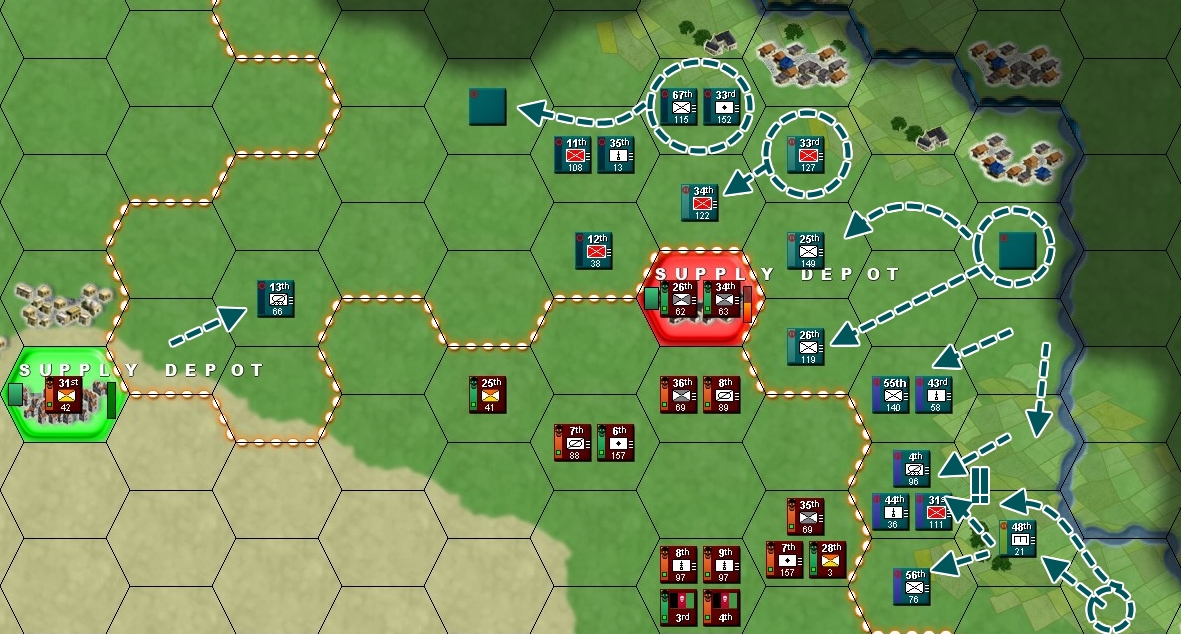 In the northeast, you get pushed away from the river, while more enemy reserves come into action from behind the main battle line. Moreover, one of your Guerrilla Groups gets punished and lets the enemy get closer to your now-unprotected rear line units.  Task Force 6 is set up to form quite a bit ahead of schedule, if current trend continues, although if TF3 takes more casualties, this timetable may yet be disrupted. Situation overview 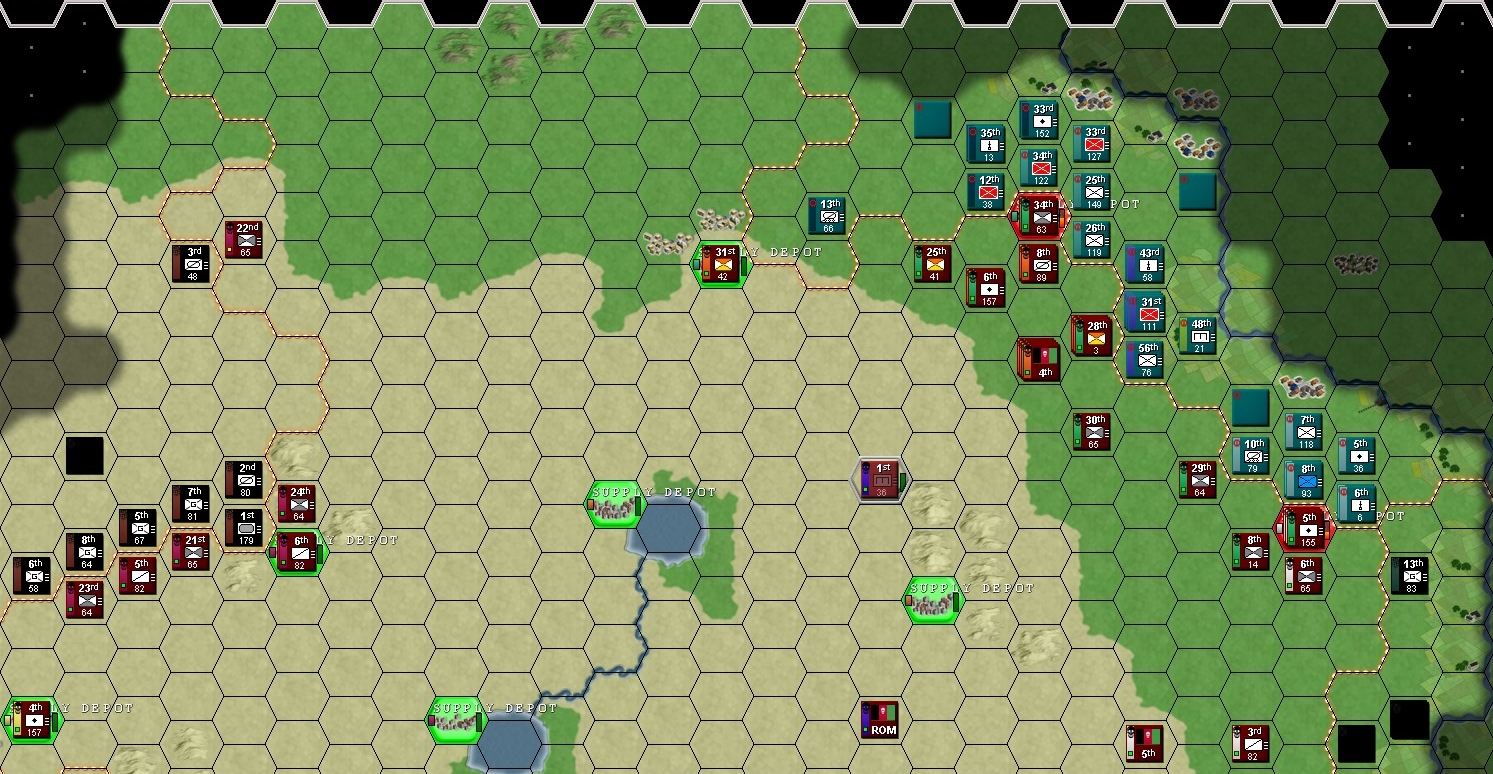  Map at start 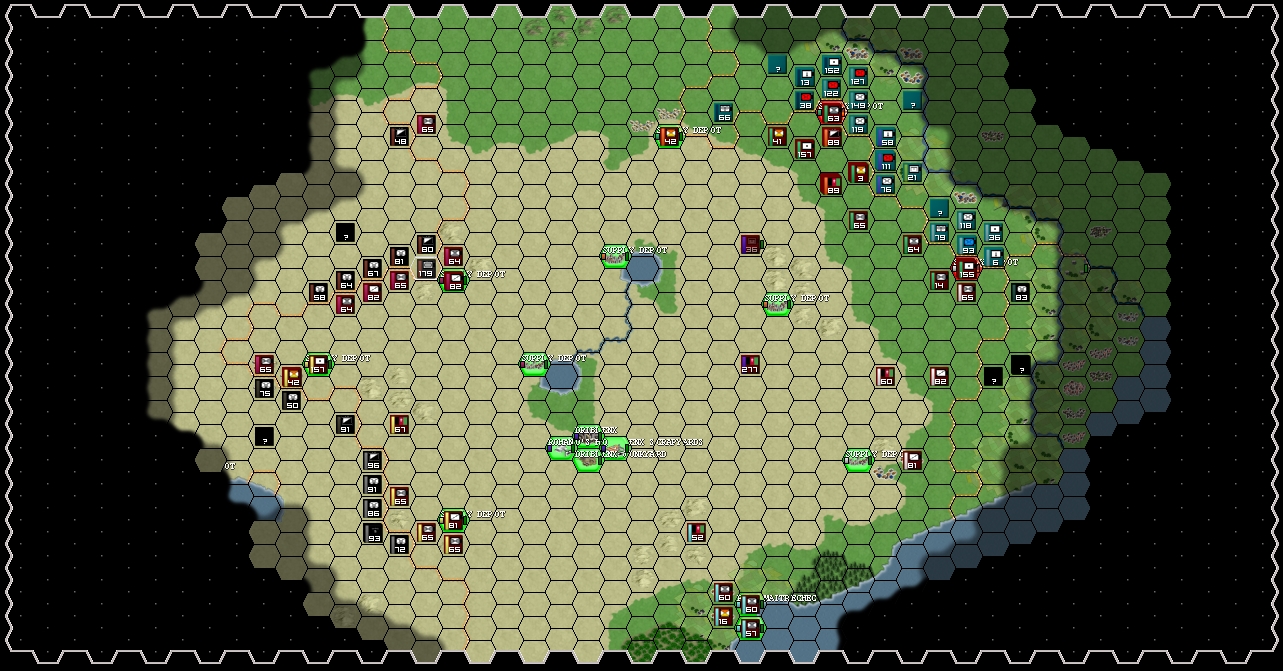 Intelligence Report UNIFIED PEOPLE'S REPUBLIC OF ALMAIN Cavalry Regiment - 3 currently in sight - 17-21 Cavalry, 2-4 Machine Gun, 1-6 Horses, 3-4 Armoured Car Field Artillery Regiment - 2 currently in sight - 1-7 Artillery, 5-6 Horses Infantry Regiment - 13 currently in sight - 13-45 Rifle, 1-5 Anti-Tank Gun, 1-8 Horses, 3-17 Machine Gun Mortar Regiment - 5 currently in sight - 2-9 Mortar Engineer Regiment (new!) - 1 currently in sight - 16 Engineer SEPARATISTS OF AW-FULIA Artillery Combat Group - currently none in sight - last seen 16 November - 6 Artillery, 4 Horses Armour Combat Group - 1 currently in sight - 8 Awfulian Tank, 3 Armoured Car Guerrilla Group - 10 currently in sight - 21-44 Guerrilla, 2-7 Machine Gun, 3-15 SMG Cavalry Combat Group - 5 currently in sight - 6-25 Cavalry, 1-5 Awfulian Tank You have 48 hours to input your orders.
|
|
#
?
Oct 12, 2018 22:28
|
|

|
Northern Combat 1) Blue moves happen first. 2) Both artillery bombard enemy 26th infantry [orange arrows]. 3) 7th cav, 25th and 2th attack enemy 12th infantry. Do not move to occupy the hex. Afterwards if 25th guerilla has enough AP it is to retire to its original hex. 4) 8th Cav and 34 and 35 infantry attack enemy 26th infantry. Don't occupy the hex. 5) If our 35th infantry has enough AP to retreat to its SW [dotted blue line] then do that. If not move the 36th along the white line to help cover it. If 35 can withdraw then don't move the 36th.  The rest move as follows. ----------------------------------------------------------- Jessejin i'm bugging out to the north with my infantry, i'd say pull back one hex so they occupy the supply depot and I can finish it off next turn with a bombardment. There's also going to be a hole to the north where my infantry have moved out.
Saros fucked around with this message at 15:50 on Oct 13, 2018 |
|
#
?
Oct 13, 2018 15:44
|
|
|
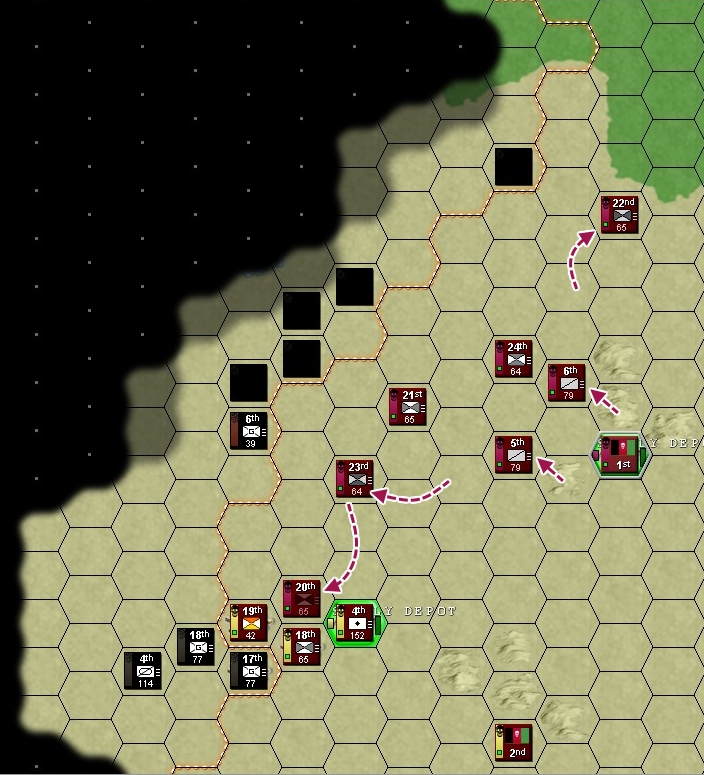
The Northwest and Western maps are linked so I will start with those: _________________________ 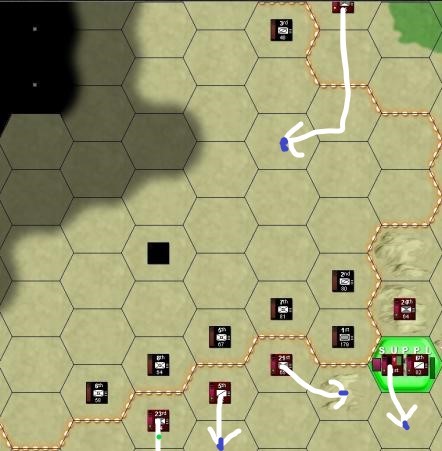 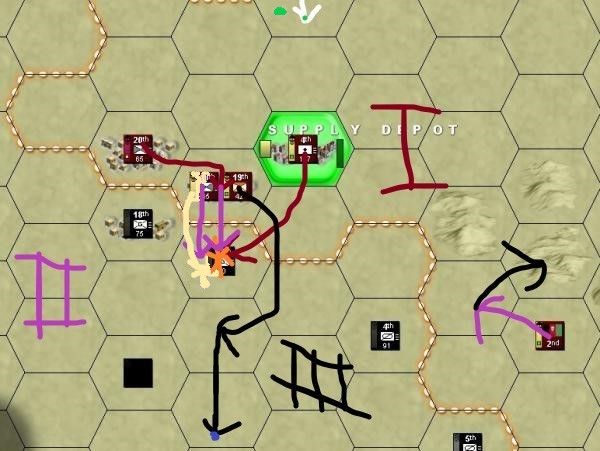 The 23rd is indeed moving crossing the boundary. The 22nd should retreat at 25% casualties. Retreat at 75% casualties for the 24th, 21st, 20th, 6th. The 20th should not move into the attacked hex. I suspect the unidentified unit by the II mark is a HQ. The attacked hex will have major movement penalties by the time the guerilla is ready to move. This should interfere with enemy supply lines now, and might open a path to the rumored enemy supply depot to the west. Taking advantage of an isolated enemy unit is great too. 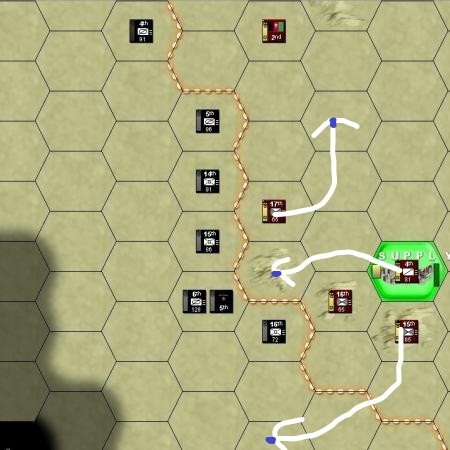 Trying to keep the enemy honest here. Should slow anybody trying to break that north-south line. Putting 2nd HQ in the middle of that hill group is a compromise move that might cause trouble later. But the bonus to west group's attack and supply should be worth it.
|
|
#
?
Oct 14, 2018 04:11
|
|
|
Okay, my orders are simple. First and foremost, I'd like for my northern troops to retreat on the blue lines. North:  Second, on the south, guerilla division will go to the harbour area, and everyone else should go to the north east, as far as they can in one turn. Northern cavalry divison will retreat one hex toward guerilla divison, while southern will remain as it is now. South: EDIT: I amended order, so no unit splitting is happening. Pictures will remain, but red marked units in the northern part should be ignored. Jesenjin fucked around with this message at 17:37 on Oct 14, 2018 |
|
#
?
Oct 14, 2018 09:02
|
|
|
Oh attacking and winning doesn't waste ap as if they win they get to move into the hex for free.
|
|
#
?
Oct 14, 2018 10:58
|
|
|

|
| # ? May 8, 2024 08:34 |
|
|
Yes, but the guerrilla unit wants to get further than the contested hex. My initial version of the plan had the 18th taking advantage of that, but I decided against it. Edit: Going to have egg on my face if the enemy runs in the first round. habituallyred fucked around with this message at 03:45 on Oct 15, 2018 |
|
#
?
Oct 14, 2018 17:23
|
|