


|
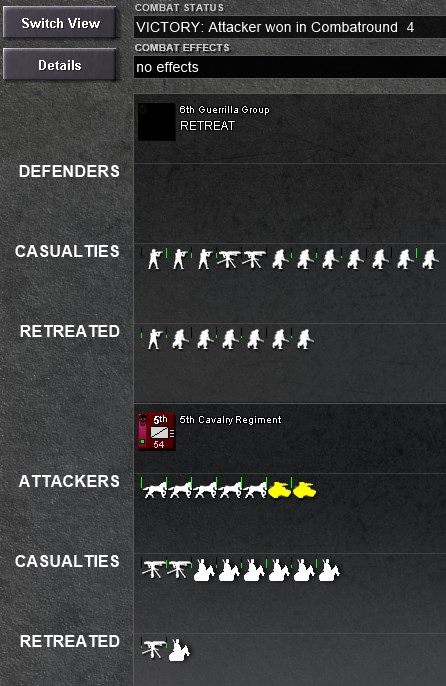
  You reposition in TF1's sector and prepare to face the enemy onslaught. Hopefully, the tanks will break on your entrenchments. 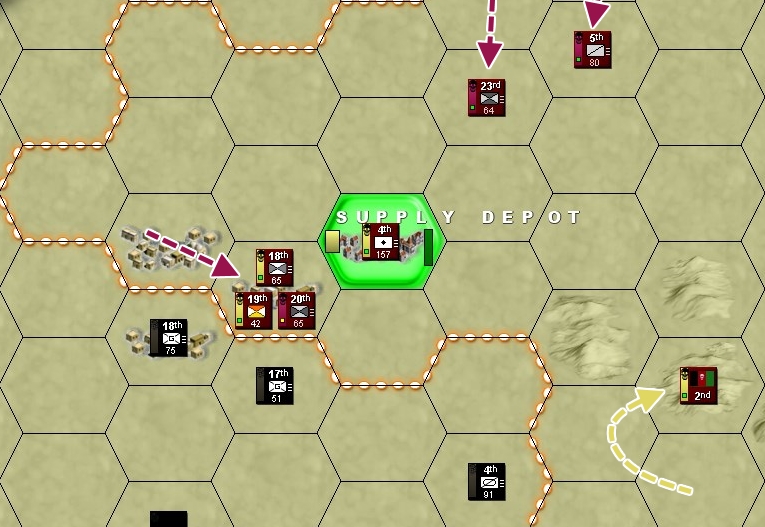 20th Infantry positions for an attack against the enemy positions, while TF2's HQ brushes past enemy cavalry to take position in the hills. 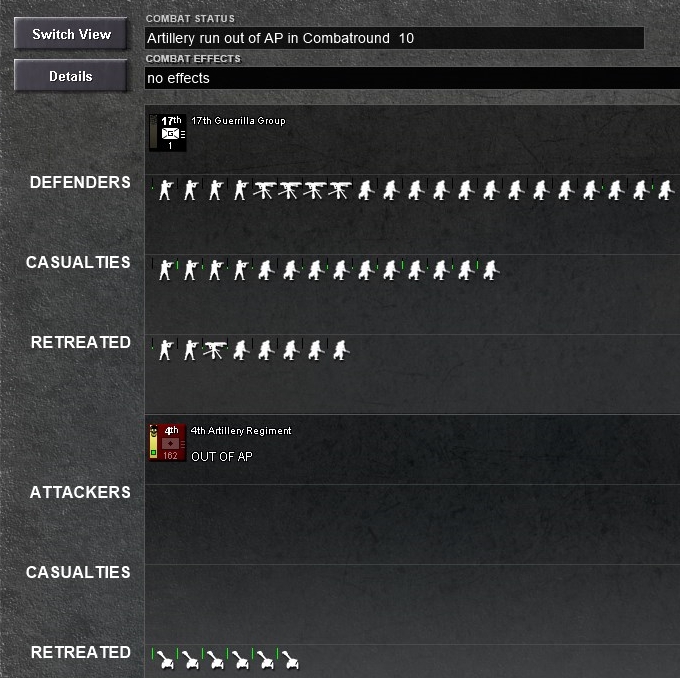 Your artillery brings the hammer down on exposed Awfulian guerrillas.  This makes them easy pickings for ground attack. The enemy folds after barely a day, retreating in poor, but relatively cohesive order. 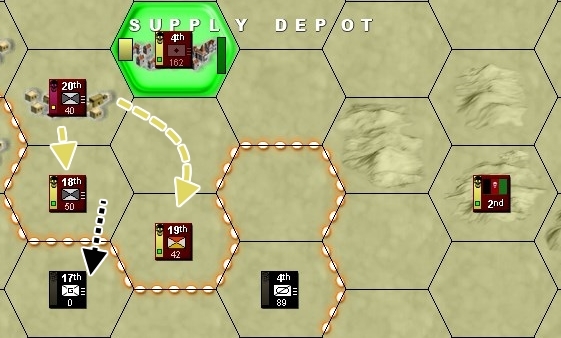 The 19th does not manage to get too far before it has to stop. Enemy presence is stronger than expected.  Still, you manage to confirm that the unknown unit in the vicinity is an HQ - this one under a mercenary only known under his nom de guerre Triple Force Hennessy. 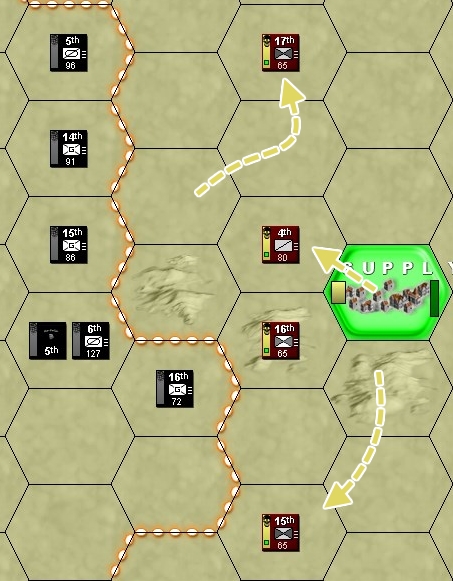 A meridional line forms west of the critical SW supply depot. 4th Cavalry is slow to move into the hills, however - its tanks must take it slow to avoid possible enemy ambush. Tracked units require 75 AP to enter a hill hex - which is exactly as much AP as 4th has... but enemy Zone of Control (they extend into your territory!) adds an additional 10 AP cost, stopping your force before it can enter. 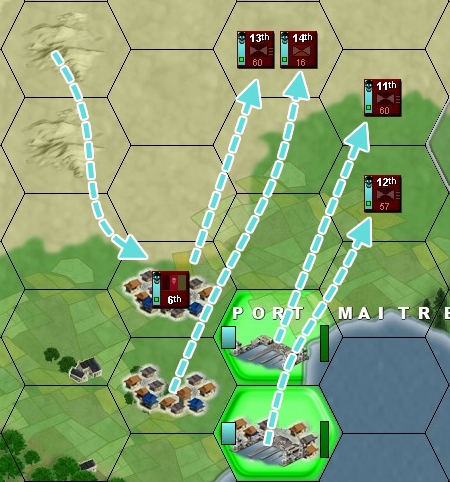 The undermanned TF6 sets out due northeast. Its final echelons should reach it along the way. 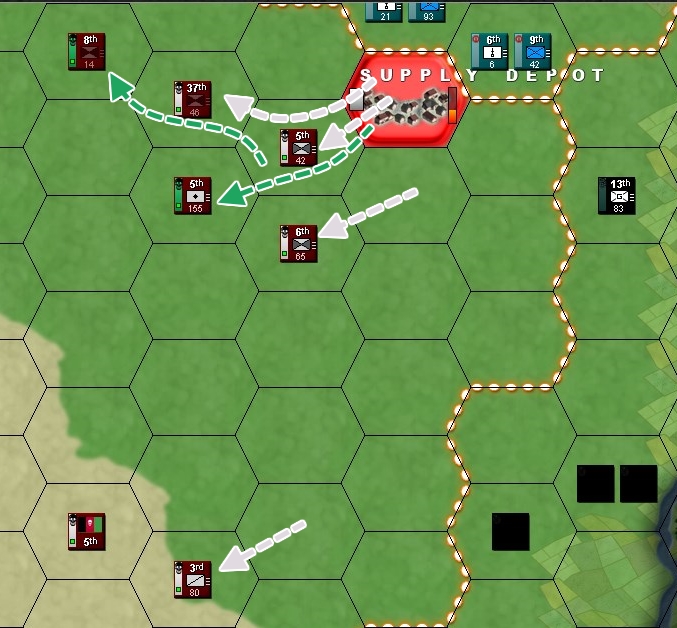 You abandon the supply depot and take positions in the second line, behind it. The troops are already digging trenches - for what good it will do in the open steppe. 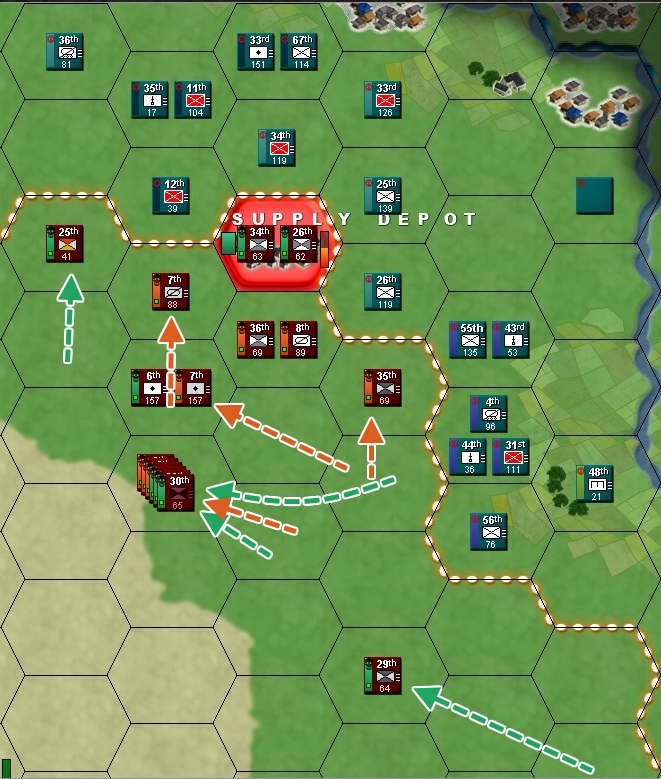 More of your forces concentrate around the northern depot and prepare to blunt the enemy advances. 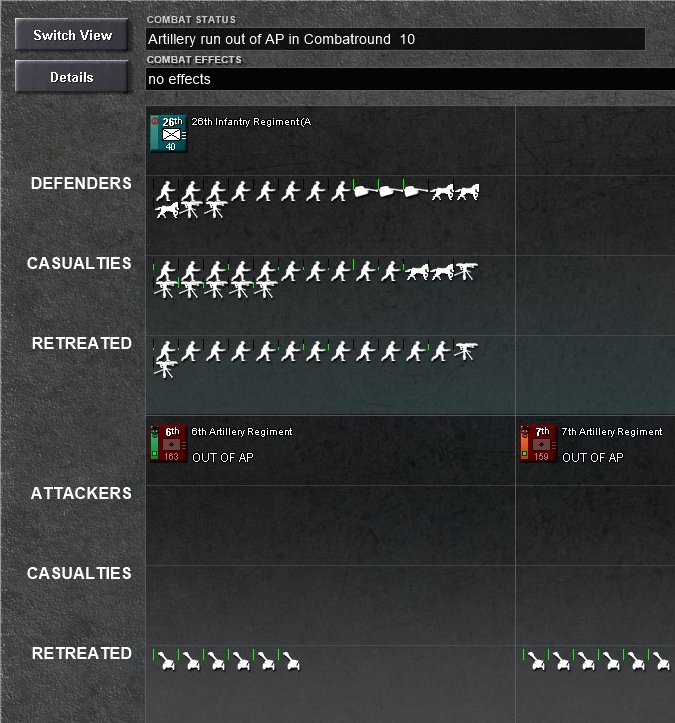 Artillery barrages the enemy 26th Infantry Regiment. Reports indicate the casualties are horrendous. The force is made up mostly of fairly new recruits, who stand up poorly to intense gunfire. Soon after, your ground assault demolishes their weak defences. (Missed a screenshot - sorry!) 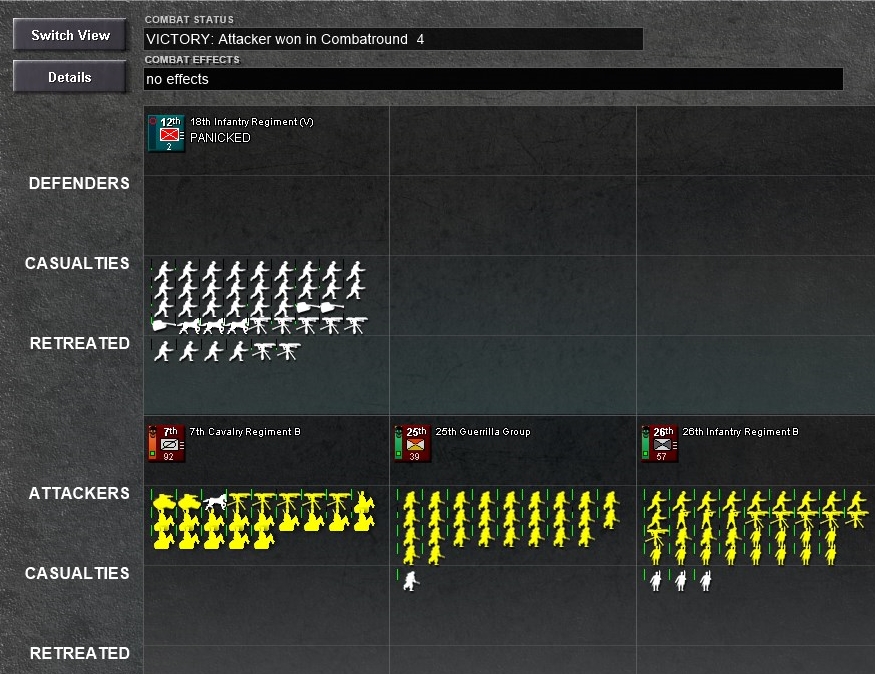 The enemy cede ground after just moments of combat. What is going on? They barely shoot back. Few of them surrender, even if many choose to take their own lives rather than give up; what few you manage to take prisoner seem weak, frail, exhausted. Early interrogation reports state they complain they had nothing to eat for days. 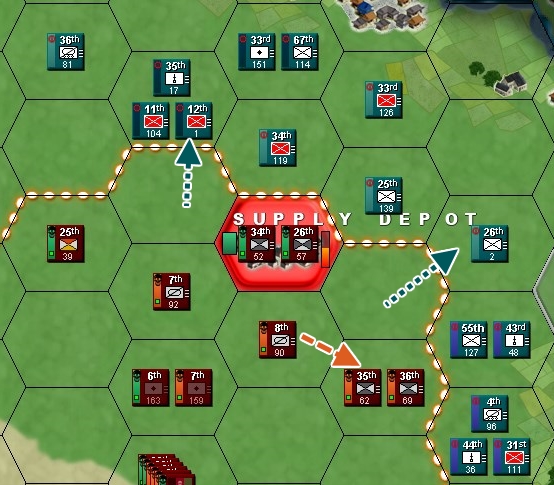 Either way, both enemy forces withdraw. 36th Infantry moves to cover its fraternal regiment. End of turn overview 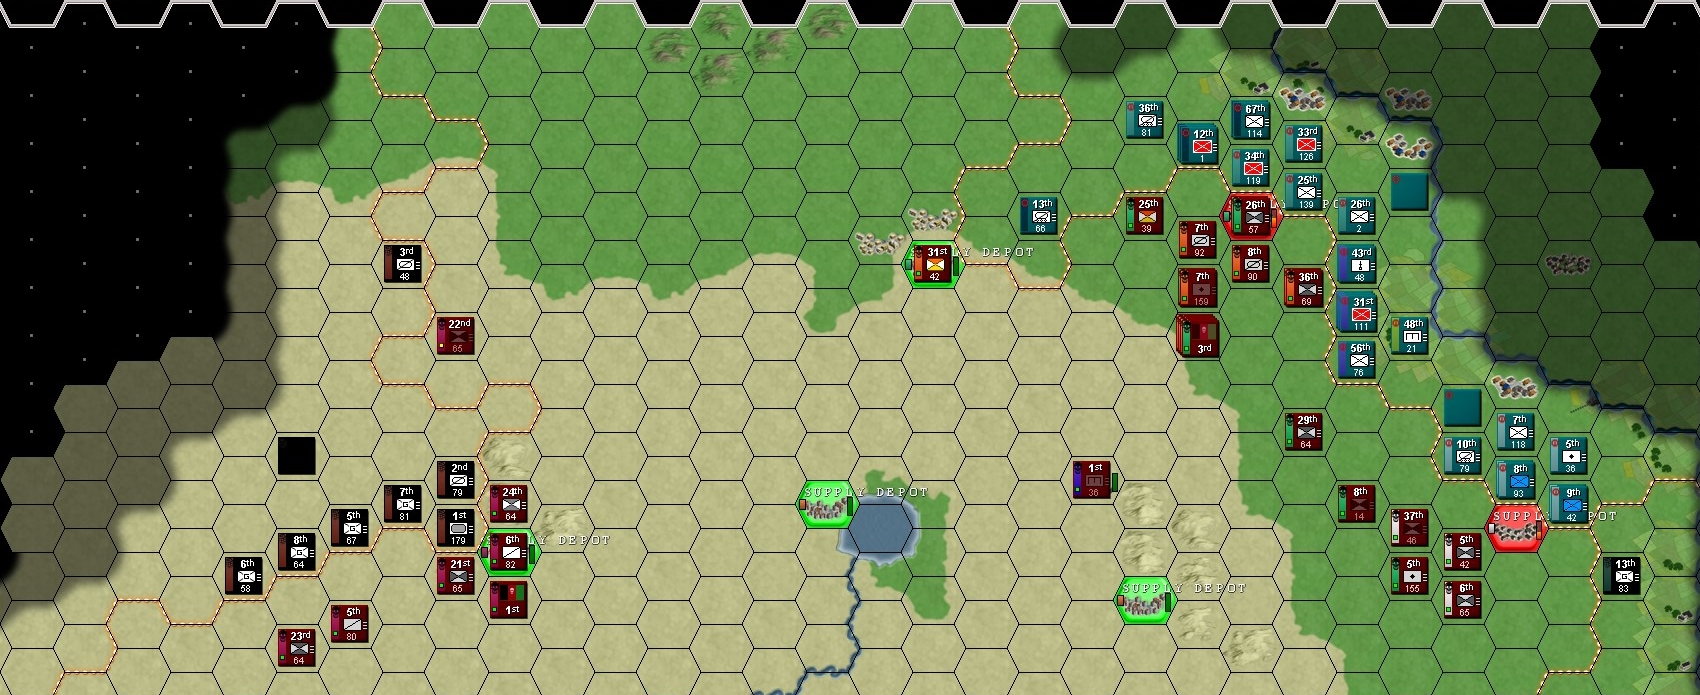 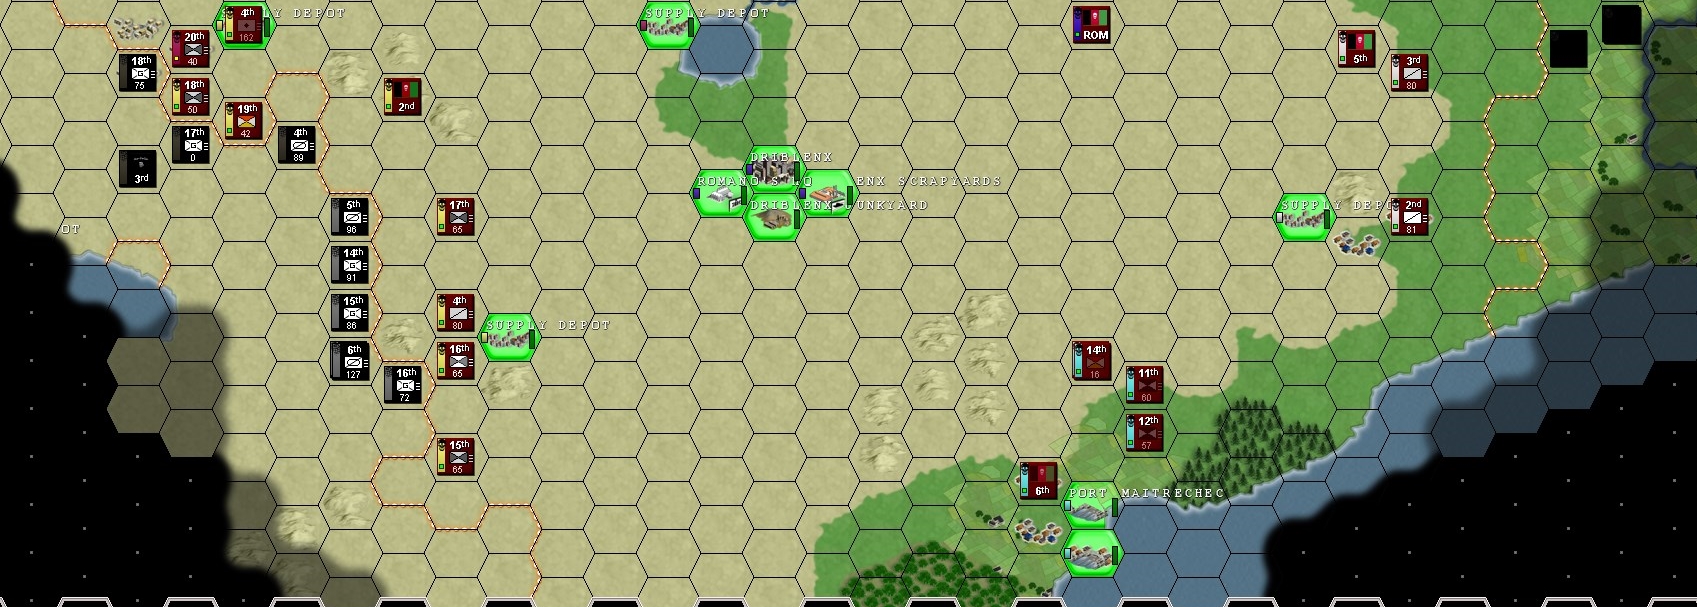 End of turn map 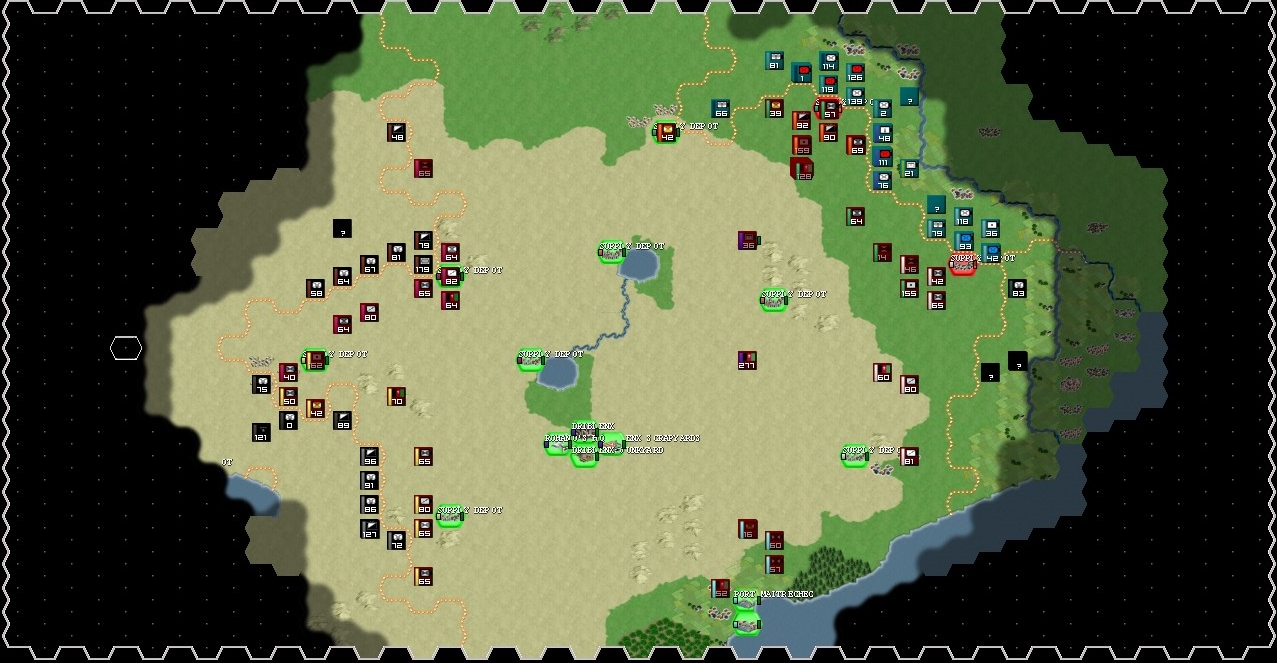 The turn now passes to the Separatists of Aw-Fulia.
|
 #
?
Oct 15, 2018 20:16
#
?
Oct 15, 2018 20:16
|
|


|

|
| # ? May 8, 2024 22:08 |
|
|
Whoever is in Charge of tf6 you are going the wrong way! The east is okay for now but the west is getting enveloped.
|
|
#
?
Oct 15, 2018 20:46
|
|


|
In retrospect the plan was doomed without a total elimination of the enemy force. Even if they had retreated to the left hex there still would have been too many combat patrols. I should have written out orders for 2nd HQ to provide maximum support to the attack and then move into cover. I will preemptively ask for fuel for next turns counter attacks. Now that Upra has a bridge to send supplies with the West is going to get ugly. Jesenjin you wrote that you wanted the guerilla unit to hold the port, but you drew orders sending your 6th HQ to hold the port. HQs are pretty mobile so you have time to fix this.
|
|
#
?
Oct 15, 2018 22:09
|
|

|
Gods, I'd give my left testicle for more mobile troops here. It's really crazy how they amble forward without always protecting their flanks.
|
|
#
?
Oct 18, 2018 10:06
|
|

|
HorrificExistence posted:time is a flat circle Tevery I humbly request new units be created. Dibs on the first Truck-BMP's and machine-gun chariots.
|
|
#
?
Oct 19, 2018 15:01
|
|


|
Wouldn't those just be armored cars and MG units coupled with horse units? Well, I guess the Tachanka is a bit different in that it fired on the move.
|
|
#
?
Oct 19, 2018 15:53
|
|
|
 Well this thing says "Death to black bandit Baron Wrangel". That's this guy.
|
|
#
?
Oct 19, 2018 20:56
|
|
|
How appropriate
|
|
#
?
Oct 19, 2018 21:28
|
|
|
And here I thought we were going old school: https://en.wikipedia.org/wiki/Carroballista
|
|
#
?
Oct 20, 2018 03:08
|
|
|
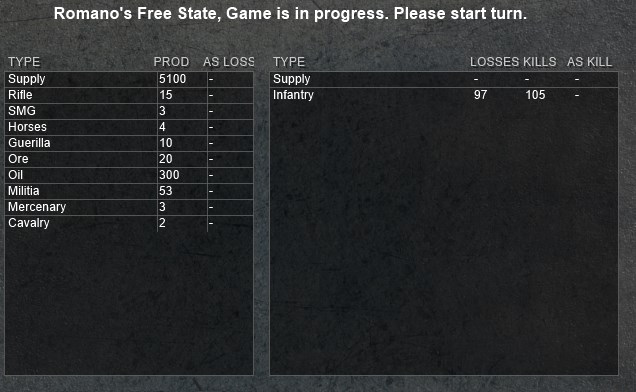
November 22, 1928 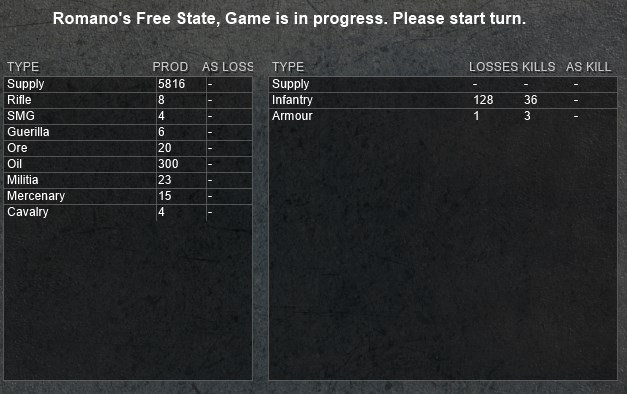 That's a lot of casualties for a single turn. 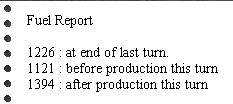 Fuel reserves are dropping quickly. 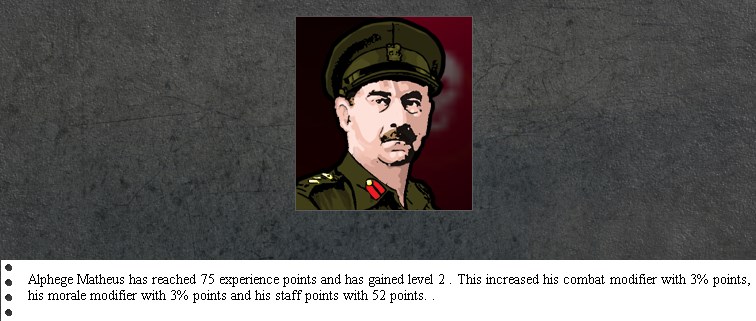  Two of your commanders level up. Saros even unlocks a special feat!  This... is not a skill that will come in handy any time soon, but, well, if all goes to hell... 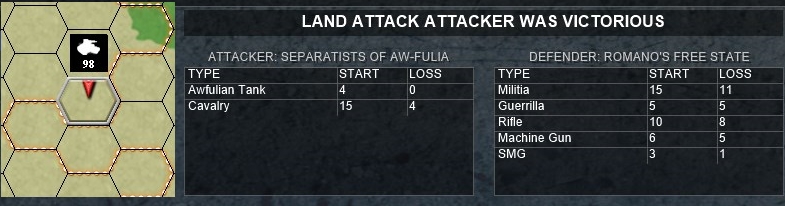 In the northwest, Awfulian cavalry shatters your stray infantry regiment, causing the survivors to retreat in disarray. 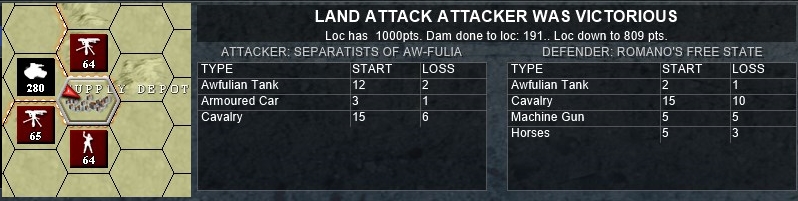 An armoured assault then pushes you out of the northwestern supply depot with heavy casualties - although they have lost several vehicles, which won't be easy to replace so far from their actual infrastructure. 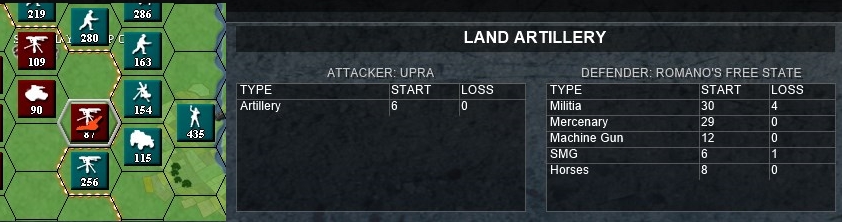 On the UPRA front, your mounted troops receive an enemy artillery barrage. Damage is moderate. 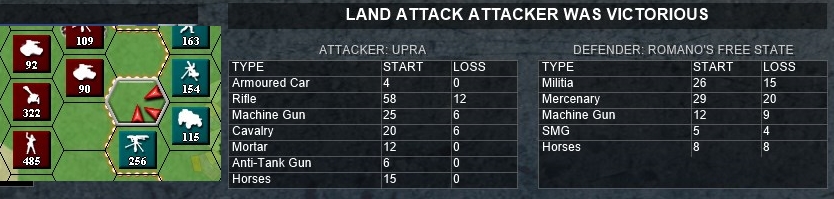 But this is then followed by a massed enemy offensive that shatters both sister regiments. Only a small remnant force manages to withdraw, if perhaps in decent enough order. Notably, they have lost every single horse, and for now are back to foot-mobility. 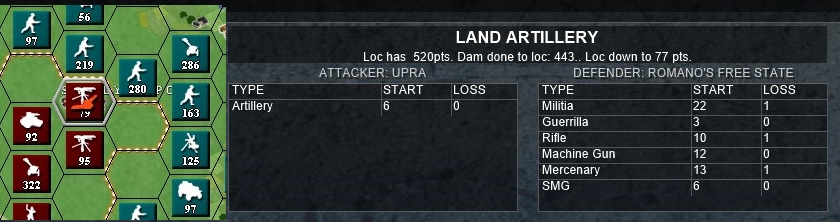 Enemy also shells the northern supply depot. Most of it has collapsed, but some infrastructure still remains. 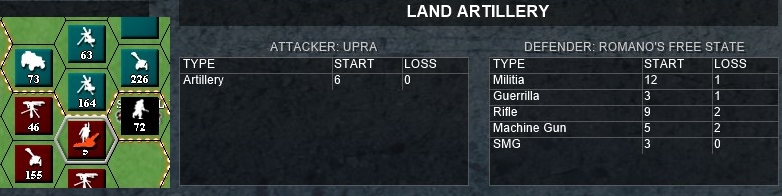 Shells fall on you near the souther supply depot you just vacated. The damage is not overwhelming, but this regiment was battered anyway and this definitely won't make things better. 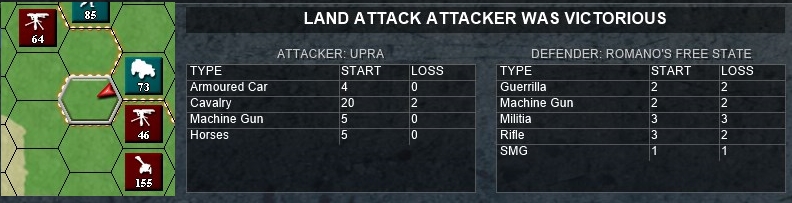 Enemy cavalry shatters the weak unit on the southern edge of TF3's sector. The "regiment" is reduced to a single platoon of riflemen. 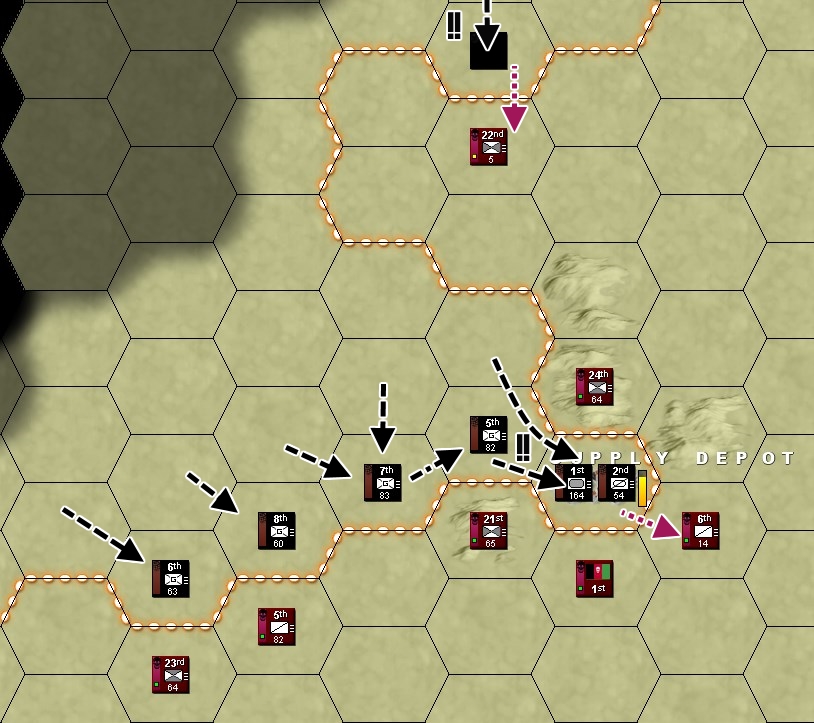 Now that the depot has fallen, your position here looks precarious. 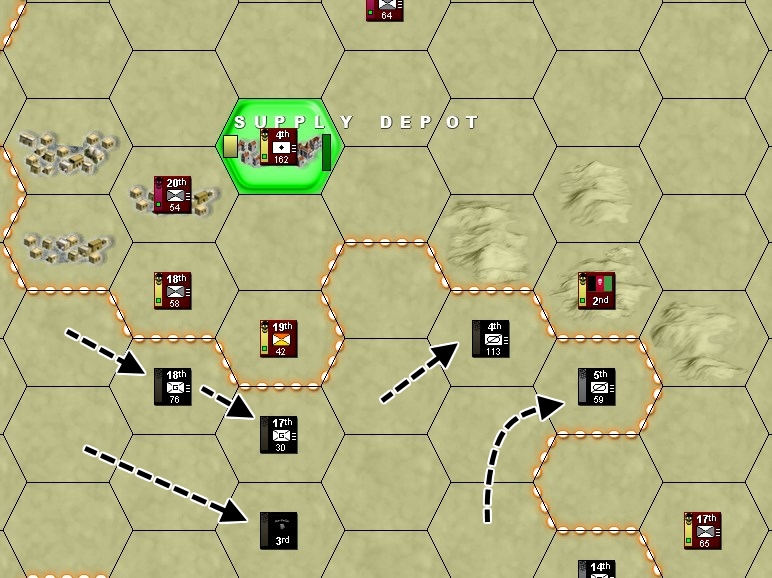 Near the western supply depot, the enemy attempts to circumvent your positions while pushing towards TF2's HQ. 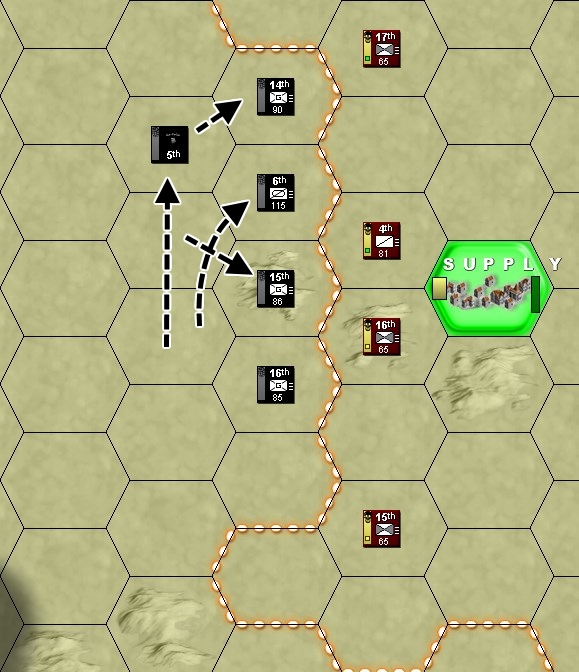 No attacks near the southern supply depot 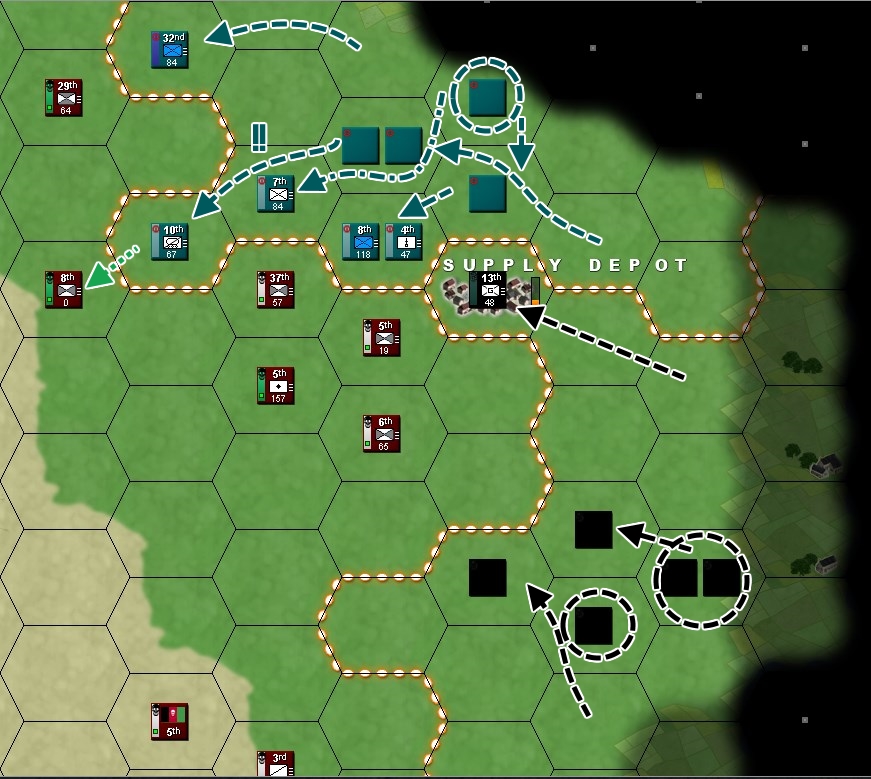 A few hours after you vacate the eastern depot, an Awfulian guerrilla group lodges itself comfortably within its fortifications and helps itself to whatever materiel you did not cart away. They are frustratingly well-informed. Moreover, a large Awfulian force is spotted rolling out of the fog of war further to the southeast. UPRA troops bypass the depot instead of trying to push the Awfulians out, then launch attacks against your weaker units. (Also, Romano's engineers have constructed another segment of the fortification line. It's not on the screenshots for reasons.) 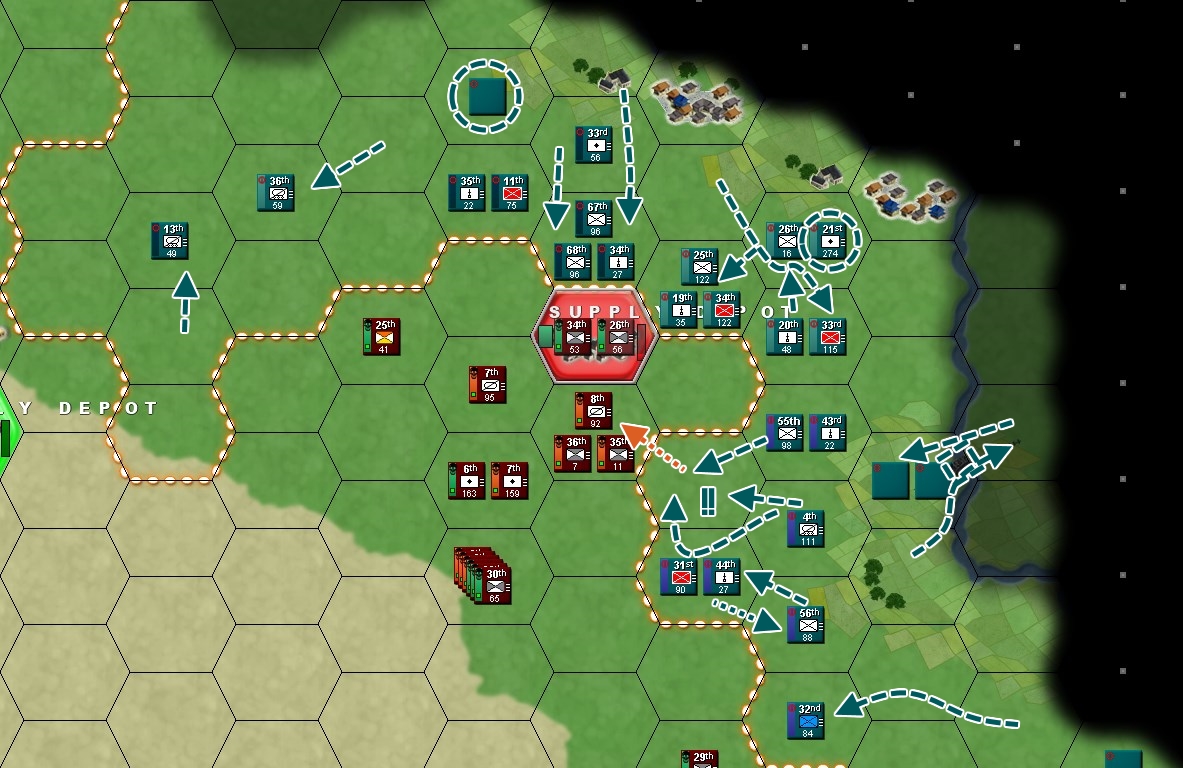 UPRA troops continue to cross the river and approach your positions. Your scouts report they have thrown another bridge across the Ful. They crush your two mounted regiments, but do not pursue or attempt to seize territory. Situation overview 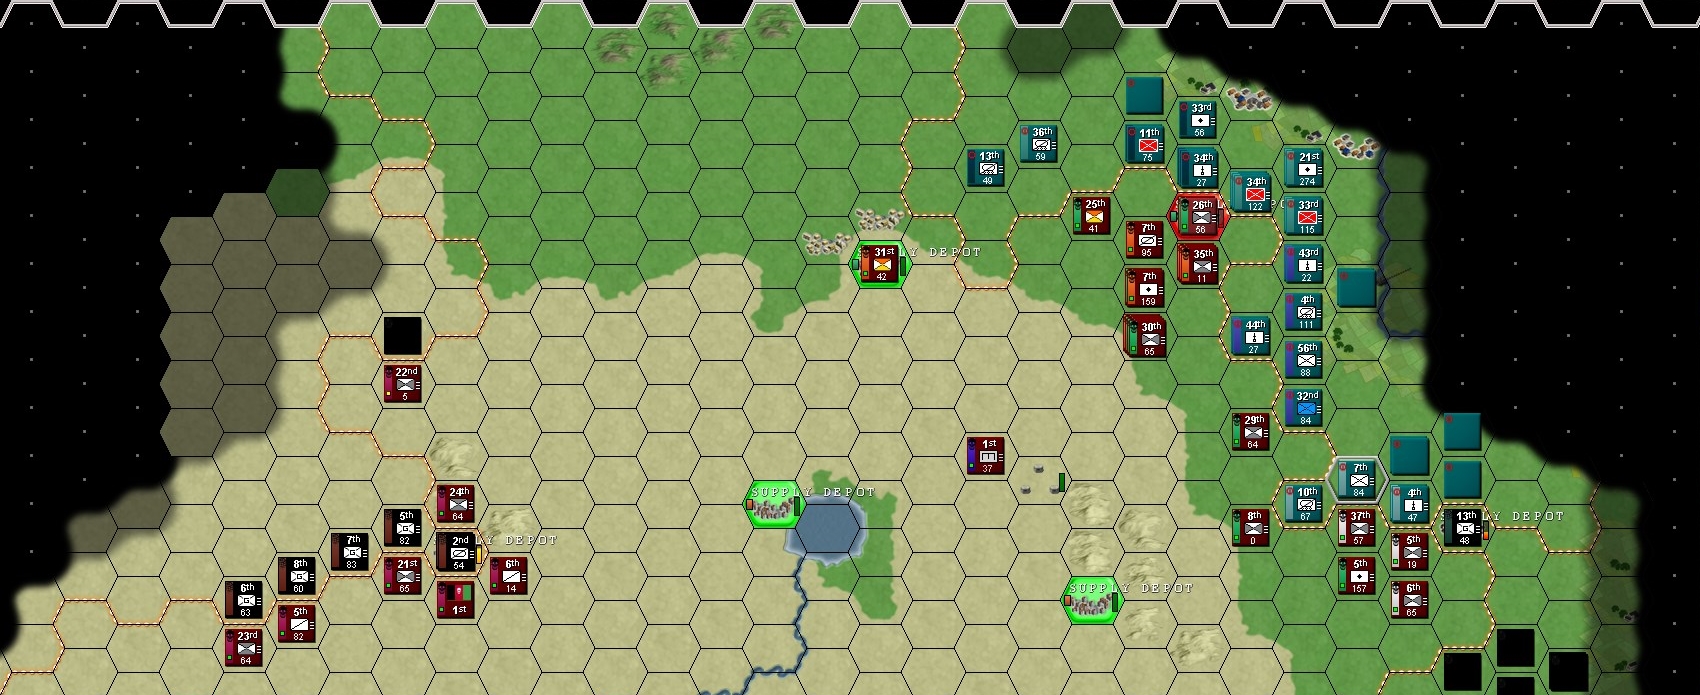 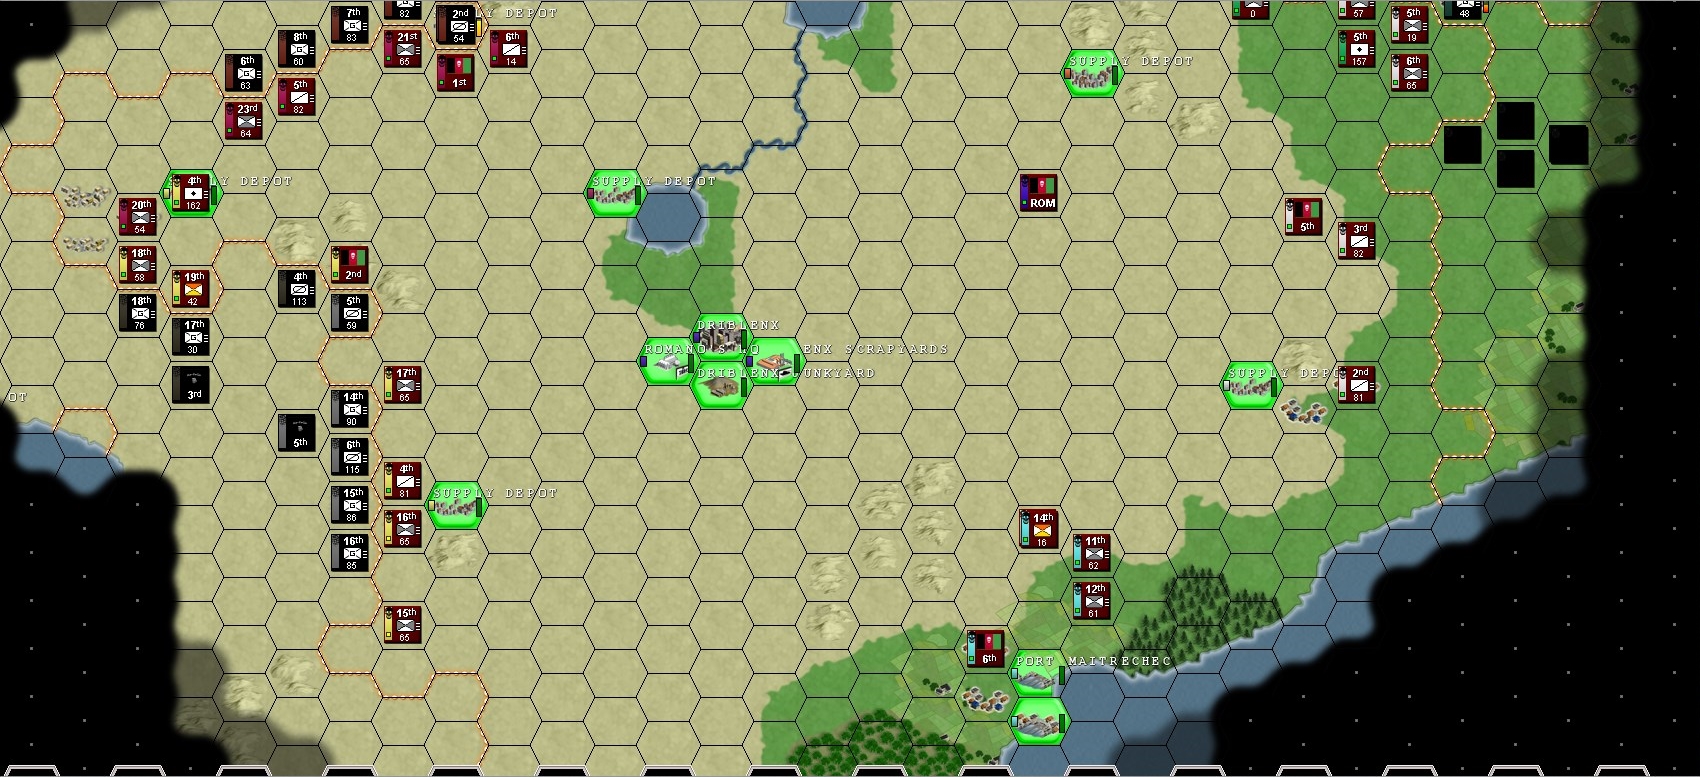 Map 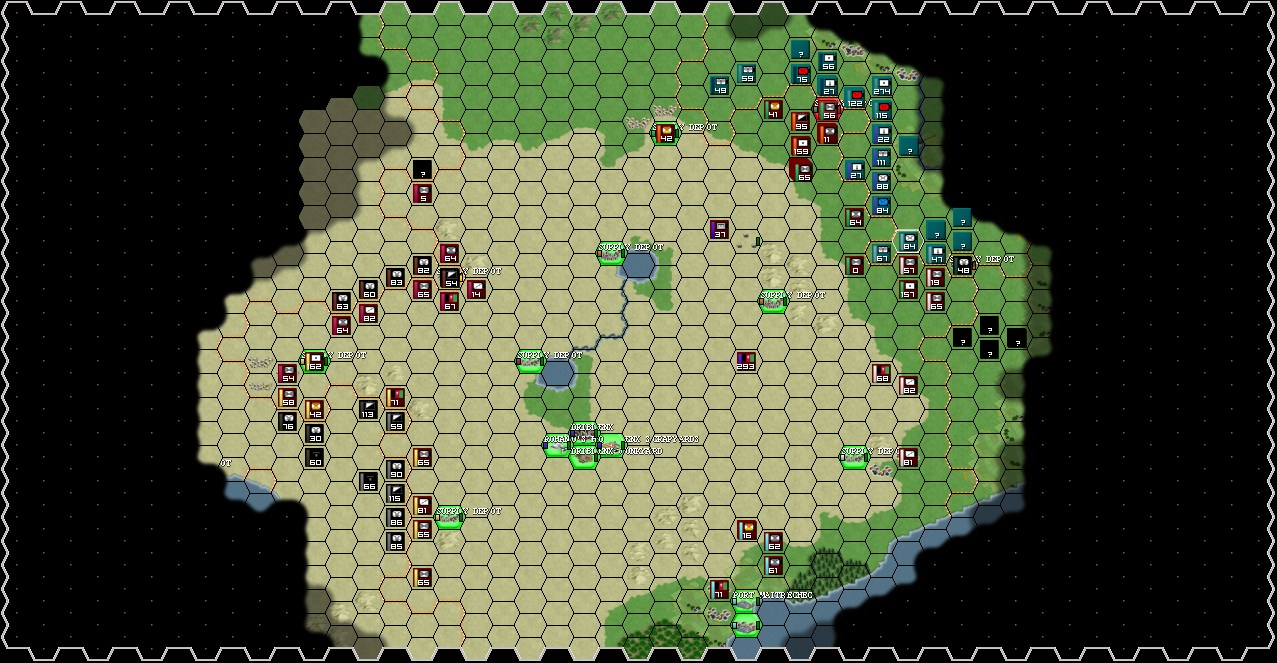 You have 48 hours to submit your orders.
|
|
#
?
Oct 23, 2018 17:25
|
|
|
Intelligence Report UNIFIED PEOPLE'S REPUBLIC OF ALMAIN Cavalry Regiment - 4 currently in sight - 8-23 Cavalry, 1-8 Machine Gun, 2-6 Horses, 1-5 Armoured Car Field Artillery Regiment - 2 currently in sight - 2-10 Artillery, 7-8 Horses Infantry Regiment - 13 currently in sight - 5-39 Rifle, 1-4 Anti-Tank Gun, 0-8 Horses, 1-11 Machine Gun Mortar Regiment - 6 currently in sight - 3-7 Mortar Engineer Regiment - currently none in sight - last seen 20 November - 16 Engineer SEPARATISTS OF AW-FULIA Artillery Combat Group - currently none in sight - last seen 16 November - 6 Artillery, 4 Horses Armour Combat Group - 1 currently in sight - 7 Awfulian Tank, 2 Armoured Car Guerrilla Group - 10 currently in sight - 19-37 Guerrilla, 1-5 Machine Gun, 5-15 SMG Cavalry Combat Group - 4 currently in sight - 9-14 Cavalry, 2-5 Awfulian Tank Clean images 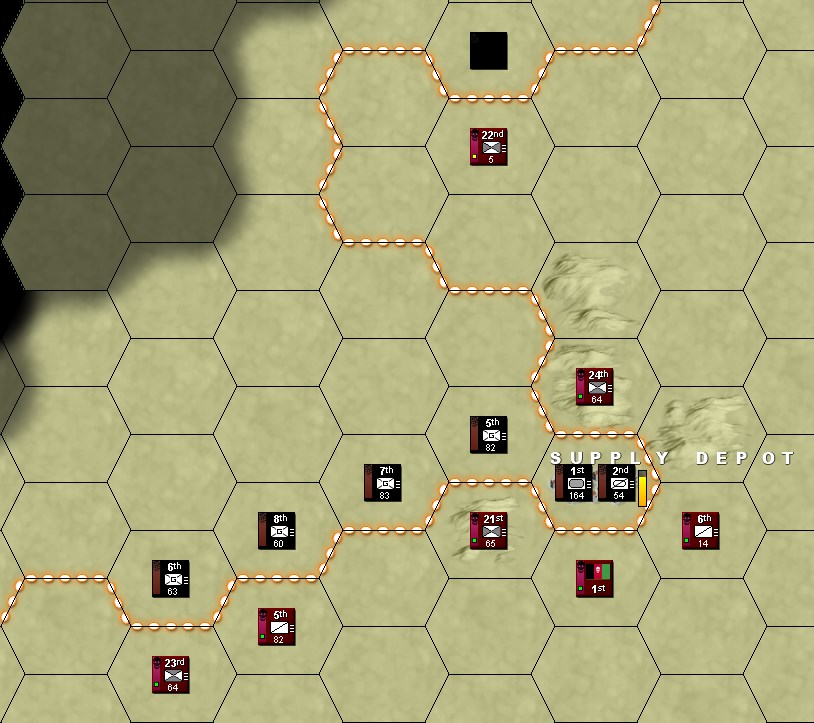 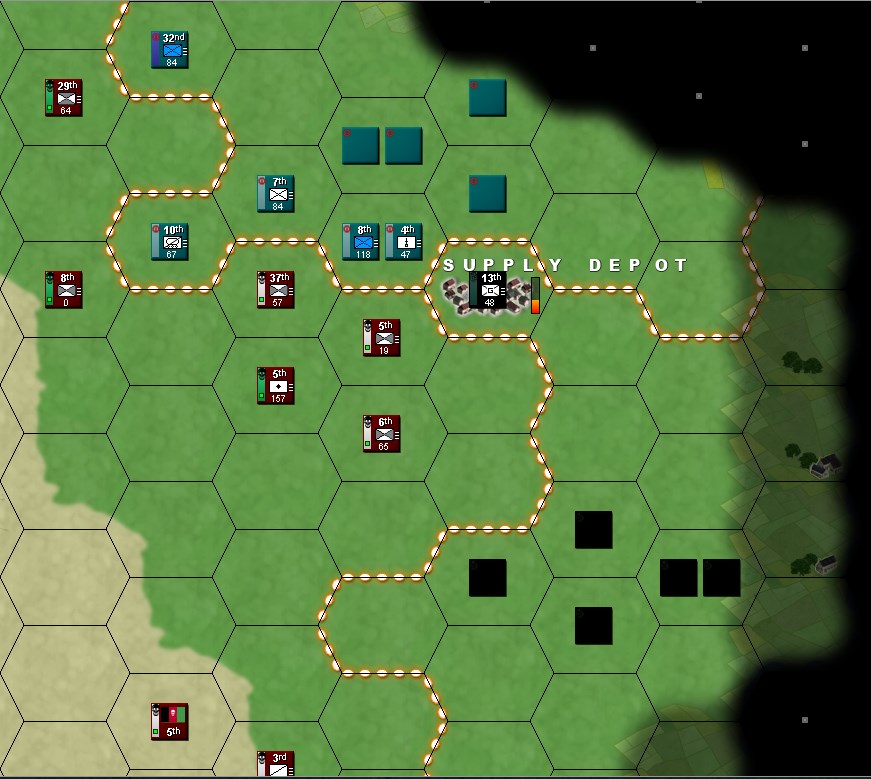 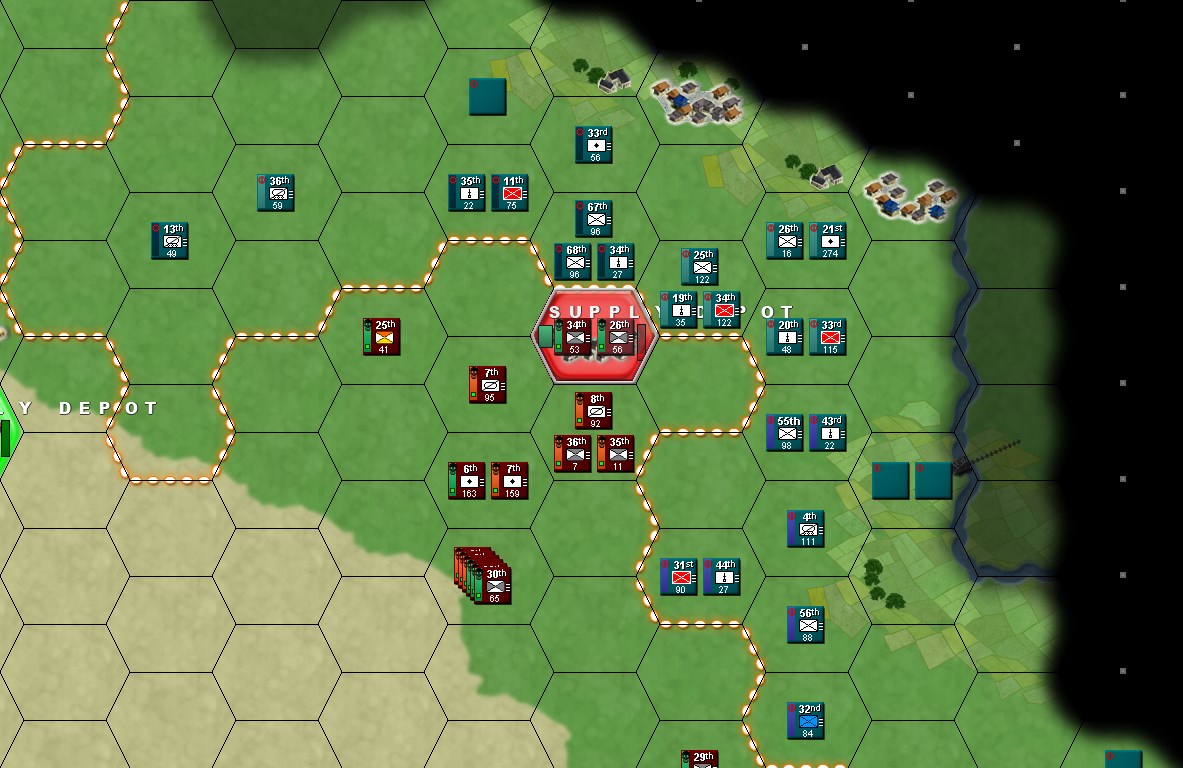 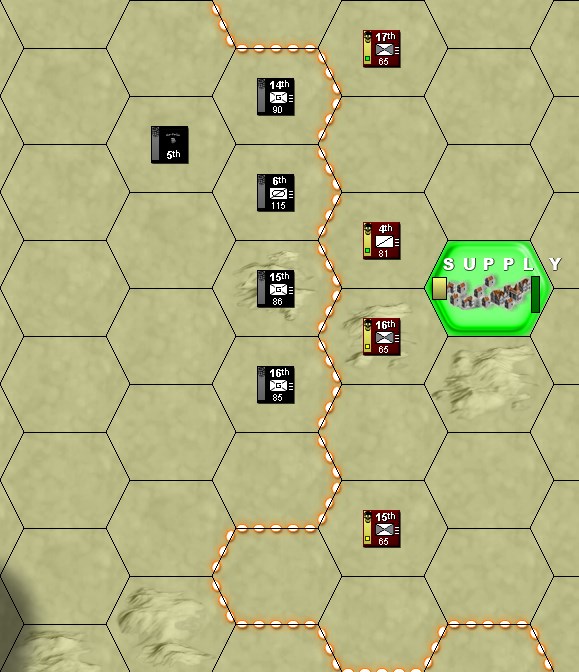 
|
|
#
?
Oct 23, 2018 17:34
|
|
|
Pincer attacking the 5th to leave the enemy tanks surrounded by supplies they are not authorized to take would be overly aggressive, unfortunately. Bombarding enemy HQs has never been quite as impressive as it should be, unless it is different in the desert. Seems to only kill a few staff officers and do very little to the enemy supply level. I will be using cavalry units offensively this turn, will put a preliminary map on the discord later. Going to be doing a lot of pairing up and attacking the enemy.
|
|
#
?
Oct 24, 2018 00:05
|
|
|
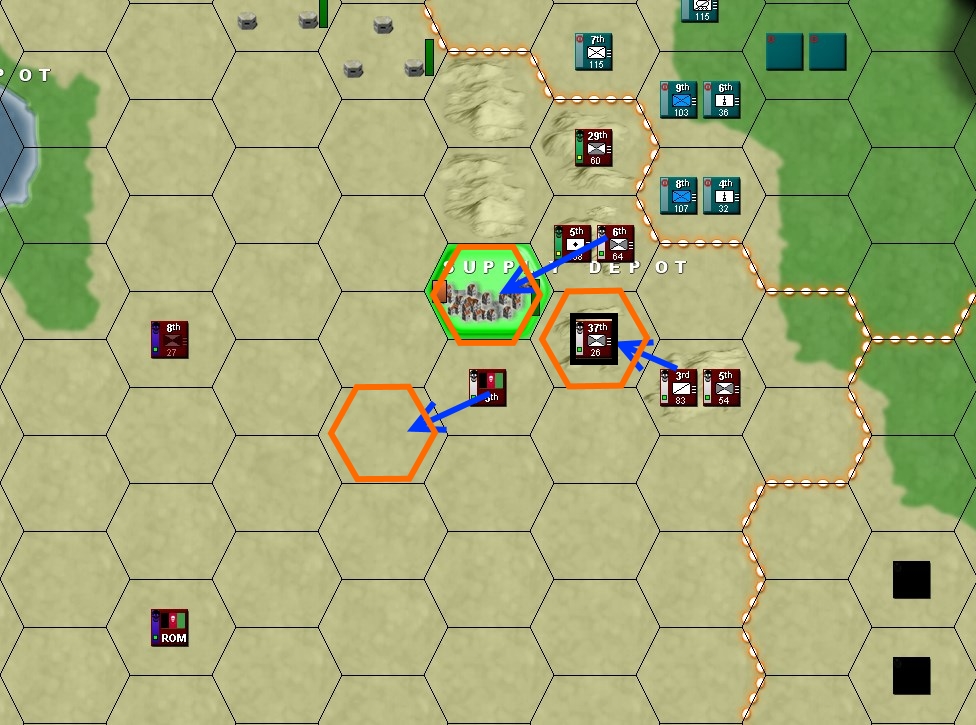
Orders for TF 3 and 4 Jessejin I need you to cover my southern arty with some infantry, preferably 37th or 6th as they are in good shape. Also turn TF6 off priority for replacements I am hurting bad up here. Jessejin I need you to cover my southern arty with some infantry, preferably 37th or 6th as they are in good shape. Also turn TF6 off priority for replacements I am hurting bad up here. Orange = bombards, Blue = Moves Red = Attacks. Nobody is to occupy hexes taken in attacks. Oh and it's not in the image but one rocket arty moves north 1 hex to where the artillery start. Contingency: If the 30th, 8th and 26th all have enough AP to withdraw one hex SW after the attack do so if not leave them all in place. 3rd and 4th HQ are to be set to priority replacements. ROMANO REQUEST  Engineers stop building the fort line after the second (completed?) fort and move to demolish this supply depot.
|
|
#
?
Oct 24, 2018 13:52
|
|
|
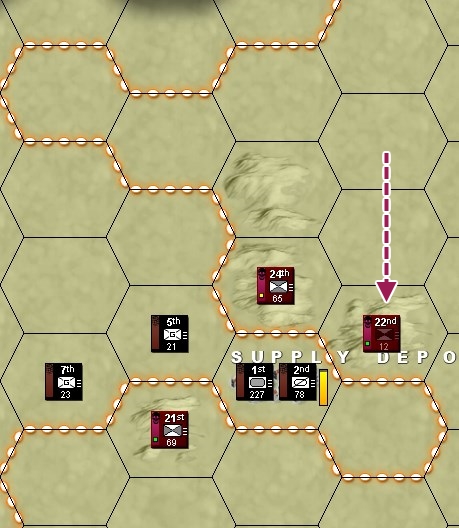
Orders for TF 5 and 6 TF 5 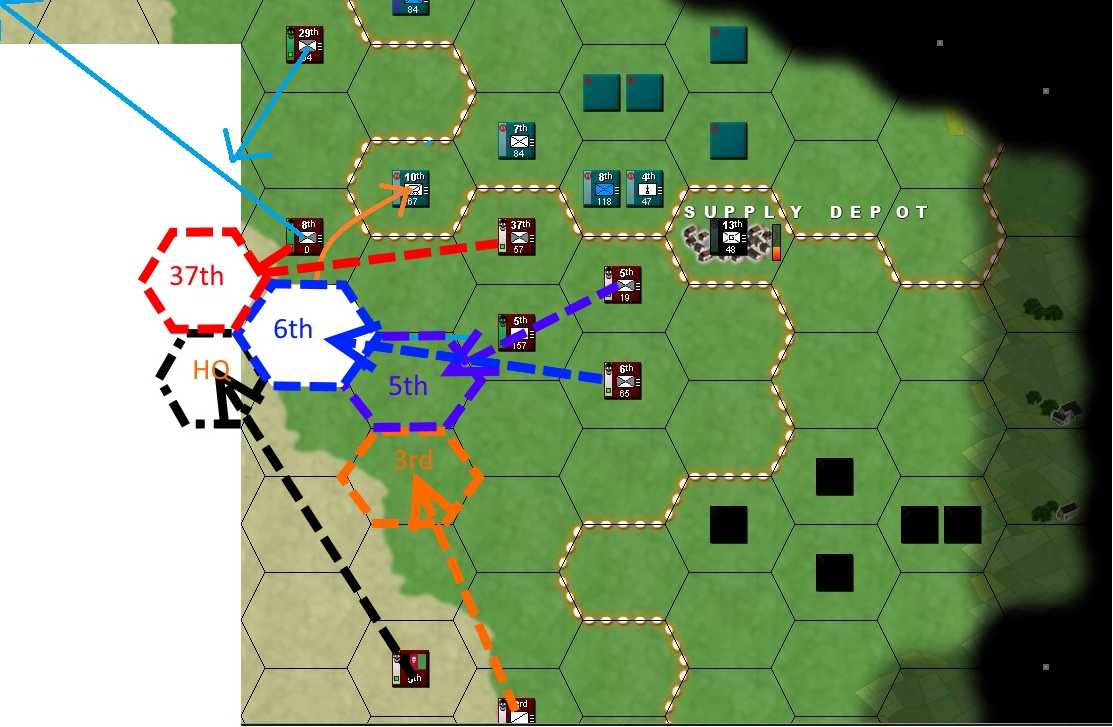 I want to have saros orders on same pic as mine, so I am using his orders as my background. First of all I am moving my infantry to the spots marked on the map, and their hex position are marked with numbers as they are in the game. I must stress that 6th is to occupy same hex as Saros artillery. Northern cavalry will move to support their flank, while cavalry will remain as is, so they can stall enemies or use their absence to gain some ground on the sheiks TF 6 I don't have a clean pic, so this earlier pic from movement phase will have to do. 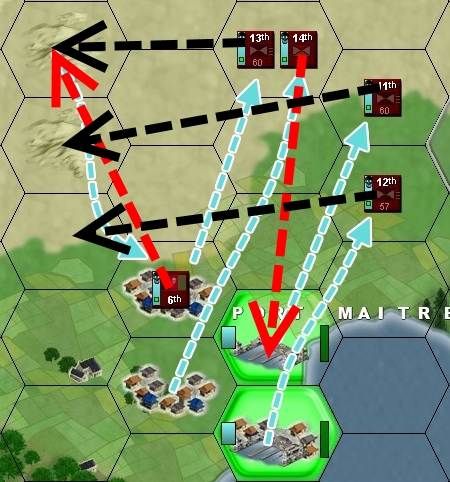 Everyone, except Guerilla will move to west (marked by black arrows). I must stress that they are to move to their maximum movement point, arrows are just ilustration for the sake of knowing their movement direction. Guerilla will take up port facilities (marked with red arrow). Also, reinforcement priority will have to be turned off.
|
|
#
?
Oct 25, 2018 00:17
|
|
|
Multiple arrow line means go as far as possible. Forgot to tell the 1st HQ to move as the zeroth order, would prefer if they move into direct signal range first. 23rd and 5th are forbidden to follow up the attack. They should follow the white line if they have enough movement remaining. Some good old concentration of force here. Artillery moves and bombards, followed by an infantry offensive. The 18th is authorized to move up, the 19th is forbidden. One turn's bombardment in the open should be comparable to two turns in a suburb. 20th should be enough of a deterrent to a direct attack on the artillery, but I do admit it is a possibility. 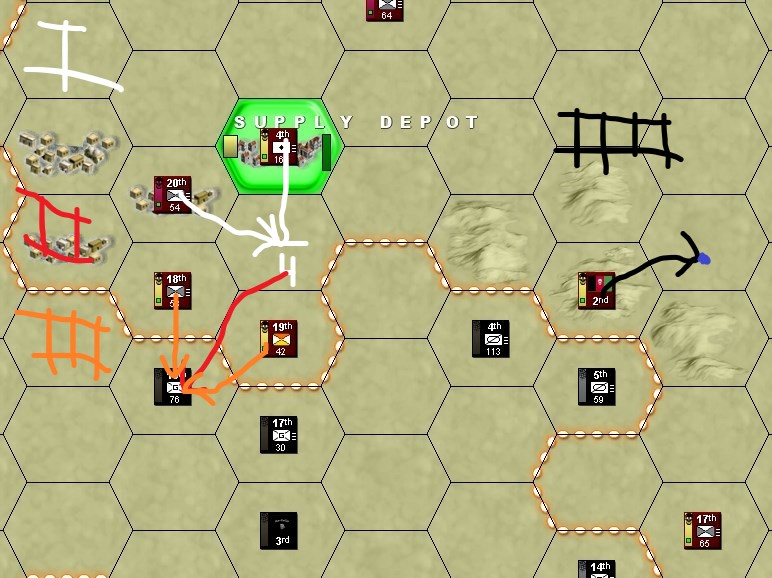 Can't quite trust the enemy cavalry not to move straight into the supply depot. Balancing keeping supply open and available to both the north and south parts of 2nd HQ is getting trickier and trickier. 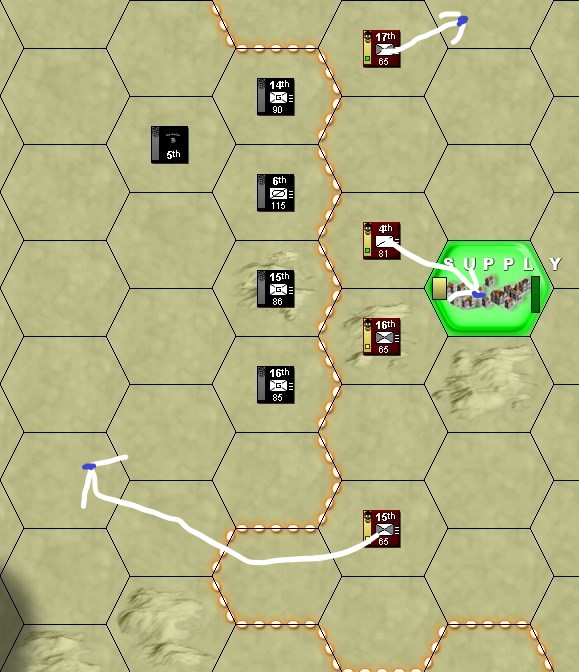 Seconding the Demolition request. Most of my forces are not between the enemy and this supply depot. Their current conquest is not sufficient to threaten our home base, and the southern lake should be much easier to hold.
|
|
#
?
Oct 25, 2018 09:35
|
|
|
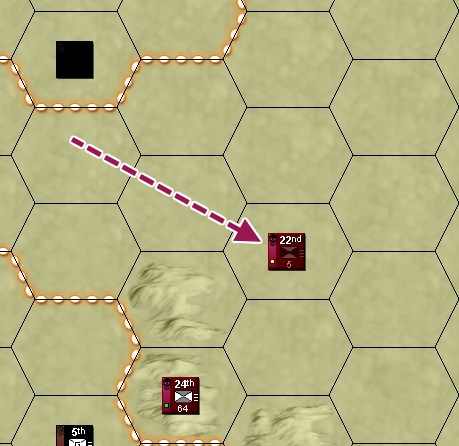 The battered remnants of the 22nd scurry away before the enemy punish them any further. 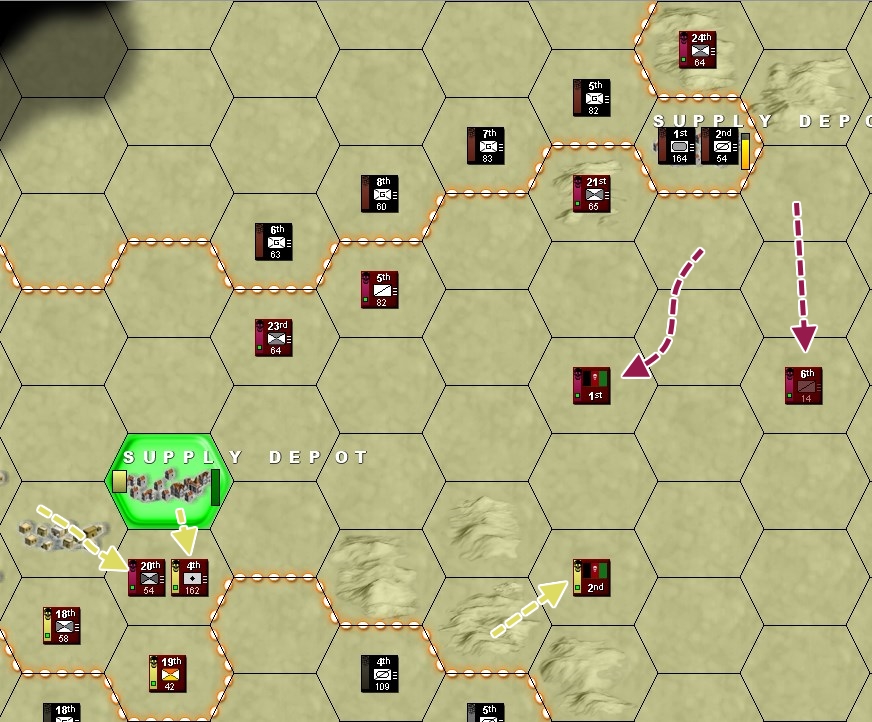 Not much movement here, but it is notable for its purpose. 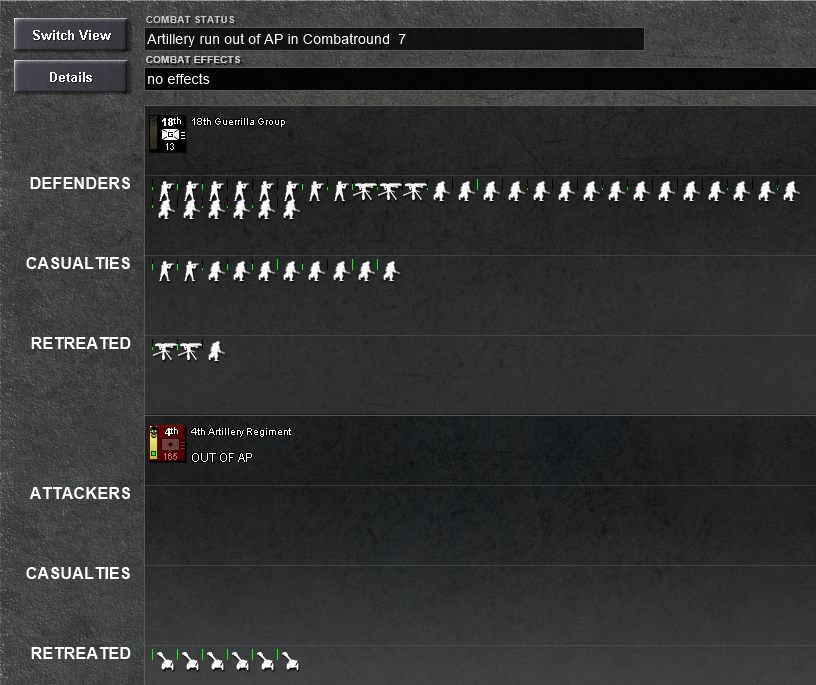 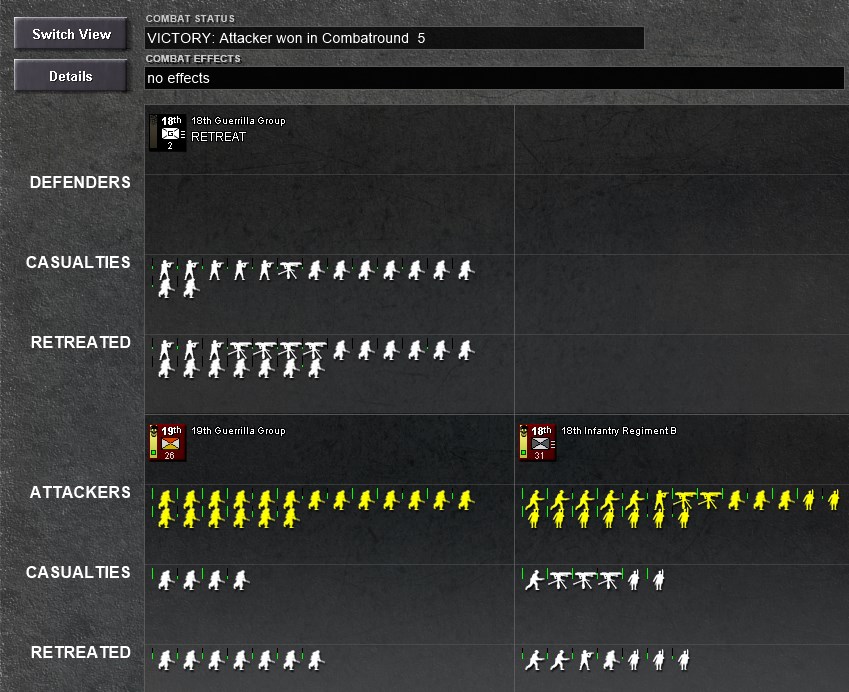 That purpose, of course, being the destruction of enemy elements further south to impede their progress. 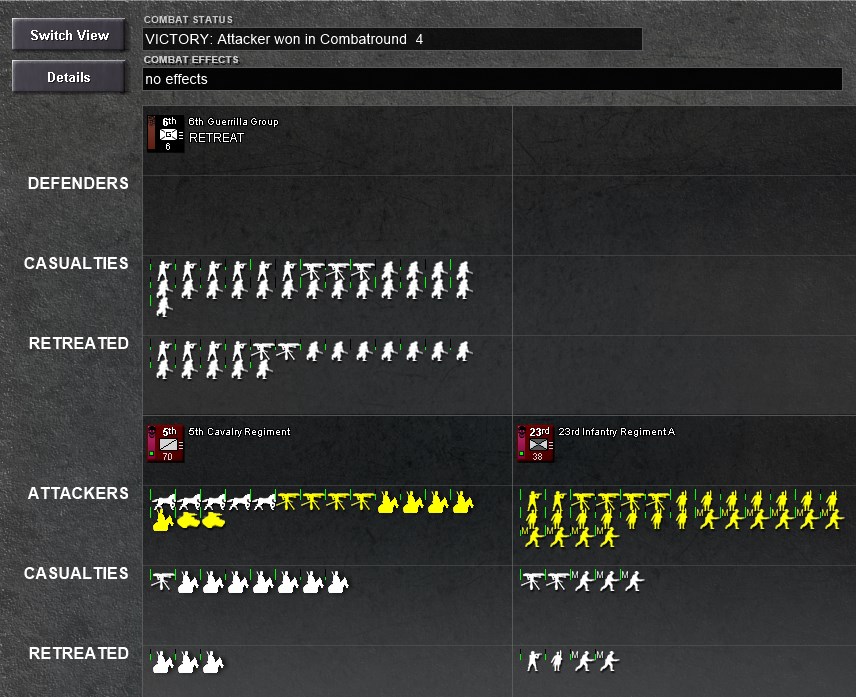 You also punish the westernmost enemy regiment for daring to come so close without anti-tank weapons. 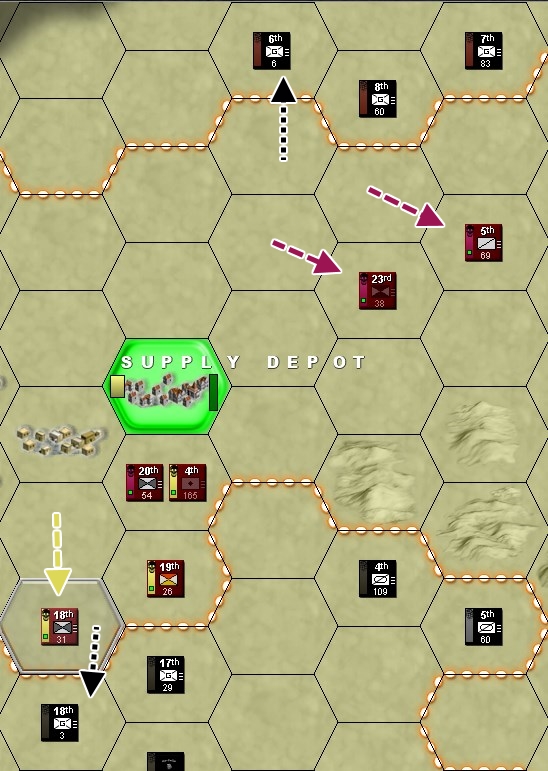 The operation is a success and you tighten the pressure on the enemy force here. 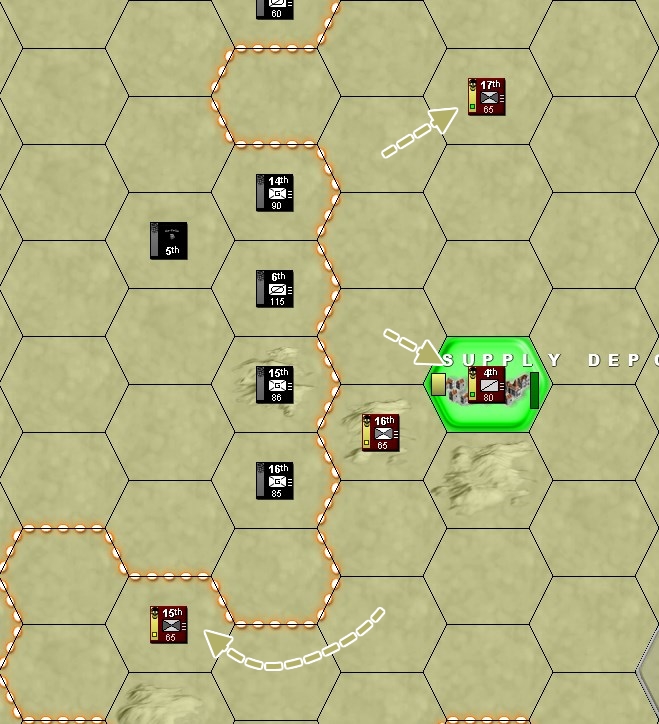 TF2 stretches its supply lines another bit, disentangling from the menacing Awfulian line. 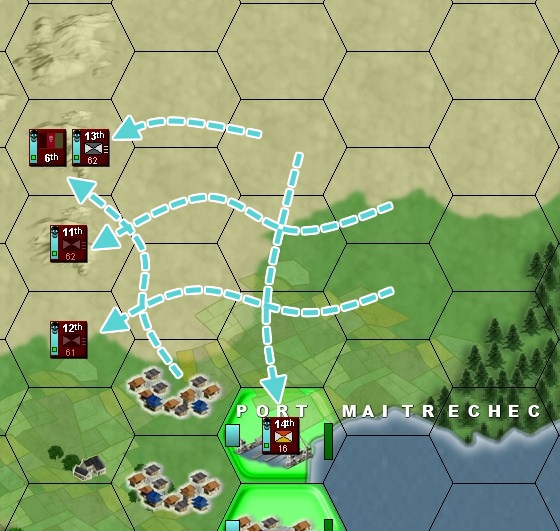 TF6 performs an about-face and heads west to stop the Awfulians from breaking in any further. 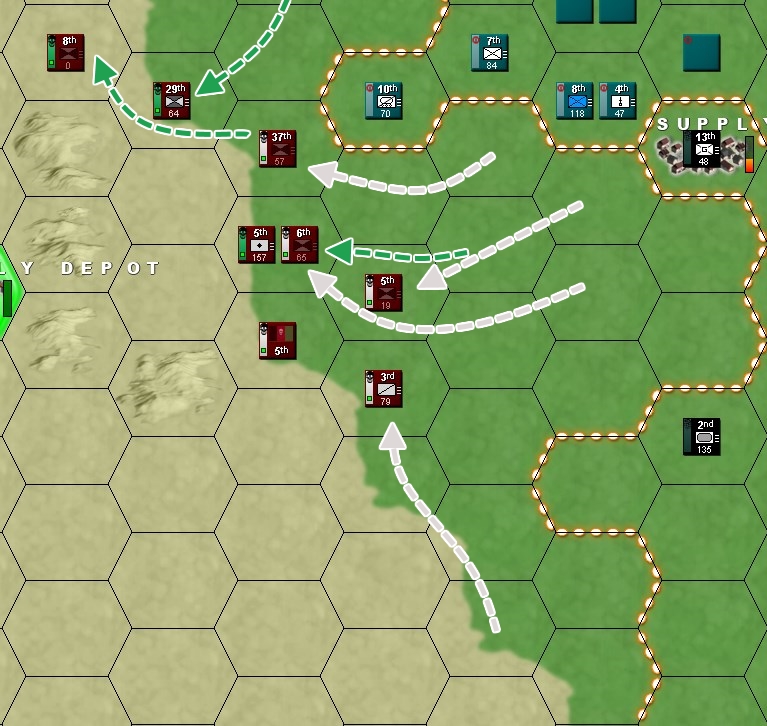 TF5 retreats from the now-Awfulian depot and reforms further west. This is probably your last line of defence before Etyman Hills. 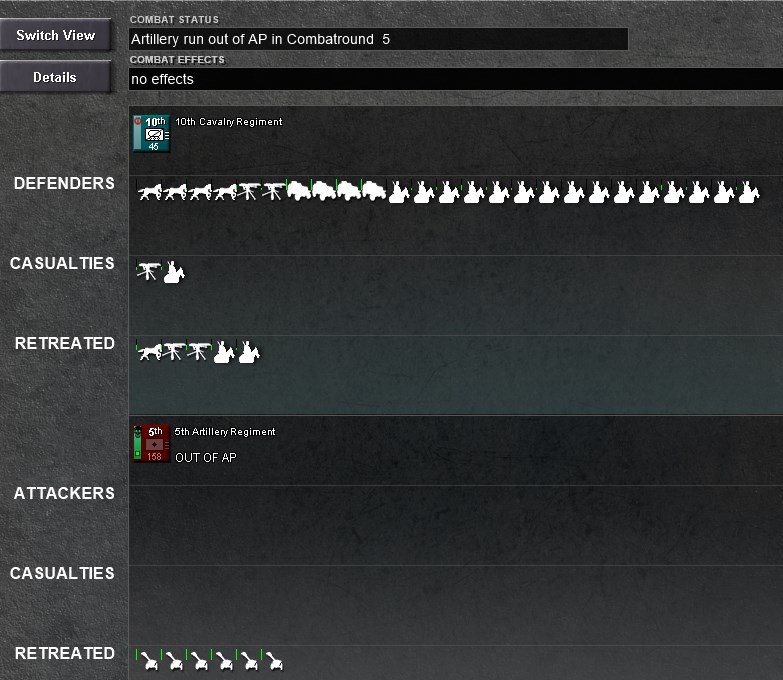 You barrage the enemy cavalry. It is not very effective casualty-wise, but introduces plenty of disruption into their force - except for the armoured cars. 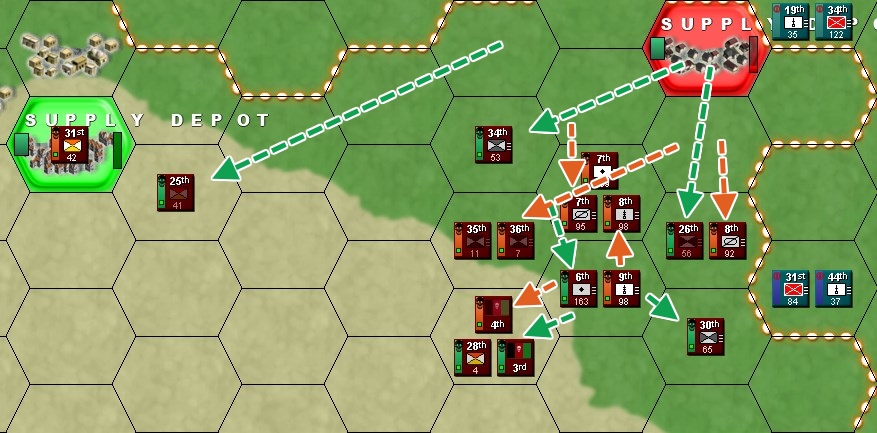 TF3 and TF4 consolidate, reposition, safeguard their flank, prepare for a local counteroffensive, and protect the battered infantry regiments. All this comes at a price - their line is notably shortened.  Enemy regiments in the area prove very vulnerable to an extended artillery barrage. 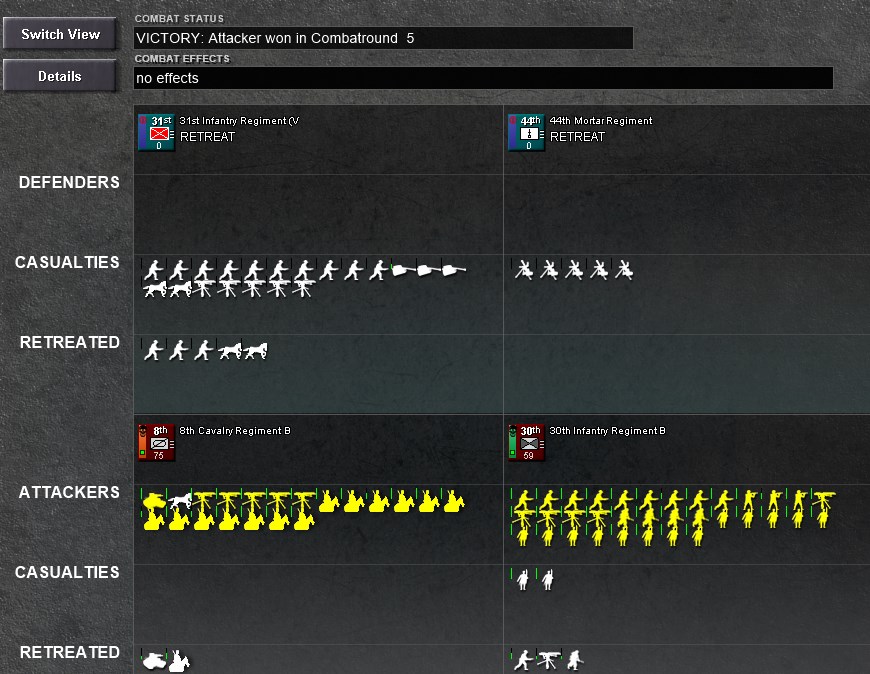 The attack that follows flattens the enemy force, removing all of their heavy weapons, including an entire regiment of mortars.  The enemy's surviving remnant retreats east after the battle. End of turn overviews 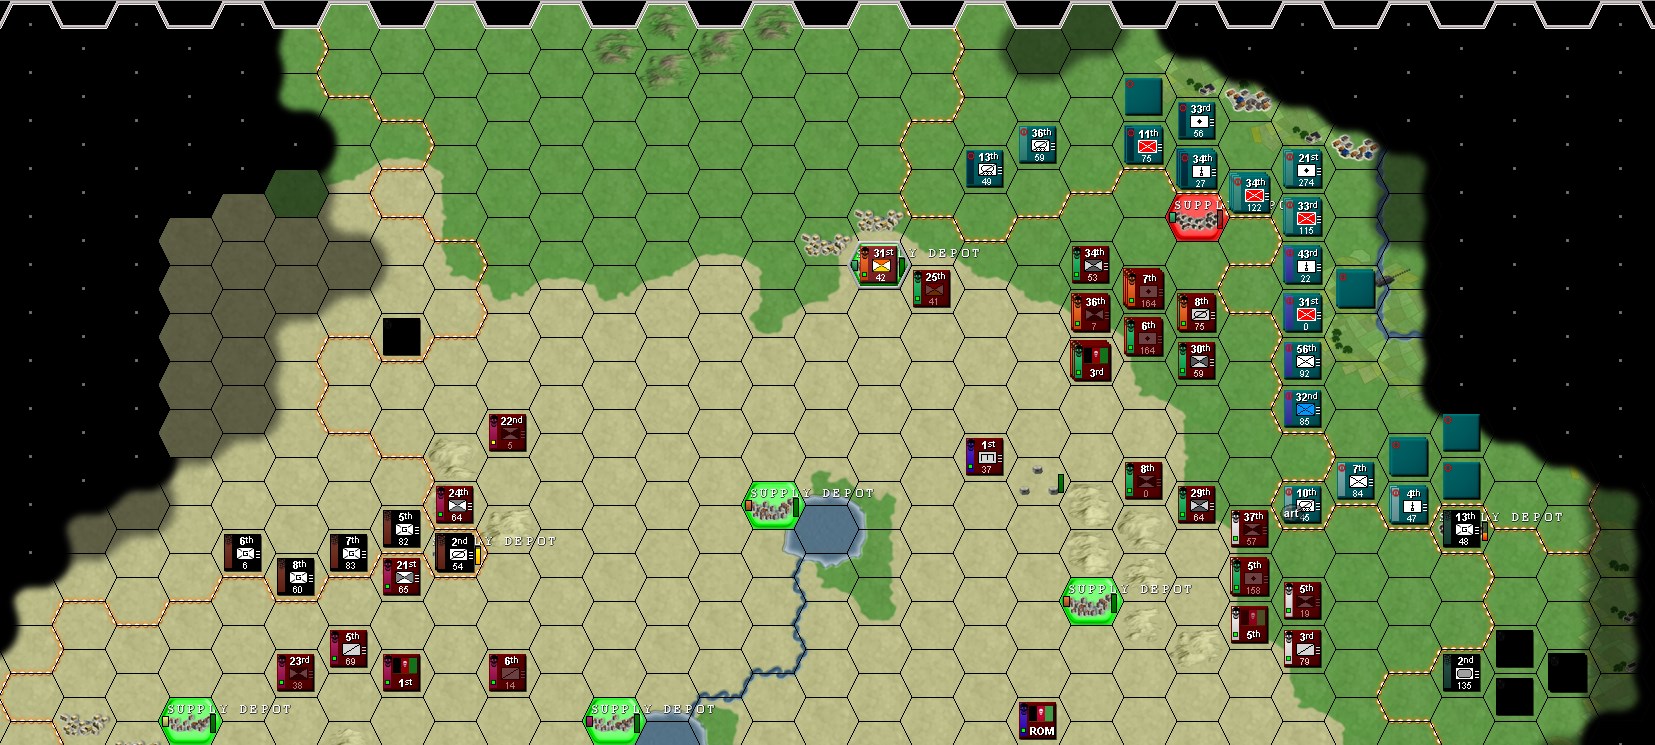 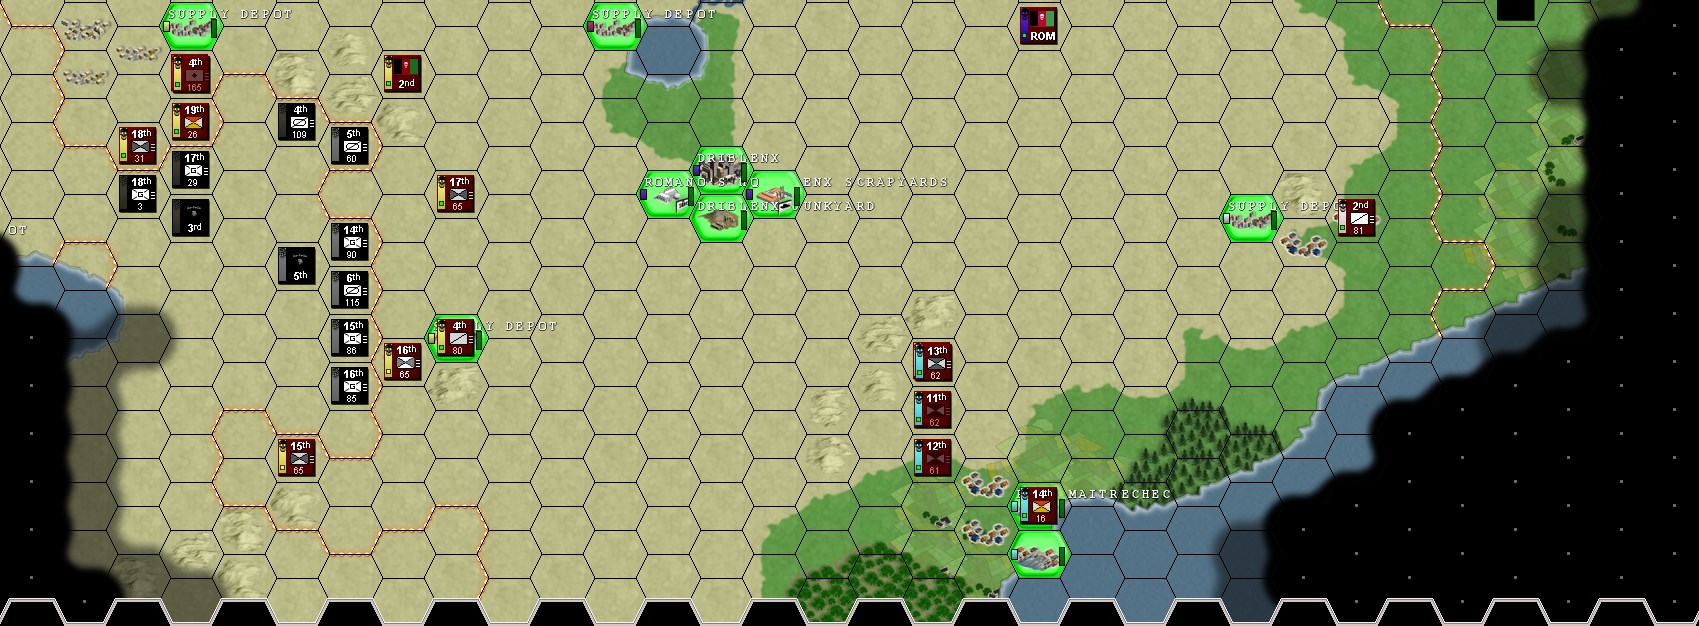 Note: Second part of the fort line is not currently visible in the screenshots because of reasons. This is a bug, it will be edited in before the Awfulian turn begins. End of turn map 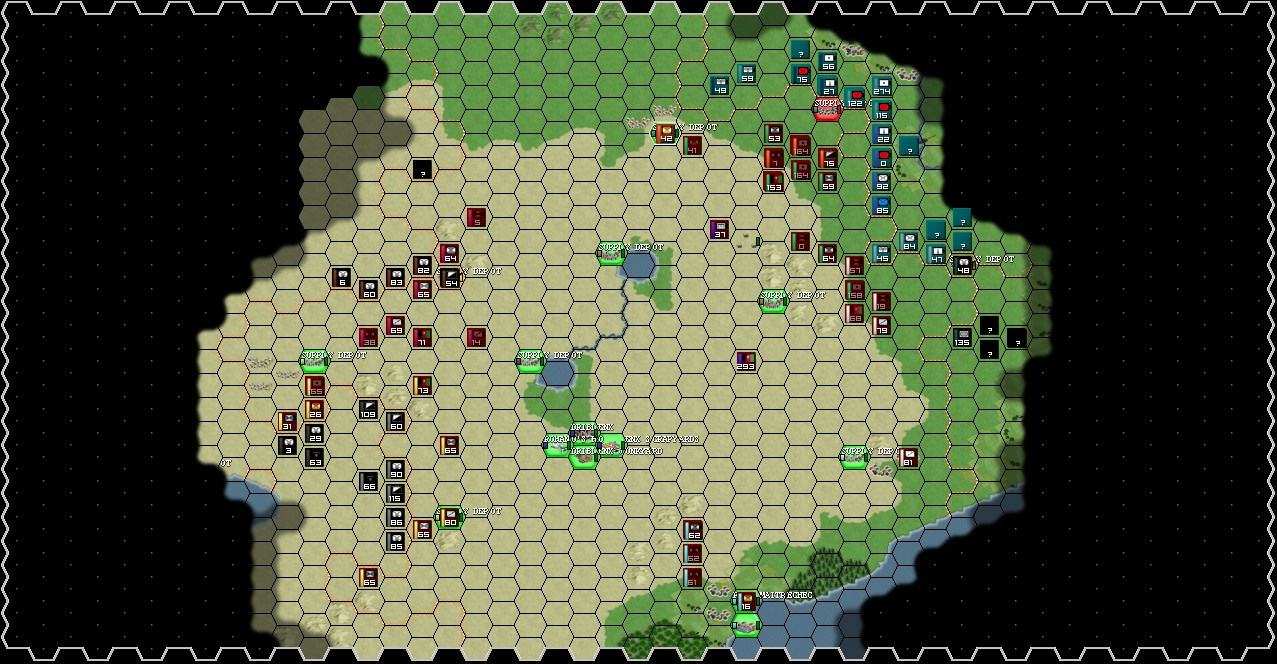 The turn passes to the Separatists of Aw-Fulia.
|
|
#
?
Oct 26, 2018 15:30
|
|
|
Overall not too bad a turn. Mortars are expensive and the way the UPRA is throwing bridges down they cant have that much Raw to spare. Only thing is Habit you have to stop leaving troops along against 3-4 Awfulian units plus tanks. 21st is gonna get annihilated next turn even with the hills and they could cut off your entire force.
|
|
#
?
Oct 26, 2018 16:03
|
|
|
The 21st may or not get annihilated by the enemy dedicating 3+ units against them. But if they are using their tank or cavalry unit to do that they are not using it to cut towards the supply depot we wish to demolish. The 22nd can still delay them a turn if they go for the northern depot. In retrospect I should have valued the 6th's lives a bit less by only moving them only one hex south, or one hex southeast. If the enemy only sends two guerrilla units against the 21st I like our odds. If they send two guerrillas and the cavalry unit we will still do some serious damage. And if they send the tanks in it will at least cost them a lot of oil and time. As long as we hold one of the hills alongside the pass we are complicating the flow of supply from the depot, to their HQ, and then back to the units that are in the depot. And while I am writing I will complain about junior staff officers these days. They seem to have no stomach for blood at all! I would have killed for a chance to directly observe combat from a nice safe hill. And all the 2nd HQ had to do was hide out until dusk, with hardly anyone shooting at them. Don't they teach how valuable a third party observer can be for artillery bombardments?
|
|
#
?
Oct 28, 2018 19:52
|
|
|
I'll have you know my doctor gave me a written statement about my hemophobia 
|
|
#
?
Oct 29, 2018 12:49
|
|
|
 You are producing a lot of replacements, they just can't make it over to the front lines. Also wow, that is a lot of fighting that took place over the last turn! 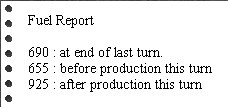 Your fuel situation is really, really bad. Also apparently your tanks fought during the enemy turn! 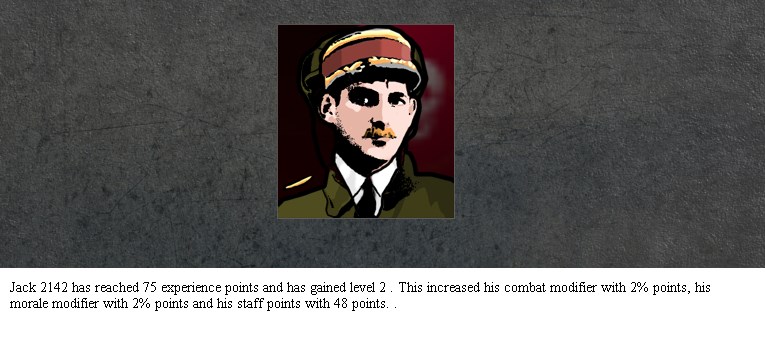 Jack2142 in TF1 gets another level. 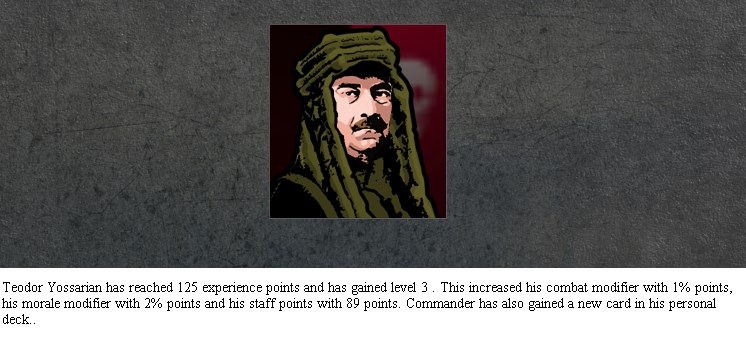 As does Yossarian from TF2, who also happens to have unlocked a card on the occasion! 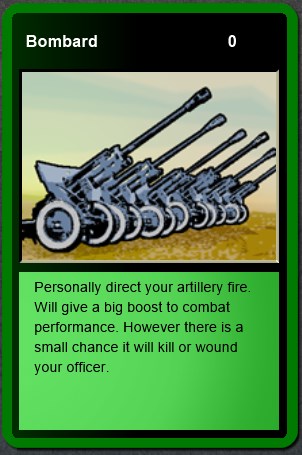 He gets Bombard - very nice, considering he is one of your few commanders with access to artillery.  The Awfulians you've been battering in the west for the past couple of days try to get some revenge. It ends poorly for them.  They seem to be attacking all along the line! 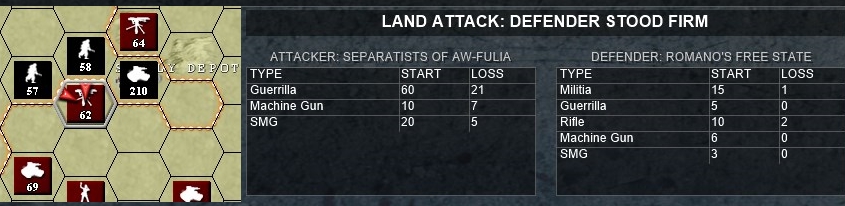 They even try to evict you from Termina Hills. It ends no better than anywhere else.  UPRA opens with artillery. This is the cav/arty stack near the northeastern supply depot - they deal little damage, but manage to kill one of your artillery-pulling horses.  More shells fall on your artillery near the southern supply depot, but to little effect.  They also barrage the cavalry regiment that killed their mortars last turn. This is by far the most effective they managed with their field guns today. 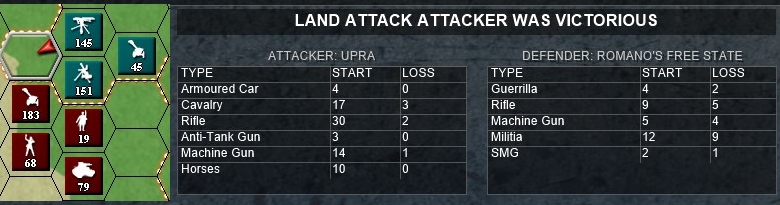 The enemy catch up with the slacking 37th Infantry in the south and shatter the unit.  Another attack hits 8th Cavalry. You fight well, and do a bunch of damage to their forces, but in the end it is your troops that end up spent and have to withdraw. None of your best tanks are damaged beyond repair - you get the feeling you got very, very lucky in that regard. 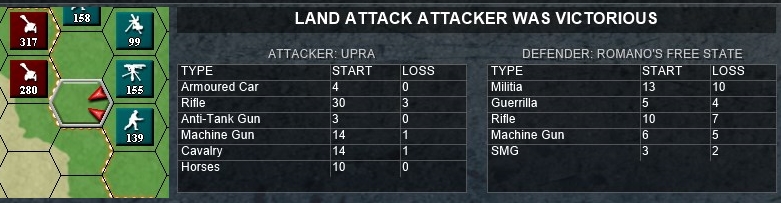 They follow it up with a cavalry strike on one of your infantry regiments. It is very effective indeed.  The engineers move to demolish the supply depot. 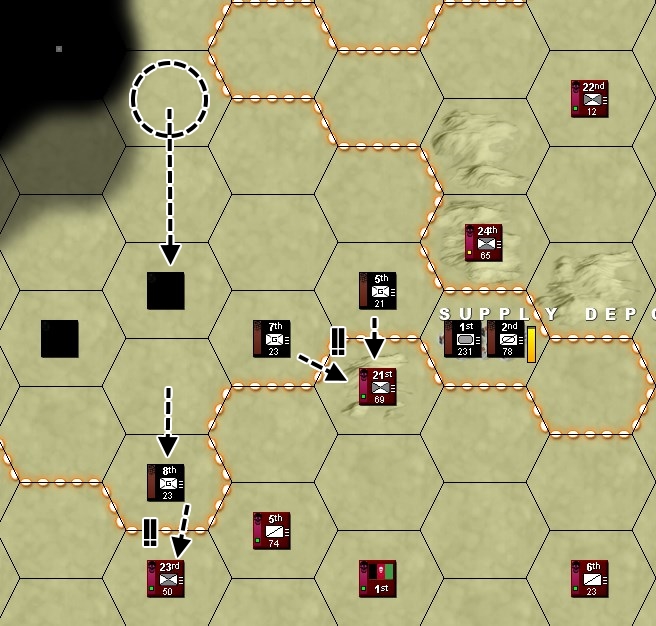 There is little movement in TF1's area, but plenty of combat. You hold strong. 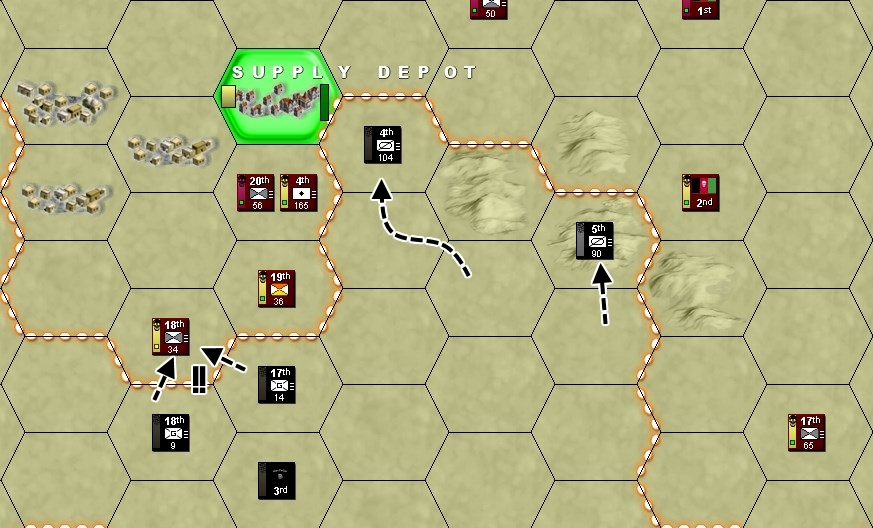 The enemy is pushing from the southern edge of this salient too. In fact, their cavalry now has you in a dangerous spot - one group threatens the HQ, another threatens to cut off the western depot.  Here, the Awfulians pressure you from both north and south, threatening to envelop the supply depot. 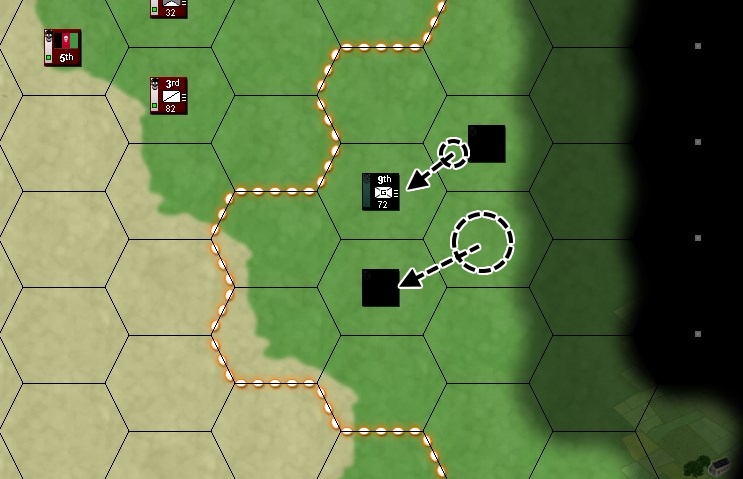 Two Awfulian combat groups emerge from the fog of war. They are operating quite far from Alfuego now. 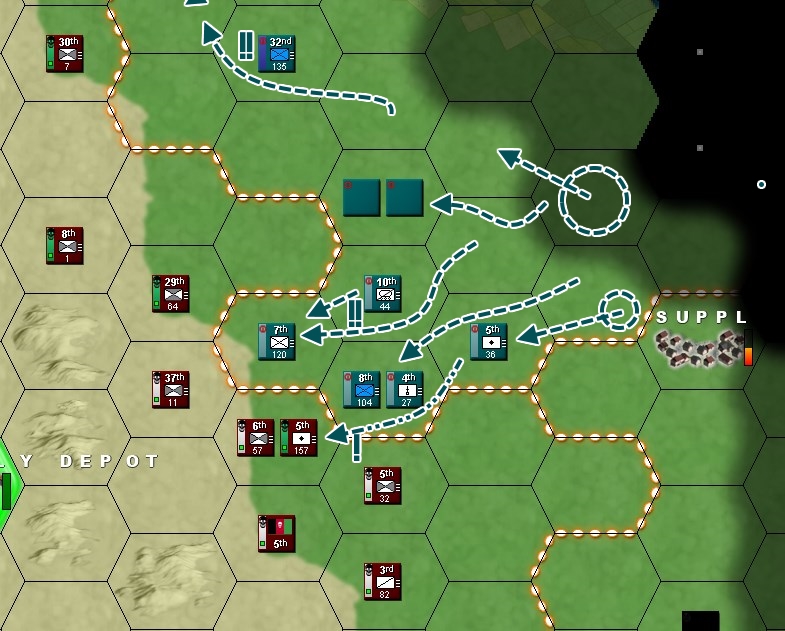 There is no shortage of UPRA troops either. They bully one of your regiments and push the line closer to Etyman Hills and their supply depot. 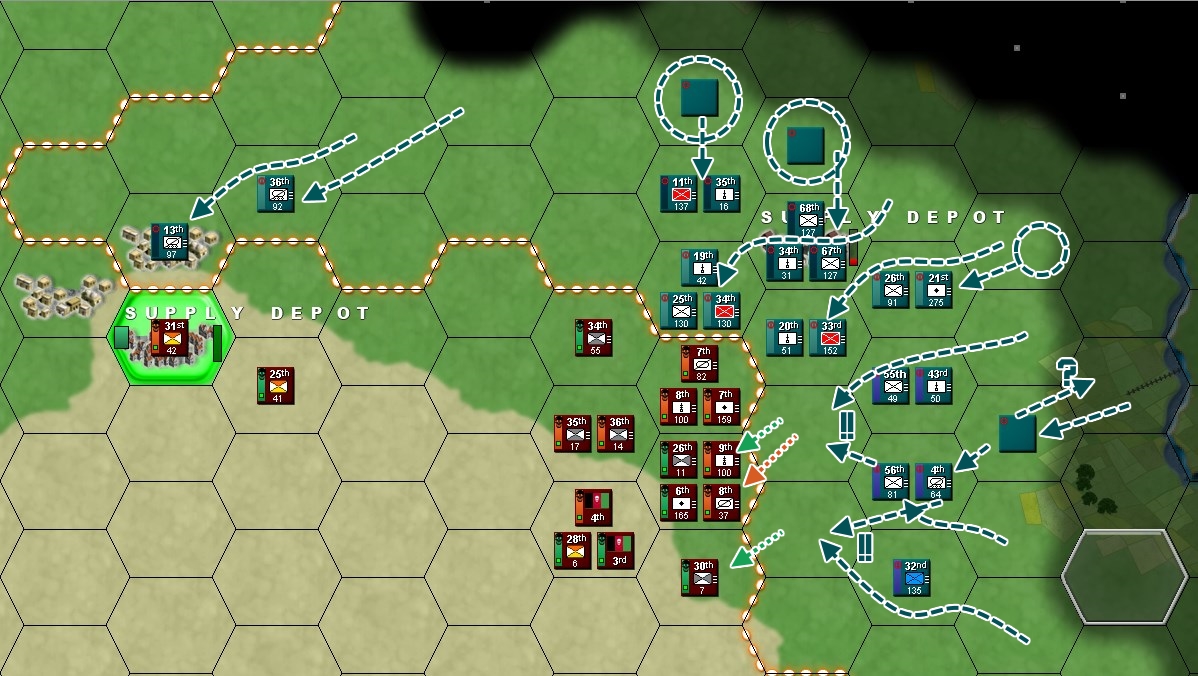 There is a lot of movement in the northeast. The enemy is closing distance, moving back towards the western depot, and hitting you hard on the southern edge of the sector. Starting this turn, you will receive a map showing your units' readiness. The horizontal bar above the strength number on the unit counter shows the average readiness of all subformations in that unit. This should give you a good overview of what shape they are in. 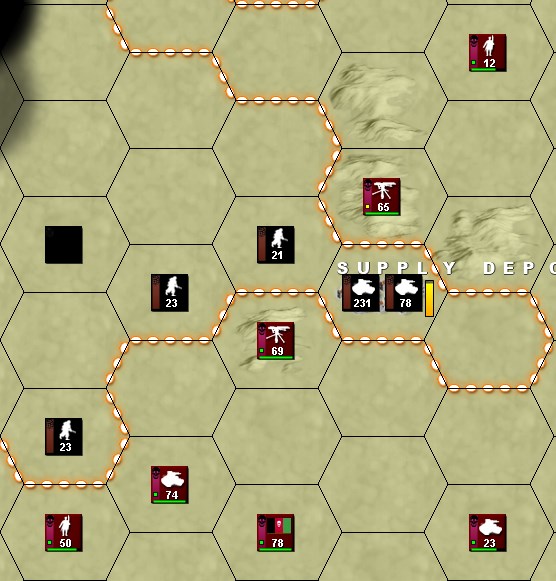 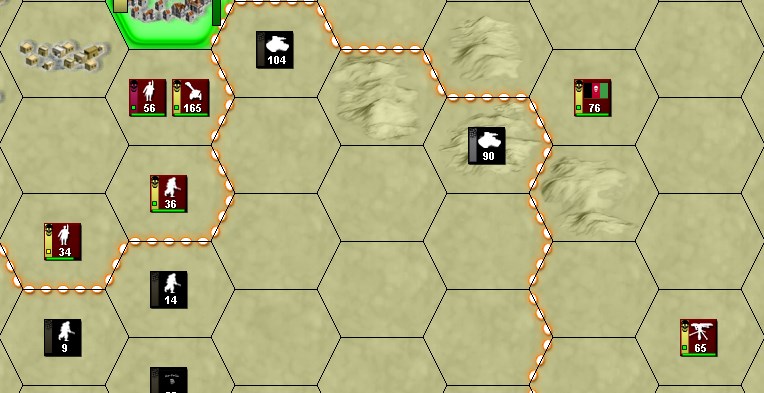 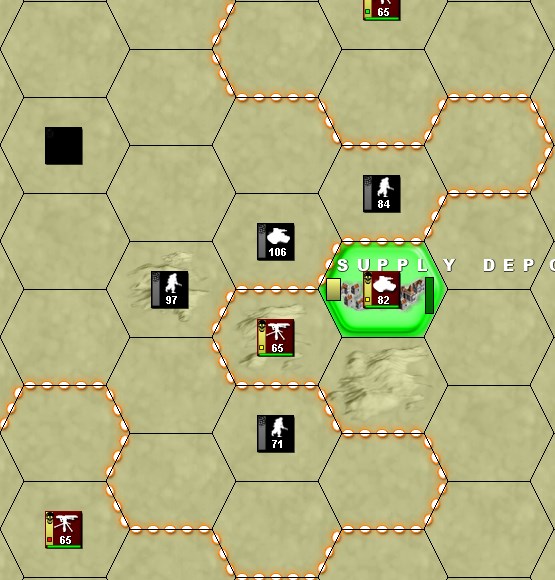  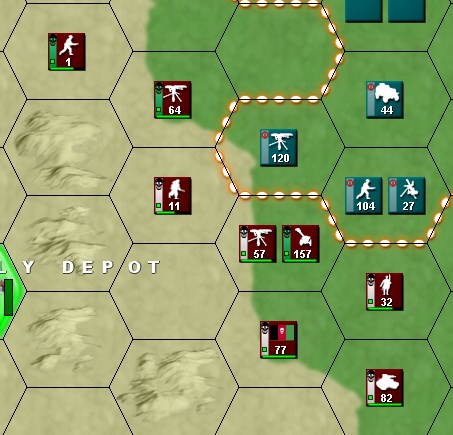 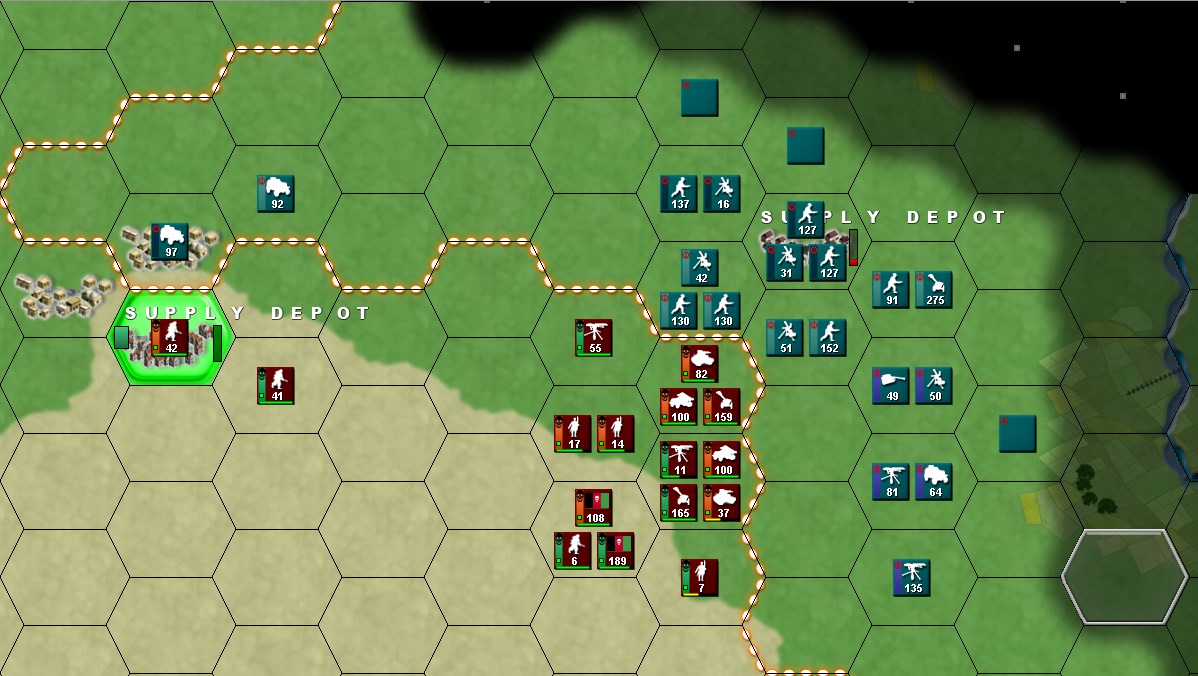 I've also prepared briefs on the replacement situation.        These screens are a little hard to parse at first. They outline the number of replacement units that have been requested from a given HQ by its subordinate units and have flown out of the HQ this turn. Note that this means for B corps the columns represent essentially the demands of all HQs under it, i.e. how many subformations are yet to be sent out at all. Remember, Romano sends to TFs, TFs send to Regiments the turn after. Replacements arrive at lowered readiness. The columns are, left to right: - REPLACEMENT TYPE - self explanatory for the most part: the type of subformation that has been requested. The tag in the brackets represents the "nationality" (equipment model) that was requested. I believe Standard Light Tank requests can be fulfilled by Awfulian tanks where applicable, it's just that you are constantly too far from Romano for him to be able to send them your way. - REQ-OUT - number of subformations of the given type that have been requested from the HQ at the start of the turn. This is a total of all outstanding replacement orders at turn start, not just the losses reported this turn. - OUT - subformations that have actually been sent out this turn. If this number matches the REQ-OUT number, that means all necessary replacements have been sent out. - D-OUT - subformations that have been destroyed by enemy action en route to their destination. - RET - subformations returned to HQ (usually because a TOE change left a unit too big to meet the new TOE standard). NEW RULE: to help with unit recovery while preserving your defence lines, you can now send a unit for reconstruction. If you do, the unit will immediately start moving towards Romano HQ and be reassigned to it until it is back at 100% TOE. At that point, it will come back under your control. You cannot give orders to units in reconstruction, you can, however, request them to be returned to you early (this will take effect at the end of the turn when you request that, so you will not be able to control that unit immediately). Reconstruction will temporarily reduce unit readiness when it changes commands. 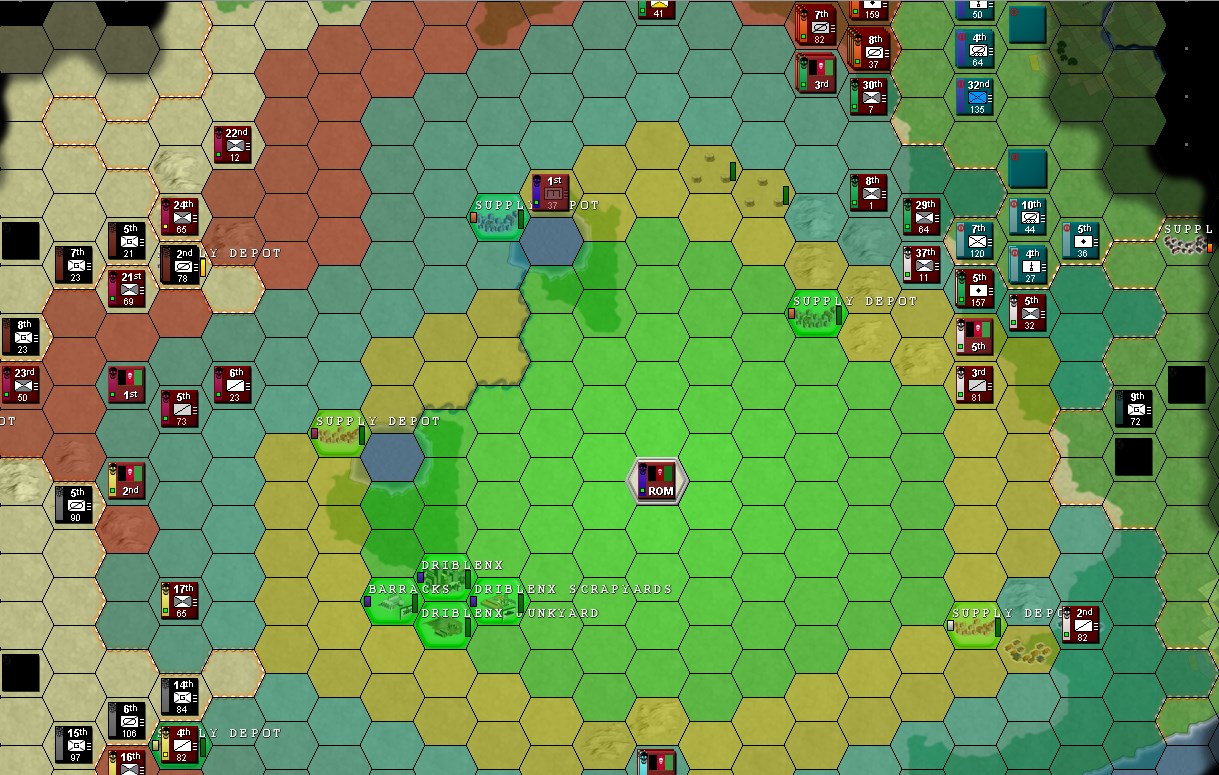 For reference, this is how far Romano can send supplies (and, by extension, replacements). Situation overview  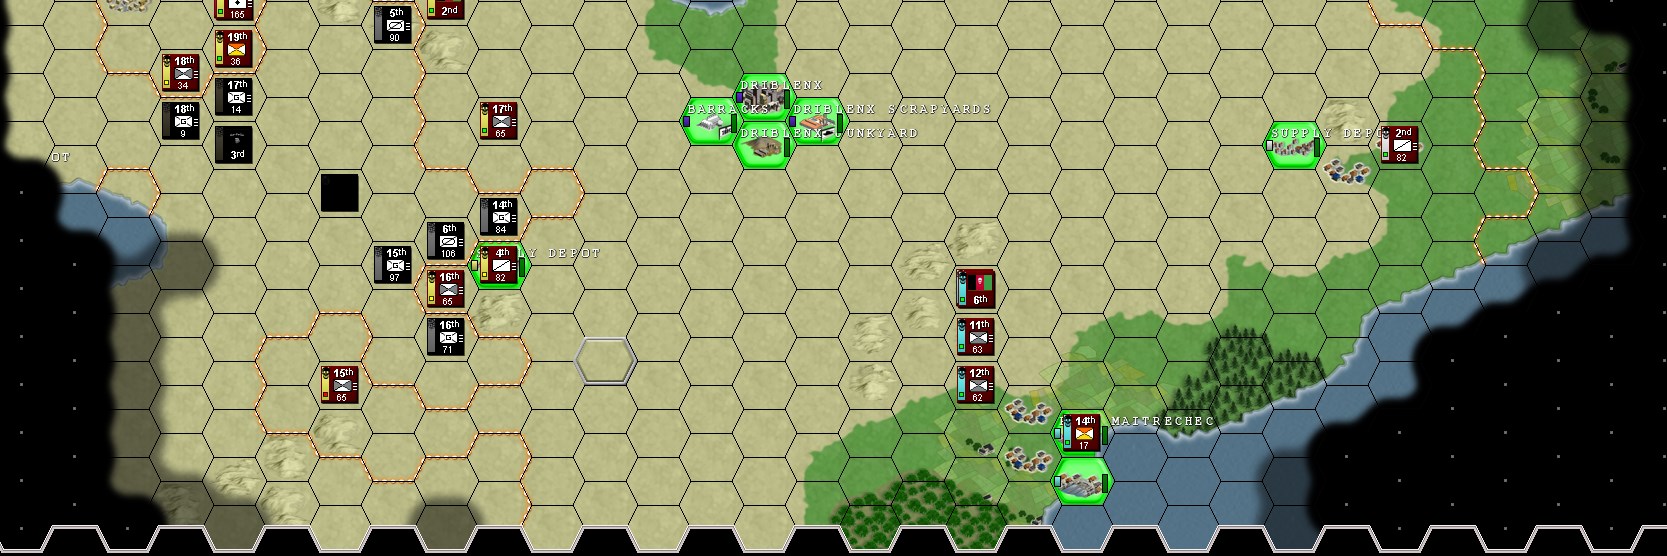 Situation map 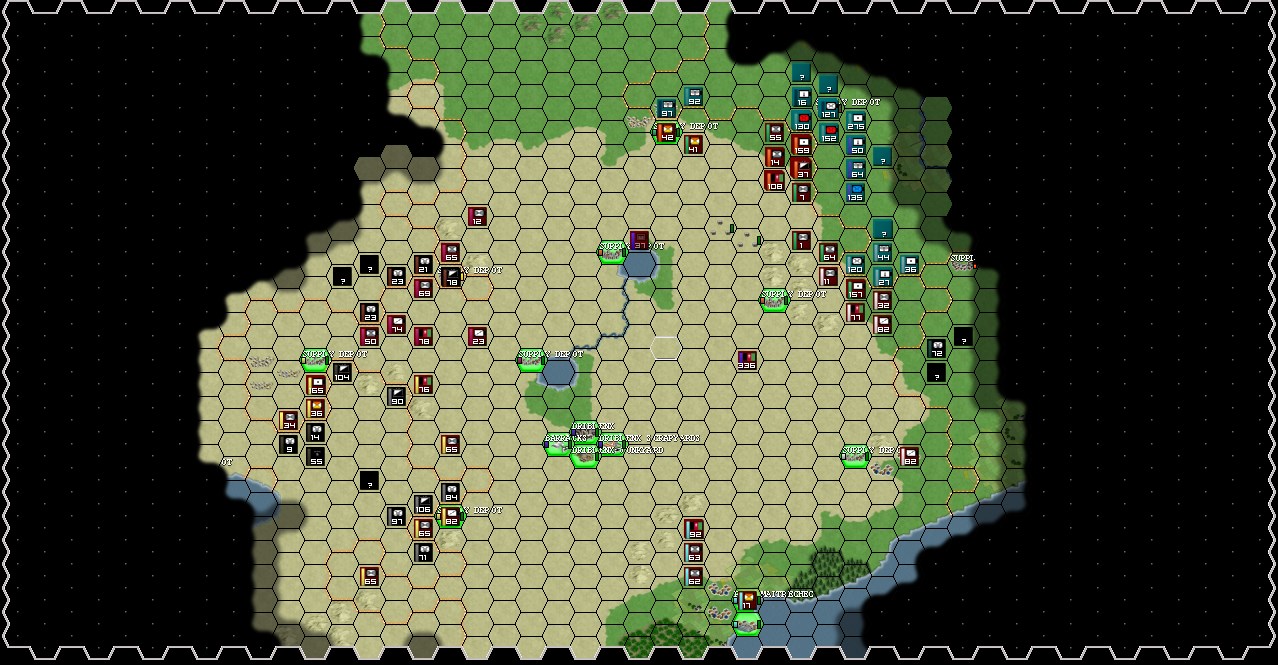 (NOTE: Romano HQ position has been shifted two hexes SW in the game, which is not denoted in the overview or the map.) Clean images 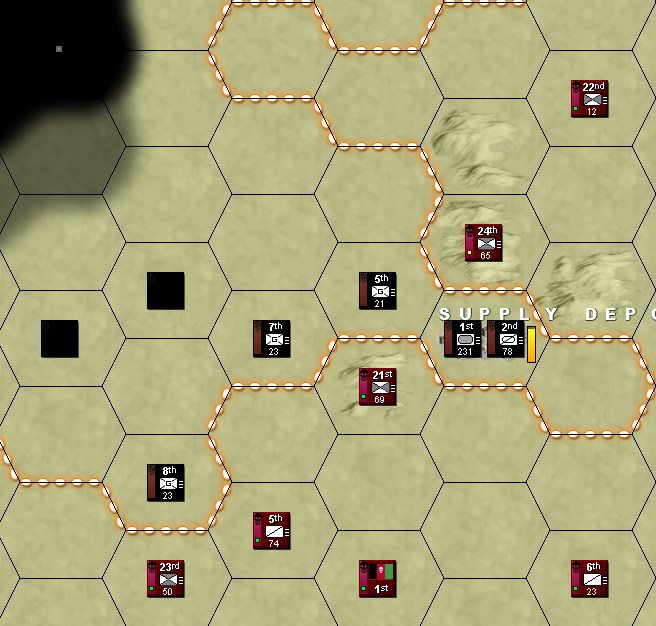 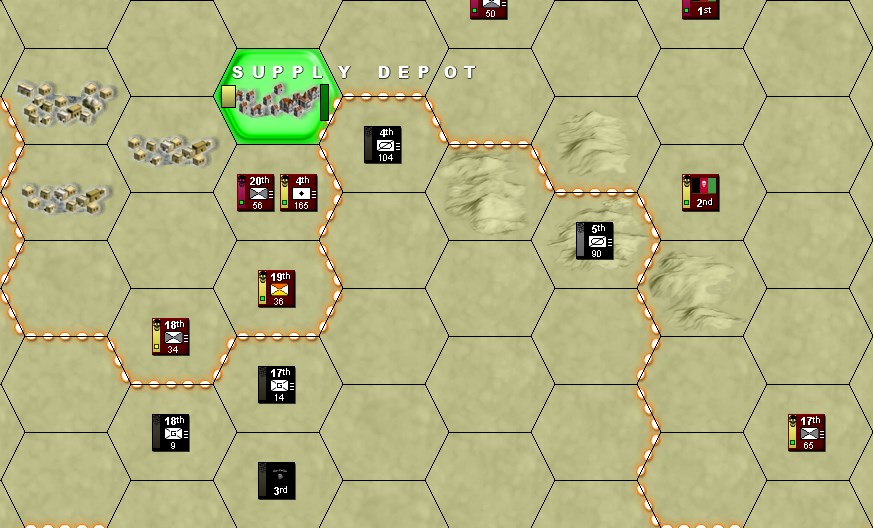 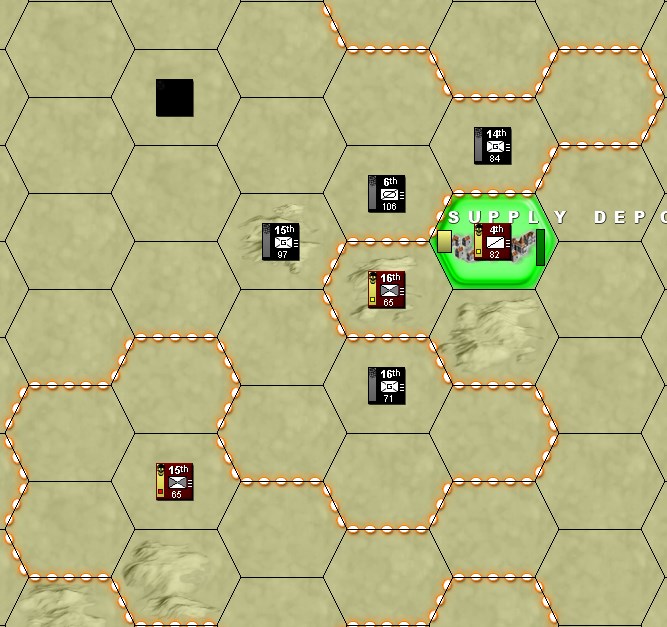 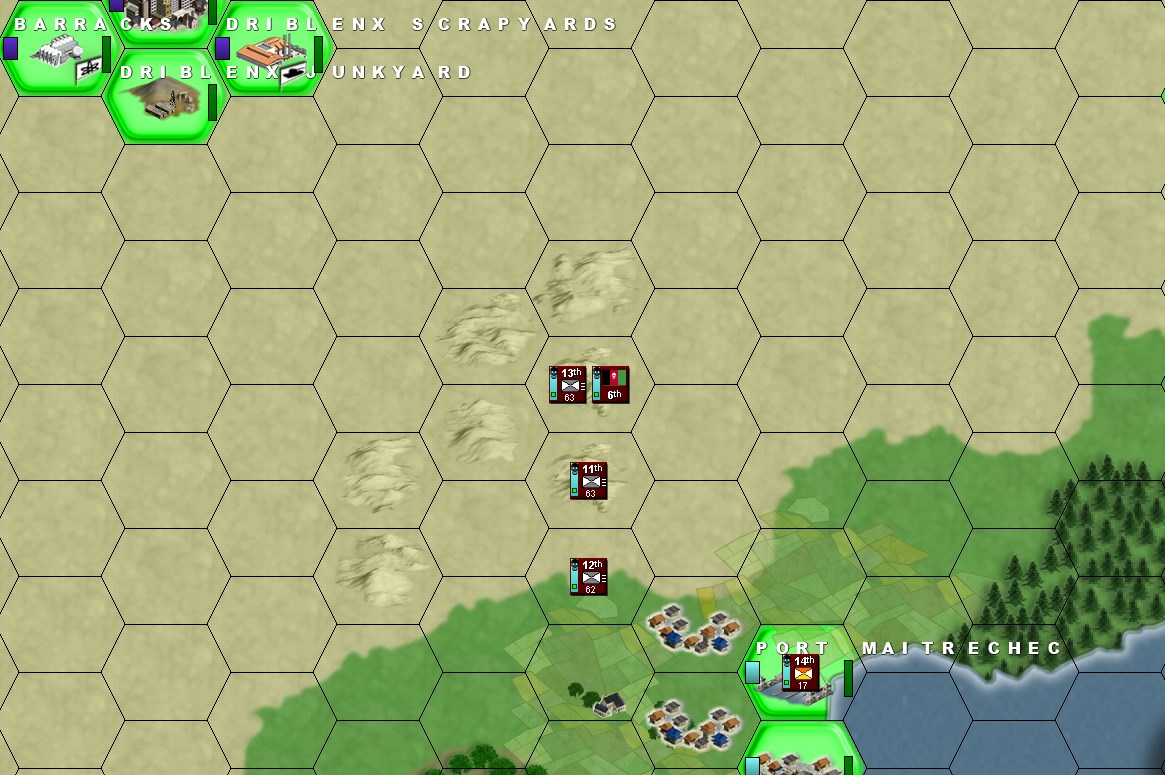 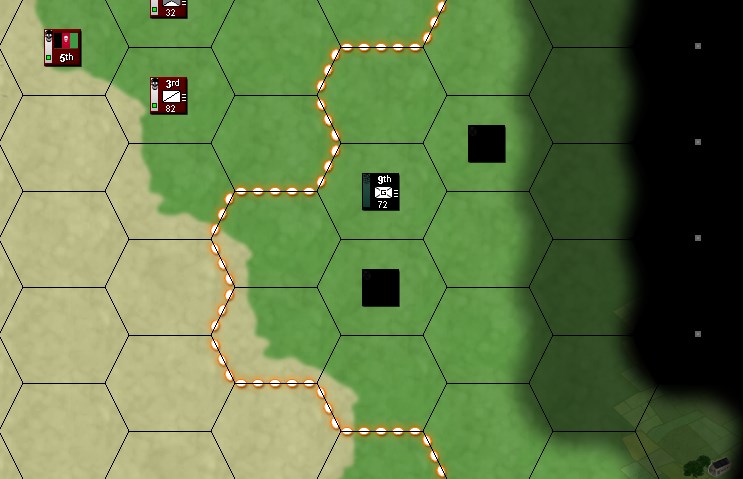 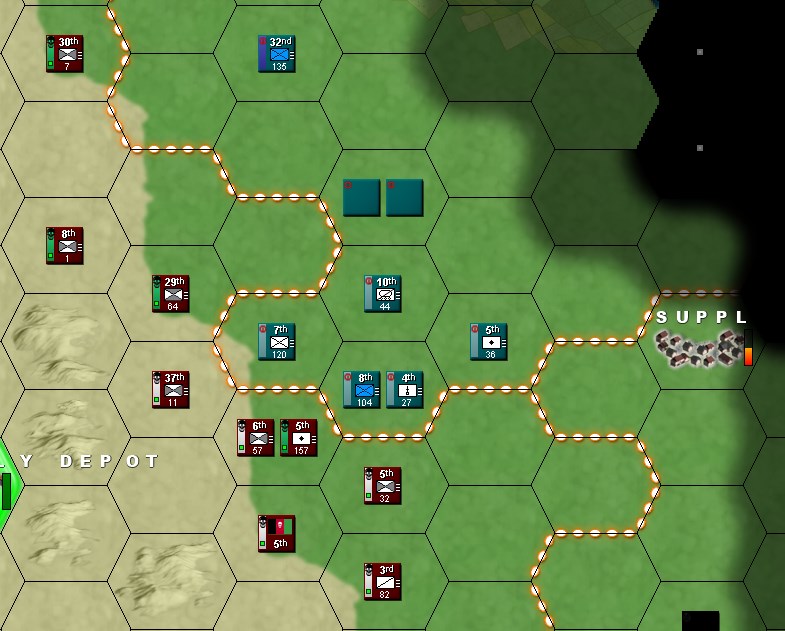 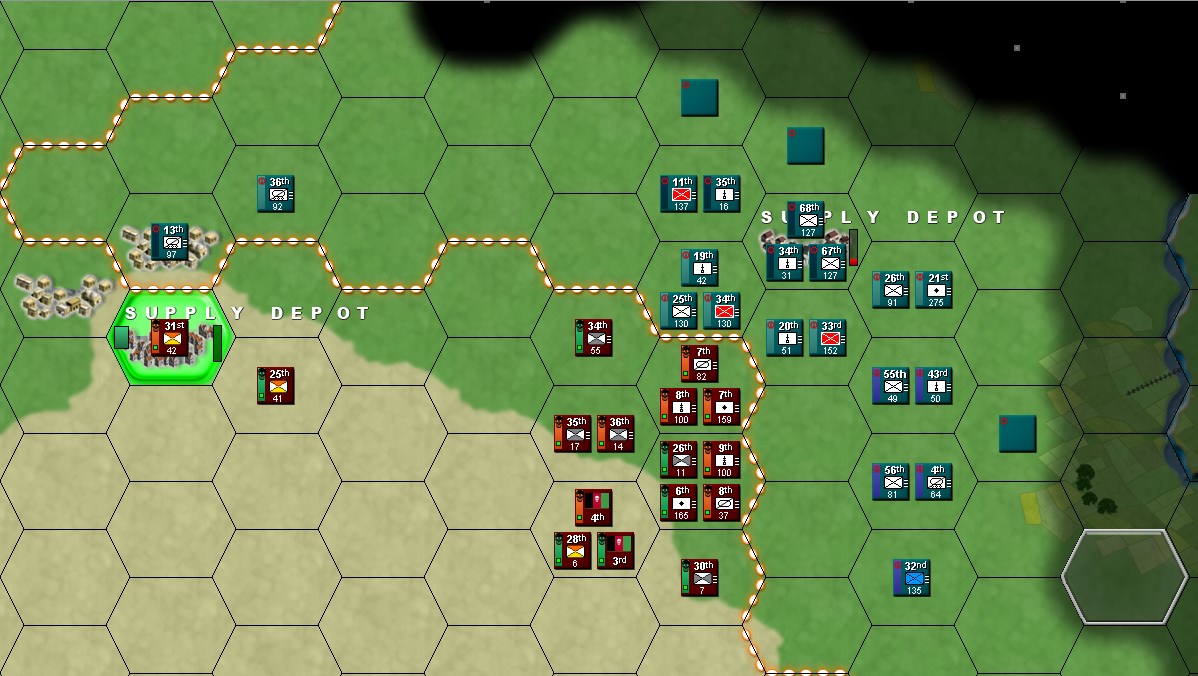 Intelligence Report UNIFIED PEOPLE'S REPUBLIC OF ALMAIN Cavalry Regiment - 4 currently in sight - 7-23 Cavalry, 1-5 Machine Gun, 4-7 Horses, 2-3 Armoured Car Field Artillery Regiment - 2 currently in sight - 1-10 Artillery, 8 Horses Infantry Regiment - 12 currently in sight - 11-52 Rifle, 1-5 Anti-Tank Gun, 2-9 Horses, 4-17 Machine Gun Mortar Regiment - 6 currently in sight - 2-8 Mortar Engineer Regiment - currently none in sight - last seen 20 November - 16 Engineer SEPARATISTS OF AW-FULIA Artillery Combat Group - currently none in sight - last seen 16 November - 6 Artillery, 4 Horses Armour Combat Group - 1 currently in sight - 9 Awfulian Tank, 2 Armoured Car Guerrilla Group - 9 currently in sight - 16-45 Guerrilla, 1-7 Machine Gun, 4-14 SMG Cavalry Combat Group - 4 currently in sight - 12-22 Cavalry, 3-4 Awfulian Tank You have 48 hours to submit your orders.
|
|
#
?
Oct 30, 2018 20:19
|
|
|
You know how some groups have a conch and the person with the conch gets to speak? I would ask for the establishment of a jerry can equivalent. The commander with the can is the only one allowed to use tanks in attacks. Edit: preliminary thoughts, cutting some stuff if I don't have fuel authorization Taking the time to whittle the enemy down, not going to follow up on 5th's attack. Might substitute with attacks on both the enemy 5th and 7th if no fuel authorization. Enemy cavalry has stopped pushing to the north so I will put that beat up unit to better use as a blocker. 6th moving to mapsheet west to aid 2nd HQ.  23rd moving to secure supply depot. 2nd HQ will be forgiven for their past... haste if they boost 4th's artillery attack. Cards are not guaranteed every turn, so I am assuming that we have one now. Can't attack the supply depot if the supporting cavalry is too busy calming their horses. Garrison helps protect against possibility that the enemy shoots their horses. Continuing to strike while the iron is hot towards 3rd. 17th moving to mapsheet sw. 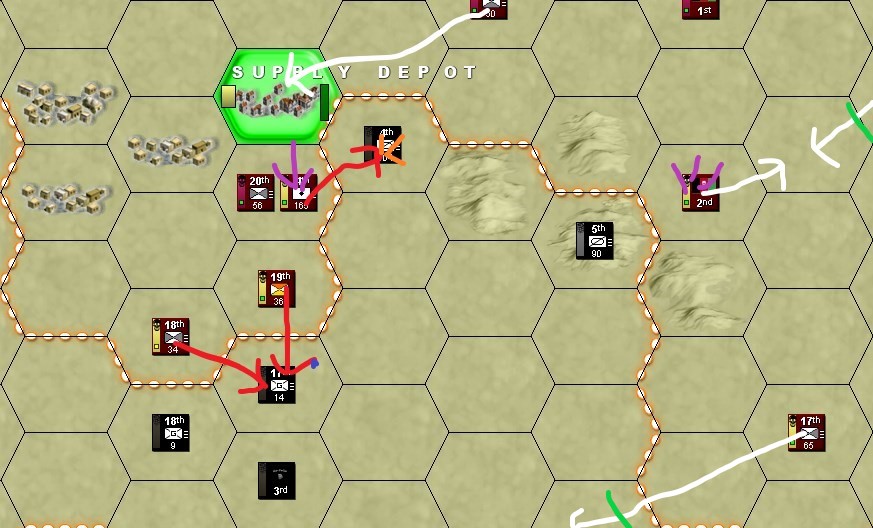 17th moving to block up the enemy HQ's line to the front. 15th hopefully moving to block up enemy HQ's line to the rear, a teensy bit suicidally. Moving 16th into supply depot would greatly aid holding it this turn, but would complicate things next turn and with the flankers. Still thinking about that one. 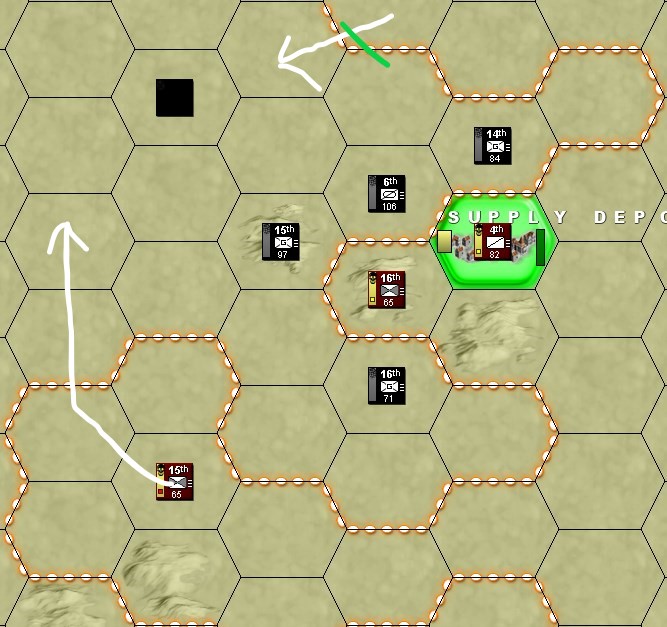
habituallyred fucked around with this message at 05:07 on Nov 1, 2018 |
|
#
?
Oct 30, 2018 20:41
|
|
|
3 & 4 HQ orders Both HQ set to priority reinfircements - Jessejin your 6th is still on priority. 8th rockets is to bombard the supply depot, if it is not destroyed then the 9th rockets will move up and do the same. If it is 9th will withdraw.  Withdraw to shown positions. I forgot to include it but 25 guerilla is to move onto the supply depot. If the arty with the mising horse can it is to steal horses from wherever it can so it's mobile again.  8th infantry is to be detatched for rebuilding. Saros fucked around with this message at 15:08 on Nov 2, 2018 |
|
#
?
Oct 31, 2018 15:58
|
|
|
Final orders All designated units attack without pursuing. Nothing fancy, just hitting the enemy while they are recovering. 6th cavalry is moving to w mapsheet to assist 2nd HQ, execute this order last. 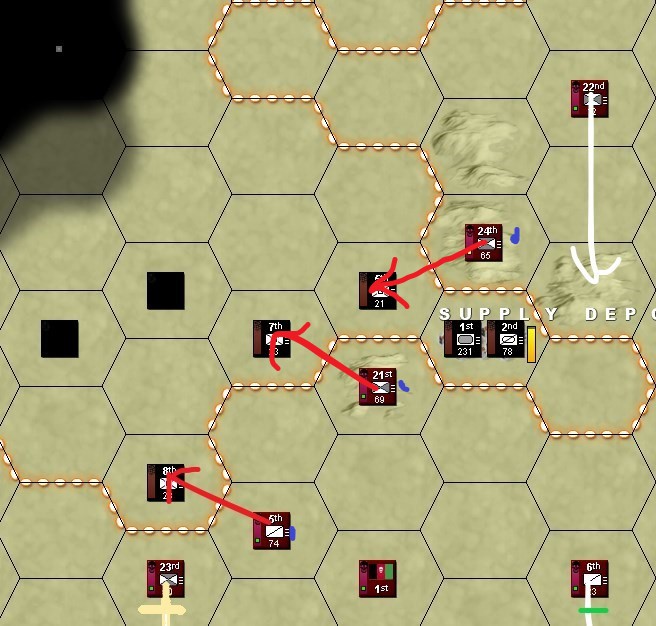 Execute orders in numerical order. First boost the 4th artillery with excellent advice without moving. Please keep us up to date on when this advice is ready to go in the future. Then proceed with the barrage on the enemy 4th cavalry. The 18th is forbidden from pursuing while the 19th is encouraged to. Finally move into designated positions, especially 2nd HQ. 17th moving to sw mapsheet to help pin the enemy HQ. 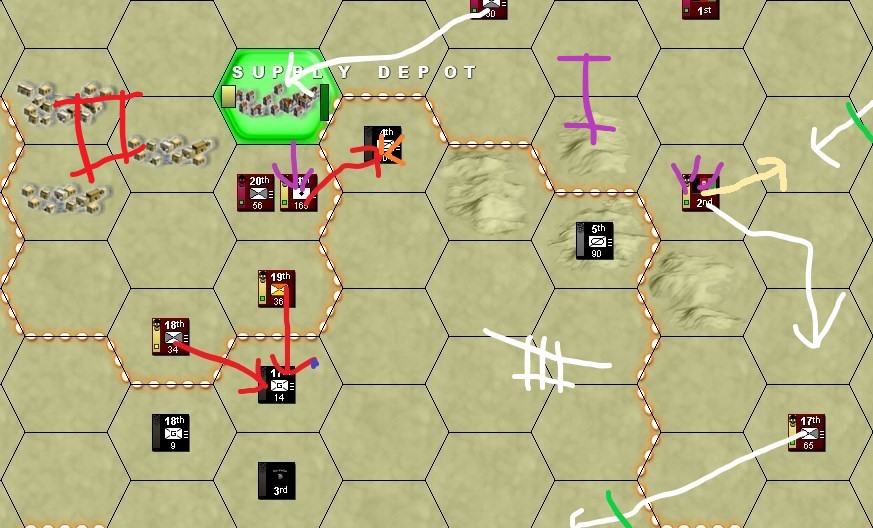 Finally the SW movements happen. This should encircle the enemy more than it does us.
habituallyred fucked around with this message at 05:11 on Nov 1, 2018 |
|
#
?
Nov 1, 2018 05:07
|
|
|
I require few extra hours for the orders, as I was/ and still is in transit from conference in Slovenia. I should be able to post orders by 23:59 CET today
|
|
#
?
Nov 1, 2018 10:55
|
|
|
Sure, I'm visiting family until Saturday anyway.
|
|
#
?
Nov 1, 2018 11:32
|
|
|
I'll have time to update tomorrow evening - 24 hours deadline okay with everyone?
|
|
#
?
Nov 2, 2018 19:49
|
|
|
Sure. I am putting a little bit extra effort, just for visualization sake. Here are my orders:  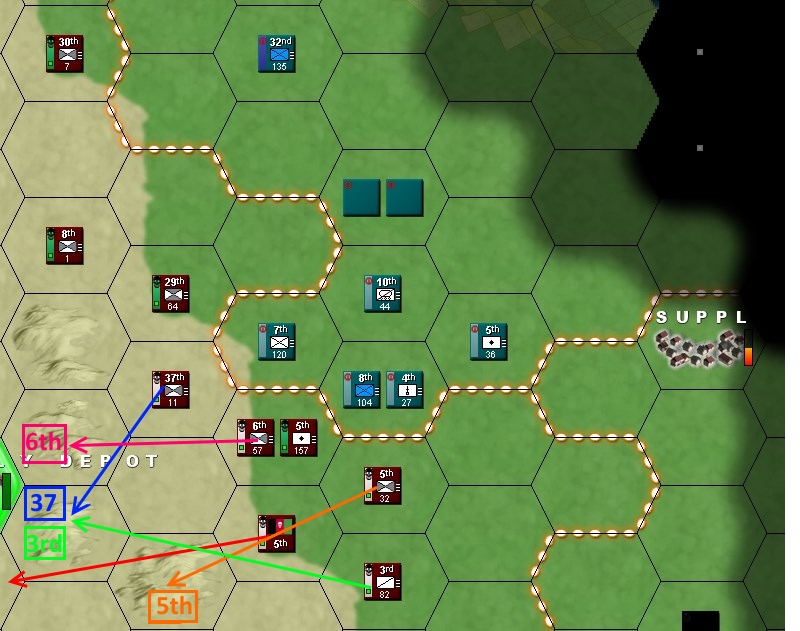 A synchonized retreat with Saros troops is in order. I've marked all the troops movements, and their position after the move. Hopefully they have enough action to do it all. I am grouping cavalry and weakest infantry, so the infantry doesn't give away at once to the enemy and make a gaping hole in the frontline. HQ is to go to the position one hex south from supply depot. Cavalry in the south is to remain in position if the Sultan's troop try to move south to take the depot.  Continues west (with one hex to the north as well) and hope for the best. No pic needed this turn, as their maximum movement will not get them near enemies. Also, put them out of reinforcement priority, as said last turn...
|
|
#
?
Nov 3, 2018 01:42
|
|
|
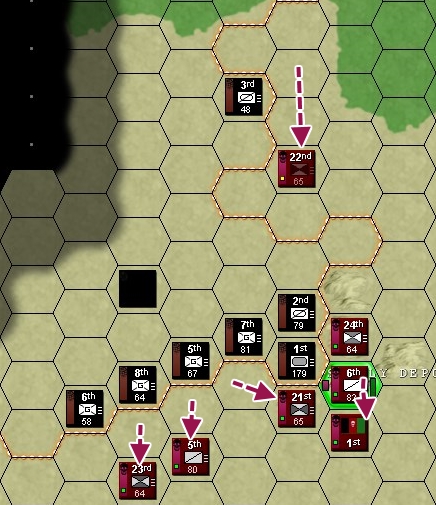
 Not much movement here - just the 22nd rejoining the rest of your forces. 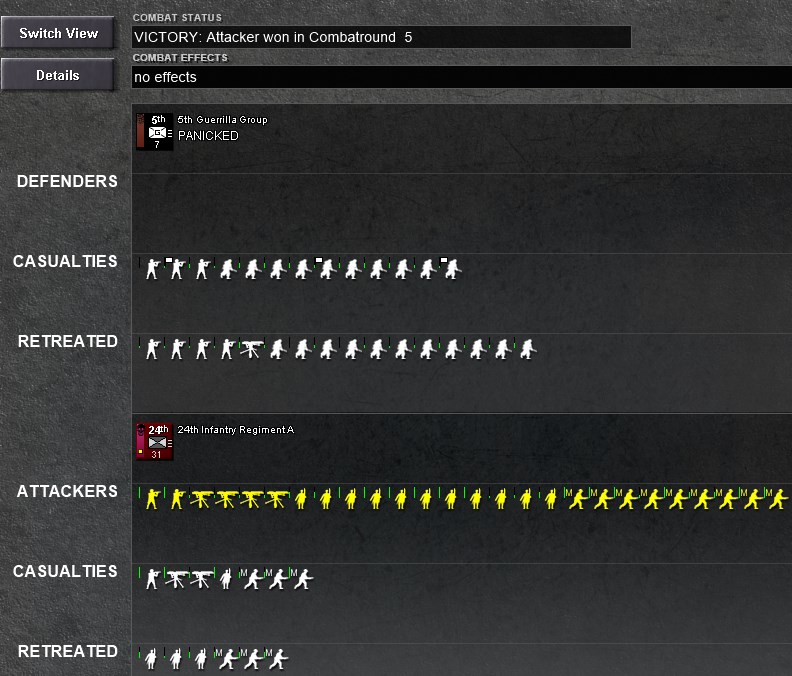 The enemy guerrillas, disorganised after their own attack, get easily pushed out of position near the supply depot. You have now encircled the enemy forces in there. 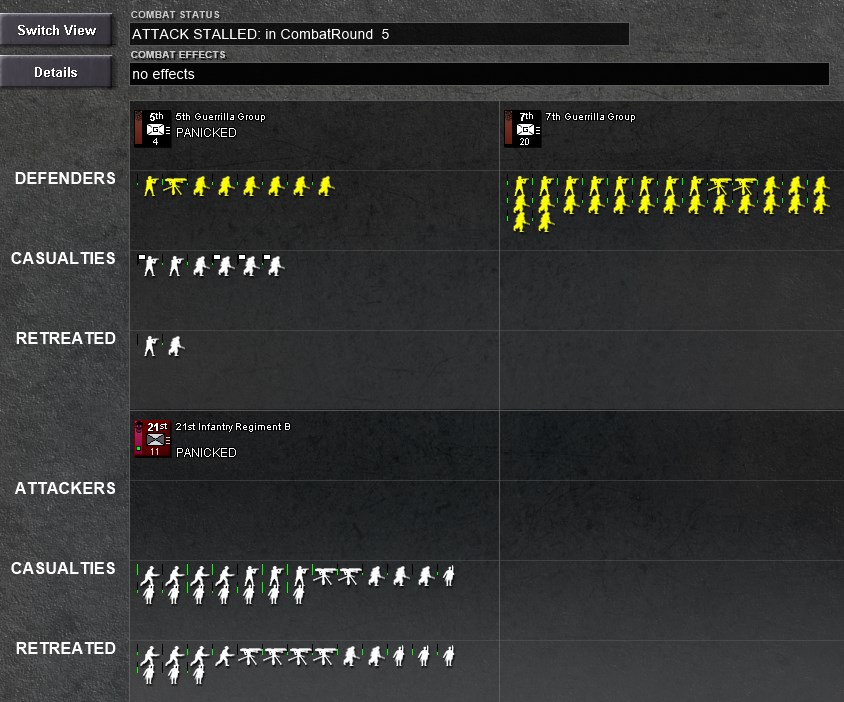 However, they retreat towards the positions of their 7th Guerrilla Group, which allows them to help in repelling 21st Infantry's attack! 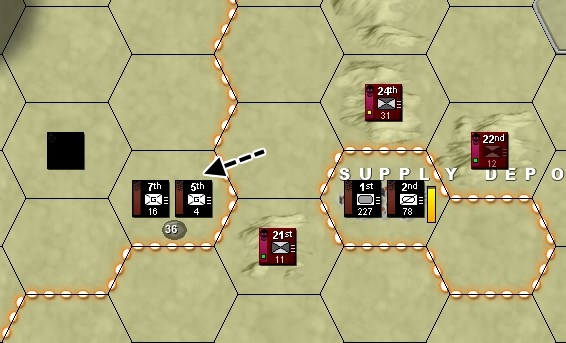 This is what it is when all is said and done. 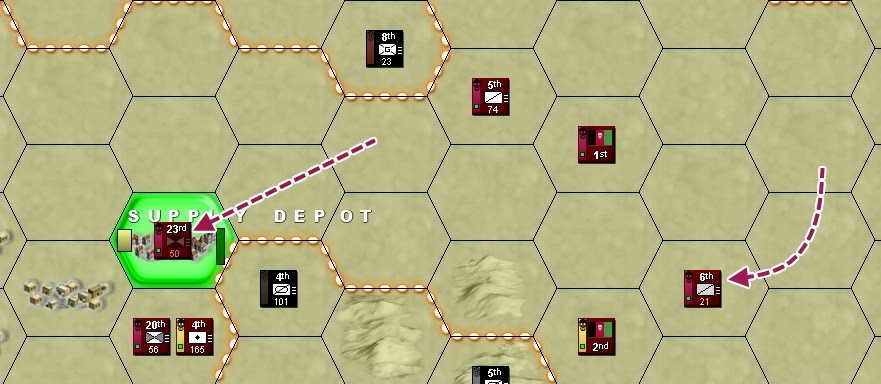 A little further south, there is a bit of repositioning to better facilitate upcoming counterattacks. 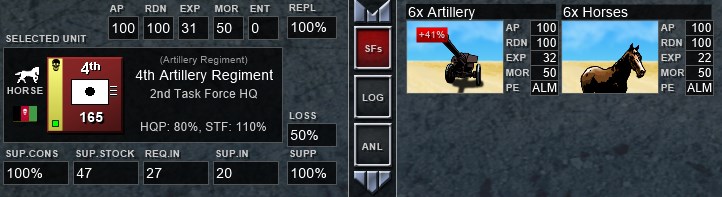 4th Artillery gets some personal touch. 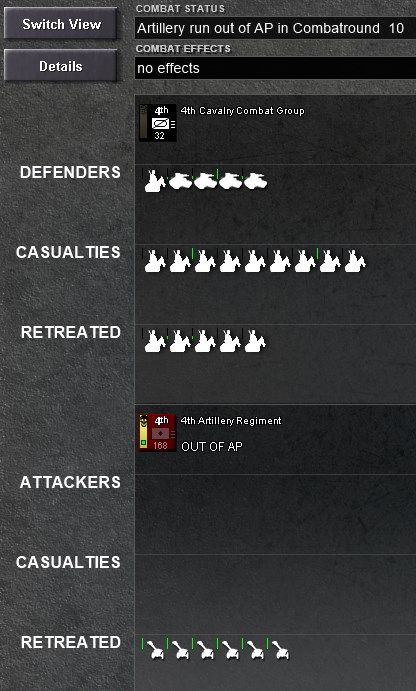 It has a devastating effect on the enemy cavalry, even if their tanks are still standing. 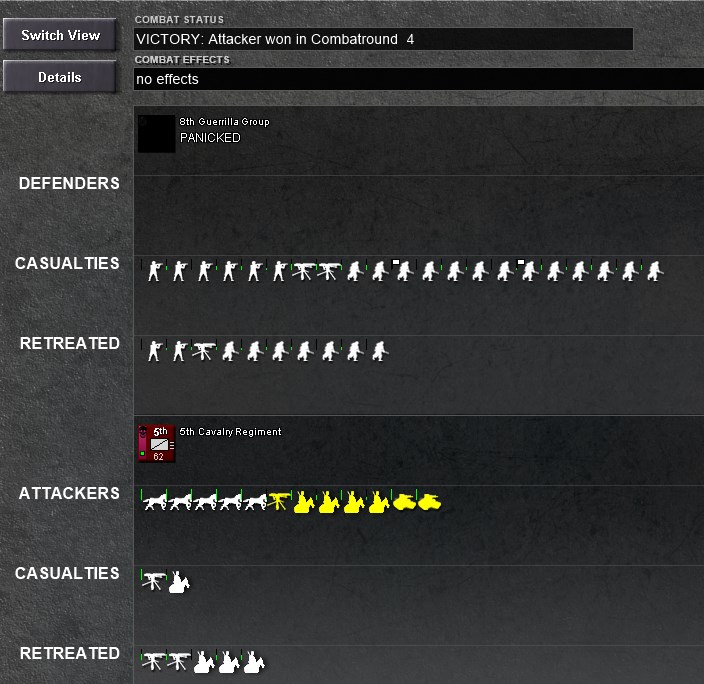 Your cavalry makes short work of the enemy guerrillas - they flee in panic, and some just outright surrender. The lack of AT weapons is really hurting them here. 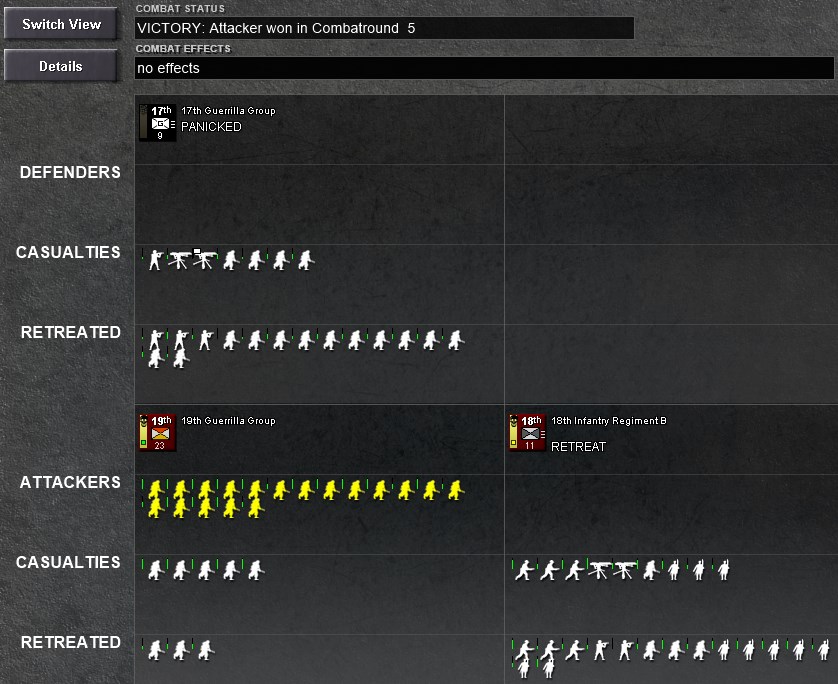 The attack against enemy 17th Guerrilla is successful - the 18th holds them in place, while the 19th takes advantage and pushes them out of position. It is quite hard on the 18th, however. 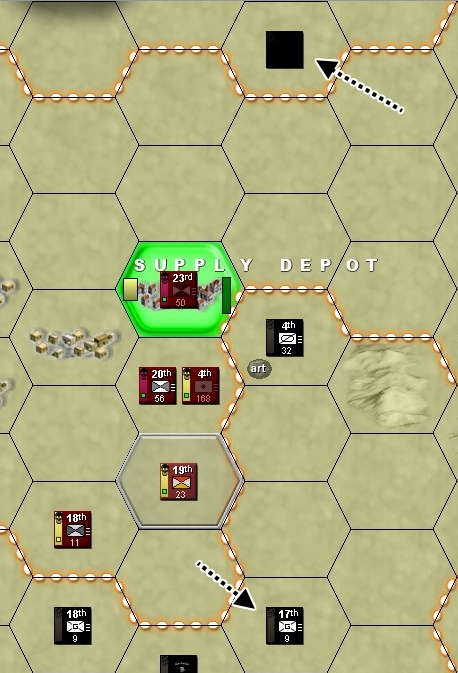 Awfulian forces waste no time in retreating in the wake of your success. 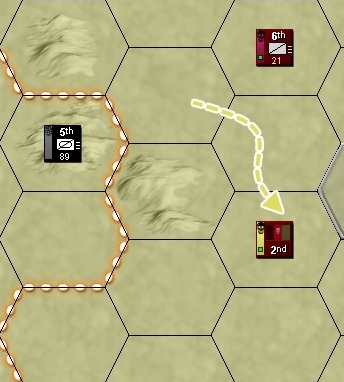 2nd HQ then moves away from the enemy tanks. For safety. 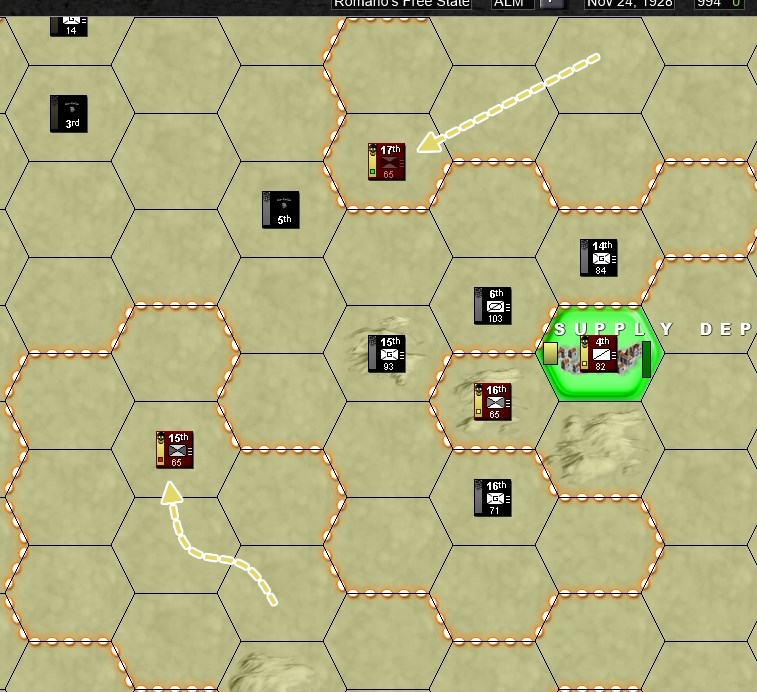 You continue probing the enemy line near the southern depot, hoping to catch them off-guard and encircle them, but it is an uphill struggle. 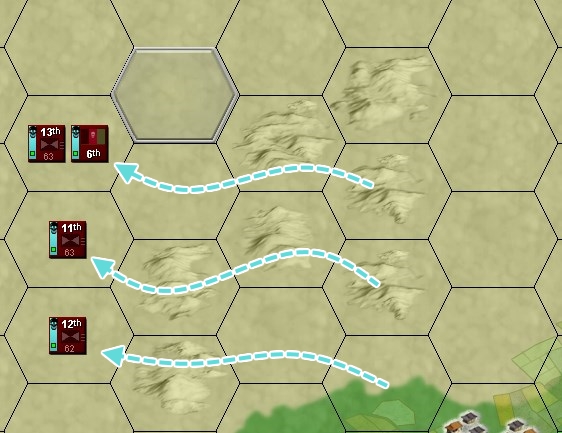 TF6 continues to go west. 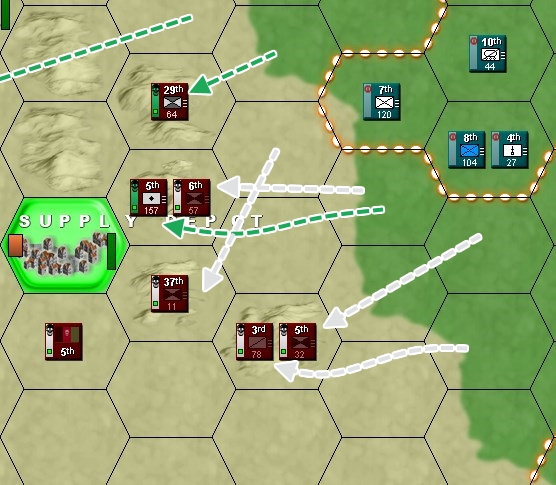 You begin the withdrawal towards Etyman Hills. However, many of your units are disorganised, and with stragglers getting in the way, you suffer from many delays here. Your positions are not as good as you would have them be. 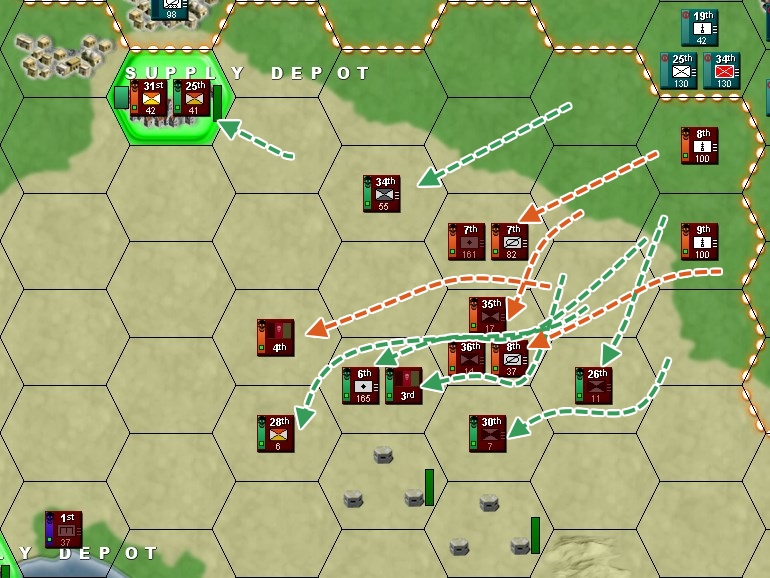 It's a very similar story further north. You are reaching better positions, but the cost in disruption is significant. 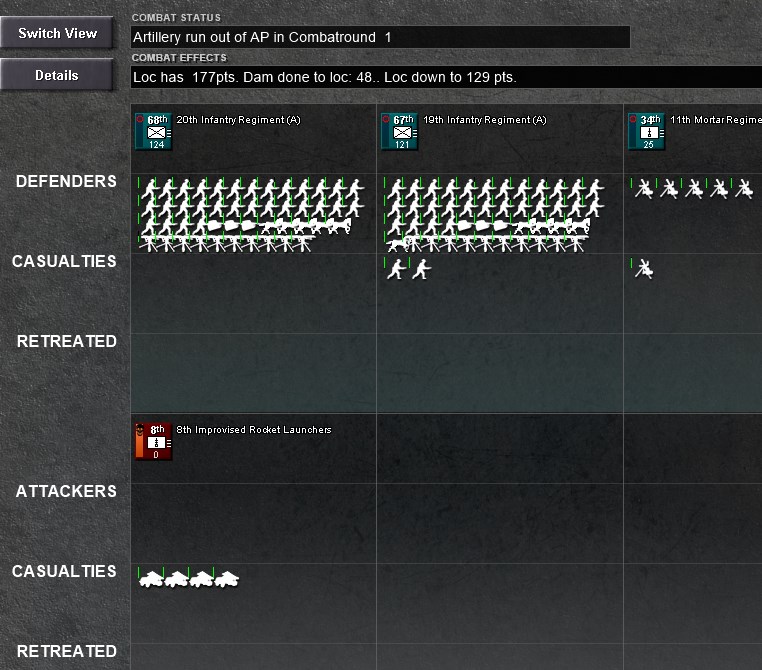 8th Rockets barrage the northern supply depot, but it is left standing. 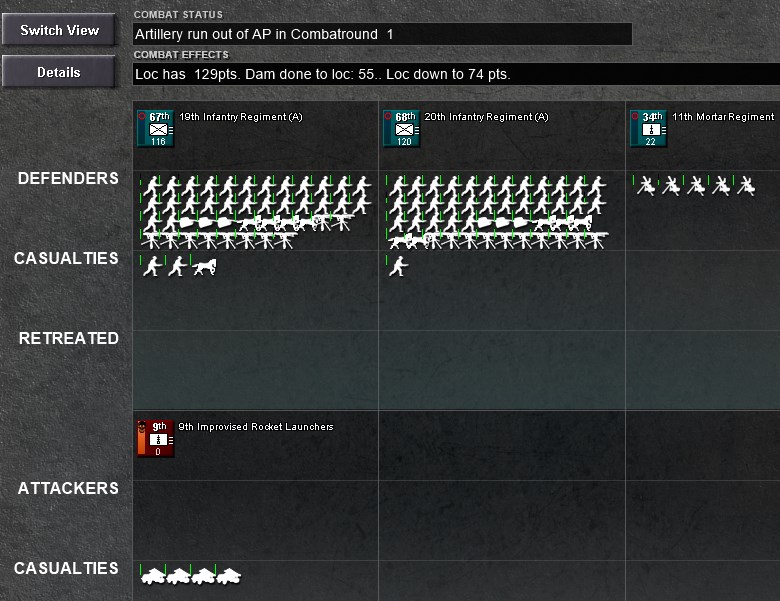 Frustratingly, even a repeated barrage from the 9th fails to demolish those half-ruined leftovers, and the enemy don't take any serious damage either! As your troops abandon the now-useless launchers, they have a distinct bitter taste in their mouths. End of turn overview 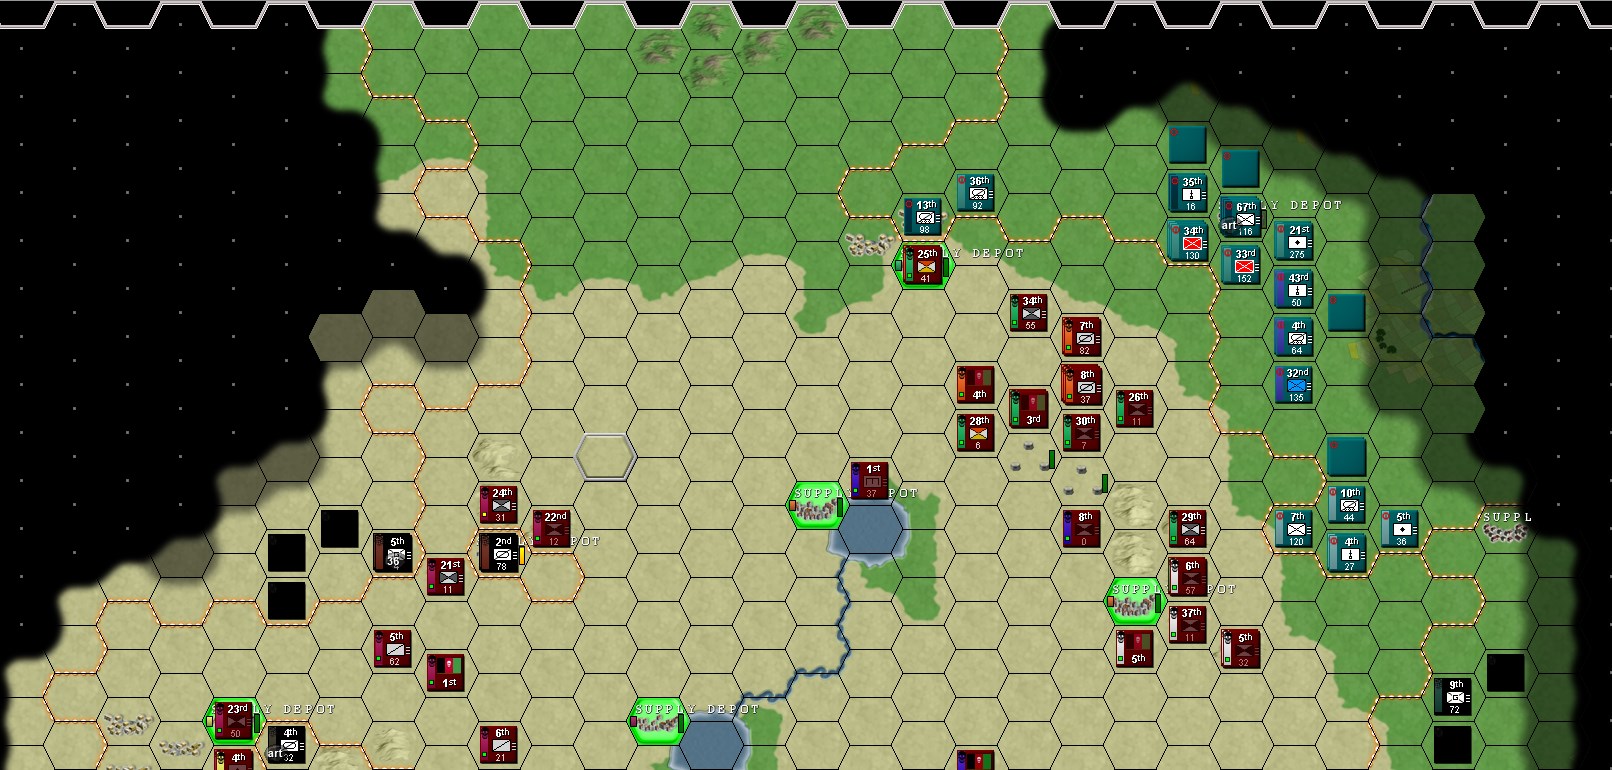 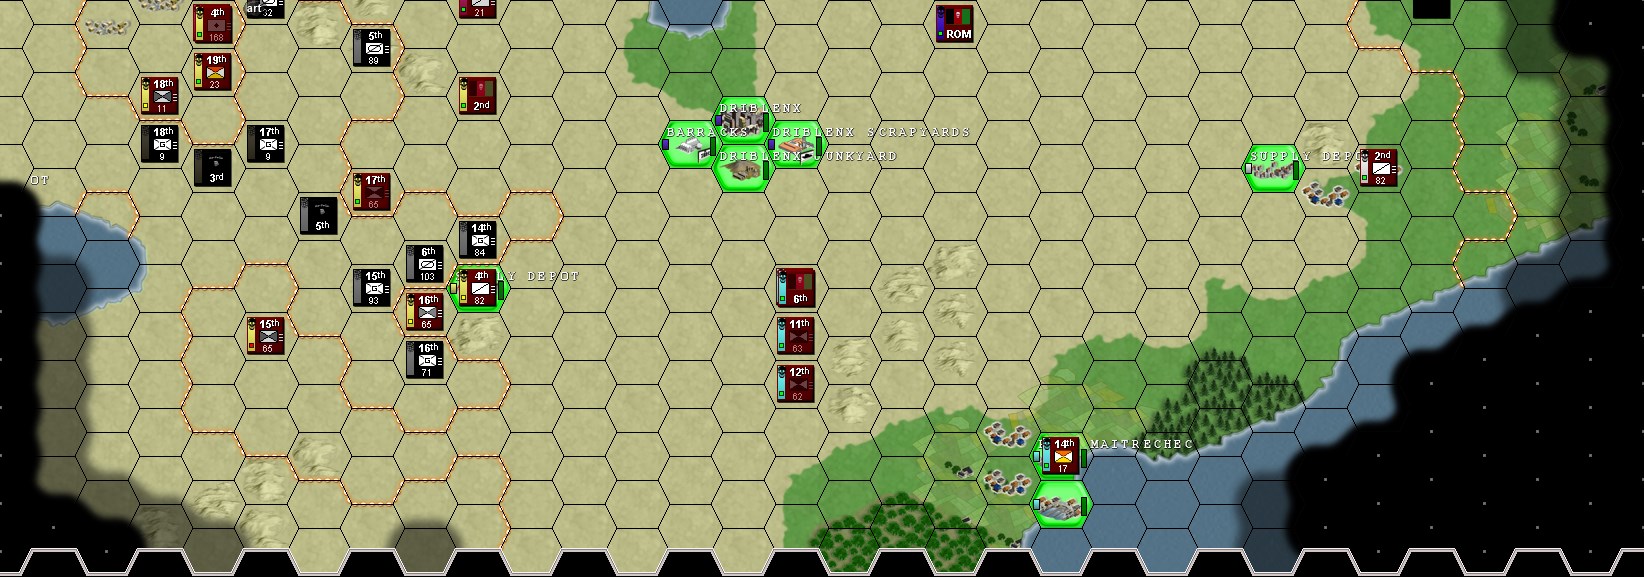 End of turn map  The turn now passes to the Separatists of Aw-Fulia.
|
|
#
?
Nov 5, 2018 13:14
|
|
|
I am happy to note that not only has our artillery barrage reduced the enemy cavalry to a wild herd, but also blown a track off all but one enemy tank. Even if the enemy shoots all of their horses they will still have trouble attacking. I am sorry for the losses the 21st took in the most recent action. I got greedy with the dual attacks and now stand to lose one of the pillars holding the enemy tanks in check. I suppose it would be out of the question for the 22nd to transfer non-guerrilla troops to one of it's sister units and then to withdraw for reconstruction?
|
|
#
?
Nov 5, 2018 20:18
|
|
|
habituallyred posted:I am happy to note that not only has our artillery barrage reduced the enemy cavalry to a wild herd, but also blown a track off all but one enemy tank. Even if the enemy shoots all of their horses they will still have trouble attacking. I am sorry for the losses the 21st took in the most recent action. I got greedy with the dual attacks and now stand to lose one of the pillars holding the enemy tanks in check. You know what, I'd allow it, but there's no certainty the 22nd even survives until your next turn, so let's go back to this once it comes around.
|
|
#
?
Nov 5, 2018 23:22
|
|
|
26 November 1928 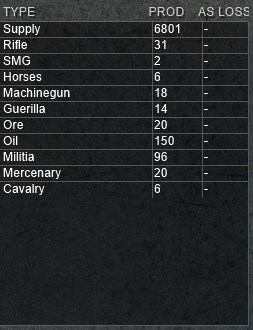 Recruitment and equipment of troops proceeds apace. 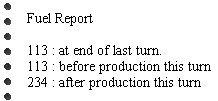 Fuel reserves are very low, but Admiral Romano has taken personal oversight of the Maitrechec harbour transports to assure what arrives is delivered as quickly and efficiently as possible. 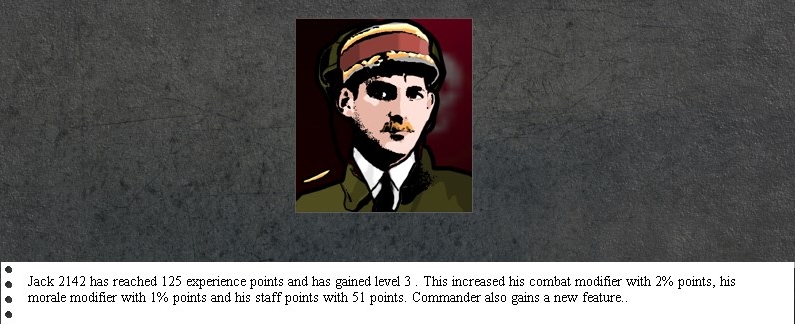 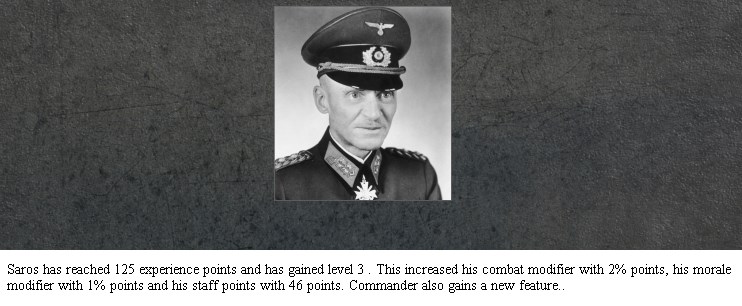 Jakc2142 and Saros get another level. And both gain access to a new ability! 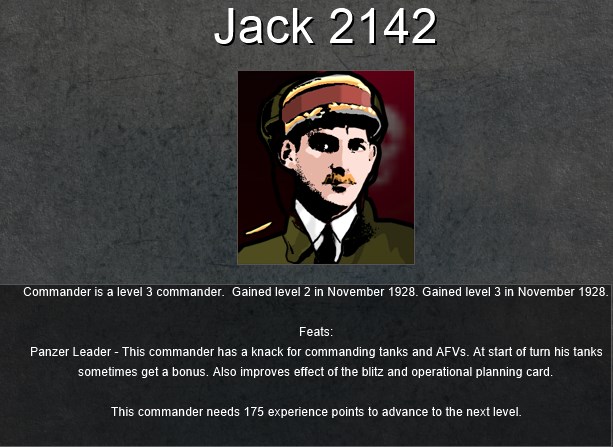 Jack2142's ability is something you cannot really rely on, but he has enough tanks to make it quite a nice bonus. 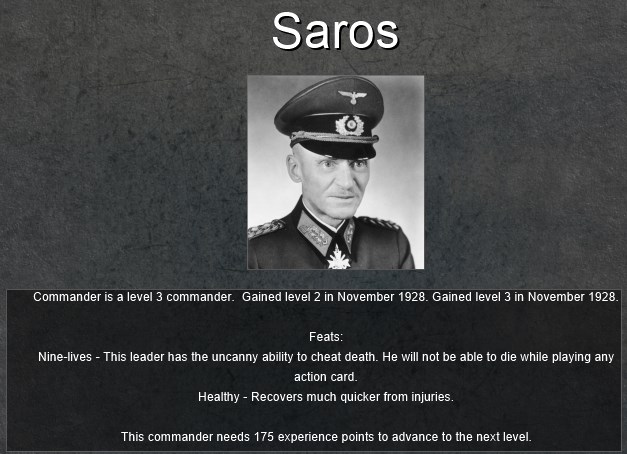 Saros is now extremely capable of surviving when playing cards. But he still has no cards.  Awfulians reopen a line to the supply depot. 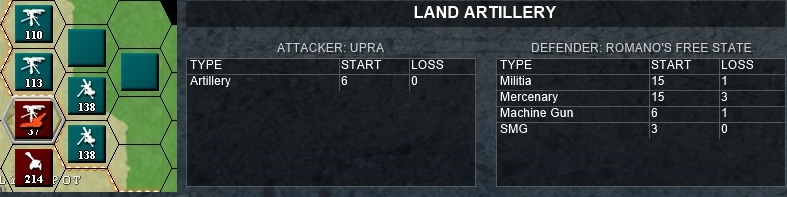 Artillery starts falling on the 29th Regiment in Etyman Hills. Results are minor. 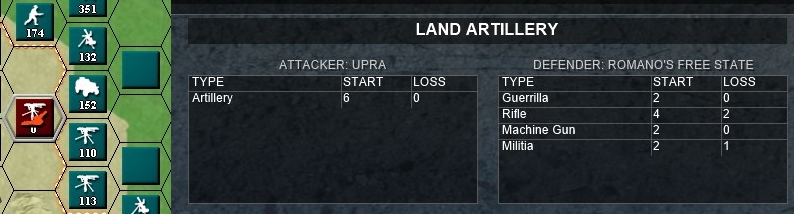 26th Regiment's remnants take fire as well. 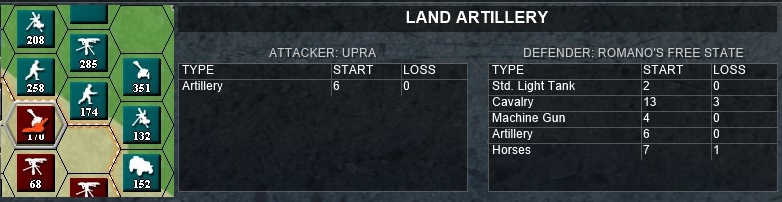 TF4's tanks and artillery are also shelled. The tanks are intact, as are the artillery guns, but the artillery loses a horse again and the other forces are severely disorganised.  To top it off, the enemy capture the northernmost supply depot with their cavalry, scattering the guerrillas protecting it. 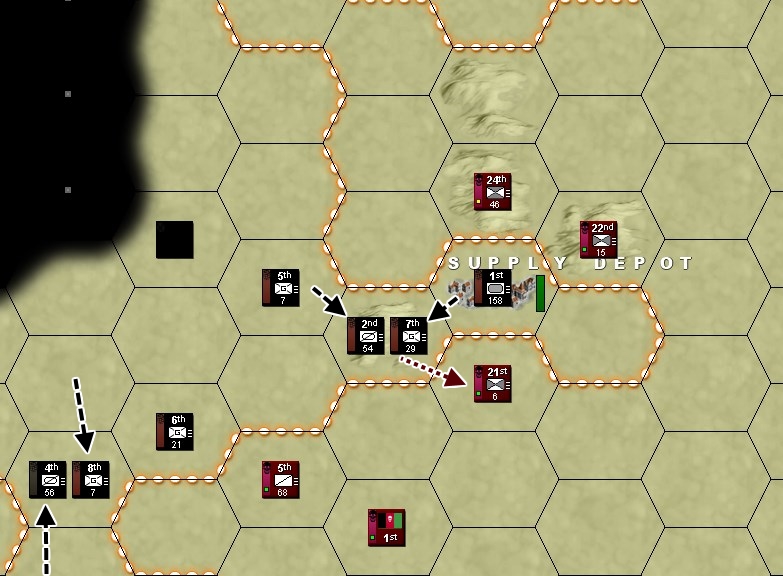 TF1's area of operations does appear to have little movement aside from the Awfulian breakout. 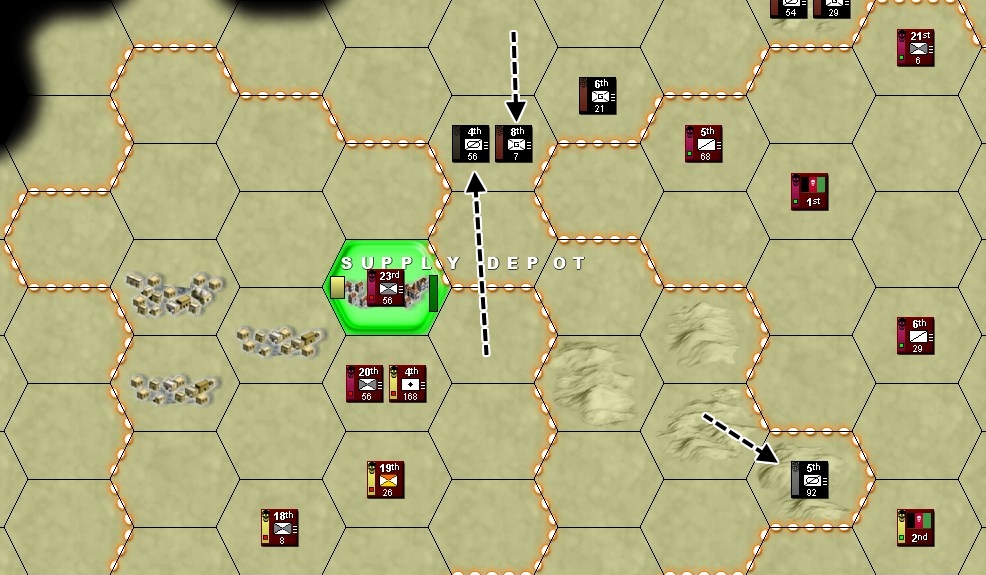 The Sheikh's forces cut off contact between the forces near the western supply depot and their HQs. NEW RULE: If you have units cut off from HQs (and thus supply) in an area where there are supply sources, you can create a temporary HQ for the purposes of redistributing those supplies. All units in the area will be assigned to the HQ, but the HQ will not have a general in it, and most likely no staff either (so no combat bonuses). The HQ will be removed when you request it, and the units returned to their original HQs (if possible). This all comes with normal readiness losses when reassigning troops. 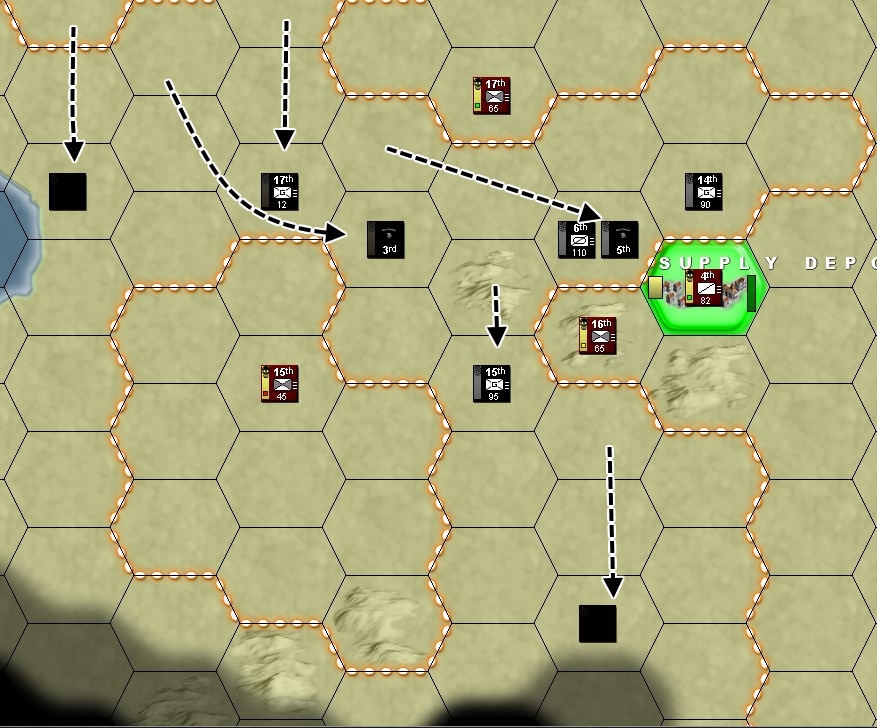 Down by TF2's southern depot, Awfulians move their line south. They cut off 15th Regiment in the process - and they've been out of supply for a few days already, and are starting to lose readiness. 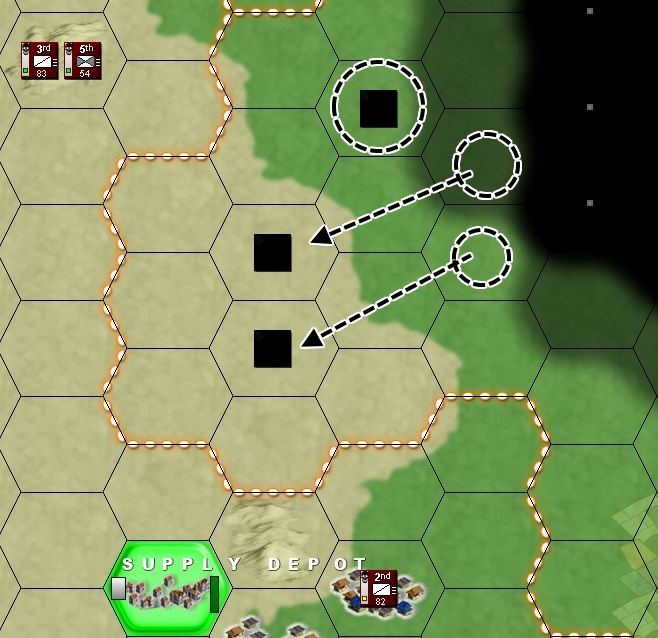 Awfulians are pushing in the gap between TF5's southern cavalry and your line in the hills. 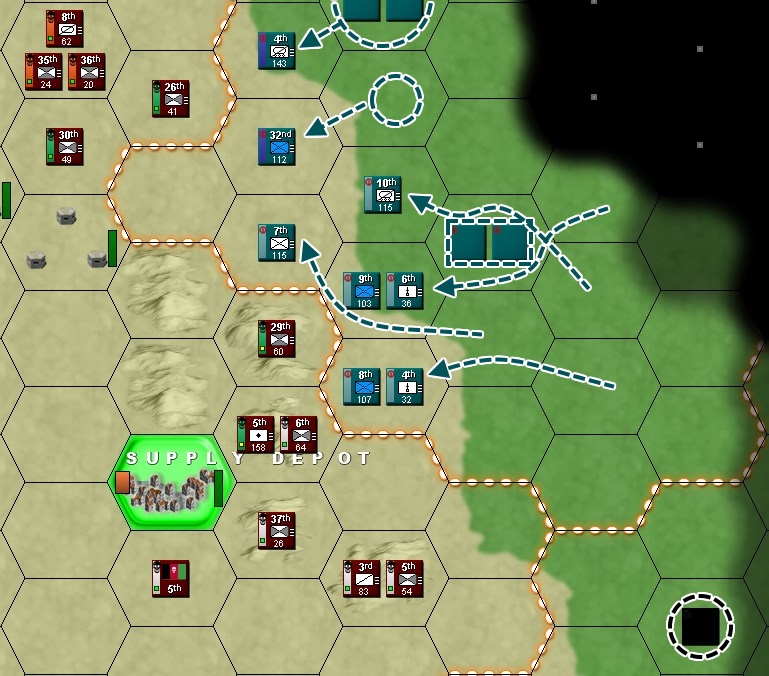 UPRA forces appear to be massing near the northern end of Etyman Hills.  They are making large movements in this area and pressing on you hard, but can't really catch up. 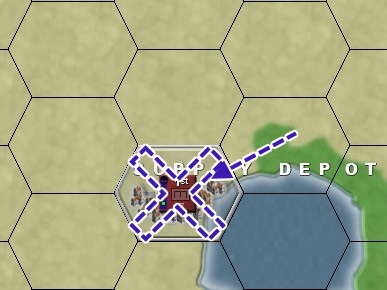 The engineers rig the northern supply depot to blow and demolish it in its entirety. The ruined fortifications still offer some combat advantage, but what supplies could not be lifted out are gone. Readiness reports 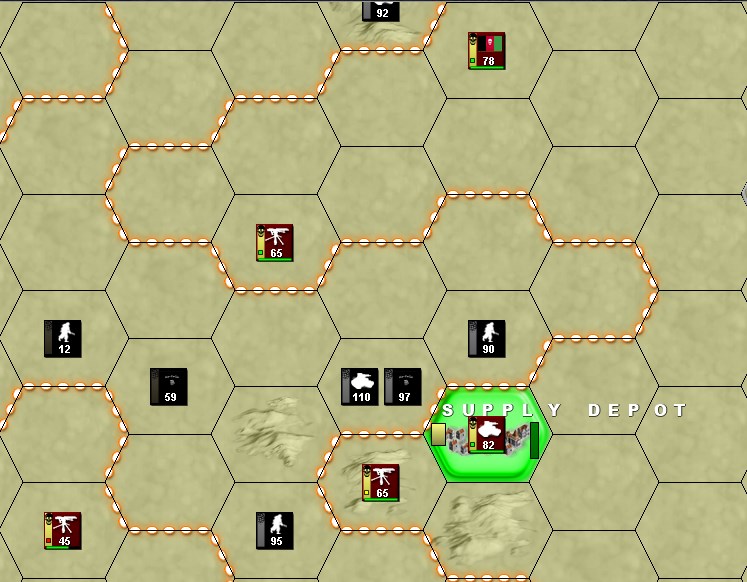 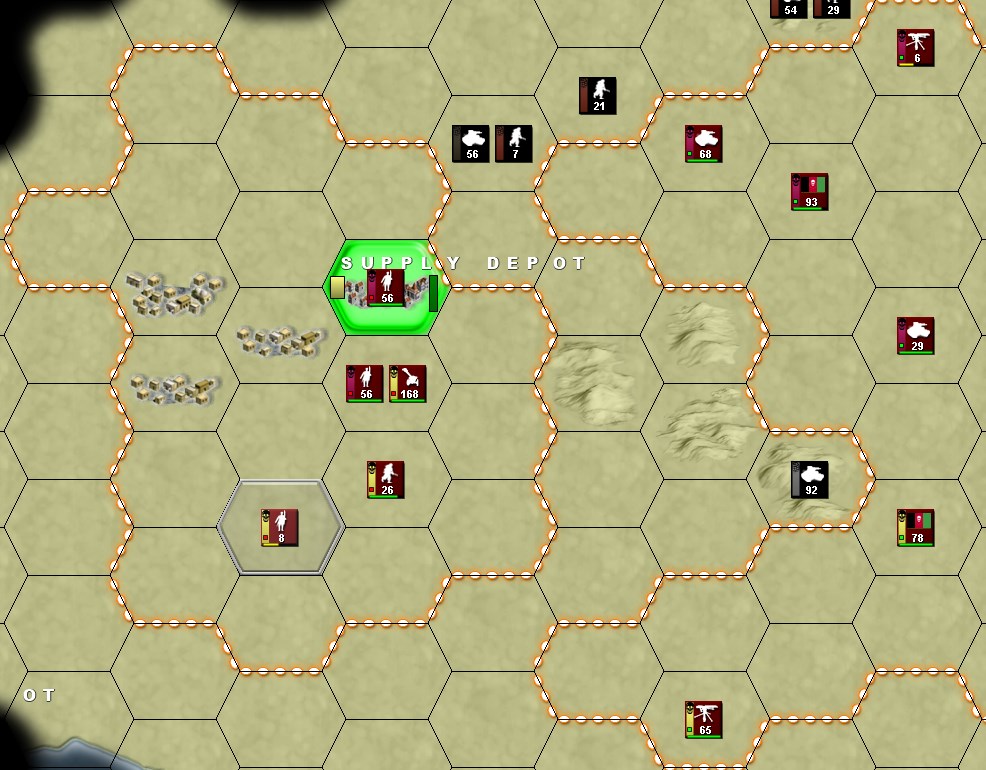 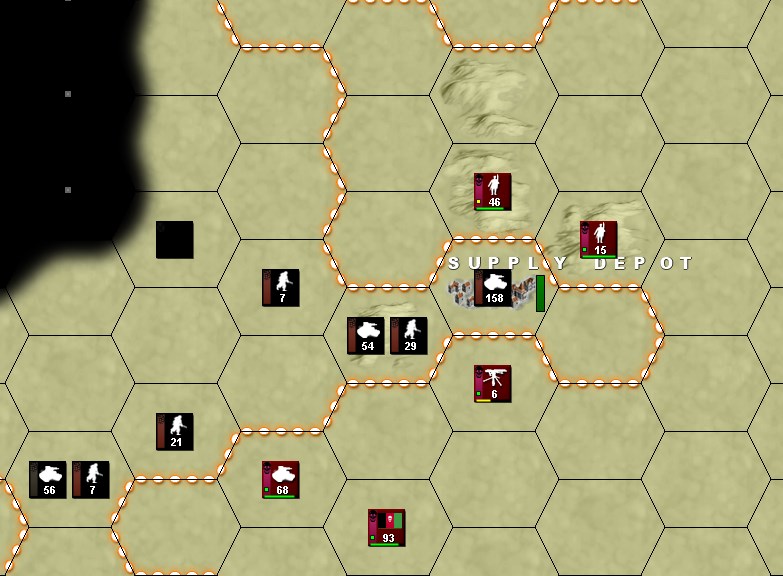 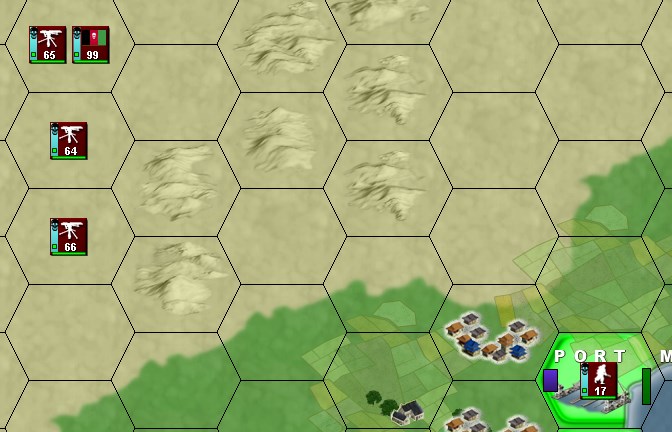 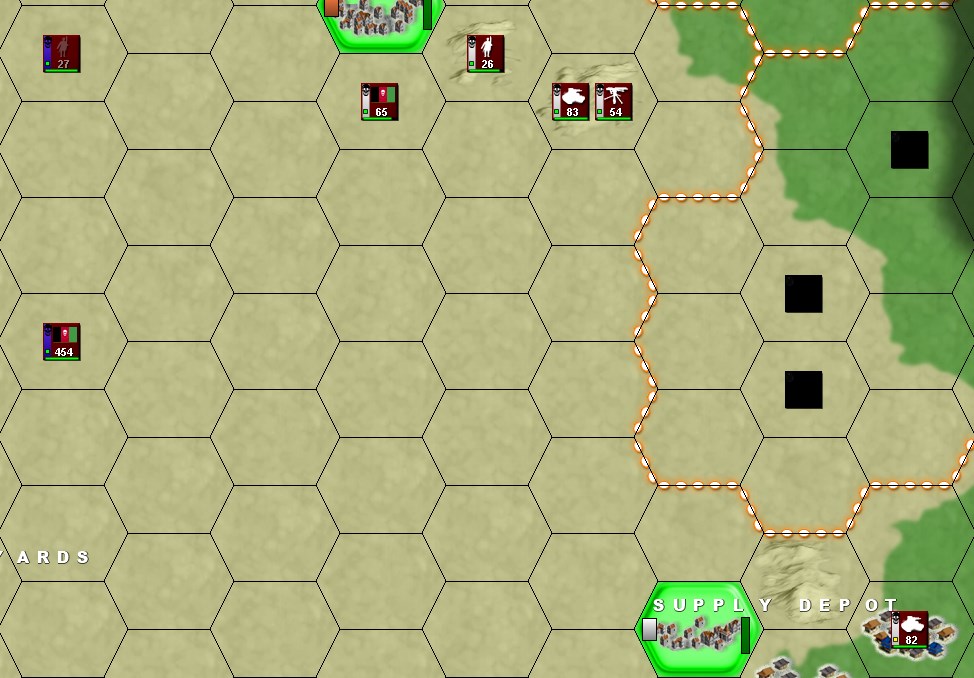 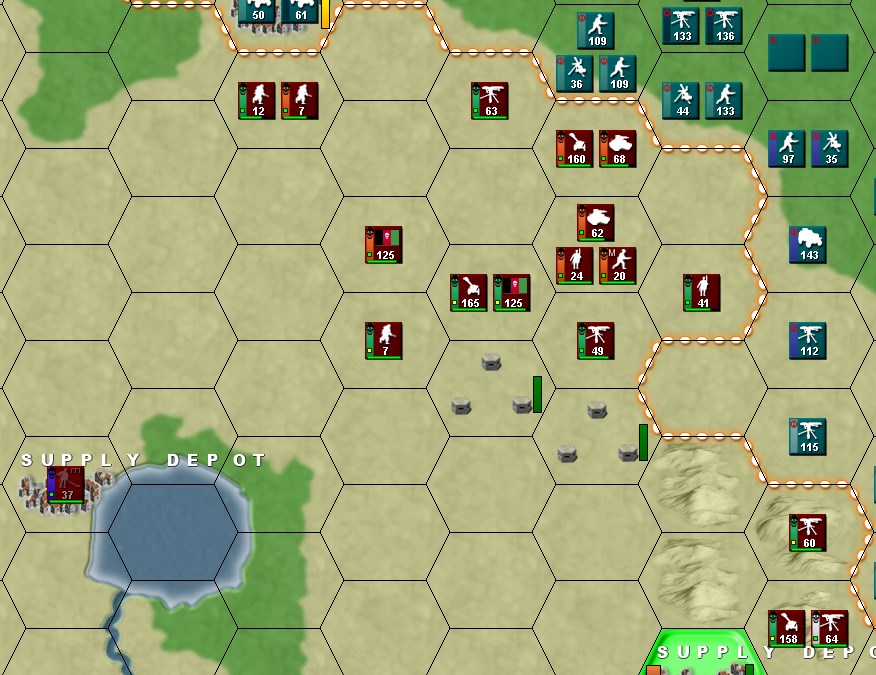 Replacement reports        Situation overview 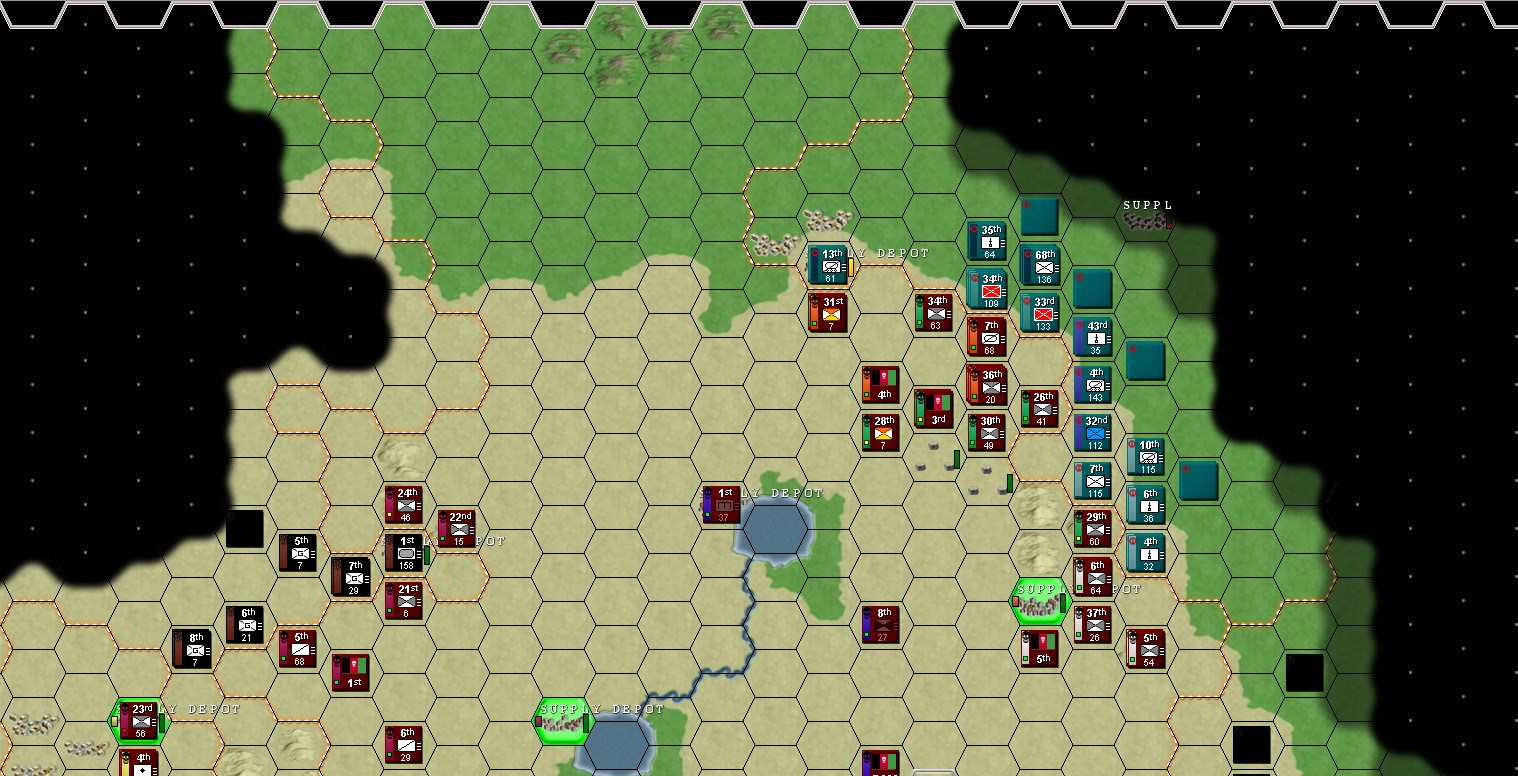 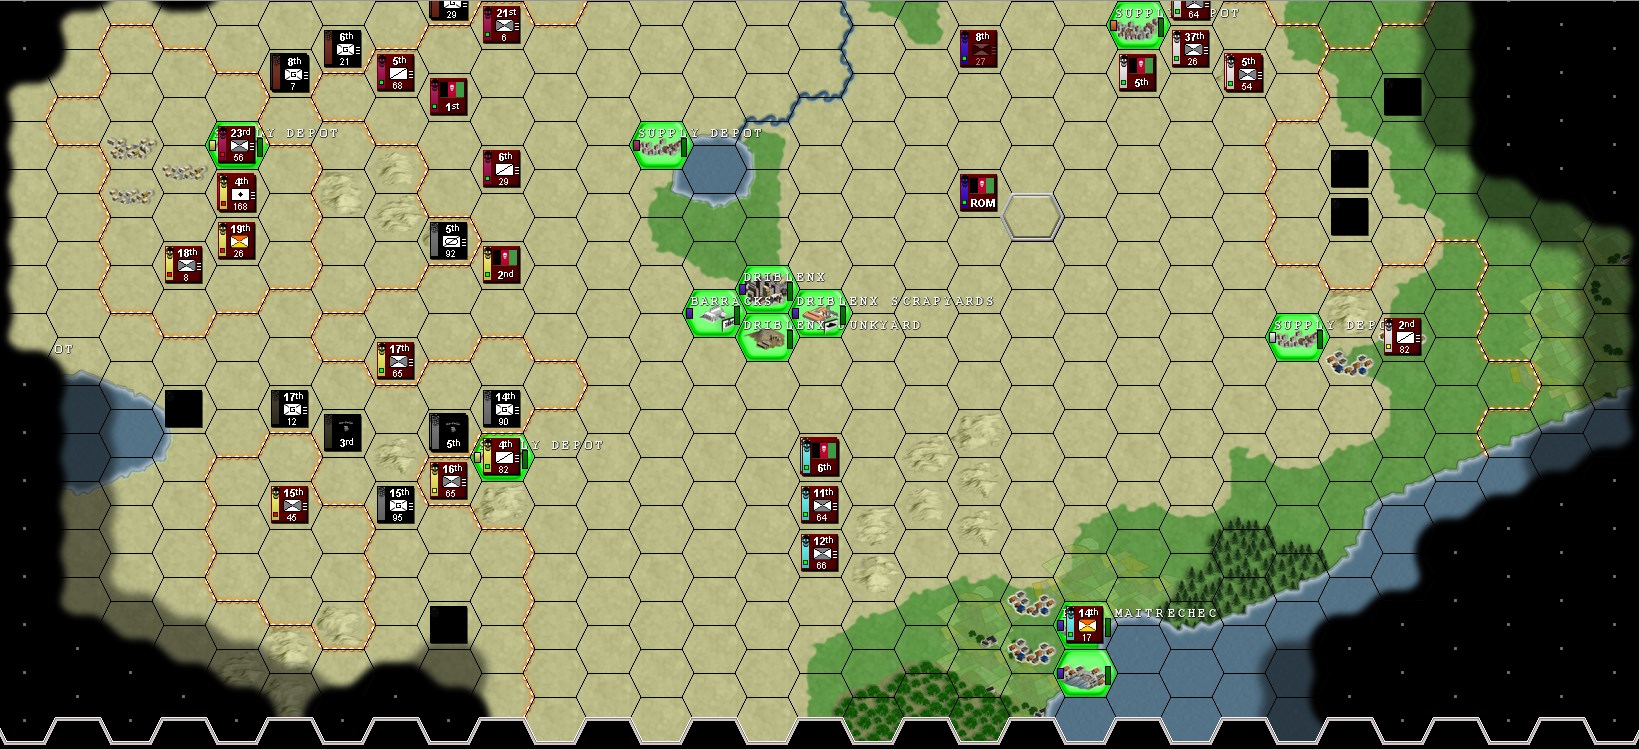 Situation map  Clean images  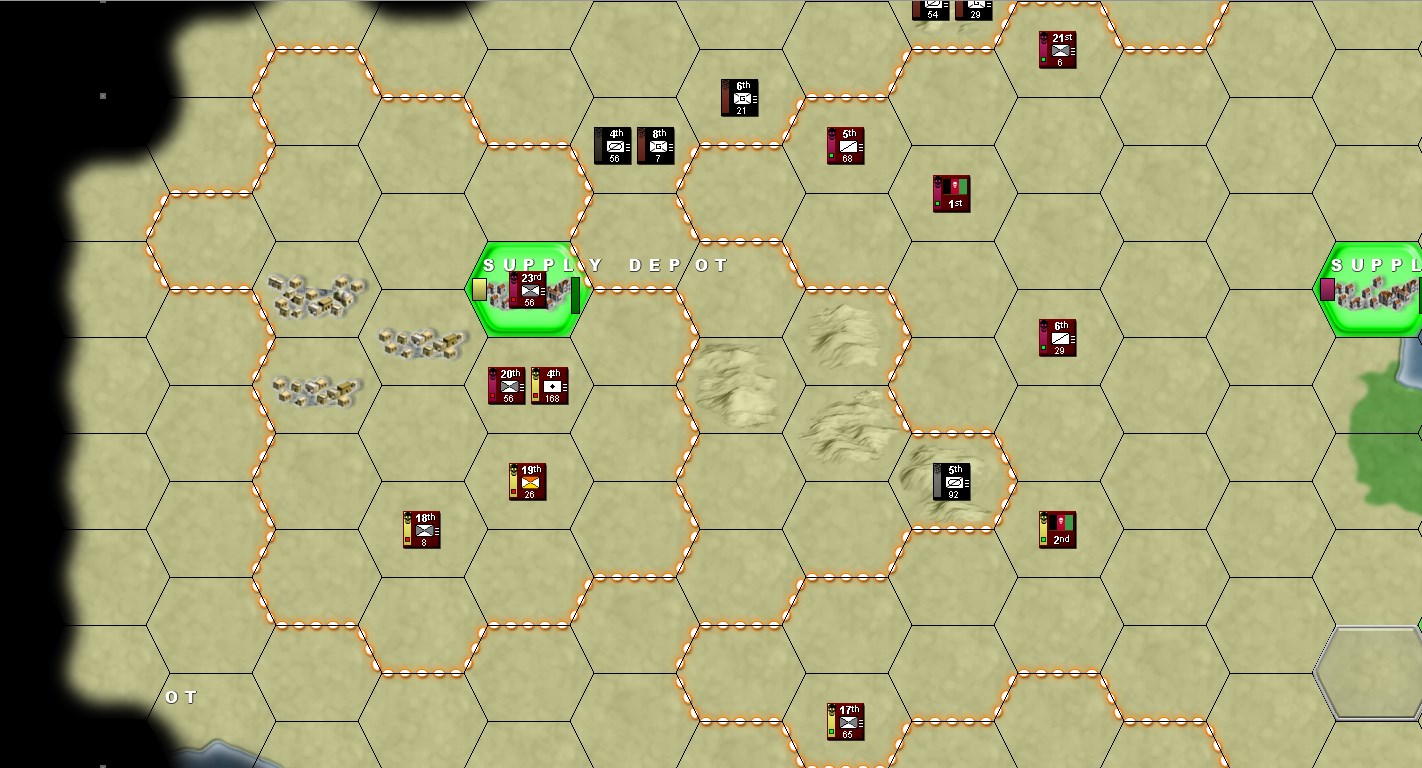 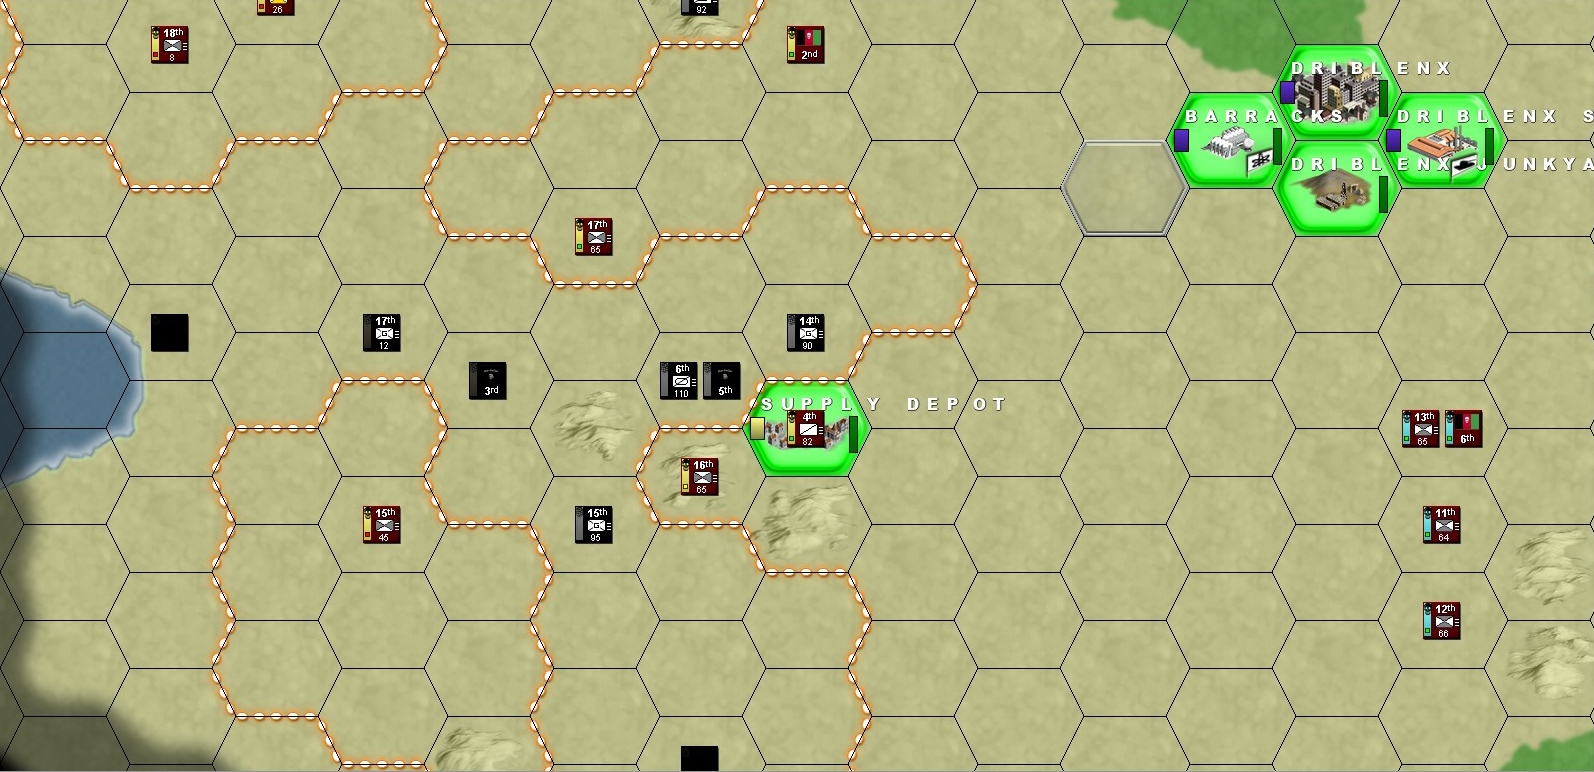 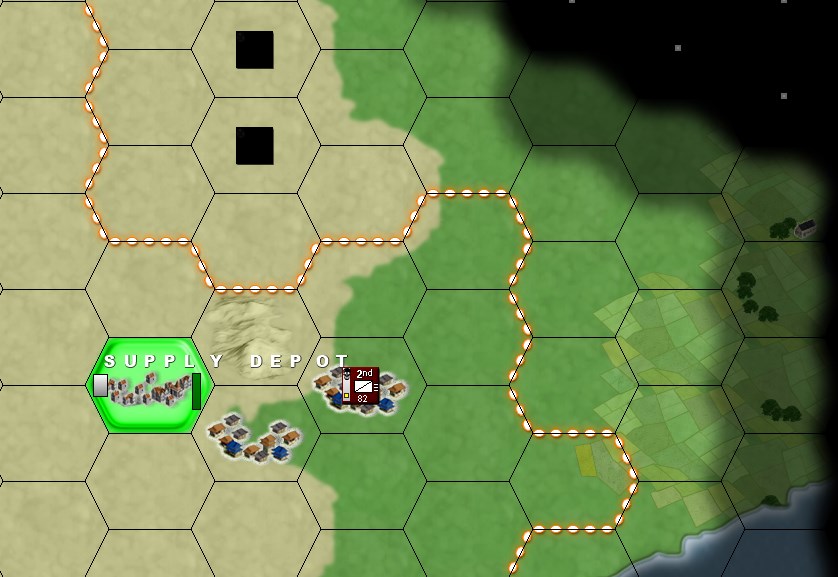 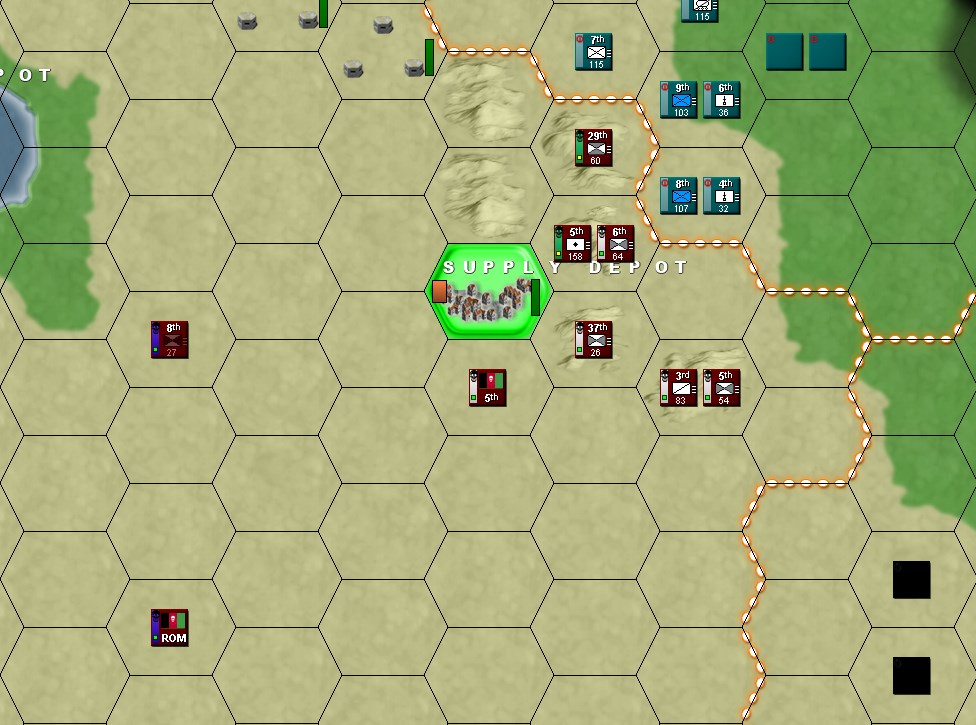 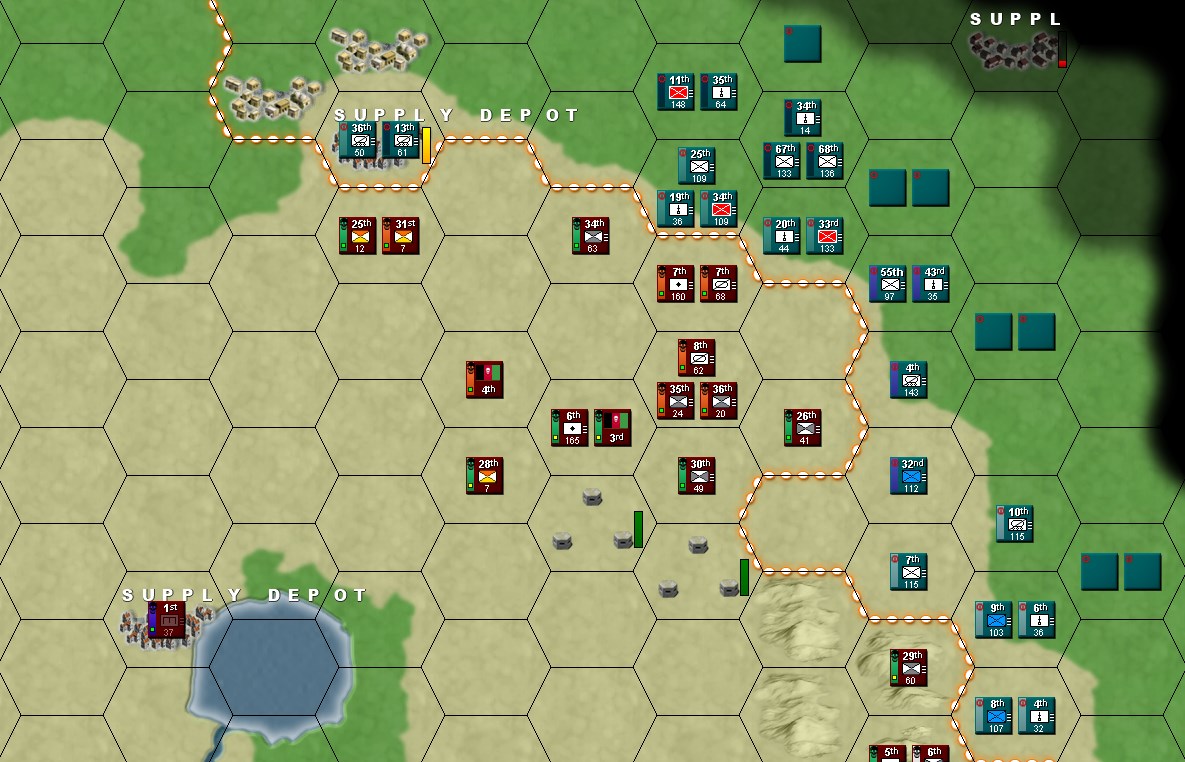
|
|
#
?
Nov 12, 2018 15:15
|
|
|
May I have an estimate of what troops are in the enemy 3rd HQ? I don't want to blindly run into a bunch of tankers or troops on furlough.
|
|
#
?
Nov 12, 2018 20:29
|
|
|
habituallyred posted:May I have an estimate of what troops are in the enemy 3rd HQ? I don't want to blindly run into a bunch of tankers or troops on furlough. Sure: 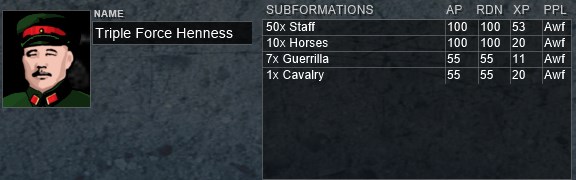
|
|
#
?
Nov 12, 2018 22:08
|
|
|
Nothing portrayed on this map. 24th and 22nd are just going to hang out and make the enemy take action to destroy them or isolate them. The 5th is to attack their neighbor and then proceed along their movement line. 4th artillery is moving south to mapsheet sw and firing at the enemy's 18th in the remote possibility that there is time left over, or in the more likely event that movement is short of the destination. The 20th is to proceed exactly as planned, northeast twice and then south to the hill. The 18th is not currently combat effective but should be able to hunt the enemy supply depot rumored to be on the lake shore. The 18th is to cease movement at the exclamation mark if they spot any new force in regions completely unknown to us. The 21st is to proceed as far as possible along their line before switching to reconstruction mode. I don't think I left anybody out but if any white lines are left over move along them. 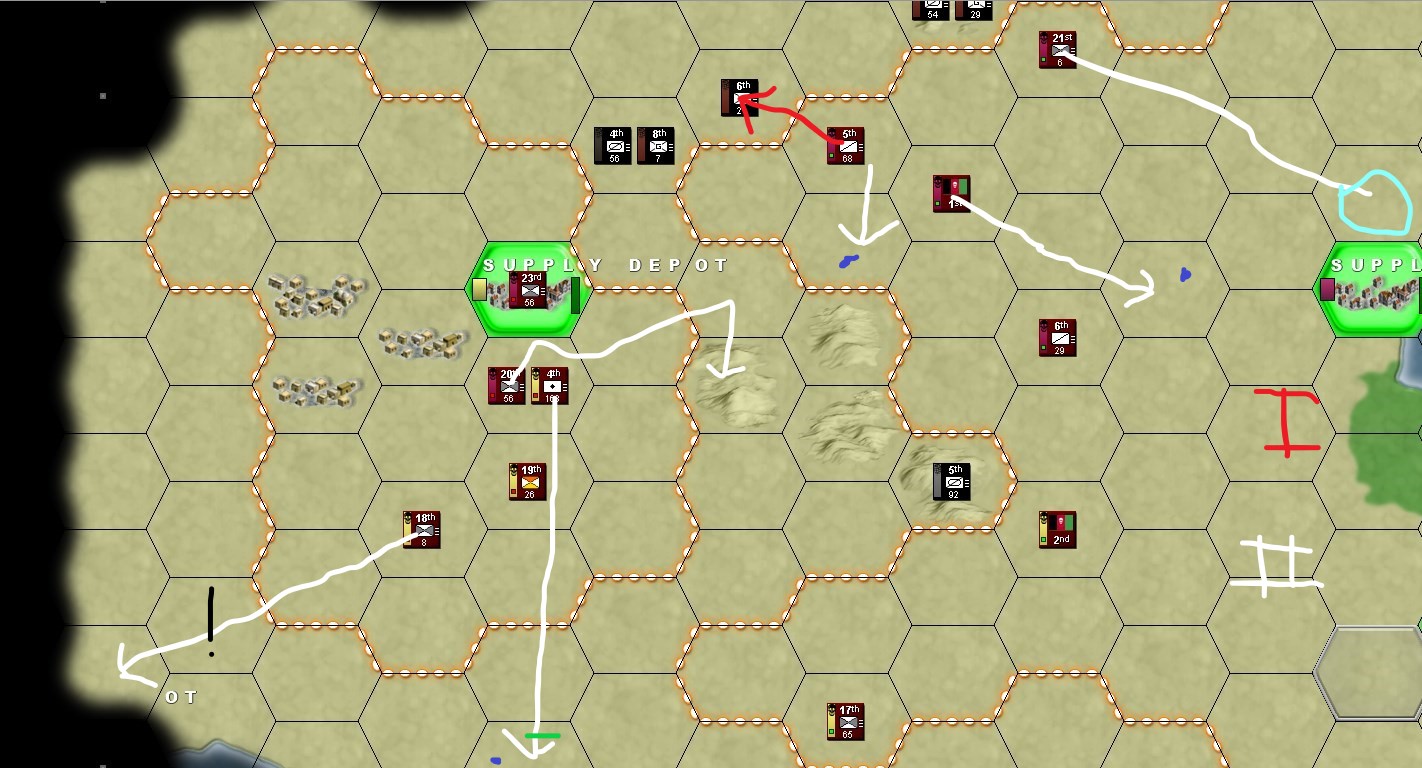 ___________________________  Execute all orders in numerical order, starting with 2nd HQ's initial movement. Our 17th and 15th will team up to smash the remnants of their 17th. 15th should move into the hex vacated by the enemy 17th if they want official army food and drink again. I would prefer it if they could finish off the enemy 17th, but will understand if their final disposition does not permit this. Our 17th is not to pursue the enemy, but should consider an attack on the enemy 3rd HQ if time and supply permits. I'll repeat that 4th artillery is moving in from mapsheet w and firing at the enemy's 18th formation if time permits or their movement is forced to stop short of their destination. Jesenjin, nice to have you with us. I don't have forces to spare for the possibility that the enemy just goes straight for Driblenx. One formation moving northwest instead of just plain west should be sufficient insurance.
|
|
#
?
Nov 14, 2018 11:16
|
|
|
A bit hard to keep pace, but I just want to say that the plan for the 18th is spot on. They got to have supplies there in order to move like they do, I think 
|
|
#
?
Nov 14, 2018 11:36
|
|
|
TF 3 & 4 ORDERS: - Set all artillery units to PRIORITY reinforcements. - TF 3 & 4 HQ's to be set to PRIORITY if not already. Romano requests - Engineers are requested to move to destroy the designated Supply depot.  - Romano HQ is requested to move close enough to TF3/4 HQ's that infantry reinforcements can make the walk by themselves (3/4 hexes?). - Artilley regiment TOE tweak - add an extra horse or two so losing one doesn't completely destroy their mobility. Jessejin i'm moving to compact the line as much as possible - i'd advise withdrawing from the hills hex surrounded on three sides and having 2 units/hex anywhere they can reach. Don't forget HQ give their max combat bonus out to 3 hexes so you don't have to have them up so close, if you can get it to within 3-4 hexes of Romano's HQ infantry can walk from his HQ to yours which means you get a much much steadier stream of reinforcement. Overall i'm trying to abandon the north and have the UPRA stretch west as much as possible using the river as a backstop - ideally running them into the Awfulian advance.  As usual Orange is bombard orders.
|
|
#
?
Nov 14, 2018 11:59
|
|
|
  Okay, this is going to be another turn of retreat. Unit marked in black (37th) will remain as is. EDIT: Slight change of order. Northern cavalry (3rd) will move into same hex as 37th infantry. Infantry unit in the same hex (5th) will go north-west and occupy same hex as 37th. 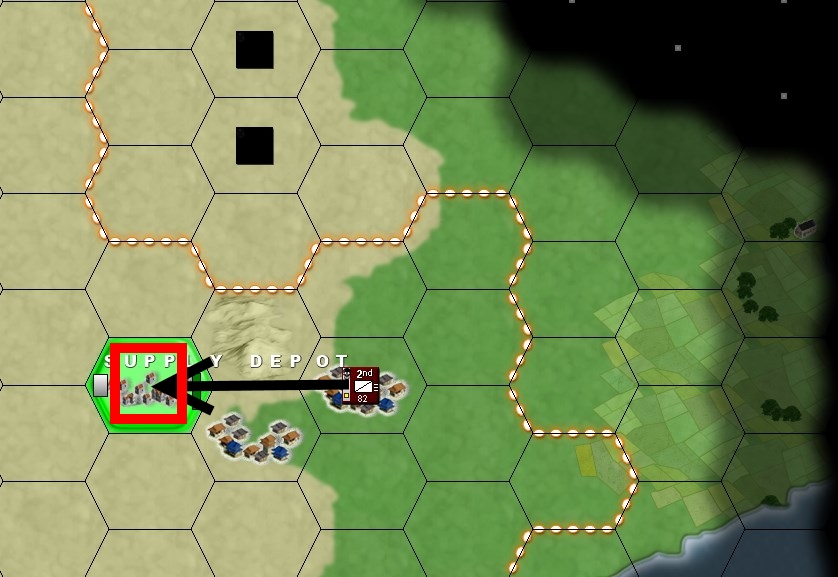 Southern cavalry will go and occupy supply point, and hope whoever is advancing is not someone strong. HQ for TF 5 will go one hex to the southwest, to gain most of the Romano HQ bonuses.  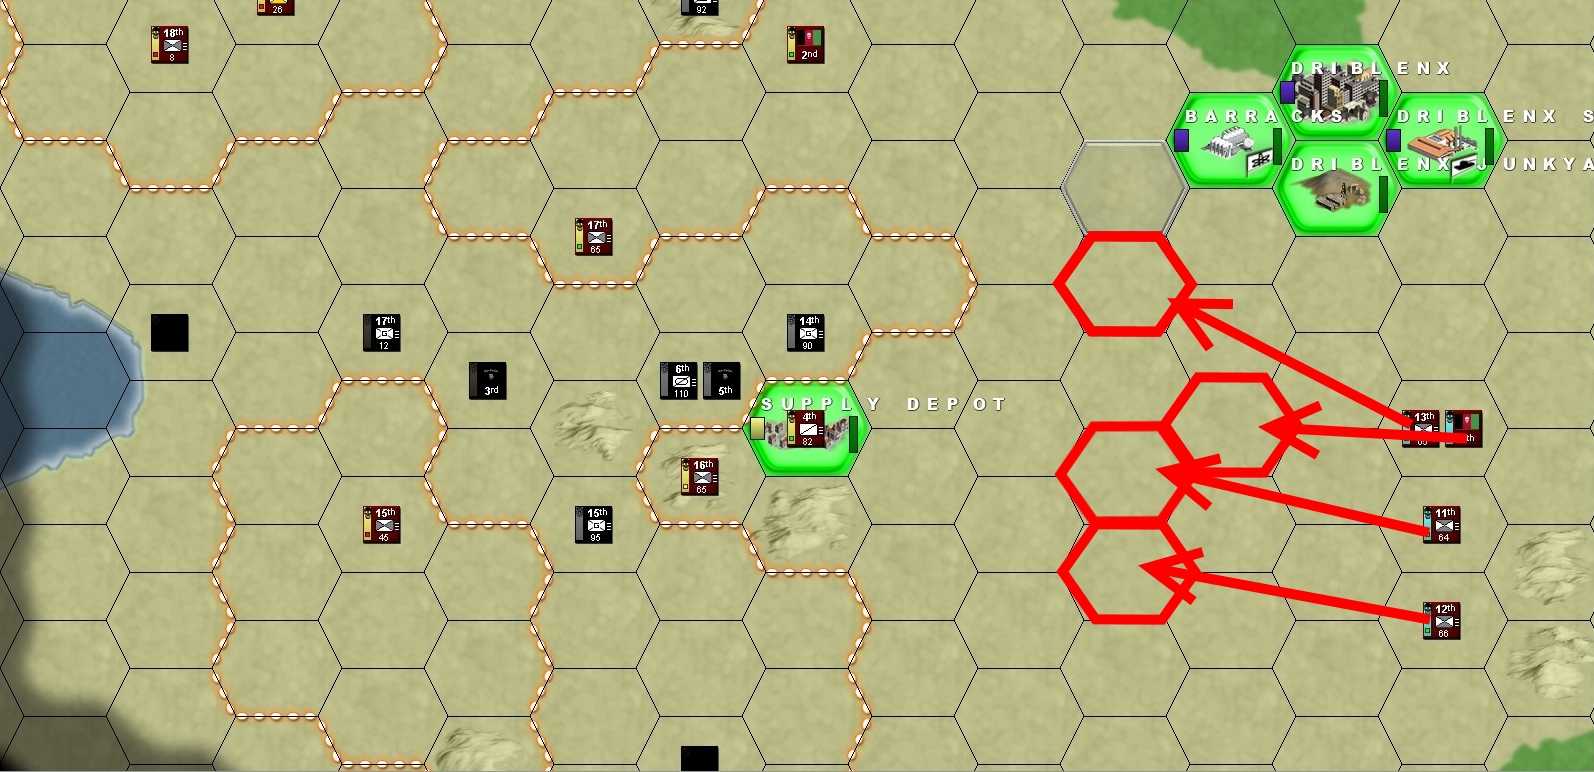 Units will move to the west as a whole, to the designated hex (or as close as possible). HQ unit will occupy one hex to east of position for infantry units, as marked on map Jesenjin fucked around with this message at 22:52 on Nov 14, 2018 |
|
#
?
Nov 14, 2018 17:32
|
|
|
Saros posted:Romano requests In order: - REQUEST PARTIALLY GRANTED. The Engineers will move there, but only destroy the depot if TF1 begins to retreat closer to other supply sources - without the depot, the Task Force is unsupplied. - REQUEST DENIED. It is not possible to move the HQ any further north away from Driblenx without breaking supply and communication chains to the capital, which cuts down on replacements anyway (and also seems to break your RAW supply something fierce). - REQUEST GRANTED.
|
|
#
?
Nov 14, 2018 21:22
|
|
|
I have been informed that an improved barrage is available. Do not use this card this turn, under any circumstances. To clarify the purple step on mapsheet sw. These attacks should only take place if 30 AP are available for the attacking units and our attackers are not grievously outnumbered estimated power point wise.
|
|
#
?
Nov 14, 2018 21:27
|
|
|

|
| # ? May 8, 2024 22:08 |
|
|
 This turn, atypically, opens with a combat report as 5th Cavalry attacks the Awfulian guerrillas. The attack is successful, although losses on your end are quite a bit higher than you'd want to. However, you are now out of fuel.  Every ship we have in Maitrechec is now hauling barrels of gasoline. This should ensure 650 tonnes of fuel are offloaded every two days, but that is pretty much as much as we will get. We need to stabilise the line and allow the fuel reserve to recover! Every ship we have in Maitrechec is now hauling barrels of gasoline. This should ensure 650 tonnes of fuel are offloaded every two days, but that is pretty much as much as we will get. We need to stabilise the line and allow the fuel reserve to recover!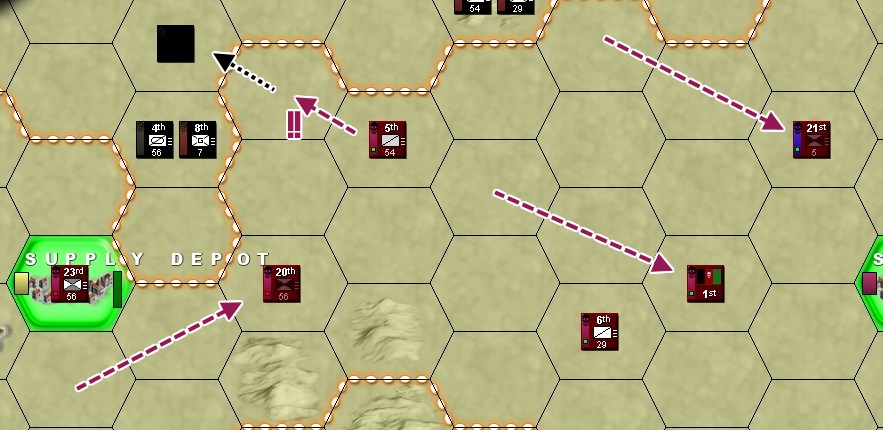 That means 5th Cav cannot move from the site of the battle. Infantry, however, are not burdened by this. 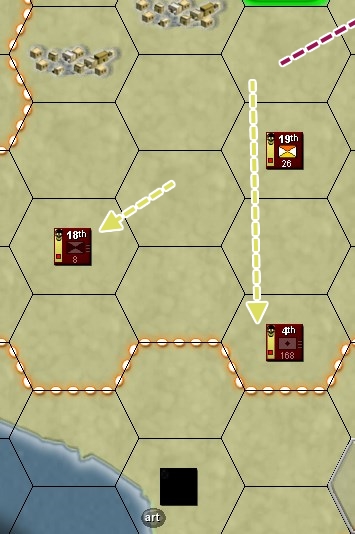 18th Infantry can only move one hex due to the supply shortage. 4th Artillery goes south to barrage Awfulian troops. 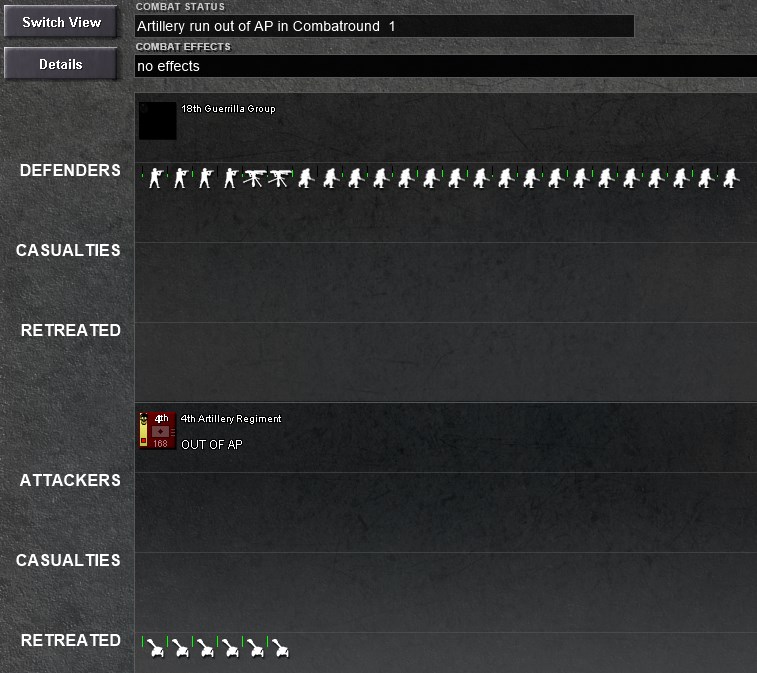 Briefly. 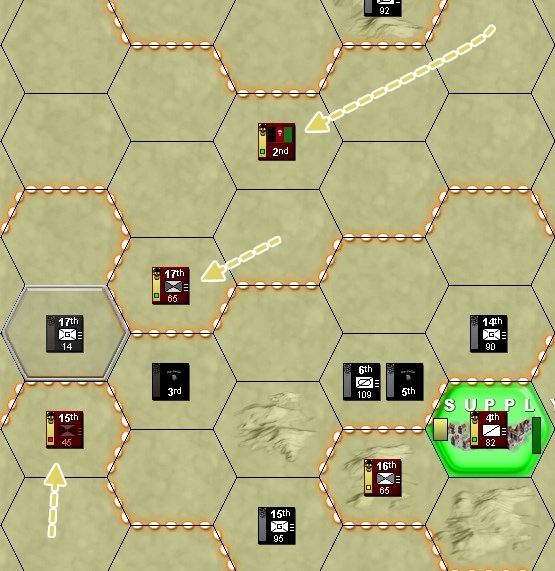 15th Infantry is too exhausted and undersupplied to launch an attack on Awfulian 3rd this turn - as per default rules of order interpretation, this means the attack does not proceed. 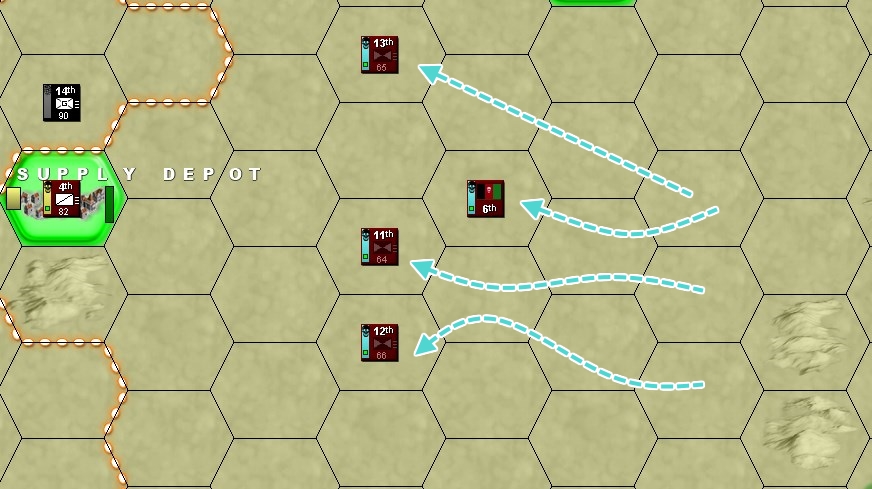 TF6 finally starts reaching the front lines. 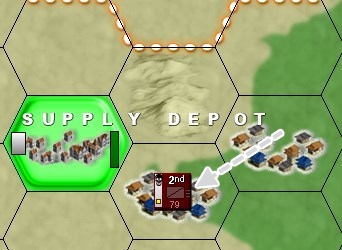 2nd Cavalry does not have enough fuel to reach the supply depot. 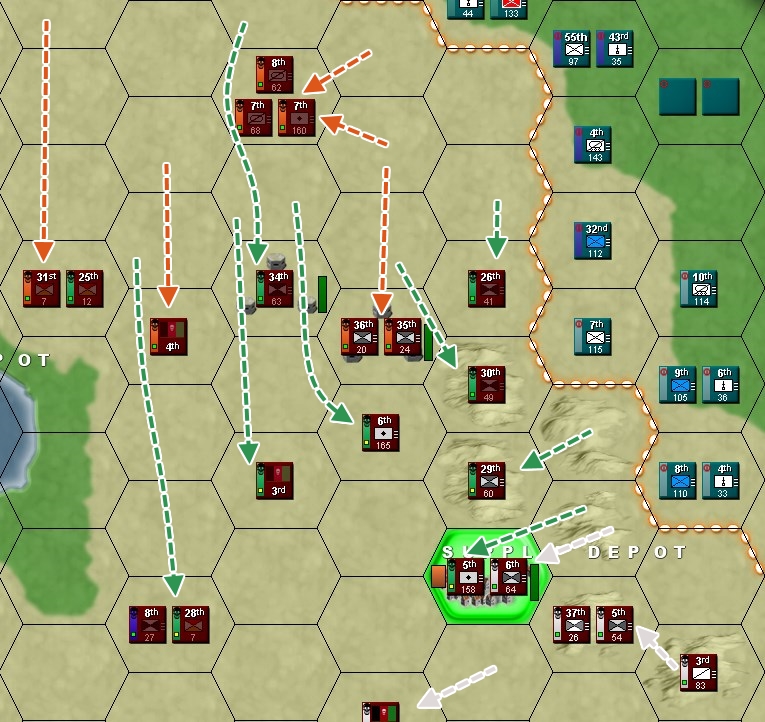 Fuel shortages are felt very painfully in this sector - the two armoured cavalry regiments barely manage to move at all, leaving them stranded in a powerful hedgehog alongside the artillery. 3rd Cavalry does not manage to move at all. 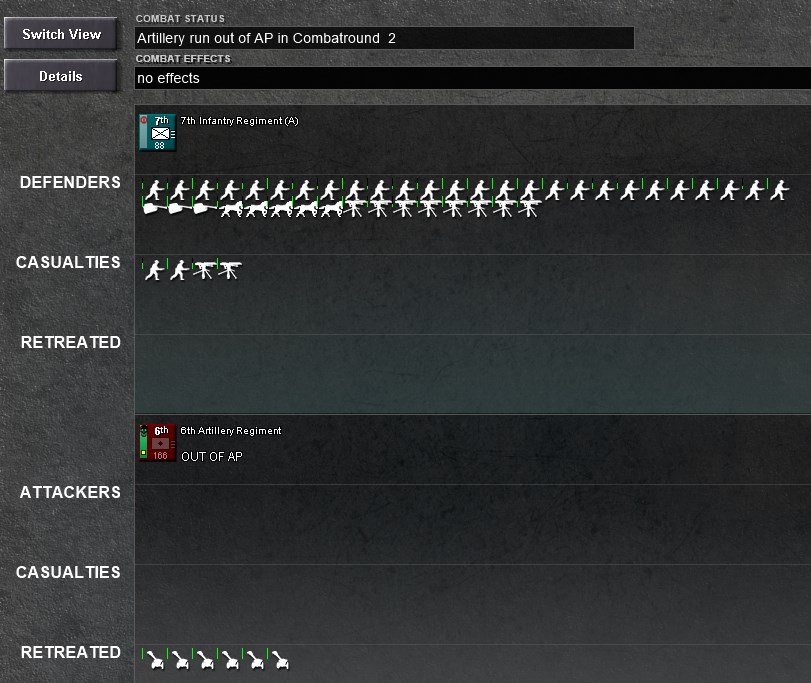 Artillery operates normally, though! This barrage is largely ineffectual... 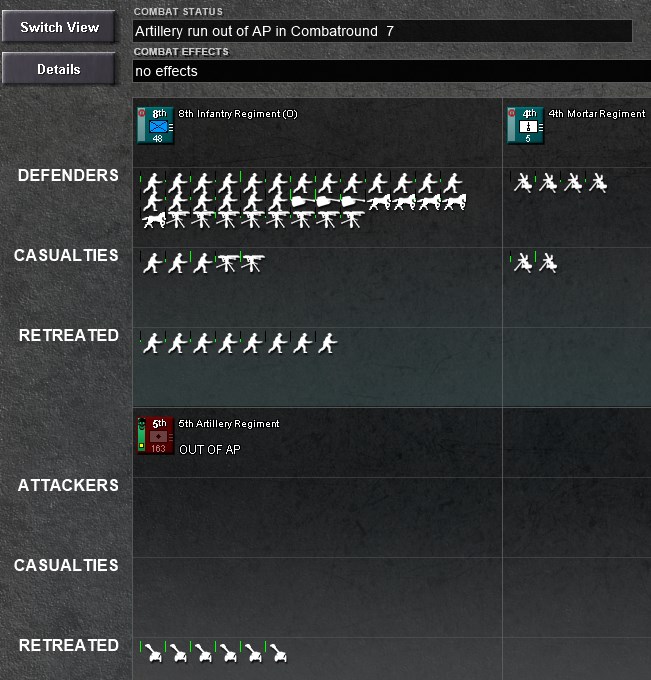 ...but the other heavily disorganises the enemy infantry regiment and eliminates several mortar batteries! End of turn overview 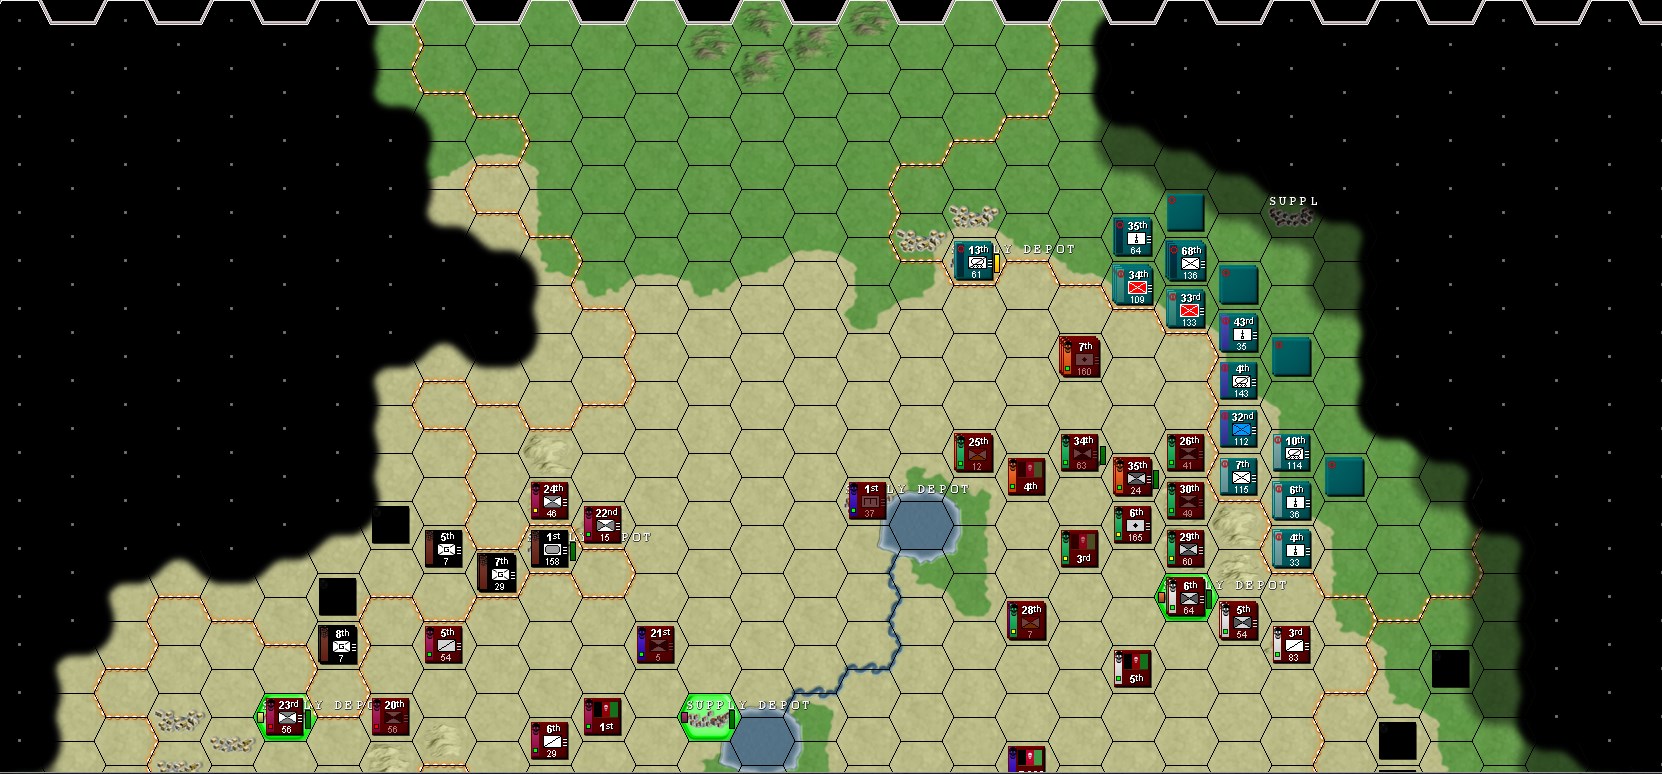 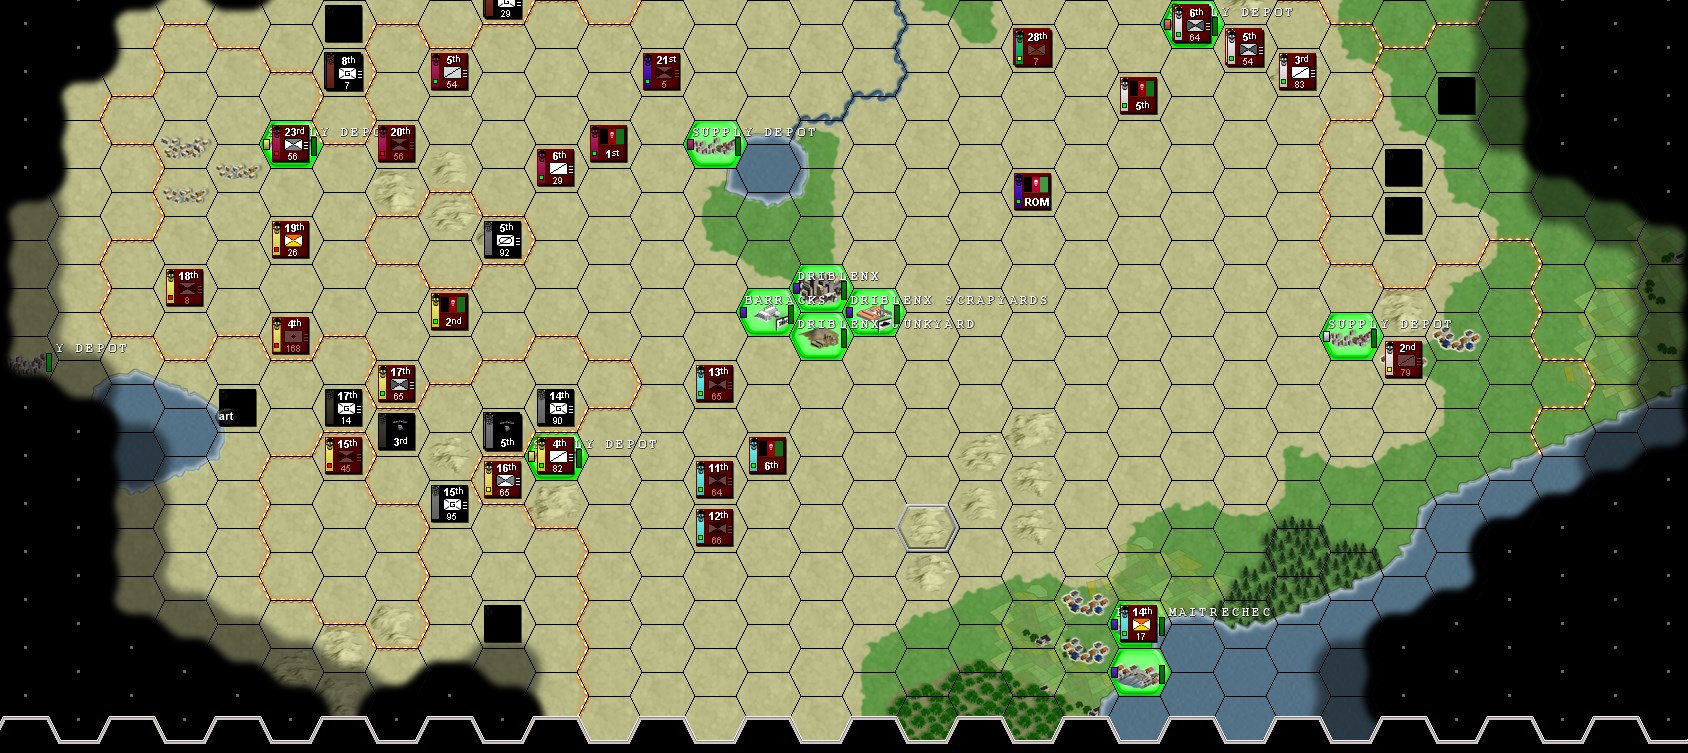 End of turn map 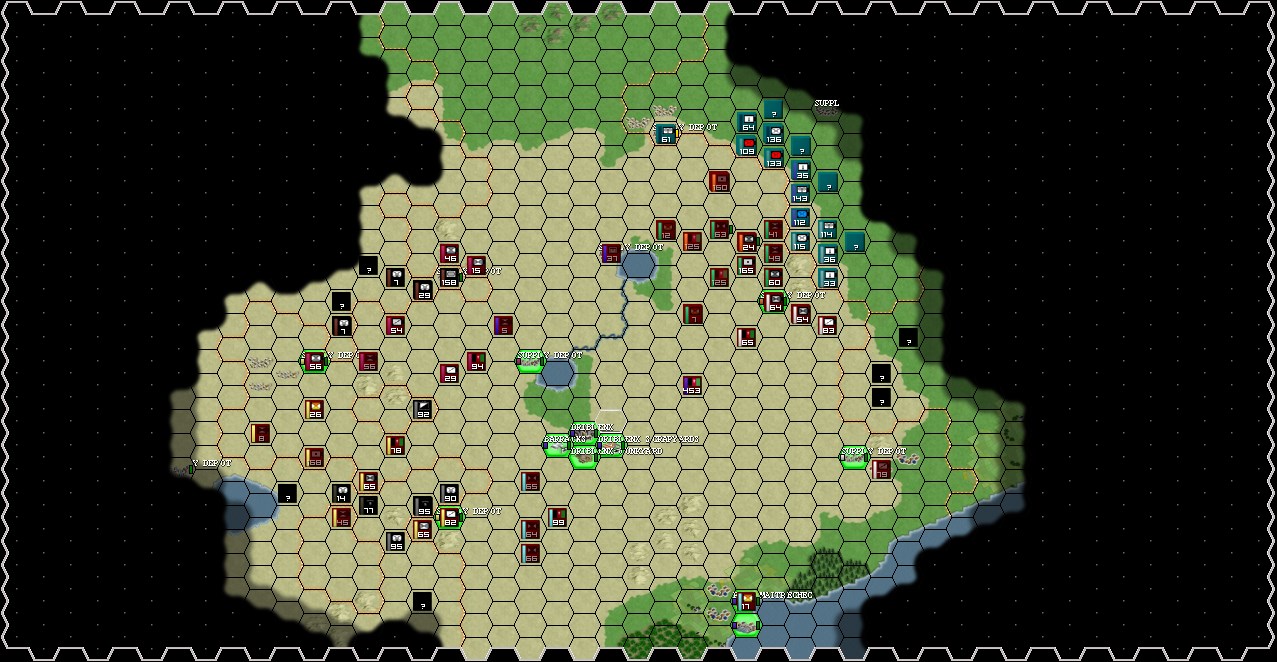
|
|
#
?
Nov 15, 2018 16:44
|
|