


|
Cool LR tip I was introduced to recently and made me 1% less dumb: hold alt when dragging the 'masking' slider under sharpening to visualize where the mask is applying. Only apply sharpening where you want it.  Also, hit A when using the spot removal tool, it switches to the same edge finding preview and makes it much easier to spot sensor dust because it glows white as hell. Not as useful with high detail images but if you have a lot of sky it's a good way to avoid publishing and immediately getting bombarded with people pointing out dust.
|
 #
?
Feb 20, 2019 15:56
#
?
Feb 20, 2019 15:56
|
|


|

|
| # ? Apr 29, 2024 10:53 |
|
|
I have a 15-stop ND filter that causes severe vignetting, even at f/22, even though I don't see any vignetting without the filter. A quick solution is to use the vignetting tool in Capture One and brighten the edges. While this works, I can still see some nonuniformity. So I was thinking of taking a calibration image of a uniformly illuminated area using the filter, and use that calibration image (or its inverse) as a mask to brighten the actual image. I have used this method in my astrophotography work. However, I cannot seem to find a way to do this in Capture One. I would have to import the calibration image as a mask/layer, but Capture One only allows me to use brushes in mask/layer. Is there a way to do what I want to do, or am I stuck with the vignetting tool?
|
|
#
?
Mar 31, 2019 18:28
|
|

|
How do you people do split toning in LR? I prefer to do complementary colors, but the standard color picker isn't standard RGB/CMYK so I just gotta approximate it. Are there better ways to do it? (I also apply it very sparingly and not slather an obnoxious teal-and-yellow coat)
|
|
#
?
Apr 16, 2019 04:24
|
|

|
I have a couple of preferences. Firstly, unless I'm using it to correct a strong colour cast (such as from stage lighting), I never pick a saturation value higher than a few pixel above the baseline. For landscape and outdoor shots my usual target area is the area between the yellow/red on the left side. I'll usually set the highlights a little more warmer and a little more saturated than the lows too. Like this:  I tend to use the picker rather than the sliders because it lets me more easily visualise what the opposite of the existing colour casts is so that I can cancel them out. For example this shot:  As you can see it has a very strong magenta cast due to the stage lighting. I can easily see what the opposite colour is in the picker to cancel that out. 
Helen Highwater fucked around with this message at 07:05 on Apr 16, 2019 |
|
#
?
Apr 16, 2019 06:51
|
|

|
That's very useful, thanks!
|
|
#
?
Apr 16, 2019 16:46
|
|
|
Yeah, that's pretty cool. I've generally stayed away from split toning because I have no idea what I'm doing with it (more so than the rest of LR even!), but this looks pretty straightforward.
|
|
#
?
Apr 16, 2019 16:53
|
|


|
underage at the vape shop posted:uhhh maybe turn f.lux off when you're working with colour too
|
|
#
?
Apr 16, 2019 19:28
|
|
|
Nah man, the colours would look off without it
|
|
#
?
Apr 16, 2019 20:00
|
|


|
Is Capture One the only option if I don't want to be roped into a subscription?
|
|
#
?
Apr 18, 2019 19:54
|
|


|
refleks posted:Is Capture One the only option if I don't want to be roped into a subscription? I like Darktable as far as FOSS options go. It's a little less refined than Lighroom but doesn't seem any less capable, after taking some time to figure out all the tools and tricks, the workflow feels nice and I can continue to be cheap. For one-time purchase programs, there's also the non-sub version of Lightroom, DxO, Luminar, and some others that I can't recall right now.
|
|
#
?
Apr 18, 2019 20:44
|
|

|
I primary use Darktable and would recommend trying it. Compatibility with new hardware for things like lens corrections is very slow in coming if at all, and I think X-Trans is the only non-Bayer supported sensor type. There is also Rawtherapee, which I haven't used but have heard recommended as a little friendlier.
|
|
#
?
Apr 18, 2019 21:12
|
|
|
Fools Infinite posted:I primary use Darktable and would recommend trying it. Compatibility with new hardware for things like lens corrections is very slow in coming if at all, and I think X-Trans is the only non-Bayer supported sensor type. Last time I used Darktable was in 2016 and it didn't seem to have X-Trans support then. Has it vastly improved?
|
|
#
?
Apr 22, 2019 04:24
|
|
|
refleks posted:Is Capture One the only option if I don't want to be roped into a subscription? I've been away from SomethingAwful for no particular reason for a while, and in the meantime (since the bottom of page 1) I've settled into using ACDSee for my post-processing. Quick story time: I bought LR 3.6 a few months before LR 4.0 came out, and in that time I bought a new computer specifically to make LR run faster - success! I did not upgrade to LR 4 because among the changes reported by people was a slowing down in things like import - the main problem I had just spent hundreds of dollars to overcome. Time passes, Adobe comes up with their subscription-based business plan. I don't want to subscribe, so when I get another new computer I decide it's time to see what the alternatives are; this was late last year. For reference, I'm running Windows 10 64 bit on an ASUS middle-of-the-range laptop I use mainly for work (I'm a scientist, but my data-crunching is not really something that taxes a processor). Photo and video editing is the most processor-intensive task I ask my computer to do. Corel AfterShot Pro 3 - fits the bill, in that it's similar to LR in how it looks and feels. However, it suffered terrible crashing problems even after Tech Support solved the "complete failure" thing it was doing due to a Windows update. One thing I did not like about it, when it was working, was the auto exposure / light balance options. In LR, if you hit "auto" it shows you where it moved the sliders but AfterShot's two built-in auto modes just change your image in mysterious ways, so they're less useful as a learning tool. I had been using LR's auto to figure out ways to use some basic editing options. Cost: about $50 depending on where you are. ACDSee Professional - the middle option from ACD Systems. LR-alternatives are what this company does, as far as I can tell. I've been using this since February and I'm happy with it. The workflow is a little different from either LR or AfterShot but the basics are similar and I had no trouble adapting once I figured out my current workflow. It's still clunky, but I'll probably figure out smoother ways as I continue to use it. Cost: about $65 though a subscription is available. This makes me mildly worried, as I hope ACD Systems does not decide the Adobe business model is also for them. There is also the cheaper consumer version, which does NOT do non-destructive editing, and the Ultimate version that handles layers. Professional does not do layers, so the Edit module is effectively redundant for me and I never use it; the Develop module has all of the same functions and loads faster. RawTherapee - the Open Source alternative. Probably the most different from LR in how the little details of a workflow fit together. For example, in LR and AfterShot the first step after copying the files from my camera onto my computer is to import them, and then wait for the software to do that. In RTP, the software doesn't import an image until you click on it (or go to next image) in the file-handling module. This means that rather than clicking "import" then going off to get another drink, my first-pass image evaluations ("poo poo, poo poo, poo poo, OK, good, poo poo, poo poo, poo poo...") is slower, with a few seconds of not much every time I move to the next image. The killer for me, though, was the lack of a key feature that I need in an image-editing program: dust-spot removal. My camera sensor is usually filthy, and I need to scrub those spots out on nearly every image. RTP does not have this feature; if you google it you'll find the discussion thread where various Open Source devotees are talking about how they're trying to build that function, but they're not there yet. Cost: free! of course. Though you might need to grow a giant beard and spend a few months in a lightless basement to really get the full experience. There are other products out there that I have no experience of, yet also qualify with key features like non-destructive editing and the ability to apply edits in batches to many photos at once. Most software in general comes with free download trial versions, usually full-featured. I've never used Capture One. Yesterday I discovered that video editing programs are a completely different ball game, even if they're from the same companies. The free video editor ACD Systems bundled with my purchase of ACDSee Pro is useless to me because, like RTP for photos, it lacks a key function I need: shake reduction. This is beyond the scope of this thread, but I tried a couple of free-download shake-reducing video editors and I'm happy with Corel's offering, Video Studio Ultimate 2018 that I bought bundled with AfterShot last year. It has yet to fail on me, and so far so good though I'm the first to admit I have no idea what I'm doing when the pictures start moving on their own.
|
|
#
?
Apr 28, 2019 09:20
|
|

|
refleks posted:Is Capture One the only option if I don't want to be roped into a subscription? Sorry in advance for not addressing your question, but is there something you do not like about C1, or are you just trying to see what else is out there before committing? If you don't like to price point, do you by any chance have a Sony or a Fujifilm camera? C1 offers discounted versions that work for just those cameras (if you buy the Sony version, you can only import Sony raws).
|
|
#
?
Apr 28, 2019 16:45
|
|
|
theHUNGERian posted:Sorry in advance for not addressing your question, but is there something you do not like about C1, or are you just trying to see what else is out there before committing? If you don't like to price point, do you by any chance have a Sony or a Fujifilm camera? C1 offers discounted versions that work for just those cameras (if you buy the Sony version, you can only import Sony raws). Just wanted to see what alternatives was out there - I'm on a Fuji so I can get the discounted version of C1 if I go that way.
|
|
#
?
May 13, 2019 20:09
|
|
|
I'm trying to make a photo-heavy press print calendar. Last year I didn't know what I was doing and it came out pretty well, but I now have a decent monitor and I'm hoping to take some guesswork out of the photo colors. The basic workflow is exporting .jpegs out of Lightroom, placing them into an InDesign document, and then exporting a CYMK .pdf out of InDesign to the print house. What can I do in Lightroom to make sure the photos will still look good at the end of all this? Ideally I'd like an ICC profile so I can soft-proof, but failing that, what can I do to make sure I'm going to get reasonably close. e: Answers from Creative Convention��Export from Lightroom as a TIFF, bring into Photoshop, edit and export as CMYK from Photoshop into InDesign. Looks like my days of avoiding photoshop are over... BetterLekNextTime fucked around with this message at 07:06 on May 17, 2019 |
|
#
?
May 15, 2019 22:50
|
|

|
I'm just playing around trying to improve some skills, but does anyone know a good way to make some fake skin pore texture?
|
|
#
?
Jun 8, 2019 03:37
|
|
|
Myrmidongs posted:I'm just playing around trying to improve some skills, but does anyone know a good way to make some fake skin pore texture? Use frequency separation except set the amount of the Gaussian blur to practically zero. Then use the clone stamp tool.in the high frequency to add pore texture by copying it from somewhere else.
|
|
#
?
Jun 9, 2019 10:02
|
|
|
Helen Highwater posted:Use frequency separation except set the amount of the Gaussian blur to practically zero. Then use the clone stamp tool.in the high frequency to add pore texture by copying it from somewhere else. Yeah, I was more tinkering on fixing up images that someone has completely oversmoothed and there's no more pore texture. Closest I've got so far is messing around with a brush, but it's pretty time intensive and takes a lot of trial and error to get the color and size right. I just haven't found a faster / easier method that's still fairly convincing.
|
|
#
?
Jun 9, 2019 19:07
|
|
|
Anyone have a Photoshop book geared towards photographers that they like? Probably beginner/intermediate more than super advanced.
|
|
#
?
Jun 27, 2019 05:25
|
|
|
Having some trouble editing this picture to my liking. Some of the colors are downright atomic, and I'd like to tone things down a bit, but simple approaches like desaturation/lowered vibrance make things start to look blotchy. The image was shot in pretty strong mid-morning light--am I kind of just stuck with what I have? 
|
|
#
?
Jun 30, 2019 16:10
|
|
|
Strong light gives you strong colours and blown highlights, the colours seem pretty accurate, I mean there's a reason we like flowers, the colors are vivid. You could try messing with colour profiles to see if you find one that suits your tastes more. jarlywarly fucked around with this message at 17:15 on Jun 30, 2019 |
|
#
?
Jun 30, 2019 16:52
|
|

|
That confirmation helps�thanks. The output you�re seeing here is using the LR portrait profile, and I�ll likely play around with that tack some more. As I continue to try and improve as a photographer, one thing I�m aware of is that in the past I�ve over relied on things like saturated colors because I thought they might help make my images more interesting. I�m trying to discard that particular (flawed) crutch, but I also want to make sure I don�t overcompensate... President Beep fucked around with this message at 17:01 on Jun 30, 2019 |
|
#
?
Jun 30, 2019 16:58
|
|
|
President Beep posted:That confirmation helps�thanks. The output you�re seeing here is using the LR portrait profile, and I�ll likely play around with that tack some more. Yeah remember monitors are vastly different, I tend to find black levels and dynamic range on my main edit monitor are so much better than than most screens out there that photos that look fine on my screen look very dark on less good monitors, in some way if you are editing for mass consumption you have to normalise the colours and black levels somewhat for the lowest denominator, a bit like audio on the radio.
|
|
#
?
Jun 30, 2019 17:19
|
|
|
You can try applying an Lab tone curve. Try keeping the center point on the a/b curves fixed and playing with the upper and lower sections to tweak the color. Edit for example: 
Fools Infinite fucked around with this message at 21:50 on Jun 30, 2019 |
|
#
?
Jun 30, 2019 21:27
|
|
|
Does Capture One have Fuji film simulation modes like Lightroom does (albeit LR's is an approximation)? EDIT: Apparently it has but it's not available for my X-T1...
|
|
#
?
Jul 2, 2019 09:11
|
|
|
Schneider Heim posted:Does Capture One have Fuji film simulation modes like Lightroom does (albeit LR's is an approximation)? look under base characteristics, the curves are available for any RAF, so you can have eterna with an x-t1.
|
|
#
?
Jul 2, 2019 10:12
|
|
|
I've been doing post processing with Lightroom for about 4 years now and originally watched a tutorial series on Lynda.com by some guy who's main photography subject was overly HDR'd cars. Thinking it's time I find a new course to improve my skills and fix any bad habits that guy taught me. Any recommendations for a course to watch or book to get? Edit: Just going to read articles on the bits I don't know and on effects I want to achieve. huhu fucked around with this message at 17:24 on Jul 5, 2019 |
|
#
?
Jul 5, 2019 10:35
|
|

|
Schneider Heim posted:Does Capture One have Fuji film simulation modes like Lightroom does (albeit LR's is an approximation)? I just found this pack this morning, it may get you close. Yeah, it's affinity photo, but any program that can use LUTs should be able to open them. https://forum.affinity.serif.com/index.php?/topic/47158-haldclut-luts-for-affinity/
|
|
#
?
Jul 6, 2019 00:46
|
|
|
I made a video about cyanotype printing. https://www.youtube.com/watch?v=z8fFb7Rxz88
|
|
#
?
Jul 10, 2019 17:17
|
|
|
Helen Highwater posted:I made a video about cyanotype printing. Does it work on wood?
|
|
#
?
Jul 10, 2019 18:23
|
|

|
Not sure. It should work on anything that will take the solution but not be saturated by it, and that will survive being washed.
|
|
#
?
Jul 10, 2019 19:12
|
|
|
Here's the post about making the sensitiser solution. There's also this kit which is exactly the same as the Mike Ware recipe that I use, if you just want to gently caress about with making a couple.
|
|
#
?
Jul 11, 2019 08:00
|
|
|
Any MIDI2LR users here? I'm gettin' real upset! Had to reinstall Windows and made sure to save my XML presets for my Behringer X-Touch Mini. I was using LR5 or 6 before and now have Classic with my Creative Cloud subscription. MIDI2LR supposedly connected to LR Classic and the MIDI controller is connected and lit up etc, but Lightroom won't do anything. I did some Googling and it says to load the presets using File / Plugin Extras... but it wants a text file and the MIDI2LR config file is XML. Have tried renaming or copy/pasting into a text file and loading that, but LR won't read it. Is there any way to fix this, or do I need to start from scratch and redo everything?
|
|
#
?
Aug 31, 2019 03:27
|
|

|
Which version of this image do you think is best? I originally created the one on the left, but re-visiting it a few months later I made the one on the right. 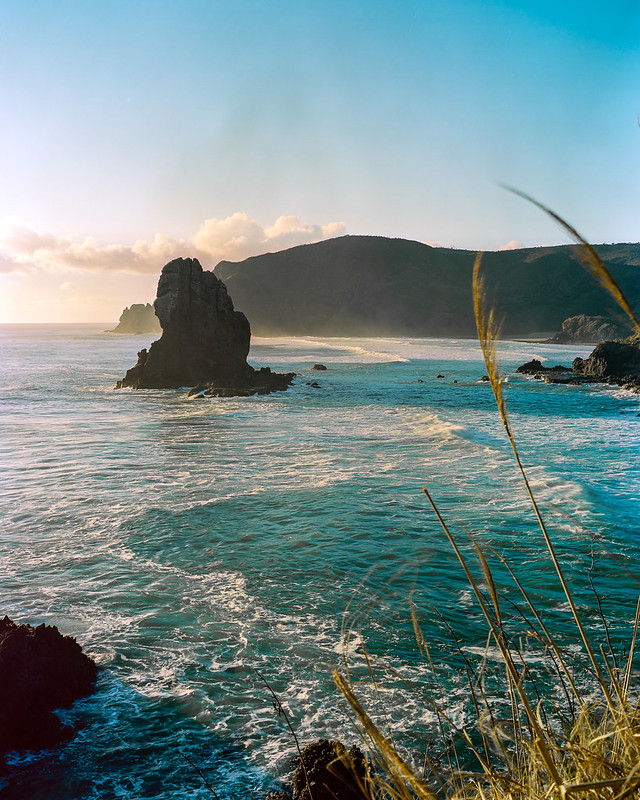 Pretty minor I guess? Just bringing the exposure down a bit, get some more colour in the clouds. It's on film so there really isn't a great deal of information in the shadows anyway so if you try to lighten them up you just get grain. Edit: Also for some reason the small jpg's I just posted have really uneven and smudgy looking skies compared to the original image :S
|
|
#
?
Sep 14, 2019 04:20
|
|

|
Blackhawk posted:Which version of this image do you think is best? I originally created the one on the left, but re-visiting it a few months later I made the one on the right. I prefer the first one since the color of the water looks more natural and the rock near the center has more visible detail. It seems that you cranked the contrast up on the second too much.
|
|
#
?
Sep 14, 2019 06:10
|
|
|
First one. In the second one the contrast between the sky and water is distracting.
|
|
#
?
Sep 14, 2019 07:22
|
|

|
Up until now I've been putting (what I hope is) a subtle watermark on my Instagram posts in the corner, faint and oriented sideways so that the text is tucked away along the right edge. Example: https://www.instagram.com/p/BmbavT_hTAp/ I just switched to Capture One, though, and I don't see a way to do this. What's the easiest way to replicate this sort of watermark? I go back and forth a lot on watermarks, whether to use them, and how to best implement them. I may end up deciding to just ditch them later, but until then, I'd like to figure out how to keep this one.
|
|
#
?
Sep 18, 2019 00:40
|
|


|
I'd say don't waste your time and don't watermark.
|
|
#
?
Sep 19, 2019 02:48
|
|
|

|
| # ? Apr 29, 2024 10:53 |
|
|
bobmarleysghost posted:I'd say don't waste your time and don't watermark. This is the answer. But if you want to for some reason, then usually it's an option in the export settings, which I believe C1 calls process recipes.
|
|
#
?
Sep 19, 2019 05:00
|
|