


|
TDs: The HQ unit that lost its PL should SLOW 25m down the hedgerow and away from the Germans. Ammo teams go FAST through the woods 25m away from the area being shelled and then hide. Get the 76mm on the bridge to face towards the Germans. If I could get a current LOS check in what they can see to their NE from their current position, I'd love it!
|
 #
?
Feb 5, 2019 11:15
#
?
Feb 5, 2019 11:15
|
|


|

|
| # ? May 2, 2024 08:56 |
|
|
Tank Destroyers B Company 2nd Platoon PLEASE LET ME KNOW IF I'M STILL ORDERING THE WRONG UNITS AROUND. PLEASE LET ME KNOW IF I'M STILL ORDERING THE WRONG UNITS AROUND.I recognize that one of my guns is currently suppressed and thus can't get orders. They're there in case my RL keeps being busy (family member just got out of hospital yesterday after emergency surgery two weekends back, safe and sound but still stressful) and I can't give orders next turn. 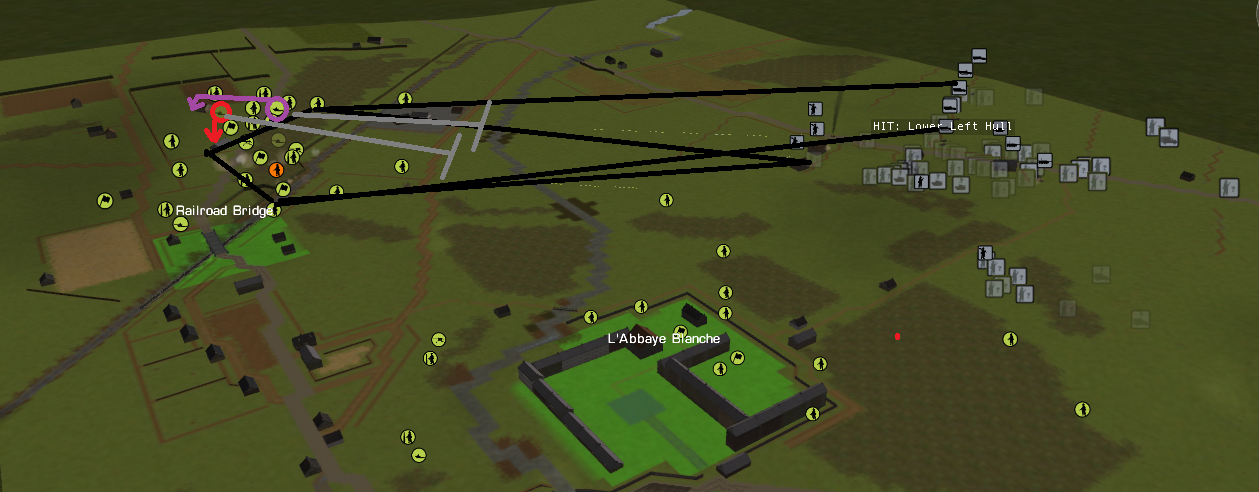 Orders: A) BOTH guns are to FACE east towards the Jerrys and pop smoke along the line as indicated by GREY. Inputters have discretion to re-aim the smoke line if where I'm putting it won't be effective due to height/terrain. If my boys aren't close enough to pop smoke, they are to MOVE FAST to where they can. B) After popping smoke, AT gun PURPLE is to MOVE FAST behind the building as indicated, and AT gun RED is to do the same to behind the building as indicated. Contingent Orders: A) I believe my units still have their guns and the guns are operable, so they're not to abandon them until they no longer have the crew to be operated or the gun itself has been damaged.
|
|
#
?
Feb 6, 2019 15:12
|
|


|
Can't get a video until late tonight, but here's the map for the update: Aside from the exposed AT gun getting finished off, nobody really took any casualties. Big areas of concern are, obviously, the vehicle contacts to the north and south. Contact to the north (the bottom of this map because I'm bad at taking consistent map pictures) is composed of at least one truck, and no sight contacts on either of the unseen AFVs.
|
|
#
?
Feb 6, 2019 23:39
|
|


|
Have a video! https://www.youtube.com/watch?v=AwZtPei7OKc
|
|
#
?
Feb 7, 2019 07:22
|
|
|
Can someone tell me where to move my platoon HQ tro be able to call in a morter strike on the enemy infantry in the edge of the forest, who are pinning my scouts?
|
|
#
?
Feb 7, 2019 12:10
|
|

|
Reinforcements are on deck! Over the din of German HE shells exploding around it, the radio at F Company HQ crackles to life. Regiment has received your message about a strong enemy attack on your sector, and has prepared a small relief force. They are mustering in Le Pilon and Neufborg and will arrive at 1:10:00. That's the update after next. 120th Infantry, H Company, 2nd Platoon. 2nd and 3rd squads have bazookas. 746th Tank Battalion, B Company, 1st Platoon (3x M4A3(75)W Sherman) Everything will arrive where shown in these screens.  
|
|
#
?
Feb 7, 2019 16:50
|
|
|
Orders are due Friday February 8 at 7:00PM EST.
|
|
#
?
Feb 7, 2019 17:47
|
|
|
*ORDERS* Northern area: We're still breaking contact on this ridge. My intention is to leave spotting and radios behind because these sight lines are beautiful. This means we'll need to defend the north ridge from enemy efforts to dislodge us, which may now come from either direction (although from the south it'd be a long charge across a kill zone). I want everyone to break contact and move to rally points, try to let your pixelmen rest within command radius to try and relax a little. 3rd Platoon, Gay Hitler: We're too drat valuable here on the ridge calling down mortars and even eventually aircraft into the enemy's assembly areas. Your teams on the ridge are to assemble and rest a few mins out of enemy fire. Their mission will be to prevent the enemy in the northwest that just showed up from dislodging our ability to spot and call in support from the ridge. You'll need to identify a rally point for the purpose of resting and redressing your formations, and then pick your fighting positions. It seems like you have the game, so careful examination of positions that will allow the forces near the rail bridge to offer support would be excellent. You have discretion as to which teams are in a position to rally to the north. Any which are not are to either support the HW teams at the southern point of the ridge or the rail bridge. 823 TD detachment: You're no longer effective up on the ridge. Use smoke as you can to help still suppressed and under fire teams, and move to a rally point. For the next little while you'll be a reserve for 3rd platoon. Once the tanks arrive we intend on moving them to a position in the middle that can fire on the houses and fence, and the mortars will have had time to do their work. Once that happens I want your remaining infantry to move south of the rail bridge and in to the forest immediately north of the abbey. Their carbines and SMG's will still be useful to us there. The tanks are arriving turn after next, and will likely take one additional turn to get into position, so be prepared to move out in 3 turns. Meanwhile, we have infantry reinforcements arriving on foot on the Le Pilon road. I want your trucks to meet them when they arrive and give them a ride to the south side of the rail bridge. They can likely then be used to give a ride to the remainder of your men. Oh, and you've been decimated by bad programming and enemy fire, so you get first pick on reinforcements. 823 B 1 Platoon, Bacarruda: You're the proud owner of our one remaining 3in gun. It's task remains the defense of the rail bridge. Ace is moving a 57mm gun north to support your position. The incoming infantry platoon is also going to be deployed at least partially in defense of the rail bridge. Prepare to receive the enemy, and ponder how to use your HQ to call support if it needs to. 823 B 2 Platoon, Habeas Dorkus: Welp, your guns are gone. Combat Mission!   Also, your commander is dead. Yay! Get your guys to a safe rally point and prepare to move them out. And select your reinforcement command. Also, your commander is dead. Yay! Get your guys to a safe rally point and prepare to move them out. And select your reinforcement command.Oh, and a speedy recovery to your family member and patience and serenity to you while you help them. Just let us know if you need to back off your input to this play by forum grog game. Middle Area: We're fairly weak here right now, but the Abbey is a commanding strongpoint. I intend to reinforce this area with the non-bazooka squad of the reinforcements and the infantry remains of the 823rd TD detachment. We'll also be adding at least one tank to take shots at those darn houses. 2nd Platoon, Comstar: You're doing great work so far. I'm giving you command of our 1 available mortar tube this turn. Hypnobeard's HQ has LoS for a strike on the Germans engaging your scout, so convey your desires to Hypnobeard as to what you need. I'm having a .30 join you in the abbey. HW Platoon, Generation Internet: I'd like your .50 in the north to target the houses, since the mortars will be encouraging the fence to put their heads down. Both .50's are taking fire, it looks like. A reminder that you have discretion regarding when to scoot if it is needed. If you would, please state your intention for the .50's either in the discord or in the next orders post. I'm worried that your undeployed .50 is in a position where it will take fire from the rear if and when it needs to engage the Germans to the NE. Also, the arrival of the tanks to the south makes the volume of .50 fire on the houses and fence less important when the tanks arrive. I'd like you to scope out positions that allow them to (in order of importance): 1. Support the rail bridge and 3in gun 2. Stay out of the sights of the center west German force 3. Support 3rd Platoon to the N if the enemy assaults the ridge from the NE. Depending on the situation we may want to shift one or both when the tanks arrive. Move the southernmost .30 into the Abbey. Write contingencies in your orders to have them sprint to cover if our scouts see armor about to round highway 2 while they're in the open. Southern Area: The tanks change things here as well. We're going to lay a trap for German armor on the highway and contest the forest against infantry. I intend for 1 platoon to hold the forest and thereby threaten the Abbey road with their bazookas. This will force the Germans to both commit infantry to the south to fix those forces, and concentrate those units into a juicy support fire target. If the enemy wants to move armor down Hwy 2 without holding that forest with infantry, we'll let them approach the abbey, hopefully even into the mines, and then spring bazookas and tanks on them. 1st Platoon, Hypnobeard: 2nd and 3rd squad are to take positions in the forest south of the Abbey. Remember to add contingencies to sprint for cover if German Armor is spotted heading in while your men are in the open. If the enemy does gain fire superiority (and the PG's SMG's will help them at the ranges you're likely to be fighting) I intend your units to withdraw against the Abbey wall, where your 1st squad can offer support. Be aware that the importance of holding that position may change as the battle progresses, so the threshold for retreating may change as time goes on. Finally, regarding reinforcements: I have two thoughts regarding how to change things. One is to attach the remaining 3in to the organic AT guns (57's) and then have the tanks and the infantry platoon as reinforcement commands. The other is to create ad hoc 'geographic' groups by detaching assets so as to create 3 commands. Those would be: 1. Rail bridge command, with Bacarruda's HQ, 1 and 2 squads of the reinforcement platoon, Bac's 3in and ammo bearers, and one of the 57's. 2. Central forest command, with the reinforcing platoon's HQ, the remaining soldiers of Habeas Dorkus' unit, the other .57, and 3 squad of the reinforcing platoon 3. The tanks Or let me know if you see a better arrangement. Let me know what you think. This is a 'what's more fun to play' question, so I need your input.
|
|
#
?
Feb 7, 2019 23:54
|
|
|
It looks like they've put some MMG's and squads in the forest west of the Abby to try and pin us down, and send a platoon of infantry to flank to the right. F Company, 2nd platoon  Hypnobeard= I request you drop a morter barrage on the BLUE line. I suspect they plan to use it as a base of fire while flanking an infantry platoon to the right of the Abby through the forest. Scout team - FALL BACK down the RED line. Then MOVE down the BLUE line and face the YELLOW line. Squad in the building over 2 levels- face the YELLOW line (in the direction of the multiple contacts). If they have LOS on enemy units, shoot them instead. Platoon HQ:: RUN down the RED line to the Abby and move to the 2nd and 3rd floors (splitting the squad, Commander on the higher level). Face down the YELLOW line. Comstar fucked around with this message at 00:46 on Feb 8, 2019 |
|
#
?
Feb 8, 2019 00:43
|
|
|
Orders in case I don't get around to it later. Quick the undeployed .50 to its previous position. Face it north as it was previously. Face the .30 that recently moved to the east.
|
|
#
?
Feb 8, 2019 19:48
|
|
|
1st Platoon, F Company HQ element SPOT for 60mm mortar strike. Line (along pink line, start at south end), 1 tube, Light, Short, General, Immediate. (Note: I don't think we have anti-personnel rounds for the mortars, but use your discretion on the type of ammo.) 1st squad Scout team: Face as indicated. HOLD FIRE. Sections: Face as indicated. 2nd squad MOVE as indicated to yellow diamond. Once there, face as indicated. HOLD FIRE. 3rd squad Scout team: Face as indicated. HOLD FIRE. Squad: Face as indicated. HOLD FIRE
|
|
#
?
Feb 8, 2019 22:54
|
|


|
HQ elements CO is to hold fire once his spotting is done. XO is to move down one floor, and hurl taunts at the Germans regarding their questionable heritage.
|
|
#
?
Feb 8, 2019 23:44
|
|
|
Third platoon, listen up Platoon HQ Get the hell out of dodge  First Squad A Team Get in slight better cover, face north, hide  B Team Face north towards AFV contact  C Team Break contact and setup slight behind A team, face north, hide  Second Squad A Team You're facing the wrong way dudes, continue to hold position east of railbridge  B Team Hold position, eyes open  C Team Setup next to gap in bocage, face north, has nice LOS on far hedges  Third Squad A Team Run the gauntlet south, and setup next to 2nd squad's C team. Waypoint to foxholes on the way. face north  B Team You're taking light fire from your E-S-E but y'all brave and your LOS justifies getting shot in the back by stray fire  C Team Continue to loot fine china from that house, face north. 
Gay Hitler fucked around with this message at 01:06 on Feb 9, 2019 |
|
#
?
Feb 9, 2019 01:03
|
|

|
Comstar: What can I do to support you? We're prepping for troops to move through those woods to the east of the Abbey, so I should be able to provide some flanking fire if necessary.
|
|
#
?
Feb 10, 2019 17:23
|
|
|
I present to all of you, a very longass turn video! https://www.youtube.com/watch?v=O--25caNNTw tl;dr: some Panzer IVs show up in the north, a handful of Comstar's dudes get blapped by a 75mm howitzer on a halftrack, the mortars go off, few casualties by ho boy is this a dicey situation E: Now with map, oriented on a much more sane North/South axis: 
Acebuckeye13 fucked around with this message at 18:31 on Feb 10, 2019 |
|
#
?
Feb 10, 2019 17:34
|
|
|
Attention! If you want to command reinforcements, it's time to say so now. Bacarruda gets first dibs because the guns got CM'd hardcore, and Habeas Dorkus has had to bow out temporarily. Post here or say something in discord, but ya gots ta pipe up before the turn deadline. Or else I'm letting my cat command them.
|
|
#
?
Feb 11, 2019 04:37
|
|
|
I'll take the tanks, barring anyone else piping up.
|
|
#
?
Feb 11, 2019 05:41
|
|
|
I'll pass off my 57s to GI and take the infantry platoon. Bac, you gonna hold onto your 76 or pass that to GI as well?
|
|
#
?
Feb 11, 2019 05:49
|
|
|
Can we get the armour to take on that half track with the '75 that's killing me?
|
|
#
?
Feb 11, 2019 07:27
|
|
|
Comstar posted:Can we get the armour to take on that half track with the '75 that's killing me? It'd be tricky. As near as I can tell, there's only two ways we could do it�either driving a tank into the abbey itself, into the precise corner where it could see the halftrack (If it doesn't move), or driving a tank down Highway 2 and up the hill, flanking the halftrack (As well as a huge portion of the rest of the German force)  Neither option is great, since it would take the tanks a while to get to either position and would be reliant on the support halftrack not moving. The abbey position would also be fairly limited, really only able to shoot things on that narrow section of hill. As for outflanking them... well, that's a high-risk, high-reward type deal, and we may or may not have the resources to actually pull something like that off effectively.
|
|
#
?
Feb 11, 2019 17:30
|
|
|
Orders due Tuesday, February 12 at 7PM EST. Your reinforcements arrive in one minute.
|
|
#
?
Feb 11, 2019 17:38
|
|
|
*Orders* 1. Command Shifts: Habeas Dorkus has stepped out. Generation Internet now controls the remaining AT assets, including the entire organic AT platoon and it's HQ and jeep, and the 3 in and it's nearby HQ and bearer teams. The teams associated with the other guns that are now destroyed are not. Acebuckeye13 now controls the reinforcing infantry platoon. In addition, I'm detaching the trucks formerly associated with the 3in platoons to your command. Try not to get them all blown up, but their ammo is now less critical given the ratio of alive bearer teams to alive guns. Bacarruda now commands the tank platoon reinforcing. Gay Hitler now commands all units on the ridge, to include the gunless AT gun teams, ammo bearers, the CO, and every surly french squirrel willing to toss nuts at the Germans. 2. Deployment of reinforcements Acebuckeye13 you have command of the trucks to speed the deployment of your platoon. Use them only if the danger of magic German panzer LoS is acceptable. You are to move the infantry east upon it's arrival. Once the tanks have arrived and are about to engage the panzers up in the north, you have discretion as to whether to use them to increase your platoon's mobility. In either case, the platoon is to head to the trees west of the abbey to assemble. Eventual deployment depends on how the battle goes. If it goes well and the panzers are suppressed soon, we'll use them in the central forest to enact a double envelopment by giving ground on either side of the abbey and then flanking with armor. If it all goes terrible up north they'll be deployed around the rail bridge. In the most likely in between case, we'll react to the enemy's axis of advance.  If you determine the platoon are sitting ducks, you should advance using the town and rail line as cover to the north and deploy along the town and rail line depression. In this case the north is well and truly lost, and you'll be needed there anyway.  Finally, as the FO you have all free tubes to suppress those goddamn german PG's in the north before they kill our 3in gun with suppression. Use whatever mission you deem likely to be most effective. Bacarruda, your tanks are going to be immediately needed to engage the panzers looking down the long, crazy LoS in the north. You have full discretion to maneuver however you feel appropriate to engage them. A reminder: this is exactly the worst way for you to be engaging German armor- head on at long distance. Keep your tanks together and try to land the first, second, and third shot before they can shoot you. If you by some miracle manage to destroy or drive off the panzer threatening most of the map, you are to proceed to the assembly area and possibly take shots at the huns in those goddamn houses. 3. Other formation orders Generation Internet you now control all towed at assets (except the trucks and orphaned teams). Do your best to integrate them into the other heavy weapons positions. Also, the southernmost .30 is just kinda by itself right now. I'd prefer it move towards the abbey to help with fire superiority there. Otherwise, do everything you can to put some fire on the german infantry suppressing your AT gun by the bridge. Remember that your bearer teams have rifles too, and giving the 3in enough of a break to aim some shots right now is VERY important. Keep your mortars firing. I really doubt the panzer can see you, we're gonna give him reasons to stay buttoned up, there's a bazooka this min and tanks coming the next min, and most of all, we really need those tubes working overtime right now. Good luck. Gay Hitler We're in another emergency situation here, where putting any fire we can on the German infantry in the northern hedgerows is critical to give the AT gun enough time to get off a shot or two. Accordingly, you now have command of everything on the ridge that isn't one of GI's machine gun teams. Anyone who can be put into a position to shoot those germans (i.e. not the detached squads way out to the east) should get to a position where they can ASAP and start shooting. The only exception is the bazooka, who needs to take that glorious shot on the panzer. Comstar That was a tough turn for you. Your responsibilities remain the same, change positions and/or disperse your teams to respond to the threat as you see fit. Hypnobeard complete your movement into the forest.
|
|
#
?
Feb 12, 2019 00:41
|
|
|
F Company, 2nd platoon The squad getting shelled by the 75mm, you should stop doing that. FALL BACK down the stairs and go to the ground floor of the Abby. Rejoin the spilt squads back into one.
|
|
#
?
Feb 12, 2019 05:55
|
|
|
Acebuckeye13 posted:I'll pass off my 57s to GI and take the infantry platoon. Bac, you gonna hold onto your 76 or pass that to GI as well? GI can have 'er.
|
|
#
?
Feb 12, 2019 07:28
|
|
|
Orders Not-pinned .50 team  Quick-quick-fast into the house as shown, 2nd story, facing north. Ammo team to execute same pattern but on the 1st floor I'll add more to this pending figuring poo poo out
|
|
#
?
Feb 12, 2019 21:28
|
|
|
1st Platoon, F Company HQ element Continue to SPOT for 60mm mortar strike. 1st squad Scout team: HUNT to yellow diamond. Face as indicated. Sections: Face as indicated. 2nd squad MOVE as indicated to yellow diamond. Once there, face as indicated. (Intent is to move south to get past the barbed wire, then east into the woods--don't need to stay on the road if it's easier to bypass the wire otherwise.) 3rd squad Scout team: Face as indicated. HOLD FIRE. Squad: MOVE to yellow diamond as shown. Face as indicated. Hypnobeard fucked around with this message at 00:10 on Feb 13, 2019 |
|
#
?
Feb 12, 2019 21:36
|
|
|
Quick and dirty orders for the new infantry platoon: Load into trucks, then drive along the map edge up to the town square. Unload there, occupy the buildings, send the trucks back, and wait for further orders from up top.
|
|
#
?
Feb 13, 2019 00:04
|
|
|
So we learned that the mortars could possibly direct fire on the infantry squad shooting the AT gun, and what the hell. Ace go ahead and try that, preferably with the one not assigned to a fire mission. Both 57mm guns should carry on with their previous orders, including moving the currently limbered one to its intended destination Everything else just carry on other than the orders I've already posted
|
|
#
?
Feb 13, 2019 00:12
|
|
|
I am working out final tweaks to orders now, update shortly
|
|
#
?
Feb 13, 2019 01:10
|
|
|
Overview of elements unlucky enough to be under my command 3rd Platoon HQ Good command links, hold position  1st Squad A Team Face the tank, keep hiding  B Team Keep watching the north road  C Team Hunt north east to screen infantry moving towards my bazooka  2nd Squad A Team Hold position  B Team Hold Position  C Team Better Los than youd think, hold position  3rd Squad A Team Y'all are hosed, if you unfuck yourself, crawl to the foxholes in front of you  B Team Taking inaccurate fire from the east, ignore it and let them expend their ammo  C Team Stop wasting ammo taking potshots to the east, save ammo for northern germans  De Jure inherited forces B Company 1st Platoon 1st Section - B Team Brave potential fire from the east, setup to watch western road  2nd Section - A Crew Brave potential fire from the east, setup to watch western road  Second Platoon HQ Quick to northern foxholes if you unpin  1st Section - B Team Will only walk because rattled, scoot up a bit  2nd Section - A Crew Get to the foxholes  2nd Section - B Team Stay in the house, keep facing the north road 
Gay Hitler fucked around with this message at 01:53 on Feb 13, 2019 |
|
#
?
Feb 13, 2019 01:45
|
|
|
Turn update! https://www.youtube.com/watch?v=IUrwJzh3kYM 
|
|
#
?
Feb 13, 2019 12:45
|
|
|
We seem to be getting a hammering by superior German Armour, though we did disable of of the PZIV's in the south, so that's good.
|
|
#
?
Feb 13, 2019 14:44
|
|
|
Ok, here we go. Doin' my best here. ORDERS Gay Hitler Well, that was ugly. You now get to decide which of your forces are best used keeping their heads down and providing vision and which are going to high tail it south of the rail line. The little copse of trees where one of the .50's initially set up and the village houses both seem like decent safe zones. Your goal should be to 1. Withdraw as many troops now exposed without AT support north of the rail line as possible and 2. Hopefully break contact and find your units a place to calm down away from bullets whizzing overhead. The north is now a cluster of tanks and your bazooka got screwed, but we still need your command. We may be counterattacking the Germans in the town after some tank on tank action, and we may be transferring you to support the abbey. Or something we don't see right now. In all cases, the more of your command that you can successfully withdraw south of the rail line the better our position is. Generation Internet Watch that .30 in the middle. I don't like that StuG looking at it. Otherwise: your AT guns are in a difficult position. We'd prefer them to be in a position to shoot at the panzers in the north, but we probably need them to concentrate to be effective. With all those Panzer IV's around, I'd prefer we get two shots on a tank. I think that starts by getting your limbered gun over to the other one. Do try your best only to move if the Shermans are currently preventing panzers from blowing up your limbered gun. You are authorized to requisition one of the trucks if you can use it. The way I envision it, your AT guns can take shots at half-tracks that dare cross towards the ridge before they concentrate, hunt StuG's once they concentrate, and then possibly relieve the Shermans of watching the high ground in the north if they tear things up. Acebuckeye13 let your men catch their breath as you deem advisable, and occupy strong positions in the town to deny the enemy use of the rail bridge. Do what you can to provide cover to Gay Hitler as his forces retreat. Shake out your forces into their fighting configurations as well. Comstar Party continues on the first floor! Carefully consider how to keep your forces out of the reach of those damned half track guns. We'll give them a little shock this turn. Hypnobeard Lets see if we can convince the enemy to reallocate those StuG's. shake out into fighting configurations, and engage the enemy for 2 mins. Remember the poor bazooka of 3rd platoon- don't let your AT guys get plastered because an MG started shooting near them. Target-armor is your friend. On the 3rd turn toss smoke at the enemy, maybe do your best to make it look like you're covering for vehicles about to round the bend on hwy 2. Next turn we'll likely want you to withdraw. If you see any big bads (like a StuG covering your forest line) withdraw.
|
|
#
?
Feb 14, 2019 04:52
|
|
|
 Tank 1 will HUNT forwards to the marked location. Tank 2 will HUNT forwards, as marked. Tank 3 will stay where it is and pop the Panzer IV it hit before.
|
|
#
?
Feb 15, 2019 05:47
|
|
|
F Company, 2nd platoon The squad getting shelled by the 75mm, you should stop doing that. FALL BACK down the stairs and go to the ground floor of the building BEHIND the Abby.
|
|
#
?
Feb 15, 2019 06:49
|
|
|
Alright, some infantry platoon orders: Platoon HQ (Purple) will jump inside the house. 1st Squad (Red) is to take up positions on the hedge behind the rail bridge. A and B teams will target known German positions to defend against an infantry advance on the orchard, while C team will (potentially) move across the tracks to take up a hidden forward position to defend against German armor from moving forward. 2nd Squad (Green) is to take up positions along the stone wall to act as a backstop. 3rd Squad (Yellow) is to take up positions in the house and along the rear hedge in the orchard, to defend against the German infantry advance. All units will move at a QUICK pace.
|
|
#
?
Feb 15, 2019 19:45
|
|
|
Orders due Saturday February 16th at 7PM EST.
|
|
#
?
Feb 15, 2019 20:15
|
|
|
1st Platoon, F Company HQ element Face as shown. 1st squad Scout team: MOVE to yellow diamond, face as shown. I want to get this team in a position to dash to the house across the road if the Germans allow it. Sections: Face as shown. 2nd squad SPLIT AT section off. AT section: MOVE along thin line to yellow diamond. At yellow diamond, SET FIRING ARC as shown and TARGET ARMOR. MOVE to second yellow diamond, continue firing arc and target orders. Squad: MOVE along indicated path to edge of woods. SET FIRING ARC as shown and face direction indicated when reaching edge of heavy woods. 3rd squad SPLIT AT section off. Scout team: Rejoin main squad when it arrives. AT section: MOVE along thin red line to first yellow diamond. SET FIRING ARC as shown and TARGET ARMOR. MOVE to second yellow diamond and maintain arc and target orders. Squad: MOVE to yellow diamond as shown. SET TARGET ARC and face as shown. Contingency for 2nd squad and 3rd squad: I want at least one minute of engagement with the troops in the woods opposite the scouts and whatever vehicles are coming down that hill, if any. If we can get that in the turn, great. If we have time at the end of the turn, I want both squads to face due east, throw smoke, wait 30s, and then retreat back into the woods directly west. That's the main squad bodies and the AT sections. If they don't have smoke, immediately retreat. If this can't be done in the turn--they're taking too long to move through the woods for whatever reason, complete the orders and I'll start next turn with the smoke.
|
|
#
?
Feb 16, 2019 04:36
|
|
|
Orders Deploy the .50 in the house  do that with the limbered gun and try and deploy it facing south-east when it gets there, the moves are fast deploy the undeployed mortar and try and give the mortars target orders on infantry concentrations in the north if they're not assigned to a fire mission Generation Internet fucked around with this message at 00:38 on Feb 17, 2019 |
|
#
?
Feb 17, 2019 00:25
|
|
|

|
| # ? May 2, 2024 08:56 |
|
|
The north is lost and everything is hosed All units recieving this message and not becoming one with the dirt, retreat to the buildings south of the rail bridge.  All units not pinned and capable of receiving commands in this screenshot haul rear end to the buildings south of the railbridge  e: Ace, any units you deem to have spotting potential of equal or greater value of the lives of said units may watch death approach with open eyes Gay Hitler fucked around with this message at 02:27 on Feb 17, 2019 |
|
#
?
Feb 17, 2019 02:20
|
|