


|
 Pioneers 3rd Platoon Orders Pioneers 3rd Platoon Orders  2nd Squad is to BLAST the hedgerow as indicated. They are to then FAST to the nearby house and occupy it, one team each floor. 1st Squad is to PAUSE until the hedgerow is blasted, then FAST behind 2nd squad , then QUICK from the nearby house to the more distant house which they are to occupy. The HQ is to get out of the way of the other squads until they are through, then FAST behind them to just outside the nearby house so that they are covered from fire. 3rd and 4th Squads are to QUICK through the woods to a forward position. If they are not in contact with the enemy at the end of the solid arrows, they can bound until they are in contact or until the frontage of the woods crowds them too tightly. I intend to reach forward positions in contact with the enemy and suppress them. HMG does not move at this time. If they are not firing on anything, you may TARGET BRIEFLY any known or obvious enemy positions at your discretion with a prioritization of AT guns, mortars, HQ units.
|
 #
?
Feb 19, 2019 23:49
#
?
Feb 19, 2019 23:49
|
|


|

|
| # ? May 4, 2024 01:57 |
|
|
NEW TURN The video will be live here in a few hours from this post. A real post to come when I'm not exhausted and going to be late for work! https://www.youtube.com/watch?v=wF27aijReo8
|
|
#
?
Feb 21, 2019 06:08
|
|

|
i personally got killed lol. seems like taking out as many of them as they did of me is more than a fair trade, though. hopefully glynn can move forward now, maybe my platoon will be able to support him?? maybe not if dublish wants to take command of the HMG btw he can do that, it's a company asset. glynn and i just grabbed one each before we had a company commander. aside from moving the HMG, can i do anything or do i just
|
|
#
?
Feb 21, 2019 09:08
|
|
|
Armor orders: Koolkevz Good stuff with the move up. Get your tanks into positions, unbuttoned , perhaps a bit west from where they are heading. One can probably tuck up close to the hedge and should be room for three west of the house. I want at least two western tanks to have target armor arcs covering the allied backfield - it looks like any minute now the two sides will start spotting and engaging each other and I really don't want us to be distracted shooting up infantry when there are bigger fish to fry. [edit]  THIS TANK HAS SPOTTED A SHERMAN! SHOOT IT SHOOT IT SHOOT IT! Pthighs Good stuff taking out that AT gun. Find a Stug with HE remaining and send it to support the infantry getting shot up from the northern side of the abbey. The other two I want finding spots to engage that Sherman by the enemy mortar position - I think we should be able to see it if we are clever. One is I think almost out of even AP ammo so make sure to get ammo counts and target armor arcs if they're under fifteen AP shells or so to prevent them wasting it on infantry. Northern infantry! Our panzers will be engaging the enemy shermans likely throughout this turn. We needs max suppression going out of the enemy positions to stop them taking potshots and buttoning up our commanders and if anyone can bounce some rounds off enemy tanks to button their commanders it would be greatly appreciated.
Saros fucked around with this message at 14:12 on Feb 21, 2019 |
|
#
?
Feb 21, 2019 13:50
|
|


|
Orders due Friday February 22 at 8PM EST. Moving back the deadline an hour to help out North Americans a bit. We're usually starting around that time anyway.
|
|
#
?
Feb 21, 2019 18:20
|
|
|
 Kompanie HQ: FIRE MISSION  HMG Section HQ is to call an immediate fire mission from our off-map mortars, as shown. 2. and 3. Platoons:  oystertoadfish, you've taken about 25% casualties by my count. Pull back what you can and regroup. Their mortars have not been kind to you, and they are still firing. Your HMG has eyes on an unbuttoned Sherman, and I want it buttoned up. glynnenstein, you've got one team ready, one tiring, and 6 (plus your HQ) are tired. Hold position and let the panzers do their thing. Your HMG has eyes on a buttoned Sherman, and I want it to stay buttoned. Keep your men firing at whatever they can get their eyes on
|
|
#
?
Feb 22, 2019 03:38
|
|


|
As we move into the assault phase of the battle, watch out for convergence in your platoons. This is where they bunch tighter together as they approach the target, presenting fatter targets. A platoon moving onto a known enemy position should always have a squad suppressing the enemy or suspected positions while the assault force moves into place (unless the neighbouring platoon is covering the whole attack zone) Don't be afraid to specify targets, DSM is our friend (and real, and strong) and he isn't going to allow your troops to die or sit idle because a tree happens to be in the way or something. It's still looking good. Every turn we are still making gains somewhere and our losses are far from excessive. That's all a commander can ask for, really!
|
|
#
?
Feb 22, 2019 11:53
|
|


|
Northern panzer orders All tanks unbutton. The far western Panzer is to directly target and fire on the Sherman that it can see. The two middle panzers are to use Quick to follow the yellow arrow and then set up a Target armour arc in the direction of the sherman tanks. The remaining panzer is to target any visible allied infantry to help support our advancing infantry. koolkevz666 fucked around with this message at 13:24 on Feb 22, 2019 |
|
#
?
Feb 22, 2019 12:29
|
|
|
Dark_Swordmaster posted:THAT TURN I JUST POSTED BUT NOW WITH PICTURES! Turn One Orders     END OF TURN    
|
|
#
?
Feb 22, 2019 13:28
|
|
|
Hob, is there a plan for dealing with the platoon east of the abbey?
|
|
#
?
Feb 22, 2019 15:29
|
|
|
9 co orders We are closing up on abbey walls. It is important to punch through as quickly as possible. Pioneers will breach and we will set up in the closest building in the area. We'll clear the abbey area first and then go to the top floors to support northern group. Since Americans seem to be willing to attack us, we'll let them do so whenever possible. The small force east of abbey is not a great threat. We'll keep it contained for now and see what happens. It is important we concentrate on the abbey, not a small force in front of it. Frang Use your platoon to cover the movement. Bagpipes This platoon is under command of Frang until Bagpipes comes back. I'll use the same platoon names to avoid confusion. Leave a small force to contain the americans opposite Dublish. Otherwise pour through the breach at full speed and set up inside abbey houses. Malick Move forward with aggression and speed. Split off and send scout teams first, keep going until you start drawing fire. Your objectives are to threaten abbey from the south and if opportunity presents itself, wipe out the American force in front of dublish. Keep clear of pioneers, I don't want you running there. Dublish Go through Bagpipes platoon, breach the wall, if necessary force entry into the first house inside abbey. Keep fighting it out with your main force but carefully. No unnecessary risks, your people are in no shape to assault. It is enough to keep them engaged. Support platoon Keep firing on targets of opportunity. If company HQ can see mortars, AT guns or machine guns outside houses order a fire mission from mortars on it.
|
|
#
?
Feb 22, 2019 15:55
|
|

|
Tank section 3 orders All tanks unbutton and stay that way. Tank 1 (shooting at AT gun). Area fire on most likely AT gun locations for 45 sec then move quick as shown, face as shown. Tank 2 (western). Move fast as shown, once in northern location atea target the abbey north facing buildings to support our infantry, if they cant get LoS from there move them somewhere they can. Tank 3 (Eastern) Area fire or target enem ycontacts for 30 seconds then move quick as shown.
|
|
#
?
Feb 22, 2019 16:59
|
|
|
 3. Squad:  Change in orders. All existing movements are to be cancelled. 3. Squad is to immediately ACQUIRE 1000 ROUNDS OF 7.92MM AMMUNITION. 3. Squad will then DISMOUNT their truck, QUICK as shown to reach the woods where Bagpipes is getting ready, and MOVE to a spot along the abbey wall immediately opposite the large 3-story building, where it will breach the wall. Any breach should wait until the beginning of a 3-minute turn. No breach should be made yet.Zug HQ, 1. Squad, 2. Squad, 4. Squad:  HQ will PAUSE 1:30, then MOVE northwest across the open ground and west through the abbey woods as shown. 1. Squad will ASSAULT and HUNT through the northern edge of the abbey woods. 2. and 4. Squads will each SPLIT TEAMS, then move:
dublish fucked around with this message at 01:34 on Feb 23, 2019 |
|
#
?
Feb 22, 2019 18:04
|
|
|
hmm, should I pull back from the forest too the hedgerow behind it? the guys in the houses south of the forest are getting hit too, but seemingly not as badly... should they go backwards as well? I'm afraid the guys in the forward houses will take worse hits leaving cover and running through the mortar fire. the guys on the small hedge and in the forest are hurting tho
|
|
#
?
Feb 22, 2019 19:04
|
|
|
9th Company 3rd Platoon The name of today's game is recon in force. The squad in the north is doing a good job and should not move. Blue squad should split and quick along the blue line and take positions at the edge of the woods. If they have a MG deploy it facing the South Bridge. The goal is to interdict anything coming over the bridge. Green HQ quick along the green line and take positions in the woods. They should be able to support red squad and hopefully put fire on the Americans in the woods. Red squad split and quick through the woods until they get to their positions on the edge. If A or B have a MG deploy it facing the abbey. The other half a squad should run across the road and then hunt along the dashed line. This should clear the Americans from the woods and give me the ability to assault the abbey from the south in the next few turns.
|
|
#
?
Feb 22, 2019 20:53
|
|
|
oystertoadfish posted:hmm, should I pull back from the forest too the hedgerow behind it? the guys in the houses south of the forest are getting hit too, but seemingly not as badly... should they go backwards as well? I'm afraid the guys in the forward houses will take worse hits leaving cover and running through the mortar fire. the guys on the small hedge and in the forest are hurting tho Some of your guys are retreating already, so it may be moot. I don't think pulling back all the way to the hedgerow will be necessary since the trees will block LOS well enough. As far as buildings go, they're looking like tank shell and HMG magnets. You're right that withdrawing from them could hurt anyway though. I'll leave that to you.
|
|
#
?
Feb 22, 2019 20:54
|
|
|
Otf imo your best bet is to get your men pressed up against the northern sides of the houses, they should be nearly untouchable except to rogue mortar rounds and will peek around the corners for spotting.
|
|
#
?
Feb 22, 2019 21:17
|
|
|
Saros posted:Otf imo your best bet is to get your men pressed up against the northern sides of the houses, they should be nearly untouchable except to rogue mortar rounds and will peek around the corners for spotting. This would be a great idea for the west house, which has a door on the north side. East house's door is facing east, and is exposed to enemy fire.
|
|
#
?
Feb 22, 2019 21:28
|
|
|
we're gonna have to see if I get home before the deadline. I'm hoping so. I'm the meantime I'm thinking of orders like this: - hq (such as it is) and the forest teams (that's the word for half squads, right?) should retreat to the open ground behind the forest, ideally a bit back of where the rearmost shells have been noted. - the half hedge teams should try to hide behind the north face of the buildings as people have described above. I assume I don't want to clump things up too much here, in case a shell does fall... CHANGED in response to jaguars below: - teams still in the back house are to suppress enemies to assist in the retreat. target big guns and MGs first, then riflemen. minimize casualties in other squads during the pullback. the teams running from the other house should keep running and reform behind the forest, to the east of the other squads. in general, attempt to reform the platoon in a line behind the forest and behind the rearmost observed mortar hits, except for a team or two in the house who haven't run yet. they will provide cover for the rest of the platoon's movement ADDED in response to dublish below: - HMG is to TARGET the Sherman we can see, in an effort to button them up and suppress. if the Sherman is disabled go back to dominating the road oystertoadfish fucked around with this message at 00:49 on Feb 23, 2019 |
|
#
?
Feb 22, 2019 22:06
|
|
|
oystertoadfish posted:oh, and should I issue the HMG to specifically target that Sherman for suppressive fire Yes.
|
|
#
?
Feb 22, 2019 22:29
|
|
|
Orders - StuG Battery StuG 2 - Move just around the corner of the house and target the house with the spotted enemy just Easy of 3rd Platoon to our NNW for one round. It's the one that was shooting at us the previous turn. After one round, switch to TARGET LIGHT to hit it with machine guns and keep them suppressed. StuG 3 - Move forward just enough to TARGET the north side of the Abbey. Pick a spot on the North side to suppress, feel free to move the target point around as new contacts pop up. Also feel free to switch to TARGET LIGHT after one minute if nothing is actively visible. 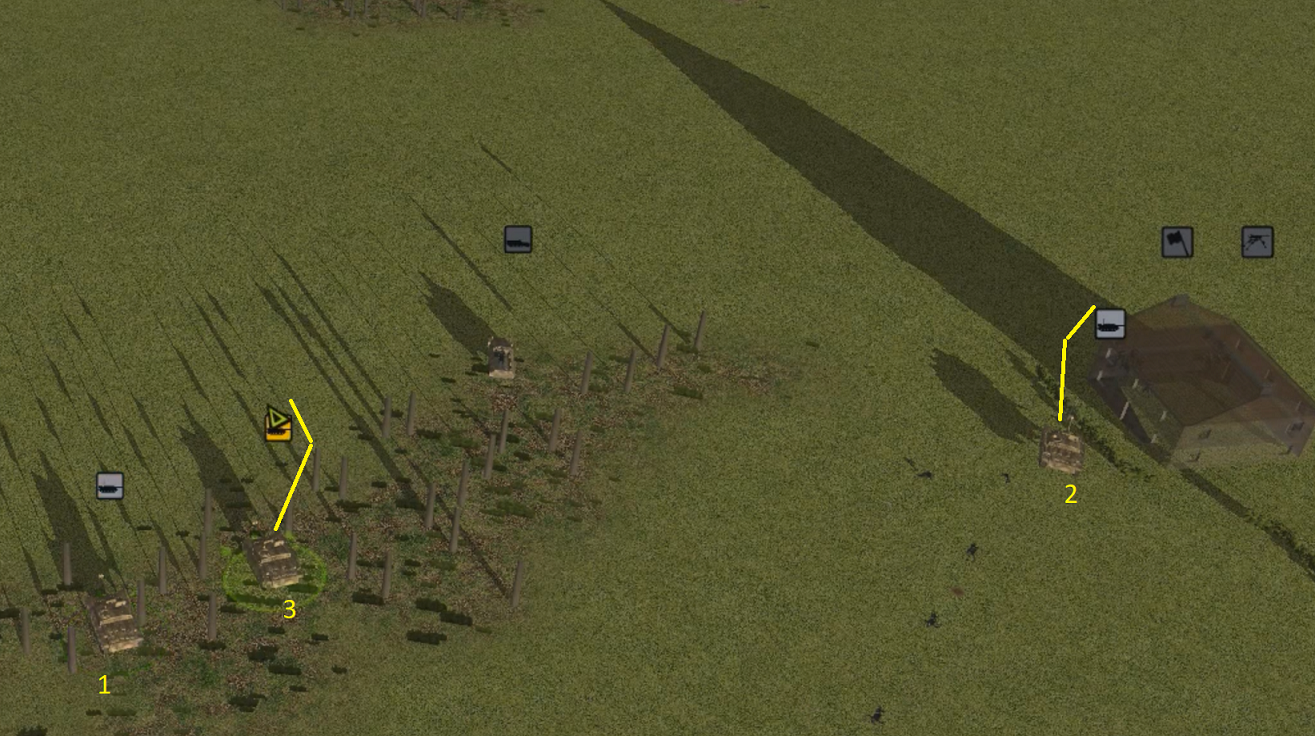 StuG 1 - Move roughly as indicated to attempt to target the enemy Sherman located right by their mortar team. Please pick the earliest point at which it can be seen (LOS is hard without the game), and keep on the low ground during transit as much as reasonably possible. 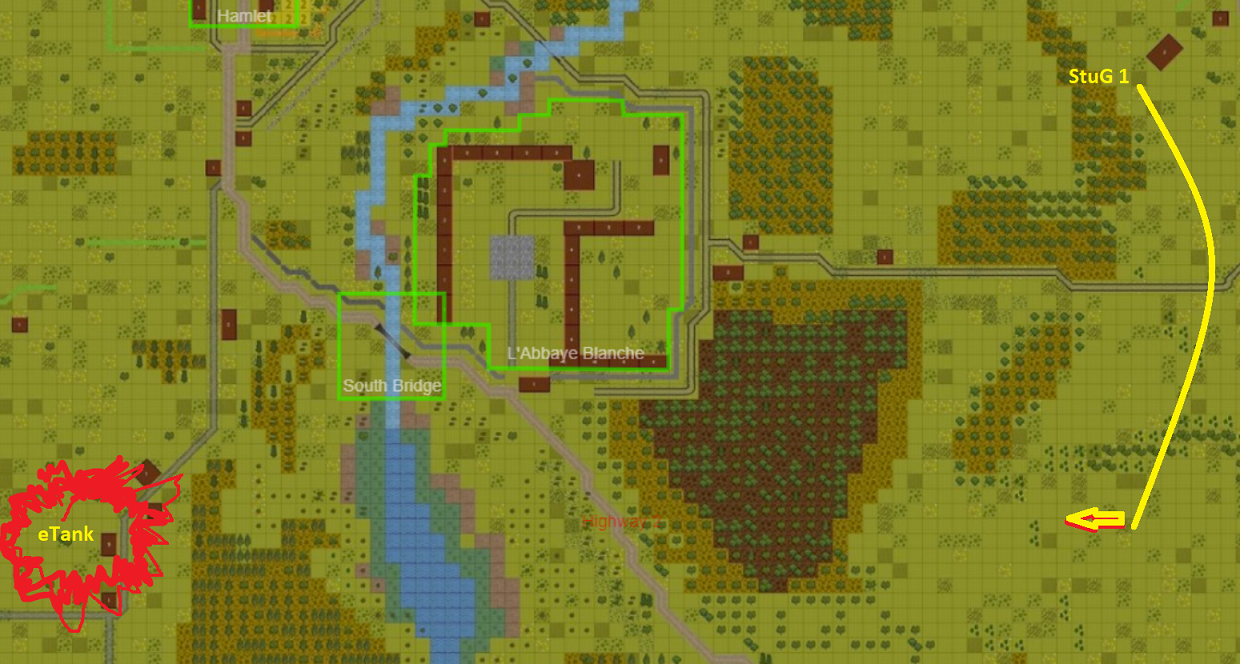
pthighs fucked around with this message at 00:19 on Feb 23, 2019 |
|
#
?
Feb 22, 2019 23:38
|
|

|
In three minutes you'll probably get some panicking units under control, so it's definitely worth specifying where your squads will move to once they've pulled back. Your guys have already abandoned the front house, refer to about 22:13 in the video (And note that the unit Icons float way above the unit itself, it can be very misleading when you're a newbie). Sheltering a couple of units behind the houses as mentioned is a very good idea. If your most beat up units don't pull back of their own volition, try and get them out of the strike zone so they can recover. Next turn we can re-organize. Personally, I'd try and get an MG 42 into the right hand house because it has a field of fire that is much narrower but sees into the hamlet quite well. Failing that, I'd have the team already in there suppress either the MG position or the Infantry target that they can already see because some suppression is always better than no suppression and you need some to cover retreating squads. The front house is exposed to enemy fire from a lot of angles and should only be occupied once a base of fire has been re-established.
|
|
#
?
Feb 22, 2019 23:57
|
|
|
Pioneers 3rd Platoon Orders Allow all current orders to resolve and maintain those positions for the following turns. They should be in effective positions and need to rest a bit. At the beginning of each of the next 3 turns, give one TARGET BRIEFLY order to the HMG aiming at the visible tank target. Intent is to keep them buttoned for the duration while flexible to shoot at other targets of opportunity should they appear later in the turns. If any other high value targets appear (Tanks, TDs, AT guns, mortars) you may target them at your discretion. Priority is any unbuttoned tank/TD. At the 3rd turn, QUICK the platoon HQ per the map to just behind the southern building. My intent is to move them up into the shadow of the more forward building to provide leadership and morale to the forward positions.
|
|
#
?
Feb 23, 2019 00:24
|
|
|
posting this on request from Frang who ran into technical woes: 1 and 2 platoon orders, although I'm still hazy on which is which  Frang platoon remain in position, lay fire onto the houses with known enemy contacts with one gun each and use the other guns at DSM's discretion to engage enemies spotted beyond the Abbey or contacts within the Abbey if they continue to resist. Ensure that the half-track that transported 1st squad is actually emptied, half of the squad is currently crewing it. The Northeast MG is to kill or area fire the enemy mortars. The Northwest MG is to kill or area fire the enemy contacts exiting the railyard. If wished, target brief orders can be used to attempt to area fire for the first 15 seconds of the turn while you can predict enemy movement and then let them spot for the other 45 seconds so that they can fire reactively. The southern MGs are to wait and may area fire any suspected enemy positions they can still see. On turn three, mount them up and prepare to move them. Bagpipes 2nd Squad is to support Dublish, alongside 3rd Squad B team as shown. The rest of the platoon is to make its way through the woods into a covered position from which they can observe or fire at the objective house. If any suspicion of contact in that house is seen, area fire onto it with the half platoon and the half-tracks. The southern half-track may assist Dublish instead if it can be moved to gain an advantageous sightline.
|
|
#
?
Feb 23, 2019 00:32
|
|
|
thanks Jaguar, made edits intended to get your helpful intent across in case I can't draw anything.we might be better off with DSM figuring out where safety is, rather than me, though I wouldn't want broken squads to rally and just go back to the house, hopefully that won't happen. at this point I'm hoping to use one team with their MG to cover all of this retreating. that's where I'm at
|
|
#
?
Feb 23, 2019 00:59
|
|
|
LOOK AT THIS COOL NEW TURN WE FOUND!! https://www.youtube.com/watch?v=4MTZ8Sr72LU Turn One Orders     END OF TURN      
|
|
#
?
Feb 24, 2019 01:39
|
|
|
Kompanie HQ:  HQ Team will ride its car FAST on the orange path, then QUICK through the gap we blew in the hedge to the 2nd floor of the house. FIRE MISSION CHANGE  HMG Section HQ is to modify its mortar fire mission as shown. 2. and 3. Platoons:  oystertoadfish, this might take a bit. I want you to shift your pioneers around behind glynnenstein. Instead of crossing that horrible open ground to get to the bridge, I'm eventually going to swing you around to hit the hamlet from the northeast. You should have a better approach from that direction, and this will give you time to recover a bit. Use your trucks if you want- you've taken enough casualties that the loss of a truck and car shouldn't matter. glynnenstein, apparently the enemy infantry just down the hill have forced our tanks to button up. I want you to make it safe for koolkevz to poke his head out again. I'd advise against assaulting until at least another Sherman has been destroyed, but I leave it up to you. Suppress that hedgeline.
|
|
#
?
Feb 24, 2019 03:02
|
|
|
9 co orders Breach breach breach! Frang, Bagpipes Shoot back. Malick Suppress and kill that AT gun. And go pick up the machine gun you dropped, it's worth more than the rest of that fireteam. Dublish We need a hole in the wall. Set up to breach as closely to start of next turn as possible. Platoon support Target the known .30cal location with at least one HMG. Reposition Stummels so that they can shoot on the new contacts. Have both move, they don't know we're out of ammo. Target mortars on hamlet and fire everything we have there. All company halftracks still in reserve that have gunners: Move alongside Stummels and target the new contacts inside abbey. This includes everyone not part of our main firing line. Make sure everyone who can has a man on the gun. Move at full speed. Spread fire around, I want the entire length of that building sprayed. Saros, requesting as much support as possible.
|
|
#
?
Feb 24, 2019 16:50
|
|
|
oystertoadfish, here's 2. Platoon's current situation.        Casualty locations are in red. Of your 4 LMGs, only one is currently lost. It's in the middle of the woods, straight south of the car. You've still got the majority of your satchel charges. Nobody is currently in any buildings.
|
|
#
?
Feb 24, 2019 21:51
|
|
|
thanks! alright, 3. and 4.A are the only non-broken folks. worse than i thought, but at least i know i'm out of those positions entirely and there's no hope in retaking them with what i've got. the allies got what they wanted; i hope it wasn't worth it for them. 3.'s near that small house north of the forest - can they see anything useful from there? if anybody's gonna be covering this retreat it's them, but i'm not going to move them forward to do it. if they can't support this retreat then they should probably lead it, they're my least useless combat element right now 4.A is reasonably near where you say the only lost LMG is - i want to order them to retrieve it before their retreat. think that'll work? are there still trees blowing up and murdering everybody in the forest? if it's a fool's errand i'll leave the gun behind but i'd really like it... everybody else, all the broken units, i guess should just get arrows going straight to the hedgerow gap and off to the east, and we'll see how far they get in 3 minutes oh, and the HQ kubelwagen is stranded by my dead nazi alter ego and the only living HQ guy is long gone, right? any point in telling 4.A or anybody else to commandeer that jeep? it'd probably just get shot like the truck did so i'm inclined to abandon it, but i'm just checking does that all seem fair? i can draw arrows to indicate all of that. edit: oh yeah, i'll throw in the idea of putting my last functional squad's MG42 right next to the HMG and trying to help it win its battle against the MG in the house and keep suppressing downhill. those aren't my orders, though. the HMG stays where it is either way oystertoadfish fucked around with this message at 22:37 on Feb 24, 2019 |
|
#
?
Feb 24, 2019 22:31
|
|
|
Northern panzers Sorry if the image is confusing. All tanks are to unbutton and then it pretty much it comes down to the three panzers that have LOS on the allied sherman positions are to maintain or establish armour target arcs whilst the lone panzer without any armour LOS is to put some HE shells either into the allied contacts marked with the yellow circle if it can see them or if not then put some HE rounds into the area of the allied positions in the red circle.
|
|
#
?
Feb 24, 2019 23:26
|
|
|
Pioneers 3rd Platoon Orders 3rd and 4th Squads: Trailing teams are to QUICK up to where the forward teams are, approximately, and then all teams are to HUNT forward about 20 meters. If they get far enough to Target Briefly the ground around the enemy units that were shooting at the tanks that is sufficient for now. I am hoping to come into contact with the closest elements in the southern tip of the woods / that hedgerow area with the bulk of these squads at the same time. Intent is to pressure the elements there that area to protect the tanks without a full assault just yet.  HMG: At the start of the first minute, use one or two TARGET BRIEFLYs at the tank it has spotted to induce them to re-button. In the second and third minute, use one or two TARGET BRIEFLYs at the southern tip of the woods / hedge where enemy fire caused our tanks to button if the enemy is still effective in that area, or continue to keep the tank buttoned, at your discretion. As last phase, the intent is to protect our tanks by suppressing the enemy and keeping the tank buttoned while available for targets that become visible. In the case that the enemy tank starts firing on the HMG directly, send them FAST into hedge cover to the west and hopefully they will survive to resume useful fire. 1st Squad (Southern House): Use one or two TARGET BRIEFLY commands to suppress the nearby enemy just to their south to protect the tanks at the start of each minute. Use your discretion to conserve ammo / remain available for other targets if the enemy in that area moves out or remains well suppressed. Trucks: Per the map, one is to QUICK into the cover of the house, the other is to QUICK south by the woods, then MOVE into the trees where hopefully it will be covered from enemy fire. It looks like the game will let us try it, though I didn't test if the truck will actually behave as desired, so it's a bit of a gamble with the TAC AI, lol. I'm going to have infantry get some ammo from each truck shortly if they make it. 2nd Squad: Once the truck is by the house, I'd like the team on the lower level to get on the truck and get like 2k rounds of 8mm rifle ammo (non-kurz). This team will then QUICK back into the building, join the other team on the upper floor, where they should rejoin and share ammo as one squad. I'm not sure if this all can happen this turn due to the dumb way CM does infantry in trucks, but that's my intent.  Move up the rearward vehicles to ready positions per the map in case moving the other trucks up becomes a fiasco, as is possible.
|
|
#
?
Feb 25, 2019 01:30
|
|
|
reinforcements on deck! At 0:55:00 you get the following in the SE corner: 2x Panther  You notice the morning fog has begun to lift... Fray fucked around with this message at 06:02 on Feb 26, 2019 |
|
#
?
Feb 25, 2019 21:33
|
|
|
Southern Armor Orders: -Bottom two tanks are to unbuttton and move quick or reverse/quick as shown to the white dots and wait there until the start of the second minute. -At the start of the second minute they are to move FAST straight forward as shown to spots they can receive target area orders on the AT gun and hammer the poo poo out of it until we are 100% certain it's dead.  -Confirm tank is unbuttoned. Keep it open even if the CO hides at any point. -Northern tank is to move quick as shown to a spot where it can target area - 1 minute on the machinegun shown, adjust exact spot if necessary. If it can see the spot from its current position do it before moving. -After that it is to target area one minute on each of the two buildings the allied contacts are spotted in.
|
|
#
?
Feb 25, 2019 21:55
|
|
|
Is there anything the Panthers can hit from the south other than the abbey? Assuming Saros takes out the remaining HMG and AT gun we can see with the Pz4s, of course.
|
|
#
?
Feb 25, 2019 22:35
|
|
|
I'm assuming if we are getting Panthers the Allies must be getting something decent like Sherman 76's or Jumbo's and the Panthers are only so so against infantry. I'll probably have them replace the Stugs as long distance support as the Stugs are almost out of ammo.
|
|
#
?
Feb 25, 2019 23:13
|
|
|
9th Company 3rd Platoon Red and blue squad should suppress the AT gun. Purple squad should split and wait until the Pioneers have swept the woods then quick to positions along the purple line so they have LOS across the south bridge. I'll have red squad B pick up the LMG next round after the AT gun is suppressed. Also hoping no one is in those woods to the west. After the AT gun is down I'll reposition. Could I get sight lines to the west from my guys at the end of the turn. Thanks.
|
|
#
?
Feb 26, 2019 03:18
|
|
|
 The goal is for all teams to position themselves for the attack on the abbey, by reaching the abbey wall without coming under fire. HQ will MOVE west, taking care to stay deep enough in the trees so that it will not be visible to the abbey. 1. Squad will HUNT southwest, then west, and FACE south roughly where the red label is, to keep an eye out for any American infantry remaining in the woods. 2. Squad A and B Teams will HUNT west. B Team will stop and FACE southwest just west of 1. Squad's ending location, and should be deep enough in the woods that it will not be visible to the abbey. A Team will QUICK to the southeast corner of the abbey wall and stop. 3. Squad will, as soon as it is able to receive orders again, MOVE north through the woods so that the 3-story building inside the abbey walls blocks sight from the garrisoned buildings in the center of the abbey, then QUICK to the wall, and MOVE to the breach location. I want them in place to breach at the beginning of our next 3-minute turn, so if it looks like they won't make it in time with MOVE commands, they should QUICK the whole way. 4. Squad A and B Teams will HUNT west, until near the edge of the woods, and each will then QUICK to the abbey wall and HUNT north along the wall to the building outside the abbey. They are to stay between the building and the wall until we are ready to breach. All vehicles are to QUICK as shown, and stop in a group east of the abbey woods.
|
|
#
?
Feb 26, 2019 04:54
|
|
|
Orders are due Wednesday, February 27 at 8PM EST.
|
|
#
?
Feb 26, 2019 06:06
|
|
|

|
| # ? May 4, 2024 01:57 |
|
|
edit: ah, we've got a while to refine these. let me know if this can be improved upon. i suspect it can so here's a godawful map to match the godawful state of my platoon PIONEERS 2. ZUG ORDERS  - there's an abandoned machine gun in the forest. if anybody can grab it, grab it. i've circled the most likely folks, in other words the closest. - if that kubelwagen can be used for troop transport by non-HQ squads then do it, that'd be funny, otherwise abandon it - the HMG isn't going to change a thing. it's justifying my existence - everybody gets in the trucks bc maybe that'll help?? and goes behind that one hedge, then they go run through the gap to help 3. Zug does that sound about right? little of this will happen in the next 3 minutes, almost everybody's broken, but that's what they should do, right? lmk if they shouldn't get in the trucks or if the trucks should drive down the road to get even closer to 3. Zug's positions oystertoadfish fucked around with this message at 06:11 on Feb 26, 2019 |
|
#
?
Feb 26, 2019 06:09
|
|