


|
Turn 8 
|
 #
?
May 7, 2019 13:50
#
?
May 7, 2019 13:50
|
|


|

|
| # ? May 2, 2024 03:56 |
|
|
Can I get a heads up on whether the HMG teams attached to me are in LOS to the trenches & Tiger south of the ford? I don't really need to know whether anything is there, I just need to lay down suppressing fire to assist my dudes in Klauswoods.
|
|
#
?
May 7, 2019 14:07
|
|


|
I show it somewhere in the video but no, they are not. One of your guns has partial eyes on the tiger so I ordered him to open up and maybe dome the commander but I don�t think they ever fired.
|
|
#
?
May 7, 2019 15:00
|
|
|
Ok, we need to face some hard realities and decide upon a plan. Throwing in my two cents, I present a crudely drawn map that I call "Operation: Last Ditch"  Here's my thinking that lead to this: 1. The Germans have fortified the north, any major assaults from that direction are going to be incredibly costly in a fashion that we simply cannot afford now. 2. We've lost the majority of our tank strength and the Tiger is a major threat until it runs out of ammo and even is then still a credible threat. 3. Woods and houses are our best defense 3. We still have quite a lot of infantry but we're far too spread out to be effective. 4. The Germans still seem to think we'll attack north. We've made enough noise up there and our eastern attacks have gone in piecemeal and have been defeated. The idea: -We can assemble three almost totally full Inf Platoons (Habs, Jag, Len) along with a scattering of armed tank crews, part squads and HQs for a single decisive push in numbers. We have enough other men that we can make noise elsewhere. -We make a ton of noise in the north and march damaged units (SMGS, Habs atrs and the most damaged units from SWAT) around in Boris and Klaus as if we're staging a bunch of infantry. At the same time the most complete units from SWAT push down the western side of the map as planned previously, killing any german stragglers and getting into a position to make the hop south west and across ford "not appearing in this game" -Recon platoon HQ gets into a position to call in a line barrage down over the northern German trench line and uses one of the mortar tubes to call in a bombardment using a good amount of ammo. -Jags platoon (or part of it) runs the gauntlet of the house HMGs and clears the last german survivors from the swamp so they dont have good eyes on the far east of the map. -Pretty much every other unit we have (minus OTFs survivors and a couple MGs and HQs to make noise) starts pushing east and then south to get in a position to make the hop from "Zelda themed shrubbery" into Natasha. They don't need to push as far south as I've drawn and will most likely head directly across to the eastern tip of Natasha. -3 or so minutes after the HE Barrage has been first called in, a smoke mission will be called in to blind the HMGs covering the eastern approaches to castle town. -We'll stage and engage the northern trench line with the damaged units in Klaus and Boris while they are under HE bombardment, hopefully pinning forces there while we try to sneak SWAT along the western map edge. -As soon as the smoke starts falling we'll burst from the eastern trees and charge Natasha, clearing it with a small force while the rest go south of it and push hard and fast to the west. Overwhelming the small amount of inf there and bypassing the HMGs. Once in town we'll establish small squads in houses along the south and secure the church, hopefully forcing the Germans to have to attack us and leave the trench line. This is a badly formatted flow of conciousness but hopefully you get the general idea, we force them to look north and engage them. Before smoking east and charging. Downsides of this plan being that it will take 4 or so turns to get into position and the Germans might cotton on. We have 38 minutes left so we've plenty of time to get into positions. It'll just be a bit dull Abongination fucked around with this message at 09:01 on May 8, 2019 |
|
#
?
May 8, 2019 08:53
|
|
|
I think most of us would agree that the preliminary moves make sense. The problem with the huge flanking movement on foot is that it will be massively telegraphed by movement sign and the Germans can reposition their troops much faster then we can. So as a strategy that relies on the element of surprise it won't work. It does highlight the two most favourable routes into the village though, through the far ford and from the south. My alternative would be basically to take the flanking move out of it. Keep taking the hinterland as we are now and as areas are cleared to concentrate in one or two fronts, aiming to attack from two or possibly three directions. As the Germans retreat, they pack more and more densely, making our mortars more effective. We can see that at German crossing, where they've congregated into a nice fat target already. So lets make use of that, keep up momentum and maximise control of the board so that we can use much shorter flank movements to bypass the hard cover. The tiger will be a challenge, but it's literally one effective unit in a sea of ineffectives. Where it comes to bear, we'll have to give, but by the same token, wherever it's not we will keep pushing toward victory.
|
|
#
?
May 8, 2019 09:37
|
|


|
Yer, been having a think and what if the hard push came through Vlad instead, with two full inf platoons and everyone else we can pull together. We smoke right on top of the house line as much as possible and try to rush units into the houses to kill the HMG teams man to man.
|
|
#
?
May 8, 2019 09:59
|
|
|
On a smaller note, Kev, OTF, this is what I'm looking at for 1 Squadron's next moves. These are not orders, just planning at the moment. OTF takes over all the troops in the red area bar one HMG team which I'll start bringing down to Zelda. His job is going to be to stop the troops in Natasha and Tanya from killig my troops as they move, concentrating mostly on the red bits of the areas. The main part of this will be allocating firepower, especially making sure HMGs are hitting any hotbeds of resistance. Secondary task is to keep reorganizing the rough units and finding them small helpful tasks like supressing small, weak units. For my part, with the flanking fire shut down, I'll concentrate on firing directly into the south end of Natasha and assaulting in. Swamp will be dealt with in the lead up and a couple of small units will maintain the fire until second echelon units can get in close and clear it for good. The biggest problem is going to be the gap with the road, where HMGs in hard cover create a killing zone that is very hard to cross. The best way of doing this is to put a small, intense smoke barrage directly in front of them, putting them out of the game temporarily. There's apparently a lead in time of nine minutes. An alternative that could speed things up is to shift the current mission to bomb the area and suppress the supporting troops, use the AT rifles in Zelda to fire on the houses and perhaps get the T-70 in to supress them. The final option uses organic units only would be to schlep out HMGs down there but takes a very long time with no guarantee of success. Once we're across, then we can look at moving OTF's forces, for which there are a few options which we can look at when the time comes. Jaguars! fucked around with this message at 10:21 on May 8, 2019 |
|
#
?
May 8, 2019 10:19
|
|
|
Orders are due: Thursday, May 9 at 7PM EDT Thursday, May 9 at 11PM GMT Friday, May 10 at 7AM AWST
|
|
#
?
May 8, 2019 16:26
|
|
|
 Army Orders Following general consensus the plan for the next three turns is as follows: 1) Forces in the north are to continue to clear Dick Wood and Runner Wood and if both are secured then they are to position forces ready for a push south. 2) Forces in the south are to continue to engage and defeat german forces in Swamp and Natasha and prepare themselves for a southern assault. 3) Forces in the center are to be moved eastward except for those units that squadron leaders believe are already in good support positions in preparation for the assault south. 4) Mortar barrage is to be Cancelled.
|
|
#
?
May 8, 2019 16:50
|
|

|
I can't give any detailed orders this time around, sorry. if someone else wants to give the orders feel free, but i think Jag!s orders mostly speak for themselves. get set up with lines of fire, target known enemies in decreasing order of dangerousness
|
|
#
?
May 8, 2019 21:34
|
|

|
1st Squadron (All)  Oyforce and Jagsforce are as per the plan previously posted, except I want to grab one HMG as detailed below. Oyforce: Have all the house units concentrate their fire on the North end of Natasha. Units that can't see anyone should be given area targets in the vicinity of areas that nearby units are targeting. Any other unit that is above exhausted and doesn't have anyone nearby to medic should target units in Tanya, Natasha or the east side of Boris. Jagsforce: Have the rifle platoon in Zelda concentrate their fire on the largest unit in swamp. Have HMG 2-1 (The one with 500 rounds) move NW to the back of the woods, jog across to Sacred woods and once they're well within the woods, move southwards to Zelda Woods. Support request: I'd like to request a smoke mission in the gap between Natasha and Tanya woods. It's about 50m wide and I want a decent amount of depth to it as well so a circular or a short linear are fine, as long as we get about 6 - 12 rounds on target the screen should be effective. You can place it on the forward slope or center it round the trench line, whichever we can see. Use 1 sq HQ or if the Mortar HQ can see it from anywhere in Zelda, that's fine, whichever can get a solid LOS and call it in quickly. IRT tanks, I don't think we really need your services at the moment,save your shells for the assault phase coming up in a couple of turns. General: This round is should complete softening up of the enemy. Next round I'm going to start creeping forward a bit in anticipation of the smoke with the full assault going in as the smoke starts landing. Jaguars! fucked around with this message at 13:25 on May 9, 2019 |
|
#
?
May 9, 2019 12:55
|
|
|
Tank 1st Company, 1st Platoon - "The Fighting  Reverse tank. Continue firing on infantry targets as before once settled. Prioritize the Tiger if it becomes visible.
|
|
#
?
May 9, 2019 14:14
|
|

|
2nd Squadron Orders Our tasks have not changed; continue with your tasks. Lenisto - Remain in reserve, and be ready to move when needed. Habeas - Fully secure Runner Woods; form a fire base to put fire down on the woods to the south.
|
|
#
?
May 9, 2019 17:56
|
|

|
2nd Squadron: 3rd Platoon, SMG Platoon, HMG detachment, & AT detachment We may be down on tanks, but that just means one of you will be able to pull that Tiger's commander from his chariot and bayonet the fascist up close! But first, we need to close ground and move carefully. Legend Red: SMG Platoon Yellow: 3rd Platoon Blue: AT Section Green: HMG Section Minutes 23-25 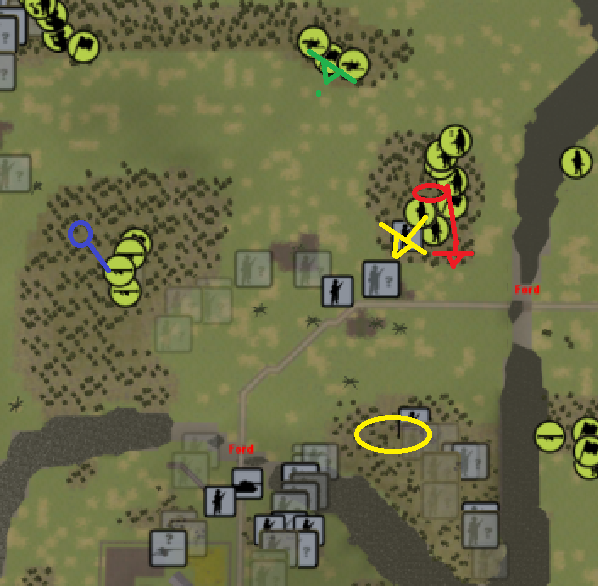 SMG Platoon: It looks like we still have about half of the platoon combat effective. Recover ammo (and any especially good weapons like LMGs) from our dear, departed comrades for the first two minutes, and on minute three move NORMAL to the RED line facing SOUTH. 3rd Platoon: Arrange yourselves in cover along the YELLOW line moving on HUNT and kill any remaining non-surrendered Germans who are running away. Face SOUTH/SOUTHWEST and have the platoon MG BRIEFLY TARGET the YELLOW circled area at minute 3. INPUTTER'S NOTE: If it's actually possible to recover weapons from the German casualties, have someone try and grab a M42. No worries if that's not doable. AT Section: Bad, bad luck to have two of our AT gunners get dropped by light fire. The remaining members of the section is to HIDE, immediately. Minute two they should stay down, move SLOW, and then RECOVER the lost AT rifles. Then draw back SLOW along route BLUE to a deeper point in the woods. INPUTTER'S NOTE: I think SLOW is the crawl command, but if I'm mixing it up, I want them hugging the ground as they move. Yes, it's tiring, but it's less likely to get them killed. HMG Section: DEPLOY, if they haven't already, and BRIEFLY TARGET the KT if they have line of sight. Shoot at any other enemies they can see if they get a line of sight on them. Otherwise, they're to rest up, I'd bet they're exhausted from the run. 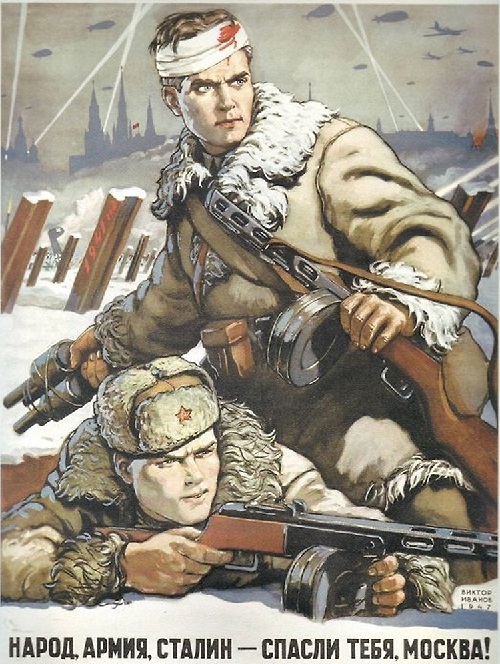 The People, The Red Army, Stalin - They Saved You, Moscow!
|
|
#
?
May 9, 2019 19:08
|
|
|
I'm away from my computer on vacation until Monday, so I won't be able to elaborate on jags' orders, sorry. if necessary others can take the troops
|
|
#
?
May 9, 2019 21:29
|
|
|
Randomcheese3 posted:
Makes sense. Orders are to continue as last turn: Infantry and associated HQs should continue moving to those woods, keeping some 25-50m between in case there are any mortar tubes left on the German side. HMGs will take a while to catch up so they and the AT sections should follow the same path the infantry did and be ready for the push in a couple turns.
|
|
#
?
May 9, 2019 23:46
|
|
|
Turn 9
|
|
#
?
May 10, 2019 09:28
|
|
|
Orders are due: Sunday, May 12 at 7PM EDT Sunday, May 12 at 11PM GMT Monday, May 13 at 7AM AWST
|
|
#
?
May 11, 2019 16:34
|
|
|
Army Orders  Northern forces continue to clear and kill german forces in your vicinity while making your way down southwards. If you can begin to position your units roughly at or behind the drawn red lines in preparation for a northern assault into the village. Southern forces continue to rest up and engage any enemy forces your units can spot from their current positions. However, I would like one of the AT rifle teams currently sitting next to the middle ford to make their way across to Boris and scout it out, represented by the red star. I would like to know if they enemy have fully evacuated it and would rather use an AT team then lose any rifle or SMG infantry doing so. T-70 please fall back behind Mikhail somewhere near the tip of the red arrow, depending on how the Tiger acts I will either have you push south again and support that attack or cross the Ford and try and assault from the north. I also would like a mortar barrage called on the northern german foxholes/trenches which should be highlighted by the black circle. Use most of the mortar rounds we have left to flatten those german units there but inputter pelase leave enough for us to call in a smoke mission. These orders may be changed and updated so check back from time to time.
|
|
#
?
May 11, 2019 17:20
|
|
|
The T-70, the last remnant of my shattered command, is to back the gently caress up out of the line of fire from the Tiger.
|
|
#
?
May 12, 2019 22:15
|
|


|
2nd Squadron Orders Continue to consolidate your positions. Lenisto - Remain in reserve, and be ready to move when needed. Detach an ATR team to scout Boris. Habeas - Make sure your fire base is well established in Runner Woods. Be ready to move southwards when ordered.
|
|
#
?
May 12, 2019 22:30
|
|
|
1st Squadron 1st Platoon These moves are for the rifle platoon only. All other units continue last orders.  All moves are fast. Move the HQ and the east unit on turn one and try and have them firing at the swamp targets by the time the middle unit moves on turn 3. The HQ is not to move further than the south end of the yellow field this round.
|
|
#
?
May 12, 2019 23:27
|
|
|
Follow my orders from prior turn. Move HMGs down shaft and then across to klauswoods.
|
|
#
?
May 13, 2019 00:00
|
|
|
Turn 10
|
|
#
?
May 13, 2019 10:27
|
|
|
Orders are due: Wednesday, May 15 at 7PM EDT Wednesday, May 15 at 11PM GMT Thursday, May 16 at 7AM AWST
|
|
#
?
May 14, 2019 01:17
|
|
|
1st Squadron orders Mission update: I still aim to close the distance to the village but obviously we can't do that directly with the tiger in the way. I still want to try and probe forward wherever the tiger is not though. Oyforce: I want you to keep eyes on Tanya/Natasha woods, but otherwise expose the minimum forces to the tiger. Use AT rifles to harrass only if you judge it prudent. I realize that these are fairly static orders but review your units and don't be afraid to give orders to individual units if you think you can improve their position. Hopefully we can act as a company once we get an plan of how to nullify their tiger advantage. Jagsforce: Will give detailed orders later, which will involve redeploying AT rifles and continuing to probe southwards as long as we aren't taking casualties. Second squadron What are your plans for the forces coming up behind OTF? would it help if we vacated part of our sector to make room for you?
|
|
#
?
May 14, 2019 02:47
|
|
|
Army Orders  SWAT: If you can hug the map edge and have your men make their way down to the south, no need to go quickly take your time if it helps to avoid becoming exhausted. Want to get you close so that when the mortars come in you can attempt a flanking move to hopefully secure the church. Runner Woods: If you can spread your men out a little if you think ti will help avoid any possible mortar fire that may come your way otherwise sit till recover your men's stamina and prepare for the big push. 1st Squadron: Jaguars I like your orders and keep them as they are, if you can get some of those riflemen to flank east and around to the south without drawing fire from the Tiger I would like you to do so otherwise continue as planned. T-70: I'd like you pull around to the back of Mikhail near to the ford but not out past it so that you can either A) Move out and shoot the Tiger if it attempts to turn around and retreat to the town or B) potentially cross the ford if a chance becomes available. Everyone else: Sit tight, stay alive, rest and recover and wait for the mortar bombardment before we attempt any sort of assault.
|
|
#
?
May 14, 2019 16:36
|
|
|
Tovarich Randomcheese: Permission to move the remaining SMG troops to Klauswoods so they can help cover/screen SWATs advance. Also considering sending part of 3rd platoon to Boris and distributing the rest around Runner (and into some of the trenches) to avoid mortars. Feel free to tell me if either or both of these are bad ideas, though.
|
|
#
?
May 14, 2019 18:05
|
|
|
Apologies on missing the last turn but it looks like the scouting of Boris turned out ok. What is the LOS between the Tiger and the infantry to the north? I feel like I should spread them out a bit so an HE shot or mortar shell doesn't take out half the line. I am all for those HMGs hiding in the woods and waiting for a better moment to cross the field.
|
|
#
?
May 15, 2019 05:33
|
|
|
1 Sq 1 Platoon One AT team and second squad  Put the scout team well behind the woods. If units come under effective fire, go to ground and crawl to their destinations. Other AT Team:  Move FAST to here. Third turn:  If the previous teams make it across intact, send 1st Squad across to the lowest point you can find in this vicinity. Jaguars! fucked around with this message at 13:00 on May 15, 2019 |
|
#
?
May 15, 2019 12:52
|
|
|
2nd Squadron Orders We're going to make some small movements forward in the west, while continuing to consolidate in the east.. Lenisto - Remain in reserve, and be ready to move when needed. Stay spread out to reduce the risk from mortar or tank fire. Habeas - You are clear to move forwards to Boris; spread out in Runner Woods to reduce the risk from mortar fire. Make use of the trenches where possible. I don't think it's the best idea to move west to Klaus Woods until Boris is clear.
|
|
#
?
May 15, 2019 14:12
|
|
|
Emergency orders for SWAT: I would like one team to advance quicker than the rest to see if the fleeing enemy are still running or potentially setting up an ambush.
|
|
#
?
May 15, 2019 15:31
|
|
|
Orders for my boyos: HMGs: are to continue moving down the shaft, then cross to the northwest quadrant of Klauswoods. I expect this will take a while as they're exhausted. AT rifles: are to re-group in the northeast quadrant of Klauswoods at NORMAL speed. SMGs:: Send one team (preferably one with only a couple dudes left, not the undamaged one) FAST to Klauswoods. They're scouts, I want to see if they draw fire. The rest of the SMG platoon should take cover and spread out in the northern part of Runner Woods, using the northern trenches where possible. 3rd Platoon: Nearest squad is to move FAST from Runner to the edge of Boris, then HUNT through Boris. Don't get too close to the riverbank, I don't want to catch fire from the entrenched positions on the other side or the Tiger. Platoon HQ and the other squad is to get into the southern trenches and/or spread out to reduce the risk of getting killed from mortars. INPUTTER CONTINGENCY: If any of my boys start getting mortared or hit with MG fire you should duck them into cover or have them get out of the fire zone ASAP so long as doing so doesn't put them into even greater danger.
|
|
#
?
May 15, 2019 16:24
|
|
|
2nd Squadron As before. That AT guy in Boris has them worried and is giving us peace of mind that the woods are empty. Everyone else should hold their general positions but spread out to the north to avoid big dangerous explosions. Going north keeps the woods between them and the Tiger and keeps us ready to charge that ford.
|
|
#
?
May 15, 2019 18:01
|
|
|
T-70: FAST up to the tip of the woods, FACE south. If the Tiger appears to be on a Target Order, or is turned around and falling back, adjust orders to charge forward and take a shot at the sides of the motherfucker. If this does happen, pull back immediately the turn after firing.
|
|
#
?
May 15, 2019 23:06
|
|
|
Turn 11
|
|
#
?
May 17, 2019 01:26
|
|
|
Orders are due: Sunday, May 19 at 7PM EDT Sunday, May 19 at 11PM GMT Monday, May 20 at 7AM AWST
|
|
#
?
May 17, 2019 18:51
|
|
|
Army Orders  SWAT: Continue to move your men down the western map edge and gather at the tip of the woods in preparation for moving across the ford and flanking around to the back of the village. Runner Woods: Have your men advance into Boris and occupy the trenches there, don't follow my arrow exactly try and keep out of sight of the german troops in the forward northern trench lines at the village. 1st Squadron: The troops in the west have them move down and around swamp and when you feel ready move to occupy Natasha Woods in preparation for assaulting the town. Cabbage Houses: Any troops that can open fire on the Tiger and make yourselves visible to it, try and get it's attention. T-70 As discussed try and cross the ford and find a position to be ready to assist the northern forces. Everyone else: Hold position and be ready to move.
|
|
#
?
May 17, 2019 21:08
|
|
|
Orders 1 Squadron We are going to attack the town from the SE direction. To do this we have to get there first. It's going to take some time, I'm hoping that we can get there in about 15 minutes and spend the final 15 destroying enemy troops as they retreat from our forces to the north. Map:  The terrain is pretty flat, but even so there is still some features of use to us. The creek bed provides some cover, and the area marked reverse slope has the useful function of hiding our troops if they go to ground. Enemy wise, there's the tiger, the middle infantry group who should be blocked by smoke, and the south group that I'll continue to pursue. Execution: Our first task is to get our troops to the form up point marked on the map. We won't gather our troops there, instead we'll flow our troops through there and send them to their jumping off points as they arrive. Once we have enough troops in place then we will start the attack and the remainder of our forces will flow through as reinforcements. This move is going to be a balancing act. The quicker we get to the form up the better, but we can't attack with exhausted troops. The further back we go, the safer, but the longer it takes. Clearing the remainder of Natasha woods is going to take time. What we are going to have to do is customize our approach with each group of units, getting a priority force to the form up as soon as possible while the rest take the slower, safer or less tiring routes. The tiger tax is going to get us bad here. We need to bypass it without losing too many people which is going to take time. We don't know how it will move so our best defense is to spread our units right out, so that it can only engage one or two units at a time. Priority for units: -Fresh infantry units, especially those with multiple SMGs -1-2 HMGs -Units that have only a short distance to move Timing: In terms of the game clock: Immediate: Jagsforce pursues the infantry in U-boat woods, sets up an HMG in zelda to fire westwards toward the Tanya-Natsha gap. Rest of Jagsforce crosses as soon as the smoke screen is effective. Oyforce pulls priority troops into safe places and starts bypassing the Tiger. 25:00: First troops reach Natasha woods, begin clearing rest of Natasha 20:00: Rest of Jagsforce in Natasha, First Oyforce troops arriving. Decide on attack routes and begin moving to jump-off points. 15:00: First wave of troops in place and firing into village, want to get about four squads or equivalent. 10:00: Advance into village and victory! Support: We probably aren't going to need much once the smoke mission's finished but we probably aren't going to be in a position to provide much, our units in the north are going to be in a better position for calling in bombardments. I'll move the Mortar co-op team with my troops and try to find a useful place for it. Tactical notes: https://i.imgur.com/QIzZmCS.png Jaguars! fucked around with this message at 13:54 on May 18, 2019 |
|
#
?
May 18, 2019 13:49
|
|
|

|
| # ? May 2, 2024 03:56 |
|
|
2nd Squadron: 3rd Platoon, SMG Platoon, AT detachment, & HMG detachment Time to get ourselves into position for the final push! URRA! Legend Red: SMG Platoon Yellow: 3rd Platoon Blue: AT Detachment Green: HMG Detachment Turn 11 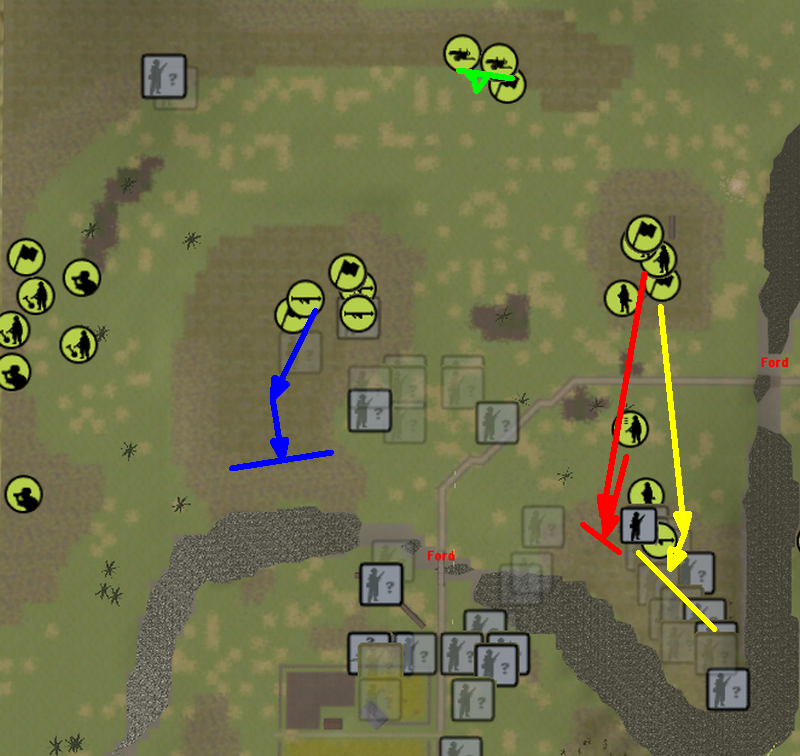 SMG Platoon: The SMGs already down by Boris are to HUNT forward along RED until they kill that last surviving kraut, and then take up defensive positions facing SOUTH in the now vacant trench. The rest of the platoon still in Runner are to move FAST down to Boris, if they get there and the feisty Kraut is still alive, have them start moving on HUNT orders. Once they're there, same rules about spreading out and taking fire as the currently southern elements apply. Inputter's Contingency: Once Boris is secured try to spread them out and get them into cover so an unlucky HE shot or mortar can't kill them all at once. If they come under heavy fire you're to either move them as see fit to get them out of line of sight/imminent death or HIDE if you think that works better. Feel free to have them attack targets of opportunity across the river. 3rd Platoon: Move FAST on YELLOW, until you're in the woods and then switch to HUNT orders as they move to . Keep spread out, and face South/Southeast towards the foxholes and village across the river. Inputter's Contingency: Try to keep them from doing anything suicidal or highly deadly like continuing to run towards the Tiger when it sees them. If they start taking MG fire as they're in Boris, please set them to move SLOW towards the YELLOW line. AT detachment: Move NORMAL to end of the first BLUE directional line, then SLOW towards the endpoint. Inputter's Contingency: If they take more than scattered rifle fire, have them take cover and wait for the baddies to forget about them. HMG detachment: One of the guns can apparently see a German Mortar team. Make them dead, or at least keep fire on them until they've hosed off. Otherwise, see Inputter's Contingency: I'm going to be relying on Abongination for most of this, since I can't determine a good LOS spot for the guns. One already has a bead on troops falling back from the farthest forward trenchline, and are deploying. They're to shoot anything they can see, and feel free to toss in some area fire into the woods/foxholes to make those guys keep their heads down. For the other, I need you to find it a position where it can pour fire across the ford to both tthe foxholes in the woodline and the second trench line. Get it there, DEPLOY, and shoot. If there IS no good spot like that, or if there isn't one that doesn't leave the HMG mega exposed and at risk, do your best to keep it moving to someplace where it can complete those two objectives in comparative safety. 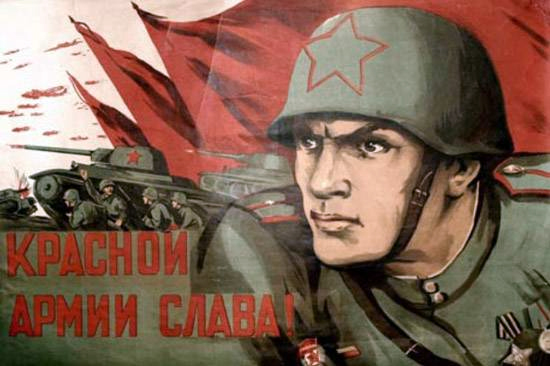 Glory to the Red Army! habeasdorkus fucked around with this message at 15:44 on May 19, 2019 |
|
#
?
May 18, 2019 18:44
|
|