


|
I'm interested in being a squadron commander - I've not really played Red Thunder, but I have played other Combat Mission games. I've followed all the goon games, but I've not played in one before.
|
 #
¿
Apr 10, 2019 01:09
#
¿
Apr 10, 2019 01:09
|
|


|

|
| # ¿ May 22, 2024 17:24 |
|
|
Second Squadron Orders: Preliminaries: Utilisation of forces: As I see it, the company's two cavalry troops are divided into a 'base of fire' troop (1 Troop, under [Lenisto) and an 'assault' troop (2nd troop, under habeasdorkus). In general, I'd recommend sticking to a methodical approach, with 1 Troop providing suppressive fire as 2 Troop approaches the location to be secured. 2 Troop can then assault and secure the position, allowing 1 Troop to move up and the process to begin again. Deployment of Squadron Heavy Weapons: I intend to delegate the squadron's heavy weapons to troop commanders; I want you to have what you need, where and when you need them, rather than risking having them in the wrong place. To this end, Lenisto should consider the squadron's HMG platoon as part of their troop, as they complement 1 Troop's general role outlined above. The 1st AT Section will also be attached to 1 Troop, giving it an organic light AT capability. Similarly, 2nd AT Section will be attached to habeasdorkus's 2 Troop. Overview: 2nd Squadron's current role is to support the Special Weapons Platoon in its approach to Objective Boris; as such, we should be ready to provide fire support, and if necessary, reinforcements. Once this has been completed, I understand the honour of making the first moves towards the village may well be ours. Deployment:  1 Troop should deploy in the region of the black line, while 2 Troop should deploy around the yellow line. Squadron HQ will deploy at the north end of 1 Troop's line. Movement  From the deployment positions, the troops should move forward to support dtkozl's platoon. 1 Troop should move forward to the area of the red line, and set up there, to provide fire support towards the west bank of the river and Objective Boris. I would recommend keeping a pair or so of the squadron HMGs in the forest at the south end of the line, as this offers concealment and good lines of sight towards our targets. 2 Troop should move to the yellow line, and be ready to cross the river, should dtkozl require reinforcing. Squadron HQ will move to the white dot.
|
|
#
¿
Apr 11, 2019 02:23
|
|
|
Lenisto posted:If I'm understanding everything correctly then: 1 Troop are staying on this side of the river covering Boris from the direction of the field and broken bridge? While 2 Troop and SWAT toward the Vodka ford point and then head south to occupy the Boris woods. Yes, 1 Troop is to provide covering fire. 2 Troop, though, is to remain in position in and around the yellow line; you're there as reinforcements if the SWAT platoon need you. More likely, though, you'll be hanging around there until it's time to move south for the village assault. Do not cross the river yet. Randomcheese3 fucked around with this message at 01:52 on Apr 12, 2019 |
|
#
¿
Apr 12, 2019 01:48
|
|
|
Lenisto posted:
Just a couple of comments here. Firstly, there's no need to rush - you'll tire your men out for the actual assault. Secondly, could you spread your men out more. If the Germans start mortaring your position, or shelling it with tanks, you will lose a lot of men as you are now. Spread out to the north. Your men will be fine in the open (I doubt there's much that will be able to bring them under fire, anyway).
|
|
#
¿
Apr 13, 2019 08:36
|
|


|
Second Platoon, Second Squadron Stand-in Orders: If Habeasdorkus doesn't show up, these are the orders for their platoon. Deployment: 2 Troop will deploy along the yellow line, with the SMG platoon at the north end and rifle platoon at the south end. Movement The Troop will then move forward to the yellow line in this image, keeping dispersed to prevent the platoon being disrupted by any artillery fire. The SMG platoon will stay at the north end of the line, rifles again to the south. Once at the line, they will face west and seek cover.
|
|
#
¿
Apr 13, 2019 23:31
|
|
|
 2nd Squadron Orders Lenisto - Set up the HMGs attached to your troop to cover your advance. The rest of your platoon should advance to contact; if fired upon, you should return fire. HabeasDorkus - Continue moving into position; be ready to advance over Ford Vodka if needed.
|
|
#
¿
Apr 16, 2019 01:07
|
|
|
Lenisto posted:
Could you clarify your conditional order for 1st and 2nd Platoons - just make it more clear who's meant to do what when they receive fire.
|
|
#
¿
Apr 16, 2019 22:11
|
|
|
2nd Squadron Orders The Germans have decided to show up in force, so now our squadron's got to show them what a bad idea that was! 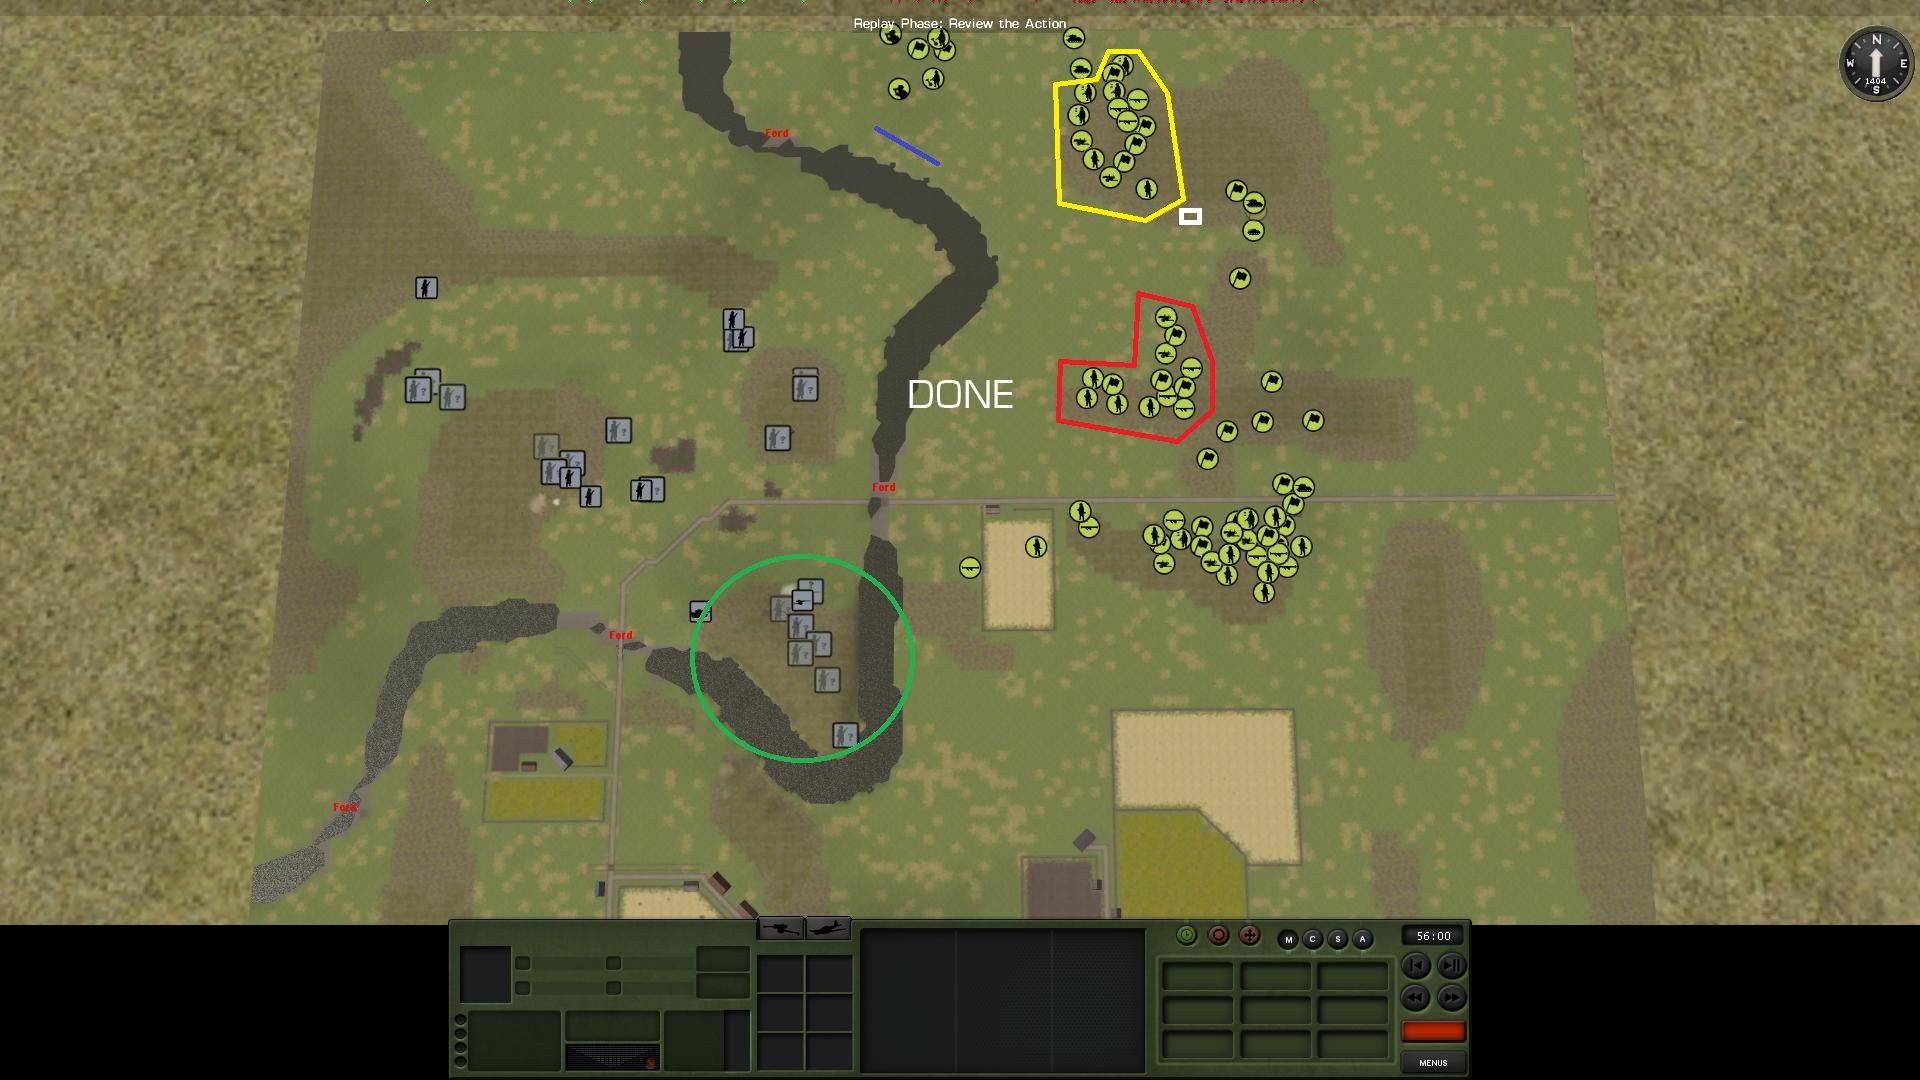 Squadron HQ - move to white square to gain LOS on green circle, if I do not already have it. Radio for a mortar barrage targeted on the green circle. Use all 8 tubes available, medium duration, heavy mission, Lenisto (troops outlined in red in image) - Begin engaging German troops on the west bank of the river. Key targets are AT guns, HMGs, and troops in the open moving northwards. You may manoeuvre as you see fit to maximise the effectiveness of your fire. Maintain spacing, and I'd recommend moving out of the line of fire of the tanks HabeasDorkus (troops outlined in yellow in image) - Your rifle platoon and any attached units should halt movement and begin firing on German troops on the western bank, especially troops in the open. Move the SMG platoon up to the blue line to cover the special weapons platoon as they cross the ford.
|
|
#
¿
Apr 18, 2019 07:09
|
|
|
2nd Squadron Orders Continue to engage German troops on the western bank. Squadron HQ should move towards Lenisto's platoons, maintaining line of sight for the mortars, ending up where the MG section is now. habeasdorkus - it might be worth shifting your rifle platoon forward too, to cover SWAT's move across the ford. We need to think about how we're going to deal with German troops in the forest, especially those in the western end of it. Randomcheese3 fucked around with this message at 23:54 on Apr 22, 2019 |
|
#
¿
Apr 22, 2019 04:36
|
|
|
Lenisto posted:The 2nd Squadron machine guns have had a gun run on that field between the northern forests but looks like that's clearing out. My infantry have moved up and will be firing across the river still so I'd planned on packing one of the machine guns and moving them a bit west as well so they have LOS on those woods also. Feel free to move as you see fit to carry out your orders. This sounds reasonable to me.
|
|
#
¿
Apr 22, 2019 23:53
|
|
|
Hob_Gadling posted:I need best estimates from squadron and armor commanders. I want two estimates from everyone: fast and conservative. Fast allows for more casualties, conservative plays it safe. Based on these building blocks I'll work out the final approach towards village. My fast estimate would be ~15 minutes for a fast one (3 minutes for each of the following phases: bringing Habeas' squadron into Dick Woods to form a base of fire, assaulting Runner Woods with his SMG platoon, suppressing Boris while Lenisto's troops start to cross/clear wire, assaulting Boris from Runner and finishing bringing Lenisto across). For a conservative estimate, I'd double that, to 30 minutes. If we do get the smokescreen, I'd put it down between Runner and Boris, to cover the assault/crossing.
|
|
#
¿
Apr 23, 2019 18:20
|
|
|
FrangibleCover posted:The fundamental difference between Fast and Slow is how much attention I pay to the balls. Given the timetable I can't afford to take it slow, with the approximate plan being thus: I intend to send Habeas' squadron through Head and Shaft, so perhaps it might be worth shifting both your platoons to Balls; Habeas' SMG platoons should be OK to clear those areas.
|
|
#
¿
Apr 24, 2019 01:44
|
|
|
2nd Squadron Orders Our squadron's goal is now to destroy the German invaders on the west bank of the river. Lenisto, your troop will pin down the fascists in Runner Wood while Habeas' troop takes them in the flank; we will then re-align for a full-squadron assault on Boris. Lenisto - Continue to engage German troops in the Runner Wood area. Be ready to move forward, across the Ford of Courage. Habeas habeasdorkus posted:2nd Squadron: 3rd Platoon, SMG Platoon, & AT detachment Looks good to me.
|
|
#
¿
Apr 24, 2019 19:05
|
|
|
2nd Squadron Orders Squadron forces on the west bank should clear it in association with SWAT platoon. Forces on the east bank will move to support 1st Squadron's moves into the village. Lenisto - Leave your HMGs in support of 2nd Troop's push into Runner Wood. Your other forces should break contact and head southwards, following 1st Squadron.. Habeas - Carry on; those orders look good to me. HQ Section - if no German infantry contacts are sighted in Boris, cancel the mortar barrage at next opportunity. If mortar barrage is complete or cancelled, move southwards, staying close to Lenisto's HQ.
|
|
#
¿
Apr 27, 2019 17:12
|
|
|
2nd Squadron Orders This turn, the squadron is to continue clearing the western bank, while moving to prepare for future operations. Lenisto - Move to support Habeas' push into Boris; if you can get fire onto the ford the Germans are using to cross, I would strongly recommend it. Keep a broad spacing, to avoid losses from tank fire and the like. Habeas - Detach an MG team from your rifle platoon; them and your ATR teams should suppress the AT gun in Balls Wood. The remainder of the rifle platoon should secure Runner Wood while the SMG platoon moves to secure Boris. HQ Section - Move south, continuing to stay close to Lenisto's HQ.
|
|
#
¿
Apr 30, 2019 17:49
|
|
|
Lenisto posted:
Crossing the ford is not a good plan, and does not fit well with our strategy. For now, you're our tactical reserve. Remain roughly in position, and be prepared to either cross the ford, or move south to support 1st Squadron. Randomcheese3 fucked around with this message at 19:00 on May 1, 2019 |
|
#
¿
May 1, 2019 16:15
|
|

|
2nd Squadron Orders Continue clearing the west bank; while forming a reserve to support future operations. Lenisto - Consolidate your position, and be ready to move either west or south. Bring your HMGs up to join your platoon. Habeas - Continue as planned. I think trying to get your AT rifles to engage the Tiger at close range is a worthwhile plan; extra vodka rations all round if they do manage to damage it.
|
|
#
¿
May 5, 2019 18:00
|
|
|
2nd Squadron Orders Our tasks have not changed; continue with your tasks. Lenisto - Remain in reserve, and be ready to move when needed. Habeas - Fully secure Runner Woods; form a fire base to put fire down on the woods to the south.
|
|
#
¿
May 9, 2019 17:56
|
|
|
2nd Squadron Orders Continue to consolidate your positions. Lenisto - Remain in reserve, and be ready to move when needed. Detach an ATR team to scout Boris. Habeas - Make sure your fire base is well established in Runner Woods. Be ready to move southwards when ordered.
|
|
#
¿
May 12, 2019 22:30
|
|
|
2nd Squadron Orders We're going to make some small movements forward in the west, while continuing to consolidate in the east.. Lenisto - Remain in reserve, and be ready to move when needed. Stay spread out to reduce the risk from mortar or tank fire. Habeas - You are clear to move forwards to Boris; spread out in Runner Woods to reduce the risk from mortar fire. Make use of the trenches where possible. I don't think it's the best idea to move west to Klaus Woods until Boris is clear.
|
|
#
¿
May 15, 2019 14:12
|
|
|
2nd Squadron Orders Join the general push forwards. Lenisto - Be ready to move forwards into Vlad Woods, remaining towards the northern edge of it to reduce exposure to tank fire. Set up your HMGs to support 1 Squadron's moves. Habeas - Capture and secure Boris. Your orders look good for this.
|
|
#
¿
May 19, 2019 00:04
|
|
|
2nd Squadron Orders Lenisto - Now's your time to shine. Advance your platoon through to Tanya at speed, and if you can, secure the buildings on the outskirts of the village. Habeas - Put down fire to pin down German forces around the northern ford. Prevent them moving to interfere with Lenisto's movement. 2nd Squadron HQ - Join Lenisto's advance.
|
|
#
¿
May 28, 2019 11:55
|
|
|

|
| # ¿ May 22, 2024 17:24 |
|
|
Lenisto posted:
I'd prefer it if you just went straight at the houses. Faffing about moving to the road is a risk. Posting orders for Habeas's platoon in his absence: units that can see German troops in the northern trenches should open fire. Those that can't should move slowly forward into positions where they can engage. 2nd Squadron HQ will join Lenisto's advance.
|
|
#
¿
Jun 3, 2019 22:23
|
|
