


|
This is the American team thread! If you are on the German team, stop reading now! If you�re wondering what this is, see this thread. June 8, 1944 St. Marcouf, Utah Sector, France ***Special note: This match is closely based on a real event. I ask that you all refrain from reading up on it until the match is over! You came ashore with the US 22d Infantry Regiment, 4th Infantry Division on D-Day. Your first day on the continent was calm, spent slowly crossing the inundations behind Utah against minimal resistance and then relieving pockets of Airborne. However, the regiment is now tasked with one of the most difficult missions in the Utah sector: Expand the perimeter northward up the coast, defeating numerous German forts along the way. One such installation, on a slope overlooking the villages of St. Marcouf and Crisbecq, hosts a battery of heavy casemated guns trained towards the sea. Despite massive aerial and naval bombardment, the guns remain intact after sinking the destroyer USS Corry on D-Day.  Capturing this fort was the D-Day objective of 1st Battalion, 22d Infantry Regt, but the first assault was not launched against it until D+1. That morning, the 1st advanced north from Ravenoville, through St. Marcouf, and up the slope. There the battalion encountered concrete blockhouses, pillboxes, and wire entrenchments. After several hours of fighting, the battalion was driven back by artillery and a counterattack from the northwest, and retired southward. Today, D+2, you will make a renewed attempt on the heights, backed by heavy fire support from Regiment and the Navy. This fort must fall to eliminate the threat of its guns and to bring more of the coastline under control. Enemy Intel The fort consists of concrete blockhouses, underground tunnels, casemated anti-ship guns, and pillboxes. Combat Mission can�t exactly model all this, so it�s basically a large trench network with pillboxes and wire. Bunkers simulate the underground shelters that allowed the garrison to survive the intense bombardments. The heavy gun positions are abstracted since they weren�t suitable for defending against ground attack anyway. You have this view from pre-invasion aerial reconnaissance:  The 709th Static Infantry Division mans the German coastal defenses in Utah sector. The first two days of fighting have revealed it to be far from first-rate, with much of it consisting of eastern conscripts. The enemy you faced yesterday were actual Germans, however, and their successful defense suggests that you face some of the 709th�s better troops. American tanks won a small armor engagement north of St. M�re-�glise yesterday, so German armor is known to be in the area. American Forces Your force is the 1st Battalion, 22d Infantry Regiment, 4th Infantry Division. You are supported by a platoon of M4 Sherman tanks. The heavy cruiser USS Tuscaloosa and its 8-inch guns are tasked to deliver a preparatory bombardment against the fort. A Shore Fire Control Party (SFCP) from Tuscaloosa has been assigned to your force for this purpose. In-game, this is an FO team that you may only use to call fire missions from Tuscaloosa. Force Walkthrough: https://www.youtube.com/watch?v=nPYm9ln0R4w   The Map! The map is 1264m x 1456m. Map conditions are clear and dry. Moderate wind from the east.   Here�s the map walkthrough. https://www.youtube.com/watch?v=dxcHtn69Dak Objectives The fort�s three gun positions are represented by specific points in the fort and are marked as terrain objectives. The Americans can demolish a gun by the following method:
A strongpoint at the front of the fort and the nearby village of Crisbecq are each 250VP Hold objectives for the Americans. The Gun terrain objectives are not worth any VP aside from the demolition process. All German VP is scored by inflicting casualties, up to a maximum of 2000VP. Both teams have exactly the same info about objectives and scoring, and the terrain objectives are visible to all. Reinforcements Charlie company is held in reserve and will join the assault later. Discord: https://discord.gg/AUQQwGd Ask for the Allies role. Save File: https://drive.google.com/open?id=17ePsWQbnsRkVrNLyQqiqENMKGO2wrfrh Password: tuscaloosa This file is official. You�ll do your setup in it and turn it over to the Germans.
|
 #
?
Mar 1, 2020 19:43
#
?
Mar 1, 2020 19:43
|
|

|

|
| # ? May 2, 2024 13:27 |
|
|
alright, let's go team good guys. haven't been able to watch the videos yet but I'd like a lowest level position
|
|
#
?
Mar 1, 2020 20:50
|
|

|
Okay goons, the thing Fray didn't mention is that this is a two hour mission so slow and methodical will be the game here. A plan is coming together in discord and when we have everyone signed up to various commands then I'll post here what my intent is.
|
|
#
?
Mar 1, 2020 21:26
|
|

|
Here's the unit overview so anybody who doesn't have the game can pause and see how their mans are armed or critique their commanders' names or whatever. https://www.youtube.com/watch?v=aUuTmNHsThE
|
|
#
?
Mar 1, 2020 22:44
|
|


|
First orders are due 10AM EST / 3PM GMT on Saturday, March 7. You will input your orders first and then pass the file to the Germans.
|
|
#
?
Mar 3, 2020 18:46
|
|
|
Alright then lets do this! Fray has already done SITUATION and MISSION, so to fill out the rest of the OPORD that matters: 3. EXECUTION. a. Commander's Intent I intent to conduct a deliberate attack on enemy positions, assaulting first on the fort overlooking Crisbecq, and then the village itself. I will seek to deny the enemy awareness of my intent and seek to keep sufficient reserves disengaged and available to respond to any contingency. b. Concept of operations. I will conduct this operation in three phases. In phase one the battalion will deploy from its initial positions to start lines for the assault. Scouting elements will deploy forwards to identify, locate and destroy German observation posts, as well as pinpoint heavy weapons.  At H+20 phase two will begin. Under cover of naval bombardment the battalion left flank will conduct a rapid advance to the fort and clear it of enemy presence.  Phase three follows the capture of the fort, in which the battalion right flank, along with reserves, will envelop and destroy German forces in the town.  c. Scheme of Fires. At H+15 the Tuscaloosa will commence a preparatory bombardment of the fort area. This bombardment will provide cover for the battalion's advance. d. Casualty Evacuation. Casualties are to be left behind by assaulting units and are to be treated by follow-on forces. Casualty treatment will take the form of rummaging through their pockets for a few minutes until they disappear. e. Tasks to Subordinate Units A Coy: Acebuckeye13 You are responsible for the battalion's right frontage. You should probe your front to scout out German positions and engage them if you feel you have a decisive local advantage. In the first phase of the operation it would be advantageous for you to conduct a demonstration in your sector to garner German attention, but you should preserve your force for the assault on the village. Crucially you will not have armour or heavy weapons support for much of the battle so you should take care not to get too heavily engaged. B Coy: LazyQ You are to deploy to the battalion's left, identify a start line for you assault on the fort, and have your company ready to go at H+20. You should use scouting elements to identify enemy positions to your front which will be suppressed during your approach. You should seek to avoid detection by the enemy for as long as possible, you may wish to do that by ordering your company to move stealthily to the start line or deploying rapidly from cover close to the assault time. After you have finished securing the fort you are to establish a defence, supervise the destruction of the guns, and provide security for C Coy's assault of the village. C Coy: Randomcheese3 On arriving on the battlefield you will follow B Coy's assault on the fort. If the assault has stalled you are to reinforce B Coy, otherwise you are to preserve your force until the fort is secure, after which you will conduct a passage of lines to seize the village. D Coy: Eukie You are to deploy to support B Coy's assault. HMG teams will provide suppression of suspected enemy positions and mortars will strike critical targets and provide a covering smokescreen at the appropriate time. You will follow the assaulting force and provide additional firepower where required. On securing the fort you will deploy to support C Coy's assault on the village. Det. 746th Tk Bn: Frangible You will operate on the left flank of the battalion to support assaulting elements as you deem most appropriate. Nobody has taken Pioneers yet so I suggest that unless anyone appears we treat them as part of Eukie's heavy weapons company.
|
|
#
?
Mar 4, 2020 18:36
|
|
|
 Orders Group St. Marcouf, 0700, 8th June 1944 Gentlemen! This is our first taste of combat in the great endeavour to liberate Europe. No, before you say it Staff Sergeant Centurium, bar fights do not count. Our overall objectives are follows: o Support friendly forces o Preserve ourselves o Kill Nazis These are in order. We may have to sacrifice our safety for the security of the mission, we may have to sacrifice the chance to rack up our kill count for our own safety. In specific we are going to support Captain LazyQ's B Company as they advance up the left side of our area of operations and respond to their requests for support. Captain LatwPIAT of D Company will be working alongside us again, you may remember him from the drag revue just before we left. And indeed the one the week before that. Odd chap but he knows his tubes. Both commanders may request that our tanks take a position under fire and I'd like you to follow their instructions unless I specifically countermand them. For the early stages of the mission I expect minimal action for our tanks, it's best to conceal them at this stage and I'd like to draw your attention to a terrain feature:  This is an interesting type of hedge that you get in this area of France, which a local farmer tells me is called Bocage. Or possibly Merci Beaucoup or Laisse Moi Te Donner Cette Bouteille De Calvados. I'm not clear for some reason. Point is, we can use it to conceal our vehicles but if we roll forward until the tracks are against the berm we can point our gun barrels through and deliver fire! I hope we see a lot more hedges like this as we advance, they are just perfect for tank work. I want all of our vehicles lined up behind this position and I want everyone ready to roll forward and suppress enemy positions, especially anti tank guns, without orders to do so from me. I draw your attention to the large forest at the back marked "Back in Black" on your maps, although what that means I couldn't tell you. This is an excellent position for anti-tank guns and the Germans have very few good positions in this area. Be careful of it, and good luck to you all. Supplemental Maps:   (OOC Note: He/Him for Captain LatwPIAT, She/Her for Forums User LatwPIAT. But of course women can't serve in 1944?)
|
|
#
?
Mar 4, 2020 23:52
|
|
|
First, I have taken it upon myself to give names to many of the key points and features of the map, which should hopefully aid in planning and coordination. I will refer to several of these points in my orders below. With that out of the way, let's do some orders, subject to change.  OBJECTIVE: Command wants us to move up and tie down German forces on the right. This means: A: Identifying where the enemy is, so we can kill them, B: Finding ideal positions from which to engage the enemy, bringing the brunt of our force to bear, so we may kill them, C: Cutting off routes of escape, so that if they try to run, we may kill them. Now, let's look at the area we'll be fighting.     The AO is a heavily forested area, flanked by a ridge to one side and water to the other. The ridge is the key ground, offering excellent firing lines across the valley. As such, I have devised the following plan of attack:  First platoon under RandomCheese will move into Pyromania Forest, spreading out and establishing positions that can fire into Joshua Trees. Second Platoon under Aphid is going to attempt to move to Appetite for Destruction Point, and occupy the treelines along Oates Way looking out across the valley. Third platoon is to be held back for the time being, taking up positions in the northernmost houses of Jackson City, and moved up when necessary to plug holes or lead the next advance. Both First and Second platoon are ordered to approach cautiously and in waves, splitting their teams, spreading out, and sending out small recon pickets well before the bulk of your force, so that if enemy activity is detected we may redirect our forces where needed. The M1919s of the Weapons Platoon will be supporting Aphid as he advances to Appetite for Destruction Point. Once he secures it, they'll move there to provide fire support and to cut off enemy reinforcement or retreat from Joshua Trees. The mortar platoon will be setting up in a copse of trees near Jackson City, and will be available to provide fire support and smoke cover when enemy forces are detected. To both of you, be careful. I already said it, but spread out your forces and advance them slowly. We won't have much in the way of support, so we want to preserve our forces as best we can while putting as much fire onto the enemy as possible. Though it's unlikely the enemy will be allowed to deploy directly into Pyromania Forest or near Appetite for Destruction Point, they may rush to occupy those positions as we advance, so keep your guard up. b Lemme know if either of you have any questions.
|
|
#
?
Mar 5, 2020 00:25
|
|


|
A note on mortar employment: You can use any on map mortar either for indirect fire with a spotter, which is slow, finicky and expensive in ammunition but can allow you to drop rounds into defilade by using area target orders; or you can use direct fire by setting up the mortar in line of sight of whatever you want dead and letting them walk rounds into target. Direct fire obviously carries its own risks but it's very fast and the best part of the long range firepower of the American infantry company. I would advocate for the use of 60mms in the direct fire role and 81mms in the indirect fire role, although obviously this is purely advisory.
|
|
#
?
Mar 5, 2020 11:22
|
|
|
THE PLAN The plan for Phase One is very straightforward A to B to C as far as movement goes. The company carefully moves up to JUMP line in rough diamond formation, 3rd on point, 1st on the left, 2nd on the right and 4th at the back, scouting ahead and identifying German defensive positions for our supporting tanks to engage and destroy. At H+15 as bombardment starts the company approaches the START line from which it will launch the assault against the fort immediately after the artillery falls silent. Once taken the company takes position on the eastern side of the fort to defend against counterattacks and provide security for the pioneers.  ENEMY Black marks possible enemy positions. Lines in RunDMTrees and Thriller Forest are expected to be infantry, the circle in Back In Black Forest most likely Anti-tank guns. Two major threats: first, the possibility of a tank attack from the northwest. Unfortunately in this open country there is very little B company can do about that so we put our trust in FrangibleCover's tanks. Second is the black X in the corner of RunDMTrees. This is an opening giving any units in the strongpoint excellent view across the field and our approach. This will be countered, in addition to the initial artillery strike, with heavy smoke cover and additional suppressive fire from our support units. PLATOON ORDERS 1st Platoon under oystertoadfish moves up to the hedgerow east of Route U2. Once the bombardment is under way you will proceed to the western end of START. During the assault your job is to clear any remaining defenders in Thriller Forest, then turn east and attack the fort itself. 2nd Platoon under HabeasDorkus takes position at the eastern end of the Powerslave Line and, at H+15, move forward to the eastern end of START. Your right flank should be covered by A company but they will be positioned way back there so keep an eye out. During the assault you will strike the southern tip of the fort along the road. 3rd Platoon under Centurium takes point, moving up to the small copse of trees west of Powerslave Line. At H+15 you move to the center of START line and from there attack the middle of the opening between the strongpoint and Thriller Forest. GENERAL NOTES Don't be afraid to split squads and scout forward! Any initial contact with the enemy should be light with minimal casualties. We have tanks and heavy weapons to engage at range. The main event for B company is the assault on the fort, our real work begins at START line. We have very open ground on our approach, use your own judgement interpreting my plan. The main objective for Phase One is to be as close as possible to the START line at H+20, with rested men and minimal casualties. You notice the assault plan for Phase Two is pretty vague, we need to improvise a bit there since we have no intel on the disposition of German defenses. SUPPORT FrangibleCover, I would like you to take major part in taking out any enemy first line of defense up to the RunDMTrees. My guys scout targets and your tanks blast 'em. There's also two specific jobs for you and Eukie. First, suppressing the strongpoint as Baker approaches RunDMTrees, 81s fill that thing with smoke and then just pour area fire in. Assuming the big guns didn't do the job. Second is giving close support to 1st platoon during their assault into the Thriller Forest during Phase Two. UNIT ORDERS FOR INPUT HQ: moves along with 3rd platoon XO: moves along with 1st platoon 4th platoon: behind 3rd and 2nd, roughly in between as per map EDIT All platoons keep their main force hidden in deployment; only send scouts forward. General plan takes effect on command. LazyQ fucked around with this message at 13:20 on Mar 6, 2020 |
|
#
?
Mar 5, 2020 18:32
|
|

|
 Orders Group St. Marcouf, 0700, 8th June 1944 The purpose of these orders are to move Dog Company up behind Baker Company. Dog Company machine guns will be available for speedy suppression of German forces and then set up in positions where they can support the assault on the German fortifications. Dog Company mortars will be kept in the rear, with the Mortar Platoon HQ following closely behind Baker to be available for immediate fire direction and then set up in a position where they can guide indirect fire onto enemy positions defending the German fortifications. MAP  COMPANY ORDERS All advances should attempt to stick to cover whenever possible. The machine gun teams are to at all times be accompanied by their Ammunition Bearer subteams. Company HQ Company HQ is to advance to the area south of the Alexis line, where they will maintain direct contact with both Mortar Sections and in radio contact with the Mortar Platoon HQ. Their purpose is to relay fire directions between the Mortar Platoon HQ and the Mortar Sections. This will facilitate indirect fire onto the Run DMTrees line in support of Baker Company. MG Platoon 1 Team 1 MG Platoon 1 Team 1 will advance to house Bethany, enter it, and set up a machine gun position on the top floor. They are to observe and cover the Back in Black forest. This will give advance warning and, hopefully, allow them to suppress enemy targets in the Back in Black Forest, thereby covering Baker and our tank platoon. MG Platoon 1 (sans Team 1) and MG Platoon 2 The MG platoons will advance 100 m behind Baker Company in order to reach their destinations, described later. If Baker makes contact with the enemy, the MG platoons are to rush forward until they can see the enemy. Then they will set up their machine guns to immediately suppress enemy positions with the intent of achieving fire superiority to allow Baker to continue their assault. MG Platoon 1 (sans Team 1) MG Platoon 1's destination is Dorothy-1, where they will set up their machine guns to cover the line of Run DMTrees towards the Strongpoint. If LOS does not permit this, they will relocate to Dorothy-2. If LOS still does not permit this, they will advance behind Baker Company to the Erika line and set up positions there. MG Platoon 1's job is to cover Baker in the north-northwest sector and suppress and achieve fire superiority over enemy forces with the purpose of facilitating Baker's advance and assault on the enemy fortifications. If LOS permits, MG Platoon 1 is also to cover the Back in Black Forest. MG Platoon 2 (sans Team 4) MG Platoon 2's destination is Chelsea, where they will set up their machine guns to cover the Strongpoint and to the left and right of this. MG Platoon 2's job is cover Baker in the north-northwest sector and suppress and achieve fire superiority over enemy forces with the purpose of facilitating Baker's advance and assault on the enemy fortifications. MG Team 4 MG Team 4's destination is Claire, where they will set up their machine guns to cover the Strongpoint and to the left and right of this. MG Platoon 2's job is cover Baker in the north-northwest sector and suppress and achieve fire superiority over enemy forces with the purpose of facilitating Baker's advance and assault on the enemy fortifications. Mortar Platoon HQ The Mortar Platoon HQ is to advance 100 m behind Baker's line of advance until they reach the Claire line. At their destination they are to observe the Run DMTrees line and provide forward observation for the Mortar Sections. This will allow the Mortar Sections to engage in a bombardment at H+15, which will support Baker's assault. If the Mortar Platoon HQ cannot effectively call in fire on the Run DMTrees line from Claire, they are to advance to Chelsea. If Chelsea is also unsuitable, they are to follow behind the line of Baker's advance until they reach the Erika line. The purpose of the Mortar Platoon HQ is to provide forward observation for the Mortar Sections in order to assist Baker's advance and assault with indirect fire. If Baker makes contact with the enemy, the Mortar Platoon HQ are to advance towards cover until they can see the enemy or until they reach the forward edge of Baker's advance, whereupon they will provide fire directions to the Company HQ. Mortar Sections The Mortar Sections are to advance to the area south of the Alexis line, where they will deploy their mortars and maintain direct contact with the Company HQ. Their purpose is to receive fire directions in order to cover the Run DMTrees line with smoke at H+15. Once Mortar Platoon HQ reports effective smoke cover, they are to bombard the Run DMTrees line with explosive munitions. This will facilitate indirect fire onto the Run DMTrees line in support of Baker Company's advance. Prior to H+15, the Mortar Sections are to be available to support Baker's advance with smoke or high explosives. if Baker makes contact with the enemy prior to H+15, the Mortar Sections will deploy smoke and high explosives onto enemy positions. This will suppress enemy positions and allow Baker to continue their advance. Pioneers The Pioneers are to follow the Company HQ to south of the Alexis Line, where they will await further instructions. They are to remain in the rear area to avoid taking fire, in order to conserve their numbers in anticipation of the assault on the German fortifications. This is to ensure that we maintain the capability to demolish the German guns until they are needed. LatwPIAT fucked around with this message at 23:10 on Mar 6, 2020 |
|
#
?
Mar 6, 2020 00:38
|
|

|
Orders Combat Command Louseliquor  Squads deploy in the positions indicated on the map, just ploinked into the field. HQ QUICK to h2 via h1. A squad SPLIT and one team each to QUICK to the dots at a2. Indicated half then HUNTs to a3. B squad SPLIT in half. QUICK to b1, then to b2 as indicated. Half stays there, second half HUNTs to b3. C squad detach one SCOUT TEAM (ST). All MOVE to c1. Bulk of squad then HUNT to c2. Scout team HUNT to c3.  Squads deploy in the positions indicated on the map. If possible, HQ splits off a team to MOVE to the top floor of the house (it should be the three storey one) then HIDES. If HQs can�t split off teams just HIDE the whole thing on ground floor. A squad MOVEs into the building indicated by the blue line, then HIDES. B squad MOVEs into the building indicated by the blue line, then HIDES. C squad MOVEs to c2, then HIDES. Don�t worry boys, your time will come. aphid_licker fucked around with this message at 10:10 on Mar 7, 2020 |
|
#
?
Mar 6, 2020 14:13
|
|


|
Orders: 1st Platoon, A Company Platoon is to deploy as follows: 1st Squad is to deploy at the southern blue line, and MOVE to the northern blue line. 2nd Squad is to deploy at the southern red line, and MOVE to the northern red line. 3rd Squad is to deploy at the southern yellow line, and MOVE to the northern yellow line. Platoon HQ is to deploy at the southern black circle, and move to the northern one. 2nd and 3rd Squads are to leapfrog across Synchronicity Field to the forest. If fire is taken, 2nd and 3rd Squads are to form a fire base, while 1st Squad and the Platoon HQ attempt to flank, preferably by moving to the left, into the houses.
|
|
#
?
Mar 7, 2020 00:05
|
|

|
is that darker area in aphidlicker's map the deployment zone? if so, i'll need to start near the houses. i drew up an incredibly detailed plan: Third draft of Orders, 1st platoon, B company third try:  I'll plagiarize the plan posted just above on general format: ALL Squads are to SPLIT and send one fire team ahead as scouts. 1st Squad is to deploy at the southern red line, and MOVE to the next red line, then the next. one fire team should precede the other, with the second providing fire support. 2nd Squad is to deploy at the southern blue line, and MOVE to the northern blue line. one fire team should precede the other, with the second providing fire support. after reaching the final blue line, provide fire support to 1st and 3rd squads. 3rd Squad is to deploy at the southern black line, and MOVE to the northern black line. one fire team should precede the other, with the second providing fire support. Platoon HQ is to deploy behind 2nd Squad and follow them at a safe distance. sorry for how squiggly the lines are. i'm attempting to stay behind elevation while moving and occupy elevated areas at the end of my movements, as pointed out by centurion. the squads should reach their positions in order of 3rd-2nd-1st, with scouts for each movement. if we make contact i assume the turn ends and we get a chance to give more orders. i believe we have an hour to discuss this. oystertoadfish fucked around with this message at 14:57 on Mar 7, 2020 |
|
#
?
Mar 7, 2020 01:23
|
|
|
oystertoadfish posted:is that darker area in aphidlicker's map the deployment zone? if so, i'll need to start near the houses. i drew up an incredibly detailed plan: I sure hope it is because that's the assumption I built my deployment plan around  But it's been a while since I last played this game.
|
|
#
?
Mar 7, 2020 10:13
|
|
|
lovely phone orders: glynn if you can, deploy my mortars in that treeline near my half of the deployment area, and my MGs/ammo bearers and company command team in that house right on the edge of it, kthx
|
|
#
?
Mar 7, 2020 14:59
|
|
|
Command Tank Orders Conform to Centurium's movements. Emergency Tank Orders Place any tanks not under orders by the deadline behind the marked Bocage from my first post.
|
|
#
?
Mar 7, 2020 15:53
|
|
|
Orders, 3rd Plt B Coy All platoons are to immediately split off scout teams. 1sq is BLACK 2sq is RED 3sq is BLUE For the first two turns of the game: Scout elements are to MOVE along their squad routes. 1sq is to occupy the 1story building juuuust outside the deployment zone on the left and in front of the 2 story building with the HMG on the second floor. 2sq is to occupy the 2 story building with the HMG on the first floor 3sq is to occupy the 2 story building with the HMG on the second floor. Command element is to also hang out on the second floor and look at stuff with binoculars. On turn three: Everyone gets out of the buildings On turn four and afterwards: The squads MOVE following their prescribed routes. command follows 3sq.  NOTE: THESE ORDERS ASSUME BREAKS FOR MORE ORDERS IN CASE OF MEETING SIGNIFICANT RESISTANCE. If that assumption is false, if the scout teams meet fire please move main squads to support in 1-2 bounding order, with 1sq moving and 2 and 3sqs providing fire, then 2 and 3 move next, etc. Thanks!
|
|
#
?
Mar 7, 2020 15:57
|
|
|
ORDERS, 1st section 1st plt 746th Tank Btn Tank 1 is black Tank 2 is blue Both are to go exactly one game square behind that delicious bocage. If any tasty targets present themselves the tanks are to go directly up to the bocage and shoot the target until it is dead or no longer has confirmed sighting for more than a whole turn, at which point the tank should displace 3-5 squares laterally along the bocage and again 1 square behind it. For loss of sighting less than 1 turn long the tanks should area target the last known location of the target. Centurium fucked around with this message at 16:05 on Mar 7, 2020 |
|
#
?
Mar 7, 2020 16:02
|
|
|
 WHADDAYAMEAN WE'RE LATE?! 2nd Platoon B Coy 1. Squads 1, 2, and 3 are to SPLIT off one two man scouting team each and send them along the following general path. 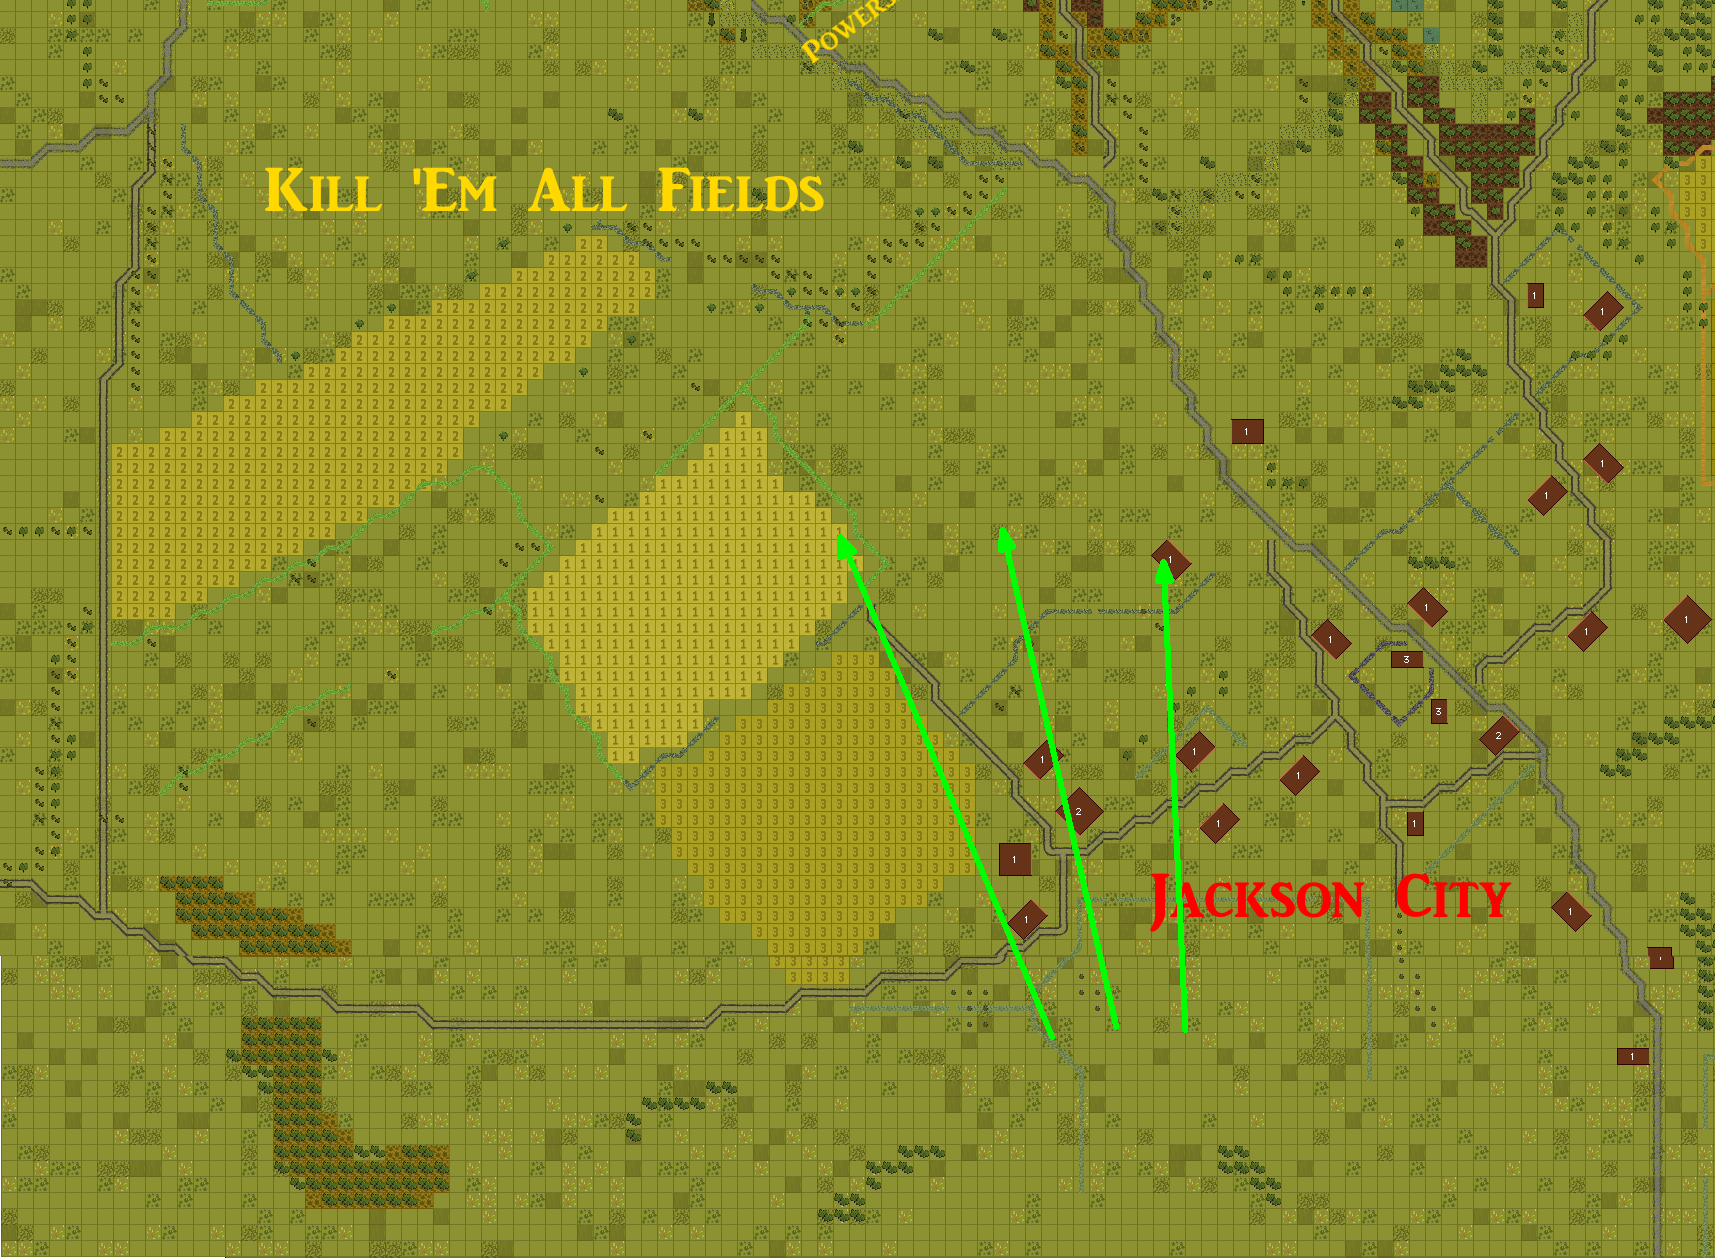 2. Scout teams are to move FAST for 1 minute, then NORMAL 3. The rest of the platoon is to HOLD for 1 minute, then follow along behind the scout teams at NORMAL speed, with the HQ behind the three squads in a diamond formation. 20m between squads please. Sorry about being late! It's my senior NCO's fault!
|
|
#
?
Mar 7, 2020 16:27
|
|


|
Orders (I'll make this look pretty later, when I'm not sick) Mirror Centurium's orders, keeping a decent amount of spacing between my and his armor. Same firing provisions, if possible.
|
|
#
?
Mar 7, 2020 16:51
|
|

|
Okay! We survived setup without any disasters! No ambushes, minefields, or stuck vehicles! Yet! https://www.youtube.com/watch?v=D0p9bDo-4AI Well, actually.... https://www.youtube.com/watch?v=1aAVpIg1yzo So... turns out at max zoom I couldn't hear or see those tracers. About to get exciting! Fray will post when the Germans have gotten their video done and then we will have 2 days until orders are due and we run turns again. If anyone wants specific videos of their unit with questions about terrain, just let me know. I can also get overhead shots for orders if commanders can't, etc.
|
|
#
?
Mar 7, 2020 23:21
|
|
|
Orders are due 3PM EDT / 7PM GMT on Monday, March 9. Going forward, all rounds are fixed at 3 minutes. Fray fucked around with this message at 00:53 on Mar 8, 2020 |
|
#
?
Mar 8, 2020 00:28
|
|
|
No changes to orders, per the plan. My loader has some coffee on the go if you guys want some?
|
|
#
?
Mar 8, 2020 15:33
|
|
|
B Company No change in orders, be very careful now.
|
|
#
?
Mar 8, 2020 16:03
|
|
|
A Company, 2nd and 3rd platoons Colored lines to indicate the type of move orders i want used, blue=move and purple=hunt. Two lines emanating from the same unit indicate that I want that unit split, if it can't be split - I'm a bit hazy on the rules for that - move the unit to a bit of cover in between the two target points. A Company, 2nd platoon  A Company, 3rd platoon 
aphid_licker fucked around with this message at 19:02 on Mar 8, 2020 |
|
#
?
Mar 8, 2020 18:55
|
|
|
so, my 3rd squad got shot at, but it's the westernmost of them, 1st squad, that seem to be in the most danger, the ones who will be walking into range of that bunker soon. do we still need to advance or should i change orders?
|
|
#
?
Mar 8, 2020 21:05
|
|
|
MAP  COMPANY ORDERS MG Platoon 1 HQ ("2nd Section HQ" on map.) Are to advance to the Denise line and set up their machine gun in order to cover the N-to-NW direction. Their job is to be available to lay down immediate suppressive fire to cover the advance of Team 1 and Baker's left edge if either makes contact with the enemy. This will protect Team 1, suppress the enemy, and allow our forces to achieve firepower superiority over the enemy, in order to facilitate our planned attack. (I had no idea the Platoon HQ also got a machine gun. Oh so many machine guns...) MG Platoon 1 Team 2 ("1st Team" on map.) Are to advance to the west side of the northbound road to their west. They are then to advance north along the side of the road, using the sloping terrain for cover from the W-NW direction, keeping behind Baker's line of advance until they can advance across the road to Dorothy-1, as indicated on the map. Once at Dorothy-1, they are to attempt to find the enemy. If enemies are found, they are to deploy their machine gun. If no enemies can be found, they are to advance to Dorothy-2 behind the line of Baker's advance. Once at Dorothy-2, previous orders apply (i.e. attempt to line up on Rum DMTrees, if not possible move behind Baker to the Erika line.) Team 2's job is to continue their advance in a careful manner so that they can survive until they can use their machine guns to support Baker. This is to protect Baker from enemy fire and facilitate our planned attack. If MG Platoon 1 HQ ("2nd Section HQ"), or nearby Baker troops take fire from an identified enemy position, 1st Team are to abort and move to nearest cover, then set up their machine guns to engage the enemy. If 1st Team take fire or make contact with the enemy, they are to abort and immediately move towards cover. Once in cover, they are to search for the enemy. Upon finding the enemy, they are to deploy their machine gun and engage. Suggested covered areas include Dorothy-1 itself and where the extension of the Denise line meets the northbound road. MG Platoon 1 Team 1 ("1st Team" on map, the one in Bethany.) Team 1 are to enter the Bethany building's second floor and deploy their machine gun so they can cover the territory towards and including the Back-in-Black Forest with heavy machine gun fire and lay down immediate suppression. All Others As you were. LatwPIAT fucked around with this message at 14:54 on Mar 9, 2020 |
|
#
?
Mar 9, 2020 06:33
|
|
|
Orders, 2nd Section, 1st Platoon, 746 Tank Battalion (Det.), Sgt. Panzer Section NCO. Continue to hold position behind the safety hedgerow and hold fire. If the infantry gets into a mess they cannot handle on their own, armor may support at their (re: glynnenstein's) discretion. Otherwise, hurry up and wait a while.
|
|
#
?
Mar 9, 2020 18:08
|
|
|
Orders 1 Section 1 Platoon 746 Tank Battalion No change in orders. Discretion to break cover and open fire is upon Glynnenstein's appraisal that failure to do so endangers the infantry. Shoot and scoot rules still apply in that case. Orders, B Coy 3 Platoon You're late, men. Hurry up and follow those orders from last time. Edit: let's make up for time. Once all squads are out of buildings and moving, change to quick for at most two turns. After that back to move if they ain't there yet. Centurium fucked around with this message at 18:40 on Mar 9, 2020 |
|
#
?
Mar 9, 2020 18:25
|
|
|
phone posting... B coy 1st platoon orders. the westernmost troops on the map. westernmost squad: advance/retreat to the Dorothy line on PIATs map. hide and await support. Central squad: stay where you are. easternmost squad: retreat, crawling, to the closest available reverse slope. hide and await support. sorry the orders are lovely... I might have a chance to look at this in an hour but maybe not. work.
|
|
#
?
Mar 9, 2020 18:35
|
|
|
Company orders: Same as last time. Random, see if you can split your platoons and spread out a bit more to cover more frontage. Weapon platoon orders:  Let's get these guns moving. Mortars I want moving up to that hedge line, get them closer to the action. Mortar HQ gets to jump into the nearby house. Machine Guns and their associated ammo bearers should start moving Quick to catch up to the advance. Weapons Platoon HQ I also want moving Quick, then a Hunt action up to the forest line to get some eyes on the valley. I also want a Target Arc of 360 degrees and 20m on them so they don't reveal their position by taking unnecessary potshots. Company HQ teams should move Quick up to the house behind the crossroads, where they'll be with the MG platoon HQ and one of the MGs. If things start going pear-shaped, use your discretion to cancel movement orders and get dudes into cover or start laying down suppressing fire. This goes double for the mortars�they don't have a very long deployment time, but I want them stopped and deployed if we get any significant contact we may need them for.
|
|
#
?
Mar 9, 2020 18:52
|
|
|
I already stacked two HQs into that house, hope there's some wine and cheese available for all those nobles
|
|
#
?
Mar 9, 2020 20:57
|
|
|
Acebuckeye13 posted:
I've only got one platoon, and it's hard to see how I can spread it out more - I think I'm covering about the eastern third of the front. Do you mean Aphid?
|
|
#
?
Mar 9, 2020 22:26
|
|
|
I hosed up the render stitching the videos together or something. I have no idea what I'm doing... so here are the 3 videos for each minute. Freshly uploaded so they may be in low-quality for a few minutes. My voiceover may be a touch hot... First minute (Turn 7) https://www.youtube.com/watch?v=CWoRFHfuf04 Second Minute (Turn 8) https://www.youtube.com/watch?v=N_gLpCKfLTY Third Minute (Turn 9) https://www.youtube.com/watch?v=aDwlptukU0o And here is a full gallery of screenshots of stuff like close-ups of enemy units, who spotted those units, and top-down screenshots of unit formations for orders and such. We should have until Thursday afternoon to submit orders; if anyone wants specific looks at LOS, unit status, or anything else I can hopefully get that done in the evening the next couple days. The sooner you request the better!
|
|
#
?
Mar 10, 2020 00:49
|
|
|
Orders are due 4PM EDT / 8PM GMT on Thursday, March 12.
|
|
#
?
Mar 10, 2020 02:59
|
|
|
OKAY BOYS, COMMAND SAYS GO! Get out from behind this hedge, it's done its job, get the tanks into hull-down positions and get shooting! Staff Sergeant Panzer, I want you to take your tanks and knock out that bunker. Staff Sergeant Centurium, I'm attaching my vehicle to your force and I want you to play this more reactively, support the infantry. Now, both of you, if the infantry spot an anti tank gun before we move out from behind the hedge then I want you to stop moving and we'll work it out from there. If any vehicle is exposed beyond the hedge when the gun is spotted or if the gun shoots at us and you have a fair idea of where it's shooting from then drop everything, get your tanks into a position to engage it and deluge those Nazi motherfuckers in American lead. Captains LazyQ and LatwPIAT, please hold firm, set up and if any of your guys spot an anti tank gun I would like you to poo poo fury on it. Purely a recommendation but my boys do their best work when not on fire.
|
|
#
?
Mar 10, 2020 22:06
|
|
|
B Company Everyone, we should be moving forward in 6 minutes. Forget JUMP, this is where we begin our approach to START. 1st Platoon, nothing much for you, hunker down and wait. 2nd Platoon, there seems to be somebody skulking in the bushes near you, investigate and deal with it, don't forget Area Fire 3rd Platoon, try to get more to the left from 2nd so you don't clump together once you go forward. UNIT ORDERS FOR INPUT HQ+XO: continue but trail right behind their respective platoons if possible 4th Platoon: move up to the low hedge just south of 2nd Plat 2nd squad/B team.
|
|
#
?
Mar 10, 2020 23:06
|
|
|
Randomcheese3 posted:I've only got one platoon, and it's hard to see how I can spread it out more - I think I'm covering about the eastern third of the front. Do you mean Aphid? What I mean is by splitting your squads. Each squad is made up of up to three fire teams that can be split up and directed as their own individual units, and I'd like you to try and split your squads up so you can cover more frontage, while also making sure that your individual pixelmen are spread out so a single MG burst won't kill five guys* *this has happened to me If you want/need more details, feel free to @ me in discord and I'll be happy to oblige.
|
|
#
?
Mar 11, 2020 05:47
|
|
|

|
| # ? May 2, 2024 13:27 |
|
|
MG Platoon 1 Team ? (The guys who got shot) Immediately withdraw southwards into bocage. Then, moving northwestwards along the south side of the bocage towards the Denise line, they are to attempt to make visual contact with the enemy. If they do, they are to deploy their machine guns and lay down fire on the enemy. MG Platoon 1 HQ ("2nd Section HQ" on map) Keep pouring fire into the identified enemy positions. Everyone Else As you were. EVERYONE When firing, prioritize, highest to lowest: 1. Immediate self defence 2. Enemy anti-tank guns 3. Enemy machine guns 4. Enemy mortars 5. Enemy infantry 6. Enemy vehicles The intent of this is to suppress enemy anti-tank weapons in order to allow our tank platoon to destroy enemy positions, which will allow us to maintain the assault with minimal casualties. After this has been achieved, suppressing enemy machine guns will enable us to win the firefight and allow Bravo to eliminate enemy positions. After this has been achieved, eliminating enemy mortars will prevent the enemy from laying down effective indirect fire on our machine guns. After this has been achieved, other targets are to be eliminated in decreasing order of .30-06 effectiveness.
|
|
#
?
Mar 12, 2020 05:42
|
|