|
A Company, 2nd and 3rd platoons Colored lines to indicate the type of move orders i want used, blue=move and purple=hunt. Conditional for contact: If not taking fire, HIDE. If taking fire, SNEAK back the way you came until contact is broken. A Company, 2nd platoon   A Company, 3rd platoon  
aphid_licker fucked around with this message at 14:44 on Mar 12, 2020 |
|
|
|

|
| # ? May 2, 2024 09:50 |
|
A Company, 1st Platoon All squads are to split into fire teams, and take up positions as indicated (blue for 1st Squad, red for 2nd, yellow for 3rd). One fire team from 2nd and 3rd Squads is to move forward to the river line, sticking close to the red/yellow lines respectively. If no fire is taken, then the rest of the squads can move forward to meet them. Platoon command is to move to the black circle.
|
|
|
|
Orders, 2nd Section, 1st Platoon, 746 Tank Battalion (Det.), SSgt. Panzer Section NCO. Alright boys! Orders from Lieutenant are to engage that sorry-rear end Kraut bunker, so that's what we're gonna do! We will wait for a single minute to give our infantry buddies out in the field a chance to spot any enemy anti tank guns. If AT guns are spotted, we will hold position at the hedge until otherwise ordered, unless we are out of it's firing arc. If we are out of it's arc, we will bound up from cover to cover, as close as we can without getting our asses shot off. If everything is good for us to continue moving, we'll move up to a relatively covered position where we can fire upon the bunker, and put some HE rounds into that pillbox. You have your orders, crews, let's get to it.
|
|
|
|
 Deploy the A Company LMGs, just in case.
|
|
|
|
 Ok, each squad is to SPLIT into fire teams and MOVE into position. Glynn, please do your best to guess the military crest and keep the boys just on the reverse slope side. RED is Command BLUE is 1 sq AQUA is 2 sq MAROON is 3 sq. Again, if the enemy informs you of LOS by means of hot lead, please hit the dirt. If there's at least 3 fire teams able to shoot back, shoot back for a turn and disengage at your discretion. If a fire team is on their lonesome, SLOW back to break LOS. Sorry for the work intense orders.
|
|
|
|
 RED is HQ tank BLUE is 1 tank PURPLE is 2 tank Ok, three phases: First phase, all three tanks roll out past the hedge. WAIT at circle doing your best to allow enough time for all tanks to clear the hedge and FACE towards direction of next movement. Second phase, MOVE along lines to destination. Third phase is contingent: If AT guns fire on you: POP SMOKE and run to the nearest hull down wrt the AT guns If you can shoot the germans: Shoot the germans in the hedge that MG'd us last turn. OPEN UP unless under heavy fire. If you can't: manuever till you can. OPEN UP unless under overwhelming fire. Centurium fucked around with this message at 21:03 on Mar 12, 2020 |
|
|
|
Turn 10 https://www.youtube.com/watch?v=TDeksagrEEc Turn 11 https://www.youtube.com/watch?v=2GnMRmltU8I Turn 12 https://www.youtube.com/watch?v=PeBxx23t8Ok Unit screenshots. e: Posted while videos are still processing!
|
|
|
|
 Alright boys, look like we got some CONTACT 1st Platoon Status You've picked up some heat!  Looks like 2nd Squad/C Team has started taking some scattered rifle fire from that sound contact. Fortunately, you have something they don't: The M1918 BAR. You want my recommendation, put down a Area Target or Target Briefly on that contact and start blastin'.  Otherwise, things are somewhat quiet. The rest of 2nd Squad can't see poo poo and can freely move up. 1st Squad is in a decent position to provide fire across The River if needed, though Glynn could probably scooch them around a little for better LoS. 3rd Squad is still moving. Orders Keep moving to the edges of the forest, getting LoS. 3rd Squad in particular should be able to move up through the woods to get right up to The River, and we may be able to start crossing as soon as the next set of turns if we don't run into any more contact. 2nd and 3rd Platoon Status We went over this in the discord pretty thoroughly, but to briefly recap: Most of your troops can't see poo poo, but some have reached good positions, and some are already firing on visible German contacts. Orders  Continue putting 2nd Platoon in firing positions, and start moving 3rd Platoon to that first hedge line. We're still probing the German lines so don't get too bold � moving up a single scout team or squad to see if the enemy starts firing is a much better strategy than moving the whole platoon at once. But also don't be afraid to put down some Area Target or Target Briefly orders anywhere you even suspect there might be Germans. Better to waste some bullets on empty dirt than waste troops crossing a field you thought was safe. In particular, if you could move 3rd Squad/B Team of 2nd Platoon to the edge of the hedgeline that touches the tip of Appetite for Destruction Point, I would greatly appreciate it. Also feel free to move 2nd Squad, 2nd Platoon up somewhat to help out Random with that sound contact. Weapon Platoon and Company HQ Orders: 4th Platoon HQ is to run FAST back to the mortars, since the Mortar Platoon HQ doesn't have their own radio.  Appetite for Destruction Point is going to become the Company CP. 2nd Squad/A Team and the ammo bearer are going to move Quick to the point I labeled earlier for 3rd Squad/B Team, unless that team takes close fire from the hedge to its NW. If that happens, cancel the movement of the MG and deploy in the treeline along the ridge, facing NE. XO Team I also want to move up at Quick, taking position in the treeline facing that aforementioned Danger Hedge. The other MG Team I'll move Quick to support 1st Platoon and their crossing of The River. A Company HQ should also move Quick to Appetite for Destruction Point, though the same movement cancellation orders for the MG team apply. Place them in the treeline here: 
|
|
|
|
Orders are due 3PM EDT / 7PM GMT on Monday, March 16. There is, however, a chance the inputters can run the turn Sunday 4PM EDT / 8PM GMT. If everyone gets orders in by then, and IRL works out, we'll go then.
|
|
|
|
 Right, first and foremost you lazy bastards, get your heads out of the tanks. No wonder you're claiming you can't see anything, you're not even trying! I'm going to turn out and I expect you to follow me.  Here's a quick sketch map. I want you two to get all of your vehicles into the triangle between the hedge Dog Company is at and the road and start killing Nazis. Keep a contingency plan for if you see an anti-tank gun, but if we've not seen one by now I think one is unlikely. Panzer, you're still on bunker duty, Centurium I want you to Target known or suspected enemy positions Briefly and then wait and spot for a bit. Press up, take a risk or two and give them hell while they're moving around. I want to get them off guard and ideally I want their first orders in the turn after next to be to run back to the fort right as the 8" starts to arrive.
|
|
|
|
e: second try A coy 2nd &3rd platoon Colored lines to indicate the type of move orders i want used, blue=move and purple=hunt. I kept the lines separate so they'd be discernible so don't slavishly stick to them, basically I want all guys to be moving inside the treelines so they're not as easy to be observed and then end their movement at the edge of the trees so they can see. Conditionals for contact: fire upon weaker, similar-strength or out-of-position/moving stronger forces, retreat when clearly outgunned. I'm not sure who is whose HQ, please HUNT them to the positions indicated in the pictures along a conservative route. 2nd platoon  3rd platoon 
aphid_licker fucked around with this message at 20:24 on Mar 14, 2020 |
|
|
|
aphid_licker posted:A Company, 2nd and 3rd platoons wait wait what no no no this is not what I wanted at all do not do this
|
|
|
|
Orders, 2nd Section, 1st Platoon, 746 Tank Battalion (Det.), SSgt. Panzer Section NCO.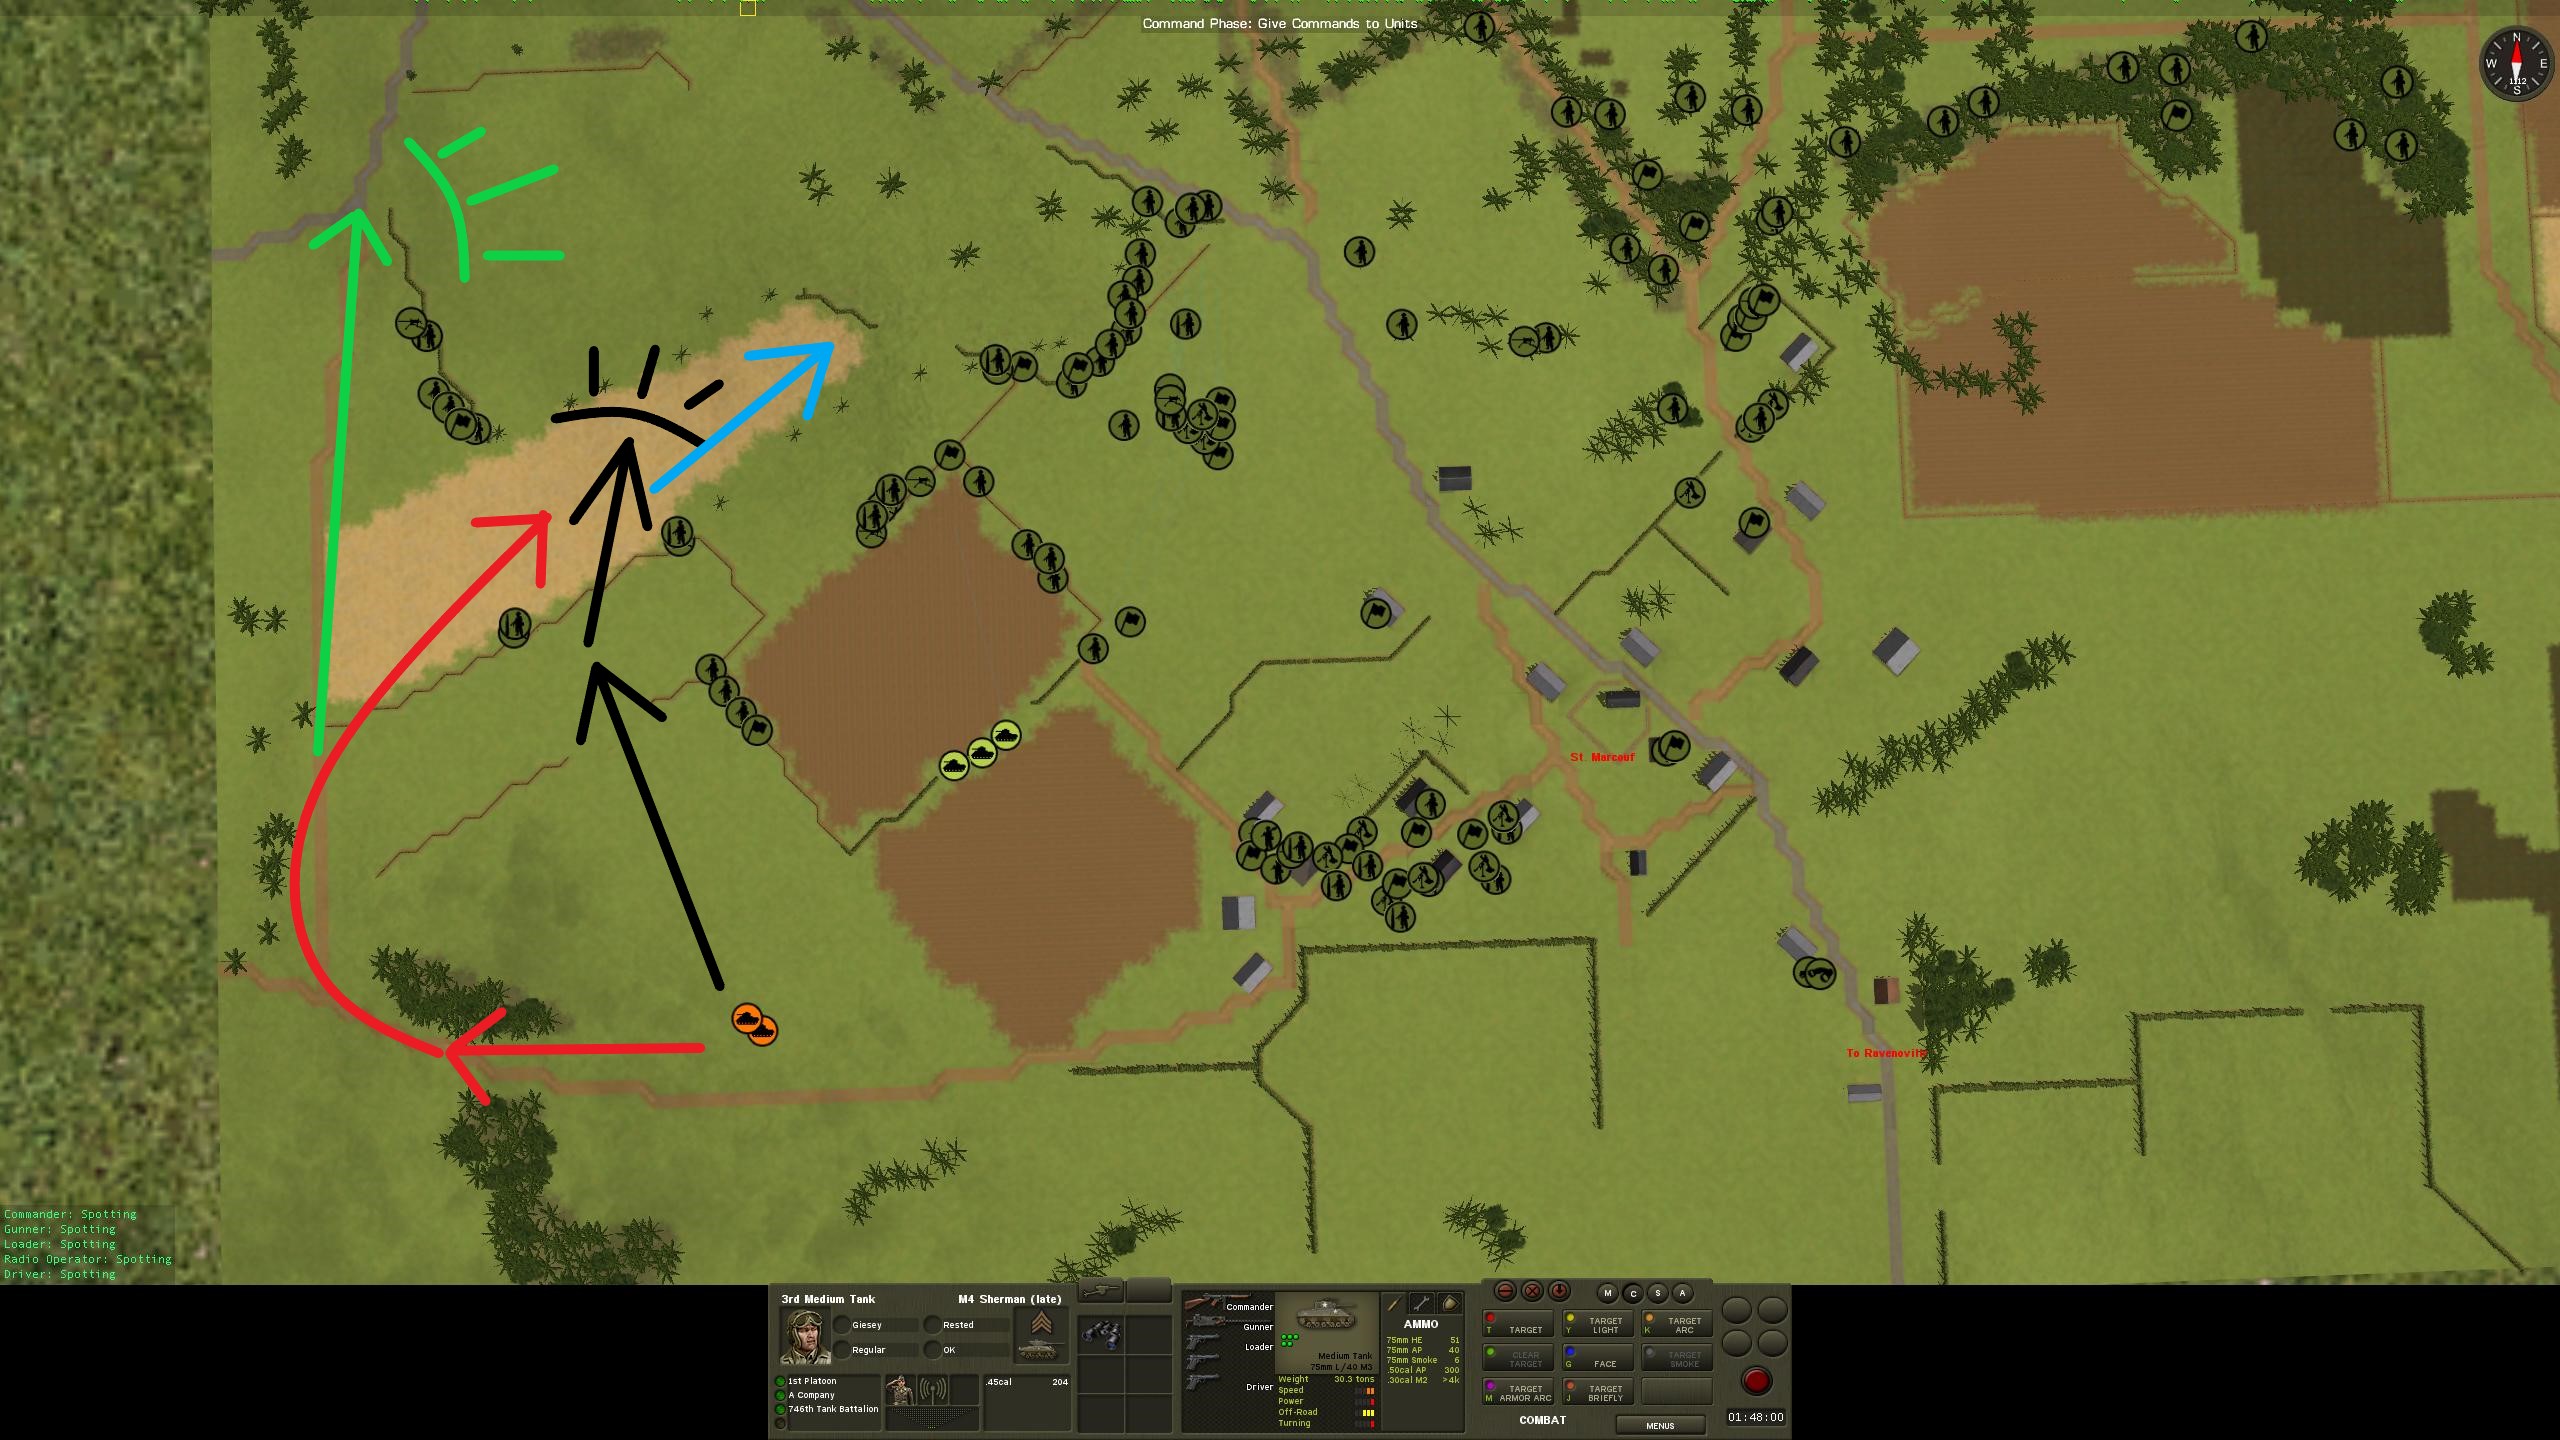 OK, let's try this again from the top, since you knuckleheads are as bad at reading a map as a butter bar! Now then, I've marked on the map a couple of different movement orders, and this time around, we're going to be firing our guns, so make sure to Load the proper HE ammunition, alright? First off, Line of Advance Black: Assuming nothing goes wrong, this will be our default advancement line. We'll simply push through the gap in the hedgerows and into the field, set up facing the bunker, and get to blasting away at the poor kraut bastards within. If we spot a ridiculous amount of enemy anti-armor en-route to that position, we'll detour down Line of Advance Cyan, where we'll use the hedgerow there to break line of sight, then engage the enemy AT locations unless otherwise ordered. If for whatever reason Lt. Frangible wants us to head that way instead of directly into the field, Line of Advance Red is in place as a fallback option, using the thick hedgerows and the road behind them to conduct a long, sweeping flank up and into the field. If reason exists to avoid the field all together, a secondary firing position has been marked at the end of Line of Advance Green. If the infantry for whatever reason needs to conduct a mass retreat, we'll cover that with suppression fire, though at this point in time I highly doubt that will be required.
|
|
|
|
B Company Generally we are starting to move north with the goal of reaching RunDMTrees by turn 20. This will take some tricky coordination especially from 1st platoon since there are three conditionals: first, tanks must begin shooting; second, the bunker facing southwest must be destroyed; third, platoons should reach RunDMTrees together. 1st platoon, your men on the left should get up and start suppressing any target of opportunity. The right should join with the center and find safe forward position from which they can start moving up to RunDMTrees. You might want to take cue from Das Panzer's 2nd Section 2nd platoon, get together to support 3rd. Send one team up to Powerslave Line to scout. 3rd platoon, take lead in countering enemies approaching along the Hall Road, move up to Powerslave Line if applicable. You have 2nd and 4th platoon to support you, be clear if you have any specific deployment requests. Be mindful of the bunker facing south. Orders for Input HQ: as before XO: as before 4th platoon: Move to line indicated into positions with best possible LOS towards the approaching germans, probably not very good but we'll settle for this turn. Movement should be as fast as possible without becoming too tired. 
LazyQ fucked around with this message at 12:03 on Mar 16, 2020 |
|
|
|
 MAP  COMPANY ORDERS Mortar Platoon HQ Mortar Platoon HQ are to call down LINE, SMOKE, 4 TUBES, MEDIUM DURATION on the Fairuza line. The purpose of this is to cut enemy forces in Run DMTrees off from support, including anti-tank fire, from the north while Baker Coy and our tanks conducts their attack on the DMTrees line. This will enable that attack. Platoon 1 HQ Platoon 1 HQ are to call down LINE, MEDIUM, 2 TUBES, SHORT DURATION, PERSONNEL on a visible enemy position in Run DMTrees, stretching from 50 m on one side to 50 m on the other side, along the line of Rum DMTrees. The purpose of this is to suppress, scatter, and destroy enemy forces. This will allow our machine guns to win the firefight and enable Baker's assault. If there are multiple targets, prioritize, from highest to lowest: 1: Large concentrations inside a 100 m diameter area, such that the line of bombardment can hit a large number of enemy infantry 2: Enemy machine guns 3: Other enemy infantry Mortar Tubes 1-4 Are to be ready to receive a fire mission from Mortar Platoon HQ. Mortar Tubes 5-6 Are to be ready to receive a fire mission from Platoon 1 HQ. EVERYONE ELSE As you were. LatwPIAT fucked around with this message at 18:19 on Mar 15, 2020 |
|
|
|
A Company, 1st Platoon The forward fire-team (Team C) from 2nd Squad is to put down fire, using an AREA TARGET command, towards the sound contact ahead of it. Team B from 2nd Squad is to move QUICK to level with it, and begin firing on the sound contact. Team A is to move QUICK to a position on the flank of the contact. Approximate positions are shown by the red lines. 3rd Squad is to move up to the line of the river, in positions shown by the yellow line. 1st Squad and the HQ squad are to remain in position to cover both 2nd and 3rd Squad.
|
|
|
|
sorry i've been unresponsive the last few turns. here are my initial thoughts on movements: just realized i forgot to put 1st Pltn on this banner, it really is the worst banner ever  RED squad: stop hiding, start shooting. BLUE squad: MOVE to the next fence, deploy ready to shoot at enemies. BLACK squad: SOLID ARROW: MOVE to the next hedge, deploy ready to shoot oystertoadfish fucked around with this message at 17:12 on Mar 16, 2020 |
|
|
|
 Alright gentlemen, Divine Providence has seen fit to provide us the opportunity to rid this particular tree line of Nazi wickedness. Ok, we all wait 30 seconds to give the tanks some time to give the Hun something to ponder. Squads, I want you to MOVE by fire teams towards Powerslave Line. Everyone run up to where you can shoot, then 1 team advances while 2 teams shoot. Once the return fire has died down, you're authorized to move 2 teams while one team overwatches. I want you to remember three things: all of Baker Company has our backs, five tanks are delivering high explosive wrath on our enemies, and as we speak the good men of the Tuscaloosa are raining down fire the likes of which we've never seen and God willing we never shall have cause to again. So I want you all to advance with the knowledge that your task is righteous, and the spears of archangels accompany you. For it is written: I will execute great vengeance upon them with furious rebukes; and they shall know that I am the Lord, when I shall lay my vengeance upon them. I'm confident I shall meet you at Powerslave Line shortly.
|
|
|
|
Tanks 1st Section We caught em now boys! LT says 2 section are a-stavin in those bunkers, so us and him gets to poke them MG's in the tree line yonder. Open up and don't stop till they're all quiet like. Target Briefly in 15 second increments all the targets you can see in RunDMTrees and anywhere else that seems ripe for 75mm HE. If you're out of targets, HUNT till you ain't, and shoot some more.
|
|
|
|
B Company, 2nd platoon Team next to the hedge moves across the road and continues to hunt to Powerslave Line. Everyone else rendezvous as shown. 
|
|
|
|
Obviously discord collapses as the turn is being run.
|
|
|
|
Well then! Note, the volume might be a little loud on some of these videos because of being zoomed in for stuff. Sorry! Turn 13 https://www.youtube.com/watch?v=w65BEP3Fay4 Turn 14 https://www.youtube.com/watch?v=VnFjWCC7KQ8 Turn 15 https://www.youtube.com/watch?v=XfceJQ3EZtY Unit position screencaps.
|
|
|
|
Orders are due 3PM EDT / 7PM GMT on Thursday, March 19.
|
|
|
|
 Ow, my head. Alright, orders are fairly simple this time. Drop everything, kill the AT guns and the Marders. Don't do anything fancy to try to get line of sight on the one near the 8" blast zone, it's fairly likely to be knocked out soonish. Issue contingency orders to fire at other targets if all the AT assets are dead but don't worry too much about it. Glynn, important instruction for you, don't fire at the bunkers if you can't spot them. Firing HE near them will do nothing except waste time and shells. Panzer, when things settle down a bit I'm going to transfer operational control of my command tank to you so that we have two pairs of mutually supporting tanks but right now poo poo is hosed and I'm leaving it to Cent.
|
|
|
|
B Company 1st Platoon, with the tanks retreating you're pretty much stuck. Hide if you must, shoot and suppress germans if you can. 2nd Platoon, take position at the right end of Powerslave Line and send a small team along the Hall Road to the hedge parallel to Powerslave. Also, your 3rd squad sees some guy near them (Turn 15 vid, 10:07), get rid of him. 3rd Platoon, take position along Powerslave Line. Shoot/suppress at your discretion. UNIT ORDERS FOR INPUT HQ+XO: as before 4th Platoon: the 2nd Team mg doesn't seem to be doing much, move it up to Powerslave with 3rd platoon. At least one mortar sees the Marder, if it makes sense to shoot at it go ahead. If not, keep them being as useful as possible. Contingency: if the bunkers are taken out of action 2nd platoon, after regrouping, starts to attack enemy positions along the Hall Road line. Rest of B company gives all the supporting fire they can. LazyQ fucked around with this message at 19:40 on Mar 18, 2020 |
|
|
|
LazyQ posted:B Company well that's not too hard.  stay in your current positions. if you can see the enemy, shoot the enemy. if you can't see the enemy, commence area fire on positions of enemy concentration (sound contacts).  image of current and future locations, for reference. i imagine there's no good chance of moving my backmost men up? considering what happened to the tanks who tried to do that, i suppose there's no reason to overrule my commanding officer.
|
|
|
|
 Compared to the rest of our forces, we've been lucky enough to only see extremely light contact thus far. Let's take advantage of that. First though, an overview:     Given the light German resistance thus far, I want to push into Joshua Trees and begin probing the village defenses from multiple directions. First Platoon: I want you to fully commit to the eastern half of Joshua Trees, start getting everyone moving. I'll deploy the LMG to provide cover. Ultimately I want each of your fire teams to have eyes on the village and its defenders, preferably from multiple angles. Second Platoon: Maintain overwatch with your squads on the ridge, while advancing some troops forward into the hedges. Third Platoon: Change of plans. Move right and into Joshua Trees to gain eyes on the village. Ideally, by the next turn or the turn after I'd like to have our lines look something like this:  In this scenario, if Joshua Trees is truly abandoned (though that's a dangerous assumption and I wouldn't count on it), I want to start getting our squads into a position where they can threaten the village from multiple angles: First from the East, Second from the west (After a future movement forward), and Third from the South. If nothing else, we'll begin getting more eyes on the enemy, and hopefully help ease some of the pressure off B company. Artillery I want to start harassing the troops in the village with the following bombardment: 
|
|
|
|
1st Bn Command The plan remains intact, everyone keep doing what you are doing. A Company: the German right looks potentially quite weak. You have the option to disengage on the left, pull those forces back, and wrap round to redeploy them on the right and take a move covered approach to the town. This and the next turn are probably the last point in the game where you will have that option. If you decide not to then one possibility is that when C company arrives it can march and deploy down the coastal road rather than through B Coy's footsteps.
|
|
|
|
 Come on son, pick up the pace! Previous orders continue. Make sure the CO is going as well.
|
|
|
|
 ORDERS Everyone If any more anti-tank guns turn up, the nearest machine gun team not occupied with another anti-tank gun or fire direction should lay down fire on it. This will ensure their anti-tank guns are taking fire so our tanks can move and destroy the German bunkers, allowing us to win the firefight and enable Baker's assault of Run DMTrees. Otherwise, as you were. Just keep hitting those Germans! LatwPIAT fucked around with this message at 18:46 on Mar 19, 2020 |
|
|
|
Orders, 2nd Section, 1st Platoon, 746 Tank Battalion (Det.), SSgt. Panzer Section NCO. Well poo poo, there goes Baker tank. Alright boys, let's get stuck in and kill these kraut shits. Gunner, focus fire on the enemy's Anti-tank measures, starting with that crewed AT gun. Ignore the AT gun that got de-crewed, odds are it's no longer operational. Driver, hold tight and make sure our frontal armor is faced towards the enemy. If we're lucky, we'll catch it on the chin instead of the rear end. Driver, roll our tank forwards until you once more have line of sight on that crewed AT gun, assuming you don't currently, using the destroyed Sherman as cover if possible. Might as well get some use out of the damned thing- and see if anyone survived that knock-out. Let's get to it, boys. We have Germans to kill. Oh, and if we run out of hard points to shoot at, help the infantry suppress the enemy infantry, I guess.
|
|
|
|
Tanks 1st Section Them there's set arunnin! Shift fire right! We right near got em that time! When we do, we go in slaunchwise on the bunkers. And tell the LT to get his rear in the durn tank. I don't care how he ain't afeared, without his head I'll have a sorry time listenin to his orders. Button up area fire on the remaining AT gun. If it dies: Reposition 2nd Tank very slightly forward and right to achieve LoS on bunker. Continue to target briefly targets of opportunity 15 seconds at a time if bunker is not available, target bunker if it is. No area fire on the bunkers. If it doesnt: Area fire until they stop shooting back. Your discretion of when to keep one tank firing on it vs when there's enough mortars and MG's firing on it for the tanks to shift targets. You also have discretion to keep shooting the AT gun if a mission kill seems likely. If you see/hear Marders moving to attack: Assign at least one tank to counter the Marder. Use Target Armor unless that's a bad idea situationally. If the Marders are in a position that directly threatens the tanks: All tanks shift fire to the Marders immediately. Centurium fucked around with this message at 01:26 on Mar 20, 2020 |
|
|
|
A Company, 2nd and 3rd platoons Colored lines to indicate the type of move orders i want used, yellow=quickand purple=hunt. Darker purple apparently is SLOW according to GIS? I'll write it out below. A Company, 2nd platoon   Western element (under the machine gun) moves SLOW a bit down the hedge, takes position looking towards enemy. Easternmost element moves SLOW back from the edge of the wooded area, then QUICK into a covered reserve position as indicated. Second most easternmost (sorry) element FAST across the road, HUNT into the hedge so that they can see towards the enemy. Third most easternmost (argh) QUICK to the edge of the woods, HUNT into the hedge so that they can see towards the enemy. Fourth from the East just move up a bit through the woods using QUICK. A Company, 3rd platoon   All elements QUICK as indicated, moving deep through the woods to avoid being spotted while following the general route shown. The HQ stays at the point where the platoon splits up again, one squad moves QUICK along each of the three paths indicated, switching to HUNT right before getting to the very edge of the woods and taking up position there so that they have visibility out of the woods. Easternmost squad splits off a SCOUT TEAM, sends it off further north as indicated while bulk of the squad stays in position at the edge of the forest.
|
|
|
|
B Company, 2nd Platoon 2nd Platoon takes position at the right half of Powerslave Line. 3rd squad engages the enemy they saw near them but do not cross the road. If HabeasDorkus posts orders, disregard this post.
|
|
|
|
A Company, 1st Platoon 2nd Squad is to HUNT forwards to the northern-most set of red lines. If they encounter Germans, they are to hold and return fire. 3rd Squad is to QUICK MOVE across the river, then HUNT forward through the woods, aiming to end in the positions shown by the yellow line. 1st Squad and the HQ squad are to MOVE up to the positions presently occupied by 3rd Squad. They are then to QUICK MOVE across the river, and HUNT through the woods, to the positions indicated by the blue lines and black circle.
|
|
|
|
Last turn is taking ages to process so we'll just call it a cliffhanger for the early birds and post away. Tons of artillery fire so the audio may be loud at times! Turn 16 https://www.youtube.com/watch?v=voGvb0quS9U Turn 17 https://www.youtube.com/watch?v=Gt0nBlZrgsU Turn 18 https://www.youtube.com/watch?v=lvQeHymbcx0 Unit Positions glynnenstein fucked around with this message at 01:49 on Mar 20, 2020 |
|
|
|
Orders are due 3PM EDT / 7PM GMT on Sunday, March 22.
|
|
|
|
1st Bn Command Order the naval bombardment to cease fire for, uh, reasons. Everyone else can continue to follow the plan as written.
|
|
|
|
RIP naval bombardment, literally killed for being too awesome
|
|
|
|

|
| # ? May 2, 2024 09:50 |
|
Me watching the last three turns: https://www.youtube.com/watch?v=Te7goyAnzAQ
Alchenar fucked around with this message at 12:24 on Mar 21, 2020 |
|
|


