|
AOMD 4: Pages by the Mages from Those Ages The Mages' Guild entryway has three teleporters, at the north, east, and south. I start by going straight ahead to the east one.  That goes to a short hallway with a staircase in the middle. I tried looking at this while Amber and San-Raal were still in the party, and it didn't change the description at all. While this looks like text, there are no translations or other race-based comments/reactions in this game.  Something annoying about this stage is that doors look like walls. The only real tell is their position in the middle of a tile. They appear to dissolve when opened, which goes in reverse when they're closed again. There are doors on both sides of the stairs, which each introduce one of this stage's monsters:  First up is the ogre slug. The manual says they can spit acid, but I've never actually seen them do that. They take half damage from blunt weapons, which include Delmair's claws. They have HP in the 40s, which Isharn can sometimes do by himself. All in all not much of a threat.  Watchghosts are the more dangerous enemy here. They have projectile attacks that look like Ice Storm, but only hit one character. It does damage in the teens after being mitigated by Blessed Warmth, but does not cause Delmair's transformation. Their threat is greatest when they appear in numbers.  The stairs go up to a floor inhabited exclusively by ogre slugs. Among the items to find are this Potion of Healing and Cloak of Protection +3, as well as a Potion of Giant Strength in the southern hallway. Being the Mages' Guild, there are of course mage scrolls here too. On a pair of shelves you can find Cone of Cold, Hold Monster, Disintegrate, Death Spell, Flesh to Stone and Stone to Flesh. That last one has no real use since there are no petrifying monsters in this game.  A room near the center of that floor has this. It is usable by any character, and identifies the item held in their other hand. It seems to have infinite uses.  The next floor is patrolled only by watchghosts. In the middle is this nook with two buttons across from each other.  Pressing both of them removes the wall on the opposite side, releasing these watchghosts. Fireballs are helpful here.  The room they were in has two shelves. Their contents are a Necklace of Magic Missile, a Wand of Fireball, and a parchment whose text I'll show a bit later. This ring is a required item.  There are three staircases up around the floor, leading to small rooms also occupied by watchghosts. The eastern one is slightly bigger than the other two, and is the only one with an item. This ring is +3.  From there I return to the entryway and take the north teleporter. This ogre slug always starts facing east, so you can sneak up on him like this. Further on, a button removes a wall, releasing four more watchghosts. Their room has two books in it.  They give some hints for the near future. That parchment from earlier has a small bit of additional plot detail. Nearby is a teleporter that goes to the same area as the south one in the entryway.  That area has a hallway with four teleporters, each marked by a sign.  They all go into a room with four more teleporters behind doors, which each have banners representing one of the elements beside them. The central room initially has four watchghosts in it, one of which landed a physical hit on Delmair. It also had the scroll shown at the bottom. I've been saving most of the scrolls for the second mage recruit, who we'll meet soon.  The solution to this was pretty much spelled out by the book we read. Go through one of the season teleporters, then the one for its correlated element.  The first three times, you will be taken back to the end of the season hallway. You can start with any of them, but have to follow the cycle afterwards.  If you go through the wrong one, there will be a watchghost waiting for you at the season hallway. If you did it properly, the last one will take you to Mages' Guild 2.  There, steel shadows will immediately attack. They're weak, three out of these four were killed by a single fireball. Behind this is a teleporter going back to the season hallway, where all four teleporters now go here.  Past them we meet that mage I was talking about earlier. 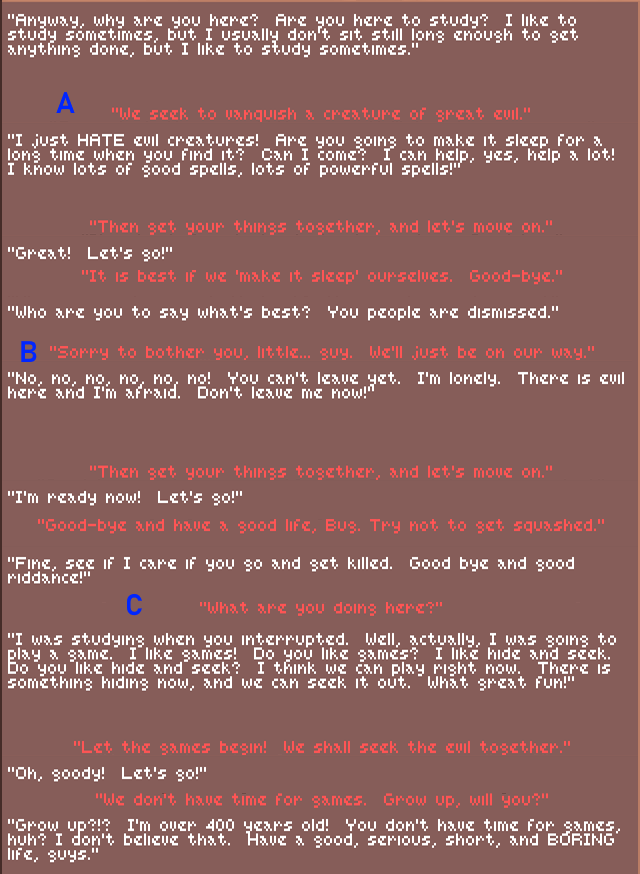 Once again your party can be pretty mean when they reject a potential member. Of course, I accept him.  He starts with the three items listed at the bottom. This mechanical scorpion is called a scaladar. They will come towards you but won't attack as long as the Ring of Trobriand is in your inventory, not even fighting back when you hit them. It's not necessary for anybody to actually wear it. They are immune to lightning bolts, Magic Missile, Disintegrate, hold, and cold-based attacks. In addition they have 35% resistance to other magic, and take half damage from fire and sharp weapons. While they're not hostile, they ARE in the way. Be sure you're not facing the entrance, because firing a projectile into an area transition will cause it to be lost. It takes a lot of bashing to bring them down.  And you really should do that, because you'll need to put the Ring of Trobriand into a shelf to progress further. That will permanently remove the wall and the ring, which makes them hostile. Past it is this cord that opens the doors on both sides of it.  Thankfully, the doors in this stage are easily identifiable as such. This one is opened by a button on the north wall. Inside this room are a couple steel shadows, a staff +1, two arrows +2, a wooden club, and four rocks. The club and rocks are non-magical.  This is in the northwest section. It's magical, but I'm not sure what its effects are. There is also a cord that does nothing but create an illusory wall.  Another cord in the northeast section teleports you to an isolated room. This dagger is "Ocnor" +4, which returns after being thrown. Bug can now contribute to all-attacks. Taking it or any other item from the shelf causes a steel shadow to spawn behind you each time. Two teleporters in this room just go between each other, the third goes back to the northeast section.  Leather Armor +4 can be found in the northeast. A room along the eastern hallway has two Potions of Invisibility, a Wand of Flesh to Stone, and a Ring of Sustenance, our fourth altogether. Not many upcoming foes are actually made of flesh.  This lab has four rocks +4 on top of an exploding spellbook. Under that are three Potions of Poison and an apple, so it's not worth taking the damage.  The southern hallway has a gauntlet. Four grates will raise spikes when walked on, causing damage to the whole party and forcing them west. Between those grates are three pairs of scaladars, no longer placated by the Ring of Trobriand. Their tails don't poison, rather they shoot lightning bolts that hit the whole party. They are quite deadly, especially when they're on both sides of your party. It's best just to run past them as quickly as you can. That's possible because they never move from their starting positions.  The spikes did a number on our party, but they also don't make Delmair transform.  This small button can be found just past the gauntlet. It removes the wall it's on, leading to another larger button that makes a way back before the gauntlet.  This other button, slightly further past the gauntlet, is kind of a trick. Pressing it deactivates the previous spike traps, which allows you to kill the scaladars by hit-and-run. However, that also activates spike traps to the west, where you're going. It can be re-pressed to toggle which spike traps are on. The southwest area has a short sword +3 and steel shadows, one of which lands a hit on Delmair.  At the end of the stage is this hallway. The first time you step on this tile, all of your party's metal items will be dropped, and two steel shadows will spawn in each of the tiles to the east and west. Once again, a single fireball kills three of the four. An interesting note is that the offhand is still free with the staff. I didn't bother keeping any of the ones I found, but clubs are heavy weapons that can only be used in the main hand. Past this, another cord opens the way to the stairs going to Mages' Guild 3. Alpha3KV fucked around with this message at 04:41 on Apr 6, 2022 |
 #
?
Apr 5, 2022 20:33
#
?
Apr 5, 2022 20:33
|
|


|

|
| # ? May 9, 2024 09:23 |
|
|
The dart of hornets nest is a dart that does extra damage. It multiplies into several darts when thrown. Exactly how many varies via a dice roll in tabletop. I don�t recall how it�s done in the game.
|
|
#
?
Apr 5, 2022 22:56
|
|
|
I don't remember Bug at all, but then again I only remember Rex, Delmair and the good Father because they were always in my party. Rex and Del are cool character concepts, and as for Jon I just like C/M multiclasses. I always had a paladin as my lead tank too.
|
|
#
?
Apr 6, 2022 00:23
|
|


|
Ogre... slugs...? These games have some weird loving enemies sometimes. Also do the Scaladars remain passive when wailed on as long as you carry the ring?
|
|
#
?
Apr 6, 2022 00:48
|
|


|
PurpleXVI posted:Ogre... slugs...? These games have some weird loving enemies sometimes. That's right, if you have it they won't fight back.
|
|
#
?
Apr 6, 2022 01:39
|
|
|
They want hugs, but you gave then death 
|
|
#
?
Apr 6, 2022 03:41
|
|


|
Made a couple edits noting what happens if you take a wrong season/element teleporter, noting that scaladars don't fight back if you have the ring, and fixing a bit of redundant language near the end.
|
|
#
?
Apr 6, 2022 04:48
|
|
|
A knife called Ocnor? Oh i get it.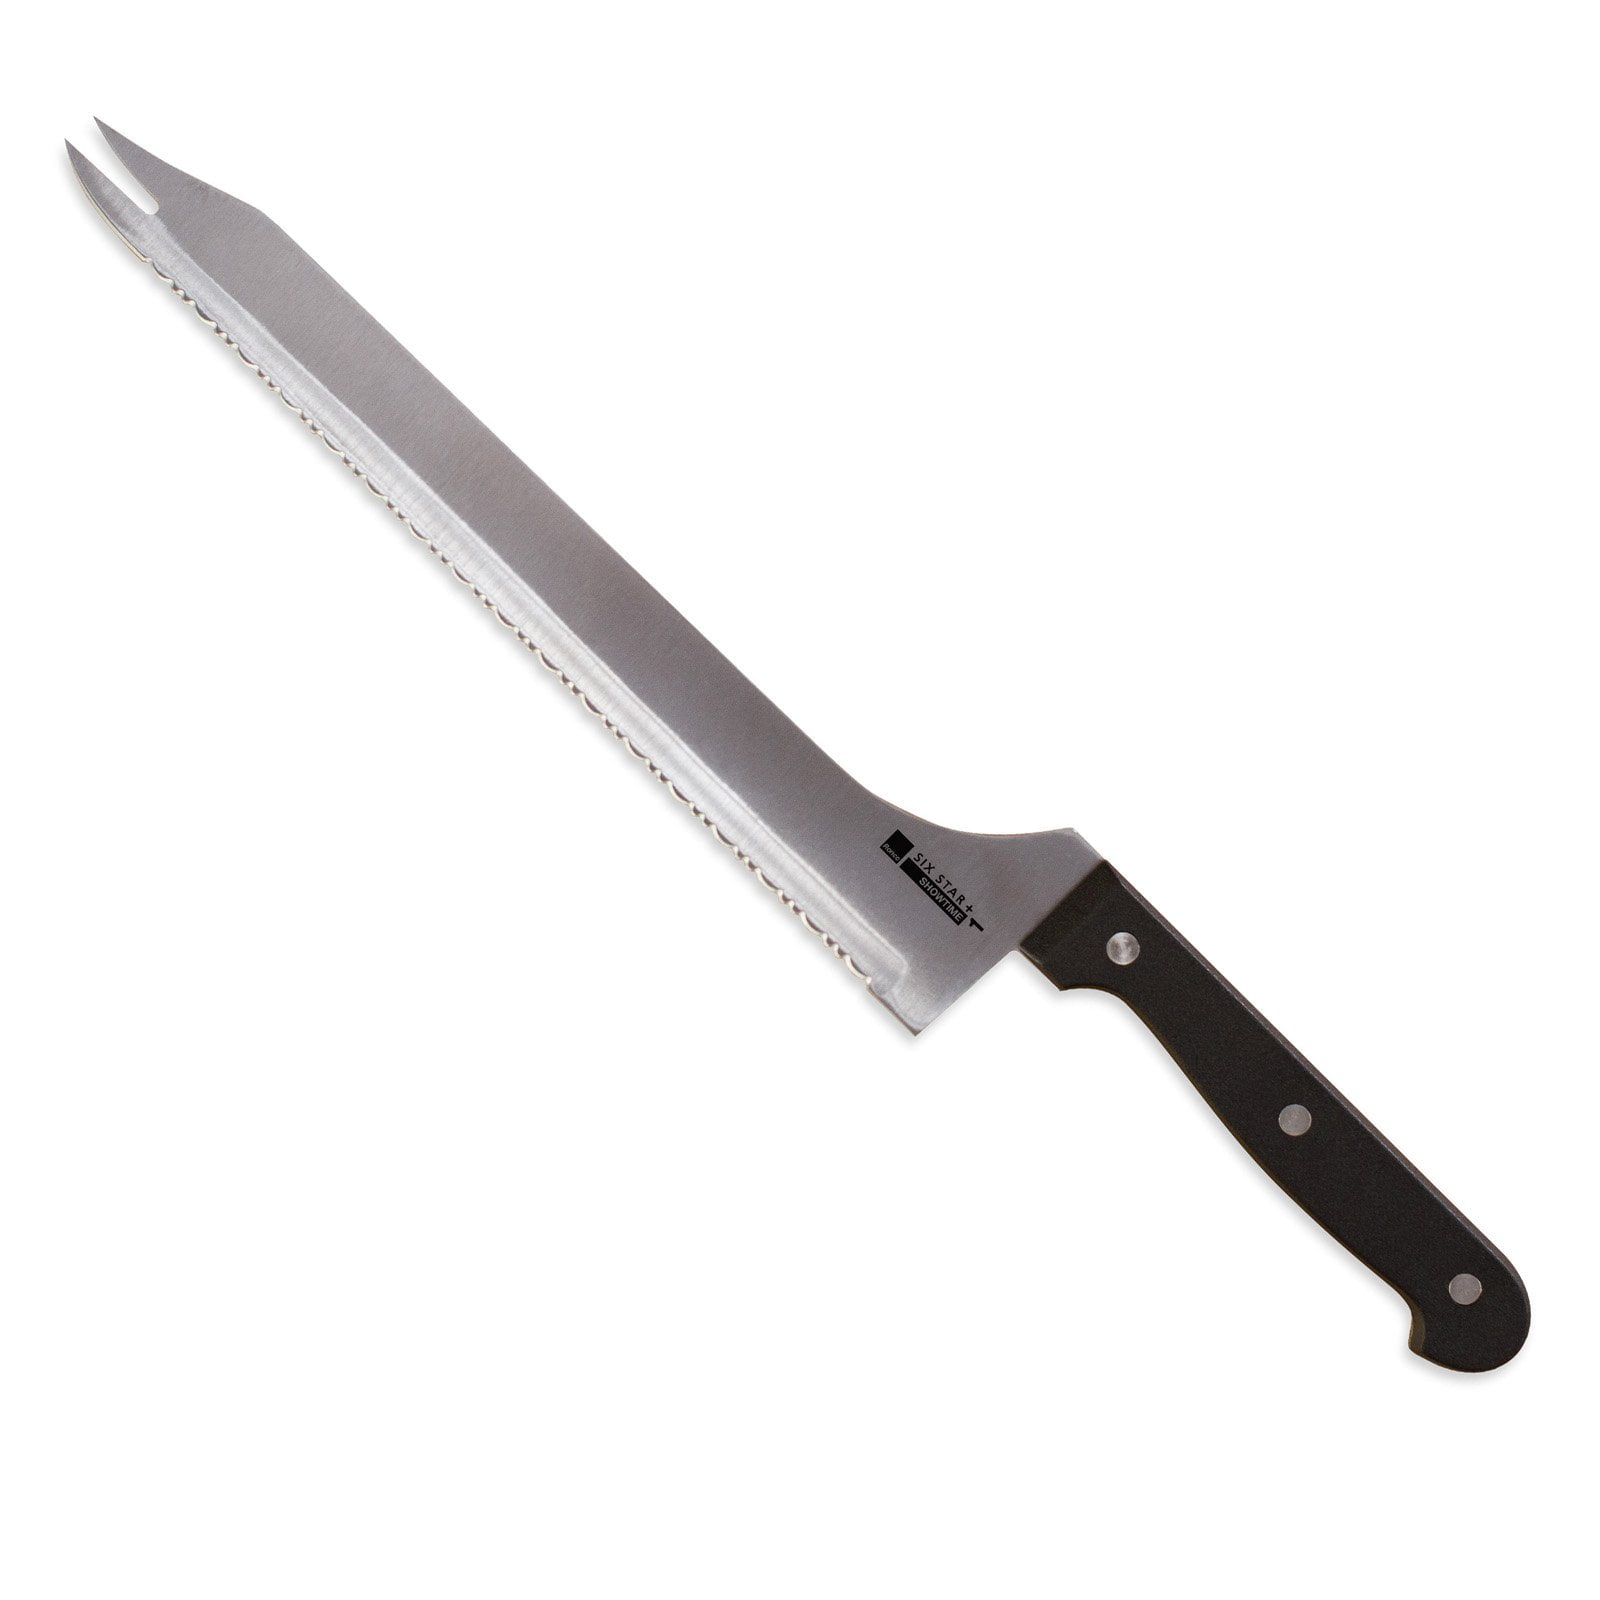
|
|
#
?
Apr 6, 2022 09:04
|
|

|
AOMD 5: Acwelemental The first thing found in Mages' Guild 3, right at the beginning, is a grappling hook. It's an item that's required here.  The first puzzle involves hidden teleporters on both sides that keep you stuck in this hallway. To get past them, you need to take the red and blue gems from the north and south walls. When held in a mage's hand, they allow passage. This is the one instance where a particular class is absolutely required, you can't finish this game without a mage here.  The south button changes the position of this wall currently making a dead end.  Shortly after we encounter the first enemy of this area, the earth elemental. As seen here, they can hit multiple characters at once like the frost giants from the second game and pack a mean punch. It takes +2 or better weapons to hit them, so Delmair has the best armor to keep him from uselessly pawing at them. They're the last monsters to be any kind of real threat, which is mitigated by their lack of speed.  There are some locked grates around this stage. Without the key, we'll check this out later.  Here we find elven chainmail +3, two arrows +4, and a -4 robe.  That button at the end opens a door to the southeast, but that grate in front of it is a spike trap which will push you back. An item must be thrown to press the button, but make sure it's something you don't need since it won't be retrievable.  The other enemies of this stage are water weirds, located at certain grates. They take half damage from sharp weapons, but are immobile and not very tough.  At the southeast corner, there's a pair of doors with a sign between them. Despite what it says, you can go into both. They each launch a single fireball from the south end after being opened. The east room has these five mage scrolls. Both 8th level spells: Bigby's Clenched Fist (creates a melee weapon usable from any row) Abi-Dalzim's Horrid Wilting (Damage spell that instantly kills creatures made of water) Three 9th level spells: Energy Drain, Power Word, Kill, and Meteor Swarm, which launches a set of four fireballs which alternate between the sides and corners of a 3x3 square as they move forward. Bug learns all of them, though he'll never get anywhere close to casting them. The other room has Leather Armor +4, a Ring of Protection +3, and a Short Sword +3. There is also a parchment I'll read a bit later.  North of that, we find the key to that locked grate we saw earlier. Notably, it does not stop existing after its first use.  The grappling hook is needed to open those grates after they're unlocked. They're entrances to Mages' Guild 4, which is entirely underwater. Without Water Breathing, each party member will take 1-4 damage with each step.  One step in we come across an enemy. It's called a slithermorph, but this one never showed why it has that name. I seem to have snuck up behind it and it didn't react to the party's presence however long I waited. It died instantly when I finally attacked.  That grate only went to a small and isolated area of MG4. Aside from the slithermorph, it only has those two magic items listed at the bottom with a normal longbow. Getting back up requires using the grappling hook on the grate again.  From there I head to the northeast quadrant of MG3. This gem is in the same room as another parchment. Time to read that and the one we got earlier. 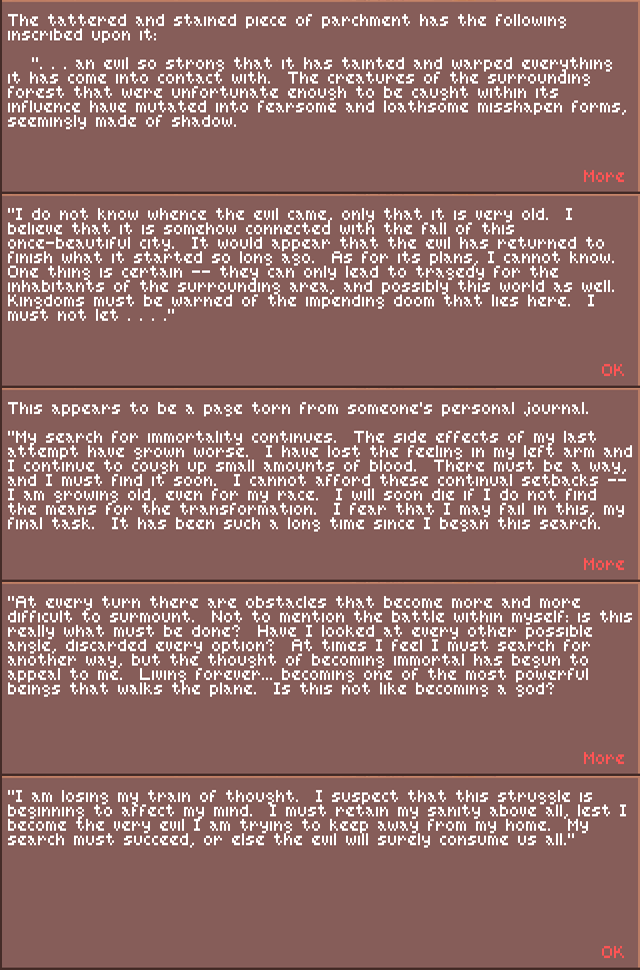 It seems there's a lich who became that way in order to fight a greater evil. As an aside, the story that begins the manual ends with the revelation that good liches do actually exist. In fact, Delmair's mother is one of them. I'm sure this information bears no relevance to the mission our starting party took.  Further north we find a Potion of Speed with two sets of all four level 9 mage spells: the three we got earlier plus Time Stop. Racial level limits prevent Jon from ever reaching a high enough level to cast these, but I have him scribe one set anyway for lack of much else to do with them. I'm keeping the other four.  The northeast corner of MG3 has this locked grate. A button on the west wall opens a door to the brass key which unlocks it. That key also stays around after use, since it's needed later. There is absolutely no reason to go into this grate. It leads to a section of MG4 entirely in a magic nullifying zone. That dispels all buffs, including Water Breathing, and prevents anything from being cast successfully. There aren't any items to find, only pain.  This hallway goes to the northwest section. When you step on the north tile of this intersection, a lightning bolt is shot from the south end. There is plenty of leeway to reach the end of the corridor and get out of its path.  That leads to a part entirely covered in grates. None of them are entrances, but ten of them have spike traps. Behind the party's current position is a cord which opens a door to the south. 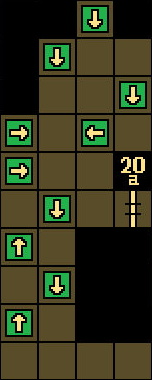 That door can be reached without stepping on any spike traps, if you know where they are. This GameBanshee map shows that and which directions they push the party if stepped on. That's important since some will be unavoidable in the near future.  Behind it is the main entrance to MG4. It requires a key we don't have yet and the two we already found. That switch behind it removes a wall to the east, allowing the lightning trigger to be bypassed. The first key to this grate is at the northwest corner of MG3. To get there, go straight west from this position. That requires going over two spike grates, but they'll push you back to the correct path. Beware of earth elementals coming from the south.  The crystal key, which opens green locks, is spawned on this shelf when you put a green gem in each of the two back shelves. The second one is not far from here, around the corner of the opposite wall. The area to the south has a copper key behind an illusory wall, as well as another grate with a green lock. That goes into another isolated portion of MG4 with a +4 longsword and Potion of Giant Strength at its east end. Its two westmost tiles are in the magic null zone, but there's no reason to go that way in the first place. It's now time to go to the main part of that stage: take one step into the all-grate floor, then onto the north spike trap. Then you can walk to the east wall then south to the entrance with no further spikes. Be sure to memorize multiple Water Breathing spells.  A water elemental comes to greet us. Like their earth counterparts, it takes +2 weapons to hit them. However, they lack their resilience and ability to hit multiple characters. Delmair isn't in tiger form since he only took damage from spikes.  South from the entrance is a circular room with these items. The yellow gem isn't used for anything.  Like many underwater stages in videogames, this has currents. Which ones are active can be changed by flipping stuck levers, with thieves' tools or 22 strength. I don't think it's actually required to change them at all.  Here's a view of a slithermorph attacking, showing the reason for that name. They're otherwise unremarkable.  These are found in the southeast section. They set the wearer's strength to 19. That's not as good as fire giant strength of 22, but still good for your other melee character. The other item of note in this section is a stone key, needed a little later.  Back north near the entrance, an unavoidable current pushes us to a seeming dead end. The way out comes from pressing these tiny buttons. On the opposite side are a Wand of Ice Storm and a +3 dagger.  A little ways past that is a door opened by putting the stone key on this shelf. Where does it lead?  Ugh. But note that there are small portions where magic can be used. It's possible to rest underwater, as long as the Water Breathing spell is active. You can cast it in those pockets and rest to heal damage taken from walking through this section. Potions of Healing still work within it. I also trade my single Helm of Underwater Breathing among the casters while going between casting areas. If you were playing without a guide, the scrying glass can be used to determine where spells can be cast without wasting any valuable charges. 12 marks the stone key door, the other numbers are items: 13 - Potion of Giant Strength and +1 helm. 14 - Bracers of Protection +4, a copper key, and a Wand of Lightning Bolt. 15 - Another returning +4 dagger, named "Ronco" after a real-world kitchenware brand. 16 - Two arrows +3, a second Helm of Underwater Breathing, and two Potions of Healing.  Southeast from that section is this item pile. It has normal leather armor, four darts +1, two 9th level mage scrolls (Power Word, Kill and Time Stop, which Bug scribes), another red gem and finally a crimson key. Nearby is a trio of grates on the floor. Stepping on one of them takes the party to the middle of them and faces them north, where a lightning bolt comes. It can be blocked by a Wall of Force, and the trap is disabled after triggering once. A small button on the south wall reveals a teleporter to an isolated section of MG1, where you can find a couple watchghosts and a scroll of Wall of Force.  Getting through this door requires not just a copper key, but also shutting off a current with a button past a wall to the east.  This room in the southwest corner has currents preventing access to its east door. They take the party to the location of this sign, which gives hints on getting out.  Casting Wall of Force on this corner permanently shuts off the current. Now that the door is reachable, it's opened by putting a red gem in a nearby shelf.  Past that, another small button opens a door to the east. The room has a +1 shield and a Ring of Protection +3, along with rations.  It also leads to the way out. Putting the crimson key on this shelf opens another door to the east. That room has the grate up to the last part of MG3, which is the final section of the Mages' Guild altogether.  The grate leads to a 3x3 square hallway, where it's only possible to move clockwise due to a following wall. This small button in the southwest corner removes a wall to the north.  That opens the way to another 3x3 room. Each side of the room has a magic arrow launcher, disabled by the respective lock on the central pillar. The keys needed are crystal, copper, brass, and silver. I start from the south and go counterclockwise, since "unlocking" every side opens a wall to the east where there are a lot of earth elementals.  Further east is another, larger square hallway. This one has shelves containing Rings of Protection on each side. These are +1, -1, two +2, two -2, -3, and +3. A nook on the east side has this balance puzzle. Only rings can go into the niches on top. You need to put four in each, such that each side's total bonus is equal to zero. An easy way to do that is 1's and 3's on one side and all 2's on the other. I think it's possible to keep the +3 ring if you still have +2 rings from the first game. Completing this puzzle will immediately warp you to a boss fight, so prepare for that appropriately beforehand. You'll probably need to go all the way back to the grate to rest. If you do that, memorize Protection from Paralysis and some Slow/Neutralize Poison spells.  We finally come face to face with that lich we were sent after. This is not Delmair's mother. Let's see if trying reason is worthwhile. 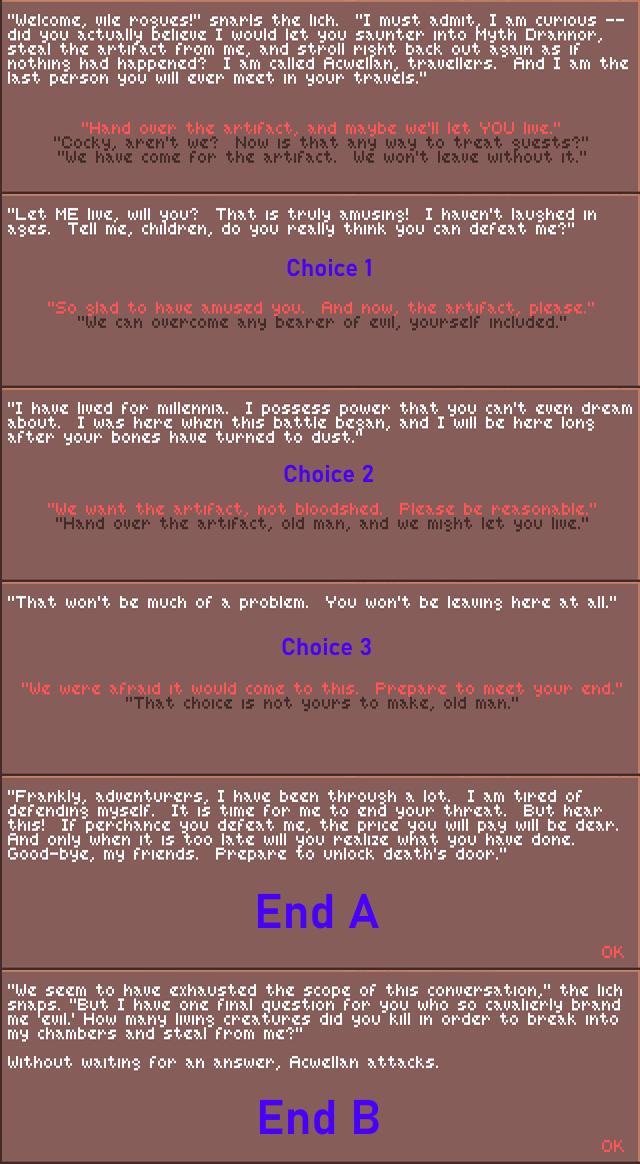 For the second dialogue option, no matter what you chose first, the top choice goes to End A while the bottom leads to End B. There is no peaceful solution here.  Acwellan starts out with several mirror images of himself. What you face at the beginning is always one of them. Each one gets dispelled by a single hit. With all attack, the real one barely lasts any longer. From a test run to see what he can do, he doesn't really cast any particular spells. Rather, he also has a physical attack which can hit the whole party. This can also paralyze the victims. You might want to keep ranged weapons out of the all attack, since you won't get them back if they're still in the air during your final blow. Speaking of weapons, he's immune to normal ones.  Much like Khelben, our mysterious quest giver teleports in immediately after we finish his task. We're 3 for 3 on them not noticing the party which finished the job is completely different than the one it was given to.  It turns out this guy especially didn't really care about the party in particular. He takes the Codex of the Planes, which is also what Rex was searching for. I think we may have made an oopsie here.  I'm glad the party doesn't judge people by their appearance, but they probably should have made any sort of inquiry about his "master" before accepting this assignment.  Acwellan's final act is doing just as he says. We end up right outside the temple entrance, with the wall blocking it now gone. There might be wyverns nearby, which is why I recommended anti-poison spells. Video: Acwellan battle, with mini-preview of next update
|
|
#
?
Apr 20, 2022 09:35
|
|
|
Do the Water Weirds work like their Monstrous Manual version? Because the MM version doesn't do damage, it just has one attack of "save vs instantly getting drowned by an angry blob of water."
|
|
#
?
Apr 20, 2022 09:51
|
|
|
Another terrible misunderstanding that could have been easy to avoid if Mr. Lich wasn't quite this aggressive.
|
|
#
?
Apr 20, 2022 10:05
|
|
|
Where does the game tell you about Delmair's mum? I don't remember that bit of lore at all.
|
|
#
?
Apr 20, 2022 15:11
|
|
|
Ugh, I seem to remember that underwater level being a huge pain. That and the clich� end of the following underwhelming boss fight are definitely what soured me on this game. Still looking forward to the rest, though. Lathander is the Realms god of the sun and renewal. He�s a good guy. If an evil being is hanging out in Lathander�s temple, it must have been seriously desecrated. Not surprising for Myth Drannor.
|
|
#
?
Apr 20, 2022 15:21
|
|
|
JustJeff88 posted:Where does the game tell you about Delmair's mum? I don't remember that bit of lore at all. You must have "lost your manual" back in the day.
|
|
#
?
Apr 20, 2022 15:30
|
|
|
PurpleXVI posted:Do the Water Weirds work like their Monstrous Manual version? Because the MM version doesn't do damage, it just has one attack of "save vs instantly getting drowned by an angry blob of water." No, they just do single-digit damage. They're really pathetic here, though they do have a fast attack rate. JustJeff88 posted:Where does the game tell you about Delmair's mum? I don't remember that bit of lore at all. The game itself doesn't do that. It's revealed at the end of the story in the manual.
|
|
#
?
Apr 20, 2022 18:40
|
|
|
Alpha3KV posted:The game itself doesn't do that. It's revealed at the end of the story in the manual. No memory of that at all, sadly. Hannibal Rex posted:You must have "lost your manual" back in the day. Yes, I must have been a precocious software pirate because I don't remember a tiny bit of lore in a manual of a game from over 25 years ago that was in a foreign language.
|
|
#
?
Apr 21, 2022 00:41
|
|
|
JustJeff88 posted:
Shame, cause i do.
|
|
#
?
Apr 21, 2022 02:35
|
|


|
By popular demand posted:Another terrible misunderstanding that could have been easy to avoid if Mr. Lich wasn't quite this aggressive. Sure sure, blame the victim of unwarranted aggression by a group of murderhobos
|
|
#
?
Apr 22, 2022 14:38
|
|

|
AOMD 6: A Temple in Shambles The Temple of Lathander is inaccessible until you have defeated Acwellan. After that, the party is teleported only a few tiles away from its entrance. This game can be finished with almost no backtracking to previous areas.  Time to start the final dungeon.  The temple uses the same tileset as the Warriors' Tomb. One of the very first things you see within is evidence of its defilement. The ground floor is symmetrical in design. There are a total of four "circular" rooms to the east and west of this fountain.  Three of them have altars like this one in the southwest. Putting almost any weapon on this one will remove a wall to the west, after which you can take it back. However, maces don't work, as indicated by the closed eyes. Maybe because it seems to be floating in front of the altar rather than on top of it.  The room opened up by that altar has these items: a long sword +4, three incense bags, and a chalice on the southern shelf.  This is on the west wall. It actually does have visible genitals, though blurry and not very prominent.  Soon after we encounter the first enemy, called a living muck. Their attacks don't connect often but cause 7-28 damage when they do. The manual says they have a chance of causing paralysis, but I haven't seen that happen. Like trolls, they take a maximum of 6 damage from weapons, but do not share their weaknesses: They are immune to lightning, poison, and acid, as well as taking half damage from fire and magic missiles. They have a lot of HP, so it can take a little while to bring them down. Especially because of this:  Hitting them with metal melee weapons can get them eaten. Magical ones have a chance to resist this, at 20% per 'plus' bonus. That means +5 weapons can't be lost this way. It can only happen when you hit the muck, not the other way around. Wooden weapons and projectiles, even metal ones, will always survive. They don't eat armor, rings, or any other metal items. Instant death spells can work against them. If they fail, I spam the Cone of Cold wands from town against them. Their movement sprite is a slightly recolored version of the slithermorph's. Compare: I go to the northeast room from there.  It's the only one without an altar. Putting incense into these restores some HP to all characters as well as casting Bless on them. This one in particular also removes a wall in a hallway to the north. This is also where I first encountered the other enemy of this floor, but dark backgrounds made it hard to get a good cap. I'll use the cluebook for that:  Their hits aren't really that strong and rarely land anyway. Both monsters have a somewhat frequent spawn rate, but it's not overwhelming.  This door is accessible from the start, but it's not where I'm going right now. The removed wall opens the way to a staircase east of this.  That goes into a small room where we meet the final party member.  She has no further words upon joining.  Near the very end of the trilogy, we finally get a paladin in the party. A scroll of Heal gets her back into fighting shape immediately. She starts with a long sword and plate mail, both +2, a Ring of Feather Falling, and a green holy symbol. This game makes no distinction between cleric and paladin holy symbols. Speaking of which, filling the censers at both side of the stairs makes another holy symbol drop at the tile just north of where we met Tabitha.  After that I make an offering to the southeast altar, opening the way to this room. It has the parts needed to repair the fountain as well as that statue on the east wall. I couldn't help but be a little immature with the detached arm, so the next image is under a spoiler as  out of an overabundance of caution. out of an overabundance of caution. Repairing the statue gets us a visit from the big man himself:  He gives us a spiel: 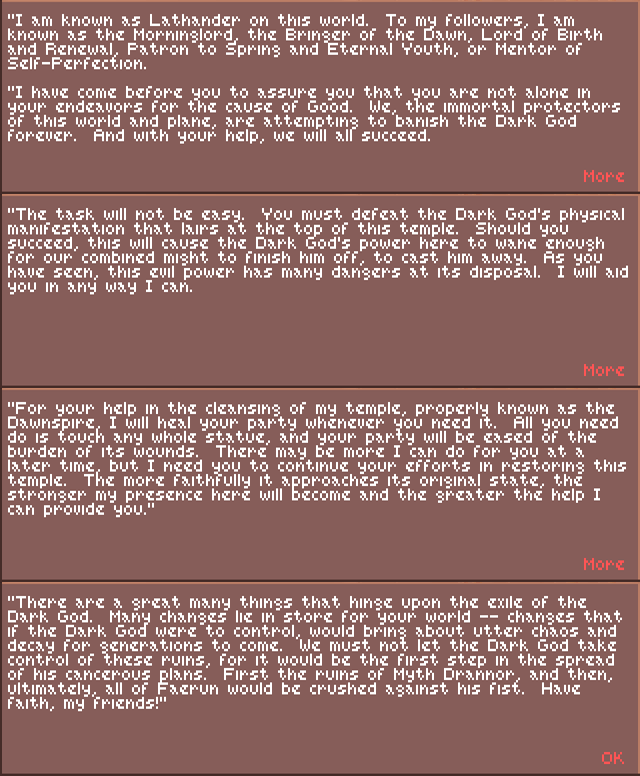 Just as he says, the party is healed by the statue. Now time to follow that up with the fountain.  It can now cast infinite Prayer spells. There's another altar northeast of it. I bet you probably won't guess what its theme is.  That wasn't sarcasm, it's the only one not based on one of the Four Horsemen. Much like the mace, the chalice graphic kind of goes in front of the altar rather than on it.  That removed another wall, opening the way to more stairs. This room has the same layout as the one Tabitha started in. Closing all of these tombs makes another holy symbol appear in the same position.  After coming back up, we find this button further along the hallway. Pressing it removes a wall at the west end, where a fire key is found.  Another stairway to the south goes into another small room. There are four of these pressure plates, which activate fireball launchers when weighed down by anything but shields. A shield on each creates a holy symbol in the shelf on the south wall. I have four shields +3 that I'm not actually using.  The south stairs on the opposite end go to where the fire key is used. This opens doors on both sides of it, where you can get four normal shields, a mace +4, an arrow +2, and two bags of incense.  We finally enter the north section. It's a big cross-shaped hallway that doesn't really have much in it.  Each side has one of these stairways, which go into an inescapable void. The only way out is reloading. Any items thrown at them will never be retrieved.  There are three altars, one at each point of the cross, that start with these black holy symbols on them. Replacing those with any other holy symbols will make the "pit" stairs seen earlier go up to the second floor. You might be wondering if they actually do something.  To answer that, I edited a save from just before meeting Tabitha to make the whole party evil. She still joins you if that's the case. Like other holy symbols, they're only usable by clerics and paladins. They function normally for evil ones, and instantly kill those who aren't. I reloaded my main save to go upstairs after throwing them into the pit.  There are a couple of shambling mounds waiting for us up there. Like living mucks and trolls, they take a maximum of 6 damage from weapons. They're immune to fire and lightning. They have a whole lot of HP to go with their damage resistance, so this makes a good time to break out those two extra Power Word, Kill scrolls I got from the Mages' Guild. For others, I start with Slay Living and spam Magic Missile wands if that doesn't work. They can do damage in the teens with their hits, but they're slow. If you saved the scroll or actually have a mage high enough level to cast it, Abi-Dalzim's Horrid Wilting is instant death to them. The two tiles just north and south of this entry square will make your party do a 180.  I go north first, where there are a pair of stairways to little subsections. These pressure plates initially close the doors next to them, trapping you in this room. But that doesn't force a reload, even though it isn't absolutely necessary to go here.  The return of this tileset also means the return of these tiny corner buttons. This one removes the wall it's on, revealing a lever behind it. Flipping that causes the pressure plates to open the doors back up. The west one leads to three more shambling mounds, one of which holds a gold key.  The other stairway leads to a little square hallway, where a couple more corner buttons open the way to items. One is cursed plate mail -4, the other is this Cloak of Defense +4. Unlike robes, Cloaks of Defense naturally improve AC by 2. That means this gives a total AC improvement of 6, making it the one and only upgrade to the robe +5 from the first game for single class mages.  That's timely since I'm putting both mages in the front row for a while. The other enemies on this floor are bone naga, undead who can cast Magic Missile and reduce strength with their hits. Negative Plane Protection and having both front-liners cast Shield will nullify that. I increase their HP with Vampiric Touch and give the Gauntlets of Fire Giant Strength to Jon. I don't bother increasing Bug's strength since these guys aren't tough enough to warrant that and it makes no difference for shambling mounds. I found that while he can wear any helmet, only the Helm of Underwater Breathing actually functions on him. Other magic helms will reduce AC on armor wearers. Another thing to note is that paladins can't cast Spiritual Hammer, but can use ones made by clerics.  A room in the northwest has this poem. No other items are in that section.  Behind a door in the northeast is a path leading to this room. The items on the floor are scrolls of Raise Dead and Disintegrate, a potion of speed, and a +4 shield. That's the best one in the whole trilogy, though again I'm not really using shields anymore. Stepping in here will make a wall to the north close you in. To remove it, use items to weigh down three pressure plates. Each one will activate a fireball launcher on the opposite wall. Use Protection from Fire or quickly dodge them.  The way into the south section has a one-time lightning bolt gauntlet. Just rush through it and you'll get out unharmed.  There's a fully intact sign on the other end, and you can turn around to watch an electricity show.  In the northernmost tile of the southwest portion you can find a short sword +4, best offhand weapon in the trilogy. The shelf behind it has a frost key.  Also in the southwest are another pair of hill giant strength gauntlets and two arrows +3 under a normal rock. Those are the last arrows to find in the series.  The stairs to the third floor are in the southeast corner. To get there requires going through a section which will change the party's direction every tile unless they have a Bless spell active. There's a censer to the north if you can't cast that, or you can just deal with the inconvenience of correcting their path after each step.  The room with the stairway up is inhabited by three shambling mounds, and has this door on its north side. Behind it is a shelf with an orb called Morning's Light. When you take it...  You also get the sword Delmair talked about in his introduction. It's a two-handed sword +5, which instantly destroys undead as described. That's the only +5 item found in this game. This event also gives experience, and both clerics reach level 11. That gives them access to 6th level spells, as we approach the end of the game. This makes a good time to rest, especially since that can't be done on the third floor at the start. I include some Slow/Neutralize Poison spells since it's also the last place where that will be a potential hazard. Next time will be the grand finale. Alpha3KV fucked around with this message at 17:08 on May 21, 2022 |
|
#
?
May 7, 2022 08:54
|
|
|
Sweet, God hands the party a lightsaber and tells them to go to town.
|
|
#
?
May 7, 2022 12:58
|
|
|
For extra points, Lathander looks like Obi-wan!
|
|
#
?
May 7, 2022 14:27
|
|
|
I thought Lathander was a dead god, or is the BG2 temple for someone else?
|
|
#
?
May 7, 2022 16:03
|
|
|
That�s Amaunator. Lathander is the primary active worshippable good god in BG2. Cleric of Lathander is one of the playable character classes.
|
|
#
?
May 7, 2022 16:05
|
|
|
Mzbundifund posted:That�s Amaunator. Lathander is the primary active worshippable good god in BG2. Cleric of Lathander is one of the playable character classes. There's hints that they are one and the same; simply a reawakening/branding of a similar, but not quite the same, portfolio and dogma. Of course, that's just speculation. He's probably just an outsider god invited to the general FR pantheon to fill an available void of portfolios and to prevent other, power-hungry gods like Talos from simply usurping those roles. Gods making personal appearances like this is pretty common in the Realms for high-power worthies! I don't think they do the same in any other TSR setting, save for St. Cuthbert and Iuz the Evil in Greyhawk and only because they were from Oerth originally. That said, Birthright has a Quest spell (an underappreciated but cool special type of priest spell) that allows the caster to appear as their god's avatar for a time. And, of course, the gods COULD manifest in that setting, all having been mortals there originally, but they do not wish a repeat of WHY they are now gods. Gotta love a direct hand-over of what is effectively a minor artifact weapon, though!
|
|
#
?
May 7, 2022 18:26
|
|
|
Chronische posted:Gods making personal appearances like this is pretty common in the Realms for high-power worthies! I don't think they do the same in any other TSR setting, save for St. Cuthbert and Iuz the Evil in Greyhawk and only because they were from Oerth originally. That said, Birthright has a Quest spell (an underappreciated but cool special type of priest spell) that allows the caster to appear as their god's avatar for a time. And, of course, the gods COULD manifest in that setting, all having been mortals there originally, but they do not wish a repeat of WHY they are now gods. Yeah, the last time the Birthright gods manifested on the mortal plane to interfere in a vital battle, it turns out conventional reality couldn't handle that conventration of divine power and they literally exploded, their essences seeking out mortals to empower. 
|
|
#
?
May 7, 2022 18:29
|
|
|
PurpleXVI posted:Yeah, the last time the Birthright gods manifested on the mortal plane to interfere in a vital battle, it turns out conventional reality couldn't handle that conventration of divine power and they literally exploded, their essences seeking out mortals to empower. Well, that, or Azrai was a LOT stronger than any of them thought! Of course, the question of the non-human gods remains: what the hell were those losers doing? But nobody cares that much about the goblins, gnolls, or orogs, and I suppose you could just say they are powerful demon lords or something to account for the lack of any really powerful priests of those gods noted in the setting books. As for the dwarves, giving them the Priest of Moradin from Demihuman Deities is waaay outlandishly strong for the setting. I've had to do a fair bit of work to fix some of the rough edges of Birthright, but it's only to be expected considering it got the last little spurts of TSR cash before getting bought by WotC who instantly cut all funding to everything but Forgotten Realms.
|
|
#
?
May 7, 2022 18:34
|
|
|
Chronische posted:Well, that, or Azrai was a LOT stronger than any of them thought! I mean, for instance, the elves are literally too arrogant to worship any gods. That explains one of them, and most of the "dark" non-humans worship Azrai. Birthright has some rough edges, but I still feel like it's one of the best and most well-realized D&D settings.
|
|
#
?
May 7, 2022 18:45
|
|
|
The elves actually have my favorite pantheon of the FR Gods. Corellon Larethian is the uber elf king with his triple goddess queen Angharradh and ex Lolth, whom the drow worship. Bunch of minor gods and goddesses on both sides too. Most non-human races only have one god in FR. Dwarves and Elves are the exception. Dwarves have Moradin, a hearth goddess, a battle god, and Dumathoin, keeper of secrets under the mountain. Stupid people make his work easier, according to dwarven insult. ")
|
|
#
?
May 7, 2022 20:56
|
|
|
achtungnight posted:The elves actually have my favorite pantheon of the FR Gods. Corellon Larethian is the uber elf king with his triple goddess queen Angharradh and ex Lolth, whom the drow worship. Bunch of minor gods and goddesses on both sides too. They might have evolved things more over the years, but if you look in 3e and beyond they fleshed out gnome, halfling and non-PC-race pantheons quite well. On a totally unrelated note, I still don't know how Lolth is a greater deity given that the drow are not that numerous, laregly due to killing each other as much as other races.
|
|
#
?
May 7, 2022 22:44
|
|
|
Demons and some nonhuman races, many of the latter drow slaves, also worship Lolth maybe?
|
|
#
?
May 7, 2022 22:50
|
|
|
Those 5 spiders you swallow every year in your sleep all worship Lolth 
|
|
#
?
May 7, 2022 23:55
|
|
|
JustJeff88 posted:They might have evolved things more over the years, but if you look in 3e and beyond they fleshed out gnome, halfling and non-PC-race pantheons quite well. achtungnight posted:Demons and some nonhuman races, many of the latter drow slaves, also worship Lolth maybe? Originally she was NOT a god, she was simply a demon lord. I believe it was FR that made her a fully-fledged god, whereas in Greyhawk she was simply a demon lord. There, she had human worshipers, most notably Lareth from the Moathouse! Making her a greater deity in FR was part of the overall move to make everything in FR more powerful than all other settings. Pretty lame in my opinion! The truest form of Lloth is from Queen of the Demonweb Pits where she is eminently killable and, honestly, her henchmen in the room she is in are more dangerous than she is. PurpleXVI posted:I mean, for instance, the elves are literally too arrogant to worship any gods. That explains one of them, and most of the "dark" non-humans worship Azrai. So, during the war against Azrai you're correct that he had basically conquered the world at that point. Elves don't worship gods not out of arrogance per-se but because they simply do not conceive of anything as being greater beings than they are due to their weird connection to the magic of the world. That gets even weirder once you read more of the Shadow World lore on them, and read up on the Sie, which implies that before the Shadow World split from the daylight world they were once super-beings. So, they have no gods in the same way that sprites and brownies and other fairies didn't have gods until later (and those are, iirc, unique to FR as well). I love Birthright and, yes, while it has some rough edges and was blatantly unfinished and undercooked due to lack of funding, it is still one of the best out there. Just the seasonal event chart alone is a great inspiration for potential adventures, much less all the potential plots of the numerous lords, guilders, temples, and mages out there! Meanwhile, the Forgotten Realms doesn't have them ask so much as demand that you adventure, like the impetus for this game. Even high level adventurers are still going to be bullied by eternally higher level NPC goobers! At least you get sweet magic swag on the journey. Funny enough, that was a noted reason to visit the Realms in one Planescape source I read ages ago; there may be a lot of dangerous locals, but there's also a ridiculous abundance of magical items.
|
|
#
?
May 8, 2022 05:52
|
|
|
The Salvatore books surely had a lot to do with this, but I imagine that Lolth was such a popular villain that it only made sense, such as it was, to promote her to the highest level of deitidom. There's a whole sextet of books that focus on her promotion to greater deity status where she sets up a new domain in the outer planes. Mind you, I always thought that deities did not have any sort of rank until after the Time of Troubles and all the changes that Ao made, but I've seen plenty to contradict this. One bit of lore that I recall that would support Lolth's high status is that deity rank is not just based on faithful worshippers, but also how a god's portfolio touches peoples' lives, good or bad. For example, not many people worship Talos, the god of destruction, but a whole lot of people are terrified of him and try to appease him, which makes him a greater power. Sune is a high-ranking deity because love is such a huge part of the human experience; same as hate, which was Bane's portfolio before he was destroyed.
|
|
#
?
May 8, 2022 15:51
|
|
|
I made some edits adding a little more detail on the monsters. I emphasize that living mucks can only eat metal melee weapons, nothing else, and only when the party hits them instead of the other way around. I also point out that bone naga can reduce strength with their normal attacks.
|
|
#
?
May 8, 2022 18:22
|
|
|
AOMD 7: The Dark Fraud This message is displayed on your first entry to the temple's third floor. It's not what's written on the sign:  It's not long until we're approached by the first enemy of this stage, a banshee (called groaning spirit in the manual and cluebook). They're undead who are immune to cold, lightning, and normal weapons. What they are not immune to is Dhauzimmer, the undead-destroying sword we got at the end of the previous floor which makes them a complete non-threat. When it hits an undead monster, it does their exact HP in damage. From that I learned that the range for banshees is in the 40s to low 50s.  This message is on the east and west faces of that pillar at the start. Not far to the west is one of the other monster type on this floor, the spirit naga. They're the last enemies in the trilogy capable of inflicting a status effect, in this case poison. They're not undead, so I'm not sure what their exact HP range is. It's certainly not enough to withstand an all-attack. This junction has a copper key behind an illusory wall.  Another one appears on this shelf after you touch that statue. It also restores some HP to the whole party like others of its kind. That could be helpful since as shown here you can't rest on this floor at the start. There's no special graphic for nightmares like there is for the lowest levels of the Darkmoon catacombs.  The other gimmick of this floor is that any rations you bring will become inedible. There are two stairways to isolated portions of the fourth floor, one of which is close to the statue. The south one is a potential resting spot, since it has nothing except a teleporter to the other section...  Where you can get a preview of fourth floor enemies. These are death knights, undead who can launch fireballs. Protection from Fire on all characters makes that a non-issue. They attack fairly quickly and can cause damage up to the 20s, but no side effects. They have 75% magic resistance but 0% resistance to Dhauzimmer. From that I learned their HP range is high 50s to low 60s. The cluebook says "Death knights are difficult foes to vanquish." Whoever wrote that obviously didn't account for the anti-undead superweapon players are very likely (but not guaranteed) to have at this point. This room has a +4 staff and a scroll of Resurrection, an improved Raise Dead that also works on elves.  The copper keys unlock these rooms. There is one in the middle of each edge of the third floor. They all have these beacons and signs that hit the party with a weak fireball when read. Once again Protection from Fire solves that problem. I can't really do anything with the beacons just yet...  But it was still worthwhile to click on that since it made these cups appear in the central square. Putting them in the niches removes inner walls of the square, making the very middle of this floor accessible. The plaques here also cause fire damage when read.  This event happens every time you step onto the central tile of the third floor. It casts a more powerful version of the spell Heroes' Feast on the party. The normal spell is a combination of Create Food and Bless that also restores some HP to the whole party. It's not a guaranteed full recovery of either health or even the hunger meter. That would obviously be overpowered, even for a 6th level spell. This version of it, however, is a full recovery for both, with infinite casts to boot. This game pretty much gives up having any semblance of difficulty by the end. That red rock is called an Ember of Hope, the item needed for a beacon.  From there I went to the east end. The first beacon is now lit.  A little north of that is a small room with a pressure plate inside. Stepping on it closes the door behind you and spawns two banshees. One of them drops the iron key which unlocks the way out. The end of the room has this halberd +4 and healing potion.  Further north is a junction with false pits on each side. You can walk over them without issue. The west path leads to a room with two more embers. The east path goes to a room with several spirit naga, who guard another copper key.  I use one ember to light the north beacon then head south. This lever opens a door into the southwest quarter. It also launches Ice Storms from the north and south, which can be dodged by backing into this nook.  After lighting the south beacon, I go in there. Under the shield is a flail called "Mourning Star" which is the best blunt weapon in the trilogy, though we're well past that damage type being truly relevant. Both items are +4.  The room at the end of this section is trident-shaped. The middle prong has a censer. The north and south both have plates that launch Ice storms and levers to deactivate them. Those can be flipped without harm by throwing items at them. The north prong has a shelf with the last ember in it. The south shelf has a scroll of Fire Storm, which is Ice Storm with a different element that makes it safer to use due to Protection from Fire.  The western hallway has a room on its south side with three banshees inside, one of which drops a copper key. Lighting all four beacons makes rest possible on the third floor and stops plaques from burning when read. It also creates this key on an altar a little ways northeast of the western beacon.  The end of this stage is in the northwest quarter. This pressure plate will close the door to the south, which opens again when you step off. Throwing an item onto another plate further ahead will keep the door open, allowing you in.  The last puzzle of the third floor. This teleporter just takes you back to the entrance of its room...  Until you throw the Key of Faith into it. Now it leads to the main part of the fourth floor.  You arrive in a room with three doors, which won't open when clicked. There are no buttons or levers, only a plaque with this obtuse hint. Casting Dispel Magic will open all three doors, which also introduces the last regular monsters. Shadow hounds are immune to normal weapons, not undead, and can cause damage in the low teens when they hit, which isn't often. They're not very tough but do tend to appear in rather large packs.  The north door leads to nothing but more enemies, and the south has a couple death knights guarding another prayer fountain. The west hall has two pairs of lightning bolt launchers, activated by stepping in their row. The row between them is safe. That's a crystal key on the floor, which unlocks a pair of doors straight ahead.  Before going in I head south, where more shadow hounds guard a +4 spear and another +3 returning hammer.  The north path has a fork. This shelf in the east room holds another crystal key. The west room is occupied by death knights, and has a scroll of Disintegrate and a coin on its floor.  Putting that coin in the fountain south of the entryway creates a third crystal key in an adjacent shelf.  After fighting through several shadow hounds in the central room, I head straight west. This room had a pair of death knights in it. That face on the wall can be taken down. It's a +3 shield, but needed for another purpose later. I then clear out the north and south corridors, which lead to crystal locks. The north room has death knights inside, as well as a tile that warps you back to its entrance.  To get past that you must click one of these basins in the central room. Taking damage or killing an enemy will dispel its blessing, which is why I cleared the area beforehand. This allows the party to take the Staff of Life.  That's needed in the south room, which had enough shadow hounds to make me use my scrolls of Fire Storm and Meteor Swarm. Clicking this sculpture with the Staff of Life will remove them both. clicking it with anything else causes damage in the 20s to all characters, with no special comments.  Removing the sculpture also removes a wall in the central room, exposing this door. Putting the Sun Mask in the middle of it makes it openable. Behind it is a teleporter to the final boss. It's possible to kill him from here, without even going into his room, by spamming ranged attacks through the teleporter. I'll be showing his last monologue and another humiliating way to defeat him.  After this, those curtains in the corner are pulled away.  He does standard smug villain gloating much like his predecessors.  Admitting you've already underestimated us isn't really a great sign for you.  During a closeup, his face changes to its true appearance.  As shown in this scene, we're up against the only final boss of this trilogy to have minions in his room. Though easily dispatched, they can still be annoying. To deal with that, I break out the spare Time Stop scroll from the Mages Guild. If the Dark God lives up to his name, he should be unaffected, but at least there won't be interference.  Well well, looky here. Check out who's ALSO vulnerable to Time Stop. It suspends projectiles in midair, so only the melee warriors are really contributing damage. He evidently has has extremely good AC, since they frequently miss even when they all have 22 strength (via my last two potions). The cluebook says "The Dark God is very difficult to defeat," to which I can only say  , ,  . To be fair, he has a lot of HP and quickly spams lightning bolts when allowed to act. But of course I didn't do that and just dropped a steamroller on this fool. . To be fair, he has a lot of HP and quickly spams lightning bolts when allowed to act. But of course I didn't do that and just dropped a steamroller on this fool. Lathander shows up once more after the battle. 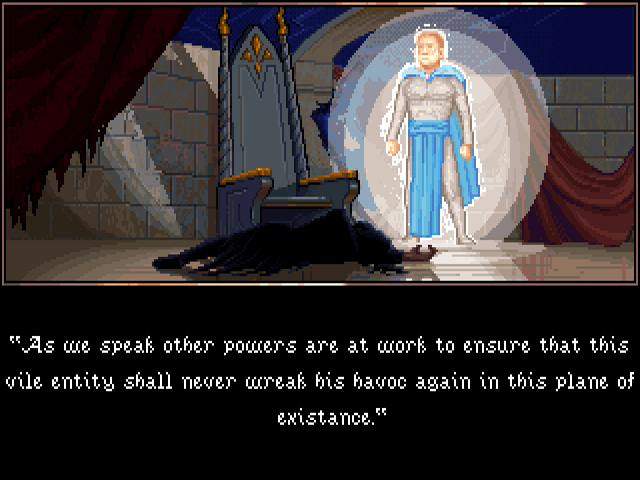 Even actual deities make spelling errors.  The portal is closed during this line.  We hosed up but immediately corrected that gently caress-up, so it's all good.  The party is greeted on their way out of the city.  Remember this guy? We saw him at the very beginning of this game, but not since then. Sure is an honor to join the group that didn't really do anything.  After this, the credits roll.  Isharn and Father Jon both finished at level 11 in both of their classes. Isharn was the sole beneficiary of a small amount of grinding and the level-up book. Rex also finished at level 11, making that half the party. Tabitha was the only one to finish under that, staying at level 10. Bug reached level 12 early into the final floor. Delmair had the highest level at 13. Video: The "climactic" finale https://www.youtube.com/watch?v=3LnFtGlbKNY Alpha3KV fucked around with this message at 17:33 on May 18, 2022 |
|
#
?
May 17, 2022 19:29
|
|
|
And you are done! Congratulations. Fun games.
|
|
#
?
May 17, 2022 19:42
|
|
|
Congrats! I always have a strange soft spot for these games; I didn't grow up with them and have only poked and prodded through the first one a bit, but something about these gold box games just hits the right buttons.
|
|
#
?
May 17, 2022 21:27
|
|

|
Congrats on finishing up the LP! Good work!
|
|
#
?
May 17, 2022 22:05
|
|
|
Congrats! Is he really only ever called the "Dark God"? No further lore about who or what he's supposed to be, exactly? He's nowhere near as memorable as Dran, that's for sure.
|
|
#
?
May 17, 2022 22:29
|
|
|
|
| # ? May 9, 2024 09:23 |
|
|
I think nothing sums up what everyone has been saying about power creep better than that last fight. Especially compared to the damage the 1st games last boss did to you when you took it in a straight up fight.
|
|
#
?
May 17, 2022 23:13
|
|