


|
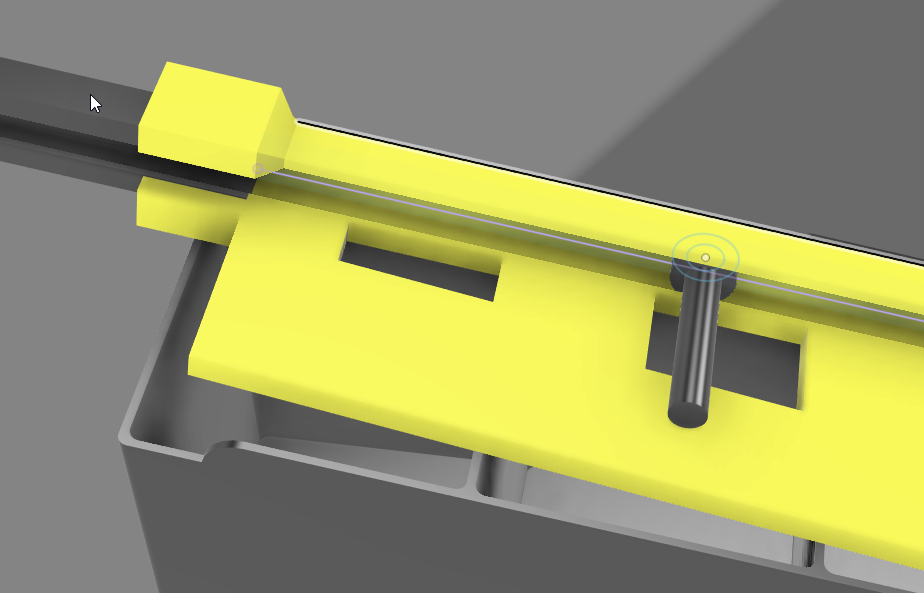
I really thought a bayonet type connection for two pipes would be straightforward (especially because I mostly copied a thingiverse design), but the retention 'dimple' is either too strong or too weak. I designed a nice springy version, but I can't actually use that as it won't be printable in the final design...
|
 #
¿
Jul 22, 2021 15:13
#
¿
Jul 22, 2021 15:13
|
|


|

|
| # ¿ May 8, 2024 20:38 |
|
|
So I dropped and mostly mixed a few thousand M3 screws. Although I have sorted them by hand already, I was inspired to build a sorting mechanismn and two days later I have just finished it. I am amazed by how well it works. I could even easily motorize it. Gotta love how 3D printing allows us to easily create this sorta solution to this type of problem.
|
|
#
¿
Aug 3, 2021 16:52
|
|
|
The Eyes Have It posted:That's super cool! How did you approach the problem? I tried looking up different approaches,but gave up quickly. I came up with my own linear mechanismn. First thing I do is righting the screws (at this stage I could also easily seperate out different sizes, but there was no need for that for me). Right now I am doing it with a simple 'handshaker', but you could easily add this to a 'classic' rotary mechanismn. This gives me perfectly straight screws on a rail, which I can directly feed into the next stage. It's a slanted plane with cutouts that are just large enough for every size. The screws basically are supported at the top and bottom until they get to their size, at which point the tip is no longer supported and they tip down, rotating over the rail. I can add some illustration tomorrow if you want.
|
|
#
¿
Aug 3, 2021 17:36
|
|
|
 As promised here is a picture of my screw sorting machine. Please note, that the plane needs to be tilted forward by approximately 45� (In addition to the 10� slope to the right), I have not made this change in the design yet and achieved it by simply holding it that way. This way the screws dangle from the bottom edge (a bit hard to see) and the top edge is not present in this part of the machine. This makes the screws drop in more easily, the shortest size I have has a too heavy had to drop in fast enough otherwise. It also prevents the screws twisting a bit.
|
|
#
¿
Aug 4, 2021 14:37
|
|
|
Do any of you know an effective way to get curved surface profiles? I tried reference images, but the curves are not easily photographed.
|
|
#
¿
Aug 5, 2021 14:06
|
|
|
Doctor Zero posted:What do you mean by 'profiles'? I am trying to create a cover that attaches to my car, but there are tons of curves intersecting it and I am trying to match them basically.
|
|
#
¿
Aug 5, 2021 15:46
|
|
|
I have looked at that, but they are way too inprecise and large.
|
|
#
¿
Aug 5, 2021 17:40
|
|
|
armorer posted:You take the contour with the gauge, take a top down photo of it on graph paper of a known grid size, import that image into your software of choice, and draw a curve along the photo contour. The gauge has too low a resolution I guess, my curves are like <5 cm in length.
|
|
#
¿
Aug 5, 2021 18:59
|
|
|
SEKCobra posted:The gauge has too low a resolution I guess, my curves are like <5 cm in length. I guess I developed my own technique because nothing 'standard' really works, I am using wire (solder wire) to trace the shapes and then I trace that onto paper with manual air brush pens. Can measure/scan directly after that. Also printed a helper part that hooks onto the plastic so I can try and measure some 90° distances which I might be able to reference as well.
|
|
#
¿
Aug 6, 2021 04:36
|
|
|
My Ender 3 has been totally solid, although I have upgraded quite a few things over time. So far the only necessary maintenance was changing a faulty roller.
|
|
#
¿
Aug 13, 2021 15:18
|
|
|
The Eyes Have It posted:That's I know your pain, trying to get real world measurements of curves into a CAD workflow is a serious pain. Photogrammetry sadly failed early on because my things are too shiny and big. What I have found to probably be the best tactic so far is to get a reference line into the real world (I use a level for this) and somehow fix it to the part, then take defined measurements (Basically getting coordinates of the parts surface), if you just get 3-5 measurements you can probably extrapolate any curves that were previously CAD designed.
|
|
#
¿
Aug 31, 2021 06:15
|
|
 God lining up poo poo and trying to scale it, etc is a real pain. Trying to dovetail results into real-world measurements is really not at all the whole workflow's strong suit.
|
My take on the Ender/Prusa debate is the following: I bought an Ender 3 to get into the hobby, I do not regret it. With what I know now, I would just buy a Prusa, despite the much higher cost. But I could not have known these things before. But why? First of all, I did not know if 3D printing /really/ was "for me". Or if I would really use it. How the gently caress could I justify dumping Prusa money on a hobby I might lose interest in quickly? Exactly, gently caress that. 300€ or whatever my kit cost back then was just about an acceptable expense under the assumption that it would be a great hobby. I was not afraid of tinkering (basically a hobby of mine already) and really impressed by what Enders were capable of compared to the repraps I had run into before. Getting started was rough, I had to deal with a lot of problems and even some bad advice/"common knowledge". Tinkering became a disappointing chore at times and dialing in my printer profile took at least months because of demotivation. Still don't get why I couldn't find a profile with tweaks similar to mine. But at some point after the first upgrades (glass bed) and getting a feeler gauge instead of paper I started to get satisfying results and had learned enough to slowly tweak the right parameters. I finally could start printing cool thingiverse stuff. Then came phase 2: Learning CAD. And this is when things really took off for me. I really like the rapid prototyping workflow. And I have created so many useful things by now. Despite really enjoying tinkering, most of the time during phase 1 I just felt like I was trying to reinvent the wheel step by step, having to learn about every detail a bit too in depth. Sure, this has definitely given me a much better understanding of how everything works and what the spectrum of options is, etc. But it really just kept me from getting to phase 2 for a long time. Knowing all this, I'd much rather just get a well tuned machine with all the repetitive work done, get a honed to near perfection slicer profile and get to work. So yeah, I would never want an assembled Prusa, but gently caress yeah give me that kit, by now I know that this tool is worth the investment (although really I would want a Core XY machine with Prusa quality at this point, probably). But yeah, not 'knowing' the hobby, justifying the expense of a Prusa compared to an Ender (200$ upfront now?) Is a whole different league. Sure I spent a few dollars over the years for upgrades, but it wasn't THAT much and I knew by then that I really would get my money's worth out of the additional expenses. Also, my nozzle camera is the most amazing thing ever and should be a standard feature of every 3D printer. It makes understanding print failures soooooo much easier and is just generally awesome to watch. SEKCobra fucked around with this message at 20:32 on Sep 4, 2021 |
|
#
¿
Sep 4, 2021 20:28
|
|
|
I really don't know what to make of this, my printer's cables really get hot during heatup, maybe I should just rework the connector at some point.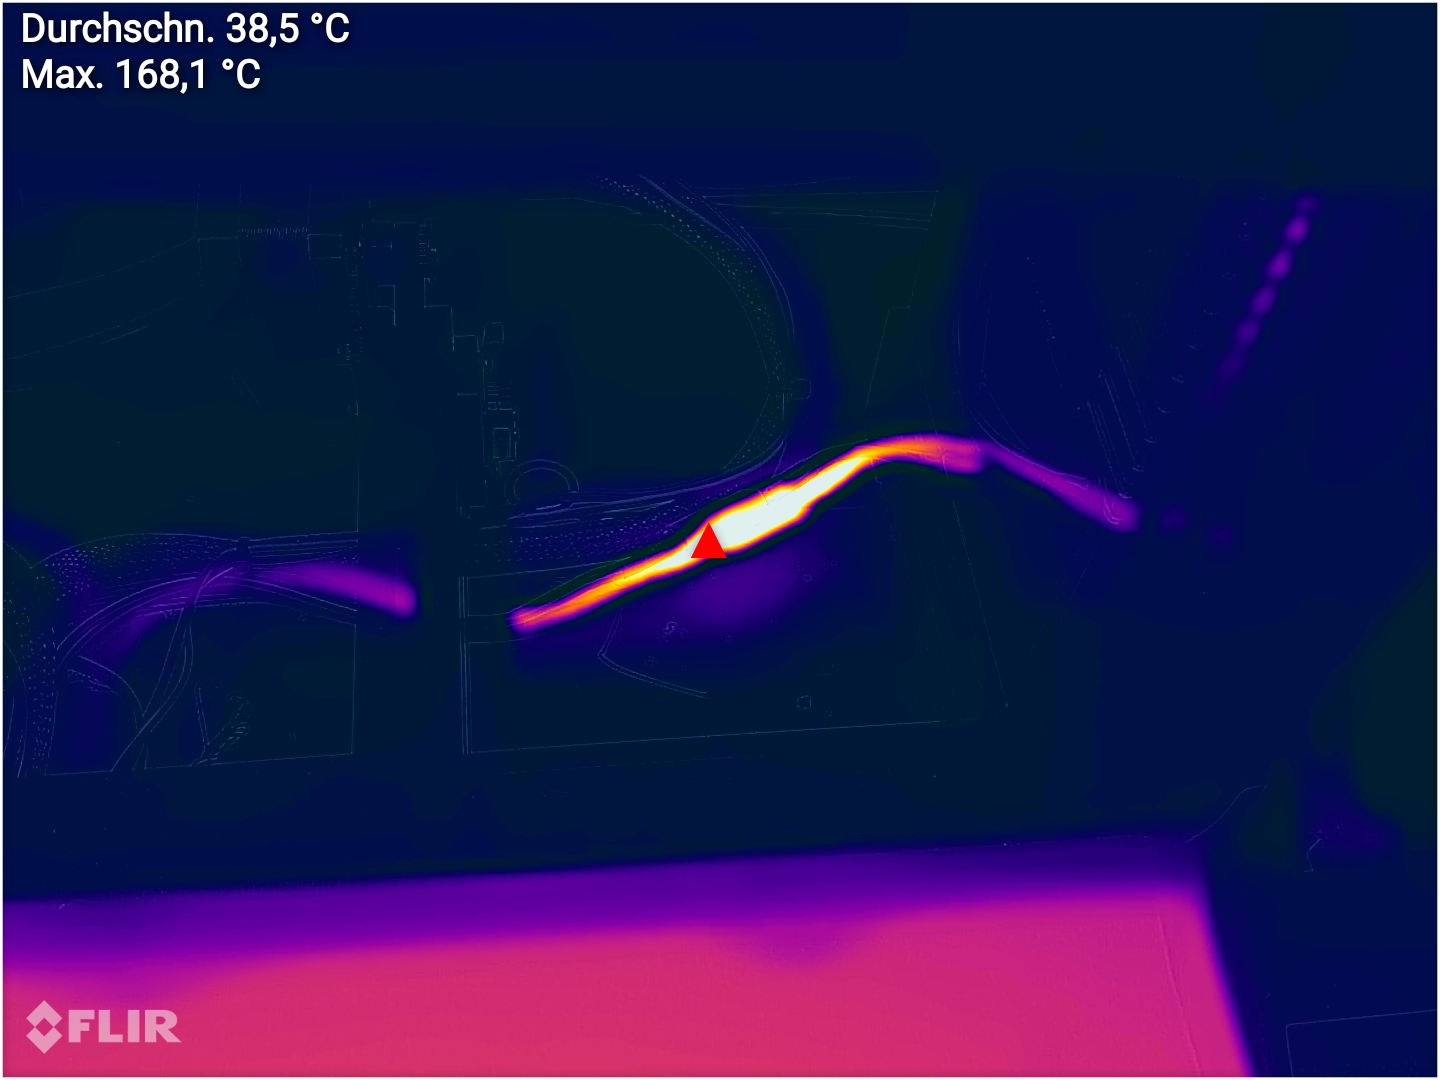
|
|
#
¿
Sep 8, 2021 07:19
|
|
|
Wibla posted:That's a fire hazard. While I agree that this is poor design, the connector is rated to 120°C, and the cables are silicone insulated and probably rated a lot higher. It's only the cable that reaches that max temperature. Still, if I am going to entertain ABS printing more often, I'm probably rework this stuff.
|
|
#
¿
Sep 8, 2021 08:00
|
|
|
Sagebrush posted:What cable is that? The bed heater? It's the cabple from the PSU to the mainboard with the XT60 connector. It doesn't normally get this hot, but I was printing some ABS and decided to check on it.
|
|
#
¿
Sep 8, 2021 08:33
|
|
|
ImplicitAssembler posted:Probably a cheap clone XT60. Silicone cables can withstand at least 200C, so it's unlikely to blow up, but you should fix that. I doubt any Ender 3 uses original XT60s
|
|
#
¿
Sep 8, 2021 09:13
|
|
|
Hadlock posted:Correct This is obviously a high resistance path, but this is not a spontaneous failure but probably how this thing has been from the getgo, just now showing more because of the higher current. I don't know why you guys assume anything is gonna catch fire spontaneously, these aren't unheard of operating temps, just far out of an ideal spec. E: I tore it down, it's clearly a bad crimp on the negative terminal of the XT60 (aren't these usually soldered on?), there is no runaway condition, it's just not coping with the higher current because it is improperly terminated. Been meaning to redo it anyway, so I don't really mind discovering this now. SEKCobra fucked around with this message at 09:47 on Sep 8, 2021 |
|
#
¿
Sep 8, 2021 09:15
|
|
|
Rexxed posted:There was a batch of bad XT60 connectors at one point, yours might be from that batch. Creality blamed a vendor of theirs and it did seem to get fixed quickly, however I doubt they tracked down every unit to do a recall because it's Creality. Yeah I read about that back when I got it and made sure to check the connectors for issues, I have evaluated their temperature before and it was fine, I have however also not printed much besides PLA so far which obviously means I also didn't draw nearly as much power continuously before. Still, why are these even crimped, I didn't know you could crimp this type of connector 
|
|
#
¿
Sep 8, 2021 11:41
|
|
|
SEKCobra posted:I really don't know what to make of this, my printer's cables really get hot during heatup, maybe I should just rework the connector at some point. Here is what a proper soldered connector SHOULD look like even under load. 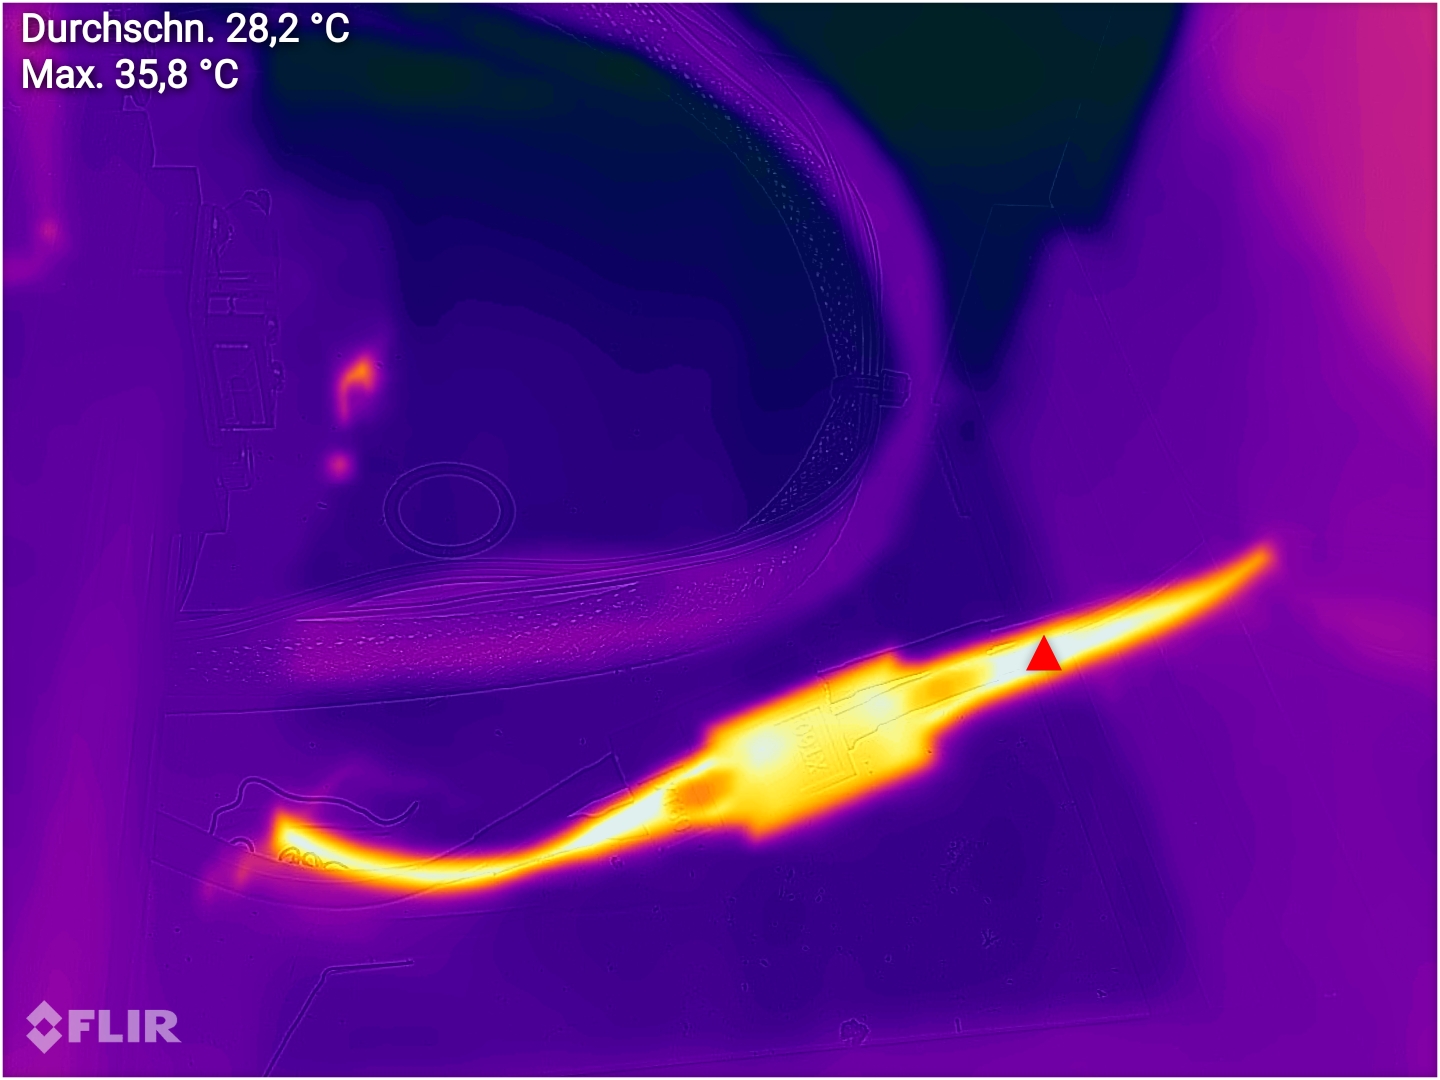 Still is a mystery to me how someone apparently made crimpable versions of this.
|
|
#
¿
Sep 10, 2021 17:21
|
|
|
I'm interested in what your favorite prints so far are. I am really getting into solving small everyday issues with my printer and would love to see things others have come up with.
|
|
#
¿
Sep 11, 2021 20:29
|
|
|
Trying to print some ABS in a space blanket 'enclosure' and it appears my Petsfang has split and melted. No idea what happened there, will have to examine once the printer stops, for now I have ziptied it to the gantry.
|
|
#
¿
Sep 12, 2021 14:23
|
|
|
Dr Sun Try posted:what material is the petsfang? if it's not ABS and your printing at ABS temps, it probably got too hot. Yeah it's PLA, it's just funny that it seems to have split at the layer lines on the left mount and is just kinda "rubbery" on the right. Probably is related to the airflow around the hotend. I am expecting that I will have to renew it fully after this print, but I did not anticipate it to fail so catastrophically right at the start.
|
|
#
¿
Sep 12, 2021 15:07
|
|
|
The Eyes Have It posted:I have sometimes used 6mm airsoft BBs as "alignment pegs" because they're cheap, consistent size, can be embedded in the print and no one cares, and most importantly: the two halves can be modeled with a 6mm hemisphere in each instead of a hole in one side and an awkward peg in the other side that inevitably causes print headaches due to its location. Thats a cool idea, i think i'll steal that.
|
|
#
¿
Sep 12, 2021 17:50
|
|
|
I am just really laughing my rear end off after unsealing my ender 3 after this 6 hour print, maybe you shouldn't use PLA parts inside a heated chamber. Almost all upgrades I have printed have drooped or given out in some way. It's pretty funny. Guess I'll reprint it all in ABS and use that time to get familiar with the material properties some more. Also, dealing with ABS looks like it's basically gonna be starting to print all over, I see a lot of failures and few successes in my future. I'd pay extra to get something as temperature stable as ABS, but printable like PLA.
|
|
#
¿
Sep 12, 2021 20:49
|
|
|
Zorro KingOfEngland posted:I've never printed ABS, just used PETG in any application that needed slightly higher heat tolerance than PLA. I want to do some stuff for cars and everything but ABS seems to droop after a bit too much sun exposure.
|
|
#
¿
Sep 13, 2021 07:06
|
|
|
I kinda want Prusa to release a Core XY model at a similar pricepoint to the MK3. But I also hope they don't, so I don't get any funny ideas about spending money.
|
|
#
¿
Sep 14, 2021 06:17
|
|
|
becoming posted:I like OctoPrint a lot. It's a bit of a pig and unfortunately doesn't run well on a Pi Zero, but if you have a spare 3B or 4B sitting around, it's super handy. (Prusa does maintain their own version of OctoPrint which is meant to run on a Zero and can hook right up to the motherboard of your MK3S+ and this may be worth considering if you've got a spare Pi Zero-W around.) Base OctoPrint is handy for remote monitoring, a remote-accessible terminal for running gcode (probably less handy on your Prusa but it's been a lifesaver on my Ender 3 v2 and deltas), and timelapses look cool and can be really helpful for seeing when/how a print went wrong. There are mobile clients for OctoPrint - I really like OctoPod on iOS / iPadOS - which enrich the experience. A lot of OctoPrint's strength comes from its plugins though, similar to how Firefox is much better once you get some Extensions rolling - Octolapse and The Spaghetti Detective are the famous ones, but there are hundreds of plugins big and small that add all sorts of great functionality. Sounds fair enough, but really I probably don't want a much larger footprint at this point in time. Really, many stars would have to align to really give me a good reason to upgrade at this point.
|
|
#
¿
Sep 14, 2021 09:54
|
|
|
Well, my recent droopattack has taken it's first victim, my nozzlecam was unsalvagable, but I had all the parts to make a new one. Decided to make it from ABS to prevent another flaccid incident, but sadly it didn't quite work out. The focus distance is all wrong, the lens got scratched up because of the changed tolerances and the mount broke while screwing it down... So I guess I will just have to try again with PLA and another endosocpe whenever that arrives. I will be all out of lenses at that point. Considering my nozzle cam has been a huge source of joy I am really saddened by all this.
|
|
#
¿
Sep 16, 2021 15:17
|
|
|
poverty goat posted:So there was a $200 Ender 3 v2 on amazon, usable with aesthetic damage and serviced by amazon w/ the amazon return policy. So I figured, what the hell? I'll see if I can get it working and return it if not. I had this problem until I slowed down the first layer.
|
|
#
¿
Oct 1, 2021 12:42
|
|

|
Hadlock posted:Is there a magic setting that will shut down (or at least disable the fans, including power supply fans) my ender 3 v2 after the print finishes, particularly using prusaslicer. I usually kick off a print around midnight and it wraps up right before my wife needs to use that room You can do this with octoprint and a control board, otherwise no, the fans are hardwired.
|
|
#
¿
Oct 4, 2021 11:25
|
|
|
Nitrile gloves are not chemical safe.
|
|
#
¿
Oct 9, 2021 19:19
|
|
|
CURA purge line is gcode and not actually part of the slicer.
|
|
#
¿
Oct 11, 2021 06:47
|
|
|
Trying really hard to convince myself that I can somehow use a second printer, but I really don't know how.
|
|
#
¿
Oct 16, 2021 06:55
|
|
|
Wouldn't the LK4 Pro be a better deal actually?
|
|
#
¿
Oct 16, 2021 11:23
|
|
|
Roundboy posted:My printer is two weeks old but I start longing for a new printer when I start a long print and need more things That printer is too cheap and my income too disposable and so I have ordered it. I figured I can pass it on to my dad or colleague with a old rep rap crappy printer with some coercion.
|
|
#
¿
Oct 16, 2021 21:15
|
|
|
My Longer 3D Printer has arrived. This will be interesting.
|
|
#
¿
Oct 21, 2021 10:46
|
|
|
I printed a benchy on the Longer LK1 today and it seems OK, although the flavor of Marlin they put on there seems to have a problem with M1/M0 gcodes, I found that out trying to use my leveling script which causes the controller to crash. Also, being on stock cura profile is strange, especially because they default to a raft. Will have to really tune this in later.
|
|
#
¿
Oct 28, 2021 23:47
|
|
|
Deviant posted:"your prusa mini has shipped" Literally neighboring coUntry for me so I'd love to get one someday
|
|
#
¿
Nov 2, 2021 16:23
|
|
|
blugu64 posted:Some folks have done city height maps. They don�t distribute the STLs but base data is all free government heightmaps that you can price together yourself. There�s a tutorial out there somewhere, but I couldn�t find it. Ok, that is really cool. Unfortunately I never got good enough in QGIS to manipulate data in a meaningful way, because I have previously tried doing stuff with open map data.
|
|
#
¿
Nov 12, 2021 17:46
|
|

|

|
| # ¿ May 8, 2024 20:38 |
|
|
goddamnedtwisto posted:Yeah, OSM data is frustratingly not-quite-good-enough. It's fairly easy to export it and turn it into an STL via 3D Builder but there's always loads of little niggly issues that stop you getting nice clean results like that. Actually the data isn't too bad, but styling, changing and selecting it requires knowledge I don't have.
|
|
#
¿
Nov 12, 2021 21:21
|
|