


|
Fire Emblem is a series of fantasy strategy role-playing games developed (mainly) by Intelligent Systems and published by Nintendo. The series began in 1990 with the release of Fire Emblem: Shadow Dragon and the Blade of Light for the Famicom. It is now on its 16th mainline entry with 2019's Fire Emblem: Three Houses for the Switch. A decade ago, Fire Emblem experienced a resurgence with the release of Fire Emblem Awakening, one of the most celebrated RPGs on the 3DS. Fire Emblem Fates, the subject of this LP, was the follow-up that came out three years later, also on the 3DS. It's only barely a sequel�the characters, events, and locations featured in Fates are mostly disconnected from the world of Awakening�but Intelligent Systems tried to preserve the features that made Awakening so beloved while expanding the scope of the story across three different routes and polishing the gameplay systems to perfection. As far as the writing goes, they were, uh, not wholly successful. But on the gameplay front, specifically on the Conquest route, they absolutely killed it. The three routes in Fates are Birthright, Conquest, and Revelation. They're really three different games; after the decision point in Chapter 6 (out of 28), the routes have different (but overlapping) playable casts, distinct gameplay design, and very divergent stories. Birthright is aimed at newer or more casual players, being generally easier and allowing players to grind to their heart's content by completing optional skirmish battles. In Birthright, you join the royal family of Hoshido in their war against Nohr. Conquest, which is the route we're playing, is the one where you side with Nohr against Hoshido. This route is designed for veterans. The battles are more difficult: enemies have powerful skills, they're positioned in ways that make them tricky to approach, and the AI is adjusted so that they won't just make pointless suicide charges into units they can't damage. Conquest also doesn't allow grinding (without DLC), so you're forced to make do with whatever experience and gold you can get in the campaign itself. In practice, the grinding restriction isn't so bad, since Conquest is very generous with money and all the characters are at least competent when they first join. Revelation is the golden route where you unite the royal families of Hoshido and Nohr against a hidden threat that has been secretly orchestrating their conflict. This route sits between the other two on the difficulty scale: enemies are tougher than in Birthright, but that's mostly because they have bigger stats, rather than having clever combinations of skills and positioning. You're still allowed to grind, unlike Conquest. Unfortunately, Revelation clearly didn't get playtested as much as the first two routes, so there are some very awkward balance problems. It still works as a sandbox to play with (almost) all of your favorite characters from both sides, though. For this LP, I will be playing Conquest on the hardest difficulty, Lunatic. But beyond that, I'm adding an additional challenge.  I have long wished that Fire Emblem LPs could actually showcase every single character a game has to offer. The problem is that the mechanics don't usually support that: you're generally meant to pick out a small group of favorites and just train those, replacing people only occasionally�when they fail too many growth rolls and their stats fall behind, or you get a powerful new unit you want to use, or one of them drops dead and you forge on without them. That's still true in Fates, but this game has a couple of mechanical changes that make it more feasible than usual to train a big team. For one thing, overleveled units earn very little EXP, so it's not possible to get just one or two units outrageously far ahead of the curve the way you could in Awakening. And the Tag Team mechanic makes it a lot easier for weak, underleveled units to pick up kills quickly, since they can borrow a lot of damage from stronger teammates. There's no need to arduously whittle down enemies to 1 HP just to let your weaklings deal the final blow. With that in mind, I am going to train every character in the roster during this run. Here's what that means:
Those are the basic rules of the challenge, but I'm adding a few extra objectives on top:
Fire Emblem Fates has a "home base" feature called My Castle. Here are the rules I'll follow for that:
This is an extreme challenge that has taken a ridiculous amount of planning, but I'm pretty sure I can do it! A disclaimer, though: please don't treat this LP as an actual guide on how to play Conquest. I am making this way, way harder on myself than it needs to be. This is not an ironman run, so if anyone dies, I will reset the map and try again. (That will definitely happen, but you won't see it.) I heard the plot is bad. Are you going to cover it? No! But also yes! The writing in Fates is not good, and I don't care to show it. For years now, I have been mashing Start to skip all the cutscenes. If you do want to see an LP that presents the story of Conquest, try this one. However, I'm using this LP partly to showcase the nascent 3DS Fire Emblem modding scene. As part of that, I am going to present the story as rewritten in the Good Guy Garon mod. I don't necessarily endorse this mod, since I haven't even seen the whole rewritten script to judge it. From what I have seen, though, this seems like a decent attempt at a very difficult task. I'm also using a variety of other mods. You can see that list here. Since I'm playing the game on Citra, I'm also able to use HD textures to make the game look a lot prettier than it would on the tiny 3DS screens. What's the spoiler policy? I wouldn't normally care, but since I'm showing off a rewrite of the game, please tag all spoilers for events that happen beyond the point we've reached in the LP (even if they play out differently in the unmodified script). I'm lost. How do you play Fire Emblem? We're going to see this game's own tutorials, and those should give you enough grounding to follow along. However, I'm not going to do a comprehensive lesson on the fundamentals of Fire Emblem gameplay. If you're interested in a general overview of how these games work, I recommend checking out the other Fire Emblem LPs in the Archive. What's the format for this LP? It's traditional here on SA to present these games as SSLPs, but I'm doing this on video because in the course of this challenge, there will be a lot of intricate maneuvers�too many to reasonably explain in screenshots. It'll be easier to follow along in motion. If you're not interested in the story at all, the video format also lets you skip straight to the action pretty easily. In addition to the videos, I'll be posting extra content in this thread, including my notes on the progression of the campaign (tracking support points, finances, etc.). Zoran fucked around with this message at 21:35 on May 19, 2022 |
 #
¿
Mar 22, 2022 01:57
#
¿
Mar 22, 2022 01:57
|
|

|

|
| # ¿ May 14, 2024 14:16 |
|
|
https://www.youtube.com/watch?v=A-VFQkQS4-Q We kick things off by creating our avatar and playing the Prologue!
|
|
#
¿
Mar 22, 2022 01:57
|
|
|
Walla posted:Nice mod list. Why not put Azura in her Conquest outfit as well? I used to have that installed too, but I thought it would interfere with the story a little bit.
|
|
#
¿
Mar 22, 2022 03:16
|
|
|
midnight lasagna posted:How are you handling second gen units with regards to them needing to reach level 5 promoted? Given how you're going out of your way to make things difficult I assume you're not just going to Offspring Seal them and then consider them trained and done? The S support requirement means I can't just abandon the kids right away, and in fact they'll take over the army towards the end.
|
|
#
¿
Mar 22, 2022 14:18
|
|
|
I think prophetic dream logic is the only answer.
|
|
#
¿
Mar 22, 2022 16:14
|
|
|
https://www.youtube.com/watch?v=BFOI5LFC0tc We prove our mettle against our older brother, Xander, and meet the rest of our siblings in the Nohrian royal family.
|
|
#
¿
Mar 24, 2022 01:30
|
|
|
It�s really more like �Not Overtly, Cacklingly Evil Garon.� He�s still the hereditary absolute monarch of an imperial power, and he acts the part.
Zoran fucked around with this message at 23:03 on Mar 24, 2022 |
|
#
¿
Mar 24, 2022 23:00
|
|
|
https://www.youtube.com/watch?v=VDhUYIpJxcw We meet King Garon in the flesh, we get some new teammates, and we encounter some Hoshidan infiltrators. Zoran fucked around with this message at 02:27 on Apr 1, 2022 |
|
#
¿
Mar 26, 2022 03:32
|
|
|
https://www.youtube.com/watch?v=0N75NVZlrZM We go on a tour of Nohr, encounter some opposition at the border, and find ourselves embroiled in a mysterious plot. Zoran fucked around with this message at 02:27 on Apr 1, 2022 |
|
#
¿
Mar 30, 2022 02:19
|
|
|
The Shortest Path posted:It's been so long since I've watched these cutscenes instead of skipping them that I forgot how utterly ridiculous and contrived this entire section was. No amount of rewriting can save it from being terrible. I think I agree. There just way too much going on here, and you can�t adequately set everything up and give things room to breathe with some dialogue edits. Zoran fucked around with this message at 02:33 on Apr 1, 2022 |
|
#
¿
Mar 30, 2022 10:20
|
|
|
If you care about Corrin's hair color, vote in this poll! Your options are the canonical #EDDBC5 or #94D1FF.
|
|
#
¿
Apr 1, 2022 02:31
|
|
|
https://www.youtube.com/watch?v=8J3pR9g2eDg Our assailant nurses us back to health and then leads us on a whirlwind tour of Hoshido. We meet our real family* and lead a daring rescue of our two sisters. *Kinda.
|
|
#
¿
Apr 2, 2022 03:30
|
|
|
If you only ever play Conquest, or if you play Birthright but don�t marry any of your Hoshidan siblings, then I�m pretty sure you never find out they�re not actually related to you.
|
|
#
¿
Apr 2, 2022 16:25
|
|
|
Hey everyone, I know a lot of us know the story, but I'm still going to insist on spoiler tags for stuff that we haven't covered yet. (Talking about things in Birthright or Revelation that don't occur or aren't revealed in Conquest is fine, but if it touches on or hints at the events in Conquest, best to tag it.)
|
|
#
¿
Apr 3, 2022 20:11
|
|
|
https://www.youtube.com/watch?v=puXcDRgDHpg The final chapter before we begin Conquest proper. Our family reunion is spoiled.
|
|
#
¿
Apr 5, 2022 02:02
|
|
|
Thanks! I just try to make videos I can be proud of. ") The funny thing is that I was far more nervous about posting an LP here than I ever was about just putting one out into the vast YouTube wilderness. Zoran fucked around with this message at 02:51 on Apr 5, 2022 |
|
#
¿
Apr 5, 2022 02:31
|
|
|
theshim posted:I wonder if this would be doable on Birthright without using any optional maps? You get less of the gently caress-you enemy skillsets that lategame Lunatic Conquest throws at you, but after my last playthrough and midnight lasagna's excellent Royalty-Free Birthright Lunatic LP, it really does seem that the base route just has less experience available overall. Maybe my impression is off, I dunno - I've never even thought of attempting this kind of challenge. It kinda depends how much you�re willing to abuse the infinite experience in Birthright chapter 20. But for me, the thing that makes this less fun for Birthright (overall game design preferences aside) is that Birthright gives you a ton of characters immediately, so you have a roster full of underleveled units who can�t all get adequate EXP for a long time.
|
|
#
¿
Apr 5, 2022 03:12
|
|
|
Keldulas posted:I'm surprised you didn't have Azura take that last swing instead of Rinkah. If Sakura was standing next to her, she would've only injured rather than killed and Kaze still could've taken the kill. Azura gets a little bit more experience from singing on her player phases than from attacking (unless she kills). The extra weapon experience is nice, but not very important, since we already got more than enough.
|
|
#
¿
Apr 5, 2022 14:13
|
|
|
FoolyCharged posted:I think my favorite part of the rube Goldberg plan is Hans repeatedly and actively trying to kill Corrin. Its just completely in opposition to the corrin guided bomb plan I think the idea behind this is that Anankos is just trying to acquire the sword so he can kill Mikoto and accelerate the war, and the fastest way to get it is to have someone bring it to the Bottomless Cannon; it doesn�t have to be Corrin who carries it all the way to Hoshido. Also, I don�t think (evil) Anankos is aware that Corrin is his child? So as far as he knows, Corrin is just a captive Hoshidan princess being raised as a ward of Garon, and that makes her disposable. I�m speculating here because the game doesn�t elaborate on the reasoning for Garon's plan or the origins of Ganglari. I don�t know whether the rewrite addresses those things more fully later on or not.
|
|
#
¿
Apr 8, 2022 06:33
|
|
|
https://www.youtube.com/watch?v=L2P5IWWogTw We remake our avatar and choose our path.
|
|
#
¿
Apr 10, 2022 07:26
|
|
|
https://www.youtube.com/watch?v=jFmF1gyZgSQ King Garon suspects our motives for coming back. As a test of loyalty, he commands us to suppress a rebellion from the Ice Tribe; to get there, we have to navigate the Woods of the Forlorn alone. Going forward, I will post an image like the one below with each update. It presents all of the support points gained by each unit; our expenditures in terms of both Dragon Vein Points and gold; our earnings, including items, gold, and gold bars; and any class changes we have done (with the columns at the far right tracking how many of each class-changing seal we have left).  B Supports 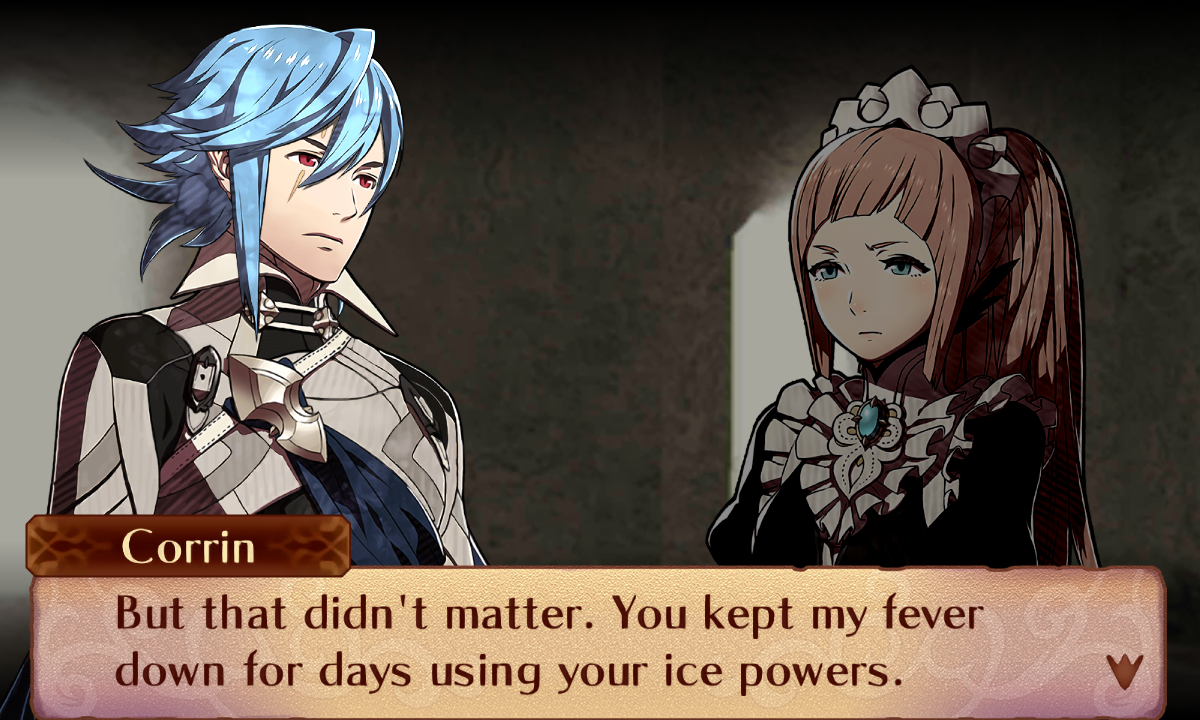 C Supports 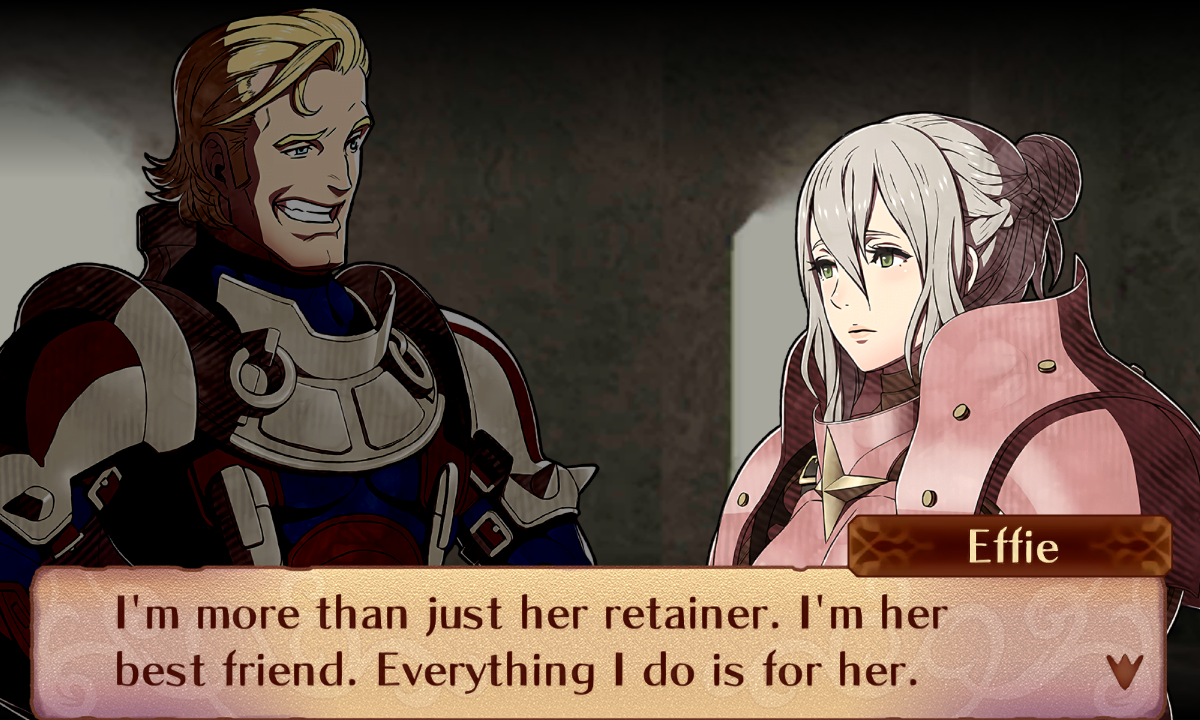   
Zoran fucked around with this message at 01:19 on Apr 17, 2022 |
|
#
¿
Apr 15, 2022 20:30
|
|
|
I think I�d probably give Boots to Corrin, Paragon to Elise, and Witch to Felicia (who could get Warp almost immediately).
|
|
#
¿
Apr 15, 2022 21:23
|
|
|
Once we actually start having to make decisions on who to deploy, I�ll be trying to explain my reasoning, and the marriage plans will be a big part of that.
|
|
#
¿
Apr 16, 2022 12:07
|
|
|
Appendix A: The Support System Fire Emblem Fates tracks support progress on two different levels. Between battles, it records the amount of progress that two characters have made toward their next support rank as an integer between 0 and 5. Usually, the requirements for unlocking each support rank are as follows: C: 3 points B: 4 points A: 4 points S: 5 points There is no overflow from one rank to the next. Even if you collect what should have been 5 support points before viewing the C support, you won't get any credit toward B support; you'll start again at 0. And you can only gain up to 3 points in a single battle, so normally it takes at least 7 maps to go from no support to S rank: one battle for C and then two each for the next three levels. Some pairings, typically between family members or among royals and their retainers, are "fast supports." These have lower requirements for the first two support ranks: C: 2 points B: 3 points A: 4 points S: 5 points It's possible to max out a fast support in just six maps because the B support only requires one battle, not two. The Seed of Trust item and the various events in the castle that can generate support points work by adding directly to these support counts. During battle, the game tracks support gains much more granularly, assigning different values to different actions:
I generally use the term "support points" for both these in-battle values and the out-of-battle ones, but for the sake of this explanation, I'll refer to the in-battle values as tracker points. In a single battle, a unit can progress one relationship by up to 3 support points, another by up to 2, and potentially a third by just 1. If a unit earns tracker points with more than 3 others, the top three are sorted into these tiers, while anyone who finishes 4th or lower in the count gets no credit. For each tier, there is a minimum number of tracker points to qualify:
Note that just finishing first doesn't guarantee you'll end up in the 3-point tier: if unit A generates 22 tracker points with unit X, 20 with unit Y, and 10 with unit Z, then the A-X and A-Y relationships will both grow by two points, while the A-Z support count will increase by one. Conversely, if unit A got 42 tracker points with X and 40 with Y, then Y would get stuck in the 2-point tier: even though Y had enough tracker points to get to the highest tier, they didn't finish in first place. In the event of a tie, the order is decided by an internal list. That list can be seen in-game: it correspond to the ordering of the characters' support lists when they're completely empty. Where this gets really complicated is when you consider how placements in the support "race" might differ depending on which perspective you're using. Unit Z might be #3 in Unit A's count of tracker points, but it's perfectly possible for A to be #4 in Z's list. In that case, there will be no progress on the A-Z support. Moreover, there are no "promotions" or substitutions in these cases: if unit W had finished 4th on A's list, and they had enough tracker points to reach the 1-point tier if it hadn't been for Z finishing 3rd (from A's perspective), W doesn't get to take Z's place; there's no progress on the A-W support either. This table shows the actual count of tracker points between all six units we used in chapter 7: 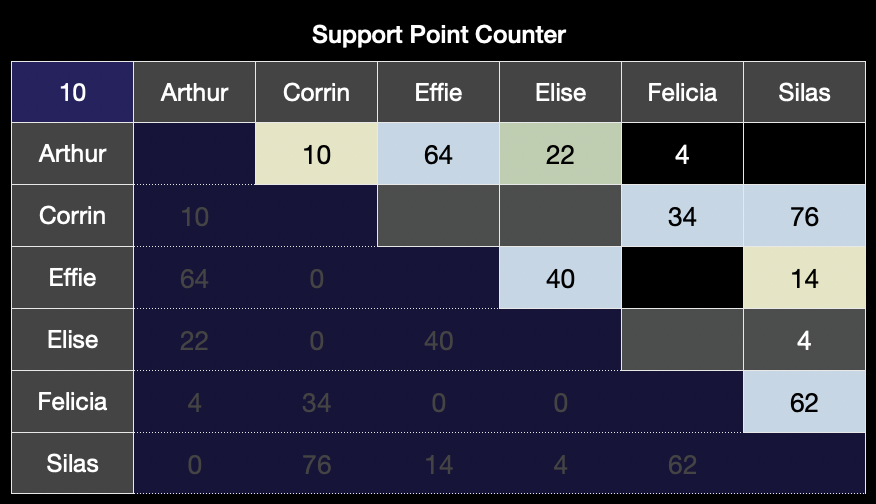 The table below identifies who finished first, second, and third for the character in each column, and it highlights those units according to the number of support points that should ultimately be earned: blue for 3 points, green for 2, and yellow for 1. In this case, there is a disagreement between the columns: Elise sees Effie as her #1 with 40 points, but Effie actually got even more tracker points with Arthur, so Effie and Elise only received two support points together, not three. Luckily, since Effie and Elise have a fast support, that's enough to unlock C rank anyway. 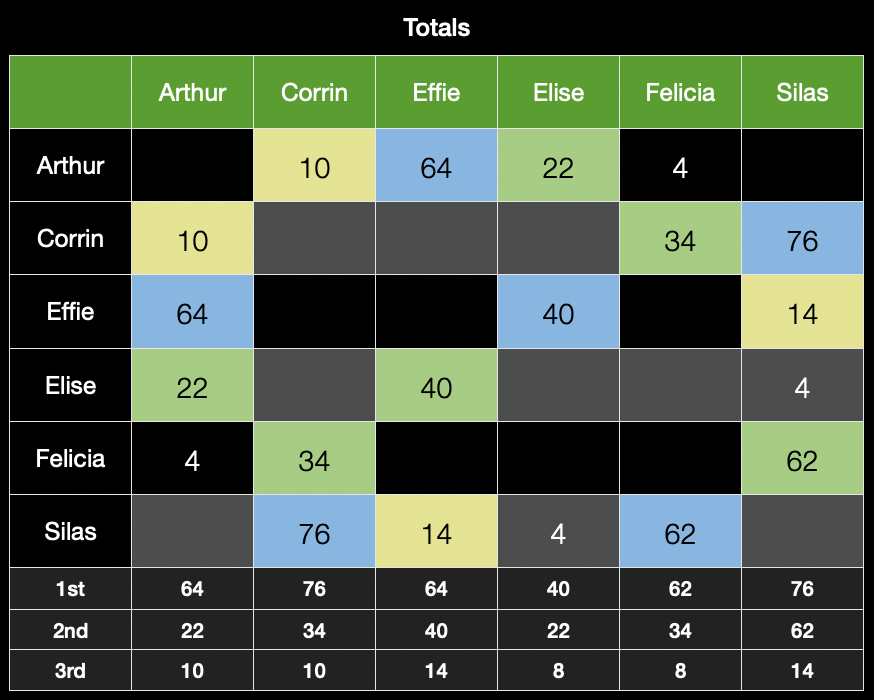 Felicia only earned two support points with Corrin, but she and Corrin had already gotten one point of progress toward B support from the Private Quarters, and they also have fast support progression with each other. Therefore, the two points here were enough for them to unlock B rank. Zoran fucked around with this message at 02:09 on Apr 17, 2022 |
|
#
¿
Apr 17, 2022 01:19
|
|
|
Bogart posted:Idiot question from a fool: with the resource boost mod, how do I install it to Citra? Do I download all four files and slap them into the exefs file? On that github page, go to the folder matching your version of the game: 179800 = USA Special Edition; 179600 = USA Conquest; 12DE00 = JP Special Edition (I think). Download the code.ips file there. In Citra, right-click on Fire Emblem Fates and select "Open Mods Location." Create a folder named "exefs" here if there isn't one already. Place the downloaded code.ips file in that exefs folder. If you have multiple code.ips patches and you want to use them simultaneously, you'll want to merge them. I think this site can do the job: https://zaksabeast.github.io/ipspatcher.js/build/
|
|
#
¿
Apr 17, 2022 18:14
|
|
|
https://www.youtube.com/watch?v=L5mo8SUBaE4 Through a stroke of good luck and the generosity of a stranger, we find our way into the Ice Tribe's village. A certain character's tactlessness causes trouble. 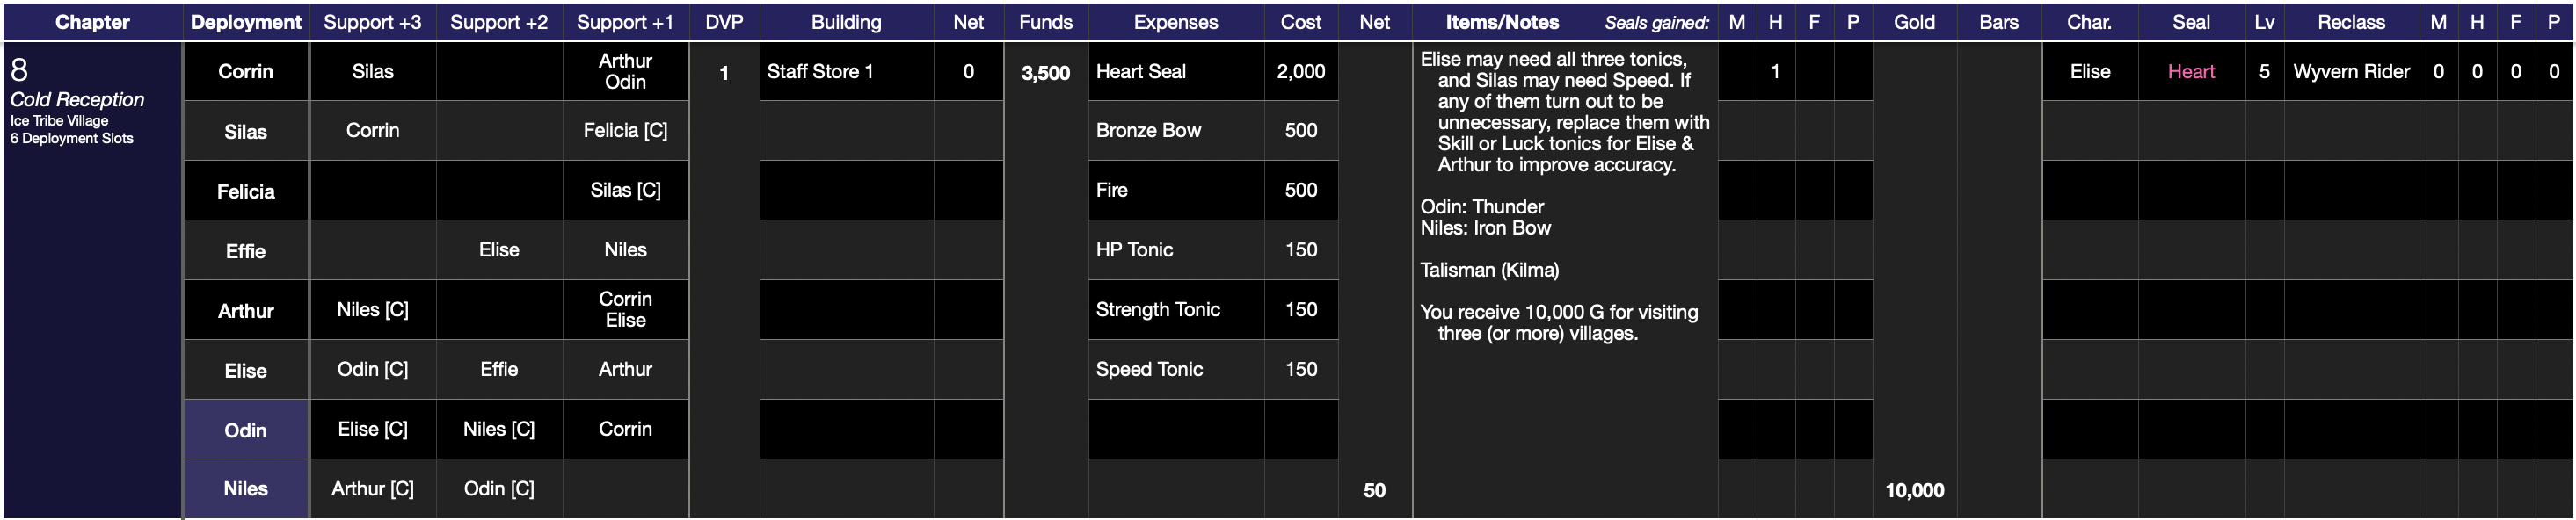 Odin and Elise are off to a really good start! C Supports 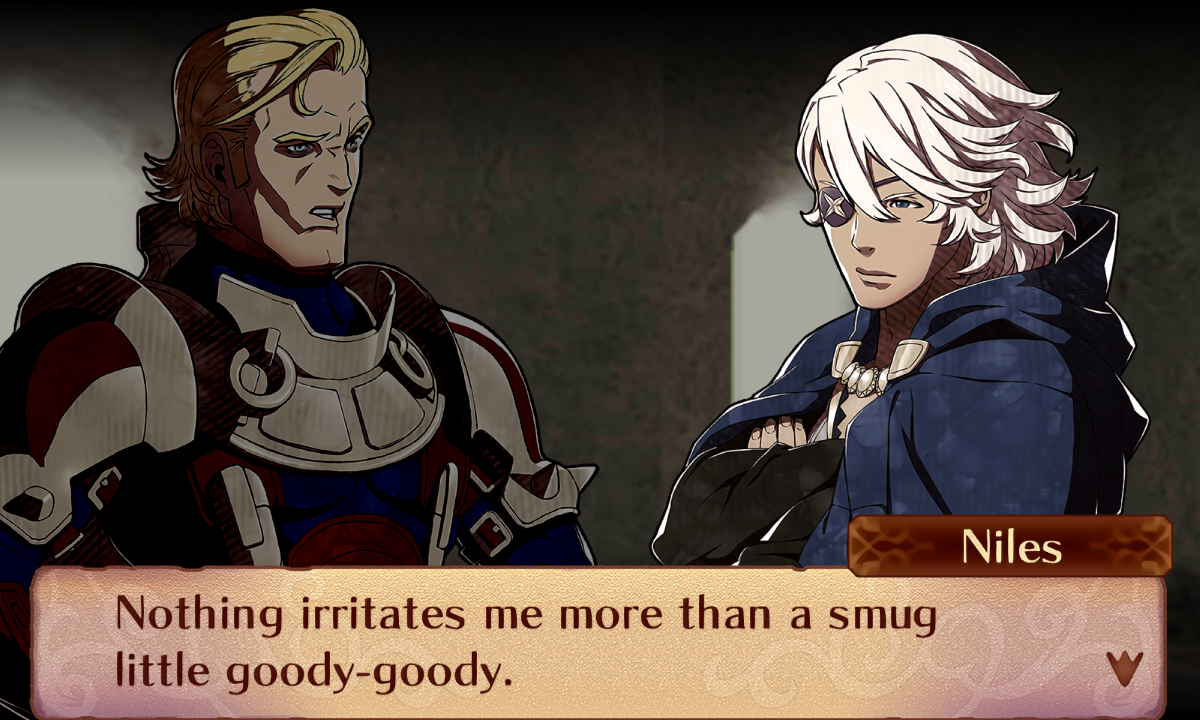  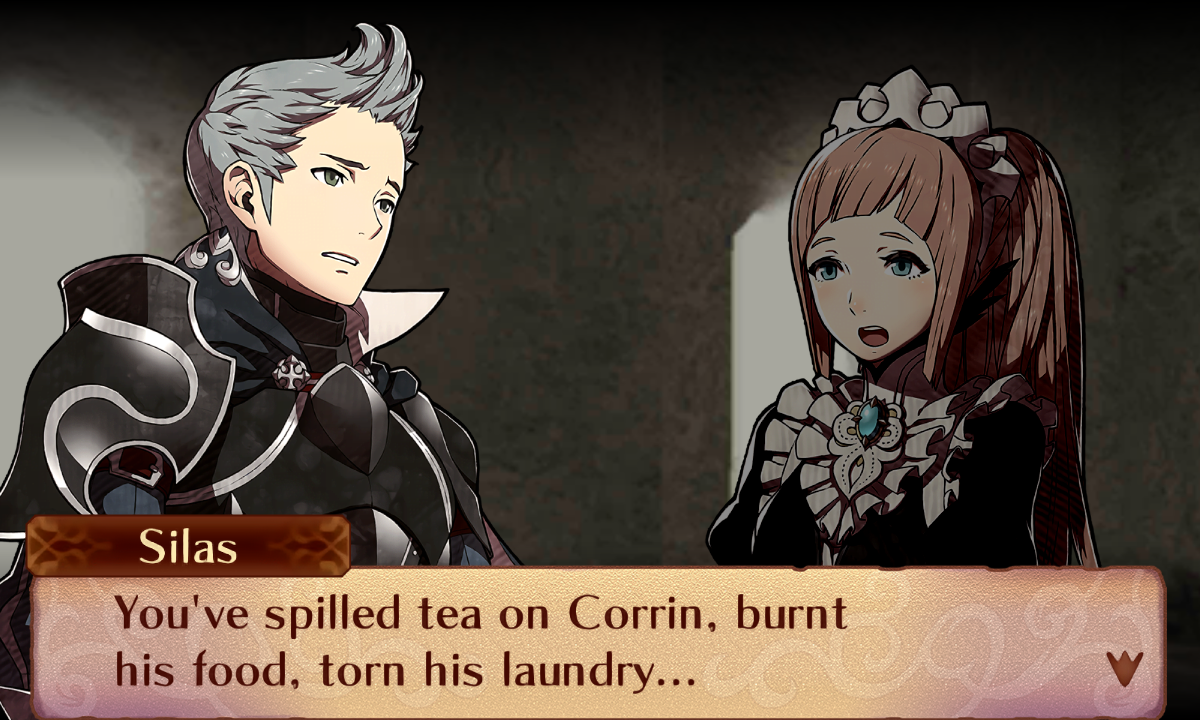 
Zoran fucked around with this message at 04:56 on Apr 22, 2022 |
|
#
¿
Apr 22, 2022 03:00
|
|
|
https://www.youtube.com/watch?v=7aCJDX719ds After our triumphant return from Ice Tribe territory, King Garon sends us on a new mission. Along the way, we encounter the Hoshidan vanguard, which has made its way into Nohr and occupied an abandoned fort. 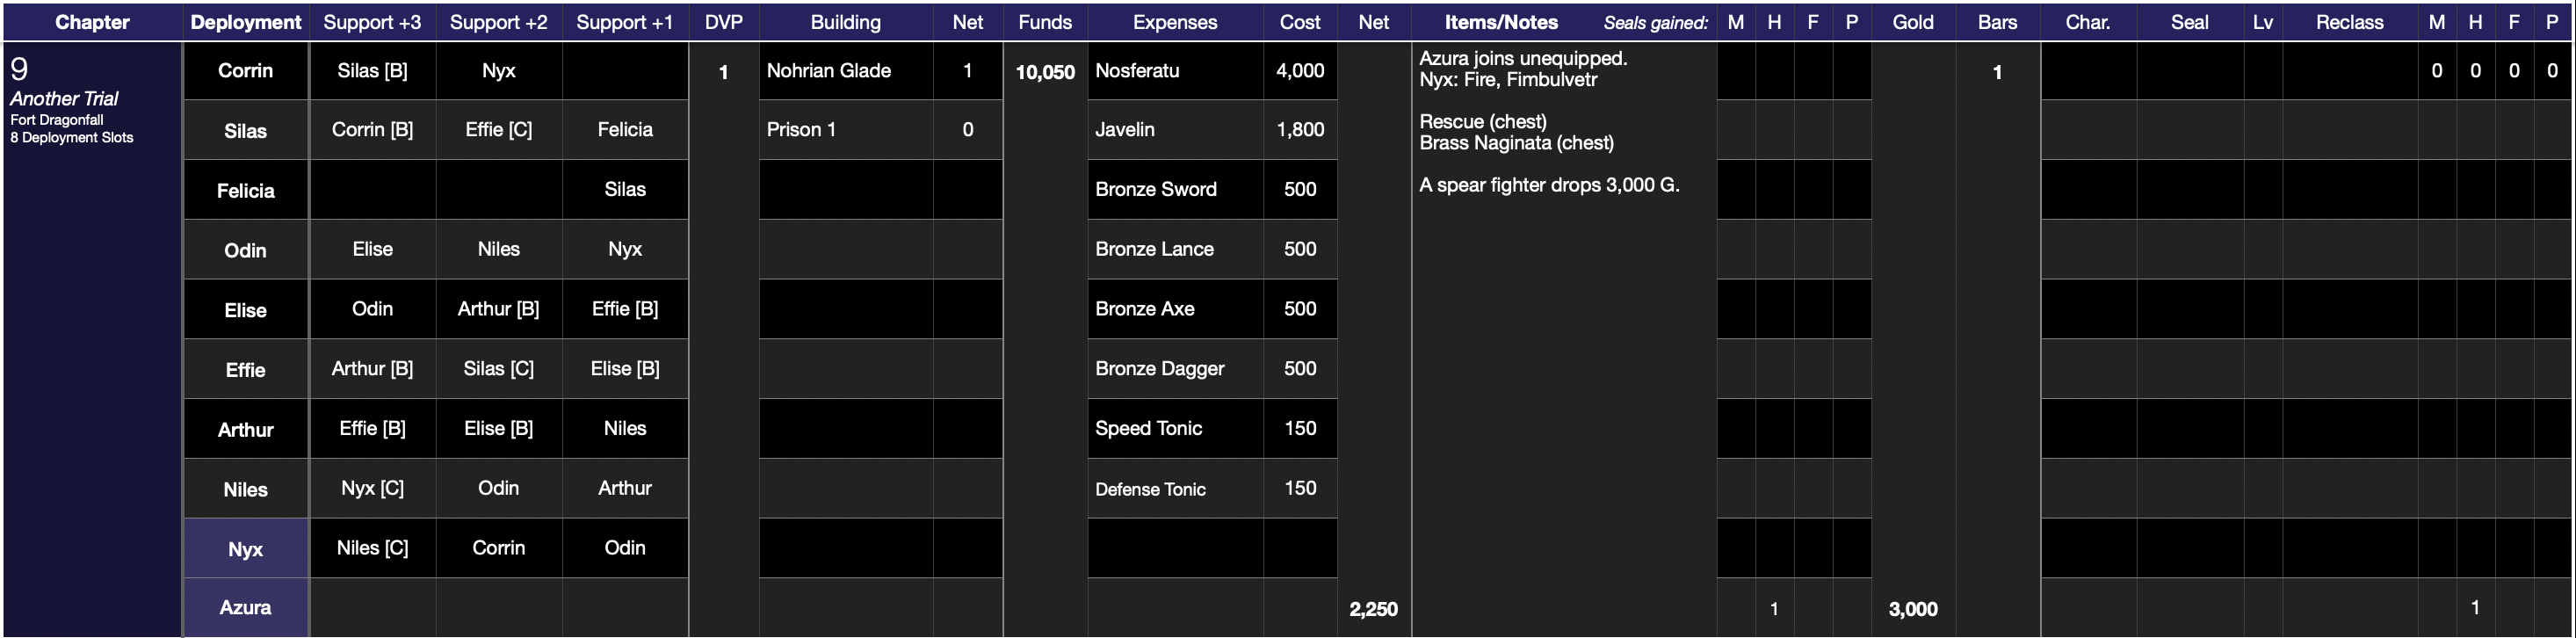 C Supports   B Supports    
|
|
#
¿
Apr 29, 2022 06:00
|
|
|
https://www.youtube.com/watch?v=yj87NRm8KeE We venture to a village near the border with Hoshido as we respond to reports that a horde of Faceless have broken loose. Because this map is full of identical brainless monsters to kill, the play-by-play gets kind of boring. Instead of keeping up that commentary the whole time, I'm also covering some other topics, especially our medium-term strategic plans. 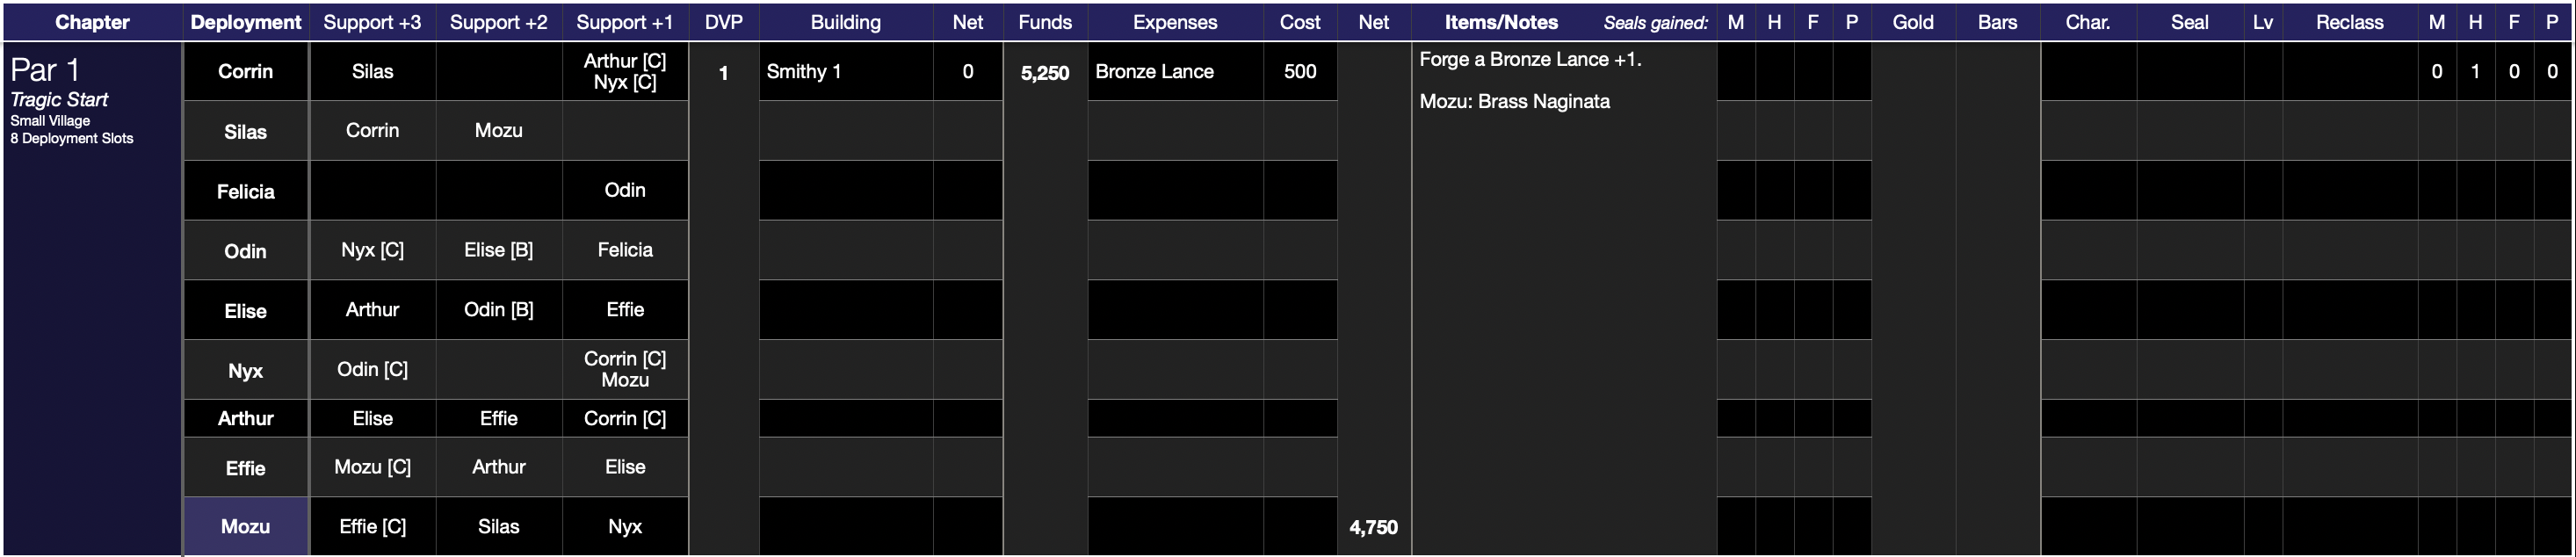 C Supports     B Supports 
|
|
#
¿
May 16, 2022 02:15
|
|
|
https://www.youtube.com/watch?v=bpv9VOTL9h4 While we make our final preparations for Chapter 10, we defend our castle from some ghostly invaders. 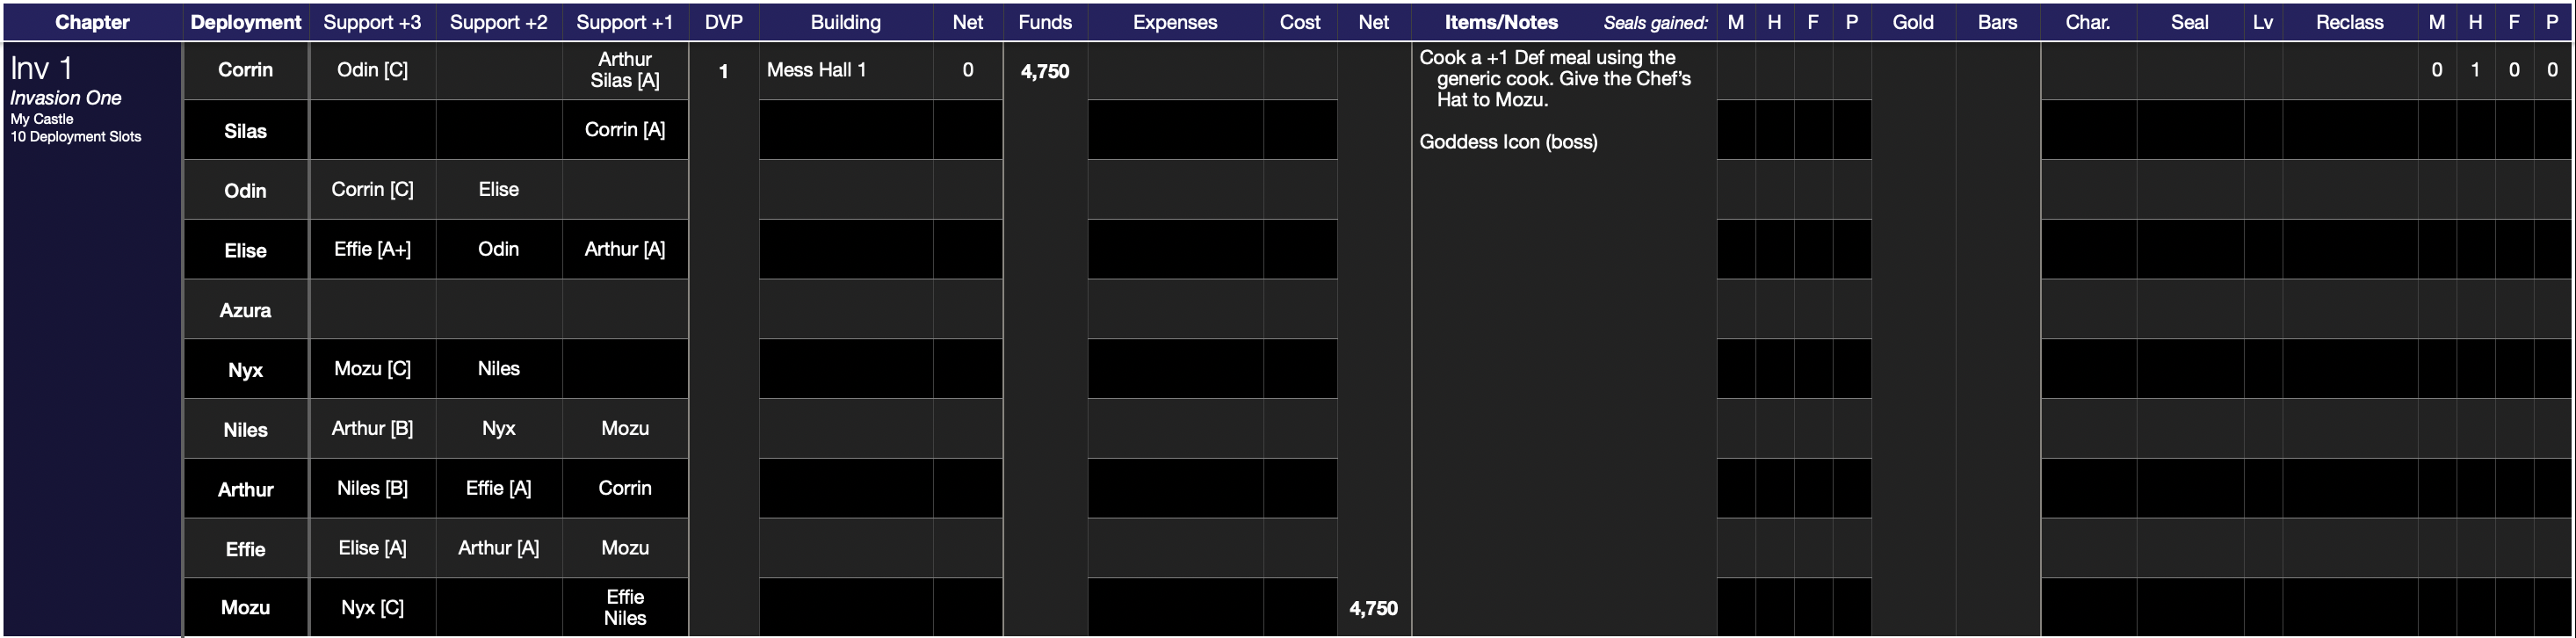 C Supports   B Supports  A Supports   
|
|
#
¿
May 29, 2022 01:30
|
|
|
theshim posted:I had no idea at all that losing buildings reduced the DVP reward from the invasions. What a weird system. This game has so many of these intricate rulesets for how things work that are utterly unnoticeable to casual players. I genuinely didn�t know either until a few weeks ago.
|
|
#
¿
May 30, 2022 02:13
|
|
|
https://www.youtube.com/watch?v=a0C40gNsFms We arrive at a port in southeastern Nohr, where we plan to launch our ships toward the island domain of the Rainbow Sage. But Hoshido has beaten us there, and they're about to attempt an amphibious assault. 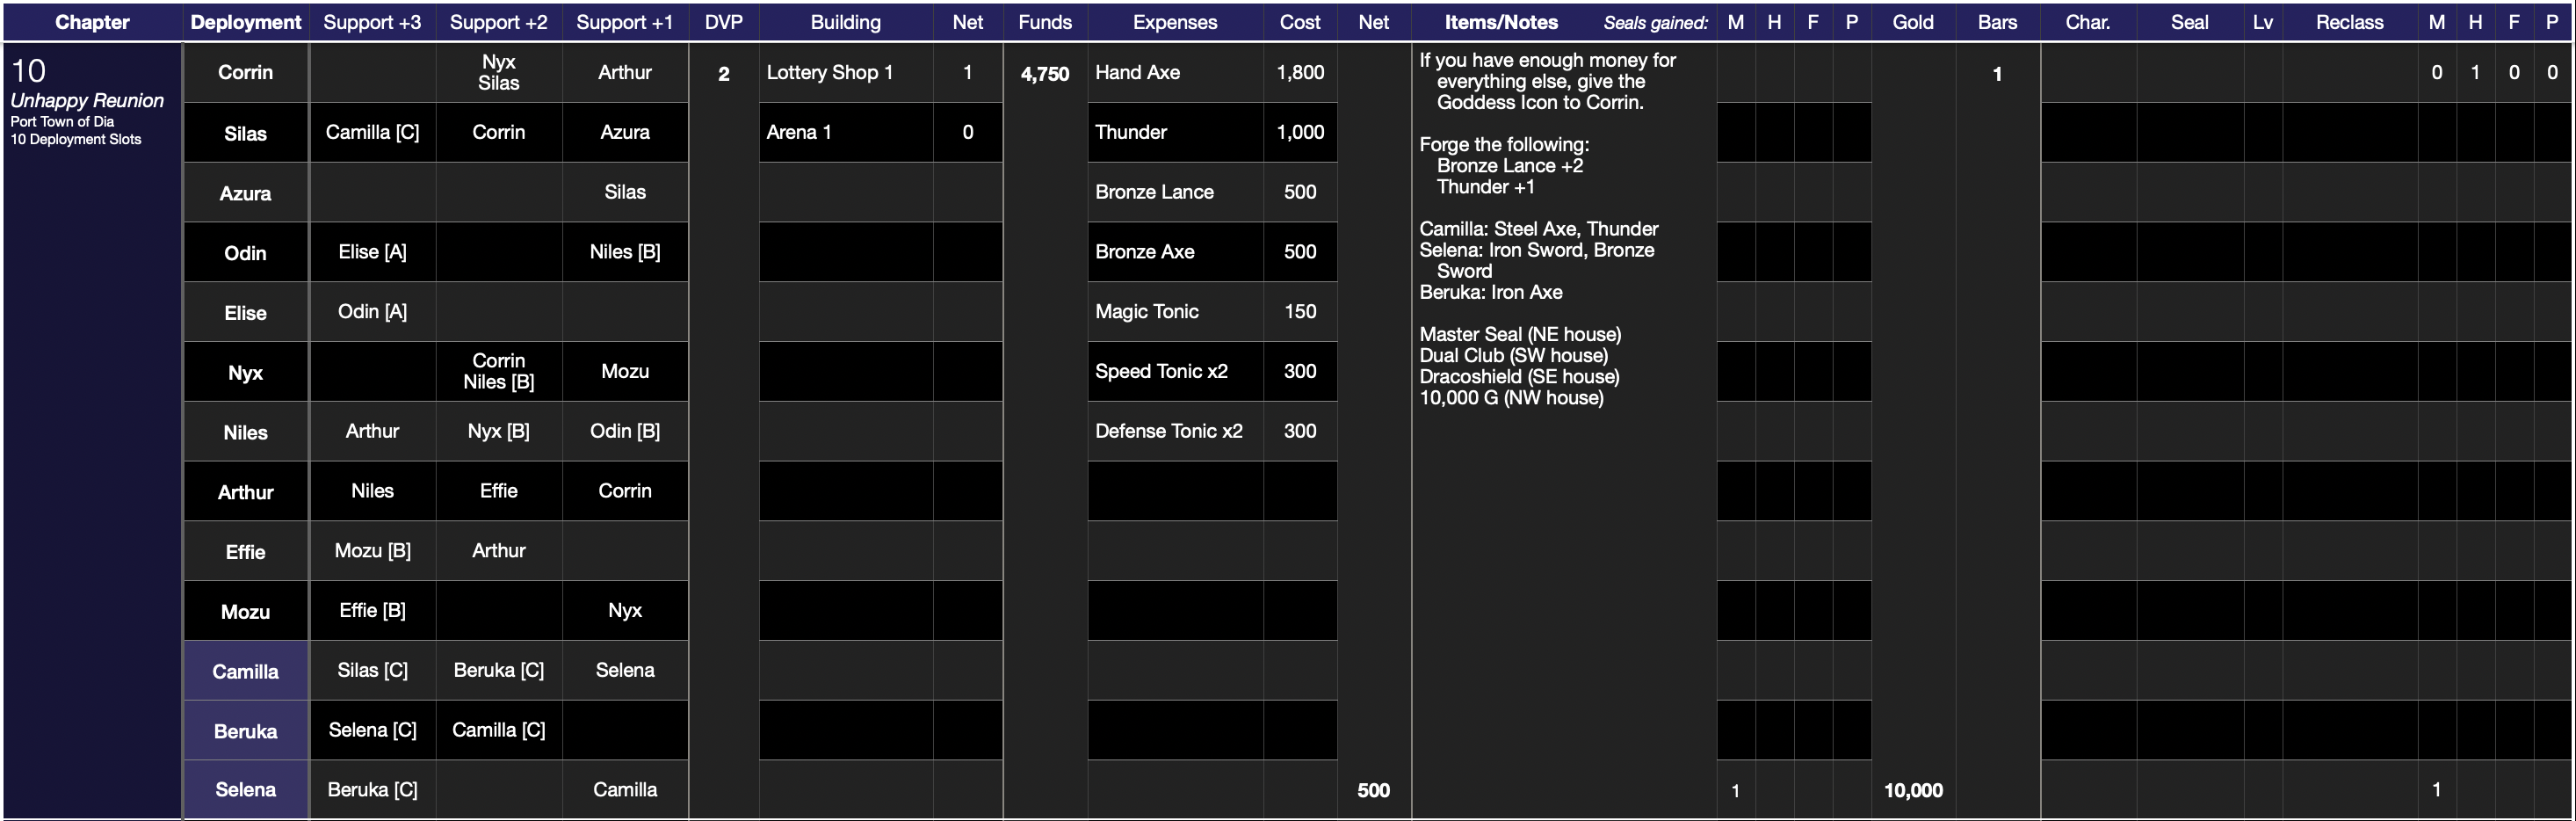 C Supports    B Supports    A Supports 
|
|
#
¿
Jun 15, 2022 18:00
|
|
|
FoolyCharged posted:My God, not just a full clear, but a full clear where Camilla only killed a single dude. Two, actually! She killed an archer and an oni savage. midnight lasagna posted:Poor Selena, if only her personal skill could have existed in her home game of Awakening. Maybe if she had something more reliable like doing 75% damage on dual strikes (instead of 50%) she could be better? If Selena's personal skill was just Dual Striker (dual strike damage +3) instead, it would be amazing. But it's okay, Selena has lots of other nice qualities as a unit.
|
|
#
¿
Jun 16, 2022 00:31
|
|
|
https://www.youtube.com/watch?v=6y1H8tW1SOA In this bonus video, I talk about how I develop strategies for this challenge, using the example of Chapter 19�the chapter I'm currently planning.
|
|
#
¿
Jun 25, 2022 16:45
|
|
|
https://www.youtube.com/watch?v=hf07cw3MnQE We land on Notre Sagesse and climb a mountain to reach the lair of the fabled Rainbow Sage. Other heroes have already sought his power. Will he bless us too? 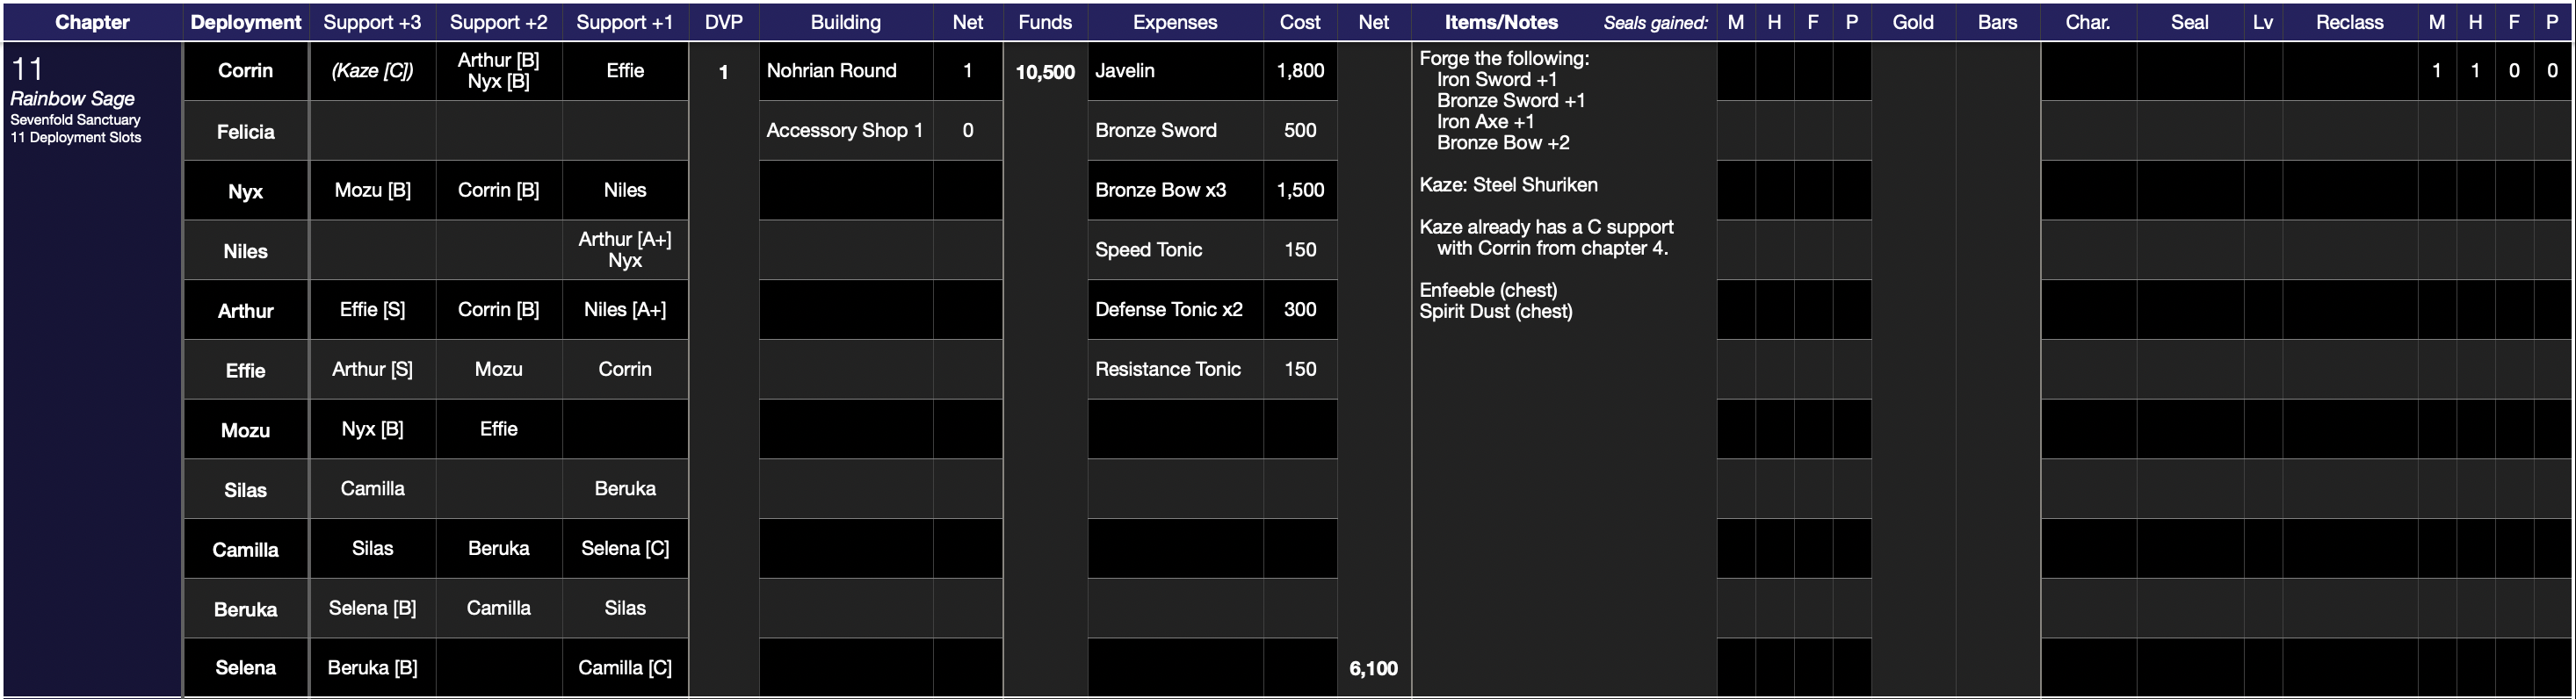 C Supports   B Supports     A Supports  S Supports 
|
|
#
¿
Jun 30, 2022 23:00
|
|
|
https://www.youtube.com/watch?v=4gKFKlco8Os On our journey back to the capital, Elise comes down with a mysterious illness. We seek medicine for her at Palace Macarath in the heartlands of Nohr�where, astonishingly, Prince Ryoma has already arrived. How has his army penetrated so deep into our country already? There must be treason afoot... 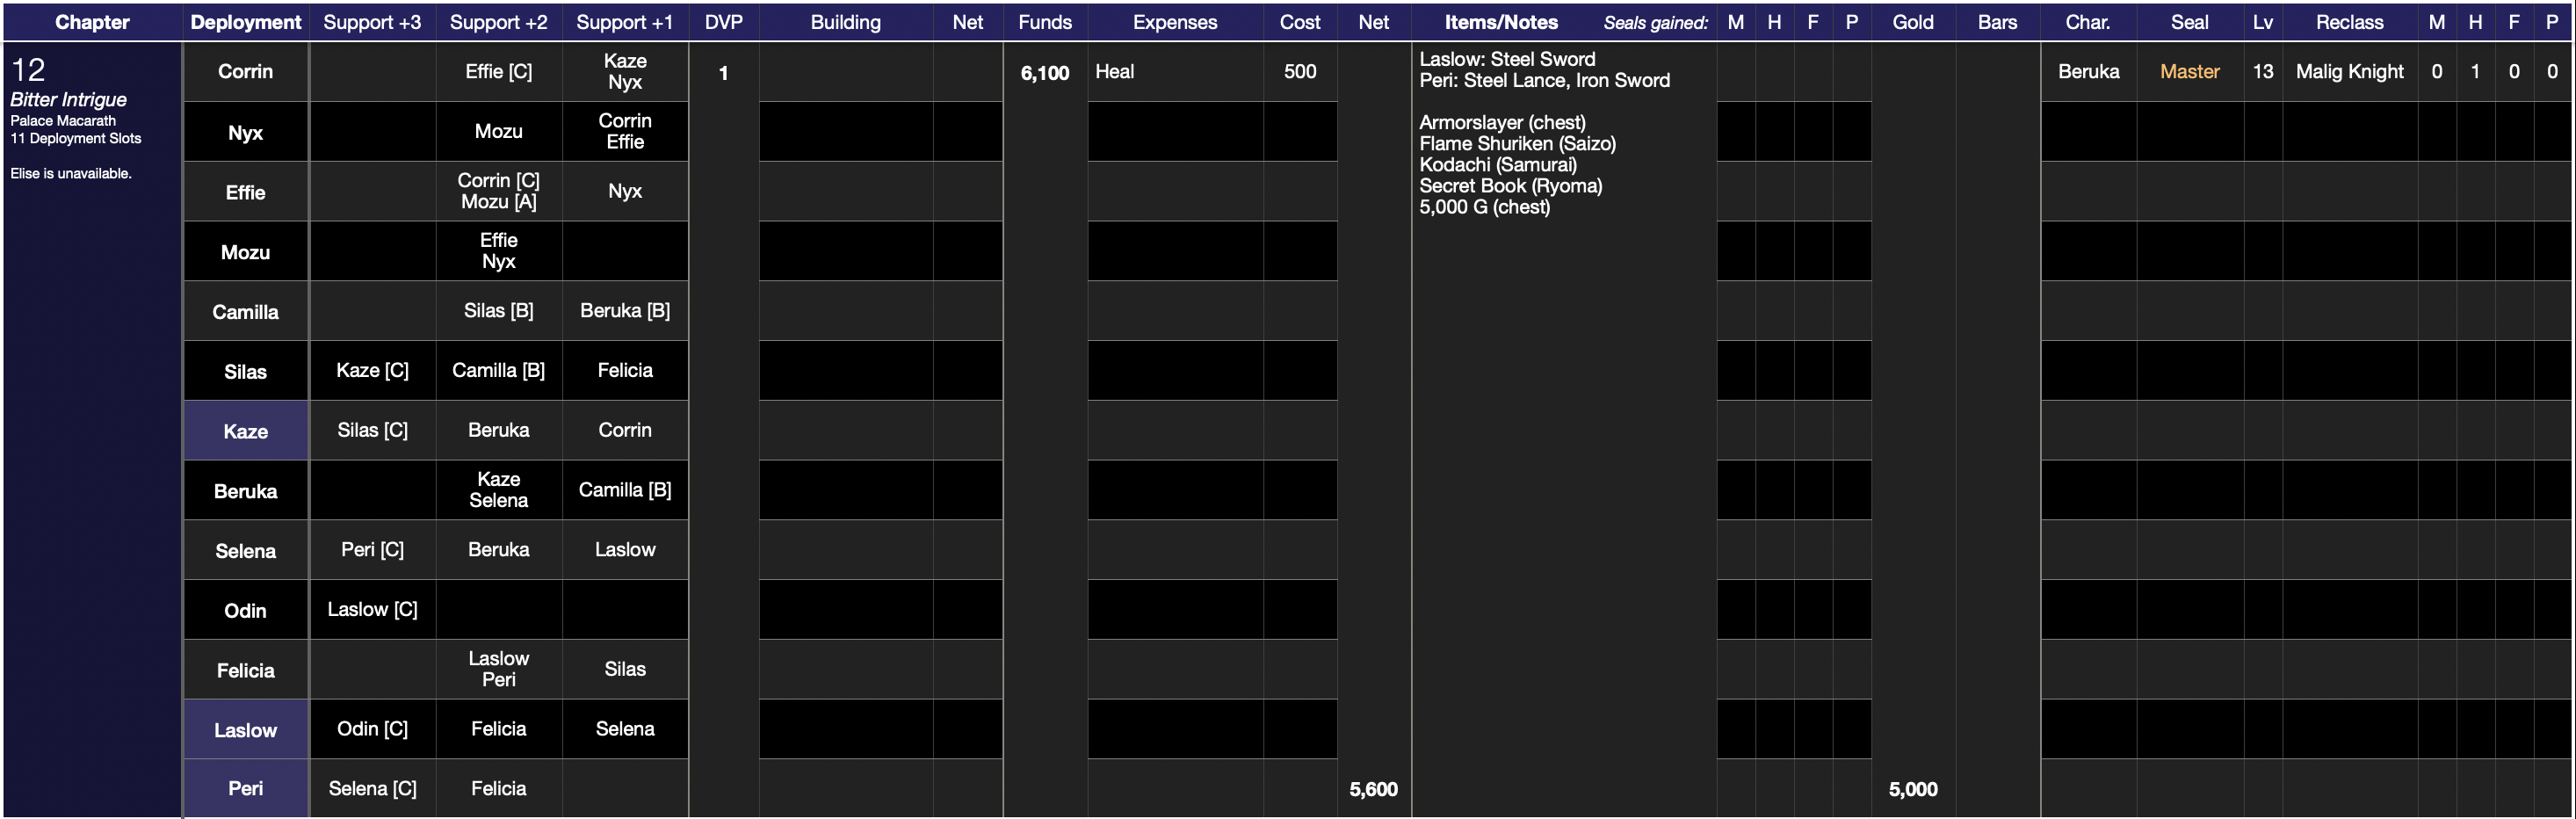 C Supports     B Supports   A Supports 
|
|
#
¿
Jul 21, 2022 17:45
|
|
|
theshim posted:Also fun fact: not to detract from the extreme amounts of care and planning that went into this map, but did you notice that you did not miss a single time all map long? Despite facing a fair amount of hitrates in the 80s and even 70s. I certainly noticed! This recording took a lot more attempts than usual. I did know a few backups for several situations where I might have missed, and I was prepared to use the ones I mentioned if necessary, but I took a lot of resets for others. Some of those were just crucial to the clear, but in most cases, the main reason to reset was that I really don�t like presenting situations where I�m just waiting around for something to work. For example, suppose Mozu had missed any of the three Ninjas on turn 3. That wouldn�t be the end of the world. However, the support requirements are so stringent that I can�t just improvise, and I also know that Mozu probably needs to gain a certain amount of levels to have good chances of reaching her benchmarks for later chapters. So the likely result of a miss there would be me just waiting until everything goes right, with 90% of the team standing there doing nothing. I think that�s boring to watch, and more importantly to me, it sucks to write commentary for. I really make these videos for myself, not for anyone else. Also, I�ve sort of decided that I�m going to design and execute my strategies on the expectation that I will try my best to make all my attacks hit. There are a lot of cases where I could benefit from missing, including some really degenerate ones where I could grind support points by missing on purpose. I don�t want to tempt myself with any of that, so generally if something doesn�t work in the first several turns of a map, I�m resetting no matter what. If I�m trying to do something that�s super unreliable, well, now I have a very strong incentive to make a better strategy. It�s annoying to redo the recording, but the truth is that the big time-sinks for this run are the planning and the writing, not the production. Zoran fucked around with this message at 16:55 on Jul 22, 2022 |
|
#
¿
Jul 22, 2022 07:09
|
|
|
The0ldFish posted:Thanks for inspiring me to try this game out! You�re very welcome, and I�m glad to hear you're having a good time! I would definitely not recommend trying to follow this playthrough turn-by-turn. The challenge is very difficult, and it forces me to play in a way that's entirely different from what I would actually want to do if I were just trying to beat the game.
|
|
#
¿
Aug 1, 2022 02:04
|
|
|
Walla posted:You also have to remember that Felicia and Jakob are treated as being promoted at level 20. Using a DLC class scroll on them adds 20 levels to them and the stat gains do not make up for it. Also I think their experience gains are adjusted accordingly. They are treated as being not promoted at all, and when you give them a DLC scroll, even though their displayed level goes up by 20, they still gain experience at the same rate as before.
|
|
#
¿
Aug 3, 2022 07:13
|
|
|

|
| # ¿ May 14, 2024 14:16 |
|
|
FoolyCharged is right: that Kana will get Samurai as a third class, in addition to Nohr Princess and Dark Mage. One little quirk is that the class inheritance for children always goes [child's default class], then [father's class], and then [mother's class], and that means that even if both Corrins have the Mage talent, Odin!Kana and Ophelia!Kana are different. Odin!Kana gets Nohr Prince and Dark Mage, and then because he already has both of his mom's classes, he gets the opposite-country version of Corrin's talent class, which is Diviner. In the case of Ophelia!Kana, she also gets Dark Mage from her dad and she also cannot get her mom's primary Dark Mage class, but this time the mom is Ophelia and not Corrin. As a result, she inherits Ophelia's secondary class, Samurai.
|
|
#
¿
Aug 5, 2022 02:54
|
|