


|
Glad to see they updated this mission with the new nations. e: Update on previous page
|
 #
?
Jan 25, 2024 04:05
#
?
Jan 25, 2024 04:05
|
|


|

|
| # ? Apr 29, 2024 20:38 |
|
|
Tamerlane - Part 6: A Titan Amongst Mortals Mission 6 Starting Text "The relationship between Tamerlane and Ottoman Sultan Bayezid was one of great enmity. The two of them have been exchanging scathing letters for years.' Finally, Tamerlane had the opportunity to crush his rival, whose armies were weary from wars in Byzantium and Hungary. Even so, the Ottoman Empire was no trifling opponent, its army driven by intrepid leadership and the power of its Janissaries.' The Ottoman force marching to meet Tamerlane was large but divided. Turks, Serbs, Tatars, and various other vassals all contributed troops in this powerful yet volatile force. If some of them could be pried away and convinced to defect, the tide would turn in Tamerlane's favor.' 'This would be his greatest test yet. The fate of two empires hung in the balance!'" 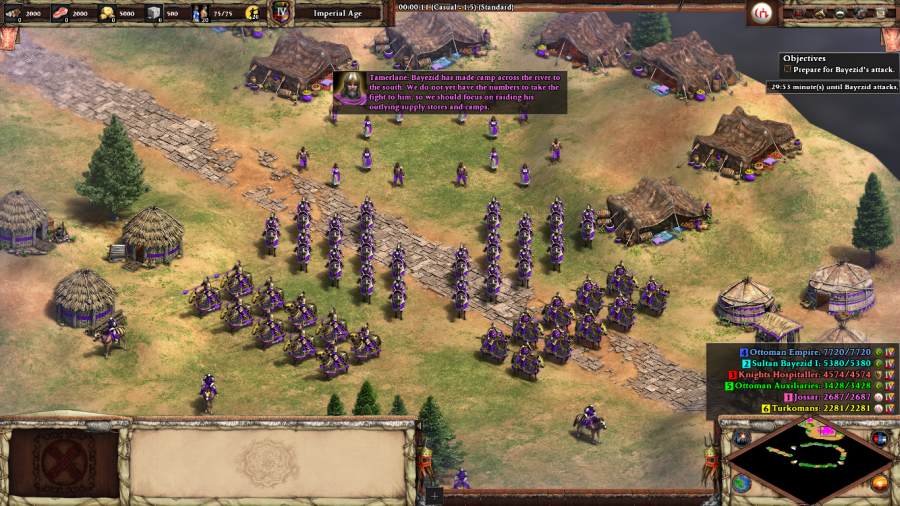 Tamerlane: Bayezid has made camp across the river to the south. We do not yet have the numbers to fight him, so we should focus on raiding his outlying supply stores and camps. Timurid Rider: Our spies report that the loyalty of the auxiliary troops accompanying Bayezid is in question. We should visit their camps and see if we can... pry them away from him. The final mission of the campaign starts you with a decent size army and a number of villagers with which to build a defensive camp. Now theoretically, you could just boom for thirty minutes and build a gigantic army/Castle death trap with which to destroy all of Bayezid's oncoming forces, but why not show off all the side-quests while I'm here? 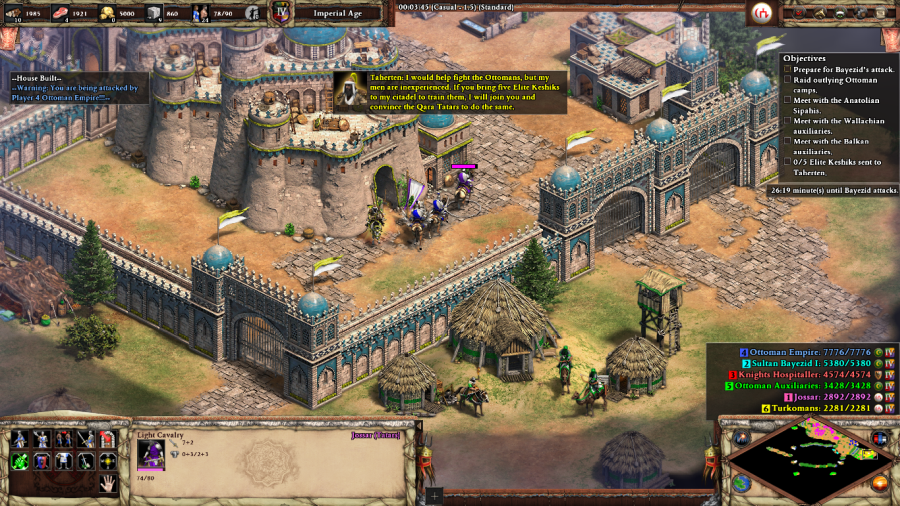 Taherten: I would help fight the Ottomans, but my men are inexperienced. If you bring five Elite Keshiks to my citadel to train them, I will join you and convince the Qara Tatars to do the same. (after bringing the Elite Keshiks) A deal is a deal, Tamerlane. We will be there for you when the time comes. The Turkomans are just past an outlying Ottoman camp which is somewhat annoying to get past if you don't intend on destroying it, but I manage. In exchange for a couple of Elite Keshiks, Emir Taherten gives you a few troops, including some Tarkans and Camel Archers which he managed to acquire... somehow. He's the most active ally you have in this mission, which isn't saying that much, but he will at least try to attack the Ottomans and it's useful to ensure he's on your side just to have a Market to trade with and for one other thing that happens later. 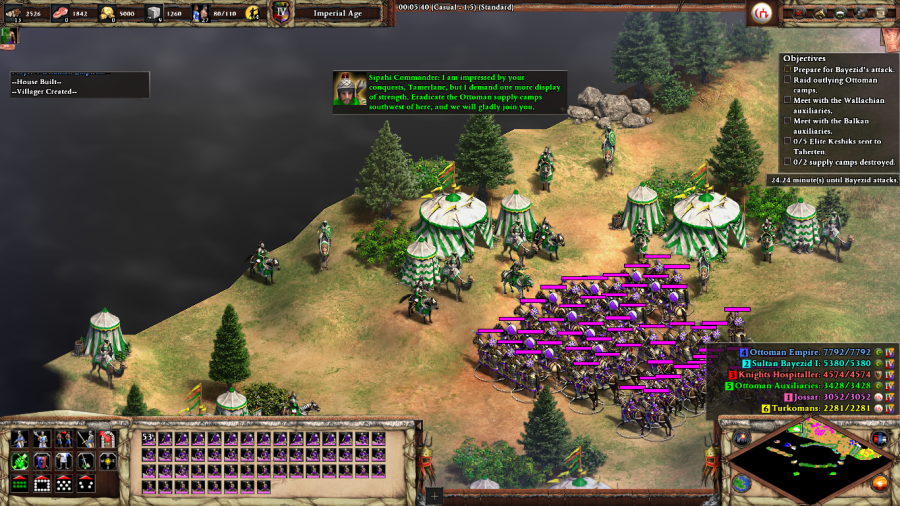 Sipahi Commander: I am impressed by your conquests, Tamerlane, but I demand one more display of strength. Eradicate the Ottoman supply camps southwest of here, and we will gladly join you.  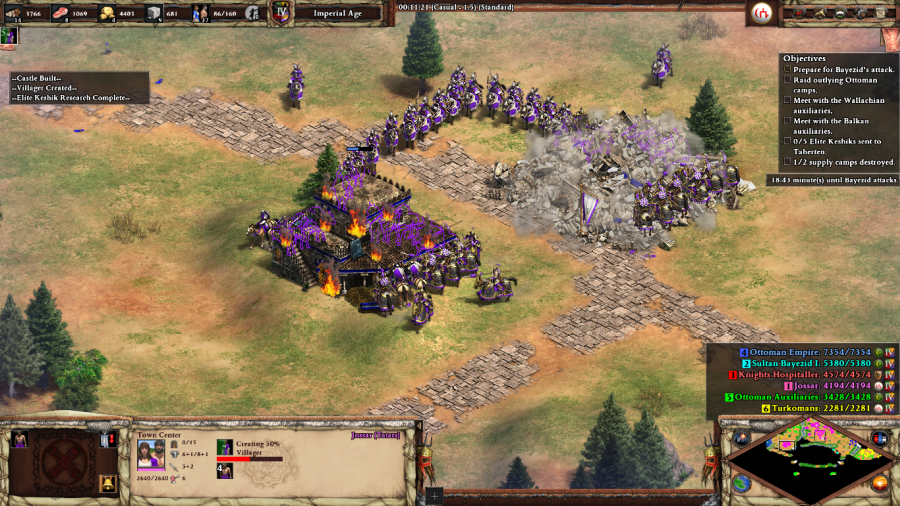 Sipahi Commander: Hah! I never doubted you for a second. Come on men, we serve a new lord now! The Anatolian Sipahis ask you to destroy this set of Ottoman supply camps, lightly guarded by the units that you'd expect from Post-Imperial Age Turks: Bombard Cannons, Janissaries, and Hussars. Doing so gives you a bunch of free Pavilions, some Camels and Cavalry Archers, and the Sipahi Commander himself. 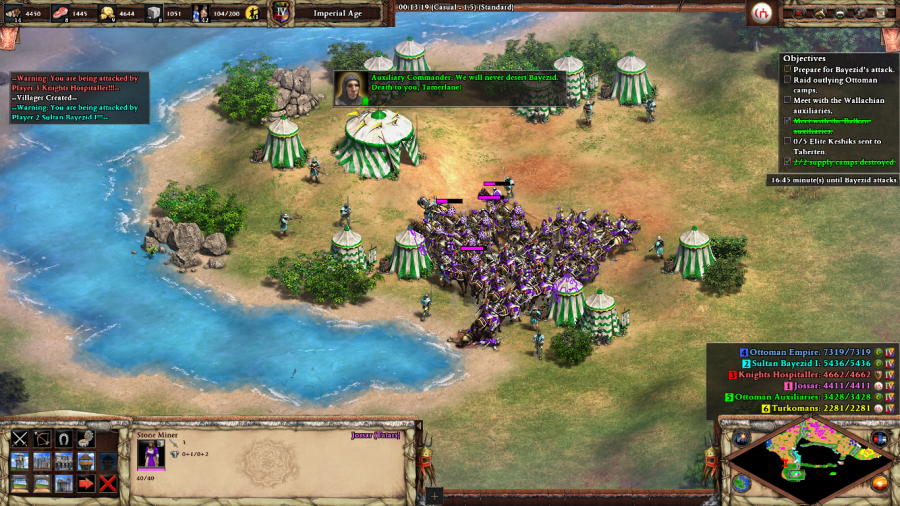 Auxiliary Commander: We will never desert Bayezid. Death to you, Tamerlane! The Balkans auxiliaries don't have a side-quest for you, this is just a chance to run them down before their Crossbowmen and Champions can join Bayezid's main force. 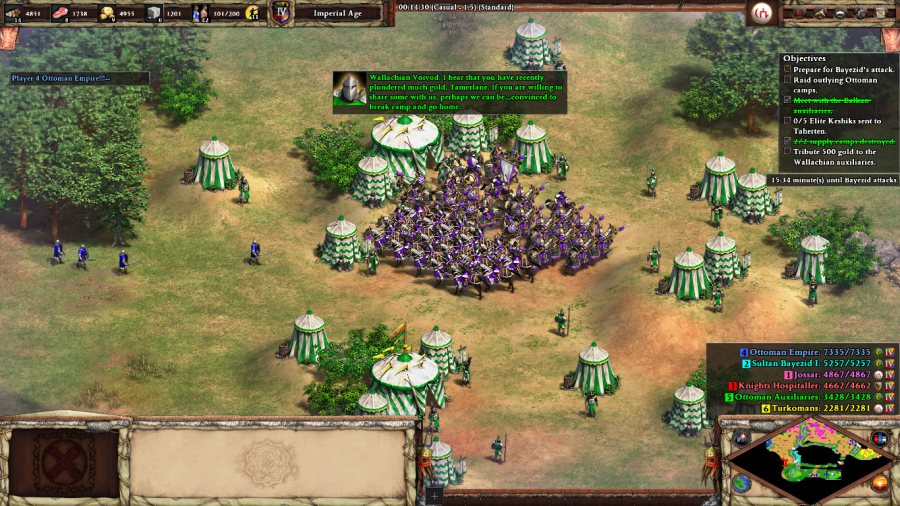 Wallachian Voivod: I hear that you have recently plundered much gold, Tamerlane. If you are willing to share some with us, perhaps we can be... convinced to break camp and go home. (after receiving the gold) Bayezid would never share his spoils with us. Let us go home, men! The Wallachian auxiliaries ask for 500 gold, at which point their Pikemen and Skirmishers quit the field without a fight. Notably, once they do so, they surrender their pavilions to the Turkomans. That's the other reason why you want the Turkomans on your side, everybody except the Sipahis surrenders their buildings to them and not you. 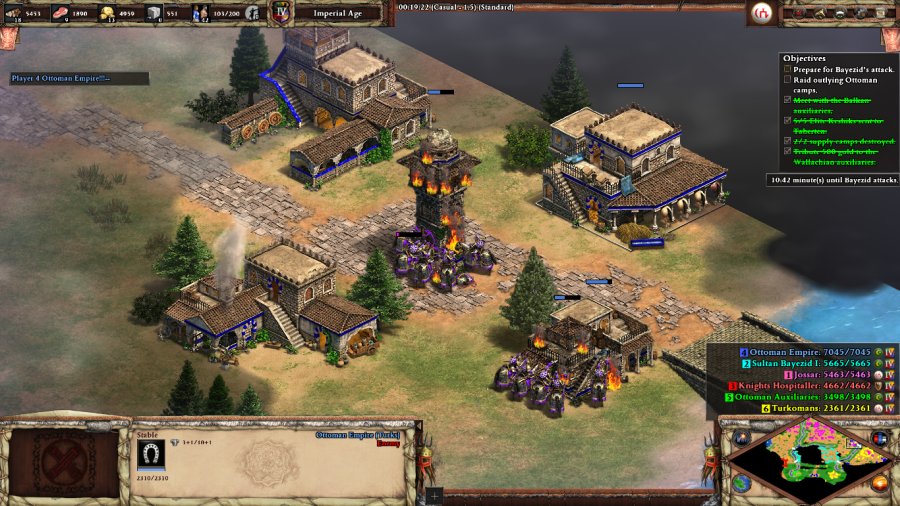 Timurid Rider: (after destroying a Stable) The Turks will not be using these horses any time soon! (after destroying a Blacksmith) We have seized Turkish weapons and armor from this blacksmith! (after destroying an Archery Range) Without this training ground, the Turks will field fewer janissaries! 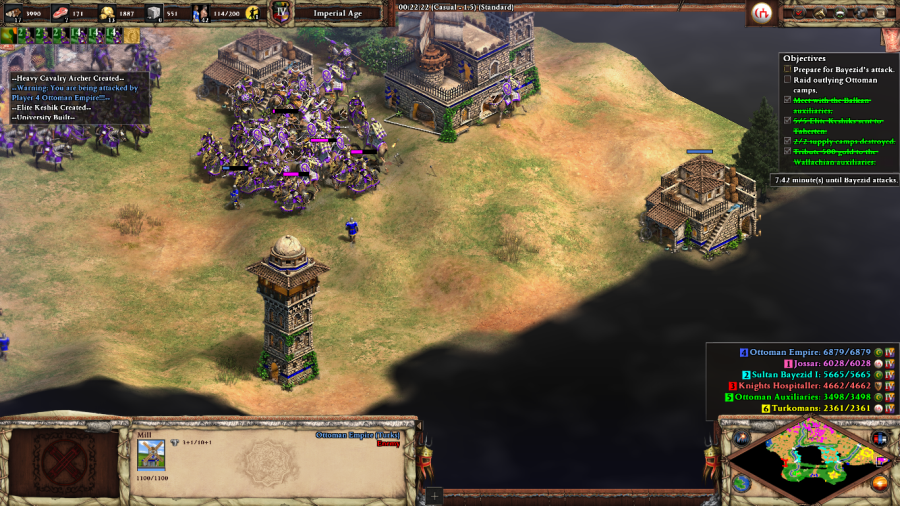 Timurid Rider: (after destroying the Mills) The grain in these mills will feed our men now!  Timurid Rider: (after destroying a Siege Workshop) Let us see Bayezid fire his cannon without this gunpowder! All that's left to do is wreck as many outlying Ottoman camps as possible. Doing so greatly limits the amount of troops that the independent Ottoman faction can bring to bear, and provides you with free upgrades and resources. Don't waste your time attacking Bayezid's main camp in the center of the map during all this. You get nothing for it, and it's protected by a ton of Bombard Towers and Janissaries. 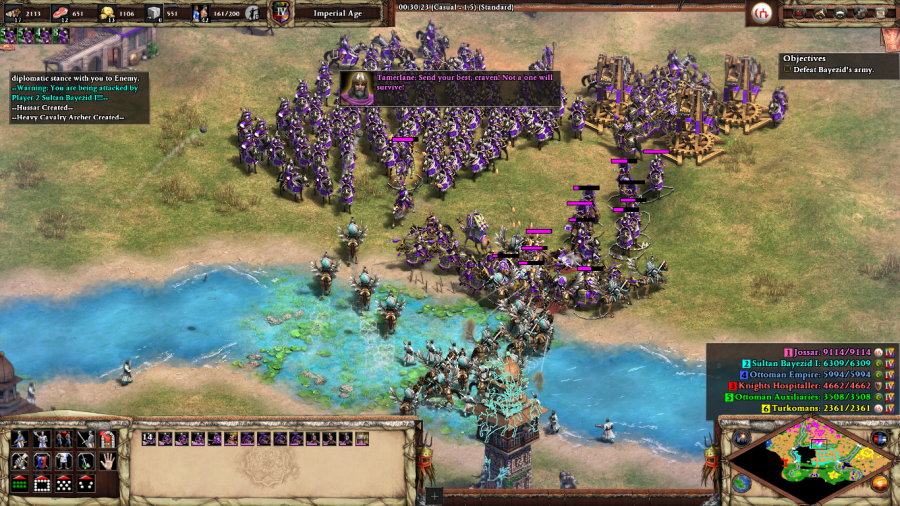 Sultan Bayezid: We will crush your forces on these plains, Tamerlane. Prepare for battle! Tamerlane: Send your best, craven! Not a one will survive! 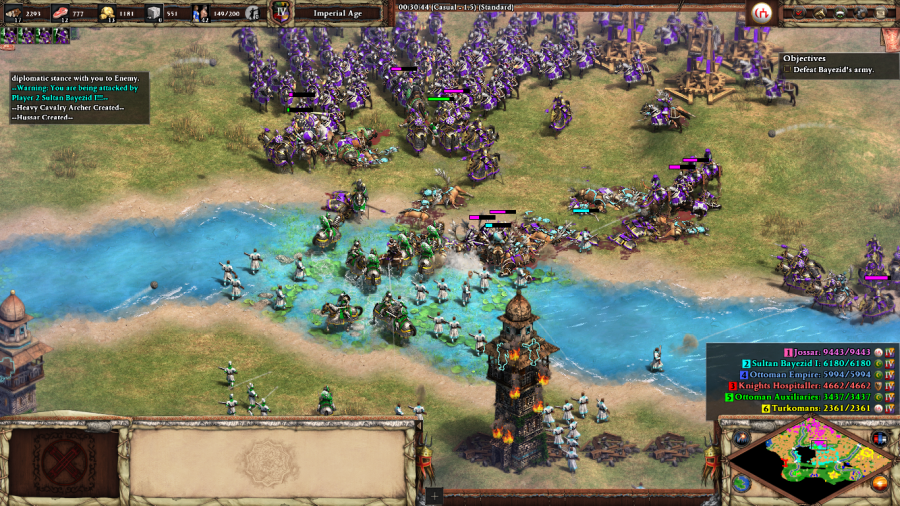 Serbian Knight: The valiant Stefan Lazarevic is wounded! What hope have we now against the Tatars? Tamerlane: Hah! The enemy is breaking into a full rout! Ride them down into the dust! Once the half-hour timer is up, Sultan Bayezid will send a large, fully upgraded Post-Imp Turkish army to attack you from his main camp, but if you've done everything correctly it's only going to be supported by one small group of unavoidable Ottoman Auxiliary Cataphracts and nothing else. Destroying the army moves the scenario to phase two. Timurid Rider: Amir, Sultan Bayezid has fled the field and taken refuge in his mountain fortress to the south. Tamerlane: He may flee as far as he likes, but we will track him down as a wolf does his prey! 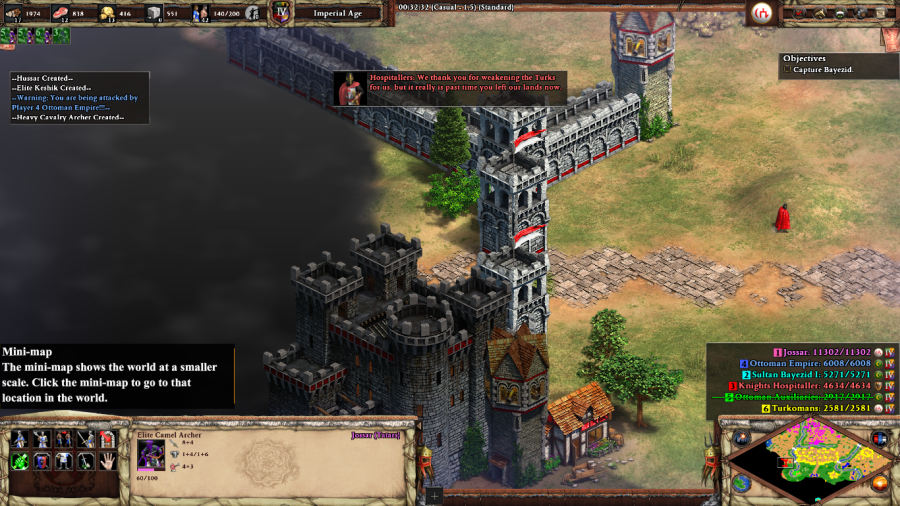 Hospitallers: We thank you for weakening the Turks for us, but it is really past time you left our lands now. Tamerlane: Hah! I will burn your city just like the others! Hospitallers: You will try. 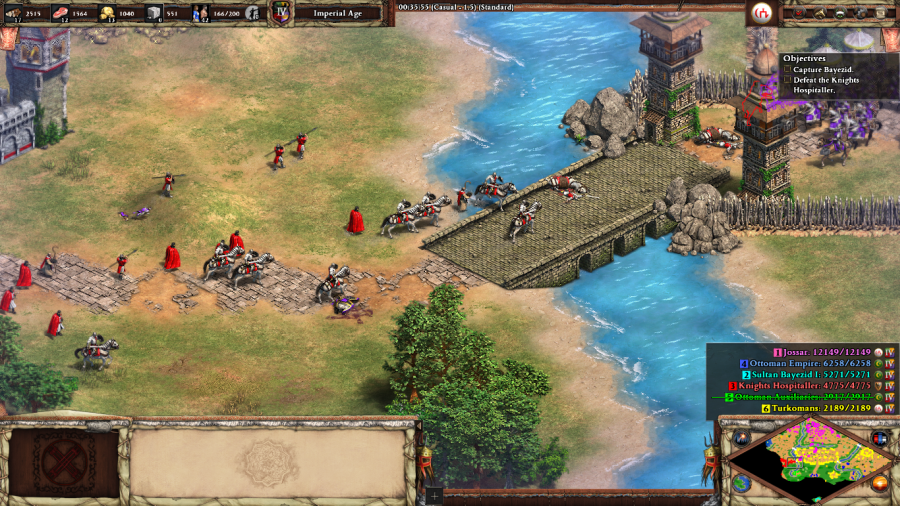 So yeah, Sultan Bayezid turns out to be in another Castle, and the Knights Hospitaller in charge of maintaining the garrison of the nearby city of Smyrna have taken a good, long, look at this whole mess and nevertheless decided they're going to commit suicide by Timur for... reasons. Especially with the outlying Ottoman bases already destroyed, the Knights Hospitaller are the clear and present threat. They quickly launch an attack with a large, Post-Imperial Age Teutonic army, which I repel with my own forces and the support of the allied Bombard Towers in Bayezid's former camp.  Smyrna itself is, how to put it... An extremely nasty fortress with multiple overlapping Castles and Bombard Towers, as designed by the kind of maniacs who force three hour long matches in Black Forest.  Timurid Rider: A renegade has informed us that Smyrna depends on shipments from Europe for wood and gold (after a few seconds) If we destroy the outer defenses of its harbor, the rubble will fall into the sea, causing supply ships to be dashed to pieces on the rocks! Tamerlane: Excellent! Execute the deceitful traitor and prepare the attack on the harbor of Smyrna! The game gives you a side-quest here to cut off Smyrna's Wood and Gold supply, but honestly I found that the static defenses were much nastier than anything the Knights Hospitaller were producing. Good thing I have access to Timurid Siegecraft Trebuchets to outrange Teuton Castles and reduce the place to rubble! Hospitallers: Our great stronghold lies a smoking ruin! Flee, flee before the Tatars kill us all!    By contrast, taking out the final Ottoman base to the south is more of a coup de grace than anything else. They have a lot of defenses, but most of them are just empty HP except for the dual-Castle setup, and even that's no real obstacle at this point. Crack open Bayezid's Castle, and he'll pop out and surrender, ending the campaign. 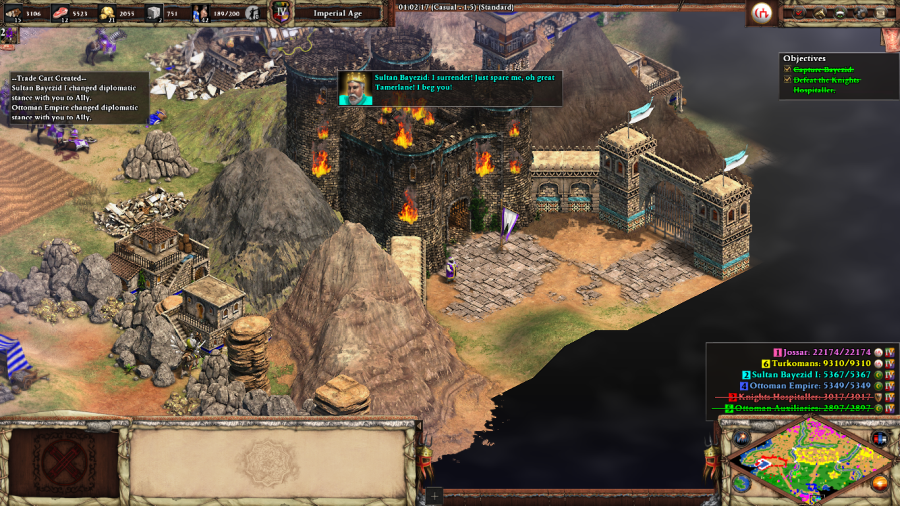 Sultan Bayezid: I surrender! Just spare me, oh great Tamerlane! I beg you! Tamerlane: No adversary can stand his ground against me! I am a titan among mortals, a harbinger of devastation, and the architect of an empire without bounds! Mission 6 Ending Text "The Battle of Ankara was a catastrophe for the Ottomans. Never before they had suffered the disgrace of having their sultan captured in battle.' Turning his armies around, Tamerlane left Anatolia in chaos. It is only a matter of time before he seeks another victim.' The man ended his tale on that foreboding note. I realized that I had to prepare my kingdom lest my lands appear ripe for the picking. I ordered everyone to retire to their quarters. We would discuss this new danger in the morning with clear and ready minds. Suddenly, the doors burst open and a servant rushed towards me. 'Sire, a messenger from a warlord called Tamerlane is here to speak with you. He claims that you are harboring someone of interest to him.' I turned to the old man, who had not heard the messenger, and asked for his name. His weary, dark eyes met mine, and he answered in a grim voice: 'I am Tokhtamysh Khan, of the blood of Genghis Khan and the rightful ruler of the Golden Horde! Landless and friendless, all I have left is my tale.'" Even with a six scenario campaign, they couldn't give enough space to document all of Tamerlane's conquests in full and tried to compensate for that by shoving everything that was left in at the end. For that reason, both narratively and mechanically this last scenario is way too busy. At the very least, the developers really should have left the Hospitallers out, even if that meant we didn't get Tamerlane's final siege represented. Despite that and one or two other problems, overall the Tamerlane campaign is very satisfying. You not only get to be the terrifying storm that sweeps through Central Asia/Persia/Russia/India/the Caucasus/the Middle East, but you get a lot of options in how to go about doing so. Tamerlane himself is a surprisingly strong and active presence throughout, something which is very often sorely lacking, and is a welcome addition to the campaign experience. Even if he's mostly talking about how he's killed everybody in such and such city and turned their skulls into a tower. And that also brings The Last Khans to a close. I wish Ivaylo was better so that I can say that it was an unmarred triumph, but even so it's still a sign that overall things are going in the right direction as we enter the Definitive Edition era. Extra Slides Mission 6 - Intro Slide 1 Mission 6 - Intro Slide 2 Mission 6 - Intro Slide 3 Mission 6 - Intro Slide 4 Mission 6 - End Slide 1 Mission 6 - End Slide 2 Mission 6 - End Slide 3 Mission 6 - End Slide 4 Mission 6 - End Slide 5 Jossar fucked around with this message at 06:21 on Jan 25, 2024 |
|
#
?
Jan 25, 2024 06:01
|
|


|
Campaign Vote #27 A. Edward Longshanks - Britons B. Grand Dukes - Burgundians C. The Hautevilles - Sicilians Voting lasts for 24 Hours from the time of this post. In the event of a tie, I will act as the tiebreaking vote between the two tied options. Please bold your vote in order for it to be counted, as well as noting if you are changing your vote from something else.
|
|
#
?
Jan 25, 2024 06:03
|
|
|
Vote's... closed? Well, since all the options are tied at 0 votes, I guess I'll just pick Edward Longshanks because why not. If this happens again, I might need to rethink whether the voting's still relevant and just go through the rest at my own discretion.
|
|
#
?
Jan 26, 2024 06:12
|
|
|
At this point it's probably just go through them at your own discretion with how commentary has dropped off a bit.
|
|
#
?
Jan 26, 2024 12:13
|
|


|
I do wish they'd given Tamerlane a dream scenario that covers the planned invasion of China. It's a fun campaign regardless though, nice to experience some big brutal brawls from mission 1
|
|
#
?
Jan 26, 2024 19:08
|
|


|
I'm still reading! But you are well into uncharted waters for me so whatever.
|
|
#
?
Jan 26, 2024 19:58
|
|


|
Edward Longshanks - Part 1: Vain Ambition Age of Empires II: Definitive Edition - Britons Theme Very well, then let us begin, the tale of the long-haired menace. 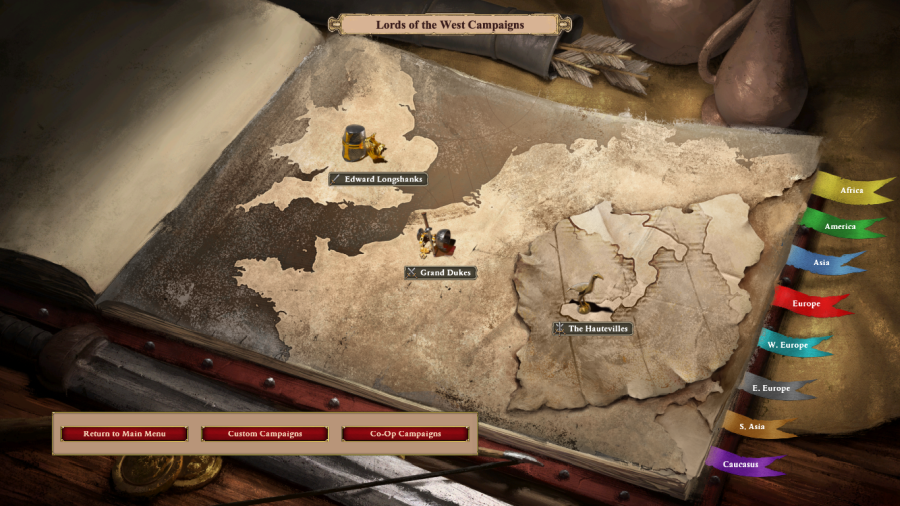 We're now entirely done with the original set of campaign maps. Going forward, each expansion displays its campaigns in its own particular subregion of the world. For Lords of the West, that's Western Europe (well, Sicily is arguable, but it's west enough for this purpose). 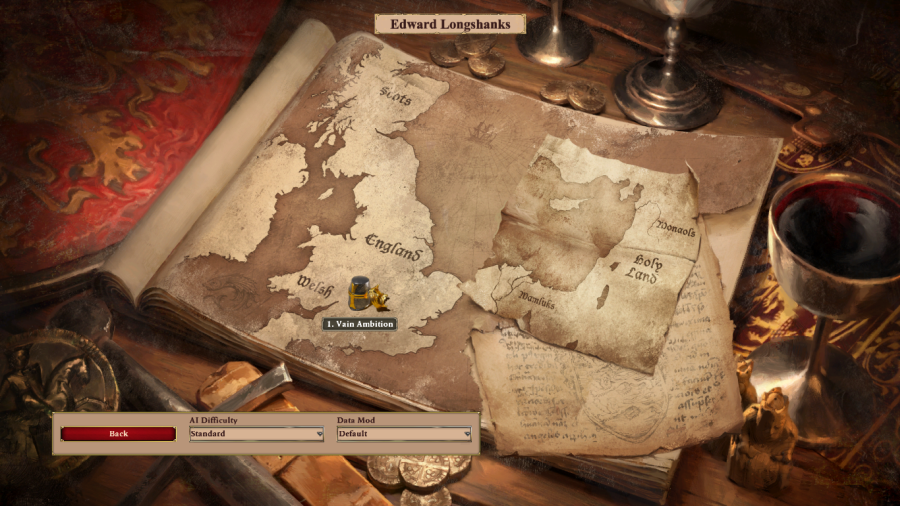 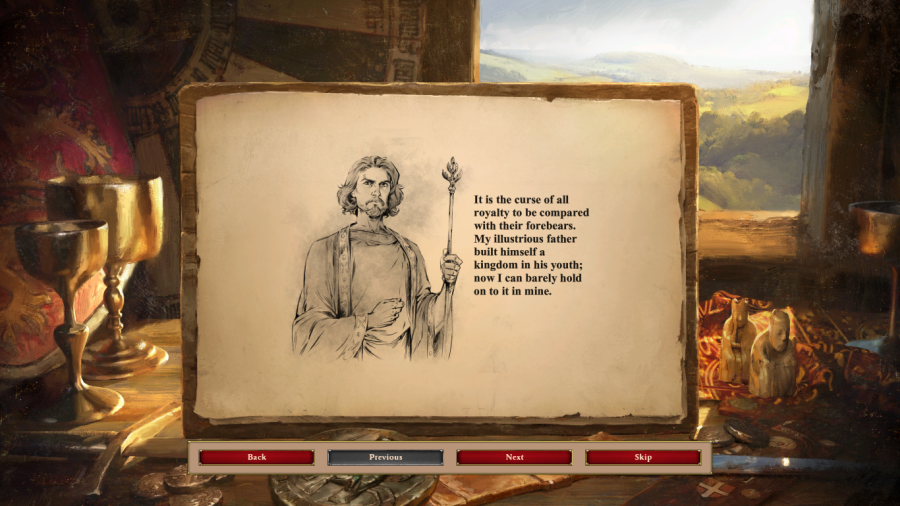 Mission 1 Starting Text "It is the curse of all royalty to be compared with their forebears. My illustrious father built himself a kingdom in his youth; now I can barely hold on to it in mine. I hear all of the nobility's whisperings at court. They say that I may be King of England by birth, but I will never be so by merit. That I, Edward II, am unworthy of my father's name�how much longer until these whispers become cries of rebellion? My heart quivers when I visit his tomb in the abbey; I am wracked by fear; it claws at my soul like the talons of demons. Fear, that I will prove them right; that I will disgrace this family's legacy, as my grandfather did� Yet, I must not give in. I will study my father's reign, and hope that it will imbue me with his strength; the fortitude that I so lack. My father Edward spent his youth watching in disgust as his ineffectual father Henry drove England to the brink of ruin. When his subjects could bear his ruinous reign no more, a rebellion led by the baron Simon de Montfort deposed Henry, leaving his kingdom in tatters. After the disastrous Battle of Lewes, the baronial forces captured and jailed my father and grandfather in Hereford. Some kings begin their rise to the throne from within the palace. Edward began his from the anguish of imprisonment. Yet, even when the future seems bleak, fate occasionally extends its hand and offers allies from the most unlikely of places�" 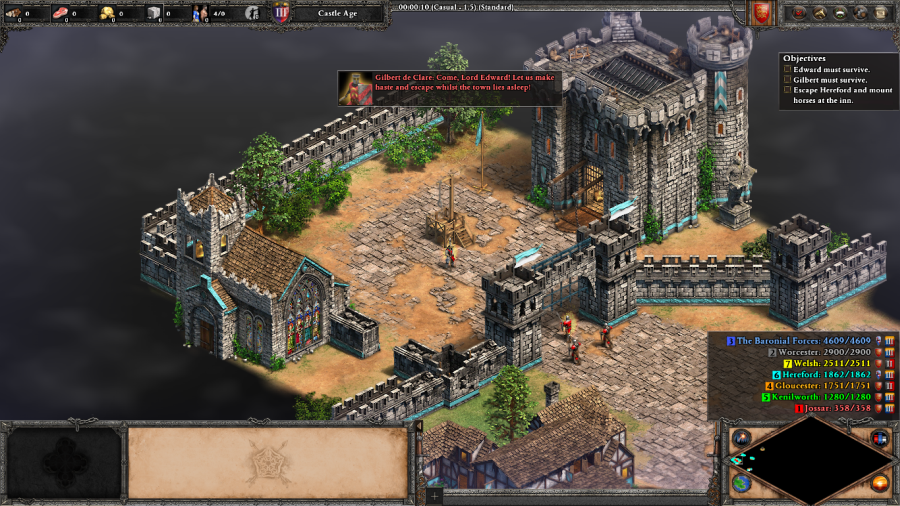 Gilbert de Clare: Come, Lord Edward! Let us make haste and escape whilst the town lies asleep! In this scenario you start with the weakened infantry versions of Edward Longshanks, Gilbert de Clare, and two Men at Arms, at which point the game says: "Good luck, figure out how to escape Hereford on your own." 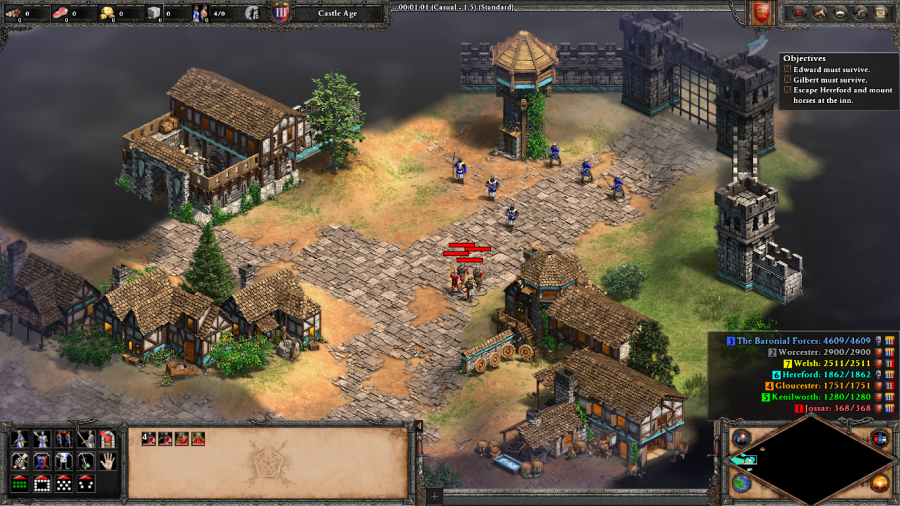 Gilbert de Clare: The guards are upon us! We have no choice but to carve our way out through the main gate. I will protect you with my life, Lord Edward! There are several ways of escaping Hereford. The clever ways of doing so involve fighting 2-3 units and either stealing a Transport Ship to sail down the river (making sure to avoid a Demolition Ship along the way) or jumping out of a Fortified Tower (via garrison/ungarrisoning). I, of course, chose neither of these and just got into a fight at the front gate against a couple of Pikemen and some Long Swordsmen. This is a surprisingly difficult fight, and I ended up losing both of my own Men at Arms as a result. 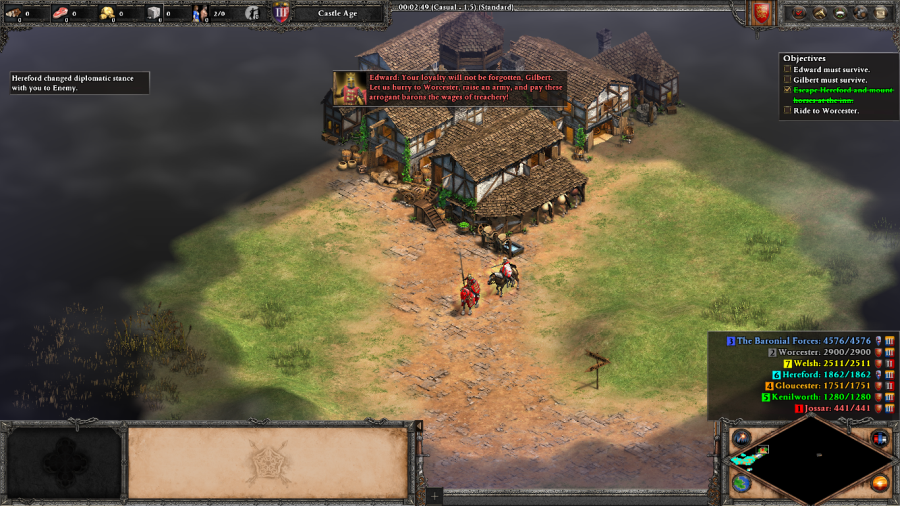 Edward: Your loyalty will not be forgotten, Gilbert. Let us hurry to Worcester, raise an army, and pay these arrogant barons the wages of treachery! Any units that make it to the inn outside Hereford become cavalry units (I believe the Men at Arms become Knights? Edward Longshanks becomes a standard Cavalry hero unit and Gilbert de Clare becomes a weaker Cavalry hero unit with a charge attack that deals extra damage.) and the mission continues. The next step is to make sure that your hero units make it to Worcester in one piece. 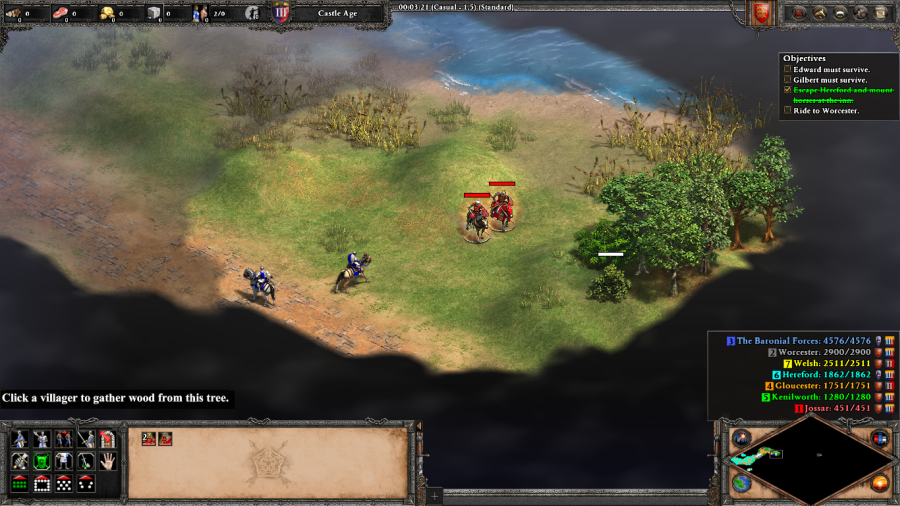 This is easier said than done, as Baronial Forces patrol the road. Especially if you lost the starting Men at Arms, you do not have much to work with here, so I stick to riding off the beaten path and running past enemy units when I can't avoid them. 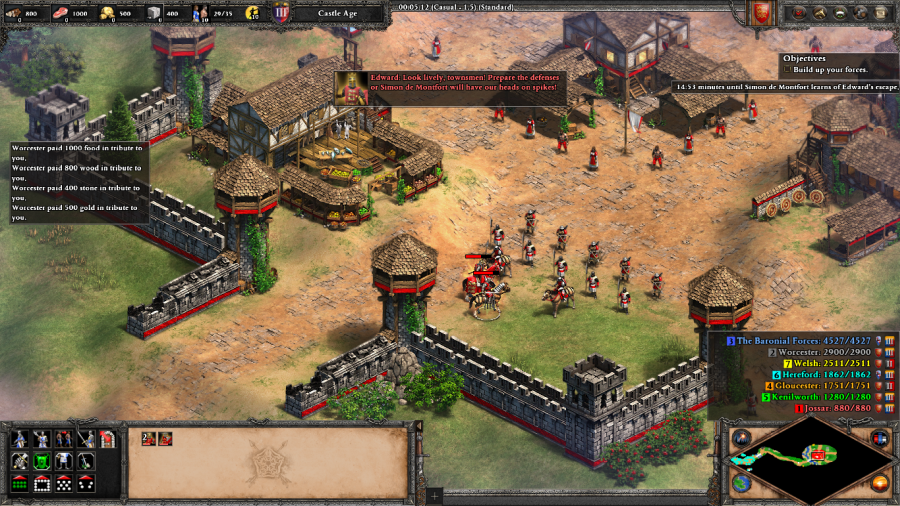 Edward: Look lively, townsmen! Prepare the defenses or Simon de Montfort will have our heads on spikes! Once you make it to Worcester, the build and destroy part of the mission begins. You gain a small number of troops and a decently well fortified base with Towers (although there are plenty of gaps in the walls). A timer counts down, giving you 15 minutes to build up in peace. 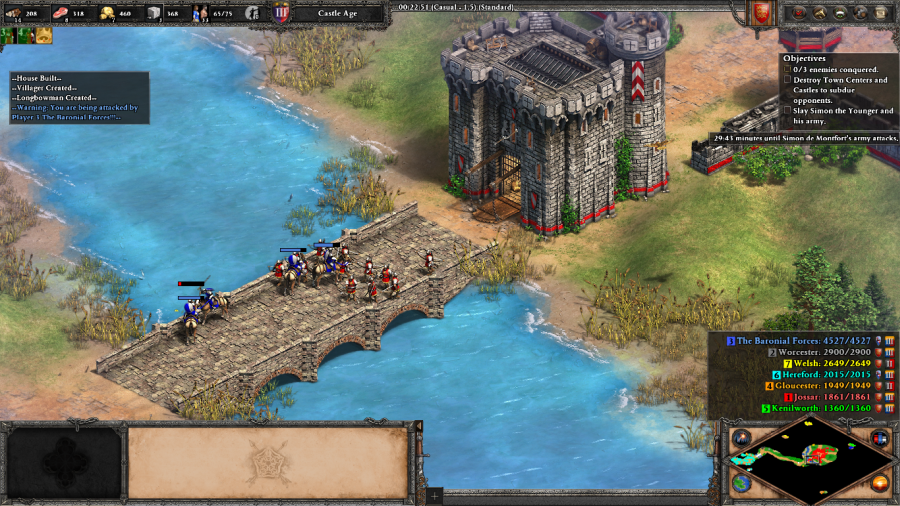 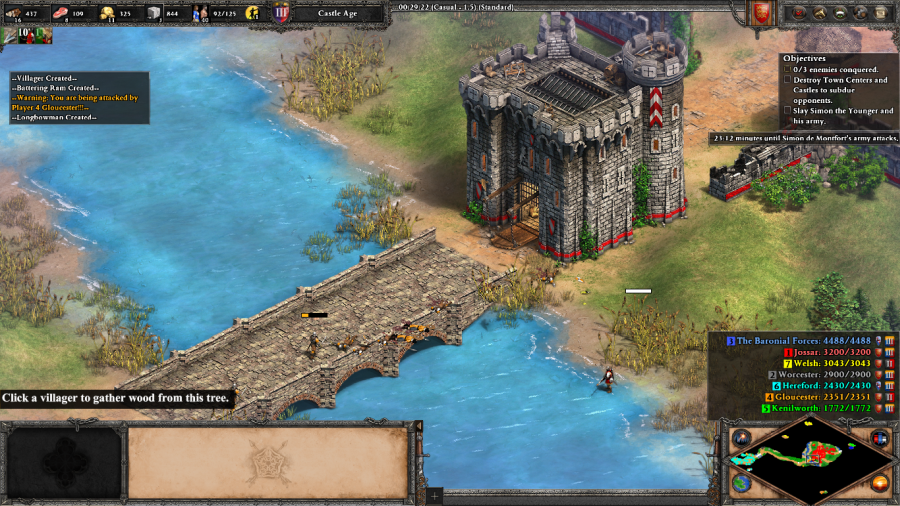 Simon de Montfort: So, the tall prince has escaped my clutches... for now. I shall assemble the baronial army myself and prove him to be as foolish as his father! Llywelyn ap Gruffydd: Wales casts its lot in with the barons! We will help you return the brash Longshanks to his cell. Edward: Our holdings in Worcester can support but a small force! We must strike quickly to bring our rivals back into the fold and even the odds. After that point, all the enemy factions on the map wake up, and start attacking your base. I found that despite the special attention paid to Wales in the text to narratively justify why they're here, it was mostly Gloucester that played an active role in trying to kill me, alongside the Baronial Forces. Fortunately, this southern Castle chewed up all of their troops, leaving me free to finish building up and go on the offense. 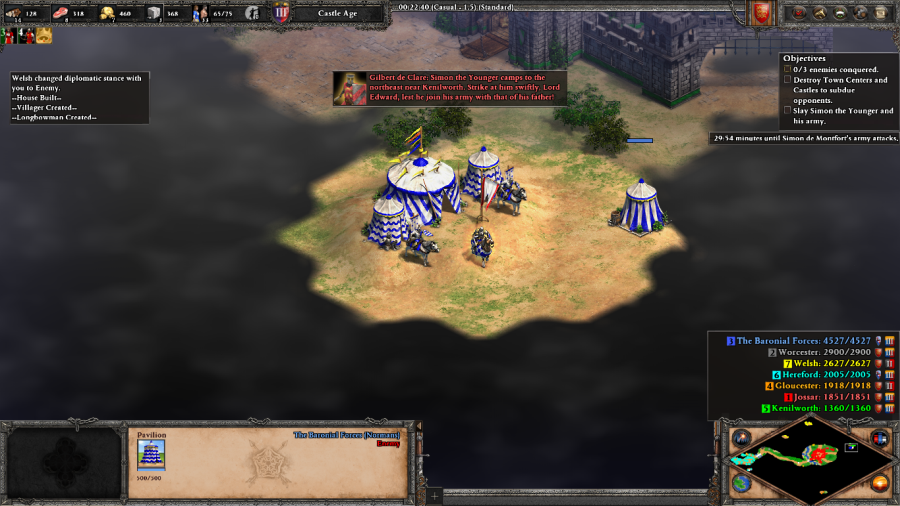 Gilbert de Clare: Simon the Younger camps to the northeast near Kenilworth. Strike at him swiftly, Lord Edward, lest he join his army with that of his father! First thing's first: Simon the Younger here has a pretty large force that can cause some major trouble if he manages to live long enough to join up with his father. He's also sitting right next to Kenilworth, one of the five enemy factions, three of which need to be subdued/defeated in order to win the scenario. So the plan is to build up an army capable of taking him out, then leverage that victory to destroy Kenilworth's Castle. 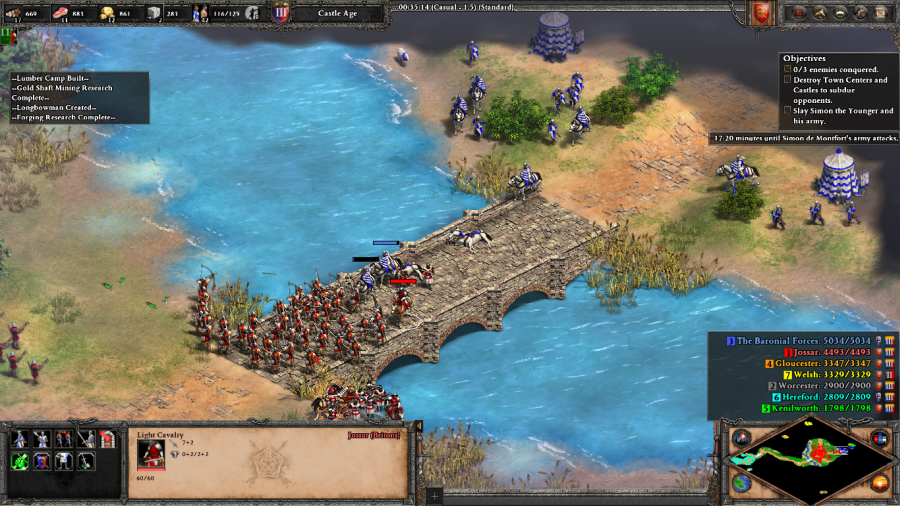 Unfortunately for Simon the Younger, his forces are easily lured across this bridge, which serves as a perfect place to put the Briton gameplan of: "build 70 Longbowmen, create a shooting gallery, and mow down everything that moves" into action. 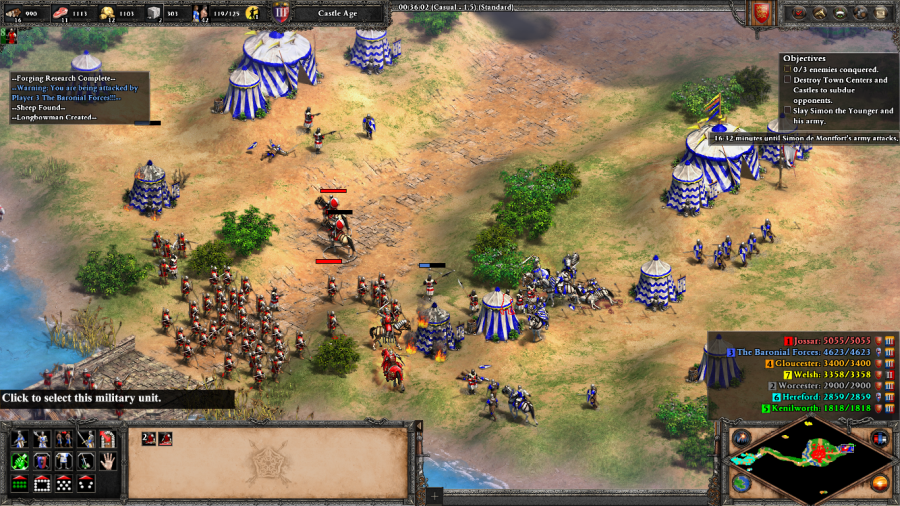 Edward: Strike these foul wretches down without mercy! Their armor and wealth will serve our bannermen well. Not all of Simon the Younger's army will fall for this, but at this point they're weakened enough that they can be defeated with minimal difficulty. Finishing this force off gives you some free armor upgrades (which you don't care about, because you're too busy using Longbowmen) and grants you an achievement. 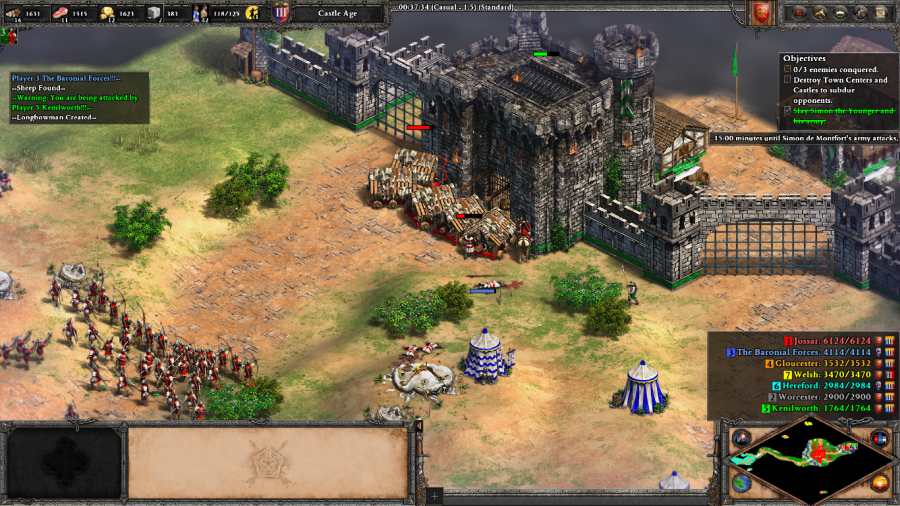 Edward: Kenilworth has fallen! Have the locals rebuild this tattered ruin, then levy them into our army. With Simon the Younger's army out of the way, Kenilworth barely puts up a fight. Since you're stuck in the Castle Age for this mission, you're stuck using Rams to defeat Castles and Town Centers rather than the Britons' powered-up Trebuchets, but as compensation for this, most of the enemy factions will give up and ally with you as soon as you take out their Castle or Town Center rather than needing to be defeated fully. This is notably not the case for the Baronial Forces, who will fight you until the bitter end. 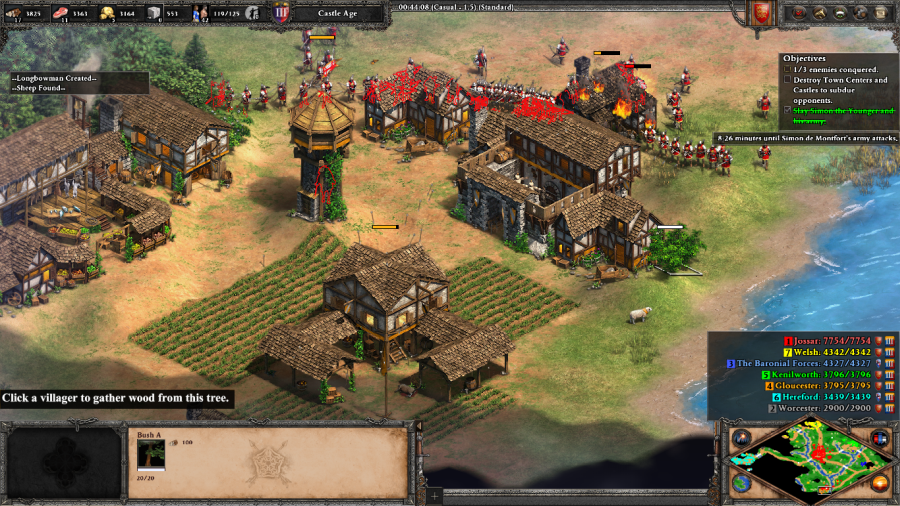 Edward: Your seat in Gloucester is yours once more, bold Gilbert. Raise the banners! With Kenilworth out of the way, Gloucester is next on the list, and doesn't really have much in the way of stopping you from just raining down arrows on their Town Center. I still have to wait for the Rams to finish things off, but they're slow enough that it's worth getting some damage in from the massive Longbowmen army first. Corresponding to Edward's dialogue, Gilbert de Clare does in fact leave you here and becomes a unit of the newly allied Gloucester instead. Doesn't make that much of a difference at this point, but interesting to notice. 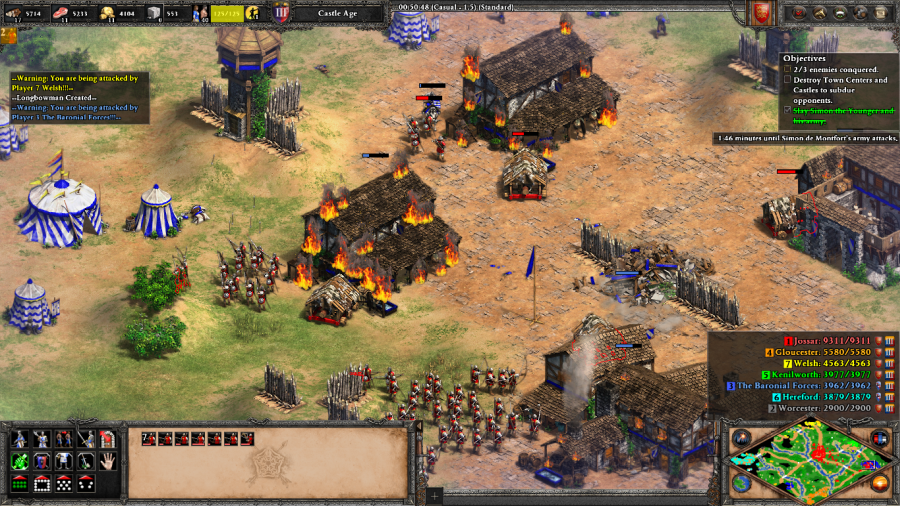 Simon de Montfort: Enough tarrying! My knights come for you, my valorous but rash prince. (after dying) How deftly they advance! Our bodies are theirs, our souls are God's. At this point there are three enemies left on the map, one of which needs to be defeated to end the scenario: Hereford, the Welsh, and the Baronial Forces. In the end, the timer makes my decision for me. I don't expect to be able to defeat any of the factions before Simon de Montfort's army show up, so I might as well take the offensive to the Baronial Forces first. I smash their eastern camp and Simon de Montfort... just sort of shows up and dies. I was a little confused by this, is he supposed to grab whatever he has in his already existing bases and fling them at you rather than spawn in with an extra army? Or maybe he did spawn in with some troops and they all died to arrow fire while I wasn't looking. 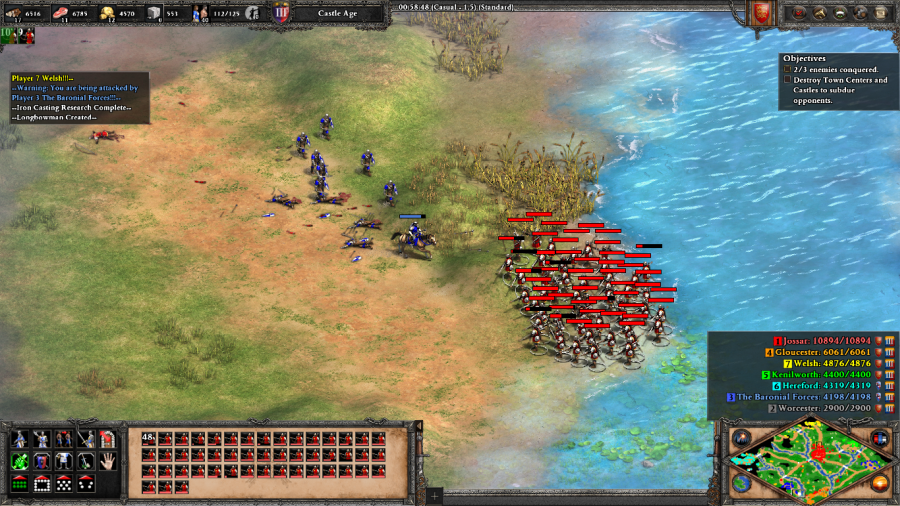  Edward: The baronial forces crumble. Clap these perfidious rebels in irons and distribute their wealth and supplies to our hardy yeomen! The last Baronial Forces base has a much larger garrison than I was expecting given how much they're on the ropes at this point, but once my troops pour in from the other side of the map, it's as good as over. Note: you get a large amount of resources from defeating the barons, which is strange given that they're almost certainly going to be one of the last factions you defeat, if you go for them at all. Edward: The rebel forces fall like grain to the scythe! With their forces in disarray, the rest will be compelled to fall before me and beg for mercy. Mission 1 Ending Text "Like his Norman ancestors, Gilbert de Clare was a shrewd opportunist. Initially a commander in the rebel army, he keenly sensed its divisions and saw that he could further his own ambitions by defecting to Edward. My father moved with alarming speed. Worcester and Gloucester, Gilbert's family seat, were seized without delay. After a string of further victories, he compelled the leaderless and battered rebel forces to capitulate. Known by many as Longshanks, Edward was feared for his imposing stature and foul temper. While Henry was restored to the throne, all were well aware that Edward was now the true power behind it." The strangeness with the Baronial Forces is less notable to players who are quick enough to take out Wales as the third necessary faction instead, thus avoiding dealing with them entirely except for Simon the Younger's troops on the route to Kenilworth. Apart from that, it's your standard introductory RPG lead-in to build and destroy scenario. It shows the player how to play the Britons, with a little bit of encouragement to try and get the player to achieve their objective quickly rather than sitting and booming forever. Extra Slides Mission 1 - Intro Slide 1 Mission 1 - Intro Slide 2 Mission 1 - Intro Slide 3 Mission 1 - Intro Slide 4 Mission 1 - Intro Slide 5 Mission 1 - Intro Slide 6 Mission 1 - Intro Slide 7 Mission 1 - End Slide 1 Mission 1 - End Slide 2 Mission 1 - End Slide 3 Mission 1 - End Slide 4 Jossar fucked around with this message at 17:51 on Jan 27, 2024 |
|
#
?
Jan 27, 2024 17:39
|
|
|
Time to get carried by your English Longbows.
|
|
#
?
Jan 27, 2024 17:53
|
|
|
I'm reading every post, but sometimes there's a few days where I don't have time to check. I woulda voted hautevilles, for what it's worth. :V
|
|
#
?
Jan 27, 2024 21:06
|
|

|
Still reading a well, just not posting much because the very self contained nature of the maps mean the updates pretty much speak for themselves. I've got no strong opinion on the ordering of campaigns and have basically always voted for just following the way the game presents them so I'm ok with you playing them the way you like.
|
|
#
?
Jan 27, 2024 21:56
|
|

|
I was busy and almost missed the start of the elemental evil campaign. I'm also still reading, just not posting much because I don't really have much to add.
|
|
#
?
Jan 27, 2024 23:53
|
|

|
Edward Longshanks - Part 2: A Man of God Mission 2 Starting Text "Ruthless and cunning, Edward did not always adhere to the chivalric codes that the European nobility held so dear. After massacring Simon the Younger's men in a stealthy night attack on Kenilworth, he used the captured banners to disguise his army before smashing de Montfort at Evesham. In an act of alarming brutality, the corpse of de Montfort, an earl of England, was hacked into carrion and his head mounted on a pike. Edward had won the war and cowed the rebels into submission in just over a year, but the victory came at the cost of his honor. Nobility and clergy alike cringed at the thought of an impious butcher one day ascending to the throne of England. To restore his ailing reputation and prove himself worthy of the crown, my father resolved to lead a crusade east to the Holy Land, where the situation grew increasingly dire. The voracious Mamluk Sultanate waged a fierce war of expansion, first against the Mongols and now against the beleaguered Crusaders. Several fortresses quickly fell before their unstoppable onslaught. Their leader was Sultan Baibars, a man not unlike my father Edward. Originally a slave of Cuman origin, he rose to prominence through military service and had recently taken power after murdering the reigning sultan. Having just slaughtered the population of Antioch, his armies now threatened Acre and Tripoli from the east, converging on both cities in a suffocating siege. Edward's army arrived in Acre to find the inhabitants desperate, but not beyond hope." 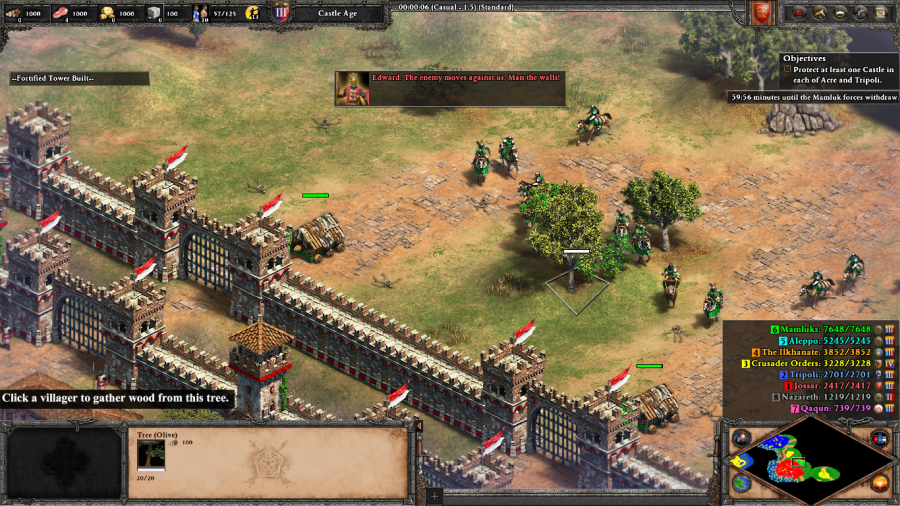  Edward: The enemy moves against us. Man the walls! Baibars: You Crusaders have sullied our lands long enough. We will drive you from your castles and into the sea! This scenario starts with an attack by the Mamluks on your main fortress in Acre from land and sea. You have to run off to repulse it with your initial forces before getting down to business and setting things up for the rest of the mission.  Edward: We cannot merely hole up within our walls like wretched rats! Strike out and rain fire and brimstone on the heathen camps and any towns that support them!  The main goal of the scenario is to last for an hour against the assault of the Mamluks and Aleppo, as supported economically by the smaller towns of Qaqun and Nazareth. Acre is fully developed building-wise to start with, but you can't build more Villagers and are pretty heavily limited on what buildings you can construct. Nothing's stopping you from building Fishing Ships and Trade Cogs, but the Mamluks have a well fortified base to the south that's entirely devoted to raiding your commerce fleets. Tripoli is a purely defensive allied faction that is the main lightning rod for Aleppo's attacks and can mostly handle them but might start to buckle in the late game if entirely ignored.  Crusader Orders: We are yours to command, Lord Edward. Direct us where the fighting is thickest and we shall prove our worth many times over! In addition to providing you with a reliable trading partner by sea, the Crusader Orders are a surprisingly competent ally that can do a lot of the heavy lifting in this scenario. The catch is that they're entirely passive unless you can manage to navigate the taunts menu to order them around. I found that just telling them to attack the enemy generally, once or twice, was good enough to get them moving, so not too much of a hassle. 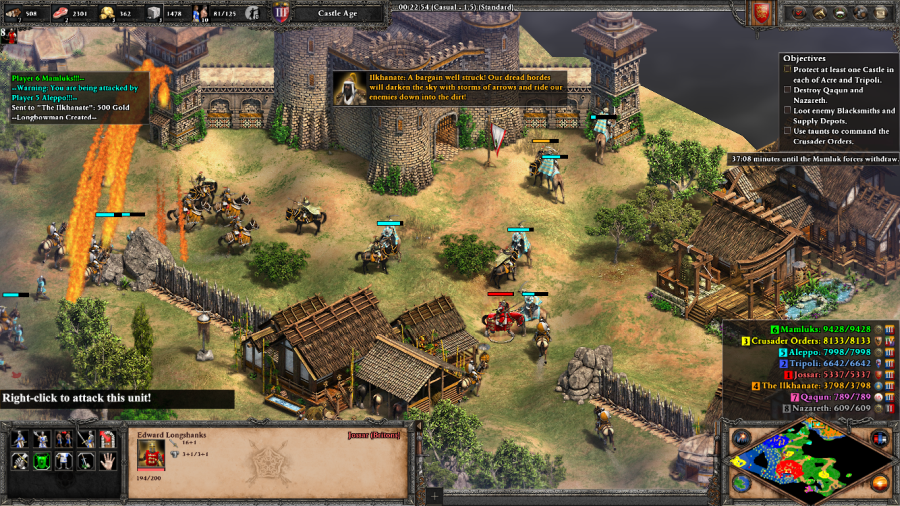 Ilkhanate: Crusaders! It seems that we share a common rival in the Mamluks. Send an emissary to our khan and we will discuss the possibility of an alliance. (after sending an emissary to the Ilkhanate Castle) We have spoken with your emissary and offer these terms. Pay us 500 gold and we will make fierce war on Aleppo and the Mamluk army! (after tributing the Ilkhanate 500 Gold) A bargain well struck! Our dread hordes will darken the sky with storms of arrows and ride our enemies down into the dirt! Baibars: You ally with the Mongols to no avail, Crusader curs! The khan's head will rest beside yours, nailed to my palace doors! After 20 minutes in, the Ilkhanate offers terms for an alliance if you can get someone up to their camp. They raid Aleppo's external bases, serving as an additional distraction for said enemy faction and stopping them from bringing their full might to bear against Tripoli. 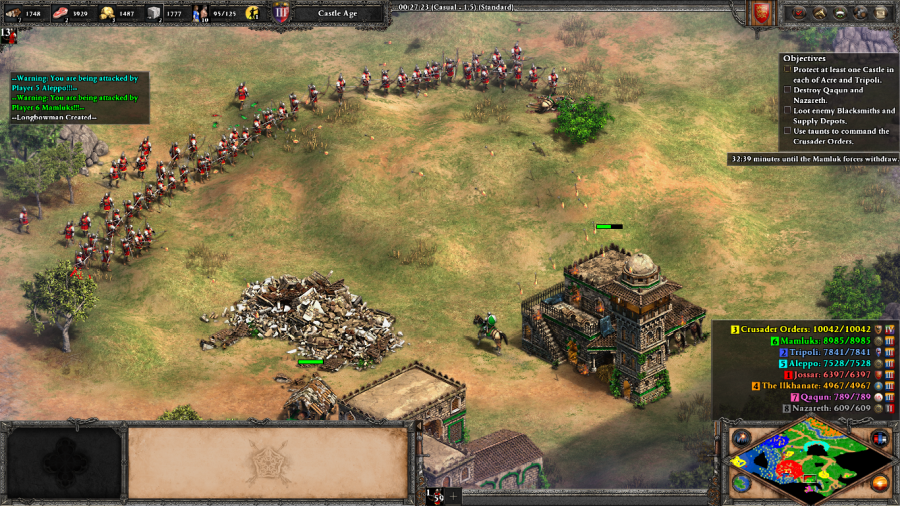 Eventually I'm happy enough with my build up to send a full stack of Longbowmen against the outlying Mamluk camps. Offscreen, the Crusader Orders have taken out one or two of these camps which has provided a few of the otherwise unavailable Imperial Age Blacksmith/University upgrades. If you thought that Longbowmen were destroying everything in sight last mission, these guys can now take down some of the production buildings in seconds, and this is without their Elite upgrade. This snowballs into providing me with the rest of the Imperial Age upgrades and a bunch of resources from Mamluk supply depots. 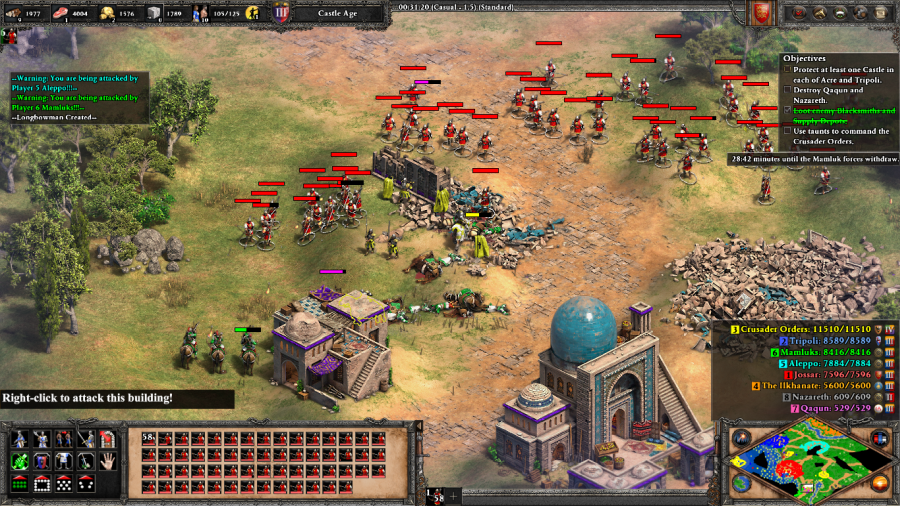 Edward: Qaqun burns! Claim what spoils you can and commit the rest to the flames! I catch up with the Crusader Orders in Qaqun and together we defeat the local garrison backed up by an eclectic mix of Saracen units (Cavalry Archers, Light Cavalry and Mamelukes). Destroying Qaqun lowers the amount of resources going to the Mamluks and provides me with a big boost of resources.  It's at this point that I notice that Tripoli's main gate is starting to get heavily damaged, so I send a smaller squad of troops to reinforce it, just in case. Remember, this is even with the Ilkhanate ostensibly serving as a screening force. 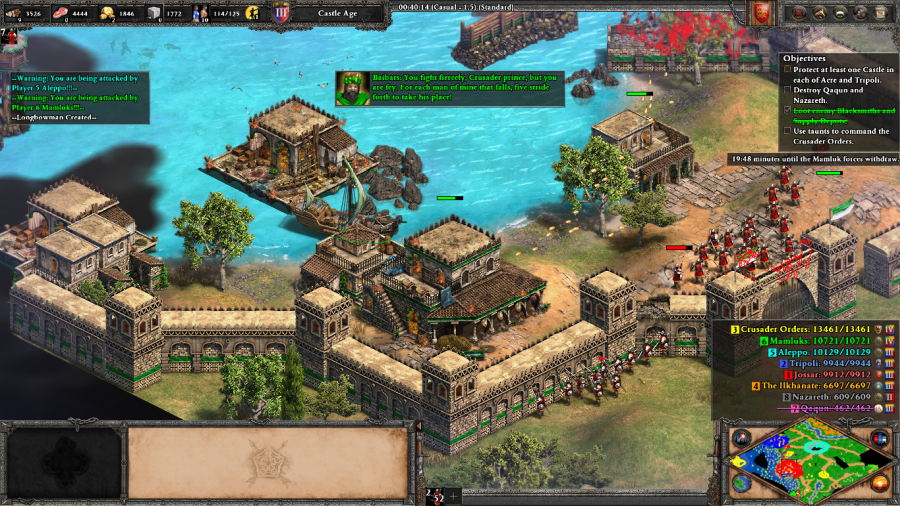 Baibars: You fight fiercely, Crusader prince, but you are fey. For each man of mine that falls, five stride forth to take his place! My main army spends a surprisingly long amount of time cleaning out the southern Mamluk base. This place is packed with enemy production facilities, and ensuring that the Mamluk threat by sea stops entirely is a pretty big slog. 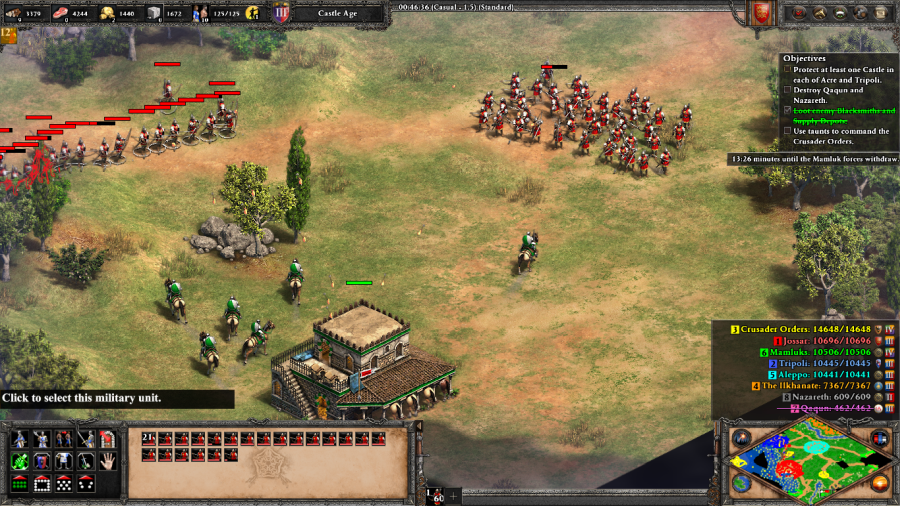 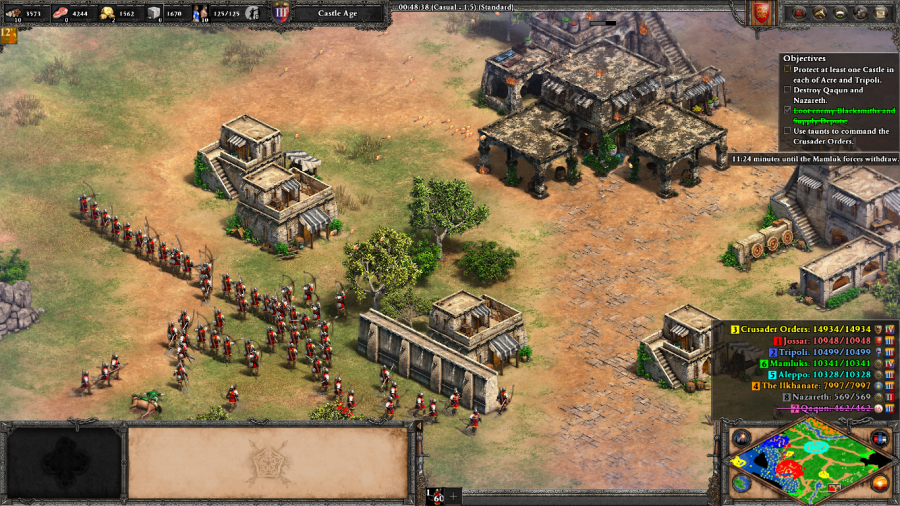 Edward: Nazareth has fallen. Pay your respects to Christ and seize anything of value! On the way to Nazareth, I sweep through the last of the Mamluks' external bases before taking down the town. It's the same deal as Qaqun: resources and resource denial. 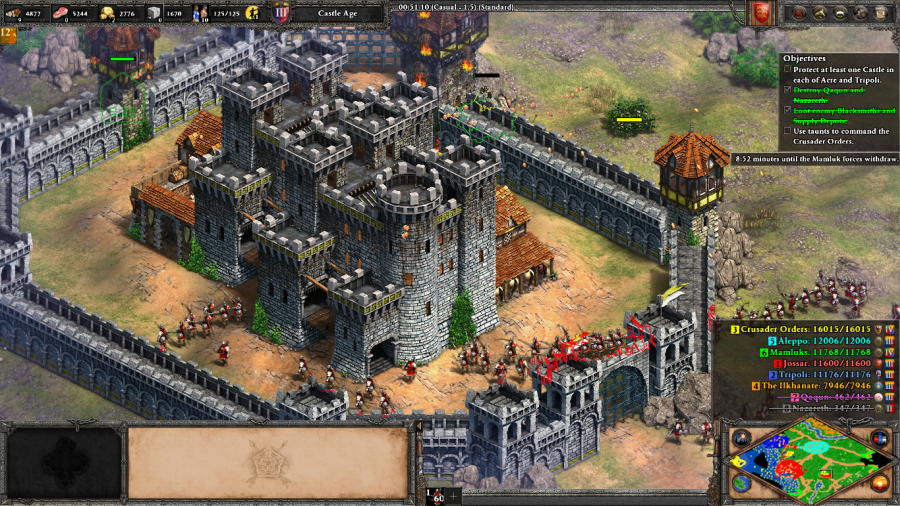 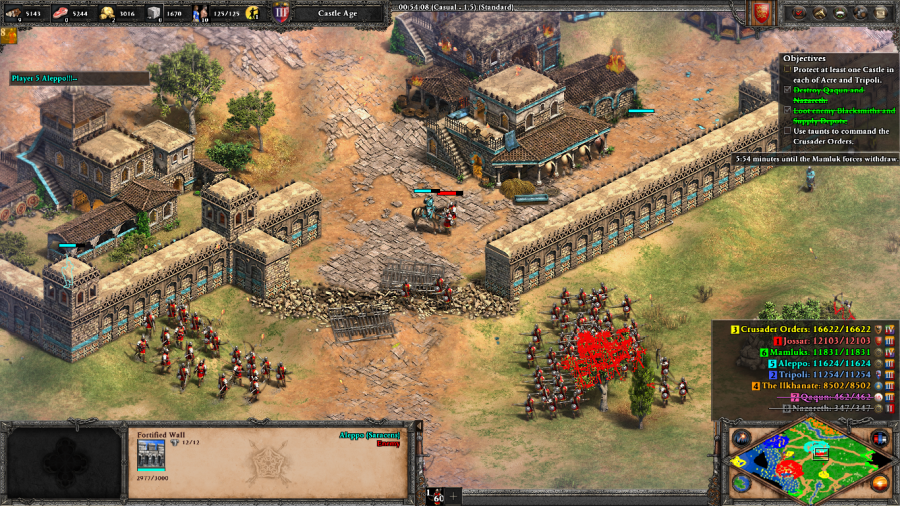 With this, the enemy factions have been entirely dealt with outside of their main strongholds. So after repelling a desperation attack on the central Crusader Orders' Castle by the Mamluks, I take the fight to Aleppo. The main enemy bases are big and I still don't have Trebuchets, so I don't manage to defeat them before the timer runs out, but I do manage to cause a surprising amount of damage in the process. Not bad for a spur of the moment decision to give the finale a bit more punch. Baibars: Enough! Call off the attack. What we cannot achieve through force, we must accomplish by stealth... Mission 2 Ending Text "The fighting was vicious. Droves of Crusaders and Mamluks alike fell, spattering the battlements and the fields surrounding Acre and Tripoli with blood and gore. Throughout the Crusade, my father proved his mettle as a tactician and as a statesman. Fearless when faced with peril, he led a daring raid that devastated the enemy towns of Nazareth and Qaqun. Following these victories, he convinced the terrifying horde of the Mongol Ilkhanate to descend upon the Mamluks, devastating the region around Aleppo. The hitherto invincible Baibars was overwhelmed and forced to withdraw, but before doing so he sent a Nizari with a poisoned blade to remove his capable rival. Edward slew the assassin, but a wound in his arm left him bedridden for months." This is a pretty good mission. Getting to use the Crusader Orders as a special forces squad is neat, but I'm sure that doing so with any form of finesse must be a real nightmare. Extra Slides Mission 2 - Intro Slide 1 Mission 2 - Intro Slide 2 Mission 2 - Intro Slide 3 Mission 2 - Intro Slide 4 Mission 2 - Intro Slide 5 Mission 2 - Intro Slide 6 Mission 2 - Intro Slide 7 Mission 2 - End Slide 1 Mission 2 - End Slide 2 Mission 2 - End Slide 3 Mission 2 - End Slide 4 Jossar fucked around with this message at 18:58 on Jan 28, 2024 |
|
#
?
Jan 28, 2024 18:47
|
|
|
Edward Longshanks - Part 3: Of Castles and Kings Mission 3 Starting Text "Edward left the Holy Land in an uneasy truce. Baibars had promised to keep the peace for ten years, ten months and ten days; now, with more pressing matters developing back in England, my father could only hope that the Sultan would keep his word. While Edward was away on Crusade, building his reputation as an honorable and capable leader, his father Henry died, leaving him the English crown. He returned to an England both stable and eagerly anticipating his arrival. On August 19, 1274, the Lord Edward was crowned Edward I of England. Wishing to expand his new kingdom, Edward set his sights west towards Wales, an old enemy that had supported Simon de Montfort during the baronial rebellion. The Welsh prince Llywelyn ap Gruffydd constantly antagonized the Anglo-Norman marcher lords on the border. Adding insult to injury, he took Simon de Montfort's daughter Eleanor as his bride. My father pounced on the already fractured Welsh factions, seeking to conquer them piece by piece. But if there was one thing that the Welsh princes hated more than each other, it was Englishmen imposing their laws on Welsh territory. Llywelyn's brother Dafydd joined the fray and the brothers waged a war of stealth and ambushes, defeating Edward's southern armies under Luke de Tany and Gilbert de Clare. Seeing that the hardy folk of these mountainous forests and coarse heaths would not bend easily to his will, my father changed tactics. If the Welsh could not be crushed in open battle, they would be brought to heel from a series of impenetrable castles." 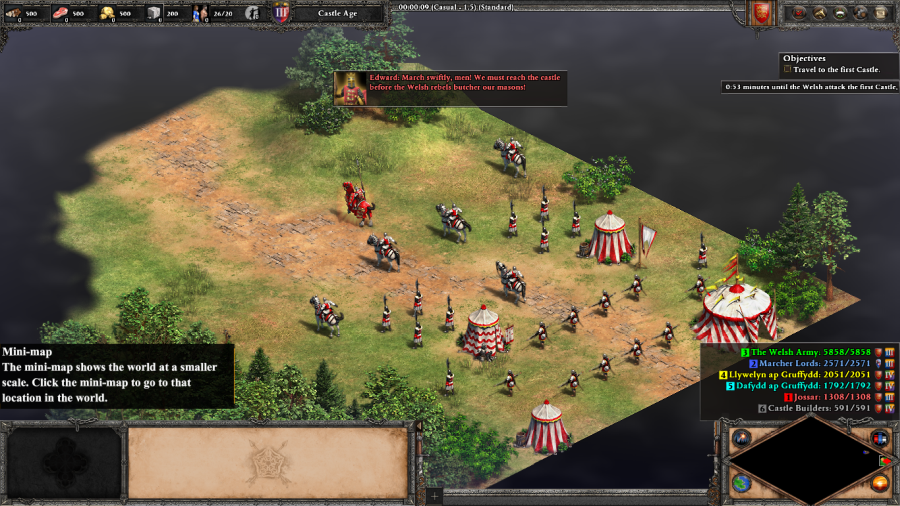 Edward: March swiftly, men! We must reach the castle before the Welsh rebels butcher our masons! 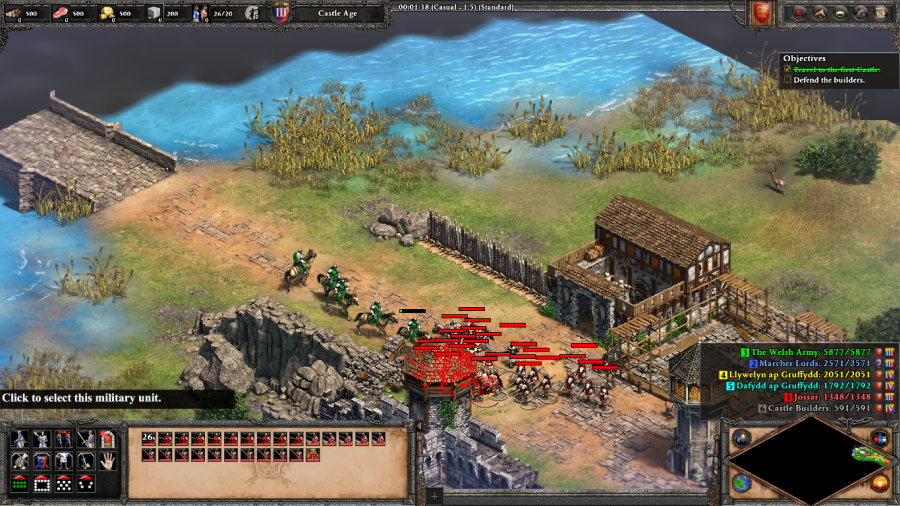 Edward: Array yourselves in formation and keep alert. Marauders could emerge at any moment! 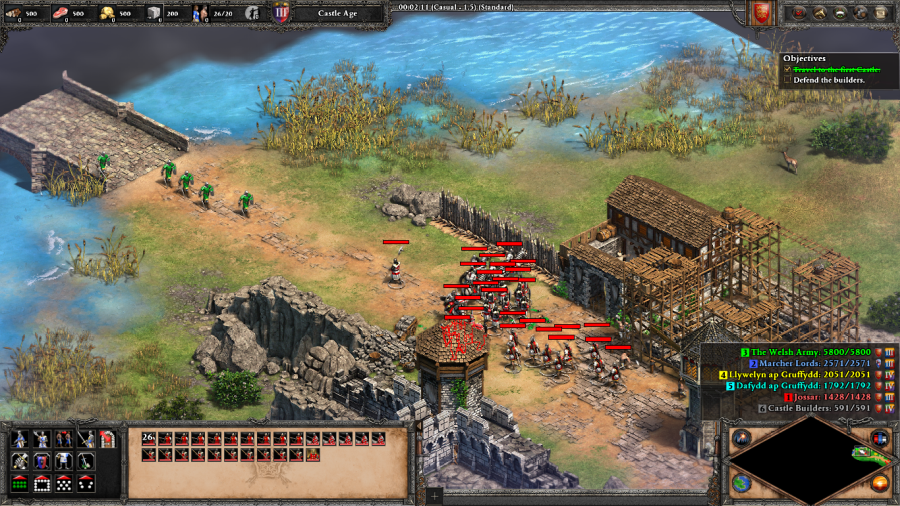 Llywelyn ap Gruffydd: We will not let these English invaders build a castle on Welsh soil. Charge! This mission starts you out with a small army lead by Edward. Your goal is to ride to each of three Castle build sites and protect the three Villagers present at each one while they try to get the full structure up. Fortunately, the Castles build much faster than usual, but your forces will be under attack by multiple waves of units from the Welsh Army (mostly Light Cavalry, Skirmishers, and Long Swordsmen) in increasing numbers. 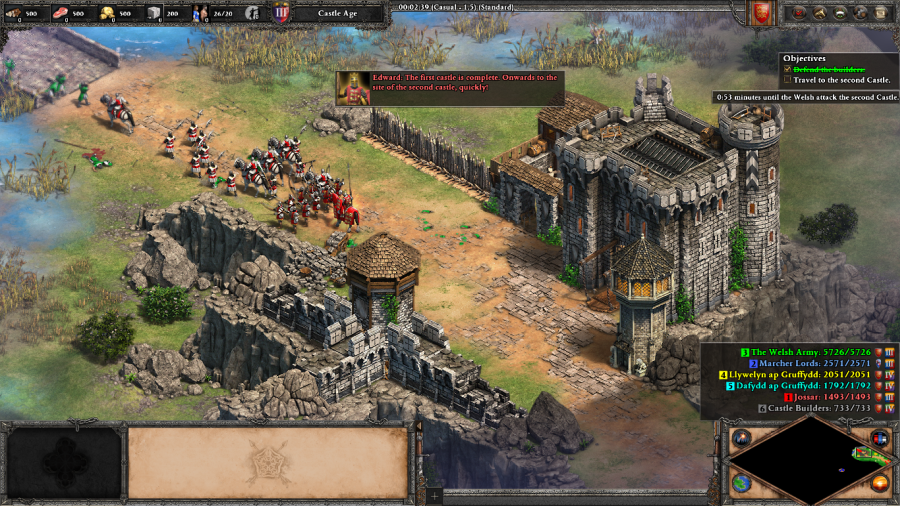 Edward: The first castle is complete. Onwards to the site of the second Castle, quickly! Once the Castle is up, you need to run to your next objective immediately. Don't worry about any remaining enemy troops, the Castle will kill most of them, and what's left will either retreat or can easily be dealt with at the next site. But you can't afford any delay as this will give the Welsh Army a head start on attacking the next Castle build site and potentially causing a mission failure state.  Edward: Dig in and nock your arrows. The Welsh will surely strike soon!  Llywelyn ap Gruffydd: Speed forth, brave Cymry! Send the English fleeing before a hail of darts and spears! Second verse, mostly the same as the first. You can see that things are starting to get a little bit more difficult, though. Edward: The second castle stands firm. Now, away to the site of the third castle with all speed. Tempus fugit!  Edward: Guard these masons with your lives, or we shall all be food for the crows before long! Llywelyn ap Gruffydd: Rally, fearless warriors, and send these wretches to the abyss! For Y Brythoniad! The final Castle defense is kind of a mess. For the last two, I could get away with trying to go out and actively slay the Welsh Army units, but here I'm pressed sorely enough that I struggle just to run out the clock.   Edward: These castles must be manned and kept secure at all costs. Marcher lords! I charge you with their defense! (after a few seconds) These ingrate Welsh rebels fight fiercely, but will surely desist if their princes are slain. I shall humiliate them on the field or have their heads! (after a few seconds) A river must be dammed at its source. By harrying the peasants supporting the Welsh army, we will rob their princes of provisions as well! Once the third Castle is constructed, all surviving buildings/units belonging to the Castle Builders swap to your control. This is good, because it means you can garrison your remaining forces in the last Castle while it kills the remaining Welsh Army forces from the first segment. This also marks the start of the base building segment, although you can't build any more Castles: the ones you've already built are all you get, and must remain standing. Lose any of them and you lose the scenario. Fortunately, the Marcher Lords will send a small force to help defend each Castle against future attacks (though they are otherwise passive). 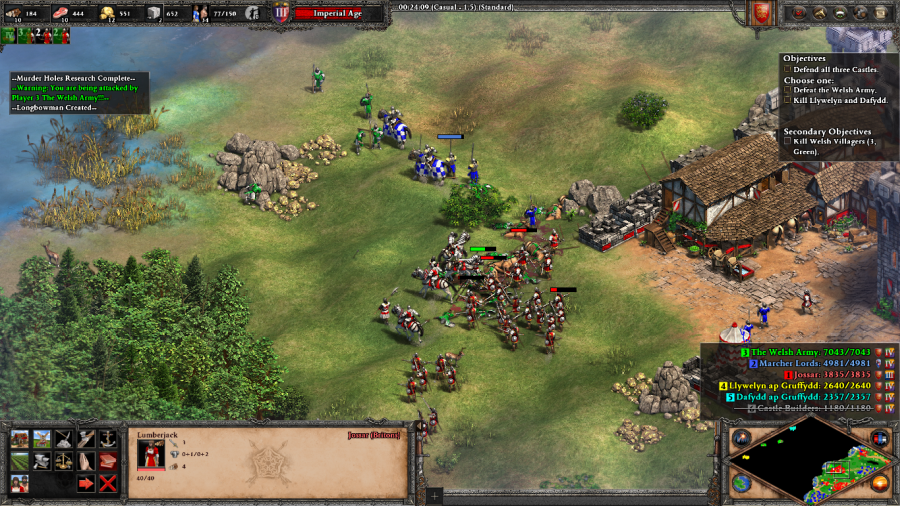 Llywelyn ap Gruffydd: English tyrants! Thousands of valiant Cymry descend upon you. Flee back to Chester in shame and you might just find us in a merciful mood! 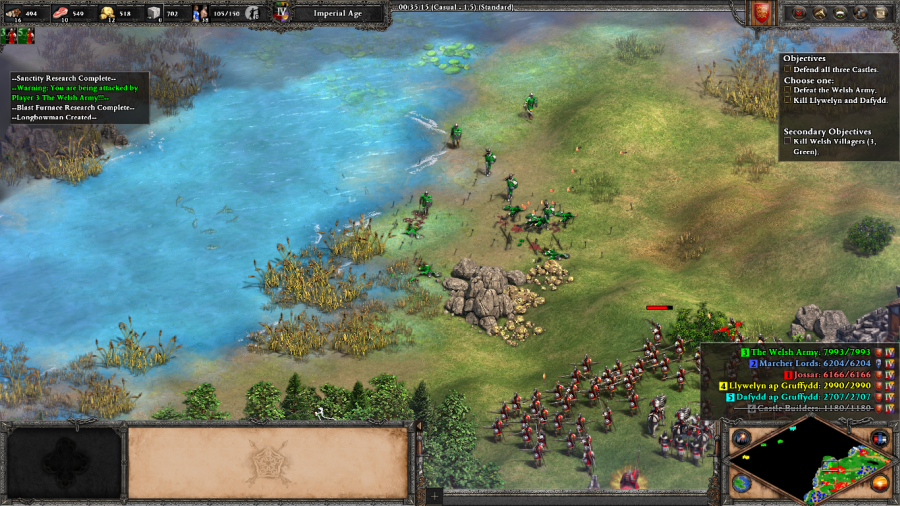 Welsh: Hold every hill, guard every ford, and haunt every wood. Make the English pay dearly for each pace they take into our beloved Cymru! The Welsh Army will continually send attacks across the river, but this was pretty much decided the instant I got my economy up and running. Now they're nothing more than target practice for Elite Longbowmen. 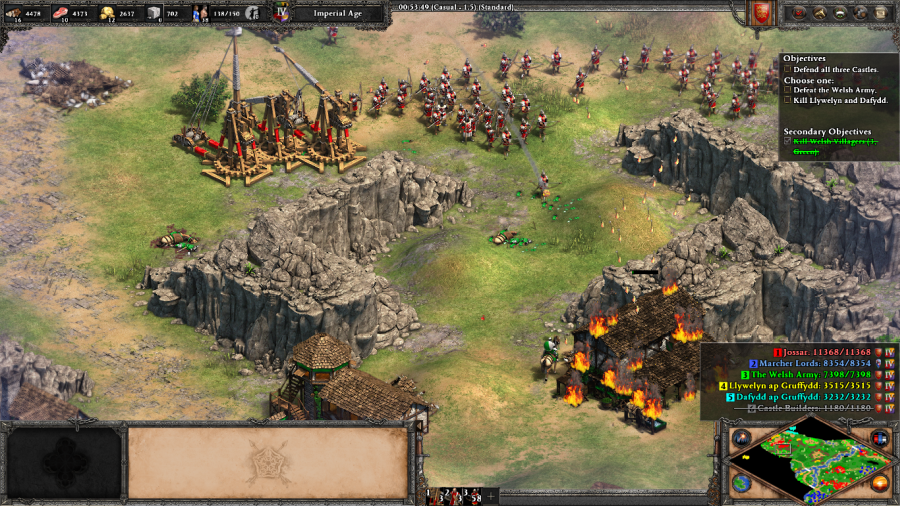 I don't have Warwolf yet, but even generic, fully-upgraded Briton Trebuchets are more than enough to allow me to rampage across the Welsh countryside and cripple the enemy factions' economy. But the Army's camps are too widely spread for me to take out easily, so in the end I pivot towards completing the scenario by defeating the two brothers. 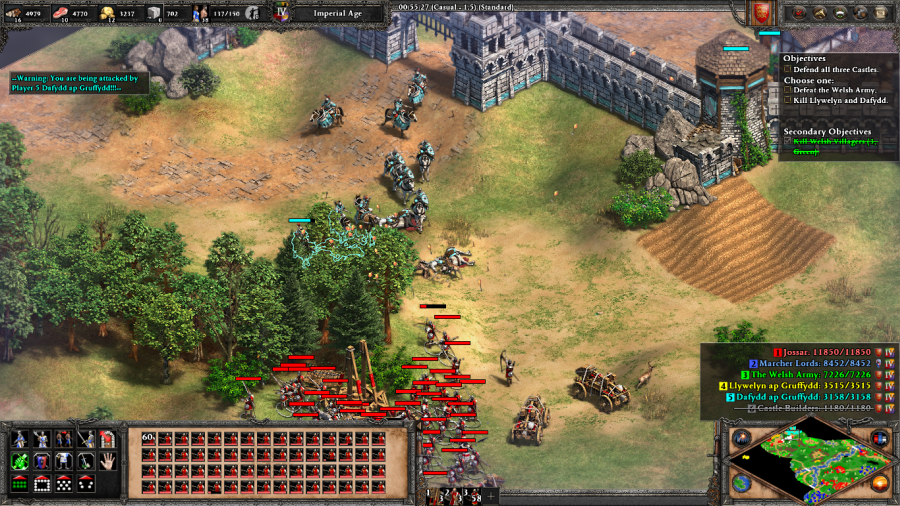 Welsh: The blighted English curs threaten noble Dafydd. Soon these fools will taste the bitterness of our wrath! 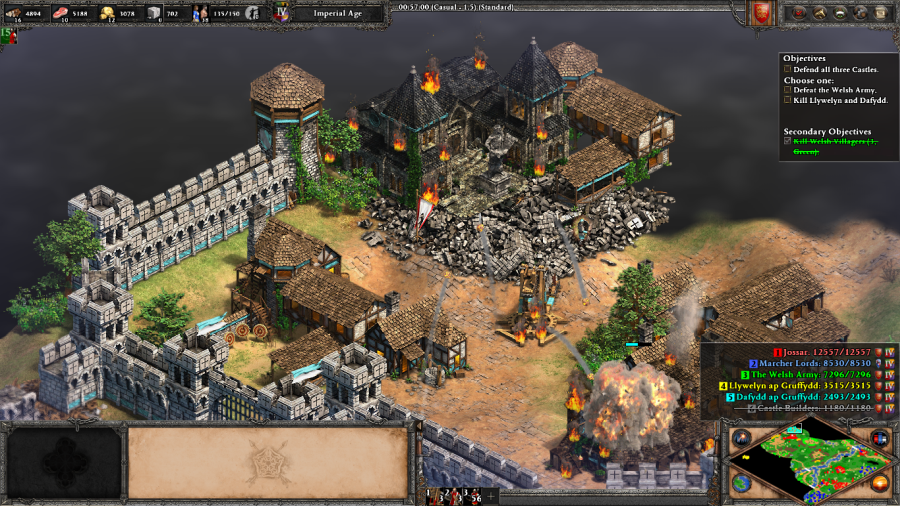 Edward: I had wanted Dafydd alive to make a grim example, but dead... is just as good. Dafydd has a fortified base to the north, protected by Fortified Towers and what is way too many Knights and Cavalry Archers for late-game Britons. Once his Castle is wrecked, Dafydd himself pops out as an Infantry hero unit, and is easy prey to longbow fire. 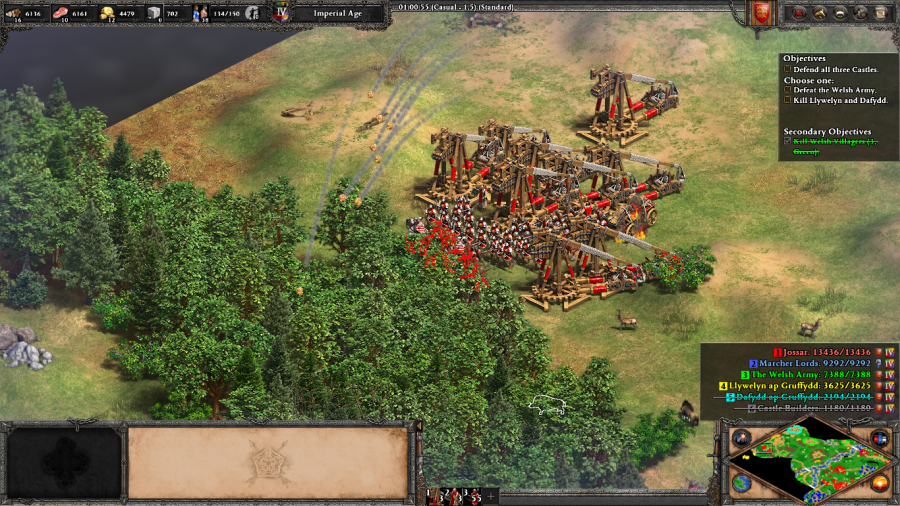 After doubling back and a quick round of deforestation via Trebuchets... 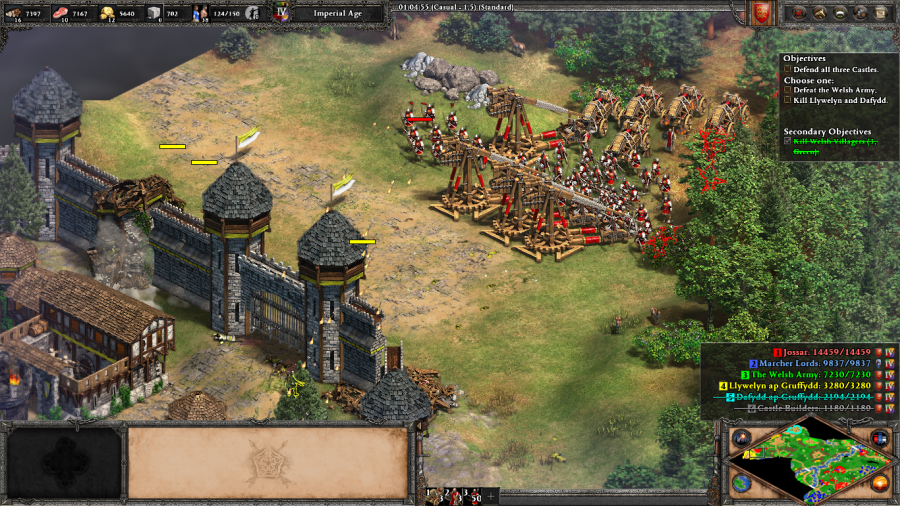 Welsh: The English strike at the hold of Prince Llywelyn. Dispatch a relief force, immediately! 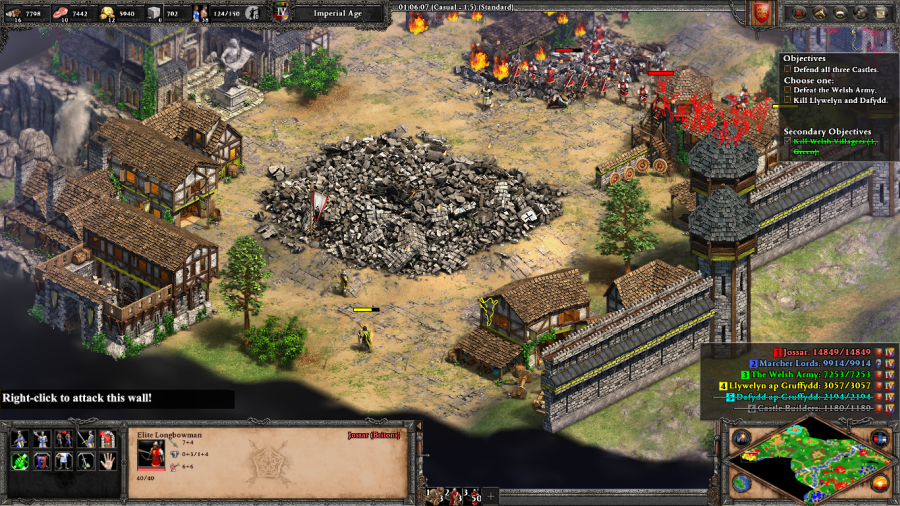 Edward: Llywelyn's corpse lies broken in the dirt. Llywelyn the Last, they shall call him now! I arrive at Llywelyn's base to the southwest. It's a bit more intimidatingly built than Dafydd's and Llywelyn has a more conventional army for Britons, but without supporting resources from the main Welsh economy he's desperately outgunned at this point. A few more arrows fired and the scenario comes to a close. Welsh: Fighting on without our bold leaders is to no avail! We must submit to the English king and pray for his mercy. Mission 3 Ending Text "The Welsh fought valiantly, but they were no match for Edward's wrath. My father's forces outmaneuvered Llywelyn's forces and smashed them at Orewin Bridge. The Welsh prince fell to the lance of a lone rider, who knew not the importance of the man whom he had slain. His brother Dafydd was captured at Nanhysglain and declared a traitor to the English crown. Edward pitilessly condemned his bold adversary to be drawn and quartered. Wales was now firmly in my father's grip. He bestowed upon me the title of Prince of Wales, which shall be the heirloom of my line henceforth. The network of formidable fortifications that Edward constructed throughout the land shall ensure that the Welsh bow to the English crown for generations to come." The Castle defense segment is definitely the highlight of this mission, although I understand that making a whole mission out of them would have quickly proved either tedious or unsustainable and is more like something you'd see in a custom multiplayer map instead of an official scenario. So, another build and destroy to cap things off, it is. Extra Slides Mission 3 - Intro Slide 1 Mission 3 - Intro Slide 2 Mission 3 - Intro Slide 3 Mission 3 - Intro Slide 4 Mission 3 - Intro Slide 5 Mission 3 - Intro Slide 6 Mission 3 - Intro Slide 7 Mission 3 - Intro Slide 8 Mission 3 - End Slide 1 Mission 3 - End Slide 2 Mission 3 - End Slide 3 Mission 3 - End Slide 4 Jossar fucked around with this message at 02:32 on Jan 30, 2024 |
|
#
?
Jan 30, 2024 02:27
|
|
|
It's a fun twist to the start of a level; get your mind into the mission before starting into the usual Build Em Up gameplay, and once the segment's over, you get a nice gift of some starting castles. I enjoyed it.
|
|
#
?
Jan 30, 2024 03:04
|
|
|
Oh hey, it's the premise of Castles from 1991: https://www.mobygames.com/game/177/castles/
|
|
#
?
Jan 30, 2024 16:59
|
|
|
Something broke for me when I played this mission. The castle segment went as it normally should, but after that I saw literally nothing from the 3 enemy AIs. It was disappointing to be honest, I was expecting a decent challenge (As challenging as 1 sword campaigns go anyway) but got nothing but a slaughter against 3 passive AIs.
|
|
#
?
Jan 30, 2024 20:12
|
|
|
BlazetheInferno posted:It's a fun twist to the start of a level; get your mind into the mission before starting into the usual Build Em Up gameplay, and once the segment's over, you get a nice gift of some starting castles. I enjoyed it. Nostalgamus posted:Oh hey, it's the premise of Castles from 1991:
|
|
#
?
Jan 31, 2024 00:06
|
|
|
Edward Longshanks - Part 4: Toom Tabard Mission 4 Starting Text "I fear that I am deceiving myself in studying only my father's achievements in war. As king, I must be both a warrior and a statesman, just as he was. Drawing inspiration from the legendary stories of King Arthur, Edward grew from a deceitful and duplicitous youth into a pious and chivalrous leader respected throughout Christendom. My father implemented economic, administrative and legal reforms that strengthened and stabilized his kingdom. His borrowing of Byzantine concepts led him to be known as 'The English Justinian'. Yet, to Edward, this was just another part of ruling effectively, and everything that he did furthered his fierce desire to rule over all of Britain. When Alexander III of Scotland died without a male heir, that ambition suddenly seemed within reach. My father first strove to marry Alexander's young granddaughter Margaret to me, the heir apparent to England. When she died unexpectedly just a year later, Edward instead installed John Balliol as king in Scotland. The proud Scots would not suffer themselves to be ruled by an English puppet whose master sought to conscript them into war with France. Instead, they allied with the French and rose in open rebellion. Edward's fury was unbridled. If Balliol could not hold his subjects in line, my father would seize Scotland by force." 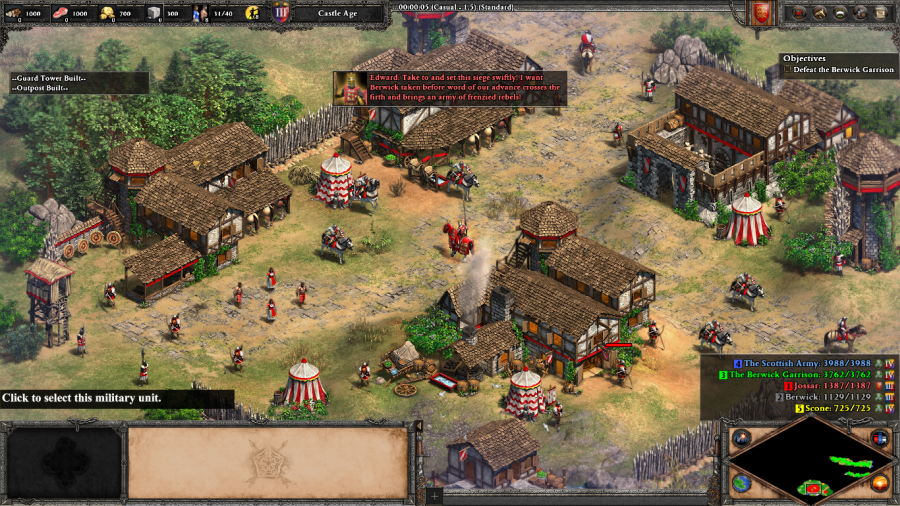 Edward: Take to and set this siege swiftly! I want Berwick taken before word of our advance crosses the firth and brings an army of frenzied rebels! The final two missions of this campaign are us doing the tutorial, but flipping the perspective. Instead of being the Scottish as they struggle to build up an army to counter the English invasion, we're the English invasion marching through Scotland and sacking any towns in our way. The game gives us a couple of units as a defensive force, a couple of Villagers and tells us to start building up for an assault on Berwick and defeating the town's garrison. 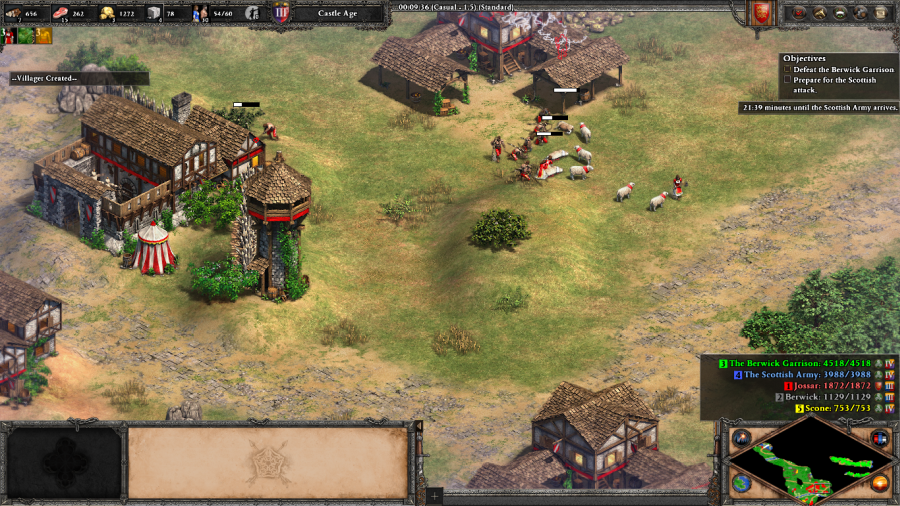 John Balliol: King Edward, there is no need for English troops on Scottish earth. Please, strike your tents and allow me to bring my rebellious subjects back into line. Edward: That oath-breaking weasel Balliol is just itching to betray me. Send scouts to the River Forth and keep watch for dust and banners! Well, not quite. After about a minute, you get the above messages, indicating that the Scottish Army is going to attack you in 30 minutes. It turns out that this mission is really here to test your ability to boom in a short amount of time so you can blunt their initial advance once the bridge across the River Forth comes back up and then press them hard enough so they don't get another shot at it. At 10 minutes away, Balliol will chime in again to beg you to leave/remind you of the timer: John Balliol: I ask this of you one more time, Edward. Depart Berwick and leave this matter to me.  John Balliol: Your ruthless incursions leave me no option but to raise Scotland against you. We Albannaich shall take back what is ours! Edward: Traitorous wretch! I shall force him to his knees and strip the sigil from his coat! A Castle, combined with our usual complement of Longbowmen, shatters the Scots. 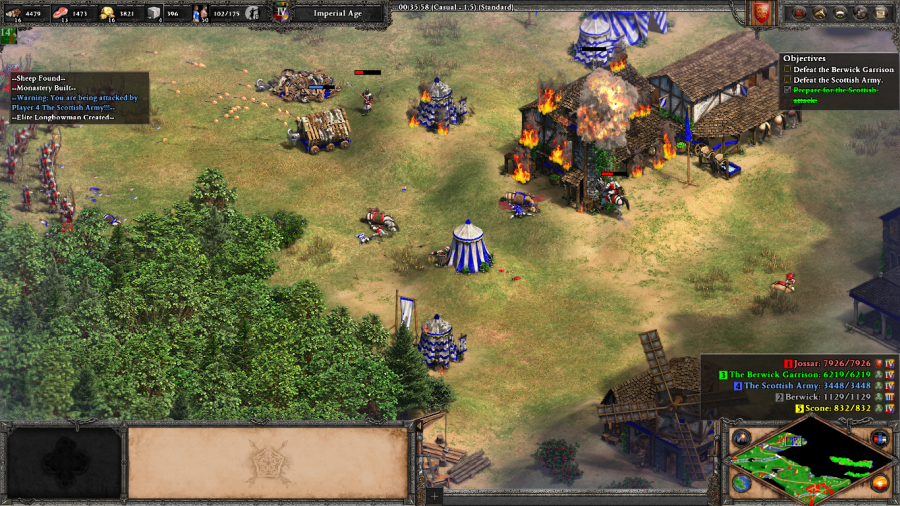 Edward: We have pierced the hide of the wyvern now! Push forth dauntlessly and set fire to the camp! 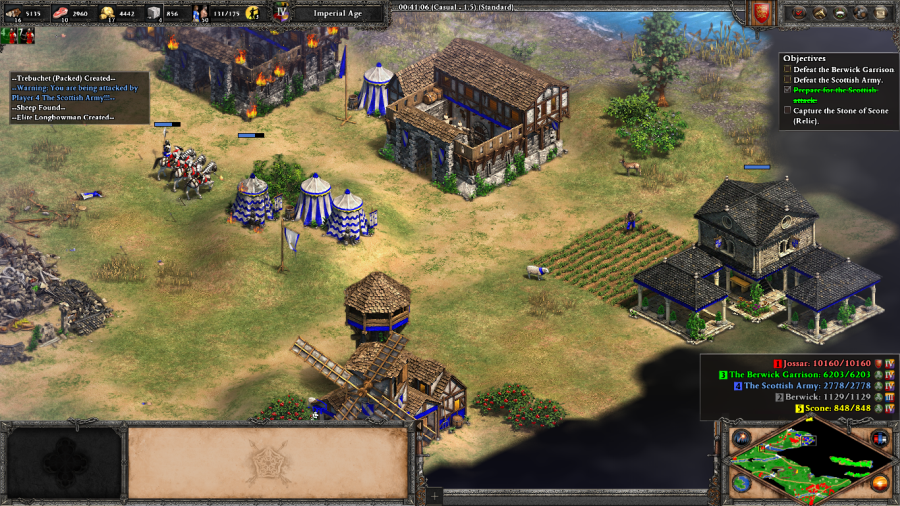 John Balliol: Alas, I am ruined and my forces crushed! I place myself within your power, King Edward. The Scottish Army will continuously keep spitting out troops from its production buildings, and even try to advance Villagers forward towards the River Forth to further expand its camp, but if you've boomed hard enough then there's nothing they can do. 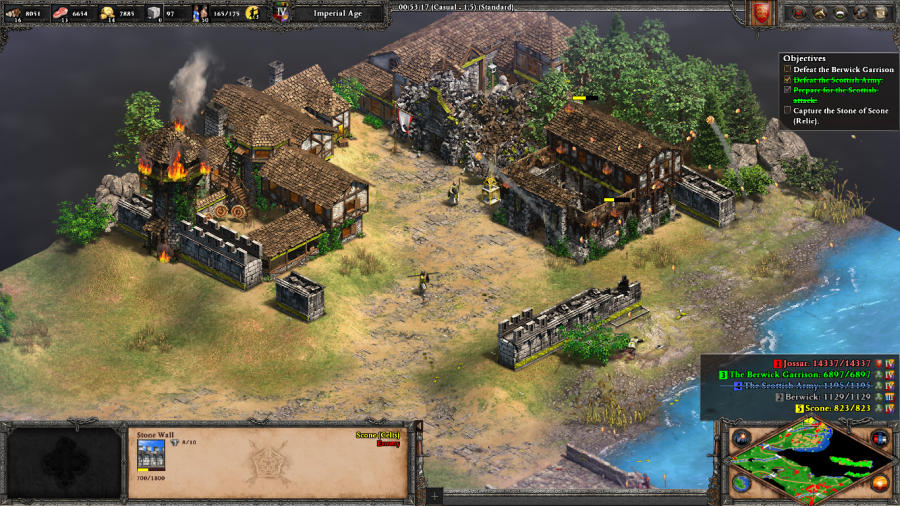 Edward: The Scots crown their kings on an old stone in Scone Monastery. Were we to seize it, that fool Balliol would lose all legitimacy before his bannermen! John Balliol: (after you garrison the Stone of Scone in a Monastery) The Stone of Scone is lost! Woe that I should live to endure such shame! This is a little bit of a sequence-break here. What you're supposed to do is capture the Stone of Scone (represented by a Relic in a Monastery to the north of the Scottish Army camp) before you start the siege to demoralize the Scottish Army troops and receive 5000 Gold. But I've heard conflicting stories on whether this actually debuffs the Scottish Army or not and I didn't really need the resources so I went and did that first. Still wanted to show it off and grab the associated achievement, though.  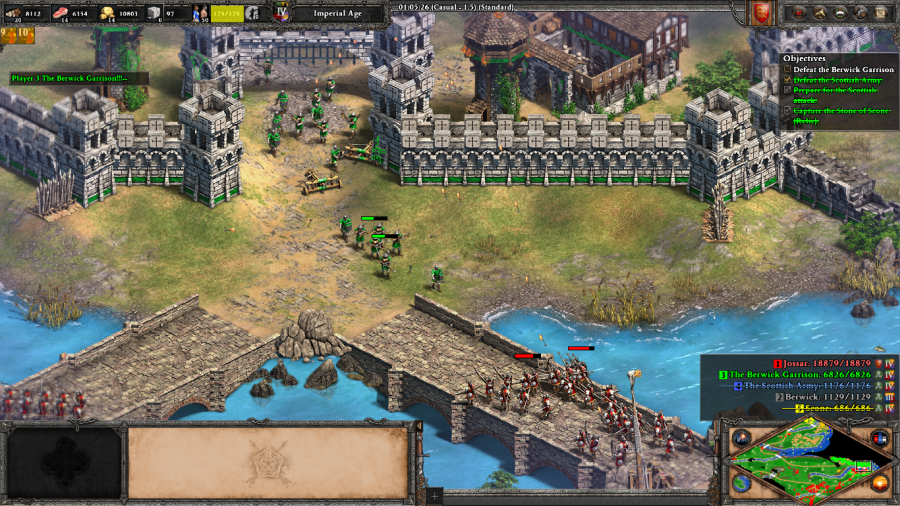 Edward: I care not for boiling oil, nor for barbed bolts. Steady on and press the assault on those infernal walls! 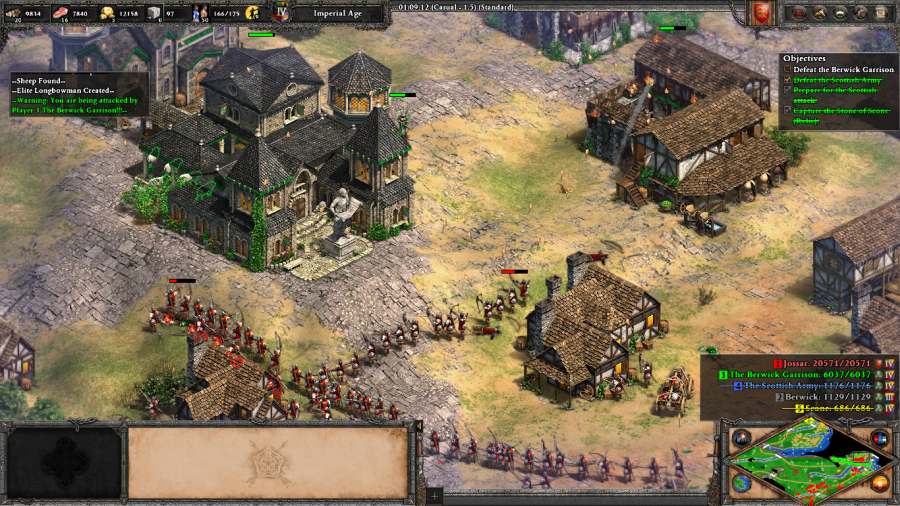 With everyone else out of the way, all that remains is the original objective: defeating the Berwick Garrison. The garrison has a couple of units hanging out around the military camps outside of the town, but the bulk of their forces are saved for a final counterassault once you reach the main set of Fortified Walls. Once I break into the city, I just start smashing things until they surrender. Edward: Berwick is ours! Put the garrison to the sword and sack the town without mercy! Mission 4 Ending Text "Father was unspeakably cruel to the Scots. In retribution for an attack on Carlisle, he seized and sacked the wealthy town of Berwick, slaughtering some 20,000 inhabitants. Balliol, the puppet that Edward had installed as king in Scotland, proved himself a traitor. He marched the Scottish army south against the English, but it was viciously drubbed at the Battle of Dunbar. Begging for mercy, Balliol capitulated to Edward, who scornfully stripped him of his coat of arms. This disgrace earned him the moniker Toom Tabard, 'Empty Coat'. As a final humiliation, Edward seized the Coronation Stone from the monastery in Scone and placed it in a chair in Westminster Abbey. The hallowed Stone of Scone, a symbol of Scottish royalty, shall now sanctify the destiny of an undying line of English kings." Defeating Berwick gives you a bunch of resources, so it kind of feels like you're supposed to take the town first before wheeling around to deal with the Scottish Army? Honestly, Berwick still felt like the tougher nut to crack because of all those Scorpions that that you can see in the shot at the town's main gates. This also seems like a scenario where you could approach it in a lot of wacky ways if you really wanted to mess around: I wonder even without Cannon Galleons if you could still do a half-decent naval assault on the main base of the Scottish Army and at least part of Berwick? Extra Slides Mission 4 - Intro Slide 1 Mission 4 - Intro Slide 2 Mission 4 - Intro Slide 3 Mission 4 - Intro Slide 4 Mission 4 - Intro Slide 5 Mission 4 - Intro Slide 6 Mission 4 - Intro Slide 7 Mission 4 - End Slide 1 Mission 4 - End Slide 2 Mission 4 - End Slide 3 Mission 4 - End Slide 4 Jossar fucked around with this message at 03:11 on Jan 31, 2024 |
|
#
?
Jan 31, 2024 03:08
|
|
|
Edward Longshanks - Part 5: Hammer of the Scots Mission 5 Starting Text "The Scots did not take their humbling well. A year after Balliol's defeat, they rallied around the fiery knight William Wallace and poured out of the highlands like rabid wolves. Wallace was said to be a seven-foot-tall giant who lopped off the heads of horses and men with a five-and-a-half-foot sword: a barbaric match for my own ferocious father. After a string of unexpected victories, Wallace's rebels were scattered at the Battle of Falkirk and forced into hiding. Like a vengeful spectre, he continued to harry English troops and convoys from the shadows. Undaunted, Edward and his commander Aymer de Valence approached Stirling Castle. Accompanying them was Robert the Bruce, a Scottish lord sworn to Edward but known to covet the Scottish crown. Keep your friends close, but your enemies closer, as the ancient adage goes. Taking after his famed predecessor Richard the Lionheart, he ordered the construction of a massive set of trebuchets near the walls of Stirling. His warning to the defenders was simple and dreadful: surrender or face bombardment more ferocious than a rain of hellfire and brimstone." 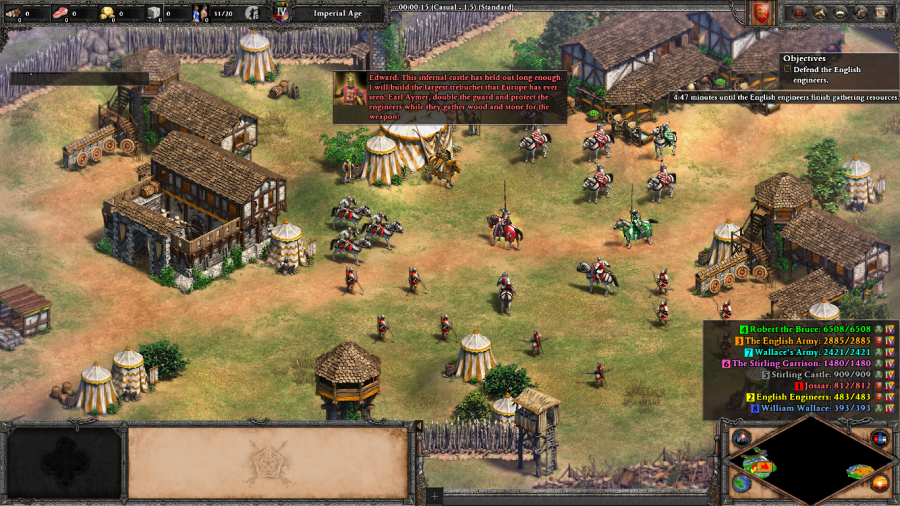 Edward: This infernal castle has held out long enough. I will build the largest trebuchet that Europe has ever seen! Earl Aymer, double the guard and protect the engineers while they gather wood and stone for the weapon! 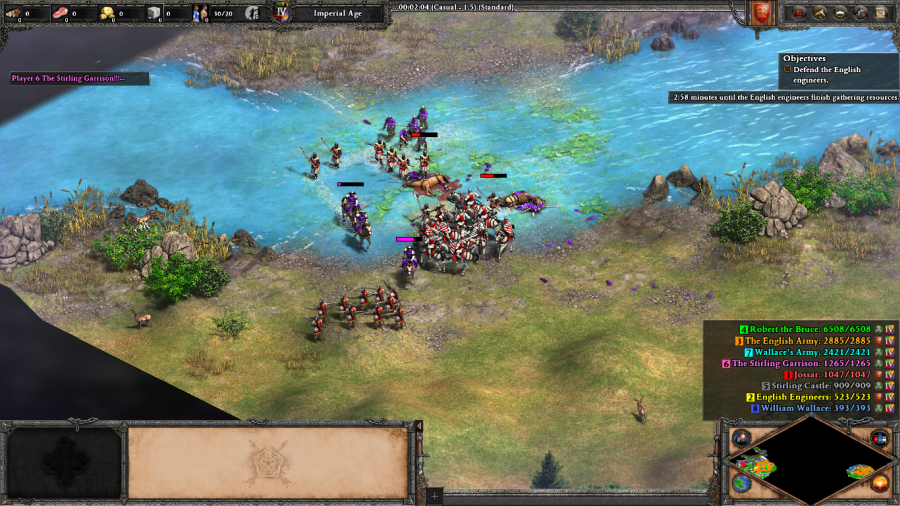 Aymer de Valence: The Scots are making a sally against our builders! To arms! Rain arrows on the villains! This scenario starts with you commanding a small force under one of King Edward's earls, Aymer de Valence (as the King himself is becoming increasingly infirm). In a tie back to Mission 3, you're once again playing defense, this time for a bunch of Villagers harvesting resources. The Stirling Garrison is a surprisingly tough force to beat, especially because you want to try and preserve as many units as possible, so micromanagement and positioning are crucial. You'll know that the end is near once they send a wave of Woad Raiders your way, signifying that this time the Scots will be using plenty of the Celts' unique unit. 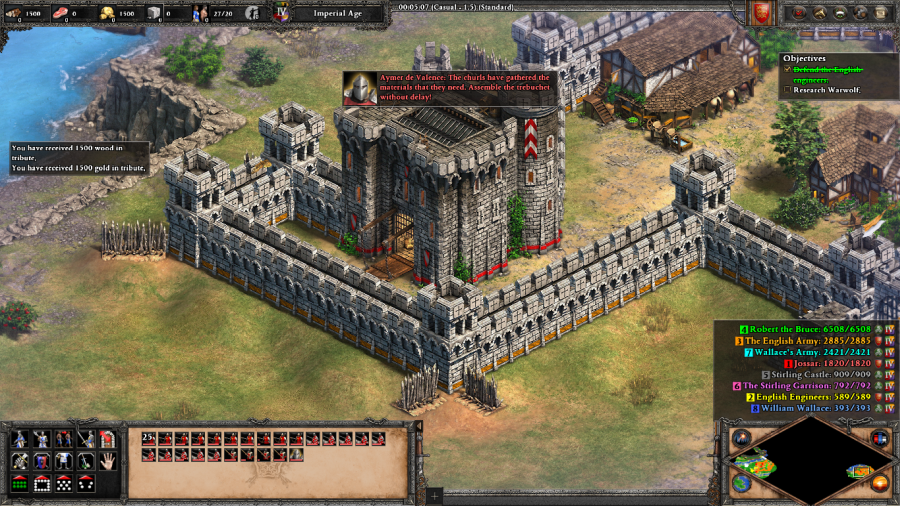 Aymer de Valence: The churls have gathered the materials that they need. Assemble the trebuchet without delay! So up until this point, even when I got access to Trebuchets, I haven't been able to research Warwolf. As it turns out, that's because the game was saving it for this moment. While I research the tech, my forces heal up with some Monks that the game gives me after fending off the Stirling Garrison and march towards the eastern entrance to the town. 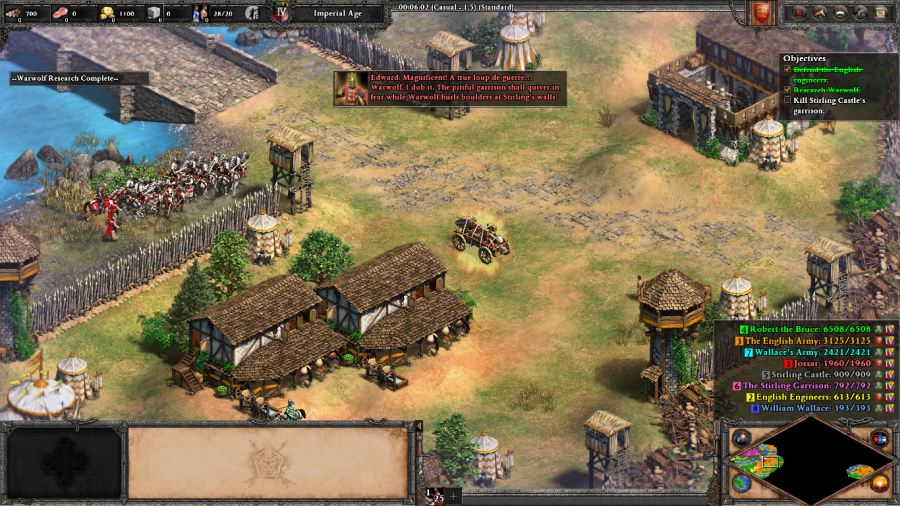 Edward: Magnificent! A true loup de guerre... Warwolf, I dub it. The pitiful garrison shall quiver in fear while Warwolf hurls boulders at Stirling's walls! Researching Warwolf (the technology), also grants you Warwolf (the hero Trebuchet unit). It's about twice as good as a regular Trebuchet, maybe a little less so on direct attack power. So it's nice to have, but not necessarily crucial for anything beyond this initial siege. 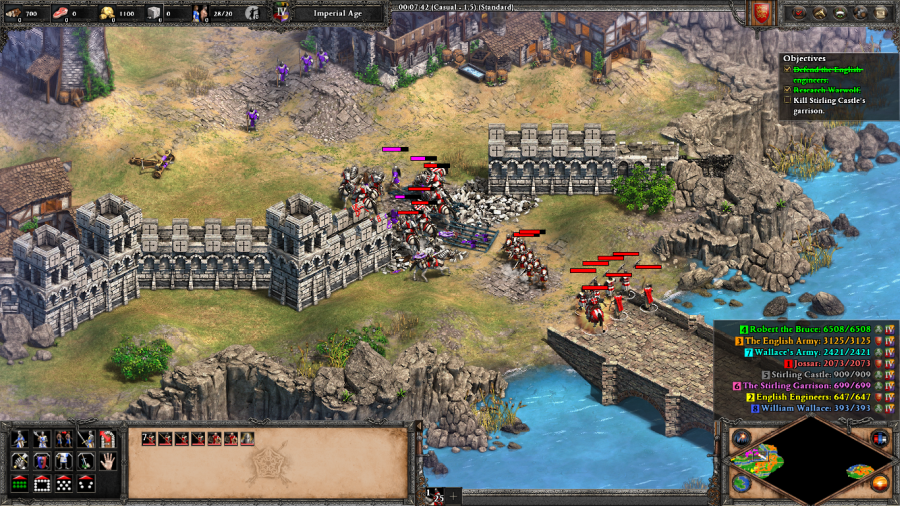 Edward: No quarter, I say! Dispatch the doomed men and post loyal Englishmen in Stirling Castle. After displaying the firepower of this fully armed and operational 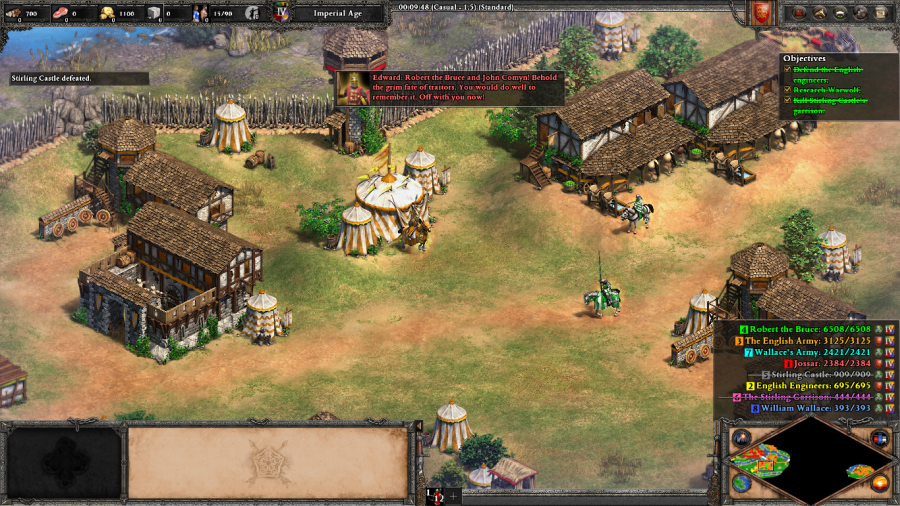 Edward: Robert the Bruce and John Comyn! Behold the grim fate of traitors. You would do well to remember it. Off with you now! Robert the Bruce: Aye, duly noted. Farewell, King Edward. Robert the Bruce and John Comyn here have been hanging around Edward's camp since the start of the mission. Completing the siege of Sterling Castle plays this cutscene, freeing them up, and setting off an invisible timer. This is important, because of what comes next. 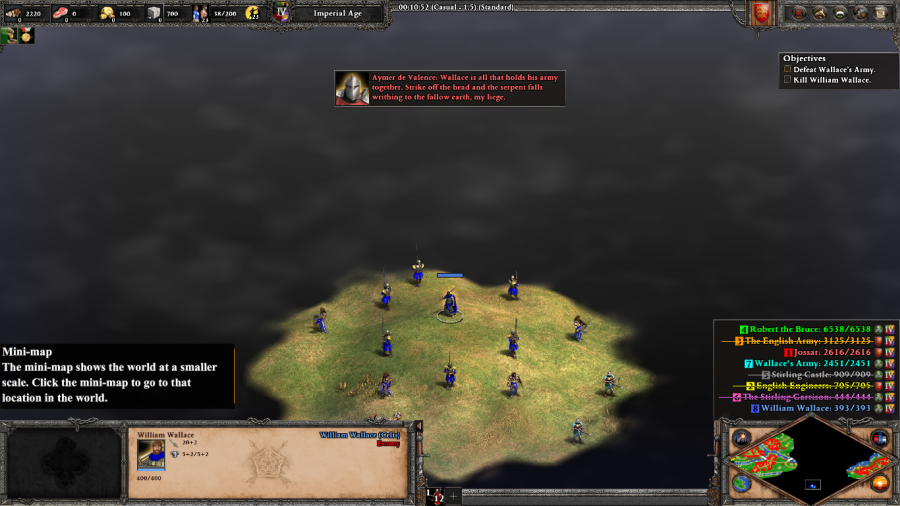 Edward: There remains one more traitor yet to hang. Muster our forces and bring me the head of William Wallace! Aymer de Valence: Wallace is all that holds his army together. Strike off the head and the serpent falls writhing to the fallow earth, my liege. William Wallace has arrived, and there's an achievement associated with defeating him before the aforementioned timer runs out. You have approximately 20 minutes from this point to accomplish this. 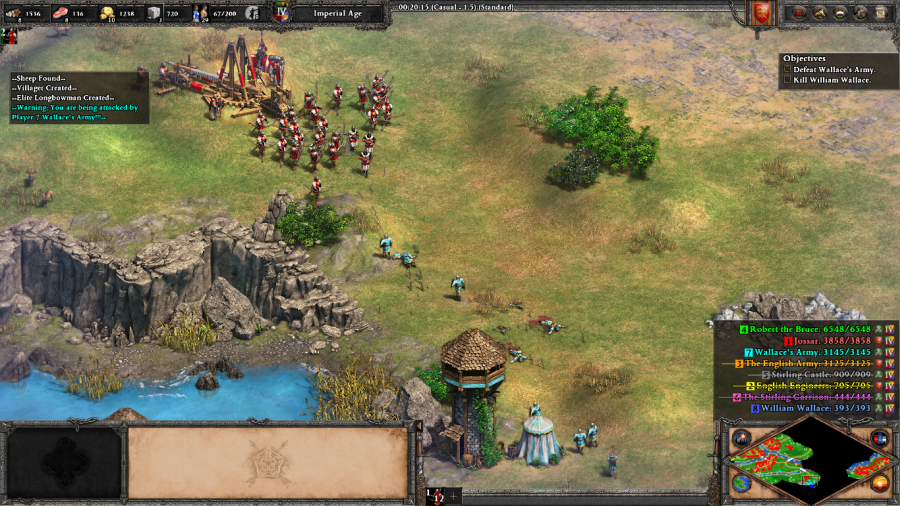 I spend the next 10 minutes building up as many Longbowmen as I can and then send everything I've got towards Wallace. The Army forms a weak shell of units and static defenses around Wallace, although they could theoretically become a threat if left alone for too long. William Wallace's force consists of the hero unit himself, a couple of fully upgraded Post-Imperial Champions/Elite Woad Raiders, and most crucially, a couple of Siege Onagers. 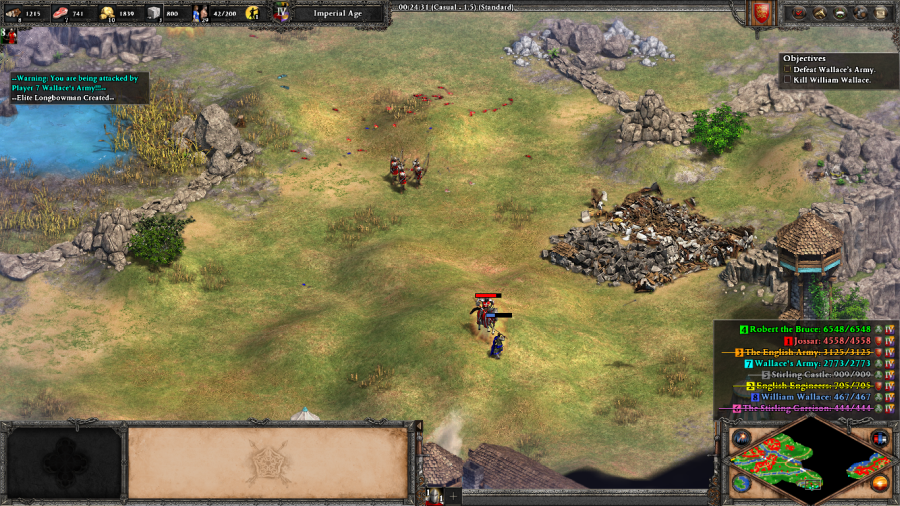 Edward: Quarter Wallace's corpse and send the remains to all corners of Scotland! Let this stand as a warning to any who might aspire to play the rebel. Aymer de Valence: Wallace's forces scatter like chaff on the wind! Where is their furious, foolhardy spirit now? The rest of the force wasn't too difficult, but the AI is very good at using Siege Onagers against players with mediocre micro, and that wrecked most of my Longbowmen. I was left having to use Aymer and a few remaining Longbowmen to finish William Wallace off before the timer ran out. Fortunately, once Wallace dies, the Army surrenders alongside him. 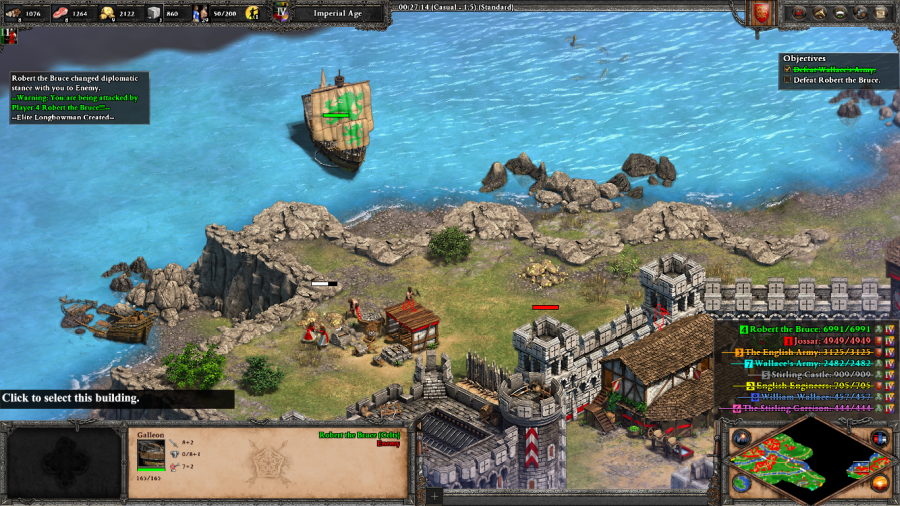 Aymer de Valence: My Lord! We have word that Robert the Bruce has murdered John Comyn and laid claim to the Scottish crown! Robert the Bruce: No longer will dear Scotland suffer under the yoke of English tyranny! Alba gu brath! Edward: I would ride north to punish the scoundrel myself if not for my failing health. I place you in command of this campaign, Earl Aymer! Aymer de Valence: My Lord, shall your son, the Prince of Wales, lead the forces with me? Edward: My son? Bah, the mere sight of that craven would only make the Scots confident of victory. I trust you alone with my armies, Earl Aymer! Aymer de Valence: I will not fail you, Lord King! Hmm, you know, that might be the most text we've seen in a mission cutscene yet. It's certainly pretty far up there. Anyway, once the timer runs out or you defeat William Wallace, Robert the Bruce betrays you. He's surprisingly pretty big on trying to raid you with his navy. I found these Galleons to be as much of a hassle as his army, if not moreso. 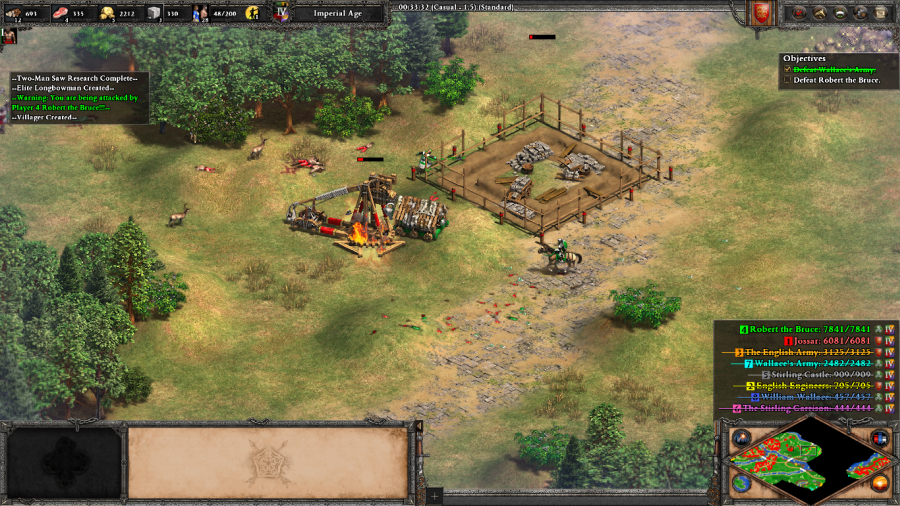 Robert the Bruce: I ran Comyn through with my blade before the altar of a church. Perhaps I shall celebrate my coronation by doing the same to you, Longshanks! Robert the Bruce is pretty good about going on the offense with his land troops though. Depicted here is me getting caught flatfooted and losing a whole bunch of Longbowmen, a forward Castle build, and Warwolf to his first big attack (there were a lot more units on both sides before this photo). Robert doesn't use that many Siege Onagers compared to William Wallace, but he is pretty good about knowing that you'll be primarily be using Longbowmen and loves to include a whole bunch of Siege Rams to absorb arrow-fire and combine them with fast Celtic infantry to wreck your forces. 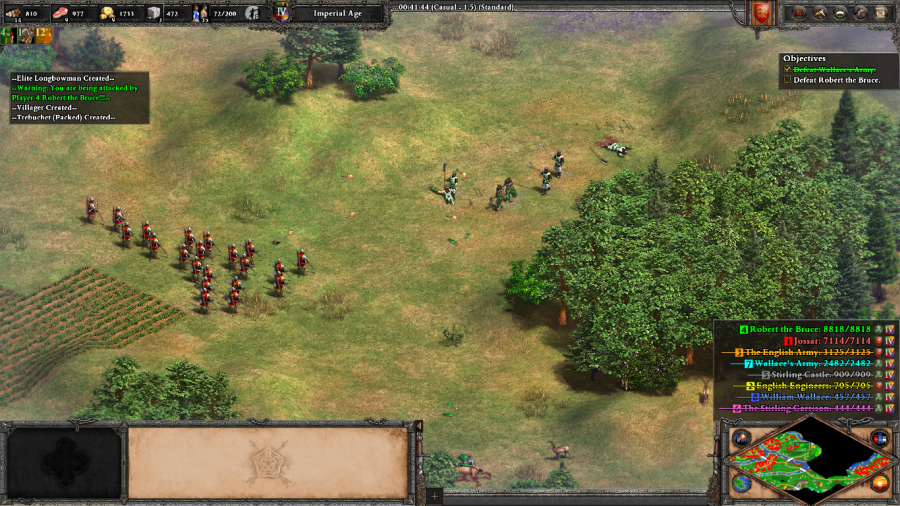 Robert the Bruce: English knights are no match for proud Scottish infantry. Our schiltrons will skewer your 'chivalrous' hosts! Aymer de Valence: You dare speak of chivalry, false king who murdered a lord in a church? The devil will have you! You have the advantage overall, as once your troops are massed you can focus fire down the enemy Infantry easily enough, but the enemy's speed means that getting distracted can quickly lead to a world of hurt. And it's easy to get distracted as Robert the Bruce is constantly sending in troops from all over the northeastern side of the map. 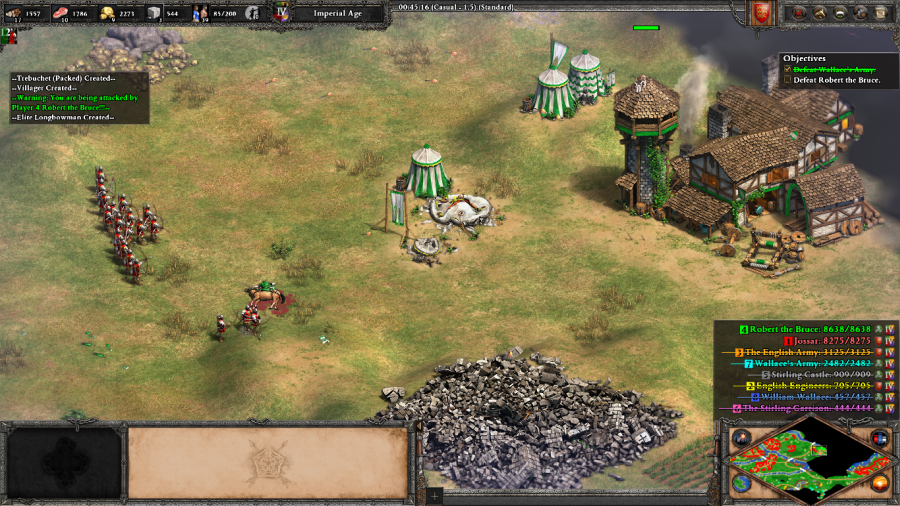 Robert the Bruce: The English are attacking us in the dead of night. Take up your weapons, bold Albannaich! 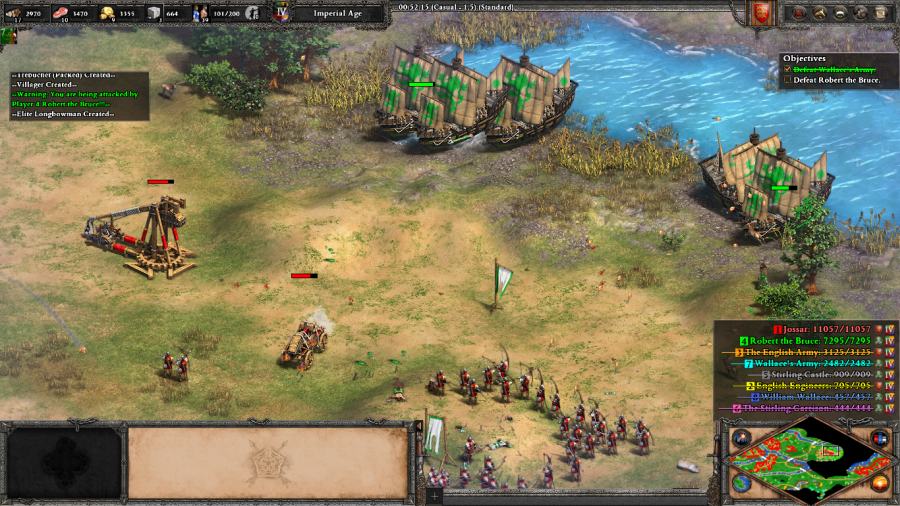 Robert the Bruce: Put down your longbows, English cravens, and face proud highland warriors in the battle line like real men! 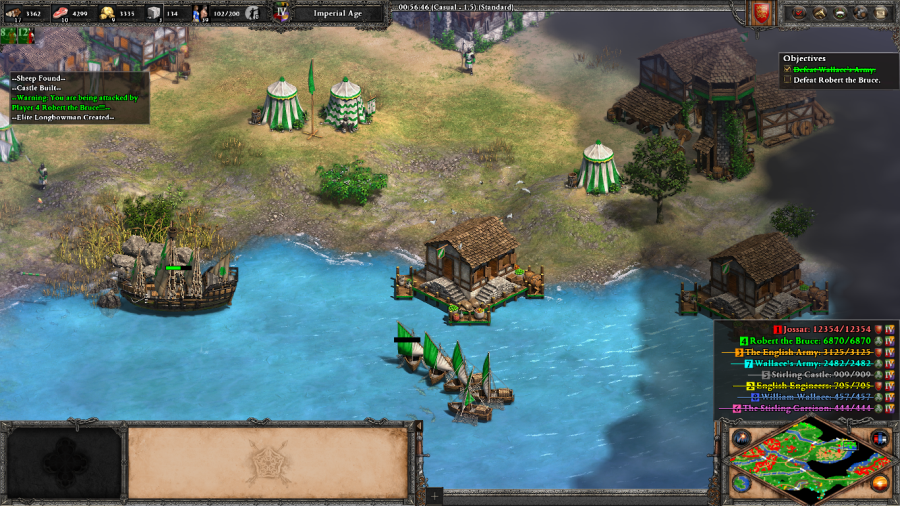 Eventually the tide turns and I start ruining the outlying economic base and military production camps of Robert the Bruce. Again, I want to emphasize just how much naval capacity he's bringing to bear for what is ostensibly a land based mission. It's kind of absurd. 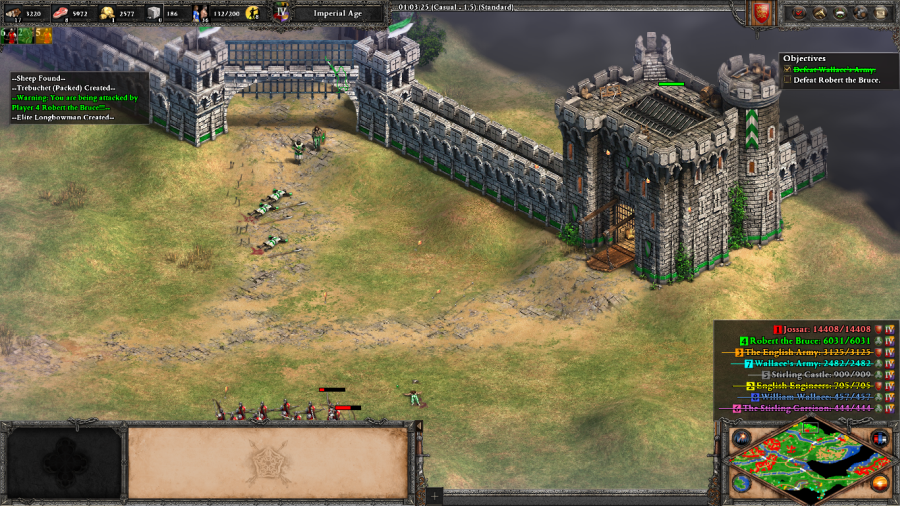 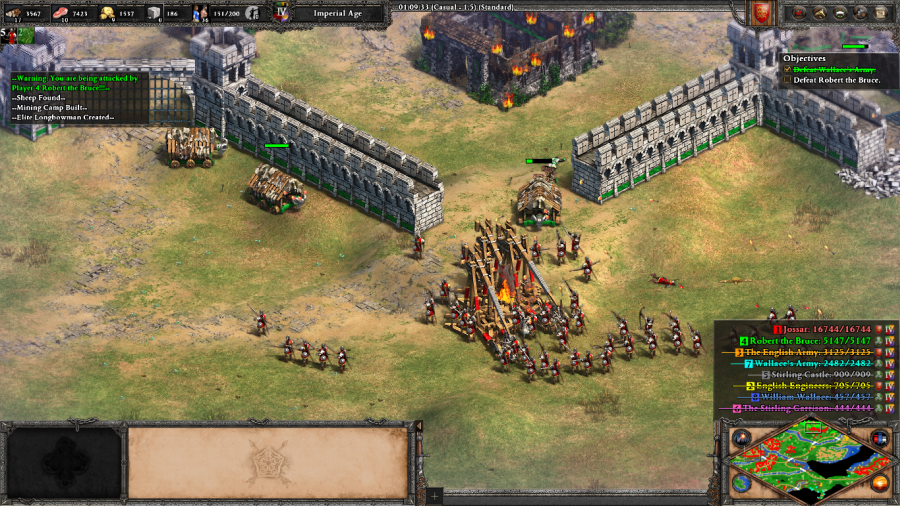 The final set of fortifications in the north of the map puts up a good fight, even despite Robert the Bruce's main economy being annihilated. Just have to keep destroying Castles and military production facilities until the battle and the campaign are won. Aymer de Valence: We have won a glorious victory, King Edward! The Scottish forces are routed and Robert the Bruce flees to the highlands with his tail between his legs! Edward: Let him call himself king of the outlaws, if he should so desire. His skulking followers shall whisper of me in terror as the Hammer of the Scots! Mission 5 Ending Text "William Wallace's body was butchered and his remains were scattered across Scotland as a grim warning to any who might fancy themselves a heroic rebel. Yet, the effect was the opposite of what my father hoped for. The dying embers of rebellion were kindled into a raging flame as the treacherous Robert the Bruce renounced his vassalage and raised his banners. With his last war still raging, my father, the mighty king of England and Hammer of the Scots, passed away. England is now mine to rule; his vision mine to fulfill... or to squander. Robert the Bruce remains a threat and unrest brews throughout England; even my own barons show contempt and demand that my powers be diminished. I have studied all that my father did, and still the task at hand terrifies me. He faced every adversity and grew to be a great king; yet I already feel my soul buckling under the weight of the crown. I am king now, but what king shall I be? Should I be deceptive, as my father was in his youth? Should I be the pious and chivalrous administrator. Or brutal to no ends, a new Hammer of the Scots? How ever can a man become so great as to fulfill all of these roles? I fear that there is no answer. Even so... when I stand by my father's tomb, the fear and the shame sometimes sweep aside. Deep within me, I know that, whatever else, I must try. I must fight for my crown, my kingdom, and for my father's legacy... I will not fail you, father." I made this mission a little dicier than it had to be, but I still think that it's a pretty good conclusion to the campaign, although I do wish William Wallace had gotten a voice line. The campaign has enough of a dialogue budget that they could have afforded him at least the one. Guess I'd better address the elephant in the room: I do like the Edward Longshanks campaign, but it also can't escape the fact that the Britons' gameplan always boils down to making a ton of Longbowmen and then murdering everything from 12 range away. I mean, that is how you play the civilization, but it would have been nice if there was one mission where you had to change things up. Maybe try to make Briton Cavaliers work. Extra Slides Mission 5 - Intro Slide 1 Mission 5 - Intro Slide 2 Mission 5 - Intro Slide 3 Mission 5 - Intro Slide 4 Mission 5 - Intro Slide 5 Mission 5 - Intro Slide 6 Mission 5 - End Slide 1 Mission 5 - End Slide 2 Mission 5 - End Slide 3 Mission 5 - End Slide 4 Mission 5 - End Slide 5 Mission 5 - End Slide 6 Mission 5 - End Slide 7 Mission 5 - End Slide 8 Mission 5 - End Slide 9 Jossar fucked around with this message at 03:57 on Feb 1, 2024 |
|
#
?
Feb 1, 2024 03:41
|
|
|
Following the discussion after the last poll, I think I'm just going to abolish voting and play through the rest of the campaigns in the order listed on the wiki from this point on. Next up, The Grand Dukes.
|
|
#
?
Feb 1, 2024 03:43
|
|
|
I do like that the last and second to last missions have the same map, though slightly shifted, since it's in the same area. Always fun when you return to the same area (there's a great example coming up soonish) buuuut having it back to back isn't so good.
|
|
#
?
Feb 1, 2024 09:03
|
|
|
Only just found this now. One neat thing that was overlooked in the Scourge of the Levant mission for Tamurlane was that in the south-east of the map up against the edge there is a relic surrounded by three gold mines. So if you were so inclined, you could dig it out, and then get it to have a slow trickle of gold to eventually win. Perhaps a decent backup plan if you somehow overspent so badly that there is not enough gold otherwise to win from tribute/you REALLY don't want to try besieging anyone else. As to the second to last Edward mission, the lake/river is surrounded on your side by cliffs and such, so no building a navy there.
|
|
#
?
Feb 13, 2024 04:01
|
|

|
https://www.youtube.com/watch?v=2E721-vptOo
|
|
#
?
Feb 24, 2024 03:42
|
|
|
So the english campaign ends with you failing to really do much besides steal a national treasure. Ah, how uplifting. Still, neat, even if the longbow pretty much their only defining thing, gameplay wise.
|
|
#
?
Feb 24, 2024 16:28
|
|

|
NewMars posted:So the english campaign ends with you failing to really do much besides steal a national treasure. Ah, how uplifting. Still, neat, even if the longbow pretty much their only defining thing, gameplay wise. I mean, you do also kill William Wallace, and teach the people who only learned his story via the Tutorial campaign that... no, no he did not get as happy an ending as that tutorial made it sound.
|
|
#
?
Feb 24, 2024 16:32
|
|
|
Ugh, I take a month off to play some other games and the devs are already widening the gap on full campaign completion! Back we go, I guess... The Grand Dukes - Part 1: A Kingdom Divided Age of Empires II: Definitive Edition - Burgundians Theme Very well, then let us begin, the tale of the practical ones. The men without mercy. 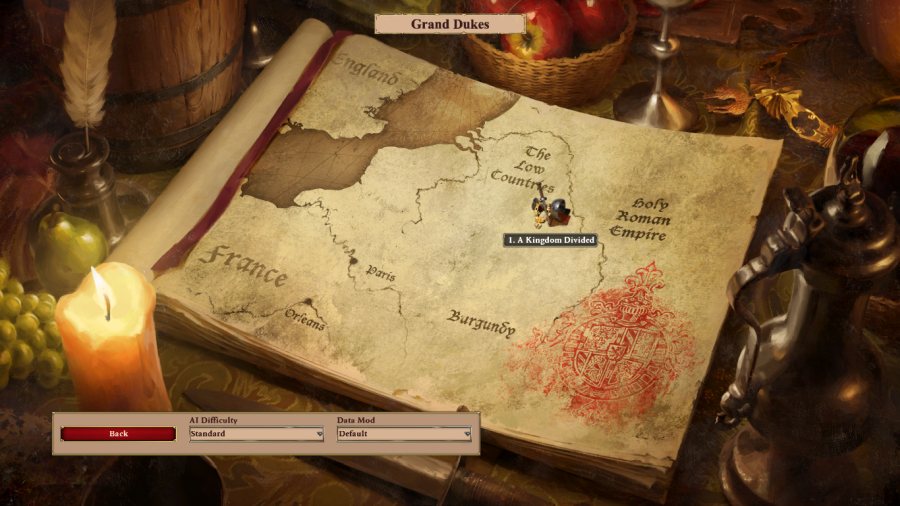 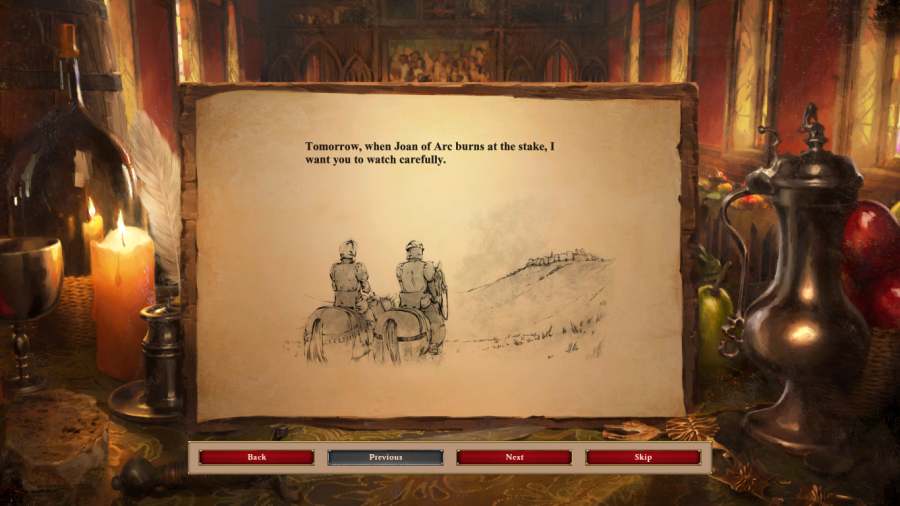 Mission 1 Starting Text "Tomorrow, when Joan of Arc burns at the stake, I want you to watch carefully. Not the young woman in the flames� but the men who sentenced her to burn. The English will carry out the sentence; but when nothing but her ashes remains, it is the Grand Duke of the West, our Duke of Burgundy, that will have seized a triumph. For you see, this spectacle is not really about the Maid of Orl�ans; her death is only as important as the benefit that it brings us. What burns on that pyre is not Joan the person, but La Pucelle: the symbol of the French resistance. You are young, my son; you have never seen our duchy as anything but a powerful state. But we were not always so mighty. In the greater tale of history, Burgundy is but a newborn power, carved from the lands of the kingdoms and empires that surround us. Our ascent began with John the Fearless, the father of our current duke. Up until then, the dukes of Burgundy and the Armagnac faction had been equal rivals, fighting for influence at the court of the Mad King of France. Louis, the leader of the Armagnac faction, had been using the funds of the French crown for years to stifle John in any way possible. He also boasted of having bedded John's wife... Tiring of these insults and Louis' abuse of royal influence, John decided to end their rivalry for good. Just three years into his reign, he sent fifteen men to stab the Armagnac duke to death on the streets of Paris in broad daylight. It was a true show of force; in one bloody act, John established himself as the most powerful duke in France. The Armagnac faction, now leaderless, began preparing for a long war. To keep the Burgundians occupied, they supported a revolt in the city of Li�ge, which was ruled by John's brother-in-law, the Duke of Bavaria. John the Fearless would not let such unrest spoil his plans for the grand duchy. And so he marched his armies north, to a small village outside Li�ge called Oth�e�"   Duke of Bavaria: The Armagnacs are inciting the local population to take up arms and rebel! John, let us put an end to this insubordination! You start this mission with a moderate base and a small raiding force, including John the Fearless (a Cavalry hero unit). You're allied to the Duke of Bavaria, who is a fairly competent ally as far as things go and can at least be relied upon to help manage base defense.  Scattered around the map are six small villages, which can be raided for resources. Each of the villages has a small garrison of units, but it mostly consists of Spearmen, Militia and the occasional Crossbowman, making it no real threat. Destroying each of the relevant buildings (Mills, Markets, Trade Workshops) provides Food, Gold, and Wood and Stone respectively. After about ten minutes of doing this and booming, the Duke of Bavaria will chime in, telling you to get a move on: Duke of Bavaria: It is past time to take back what is mine! Charge, my knights, charge! What are you waiting for, John the Fearless? Join me!  Burgundian Soldier: Sire, your nefarious enemies in Paris have renewed the charges against you for freeing France from this insane tyrant! John the Fearless: Oh, these bastards! They seem not to take me seriously! I will show them! No more mercy to our enemies! Spare no one! And if you don't listen to the Duke of Bavaria for his sake, you should listen for your own, as a few minutes afterwards Li�ge will start to attack your main base. Note that everyone here is sort of cheating the normal rules for AoEII age development: both you and Li�ge are locked to the Castle Age but as the Burgundians you get most of your relevant upgrades an age early. Li�ge doesn't have a formal mechanism for subverting the Castle Age, but as part of the scenario conditions gets access to a bunch of Hand Cannoneers and Organ Guns until you shut their supply depots down. Additionally, this first attack also changes the mission objective: now you must kill approximately 3/4 of Li�ge's Villager population in order to win. 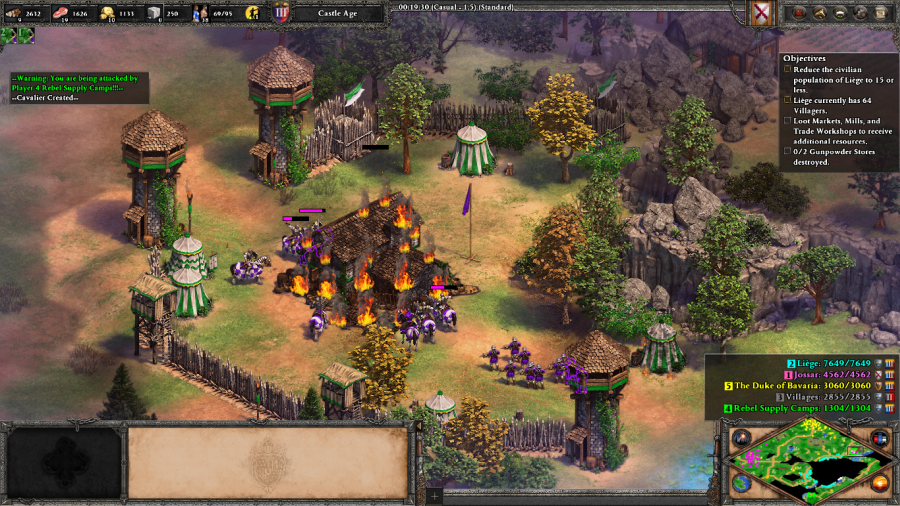 Burgundian Soldier: These simple-minded rebels in Li�ge seem to think that our scouts would not discover their secret gunpowder depots... how wrong they are! Destroy the depots so the Li�ge rebels can no longer make use of their cannons.  After repelling the attack from Li�ge, I circle around the map, continuing to torch villages and destroying the first of the Trade Workshops that controls Li�ge's gunpowder supply. Unfortunately, while attacking the village after the supply depot, I get a little too close to Li�ge's main army and my raiding force is obliterated with extreme prejudice. 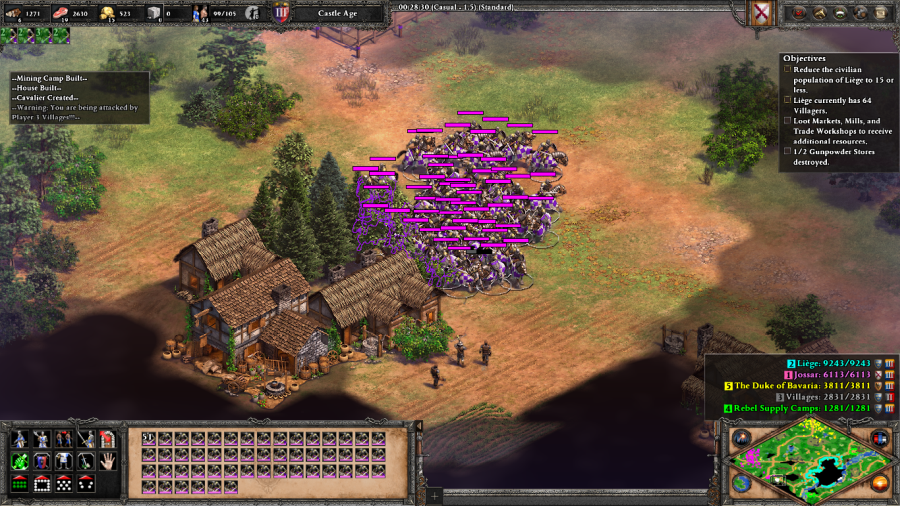 Oh well. My economy is now up and running, so I can just throw several dozen Cavaliers at my problems until they go away. 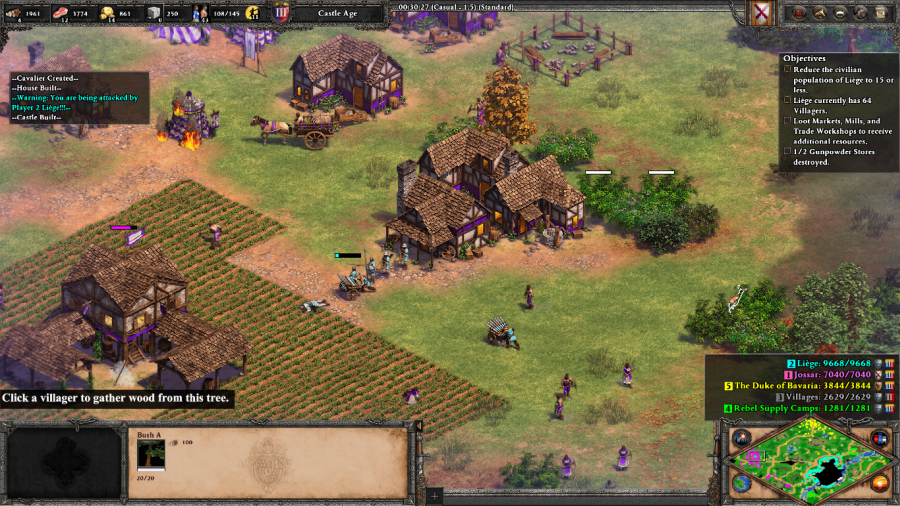 Duke of Bavaria: These obnoxious rebels somehow managed to break into my camp! Come to my aid as quickly as possible, John! Li�ge gets one more round of attacks in on both me and the Duke of Bavaria in a counter-offensive which is rapidly repulsed. 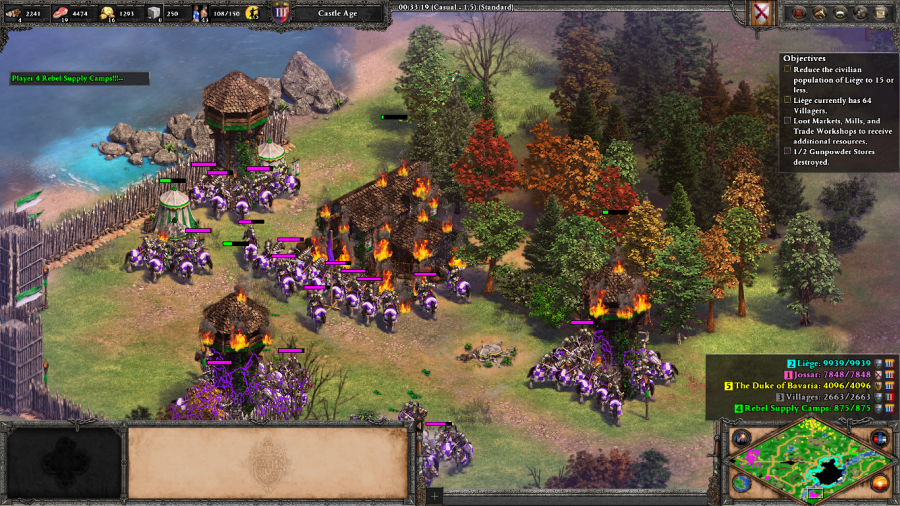 It's the last one they'll get. With the second gunpowder depot destroyed, Li�ge's ability to project force outwards has been crippled and all that remains is to lay siege to the city itself.  Duke of Bavaria: To overcome the walls of Li�ge, we will need siege weapons. It would be wise to start constructing some, John!  Despite what the Duke of Bavaria says, breaking through the walls of Li�ge isn't the problem. The real bloody part of the assault is taking down all the Castles scattered throughout the city where the Villagers are hiding. Battering Rams do make this part easier/faster, but there's an achievement associated with winning the scenario without siege weapons, so I let my Cavaliers finish their grisly work unaided. John the Fearless: Li�ge has surrendered, but I will not show mercy to these traitors! Drive all rebels out of their hiding places! Hang them all! Wipe out their entire families while you are at it! Mission 1 Ending Text "The Battle of Oth�e was a decisive victory for John the Fearless. He rode in triumph to Paris and his armies entered the city without a fight. The Armagnac plot had failed. But since they had not openly waged war on him, John could not yet exact his revenge by force. Instead, John had the 15-year-old son of the deceased duke brought before him. Still mourning the death of his father, the boy was forced to forgive his father's murderer in public. A cruel act, you say; and that it was. But remember, my son, that cruelty was not John's goal, only a means to an end. By orchestrating this public display, John showed not just the boy, but the entire House of Armagnac on their knees, kissing his feet. It was one insult too many for the proud Armagnacs, and the struggle between the two factions would soon turn into open war." I dunno man, I think John here is giving Tamerlane a pretty good run for his money in the "burn everything to the ground while yelling maniacally about it" department. Cool way to start the campaign. This is a standard build and destroy mission, but it does a very good job of showing off most of the strengths of the Burgundians as a civilization, highlighting their economic bonuses and Castle Age powerhouse status. Their explosive finish (in the form of gunpowder units and their Imperial Age unique tech) will have to wait though. Extra Slides Mission 1 - Intro Slide 1 Mission 1 - Intro Slide 2 Mission 1 - Intro Slide 3 Mission 1 - Intro Slide 4 Mission 1 - Intro Slide 5 Mission 1 - Intro Slide 6 Mission 1 - Intro Slide 7 Mission 1 - Intro Slide 8 Mission 1 - Intro Slide 9 Mission 1 - Intro Slide 10 Mission 1 - Intro Slide 11 Mission 1 - End Slide 1 Mission 1 - End Slide 2 Mission 1 - End Slide 3 Mission 1 - End Slide 4 Mission 1 - End Slide 5 Jossar fucked around with this message at 00:32 on Mar 3, 2024 |
|
#
?
Mar 3, 2024 00:27
|
|
|
Ah, the other evil campaign. You know, I'm reading a book on war crimes and other crimes during the hundred years' war as documented through letters of grace for both members of armed forces and civilians. It gets rather grim. It seems that the French army professionalization was a success both at battlefield success and reducing criminal acts, while the Burgundian was less so, the English leave significantly less paper traces in a number of respects but while everybody seems to agree that all armed forces are bad to have around, the English are somehow worse.
|
|
#
?
Mar 3, 2024 02:16
|
|
|
Just setting the foundations for perfidious Albion to become Perfidious Albion�!
|
|
#
?
Mar 3, 2024 07:06
|
|

|
Yeah, the English were always broke, so for most of the Hundred Years War their pay structure mostly consisted of "find a guy to ransom and get rich, or else kill him and take his stuff". Since the English had no reason to show any restraint at all, things spiraled out of control pretty quickly, turning most of France into a complete and utter wasteland. This was great for the first part of the war, when the English were seemingly on the back foot and the French held all the advantages, since they could drain France's economic strength and make it their own. But long-term, the constant looting and killing was probably the thing that doomed England the most in the Hundred Years War. Eventually the French civilians just stopped working entirely because everything was going to get stolen anyway, and then all of England's problems came back immediately, made worse by having to also manage an unwilling and unproductive Northern France. Even without the French winning a sizable military victory (which they did, thanks to Joan), it was inevitable that England would eventually collapse under its own weight sooner or later (which it did, right after the Hundred Years War ended).
|
|
#
?
Mar 3, 2024 13:05
|
|
|
The Grand Dukes - Part 2: The Wolf and the Lion Mission 2 Starting Text "John the Fearless was now the most powerful man in France. But his rivals, the House of Armagnac, had not been idle. Now lead by the fearsome Count Bernard, they built and alliance against John that included the Dukes of Orl�ans and Bourbon and the Count of Alen�on. Bernard sent bands of ravaging mercenaries into the lands controlled by John to draw him out. For John, this was the last straw. He marched his army out of Paris to face the burgeoning alliance. And so France fell head-long into a war that would last for decades."  John the Fearless: The Armagnacs hire bloodthirsty southern rabble to lay waste to our beloved country. We will hunt down the �corcheurs, one by one!  �corcheurs: There they are! Engage these haughty Burgundians! This mission begins with you in control of a moderate size army with instructions to defeat the �corcheurs, who are setting fire to the �le-de-France. They can be a difficult fight if all aggro'd at once, so it's good to eliminate each enemy group entirely before moving onto the next. 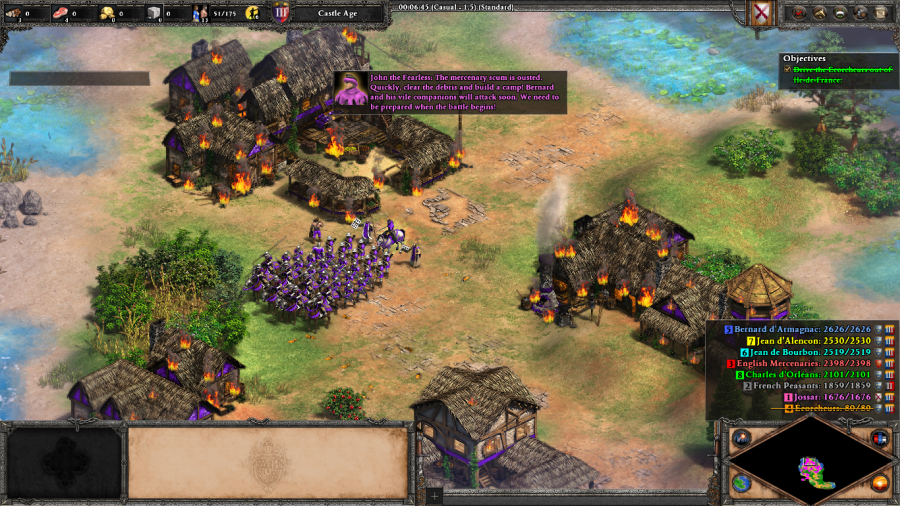 John the Fearless: The mercenary scum is ousted. Quickly, clear the debris and build a camp! Bernard and his vile companions will attack soon. We need to be prepared when the battle begins! After clearing out the �corcheurs, you gain control of the ruined buildings that they were torching and some Villagers. You can fix the buildings, but frankly speaking it's a waste of resources. From this point, you have about 10-15 minutes before the enemy factions wake up, so you'd better boom with an eye towards pumping out Castles as quickly as possible. 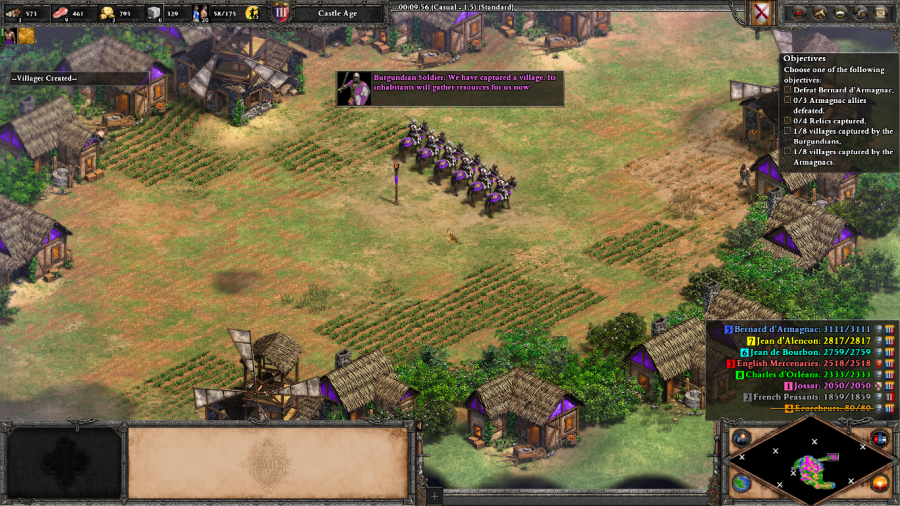 John the Fearless: We cannot hide here and let the enemy take the initiative! There are numerous villages in the region that we should occupy before the Armagnacs can! Burgundian Soldier: We have captured a village. Its inhabitants will gather resources for us now! There are a bunch of these villages scattered throughout the map that can be captured and will provide you with a trickle of resources if you manage to hold them. But in my experience, the enemy factions were far too active in trying to reclaim these villages for them to be worth actively fighting over. 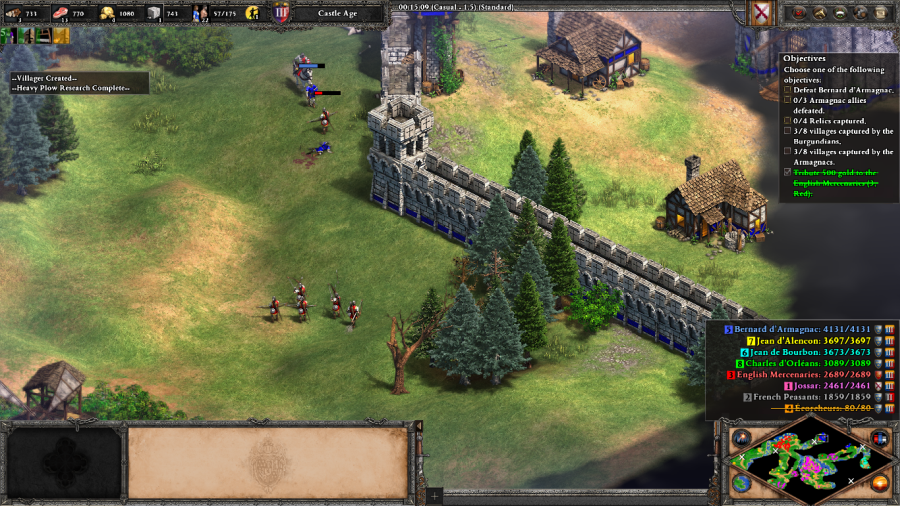 English Mercenaries: You Burgundians are a rich people they say, and it is known that you are always looking for capable soldiers. We are at your disposal--if you can afford us, of course... (After a couple of minutes) This war is cruel and many of my men have already paid with their lives. I am afraid that we will need more money if you want us to continue risking our necks for you. Hey, weren't we just talking about this? These guys aren't the main English army, of course, but a band of mercenaries that has already seen the chaos and come to make some money. You can pay them 500 Gold to obtain their services (and prevent them from joining the enemy side), but they'll periodically keep asking for payments of 300 Gold or else they'll just sideline themselves for the rest of the mission. It's worth paying them the once, just to have one less enemy on the map.  Jean de Bourbon: My men have admired their shiny polished armor long enough. It is time to crush these Burgundian upstarts. Jean d'Alen�on: That sound that you hear is not thunder. It is the sound of marching boots coming to destroy you! I am the Duke d'Alen�on. Remember that name well, John! Charles d'Orleans: You killed my father and somehow evaded justice for this heinous crime, but my day has come. I will have my vengeance and it will be sweet! Bernard d'Armagnac: You are nothing but a devious murderer who has escaped justice for far too long! But mark my words, John: I will right this wrong! Time's up. The four enemy factions will now proceed to flood your base with units from this point on, until their defeat. Bernard is supposed to be the most dangerous of the bunch as he quickly gains access to Imperial Age units, but I found that Jean de Bourbon was probably the most dangerous of the four because he always seemed to send the largest set of waves. The fact that he sends a lot of Pikemen at you, which are a natural counter for Burgundian Cavalry, also didn't help. 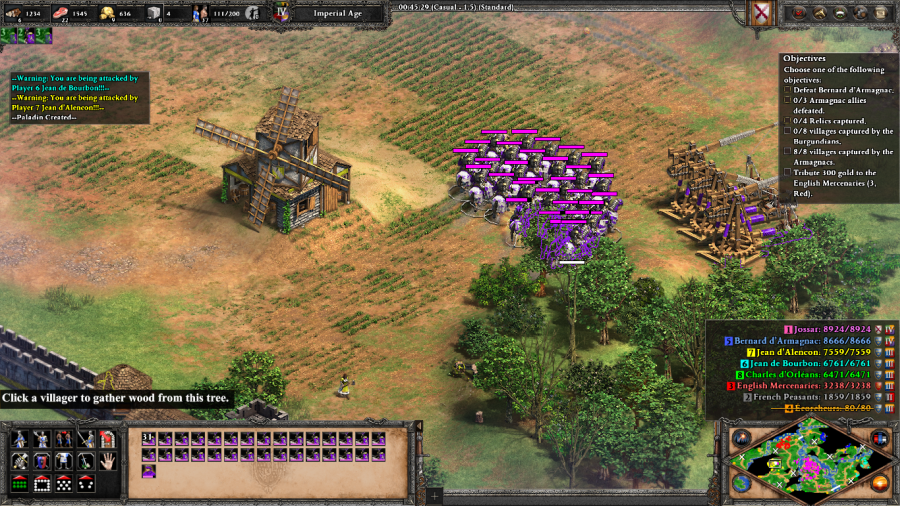 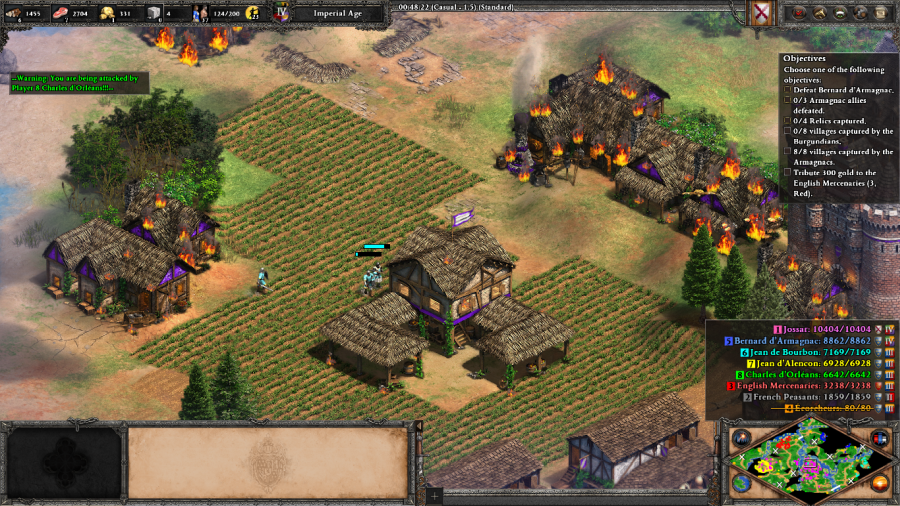 Jean d'Alen�on: You and your Burgundian rabble shall not stop us! Watch your back, John, because this is far from over! Bernard d'Armagnac: You think that targeting my allies will stop me? Like the Hydra, for every head that you cut off, two new ones will grow in its place. We will not stop until your blood waters our precious French soil! I'd like to say that there was some big breakthrough here, but as you can see, really it was just about fending off enemy attacks until I could mass Paladins and a couple of Trebuchets, and start going to town on the enemy allied factions. There are a couple of other alternate victory conditions, but I was worried about Bernard's fortress being impenetrable and my micro skills not being good enough to manage relic collecting amidst everything else. If d'Alen�on's comment here about Burgundian rabble sounds familiar, that's because it is. He's a return character from the Joan campaign and it's a slight variation on his line from when you're attacked by Burgundians during the starting segment of Joan 2. I'm not sure if Bernard's line here about your blood watering the soil is meant to be a call forward to La Marseillaise though. 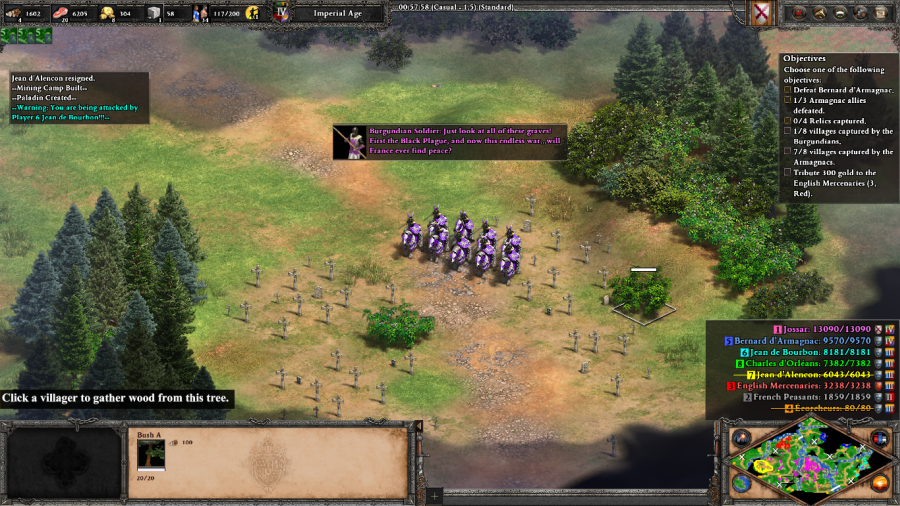 Burgundian Soldier: Just look at all of these graves! First the Black Plague, and now this endless war... will France ever find peace? A brief moment of silence for reflection on the human cost of all the fighting. ... 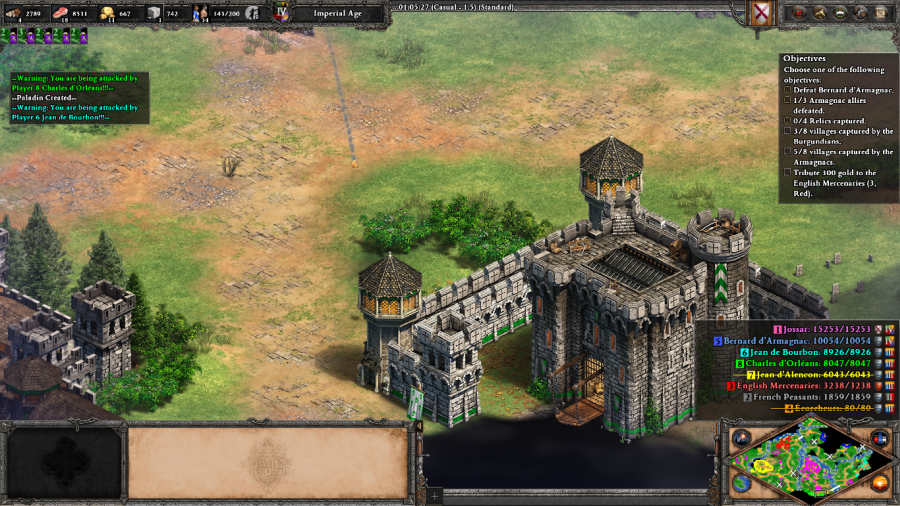 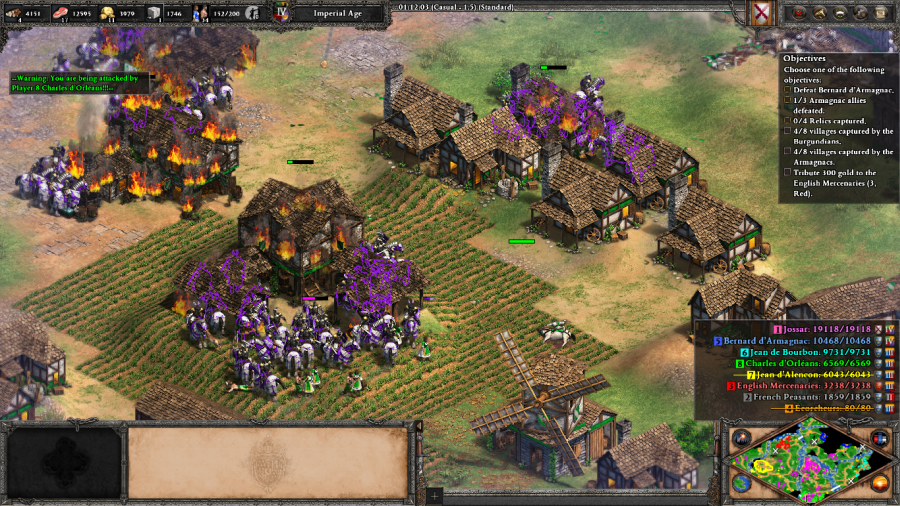 Charles d'Orleans: You may have defeated me this time, John, but at the deathbed of my mother, I swore the oath of vengeance for my father's murder. You cannot stop an orphan with nothing left to lose! 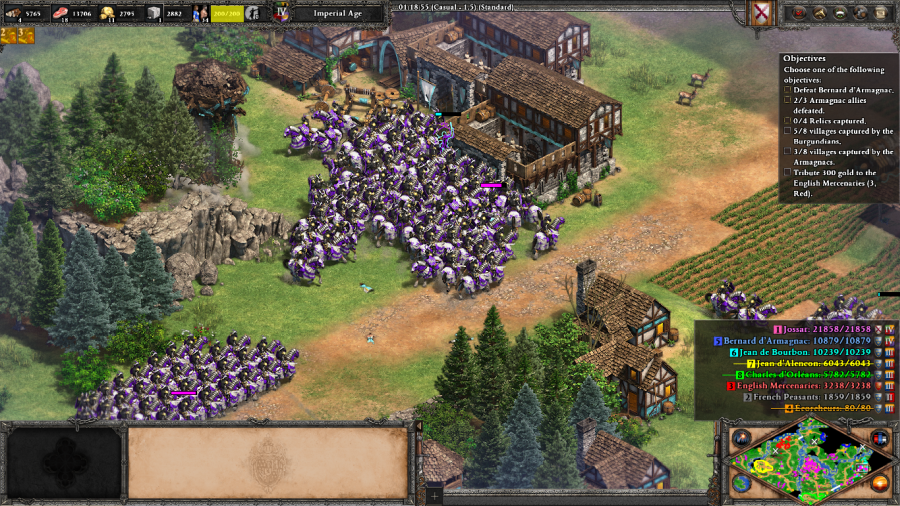 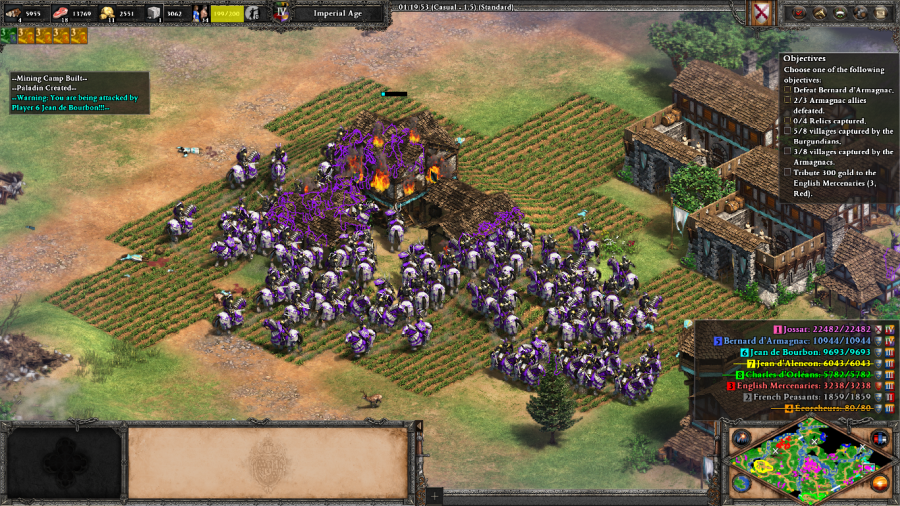 Jean de Bourbon: A curse on you Burgundian dogs! Did I actually underestimate you, John? Alright, moment of silence over. Time to bury these guys in Paladins until they cry uncle. Mission 2 Ending Text "The Armagnac alliance was broken... for now. But even as he was victorious on one front, John faced a serious setback in Paris. A revolt by the butcher's guild, which was loyal to Burgundy, had spiraled out of control and the Burgundians and their loyalists were expelled from the city. John retreated to his domains in Burgundy to regroup, but he would not be able to rest easily. Across the sea, on old foe of the French had been lying in wait, anticipating the right moment to strike. For Henry V, the king of England, that moment had now come." This mission puts me in mind of Barbarossa 1 or Tariq 2, moreso the latter, although the alternate relic victory condition and the aggressiveness of the enemy factions definitely calls to mind the former. I do appreciate how hard they went on making sure that even the bit players in this one had decent dialogue, always nice to see. Extra Slides Mission 2 - Intro Slide 1 Mission 2 - Intro Slide 2 Mission 2 - Intro Slide 3 Mission 2 - End Slide 1 Mission 2 - End Slide 2 Mission 2 - End Slide 3 Jossar fucked around with this message at 22:27 on Mar 3, 2024 |
|
#
?
Mar 3, 2024 22:20
|
|
|
I do find it interesting just how much of AOE2 there is now. Also that Burgundy got a campaign, which is fun.
|
|
#
?
Mar 3, 2024 22:23
|
|
|
The �corcheurs, or, literally, the skinners, are lovely fellows. Mostly, they are what happens when you have mercenaries and stop paying them, either because you ran out of cash or the contract ran out and they decided that actually it should keep going and you should keep paying them. They pay themselves from the local population, their subtle moniker might imply they are awful, it is correct. They generally demand to be paid off to leave and might not hold up their end of the agreement when paid. Another source of �corcheurs are various former soldiers, especially demobilized en masse after a campaign, who have realized that they will go back to being poor (for nobles and peasants alike, just differing standards that merge when you get really low on the nobility scale), and this is easy work and pays well and they don't have to walk all the way home. Various solutions are tried against both of them, violence works, but rehiring them when possible also works, requires a lot less state violence and enhances state violence against the English and Burgundians. The unpaid soldier variant gradually falls in number to not negligible but manageable levels as the French army professionalizes, the mercenary variant kept happening regularly all over Europe until large mercenary forces fell out of fashion, everyone hated mercenaries and for excellent reasons.
|
|
#
?
Mar 3, 2024 23:37
|
|
|
Jossar posted:Charles d'Orleans: You may have defeated me this time, John, but at the deathbed of my mother, I swore the oath of vengeance for my father's murder. You cannot stop an orphan with nothing left to lose! First thing that popped into my head- https://www.youtube.com/watch?v=ssjUcMkRG7g
|
|
#
?
Mar 4, 2024 02:29
|
|
|
Absolutely wild to me that we're getting improved pathing behavior for boarding transports and garrisoning rams (you click a transport/ram and units will seek the closest, still-not-full one) after so long 
|
|
#
?
Mar 4, 2024 05:18
|
|

|
Tapping in just to say that even while I never really post, I enjoy the LP. AoE2 is a great game and I always appreciate people getting to see more of it. So thanks for the content Jossar!
|
|
#
?
Apr 16, 2024 00:09
|
|


|
Thanks! I guess this is as good a time to chime in and say that while I have definitely been neglecting the LP, I have a vacation coming up and since I don't have anything else planned will be trying to shove out a bunch of updates, so stay tuned to this space later this week.
|
|
#
?
Apr 16, 2024 00:37
|
|
|
The Grand Dukes - Part 3: The Cleansing of Paris Mission 3 Starting Text "In England, they celebrated the Battle of Agincourt as a victory over France. In truth, it was a victory only over the Armagnacs. The Burgundians stayed out of the fight and John eagerly watched as the English king did his work for him, decimating the Armagnac alliance. Still, the English invasion of France had swiftly turned in Henry's favor. With the road to Paris now open, he marched his armies towards the French capital. Sensing his time to strike, John the Fearless rallied his armies. He would race the English to Paris and seize it from the Armagnacs before Henry could arrive." 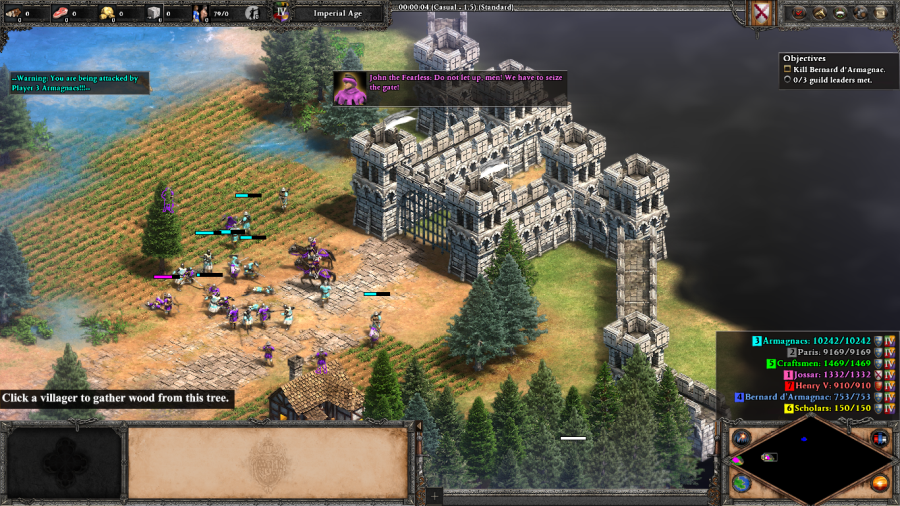 John the Fearless: Do not let up, men! We have to seize the gate! 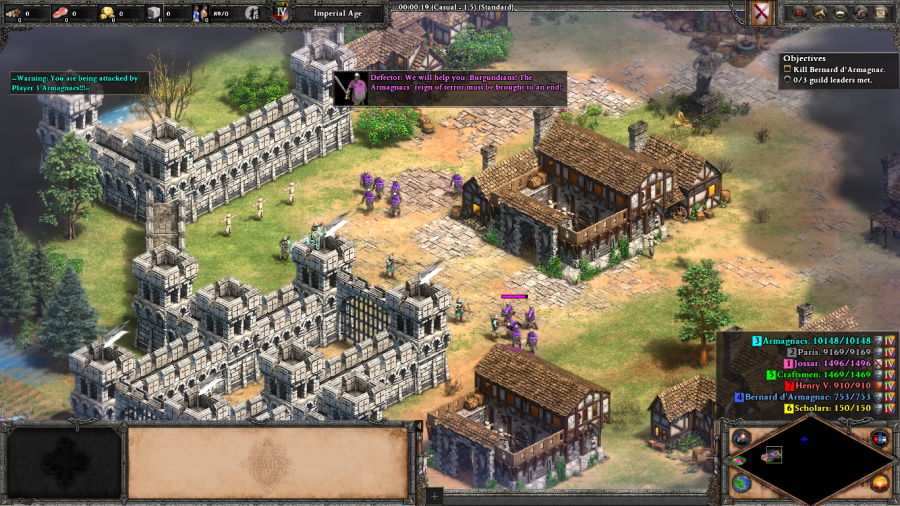 Defector: We will help you, Burgundians! The Armagnacs' reign of terror must be brought to an end!  John the Fearless: The gate is ours, but there is no time to rest! We must conquer Paris before the English arrive and take what is rightfully mine. This mission starts off with a quick starting skirmish which introduces you to the main idea of this mission: It's an homage to Joan 5 where you're trying to break into Paris and capture it, but unlike that mission where the French have to bail after realizing that they have no backup from King Charles VII, here you're committed to finishing the job no matter what. That means no base-building, just recruiting what forces you can as you run through the city and micromanaging what you have to the best possible effect.  Burgundian Soldier: This gatehouse is no longer controlled by the Armagnacs! I'm a bit worried about potentially running into problems at the gate that the game wants you to go through, so I redirect my army to take a more southern entrance into Paris. Either way, there will be plenty of Armagnac patrols roaming throughout the city to watch out for of varying size and strength, ranging from "three Crossbowmen" to "moderate size group of Paladins and Hand Cannoneers". Especially towards the upper end of the scale, these can get very dangerous so you don't want to make fights any more drawn out than they have to be. This is somewhat made worse by AoEII city pathing, but we're all used to that by now.   Of course, getting access to Paris was the easy part. Getting across the Seine to where Bernard's forces are located takes a bit more effort. There's two main ways to do so: the first is fighting through a large Armagnac army with Paladins, Hand Cannoneers, and Onagers, in the center of the city at the �le-de-la-Cite crossing. But it's pretty obviously a death trap meant for players who don't bother to explore at all, so I go with the second approach of destroying a more sensibly-sized garrison of Crossbowmen, Pikemen, and Hand Cannoneers enforcing a blockade on the river at the south of the city. Doing so gets the local merchants' guild on my side and they rebuild the southern bridge, allowing my forces to cross mostly untroubled.  After fighting my way through the streets of the east side of Paris for a couple of minutes, the game gives me some Missionaries. I'm not sure if this is tied to specifically doing the merchant quest, reaching a certain point on this side of the river, or is automatically a guaranteed set of units you get after the timer drops by a certain amount. Speaking of which... The mission is on a 45 minute timer, under the justification that if John can't take the city before English show up, it will be impossible to hold. This makes doing most of the other side quests that exist in this scenario (retaking a Lumber Camp for the woodcutter's guild, freeing prisoners for the butcher's guild, and rescuing a bunch of Relic Carts for a local Monastery) somewhat dicey. Doing them will give you some more troops and techs, and honestly I probably should have done one of them just to make the ending of this mission a little bit less down to the wire. But apart from letting my troops have a couple minutes to heal here, I went about as minimalist as possible on this one and still ended it with over half the time elapsed, so it seems fairly easy to run out the clock if you're not careful. 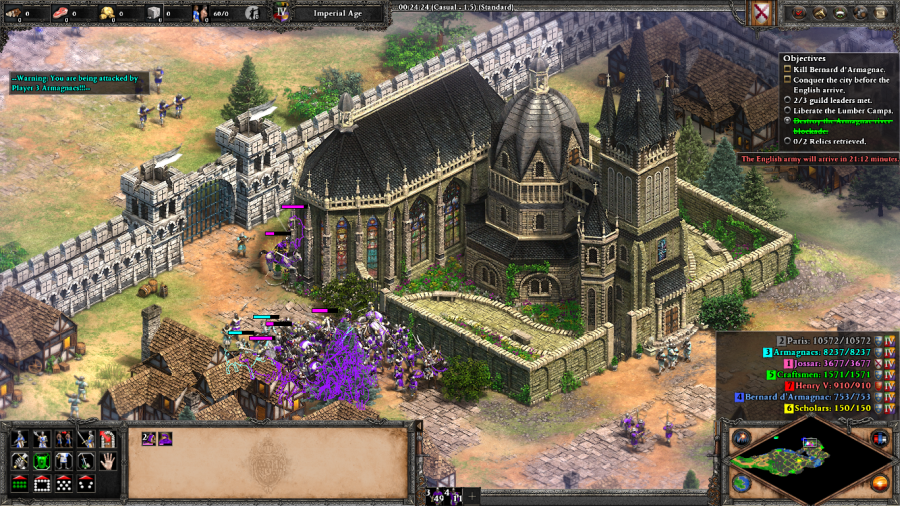 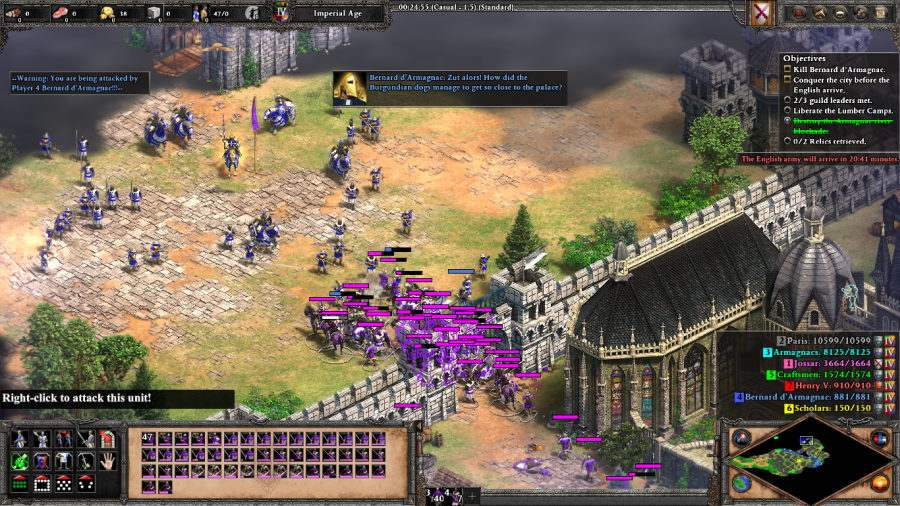 Bernard d'Armagnac: Zut alors! How did the Burgundian dogs manage to get so close to the palace? 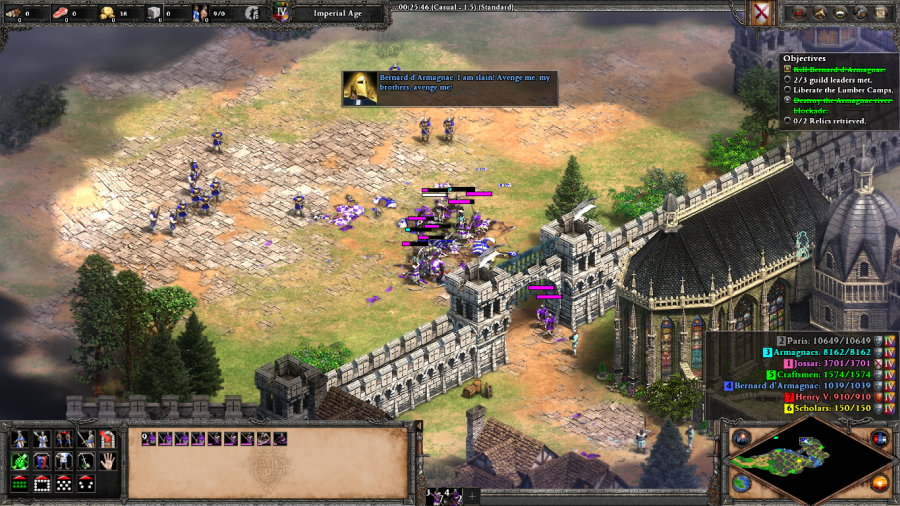 Bernard d'Armagnac: I am slain! Avenge me, my brothers, avenge me! After healing up, I went after Bernard through the gate directly south of his position. Do not do this: there are a deceptive number of nasty units/patrols placed around this gate and combined with Bernard's archery/gunpowder units this can become a meatgrinder really fast. Some of this is unavoidable, even if you try to sneak around to the north of the city to attack him, but I only managed to kill Bernard with a single digit amount of units remaining. Fortunately, killing Bernard disables all enemy aggression and functionally ends the mission, save for a brief cutscene showing the English arriving to the sight of John having conquered Paris. 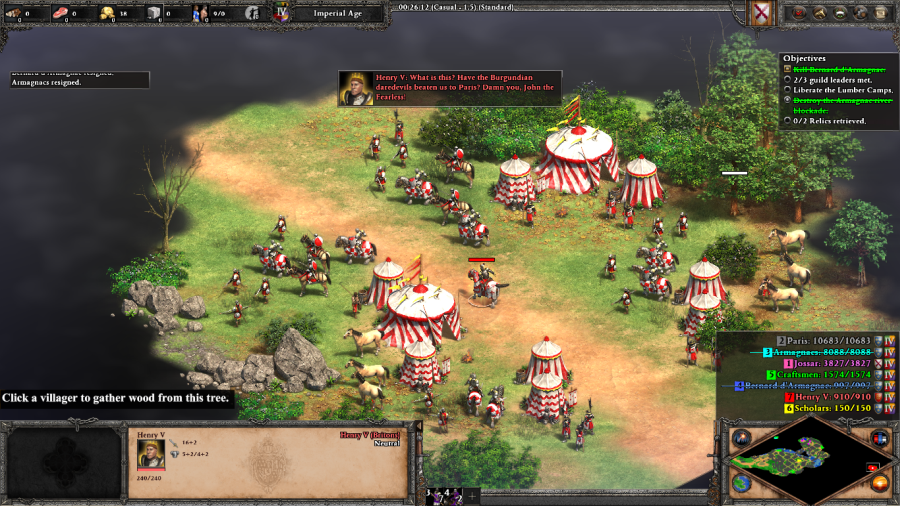 Henry V: What is this? Have the Burgundian daredevils beaten us to Paris? drat you, John the Fearless! Mission 3 Ending Text "Paris was now in Burgundian hands, but in seizing the city, John had made an enemy of the English king. Not wanting to fight both the Armagnacs and the English at the same time, he moved to make peace with his French rivals. The heir to the French throne, the Dauphin, agreed to meet with him on a bridge near Montereau. John and the Dauphin each arrived with ten of their trusted men and John knelt before the Dauphin as a show of respect; but as he rose, two men of the Dauphin's retinue, who were Armagnac loyalists, sprung into action and charged John with axes raised. It was a trap. Before the meeting could even begin, John the Fearless was struck down and killed while the Dauphin only watched unperturbed. It was a fitting end for the man whose career had started with just such an assassination. The Burgundians were outraged. There would be no peace between the French factions, and Henry V would go on to win many more battles against his fractured enemies. But while this marks the end of the story of John the Fearless, the tale of Burgundy is not yet over..." So ends the first half of the campaign, neatly divided in twain. It is "The Grand Dukes" after all. I think this scenario still could have worked if you were given an hour instead of forty-five minutes, allowing you to grab those extra side-objectives without feeling like it was stretching your time too thin, but it's still doable even without them. Makes the scenario feel a little bit too compact though. Extra Slides Mission 3 - Intro Slide 1 Mission 3 - Intro Slide 2 Mission 3 - Intro Slide 3 Mission 3 - End Slide 1 Mission 3 - End Slide 2 Mission 3 - End Slide 3 Mission 3 - End Slide 4 Mission 3 - End Slide 5 Mission 3 - End Slide 6 Jossar fucked around with this message at 15:02 on Apr 19, 2024 |
|
#
?
Apr 19, 2024 14:56
|
|
|
There's a later campaign that includes a similarly open-ended, time-based scenario that I also wish gave the player some more time to actually finish objectives. I wonder if the tight time limit in these cases was to encourage replay.
|
|
#
?
Apr 19, 2024 16:07
|
|

|

|
| # ? Apr 29, 2024 20:38 |
|
|
The Grand Dukes - Part 4: Unholy Marriage Mission 4 Starting Text "You see, my son; it was not John the Fearless who brought La Pucelle to the stake here in Rohen, but his son: our great Duke, Philip the Good. Until this point, he had been ruling the Burgundian Low Countries in his family's name, presiding over an economic and cultural golden age in this corner of Europe. Outraged by the murder of his father, he quickly formed an alliance with the English to avenge the death of John the Fearless. But his war against the Armagnacs would have to wait. The Duke of Bavaria, who had fought with John at the Battle of Oth�e many years before, once more called for help from the Burgundians. This time it was not against an Armagnac revolt, but against his own niece. Jacqueline of Hainaut was not a woman content with obeying orders. For a short time she had been the queen-to-be of all of France; but when her husband died, she was quickly relegated to her Dutch holdings. With her claim to the Low Countries contested by the Burgundians, she fled across the English Channel, where she married the Lord Protector of England. Together, they now returned to claim the lands she had lost to the Duke of Bavaria. Philip, seeing his northern lands under attack by an English renegade, rode north to push them back into the sea." 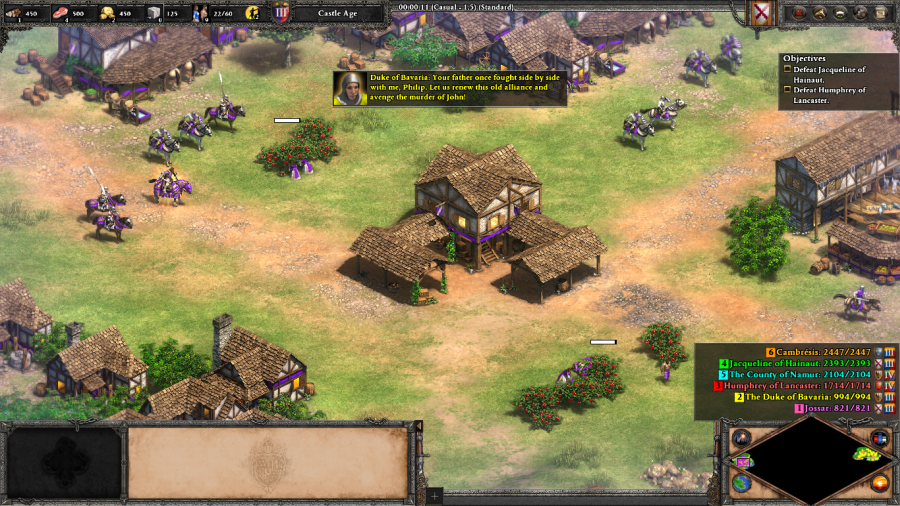 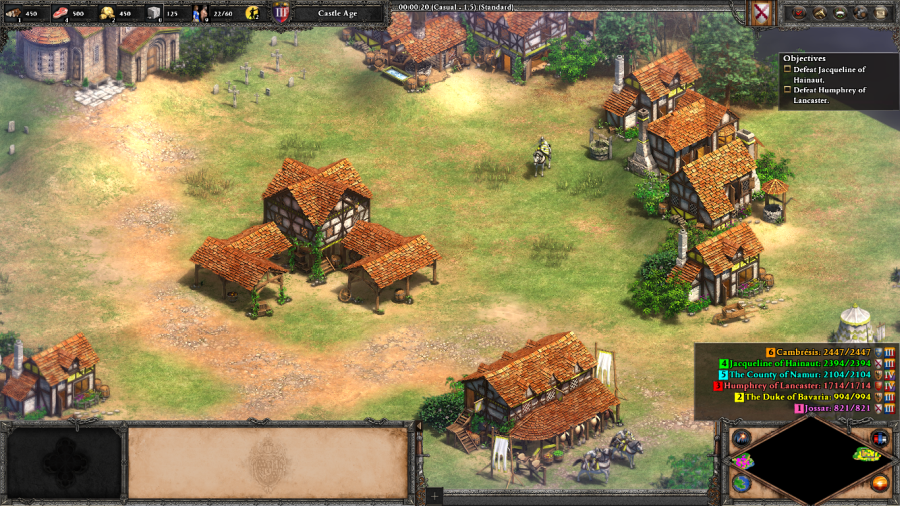 Duke of Bavaria: Your father once fought side by side with me, Philip. Let us renew this old alliance and avenge the murder of John! To start off the second half of the campaign, it's... a standard base building mission. If anything, this feels like it should be the starting mission of the campaign rather than the A Kingdom Divided, except for the part where it doesn't fit historically. The only real difference on your end is swapping out John the Fearless for Philip the Good, a slightly stronger and slower hero unit than his father, and you can reach Imperial at this point in the campaign. The Duke of Bavaria is back from the first scenario as an ally, and like last time he is mostly competent: in the sense that he absorbs most of Jacqueline's ire without immediately falling over. Just don't expect him to win on the offense, ever. 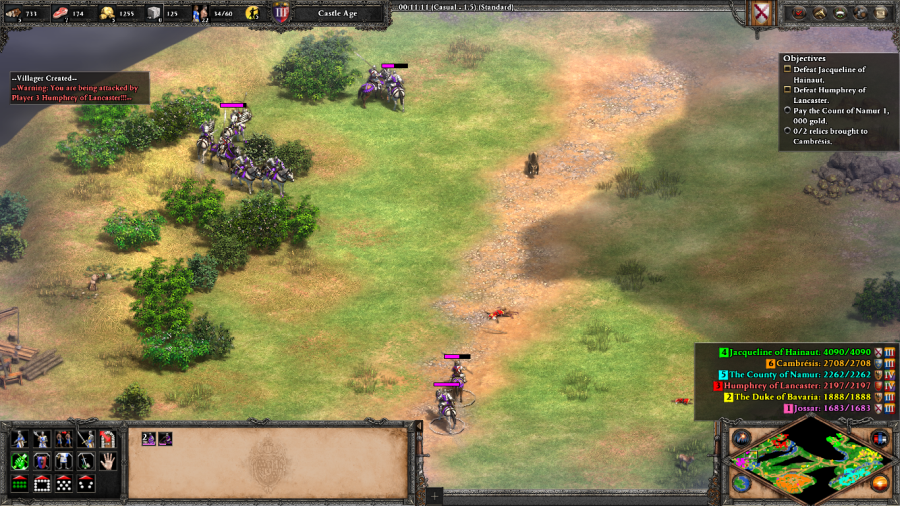 Humphrey of Lancaster: Philip! You, me, two lances, and some horses? A man of your standing cannot refuse a proper duel. Philip the Good: Do not worry, Humphrey. I am on my way. Blood will stain our swords lest we be considered cowards! 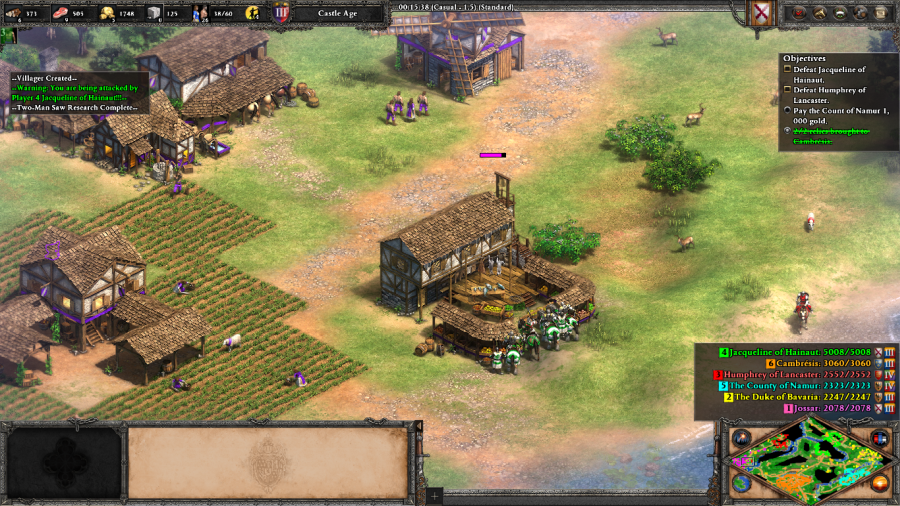 Jacqueline of Hainaut: First my husband and my uncle tried to tell me what to do, and now you Philip? Has your mother not raised you to have any manners? Facing us are the husband-wife tag team of Humphrey of Lancaster and Jacqueline of Hainaut. Humphrey is playing as the English so leave him alone for long enough and he'll be dumping Longbowmen and Trebuchets on you, with some various Cavalry units to support them. Jacqueline is playing Burgundians and while not programmed to be a mirror match will make most of what you're making (Coustilliers/Paladins, Halberdiers, and Rams). Humphrey has a weaker economy and AI, but he's also geared to specifically produce units that wreck your probable unit comp, so he's the bigger priority to take out first. As mentioned before, the Duke of Bavaria can do a decent (although not perfect) job containing Jacqueline until you've eliminated Humphrey at which point your superior economy and micro can let you win the match against Jacqueline. Everything else in the scenario pretty much follows directly from that overall gameplan.  Philip the Good: My family has considerable influence in Cambr�sis, and it just so happens that one of my relatives is a candidate to become the city's next bishop. Bring two relics there so that Cambr�sis will favor Burgundy! Bishop of Cambr�sis: I owe you my gratitude, cousin! Rest assured, I will assure that Cambr�sis' tithes find their way to your coffers. Count of Namur: I am an old man without an heir. It is said that you are not only an ambitious, prudent ruler, but also a wealthy man. If you are willing to pay, I will bequeath you my county. I know that it would be in good hands with you, Philip. The other two factions are the map are potential allies. Cambr�sis can be bribed with relics (two of which you start with) into supporting the election of a bishop who directs a constant flow of tribute from the city to your resource stockpiles. Eventually the tribute will be cancelled until you can build a Cathedral (costing mini-Wonder level resources, but nowhere near the production time of one), at which point the tribute resumes for the rest of the mission. Namur is a more straightforward "pay 1000 Gold to buy these guys' ally status" deal, but if you take too long then they eventually become your enemy instead.  Humphrey of Lancaster: You do not stand a chance against English longbows, Philip. Why not come over here to face me like a real man?  Humphrey of Lancaster: Oh, how I would have loved to fight you in person, Philip. A man that lives up to his reputation is a rare enough thing. Sadly, the boring old men in England think that I should not be fighting our allies. Eventually the assault begins in earnest. Humphrey's units will keep harassing your siege, aided by assistance from Jacqueline's forces, but crack the walls and he has a jaw made of glass and resigns in short order. Hmm, I wonder how the Duke of Bavaria's doing on the other front?  Jacqueline of Hainaut: Whatever you do, Philip, do not treat me as one of your brittle courtesans. I have spent my whole life hunting and watching intrigues unfold at court. I am no ordinary countess! Philip the Good: Jacqueline, you are as cunning and sly as a true Burgundian. If I had not known better, I would have sworn you to be my sister. ...alright, let's get to work.  Jacqueline of Hainaut: These lands and titles are mine. You will have to pry them from my cold, dead hands before I give them up. 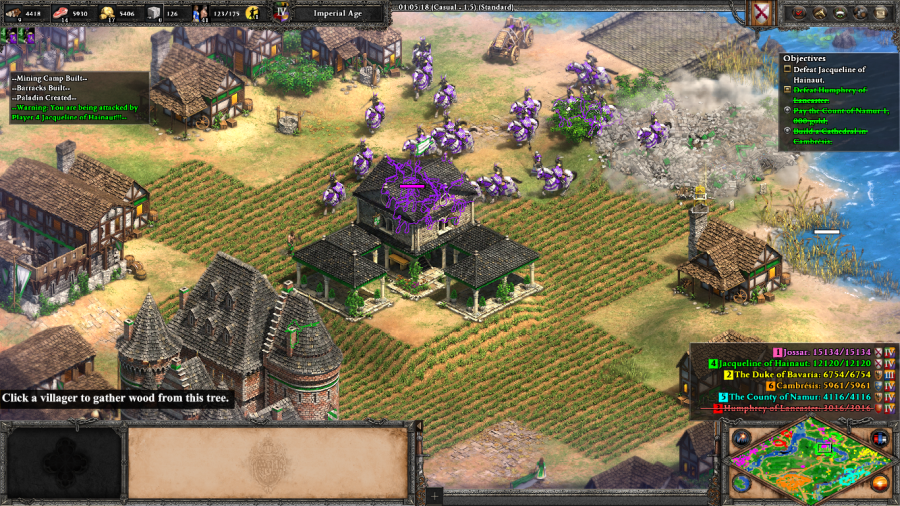 Jacqueline of Hainaut: This is it. I have nowhere else to go. Very well, Philip, you have won this round, but as long as I breathe I will not bow to any man. This isn't one of those missions where defeating one of the opponents turbo charges the other. While Jacqueline is the more competent of the two, that itself is not enough to stop you from steamrolling her at this point of the match. Philip the Good: Hainaut is ours and the English have fled! The lands are mine and Humphrey and his Englishmen are back on their way to England. Take Jacqueline to Ghent where she can no longer do any harm! Mission 4 Ending Text "Philip treated his beaten foe with respect. While Jacqueline was only a Burgundian by marriage, her plot, while failed, had been in true Burgundian fashion. Even so, Jacqueline found her imprisonment in Ghent intolerable. Not long after her capture, her uncle, the Duke of Bavaria, was found dead; murdered by poison. It is unclear if Jacqueline was behind this; some have even speculated that Philip himself ordered the assassination. But do not let anyone hear you say that, my son. Regardless, Jacqueline used the ensuing chaos to escape her house arrest. Dressed in men's clothing, she fled to Holland, forcing Philip to keep his attention in the north." Not really much more to this one than what I've already discussed. It does a good job setting up the next scenario, which is a little bit more complex. Extra Slides Mission 4 - Intro Slide 1 Mission 4 - Intro Slide 2 Mission 4 - Intro Slide 3 Mission 4 - Intro Slide 4 Mission 4 - Intro Slide 5 Mission 4 - Intro Slide 6 Mission 4 - Intro Slide 7 Mission 4 - End Slide 1 Mission 4 - End Slide 2 Mission 4 - End Slide 3 Mission 4 - End Slide 4 Mission 4 - End Slide 5 Jossar fucked around with this message at 20:46 on Apr 19, 2024 |
|
#
?
Apr 19, 2024 20:41
|
|