


|
A Malay
|
 #
?
Sep 17, 2023 00:25
#
?
Sep 17, 2023 00:25
|
|


|

|
| # ? May 16, 2024 16:49 |
|
|
Eh, not a lot of enthusiasm on this one I guess. Out of personal interest, I guess we'll go with Gajah Mada.
|
|
#
?
Sep 17, 2023 19:15
|
|


|
Jossar posted:Eh, not a lot of enthusiasm on this one I guess. Out of personal interest, I guess we'll go with Gajah Mada.
|
|
#
?
Sep 17, 2023 20:34
|
|

|
Gajah Mada - Part 1: The Story of Our Founders Age of Empires II: Definitive Edition - Malay Theme Very well, then let us begin, the tale of the minister who swore off spice.   Mission 1 Starting Text "What drives a king to expand his rule to the very edge of the unknown? Why are his people willing to sacrifice their livelihoods and even their lives for a ruler who sits on an ivory throne? The legends of our ancestors, and the greatness they achieved, drive us forward. All in Asia have heard of the great Srivijaya Empire � a grand power of the past that ruled all of the Indonesian islands. We dream to one day surpass these legends. In our culture, we hold the Kancil, a tiny mouse deer, the highest among the animals. Foreigners laugh mockingly at our reverence for such a benign creature, but they know nothing of the kancil's heart. Despite its unimpressive appearance, the kancil can overcome any obstacle and defeat much larger adversaries through sheer cunning. Its bravery is like that of no other animal. Our people are like the kancil. Our enemies underestimate and mock us, but we will show them our true spirit. For that very reason, the story of our empire's founder, Arya Wiraraja, is revered among our people. When faced with a Mongol invasion, he built an empire from a tiny village..."  Raden Wijaya: Both the Kediri and the Mongols consider me insignificant. I will show them what I am capable of. You start the mission with a small base in the north of the map and a couple of soldiers, mostly Karambit Warriors (Malay unique unit, cheap and expendable infantry unit that only takes up half a population space). Most of your effort early on should be spent on trying to improve your economy, but you can use these starting troops to help with the first gimmick of the mission...  Majapahit Soldier: This dense jungle cannot provide supplies for many people. Luckily, conquering enemy villages will help us support a large population. Well, maybe after producing a few Battle Elephants first. Karambits do have a tendency to die under fire, after all. You're stuck at a 75 unit population cap until you take out the Tower dominating each of these villages, surrounded by enemy troops. Knocking down the Tower replaces it with a friendly Tower and gives you an extra 5 pop cap. There are ten villages in total, allowing for a total pop cap of 125 units by the mission's end.  Majapahit Soldier: The Mongols and Kediri have been fighting quite intensely, and everywhere there is abandoned equipment to be found. We can use it to hasten our military advancements. In between the towns are a number of small camps with additional troops present. Defeating all of them gives you a couple of technologies, in this case Long Swordsmen and a Blacksmith upgrade. I lose most of my starting forces here, but by this point have built up enough of an economy to regroup and deploy a larger army. From here, the process repeats for a bit.  Mongols: The enemy of our enemy is our friend. What do you think of making an alliance against Kediri? (after accepting) So we are friends, for now... Several villages into the process, the Mongols ask if you want an alliance against Kediri, giving you a 10 minute time limit to make up your mind. This is pretty obviously telegraphing an upcoming backstab, but there's no real disadvantage to allying with the Mongols unless you're trying to play really aggressively to weaken them early, so this just lets you send them after your opponents instead of you.     After conquering most of the villages not under Mongol control, I find myself falling into both Singhasari and Kediri's bases by accident. Given that I end up meeting a lot less resistance than I expected, I try to go for a simultaneous push on both bases so I can knock them out one after the other and try to minimize the amount of time spent having to endure the Mongols without being able to mount a counterattack.   Mongols: Kediri has accepted the Great Khan as its overlord. Now you must do the same! The timing isn't perfect, but I'm prouder of managing this than is really warranted. A couple of small groups of Mongol Mangudai, Cavalry Archers, and Light Cavalry attack the villages, but are easily repulsed by some garrison forces that I have scattered around the map and the free Towers. 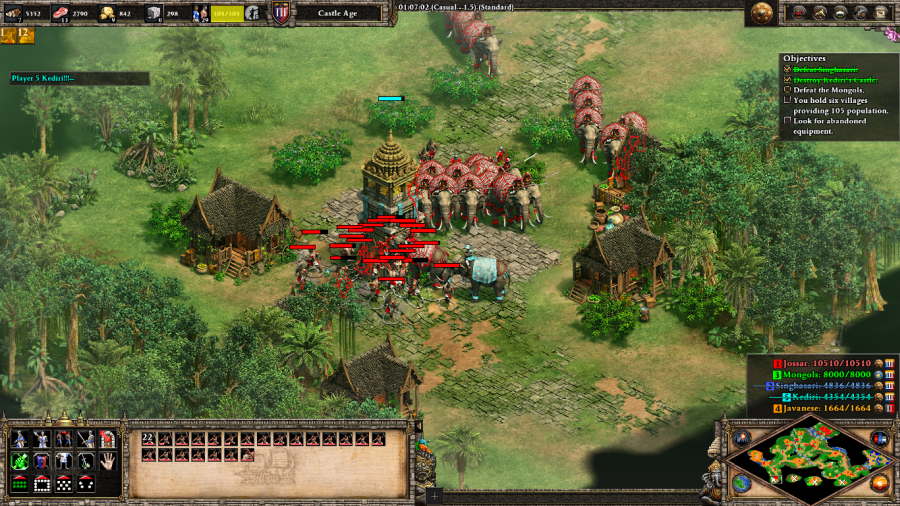 Anyway, with Kediri and Singhasari off my back, I'm free to claim the last few villages and begin the march to Mongol territory. 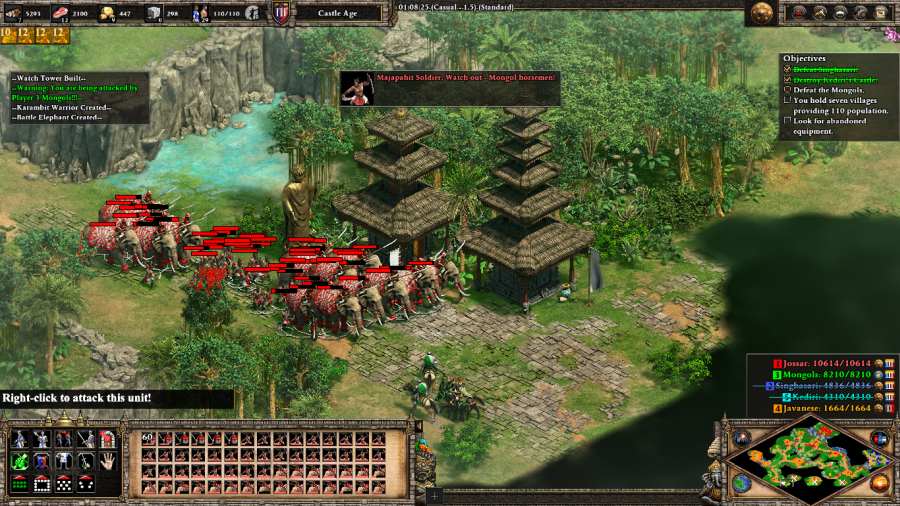 Majapahit Soldier: Watch out - Mongol horsemen! The closer you get to liberating the last couple of villages, the more likely it is that you start running into the main Mongolian force. They have less distance to travel to reinforce areas, but by this point you now have the numbers advantage and can still swarm them down with Battle Elephants and Karambit Warriors.  This abandoned Kediri Siege Workshop over here is pretty important as it holds a free Trebuchet and two Siege Rams, which are irreplaceable in this mission. Lose them and the siege on Mongol territory becomes much harder.   Majapahit Soldier: The Mongols have run out of supplies and fear the coming monsoon rains, so they are retreating back to China. Let us take what they leave behind. The Mongols have an extensive multi-part base in the southern corner of the map, consisting of at least two Castles and Town Centers, along with a multitude of military production buildings. Tear the important ones down to defeat them. If you do this early enough you'll gain control of the remnants of their base and some economic upgrades, but I found that it wasn't really worth it, especially as the Mongols are the hardest fight in the scenario by far. Raden Wijaya: With Kediri conquered and the Mongols fleeing to China like cowards, it is time for the Majapahit to become the one true Indonesian empire! Mission 1 Ending Text "I heard the story of Arya Wiraraja many times when I was a child. Through the cunning of the kancil, he defeated both his Javanese overlords and the mighty Mongols. Now, Arya did not do this alone. I have always believed that the gods favored him and his descendants. That is why I, Gajah Mada, commander of the elite guard of the Majapahit kings, have sworn to serve the royal family until my last breath." Fun little scenario, encouraging you to slowly keep moving forward and take over the map to expand your troop capacity. The Mongols are way too much of a tarpit though, and on higher difficulties can become extremely annoying as the Malay don't really have great tools to counter their Mangudai and Cavalry Archers. Extra Slides Mission 1 - Intro Slide 1 Mission 1 - Intro Slide 2 Mission 1 - Intro Slide 3 Mission 1 - Intro Slide 4 Mission 1 - Intro Slide 5 Mission 1 - End Slide 1 Mission 1 - End Slide 2 Mission 1 - End Slide 3 Jossar fucked around with this message at 16:50 on Nov 5, 2023 |
|
#
?
Sep 21, 2023 13:08
|
|
|
A fun introduction to the Malay, and their quantity over quality style of land armies. They're good economically too, with faster advance times and their cheap fish traps are an incredibly efficient way of converting wood into food. Their cheaper elephants are individually the weakest by far, but they do match up with equal resources, and they are the only elephant civ to get Heresy.* *Aside from the Gurjaras, but their elephant is a ram replacement, rather than a heavy cavalry unit.
|
|
#
?
Sep 21, 2023 17:22
|
|
|
Gajah Mada - Part 2: Unconditional Loyalty Age of Empires II: Definitive Edition - Diamond Dragon Mission 2 Starting Text "My longstanding fear that quarrels within the court would threaten its collapse has come to pass. A nobleman called Rakrian Kuti has betrayed the king and now lays siege to the royal palace. Fortunately, his treachery has not spread throughout the empire. The prime minister, Arya Tadah, remains loyal, and we have joined our forces to free the king and crush the rebellion. Let us hope that there is still enough time to save our king."   Trowulan Refugee: Our king is trapped at his palace in the city. Save him, Gajah! So yeah, in this scenario you start with a small number of troops, including Gajah Mada himself, a powerful Infantry hero unit, a few villagers... and the king is under siege right in the middle of the enemy city. There's an achievement for if you get to King Jayanegara in ten minutes, but no matter what you don't want to wait too long before trying to at least distract some of the assault forces. It is perfectly possible, especially on harder difficulties, to lose at twenty minutes as the castle is sacked and the rebels kill the King immediately thereafter.  Arya Tadah: I am here to save my king. I am glad to see you here to aid me in this difficult task, Gajah Mada. You have a few things to aid you here while you scramble to build up. The first is that as long as you send a unit north to his base, you can activate Arya Tadah's forces. They will continue to send waves of troops down to attack Trowulan until you manage to secure the King.  Majapahit Soldier: The rebels have a strong grip on the city, but we can still count on the support of the people. If we go to them, they will give us what we need. The second is that there are a number of areas (mostly on the east side of the map) that will grant you a few resources and come under your control if you visit them. Not a lot for each individual area, but every little boost to the early economy helps on this mission.  Elephant Rider: We have heard of the treacherous uprising and are here to fight for our king! Finally, if you go to the southeastern part of the map, you can recruit a bunch of free Elephant Riders/Ballista Elephants to serve as the main core of your early-game army. 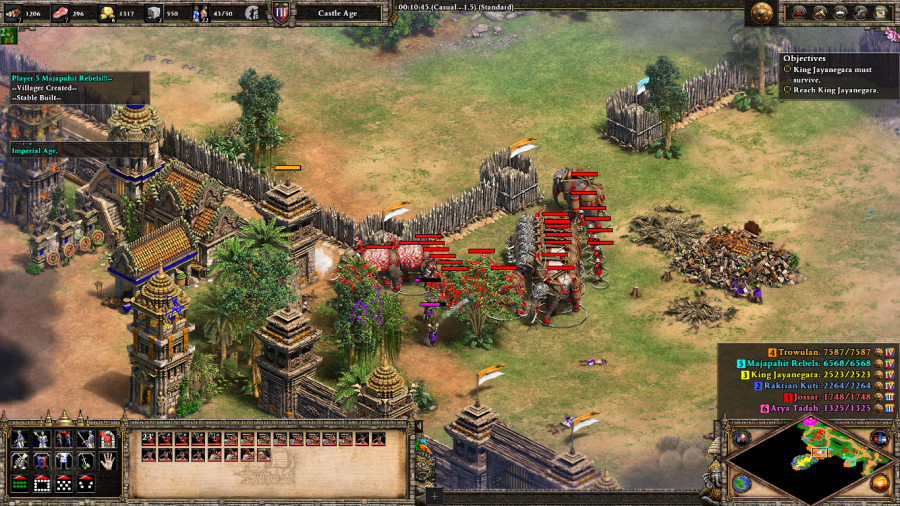 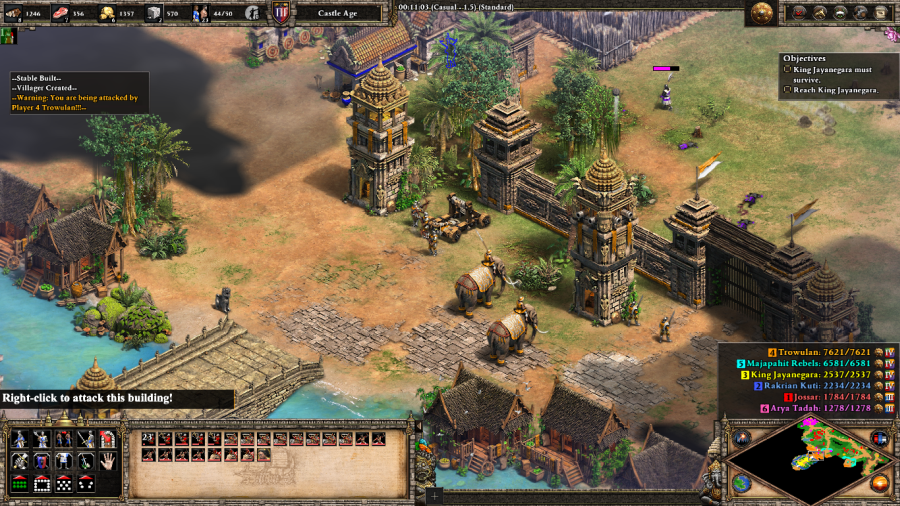 I join in with one of Arya Tadah's attacks on the city and at first things go well, but Trowulan's main eastern gate is guarded very securely with Towers/Bombard Towers and Onagers, let alone the Arbalesters/Two Handed Swordsmen/Elephant Riders.  So instead, I try to direct him towards breaking through at a less well-defended stretch of the wall. It's still pretty heavily defended though, and our initial attempts are repulsed.  Especially after these guys show up... The Rebels are the most dangerous of the three enemy factions because Trowulan is mostly focused on defense, Rakrian Kuti is mostly focused on going for the King snipe, but the Rebels have no targeting restrictions and as a result will try to go after you, as they correctly assess you to be the biggest threat. They show up in pretty large numbers too.  Which means it's time to double down. The Malay Imperial age unique tech, Forced Levy, gets rid of the Militia line gold cost in exchange for an additional food cost, so now Two Handed Swordsmen (they don't get Champions) are trash units. Now that my economy is fully up and running I start spamming these guys in numbers that the enemy factions are unable to handle and break through into Trowulan proper. Because Barracks units have Arson, the Two Handed Swordsmen even double as decent building clearers as long as you have them in decent numbers (and as Malay, you should always have things in decent numbers). Honestly, once you reach Imperial, these guys are probably better than Karambits, unless you very specifically need the maximum unit production spam that you get with the Karambits being half a population space each.  King Jayanegara: I knew you would come. Take me out of here before these rebels get their filthy hands on me. Once you get to the island in the center of the city where the King is hiding out, all of his units and buildings transfer to you. Your new goal now is to escape to a flagged area at the southern corner of the map. Easier said than done, though, there's still a lot of city left to break through. Offscreen, I get a couple of civilians and have them build more Barracks on the island, to continue the Two Handed Swordsmen spam. You need to be constantly cranking out units as your recovery of the King causes two additional things to happen: first, Arya Tadah is going to stop actively assisting you, now that he thinks the "hard" part is over (it is not). Second, all of the Rebel factions realize that you've given them the slip and start attacking the central island to try and kill the King now that he's under your control.  While he has a lot of forces spread throughout the map, the last real stand of Rakrian Kuti's forces is at this Castle in the southwest of the city. This is also a notable spot because you don't want to go much further than this within the city itself. Doing so is just a waste of time and energy as you pointlessly fight throughout the rest of the city for no real gain. Instead what you want to do is break out of the city through that gate near the bottom of the screen.  This also ends up being the point of no return for me, as the Rebels and the remnants of Rakrian Kuti's forces have now massed in large enough numbers at the central district to wipe out all of my buildings there.    Numerous Trowulan roadblocks continue to serve as obstructions for my army until I reach the final challenge, a Rebel fortress sitting just on top of the flagged area. The Castle means that you can't just try and run the King over to the victory area as he'll die en route, even without being blocked by enemy soldiers. You have to take it down, and meanwhile the Rebels will be sending in reinforcements from their base in the north to try and see if they can sneak attack your army from the rear while you're focused on defeating the fortress immediately in front of you.  King Jayanegara: I am safe now. I owe you my deepest gratitude, Gajah Mada. But I keep on hammering away and eventually the Castle falls, most of the enemies are dead, and the King can safely be brought to the flagged area and claim victory. Mission 2 Ending Text "We crushed the rebellion and executed the leaders. To celebrate our victory, the king threw a great festival, and the poets sang of his courage and ferocity in the face of danger. Nevertheless, I am beginning to doubt my king. He believes that he is untouchable and acts immorally, desiring the wives and daughters of his subordinates. Even his most loyal supporters have begun to hate him. 'Tribhuwana, the king's stepsister, has even told me that the king now shows a dubious interest in her.' With such behavior, it is only a matter of time before something bad will happen to my king." Yeah, this is the kind of mission I was talking about when I said that these campaigns start becoming a real slog. While you can secure some level of safety for your main economic base relatively early on, you pretty much always have to be on offense and your offensive situation is always incredibly tenuous and at risk of being overrun by an endless wave of opponents. Extra Slides Mission 2 - Intro Slide 1 Mission 2 - Intro Slide 2 Mission 2 - Intro Slide 3 Mission 2 - End Slide 1 Mission 2 - End Slide 2 Mission 2 - End Slide 3 Mission 2 - End Slide 4 Jossar fucked around with this message at 13:39 on Sep 22, 2023 |
|
#
?
Sep 22, 2023 13:29
|
|
|
I missed commenting at the time (kinda busy with moving to a different city right now), but the win condition in the second Portugese mission is hillariously badly programmed. The game only ever checks if the final condition (destroying the emirs castle) is fulfilled before awarding the victory, so you can ally the emir, then send mangonels to destroy the castle via attack ground, and win that way.
|
|
#
?
Sep 27, 2023 17:18
|
|
|
Gajah Mada - Part 3: The Oath to Unify Nusantara Mission 3 Starting Text "As I feared, our king died this afternoon from an unknown illness. In his stead, Tribhuwana became queen regent. Her first act as queen was to retire the prime minister and give his position to me. Without hesitation, I swore an oath in front of everyone. I would not indulge in any pleasures until I had conquered the entire Indonesian archipelago for the glory of the Majapahit!"  Majapahit Official: I am sending colonists to the nearby islands. If you can protect them from our enemies they can provide you with resources.  Majapahit Official: Our villagers are setting up a colony on Bali. You start this mission with a decently well built up base on the east side of Java, and colonists are immediately sent off to start building allied bases throughout the rest of Indonesia. Each fully operational base complete with Market can tribute you resources, and three need to be up simultaneously out of four possible sites in order to win the mission, alongside the destruction of two of the three enemy factions. Colonies can be destroyed, which will stop them from giving you their resources, but will eventually be resettled in time. In practice, I found this mechanic to be pretty tangential to the rest of the mission, except insofar as it meant there were a lot of resources to play around with. Defending your own base pretty much guarantees that two of the colonies are always safe and secure, and you can pretty much let the two colonies on Borneo burn until you need to win the mission as they're a distraction from focusing on other fronts.  I build a forward Castle to protect my mineral piles, but it ends up being a little too forward, such that it's able to do a pretty good job of wrecking Sunda's front lines all on its own.  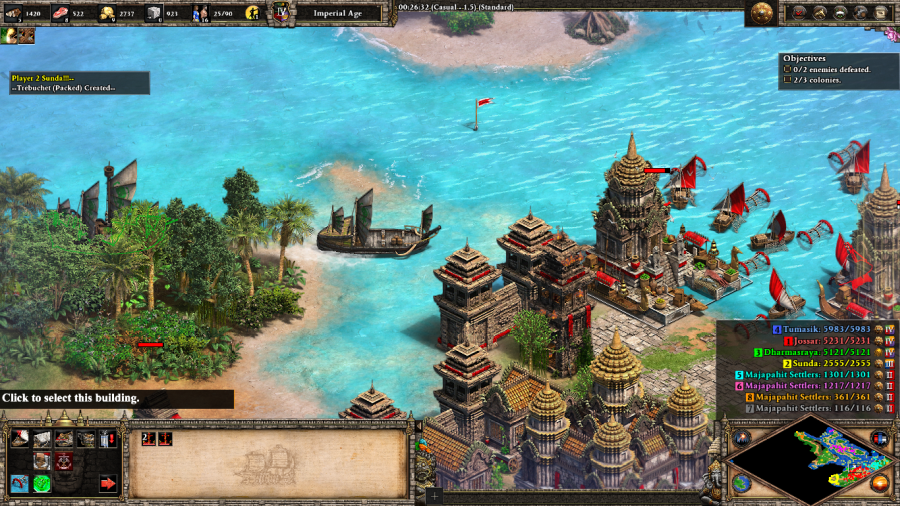 Sunda is pretty much already neutralized and Tumasik mostly contents itself with fighting the colonies instead, so Dharmasraya is my primary opponent. They constantly send ships and Transports full of Crossbows/Ballista Elephants/Long Swordsmen to raid the less well-defended parts of my economy and even come close to wrecking my northern coastline. Fortunately, via their unique Castle Age tech Thalassocracy, the Malay can upgrade their Docks to Harbors, which have increased HP/Line of Sight and can shoot arrows at enemies making them sort of like mini-Castles. This holds the line until I can get a proper northern Castle up and stop most of the bleeding.  Sunda: You have defeated our armies and we are ready to recognize your rule over Java. Teching up to Imperial and pushing just a little bit with Two Handed Swordsmen and Trebuchets is all it takes to have Sunda fall over entirely. Sunda's defeat naturally merges into the beginning of my assault on the Dharmasraya in Sumatra, just a hop, skip, and a jump across the water. At first glance this situation looks pretty dicey, but again, Harbors can do a pretty good job of holding their own, especially if you have a Villager on repair duty.    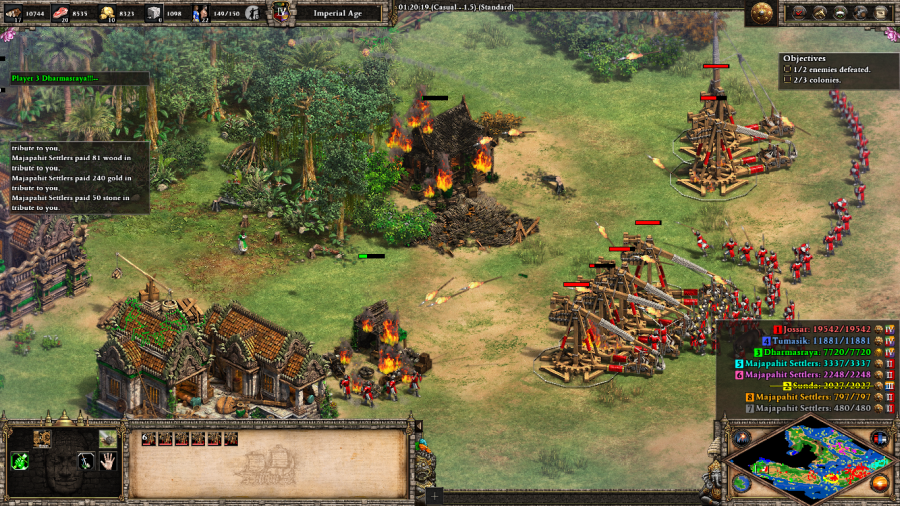 Dharmasraya: We ruled over Sumatra for centuries until you arrived. Does your greed know no bounds? Dharmasraya's intense focus on Archer units means that I have to add a bunch of Elite Skirmishers to the Malayan deathball as I expand throughout Sumatra. Otherwise, there's not really much interesting going on here. Just a long, grindy fight through three layers of defenses, coordinated from land and sea (though you can position yourself far enough inland that eventually their water defenses become irrelevant) before Dharmasraya eventually accepts defeat.  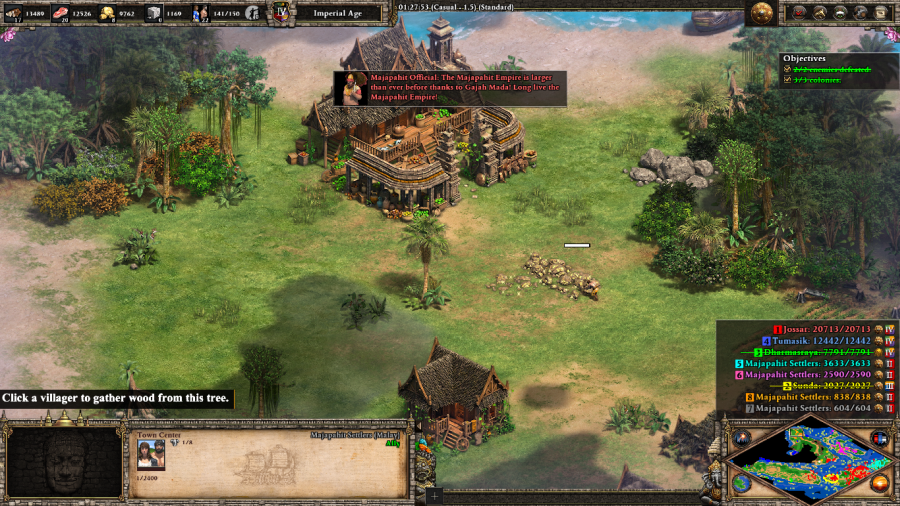 Majapahit Official: The Majapahit Empire is larger than ever before thanks to Gajah Mada! Long live the Majapahit Empire! I prepare for an invasion of Borneo to defend the colonists there long enough for them to build a Market and satisfy the victory condition, but this turns out to be unnecessary as the Tumasik can't invade both colonies at once and while distracted with the southern colony, the northern one rebuilds up to Market level and completes the mission. Mission 3 Ending Text "Even my closest friends doubted me, but I proved my worth. One by one, our mighty armies and majestic fleets conquered the surrounding islands. From Bali, the island of the gods, to the old ruins of the Srivijaya Empire... all now answer to the Majapahit Empire, just as I said they would..." Fun concept, boring map. The beginning has you pressured pretty hard, but once you get past that, it's just about slogging your way to victory. Extra Slides Mission 3 - Intro Slide 1 Mission 3 - Intro Slide 2 Mission 3 - Intro Slide 3 Mission 3 - End Slide 1 Mission 3 - End Slide 2
|
|
#
?
Oct 3, 2023 02:10
|
|
|
I can't believe I binged the whole thread. Thanks Jossar for the great thread, and thanks to all the other contributions like the MP meta and checking some of the game stuff vs historical accuracy. I'll be sure to keep up with it now, instead of waiting 21 very full pages to start.
|
|
#
?
Oct 4, 2023 15:28
|
|


|
This is one of those missions that becomes idiotic on moderate, just a huge jump in difficulty and a brutal onslaught, with hard not being all that different from moderate
|
|
#
?
Oct 4, 2023 15:35
|
|


|
Yeah, definitely. Its a massive difficulty spike in the campaign on moderate. You need a very early castle on the coast to deal with green's navy and transport drops, which means you can't cripple yellow's eco with the castle that Jossar used, so they become free to build a huge army which they will send against you if you try to stop them from stealing resources from your side of the island by killing their villagers. I think you can take resources from the four settler islands freely, which would make things easier, but I never tried it myself. And on top of that, blue sends cannon galleons against you, so you need a large navy to deal with that, too. Its manageable on water once you've got that big Imperial navy with galleons and your own cannon galleons, and yellow aren't a real threat once you're settled in but its an incredibly hectic start and possibly the toughest mission in the game that we've seen so far. biscuits and crazy fucked around with this message at 02:19 on Oct 5, 2023 |
|
#
?
Oct 4, 2023 23:33
|
|
|
Thanks for joining! And yeah, this is one of the many missions that made me go: "No way I'm doing this above Standard."
|
|
#
?
Oct 5, 2023 02:03
|
|
|
Gajah Mada - Part 4: Serving the New King Mission 4 Starting Text "Time is a cruel mistress as I grow older and older. The queen abdicated so that her son, Hayam Wuruk, could take the throne. This does not affect my ambitions. My work is not complete as long as my oath is not fulfilled. Majapahit's navy will go east, towards the small but rich tropical islands of the archipelago. There are as many as the stars in the sky, but they too will recognize my authority... and that of Majapahit's rightful king, of course."  Majapahit Sailor: drat these islanders and their blasted gunpowder ships! I guess we will have to continue on foot for now.  The mission starts with you in control of a couple of Karambits and scripted Champion units, having to run up the island while facing small groups of enemy forces. Shouldn't be too difficult as long as you don't run at them one at a time or something.  Majapahit Sailor: A village loyal to the Majapahit. Here we can rebuild our fleet and bring the fight to the islanders. (after a few seconds) These islands on themselves are to small to provide enough resources for our fleet. We will have to conquer many to get sufficient supplies/ After running up the island, you get control of a starting base. The sailor explains the mission's "gimmick", the islands are all really cramped and have a relatively small number of resources so you're supposed to island hop. But honestly, since you're playing Malay food is covered by the water anyway, wood remains plentiful and since this is a water heavy mission you don't need that many Castles. So really, all you need is to find an island or two with a good gold pile to cover you when the starting island's gold runs out and that's pretty much that problem all solved.   Majapahit Sailor: Ships have arrived to help us deal with the enemy! The enemy factions, primarily among them Makassar, will send up ships to attack your base but with a couple of extra Harbors and these ships that the game hands you, that's enough to keep things under control until you can build up an armada and go on the offense.   Destroying all of an enemy faction's Docks defeats them. Kutai here has two different bases, but neither of them is guarded exceptionally well and you can get away with a light screen of Galleons guarding a bunch of Elite Cannon Galleons as they pound everything into rubble. Sadly, you don't get any unique dialogue for beating any of these guys, the sailor just pipes up about how you've defeated the first, second, and third enemy factions respectively.    Makassar is really more of a hindrance on offense than defense. Apart from having a Castle or two (which they will try to rebuild), once you've crumpled their navy they fall without too much of a fight.    At least on Standard, Luwu doesn't really seem to wake up until you've defeated the other two factions, but at least for me they put up a surprisingly tenacious defense of the city itself. Unlike the other two factions which are represented by Chinese and Vietnamese respectively, Luwu is also playing Malay so they have access to Harbors to defend their coastline. Combined with active shipbuilding and positioning siege units on top of the cliffs to bomb the entrance to the natural harbor, I had to work to bring the mission to a close. Mission 4 Ending Text "Never before has an empire controlled so much of Indonesia. The Majapahit Empire is truly blessed and its reputation spreads. Emissaries from China and India come to our capital bearing gifts in recognition of our power. All that remains is to take the last remaining kingdom on the island of Java. The kingdom of Sunda is a thorn in my side and should not be allowed to exist any longer. My king maintains good relations with Sunda, but I am determined to be rid of them! My oath must be fulfilled!" It's a boring naval mission. The siege of Luwu is just enough to save this one from being completely generic, but it's still not AoEII at its finest. Extra Slides Mission 4 - Intro Slide 1 Mission 4 - Intro Slide 2 Mission 4 - Intro Slide 3 Mission 4 - End Slide 1 Mission 4 - End Slide 2 Jossar fucked around with this message at 01:17 on Nov 5, 2023 |
|
#
?
Nov 5, 2023 01:06
|
|
|
That mission didn't seem particularly inspired, true. Also you just got an injection of three new campaigns.
|
|
#
?
Nov 5, 2023 01:23
|
|

|
Yeah, that, among other reasons, is what encouraged me to get back on the horse. Gotta start updating again or the game's gonna outrun me with new expacs.
|
|
#
?
Nov 5, 2023 01:58
|
|
|
Gajah Mada - Part 5: The Pasunda Bubat Tragedy Mission 5 Starting Text "While I was watching the dancers in the royal gardens, a plan came to me that will ensure the downfall of the Sunda. An arranged marriage between my king and one of their princesses will cause the Sunda to lower their guard. I will then force them, under threat of destruction, to submit to my king's rule. It is a plot worthy of the cunning kancil! My king has ordered me to go to Bubat Square in our capital to welcome the princess and escort her and her family to our palace. For my plan to succeed, not even the king can know of the plot. The Sunda will protest, but with their whole royal family in our city, surrounded by my soldiers, they will have no choice but to submit." 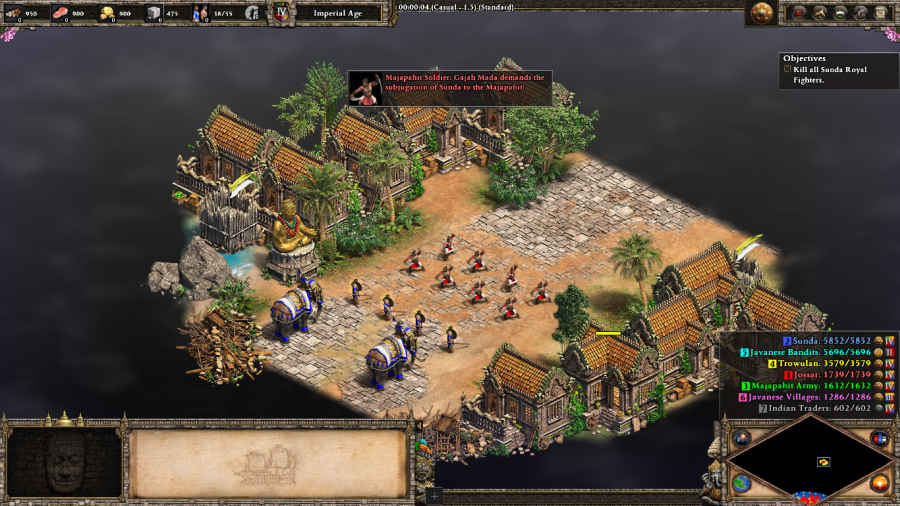 Majapahit Soldier: Gajah Mada demands the subjugation of Sunda to the Majapahit! Sunda Warrior: That is not what we agreed upon! We would rather die as free men than live under Majapahit chains! A scripted battle occurs here, with the Karambit Warriors nominally under your control dying to Sunda's forces.  Majapahit Soldier: The Sunda have the audacity to defy us! We must find a way to break into the city and kill them. And then the mission begins in earnest. Here, your first goal is to grab your forces (including a return appearance by Gajah Mada himself) and organize what you have and maybe a few extra units built at your military camp for a push to the main island and then the capital city of Trowulan by either land or sea.  In either case you will be attacked by bandits, just after the initial setup itself and then spawning more waves every few minutes.  While either method is viable, after the last mission I really wanted to get back on land again, so after preparing a few Transports, I move the entirety of my forces to a landing point directly to the northwest of my base. Fortunately, the bandits are still throwing themselves against my camp's defenses and Sunda itself only has a few ships in the area. There are a lot more of them on the naval path though.  The bandits have a couple of static groups on land, and although this one is pretty straightforward to take out, overall they are surprisingly strong for what feels like it's supposed to be a speed bump on the way to the main fight with Sunda. Also, on the way to the village, an Elephant Rider shows up and tells you that he wants to help out. He's a useful tanking unit, but mostly here to illustrate a theme...   Majapahit Soldier: We cannot risk demolishing our own capital, so we cannot use siege weapons. If we want to destroy buildings, we will have to rely on elephants. Once you get to your village of choice, the game hands it over alongside an additional military encampment closer to the capital. You are then also introduced to one of this mission's primary gimmicks: most siege weapons are disabled, so especially if you are attacking Trowulan via the land route, you're gonna have to do this via the brute force method. Fine by me. King Hayam Wuruk: Gajah, I am hearing some disturbing rumors. Since I trust you, I will not look further into them. Oh, and also King Wuruk pipes up, which via experience with AoEII campaigns indicates that Trowulan is going to backstab you in some way during the siege itself.    First thing's first though, the bandit camps need to be cleared. Doing so gives you a little bit of loot, but more importantly stops their periodic raids. I only bother to clear out the ones directly next to my own bases though, the map is generous enough with resources that I don't feel the need to fight for every single drop of gold.  And while the bandits can get nasty if left to their own devices, as indicated by this fleet torching my original base, they'll generally stay in their own lane. You won't have bandits running across the map just because they can't find a camp in the path you didn't pick.   The siege of Trowulan is another meatgrinder, although there are things that can help mitigate this. There's a trader somewhere that lets you trade gold for Siege Elephants, although this only really helps during the initial push where buildings are a concern and you will mostly want to be using Elite Battle Elephants to soak up damage anyway. This guy was more useful pre-Definitive Edition when you got War Elephants instead. You also get access to the city's military production buildings as you advance. You can't tarry for too long though...  King Hayam Wuruk: The Sunda are our guests! I will not tolerate any harm being done to them! Cease your activities now! Majapahit Soldier: The king does not know what is best for Majapahit. We support you Gajah, but we must hurry! Because starting the assault on the city in anything more than a tentative, probing manner starts a 30 minute countdown timer, after which point you can no longer justify your creative misinterpretation of the king's orders, and you are forced to surrender - thus losing the mission. (Before the Definitive Edition, this used to be tied to a Wonder in Trowulan as a non-aligned Wonder Victory, so it was theoretically possible to blow up the Wonder and avoid the countdown. While the Wonder still exists, the countdown timer is now entirely independent and so you must complete the mission in time, no matter what.)   The final goal of the mission is to kill all of the Sunda Royal Fighters, a non-unique Infantry Hero unit. They themselves are nothing special, but there are a lot of them, spread out throughout multiple plazas, with each group guarded by its own army of Elite Karambit Warriors, Arbalests, Elite Battle Elephants, and Heavy Scorpions. This culminates in this massive pile of troops here in the center of the city. Fortunately, Trowulan never actually turns on you, so the Castle is just set dressing. Unfortunately, Trowulan is mostly still in range of Sunda's navy, so your army's not entirely free of bombardment.  As it turns out, the Royal Fighters are not locked to their plazas and can be baited out to your own fortifications. This isn't a perfect solution because you still need to fight through the city to get to them in the first place and kiting wastes a lot of time, but it does make one or two of the worst fights more manageable.  But ultimately, Sunda just can't compete with my superior economy and its ability to spam out Two Handed Swordsmen and Elite Battle Elephants. Depicted here is Sunda's final stand just before another 80 guys come running over the hill to wipe them out. Majapahit Soldier: We have killed the Sunda princes! Gajah has completed his oath! King Hayam Wuruk: You had better come see me now, Gajah, lest you be declared an enemy of the state. Uh oh. Mission 5 Ending Text "At first, all went according to my plan. My army surrounded the Sunda royal family and I ordered them to surrender their weapons. I was convinced that they would comply. To my surprise, instead of surrendering, the Sunda drew their weapons and attacked my army, even though they were vastly outnumbered. I tried in vain to stop the fighting, but the Sunda were destroyed and my plot crumbled into dust. My own king and his family - the family that I have spend my entire life serving - were disgusted by my actions. When the king summoned me, I could see the disappointment and loathing in his eyes. In tears, he told me that his bride-to-be had committed suicide, and that I had ruined the reputation of our empire. Many in the Majapahit Empire wanted me dead, but because of my long years of service, the king spared my life. Instead, I was to resign and to withdraw to a small mansion in the countryside. Death would have been a less harsh punishment than having to live with this shame. And so, here I am. A lonely old man, once ambitious and young, now trapped in this secluded place. I realize that I was not clever, like the kancil, but rather greedy and blind, like the animals that it misleads. The assassination of the first king, the removal of the prime minister, all of the schemes that I planned and conspired... I let nothing come in the way of my ambitions... and now I pay the price..." A nice change of pace from the last two missions. The time limit on closing things out can be pretty nasty though, if you weren't going into the siege expecting that once you start you have to be decisive and can't just stall out for two hours as a lot of people like to do. As I said at the beginning of this campaign, I do like the story of Gajah Mada, hence picking it as the tiebreaker. This end sequence in particular is pretty well done, and I do appreciate that unlike Francisco de Almeida, Gajah Mada is in fact self-reflective enough to realize at the end of the day that he screwed up, too late for it to matter in the slightest. The gameplay was an incredible slog, starting at the back part of Mission 1 and continuing all the way until the end, but that's pretty much the MO of Rajas, so I can't really hold it against the Gajah Mada campaign in particular. Unless I am well and truly surprised going forward, expect this phrase to be repeated near verbatim for the rest of the expansion pack. Extra Slides Mission 5 - Intro Slide 1 Mission 5 - Intro Slide 2 Mission 5 - Intro Slide 3 Mission 5 - End Slide 1 Mission 5 - End Slide 2 Mission 5 - End Slide 3 Mission 5 - End Slide 4 Mission 5 - End Slide 5 Mission 5 - End Slide 6 Jossar fucked around with this message at 17:31 on Nov 5, 2023 |
|
#
?
Nov 5, 2023 17:17
|
|
|
Campaign Vote #21 A. Suryavarman I - Khmer B. Bayinnaung - Burmese C. Le Loi - Vietnamese D. Tamerlane - Tatars E. Ivaylo - Bulgarians F. Kotyan Khan - Cumans Voting lasts for 24 Hours from the time of this post. In the event of a tie, I will act as the tiebreaking vote between the two tied options. Please bold your vote in order for it to be counted, as well as noting if you are changing your vote from something else. I was tempted to inflict a penance on myself for letting this linger for a month by holding off on adding Last Khans to the pool for a round, but given how uninteresting people found the last vote, I guess I'd be punishing you just as much.
|
|
#
?
Nov 5, 2023 17:22
|
|
|
F Cumans.
|
|
#
?
Nov 5, 2023 22:29
|
|
|
C. Le Loi
|
|
#
?
Nov 5, 2023 22:32
|
|


|
A - Khmer
|
|
#
?
Nov 5, 2023 23:44
|
|

|
A. Khmer
|
|
#
?
Nov 5, 2023 23:55
|
|
|
quote:"As I feared, our king died this afternoon from an unknown illness. In his stead, Tribhuwana became queen regent. Her first act as queen was to retire the prime minister and give his position to me. Jossar posted:The assassination of the first king, the removal of the prime minister, all of the schemes that I planned and conspired... I let nothing come in the way of my ambitions... and now I pay the price..."[/i] Nice little subtle reveal (though you could probably have guessed it earlier)
|
|
#
?
Nov 6, 2023 01:57
|
|

|
A.
|
|
#
?
Nov 6, 2023 04:53
|
|
|
A All I really remember from this expansion is that the jungle maps look pretty, Gajah Mada is not so secretly the source of all his own problems and Le Loi's campaign is pretty hard. I need a refresher about what the other two even were 
|
|
#
?
Nov 6, 2023 12:08
|
|
|
Khmer. The Rajas expansion is the hardest set by some distance, so lets get it done first.
|
|
#
?
Nov 6, 2023 15:45
|
|
|
Vote's closed! Well, that's a pretty commanding lead. Right back into Rajas with the Khmer.
|
|
#
?
Nov 7, 2023 00:06
|
|
|
Suryavarman I - Part 1: Usurpation Age of Empires II: Definitive Edition - Khmer Theme Very well, then let us begin, the tale of the king who obtained nirvana.   Mission 1 Starting Text "Forward march! We do not stop until the sun falls beneath the tree line. I am Sangrama, honored general of the Khmer Empire, tasked with quelling a rebellion. Just a year after the passing of the revered Suryavarman, his successor faces staunch opposition. This chaos threatens to dismantle the empire that took nearly five decades to build. Inspiring an army of largely levy soldiery is difficult. Most are simple farmers and craftsmen, strangers to the ways of war and the grim chaos of battle. They should understand the cause for which they fight. As we trudged through the mud, I summoned the captains to the front of the line. I told them of the events that occurred before many of them were born. They would use this knowledge to inspire their men to fight. Suryavarman was once little more than a magnate with a minor claim to the throne held by another. Udayadityavarman I had established his seat in Angkor, claiming the entire empire as his dominion. Gathering his army, Suryavarman marched on Angkor from the west, establishing a camp not far from the city."  Suryavarman I: From this camp we will build up and strike at Angkor. Udayadityavarman I's reign ends this day! Yes, it's the return of people using regnal numerals when they're the first of their line. At least it sort of makes sense in this case because the narrator is leading troops on behalf of Suryavarman I's successor, Udayadityavarman II. Anyway, the mission starts with a base and a moderate army, including Suryavarman I as a Battle Elephant hero unit.   Your starting army is actually pretty powerful and can knock out several bases belonging to Udayadityavarman's Army, the offensive arm of the enemy factions. There's another fort of equivalent size to the second base at the river and a series of buildings all the way in the east of the map that mirror the one just southeast of your base, but at least for me, destroying the first two was all that was really necessary to functionally neutralize the Army for the rest of the scenario, apart from a few small waves of troops that got deleted by a forward Castle.  So I found that there was nothing really left to do at this point apart from building up a large army of Rams, Battle Elephants, and Ballista Elephants (Khmer unique unit, basically a Scorpion perched on top of an Elephant that can also destroy trees), then going to town on Angkor.  The city has its own local defense forces, but Udayadityavarman I is holed up in a Castle in the city center, protected by an additional guard of Pikemen, Battle Elephants, and Ballista Elephants.   The King will try and make a run for it once the Castle gets low on health, but he doesn't get too far before being squashed by one of the Khmer's relatively speedy Battle Elephants. Khmer Soldier: Udayadityavarman I is dead - victory is ours! Mission 1 Ending Text "The captains listened eagerly as I gave my account of the usurpation. Despite a numerical disadvantage, Suryavarman's tactical acumen proved critical to the success of such a risky offensive. Droves of Udayadityavarman's troops fell to Suryavarman's disciplined infantry and elephant corps. Entering Angkor, Suryavarman gave the order to his disciplined army that the city was to be left intact, the civilians unharmed. He would not begin his rule by committing acts of savage tyranny upon his own people." Pretty quick mission, because it's a complete nonentity. Good opportunity to get used to the Khmer and their unorthodox playstyle, I guess? A lot of their bonuses aren't really great for a campaign setting where it isn't a contest between two symmetrical opponents, so that just leaves leaning on the Elephants and Scorpions theme even harder. Extra Slides Mission 1 - Intro Slide 1 Mission 1 - Intro Slide 2 Mission 1 - Intro Slide 3 Mission 1 - Intro Slide 4 Mission 1 - Intro Slide 5 Mission 1 - Intro Slide 6 Mission 1 - End Slide 1 Mission 1 - End Slide 2 Jossar fucked around with this message at 05:42 on Nov 7, 2023 |
|
#
?
Nov 7, 2023 05:35
|
|
|
Suryavarman I - Part 2: Quelling the Rebellion Age of Empires II: Definitive Edition - Tide Me Over, Warm 'Em Ups Mission 2 Starting Text "Ascent to power does not come easily. Once the head of one beast is removed, three spring to take its place. Thus it was with Suryavarman's enemies. Rebel factions sprung up to the north, east, and south of Angkor. Legions of disgruntled soldiers marched on the city, threatening to topple Suryavarman just as quickly he had ascended to power. The most dangerous rebel faction was led by Jayaviravarman, a warlord from Malaysia with a distant claim to the throne. Advancing from the south at a rapid pace, he acquired much support from the local populace. Suryavarman had to act quickly. The rebel forces, were they to unite, would present quite a challenge to an army that had only recently emerged victorious from a grueling campaign. There was precious little time to spare."  Suryavarman I: The rebel scum threaten us from three directions. Strike them down quickly before they can pool their forces! In this mission, you're given a very large base from which to begin your conquest. The goal of the map is simple enough - defeat all enemy factions.  Almost immediately, Jayaviravarman's Army will start sending ships up the river to attack your base. The raids from the sea are constant throughout the mission, and are difficult to eliminate unless you commit to a naval assault of the Jayaviravarman Army's primary base to the south, which considering that you're stuck in Castle Age, isn't going to do much against anything except the Docks themselves. Also, that doesn't really help with the other two factions' forces. Better to just build a few Fire Ships on defense where needed and keep to land.  There's a couple relics scattered around your base, and in neutral territory, like the one sitting underneath this Buddha statue. Your enemies also have a few as well. This is a map that's out for blood, and more than happy to hand everyone the resources to make that come to pass.    After a little bit of build up, I march my forces through the Northern Rebel bases. The trick to this mission is each of the enemies has three camps, each guarded by a Tower or a Castle. Defeat the individual camp's defensive structure, and the game hands over that camp's buildings. Because the map is divided three ways, a divide and conquer strategy is preferred, as if you act quickly enough, as in this case, you can knock a faction out of the fight before they ever really get started. Northern Rebels: Please, forgive us for our rash rebellion! We will serve you now.   The exponentially growing herd of elephants continues to wreak havoc as I move through the two easy Eastern Rebel bases, but...   Jayaviravarman's Army finally takes the opportunity to start attacking in force. I have to split my attention putting out all these fires on the home front simultaneously, which puts my assault on the final Eastern Rebel base on hold for a couple of minutes.   Once that's resolved, it's time to finish these guys off. Unlike the Northern Rebels, the main Eastern Rebel base is fairly sprawling and also contains a Monastery with a relic in it. As a result, they put up a much tougher fight, including constant attempts at trying to convert my elephants. But, with the Ballista Elephants on anti-unit duty, the Battle Elephants are free to tear the Castle down. And then there was one. Eastern Rebels: We have paid dearly for our folly, Suryavarman. We will fight you no more.  Speaking of which, time for another cross base raid. Makes me feel like I'm playing AI War instead of AoEII.    The pattern continues even as I take the Jayaviravarman Army's outlying camps. Guess that means I'd better finish off the man himself before they get another shot.  The final fortress is a deathtrap, although the majority of my troops being Elephants helps mitigate the damage from the multiple Castles. Gotta be on the lookout to focus fire down enemy Pikes though. Jayaviravarman is a Karambit Warrior hero unit and his personal guard is a small selection of the best Imperial Age units that the Malay can throw at you (and some Imperial Skirmishers for some reason), but there aren't enough to save the rebel king from his fate. Only when Jayaviravarman's entire personal force is dead and both Castles have been destroyed is victory secured. Suryavarman I: The scum Jayaviravarman lies in the dirt, his forces broken. The south will oppose us no more! Mission 2 Ending Text "Humans are interesting creatures. At times they display incredible brilliance, and yet at others they behave like obstinate fools! One can only wonder at the folly that caused the rebel factions to not coordinate their forces. A bundle of sticks is difficult to break, but individual twigs snap with ease. Suryavarman's victory assured that his soldiers would not be forget this lesson." This one was pretty fun, but man oh man can I see it becoming a real nightmare on higher difficulties. Especially if you don't seize the battle's tempo really early on, as Jayaviravarman's Army and at least some of the rebel groups decide to start dumping troops towards your base. Extra Slides Mission 2 - Intro Slide 1 Mission 2 - Intro Slide 2 Mission 2 - Intro Slide 3 Mission 2 - Intro Slide 4 Mission 2 - Intro Slide 5 Mission 2 - End Slide 1 Mission 2 - End Slide 2 Mission 2 - End Slide 3 Jossar fucked around with this message at 03:05 on Nov 8, 2023 |
|
#
?
Nov 8, 2023 02:59
|
|
|
Suryavarman I - Part 3: A Dangerous Mission Mission 3 Starting Text "As the empire boomed, its neighbors became wary. They knew that a growing tiger will gorge itself on the prey that it deems most vulnerable. Some dreaded the looming war and prayed that their fears were unjustified. Others prepared for it. The Kingdom of Tambralinga, a vassal of the great Srivijayan thalassocracy, felt particularly threatened by Suryavarman's ambition. The empire was surrounded by hostile neighbors and conflict was imminent! It seemed that the only thing left to question was who would strike first. Suryavarman was wise enough to know that passivity would only lead to disaster. The various Burmese kingdoms to the west of the empire were hostile, but a potential ally lay beyond. The Cholas, a powerful dynasty based in the south of the Indian subcontinent, also desired to bring about the downfall of the Srivijaya. Dispatching an envoy laden with gifts could be enough to convince Rajendra Chola that an alliance with Suryavarman would be to his liking."  Suryavarman I: The road west is perilous. You may have your pick of as many troops as you can afford to pay with the gold I have given you. The mission starts with you in control of the Envoy (a Light Cavalry hero unit), the Grand Chariot (a self-healing Trade Cart), and a small group of soldiers. Standard difficulty comes with a Monk, but on all other difficulties you have to bear any losses you take without mitigation.  There are four groups of soldiers to hire, with you having enough gold for two of them. As usual for Khmer, I grab the groups with the elephants and move on. Note that the game will not allow you to continue until you've spent your gold.  Harbormaster: Our last ship is... not fit to sail. These scouts will help you find another way to cross the river. A truly masterful understatement, Harbormaster, if ever there was one. Thanks for the Scouts.  Scattered across the countryside are these groups of Hostile Locals, with a pretty wide range of troops across the various Rise of the Rajas civilizations, including their unique units. These are the mission's primary threat, but the smaller groups can be dispatched with minimal effort.  Envoy: With these ships, we will seize control of the water and send any enemy vessels to the bottom of the river!  That's two Heavy Demo Ships, a Fast Fire Ship, and two 20 unit Transports, more than enough to deal with anything that the locals can bring to bear and get everyone across the river in one go.  While it is possible to keep going further north along the river, the only reason you might want to do so is to discover a group of troops hidden in the middle of the jungle. But it's not really worth it, better to just embark as quickly as possible and keep moving.  From this point onwards, there are a lot of small enemy patrols which need to be taken care of in order to maintain steady progress.  Khmer Soldier: An enemy outpost lies to the west. I would advise you to take the southern route. There are also 1-2 groups of recruitable troops who provide advice on the safest possible route through the rest of the map.  This is about the only serious fight I have throughout the entirety of the mission, that Mangonel is annoying, but not enough to deal with all my troops at this point.   Swordsman: Here they are! Do not let them reach the port! Oh whoops. This is supposed to be the real final fight, but since I got bored and decided to have my Ballista Elephants cut through the jungle, I managed to bypass it entirely.  Envoy: Sailor! Book me passage on the nearest ship bound for Chola lands. Mission 3 Ending Text "Despite the hardships of the journey though hostile territory, the diplomatic convoy arrived in Chola lands largely intact. Rajendra Chola was pleased with the gifts that the envoy lavished upon him. Particularly impressive was the grand chariot, a work fashioned by the finest craftsmen in Angkor! Generous offerings and well-chosen words go a long way with a magnanimous ruler. A bargain was struck, and the envoy returned to Angkor, bearing news of the alliance." Reminds me of the first Joan of Arc mission or the third Gurjaras mission, but more boringly executed. Yawn. An interesting fact to note though, is that this mission and the next one are paralleled in the Rajendra campaign later on in Dynasties of India, where you play as the Chola instead. Extra Slides Mission 3 - Intro Slide 1 Mission 3 - Intro Slide 2 Mission 3 - Intro Slide 3 Mission 3 - Intro Slide 4 Mission 3 - Intro Slide 5 Mission 3 - End Slide 1 Mission 3 - End Slide 2 Mission 3 - End Slide 3 Jossar fucked around with this message at 03:50 on Nov 9, 2023 |
|
#
?
Nov 9, 2023 03:45
|
|
|
quote:An interesting fact to note though, is that this mission and the next one are paralleled in the Rajendra campaign later on in Dynasties of India, where you play as the Chola instead. That's cute, I like that. Ultimately there's a limited number of viable scenarios they can play out so I don't mind repetition too much so long as it's an interesting mission type with a couple wrinkles thrown in, even if they start to repeat themselves, so long as the combination is different.
|
|
#
?
Nov 10, 2023 00:32
|
|
|
Suryavarman I - Part 4: Challenging a Thalassocracy Mission 4 Starting Text "With the alliance made and the pieces on the board, conflict was inevitable. The Tambralingas themselves posed only a token threat, but they had the support of the immense naval empire of Srivijaya. The prowess of the Srivijayan navy was unmatched, but their coalition was at a strategic disadvantage. The Khmer forces threatened the enemy by land from the north and by sea from the east, while the Cholas struck out from the west. The enemy found themselves surrounded on all sides. Suryavarman sent word to the Chola force to establish a foothold on the Malay Peninsula. Taking the initiative, he ordered the outfitting of a massive navy to challenge the Srivijayans and Tambralingas for maritime supremacy. Everything hinged on the success of the Chola force that had landed on the mainland. If they could present a formidable enough threat and occupy the enemy land forces, Suryavarman would be able to wrest control of the water and launch a devastating amphibious invasion. If the Cholas were driven from their foothold, the Khmer would be forced to face down their opponents alone � a prospect that Suryavarman preferred not to contemplate."  Suryavarman I: Our Chola allies have established a foothold in Tambralinga lands. It must be held at all costs!  This mission is another one of those ones that feels like a PvP scenario rather than a campaign mission: It's functionally a 2v2 Islands slapfight, but with Tambralinga having a set of bases on your island, the Chola being located on the main enemy island, and the enemy team controlling the middle of the map to start.  While both enemy factions will attack you, Srivijaya's AI seems to be much more aggressive, constantly attacking you via the sea from the word go. You have to simultaneously manage building up your economy while fending off their raids at the same time.   I burn most of my starting land forces bumrushing Tambralinga's bases on my island. It's a big expenditure of resources, but getting the island all to myself really early on and establishing a perimeter that's difficult for the enemy team to break through is worth the cost.  Fortunately, Chola does pull their weight on this mission: the initiative still mostly lies with the player, but they do a decent job of distracting the enemy team with naval assaults and can even take out one of Tambralinga's bases on their own if not too heavily pressed. Helps that with the Dravidian unique naval unit, they only need to build a few to have an outsized impact.  After taking out Tambralinga's more centrally located base on my island, I fight my way through Srivijaya's attempts at area denial to turn it into a conveniently located launch pad for my own shot at driving them off the water.   The most important part of this is taking control of the central islands. Tambralinga doesn't provide too much of an obstruction, especially now that I'm fully able to team up with my allies. After knocking them off the island, I move my own Villagers on to fortify the place, grab the relic, and collect mineral resources.  Srivijaya's island is a tougher fight, especially since it's protected by a Castle, but I'm able to distract it with my boats for long enough to have a few Trebuchets do their work. Then I repeat the claiming process from the other island. This marks the point at which the initiative has fully turned in my team's favor. Srivijaya and Tambralinga won't stop producing boats until all of their Harbors and Docks are destroyed, but they're very much on defense from here onwards.    I decide that Tambralinga has been sufficiently neutralized, such that I'm going to focus entirely on delivering the knockout blow to Srivijaya first. After a big sea battle, my ships bombard as much of their coastal production zone as possible until I can send in the Elephants and Trebuchets to finish what's left on this part of the map.  Because my economy is primarily geared for boat production, moving further inland is a bit slower than I'd like, but even with a better protected fortress, the Srivijaya are on their last legs and have nothing left with which to contest my arrival. Suryavarman I: Even the Srivijayan thalassocracy is no match for the Khmer-Chola alliance!  The Tambralinga are almost an afterthought. As mentioned before, the Chola took out Tambralinga's main economic production hub on their own initiative, and I only need to take out the resource-depleted military production hub, before doubling back to destroy a few scattered buildings and finish Tambralinga off for good. Suryavarman I: The feeble Tambralingas are no match for our glorious armies! Mission 4 Ending Text "Storms raged as wooden vessels rammed into one another, a deafening sound prefaced by the whistling of projectiles through the air. Thousands of men sank below the angry waves, never to rise again. The Chola land force fought bravely, holding to the last. Just as it seemed that they were to be defeated by the Tambralinga-Srivijaya force, salvation arrived in the form of swarms of Khmer. Victory has a glorious taste. Over the course of a single conflict, the influence and power of the empire were raised to unprecedented levels." Like Mission 2, this is a fun mission that is almost certainly a nightmare on higher difficulty levels. Props to the developers for keeping the water action engaging and competitive, which as we've seen even in this very expansion pack is no easy task. Extra Slides Mission 4 - Intro Slide 1 Mission 4 - Intro Slide 2 Mission 4 - Intro Slide 3 Mission 4 - Intro Slide 4 Mission 4 - Intro Slide 5 Mission 4 - End Slide 1 Mission 4 - End Slide 2 Mission 4 - End Slide 3 Jossar fucked around with this message at 04:29 on Dec 4, 2023 |
|
#
?
Nov 10, 2023 02:32
|
|
|
SIGSEGV posted:That's cute, I like that. The missions are a little bit different, especially the first one, so it isn't quite literally just swapping factions. But yeah, it's fun to see some more of these campaigns reflect on the idea that the depicted events aren't occurring in a vacuum.
|
|
#
?
Nov 10, 2023 02:35
|
|
|
Suryvarman I - Part 5: Nirvanapada Mission 5 Starting Text "With the maritime rivals of the empire crushed, Suryavarman set his sights on the mainland. As the war with the Tambralinga-Srivijaya alliance had progressed, it had not escaped his attention that rivals closer to home had been plotting and wishing for his ruin. The rulers of the various Burmese and Cham kingdoms slunk around in the shadows like disgraced cowards. Instead of recognizing the superiority of their larger neighbor, they deviously plotted its downfall and encouraged rebellion within it! This behavior was unacceptable. Suryavarman's enemies may have been too intimidated to face the Khmer juggernaut head-on, but Suryavarman had no reservations about challenging his neighbors. It was high time that the empire saw further expansion. The Mekong and Chao Phraya rivers snaked through rich, fertile lands held by decadent, unstable kingdoms ripe for conquest. Triumph would add yet another achievement to Suryavarman's legendary military record."  Suryavarman I: Bountiful lands surround us, ripe for the taking. We shall build an empire to last a thousand years! This mission starts you off with a large base and plenty of resources. The goal is to conquer three enemies or build a Wonder.   Suryavarman I: Defend the Wonder from the enemy onslaught! In all honesty, the game really shouldn't have given you the latter option. Even on harder difficulties, it's far too easy to just build the Wonder immediately and run out the timer before anybody comes close to pressuring you.  Southern Cham (and occasionally Northern Cham) will send boats to attack your coastline, but they can pretty much be warded off indefinitely by a coastal Castle.   Here, Southern Cham sent a Ram to attack the Castle, to which I responded with a punitive expedition, but didn't really commit enough to take them out entirely.  At a half-hour in, Hariphunchai finally gets off their rear end to attack my outposts, but they're not even interested in getting down to the Wonder and the clock's about to run out anyway. Other things of note: - There are 9 accessible relics on this mission, collecting them gets you an achievement. Most of them are easily reached from your base, but the Lavo Kingdom tries to grab them as quickly as possible, so unless you're very quick, it usually requires you destroying Lavo to accomplish. - On top of this, Srivijaya periodically sends in shipments of 500 Gold, so gold is really not an issue on this map. - At around 40 minutes, Dai Viet (who doesn't count as an enemy faction that you need to destroy even though they start off non-allied) will offer you an alliance in exchange for 1000 Gold, and will do a decent job at fighting the Northern Cham. Mission 5 Ending Text "Hegemony is a wonderful thing. The power and prestige of the Khmer Empire reached new levels under Suryavarman I, and all prospered. Despite being known as a great conqueror, Suryavarman was not simply a militaristic aggressor. His reign was marked by vast improvements in the general infrastructure of the empire and an emphasis on religious toleration. He erected numerous palaces and temple complexes and ruled benevolently. His legacy lives through these structures, the pride of our citizens, and the strength of the Khmer Empire. This legacy is a cause worth defending. It is this notion of greatness that you must invoke to electrify the minds of the common soldiery." Was debating whether to do this scenario by taking out the enemy bases instead, but even then it still looks like a very standard, straightforward "destroy the enemies" mission that wouldn't give an interesting photo gallery for you readers. Asehujiko said they couldn't even remember what this campaign was about, and... yeah, fair enough. There were a couple of good missions involving crushing people beneath the feet of a hundred elephants, and none of the others were really "bad" per se, but the Khmer certainly aren't winning any awards for anybody's favorite AOEII campaign. Extra Slides Mission 5 - Intro Slide 1 Mission 5 - Intro Slide 2 Mission 5 - Intro Slide 3 Mission 5 - Intro Slide 4 Mission 5 - Intro Slide 5 Mission 5 - End Slide 1 Mission 5 - End Slide 2 Mission 5 - End Slide 3 Mission 5 - End Slide 4 Jossar fucked around with this message at 02:14 on Nov 12, 2023 |
|
#
?
Nov 12, 2023 02:08
|
|
|
Campaign Vote #22 A. Bayinnaung - Burmese B. Le Loi - Vietnamese C. Tamerlane - Tatars D. Ivaylo - Bulgarians E. Kotyan Khan - Cumans Voting lasts for 24 Hours from the time of this post. In the event of a tie, I will act as the tiebreaking vote between the two tied options. Please bold your vote in order for it to be counted, as well as noting if you are changing your vote from something else. (Or just go and vote for me to redo the last mission "properly", I guess.)
|
|
#
?
Nov 12, 2023 02:08
|
|
|
E Cumans. Wonder victories are legitimate victories, they certainly count for enemies in campaigns so there's no shame in using them when given.
|
|
#
?
Nov 12, 2023 02:13
|
|
|
Cumans Nothing wrong with a wonder victory. I wish more scenarios were defensive (or had a defensive option like that one did). Defensive play in AoE2 is super fun.
|
|
#
?
Nov 12, 2023 02:36
|
|

|
A Burmese there's a definite step up in quality when we get into the DE era, so I think let's just get the rise of the rajas out of the way
|
|
#
?
Nov 12, 2023 10:35
|
|
|
I agree, go for A. Burmese
|
|
#
?
Nov 12, 2023 10:38
|
|
|
A Arambai are a pretty fun unit.
|
|
#
?
Nov 12, 2023 15:08
|
|
|

|
| # ? May 16, 2024 16:49 |
|
|
A
|
|
#
?
Nov 12, 2023 16:39
|
|