


|
 *CONTENT WARNING!*: Fear & Hunger is an extremely grimdark game with plenty of content some may find upsetting. The game contains scenes of mutilation, sexual violence, body horror, exposed genitalia (both heavily deformed varieties as well as the occasional nude though not really graphic human sprite), drug use and themes of suicide and mental breakdowns. Essentially if it seems like a really edgy thing to put in a game, Fear & Hunger probably at least references it. Viewer discretion is strongly advised. The Game Fear & Hunger is a 2018 horror/Role-playing game made in RPG maker with extremely spaghetti custom code, created by Finnish independent developer Miro Haverinen AKA Happy Paintings AKA Orange~. (Mans is like a rapper with all these aliases) Billed as a horror dungeon crawler with roguelike and JRPG elements (though the roguelike aspect is about as tacked on and loose as that term gets), the game is an unholy conglomeration of trial-and-error, buggy coding and edge. Heavily inspired by Berserk, (by orange's own admission and obvious to anyone who has read/seen the series) Fear & Hunger seems to have been made under the impression Darkest Dungeon was too cheery and optimistic and decides to approach the medieval fantasy genre in the most grimdark way imaginable. The usual suspects of permadeath and sanity decay are present, but Fear & Hunger also features the possibility of permanent limb loss, death by infection, states where the game is technically playable but effectively unwinnable, and loads of beginner traps where the only way to realistically get around them is either blunder into them and use the knowledge gained to avoid that in the future, or use a guide. In terms of atmosphere and story content, the game is unashamedly edgy and checks all the boxes you'd expect for a Grimdark game. While my sardonic approach to describing all this might sound negative, I actually really love the game for how much it does not care what people will think of it, and I respect how hard it goes. And if you're willing to put up with the transparently unfair gameplay loop, this game is great fun to delve into and learn about, and is very rich in tension. And I hope to demonstrate why I think it's pretty great to you, the viewer, with this let's play! The Let's Play Per my standard, we'll be delving into this game about deep as I can go without dedicating my life to it. We'll be completing successful runs of the game with all characters, obtaining all endings in the standard game, and then obtaining each character specific ending in the game's ultra-sadistic Hard Mode. We'll also be doing at least one playthrough of the parody dating sim mode the game gives you a code for upon completion, though I will not personally commit to every ending you can obtain from that. I will also be sure to show off as many major worthwhile secrets in the game that might be worth routing into a playthrough if you were tackling the game yourself. For anything I don't feel is worth personally going for but I feel is notable enough, I'll likely link to videos from the channel NoCommentary,* a Fear & Hunger fan channel that contains videos for just about any obscure event or secret you could possibly think of contained in both games in the series. With all that being said, The Videos *IMPORTANT NOTE*: While a censorship mod does exist for the game, it excises about 30-35% of the graphics from the game. Having to describe what you're supposed to see would get old fast, so I won't be using it. It's also highly impractical for me to censor anything I'd feel worth it personally, as it would turn the videos into an editing nightmare. With that established, these videos will be covering the unmodified game, and thus I will be age-restricting them as to not run afoul of Youtube's guidelines. While I sincerely doubt anyone under the age of 18 will be seeing this thread, it is worth noting you will need a Youtube account with the age tied to the account being 18 or over to actually watch these videos. Part 1, Institutionalized Part 2, Barbed Wire Part 3, Mortal Man Part 4, Dying of Thirst Part 5, m.A.A.d city Part 6, GOD. Part 7, Sherane a.k.a Master Splinter's Daughter Part 8, HUMBLE. Part 9, Rigamortus Part 10, DNA. Part 11, FEAR. Part 12, The Art of Peer Pressure Part 13, LOYALTY. Part 14, Money Trees Part 15, Real Part 16 (Finale), HiiiPower Full Let's Play Playlist Supplemental Character: The Outlander, Ragnvaldr Character: The Knight, D'arce Character: The Dark Priest, Enki Character: The Mercenary, Cahara Characters: The Girl and Moonless Characters: The Prisoner and The Sorcerer*Spoilers!* Characters:Blood Golem, Ghouls, Skeletons, Marriage and Abominable Marriage*NSFW Imagery* Characters: Baby Demon and Kid Demon Enemies Pt.1*NSFW Imagery* Enemies Pt.2*NSFW Imagery* Enemies Pt.3 Enemies Pt.4*NSFW Imagery* Enemies Pt.5*NSFW Imagery* Enemies Pt.6 Enemies Pt.7 Enemies Pt.8 Enemies Pt.9 Enemies Pt.10 The Final Enemies Mechanics: Status Ailments Mechanics: Limb Loss and Defense Mechanics: Random Elements Mechanics: The Hexen Mini-Mechanics: Soul Stones Mechanics: Magic Mechanics: Hidden Skills Mini-Mechanics: Running From Battle Mechanics: Difficulty Levels Mechanics: Endings Mechanics: Penance Armor Interested in more Fear & Hunger? You're in luck if you don't want to wait for more videos for this let's play to drop, as I also have an ongoing Let's Play for the sequel, Fear & Hunger Termina! Currently this playthrough is on hiatus as I await the next content update, but you can find the ongoing thread at LPBeach (I hope to cross post this thread to SA once it resumes), as well as the playlist of the videos for it here. The sequel contains references to the previous game but otherwise has a standalone plot, so you can easily enjoy as a companion to the first game if you're so inclined! *Unfortunately, towards the tail end of this LP NoCommentary seemingly hit his own channel with a Dim Mak, rendering any supplemental videos I could pull from it unavailable. CullenDaGaDee fucked around with this message at 01:07 on Feb 12, 2024 |
 #
?
Dec 30, 2023 04:19
#
?
Dec 30, 2023 04:19
|
|


|

|
| # ? May 4, 2024 16:36 |
|
|
https://www.youtube.com/watch?v=X3Zi3VmE9wo Our first video, and our first foray into the dungeons of Fear & Hunger! For this first playthrough, we shall be choosing the Outlander as our character, as he is a character with equal pros and cons I feel, and a good way to explore multiple facets of the game on a first playthrough. While the Mercenary and Knight are better starting choices, I have a particular set of endings in mind for each character, so Outlander feels like the most appropriate to start with. (He'll also be the character we end with, but I'm getting ahead of myself saying that.) This game kind of forces a quick pace on the player if you don't want to run your resources dry in a hurry, so I don't dwell on anything for too long within the videos, or at least I try not to. That said, I have included timestamps in the description of the video if you're not interested in hearing things like character breakdowns or backstory choices, so feel free to jump around if any one section of the videos are too boring to you. In the interest of elaborating on the more obfuscated mechanics of the game, I'll use these video posts in the thread to add some liner notes about things in the video I might have brushed past. -For the most part, enemies on the standard Fear & Hunger difficulty are not particularly resilient so attacking parts of the enemy that look dangerous is almost always a winning move. Some enemies are more threatening than others regardless of whether or not they have limbs, but by the time you run into those enemies you'll usually have more reliable ways to kill them. With two party members, even one as weak in offense as The Girl, we can easily dismember things like Guards or even ghouls before they pose a serious threat. -Relatedly, whenever a specific part of an enemy is tied to an action, that body part flashes when they perform the action. Take note of this for potentially dangerous attacks, or in the case of something like the Jaggedjaw take note of which dog is barking so you know which one is forcing the coin toss. -It bears reiterating that any coin of judgement toss that happens in battle can be deftly side stepped by having your team leader guard the attack. While it is simply trial and error figuring out when these attacks happen, they are consistent in every event so be sure to memorize when an enemy forces a toss on you. -Fully dismembering the enemy isn't always the smartest thing! While I demonstrate the safety loop for a Guard in the video, it's worth noting that if you destroy all the guard's attacking limbs, he will resort to tackling and can deal damage, something he cannot manage if you leave the right arm intact. -In addition to random loot from all resource points in the game, the game has a handful of layouts for every map in its first half. Generally speaking, every area up until Level 6 (With the exception of the Blood Pit which is always the same) has 3-5 different map layouts the game rolls at random when starting a file. All these layouts are rolled independent of each other, so seeing one variation of a map doesn't guarantee you'll see another. Some variations of the map contain elements other variations do not, so you are actually unable to see certain Easter eggs or gain certain rewards depending on the map lay outs you got. -There are alternative routes into the level 3 Basement and Prison, but we'll be going the standard path through the dungeon in this first run. -It's worth noting that from the moment you enter the dungeon, a timer begins ticking down and should this timer expire, you're locked out of a specific ending path. This timer is around a half hour, so it's already long expired by the end of the first video, but I did not plan to get this ending for this run anyway. -If Marksmanship isn't your kettle of tea when playing as the Outlander, then the first soul stone should go to Blood Portal. I'll be picking up Blood Portal later in this run, since it's not super critical we get it right away. -Not really an important note, but at the behest of Danaru, I will be doing my best to shield The Girl from as much degeneracy as possible in the Dungeons of Fear & Hunger. This will be an uphill battle at many points. If there's anything unclear to you in the video or you'd just like more info on a particular topic, don't hesitate to ask! This game is absurdly obtuse on purpose, so learning about it is a big part of the fun I feel. CullenDaGaDee fucked around with this message at 06:33 on Dec 30, 2023 |
|
#
?
Dec 30, 2023 04:41
|
|
|
Fear and Hunger is one of those series (there's a sequel) that I basically only engage with from a distance. I'd probably hate playing it but the lore and side stuff intrigues me.
|
|
#
?
Dec 30, 2023 05:22
|
|

|
Supplemental: Enemies Pt. 1 In the interest of making it clear why I take the actions I do in the event we have to fight something, I wanted to write up a breakdown of every enemy we encounter, or can potentially encounter, in the videos as I make them. These sections will be dedicated to all the hot tips when it comes to besting enemies in the dungeons of Fear & Hunger. Jaggedjaw 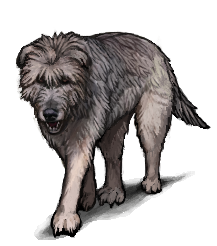 Phobia(s) Triggered: Zoophobia 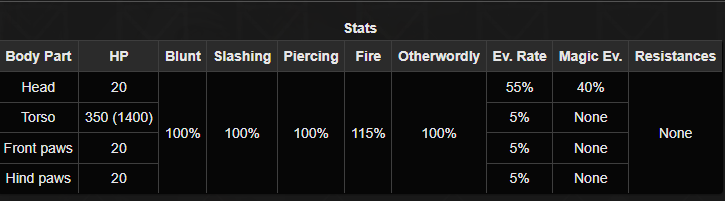 A handful of things I need to establish before jumping into describing the enemy specifically: All of these stat boxes are sourced from Tormentapedia, the dedicated Fear & Hunger wiki that has pulled the data directly from RPG Maker. (Hosted on the ggwiki format, the fandom variant is an abandoned joke of a wiki that has fallen to hackers) On Terror & Starvation mode, many enemies have more HP on their limbs and torso, but the Jaggedjaws are not one of them. The parenthetical value next to torso HP is the "True" Value. This value is how the game determines the damage of Damage over time effects like Poison and Burn. The value outside of the parenthesis is the "Break" value, the amount of damage you need to inflict to actually kill the torso, which is usually around a quarter-30% of the True value. Should the torso die, so does the enemy. Finally, those evade rates are the innate chance an attack has to fail and cannot be modified no matter what. Each weapon has its own accuracy value, so typically your actual odds to hit a limb are around 90% or so rather than 95%. It's worth noting that to compensate for most enemies not having magic evade on most of their limbs, most spells have a baked in failure chance to avoid them having perfect accuracy. The enemy dies if their Torso Break Value is depleted, or if their Head HP is depleted (with some exceptions to the latter), but the Head has high evasion by default and is its own coin flip to hit. Destroying the enemy's legs disables the head's evasion completely and makes it a truly guaranteed hit. With that being said, Jaggedjaws are one of two typical causes of death for new players. Idle around the entrance too long, and these guys show up to ruin your day. Jaggedjaws are actually two enemies represented by a single sprite, so those 3 that appeared at the start of the video were actually 6 altogether. Most enemies in Fear & Hunger are solo combatants, but Jaggedjaws are among the handful that aren't. They are absolutely nasty, hitting for over 30 damage if you don't have good armor and inflicting the Bleed and Infection status to slow burn you. Additionally, on their second turn, one of the dogs will initiate a coin flip attack that results in an instant kill if you fail it, though due to some slapdash implementation, it is possible to escape it if you're right by a door. At 350 HP on the torso, taking them out in a single hit is also a lost cause at the start of the game, even if you take the axe for the Outlander. That said, there is what I call a Safety Loop in this fight. A Safety Loop is a situation where you can lock the enemy in an AI pattern where they either won't hurt you, or functionally cannot hurt you. Jaggedjaws have the simplest Safety Loop in the game: If you have a Stick in your inventory, you can use the Talk command and select an option to throw it. This will cause the Jaggedjaws to lose sight of the battle and proceed to do nothing. The Jaggedjaw that barks will still launch its coin flip attack, but after you guard that you can simply kill it in a matter of two turns and not have to deal with the flip for the remainder of the fight. The non-barking Jaggedjaw will just be slack jawed and can be killed at your leisure. As long as you have a Stick and play the fight correctly, these things cannot hurt you. Random trivia, the Jaggedjaws are based on the Irish Wolfhound. Which is to say, Orange traced a stock photo of an Irish Wolfhound to create the battle sprite for them.  Guard 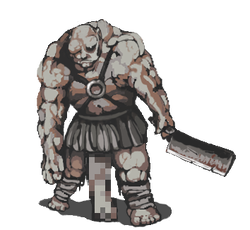 Phobia(s) Triggered: Erotophobia, Teratophobia 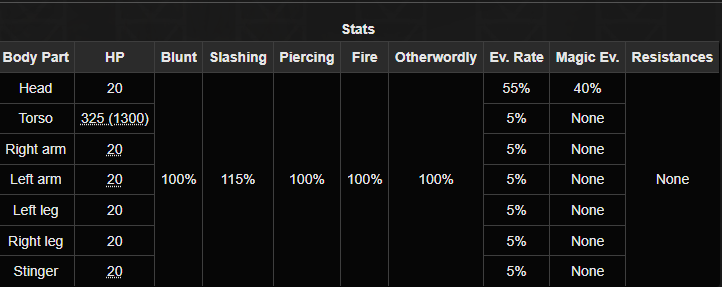 *On T&S/Hard Mode, the Torso has 625(2500) HP and the arms and "stinger" all have 250 HP Big ups to the wiki for blurring the dongs of the sexually charged enemies, allowing this thread to retain some of its dignity [/s]. Anyways, these guys are basically the gigacocked mascots of Fear & Hunger, letting you know exactly what the game is about at a glance and being a microcosm of every way a fight can go wrong in one convenient tutorial encounter. Every turn, the guard will hack at you with his Machete, which has a guaranteed chance to cut off one of your own arms, inflicting bleeding and robbing you of the ability to use shields and two handed weapons. Get whacked again, and you can't equip any weapons or shields! The Stinger only periodically attacks but hits for big damage when it does. And the Right Arm is tied to a coin flip attack that goes off in a pattern of turn 2, 5, 8, 11, etc. While the coin flip is not an insta kill specifically, it is a 5 hit attack that does about 18 damage per hit with your starting armor in play and essentially guarantees a death if you already got nailed by the machete. If new players don't get eaten by the Jaggedjaws at the entrance, a lot of them fall to this guy not expecting a real fight at the beginning of the game. (There are many testimonials on the Steam forums about this) That said, at least on Fear & Hunger mode, they aren't too difficult to engage with. I wouldn't recommend fighting them right out the gate with only your main character, as there's around a 10% chance any attack you launch will miss, and missing the machete arm is a disaster in progress. Once you have literally any party member that can inflict at least 20 damage to accompany you, these guys have a very simple pattern to follow. Take out the machete arm first turn, guard on the second and attempt to sever the stinger, and then just focus the torso from that point if the stinger was destroyed and guard again if you reach turn 5. Follow this pattern, and you'll usually end the fight with no damage taken if the Stinger didn't launch an attack, and it very rarely does. They're much more dicey to fight on the harder difficulties, requiring a minimum damage of 250 to safely make it through their attacks, but they're too difficult to avoid until you can manage that. One important thing to note about the Guard is they are the first enemy that exhibits a mechanic I call "Death Throes". Essentially, certain enemies are capable of still launching one last attack on a turn they would otherwise die. If the Guard is capable of attacking on a turn he has run out of Torso/Head HP, he will do so with the exception of the Right Arm coin flip, which will be skipped. This is important to keep in mind if you try to kill him with torso shots before destroying the machete arm, as he can still whack you with it before keeling over. Also keep in mind that if the Right Arm is destroyed along with the rest of his limbs, a Guard will resort to tackling for around 18-20 damage. The Safety Loop for this fight is destroying the machete arm and the stinger and leaving the Right Arm intact. Doing so will prevent tackles from going through, and leave a coin flip attack with a consistent pattern that can simply be guarded or even just ignored when Death Throes comes into play. The only other thing to note about the Guard is he has unique events that can happen should you lose to him that have a 1/3rd chance of happening. One of the events is that your main character is tossed into the Blood Pit with their legs cut off, which can be a game over anyway if you lost both arms in the fight. Otherwise, you're reduced to crawling and likely cannot win the game anyway since any companions you had will just be dead. Alternatively, he can throw you into a jail cell and graciously do some tailoring work for you, expanding your prison pocket for carrying more goods. And then he'll cut your legs off and leave you in a similar situation to the previous special event. The final thing that can happen is you just mercifully get a game over outright. Ballista Guard  Phobia(s) Triggered: Erotophobia, Teratophobia 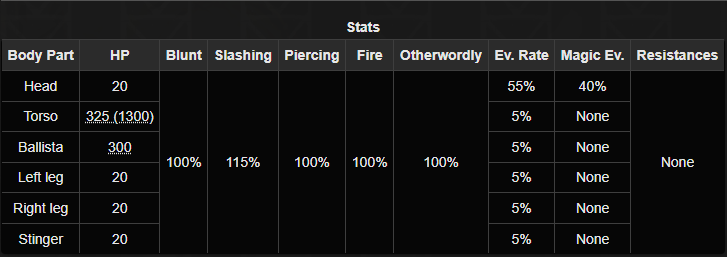 *On T&S/Hard Mode, the Torso has 625(2500) HP and the Ballista has 500 HP. Curiously, this guard's "Stinger" is less resilient and retains the 20 HP. A rare variant of the Guard you can encounter on Level 3 and Level 6 that we didn't see in the video, this guy has a Ballista. He's honestly less threatening than the normal Guard, incapable of destroying your limbs and purely being focused on damage. On the first turn, he cocks an arrow, and he looses it on the second turn. Repeat endlessly, and you have the Ballista Guard. Frankly, if you have two normal party members, you can easily kill this guy before he even does anything even on T&S mode. While there is the off chance he can hit you with the Stinger, this guy's damage potential is much lower than the standard Guard and he is much less of a problem because of it. If you're at full Body and you have any form of healing on hand, you shouldn't have to worry about what this guy can do to you at all. Elite Guard  Phobia(s) Triggered: Erotophobia, Teratophobia  *On T&S/Hard Mode, Torso HP is 800(3200) and the Arms and "Stinger" have 500 HP This guy on the other hand, is a serious problem and I would never encourage fighting him in a fair fight ever. This is the first enemy you'll come across that can't be routed with an errant headshot, as well as completely lacking a safe way to engage him. Between the Mace, Sword, and Stinger, he'll always have an option to hit you before resorting to tackles when all else fails. The sword can disarm your party members, while the mace inflicts Fracture, a permanent Body Debuff that cannot be cured without highly specific one use methods. Even on F&H mode, none of his attacking limbs can reliably be disabled with just one hit from the offset, so you should always avoid this guy if you see him. Thankfully, he only rarely appears in the higher levels of the dungeon, and there's only one you have to juke in the game, and he comes at a point where you could possibly defeat him without any serious losses anyway. My best advice is to either kill him with Marksmanship, or learn the En Garde skill to get a free turn on him and then have your party dogpile his torso before he can do anything. Should you lose to the Elite Guard, you'll occasionally get a unique game over sequence where he throws you in a cell and beats you to death with his mace, laughing all the while. It's a true game over unlike what the standard Guard can do to you, but it's arguably more dignified at least. Dark Priest 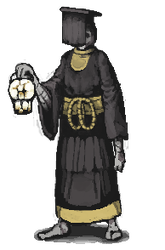 Phobia(s) Triggered: Rhabdophobia 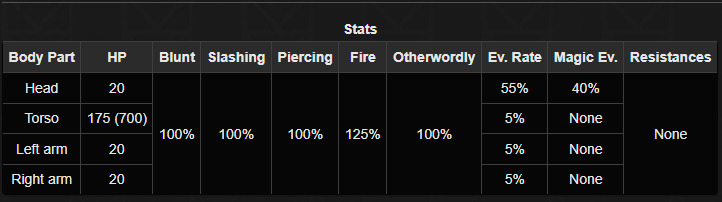 A bit of a speed bump enemy really, Dark Priests are nothing to write home about. In most cases, you can easily defeat them by just nailing the Torso, but since I started as the Outlander with the Bow, that's not really a guarantee. They have a 50/50 chance of whacking you with their lanterns, which itself has a slight chance of inflicting Burn if it happens. When the 4th turn rolls around, a Priest will begin chanting, and the chant will initiate a coin flip that results in a game over if failed. The chant can be bested by killing them, using the Counter-Magic skill to disrupt it, guarding it or simply talking to them and ruining their focus. In the event a chant fails, they will keep reattempting it until it goes through. Bow Outlander is one of the handful of situations where these guys can prove to be a problem, as you can lack the damage to kill them reliably on the first attack, and the Fur armor actually gives you a pronounced Fire weakness if you keep it on. Otherwise, these guys are easy picking for good items. If you defeat them via a headshot, you can get their Robes, which have use later in the game. Sometimes the game also bugs out and lets you get the robes even if you defeat them with a Torso hit, so that's nice. Tortur 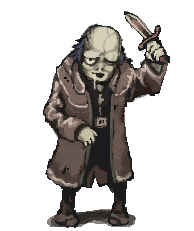 Phobia(s) Triggered: None 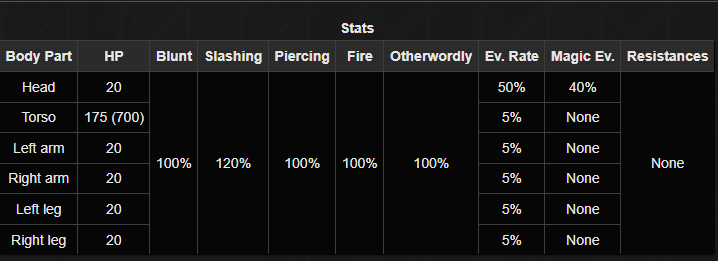 The first "boss" of the game, if you can call him that, and he's basically a joke. That knife is his only form of attack, and it hits for a piddling amount of damage. Destroy his knife arm, and he becomes completely helpless, though in most cases you can easily rout him via torso shot outright. Should you not kill him immediately, you can Steal a valuable item from him should you have that skill. You can also Talk to him to begin a sidequest where you sell out Buckman and his allies to Trortur for his torturing amusement. Completing this quest is the alternative route most characters need to take to get his stealable item at this stage of the game. In the unlikely event you lose to Trortur (only possible if you enter the fight on the cusp of death and whiff all your attacks on him), you're treated to a unique game over where he tortures you to death. Said game over can also happen if you fail a coin flip when attempting to sleep on the Inner Hall bed while he's still alive. (Sometimes the game bugs out and this flip still happens even if he is dead.) Butterfly  Phobia(s) Triggered: Teratophobia  The most dangerous enemy in the game. If you can bear his intimidating stare down, strike at his torso with all your might and pray you can escape the encounter with your health intact. Vaya con Dios. Iron Shakespeare  Phobia(s) Triggered: None  *On T&S/Hard Mode, Torso HP is 800(3200) The first real boss monster of the game, and the first instance of the game pulling a fast one on you with its mechanics. The Iron Shakespeare has highly resilient arms, but a comparatively flimsy Torso, even on T&S. As a result, trying to disarm him will result in you eating poo poo, while going for the kill outright will the end fight quickly and hopefully painlessly. The two arms hit for about 40 damage each with your basic armor, and after a turn the Shakespeare ignites an arm, bringing its damage to around 50 and having a chance to inflict burn. After two turns, both arms will be ignited and few things in the game can survive being whomped by them. Despite his name and appearance, the Iron Shakespeare is an extreme glass canon, and fighting him boils down to killing him before he can kill you, pure and simple. Should you slay him, you can use a Soul Stone on him to collect the Iron Shakespeare soul. This soul is an accessory grants 30% resistance to Slashing, Blunt, and Piercing attacks, making it a highly desirable defensive boon in situations where limb protection isn't a concern. There is one last enemy that unfortunately the wiki lacks formatted data for, the Ghoul. While I can't give too many specifics on this guy, know that his both his arms Scratch for about 6-8 damage and a chance at infection, while his head launches a Nasty Bite which deals about 14-16 damage and guarantees infection. Ghouls also have Death Throes, and can do all these on the turn where you kill their Torso. They're not super dangerous in terms of damage, but they can burn through your green herbs if you fight them, and I'd strongly advise against engaging them. If you have the Counter-Magic skill, Ghouls can be instantly defeated with it, bypassing their Death Throes in the process. CullenDaGaDee fucked around with this message at 18:43 on Jan 6, 2024 |
|
#
?
Dec 30, 2023 06:28
|
|
|
Junpei posted:Fear and Hunger is one of those series (there's a sequel) that I basically only engage with from a distance. I'd probably hate playing it but the lore and side stuff intrigues me. I'll admit, this game specifically had me apprehensive to play it, and I do much prefer the sequel. (I've played the hell out of Termina, it made up 23% of my Steam playtime for 2023) It's very sadistic in a transparently unfair way, and extremely discomforting to boot. Actually playing it is not for everyone, but I do think it has a lot of cool and interesting things in it that make it fun to deep dive on.
|
|
#
?
Dec 30, 2023 06:30
|
|
|
Supplemental: Status Ailments and Their Effects Fear & Hunger loves to obscure the under the hood information from the player, to a degree I haven't seen in an RPG in quite some time. You will see icons pop up on your character and have no idea how some of them are affecting you, or what they're even called. While the game does have a book "explaining" what each ailment does, in reality it just tells you the name of the ailment and what icon is associated with it. It's up to you to puzzle out how these things are actually impeding you, so I figured I'd create a master list explaining each Ailment, how dangerous it is, and what you can do about it, if anything.  Phobia: This is the indicator an enemy you're fighting triggers your character's phobia, whatever that may be. When a Phobia is triggered, enemy's get a flat 50% damage bonus against you, as well as ignoring 50% of your evasion. The latter is fairly unimportant but the former can easily cause you some problems depending on what you're fighting. There's not really anything you can do about Phobias, they're just something you have to weather in combat. Some Phobias are much more rarely triggered than others though, so certain ones are more desirable to have. There is an accessory that nullifies Phobias so long as you have it equipped, but I would really say it's worth it. Phobia: This is the indicator an enemy you're fighting triggers your character's phobia, whatever that may be. When a Phobia is triggered, enemy's get a flat 50% damage bonus against you, as well as ignoring 50% of your evasion. The latter is fairly unimportant but the former can easily cause you some problems depending on what you're fighting. There's not really anything you can do about Phobias, they're just something you have to weather in combat. Some Phobias are much more rarely triggered than others though, so certain ones are more desirable to have. There is an accessory that nullifies Phobias so long as you have it equipped, but I would really say it's worth it. Confused: This one can be a problem. Confused stuns your character for 2 turns, rendering them unable to act. This is a battle only ailment, curing at the end of battle should it still be in effect. Not many enemies in the game can do this to you, but the ones that can also spam it if you're unlucky. There's not too much you can do about this ailment, though some helmets give you immunity to it should you be lucky enough to find them. Always be mindful of things that can hit you with this. You do have the ability to use Confusion on the enemy with a specific spell, and it is absolutely broken if you can maintain the mind cost. Confused: This one can be a problem. Confused stuns your character for 2 turns, rendering them unable to act. This is a battle only ailment, curing at the end of battle should it still be in effect. Not many enemies in the game can do this to you, but the ones that can also spam it if you're unlucky. There's not too much you can do about this ailment, though some helmets give you immunity to it should you be lucky enough to find them. Always be mindful of things that can hit you with this. You do have the ability to use Confusion on the enemy with a specific spell, and it is absolutely broken if you can maintain the mind cost. Fracture: Sticks and stones can definitely break your bones in the dungeons of Fear & Hunger. Fracture reduces your maximum Body by 20% when afflicted on you in battle, leaving you with a maximum of 80. Once out of battle, this penalty quickly drops to 4% but is a permanent effect. There is no standard item to cure fracture, and the methods that can cure it require some degree of sacrifice in order to attain. It's definitely annoying to have to deal with, but unfortunately at least one or two of your party members is going to be saddled with this condition before the game is over. Fracture: Sticks and stones can definitely break your bones in the dungeons of Fear & Hunger. Fracture reduces your maximum Body by 20% when afflicted on you in battle, leaving you with a maximum of 80. Once out of battle, this penalty quickly drops to 4% but is a permanent effect. There is no standard item to cure fracture, and the methods that can cure it require some degree of sacrifice in order to attain. It's definitely annoying to have to deal with, but unfortunately at least one or two of your party members is going to be saddled with this condition before the game is over. Bleeding: A damage over time effect that persists in and out of battle, Bleeding causes you to lose 3% body in battle, and periodically bleed out and lose Body when exploring the dungeons. This can be cured by using a cloth fragment, or by equipping an accessory that nulls the status, thus removing the ailment. Bleed can be annoying in the early game, but it's not too hard to hoard cloth fragments to treat it, and it becomes a complete non-issue around the mid game. Bleed can be inflicted on the enemy as well, with the same effects in battle as it would be to the player, but it's easily the weakest DoT in the game and one of the most difficult to actually inflict, funnily enough. Bleeding: A damage over time effect that persists in and out of battle, Bleeding causes you to lose 3% body in battle, and periodically bleed out and lose Body when exploring the dungeons. This can be cured by using a cloth fragment, or by equipping an accessory that nulls the status, thus removing the ailment. Bleed can be annoying in the early game, but it's not too hard to hoard cloth fragments to treat it, and it becomes a complete non-issue around the mid game. Bleed can be inflicted on the enemy as well, with the same effects in battle as it would be to the player, but it's easily the weakest DoT in the game and one of the most difficult to actually inflict, funnily enough.  Poison/Toxic: A traditional RPG DoT, Poison causes you to lose 10% BP per turn in Battle, while Toxic costs you a staggering 20%. These statuses are actually relatively rare though, so you won't frequently have to suffer them. These can be cured with a White Vial, or with a Red/Green herb mix. There is an accessory that nulls poison, but it is a bad idea to use it as it cannot be removed. Poison is another ailment you can inflict on enemies, and it is devastating towards them if inflicted on their Torso, cause most enemies to keel over in 3 turns due to the way the damage is determined. Poison/Toxic: A traditional RPG DoT, Poison causes you to lose 10% BP per turn in Battle, while Toxic costs you a staggering 20%. These statuses are actually relatively rare though, so you won't frequently have to suffer them. These can be cured with a White Vial, or with a Red/Green herb mix. There is an accessory that nulls poison, but it is a bad idea to use it as it cannot be removed. Poison is another ailment you can inflict on enemies, and it is devastating towards them if inflicted on their Torso, cause most enemies to keel over in 3 turns due to the way the damage is determined.  Infection: Another common newbie killer, Infection doesn't do anything immediately. Instead, it forces a counter on your character that goes up with every screen transition. After about 7 transitions, Infection will kill your character if not treated. Infection can be purged with Green Herbs, and that's the preferred way to handle it, but Green Herbs are MUCH rarer in this game than the sequel and cannot be purchased. In an emergency, you can use a bonesaw to remove the infected limb... if you have one and are desperate enough to save the run that way. Fortunately there is an accessory that gives you immunity to it, so once you have that it ceases to ever be an issue again. Infection: Another common newbie killer, Infection doesn't do anything immediately. Instead, it forces a counter on your character that goes up with every screen transition. After about 7 transitions, Infection will kill your character if not treated. Infection can be purged with Green Herbs, and that's the preferred way to handle it, but Green Herbs are MUCH rarer in this game than the sequel and cannot be purchased. In an emergency, you can use a bonesaw to remove the infected limb... if you have one and are desperate enough to save the run that way. Fortunately there is an accessory that gives you immunity to it, so once you have that it ceases to ever be an issue again. Blindness: Blindness reduces a character's physical accuracy by a staggering 75% (Magic attacks are unaffacted). Additionally, if your main character has this, the screen in the dungeon is turned to pitch black and you can no longer see where you are going. There is no intended item to cure this, and the only intended way to cure it is the previously referenced one shot methods of curing Fracture, so in most cases getting this on your main character is a game over. That being said, there is a helmet that can prevent the status, and due to the way status resistance is coded for equipment, it actually can also cure blind if you equip it. Pretty funny, I have to say. Blind can also be inflicted on the enemy for the same combat penalty, though it's handled a bit weirdly. It can only be inflicted on the Head, understandably, and the turn it is inflicted it will only reduce the Head's accuracy by 75%. Every turn after, all of the enemy's limbs will have the penalty. Effectively this means that unless the enemy uses a Head based attack, Blind doesn't actually do anything until the turn after it is inflicted. Bear this in mind if you go all in on Blind based attack plans. Blindness: Blindness reduces a character's physical accuracy by a staggering 75% (Magic attacks are unaffacted). Additionally, if your main character has this, the screen in the dungeon is turned to pitch black and you can no longer see where you are going. There is no intended item to cure this, and the only intended way to cure it is the previously referenced one shot methods of curing Fracture, so in most cases getting this on your main character is a game over. That being said, there is a helmet that can prevent the status, and due to the way status resistance is coded for equipment, it actually can also cure blind if you equip it. Pretty funny, I have to say. Blind can also be inflicted on the enemy for the same combat penalty, though it's handled a bit weirdly. It can only be inflicted on the Head, understandably, and the turn it is inflicted it will only reduce the Head's accuracy by 75%. Every turn after, all of the enemy's limbs will have the penalty. Effectively this means that unless the enemy uses a Head based attack, Blind doesn't actually do anything until the turn after it is inflicted. Bear this in mind if you go all in on Blind based attack plans. Critical State: This one is rare but is a problem waiting to happen when it can be inflicted on you. Critical State is a battle specific ailment that will cause the next attack your character receives to reduce them to 1 BP, regardless of how much they had left. The ailment is purged upon that, and you're left with a character who can die from being sneezed on. There is no way to cure it save for having an accessory that nulls it equipped, so be very cautious when it's in play. Critical State: This one is rare but is a problem waiting to happen when it can be inflicted on you. Critical State is a battle specific ailment that will cause the next attack your character receives to reduce them to 1 BP, regardless of how much they had left. The ailment is purged upon that, and you're left with a character who can die from being sneezed on. There is no way to cure it save for having an accessory that nulls it equipped, so be very cautious when it's in play. Burning: The final DoT of the game, this one also does 10% damage per turn to you. It is the only DoT the expires upon the completion of a battle, though it can also be cure in battle by using a Water Vial. Once again, there's an accessory that can nullify this. It's fairly rare though, you're not liable to see it come into play outside of fighting Dark Priests. There are number of skills and items you can use to inflict this on the enemies, and like poison it is devastating to enemy torsos. It can also be stacked with poison, resulting in an enemy melting within 2 turns. Burning: The final DoT of the game, this one also does 10% damage per turn to you. It is the only DoT the expires upon the completion of a battle, though it can also be cure in battle by using a Water Vial. Once again, there's an accessory that can nullify this. It's fairly rare though, you're not liable to see it come into play outside of fighting Dark Priests. There are number of skills and items you can use to inflict this on the enemies, and like poison it is devastating to enemy torsos. It can also be stacked with poison, resulting in an enemy melting within 2 turns. Paralyzed: One of the rarest ailments in the game, but boy howdy can it be dangerous. Paralysis is a battle exclusive ailment that causes the afflicted character to skip their turns indefinitely. It cannot be cured save for ending the battle, so if a solo character gets hit by this it is essentially a game over. Thankfully only two enemies in the game can even potentially hit you with this, and they're both uncommon and easy to avoid. Paralyzed: One of the rarest ailments in the game, but boy howdy can it be dangerous. Paralysis is a battle exclusive ailment that causes the afflicted character to skip their turns indefinitely. It cannot be cured save for ending the battle, so if a solo character gets hit by this it is essentially a game over. Thankfully only two enemies in the game can even potentially hit you with this, and they're both uncommon and easy to avoid. Parasites: An extremely rare form of ailment where the penalty is exclusive the dungeoneering portion of the game, Parasites causes your hunger meter to fill up at double the rate. If anyone sees the later stages of Hunger, odds are they are suffering from this ailment. It's pretty uncommon in terms of being use against you, as only one enemy can do so, but there is the possibility of self inflicting it. Should you be low on food supplies and have to eat raw or rotten meats, you will be given this ailment for your desperation. It can be a bit of a problem since there is only one way to cure it, the dedicated curative potion Worm Juice. Parasites: An extremely rare form of ailment where the penalty is exclusive the dungeoneering portion of the game, Parasites causes your hunger meter to fill up at double the rate. If anyone sees the later stages of Hunger, odds are they are suffering from this ailment. It's pretty uncommon in terms of being use against you, as only one enemy can do so, but there is the possibility of self inflicting it. Should you be low on food supplies and have to eat raw or rotten meats, you will be given this ailment for your desperation. It can be a bit of a problem since there is only one way to cure it, the dedicated curative potion Worm Juice. Brain Flower: This is the ailment that functions like the more typical version of Confusion you see in RPGs. A character afflicted with a Brain Flower will have their accuracy reduced by 50% and begin to attack randomly, potentially targeting allies. It can only be cured with Worm Juice, so it can be quite the problem if you get hit by it. Thankfully, it's not too common of an ailment to contend with as more often than not the game gives you layouts upon starting a playthrough that doesn't have any enemies that can even use this against you. Always be wary when you see an enemy with one of these flowers, though. Brain Flower: This is the ailment that functions like the more typical version of Confusion you see in RPGs. A character afflicted with a Brain Flower will have their accuracy reduced by 50% and begin to attack randomly, potentially targeting allies. It can only be cured with Worm Juice, so it can be quite the problem if you get hit by it. Thankfully, it's not too common of an ailment to contend with as more often than not the game gives you layouts upon starting a playthrough that doesn't have any enemies that can even use this against you. Always be wary when you see an enemy with one of these flowers, though. Severe Anal Bleeding: Oh lord you knew it was coming. If you've heard anything about the mechanics of this game, you've probably heard of this ailment. Severe Anal Bleeding is an uncommon ailment that is set upon you in rare cases when you lose to a Guard and more commonly a possibility of something a Night Lurch can inflict on you. It can only be cured with the one shot methods for curing Fracture, Blindness or limb loss. If afflicted with it, your character will randomly pause on the field and expel blood from their inflamed orifice. This doesn't actually deal damage, but it happens constantly and locks you in place when it occurs. It can be a problem if you're being chased by something, but typically it's not a game ruiner. The constant fart noises as blood flies out of your anus gets annoying pretty quickly though. Severe Anal Bleeding: Oh lord you knew it was coming. If you've heard anything about the mechanics of this game, you've probably heard of this ailment. Severe Anal Bleeding is an uncommon ailment that is set upon you in rare cases when you lose to a Guard and more commonly a possibility of something a Night Lurch can inflict on you. It can only be cured with the one shot methods for curing Fracture, Blindness or limb loss. If afflicted with it, your character will randomly pause on the field and expel blood from their inflamed orifice. This doesn't actually deal damage, but it happens constantly and locks you in place when it occurs. It can be a problem if you're being chased by something, but typically it's not a game ruiner. The constant fart noises as blood flies out of your anus gets annoying pretty quickly though. Curse: Curse is a countdown type status effect exclusive to battle. When afflicted on a character, a counter will display over them each turn, starting at 5 and counting down to 0. At the end of the turn it hits 0, the character afflicted will die, no questions asked. This ailment only shows up in two boss fights, and amusingly it's bugged in the first one you can see it and doesn't actually do anything, made extra ridiculous by the fact it would take a whopping 10 turns to die from it with how it is used in the fight. In the more threatening fight where it comes into play at the fight's beginning, it can be cured with a Purifying Talisman though this itself is also bugged and can causes the fight to soft lock if another attempt at cursing a character is made. Basically any time this status comes into play, just focus on winning the fight as quickly as possible since that's the most pragmatic and effective way to clear the status. Curse: Curse is a countdown type status effect exclusive to battle. When afflicted on a character, a counter will display over them each turn, starting at 5 and counting down to 0. At the end of the turn it hits 0, the character afflicted will die, no questions asked. This ailment only shows up in two boss fights, and amusingly it's bugged in the first one you can see it and doesn't actually do anything, made extra ridiculous by the fact it would take a whopping 10 turns to die from it with how it is used in the fight. In the more threatening fight where it comes into play at the fight's beginning, it can be cured with a Purifying Talisman though this itself is also bugged and can causes the fight to soft lock if another attempt at cursing a character is made. Basically any time this status comes into play, just focus on winning the fight as quickly as possible since that's the most pragmatic and effective way to clear the status.  Hunger I-V: One half of the game's very title, Hunger is a constant concern when exploring the dungeons. It comes in stages, with each stage carrying harsher penalties. At 30 hunger, you get a warning and no status marker. At 49 Hunger, you reach Stage 1, losing 10% of your maximum Body and having your attack power halved. Stage 2 is at 69 Hunger, reducing your maximum Body to 80%. Stage 3 is at 79 Hunger, and reduces your maximum Body to 70% as well as reducing your attack power to 30%. Stage 4 is at 89 Hunger, reducing your maximum Body to 50%, and disabling your legs, forcing you to crawl. If somehow you don't think to eat at this point, then at 94 Hunger you reach Stage V, being struck blind until you actually eat and having your maximum Body reduced to 30%. Naturally if Hunger reaches 100, then you die of Starvation. Despite all this, you'll seldom ever see anything further than Stage 1 Hunger unless afflicted with Parasites, as the game is relatively generous with food. Going too slow can increase the odds you'll run out of food, but frankly most players will die to other things in the dungeon if they're having trouble before this becomes a problem. Later in the game, there's an easy to obtain infinite food method that essentially eliminates the problem of hunger, though on the higher difficulties it doesn't help much with other resources you need to worry about. Hunger I-V: One half of the game's very title, Hunger is a constant concern when exploring the dungeons. It comes in stages, with each stage carrying harsher penalties. At 30 hunger, you get a warning and no status marker. At 49 Hunger, you reach Stage 1, losing 10% of your maximum Body and having your attack power halved. Stage 2 is at 69 Hunger, reducing your maximum Body to 80%. Stage 3 is at 79 Hunger, and reduces your maximum Body to 70% as well as reducing your attack power to 30%. Stage 4 is at 89 Hunger, reducing your maximum Body to 50%, and disabling your legs, forcing you to crawl. If somehow you don't think to eat at this point, then at 94 Hunger you reach Stage V, being struck blind until you actually eat and having your maximum Body reduced to 30%. Naturally if Hunger reaches 100, then you die of Starvation. Despite all this, you'll seldom ever see anything further than Stage 1 Hunger unless afflicted with Parasites, as the game is relatively generous with food. Going too slow can increase the odds you'll run out of food, but frankly most players will die to other things in the dungeon if they're having trouble before this becomes a problem. Later in the game, there's an easy to obtain infinite food method that essentially eliminates the problem of hunger, though on the higher difficulties it doesn't help much with other resources you need to worry about.  Fear: Here's the other half of the title. To my knowledge, these icons actually never appear anywhere on your status screen or in battle, but the game does consider it an ailment so I may as well mention it. Fear is the result of your mind lowering, and it only really comes in two stages. At 50 mind, your character will gain the option to commit Suicide, ending the game at any moment you feel is appropriate. Should the Mind gauge reach 0, your character is permanently struck with Panophobia, triggering the Phobia penalty against anything that actually triggers a phobia. Aside from that, the game will occasionally flash creepy messages at the bottom of the screen as your mind gets lower. Unlike Termina, there are events that can happen relative to the Mind of your party members, and these events can occur in specific areas when party members have less than 70 Mind. Otherwise, Panophobia is just as real a concern for them, and they also occasionally have creepy messages populate the bottom of the screen when their mind is low. Fear: Here's the other half of the title. To my knowledge, these icons actually never appear anywhere on your status screen or in battle, but the game does consider it an ailment so I may as well mention it. Fear is the result of your mind lowering, and it only really comes in two stages. At 50 mind, your character will gain the option to commit Suicide, ending the game at any moment you feel is appropriate. Should the Mind gauge reach 0, your character is permanently struck with Panophobia, triggering the Phobia penalty against anything that actually triggers a phobia. Aside from that, the game will occasionally flash creepy messages at the bottom of the screen as your mind gets lower. Unlike Termina, there are events that can happen relative to the Mind of your party members, and these events can occur in specific areas when party members have less than 70 Mind. Otherwise, Panophobia is just as real a concern for them, and they also occasionally have creepy messages populate the bottom of the screen when their mind is low.   Stat Buffs: Not all player afflictions are negative in this game! We also do have your standard stat buffs to work with. STR up gives you 50% more attack power, EVA up gives you a flat 50% bonus to your chance to dodge an incoming attack, and SPD up doubles your speed. The last one is very good as it gives your character an Extra turn, taking place after the main combat round finishes. Spd up also increases your odds of success with the non-skill variant of the run command, giving it a 100% success rate against anything you can run from if you're a solo character. It's worth noting that Str up and Eva up only last 5 turns, while Spd up lasts the entire duration of a battle. Stat Buffs: Not all player afflictions are negative in this game! We also do have your standard stat buffs to work with. STR up gives you 50% more attack power, EVA up gives you a flat 50% bonus to your chance to dodge an incoming attack, and SPD up doubles your speed. The last one is very good as it gives your character an Extra turn, taking place after the main combat round finishes. Spd up also increases your odds of success with the non-skill variant of the run command, giving it a 100% success rate against anything you can run from if you're a solo character. It's worth noting that Str up and Eva up only last 5 turns, while Spd up lasts the entire duration of a battle. Counter: One of the various stance style buffs D'Arce can obtain along with Spd up via Fast Attack, Counter makes it so that when you get attacked (though not necessarily hit, generously enough), you will launch a fully powered reprisal to the limb that attacked you. Not that great honestly as this very rarely allows counters to go to the Torso or Head and instead will often result in an attack going to an arm. This buff is much more useful in the sequel where it is central to a nearly unbeatable combat strategy, but it just kind of exists in this game. Counter: One of the various stance style buffs D'Arce can obtain along with Spd up via Fast Attack, Counter makes it so that when you get attacked (though not necessarily hit, generously enough), you will launch a fully powered reprisal to the limb that attacked you. Not that great honestly as this very rarely allows counters to go to the Torso or Head and instead will often result in an attack going to an arm. This buff is much more useful in the sequel where it is central to a nearly unbeatable combat strategy, but it just kind of exists in this game. Perfect Guard: Another stance buff, this one makes you immune to limb loss for 3 turns. Pretty solid, though there is a guaranteed form of limb protection you can get as an accessory. Still, this can available from the start of the game and can come in clutch for some emergency situations. Perfect Guard: Another stance buff, this one makes you immune to limb loss for 3 turns. Pretty solid, though there is a guaranteed form of limb protection you can get as an accessory. Still, this can available from the start of the game and can come in clutch for some emergency situations. Bloodlust: Absolutely dreadful buff that Ragnvaldr can start with. Bloodlust puts your character in a berserk state, robbing you of control and making them attack random limbs of the enemy. They get a 50% damage boost for this, but it is very rarely worth it. Admittedly, getting access to the standard Str up status is much more inconsistent, but frankly the bonus this provides is so inconsistent and negligible, that it's not at all worth sacrificing your tactical options for. It only lasts for 3-4 turns in contrast to the 5 Str up lasts, and can even be dispelled when you take damage. Terrible skill, only even potentially helpful in a small handful of fights. Bloodlust: Absolutely dreadful buff that Ragnvaldr can start with. Bloodlust puts your character in a berserk state, robbing you of control and making them attack random limbs of the enemy. They get a 50% damage boost for this, but it is very rarely worth it. Admittedly, getting access to the standard Str up status is much more inconsistent, but frankly the bonus this provides is so inconsistent and negligible, that it's not at all worth sacrificing your tactical options for. It only lasts for 3-4 turns in contrast to the 5 Str up lasts, and can even be dispelled when you take damage. Terrible skill, only even potentially helpful in a small handful of fights.  Happy/Depressed: Two permanent joke afflictions that don't actually do anything. A certain individual with deep pockets gives you the choice between one of these two mindsets, and you'll retain it for the remainder of the game. Happy/Depressed: Two permanent joke afflictions that don't actually do anything. A certain individual with deep pockets gives you the choice between one of these two mindsets, and you'll retain it for the remainder of the game.
CullenDaGaDee fucked around with this message at 19:42 on Jan 28, 2024 |
|
#
?
Dec 30, 2023 17:15
|
|
|
This is that one game that one weird kid in your high school class always dreamed of making. You know the one. Every high school class had one.
|
|
#
?
Dec 30, 2023 21:58
|
|


|
This game was literally made off of inspiration Orange got from an illustration he made for a college art class, so that is much more accurate than you realize. The illustration in question for those who are curious: 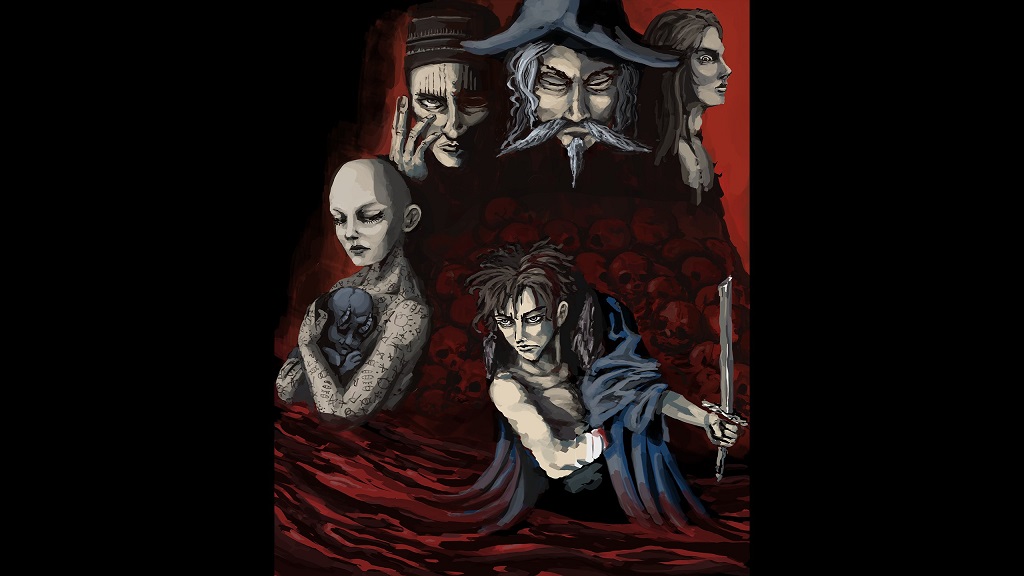 Those familiar with the game may recognize some familiar faces and elements!
|
|
#
?
Dec 30, 2023 22:38
|
|
|
https://www.youtube.com/watch?v=CgZCi6Pef8I Part 2 is out! An eventful part where we delve ever deeper, interact with interesting new cultures, and come into conflict with the avian arbiter of the prison, Crow Mauler. It's always funny going off the usual game plan for Fear & Hunger, as my attempts to be comprehensive lead into some unusual problems, but I manage to avoid game overs at least. Let's go over some extra notes for this part. -We briefly pair up with Cahara and filch his vest. He always leaves and steals an item on the next screen you go to, he wasn't being retaliatory with that action. The items he can steal are as follows: x1 Light blue vial. x1 Blue vial, if the player has no light blue vials. x20 Silver coin, in case the player has no blue vials. x20 Bottle of whiskey, if the player has no silver coins. Yes Cahara is so committed to stealing from you, he will plant 20 bottles of booze on you just so he can filch them back. What he steals does potentially have an effect later. -As mentioned in the video, there's an Easter egg in the Black Witch trap that we'll be seeing later. The Black Witch herself closes in for an attack after about 3 appearances, so you have to be quick if you want to avoid her. She's not a terribly difficult fight, but killing her here can rob you of a very good accessory later, so it's best to just escape. -All of the items the Salesman at the front entrance is hawking are poison. I'm not quite sure when he appears specifically, but he'll usually be at the front after you've reached and returned from Level 3. -There is a boss fight in the Level 4 Caverns, but it is unwise to take it on right now. We'll be seeing it and going over it later. -There is no reason to talk to Pocket Cat, but if you have loose morals you can sell The Girl to him for a rare item. In order of most useful to least useful, he can give you a Claymore which is a powerful two handed weapon, a book of Enlightenment to save your game with, or a Book of Forgotten Memories to learn a skill off your main character's Hexen. -Moonless functions mostly like a Jaggedjaw, and can be incapacitated by throwing a stick. She doesn't have a coin flip attack, so she is completely harmless at that point and can be safely dispatched if you'd rather not/lack the rotten meats to recruit her. -If Moonless loses a paw, it goes into your inventory as an accessory that boosts your Luck stat. I am unsure how much of an effect the luck stat has on... well anything. -Were I to blow open the path at the beginning of Level 5, we would reunite with Cahara in the next screen and be able to formally recruit him. More on that in the next video. -The Old Knight can easily be beaten with an explosive vial on this mode, but not on the higher difficulty where all of his armor pieces except for the crotch area have 300 HP instead of 20. -The Salmonsnake can be skinned with the Skinning Knife to get Salmonsnake meat up to 6 times. As well, if you use a Soul Stone on him you get one of the best accessories in the game. We'll be doing that later. -If you do not have the stone crown, the Cavedwellers become hostile upon stealing the Cube of The Depths. -Pocket Cat only appears in the village if you talked to him on Level 4. -In addition to her solid equipment loadout, D'arce as a party member as the Fast Stance and Defence Stance skills. These apply Spd Up and Perfect guard respectively, doubling her agility and allowing her an Extra turn for the former while making her immune to limb loss while the status persists for the latter. -The Wolf Mask feast can be used to max out your Gro-Goroth affinity if you're willing to risk game overs on the coin flips. -I'm not sure if the Catacombs are just randomly entwined with vines or if there's a timing aspect to that depending on how long it takes you to get there. What I can tell you for sure is that the actual layout is always the same, and going past this point there are no longer any randomized layouts for areas in the game. -Isayah either appears when you reach Level 7 or when you get the Cube of The Depths, I'm not completely sure on that. Regardless, he does not appear when you find Ragnvaldr's mark, as is commonly mis-stated and is actually a slightly important distinction. -This was mentioned in the ailments post, in addition to blocking blindness, the Iron Mask also cures it due to how ailment immunity on equipment works in this game. -The maps you obtain from Isayah always lead to the same locations, but you cannot actually interact with them without the maps. You must buy them from Isayah or kill him for them to get their rewards. There is in face a reason you would want to buy them that is critical for Hard mode. -In addition to Peck, Crow Mauler can use Flock of Crows on you which is guaranteed blindness if you are not immune to it. He doesn't always use it, but the risk makes it foolhardy to fight him without the Iron Mask. Since Flock of Crows is a magic attack, you can't rely on dodging it by blinding him first either. -The strategy will always be the same for fighting Crow Mauler, blind him, then poison him, then heal/guard until he keels over. His limbs and head are super sturdy, so it's just impractical to do anything else. -Maul has guaranteed accuracy even if Crow Mauler is blind, and he has Death Throes, so no matter what someone is getting a Fracture from this fight.
|
|
#
?
Dec 31, 2023 00:05
|
|
|
Supplemental: Enemies Pt. 2 We fought and encountered a number of new enemies in the previous video. This post will be dedicated to the standard, non-unique encounters. I'll be creating a follow up tomorrow for the boss type encounters we came across. Maneba 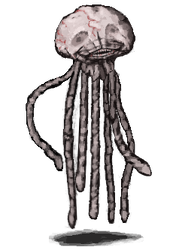 Phobia(s) Triggered: Teratophobia 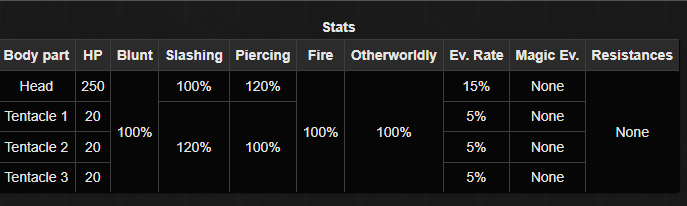 Residing in the Basement Level 2, Manebas have the unique distinction of being the only enemy in the game that can inflict Parasites on you, using their head to do so. Outside of that, they can slap with their tentacles for about 12-14 damage, though our Teratophobia does make this a bit more dangerous if they attack with multiple tentacles. It's generally just best to shoot for the head to avoid your entire team getting worms, but be prepared to miss on occasion due to the higher than usual 15% evade for what is essentially the Maneba's torso. Cavegnome  Phobia(s) Triggered: None  The first enemy we come across that only has one targetable part and the second that is two enemies in a single sprite, Cavegnomes are little more than annoyances than serious threats. Their attacks are weak, hitting for around 10 damage with a chance to inflict bleed and infection. Since they only have 100 HP, having two standard party members whack at them can take them out before they can do anything detrimental. Should they not die on the first turn, they will call in back up every turn, until the 5th turn. This can create a sizable force of gnomes if you let them persist. For the most part, it's just best to avoid these guys in the interest in avoiding wasted resources. Should you have Yellow Vial, you can use the Talk command and offer the vial to get them to leave the fight. There's also a Safety Loop in the talk dialogue that endlessly stuns them until you can kill them, though of course you need party members to make use of that. Yellow Mage  Phobia(s) Triggered: Rhabdophobia  *On T&S/Hard mode, the arms have 300 HP while the Torso has 900(1500) HP. Additionally, the Left Arm very cruelly has 40% evasion, for reasons elaborated on below. Here's an enemy that can cause some serious problems if you're unlucky. The Left Arm has a 50/50 chance of casting Locust Swarm, a party wide attack that inflicts confusion for two turns. While the damage is low, it is not impossible for him to use it repeatedly and stun lock your party, which can be a disaster if you're low on HP. With his legs, the Yellow Mage will dance on the first turn, and cast Hurting on the second. Hurting deals 50 damage if you have no otherworldly resistance, and can blast off arms as well. Hurting can be prevented by simply crippling a single leg, which interrupts the dance. On F&H, it's best to take out a leg and the arm if you're capable of doing so in one turn, but on the higher difficulties I really would recommend just ignoring the left arm and focusing the legs so you can kill him with a headshot. As long as you have full health when entering the fight, Locust Swarm shouldn't be cast enough times to kill you, it only deals about 7 damage per hit. Note that there is a unique Talk sequence you can engage in with the Yellow Mage to get an Eclipse Talisman. This Talisman is required to recruit two party members, including a very potent secret party member. Cavedwellers  Phobia(s) Triggered: Erotophobia  The Cavedwellers are among the less threatening enemies in the game, particularly the stone wielding dwellers. Both the male and female are incapable of attacking if their stone arm is destroyed, making them slightly more resilient Trorturs in practice. The Spearman on the other hand, is capable of attacking with Tackle if his spear arms are destroyed. The Spearman also possesses a unique variant of Death Throes, where he will automatically counter with a Tackle if his spear arms are destroyed. It's a good idea to destroy the spear anyway, because it is coated with poison and you may not have White Vials to treat that if afflicted. Spearmen aside, Cavedwellers are essentially free kills for Devour and Soul Stones. One unique thing about them is that they are the first enemies we come across that do not get thrown off balance by having their legs destroyed. Male Cavedwellers become off balance when their dongs are severed, while women lose their footing from an impromptu mastectomy. Miner Spectre  Phobia(s) Triggered: Phasmophobia  The first normal ghost type enemy we can come across and another enemy with only one part to target. Ghosts cannot be harmed by regular weapons. You either need a cursed weapon, or to use magic on them. On the bright side, they are weak to Otherworldly attacks so the process of killing them is relatively quick in spite of that 450 HP. Miner Spectres do only one action, use the Ruin skill on you. This is a skill that essentially ages your character, causing a permanent change in their portrait to reflect the Ruin status. While Ruin doesn't directly do anything to you in terms of your health the first two times it's used, the third time it is used will send your character in cardiac arrest and auto kill them. The Ruin status is permanent, so you can be hit with it two times the whole game before another follow up would kill you. Highly advisable you avoid these guys altogether, there's not much worthwhile about engaging them. Night Lurch  Phobia(s) Triggered: Erotophobia, Teratophobia 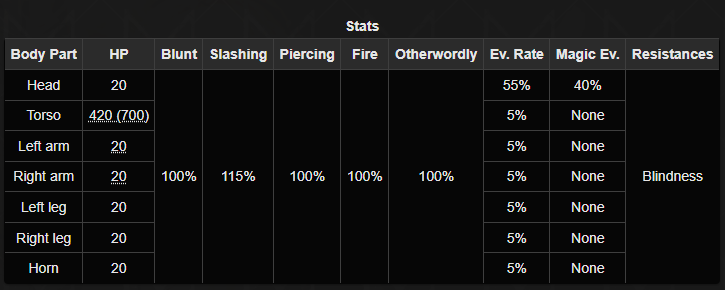 *On T&S/Hard Mode, the Torso has 1050(1500) HP while the arms have 250 HP The Night Lurch is another enemy that is loaded up on secondary effects for its attacks that make engaging it really undesirable. With its arms, it can inflict Bleed 100% of the time, Critical State 70% of the time, and infection 50% of the time. This is not an either/or situation, it can inflict all of those in a single strike (AND both arms attack individually!). The Head also attacks, having a high chance to inflict Infection as well. Should its arms get destroyed, it can still Tackle. Finally, this enemy is famed for its coin flip attack where failure results in it giving you equestrian lessons, leaving you with the Severe Anal Bleeding status. It can also hit you with this on the field should you turn your back to it and it catches sight of you. Like the Cavedwellers, it is thrown off balance by having its phallus destroyed rather than its legs. It's important to note though that enemies do not lose balance until the end of a turn, so you can not make a follow up shot on the head after destroying the horn and expect it to work in the same turn. Due to the horns bursting through its eyes, the Night Lurch has rather poor vision, and 25% of the time when you engage it, you'll get the chance to ambush it for a free turn or run away with 100% success rates since it struggles to see you. Thankfully it does not have Death Throes, so a multi-targeting item can potentially kill it on the first turn. You can also use Talk to feed it rotten meat, distracting it and giving another party member a chance to destroy the horn. It's best to avoid these guys unless you have a way to consistently beat them without fear of reprisal like the aforementioned items or the En Garde skill. This is the only other enemy besides the Guard that can inflict anal bleeding on you, though it is not the last enemy that will attempt to turn your posterior into a vineyard if you catch my drift. CullenDaGaDee fucked around with this message at 13:15 on Jan 8, 2024 |
|
#
?
Dec 31, 2023 02:01
|
|
|
So essentially this game is a game of rocket tag. Destroy the enemy (or the enemy's body part) before they can use it to insta-gib you.
|
|
#
?
Dec 31, 2023 05:42
|
|
|
Fear & Hunger really behooves you to approach it like a Survival Horror game rather than an RPG. While there's absolutely dominant strategies in combat, for the most part fights are better off avoided until you can absolutely secure victory and you get much more mileage out of smart usage of your resources and field skills.
|
|
#
?
Dec 31, 2023 06:22
|
|
|
Just now got around to watching the first video. You never encounter a normal guard, and then start explaining the dangers of the elite guard while sniping him without getting into combat. Pretty funny to me, while probably pretty confusing to the few watchers who don't already know the game.
|
|
#
?
Dec 31, 2023 12:47
|
|

|
I promise you that was not my intent, I have never gotten a layout that had so few guards. I had intended to fight at least one in the entrance hall, but there seemed to be only one camping a corner, no guards in the inner hall, and only one guard in the prison, who I did end up fighting later at least. The original plan I had was to get mauled by Jaggedjaws first (which did happen though like I expected) and then get into a fight with a guard after and show off how that can go wrong and fully demonstrate the typical new player experience. By the time I realized how sparsely populated the first level was on this particular file, I was on too much of a roll to feel like going back and throwing away progress. The random elements of this game will always make doing a comprehensive run a little finnicky, but I guess that’s why I’m doing multiple playthroughs.
CullenDaGaDee fucked around with this message at 14:24 on Dec 31, 2023 |
|
#
?
Dec 31, 2023 14:06
|
|
|
Supplemental: Enemies Pt.3 This post will go over the Unique or Boss type enemies we ended up running into during the course of Part 2, which there was quite a few. There are a couple of potential encounters I could also cover, but we'll be seeing them directly later so why ruin the surprise, eh? Moonless 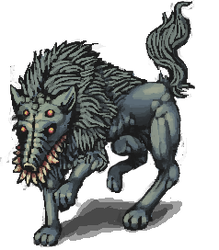 Phobia(s) Triggered: Zoophobia 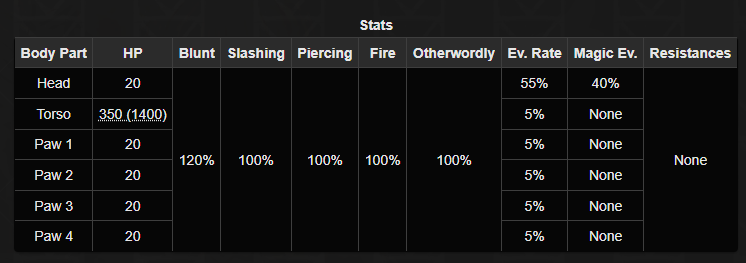 *On T&S/Hard Mode, Torso HP is 625(2500) The heavily mutated but ever loyal doggo, Moonless can be encountered in the northeastern section of the Level 4 Caverns, always being found by the bridge connecting to the opposite side of the chasm. Mechanically, she's pretty similar to a Jaggedjaw, though I don't think she has a coin flip. She's actually a bit weaker really, coming in solo and having less Torso HP on F&H mode. Regardless, the same tactics apply if you decide to fight her. Throwing a stick through the Talk command completely disables Moonless, but you can also pacify her by feeding her rotten meats. With two rotten meats, the fight will end and you can accept her into your party if you so desire. It's worth noting that sometimes, the entrance to the mines will be on the left side of the caverns where you start, thus negating the need to even get around Moonless. Old Knight/Knight Spectre   Phobia(s) Triggered: Necrophobia and Phasmophobia for the Old Knight, just Phasmophobia for the Knight Spectre 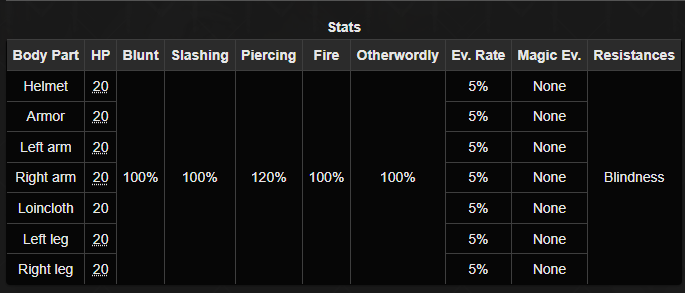 *Old Knight's HP values and resistances. On T&S/Hard Mode, all pieces except the Loincloth have 300 HP  *Spectre Knight's HP and resistances Upon entering the mines, you will quickly find yourself beset upon by the Knight Spectre. He's absolutely not meant to be fought, having a staggering 10K HP and immunity to anything that isn't Otherworldly. Even if we could hurt him at this point, he would kill use far sooner and it'd be wasted effort regardless since he just respawns after being defeated. The Knight Spectre throws out Vertical Slash to cut off your arms and Horizontal Slash to the party with a chance to take out a leg. The Knight Spectre can only be truly defeated by taking out his physical body, the Old Knight. The Old Knight fights much the same as the Knight Spectre, but he can be disabled by taking out the Right Arm, which removes his ability to attack. Now on F&H mode, the Old Knight can easily be defeated with an explosive vial, destroying all parts in one shot, excepting the chance for a miss. On harder difficulties, all pieces but the loin cloth are much stronger, meaning you can't use the explosive vial method since it only does about 50 HP of damage to each part. In this case, you absolutely want to make sure the right arm gets taken out first and foremost. You need to kill the Old Knight quickly, because after two turns the Knight Spectre will join the fray and you need to either run at that point or pray the Spectre doesn't de-limb you. The Old Knight has a variant of Death Throes where even though the fight will end when he's destroyed, the Knight Spectre still gets an action if he's there. One thing to note about the Old Knight, he is the one enemy in the game you can run from where the Run skill has a lower chance of success than the Run! command from the main battle screen. The Run skill only has a 40% success rate, while the basic success rate of the Run! command is 50%, with a 10% bonus for each failure. (It's a little bit higher in my case since I have Moonless who brings up the party's average agility.) Due to what seems to be a bug or just a really cruel decision on Orange's part, the Escape Plan skill actually lowers the success rate of the Run skill to 0% in this fight, making it the only case where the skill lowers your chance to escape and actually makes it impossible via the Run skill. Salmonsnake 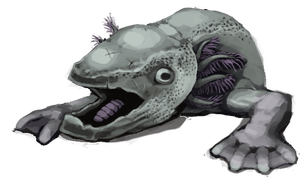 Phobia(s) Triggered: None  Here's a fight that has a lot of moving parts but is ultimately not that difficult. The primary form of attack the Salmonsnake employs is whacking your party with his arms. Both arms have a 50% chance of taking an attack action, dealing about 30 damage on hit and causing the confusion status. If you destroy the Salmonsnake's Eye, the chance the arms will make an attack is lowered to 25%, but it does not have any impact on the accuracy of the attacks. Each turn, the Salmonsnake's tongue will extend outward. When fully extended, it will launch an insta-kill coin flip. The tongue can be forced to retreat by whacking it. To be real, the best way to deal with this guy is to just have two people capable of destroying the eye focus it if you can manage that, and then have someone else poison the Torso and begin working that after. Once the Eye is gone, the arms hardly ever attack, and it's just a waste of time to try taking them out. If you can poison the Salmonsnake's Torso, he will die in 3 turns guaranteed. It's highly advisable to kill this guy, as he gives an amazing accessory if you use a Soul Stone on him, and the Stone Crown is both a decent helmet and can avoid conflict with the Cavedwellers if you leave D'Arce to her fate. It's worth noting that there is a unique interaction where you can feed this guy Cavegnome eggs to distract him for two turns, but getting Cavegnome eggs requires fighting a much more random and potentially dangerous boss, so I really wouldn't recommend employing this. Isayah 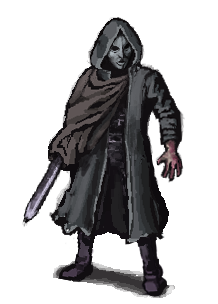 Phobia(s) Triggered: None 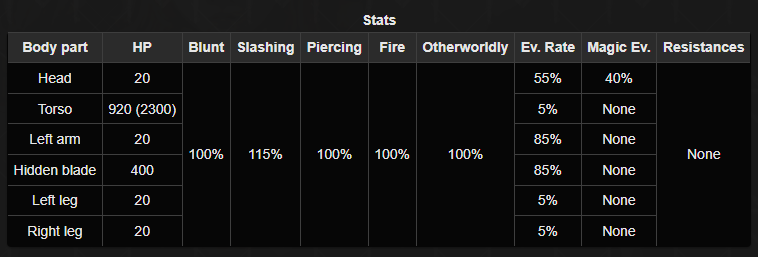 A man I rather cruelly cut down to rob him of his treasure maps and his sweet mask, you'll just have to trust me when I say he's an rear end in a top hat anyway. On the first turn, Isayah is more or less defenseless, and like I did you can hurl an explosive vial in his face and call it a day. Starting from the second turn, he will reveal a highly evasive blade arm that deals respectable damage with a chance to de-limb you. Due to his high-ish Torso HP, it's better to take out his legs on the first turn and then just cave his face in on the second if you don't have an explosive vial. It's worth noting that Isayah has a coin flip attack that if you fail it, he will touch you with his plague ridden hand and potentially give you the plague!... which has absolutely no effect on the game. As it turns out, no matter how lethal or damaging a pathogen is, it usually at least takes a day or two for the symptoms to manifest, and the game doesn't last that long. Crow Mauler 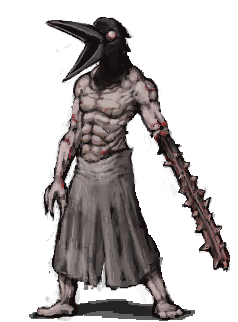 Phobia(s) Triggered: Teratophobia, Zoophobia  *On T&S/Hard mode, the head has 900 HP, the Torso has 1750(7000) HP, and the left arm has 900 HP Alongside the Guard, Crow Mauler is another enemy that is something of a mascot for the game and is a famed newbie killer. Crow Mauler functions like a Nemesis style stalker enemy, becoming a threat when either you enter the Level 5 Mines or the Level 3 Thicket (an area we'll be seeing later). From that point on, every moment you're in a room, the Crow Mauler has a chance to spawn from an entrance to the area, heralded by a distinctive siren tone. In combat, the Crow Mauler is no joke. Every turn, he will assault you with Maul from his left arm. This is an attack that deals about 35 damage and inflicts the Fracture status guaranteed, permanently lowering your max hp. Maul has 100% accuracy no matter what, it always hits. The Head can take one of 3 actions as well: most desirably it can do nothing. Alternatively, the Head can use Peck, a move that decapitates a character for a guaranteed kill, and can only avoided if the Crow Mauler is blinded. Finally, he can use Flock of Crows, a multi-hit spell that has a guaranteed chance to blind the character it hits unless they have the Iron Mask equipped. In a straight fight, Crow Mauler is a phenomenally difficult and random fight that can see you suffering serious, potentially game ending losses. With the right items though, this fight is cake. By pouring a red vial in his eyes, or using your own Flock of Crows spell if you have it, the Mauler can be blinded which renders Peck inert. By having Ragnvaldr using War Cry or using the Sylvian spell Pheromones on a character, you can redirect all of Crow Maulers attacks to a person wearing the Iron Mask. This will avoid the chance of anyone being blinded, as well as minimize the spread of the fracture status. Said damage tank can also just guard and heal as needed while the rest of your team does the fighting. Finally, by using a throwing dart or purple vial, you can poison Crow Mauler's Torso, and he will die in a matter of two turns. Just note though, the Crow Mauler has Death Throes, so he can still run roughshod on you with his dying breath. It also means that engaging him guarantees at least one character will pick up the fracture status. It is possible to use En Garde to get a free turn on him, and with enough powerful weapons you can shatter his torso on a pre-emptive strike where he can't do anything, but I don't have that kind of fire power. It's worth noting that after entering a certain area, Crow Mauler despawns from the game and cannot be encountered normally anymore. This seems to be a bug, as his siren still plays when he enters a room, he just... isn't actually there. On F&H and T&S, you can still use his bed to force an encounter, but on Hard Mode where beds can no longer be used, he is gone from the game forever. This is more of a hassle than it sounds like in one specific case. Since I may very well never get a chance to mention it anywhere else, it's worth noting that the Level 1 Inner Hall has exactly one variation where Crow Mauler makes an early bird (heh) appearance, referencing Pyramid Head's first appearance in Silent Hill 2. 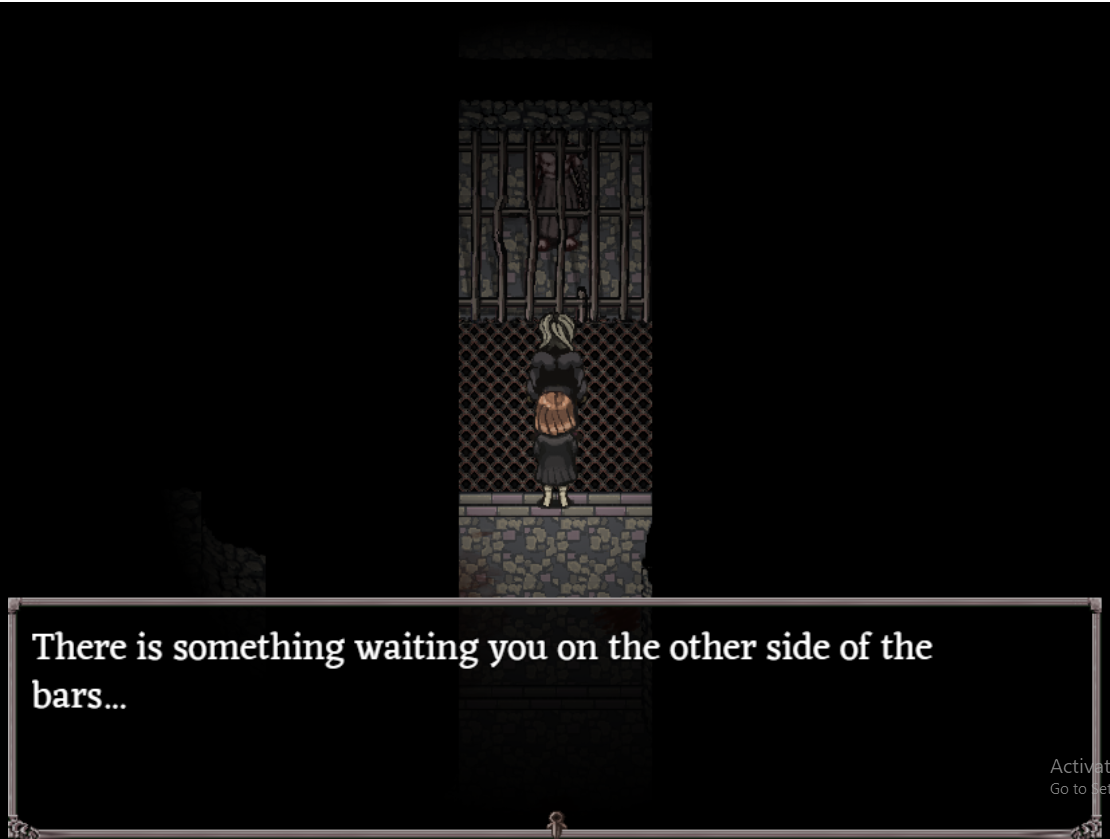
CullenDaGaDee fucked around with this message at 03:43 on Jan 16, 2024 |
|
#
?
Dec 31, 2023 15:30
|
|
|
https://www.youtube.com/watch?v=1_Yq9DlUt74 Part 3 is out! In this video, we tie up every loose end within the dungeons of Fear & Hunger proper, checking out alternative routes to the Catacombs and scoring some sweet equipment that can be obtained guaranteed. Once all the secondary tasks are accomplished, we finally set about clearing our main goal for entering the dungeon and obtain our very first ending, Ending E. Ending E is little more than a glorified game over, but the game does count it I guess. Going forward I want it to be known that I'll be making videos for this series on Saturday and Sunday primarily. Actually recording the gameplay and writing up the Supplemental information is quite a timesink, so I'd rather focus my whole effort on it on days when I have the most free time. I'll still be writing up and periodically posting supplemental posts throughout the week, though I can't promise daily updates. I will be working on a separate thread for a wildly different game starting on Monday, and that'll be updating Mon-Weds-Fri. With that established, we've hit the point in the game where we can start obtaining powerful unique equipment that is always available regardless of any random layouts you get upon starting a file. I'd like to dedicate some time to discussing this equipment. Unique Equipment Available Miasma: A powerful one handed sword with a tremendous attack power of 92. Miasma will always be located in the Level 2 Basement, behind a double door that can either be opened with the Crow Mauler Key or by forcing it. This door has much more HP than a standard door, somewhere around 3000 if I recall correctly. It takes some serious fire power to smash it is what I'm getting at. It cannot be picked, and the game gives you the option to Red Vial it, but that just results in nothing but a wasted vial. There is a skill that can auto break the door though, and I'll demonstrate that in a future video. Back to Miasma itself, it's powerful but it does have a pronounced drawback. I alluded to this in the video, and I plan to demonstrate some of it later, but for now I can just use these thread posts to talk about it a little bit. When wielding it and passing through certain areas, special cutscenes will trigger if the equipped character has 50 or lower mind on F&H mode, or 70 or lower mind on T&S mode. These areas are: Level 3 - Basement Ancient City - Tombs of the Gods Past Ma'habre - indoors Walking into these areas under the correct conditions will cause the following to happen: Is your main character wielding the sword? Then the entire party save for your main gets killed, no questions asked. (With the exception of two characters who can survive the event if they're in the party) Is a party member wielding it? A dialogue tree will appear, and depending on the choices you pick, it can result in a fight, the party member who has the sword dying, or an instant game over. In this case, you can also ignore them and continue on like nothing happened, amusingly enough. There is one character who can wield the sword who triggers the scene but is able to resist the effects, making it so there's no problems if they have the sword. You can work around this event by keeping your mind topped off or simply not having the sword equipped when going through the aforementioned areas. As seen in the video, if your main character has the sword equipped it also periodically causes hallucinations, though these are just meant to be creepy and have no effect on gameplay. Miasma is one of the strongest weapons in the game and its problems can easily be worked around, so it's worth your time to collect it. Since it's a one handed sword, almost any character in the game can wield it, adding to it being a great pick up. As one final note, it is very transparently based on the Soul Edge, something that would probably immediately be noticed by any Soul Calibur fan. Eastern Sword: Found in the Level 5 Thicket, the Eastern sword is 60 attack one handed weapon with the unique trait of having a high crit rate. This weapon has a 40% crit rate by default, meaning almost half the time it deals triple damage, letting it often hit much harder than you'd expect for its relatively humble attack power. (Though it is a fair deal stronger than most randomly obtainable weapons.) The draw back for taking it is that you are immediately thrust into a battle with the Assassin Spectre. This enemy is a ghost, so you need otherworldly damage to defeat him, and he has a high chance of taking a limb when attacking. Luckily he can be run from, but he will randomly attack you throughout the dungeon after stealing the sword. If you can defeat him (and luckily he is also vulnerable to damage from the Eastern Sword itself since it does do Otherworldly damage), the Eastern Sword will be purified. While the sword doesn't get a direct damage boost from being purified, its crit rate jumps to a staggering 70%. There is also an accessory that gives a 20% boost to your crit rate, meaning you can get near 100% guaranteed crits. If you're willing to take a chance on losing an arm to this guy, this is a phenomenal weapon to get. When it crits, it can easily hit in the ballpark of 1500 damage in the hands of Ragnvaldr. That's enough to kill the Crow Mauler in a single hit! One downside to purifying the Eastern Sword is that it no longer deals Otherworldly damage. This usually does not matter, but I have the misfortune of discovering the one situation it does in the video. Salmonsnake Soul: Now that we're getting more Soul Stones, we can use them on the corpses of bosses to obtain special accessories. The first we grab is definitely one of the best in the game, no contest. The Salmonsnake Soul makes you completely immune to limb loss in battle. (Though you can still lose them from traps and field hazards) We haven't gotten any limb protection in this run, and the accessories that do give it only cover arms or legs, not both. This soul prevents both from being lost, and on top of that it also prevents Bleed, Infection, and Burn! If that wasn't enough, it can also cure Bleed and Infection on the field by equipping it, essentially giving us infinite Green Herbs and Cloth Fragments. This is an excellent accessory, and it's great on Ragnvaldr who is able to redirect all attacks to himself. Absolutely get this when you have a chance. Crow Mauler Soul: The other notable soul we got in the video, this one is very simple. This boosts your attack stat by 30%, so if you have 100 attack, now you have 130. Nothing too flashy, but combined with the Purified Eastern Sword we can potentially roll out some absurd damage. I wouldn't say this is a must have, since DoTs tend to be better for winning fights, but I won't say no to it either. Cavemother Soul: This is poo poo on the other hand, it's literally just a weaker Crow Mauler soul. This boosts your attack by 10%, which is just too negligible to be used at the expense of something that affords you more survivability. Pass on getting this if you have the option. Iron Shakespeare Soul: I might come back for this one later, it is essentially the defensive counter part to the Crow Mauler soul. This gives you 30% damage resistance to Blunt, Slash and Pierce attacks. When you don't have limb loss to worry about, this is a very good defensive boon and it's easily the best armor option in the game for The Girl if you don't need her accessory slot for something else. It's not critical to pick up, but it has its uses. Extra Notes -If you're playing as D'Arce, you can get Miasma within a few minutes of starting the game. D'Arce can learn the skill that busts down doors, so if you're willing to dedicate the first soul stone you get from the dark priest to that, you can start with a very powerful weapon. -All truth told, if you get an explosive vial in the entrance hall, I'd highly recommend going into the Thicket over taking the route through the mines to reach the Catacombs. The two soul stones you can get here are highly valuable and there is a fringe perk to reaching the Catacombs within the first half hour of your playthrough. -I wouldn't ever bother doing anything for the Cockroach King, he takes you way out of your way for his quests and frankly the God of The Depths only has two worthwhile spells. I would just empty scroll those in the situations you'd want them for, which for most characters they have to do anyway since they can't even talk to this guy. Easily the worst implemented sidequest in the game. (For those who are curious, the second and final step of his quest is murdering Enki, which you specifically have to do when he's in the catacombs.) -As a general rule of thumb, slapping the Salmonsnake Soul on Ragnvaldr and having him War Cry creates the most effective tank in the game and can let you win almost every fight in the game with minimal issue. His Teratophobia does make this a little unsafe, but good armor can compensate if we can find it. Ragnvaldr also has War Cry as a recruitable character, so he's always capable of tanking for you. -There's basically no reason to ever fight the Cave Mother unless your going for a specific ending, her rewards are crap and the risk inherent in fighting her doesn't justify getting the Soul Stone from her nest. There is one caveat though, if you're in a layout where the entrance to the mines is located on the eastern side of Level 4, there will be a bridge leading out of the Cave Mother's nest to the opposite side of the chasm that allows you to collect the soul stone unimpeded. -I'm not 100% sure how the Assassin Spectre encounters work, they're either triggered by passing through specific areas or after a certain amount of time passes. Always make sure to have the Eastern Sword and any cursed weapons you have equipped in case you need to defend against him. -If you are unable to recruit Cahara or simply reject him, his fate is sealed and he cannot be re-encountered. -If you call him out for his theft, it prompts a fight with him. Killing him and searching his body gives additional loot independent of his equipment you normally get based on what he stole from you earlier. x2 Light blue vial, if he stole 1 light blue vial. x3 Blue vial, if he stole 1 blue vial. x25 Silver coin, if he stole 20 silver coins. x2 Bottle of whiskey, if he stole 20 bottles of whiskey. Sadly we only get a portion of his secret whiskey stash if that's what he stole. -Like the Bunnymask Orgy, the Wolf Mask Feast can be repeated multiple times to max out your Gro-Goroth affinity. Since we have a permanently safe save spot, we can easily save and load if we fail the coin toss for successive feasts. -If you reach the cell of the knight captain within about 30 minutes of starting the game, he will be alive. Ragnvaldr specifically gets the option to spare him or break his neck at this juncture. If D'Arce is in the party, killing the knight captain will initiate a fight with her. She can be Talked out of the fight, but she permanently leaves your party in this event regardless. If you're not playing as Ragnvaldr but have him in your party, he will attempt to kill the captain but can be talked out of it. There is an additional event viewable after this, but we'll go over that later. -If you have the hidden Phase skill (only obtainable with an Empty Scroll), you can bypass the text prompt you normally get when trying to leave the dungeon before confirming the status of the knight captain and get ending E in under a minute. The current world record speedrun for doing this gets an empty scroll and quill from the first couple boxes at the dungeon entrance and beats the game in 18 seconds. CullenDaGaDee fucked around with this message at 21:28 on Dec 31, 2023 |
|
#
?
Dec 31, 2023 21:10
|
|
|
Aw, I was really hoping for screenshot LP
|
|
#
?
Dec 31, 2023 22:54
|
|

|
Sorry friend, screenshot is a good format but it's not my style and is extremely demanding. Video has always been my preferred way to share games.
|
|
#
?
Dec 31, 2023 22:59
|
|
|
Supplemental: Enemies Pt. 4 Thankfully this should be a briefer breakdown since we didn't encounter too many new enemies in the last video, and the ones we did are either simple or not that threatening. Mumbler 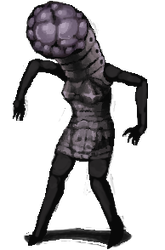 Phobia(s) Triggered: Erotophobia, Teratophobia 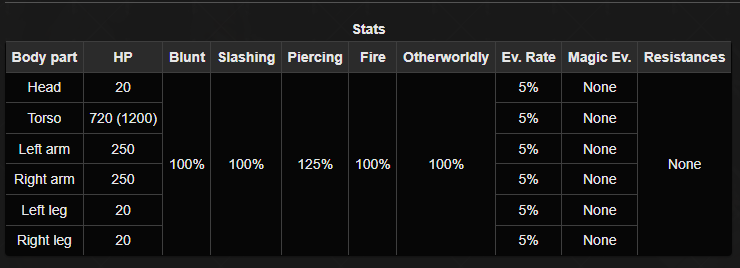 Mumblers are a weird enemy to say the least. As you can see, their Heads do not have the massive evasion bonus that is typical for enemies in the game. This is a trap, however, as attacking the head will result in it bursting, spraying poison on a random party member. This will deal about 10 damage and inflict the Poison status unless the character hit is immune to it. Naturally this can be pretty annoying if you have no white vials, and that's not all too unlikely in this game as they are a much rarer item than in Termina. Other than that, the main threat of Mumblers is their effect on your mind. Mumblers are incapable of dealing HP damage outside of their head exploding. Instead, their arms can damage your mind by about 9-11 points. Their Head has 33% chance to use the Soul Bind ability, which reduces your mind to 50 if it happens to be over that number. (Due to a bug, certain special party members have their mind PERMANENTLY lowered by this) Having your mind reduced to 0 in a battle doesn't immediately cause Panophobia, but you will develop it if you end the battle while your mind stat is still at 0. They're of little threat to us at this point in the game, but if you're able to enter the Thicket at the beginning of the game, it's better to avoid them. Greater Mumbler 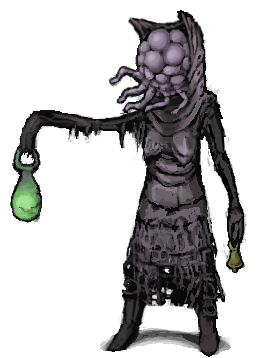 Phobia(s) Triggered: Erotophobia, Teratophobia 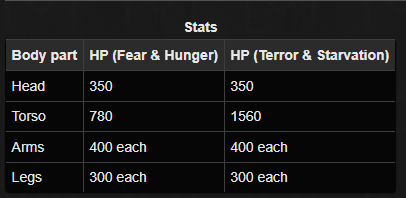 *Mumblers have standard resistances, save for 15% extra damage received from piercing attacks I can tell this page of the Wiki hasn't been updated in awhile. Anyway, Greater Mumblers are just upgraded versions of the standard Mumbler, as their name would indicate. Aside from the beefier HP stats, the main distinctions are their Bell and Lantern. The Bell does a tremendous 50 damage to your mind, while the Lantern hits for otherworldly damage, dealing a harsh 60 damage if you have no resistance. Its head is also capable of using Soul Binding, much like the regular Mumbler. If you are not able to kill this thing in a single turn, avoid it at all costs. It can easily thrash a character and can leave you at serious risk of Panophobia. Fortunately, they're pretty rare and easy to avoid when you do come across them. Infected Enemies 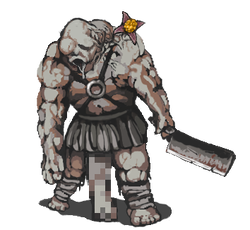 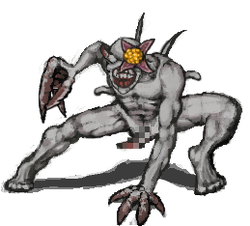  Not new enemies per se, Infected enemies are variants of monsters that have a Brain Flower attached. Their stats are identical to their standard counterparts and they have the exact same movelists, but the Brain Flower is its own target with 20 HP that attempts to spread itself to your party members. Infected enemies mostly put a strain on your action economy, since if you don't take out the Brain Flower, it will inflict the Brain Flower ailment on your party members, which robs you of the ability to control them, reduces their accuracy by 50%, and causes them to attack random targets including allies. Brain flowers can be cured with Worm Juice if you have it, but you should always double check to make sure you do before potentially engaging an infected enemy. Not many things are guaranteed in Fear & Hunger, least of all the consumables you manage to collect. Thankfully, the brain flower only has the standard 5% evasion, so a full party can usually delegate someone to taking it out and easily handle the rest of the enemy. Take special care for the Infected Guard since he has Death Throes. Assassin Spectre  Phobia(s) Triggered: Phasmophobia  A samurai ghost who is less than thrilled if you yoink his sword. The Assassin Spectre is a very simple enemy. On the first turn, he'll launch a standard attack that hits twice with no chance of limb loss to worry about. On his second turn, he'll launch a double attack again, and then follow it up with a Horizontal sweep which can cut off limbs. Repeat this pattern until he kills you or you kill him. Fortunately, his own sword can be used against him, and in the absolute worse case scenario it can kill him in 3 hits. If you have at least two more cursed weapons, or someone has the spells Hurting or Black Orb, you can easily kill this guy before he becomes a problem. As shown in the video, it isn't all that unlikely you'll just crit him with the Eastern Sword and win the fight immediately, though obviously I wouldn't recommend counting on that happening. Cavemother  Phobia(s) Triggered: Teratophobia  *On T&S/Hard Mode, the Torso has 725(2900) HP in the first phase and 625(2500) in the second To me, the Cavemother is the picture ideal of a Fear & Hunger enemy: It is gross as hell to look at and think about, and it's annoying and random to fight against. Thankfully in almost any playthrough it can just be avoided entirely because it has fairly useless rewards for besting it. The Cavemother is very simple, every turn her head will use the move One Tooth Bite. This does around 30 damage and has a 50/50 chance to destroy a random limb. At the end of the first and third turns, a Cavegnome will join the fight if her breasts are still intact. Frankly I did the fight pretty poorly in the video since I way overestimated how much HP she has. With the set up I have, I could have just blasted the torso and won the fight with no issue, as the Cavemother does not have Death Throes. Once you defeat her the first time, she retreats and then attacks again as you try to leave the nest. The second phase is identical to the first, with the sole distinction that she will summon Cavegnomes every turn as long as her breasts are intact. Due to a bizarre scripting error, if you have a full party when fighting this phase of the Cavemother, she will go before any character that does not have 20 Agility. Poor Moonless. If you lack the damage potential I had in this fight, One Tooth Bite can be completely defanged (heh) by blinding the Cavemother, but that relies entirely on either a random resource or a hard to get spell. CullenDaGaDee fucked around with this message at 03:57 on Jan 30, 2024 |
|
#
?
Jan 1, 2024 02:26
|
|
|
Supplemental: The Outlander, Ragnvaldr "Tell me - are you evil?" As a Character: Born in the northern lands of Oldegard, a nation with modest Summers but harsh Winters, the Outlander is a true survivalist. Skilled in hunting, trapping and even seafaring (though this only comes up in his backstory), the Outlander is adept at staying alive in the most difficult of situations. Ragnvaldr specifically is a hardened man born with the Tormented soul, suffering much throughout his life in the process of becoming the man he is today. Though he had a stable childhood, famine struck his home village as he entered adult hood, compelling him to join a voyage into the uncharted parts of the world in the hope of finding resources and riches. To say the trip was a disaster is putting it mildly, as the route the voyage took seemed to simply stretch on into an endless sea. With what little they could bring with them being exhausted over the course of the trip, many (potentially including Ragnvaldr himself) had to resort to cannibalizing those who perished early in the voyage. Once they finally did strike land, they had arrived in the cursed continent of Vinland, a land with the coloration of pitch and endless eldritch horrors residing within. While the voyage did ultimately succeed in obtaining valuable artefacts, all who had been on it were left permanently scarred by the horrors they witnessed. Any potential triumph from this return was quickly scattered to the wind, as not long after Ragnvaldr's village was sacked and pillaged by the mercenary group the Knights of the Midnight Sun. Ragnvaldr's family and people were killed, and the most prominent artefact from the Vinland voyage, The Cube of the Depths, was stolen. Ragnvaldr swears vengeance, and embarks on a chase hoping to mete out justice to the mercenary group's captain. To his eternal misfortune, this leads him to the dungeons of Fear & Hunger. In spite of his barbaric appearance and his vengeful motivation for being in the dungeon, Ragnvaldr is show to be fairly stoic and considerate man. His survivalist background results in him being fairly knowledgeable about the world around him, and he can occasionally regale you in folk lore relating to the Old Gods. He's about as well spoken as Enki, but is much less condescending and combative, making him a stable emotional pillar for a party that has him. All said though, he is still only human and is just as susceptible to the corrupting influence of the depths. Additionally, he is fully committed to his quest for revenge, and he won't let anyone get in his way should it come down to that. (Though of course this being Fear & Hunger, there are loop holes to get around these kinds of situations, what the plot says be damned) As your Protagonist: Ragnvaldr's Tormented Soul offers him the following skills, Devour: This is a passive skill that enables Ragnvaldr to feast on the corpses of his enemies. A devoured enemy will fully restore Ragnvaldr's hunger, at the expense of pulverizing the corpse and preventing any further interaction with it. This is one that doesn't hurt at all to have, but you need to be careful with it. Rather annoyingly, it has separate prompt from the main interaction dialogue that appears first and defaults to yes. Should you mash through this, you will eat the corpse of an enemy right off the bat, robbing you of the ability to search them for items or use a soul stone on them. Outside of that, certain enemies either can't be devoured or poison Ragnvaldr when he does eat them. It's usually pretty obvious what's a bad enemy to attempt to eat though. Bloodlust: This is a battle command skill. This puts Ragnvaldr in the Bloodlust status, boosting his attack power by 50% in exchange for removing your ability to control him. Ragnvaldr will select a random limb of the enemy to strike while under the Bloodlust status. The status clears up after 3 turns, or it has a 50% chance of dispelling when Ragnvaldr receives damage. 50% extra attack power is a decent buff, but it is absolutely not worth forfeiting control for. This has fringe uses against enemies that have either a single targetable part or have been disarmed, but I just wouldn't bother with this. Marksmanship: This is a passive skill that allows Iron Arrows fired with the Short Bow in the overworld to instant kill enemies that susceptible to them. This is a pretty great passive that when combined with Ragnvaldr's choice to start with the bow and arrows, gives him the ability to insta-kill 5 normal enemies of your choosing. This doesn't do anything against bosses, but normal enemies can be just as nasty, if not more so, so having the ability to completely remove problematic encounters like Night Lurches and Elite Guards with no potential for harm to yourself is a very good thing. Ragnvaldr has no equipment restrictions, he is capable of wearing any armor and can use two-handed weapons. Ragnvaldr's backstory offers him the following, 1.) Short Bow and 5 Iron Arrows OR an Axe and a wooden shield 2.) Devour OR Bloodlust 3.) A Soul Stone, with the caveat that there is a coin flip that results in Panophobia if failed OR nothing, but it unlocks the ability to learn Dash later in the story. 4.) 3 Iron Arrows and a Bear Trap OR Dried Meat, Moldy Bread and 3 Carrots, OR 4 blue herbs, a white vial and 2 cloth fragments OR Dash, if you elected to take nothing from Vinland earlier in the story. Alternatively, you can skip his backstory and obtain, 1.) A bow, 5 Iron Arrows, and a Bear trap 2.) The Devour passive Ragnvaldr also has a unique skill and a unique stat bonus. All characters have the same stats independent of equipment, but Ragnvaldr gets the unique trait of 10 extra attack power, giving him 40 attack without a weapon. Additionally, he comes with the skill War Cry, a self targeting battle command skill that forces all single target attacks launched by the enemy to go towards Ragnvaldr. This skill cannot be learned from the Hexen, though it can be learned via Empty Scroll. As your starting character, Ragnvaldr is pretty middle of the road. He can start with some pretty unique items, and his devour skill means that hunger is never an issue for him should he go solo, but his starting equipment is very weak even when combined with his heftier than normal attack stat. The short bow in particular is only marginally stronger than simply punching enemies, and banks entirely on its ability to cripple/kill enemies out of battle. The Axe and Wooden Shield actually are the superior choices in Hard Mode, affording better defense and attack power that actually make Ragnvaldr the one character in the mode who can consistently defeat Guards at the start with no damage to himself. It also has the fringe perk of being an extra weapon you can pass down to the scant few allies you can get in Hard Mode in the event you get hosed on weapon loot RNG. Ragnvaldr has the fairly underwhelming Fur Armor as his starting Armor, which is fairly weak and gives him a huge fire weakness. Ragnvaldr's War Cry skill gives him a unique role as a consistent tank for the party, using it will allow him to wall out any single target damage thrown the party's way if you can get the right equipment for him. This is a little harrowing as the protagonist, however, because if he dies it is game over. Ragnvaldr does very well with high crit weapons like the Eastern Sword, as his natural Attack advantage accelerates the already impressive critical damage of the sword, and in general he gets better returns on things like the Atk Up Status and the Crow Mauler soul due to the relatively greater effect they have on him. I wouldn't say he's a beginner friendly character, but he has a lot of unique traits that a knowledgeable player can get some serious work done with. Overall I'd say Ragnvaldr has a perilous early game but a fantastic mid and late game, making him the 3rd best of the starting characters and a great character for replays of the game if you feel it's getting to easy with someone like Cahara or D'Arce. As a Recruitable Party Member: Ragnvaldr can first be met in the backyard of Level 1. After exhausting all conversation options with him you can ask him to join, which he will refuse. After a screen transition, he will move to the Level 5 Thicket. You can ask him to join again at this location, but he'll only accept this time after checking all his other dialogue. Thankfully asking him early in the dialogue tree doesn't lock you out from recruiting him, you can just simply go back to check his other responses and ask again. To be completely honest, Ragnvaldr is probably better as a party member than as a protagonist. While he doesn't impart the ways of Devour on your character, he still comes with a bow, still has the extra attack power, and most critically he still comes in with War Cry, allowing him to tank for you with no risk of game over should he fall in battle. Additionally, if you can get an Explosive vial on Level 1, you can easily get Ragnvaldr into your team within 7 or 8 minutes of starting the game, which is a huge boon for surviving what comes along the way. Additionally, he's right by the Eastern Sword, so you can pick that up and hand it off to him and suddenly you have an extra pair of hands that crits for over a thousand damage half the time, while having a bow in reserve to cripple problem enemies should you pick up some Iron Arrows. If you have the option to recruit Ragnvaldr early on, you should almost assuredly take it, he is a huge help. On T&S Mode Should you enter Ma'habre without recruiting Ragnvaldr, he will enter the Thicket of his own volition and succumb to a Brain Flower infection, thus effectively dying and no longer being recruitable. There's supposed to be a battle possible with this infected Ragnvaldr, but due to script errors in the most current version of the game, this battle results in a black screen and an automatic victory should you trigger it. CullenDaGaDee fucked around with this message at 04:03 on Jan 9, 2024 |
|
#
?
Jan 1, 2024 17:01
|
|
|
Thank you for doing this let's play. I've been really wanting to learn more about Fear & Hunger but most things are too dry, too much, or too disorganized to follow for me. Your videos have been the exact thing I've been looking for and I look forward to the next episode.
|
|
#
?
Jan 1, 2024 22:57
|
|
|
Thank you! I appreciate it because I already have had a bunch of things go off script due to the random elements of the game, or just things that I couldn't realistically account for because they're situations I'd only find myself in given the approach I take for the Let's Play. I do kind of worry the whole thing seems a little messy, but Fear & Hunger is also a very messy game (in more ways than one) so I guess it would be appropriate.
|
|
#
?
Jan 1, 2024 23:05
|
|
|
I've tried this game and got completely demolishe dlike many others so I'll be following this LP with great curiosity.
|
|
#
?
Jan 2, 2024 05:16
|
|


|
Supplemental: The Girl and Moonless One notable distinction about this game from its sequel is a much larger cast of secondary characters who can be added to your party, while Termina only has products of Gro-Goroth and a joke character that can be recruited independent of the main cast. The secondary characters in Fear & Hunger typically have mechanical oddities about them in contrast to the main cast, but they are often much easier to recruit with no strings attached. (The only main character who can be recruited in a single action is D'Arce, and she carries the drawback of making the Cavedwellers permanently hostile) One important thing to establish about party members in Fear & Hunger is that they cannot be taught skills via the hexen, so what they start with is usually all they'll have for the remainder of the game. There are scrolls you can get that can teach spells and skills to anyone in the party, but with the exception of two scrolls in the game, actually getting these scrolls is entirely dependent on RNG. The Girl 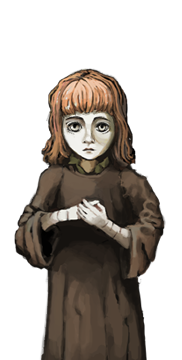 The girl takes your hand for a second before letting it go. As a Character: Not just a girl, but The Girl, she's a mysterious child found imprisoned on the first floor of the dungeon for unclear reasons. Based on the lacerations on her arm, it's safe to assume she wasn't exactly handled with care. She's extremely quiet, very possibly even incapable of speech, but she follows the player around since anything is better than rotting in a cell in the presence of the dungeon Guards. You can either protect The Girl with all your might, or be a complete monster and sacrifice her in a variety of cruel, sometimes completely pointless ways. In reality, The Girl is the child of the captain of The Knights of the Midnight Sun, Le'garde, and the New God Nilvan. Her parentage of a prophesized man and New divinity results in her having an Ancient Soul. The suffering she has gone through within the walls of the dungeon has given her a soul that is pure (albeit pure terror), and should she be able to make it into the absolute depths of the dungeon, she can become one with the darkness and ascend to Godhood on par with that of the Old Gods. The when and how of her conception is extremely ambiguous within the game, and it's possible she's even younger than she looks, although it is hinted many times throughout the game that time does not flow linearly in the dungeons of Fear & Hunger. As a Party Member: The Girl can be recruited by opening her cage of the first floor. Cahara can lockpick it, you can use a red vial on it, or you can find a key. The desk containing the Captain's Diary 1 always has a small key in the book, so you can always recruit The Girl within minutes of entering the dungeon. Being a child, most weapons in the game are off limits to The Girl, and she joins with nothing more than the clothes on her back. That said, she can use most light armor, and you can quickly secure a Dagger for her as a weapon. The Girl is actually just as defensively capable as her adult contemporaries should you find her usable equipment, but her Attack stat is much lower. The Girl only has 5 attack by default, and she honestly seems to be penalized in the attacking formula since her slaps often do 0 damage. Giving her the dagger gives her +5 attack, but she only can hit for about 20 damage (This is at least enough to take out a limb on F&H). The Girl can also equip a Skeleton Arm for +20 attack, or her dagger can be cursed for +35 attack. Sizable upgrades for her, but she's never going to be capable of doing great damage with a physical attack. Now this all sounds pretty dire for her, but she's much better than you'd expect. Like I said, she has no inherent defensive penalties, so while she has more limited equipment options, there's still plenty of stuff that makes her reasonably durable. Additionally, she's an extra set of hands you have full control of, and items have no penalty when used by her. This gives her plenty to do in fights when item usage is required. The final thing to keep in mind are spell scrolls. The Girl can learn magic from any spell scroll in the game, and there's one in particular that's a guaranteed loot item that is very helpful in her hands. Now the way I'm approaching the game is heavily delaying her ability to reasonably contribute in fights, but we'll be able to see The Girl actually put in some work that isn't just poisoning the enemy in the very near future. If you recruit The Girl early on but want to replace her with someone better later, you could sell her off to Pocketcat or sacrifice to The Lady of The Moon for a full heal including limbs if you can live with the guilt of having done so. Moonless 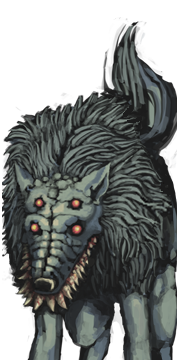 Moonless marks her territory... As a Character: She's a doggo. It's unclear if she's a wolf who wandered into the dungeon, a hapless normal dog who did the same, or perhaps a Jaggedjaw that got separated from her pack and ultimately became like this. She can be tamed, unlike Jaggedjaws, so perhaps she's not strictly trained to kill. She is a good girl. As a Party Member: Moonless can be recruited by engaging her in combat in the Level 4 Caverns, and using the Talk command to feed her two rotten meats. Doing so will end the fight and give you an option to take her along. Moonless is the first party member we can recruit who we are unable to fully control. Moonless attacks at complete random, dealing about 90 damage to whatever limb she hits with a small chance to inflict Bleed. She has 20 Agility, allowing her to go first in the turn order and get an Extra Turn after everyone else has gone. Moonless is just kind of okay, she's an extra source of damage and can take some heat off your main character in the early game. She cannot equip any armor, so she can be pretty fragile. Moonless has no phobia, is immune to Parasites and Poison, and is unaffected by attacks that deal Mind damage. The former attributes means that Moonless can eat Raw and Rotten foods with no penalty. Moonless can learn from spell scrolls, giving her something to do with her Mind should you so desire, though you have little influence over whether she casts a spell or bites something. Moonless can "level up" by marking her territory. 10 markings will turn her Bite into Jagged Jaw, giving it a damage boost. Another 10 markings will turn her bite into Grim Jaw, which can deal about 200 damage and is guaranteed to inflict confusion on the limb it hits. That's pretty solid, but keep in mind you need to pretty much fully explore the dungeon to mark that much territory. Moonless isn't bad, but she's more of a "for fun" character. He squishiness and inability to use items in battle, plus her completely random attack pattern, means she can end up being little more than a punching bag that dies quickly into a run. Grim Jaw would be nice, but the game will essentially be over by the time you get access to it. You can teach her spells via scrolls, but all but two of those are obtained by pure chance, and you have no way to get her to target a worthwhile limb with those. She also doesn't suffer from mind events, so there's no way to get her out of the party except letting her die. She has her uses, but a party with her is always going to have less tactical options than one that picks up another human character. One final random note, if you use a Bonesaw on Moonless, you will get a Cavewolf Paw as an accessory. This can be equipped to give a character +20 Luck, which I have no idea if that actually does anything. CullenDaGaDee fucked around with this message at 23:58 on Jan 2, 2024 |
|
#
?
Jan 2, 2024 13:46
|
|
|
This is still an RPG Maker game at its core, so in all likelihood Luck increases your probability of critical hits, or maybe even affects your odds of getting a desirable coin flip. It's still not worth using it over something with less nebulous effects, unless that luck goes further than I thought.
|
|
#
?
Jan 2, 2024 17:18
|
|

|
I do want to assume it improves your crit rate, but there’s also an accessory that increases your crit rate by 20% directly without boosting luck, so who knows. I can say with certainty your base luck does nothing since your crit rate is an attribute of your weapon rather than your stats.
|
|
#
?
Jan 2, 2024 17:41
|
|
|
This game is very interesting, terrifying, and sometimes hilarious. Always fun to watch others play (and suffer) through it.
|
|
#
?
Jan 2, 2024 23:24
|
|

|
As over the top as some of the elements can be, I do think the game does very well within the limitations of its engine. As hokey as the scare chord when an enemy spots you is, I’d be lying if I said there weren’t moments where I got spotted by something I couldn’t see coming and I beat a frantic retreat rather than take any chances. In general I think the sound design and ambient tracks are pretty stellar in this game. The music in thr Past Tomb of The Gods in particular just makes me deeply uneasy even though it plays in a brightly lit portion of the game where you’re solving a very simple block puzzle
|
|
#
?
Jan 2, 2024 23:30
|
|
|
CullenDaGaDee posted:As over the top as some of the elements can be, I do think the game does very well within the limitations of its engine. As hokey as the scare chord when an enemy spots you is, I’d be lying if I said there weren’t moments where I got spotted by something I couldn’t see coming and I beat a frantic retreat rather than take any chances. In general I think the sound design and ambient tracks are pretty stellar in this game. The music in thr Past Tomb of The Gods in particular just makes me deeply uneasy even though it plays in a brightly lit portion of the game where you’re solving a very simple block puzzle Playing through as a newbie in a dark room definitely had me on edge every time an enemy noticed me, and especially raised my heartrate when the battle start "gong" played. Despite being an rpg maker game it's pretty easy to get immersed in the world. The sound design does this game a lot of favors, I agree. Not a lot frustrated me except for a couple over world traps that felt annoying to traverse. Most of the time I died it was me making a clear mistake or not knowing what came ahead. Rarely (but it does happen) I die to complete rng nonsense, but a lot of fun in the game is knowing how to use what you find and have to deal with problems as they arise to mitigate the RNG bs.
|
|
#
?
Jan 2, 2024 23:53
|
|
|
Nothing like walking over a rusty nail 3 times in a row and racing to find a green herb to cure your infection.
|
|
#
?
Jan 3, 2024 00:03
|
|
|
This game is definitely made by 'that' teenager from high school. However, full respect and props for two main factors: - They actually finished and made the game - It's very consistently coherent towards a specific theme and idea, and executed it to that end. Watching this with interest, since this is 100% not something I'd enjoy playing it myself.
|
|
#
?
Jan 3, 2024 00:54
|
|
|
It is very interesting to compare and contrast this game to its sequel, Termina (Which for the record I feel is the much better game on the whole). This game was made on the spur of a whim inspiration and it really does feel like Orange was just riding the high as far as he could, including any idea he felt was interesting. This does result in a lot of moments that are either under utilized, fairly crass, or just outright poorly implemented, but at the same time there's not really anything else out there quite like it and it holds a strong interest because of that. There are games with similar vibes, sure, but I don't I feel like there is anything that goes quite as hard as this game while still feeling like it's trying to do more than just shock someone. By contrast, Termina was made 4 years later, and generally dials back the cruder aspects of the game while still retaining the same oppressive energy, and delivers a more polished experience. Super stoked for that game's content updates to drop, I feel it'll be something truly special once the rough edges are sanded down a bit.
|
|
#
?
Jan 3, 2024 01:03
|
|
|
A Termina content update is coming? Nice!
|
|
#
?
Jan 3, 2024 03:05
|
|
|
MonsieurChoc posted:A Termina content update is coming? Nice! Yeah, Orange has posted screens frequently on Twitter and has released a couple feature trailers to his youtube channel. There was supposed to be an update much sooner, but tragically halfway through last year he suffered a major laptop failure that resulted in a ton of lost coding. While he still had most of the new assets he had made up to that point, all the actual implementation was lost. Fingers crossed the next update will drop soon enough, I have been eager to play it since June of last year.
|
|
#
?
Jan 3, 2024 03:44
|
|
|
Supplemental: Limb Loss and Defense Since we suffered our first instance of limb loss in the last video (poor Moonless), I figured now would be a good time to make a mechanics post discussing limb loss, how it affects you and your party, and what you can potentially do about it should you suffer it. Additionally, since I won't really get a chance to go over it elsewhere, but I feel it's important, I'll use this post to talk about the semi related topic of defense in general. So in Fear & Hunger, as you've probably noticed, battle against enemies features multiple limbs/appendages on the enemies we can target. While destroying things like arms and legs will not kill enemies directly, doing so will cripple them and potentially prevent them from doing anything meaningful in some cases. This is not a one way feature of combat, however. Many enemies do possess access to attacks that can potentially destroy our limbs, and you can bet they'll use them. The reason the Guard is so notorious is because his standard attack with his cleaver arm, Hack, has a 100% chance of cutting off a character's arm if it hits. Many new players wing a haymaker at the Guard's torso, fail to kill it, and spend the rest of the playthrough with one arm, assuming they don't die to the coin flip attack next turn. Limb loss is a permanent affliction, unsurprisingly, and while there are ways in the realm of the occult within the world of Fear & Hunger that can restore them, they recover substantial sacrifices to obtain. Naturally, you want to avoid losing limbs at all costs, but what are the full effects of dismemberment?  This is Mercenaryz, our unfortunate Guinea Pig for displaying the effects of dismemberment. 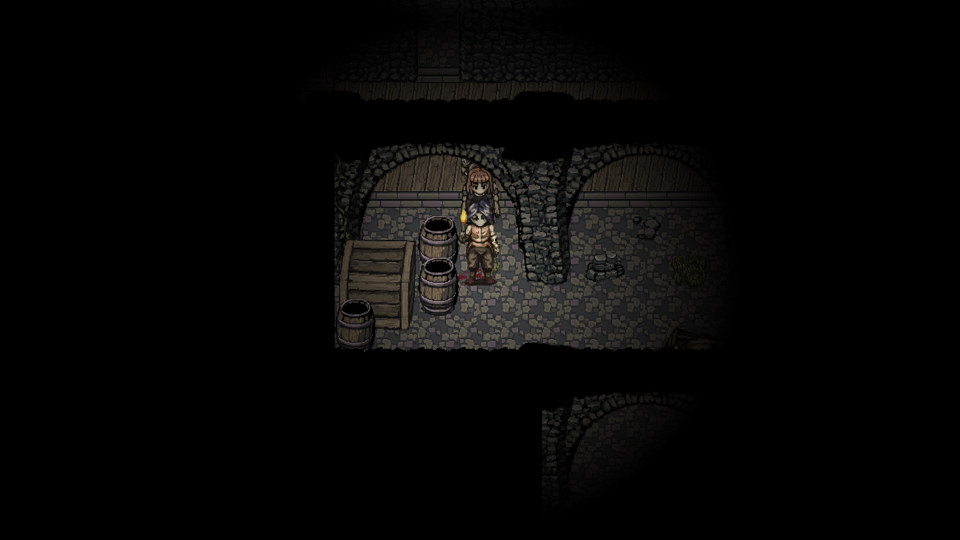 He's looking pretty chill here, but what's with the blood at his feet? Well, Mercenaryz had to perform a field amputation to deal with a nasty infection (or at least that's the excuse I fed him), so now he's short a functioning leg. Now outside the actual animation of hacking it off with a bonesaw, Fear & Hunger actually lacks graphics for losing a single leg on the field and in general it lacks portrait and battle sprites for a de-legged character in any capacity. Justify this to yourself by saying the legs are broken instead of severed if you must. For what it's worth, your character does get a new walking animation where they limp along with a single leg. What matters here is the gameplay effect this has, when the party leader loses a leg, they are no longer able to use the Dash skill. This forcefully locks you into the default walking speed in the game, which about half the speed of Dash. Naturally this is pretty annoying. To my knowledge, your party members losing one or even both legs has absolutely no effect whatsoever, so losing legs only affects party members in the capacity that any time you lose a limb, you also pick up the Bleed status. What about losing both legs? 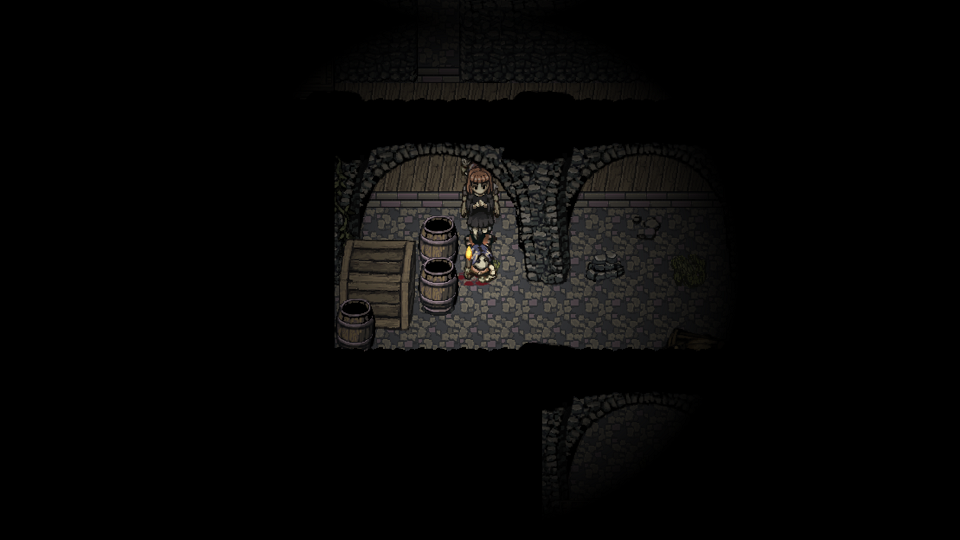 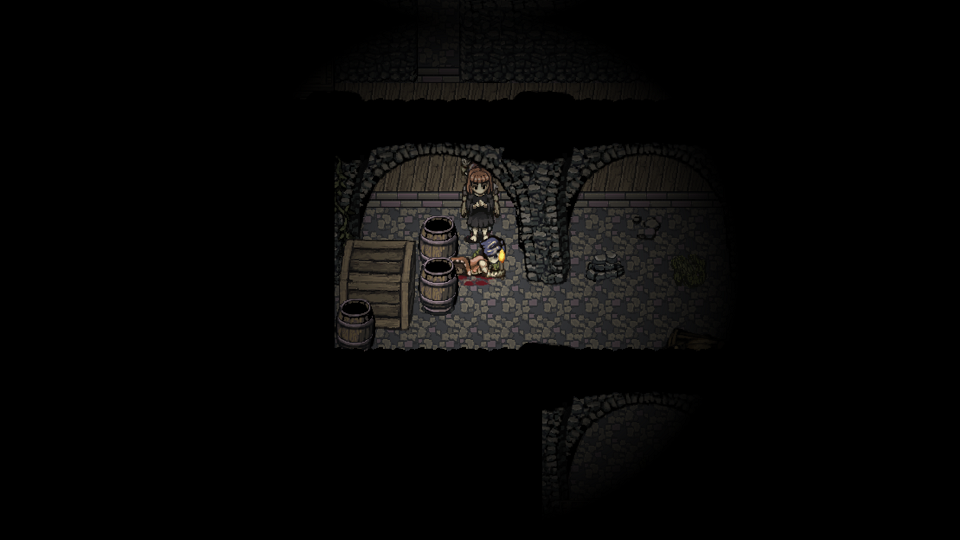 Naturally you are reduced to crawling along the ground, reducing your speed even further. Without your legs, you move at a snail's pace, leaving you vulnerable to being rushed down by just about any enemy in the dungeons. As well, the very final area of the game has some traps like pendulums, rolling boulders, and scorching steam that requires precise timing to get through them. It can be more than a little difficult to pull that off with crawling speed. Getting into this state also more or less makes T&S and Hard Mode unwinnable, as there is a mechanic in those modes that functions as a pseudo-time limit and being reduced to crawling early in the run greatly increases the chance you'll run up on that limit. Now these things are pretty annoying, but losing your legs doesn't directly impede your ability to succeed in combat and arguably doesn't get in the way of your ability to complete the game if you're at a point where time isn't an issue. Limb loss in general has no direct impact on your stats, so a legless character is just as fast and evasive as an able bodied one. What does heavily affect your stats though is equipment, and arm loss is considerably more problematic than leg loss in that regard because losing arms directly impacts your ability to, well, arm yourself. 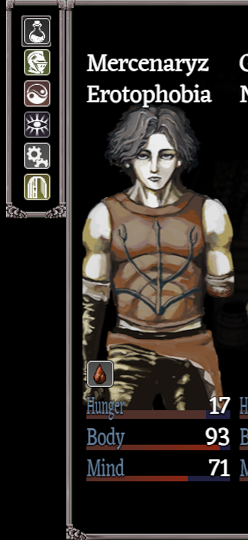 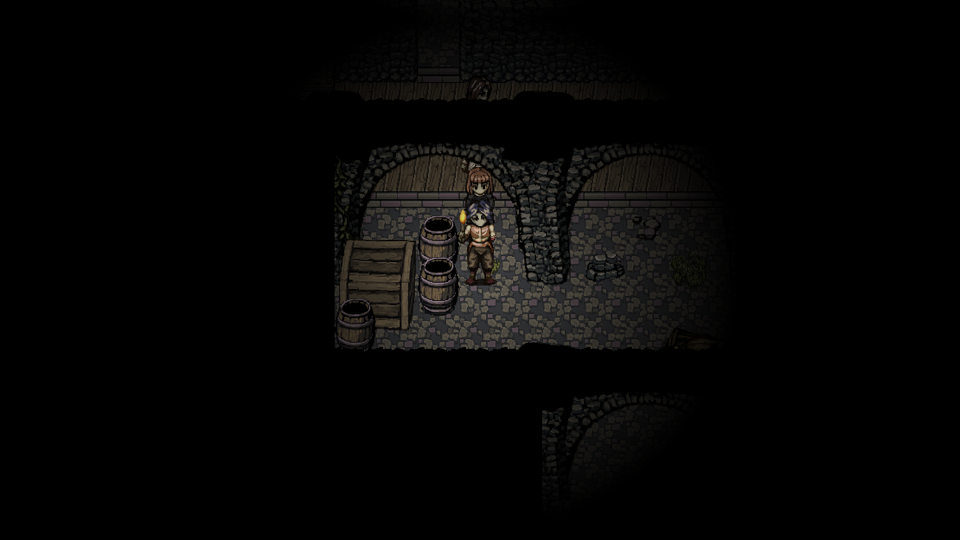 Mercenaryz had an unfortunate run in with a  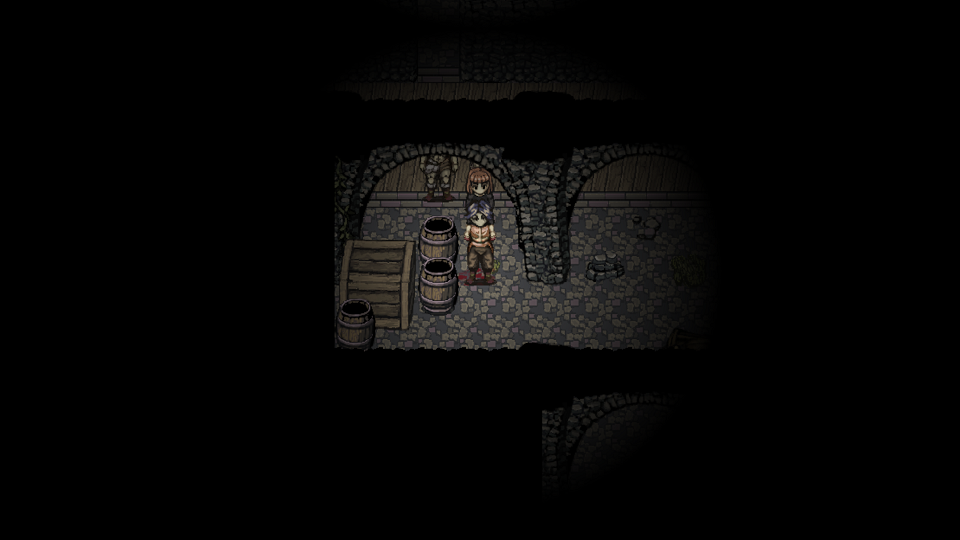 This poor boy can't catch a break. Upon losing both arms, you will be unable to use any weapons or shields, and will be reduced to shoulder checking enemies with your basic attack stat. This is of course horribly weak, and essentially prevents you from seriously being a physical fighter. There is actually still a way to contribute with your physical attack in this state, but that's a topic for another day. In a moment of acceptable breaks from reality, this does not impeded your ability to use torches, nor does it prevent from climbing ropes or ladders. Now if your character is in this state, they can still be a fighter, but they'll have to transition to magic casting. Magic does not care at all about your arms, so it's just as effective as ever should you find yourself in this situation. The final question remains, what happens if you lose all limbs? 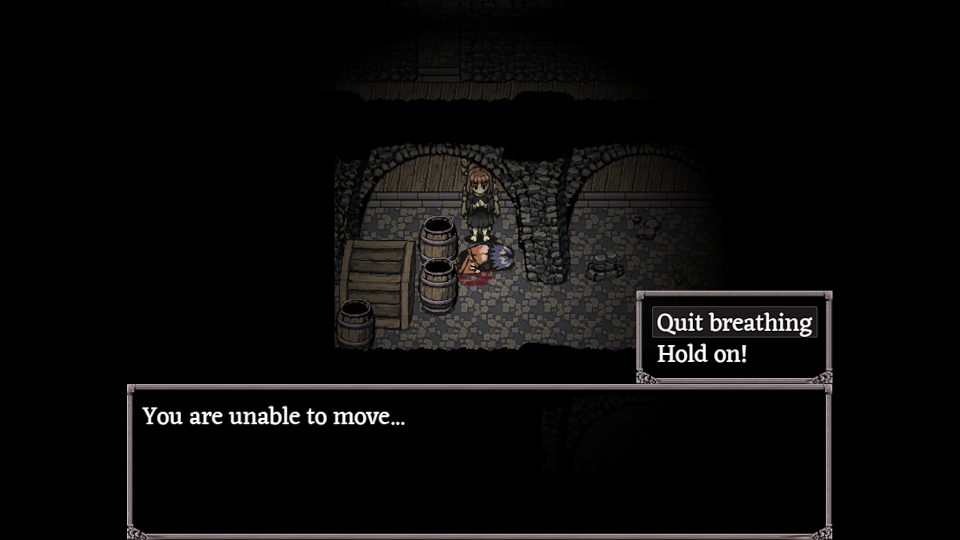  So now that we've covered the effects of limb loss, what are our options to contend with it? If party members lose their legs, that is a complete non-concern. You should only ever be worried about the legs of your party leader, who actually does suffer tangible drawbacks from losing them, and thus you should always be mindful when that is a possibility. A character like Moonless is completely unaffected by any limb loss, so she has nothing to worry about on that front. Arms are definitely the most precious thing, and anyone in the game is negatively impacted by losing them. In addition to taking more damage because of the loss of shields, magic simply isn't very good in this game and losing access the weapons is a serious blow to your ability to succeed in combat. Not helping matters is that getting spells onto anyone except your main character is entirely reliant on RNG, so a completely disarmed party member can end up being total dead weight. At all costs you should avoid situations that put your arms at risk, and when you must contend with those, put some serious thought into what you can do to mitigate the chance of serious losses. Ragnvaldr has a huge boon on this front, he can combine his War Cry skill with the Salmonsnake Soul to redirect all potentially limb destroying attacks to himself eliminating the risk any other party members will lose their limbs. If you start the game as D'Arce, you can begin the game with Arm Guards, an accessory that nullifies the chance of losing your arms on top of some extra physical damage resistance. Another alternative is dabbling into magic to create meat shields who suffer these kinds of attacks for you. Necromancy can be used to create Ghoul party members, who can then be hit by the Sylvian spell Pheromones. Pheromones is like War Cry, redirecting all attacks to the person it is cast on, but it can be used on anyone in the party as opposed to being self targeting. But I know what you're thinking, all of this takes set up and knowledge that a new player doesn't have. What if you have a decent run that suffered some unfortunate limb losses, is there a way to recover from this? As a matter of fact, yes, but they are limited methods that require a degree of sacrifice on your part. The three methods for restoring limbs available in this game are as follows, -Using a ritual circle to form a Marriage of the flesh. By showing love to a party member on a ritual circle that has not already been used to pray to Sylvian, the act of copulation will result in your characters fusing into a creature known as the Marriage. The resultant creature has all its limbs intact, has a base attack stat of 50 instead of the 30/40 the main characters have, and will inherit the soul of the main character. Additionally, it has no equipment restrictions, lifting a serious drawback Enki has if he's the base of the Marriage. Of course, this only affects the main character and the person they fornicate with, and it cannot be used with party members like The Girl and Moonless (Thankfully). The obvious drawback of this is that you're exchanging two characters for one stronger character, which isn't necessarily a lateral trade in this game. Fortunately, Ghouls can also be used for Marriages (don't think too hard about it) so that's an option if your main character has lost limbs and you have an open spot in the party. -Form an Abominable Marriage. A Marriage opting to show love to a character (which only Ghouls and Cahara will agree to) will create an Abominable Marriage. The Abominable Marriage has a staggering 70 base attack stat, but he is so heavily deformed that he cannot use any armor and can only use a select few weapons. If you have to do this, you made some serious mistakes somewhere, but it is a way to restore limbs if you lose any as the Marriage. -Sacrifice The Girl to The Lady of The Moon. The Lady of The Moon is an optional encounter located in the Tomb of The Gods, requiring you to solve a puzzle and clear a door that needs a purifying Talisman to get to. If you have The Girl in your party during this encounter, you can trade in your morals and offer The Girl up to The Lady of The Moon, who will in turn fully heal your party and restore any lost limbs. This method is more of an Easter egg than anything, very rarely will you find yourself in a situation where you can put it to use. To be honest, all of these methods are pretty impractical, and the first one is more interesting to work into a run on the basis of the statistical effects it has rather than as a source of healing. You should just consider limb loss a permanent affliction, take note of all the situations where it can happen, and do your best to avoid those situations entirely or minimize the risk within them. Now for a bonus round. Armor and Defense I've mentioned this in passing, but the defense stat in Fear & Hunger is a complete lie. The actual number is mostly just there since the engine requires it, and it is only used for literally one damage source in the game. (An enemy we have not encountered has a counter mechanic, defense is only ever used to determine the damage you receive from these counter attacks) While the defense bonus of a piece of armor can give a relative idea of how good it is, the reality is that each piece of armor in the game as a set of damage resistances for each damage type, and these resistances multiply with the damage roll for an enemy's attack to determine the actual damage you take. There are 5 damage types in the game: Blunt, Piercing, Slashing, Otherworldly and Fire. Each armor piece in the game has a specific resistance to each of these types. Taking Ragnvaldr's Fur Armor as an example, the Fur Armor has 92% resistance to Blunt, Piercing and Slash attacks, while conveying a 160% weakness to Fire and the standard 100% resistance to Otherworldly. Were a Guard to attack Ragnvaldr with his Cleaver and rolled a 30 for the damage, Ragnvaldr would receive 28 damage instead. Meanwhile, a Hurting spell would deal the standard 50 damage it always does, while a priest's lantern would get a serious bonus and could easily hit Ragnvaldr for 40 damage. This goes both ways, as enemies have no defense stat and instead entirely take their final damage on the basis of their resistances. This is why damage tends to be the same for any attack you launch regardless of what you're fighting. This system is also why an emaciated child doesn't take that more damage than a beef cake of man who goes shirtless in a northern tundra. Damage resistance from all your equipment stacks multiplicatively rather than additively. That is to say, if we have the Fur Armor which gives us 92% resistance to slashing attacks, and we have the Iron Shakespeare soul that gives us 70% resistance to slashing attacks (in addition to Blunt and Piercing resistance, but that's irrelevant right now), those multiply together to give us 64% slash resistance rather than 62%. This means that there's diminishing returns for stacking the same kind of resistances, though this doesn't matter a huge amount. The end result is that about the best you can hope for by loading up on good equipment is that you can usually get close to 50% resistance to a damage type and halve incoming damage accordingly. The game is relatively intuitive in this regard, naturally metallic armor like Plate Mail, the Iron Cuirass, Chain Mail helmets or Bascinets will convey better physical resistance than a little girl's dress. One thing to note is that the game does clue you in on certain equipment being effective against certain attacks should you read the description. For instance, Cahara's Leather Vest states it's good against Fire attacks, and indeed it conveys a massive 60% resistance to fire based attacks. Fire based attacks are actually really rare, so this is of limited help, but what is worth watching it for is equipment that protects against Otherworldly attacks. Magic attacks from enemies have high and consistent damage ranges (as mentioned previously, Hurting cast by the enemy always does 50 damage by default), so having Otherworldly protection is crucial in the situations where you face them down. Termina was much nicer in this regard, actually showing you what the resistances of equipment are in game, though it still has the problem of the misleading defense stat. Small steps when working in the confines of RPG Maker.
|
|
#
?
Jan 3, 2024 05:37
|
|
|
Welp i guess we're gonna replace Moonless pretty soon.
|
|
#
?
Jan 3, 2024 09:22
|
|
|
Seraphic Neoman posted:Welp i guess we're gonna replace Moonless pretty soon. I dunno about that one. This post did just mention that Moonless is just fine with limb loss, and Moonless is a pain to ditch out of the party because she can't have mind events, so you have to have her killed. Plus, as the game goes on she's only going to get stronger, even if she's inconsistent. There's also the issue that if they were planning on replacing Moonless, they would've done it back when Cahara was available. I somehow don't see them going to the effort of killing Moonless off now just to grab Enki or one of the more esoteric characters to recruit. Materant fucked around with this message at 10:30 on Jan 3, 2024 |
|
#
?
Jan 3, 2024 10:27
|
|
|
Yeah I currently do not have plans to ditch Moonless. The strategies I plan to use going forward should keep her pretty safe, so I’ll only get rid of her if some major screw up happens that I don’t feel like rolling back. Fortunately I have everything in place to recruit Enki, but more than likely he’s just going to chill reading light novels for this playthrough.
|
|
#
?
Jan 3, 2024 12:05
|
|
|
Well, how convenient, I was just looking for an LP of this game and here it is! Looking forward to seeing the game!
|
|
#
?
Jan 3, 2024 21:29
|
|


|
|
| # ? May 4, 2024 16:36 |
|
|
Awesome to hear, hope you like it! Don’t be afraid to chime in if anything is unclear or you feel like could be done better with the LP. The messy and random aspects of this game have cause me to lose the script on things I’ve wanted to go over now and again.
|
|
#
?
Jan 3, 2024 21:40
|
|