


|
I wonde rhow many of the mechanics carry into the sequel.
|
 #
?
Jan 3, 2024 22:00
#
?
Jan 3, 2024 22:00
|
|


|

|
| # ? May 4, 2024 10:24 |
|
|
There's one thing I appreciate about combat in this game, and that it seems to be mechanically reflecting how lethal combat can be from a real life perspective. The guy in front of you has a machete? You better have a drat good plan on how to take him down, otherwise just keep the gently caress away from him.
|
|
#
?
Jan 3, 2024 23:20
|
|
|
Supplemental: Random Elements As mentioned in the OP, Fear & Hunger bills itself on the Steam page as having "roguelike" elements. And also somewhat mocked in the OP, this game has about the loosest interpretation of roguelike elements and it only just barely qualifies as one on Hard Mode, which disables saving and forces you to complete the game in one go. There are three major elements in Fear & Hunger that are heavily affected by randomness, and these are the things that will largely differentiate your playthroughs aside from which ending route you're taking. It's worth noting that, unusually for a horror game, Fear & Hunger really does not have much in the way of randomly triggered scares or hallucinations. (Though equipping Miasma to your main character does periodically emulate the latter) Any special scene or unnerving event that you come across will always have a specific trigger that is universal across playthroughs, though some like the unique scenes that happen in the event that you lose to a Guard do have probability checks involved with whether or not they occur when triggered. Loot The first major random element, and by far the one that has most sweeping effects on how your playthrough will go. This is the one truly random element in the game, nearly every lootable container or object pulls an item at complete random from a loot table tied to whatever you're searching. There is no way to manipulate this, and how hard a run is going to be will always be at least a little influenced by the items you manage to secure from loot spots. While there are a few guaranteed pieces of special equipment in every run, and some loot spots have pre-determined items placed within them, these are far and away in the minority and most of your inventory is going to be randomly obtained. With that established, what items you actually get from a given loot spot is influenced by the actual object you're looting from. There are 6 different kinds of lootable objects, though some of these come in multiple flavors with slight variations. Barrels are likely the first type of object you will loot and these always contain food items. On F&H mode Barrels will always contain either an ingredient food item or a proper food item with an equal 7% chance. Rotten meat is also in the loot table as a dud item. On T&S and Hard mode, there is a 17% chance barrels will contain nothing, as well as a 25% chance the barrel will pull from the "Rotten" food table. Rotten meat items give you Parasites and poison while rotten veggie items only poison you. All rotten food items have an equal 12.5% chance of being pulled if that's the table you get. Crates are likely the second thing you'll search and these are the loot spots that separate great runs from the merely winnable ones. All utility items, from vials to torches to keys to quills to throwing items are found within crates. Additionally, there's a 4% chance a crate will pull from the Chest loot table (more on that below) instead, allowing them to reasonably often bless you with equipment. Crates have by the most variable contents and you want to search them whenever you see them as sometimes you can get some truly great stuff from these. In certain areas there are Shelves and Urns which are functionally the same as crates and pull from the same loot table. There is a 2% chance a Crate will have nothing in it when you loot it. Chests are a staple feature of any good RPG, and Fear & Hunger is no exception. Chests are the first loot spot that require a coin flip upon opening them, should you succeed the flip you will get a random item from the Chest loot table. Unlike the sequel to this game, Termina, should you fail the coin flip you will instead get an item pulled from the Crate loot table. This means you can still potentially get a very good item from a chest even if you fail the flip, so it behooves you to always search them even if you can't stake a lucky coin on it. If you succeed in the coin flip, most of the time you'll get a random weapon, armor piece, or accessory. Naturally, the better the equipment in question is, the less likely you are to get it. Given how limited fixed loot drops are in this game, any equipment can be appreciated depending on your circumstances. In rarer occasions, it can give you either a random skill scroll or an Empty Scroll. Very rarely, succeeding a coin flip will pull you a Soul Stone. It is worth noting there is an alternate variant of the Chest that has a 100% chance of giving a Soul Stone should you succeed the coin flip. We saw this in part 3 with the chest in the level 6 mines and the one in the second cell in the catacombs. These chests are very much worth lucky coins if you have any to spare. Equipment Racks and Tables are a rarer loot spot in the game, mostly only seen in the Level 2 and Level 3 Basement areas. These are like chests but exclusively give out equipment. They require a coin flip, and unlike chests they will give nothing should you fail it. The Rack type, despite mostly looking like weapons, gives you armor and accessories like Arm and Leg Guards. There are also mannequin torsos with armor on them that do the same. Weapon Tables, like the ones next to Buckman and Ser Seymor, instead give out weapons. While the armor racks have some unique items you can only get from them, the weapon tables just have higher odds of giving out the weapons you can get from chests with no other items mixed in. There are certain Chests later in the game that use these loot tables. One of the rarer type of loot spots in the game. Bookshelves are the final type of loot spot that require a coin flip, and these come in by far the greatest number of variations compared to any other loot spots. Like the racks and tables, you get nothing from these if you fail the coin flip. Unlike the racks and tables, and even chests, there are "Minor" variations of bookshelves that do not require a coin flip and always give an item. Unfortunately, these only ever give out lore books at random, and you can even get duplicates if you're unlucky. "Rare" bookshelves need a coin flip, and should you succeed you will get a random valuable book. This can range from crafting recipe books, to random skill scrolls, to unique effect books, to the ever coveted Empty Scrolls. For crafting and unique books, you can only get one copy of them per run. For reasons not fully understood, sometimes when getting Empty scrolls, the game will give you multiple. (There is one playthrough on youtube where the player got an absolutely staggering 14 Empty Scrolls. It was a No Empty Scroll challenge run.) There are "Rare" bookshelves in an area later in the game that have a slightly different loot table, though you still can obtain the same books through them. Lastly, there are the Scroll shelves, which as the name implies, exclusively aware you with either skill scrolls or empty scrolls should you win the coin toss. Bad book RNG can throw a playthrough way off course if you're unlucky. Potions are the final loot spot and are a fairly rare one. As you'd expect, these give a variety of different vials. Nothing too special about these, and you hardly ever see them. In the interest of not bloating this post too much, I decided not to post the loot tables here. If you are interested Tormentapedia has ripped the exact odds of each loot table, so you can use this to judge just how RNG Blessed or Screwed you are in a given run. As I said at the start, Loot is the one truly random element of Fear & Hunger, and what items you will get can vary wildly between playthroughs. Thankfully, the game is winnable regardless of what you get, but there are certainly things that will give you a much easier time if you luck into them early on. The following things are less sweeping in the nature, with the one I'm about to mention even being manipulatable. Phobias Upon selecting your character, they are randomly assigned a phobia. Phobias, as mentioned in the Status Ailments post, cause you to take 50% more damage from enemies that trigger it while also reducing your evasion against them by a subtractive 50% as well. The phobias in the game are as follows, from most to least dangerous, Panophobia is fear of everything, and will trigger against anything that triggers a phobia. There are a select few enemies in the game with no associated Phobia, so this has no impact in those cases. Panophobia is not something you can start with normally and is instead obtained by letting your mind hit 0 out of battle. Ragnvaldr can start with it, though, if he opts to take souvenirs from Vinland and fails the coin flip this prompts. Teratophobia is fear of monsters and malformations. It is essentially Panophobia light because that covers the majority of enemies in the game. A whopping 30 different enemies trigger this. Erotophobia is fear of sex and genitals. Naturally any enemy with exposed naughty bits can trigger this. There are 18 enemies that trigger it in the game. Zoophobia is fear of animals. 8 enemies in the game trigger this. Necrophobia is a fear of the dead. 4 enemies in the game trigger this. Phasmophobia is fear of ghosts. 4 enemies in the game trigger this. Rhabdophobia is fear of magic and otherworldly powers. There's a good number of enemies in the game you'd expect to trigger this, but they don't for whatever reason. 3 Enemies in the game trigger this. This is unimportant but for those reading the LP in real time, I will be going back and updating enemy posts with Phobias since that it is handy information to have. Anyways, taking more damage is always a bad thing so it pays to keep your Phobias in mind. Thankfully this is the one random element you can easily manipulate. If you spawn in the front of the dungeon with a bad phobia, just redo character selection to roll for a better one. (Remember, the Phobia is decided upon selecting your character, NOT completing the backstory) For party members, I'm not sure if their phobia is decided upon them joining you or if that is also decided upon character selection, but since them dying doesn't result in a game over it doesn't matter as much. Also it just takes much longer to confirm that, so I wouldn't care to manipulate it regardless. My main advice for this is that if you're tackling the harder difficulties, I'd highly encourage restarting if you get Teratophobia, and at least consider restarting if you get Erotophobia. The rest are rare enough to not significantly impact your run. Locations This is probably the most noticeable random element for new players, but it is far less of a worry than loot and does not matter at all after a point. For the first half of the game, nearly every level of the dungeon of Fear & Hunger has a variety of layouts that can be generated upon character selection. These layouts are NOT procedurally generated, and are instead pre-made map layouts that just get selected and slotted in at random. They are all selected independent of each other, so seeing one version of an area does not guarantee a future area will be using a specific map. The only degree of manipulation you can do with this is that if you get layouts you like after completing a character's backstory, you can make a dedicated save slot of that character so you can always load up that layout for a playthrough. It's impractical to keep resetting to get layouts you want since obviously it takes a bit of time to do all that exploring, so it's best to roll with the punches on this element. Once you make it past the catacombs, the layout of the dungeon is completely static across every playthrough, the area we will be going into in future videos is the same no matter what. This element was removed entirely from Termina, that game has completely static layouts for every area of the game. Once again, Tormentapedia has pages for each location in the game with annotated maps if you want to see all the distinct variations for yourself. Level 1 Entrance Hall has 4 potential variations you can see. This one just kind of rotates the different features around. Typically the library with mock up book is to the center or right on this map, while the Ritual Circle can be all over the place. One notable annoying variation is when the Ritual Circle is located to the center of the map, as this one can have a guard spawn by it. It is worth noting that enemies only have potential spawn points for the first few maps, meaning you can load in and have almost no enemies in the entrance hall like we did in this let's play. One mildly annoying random element to this map is that there is the potential a Ghoul can be spawned here, and if he does he can be defeated and added as a party member with Necromancy. While he's not super useful, there are some secondary things to accomplish with him, and it's annoying that it's up to chance. The harder difficulties seem to more consistently spawn in enemies in their designated points. It's a good idea to commit the layouts of this place to memory, there's a pretty infamous trap right at the start of T&S and Hard mode that can cause a quick loss if you get lost or stuck on the terrain. One last note, one variation actually affects the otherwise unchanging Courtyard, moving the Hexen out of the courtyard and into the bottom right of the entrance hall. This variation is very undesirable due to the aforementioned trap. Level 1 Inner Hall has 3 variations though they are all pretty similar to each other. You'll always arrive in front of the Alll-Mer sacrifice, and on one configuration there are only two priests instead of 3. The Library and Guard Captain's office will always be to the left, in one variation as a joined room, and as separate rooms in the other. Trotur's torture chamber and the access to the Blood Pit will always be on the right side, though one of the maps will have an early Easter egg appearance of Crow Mauler behind a gate. The Human Hydra is located by the library in two of the configs, and to the right of the Alll-mer sacrifice in the Crow Mauler config. There is a random chance for a Guard and/or an Elite Guard to be patrolling set locations in these maps. Level 2 Basement has 2 variations that are laid out pretty similarly to each other, with one notable distinction. One layout has a locked door barring access to the hall leading to the Level 3 Basement, while the other does not. If you get the door variant, you have no choice but to enter the dungeons through the main entrance if you're anyone but Cahara with lockpicking. As a slight compensation, the Door variant has a couple more lootable armor racks. Otherwise, the two maps just kind of shift details around a little, with the door variant having the access to the Level 3 basement being off to the right while it's more centered in the non-door variant. The Level 3 Basement always has the same layout. Level 2 Blood Pit always has the same layout, there's just a random chance a Lizardman will be patrolling near the prison entrance. Level 3 Prison has two layouts, one where the metal walkways are joined and you can simply go up and to the left from the blood pit to access the level 3 basement, and one where they are disconnected and you must go up and through the central area with the lever for the blood pit elevator to get to the level 3 basement platform. There's a random chance a guard with a Ballista (as in an actual Ballista on the field that he's manning as a hazard, though he is also the ballista guard in battle) will spawn on the path leading to the lever area. This guy can be pretty annoying in the connected walkway variation, as he is blocking the way to the lever room with his fat rear end. Level 4 Caverns has two variations, one where the entrance to the mines is on the western side of the map you enter from, and the other where it's on the eastern side of the map, across the bridge and just past Moonless. The variant where the mine entrance is on the Eastern side is by far the more desirable one, as this variant has a bridge connecting the Cavemother's nest to the eastern side of the caverns. This bridge does not have a trigger for the Cavemother fight on it, so you can snag the soul stone in her nest and escape uncontested. Level 5 Mines has 3 variations. The Salmonsnake will always be on the eastern end of the map, while Norasmus' home will always be located due northwest, and the rest of the map elements shift around a little bit. Depending on which map variant you have, the Old Knight is either very close to Norasmus' home or is on the opposite end of the mines from it. Between the three variants, the ritual circle occupies the west, center and east part of the maps. Typically the access to level 6 blocked by rubble is located to your left as you enter the mines, but in the variant where the Old Knight is as far as possible from Norasmus, it's actually located in the northeastern part of the map, due right of the entrance to the Cavedwellers village. The Level 6 Mines are always the same, though there is a second variation of the Level 6 mines reachable through the player's actions. The Thicket has two variations for Level 3 and Level 5, while Level 2 and Level 6 are always the same. There's not much to say about the variations here. One variation of Thicket Level 3 allows you to immediately go right to get on the path to the Cockroach King, while the other variant requires you to go left, up and around the map counterclockwise to reach the hole to him. The main difference for the Level 5 Thicket is that in one variation the Eastern sword is in the southwest section of the map, while in the other variation it is dead center. Cavedweller's Village always has the same layout, but there is a rare event that does result in a substantial change to the population of the village. On very rare occasions when selecting a character and starting a run, when you reach the Cavedweller's Village, you will find the entire population to have been slaughtered by a group of Moonless Guards. This prevents you from using the merchant, obviously, and you will have to juke around or fight the monsters that did this as they are aggressive by default. At least there's no problem with taking the Cube in this case. This event is commonly misidentified as a timed event, something that happens after a certain amount of game time passes or if you take too long to reach the village, but this is false. While the event is annoying, it occurs in less than 10% of playthroughs and many players have never seen this event at all. Be mindful of it though, and remember that Layout is an element determined upon character selection. If you create a save for a pre-made backstory and this event was selected on character creation, then the Cavedweller village will always be slaughtered in that file no matter what. One last point, this does not interfere with D'Arce's recruitment event, thankfully. There is one more minor random element to the village, and that's the Merchant's inventory. The Merchant has two possible shop lists, which again are set on character selection. This doesn't matter too much, but one of the shop lists has a Quill in it, so it's obviously more desirable if you luck into Empty Scrolls early on but no Quills. Level 7 Catacombs always has the same layout, but like the Village and the Blood Pit, it does have the potential for a certain aspect of it to change. Sometimes when you reach the catacombs, they will be covered in vines from the thicket, and all enemies present except for the Elite Guard will be infected with Brain Flowers. I'm actually not 100% sure this is random though. As mentioned in the notes for Part 3, it is possible to reach the Catacombs with the Knight Captain still alive, and I've never seen the vine variation in this event. Whether or not they are related, or if it's tied to not going through the Thicket before a certain point, or maybe it truly is random, I can't say for sure. Edit: Ask and ye shall receive, in my most recent run through I have confirmed this is indeed a random element, seemingly untied to any other factor. I double checked with another run that arrived at the catacombs past the time limit just to be sure, and they did not have the overgrown catacombs. And that's all the areas that have variations in the game. Like I said, we've passed through all the areas that can be different at this point, so the major sources of remaining RNG are purely in loot gains. All areas going forward will have the same layout, regardless of anything. Phew, that took way longer than I expected to write out, I've been going at this for 2 hours! CullenDaGaDee fucked around with this message at 15:20 on Jan 13, 2024 |
|
#
?
Jan 5, 2024 04:59
|
|

|
Hey I want to say, thanks for LPing this game. I watched a lore/playthrough breakdown but it's cool to actually see the game played and explained as it goes instead of a blind playthrough, to better see how these game elements actually fit together in play.
|
|
#
?
Jan 5, 2024 06:54
|
|


|
Thank you yourself! While there are plenty of blind playthroughs, analysis videos of specific parts of the game, and longplays and challenge runs, there�s not really that many complete commentated playthroughs of the game that actually explain how the hell it works as a whole. I�m hoping to cover as much as possible with this LP and discuss things that wouldn�t be obvious from just watching an optimized longplay of the game. There�s a lot that is done in the typical playthrough of the game that is really unclear why its being done, so just watching an uncommentated playthrough for ideas doesn�t necessarily prepare you for what the game can throw at you.
|
|
#
?
Jan 5, 2024 12:09
|
|
|
Making a quick post for some status updates. I will begin working on a new video shortly, and will also make one on Sunday. As mentioned previously, the game can be a little demanding to play given the restrictive save system and punishing difficulty, so tackling it on the weekends gives me the most free time to make sure I get an acceptable video out. I'll be going back through the previously created enemy posts to add their phobia information, since that can be handy to know and it was silly of me to leave it out. Some enemies can surprise with what they do and don't trigger when it comes to phobias. Naturally all enemy posts going forward will have this info by default. Finally, I livestreamed my first successful clear of the hidden S Ending for Ragnvaldr in Hard mode. This is generally agreed to be the hardest thing to do in the game, and while my playthrough is a pretty messy one (with pretty lousy commentary since I was hyper focused on the game and had no chatters), this does give a good outline for how to approach this challenge as a newer player. There are plenty of much cleaner runs of this ending on Youtube, so I'd highly recommend checking those out if you're interested. I of course will be making a proper video for this which will hopefully be much more polished with less mistakes than this run once the time comes for the LP. It should go with out saying, but since this is a full game clear, there will be quite a few things present that we have yet to see in the LP proper, so if you want to experience the game organically and without spoilers, I'd recommend against watching this.
|
|
#
?
Jan 6, 2024 18:51
|
|
|
https://www.youtube.com/watch?v=cTEf_zKt0Gk Part 4 is out! We've entered the second half of the game, where the explorative portion becomes completely static and unchanging across playthroughs. That's one random element removed from the RNG equation, but in compensation the threats become much more pronounced at this point. Our goal now is to work our way towards a conclusion. We have a variety of endings available to us, but for this initial run we shall be gunning for Ending D. This will require us to slaughter 4 challenging bosses and one road block, though of course there is a lot more to worry about outside of those enemies. Fortunately, we have numerous powerful tools and weapons at our disposal, with no RNG involved in the slightest in obtaining them. Unique Weapons/Items Available Bone Shears: We actually did get this through RNG, but since it's an uncommon item with a guaranteed spawn point, I figured it was worth mentioning. A pair of Bone Shears can be obtained from the hallway behind the jammed gate in the Level 3 Basement (You'll have to smash the gate to get in). Located in the skull of some poor sap at the rear of the hall, grabbing it causes some Miner Spectres to spawn in, but it takes them awhile to become tangible encounters on the field, so you can easily get past them so long as you have Dash. The Bone Shears are ludicrously powerful. giving +95 attack. That's even more than Miasma, which gives +92! There are some catches, however. The less important one is that it is a two handed weapon, so you need two arms to use it and it cannot be used in tandem with a shield. The other catch is much more insidious. Most weapons in Fear & Hunger have 97%-100% accuracy, meaning most of the time they will hit their target. (It's important to note that this game runs accuracy and evasion checks separately, so enemies always have 5% minimum chance to evade a physical attack) The Bone Shears only have 50% accuracy, meaning 55% of the time they whiff entirely. This can be abated if you have the Eyeglasses accessory, which completely offsets the accuracy penalty of the Shears, but Eyeglasses can only be obtained through RNG. This makes the Bone Shears a joke item more often than not, highly ill advised to use them on their own. Scroll of Transmutation and Scroll of Walk on Water: Hmm, the miraculous abilities of Alll-mer to create bread from thin air, turn water to wine and to walk on water. Where have I heard that before.... well anyway these scrolls are the reward for solving the riddle of Treasure Map #1. Finding the spot that map points to within the Ancient City allows you to obtain these Skill Scrolls as your prize. It is important to note that you do NEED the maps to find these things, you cannot just interact with spot the treasure is located even if you know it's there from past experience. I'll mention Walk on Water first because it is nothing more than a glorified door key. This allows you to cross the pond of the Salmonsnake to a hidden area with extra goodies, which will be described next. Now the Scroll of Transmutation on the other hand, essentially invalidates two major mechanics of the game. This scroll teaches the Simple Transmutation spell, which does two things: Allow you to convert 1 Moldy Bread into 3, gaining 2 Moldy Breads in the process, and it allows you to turn water vials into wine vials which restore 40 mind. The spell itself only costs 15 mind to cast, so the latter is an infinite source of mind. Water vials can be obtained by using Glass Vials on the Salmonsnake pond. Glass Vials, aside from the ones you get from loot, can obtained by using Blue Vials/Light Blue Vials and Wine Vials, which automatically add a glass vial to your inventory when used. With this spell, Hunger and Mind are no longer a concern. So long as we keep one piece of bread in our inventory, we can generate infinite sustenance, and getting water vials is just a matter of warping back to the Level 5 mines. While we still have combat to worry about when it comes to ways to die in the dungeon, the titular aspects of the game are no longer of any concern. Do note that due to a specific mechanic featured on the harder difficulties, this is really only super useful on Fear & Hunger mode. While the ability to generate infinite bread is always handy, getting wine vials is a slightly time consuming process, and you do not want to be wasting time in the higher difficulties. Oh and since it's not really important enough for its own heading, Treasure Map #2 leads to 70 Silver Coins. A tidy sum, but not the literal game changer this reward is. Scroll of Pyromancy Trick and Scroll of Combustion: The end reward for Scroll of Walk on Water and well worth the effort of tracking down the first treasure of Isayah's maps. Walking over the Salmonsnake pond will allow you to reach Norasmus' second lair, wherein a chest has these scrolls guaranteed with no coin flip required. The Pyromancy Trick scroll is whatever, mostly only notable because it's a way to get that skill onto your party member's guaranteed. (Real quick, Pyromancy Trick is a skill that costs 10 mind to cast, it deals ~200 damage, has a 60% chance to Burn an enemy, and whiffs 5% of the time) Combustion is the real prize here. This is a Skill that can otherwise only be Empty Scroll'd onto your main character. It is an attacking spell that does around 400 Fire damage per cast, has the same chance as Pyromancy Trick to Burn an enemy, similar accuracy, but it DOES NOT COST ANY MIND. It is a 0 mind spell, the only damaging spell in the game with this distinction. Since it can be taught to anyone, it is fantastic for The Girl, as it gives her a free source of big damage independent of her terrible strength with a good chance of melting an enemy's torso through DoT. Aside from that, another interesting application is teaching it to Moonless. Moonless can learn spell scrolls, and the usage of spells is pretty high in her AI script if she has the Mind to do so. If Combustion is the only thing she knows, she will constantly cast it since it is free to do so. Two instances of 400 damage per turn is pretty solid, regardless of where it goes to. Now it's not necessarily a good thing to teach this to Moonless, because if she has gained the powerful Grim Jaw ability, she'll seldom use it and its guaranteed stun if she has Combustion at her disposal. Something to keep in mind if you went out of your way to mark as much territory. Other than that, there's obviously no drawback to teaching this to your main character if you have it. The Gaunt Plate Armor and The Gaunt Bascinet: In this playthrough, I opted to rescue Ser Seril from his madness, but you can totally just kill him and loot his corpse. And it's pretty desirable to do as his equipment is stellar, the best normal heavy armor in the game you can collect guaranteed. The armor itself grants 50/65/70% Slashing/Piercing/Blunt resistance, while the bascinet factors in an additional 85/85/85% and immunity to the confusion status. The only other armor that has the same defensive bonuses is the secret Penance armor, which requires much more planning to get and has some drawbacks to it. In this particular run, I've been pretty screwed on armor, so it really would have to kill Seril in the effort of helping Ragnvaldr tank more punishment. Here's to the could have beens. The Ring of Wraiths: The end reward for saving Buckman's party that the game decided to undercut by randomly giving me two of as I was closing in on finishing the quest. The Ring of Wraiths is an accessory that restores 8% body to your character at the end of a turn in battle. It's a solid effect, and you can exploit it against doors by initiating a fight and then just guarding, but it's not anything majorly game changing. Once you reunite all 4 members of Buckman's party, you can return to the level 3 Basement at any time to find this ring awaiting you. To be completely honest, all other possible rewards that can be obtained from the Buckman sidequest beat out this one, even if you don't randomly get this reward from loot RNG. The 40 silver coins you get from Buckman have a lot of value in many situations, if you approach Ser Seymor alone, you can kill him for his Claymore which is a highly powerful weapon, leaving Jeanne to her fate lets you avoid a potentially dangerous encounter, and we've gone over why it's better to kill Seril. If you really want this accessory though, then you do have an option for securing it 100%. Extra Notes -One thing I want to establish right out is that you'll notice I am obliterating enemies before they get a chance to act and am merely explaining what they can do to you. While I would love to demo the potential threats of the various monstrosities of the dungeon, at this stage they really are that dangerous and can cause downright nasty afflictions or force potentially game ending coin tosses on you. It's just not practical to screw around with things in the dungeons, and I'd rather show off how to avoid problems if you have the tools to do so. -When entering the Tomb of The Ancients, I opted to take the path through the chambers on the right to enter the Ancient City. We have enough fire power to smash down the doors in the left chambers, however, and there's a Beacon of The Depths on that side of the tomb that allows you to enter the past before setting foot in the Ancient City if you so desire. In the event you have Ragnvaldr and Le'garde as party members (and this is only if he is not your main character), you will absolutely want to do this. Entering the present Ancient City with both in tow will result in a scene where Ragnvaldr attempts to kill Le'garde and will succeed unless you intervene. You'll have to kill him in that situation. Should you let Ragnvaldr carry out his revenge, D'arce will turn on the party should she be in it, resulting in two characters lost. This can be avoided entirely by simply entering the city in the past, which causes the scene to be skipped. -As mentioned previously, you do need Isayah's maps to obtain the treasures they lead to, the spots they reside in cannot be interacted with otherwise. -Generally speaking, it's better to explore the Ancient City in its past version, Ma'habre, as there are less enemies roaming around and the ones that do exist tend to be easier to avoid. Additionally, all loot spots will be interactable in the past, when a number of them are completely desiccated or rotted out in the present. There are some areas only accessible in the present, however, and the Blood Portals are only available when in the present as well. Luckily, there are beacons all over the city so it's pretty easy to swap between the two times on a purely as needed basis. -The Bug Eyed Figurine is a great guy to spend your hard earned Silver Coins on. He sells the best healing items in the game for ridiculously cheap, as well as being a great source for extra soul stones. He's right by a 70 coin reward, so we can empty our pockets on him and then immediately come back to buy 3 more soul stones and another restorative. -We only briefly set foot in the Grand Library, but just know that you can only obtain books from it in the past. The loot tables for the coin flip shelves here are a little different, generally having slightly higher odds for rare books should you succeed the coin tosses. -I would never advocate buying the crafting books from the golem who is selling them. For the ridiculous price of Alchemilla 1, you could buy 8 Body elixirs from the bug eyed figure and have a decent chance of having more healing from that for the rest of the game than what you could get from crafting. -Make sure you set up the blood portal by the library before saving Jeanne like I did, it's rather annoying to be thrown out of the city and have to work your way back from the Catacombs. - With Simple Transmutation on our side, the Salmonsnake pond is an infinite source of mind. Feel free to make periodic trips here to restore your wine reserves. Remember, using items like Blue Vials and Wine Vials returns glass vials to you inventory to be refilled. (Rather amusingly, crafting blue vials does not require glass vials, but they still add glass vials to your inventory when used) -The Crude Sword from the Lizardmen are remarkably decent weapons. It's not much of a help to us now, but it might be worth your time to try and kill one if you encounter them in one of their rare spawn points earlier in the game. -Combustion is far and away the best damage dealing option The Girl has access to, and it's a good idea to pick it up for her if you want to seriously use her in combat. -Because I was still dealing with a hang over as I recorded this, my mind completely blanked at the Hexen and I forgot to explain cursing weapons, half the reason I went to it in the first place. Next video, for sure. -The New Gods have a tremendous amount of words they can respond too, resulting in the potential for some interesting things to learn about. Interestingly, they can respond to a lot of terms and concepts relating to this game's sequel, giving some extra background on events that have yet to pass. Aside from that, the free Book of Enlightenment you get from talking to these guys is well worth checking out this scene even if you have no idea what to ask them. -If I hadn't killed Isayah for the maps and bought them from him instead, he would appear upon opening whichever chest we got to second and attempt to kill us for the treasures. Killing him at that point lets you search him for a third map, which leads to an item that useless in all but one scenario. Since it takes 50 coins to buy the maps from Isayah, I wouldn't really recommend going this route if you don't have to. -As established previously, it's better to kill Ser Seril for his armor than save him. In this run in particular I did not get any heavy armor save for what D'arce came with, so it really would have helped to cut him down. You can only save Ser Seril with an Elixir of Mind, so make sure to avoid him if you lack that. -Aside from the Bear Trap method, Scarabs can be talked down if you have Mastery Over Insects, avoiding a potentially nasty encounter. If you do not have the ability to reliably throw out 1000 damage, you should never fight these things. Losing a valuable weapon like Miasma or the Eastern Sword permanently can be a complete disaster. -With the portal in the Tower of The Endless and Simple Transmutation, we now have a base of operations and endless supplies. We can warp to the Level 5 mines to stock up water-to-wine vials and return to a decrepit bed to save our game endlessly. CullenDaGaDee fucked around with this message at 17:03 on Jan 7, 2024 |
|
#
?
Jan 7, 2024 01:21
|
|
|
You LP gives me a lot of the mood of a traditional rougelike LP, especially nethack. With random drops combining to trivialize a problem and you backtracking to a place you previously avoided to finish things. It is a good argument that the game is more Rougelike then other games with full dungeon randomisation.
|
|
#
?
Jan 7, 2024 15:00
|
|

|
For me, the high number of 100% consistent elements of the game is what kind of makes it go against the spirit of being a roguelike. The path to every ending has a dominant strategy for pulling off, and you can take these routes completely independent of the RNG. Good RNG does allow for more optimized runthroughs, or it allows you to work in things that aren't guaranteed to be on the beaten path, but if you watch enough runs of this game you'll begin to notice clear patterns for getting through the game because they always work, no matter what.
|
|
#
?
Jan 7, 2024 15:30
|
|
|
Supplemental: Enemies Pt.5 We see quite a few new enemies in the last video, though not much in the way of unique encounters or boss fights. Going forward I want to win fights in as dominating a fashion as possible, so these enemy posts will really help with understanding what the enemies we come across are capable of going forward, since we'll seldom actually see what an enemy can do to us. One thing to note is that at this stage of the game, a lot of the enemies have little to no changes between the difficulty levels. This means that should you have to engage any of these things, the same strategies will usually work across all playthroughs. Body Snatcher 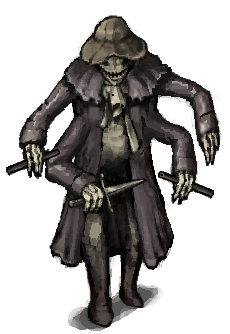 Phobia(s) Triggered: Teratophobia 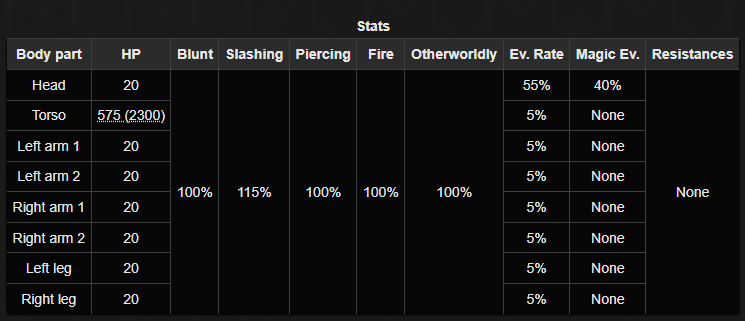 *On T&S/Hard mode, Torso HP is 725(2900) A lot of enemies at this stage of the game can take many actions in a single turn with various limbs, and the Body Snatcher is a good example of that. The Right Arm Blow Dart can launch paralysis darts at you, completely disabling a character for the remainder of a fight and is functionally a game over for a solo party. The Left Arm Blow Dart can poison you, while the Right Arm Dagger can inflict the classic Bleed/Infection combo as well as the highly dangerous Critical State ailment. Never fight these guys as a lone wolf, and in general just do your best to avoid them as they can plunge you into ailment hell. Thankfully, they're relatively frail vis-a-vis the weaponry we have now and they don't have Death Throes, so we can easily cripple them or kill them before they can act, especially with a pre-emptive strike from En Garde. Bloody Man 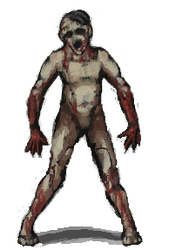 Phobia(s) Triggered: Necrophobia 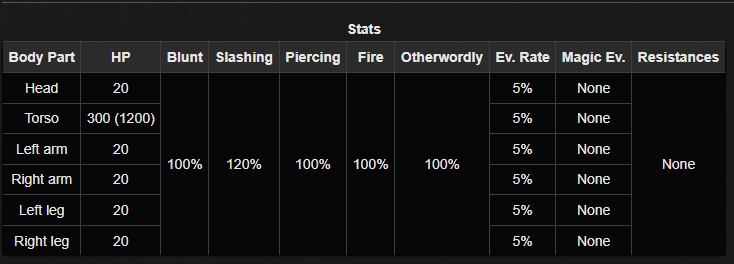 Essentially a reskinned Ghoul, the Bloody Man is notable for being the first enemy capable of continuing to fight even if its head is destroyed. It can be desirable to take out the head anyway, however, since it has standard evasion and it prevents the Bloody Man from biting you and inflicting infection. The Bloody Man has Death Throes, and he attacks with all working limbs in the event his Torso is destroyed. The best way to minimize damage in this case is to take out his head and one arm. If the Bloody Man is armless, he will resort to tackling, which is actually more damaging than a Scratch from a single arm. He has the same HP on any difficulty, so he's not a huge threat in most any case. It is worth noting that he can be bested via the Talk Skill. Asking about his origin opens the possibility of telling him he is a product of Necromancy, which causes him to die from the realization. This takes two turns though, so it really isn't anymore practical than just smashing his torso. Alternatively, if you have the skill Counter Magic, you can cast it to disable the Necromancy, effectively killing the Bloody Man outright and also bypassing Death Throes in the process. The Bloody Man has a heavily deteriorated body, so he cannot be added to your team like a Ghoul can as Necromancy will fail to make him ambulatory after being defeated. Uterus 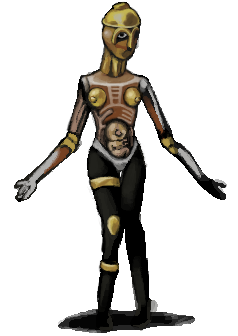 Phobia(s) Triggered: Erotophobia, Teratophobia 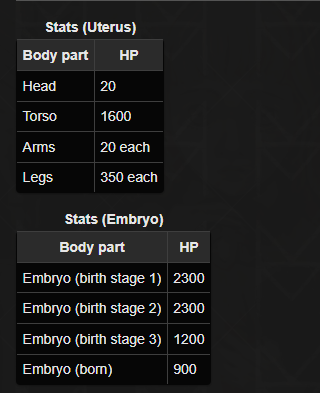 Here's a creepy looking enemy with fairly disturbing implications. The Uterus is extremely durable though not necessarily capable of laying out big damage on its own. It can only attack directly with its weak arms, so it's easy enough to cripple it. Like the Bloody Man, it can continue to fight with its head destroyed, so going for a headshot is of no help in terms of winning, and does nothing practical like preventing ailments with the Bloody Man. The real threat of the Uterus is the Embryo, which will proceed to exit its exposed womb and grow each turn. It will join the battle on Turn 4 and can inflict a number of terrible effects like Critical State and Paralysis. Thankfully, it's an extension of the Uterus and will be considered defeated if the Uterus herself is destroyed. The Uterus is an extreme danger to small or solo parties, but our team can pretty easily smash them to bits at this point. They take awhile to kill though and they're easy enough to avoid, so I usually opt to just juke around them. For a couple miscellaneous notes, the Embryo fully restores HP every time it goes to a new phase of delivery, so it's impractical to try and defeat them before they are fully born. (This is true of any multi-stage limb like the Salmonsnake's Tongue) The Uterus is a soulless automaton, so you cannot get a lesser soul from it. Mercifully, the game lets you keep your Soul Stone should you try. Embryo 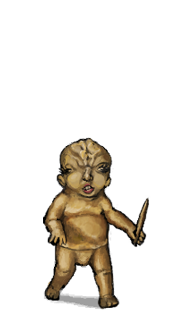  Phobia(s) Triggered: None 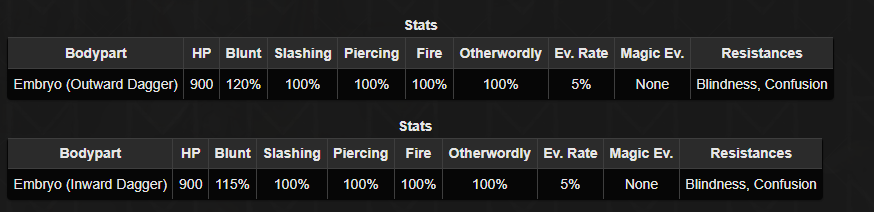 Speaking of the Uterus, their offspring can be found wandering the Grand Library in the past, independent of their mothers. They are remarkably dangerous, essentially being like if Cavegnomes could actually put up a fight. Their attacks have the potential to inflict Paralysis and Critical State, and with 900 HP it can be a dicey proposition to kill them before they cause problems. At the end of the turn, they will let out a cry for help, adding another Embryo to the fight that must be killed, and a third Embryo can join the fight if it goes on. En Garde is highly recommended for dealing with these things, as a single miss means you may not be able to kill them before back up joins. Harvestman 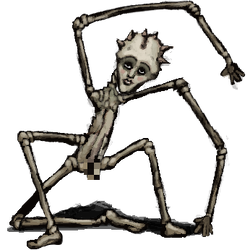 Phobia(s) Triggered: Erotophobia, Teratophobia 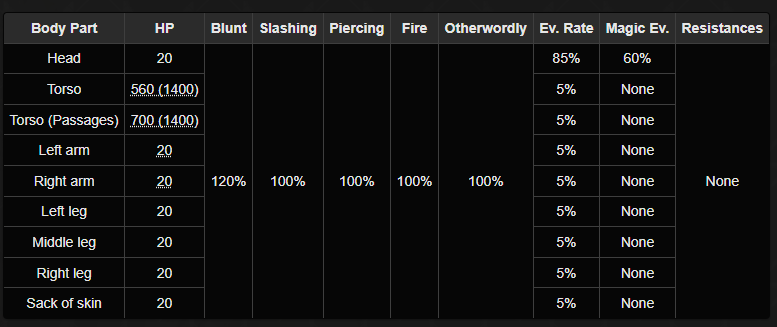 *On T&S/Hard Mode, the Torso has 1000(2500) HP while the Right and Left Arm have 300 HP. The Passages of Ma'habre variant will have 1250(2500) HP. A fairly notorious enemy, on the first turn the Harvestman will act innocuous, whistling at and petting the player. On the second turn, and every third turn after, it will launch a coin flip attack that results in it testing the player's flexibility and giving an instant game over. Due to a coding error, occasionally this coin flip will bypass Guarding, so you really want to either avoid this thing or kill it in one turn. Not much to say about it otherwise in terms of battle, it's a very straightforward enemy with a very dangerous gimmick. As some fun trivia though, the Harvestman is heavily inspired by the cover art of a Kurt Cobain solo album. 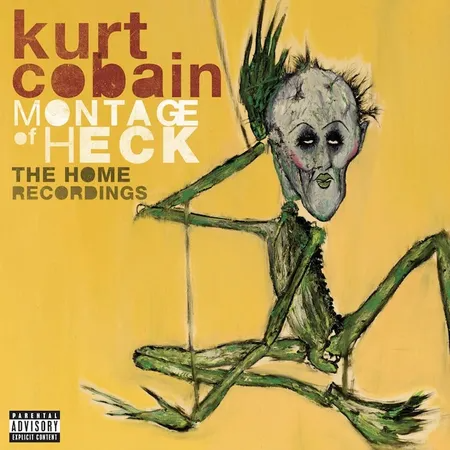 Lord of The Flies 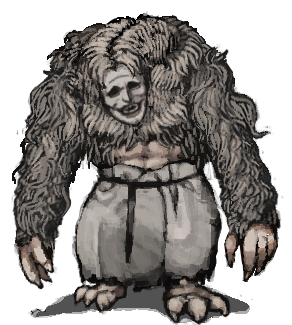  Phobia(s) Triggered: Teratophobia, Zoophobia  These guys are built like tanks. Their arms are durable and hit for about 30 blunt damage each, while they have a tremendous amount of Torso HP to burn. This is one of the handful of cases where it may be more prudent to put the enemy off balance with destroyed legs and go for a head shot. Do note the Lord of The Flies has Death Throes, so it will get off some palm strikes no matter what. The Lord of The Flies also is unique in that it has two coin flip attacks. The first one has a high tendency to happen at the end of the first turn fighting them, where you have to flip to resist the foul order the emit. Fail the toss, and your main character vomits for 10 HP of damage. The other flip attack is the Lord of The Flies attempting to put you in a bear hug. Fail this flip, and you will be captured and thrown in a cage, separated from your party. If you lack any items to get you out of the cage like a small key or Red Vial, it's a game over. These guys along with other enemy in Ancient City of the present are fairly common throughout it, and are big reasons for why it's more desirable to traverse the Ma'habre of the past. Scarab  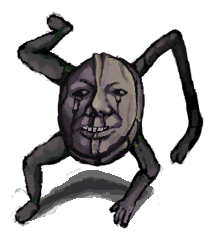 Phobia(s) Triggered: Teratophobia  Do not even play with these things man. The Scarabs are a very simple enemy, on the first turn they will poke a character and deal about 10 damage. The second turn, they will burst forth a blast of acid that deals around 30 damage and PERMANENTLY DESTROYS YOUR CHARACTER'S WEAPON. If that wasn't enough, at the end of their first turn, a second Scarab joins the fray and will do the same. This weapon destroying ability works on unique weapons like Miasma, so you can seriously be screwed over if you aren't able to melt this thing's 1000 HP in the first turn. Thankfully, there are some alternatives to dealing with them if you either lack the damage or are wary of missing. As demonstrated in the last video, they can be insta killed by Bear Traps, which they won't even try to avoid. Additionally, if you have Mastery Over Insects, you can talk them out of fighting and they'll become non-hostile NPCs. Scarabs are another thing that make the present city really undesirable to explore, they can be a serious problem for solo characters. Lizardman  Phobia(s) Triggered: Zoophobia 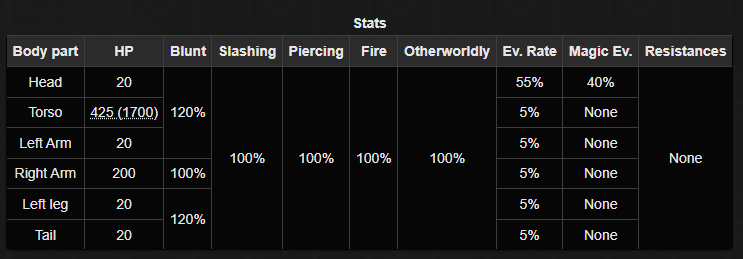 *On T&S/Hard Mode, the Torso HP is 725(2900) The only new enemy encountered outside of the Ancient City and a remarkably complex one. The Lizardman can attack with all body parts save for the legs, though thankfully is does not have Death Throes. The Head can spit poison at you, nasty if you have no white vials to treat it. The Left Arm can attempt to hack of your arms or legs, with big damage alongside it in either case. The Right Arm puts the Lizardman in the Counter status, letting him launch a retaliation attack when any limb of his is struck. The counters are notable for being the only attacks in the game that actually factor in your Defense for the final damage value, and they can be quite potent if your defense stat is low. Finally, if both its arms are destroyed, it will begin to attack with its tail, dealing around 25 slashing damage. All this said, the Lizardman doesn't have that much in the way of HP, even on T&S, so he can be pretty easily killed before he can do anything too dangerous. It's definitely worth it to take out that left arm, and he can be defeated with little problem if you hurl an explosive vial at him. He has quite a few good items he can drop, such as the Crude Sword, the Spider Shield, and the Ring of Wraiths. Should you lose to the Lizardman, you are treated to a unique game over scene where you are flayed alive. Gaunt Knight 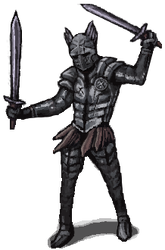 Phobia(s) Triggered: None 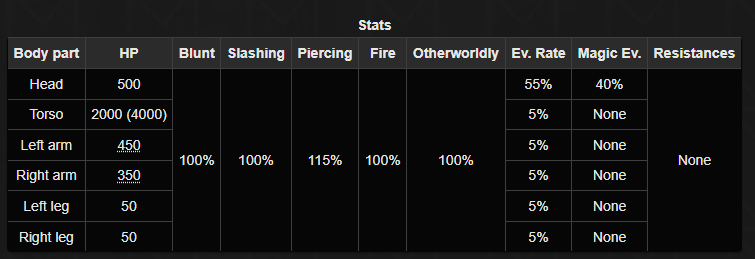 *Somewhat bizarrely, the Gaunt Knight's arms can be incapacitated for lower damage than it takes to destroy them. The left arm takes 180 damage to disable while the right takes 140 to disable. The mentally infirm Ser Seril is a pretty serious combatant, striking with both arms with the potential for high damage and arm loss. You definitely want to focus his arms when fighting him, as he has both a highly durable Head and Torso. It's ill advised to take him on without a party in tow, but if you can defeat him you can loot his armor, which is among the best equipment in the game. As demonstrated in the video, you can use Talk to hurl an Elixir of Mind at him and then proceed to talk him down in the following turn. If you have rescued Jeanne, you can then guide him back to the basement meet up point.
|
|
#
?
Jan 7, 2024 17:00
|
|
|
CullenDaGaDee posted:For me, the high number of 100% consistent elements of the game is what kind of makes it go against the spirit of being a roguelike. The path to every ending has a dominant strategy for pulling off, and you can take these routes completely independent of the RNG. Good RNG does allow for more optimized runthroughs, or it allows you to work in things that aren't guaranteed to be on the beaten path, but if you watch enough runs of this game you'll begin to notice clear patterns for getting through the game because they always work, no matter what. That is word for word exactly the case with traditional roguelikes like nethack and DCSS. Things like, in nethack, knowing what scribing 'ELBERETH' on the floor does and what creatures respect it and wont step on it. Theres a lot that was cut out in the development of roguelites. Rigged Death Trap fucked around with this message at 22:39 on Jan 7, 2024 |
|
#
?
Jan 7, 2024 22:35
|
|


|
Clearly my youthful ignorance is showing.
|
|
#
?
Jan 7, 2024 23:00
|
|
|
https://www.youtube.com/watch?v=WoaK2gy4HeI Part 5 is out! We've more or less cleared up every loose end by the close of this video, and next weekend we'll be seeing the conclusion of the first playthrough and our first proper ending of the game. There was really only one thing with this first run that didn't come together quite like I wanted, but that just means there's more to cover in successive runs. We still have a bit to get through with Ragnvaldr, so lets cover the nitty gritty of what's in this video and use it to push for a clean clear of the game. Unique Equipment/Items Available Blue Sin: I was desperately hoping to get the book required to grab this weapon or an Empty Scroll to generate a copy of that book in this video, but sadly it did not work out. Blue Sin is available in the Level 6 Mines, just north of the Wolf Mask Feast. It will be embedded in the cave wall, and pulling it free will initiate a cave in. If you have the book "The Passages of Ma'habre" (gotten through either book shelf RNG or Empty Scrolling it), you can teleport to an illusion of Ma'habre and avoid being trapped in the cave in, which is a game over if that happens. This sword is very good, being a one hander with +88 attack power, just 4 short of Miasma. Where it really shines though is if you manage to curse it. It's a steep price at 4 Lesser Souls, but if you do obtain Cursed Blue Sin, you have an amazing weapon on your hands. Cursed Blue Sin has the same attack power as Miasma, but in addition to that it can deal otherworldly damage and is capable of immolating enemies with the Burn status 70% of the time. There's a certain soul this can be combined with that gives your physical attacks a guaranteed chance to poison, creating an ungodly powerful double DoT attack. Cursed Blue Sin is pretty much the best weapon in the game, even if it doesn't have the most attack power, but getting it is something the game has to permit to a certain degree. Eastern Silk Robes, Jingasa Kabuto and the Charm of the Yggaegetsu: If you survive the cave in after grabbing Blue Sin, a new path in the Level 6 mines opens up connecting to the Level 6 Thicket. You'll find a corpse embedded in the wall along this path who you can loot these pieces of equipment from. The Eastern Silk Robes have low physical defenses, but grant a tremendous Otherworldly resistance at 70%. The Jingasa Kabuto is a hat that possesses 93% Otherworldly resistance, so combining these makes an extreme magic tank. This is situationally useful, but very helpful when it comes up. The Yggaegetsu charm is a very unique accessory, adding a flat 20% to your crit rate. Combined with the Purified Eastern Sword, you can have nearly guaranteed critical hits, which can definitely come in handy. Just adds onto the value of getting Blue Sin, as if there wasn't enough incentive. Sergal Spear: The true ultimate weapon of the game, with the highest attack power at +120. The only thing that comes close to that is Cursed Bone Shears, which has 117 attack power but all the drawbacks of normal Bone Shears. To get this, you need to fill each arm slot in the table in the Underground Cave. You can occasionally get arms from searching defeated guards, but your only other option for getting them is to remove them from your party members. This isn't a worthwhile trade on its face, but there is one catch: you can take the arms from Ghouls. Ghouls are essentially joke characters best used as meat shields, unable to equip anything and thus unaffected by losing arms. They're an easy way to fulfill the requirements for this spear, if you plan for it ahead of time. If you can work it into a run, then you absolutely should get this Spear. Be aware, this is a two handed weapon, so you need both your arms intact to use it. Additionally, Enki can't use it, so it's a waste of time for him to get it if he's not allied with someone who can use it. Chains of Torment: Not an item really, but a unique thing to obtain nonetheless. This is a spell you can obtain from the Tormented One in the present, after defeating him in the past. It deals 900 damage and causes the Bleed status to enemies. Not bad, but there's a problem: the ludicrous 80 mind it requires to cast it. There's just no justification for this in most situations, you'd need an ally to hurl Elixirs of Mind at you to maximize the effectiveness of this, and frankly there are just more practical ways to get this kind of value out of two party members. Maybe The Girl can be used as a battery for it, but she'd probably just be better off firing off Combustions. Pretty trash reward for defeating the Tormented One, but it is cool at least. White Angel Soul: Now this is the much better reward for besting the Tormented One. The White Angel frees himself from his chains on the defeat of the Tormented One, and can be found roaming around in the back alleys of Past Ma'habre. Defeat him, and you can use a Soul Stone to create this. The White Angel Soul gives you +10 agility, given you guaranteed first actions in battle and Extra Turns with no additional buffs required. If you're a solo character, this also makes the Run! battle command work 100% of the time. Definitely worth grabbing, just be cautious when fighting the White Angel as he can de-limb and insta kill you. Old Guardian Soul: A fairly interesting Soul to say the least. When this is equipped, should your Body fall to 0 in battle, you will not die and will survive any incoming damage for the remainder of the turn. If you can restore your Body before taking any more damage on successive turns, the effect refreshes, essentially making you immortal so long as you have the ability to heal. It requires Extra Turns to truly be viable, but if you can set that up it is great. Creation of Life II: We only got one piece of the recipe for this, but may as well bring it up here. If you collect the three Book Pages items, you can craft this book that teaches you the Demon Seed spell. This can be used to implant your "seed" into a corpse (don't think too hard about it), which will then birth a Baby Demon. The Baby Demon will join you as an AI controlled party member. In the span of 400 seconds of real time (though pausing the game freezes this timer), the Baby Demon will mature into the Demon Kid, who can be directly controlled. The Demon Kid is basically just a reskin of The Girl, same stats and equipment options. The difference is that The Girl is available at the start of the game where she can be valuable purely on the basis of being a controllable character who joins practically for free. The Demon Kid comes in at the end of the game, when way better options are available, if you can even get the pieces to create this Kid. The main purpose of the Demon Kid is that he's an alternate child character you can sell off to Pocketcat if you so desire. Cruel, but so are a lot of things in this game. Extra Notes -Not really relevant to anything in the video, but now that I've shown off everything that can be done with the Hexen, I'll eventually dedicate a full mechanics post to it to better explain it in detail. -The puzzle to get to Valteil always has the same solution, so commit it to memory or keep a picture of the configuration. -The Eastern Silk Robes make Valteil absolutely no threat at all if you have them on Ragnvaldr and he War Cries. Valteil's non magic damage is absolutely pathetic and the high otherworldly resistance of the robes heavily defangs Black Orb and Hurting if he uses them. -If you lack DoT effects, answering Valteil's trivia is definitely a smarter option to take than just hitting him. The damage it deals to all his parts is much greater than what any weapon could accomplish. -You can sacrifice an adult party member at the Temple of The Tormented if you didn't create a human husk, but this obviously isn't that desirable to do. -As mentioned in the video, originally you created the Human Husk at the artificial life vat present in the Ritual Circle room in the Grand Library. It's not clear why Orange changed this, probably to make it less likely a player had a human husk ready by pure chance upon reaching the Temple of Torment. -Going into Level 2 of the Tomb of The Gods is a great opportunity to pick up skill scrolls to power up party members with if you have a good supply of lucky coins. -You can raise the statue of Alll-mer by casting Necromancy on it. Try it out! -The Lady of The Moon is the only way to restore limbs to your party members outside of forming a marriage. You can totally just recruit The Girl for the purpose of this sacrifice if you don't mind cruelly sacrificing her to an entity with unclear motivations for taking her. -If you're able to craft Brown Vials reliably, or have the Fast Attack skill, the Old Guardian soul will make the bearer immortal so long as they have the healing items available to support the endurance status it gives you. -The Old Passage is required to visit for Cahara's S Ending, and is usually required for Ragnvaldr's S Ending. For Cahara, it holds the location of the treasure of Isayah's third map which is necessary to collect for his ending. Ragnvaldr meanwhile needs to kill and collect the soul of the Old Guardian, though he could alternatively Empty Scroll it.
|
|
#
?
Jan 8, 2024 01:49
|
|
|
Is Crude Sword or Miasma the better equip? The latter lets you use a shield but it seems to have a lot of instakill bullshit attached to it.
|
|
#
?
Jan 8, 2024 05:05
|
|


|
Seraphic Neoman posted:Is Crude Sword or Miasma the better equip? The latter lets you use a shield but it seems to have a lot of instakill bullshit attached to it. Since Miasma only triggers at a few certain event spots, if you know where those events are you can just unequip it from a low mind character and re-equip it once you are past that point. It's only really a danger if you are playing blind.
|
|
#
?
Jan 8, 2024 07:35
|
|

|
Yeah Miasma is not much of a threat and I am probably being overly cautious with it. You can totally just equip it on an as needed basis, I�m just very forgetful and I know I�d forget to equip it before a big fight, so I just keep it in D�arce�s hands at all times. Miasma is only seriously a problem in the hands of the main character, where triggering its insanity scene results in the automatic slaughter of your party members. If anyone else is wielding the sword, you can bypass the negative consequences by choosing to remain silent during the scene. Like Rude said, the sword only triggers in specific areas, which we've seen them all now I can just list them here unspoilered. Level 3 - Basement Ancient City - Tombs of the Gods Past Ma'habre - indoors CullenDaGaDee fucked around with this message at 13:07 on Jan 8, 2024 |
|
#
?
Jan 8, 2024 12:07
|
|
|
I can't help but think the Bloody Man looks like Cahara, honestly. I'm looking forward to the end of this since it really feels like the game is putting all this build-up into what's going on here. The fact that the game feels like it gets suddenly twice the length after finding the quest guy's corpse is a really odd feeling. It's fairly unbalanced feeling game design, but I do respect it for being unpredictable in that respect.
|
|
#
?
Jan 8, 2024 13:25
|
|
|
I think Cahara was the first character Orange came up with for the game once he had the concept fully realized, and intentionally or otherwise there are quite a few characters that bear a passing resemblance to him. One notable one is that the character Levi in the sequel re-uses the base coding for the Mercenary class in this game, and I'm half convinced there's an intentional connection there. I respect the game's difficulty on the basis that it doesn't pretend to be fair and most of the challenge is based on blundering into things and using the knowledge gained to make a cleaner run. Whenever I see people really struggling with this game, usually it's because they keep trying the same things that don't work consistently, or they commit to runs that are just dead in the water because they feel like it's a bad thing to restart the game. The game does not play fair, and expects you to play unfair in return.
|
|
#
?
Jan 8, 2024 13:39
|
|
|
I'm still midway through the second video lol. Love all the info, this will help me a lot when I decide to try braving the dungeon again.
|
|
#
?
Jan 8, 2024 15:00
|
|
|
Just echoing, thanks for making this, I love horror but I'm too much of a pussy to play horror games. I'd say Fear and Hunger really manages to hit the vibe where the over the top grimdark vibe manages to just be appealing enough without sliding into a caricature. Or maybe I'm just a sucker for those drawings.
|
|
#
?
Jan 8, 2024 20:56
|
|
|
CullenDaGaDee posted:I respect the game's difficulty on the basis that it doesn't pretend to be fair and most of the challenge is based on blundering into things and using the knowledge gained to make a cleaner run. Whenever I see people really struggling with this game, usually it's because they keep trying the same things that don't work consistently, or they commit to runs that are just dead in the water because they feel like it's a bad thing to restart the game. The game does not play fair, and expects you to play unfair in return. That principle reminds me of Bullet Hell Shooters, where it's a game with a shorter runtime that facilitates repeated tries to gain foreknowledge on what to do. Via essentially deathbombing it. That principle also means that the story in this case can be dark and dangerous, and actually still feel dark and dangerous. Which is a definite boon of gameplay/story integration. The fights feeling very high lethality for both you and your enemies gives the environs a much more bloody feel to it, too.
|
|
#
?
Jan 8, 2024 21:59
|
|
|
Supplemental: Enemies Pt.6 We've got a couple bosses to discuss here, but there are still normal enemies left to be seen, even at this stage of the game. One thing I haven't really touched on but does matter slightly for the boss fight featured in Part 5 is that like Earthbound (which this game is otherwise not like in the slightest), enemies do have completely random AI scripts for normal attacks that sometimes have dud actions in them. This is at its most prominent for boss fights, where sometimes you can luck out and bosses will just do nothing harmful to you, creating a huge relief on your resources. Never bank on this happening of course, but it sure is nice when it does. Cave Spider 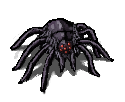 Phobia(s) Triggered: Zoophobia  Cave spiders are very weak enemies that nip at your toes to cause poison. They can be defeated in one shot from basically anything except an unarmed Girl, but they have natural evasion typically reserved for enemy heads. This can be gotten around by selecting the talk command and choosing to step on them, killing them guaranteed. Even this game has a sense of humor sometimes. Speaking of that, I don't normally go over Talk trees since most them are just really uninteresting and go nowhere, resulting you in just eating a bunch of attacks. For the Cave spider though, if you have Mastery Over Insects, you get some rather funny dialogue should you try to talk it down. 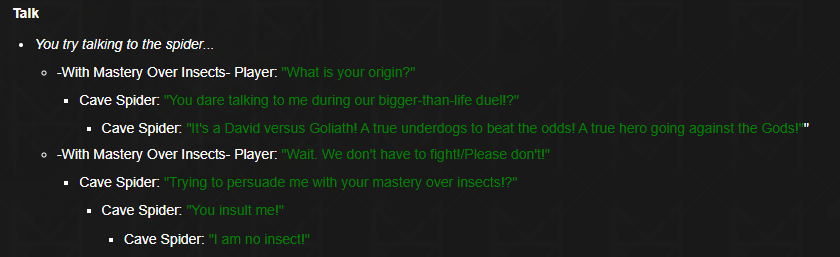 Red Man 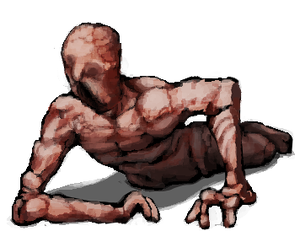 Phobia(s) Triggered: Teratophobia 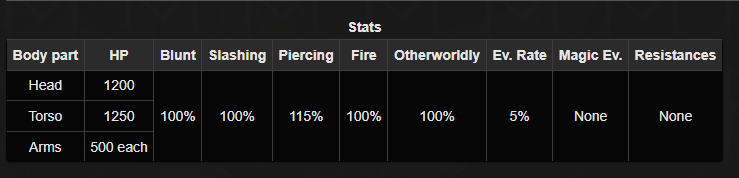 An enemy that's remarkably easy to go through the game without ever seeing if you don't return to the past Tomb of The Gods. The Red Man attacks with both his arms, each one dealing around 25-30 Blunt damage with a 30% chance to cause confusion. With his Head, he has a 50% chance to scream and deal around 20 mind damage to someone in the party. Lastly, as long as his right arm is intact, he will launch a coin flip attack every two turns that is insta death if failed or not guarded. Not too complicated an enemy. He notably has no extra evasion for his head, but since the HP of it is almost identical to his Torso, it's not really that much more efficient to launch attacks toward it. Valteil  Phobia(s) Triggered: None, surprisingly enough 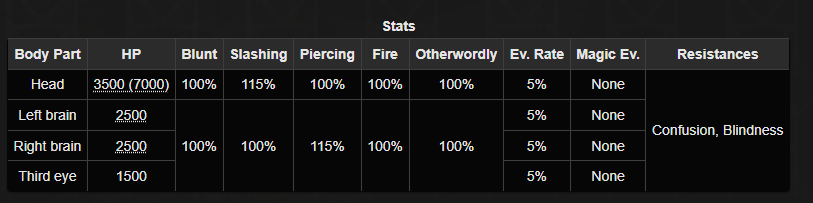 *On T&S/Hard Mode, the Head has 4500(9000) HP while the left and right Brains have 3500 HP The first New God we square off against, and he can be extremely problematic or an extremely big pushover depending on how the RNG feels that particular day. The Left Brain has a 50/50 AI script, either it does nothing or it causes the Head to do a weak headbutt that does 8-10 damage to the entire party. The Right Brain is the scary one, it has a 33% chance of doing nothing, a 33% chance of casting Hurting which does a flat 50 damage to a single party member if its unresisted and has a high chance of blowing off a random limb, and a remaining 33% chance to cast Black Orb on a single party member which can easily do around 90 damage if you have no Otherworldly resistance. By equipping Ragnvaldr with Otherworldly resisting equipment and limb protection, we can War Cry to defend against the worst of his actions, but you do need healing to keep this up depending on what he does. The Head itself does nothing, while the Third Eye takes 4 turns to rise. Once fully erected, it will cast Whispers of Gro-Goroth, a timed Doom status like you'd see in Final Fantasy. It takes 5 turns to tick down, and it's supposed to kill a character once the counter expires. Due to bugs, however, in this fight it cannot be cured and it actually does not do anything even if the fight somehow lasted that long. Poisoning or Burning Valteil will kill him well before this could ever be a threat to you, and frankly even just having your team wing haymakers at the head will kill him far before the Third Eye's curse does anything to you. Valteil has a unique mechanic relating to Talk. Should you Talk to him, he will ask you various bits of trivia about the game's lore. Failing these questions does nothing, while getting the answer right deals 400-600 damage to all his parts, making it much more effective to damage him by answering these questions as opposed to just hitting him, as far as your main character is concerned. All possible questions and answers are as follows: "The original god of destruction... One of whom is the very prime ingredient for existence... Like shadow to light... Who is his counter-part?" [ Sylvian ] "Among us... the new gods... I am Valteil to the enlightenment as Franc�is is to the domination. Who is torment...?" [ Chambara ] "We, the new gods... While still walking among men...Our fellowship, when did we embark on our journey to ascension?" [ In the year 809 ] "As Valteil the enlightened one... Who preceded me here at the grand libraries?" [ Nas'hrah ] "Alll-mer the ascended one... The last of the older gods. What year marks the birth of his new self?" [ Year 0 ] "The character who walks among men... Called the Pocketcat. Is he the servant of which older god?" [ The Trickster moon god ] "The dark continent.... whence the darkness slowly leaks to the western world... Where the day only shines..... eternal darkness and grey gloom.... What is it called among the people of Europa?" [ Vinland ] "Rher the god from the unknown beyond the blue skies... He has an effect to feeble humans, what is it called?" [ It's called moonlight cancer. ] If you have the Eastern Silk Robes, Salmonsnake Soul, and a way to redirect his attacks to whoever is wearing those, this fight is of no consequence whatsoever. The latter two can easily be secured, while the former is a bit more conditional though it isn't strictly required, it just makes going against Black Orb less scary. The Tormented One  Phobia(s) Triggered: Teratophobia 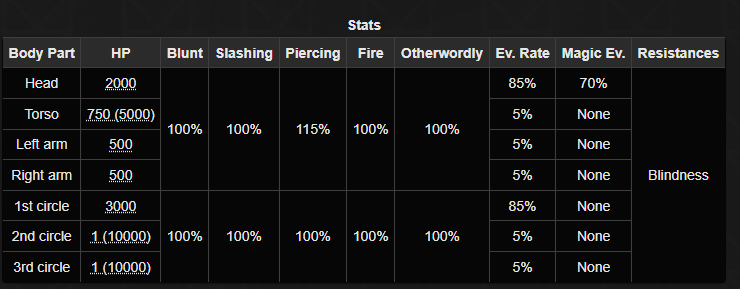 *This is pretty complicated. Should you fight the Tormented One in the flaying chamber, his Torso will have 1250(5000) HP while his Arms will have 1000 HP and his Head will have 500 HP. The only HP affected by difficulty is the HP of him on the Center Ring, which has 5000 HP on T&S/Hard Mode. The outer rings can't actually die, and can still act even if they are jammed, but the fight is borderline unwinnable if you don't jam them due to the extremely high evasion of the center ring should the outer rings be unjammed. Off the wheels of torment, the Tormented One will use Pummel with both his arms, an attack that deals two instances of light blunt damage. Only really a threat if he focuses an unarmored character like Moonless. It's unwise to take out his arms since this will force him into using Chains of Torment instead, a much more damaging attack. It's best to just burst down his torso, which will cause him to bring out the Wheels of Torment. (It's worth noting that if you take him out in the flaying chamber, he will automatically hop on the wheels when attempting to leave the temple rather than needing to defeat him off the wheels first again.) All three rings of the Wheels of Torment have 50/50 AI scripts. The outer rings will either do nothing or use Revolution Tear, an attack that deals around 30 damage with a light chance to cause infection and a high chance to cause Fracture. The center ring can either do nothing or use the much more damaging Chains of Torment. The center ring has extremely high evasion, but that can be disabled for two turns by hitting both outer rings, causing them to jam. As mentioned previously, the outer rings can still attack even if jammed, so this doesn't really save you from damage. If you have explosive or murky vials, it's not a bad idea to use them to disable the two outer rings in a single attack. If you poisoned or burned the Tormented One's torso in the first phase of the fight, that ailment will carry over into the second phase, making it much easier to hurt him while he still has his evasion active. This is what makes it a smart idea to avoid him in the flaying chamber, as dealing with the outer rings can be a serious problem on Hard Mode. With good preparations and adequate healing, this fight isn't much of an issue, but you are likely to pick up fracture on someone who doesn't already have it. White Angel 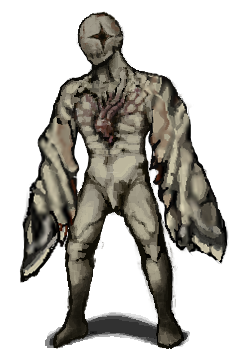 Phobia(s) Triggered: None 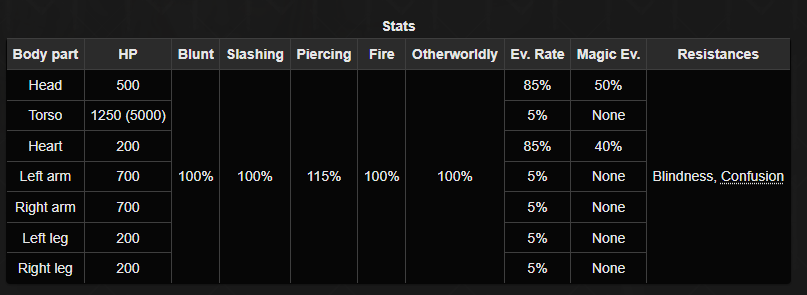 After defeating the Tormented One, this guy pops off his chained perch on the wall and begins wandering around Ma'habre. Both his arms can attack, hitting for about 20 slashing damage with decent chances to remove arms. Starting from his second turn, he will begin using a coin flip attack that will bisect and instant kill a random character in your party should you fail the toss or neglect to guard against it. If you can hit his Heart, he dies immediately, but honestly even with Black Orb I've had that endeavor fail miserably. I'd recommend just winging the strongest attacks you can at his Torso and come in with limb protection if you don't have En Garde to secure a free turn. This guy is well worth your time to kill as the White Angel soul is amazingly useful. The Lady of Moon 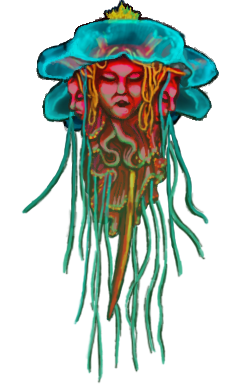 Phobia(s) Triggered: Erotophobia, Teratophobia  The Lady of Moon is not really an encounter, she's more of a special cutscene. Attacking her results in her keeling over immediately from almost anything. Instead, if you talk to her, you can strike a bargain with her: Give her The Girl and she will fully heal your party, lost limbs included. An interesting and unique offer, but you wouldn't sacrifice The Girl to a strange being with nebulous intentions... would you? If you refuse her offer, or simply don't have The Girl, the Lady of Moon retreats, never to be seen again. Old Guardian 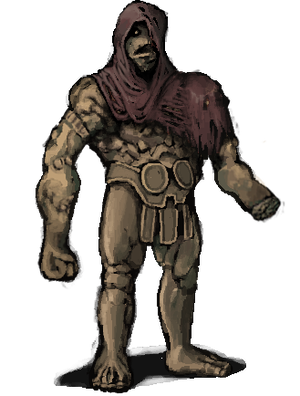 Phobia(s) Triggered: None 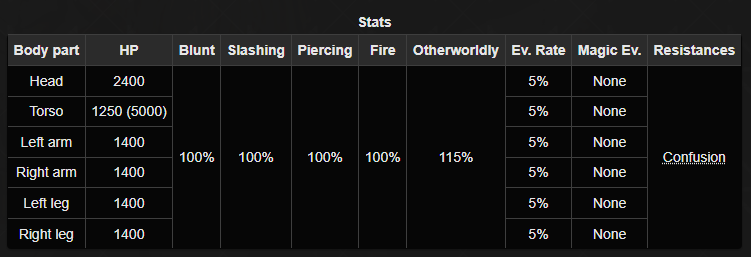 This guy is a surprisingly big push over given his imposing appearance and sequestered location. His limbs are very durable while his Torso is fairly weak, so it's best to go right for the center. His Head doesn't have bonus evasion, but it has far more HP than the torso so it's pretty clearly a trap. He can attack with his arms and legs, so if he gets the chance to go he can do some pretty nasty damage. Luckily, killing him is no issue with the team and fire power we have at our disposal, so we smash him to bits and collect our hard earned Old Guardian soul. Or at least we would if I hadn't screwed up the puzzle in the main file and had to fight him in a back up save.
|
|
#
?
Jan 9, 2024 03:59
|
|
|
If you were to sacrifice the girl for a full restore, is there any particular incentive to not saw off most (or all) of your limbs so you can have them in your inventory for whatever hosed up bullshit the game lets you do with severed limbs, like the puzzle for the Sergal Spear? I know that if your main character loses all four limbs, that's basically a game over, but I don't know what happens if a party member loses all their limbs.
|
|
#
?
Jan 10, 2024 03:07
|
|

|
Supplemental: The Hexen It has taken awhile due to my absent mindedness, but as of the last video we have finally seen all functions of the Hexen, so now I think is a good time to properly break down what the Hexen is, how you use it, what you can get from it, and the smartest picks from it as well as things to avoid. The Hexen is the primary way to gain new skills in this game, as well as being an option for obtaining stronger equipment, making it tantamount to being a level up system in a game that otherwise lacks that kind of growth for your characters. To begin with, 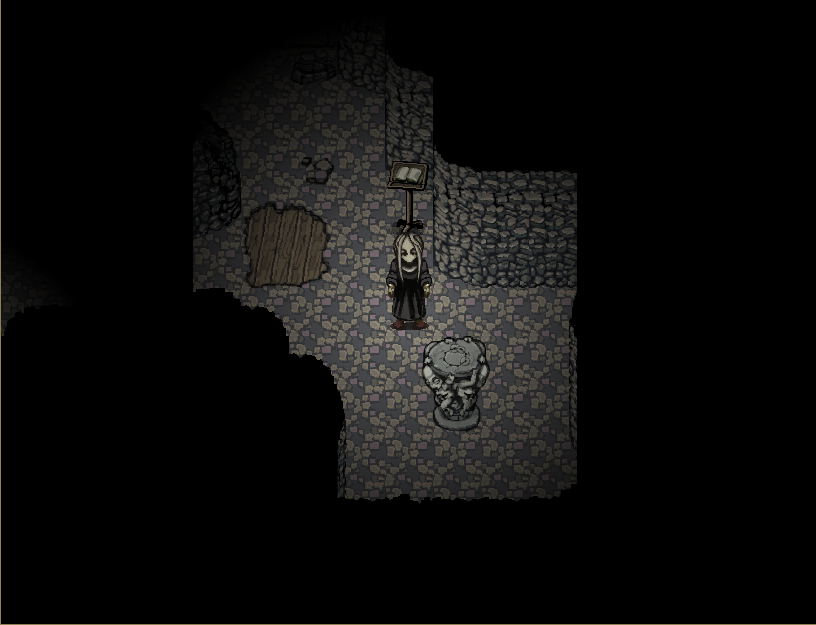 The table in the above screenshot is a Hexen. ~Useless Trivia~ As revealed in Fear & Hunger Termina, the proper name of the table is the Tes'tich Table, while the Hexen is the grid etched into the surface of the table. There are two Hexens usable in the game. The first is located on Level 1, either in the bottom right of the Entrance Hall or in the Courtyard, depending on the layout you rolled for Level 1 when selecting your character. To get to it, you need a Purifying Talisman or the Counter-Magic skill, the former fortunately being a guaranteed drop from one of the Dark Priests in the Inner Hall. The second will be located in Nosramus' first hideout in the Level 5 Mines. This Hexen is guarded by the Knight Spectre, and cannot be accessed until the Old Knight has been destroyed. This is of no issue on F&H mode, but can make it very hard to access this Hexen on harder difficulties where the armor pieces of the Old Knight are much tougher. Regardless, both are located in close proximity of Ritual Circles, so it doesn't matter too much which one you want to use so long as you have Blood Portals set up for both Levels. Now to actually use the Hexen, you need Lesser Souls. All functions of the Hexen take lesser souls as a fee, and it is otherwise a useless hunk of rock without them. To obtain Lesser Souls, you must have a Soul Stone and then use it on the corpse of a normal enemy to claim their soul. You can only claim one soul from an enemy, and the corpse must be intact, so try not to devour every corpse you create. Most things in the game give Lesser Souls when exposed to a Soul Stone, though as we have seen a number of bosses award powerful accessories instead. Now Soul Stones are pretty uncommon in the early game. In fact, the only one you can get 100% guaranteed with no work on your part is the one in the Cavedwellers Village. Otherwise, you need an explosive vial to claim the two in the thicket, you must fight the Dark Priests for what is likely the first soul you'll get in the game, and two more can be obtained from specific chests if you win their coin flips. If you're super lucky, occasionally the Yellow Mages will have Soul Stones as their dropped item when searching their robes. Soul Stones become more common in the second half, being able to purchase them at that point as well as a number of them being scattered around the Ancient City, but unfortunately they're less useful at this stage since you'll have way better equipment and accessories to work with. Bearing that in mind, our early picks for what to use our soul stones on are very important. But what can we get from the Hexen? Option 1: New Skills 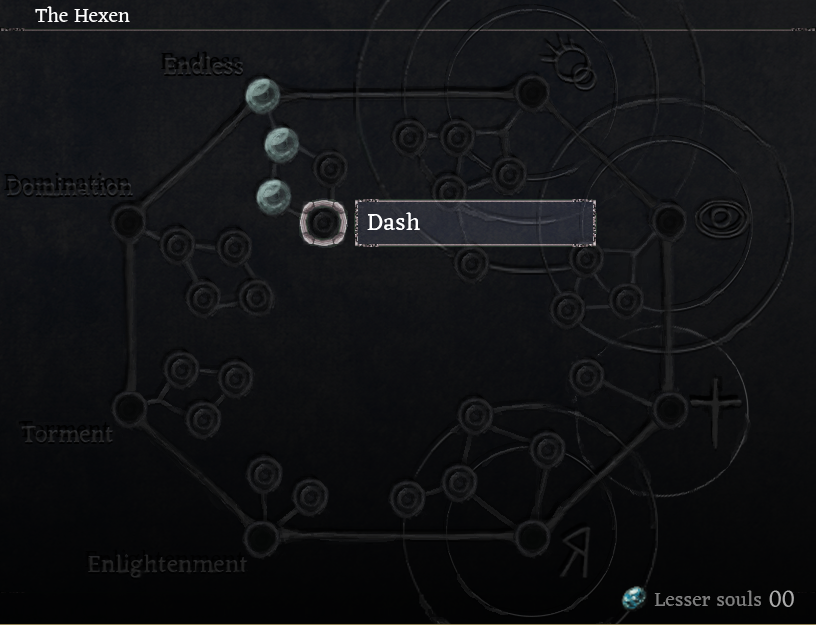 This is the screen we are presented with when using the Hexen. It is laid out into two halves, the left half being what I like to call Soul skills. These are tied to the birth soul of your chosen character, and each category can only be accessed by a specific character at the game's offset. Ragnvaldr has the Soul of Torment, Enki has the Soul of Enlightenment, D'arce has the Soul of Domination, and Cahara has the Soul of The Endless. These characters can only learn skills from these designated categories by default. Now you can have skills on a Hexen tree you don't have the Soul for by either learning the skill from a scroll or most commonly you'll see this if you have Dash from your backstory, but you cannot actually use the Hexen itself to learn these skills without being in possession of the associated Soul. Fortunately, you have some options for obtaining these Souls to expand your skill choices. 1.) Slay the New God associated with the Soul. This is the only method we're going to see in the first playthrough, and easily the least helpful since we're past the point we'd care about picking up most of these skills. 2.) Slay the associated main character of the Soul and use a Soul Stone on them. This is a cold and pragmatic way to do it, and is good for efficiency if you can make due without the party member. You may be wondering, yes these Souls will also pull double duty for their intended story function if you get them this way. 3.) Empty Scroll the Soul into your inventory. Another pragmatic way to do it, though this one is more for bypassing the boss fights you'd normally have to do to get them instead of for expanding your skill choices. Most trees only have one or two good skills, so you may as well just Empty Scroll them directly to cut out the more costly middle man. With that said, if you have a lesser soul and the corresponding birth Soul, you can use the former to learn something from the latter. I'll go over what these skills actually do in the respective character bios for the characters that possess them, this post is just meant to cover how the Hexen specifically works. It's important to note that you can only learn skills along the Hexen through a preset path, as small as they are. Going back to Dash, having the Endless Soul and Dash learned does not mean I can use Lesser Souls to learn Steal and En Garde because they are adjacent to it on the Hexen. Lockpicking is a pre-req for both of those skills, and you must know it to learn either one. By that same token, Steal and En Garde are a pre-req to Dash if you don't already know it, though you only need to know one of the skills to be able to pick up Dash. The skills and the way they flow is as follows, Endless Starts with Lockpicking, which then allows you to learn En Garde and Steal, and knowing one of those will let you learn Dash. Domination begins with Defence Stance, which will allow you to learn Fast Attack and Counter next, and one of those skills will let you pick up Leg Sweep Torment begins with both Devour and Bloodlust, and knowing either one will let you pick up Marksmanship Enlightened starts and ends with Counter-Magic and Greater Blood Magic. You do not need to know one to pick up the other, and Enki starts with Counter Magic so he has the dubious distinction of being the only character who has one skill he can learn at the start of the game. That covers the Soul half of the Hexen, the right half of the Hexen is dedicated to the Gods. You cannot learn any God associated skills from the Hexen at the start of the game, and must instead build affinity with the Gods if you want to learn their magics with Lesser Souls. There's a variety of ways to gain affinity with the Gods, but the most common one is prayer. Pray to a God at a ritual circle, and you will gain one "step" of affinity. After three steps, you will gain a full level of affinity with said God, and will be able to learn skills from them based on your level of affinity. There are also monuments dedicated to specific Gods that you can pray at for an affinity step with that God exclusively. Should you reuse a circle you prayed at, or should you offer a prayer at a God statue to the incorrect God, you will lose a Step of affinity with that God and can actually have negative affinity, though this will not lower your level for accessing skills at the Hexen. For God specific methods of gaining affinity, I will go over those in their dedicated sections. Not all Gods are represented equally on the Hexen, each of them having different max levels and number of skills you can learn, so I'll cover them in order of least skills and lowest level to most skills and highest level. I'm not going to go too deep on what any of the skills do as I plan to make a dedicated post for explaining what each spell does. Alll-Mer has a maximum affinity level of 1 and only conveys one skill via the Hexen. Aside from praying, you can sacrifice the crucified man in the Inner Hall for one Step of Affinity, and pray to Alll-mer's statue in the Courtyard for another step. Combining this with the Level 1 ritual circle, you can max out Alll-mer within minutes of starting the game. Blood Portal is the sole skill you can learn from Alll-mer, and it's the only one I'm going to spend any amount of time talking about in this post. Blood Portal of course allows you to create Portals that link ritual circles together, creating a convenient fast travel system. It is near universally recommended you use your first Soul stone on this skill as doing so allows you to more easily return to the Level 1 Hexen later, and in general creating Blood Portals asap will save immensely on resources in the long run. Very rarely is it a good idea to skip this skill or get something else before it, save for one specific ending run. Sylvian has a maximum affinity level of 2 and 3 skills to learn. You can get a full level of affinity from participating in the Bunny Mask orgy, and can repeat it for full Sylvian affinity should you be willing to risk a game over on the coin toss. Alternatively, you can Show Love to a party member on a Ritual Circle as another means to get a full level of affinity. Do note, you do not want to Show Love on a circle that you've already used to pray towards Sylvian or if you have negative affinity. Sylvian will take offense to this and you will get a game over. There is a Sylvian statue in the Level 4 caverns you can pray to for one step of affinity with Sylvian. At affinity Level 1, you can learn Loving Whispers and Pheromones from Sylvian. At affinity Level 2, knowing either of the former spells will let you learn Healing Whispers. The God of the Depths has a maximum affinity level of 2, and can teach you 4 skills. Notably, he is the only God you cannot pray to. You can only gain affinity with him by doing quests for the Cockroach King. There's a bit of a Catch-22 here, as you need Mastery Over Insects to talk to the Cockroach King... which requires God of The Depths affinity to learn from the Hexen. Mastery Over Insects isn't too helpful save for a bugged (heh) conversation it unlocks, so it's of dubious use to Empty Scroll and frankly you should just dedicate that scroll to a skill you'd actually want from the skill tree, but whatever. Enki can start with Mastery Over Insects, but for reasons he can only do one quest with the Cockroach King, so he cannot max out his affinity with the God of The Depths this way. If getting access to this skill tree wasn't a complete mess, you can learn Mastery Over Insects and Needle Worm at affinity Level 1. Mastery Over Insects unlocks access to Flock of Crows and Locust Swarm when you have level 2 affinity, while Needle Worm only opens up access to Locust Swarm. Gro-Goroth has3 levels of affinity and 5 skills to learn. Unique ways to get affinity from Gro-goroth are participating in the Wolf Mask feast for a full level (which is repeatable like the Bunny mask orgy with the same risk), performing sacrifices at Ritual Circles (most party members will balk at you trying to do this to them, but Ghouls can be sacrificed no issue), and there's a Gro-Goroth statue in the central square of Past Ma'habre you can pray to for one step of affinity. At level 1 affinity, you can learn Pyromancy Trick and Blood Golem. At level 2, you can learn Necromancy if you know Blood Golem and Hurting if you know Pyromancy Trick. At level 3, you can learn Black Orb if you know Hurting. While like I said, I won't go deep on any of these skills right now, notable picks for your early game soul stones are Blood Portal, Loving Whispers, Pheromones, Blood Golem, and Necromancy. I would not bother ever trying to use Lesser Souls on God of The Depths, the only super helpful skill that is potentially critical is Locust Swarm. Just Empty Scroll that for when you need it, trust me. So that's our first option for powering up at the Hexen. What's our other option? Option 2: Cursing Weapons Cursing weapons is essentially Fear & Hunger's take on a forging system. For a nominal fee of Lesser Souls, you can lay a curse on most, though not all, weapons in the game. This often results in a sizable attack power bump, as well as the weapon picking up the Otherworldly attribute. This creates a composite attacking type based on the weapon that was cursed, i.e. a Cursed Long Sword is an Otherworldly/Slashing Weapon. I mentioned Etrian Odyssey in the first video, and like that series when a composite attacking type is used, whichever type of attack would yield the greater damage result is what the game uses for determining the final damage. Now to be honest, this system isn't all that helpful. The early game soul stones are better used on skills, while later in the game you can just simply find equipment that is much stronger than cursed weaponry. Still, it's something to keep in mind if you happen to obtain any of the soul stones tied to RNG, and there are a couple cursed weapons that can be really worth your time to route into a run. I'll be going through all possible cursed weapons and give my thoughts on them. Cursed Short Sword: This takes 1 lesser soul and a short sword to create. It has +40 attack power as opposed to a normal short sword's +10. Now Enki starts with a Short Sword, so you could get this at the start of the game if you so desired, but frankly it is negligibly stronger than almost any random weapon you'd get from a chest or weapon table, so I can't really say it'd be a good investment. Even if the Short Sword is a complete piece of poo poo, I don't necessarily think upgrading it to be less so is really a worthy endeavor. This is one of the few cursed weapons that is in the RNG pool for Chest items. Cursed Long Sword: For 2 lesser souls, a Long Sword can be cursed to take it from +35 attack power to +70. D'arce can start with a Long Sword, so you can obtain this consistently. We see our first major problem with cursing weapons, many of them require multiple soul stones to lay a curse onto, and at the time their power would be helpful, soul stones are at a premium. By the time you can dedicate two lesser souls to cursing weapons, you can likely access stuff like Miasma and Blue Sin. One thing to note though is that the Cursed Long Sword rolls about as much damage as a Hurting spell would deal, so it provides similar utility for the same soul stone cost and no potential for mind loss. I'm still not a fan. Cursed Iron Spear: For 2 lesser souls, you can take an Iron spear from +42 attack power to +70. Now this is just trash. D'arce can start with an Iron Spear, but frankly having a two handed weapon with the same attack power as a one hander is a foolhardy decision. The Cursed Long Sword would provide the same offensive benefit in almost any fight, and allow you to benefit from having a shield equipped. Never curse an Iron Spear. It's worth noting that this is identical to the Cursed Ritual Spear, so may as well check that one off here as well. Cursed Iron Mace: For 1 lesser soul, you can bring an Iron Mace from +30 attack to +60. Now this can actually be worth it if you have an Iron Mace. The general trend you'll notice is that the weaker a weapon is, the more you tend to get back for cursing it. The Long Sword and Iron Mace get double their attack power from curses, and the Iron Mace does so for one lesser soul. Unfortunately, getting an Iron Mace is RNG, so it's hard to bank on this. It's not uncommon to see one every couple playthroughs though, since it's in the loot table for Chests. This one is worth considering. Cursed Short Bow: For 2 lesser souls, you can take the short bow from it's pathetic +10 to a respectable +50. If this only took one lesser soul, I actually would recommend it. This would let you just keep the bow equipped all the time for convenience since it's no longer a completely trash weapon. Two lesser souls makes it a lot more dubious, but keep it in mind if you get some extra soul stones through RNG. Cursed Scimitar: For 2 lesser souls, you can take the Scimitar from +27 attack to +69. It's a sizable upgrade, but you're only going to have this sword as Cahara most of the time and he has way better options than cursing his crappy starting weapon, especially for that cost. If it was 1 lesser soul, it'd worth considering. Cursed Dagger: For 1 lesser soul, the Dagger goes from +5 attack power to +35. If you don't plan on grabbing Combustion, this is a way The Girl can actually do some damage. Not super helpful, but it's not impossible to route it in if you so desire. Cursed Meat Cleaver: For 1 lesser soul, this takes a Meat Cleaver from +30 attack power to +60. It's the Iron Mace as a slashing weapon, but unlike the Iron Mace you can usually get it from slaying a guard. It's a decently strong weapon for a 1 lesser soul investment, so if you feel like you can take out a guard for a chance at this, it's not a terrible thing to go for. Cursed Morning Star: For 1 lesser soul, the Morning Start can go from +38 attack to +75. If there was a guaranteed Morning Star in the game, this would totally be worth picking up. That's a huge damage bump for 1 measly soul. Sadly, there isn't one, so this is just in the realm of the occasional thing you can route into a run if the RNG is accommodating. Cursed Bone Shears: For 3 lesser souls, the Bone Shears can go from +95 attack power to +117, but it will not lose the 50% accuracy penalty. This is the second strongest weapon in the game, but even if it was 1 lesser soul and you had Eyeglasses, I still couldn't recommend this. The number itself is impressive, but it's a marginal upgrade when you get right down to it. The high cost and inherent drawback of the weapon just completely sinks it, pass on this. Cursed Axe: For 2 lesser souls, the Axe goes from +36 to +68. The worst return on investment for a starting weapon. It's a better boost than what the short sword gets, but that one only costs 1 lesser soul. Definitely pass on this one. Cursed Shark Teeth: For 2 lesser souls, the Shark Teeth goes from +37 to +75. A slightly better Long Sword, and not too terrible honestly. There's a guaranteed Shark Teeth in the Level 6 mines, so I could see a Hard mode run making room for this. Cursed War Scythe: For 3 lesser souls, the War Scythe goes from +15 attack to +23. It does not lose the massive accuracy penalty it has, still only having 30% chance to hit. This is a weapon we haven't seen yet and will talk about at a later date, but holy balls that is a terrible investment. Like the Bone Shears, even if you have the eyeglasses, this wouldn't be worth it even if it only cost 1 soul. This is like the Bone Shears times a million for terrible deals. Cursed Claymore: For 3 lesser souls, the Claymore goes from +80 to +100. The Claymore is rarely gotten in runs due to the highly specific ways you can get it, and 3 lesser souls is way too much. This is one of the strongest weapons in the game, but it just isn't worth the cost. Cursed Blue Sin: The most expensive weapon to curse, costing a whopping 4 lesser souls. On its face, this is a terrible deal as it only takes the Blue Sin from +85 to +92, putting it at the same strength as Miasma. Uniquely though, Cursed Blue Sin has a 70% chance to inflict the Burn status. Burn is as effective as poison as a DoT, and combining it with a certain soul can let you inflict Burn and Poison in a single strike, absolutely melting bosses in a matter of 2-3 turns. If you're getting Blue Sin, you should strongly think about Cursing it. It's a great weapon on its own, and cursing it puts it over the top. It's the one cursable weapon that actually takes advantage of the fact Soul Stones are much more common in the game's second half. And that's cursing weapons. Truthfully, I rarely use this system save for Cursing Blue Sin, but it is a good idea to keep it in mind for the odd runs where you're over budget on Soul Stones before entering the Ancient city. Next mechanics post will likely be dedicated to all the spells mentioned in the previous heading.
|
|
#
?
Jan 10, 2024 04:49
|
|
|
MechaCrash posted:If you were to sacrifice the girl for a full restore, is there any particular incentive to not saw off most (or all) of your limbs so you can have them in your inventory for whatever hosed up bullshit the game lets you do with severed limbs, like the puzzle for the Sergal Spear? The wiki says that party members are unaffected by losing all limbs (at least as far as following behind you goes), though I need to test this myself to confirm the veracity of such a silly thing. As for the former, that's a perfectly valid thing to do if you want, but the most practical way to get the Sergal's spear is just to use Necromancy to create some Ghouls, and then saw their limbs to use on the table. Ghouls can be permanently dismissed from your party with the Talk skill, so you can just chuck them from the party if you don't need them as meat shields. I'd say the main use of the Lady of Moon is if you had some unexpected trouble in the run that resulted in a lot of limb loss, and you don't yet have a full party, you can return to the first floor to grab The Girl and then hand her off for the restore.
|
|
#
?
Jan 10, 2024 04:53
|
|
|
Mini Supplemental: Soul Stones Since Soul Stones are so critical to the previous mechanics post, I just wanted to add a quick addendum with a list of all Soul Stones obtainable from the game. This list will mostly just be copied directly from Tormentapedia, though I will make extra notes for Soul Stones that depend on RNG, and the last entry I've added myself. Enki and Ragnvaldr can start with Soul stones. -For Enki, choose "Stock up on magical items". -For Ragnvaldr, choose "Take souvenirs from Vinland." Level 1 Inner Courtyard: Kill one of the dark priests and search the body. Level 3 Prison: Open the chest in one of the cells and win the coin flip. Level 4 Caverns: One is sitting near the cave gnome eggs. If you pick it up and go back towards the elevator, you will be attacked by the Cave Mother. This can be gotten safely if the Mine Entrance is on the Eastern side of the caverns. Level 6 Mines, Cavedweller Village: Go into the connected houses, go up the ladder. Level 6 Mines, the other map: Open the chest near the Shark Teeth. Requires a successful coin flip. Level 5 Thicket: Press the wall near Ragnvaldr, near where you drop in from Level 3 Thicket. Level 5 Thicket: Just past the Cockroach King, there's a place to fall to the next area. You're supposed to be able to walk over this if you win a coin flip, but usually your character just steps back as the hole opens. Level 6 Deeper Thicket: Go past the first mumbler and go into the alcove along the top of the map. Level 7 Catacombs: Right after Le'garde's cell, in a chest. It's always a soul stone if you call the coinflip. Grand Library: Solve the Uterus puzzle and go down the ladder. A soul stone is on one of the platforms. Temple of Torment, Level 2: A Soul stone is sitting on the ground by a floor grate. Soul stones are sometimes dropped by Yellow Mages. It is one of five things they can drop. Outside the Temple of Torment: Leave the Temple, make sure you're in Present Ma'habre, and there will be a Soul stone sitting in front of a hole in the walkway. You can steal one Soul stone from the Black Witch or the Body Snatcher, or two from Valteil. Soul stones can be purchased from the Bug-Eyed Figurine in Past Ma'habre for 20 coins. You can get a Soul stone using an Empty Scroll. There is a 0.6% chance that you will get a Soul Stone from a chest with a successful coin flip. By extension, Crates and Urns have a 4% chance of pulling from the Chest loot table, meaning that there is a 0.02% chance any Crate/Urn/Failed Coin Flip chest will have a Soul Stone in it.
|
|
#
?
Jan 10, 2024 05:15
|
|
|
Thanks for doing this. I randomly stumbled across this game while dicking around on Youtube and the aesthetic seemed too grimdark for my tastes. Not sure how it would be playing the game, but now it kinda captivates me? The real thing that would turn me off though is the gameplay. Seems way too random for my liking. You have my gratitude for willing to go through everything just to show this one in all it's weirdness.
|
|
#
?
Jan 11, 2024 03:35
|
|

|
Don't have a formal update today, just an amusing thing to share that was discovered. It has been found out why when searching bookshelves, you can occasionally get multiple empty scrolls when winning the coin toss. When starting a playthrough, each Unique book is assigned a variable. When you win a coin toss at a rare book shelf, the game selects a variable and then runs a script going down a list of variables one by one until it reaches the variable you got. Is it a book that you don't already have that's flagged as one of a kind like the Book of Forgotten Memories? Then you get that book and the script ends. Say you DO have that book though. Then instead of terminating the script and restarting, the game simply pauses the script and begins a new one with a new variable set. The game will then once again scroll down the list of variables until it hits the one you got, and if it's something new or something repeatable, you will get that book and the first script will begin to run again. Should the newly set variable have been lower on the list than the previous variable you had, the script will then either award you the item again if it's repeatable like an Empty Scroll, or begin another script cycle if it was a one of a kind item until it finally gets to a point where the initial script can terminate. This is the reason why you can get multiple empty scrolls on occasion, or sometimes get two books when you win a coin toss. The more unique books you have, the more likely this looping rewards effect will happen. In the most extreme cases, you can get over 10 Empty scrolls if you had really good book RNG throughout the game or secured unique books through the handful of set methods you can get them.
|
|
#
?
Jan 11, 2024 03:43
|
|
|
Shitenshi posted:Thanks for doing this. I randomly stumbled across this game while dicking around on Youtube and the aesthetic seemed too grimdark for my tastes. Not sure how it would be playing the game, but now it kinda captivates me? The real thing that would turn me off though is the gameplay. Seems way too random for my liking. You have my gratitude for willing to go through everything just to show this one in all it's weirdness. Glad to hear! I think let's playing games is a great way to share them to people who might not otherwise check them out, and give a more understandable experience than a well optimized longplay would. I watched a number of challenge runs before playing this game myself, and there are a number of traps and problems you can run into that are far from obvious when you're just watching uncommentated runs of people who already know how to avoid them. Funnily enough, despite the heavy random elements, the game is fairly solvable and consistent, at least at the lower difficulty levels. One thing I don't feel like people share enough is that while it does have a restrictive save system, it's more generous than people realize. You can save as many times as you want at the Tower of The Endless, and defeating Crow Mauler also lets you use his bed for infinite saves, so once you have access to either of those you have much more freedom to screw around and test different things. I still see it as a common misconception that you can only save through using Books of Enlightenment, which is just silly considering how rare those are.
|
|
#
?
Jan 11, 2024 03:50
|
|
|
You can also safely save in any bed on a floor where you killed all the enemies. If you fail the coin toss but no enemies can spawn the save will fail but no enemy will appear. Of course, if one of the early floors with a bed has an Elite Guard you might not be able to safely clear the room early on, but I have gotten layouts where the spawns only had two guards and nothing else.
|
|
#
?
Jan 11, 2024 04:24
|
|
|
The script is a decent idea but I think they needed to include more books on it. Like I felt it was super bullshit that you got book duplicates despite winning a coin toss.
|
|
#
?
Jan 11, 2024 07:16
|
|
|
Seraphic Neoman posted:The script is a decent idea but I think they needed to include more books on it. Like I felt it was super bullshit that you got book duplicates despite winning a coin toss. For what it�s worth, the only potential duplicates from normal coin toss bookshelves are Empty Scrolls and skill scrolls. Every other book is flagged as unique and can only be obtained once. Now in the Grand Library, on the other hand, Orange forgot to flag the Alchemilla books as unique when implementing the probabilities for those, so unfortunately you can end up getting useless dupes from those shelves.
|
|
#
?
Jan 11, 2024 12:16
|
|
|
I sympathize with the no-doubt mountains of code required to make this game run, but goddamn that's a huge oversight.
|
|
#
?
Jan 12, 2024 01:38
|
|
|
It�s important to keep in mind that the whole game was coded by a single art student in his free time who had no programming knowledge when starting and tested by randos on discord who were kept blind to the game�s inner workings, so it�s impressive it got made at all. It is a shame the dev cycle ended before all the really rough edges could be sanded down though, the current 1.41 version of the game has some pretty glaring bugs like certain fights that just cut to a black screen and automatically register a win.
|
|
#
?
Jan 12, 2024 01:42
|
|
|
Supplemental: Magic This post will be dedicated to analyzing all of the various spells that were name dropped in the previous post on the Hexen. This will not cover every skill in the game; I plan to do a dedicated post for all hidden skills and crafting recipes to cover them in a convenient place independent of the video notes, and all analysis of character skills will be found in the relevant posts on said characters. With that established, let's go through every spell in the game, covered in the same order I did for the Hexen, to find what's hot and what's not. Lesser Souls are a precious resource, so it's wise to use them on only the best! It is worth noting that a good chunk of these spells have skill scrolls associated with them that allow you to teach them to anyone in the party without using soul stones, but you very rarely see these. It's best to just consider the Hexen the only way to learn them, with the occasional skill scroll you get being a nice bonus for a given run. Alll-mer's Spells Blood Portal: Actually the only spell for Alll-mer you can learn from the Hexen. While Alll-mer does have more spells tied to him, all of them are hidden and obtained independent of the Hexen. With that being said, Blood Portal is an obviously useful spell and an obvious choice for your first Soul Stone usage. This allows you to create interconnecting portals at Ritual Circles, giving you a method of fast travel. The 5 circles in the game are found in the Level 1 Entrance Hall, Level 5 Mines, Level 7 Catacombs, The Ancient City Grand Library and the Ancient City Tower of The Endless. This covers a wide scope of the dungeons, and being able to quickly jump between these distant locations when needed is obviously a great relief on your resources. Since you can max out Alll-mer's affinity on Level 1 with absolutely no difficulty, there is basically no reason not to take this right away and get to work setting up a portal network. Great spell to learn. Sylvian's Spells Pheromones: Both this and the following spell only require 1 level of affinity with Sylvian, which can be obtained for no cost at exactly the same time as you max out Alll-mer by participating in the Bunny Mask orgy. Pheromones is essentially War Cry but it can be used on anyone in the party. This forces any single target attack to go after the character afflicted with Pheromones. The drawbacks of this spell are that it costs 10 mind to cast as opposed to being free, and it actually has a chance of missing. 5% of the time, this spell will fail and that can be disastrous if you were banking on it for limb protection. I generally like War Cry, but in some cases this spell can be your only option. One perk it has is since it can be cast on someone other than the user, the target of Pheromones can throw up their guard to cut incoming damage down a lot, which definitely can be helpful. It's a good spell overall, but not really something you "need" until you're fighting bosses, so it can wait if you do have use for it. Loving Whispers: This is fantastic. Loving Whispers is a single target healing spell that can be used in and out of battle to heal 64-96 Body, usually restoring around 80 per cast. At a cost of 30 mind, this essentially turns Ales and Tobacco (which are extremely common) into Light Blue Vials. Since you can access it so early, it's a good thing to pick up after Blood Portal unless you have need for some specific non-combat skills. This is a good way to keep your damage tank up and running, or just bringing a wounded character back from the brink at a critical moment. Healing Whispers: At level 2 affinity, this requires either some extra work or taking a chance on a game over at the Bunny Mask orgy to get access to, but it's definitely another great skill. Healing Whispers is a multi targeting healing spell that restores 28-42 Body to the entire party, usually landing on something in the 30's. Obviously much weaker healing, but the caveat is that Healing Whispers also costs 30 mind and is much more economical when dealing with the enemy's own multi-targeting attacks or just situations where you don't need to redirect attacks. For a party of 4, this is essentially 120 Body of healing for the same cost as a single Loving Whispers. Great thing to pick up once you reach the Ancient City, as multi targeting attacks become a more persistent threat. God of The Depths' Spells Mastery Over Insects: I'd estimate around 70%-80% of the game's playerbase never end up using any God of The Depths skills with the exception of having this one if they start as Enki because of how silly getting Affinity for this guy is. Anyways, Mastery Over Insects is a passive that requires one level of affinity with the God of The Depths and it lets you talk to insects or insect-like creatures. Most commonly, this allows you to talk to cockroaches in various locales around the dungeon. Keep an eye out for those little brown bugs and walk up to the areas they skitter off to in order to talk to them. Many cockroaches in the game provide you with supplies and hints, so this is helpful for Enki. One cockroach in particular, located in the Ancient City, is bugged (heh) and gives you a Blue Vial every time you talk to him, allowing for infinite healing items. An obvious oversight, but use it if you want to. Aside from that, this skill lets you talk down Scarabs which is a great way to avoid having your weapon destroyed. Shame most characters never get this skill nor have any reason to learn it for reasons I'll talk about later. Needle Worm: The other level 1 affinity spell for this tree and it is a weird one. Needle worm is an attacking spell that deals 3 instances of exactly 2 damage, twice in a row. (Essentially it hits for 12 damage over 6 hits) Each of these hits restores an equal amount of Body, so if every hit connects (There's a 5% chance of missing) you get 12 HP back. The spell only costs 5 mind, so if you can cripple an enemy to the point they can't fight back, you can use them as a source of extremely cheap healing. I've never cared for gimmicky stuff like that and this spell is pretty trash outside of that so I'd never advocate picking this up. Flock of Crows: The odd man out for this skill tree, not being based on insects, and the first level 2 affinity spell. Flock of Crows costs 30 mind to cast and is an attacking spell that deals 3 instances of Pierce damage for 56-84 damage each with 100% accuracy (Not counting Magic Evade if the enemy has it, of course). The main draw of this spell is that if it hits the head, it causes blindness guaranteed. This is a more reliable form of inflicting Blindness over Red Vials, and its great for fights like the Crow Mauler or Cavemother who have Head based attacks, but actually getting it for those fights is far from easy. It honestly isn't that helpful in other situations either, so I'd pass on this. Locust Swarm: The other level 2 affinity spell for the God of The Depths and the only one I'd say is worth your time going for. Locust Swarm is a weak multi-targeting attack, hitting all limbs/targets in a battle for 8-12 blunt damage. At 35 mind, this sounds like a horrible investment, but its the secondary effect that makes this a great spell. If the enemy is not immune, Locust Swarm has a 100% chance of causing the Confusion status for two turns completely shutting down what it hits. Now unfortunately, quite a few notable bosses are immune to Confusion, but a handful aren't and one super critical one for a specific ending can only really be beat consistently by throwing out this spell and chugging Elixirs of Mind. Like Flock of Crows, it has 100% accuracy before considering magic evasion, so it is nearly infallible in the situations where it works. This is the one God of The Depths spell that I'd say is unambiguously worth learning. Just Empty Scroll it if I'm being honest. For anyone who isn't Enki, it's the way more practical thing to do since the main purpose of learning Mastery Over Insects is to eventually learn this skill, and Mastery Over Insects can literally only be learned through an Empty Scroll since you can't talk to the Cockroach King and get Depths affinity without it. Gro-Goroth's Spells Pyromancy Trick: A level 1 affinity spell, Pyromancy Trick is an attacking spell that deals 160-240 fire damage with an 8% chance of missing. It costs 10 Mind and has a 60% chance of Burning the enemy. That last part is the most appealing aspect of this spell, as Burning is a powerful DoT effect on torsos. It's inferior to Combustion, but you can get it sooner and it is a semi-reliable DoT. I'm not a fan, but it could have its uses. Pick it up if you want to try for a DoT kill on Crow Mauler but didn't have the good fortune to get a Throwing Dart. Blood Golem: A very unique spell, this is the first one we get that can create a party member. Unlike other spells in that category, Blood Golem can only be used in battle rather than creating a new team member on the field. It is also the first spell we get that is affected by the Greater Blood Magic Passive. Without Greater Blood Magic, this spell costs 20 Body instead of Mind to cast, or 5 Body with Greater Blood Magic. This will create a 200 Body Blood Golem in an empty party slot, who attacks randomly for around 300 damage. While he has baseline 100% resistances, that 200 Body makes him a phenomenal punching bag and he can get in some good shots every now and again. Obviously you need an empty party slot to use this guy. Now Blood Golem is a good skill on its face, but you'd be surprised how much the requirement to spend 1 turn casting it can really limit it. Generally if you want to employ tanking strategies, it's because the enemy can do something dangerous from the word go and you want to stop it right away, and Blood Golem really can't do that. It's a good spell, but I'd consider it more of a back for Hard Mode runs that go slightly off rail. More on that when we get to discussing Hard Mode. Hurting: A level 2 affinity spell and it is garbage for the most part. Hurting is a single target attacking spell that deals exactly 350 damage assuming the enemy isn't weak to it with 100% accuracy not counting magic evasion. Without Greater Blood Magic, it costs a staggering 40 MIND, half what Chains of Torment costs for a third of the effect and no chance to inflict an ailment! It's a bit more reasonable if you have Greater Blood Magic, which does not increase the damage but does lower the mind cost to a reasonable 10 Mind. Still, at two lesser souls to learn from the Hexen, you can get greater damage than this spell can do for no mind cost by cursing a long sword or shark's teeth. This spell is pretty bad, and the only reason you'd really use it is if you're armless Enki or you'd learn it if you wanted to get the spell it is pre-req to. Necromancy: Another spell for creating party members and the other level two affinity spell, this one allows you to animate the deceased bodies of Ghouls and Skeletons you see around the dungeon. It costs 30 mind to attempt this, and prompts a coin flip. Should you fail the flip, not only are you out the Mind but the first failure will result in the corpse reanimating only to attack you. Thankfully, you only have to defeat it once and continuous failures don't have the same blowback. If you have Greater Blood Magic, then the coin flip is skipped and the skill always succeeds, though it still takes 30 Mind to cast. Now Ghouls are essentially just punching bags with sacrificial use, being unable to equip anything, being uncontrollable like Moonless, and only hitting for around 40 damage. Skeletons on the other hand, are amazing. While they only have 16 base attack and can only use one handed weapons, they aren't weaker in terms of defenses, can use most armor and accessories in the game, are immune to stauses like Bleeding, Infection, Poison, Parasites and Blindness, and do not require food. They are uncontrollable like Ghouls and Moonless, but they do have enough fringe perks that it isn't a terrible idea to have 1 in a normal party. They can even use Miasma with no drawbacks! Necromancy is a little gimmicky in normal runs but it is essential in Hard Mode as it is the only way to get party members. In particular, Ragnvaldr and Enki will have a rough time getting to their unique endings without help, and Skeletons are indispensable allies for winning all the boss fights you'll come across. A good skill overall if you know how to work with Skeletons, and fun to play around with now and again. Black Orb: The sole level 3 affinity spell for Gro-goroth, and the sole level 3 affinity spell in the game in general. Black Orb is a single targeting attacking spell that deals 3 instances of 128-192 damage, usually hitting in the ball park of ~450 damage overall. Each hit has a 5% chance of missing, and the spell costs 20 mind, half what Hurting does for quite a bit more damage on average. Black Orb is a famously powerful spell in Termina, but in this game it's just kind of okay. It just takes way too many resources to get, and picking up some fairly useless spells along the way. If you could learn this off of learning Necromancy, it'd be fine, but unfortunately you have to know Hurting and in turn Pyromancy Trick in order to get this spell. You can kind of reduce the cost by learning Pyromancy Trick via the skill scroll from Nosramus' second hide out, but at that point you also have access to Combustion which usually hits just as hard with a good chance of inflicting Burn for free. The main selling point of this spell is that you can cast it on an enemies head and have a decent chance of scoring an instant kill, but that is fairly inconsistent so I don't think it's worth it. Great spell in Termina, but in this game I only really use it if I luck into the skill scroll when searching a Yellow Mage. On the whole, magic is kind of bad in this game. While supportive magic like healing, Pheromones and Blood Portal are highly useful and easy to obtain, attacking magic tends to be slow to obtain even if you are Enki, highly demanding in resources, and just not that much better or even weaker than conventional weaponry. When it is useful, it tends to be for specific fights and may end up only being used once. Attacking magic does have the benefit of being a stable attacking option independent of having arms, but frankly if you've had your arms hacked off you're probably not on a run where you are getting close to breaking into magic. There are some good attacking spells like Combustion and Black Orb, but the former has the serious question of whether or not it's worth the time to grab it (a major concern on the harder difficulties) while the latter just takes forever to get relative to how long a run typically lasts. Thankfully Orange noticed how magic is kind of doodoo stinky in this game and how Enki sucks, and introduced some major mechanical overhauls to magic as well as making it easier to break into casting builds in Termina. Some of the most popular and easy to win with builds in that game revolve around magic, and Marina has comfortably been a top tier pick since launch. CullenDaGaDee fucked around with this message at 23:48 on Jan 12, 2024 |
|
#
?
Jan 12, 2024 04:28
|
|
|
https://www.youtube.com/watch?v=U73MJ7cIrD4 Part 6 is out! Our very first real ending obtained and the conclusion of Ragnvaldr's story... for now. We will be seeing him again later, but for the time being we'll be working on picking up alternative endings with the other characters available. When we begin our next run, D'arce will be the protagonist this go around, and we will be beelining for the level 7 Catacombs. Do note that every playthrough going forward will be moving at a much faster clip, and I will be taking it as a given that anything I have already covered will be known to the viewer and I won't be dwelling on those details too much. There's still plenty of things to see though, it is impossible to see everything in a single run, and there's quite a few alternatives to secondary content in the game to explore. With all that said, let's break down what's present in this video. Unique Items/Equipment Available Butterfly Soul: A soul accessory, with a very unique trigger to obtain it. By slashing open the pulsating organ in the basement of the present day Golden Temple, the Butterfly in the courtyard will complete his metamorphosis and this will be left where he was standing. Obviously this will not happen if you killed him, and he only awards a lesser soul should you use a soul stone on him. It is important to note it is specifically the Golden Temple organ you need to cut to get this, you do not need to cut any of the others. What's this soul do? Well it's SUPPOSED to increase your evade rate by 50%, which actually isn't a terrible effect if I'm being honest. Unfortunately, due to a bug it does not actually do anything. In theory if this worked as intended, you could combine it with the Evasion buff to get a 100% dodge rate and avoid anything that doesn't have perfect accuracy, but it was not meant to be. Dominating, Endless, Tormented and Enlightened Souls: We got all of these over the course of this video and the last, so may as well knock them all out now. Each of these souls, when present in your inventory, unlocks to ability to learn skills off the corresponding tree in the Hexen. Additionally, the Endless, Tormented and Enlightened souls are required to have in order to challenge the Nameless Figurine, who blocks the way to the Golden Temple which is required visiting for any ending route that isn't E or a handful of the Hard mode exclusive S Endings. Naturally, at least one of these souls is going to be redundant for whoever you are playing as in terms of skill access, but possessing the physical item is necessary for being recognized by the Nameless Figurine. Note that you do not actually need to slay/meet the corresponding New God to get these. You can also elect to butcher your fellow explorers within the dungeon and use a Soul Stone on them to get them, or simply Empty Scroll them into your inventory. The Nameless Figurine has limited ways to verify your authenticity when he's rooted in place like that, so these count just as well for getting past him. Empty Scroll and Opium Powder: Not unique items per se, but these can be obtained in a fairly unique way. When killing the Dark Priests in the Inner Hall, there is a chance when searching them you will receive a Robe as an equipable item from them. (Contrary to what I used to think, you cannot secure these guaranteed by headshotting them, it is pure chance if they drop one or not) If you equip this Robe, your overworld sprite will change to that of a Dark Priest. This will allow you to talk to the priests north of Enki's crucifixion in the Endless' dream world with unique dialogue. They will inquire if you are well, and should you answer negative, they will give you these items to help you out. The opium is whatever but Empty Scrolls are always useful so this is a nice get. Before you ask, no, talking to them as Enki doesn't work even though he is a Dark Priest, he needs the Robe equipment also. Extra Notes -Bumping into any of the roaming NPC's with torches in the Endless' dream will throw you out back into the real world. This is nothing more than a minor annoyance, any character scene you've witnessed will stay completed and it just creates some extra walking. -You're supposed to be able to make out Pocketcat's face in his special scene in the Endless' dream, but it is very difficult to see it if you don't have a fully lit torch up. This scene is optional viewing, but there are some items to collect here at least. -Not that Hounds are a threat at this point, but they will attack you if you dawdle too long on the Oldegard portion of the dream. -Skin Granny's insta kill actually has unique graphics for every face she can rip off. I'll be sure to show them in the accompanying enemy post for this video. -This isn't really important but it is funny to me how D'arce's scene in the dream has basically nothing to do with her motivations for entering the dungeon and is almost entirely about Le'garde. That simp reputation is well earned. -Refusing Nilvan's request can potentially render the game unwinnable for any Ending route other than E. You do not get a second chance here, and if Cahara has died in a way that doesn't allow you to Soul Stone him (like he has in this playthrough) and there are no more Empty Scrolls, you cannot the Endless soul and by extension cannot enter the Golden Temple. She doesn't hold you to her request, so there's really no reason to refuse her other than to see what happens. -It should go without saying, but all mentions of The Girl's reactions are absent if she isn't in the party. Her reactions here are one of several hints to her parentage. -There are three possible ways to obtain the King's Passage key from Francois, the first and most obvious one being simply talking to him. Alternatively, if you blow past him and he releases the hounds before you talk to him, the key will be resting in the spot he occupied previously. If you have Nas'rah in your party, he just simply fries Francois when you talk to him and you can take the key off his charred corpse. Understandably, in this instance Francois won't release the hounds when you make your way towards the basement. -Francois releasing the hounds is just about the least threatening trap in the game. Even without Dash, you can make it to the next screen well before they ever get close to you. I imagine you'd need to be crawling with one arm for it to be anywhere close to a concern. Even on the harder difficulties, they just give up and vanish once you make it to the basement. -In addition to being beyond cruel given the implications, giving The Girl to Pocketcat in the final encounter is completely worthless. He does not offer up his usual selection of items at this stage, meaning you just sacrificed The Girl to a weird guy constantly playing pocket pool for nothing. (Don't worry, I assure you he just plans to eat her) In the event you trade The Girl off here, leaving and coming back to the screen will result in Pocketcat vacating the area and leaving a finely wrapped piece of catnip in his previous location. -Thankfully, the fire traps in the Golden Temple of the past only affect your lead character, so you don't need to maneuver the whole party around them. -Francois is highly dangerous if you don't employ the conversation loop on him. High chance to delimb you in phase 1, and bonkers damage in phase 2. Additionally, if his coin flip attack succeeds in phase 2, the game is soft locked if you can't beat him afterwards as he endlessly straddles your character upon death in battle, throwing you back into the fight just to blast you down and dominate you again. If you are unable to remove both his arms in phase 1, absolutely be sure to guard the turn phase 2 begins, as he will still launch his coin flip attack even if he is still stunned from Talk. -Should Francois successfully sell you on his supply of grape juice, the conversation loop is closed off and you cannot endlessly stun him with it anymore. -Each character gets sent to a designated spot in The Void, so if you're able to navigate it well, you can pick everybody back up very quickly. There are certain party members who do not get scattered when you enter The Void, and one who refuses to enter it and will just be gone from your party permanently. -Moonless and The Girl are the only characters in The Void to have a paired reunion scene should they enter it with you. -Those loud foot steps are not part of the OST, they do indicate how close or far away the Greater Blight is. When hiding in a hole, make sure you don't hear any stomps before exiting. -The Greater Blight isn't really meant to be beatable, as he has extremely high physical evasion when distant and deals extremely high damage once he's closed in. Due to a pretty ridiculous oversight on Orange's part though, the distant Greater Blight has no magic evade and can be hit with stuff like Combustion and Throwing Darts. Should he die from DoTs before he reaches you, it will cause the game to bug out and softlock, so avoid doing that to him on the first turn. Any turn after, he'll make it to you just fine and die as intended. -Aside from abusing DoT effects when he's distant, the only other way to realistically beat the Greater Blight without casualties is to have a full party capable of laying out 2000 damage in a single turn and praying no one misses. Fighting him solo without using DoT is essentially impossible as he deals way too much damage to survive without having 20 agility and alternating between Guarding and healing. -Each character has a unique ascended form for the final encounter of Ending D. I'll be showing them all in the companion enemy post for this video. -If you are playing on T&S or Hard Mode, an additional final boss awaits you in The Void. It will be awhile before we see this boss, but boy is it a pain in the playthrough we will be seeing it in. -The dialogue you choose when talking to your character's ascended form has no bearing on anything, just pick whatever you like.
|
|
#
?
Jan 14, 2024 01:37
|
|
|
Will watching the Termina lets play spoil the first game?
|
|
#
?
Jan 14, 2024 10:06
|
|
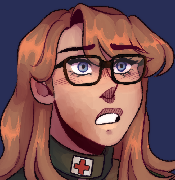
|
The plot of Termina takes place almost 400 years after this game in an alternative post WWII setting with a plot almost completely divorced from the events of this game. While there are some elements calling back to the first game, nothing gets spoiled per se. That said, I did elaborate on some of these elements when encountering them, so if you�d like to be completely blind to what happens in this game, it might be best to avoid watching more than the first 2 or 3 Termina videos.
|
|
#
?
Jan 14, 2024 14:06
|
|
|
Well, I did finish all your videos for the first game so far. I'm just wondering if I should wait for the first game video series to finish before I start the second done.
|
|
#
?
Jan 14, 2024 14:08
|
|
|

|
| # ? May 4, 2024 10:24 |
|
|
Supplemental: Enemies Pt.7 We've seen nearly everything there is to fight in the game at this point. While there are a handful of enemies and bosses we've yet to see, they are either specific to certain routes, more commonly encountered on the higher difficulties, or are just tied to sidequests have yet to explore. With that being said, I'll be covering enemies encountered in the last video in the order we encountered them in rather than trying to separate common and unique encounters. Skin Granny 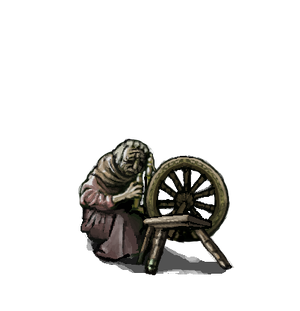 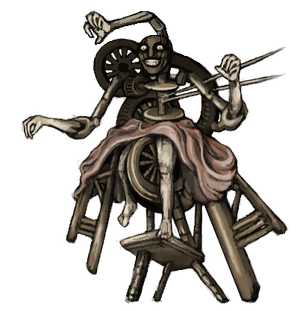 Phobia(s) Triggered: Teratophobia 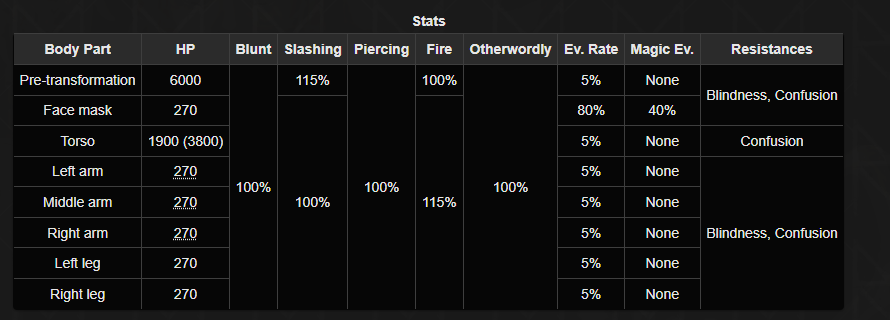 *On T&S/Hard Mode, the arms have 600 HP. The Face Mask only becomes a target if someone falls victim to her Coin Flip attack. As opposed to fighting Nilvan for her soul, progressing through the Endless dream pits us against this seemingly non-sequitur enemy. Inquiring about her at the Hall of the New Gods reveals that she is actually derived from an Oldegardian myth, serving as a boogie man of sorts for the culture, and her presence is likely tied to the area she is found in being based on Ragnvaldr's memories. Whether this was an unintended consequence of the dream or she was deliberately pulled from Ragnvaldr's memories to serve as an obstacle and a test is left unclear. Regardless, the Skin Granny starts out in the guise of a harmless old woman. She has far too much HP to kill in the first turn (though I believe the fight does end in a win if you manage to deplete it), so you want to use this turn to set up buffs and DoTs. Any DoT effects applied to the untransformed Skin Granny will transfer over to her torso in phase two. You will also want to redirect her attacks to someone with the Salmonsnake Soul as the fight gets real in phase two. Once transformed, the Skin Granny has 3 arms to attack with and 2 legs. The legs do weak kicks that typically deal about 10-15 damage. They are largely meant to act as finishers for the hands, which deal 20-30 slashing damage and have a high chance to inflict Critical State. With all the attacks Skin Granny can throw out, Critical state nearly guarantees a dead party member if it lands. Now luckily on Fear & Hunger mode, the arms are weak enough that almost any damage you have at this point can destroy them and you can quickly render the Skin Granny inert. This fight is much more precarious in the harder difficulties due to the arms being more than twice as durable, and it can be a serious stop gap to success in runs that need to fight her. Take this fight as seriously as possible when tackling it, and do not do anything less than the best you can when approaching it. The Skin Granny does have a coin flip attack, telegraphed on the 3rd turn of the fight with the message "Skin Granny is flexing its fingers...". On the following turn, the attack will be launched and if it is not guarded or the flip is failed, the character hit by it will have their face torn off and they will die instantly. This attack can be thwarted by removing all of the Skin Granny's arms, making their destruction even more of a priority. The face steal can also be blocked by the Iron Mask, if you have it. Skin Granny will wear the ripped face, and has unique graphics for each face she can steal.    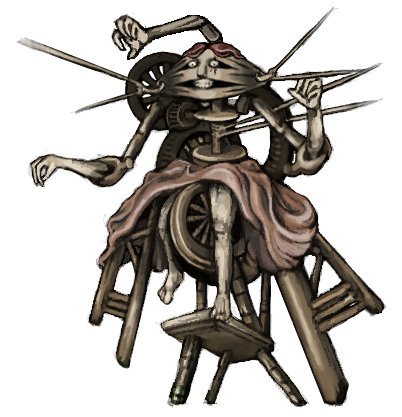   Nameless 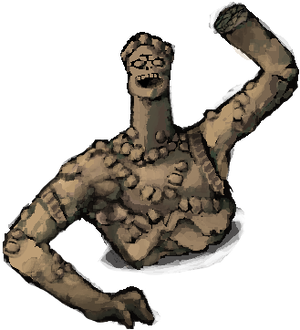 Phobia(s) Triggered: None 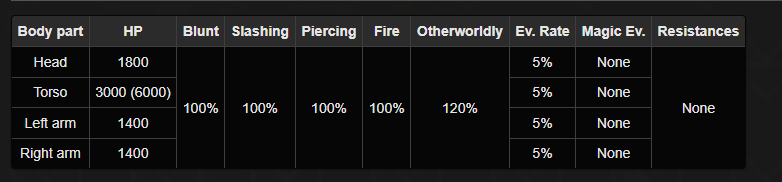 This is... an unbelievably simple and easy fight given what you normally have to go through to get to him. The Nameless Figurine attacks with his stumpy arms, each one landing hits for 30-35 Blunt damage. While that's scary damage if he focuses a single character, simply being at full health prevents this guy from ever scoring a kill on anyone, so just heal anyone who falls below 80 HP while fighting this guy. The arms don't even inflict Fracture, which you'd think they would. Showing that you can draw blood from a stone, this guy is vulnerable to all forms of DoT from Poison to Bleed, so inflict those on the Torso and either smash it down or take out the arms to minimize his damage. Nothing too special to worry about here. Francois, The Dominating One 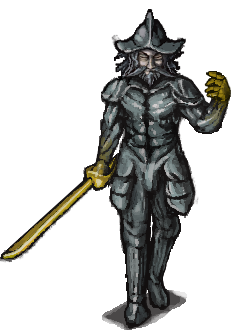  Phobia(s) Triggered: Erotophobia, Teratophobia 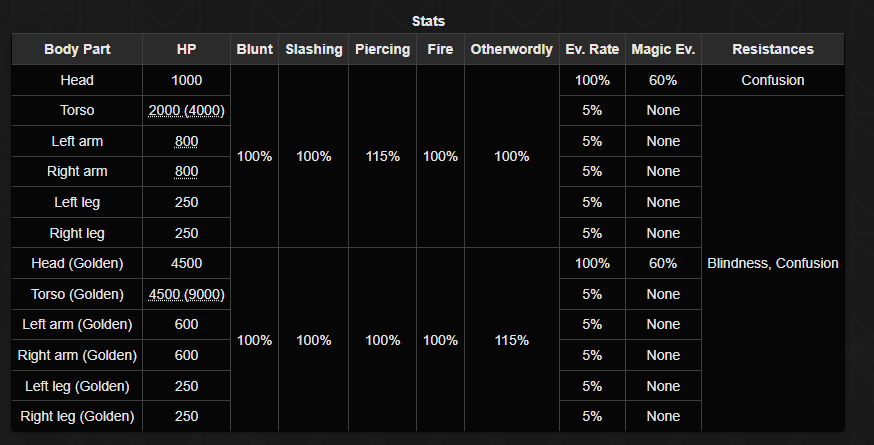 *On T&S/Hard Mode, the Phase 1 Torso has 3250(6500) HP while the arms have 1200 HP. Phase 2 has the same HP across all difficulties, but the Torso HP becomes 2700(9000) if he succeeds in tying you to the radiator. On its face, Francois is a highly dangerous opponent. In the first phase, he can launch strong slashing attacks with his saber arm, capable of hacking of a party members arms. When the second phase begins, his head and arms begin a flurry of highly damaging attacks, around 35 points of untyped damage inflict by each limb. More than enough to kill anyone should he focus fire them. If either of his arms are still intact by Phase 2, he will launch a coin flip attack that results in you seeing the full extent of the Dominating One title. This is a disaster because witnessing this removes the primary method for beating this fight, and should your party be killed and you lose the battle, the game is soft locked as Francois domination cutscene will continue to play every time you lose to him and a solo character has no hope of besting Francois as they will be thrown back into the fight at 1 Body while Francois is fully healed. Now Francois famously has one of the most prominent Safety Loops in the game tied to the Talk command. When fighting Francois, you want to Talk to him and select the following options: "Prepare to die like a worm!" "Of course you are close to gods. You're standing next to one." "You're nothing but a puppet in the greater scheme of things." "How little you really know..." These will result in Francois being stunned into inaction for 3 turns. When those turns are up, you can simply Talk to him again and repeat the conversation to stun him once more, completely preventing him from accomplishing anything. There is one caveat though: Should he still have at least one arm when phase 2 begins, he is still capable of launching his Coin Flip attack while in the conversation stun status. Do not let this hit you, either destroy his arms in phase 1 or guard when phase 2 begins. Getting hit by this removes the conversation stun as an option, and Francois can easily wipe the floor with your party if he's capable of attacking. As one final note, Francois is thrown off balance and his head is made vulnerable when all his limbs are destroyed rather than just his legs. This is fairly pointless as the Phase 2 Head has the same HP as his torso, and DoT effects tick for much less damage on the head. Molded 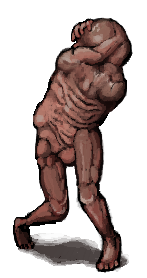 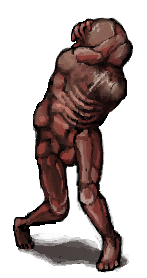 Phobia(s) Triggered: Erotophobia, Teratophobia 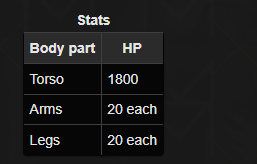 Coming in Male and Female varieties, though it's tough to tell the difference at a quick glance, Molded are the primary enemies wandering The Void. They move extremely slowly and don't react to you being in their line of sight, so it's rare you'll ever have to fight them. Male Molded fight solo and have a highly damaging attack called Inner Juices they can use. Female Molded fight in pairs but lack the Inner Juices attack. They're little more than sacks of meat, so naturally they have pretty beefy torso HP you need to blast through to kill them. Like I said, they're easy to avoid so I wouldn't stress about them too much. Blight 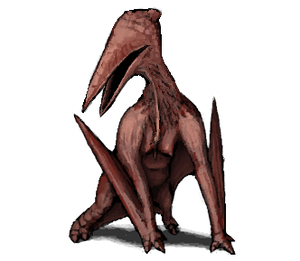 Phobia(s) Triggered: Teratophobia, Zoophobia 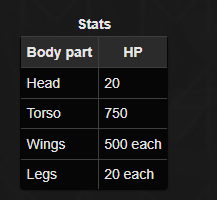 For the life of me I could not get this thing to actually attack me, so I have to rely on the rather poorly written wiki entry to describe what this guy is capable of. The Blight attacks you with his wings, both getting a chance to attack, and his Beak which can inflict Critical State. Highly dangerous to a character without party members, but if you reunite with just about anyone you can easily blast his torso down and the end the fight before anything happens. If you can even get into a fight with this guy, as he only appears in the area with the green pits and seemingly just has no hit detection. I tried, I really did. If you do somehow end up having to take this guy on solo, he has the same Talk options of a Cavegnome, and can be confused for two turns by your best Chocobo impression. (Select "~Kueh!" when talking to it) Greater Blight  Phobia(s) Triggered: Erotophobia (I don't even want to know why), Teratophobia 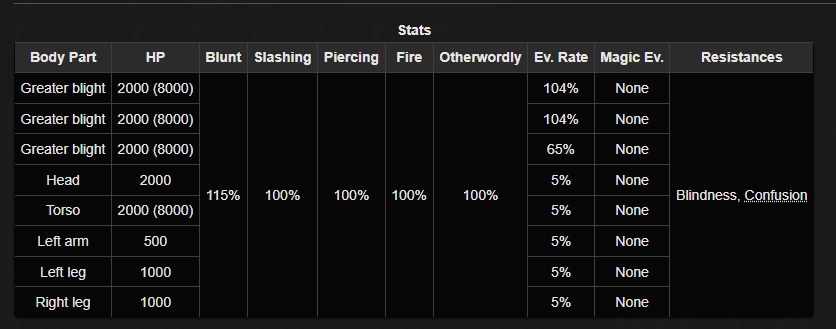 *This hasn't really come up before, but alternate use for Stones is to throw them at enemies and cause the confusion status. For some reason, quite a few enemies including the Greater Blight who are normally immune to the confusion status can still be inflicted with it by using a Stone. When traversing the Void, you will periodically be warned something has caught your scent and begin to hear increasingly loud stomps. Fail to find a hole to hide in before the stomps close in, and you're thrust into a battle with this guy. The Greater Blight is intended to be a nigh unbeatable stalker within The Void, and indeed a solo character has little hope of defeating him in a straight fight. The Greater Blight spends 3 turns approaching, his sprite gradually getting closer each turn. On the third turn he becomes almost vulnerable to physical attacks, and by the 4th turn, you can reliably hit him. Once he's fully approached, however, he begins attacking with two Stomps and a Chomp, the combined damage being around 140 unguarded and it is essentially guaranteed someone will die if you take him on with a party incapable of laying out 2000 damage in a single turn. For a variety of reasons due to some egregious oversights on Orange's part though, this guy is actually much easier to beat than intended. For starters, you probably noticed his magic evasion is None at all stages of the fight, and indeed you can start hurling spells and items at him on the approach. Inflicting him with a DoT effect on the second turn means that he will die on the turn he reaches you. It is actually possible to softlock the game by hitting him with a DoT effect on the first turn, as he will die before he reaches you. The game doesn't have any kind of handling for this occurrence, so the fight will not end and when he does reach you. He won't do anything but you also won't be able to finish him off, thus trapping you in the battle forever. As for beating him with out early DoT cheese? Well as demonstrated in the video, an adequately equipped party with weapons like Miasma, Blue Sin and The Sergal Spear can usually blast down his Torso before he takes anyone out, especially if they managed to land any hits on the third turn where having a chance of hitting him with weapons becomes possible. Can you beat him sans cheese as a solo character? Sort of. If you summon a Blood Golem and cast Pheromones on it, the 200 Body it has is enough to survive one round of combat with the Greater Blight. With the White Angel Soul or Fast attack set up, a solo character with a good weapon can more than likely kill the Greater Blight before they have to worry about personally facing down its attacks. Not strictly a solo character win, but it is an option a lone character has. Regardless, there are plenty of holes dotted around the Void, so just jump into one whenever you see it and wait a couple seconds before leaving, and you should never have to worry about facing this guy down. Ascended Protagonist 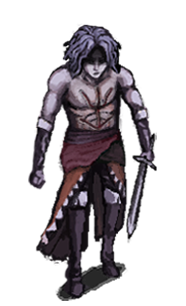 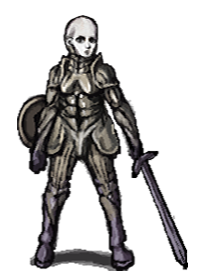 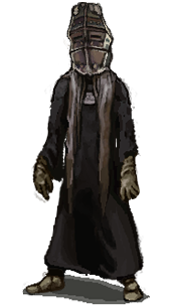 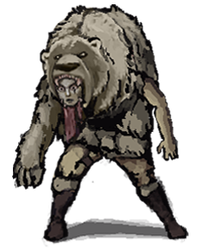 Phobia(s) Triggered: All, including for characters who don't usually have Phobias. Only technically an encounter due to presentation, every character who reaches Ending D will find themselves face to face with a representation of their New God form. They will then be asked two questions, the answers to which determines their ultimate fate as a New God, some outcomes more optimistic about their divine status than others. Regardless of the choices you take, it's ultimately revealed that everyone in your party failed to escape the dungeon and the person you were upon entering them is effectively also dead, meaning you never escaped either on a technicality. Not too much to say here, I just wanted to make this entry since we're not going to be seeing any of these forms save for Enki's in future videos. Those of you who saw the concept art that served as the basis of the series will notice that D'arce's ascended form bears a striking resemblance to the woman in that portrait, though it's generally believed that woman is a conceptual version of Nilvan instead of D'arce.
|
|
#
?
Jan 14, 2024 16:49
|
|