


|
I have opted to allow to interested viewers to influence the future of this LP in what easily the most critical aspect: Who will be our protagonist for the Dungeon Nights dating sim mode? I have posted a poll to my Youtube community page, you may vote at the link below! I'll be keeping the poll up until next Sunday, at which point whoever has the most votes will be locked in. In the event of a tie, I'll decide the winner in true Fear & Hunger fashion: with a coin toss. https://www.youtube.com/post/UgkxbbUppXpsUghvmQIKwmXmcOgwzud_zkGr
|
 #
?
Jan 14, 2024 17:14
#
?
Jan 14, 2024 17:14
|
|


|

|
| # ? May 4, 2024 19:30 |
|
|
https://www.youtube.com/watch?v=82LwxI9aNSM Part 7 is out and a new playthrough has begun! D'arce is the hero of this story, and since we've seen most of the more altruistic ways you can make it through the dungeons, we are very much playing her as a nominal hero this go around. There's still plenty of alternatives to see in terms of route through the dungeon as well as sidequest resolution, so let's explore those shall we? Unique Items/Equipment Available Claymore: A mighty two handed sword in the early game, boasting a whopping +80 attack power! Weaker than Miasma and Blue Sin, but there's no caveats with wielding it or RNG based pre-requisites to getting it. There are two options for getting it, Option A being from Ser Seymor and that's the option we took in this video. Ragnvaldr with the Axe and D'arce with either starting weapon she has can throw a haymaker at Ser Seymor's head and do enough damage to overcome its 200 HP. This is the best option for defeating him, as his Torso has a solid 1200 HP while his arms (which are a single target) have 700 HP. Beating him or crippling him without retaliation otherwise requires additional man power we simply do not have, and the Claymore isn't quite as notable if we don't get it as early as possible. It's worth noting that if you reunite Buckman with Ser Seymor, you lose the option to attack Seymor. While I took the route from the entrance to the level 2 basement for flavor, it's generally more reliable to go through the Well in the courtyard to get to Ser Seymor. The safer and more reliable option for getting this weapon is Option B, selling The Girl to Pocketcat in the Level 4 Mines. I may be playing D'arce stone cold in this, but even I can't bring myself to do that. From a practical stand point it's probably the most useful thing you can do with The Girl, however. Everwatching Talisman: Obtained if you call the coin flip correctly on the Chest found in the first room you come across in The Passages of Ma'habre, this accessory has the unique effect of nullifying the phobia status when it is equipped. I suppose it's a nice way to counteract Teratophobia and Panophobia, but to be honest pure damage is probably the least of your concerns with most attacks in this game. It's little more than a novelty accessory in my eyes, but I may as well elaborate on it here. Eclipse Talisman: I never actually went over this when we first got it. You can always secure one of these from the conversation with a Yellow Mage, though you can only get one as the conversation goes nowhere if you try it on another Yellow Mage. This gives you 10% resistance to otherworldly attacks. Situational and frankly not that good since the one time I want Otherworldly protection (against Valteil), we also need limb protection in the event Hurting gets tossed out. Extra Notes -If you're confident in your ability to avoid arm loss, then picking the rear guard option in D'arce's backstory is probably the better choice. While Leg Guards are less useful than Arm Guards for limb protection, they still provide the same 10% physical resistance, and this option gives D'arce the Eagle Crest Shield and Plate Mail, two of the best armor pieces in the game. The Long Sword is only marginally weaker than the Iron Spear, so you don't lose out much on attack power either. -As mentioned previously, Ser Seymor can only be attacked if he has not yet been reunited with Buckman. Otherwise an immediately friendly relationship is established and your character would feel too guilty about attacking him. (That's the in-universe reason I assume. Out of universe, Buckman cannot be fought and it's unlikely he'd just let you kill his friend so Orange just disables the option entirely.) -Since I didn't have any items Cahara could steal, he has absconded with Whiskey he materialized out of thin air instead. Should I have killed him later in the video, that is the loot would have gotten from him aside from his equipment. -There's absolutely no reason to talk to Pocketcat if have seen all his scenes already and have no children to sell him, so he'll just be chilling in the caverns for the rest of the game. -This is the last time fighting the Old Knight will be as simple as hurling an explosive vial, so enjoy it while it lasts. -Looting Nosramus' chest when he tells you not to sours your relationship with him. This will lock you out of Enki's S Ending, but contrary to popular belief you don't have to talk to Nosramus in his first hideout at all so it's a bit of a non-issue. -The Cavedweller village being ransacked is a pretty rare event, and I'm shocked I got it so soon again after getting it in a recent Hard mode run I did. The biggest problem with this is that the merchant is dead, so we couldn't pick up anything from her with the Silver coins we may or may not have had. Not a huge deal in this run as I lucked into most of the things I'd care to buy from her, and she would have become hostile anyway since we were going to snatch the Cube of The Depths without the Stone Crown. Remember that events like this are set upon character selection, so if you load up your initial save for a new run, this event will always occur! -The game gives you false hope if you let the Level 6 mines collapse without using the Passages of Ma'habre. You'll be shown a screen of your character trapped in rubble, and after a few moments they will realize they can't escape and it'll be game over. Also note that if you use Explosive Vials on any of the blocked paths in the Miner Spectre section, this will also cause the cave in to happen. -The Eastern Silk robes are the best otherworldly armor in the game, and they don't conflict with most forms of limb protection, so they are a very good pick up for the Valteil fight. -Collapsing the Level 6 mines provides an alternate route to the deeper thicket, though it's not really a practical one considering how much rarer the Passages are compared to Explosive Vials. -On higher difficulties, Crow Mauler can burst through the wall outside Le'garde's cell like the Kool Aid man, making getting into it a little trickier. Additionally, once you've rescued Le'garde or confirmed his passing, Crow Mauler moves a little faster on the overworld. He still can't keep up with Dash, but he is more of a threat to a character that doesn't have that skill. -As I said in the video, I'm unclear on the mechanics behind the timer to rescue Le'garde. I don't even know how much time you really have, nor do I know if the game tracks it based off of your playtime or an internal timer that only runs during certain situations. Additionally, I'm not sure what happens if you make it to the Catacombs in time, but don't actually go into Le'garde's cell to rescue him. I can't say for certain if making it to Level 7 under the time limit is enough on its own to save Le'garde, or if his fate isn't actually decided until you swing open the door to his cell. Since there's little reason to beeline for the Catacombs and not add Le'garde to your party when you get there, it seems most of the community around this game shares my apathy about testing this. -I mentioned this in the notes for Part 3, but if you rescue Le'garde as Ragnvaldr, you get the unique option to snap his neck before he awakens. This will prompt a fight with D'arce if she's in your party. -Le'garde has no equipment restrictions, making him the only non-protagonist recruit to be equally capable as the main characters. -Since Leg Sweep is a D'arce skill, she can pull the same trick for getting Miasma that Le'garde can, though it costs two Lesser Souls. -We'll talk to Isayah properly eventually. -The Human Hydra is incapable of fighting back, so he's a free Lesser Soul if you want to spend the time hacking his heads off. -To be honest, selling out Buckman is probably the best resolution for his sidequest in a strictly practical playthrough. Two light blue vials is great at this stage of the game, and doing this unlocks an additional trade with Trortur later. For runs that need money, saving Buckman and then talking to him on Level 3 is best. -If you've met Ser Seymor and killed Trortur, you can tell Buckman Seymor's location. This is fairly meaningless, as Buckman always makes his way to the Level 3 basement, regardless of if you even talk to him after killing Trortur. -If Ser Seymor is alive and you've sold out Buckman, you can tell Seymor about Buckman's fight. Sneakily but wisely, your character neglects to mention their role in Buckman's death. This results in Ser Seymor travelling to the Inner Hall and killing Trortur, before going catatonic and disappearing from the game after you leave the Inner Hall. There's not much reason to do this as it robs you of the rewards for completing Trortur's version of the Buckman quest. -In general, screwing over Buckman's party gets by far the best rewards at every juncture. Sometimes crime does pay. -You can interact with Nas'hrah at any point, but as shown in the video, lacking the required items and talking to him is just signing your death warrant. You cannot run from his fight, and he is immortal so you can't win it either. -For speed purposes, killing the other protagonists and taking their souls is the most efficient way to get through the game. All of them can be killed before you're even halfway to the catacombs with the exception of D'arce, whose soul isn't needed anyway. In this run, we will also be picking up the Enlightened Soul from Enki, but Cahara will be spared because he has use for us. -The crumbling mind events for your party members happen when you walk through specific locations and they have 70 mind or lower. It is falsely stated on Tormentpedia that these events occur at 50 Mind or lower in Fear & Hunger mode. -It's important to note that for reasons we'll see later, Enki cannot actually fully complete the Cockroach King Sidequest even though he's the only character innately capable of even doing it. -You only get one chance to tell your party members to shake off their low mind events, every time after they will break off to try and collect themselves. Certain party members can console other members to prevent them from leaving also. -As stated in the video, if you leave your party members without offering them an Ale or Whiskey, they will die of a heart attack when you leave the screen. If you do provide them Ale though, they will remain in the spot they stand in unharmed and will rejoin you whenever you come back for them. This is the only way to temporarily remove people from your party, otherwise you can only get rid of people by getting them killed. -Calling Cahara out prompts a fight, which would be nice if we wanted to get the Endless soul that way, but runs counter to my purposes for the run. Thankfully, Cahara is also unaffected by the Level 6 Cave in, I actually did not know if that would be the case or not when I grabbed Blue Sin. -Moonless Guards are not typically seen until the alternative final area of the game. I have to imagine at least one new player of this game got a really nasty surprise with this event on their first run. -Since we didn't get to see it, swiping the Cube of The Depths without the Stone Crown prompts immediate hostility from the Cavedwellers, permanently souring your relationship with them. -If you'd rather not fight the Crow Mauler at all, a bug in the game causes him to permanently despawn when you reach the central square of the Ancient City, though you will still periodically hear his siren that announces his presence when going through the dungeons. He can still attack you at his bed even if he has been despawned. -Since Nas'hrah is a fully controllable party member that is completely immortal, and can be gotten very easily if you know what items you need, there's basically no reason not to recruit him on an efficiency minded run.
|
|
#
?
Jan 15, 2024 02:17
|
|
|
I'm guessing that those HP values on the Greater Blight for when it's closing in are carried over for the actual fight. So you actually have like a solid three turns to soften it up with magic, which is...not so bad. I'm guessing the bracket HP is for Hard Mode in which case, yeah oof. Can you run from it? Also I swear I saw Sylvian's picture as a demon in SMT but I can't seem to find which one. Hmm.
|
|
#
?
Jan 15, 2024 02:20
|
|


|
I explained this in the first enemy post, the parenthetical HP value for the Torso is the "True" HP value. This is what the game checks against when determining DoT damage on the Torso, which is why that damage is so much higher on Torsos than any other limb. The non-parenthetical value is what I call the "Break" value, it's the amount of damage you need to deal to the torso to kill the enemy. The Greater Blight has the same HP on any difficulty, so if you have a method to kill him it will work no matter what. I'd put my money on Diana for the enemy you're thinking of, but maybe it's something else. 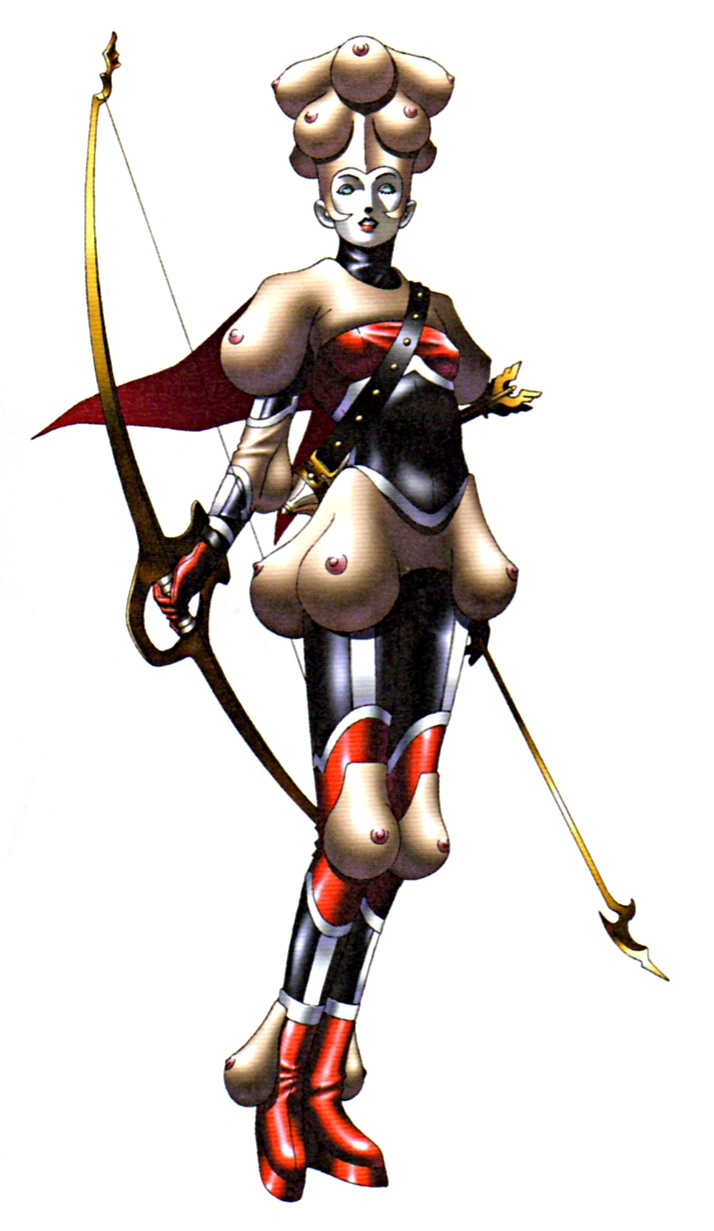
CullenDaGaDee fucked around with this message at 02:33 on Jan 15, 2024 |
|
#
?
Jan 15, 2024 02:27
|
|
|
Supplemental: The Knight, D'arce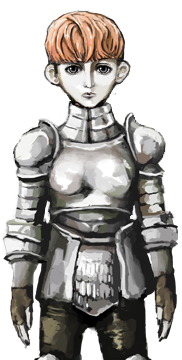 "If that's what it takes, I'll embrace the darkness. Nothing matters to me anymore but survival. I'll play the game with its rules." As a character: A noble borne woman from the kingdom of Rondon, D'arce was destined for greatness with her status and her Dominating soul. Indeed, when she was accepted as a squire for the Holy Knights of Rondon, she quickly proved herself a prodigious fighter and an exemplary knight. At her core, D'arce always had a good heart, being aware of the world around her and being a devout follower of the teachings of Alll-mer. While her station in life does make it hard for her to properly relate to those not of noble backgrounds, at the end of the day she does want the best for the world and all in it. This would come to cause friction with the order of the Holy Knights, as D'arce quickly came to see the corruption within the ranks of the knights and the preferential treatment the nobility received. Whether she deserts on the spot or briefly takes action as an internal reformist, D'arce ultimately casts aside her title of Holy Knight and abandons her noble family. D'arce had heard rumors of a talented mercenary company with a charismatic leader, taking notice of the good the band has done for the people across the land. Opting the join the Knights of The Midnight Sun, her talent as a knight quickly makes her a high ranking member of the troop and gets her close to the company's famed captain: Le'garde. D'arce cannot help but be enamored with Le'garde, who truly seems to uphold the ideals he claims and does far more for the people than the Holy Knights ever have. This notion does end up getting rattled though, when Le'garde launches a brutal campaign against the land of Oldegard, mercilessly slaughtering those in his way to obtain a curious artifact. Le'garde's reputation was already becoming malign with the nobility at this point due to his subversive nature, and this aggressive and unsanctioned campaign was all the reason they needed to arrest him and toss him in the Dungeons of Fear & Hunger. Despite her reservations, D'arce ventures towards the dungeons, hoping to save the man her charmed her with his ideals and hopefully gain some understanding on why this had to happen in the first place. D'arce is kind of the opposite of Ragnvaldr character-wise, which I suppose is kind of fitting given Ragnvaldr's enmity towards the Knights of the Midnight Sun. While Ragnvaldr outwardly radiates a savage presence, he proves to be a fairly calm, observant, well spoken individual who is highly skilled in the trades he practices and even when he's breaking down, he takes the dungeons with a reserved and collected stoicism. D'arce meanwhile gets talked up a lot for her skills as a Knight and has a noble facade, but when faced with the Dungeons she seems woefully out of her depth. While mechanically there's not much difference between D'arce and other characters, her mental fortitude towards to horrors of the dungeon seems to be by far the weakest in universe, with her suffering the most overt breakdowns at low mind. Her background leaves her incapable of thinking pragmatically, and her dogmatic mindset causes her no shortage of problems as seen with her conflict with the Cavedwellers. She also isn't particularly adept at reading people, as her whole quest is dedicated to saving a man she adores, but the man in question could not give less of a poo poo about her as anything other than a tool to further his own goals. This girl just can't catch a break. As your Protagonist: D'arce's Dominating Soul offers her the following skills, Defence Stance: A combat skill that applies the Perfect Guard buff when used in battle. Perfect Guard makes the affected character immune to limb loss for its 3-turn duration. A fairly potent buff to be sure, but it does lead to an economics problem of if its worth taking the health damage to get some guaranteed limb protection and avoid problems from missing attacks. One thing that undercuts this skill for D'arce specifically is that she is the only character who can start with a limb protecting accessory, making this less useful for her than you'd expect. It's a more interesting skill on other characters if they luck into a scroll that teaches it. Fast Stance/Attack: The game is somewhat inconsistent about the name of this skill. Disregarding that, this is a combat skill that applies the SPD Up status when used in battle. This makes your agility stat go from 10 to 20, which allows your character to get Extra Turns in battle. It also increases the effectiveness of the Run! menu option in battle, giving it a guaranteed success rate for a solo character. This status lasts the full duration of the battle. This is a very good skill for boss fights, as many of them usually start out easy and give you a chance to set up this buff with little risk. A character who can go twice can accomplish so much more than a character who only goes once, and you never have to worry about reprisal from the enemy on Extra Turns. The other means of boosting your agility are limited, like the White Angel Soul, or rare and RNG based to obtain, like Brown Vials. This is a reliable and highly useful skill that is easy to work into many strategies. Counter: A combat skill that applies the Counter status buff when used in battle. This causes the affected character to launch a full powered physical attack in retaliation to the limb of the enemy that damaged them. This buff lasts the full duration of a battle. Pretty bad honestly, I'm not a fan of a skill that revolves around taking damage in a game like this. Additionally, seldom is the case that limbs that enemies attack with are their vital parts, so counter attacks will basically never kill an enemy unless it is Tackling you. On the lower difficulties, most attacking limbs can easily be destroyed in a single strike so you may as well just launch an attack outright instead throwing up Counter. This skill has some pretty broken synergies in Termina, but in this game its very underwhelming. Leg Sweep: Yet again, a combat skill. This one is not a status buff, but an actual attack. It requires that you have a Slashing type weapon equipped (the description implies it needs to be one handed also but I'm not sure on that) and it costs 20 mind to use. This has the unique effect of destroying enemy legs, or any limb that is recognized as legs in the game code. Most of the time, this will open up an enemy to a headshot on the following turn. Due to a quirk of how this skill is coded, it also destroys doors with a 100% success rate. The latter attribute is probably the most fun and interesting thing about this skill, it can be pretty situational otherwise. As shown in Part 7 of the LP, sometimes the attack screws up and doesn't destroy both legs like its supposed to. I wouldn't go out of your way for this. D'arce has no equipment restrictions, and is capable of using any armor as well as two handed weapons. D'arce's backstory offers her the following, 1.) Fast Stance OR Defence Stance 2.) Nothing but get the ability to learn Dash later OR 20 Silver Coins 3.)A Long Sword, Eagle Crest Shield, Plate Mail and Leg Guards OR an Iron Spear, Iron Cuirass and Arm Guards 4.) 7 Tinder boxes, a quill and a blue vial OR 3 Dried Meat, a moldy bread and a cheese OR Dash if the correct choice was made earlier Alternatively, you can skip the backstory and obtain, 1.) A Long sword, Eagle crest shield and Plate mail 2.) Fast attack and Defence stance skills D'arce does not have any unique traits independent of her backstory. D'arce is a very beginner friendly character. She's the only one who can start with limb protection, including the highly coveted Arm Guards, making her the most consistent starting character when it comes to combatting Guards. Her starting armor is also among the best in the game, meaning she takes little damage in fights. D'arce's starting equipment load out is easily the best regardless of which backstory options you take, as the other characters top out around 8% physical resistance starting out while D'arce begins with about 35-45% resistance. Now this all sounds pretty good, but it's important to remember that combat is best avoided in this game, and D'arce has little in the way of utility skills. Your access to healing in this game is highly dependent on RNG for most of it, so if D'arce is constantly fighting and getting chipped down, her journey can come to an unceremonious end if she simply lacks the Body to take anymore punishment. Outside of Fast Stance, D'arce's innate skills are also pretty poor, being too gimmicky or limited in use for much of the game. Still, having the best combat starting out certainly isn't useless, and sometimes depending on RNG fights can be borderline unavoidable. D'arce is easily the best character in these situations, suffering the least amount of losses in any engagement she has to take on solo. If she's lucky enough to secure an explosive vial early on, she can also pick up Ragnvaldr within minutes of entering the dungeon, and the two prove to be quite the dynamic duo. While I'd say Cahara is the better character overall due to his excellent field skills, I'd probably advocate D'arce as the best character for first time players as her abilities are straightforwardly good and don't require a ton a game knowledge to make them shine. As a Recruitable Party Member: D'arce is very easy to recruit but does have a drawback for doing so. You'll always find her in the Level 5 mines, in the Cavedweller's village. As soon as you enter the area, take the left path and you will come across D'arce being assaulted by a stone wielding villager. Kill him and talk to D'arce after, and you do not have to do any extra arm twisting to get her to join once the dialogue option to ask her pops up. The trade off to this is permanent hostility with the Cavedwellers, BUT you can simply view this scene after completing your business in the village, which will likely have you hostile with the Cavedwellers anyway. Thankfully, if the rare slaughtered village event was set for your run, this scene is unaffected. D'arce comes in pretty heavily kitted out with a Long Sword, Eagle Crest Shield, Plate Mail and the Fast Stance and Defence Stance skills. Since you can recruit her with no drawbacks if you do things in the right order, there's basically no reason not to grab her as you leave the Cavedweller's village. To be honest, D'arce is probably the best recruit in the game, no other character comes in with as much stuff as D'arce does and it's all extremely valuable. Even if you have sacrificial uses in mind for your party members, D'arce really sweetens that pot with all the great free equipment she signs on with. CullenDaGaDee fucked around with this message at 21:15 on Jan 15, 2024 |
|
#
?
Jan 15, 2024 16:13
|
|
|
D'arce needs to meet her Guts.
|
|
#
?
Jan 15, 2024 20:56
|
|


|
Supplemental: Enemies Pt.8 We saw the majority of the encounters in the game in the first playthrough, but there are still a fair few left to see, plus some I have deliberately left out of the first run so I can keep things interesting for successive playthroughs. Perhaps the game itself has interest in me writing up more notes on encounters, as one of the thins we saw in the latest video I wasn't expecting to see for a couple weeks. Ser Seymor 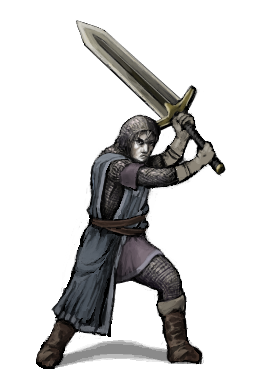 Phobia(s) Triggered: It's supposed to be None, but seemingly due to the fact that his basic code is repurposed from a Guard, Ser Seymore triggers Erotophobia and Teratophobia. Real Gigachad energy. 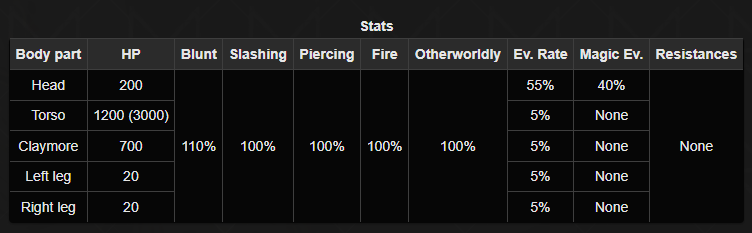 Should you encounter Ser Seymor before rescuing Buckman, you have the option to assault him for his valuables. This is pretty much a beginner's trap and the game wastes no time punishing you for your opportunism. Ser Seymor is extremely hardy for an early game enemy, with the only way you can possibly reliably kill him at the start is if D'arce or Ragnvaldr with the Axe can land a headshot on him. Both his Torso and his Claymore arms are way too durable to take out in one turn, but if you can take out the Claymore he becomes helpless. As long as the Claymore is intact, he will throw out either Vertical Slice or Horizontal slice. The former has a decent chance to lop off a random limb, while the latter has a high chance to remove arms while also being multi targeting. If you can kill Seymor, however, you are rewarded with his Claymore when you search his corpse. The start I mentioned with D'arce and Ragnvaldr is the most reliable way to get this weapon I feel, just reload if he delimbs you and keep trying until you get the headshot. Human Hydra  Phobia(s) Triggered: Teratophobia, though it can't attack so this doesn't matter 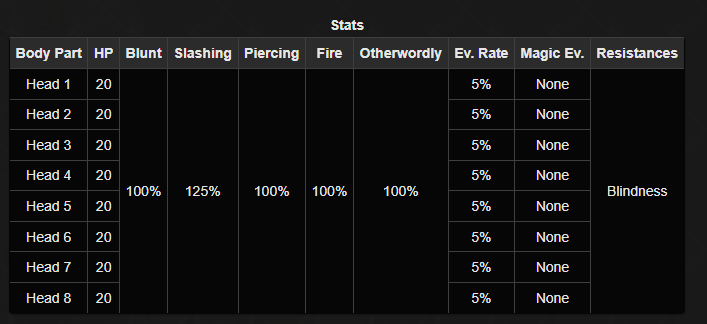 The Human Hydra is incapable of doing anything except alternating between hurling insults and begging for its life. It's an easy lesser soul if you kill it, but you can also use it to cheese passive regen accessories if you want. I find those starts to be too tedious to employ, but they are something worth considering. Moonless Guard 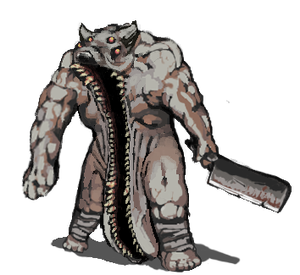 Phobia(s) Triggered: Erotophobia, Teratophobia  Typically these guys only appear in the alternate final area of the game, but every once in awhile when you start a run a couple of them will have slaughtered the Cavedweller's Village. These guys are mechanically pretty similar to normal Guards, with Hack being there as a guaranteed arm removal and a coin flip attack used in the same cycle. The major difference is their Gaping Maw, which attacks every turn for around 25-30 damage. They also have Death Throes like normal guards, so they'll always get a chomp off on you unless you got a pre-emptive strike. Not too scary once you pick up a party, but very threatening to a solo character which is why I waited on coming back for the Cube of The Depths. Nas'hrah 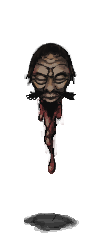 Phobia(s) Triggered: Rhabdophobia, though he doesn't actually attack so this hardly matters  The infamous wizard of the Eastern Sanctuaries, we'll go more in depth on Nas'hrah in his character bio. For this fight, though he and the creature of the darkness he summons have HP, the fight doesn't end even if you somehow deplete it all. Surprisingly, you can actually run from this fight if you lack the items needed to pacify Nas'hrah, though this denies you the ability to recruit him permanently. All I can say is, I'm glad I saved when I did or I would have had to redo a ton of the video. To "win" this fight, you need to talk to Nas'hrah with the Eclipse Talisman and Cube of the Depths in your inventory. Contrary to popular belief, you don't actually need to equip the Talisman, merely having it is enough. By saying you want to learn from Nas'hrah when using Talk, he will notice the Cube of The Depths the turn just before you would die. Afterwards you can submit to him and he will join you if you have a free slot in your party. Ragnvaldr 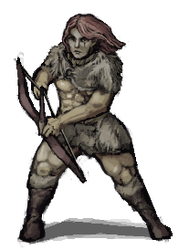 Phobia(s) Triggered: None 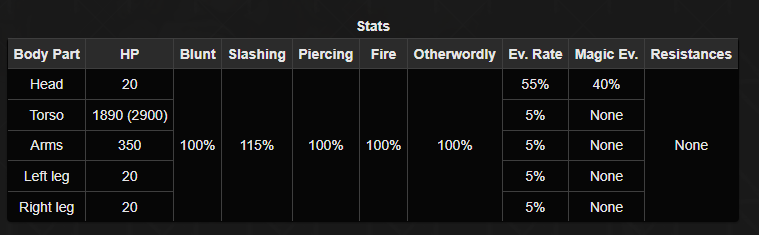 In a shocking twist, our former protagonist is now an enemy to be slain. (Which absolutely had to be done, no shameless opportunism here) Ragnvaldr is beyond beefy, and one of the few enemies in the game where it is legitimately a more effective strategy to take his legs to set up the headshot. He has a very simple pattern, simply firing arrows at you every turn for around 20-30 pierce damage and bleed. He has a coin flip attack on his second turn which is instant death if failed or not guarded. As far as I'm aware, he only uses it once per fight. If you have a second party member, he's fairly easy to kill with minimal Body lost, but attacking him solo can be a recipe for disaster. Cahara 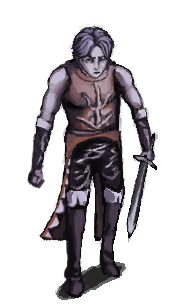 Phobia(s) Triggered: None 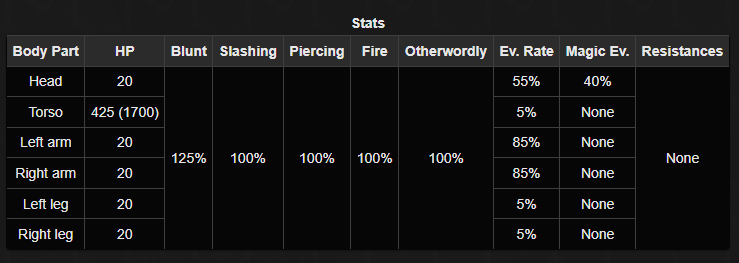 Alright we didn't fight Cahara in the video but since we did have the option, may as well go over him now. In contrast to Ragnvaldr's stone wall approach to being an enemy, Cahara is more of a glass cannon who plays with your expectations on the battle system. His arms are as weak as a Guards, but are highly evasive, making it an unreliable option to cripple him. His sword arm will attack twice, each hit having a chance to cause bleed and take an arm, while his free hand can either steal from you or use Light Blue Vials to heal himself. Since his Torso HP has such a low Break value, it's generally smarter to just aim for the center with two characters to take him out. I'm gonna be real with you, if you didn't start with Dash it is probably in your best interest to kill Cahara for his Endless soul. In contrast to his great value as a protagonist, his recruitable version is probably the most bare bones character in the game, so you don't lose much if he dies.
|
|
#
?
Jan 16, 2024 03:39
|
|
|
Is there any reason to not take Cahara's stuff when he first joins you, since you know he's going to just pick your pocket and bail anyway? I assume it's because his starting gear is trash you didn't need, and all it can do is clutter your inventory if you take it from him. Also, how come you decided to throw down with the Crow Mauler before getting Nas'hrah? I would imagine he would've helped, and if he'd gotten tagged by the Fracture, well who gives a poo poo, he's immortal.
|
|
#
?
Jan 16, 2024 05:03
|
|

|
Having finished the Fear and Hunger 1 LP so far. I went to Fear and Hunger 2. And 1 having just introduced Nas'hrah was pretty much perfect for the experience. O'saa turning out to be a yellow mage and getting lore about them was incredibly cool. I thought that they were denizens of the dungeon itself, but they're not.
|
|
#
?
Jan 16, 2024 05:24
|
|

|
MechaCrash posted:Is there any reason to not take Cahara's stuff when he first joins you, since you know he's going to just pick your pocket and bail anyway? I assume it's because his starting gear is trash you didn't need, and all it can do is clutter your inventory if you take it from him. For Cahara, yeah his gear is weaker than anything I already had. The reason I swiped his stuff in the first run is because The Girl could use the leather vest, which is slightly better than her starting dress. For Crow Mauler, partially it�s just I didn�t need Nas�hrah to beat him, partially it was just Fracture is not that big of a deal, and mostly because this game can be finnicky and I like having the ability to save before doing anything major. On the off chance I did something wrong for the Nas�hrah quest again, it was better to make another back up save before talking to him. The real mistake I made was using the light blue vial on Le�garde before his Body cap could crawl back up to 96. A little bit of wasted healing there, but in an hour+ recording with no script you�re bound to make a couple of them. The upside of that is that is allows me to go over things I didn't originally plan to or couldn't account for. I never thought too much about the Cube requirement for Nas'hrah since there's usually no reason not to grab the Cube your first time through the cavedweller's village. CullenDaGaDee fucked around with this message at 16:38 on Jan 16, 2024 |
|
#
?
Jan 16, 2024 12:07
|
|
|
Feliday Melody posted:Having finished the Fear and Hunger 1 LP so far. I went to Fear and Hunger 2. Yeah, like I said the actual plot of Termina is fairly self contained, but there are a number of elements you'll appreciate or understand more if you have the full context for what can happen in the first game.
|
|
#
?
Jan 16, 2024 13:04
|
|
|
Feliday Melody posted:Having finished the Fear and Hunger 1 LP so far. I went to Fear and Hunger 2. I also started with O'saa when seeing he wa sa Yellow Mage. His full backstory includes a text adventure trip to the dungeon of Fear & Hunger where you can easily die! Reminds me of some ttrpgs where you could infamously die during character creation.
|
|
#
?
Jan 16, 2024 16:21
|
|
|
The idea that O�ssa recalls that he actually died in his backstory and then disappears in a puff of logic is really funny.
|
|
#
?
Jan 16, 2024 16:40
|
|
|
CullenDaGaDee posted:The idea that O�ssa recalls that he actually died in his backstory and then disappears in a puff of logic is really funny. It's amazing. I look at these games, and I'm a little baffled at the typos that were just never fixed. Is fixing typos a lot of work? I actually have more understanding for not fixing some spells and items not working properly. If fixing them is a lot of work. And risks breaking other things. If the final game is still a functional game with that as a part of the community accepted balance. I can understand not wanting to tilt that balance. Getting an item that does nothing. In a game where you could just as easily get literally nothing. It "works". And if an item is broken in the player's favour, then there's no genuine harm. It's on the player's conscience about what they want to do with it.
|
|
#
?
Jan 16, 2024 20:25
|
|
|
It�s important to keep in mind that aside from a staff of friends as testers and ChillyMakesMusic providing some music, the games are entirely designed, written and coded just by Orange. One guy can only accomplish so much, and what he puts his efforts toward is ultimately going depend on what he feels is important. I imagine Orange is well aware of the shortcomings of the English script, but just doesn�t feel it�s worth going back for right now to correct it. The update cycle has also been heavily disrupted, as mentioned previously last year Orange suffered a hardware failure that wiped out about 4 months of implementation for Termina, and by his own admission it was a pretty demoralizing thing to have happen. Right now his efforts are solely focused on getting Termina�s first content update out, when and if updates meant for game polish are going to be released remains to be seen. Most people figure that Fear & Hunger 1 is completely finished, for better or worse, but who knows. There have been far stranger and more random updates to drop.
|
|
#
?
Jan 16, 2024 21:06
|
|
|
Supplemental: The Prisoner and The Sorcerer *Spoilers!* As of Part 7, we have recruited another two non-protagonist characters from within the Dungeons. Naturally I want to go over them, but the former is marred in spoilers for the game's backstory and I'd rather not write up posts that are huge black boxes, while the latter is a secret character and I feel his presence in the game is based learned about organically via seeing it. I'll be putting a considerable space below this paragraph and marking this post as spoiler heavy in the OP Table of Contents, if you have any interest in seeing everything the game has to offer as it unfolds before you, I'd recommend giving this post a pass for the time being. With that being said, Le'garde 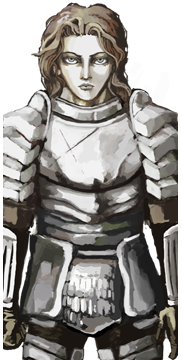 "In order to reach greater heights, to unify the land, to bring upon the new era... I need this power As a Character: The captain of the famed Knights of the Midnight Sun, beloved by the citizenry of Rondon while detested by the royalty and aristocracy who view him as a threat to their power. Le'garde is a wholly original character where any seeming inspiration derived from an iconic antagonist from a well known manga series is purely coincidental, I assure you. Le'garde has taken great strides to unify the common people of Rondon, positioning himself as a figurehead for them and achieving countless victories for the people in various military disputes the nation found itself in. Such was his reputation, many began to believe Le'garde was a prophesized individual, destined to unite the lands of the Europan continent and free them of violence. As Le'garde's influence grew, so did the size of his company. With time however, Le'gard became noticeably more ruthless and secluded in his personal studies. This came to a head with a brutal invasion campaign in Oldegard, mounted against the wishes the ruling class of Rondon, which culminated in Le'gard slaughtering the home village of Ragnvaldr and stealing the Cube of The Depths. The government of Rondon was already looking for an excuse to take Le'garde down a peg, and this unsanctioned campaign was the excuse they needed. Le'garde was arrested and tossed into the Dungeons of Fear and Hunger, along with the spoils of his campaign, where ideally he would rot and be forgotten with the passage of time. Several individuals mount their own searches for Le'garde, and with any luck they manage to save Le'garde from a premature death in the hopes of accomplishing whatever goal they had set that rescuing him would help with. Tragically, the tortures of both body and mind Le'garde has suffered in the dungeons have left him with a bout of memory loss, leaving him unable to recall littler other than his name. ...Or so he claims anyway. In reality, Le'garde is manipulating the party of whomever rescues him in a bid to create a path to the Throne of Ascension. Between his supposed prophesized status and the agonies he suffered within the dungeons reflecting the aspects of the soul needed to ascend, Le'garde believes he can become a New God without compare and fulfill his destiny. His confidence can be quite misplaced, considering he dies if the player fails to reach him quick enough, and even then he's really banking on getting good allies to make it through the perilous ancient city. It's notable Le'garde only succeeds in his ambition in a single ending, and that's only if you let him. On Hard Mode, he's dead from the word go so it is a serious case of "did not think this through". Le'gardeless, should he attain his New God status, he does seemingly succeed in his ambitions, but at the same cost of self and humanity that seems to generally go along with ascension. Like so many other things, it's also more than lightly implied that his accomplishments will be temporary and fade with the sands of time. Le'garde is the father of The Girl, having been visited by Nilvan in his dreams, and her dominion over the realm of the dreaming mind made their copulation just as real as anything else. As it turns out, the pedigree of The Girl makes her the one truly worthy of Godhood on par with the Old Ones, and should she be escorted to the absolute Depths of the dungeon, she awakens as a God far beyond the power of Le'garde and the Fellowship. Ultimately, Le'garde turns out to be little more than a middle man in someone else's path to greatness, and indeed his apparent reappearance in Termina has him lament that he was nothing more than a pawn to greater powers, meant to assist others in realizing their potential. It's worth noting that in the game files, Le'garde has sprites for animations only protagonist characters can perform. It's speculated at one point he was intended to be a main protagonist, selectable at the start of the game along with everyone else available in the current version. Certainly, choosing to willingly brave the dungeons, while risky, is a bit more sensible than the way his plan is presented in the actual game. On the other hand, it would require some heavy re-writes to the motivations of everyone entering the dungeons after him. Alternatively, those sprites mean nothing and Orange just created them for any standard controllable humanoid character that could potentially lead the party. As a Party Member: Le'garde is the one non-protagonist character who has completely standardized attributes. He's fully controllable, can use most equipment and skill scrolls in the game, suffers from Phobias and issues related to mind, and comes with a relatively unremarkable skill in Leg Sweep. Recruiting him is simple enough, simply reach him in the Level 7 Catacombs before he dies and he will join no questions asked. He will patiently wait in place for you to return if you refuse, with no further danger to himself. The time typically given for how long you have to reach him is 30 minutes, though if that is accurate or how the game tracks it, I don't know. One notable thing about Le'garde is that while he has a scene with Miasma where the sword attempts to control him, he is able to resist its temptations. Thus, there is no possibility for problems if Le'garde equips the sword. Additionally, if he is in the party with recruit D'arce, he is always able to talk her out of splitting off from the party if she is suffering from low mind. In contrast, there is a scene where he can come into conflict with recruit Ragnvaldr, which will result in one or the other dying no matter what. Should you let Ragnvaldr kill Le'garde and D'arce is in the party, she will turn on the group. Luckily this is pretty easy to avoid if you know what you're doing, and there are otherwise no drawbacks to using Le'garde and recruit Ragnvaldr in the same party. Since Le'garde is on par with your protagonist in capabilities, there's really no reason not to recruit him if your reach him on time, unless you're going for Ending D which he locks you out of as long as he is in the party. Despite his own ambitions, Le'garde otherwise does not conflict with or attempt to stop you from obtaining other endings, including Ending E amusingly enough. Nas'hrah  "I go by many titles, but you can call me Nas'hrah the Doom and Terror of Modern Man." As a Character: An immortal New God who predates the Fellowship, Nas'hrah is a phenomenally powerful sorcerer with easily the most extensive backstory of any character in the game. He has been around since the year 410, over 1,000 years prior to the events of the game. He has been the owner of the Grand Libraries of Ma'habre, he has been sultan of the Eastern Sanctuaries, he is responsible for the formation of the Yellow Mages as a group, and he's an all around vile and violent curmudgeon who is the one unambiguously evil party member of the game. While Le'garde can easily be viewed as a self-righteous extremist, he arguably has noble intentions in the grand scheme of things. Enki is certainly rude and self centered, but he doesn't really go out of his way to antagonize anyone. Nas'hrah on the other hand, is gleefully violent, irreverent to anyone and everyone he talks to, and has quite the potty mouth to boot. He will gladly slaughter you for minor sleights against him, and has no interest offering aid to anyone that does not provide any benefit to him in turn. While his ultimate goal is to restore his body which had been lost in a previous conflict, when that doesn't pan out he's content to use the party as a means to slaughter the Fellowship, whom he has an immense distaste for. While he does have his more sober moments, for the most part he's just a jackass with a misanthropy streak a mile long. Naturally, his dialogue can be pretty entertaining and he has insults for just about everyone in the game. As a Party Member: As a secret character, Nas'hrah is naturally pretty obtuse to discover. While getting the Eclipse Talisman from a Yellow Mage does also yield a hint towards his existence (if you can even think to try talking to Yellow Mages), actually knowing he's in the Level 2 Blood Pit can only really be discovered if you just randomly interact with the gore wall. Additionally, you need to have the Cube of The Depths along with the Eclipse Talisman when talking to him, or else he will see no value in you and gladly let his behemoth from the darkness crush you to death. If you do recruit him, however, you get one of the most mechanically unique characters in the game. Nas'hrah is well and truly immortal. While he does have a Body stat, being reduced to 0 doesn't actually impede him much beyond briefly stunning him. He is fully controllable and capable of using items, though he cannot use any equipment in the game, including accessories which is pretty unfortunate. He does not need to eat anything, so he's low maintenance on your food supplies. He does not suffer from Phobias, and therefore does not suffer any penalty if his mind depletes, though sadly he is not immune to the passive mind drain of being in the darkness of the dungeons. His mind is purely a resource to use the spells he comes packed in with, which are Greater Hurting, Pyromancy Trick and Black Orb. Nas'hrah doesn't have great damage potential, but he is very reliable. Magic is pretty accurate by and large, he's a good item caddy, and again the immortality means it's no real big deal if he eats poo poo in a fight. One thing to note, it's naturally an obvious strat to hit him with Pheromones so he can sponge damage for you. Nas'hrah has special dialogue calling you out if you do this, and nullifies the effect of the spell of you try it. He's really easy to recruit if you know what's required, and his low maintenance means there's really no reason not to use him. Since he can't equip anything, he can be a drain on mind restoratives since he needs to use his spells to contribute, but hey that's what the Bug Eyed Figurine's mind elixirs are for. That being said, he will refuse to enter the Void, locking him out of the party for Endings D and more importantly C, and he has a unique interaction with the final boss of Ending B which results in him being removed from the party before the fight begins. Ending A is the only time you can rely on him for assistance all throughout the final area, though this doesn't matter too much since all combat save for the final boss can be avoided. That's all folks. CullenDaGaDee fucked around with this message at 13:16 on Jan 17, 2024 |
|
#
?
Jan 17, 2024 04:18
|
|
|
CullenDaGaDee posted:On Hard Mode, he's dead from the word go so it is a serious case of "did not think this through". If he is dead from the start on Hard Mode, I assume that it locks you out of the ending associated with him on that? Pretty funny troll at the completitonists, who might have learned to speedrun to his location to find out if there is actually just a very short timer. With Francois also lamenting being a pawn to greater powers, there seems to be a trend there.
|
|
#
?
Jan 17, 2024 07:16
|
|

|
VictualSquid posted:If he is dead from the start on Hard Mode, I assume that it locks you out of the ending associated with him on that? Pretty funny troll at the completitonists, who might have learned to speedrun to his location to find out if there is actually just a very short timer. Because of the special conditions present in Hard Mode, two of the five standard endings are impossible. You'll have other business to attend to anyway on those runs, so it's not a great loss.
|
|
#
?
Jan 17, 2024 09:26
|
|

|
The anticipation for the Hard Mode runs keep building, since we keep getting hints as to how the game does some big warping of the gameplay to jigger things up. Given how Hard Mode Termina plays out, I can imagine he has a lot of the same design decisions as that example too...
|
|
#
?
Jan 17, 2024 12:16
|
|
|
Funnily enough, Hard Mode does not really make any major changes to the game, and in fact the actual obstacles and stats of enemies present are all identical to T&S mode. The two major shake ups it has though, you really feel and it's a tall ask for most players to actually commit to a run in it. Hard Mode has a bit of an interesting history. In the earliest versions of the game, it did not have the unique character specific endings that are the main reason to play it today and instead was identical in content to the F&H difficulty we are currently playing (With the exception of post launch content updates of course). The two caveats it had though, and this has been constant, is that all party members were removed from the game (with one notable exception) and saving is disabled. Beds no longer prompt an option to save, Books of Enlightenment cannot be found, and attempting to Empty Scroll a book of Enlightenment will be met with denial from the game. Orange put this mode in the game essentially as a troll, he really didn't expect anyone to beat it. Gamers are gonna game though, and people did in fact start beating it (largely helped by the fact that while most party members were removed, Necromancy and the things it can be used on were not, allowing people to make a literal skeleton crew), which prompted Orange to actually put some thought into making the mode a legitimate challenge with rewards for completing. This ultimately proved to be a good thing for the design of the Fear & Hunger games as a whole, as afterwards Orange generally put more thought into additions to the game rather than just throwing in any idea that he had during that particular coding session.
|
|
#
?
Jan 17, 2024 13:14
|
|
|
Update for our Dungeon Nights protagonist poll! The gothic bad boy grease wizard Enki is currently in the lead. His raw sex appeal gave him a commanding lead at the offset, but now he is now in a race with everyone's favorite femcel simp D'arce, who is in a decently close second! Ragnvaldr is taking a distant third so far, accurate to my personal tiering of him versus the other protagonists. As is appropriate for his proclivities, Cahara is at the bottom, just below Ragnvaldr. Vote now if you haven't to secure the dating opportunity of a lifetime for your preferred character! I'll be calling the poll sometime on the evening of this Sunday. https://www.youtube.com/post/UgkxbbUppXpsUghvmQIKwmXmcOgwzud_zkGr
|
|
#
?
Jan 18, 2024 01:55
|
|
|
I was going to vote Darcy. But that was because I had forgotten about Enki all together. Heck yes, Put sober Ozzy in the school.
Feliday Melody fucked around with this message at 05:19 on Jan 18, 2024 |
|
#
?
Jan 18, 2024 04:58
|
|
|
Mechanics: Hidden Skills We've gone over the magic of the Gods you can learn from the Hexen, and will be going over all the skills each character can learn from their respective Souls, but that is far from the limit of what you can learn in this game. There are a number of skills learned from alternative methods, usually dedicated scrolls or books, and some of these can be quite potent. More over, more than a couple of them have fixed locations for the scrolls/books that teach you these skills, and thus can be reliable and effective tools you can factor into any playthrough. A good number of them are dependent on RNG to obtain, but they can also be Empty Scroll'd like so many other things in the game. Are any of them worth that kind of investment? Let's find out! Suicide: Starting on a bit of a low note here, I'll admit. This is a skill that is completely exclusive to your protagonist, and will automatically be added to their skill list the moment they reach 50 Mind on the overworld. I'll give you 3 guesses what it does. Mostly this skill is just meant for runs that end up as a wash, and you'd like a more theatrical way to end it than just quitting to the title screen. Escape Plan: Now I know I said I'd be covering character skills in their relevant character bios, but this one is worth mentioning now due to a particular quirk of it that makes it fit in for this post. This is a Cahara exclusive skill, tied to making a specific choice in his backstory. And when I say it is Cahara exclusive, I mean that 100%. This skill can only be obtained from selecting the right choice in Cahara's backstory, it is not tied to the Endless Soul and very strangely it is the only skill in the game that cannot be Empty Scroll'd. This is unfortunate as it has an extremely valuable effect. This buffs the success rate of the Run skill, making it work 100% of the time against things found in the first 3 levels of the dungeon and giving an appreciated amount of increased success against most things past that. I plan to make a mini-mechanics post on how running from battles works later, but for now just know that this skill's exclusivity to Cahara is one of a number of reasons why he is almost indisputably the best protagonist in the game. Blood Sacrifice: This is a skill that is so under documented, I legitimately had to fire up a file I keep for testing purposes tonight to personally confirm how it works. Strange because it's actually a pretty awesome skill and I feel like plenty of runs could benefit from working it in. Blood Sacrifice is the only other skill learned that you use at Ritual Circles. You learn it either from a Scroll of The Dark Mage or an Empty Scroll. It costs 30 Body to use it. At first glance, this seems to be a disastrous permanent debuff, lowering your Body cap rather than just your current Body. Thankfully, this is temporary, your body cap reverts to 100 after about a minute or so. What's the effect for trading Body to use this skill? It will teach you a random Gro-Goroth spell you don't already know. Since there are 5 Ritual Circles in the game, Blood Sacrifice can be used to learn every Gro-Goroth spell. This is incredibly useful as any well versed player can gain access to every Ritual Circle in the game in about 20-25 minutes, and thereby get every Gro-Goroth spell for a single Empty Scroll and no soul stones spent. Very much worth considering for certain Hard Mode runs, where there are a lot of skills you want to learn but limited soul stones. Combustion: This is a phenomenal skill, obtained via a scroll found in Nosramus' second hideout or by Empty Scroll'ing it. This skill is a fire attack that is considered physical damage (so unfortunately it's not more accurate against the Head than a physical attack is) that deals 320-480 damage at 95% accuracy with a 60% chance to inflict burning. The thing that really sweetens the pot about this skill is that it costs 0 mind to cast, making it better than the majority of the weapons you can find in the game. While there's an upper limit to how much damage this can deal compared to physical attacks, it is an incredibly reliable damage that is great on weaker characters like The Girl or Moonless. Chains of Torment: Obtained from the Tormented One of the present, found in the flaying chamber after defeating him in the past. This is an attacking spell that deals 900 piercing damage at the ludicrous cost of 80 mind. It also only has 95% accuracy, though at least it's considered a magical attack. The more interesting thing about this skill is that it has a 100% chance of inflicting bleed. Bleed is a much weaker DoT effect than Burn or Poison, but it's also the one DoT nothing in the game is immune to. There is at least one fight where this could come in handy, though it's pretty gimmicky and too impractical otherwise. Demon Seed: A spell learned from the book Creation of Life II, which is crafted from the Book Pages line of items found throughout the dungeon and ancient city. The first pages are found in the Inner Hall Library, the second Pages are found is Nosramus' first lair, and the final pages are found in the Old Passage of the Ancient City. Alternatively, you can Empty Scroll it like so many other things. This is a field skill that allows you to "plant your seed" in the corpse of an enemy to spawn a Demon Infant. After about 6 minutes, the Demon Infant will become a Demon Kid, who is mechanically identical to The Girl except you have to go through over half the game to get him. The main purpose of the Demon Kid is to trade him to Pocketcat for slightly less guilt in the process, though again you get him pretty deep in a run so it's debatable how helpful this is. This skill cannot be used on Hard Mode. Rebirth of The Beloved: This skill is exclusive to Hard Mode and is essentially a key. We'll talk about it later. Phase Step: This skill straddles the line between cool hidden bonus and debug tool. Phase Step is a field skill allows your character to teleport short distances, 5 steps in the direction they are facing to be precise. It costs 10 mind to do so, and actually has a dedicated key for it in the default keyboard controls. (The C key) That default key is the only hint that this spell exists in the game, as it can only be learned via Empty Scroll. This skill was originally going to be a Tier 2 Alll-mer skill, but I guess Orange quickly realized how much it broke the game and made it a secret instead. You can Phase step past walls, into walls, into chasms at which point your character just stands in the air and can't move, and just about any other spot you can think of. Naturally, if you're in a wall or over a chasm and you no mind left or mind restoratives, you are stuck and the game is soft locked at that point. It's a fun skill to mess around with, and it is the cornerstone of Any% speed runs of the game due to how much it busts the game wide open. Simple Transmutation: Learned from a scroll obtained by solving Isayah's first treasure map (And can be Empty Scroll'd, natch). This leads to a spot southeast of the Nameless Figurine in the center square of the Ancient City. Simple Transmutation is a field skill that costs 15 mind can can do one of two things. It can turn 1 Moldy Bread into 3 Moldy Breads, netting you two extra. It can also convert Water Vials into Wine Vials, giving you a mind restorative that heals 38-42 mind. On Fear & Hunger mode, this skill completely breaks the resource economy of the game, essentially giving you infinite food and mind. While it still kind of does this in the higher difficulties, there's an additional resource to be mindful of in that mode that Simple Transmutation does not help with, and can actually detract from if you're making regular trips to the Salmonsnake pond for more water vials. Still, if you kill Isayah for his maps (and you really should) there's no reason not to grab this. Walk On Water: Found alongside Simple Transmutation, this is a field skill that does exactly one thing. This can be used to walk over the Salmonsnake's pond, accessing the area on the other side. Pretty much a glorified door key, but it is how you get the extremely useful Combustion scroll, so it's useful on that basis alone. Disguise Crafting: Not a skill specifically, but unique crafting recipes learned from a rare book. A potential book you can get from coin flip shelves is the Assassin's Handbook I (There are a lot of books marked as the first volume in this game, and like so many of those there actually isn't a Book II in the series), which allows you to craft the Ghoul Outfit, the Guard Outfit and the Fur outfit. The materials for all of these are obtained by using the skinning knife from Trortur's chamber on various creatures. Ghouls and Night Lurches provide Pale skins for the Ghoul Outfit, All varieties of Guard provide skin for the Guard outfit, and Lord of The Flies will provide the fur for the Fur Outfit. The first two recipes require two skins, while the last one only requires one fur. Should you indulge your inner Buffalo Bill to craft these, they are all armor pieces that modify your overworld sprite and make you immune to detection from the relevant enemies skinned to craft them. Much like the BDU in Metal Gear Solid 2, bumping into an enemy blows the disguise. The Assassin's Handbook is a very rare item, so you'll seldom have a run where you can do this, and it's of limited use since you need to be able to kill the enemies each suit affects in most cases to actually make them. You can Empty Scroll the book if you like. Pinecone Pig:  This is an accessory crafted from a recipe obtained from another rare crafting book, in this case the Pinecone Pig Instructions. You can Empty Scroll either the book or the Pinecone Pig itself into your inventory. The Pinecone Pig is simple to craft, requiring a pine cone and a stick to create, and when equipped he has a chance to bring you one of a number of items at the start of a battle. Notably, the Pinecone pig can appear in any fight, including unlosable ones like Doors or the Human Hydra. Thus, the Pinecone Pig can be used as a farming method for a number of valuable items if you have the patience for it. I don't, but some people like it. The odds for the Pinecone pig are as follows: This is an accessory crafted from a recipe obtained from another rare crafting book, in this case the Pinecone Pig Instructions. You can Empty Scroll either the book or the Pinecone Pig itself into your inventory. The Pinecone Pig is simple to craft, requiring a pine cone and a stick to create, and when equipped he has a chance to bring you one of a number of items at the start of a battle. Notably, the Pinecone pig can appear in any fight, including unlosable ones like Doors or the Human Hydra. Thus, the Pinecone Pig can be used as a farming method for a number of valuable items if you have the patience for it. I don't, but some people like it. The odds for the Pinecone pig are as follows:75% Chance: Nothing "The pinecone pig brought you nothing. It just wanted some company." "The pinecone pig brought you nothing. It would like to fight with you, but you shoo it away." "The pinecone pig brought you nothing..." 25% Chance: The pinecone pig brought you (insert item here)" 5% Chance: Ale Bottle of whiskey 2.5% Chance: Blue herb Blue vial Bonesaw Cloth fragment Cloth hood x5 Dirt Explosive vial Glass vial Green herb Iron arrow Nitroglycerin powder Oil x2 Opium powder Pinecone Pipe Purifying talisman Quill Raw meat Red herb Red vial Scroll of the highwaymen x3 Silver coins x5 Silver coins x6 Silver coins x12 Silver coins Small key Stick Throwing knife x2 Tobacco Water vial White vial Wooden buckler
|
|
#
?
Jan 19, 2024 04:18
|
|
|
Supplemental: Running From Battle Those who fight and run away live to fight another day, and no place is this more true than the dungeons of Fear & Hunger. In fact it's often the smarter move to escape before a single strike is even thrown on either sides. But how exactly does the game determine if you successfully run away or not? There are two options for escaping from a battle. The first is the hit cancel on the action select screen when your turn begins, which will put you in a combat menu with two options: Fight or Run!. Fight just sends you backs to your action select menu, while Run! attempts to flee the battle, not allowing for anyone on your team to take an action when you use this method, and naturally opening you up to punishment if it fails. The formula for how this escape method works is as follows, (Average Agility of player's party / 10) * 50 = % Chance to escape Or put into a less over complicated formula, your party's average agility times 5 represents your direct escape chance. Every character except for Moonless has 10 agility, so the default success rate of this run method is 50%. I'm not sure if the formula posted on the wiki is the actual spaghetti code used in the game or if the person who posted it is bad at simplifying equations, but regardless this method of running is essentially another coin flip. One thing this method has going for it is that if it fails, its an additive 10% bonus for every failure, theoretically allowing for a guaranteed escape after enough failures, though you're probably in a bad situation if you tried that many times. Moonless boosts the odds of this method of escaping, but obviously for a diminishing amount for every party member you have. If you're a solo character with the White Angel Soul, then this escape method works 100% of the time. This sounds good, but that Soul is tricky to get without an Empty Scroll, and playing as a solo character is a much more dangerous thing to do in this game than it is in Termina. For the most part, this is the inferior method of escaping from battles, save for one or two specific instances. The other option for running from a battle is the Run skill found in your skill list. This skill has a flat success rate for every enemy in the game, and often the rate is much higher than the Run! command. While it doesn't get the 10% bonus for failure, this one enjoys the mechanical benefit that if it does fail, other people in your party can still take their actions. The success rate of the Run skill is affected by two things, what difficulty you are on and if you have the Escape Plan skill. Escape Plan has its own success rates that overwrites the T&S/Hard Mode rates, making it a stronger skill in those modes. The rates are as follows, 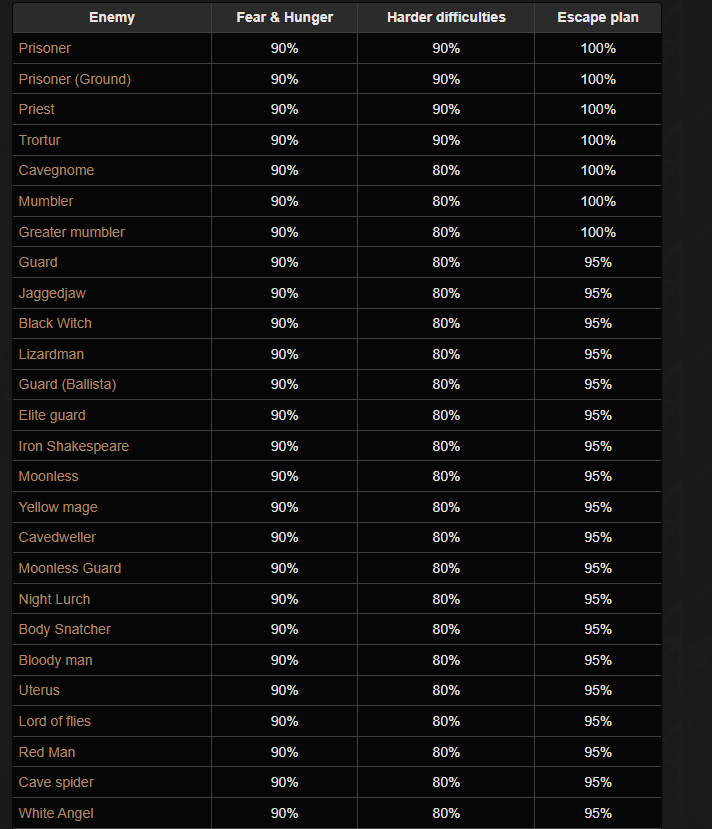 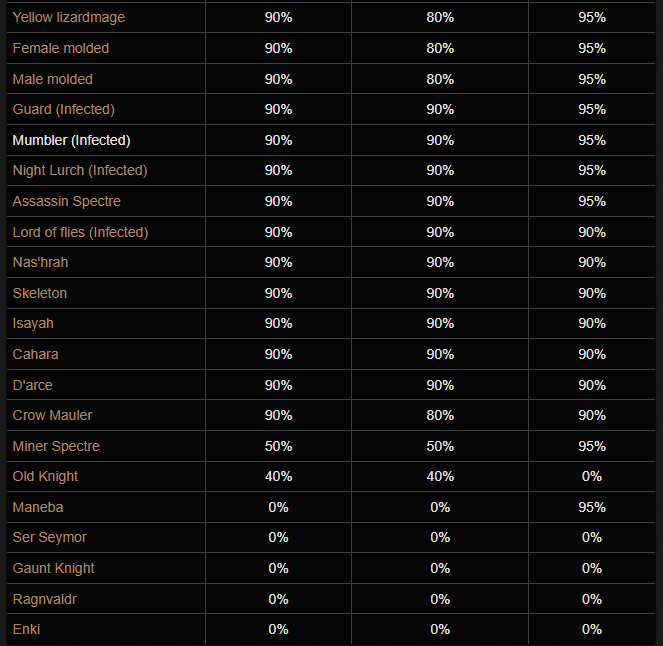 Any enemies not reflected in the above tables are special enemies such as bosses that disable running options all together. As you can see, there is exactly one fight in the game where Run! is better than the Run skill (Disregarding fights that flatly set the rate to 0%), the Old Knight. In fact due to what I'm assuming is a coding error, this fight actually has a 0% success rate for Escape Plan. Run! is probably also the better choice for Miner Spectres if you lack Escape Plan since the gradual increase in success rate does trump the rate for the Run skill. I'm not actually sure what would happen if you use Run! on an enemy with a 0% rate set for Run but otherwise doesn't disable running away. Something to try on my own time! For the most part, any time you get into an engagement you aren't sure you can win without serious losses, it's best to attempt to flee. Because Cahara has near guaranteed escape rates against most things in the game with his Escape Plan skill, this makes him a very good character for T&S mode. CullenDaGaDee fucked around with this message at 00:06 on Jan 21, 2024 |
|
#
?
Jan 20, 2024 15:50
|
|
|
https://www.youtube.com/watch?v=tuXJTb6VTiQ Part 8 is out! And as quickly as it began, D'arce's time as the protagonist comes to an end. We'll be seeing her again in due time, rest assured. In our next run starting tomorrow, Enki will be the man of the hour and we will begin our first foray into Terror and Starvation mode. I have been eager to go over the changes this introduces to the game, and believe me that some of them are a doozy. With that out of the way, onto extra notes and unique equipment! Unique Equipment Available Black Witch Soul: Probably the ultimate attack boosting accessory in the game. The Black Witch Soul gives your physical attack a 100% chance to inflict the poison status when it connects with the enemy. This is the most reliable form of inflicting poison in the game, as throwing darts are RNG while Purple Vials require a recipe book and materials to create. There is only one notable enemy in the game immune to poison, so being able to stick enemy torsos with a DoT that chops off over a third of their HP every turn with no limit is phenomenal. The only way to get this on F&H mode is through an Empty Scroll (despite entries on Tormentpedia claiming otherwise) but there is a standard way to obtain this soul on Terror & Starvation. Fun fact, in older versions of the game Flip Side was the only place you could fight the Black Witch, which meant getting Ragnvaldr's S Ending required the usage of 1 Empty Scroll since this soul was otherwise unobtainable. Thankfully, the Old Knight had the same HP across all difficulties in those versions, so there was an easily obtainable Empty Scroll in every run. The Penance Armor: By completing Trortur's sidequest, or more practically by just using the Steal skill on him when you first fight him, you can gain access to the ultimate armor in the game. The Penance Armor has huge pros but some pronounced cons. For the pros, it has the best physical defenses in the game, tied with the Gaunt equipment. (Though funnily enough, the pieces have no defense stat) The combined Armor and Helmet make you immune to limb loss, confusion, decapitation and face rip, and the Harvestman's coin flip attack. It does not make you immune to Fracture, Infection, or Blindness so you'll want to be mindful of those. For cons, it cannot be removed due to the nature of how it is worn. It prevents you from taking part in the Bunny Mask and Wolf Mask rituals, as well as showing love at ritual circles. It inflicts a pseudo-permanent bleed status on you as well. It can temporarily be staunched with cloth fragments but will quickly return. The Salmonsnake Soul and the Ring of The Still Blood will stop bleeding when equipped, but for the former it will return in short order when the soul is unequipped. (Ring of The Still Blood is an accessory that also can't be removed) Since it is redundant to have the Salmonsnake soul equipped, the best strategy is to keep equipped until you reach boss fights, at which point you can switch to a more useful accessory for attacking purposes. This armor is great, and if you can pick it up you probably should, the pros outweigh the cons in my opinion. Extra Notes -As you'd expect, the contents of the hidden grave in Flip Side change based on your main character. This is the only place in the game where you can learn everyone's ages! From youngest to oldest, D'arce is 24, Cahara is 26, Enki is 29 and Ragnvaldr is 31. -As mentioned previously, you cannot get the Black Witch Soul through normal means on F&H mode as she can only be fought in Flip Side and you get teleported out upon her death. Spawn points are added for the Black Witch in the Grand Library on T&S mode, allowing you the ability to fight her and use a soul stone on her corpse there. Be sure to take her much more seriously though, she's a way more credible opponent on that mode. -Should you use a Soul Stone on the Butterfly, you get a Lesser Soul rather than the Butterfly Soul. Since the Butterfly Soul is bugged and does nothing, it's probably better to just kill him. -We finally find out why Enki cannot complete the Cockroach King sidequest despite being the only character who can do it normally. He can't very well kill himself, can he? (Well he could but you couldn't really enjoy the benefits at that point.) It's quite the goof that Enki doesn't get a unique second objective for this quest. Due to party members being removed on Hard mode, the Cockroach King quest is also impossible to fully complete there as well. -If you let Enki live for more than turn, he begins summoning ghouls via Necromancy to aid him. If you thought he looked a bit off center in the fight, that's why. -Nas'hrah has a number of extra interactions and dialogue for various situations in the game. I won't go over all of them in the videos, so here's a compilation if you'd like to see them all. Be mindful of spoilers for things we have not yet seen in the LP! -Nas'hrah is unconcerned with DoT effects because he's immortal anyway. Don't bother curing him if he gets afflicted. -Even if you ask a bunch of dud questions to the New Gods, you always get the book of Enlightenment except on Hard mode. It behooves you to talk to them. -The Gaunt Knights arms can be disabled for less damage than it takes to destroy them, so it'd probably be smarter to go for that than how I approached the fight in the video. -If you leave Jeanne to her fate, she will of course die, with her body being in the area leading to the Old Passage. You can loot her and use a Soul Stone on her for a free Lesser Soul if you'd like. She'll also die if you save her, but don't talk to her and leave the screen. -To be real, putting on the Penance Armor would have been the practical thing to do, but given our ending I think it would have been pretty silly to throw D'arce into an armor that's not meant to let you live for more than a day. -Cursed Blue Sin is absolutely worth the effort to obtain. The 70 coins from the second treasure map will almost certainly allow you to secure enough soul stones from the bug eyed figurine to enchant it, so I'd recommend making the trip for that if you have it. -Bit of a shame that the Nas'hrah husk cannot be used in the flaying chamber. I feel like he'd have a funny reaction to that if you could use it. -Nas'hrah is supposed to immediately set you alight when attempting to show love, not the extremely buggy delayed combustion we saw in the video. I'm guessing setting the blood portal is what confused the game on this. -You need to specifically answer in the negative to the dark priests to obtain their items, a well adjusted individual deserves nothing extra. Thankfully, the option to get the items is also the default, so you don't have to worry about being screwed over if you mash through the text. -Since the Miasma event can happen only once per playthrough, you can have Le'garde tank it for you and then never have to worry about anyone suffering from it for the remainder of the game. To re-iterate where this event can happen, Level 3 - Basement Ancient City - Tombs of the Gods Past Ma'habre - indoors It will occur when you're at 50 mind or below on F&H, and at 70 mind or below on T&S. It's most dangerous when your main character is holding the sword, as they will automatically butcher your party when the event happens, with only Nas'hrah and Skeletons being able to survive it. If a non-Le'garde party member gets the event, just don't say anything to them and you will pass through it unharmed. -Since Francois is only a required fight for Endings D and Ending C, it is entirely possible to beat the game without ever encountering any of the New Gods. -Random place to mention it, but if you use Passages of Ma'habre after fighting any of the New Gods, the New Gods you have slain will not appear in the vision you get when walking across the bridge. -Despite it being his ambition, Le'garde will not force you to go into Ending C and will tag along for any other Ending of the game. Amusingly, you can send him into The Void and get a different Ending, with Le'garde's ultimate fate being left in the air. There is little reason to do this, since Le'garde is a good party member to have, but it is an option if you want to clown. Ending D cannot be obtained if Le'garde is in the party when you interact with the Throne. -Since we're not going to be coming back here in a non-Hard mode run, I just wanted to note the locations each character will appear in when scattered into the Void. Cahara can be found sitting atop one of the hills to the right of the wooden plank path. He will not immediately follow the player, but will rejoin them provided they speak to him and come back later. It takes about a minute for Cahara to collect his thoughts. D'arce can be found passed out atop one of the hills to the east of the throne. Enki can be found hiding in one of the holes to the southwest of the throne, above the green glowing pits. Ragnvaldr can be found at a campfire to the north or west of the throne. Moonless and The Girl can be found to the northwest of the throne, past a wall of twigs. If you have both of them in the party, then both will be here Nas'hrah does not follow the player into the Void. If you have any party members created via Necromancy, thankfully they do not scatter and stay with you. -Cahara's dialogue when you first talk to him in The Void is actually a repurposed conversation from the demo. It is a shortened bit of dialogue he could have in the Caverns, though I'm not sure what the exact trigger for the event was supposed to be. You can see the original use of his dialogue here. -Both versions of Ending C are the only non-Hard mode endings that can result in escape from the dungeons, as well as the only endings where multiple characters can escape. It's a deeply bittersweet accomplishment in either version of the ending.
|
|
#
?
Jan 21, 2024 01:04
|
|
|
Terror and Starvation eh? Now the REAL fear and hunger can begin.
|
|
#
?
Jan 21, 2024 08:30
|
|


|
I hear some of the requirements to activate certain scenes and mechanics and I just think, "That's insane. No one could ever figure that out on their own" Which is probably true, but it doesn't matter. Because if you play the game normally without guides or spoilers. Then all of these hundreds of little variables become a full and interesting game experience. That changes in small or big ways with every new playthrough.
|
|
#
?
Jan 21, 2024 10:32
|
|
|
Supplemental: Enemies Pt.9 We've just about seen everything the dungeons have to throw at us, save for one more area. These enemy posts will be pretty short going forward, and mostly covering unique enemies. Black Witch 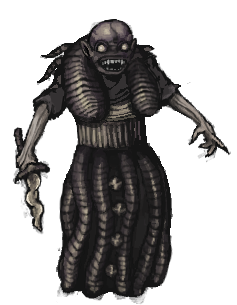 Phobia(s) Triggered: Rhabdophobia 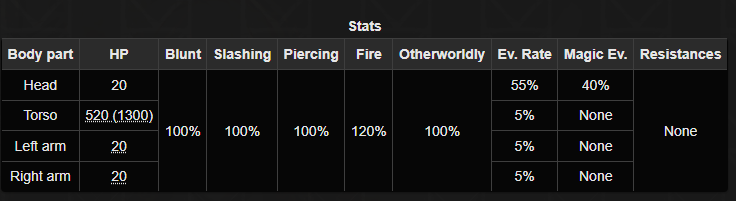 *On T&S/Hard, the Torso has 1000(2500) HP while the arms have 400 HP each A woman who has been completely subsumed by blood arts, the Black Witch will attack you if you dawdle in Flip Side for too long, and can ambush you in the Grand Library on T&S/Hard. With her right arm, she will use that dagger to stab your characters for light damage but high odds of poison and infection. Her left arm is the more pressing threat, lobbing Black Orb at you and can easily hit for 80-90 damage if you have no otherworldly resistance (which you more than likely won't). Now on F&H mode, the Black Witch is not that much of a threat. Her arms are extremely weak and she cannot act without them, so even just a party of two can dispatch her easily so long as neither of them miss. With a party of 3 or 4, you can just focus her torso and call it a day. On the harder difficulties, it's less likely you'll have the fire power to destroy any of her parts in a single strike, meaning that you have to take the fight much more seriously. Black Orb is by far the bigger threat at the stages of the game where you'd fight her, so be sure to destroy that left arm before anything else. As demonstrated in the video, the Black Witch soul is a very powerful accessory, so it's worth your time to kill her on harder difficulties where you can obtain it reliably. Enki 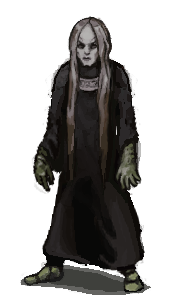 Phobia(s) Triggered: None 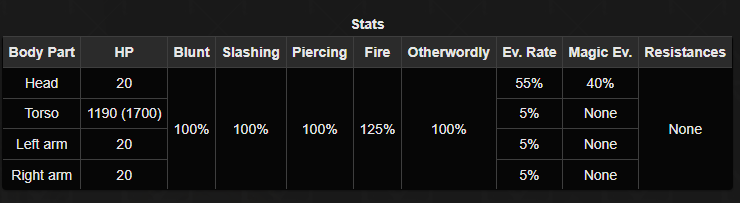 For a guy whose backstory goes into detail about his frailty, Enki has a remarkably sturdy torso. Far more HP than the more physically capable Cahara has. Anyway, Enki is a fairly simple fight and I approached him pretty poorly in the video. His right arm can cast Needle Worm and Locust Swarm, the former just being really light and unthreatening damage while the latter is pretty annoying with its high chance to confuse. The left arm will sling out Hurting, with a flat 50 damage dealt and a good chance to blast off a limb. Enki's head will summon a Skeleton to the battle, who attacks for low blunt damage. Should you destroy both of Enki's arms, he will be thrown off balance as if he lost his legs. Fortunate, since he doesn't have legs to target in the fight. It's pretty simple to take him out with two characters, just destroy the arms and follow up with a headshot. Should he summon a skeleton, the fight will automatically end upon his death, and the skeleton will fall alongside him. D'arce 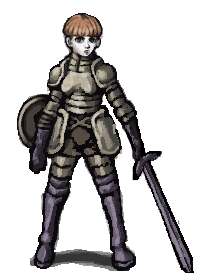 Phobia(s) Triggered: None 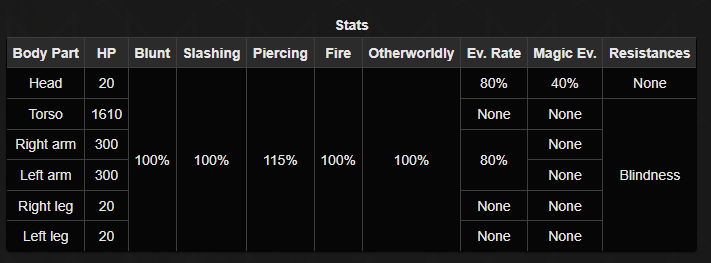 We're not going to have a chance to see the enemy version of D'arce in this LP, so may as well cover her now. Upon saving D'arce from the Cavedwellers, you have a chance to act extra tsundere and attack her afterwards. There are also some events involving Le'garde and Ragnvaldr that can prompt a fight with her though you'll likely have enough sense to avoid these. D'arce is extremely durable and fights very straight forwardly. She'll launch a slashing attack with her sword, and has a chance to perform Leg Sweep with it. Leg Sweep is one of two limb destroying attacks in the game that goes after Legs exclusively. It's additionally a multi-targeting move, hitting the whole party. Only your protagonist cares about losing their legs, so as long as you have the Salmonsnake Soul on them, you'll be fine. D'arce's arms have extremely high physical evasion, so unless you have magic it is advised to avoid going for them and instead just take out her legs and go for the follow up headshot. If you have Hurting or Black Orb, you can easily blast her sword arm off and then kill her in safety after. Since the Domination soul isn't required anything, D'arce's skills on their own aren't that great save for Fast Attack, and saving D'arce denies you the Cavedweller's merchant, there's really not any reason to ever fight her. If you do kill her, you can loot her for the equipment she joins with and the added extras of 1 blue vial and 20 Silver coins. D'arce is way more valuable as an ally though, so I really couldn't recommend this. The Yellow King 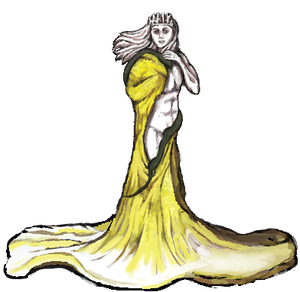 Phobia(s) Triggered: None 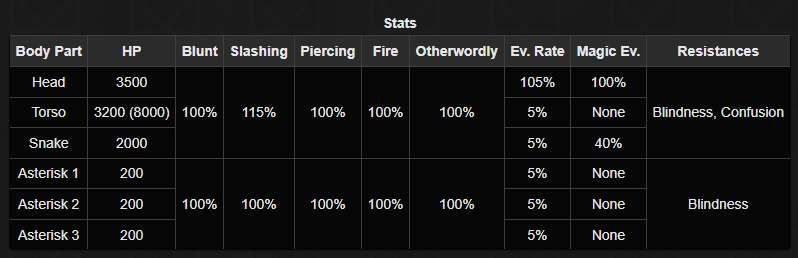 The ascended form of Le'garde, the Yellow King is remarkably unthreatening if you know what you're doing. That Snake on his shoulders will periodically heal him, though not for a great amount and it's pretty durable, so it's wise to just ignore it. The Yellow King will summon an asterisk each turn, up to a maximum of 3. These asterisks will either heal every part of the Yellow King for a fairly unimportant 180 HP or so, or hit someone in the party for small but untyped and therefore unresistable damage. The main threat of this fight is that the Yellow King will use a coin flip attack every turn called Salvation. This attack will insta kill you should you fail the flip or not guard against it. All this coming together, the Yellow King's difficulty largely boils down to how many party members you reunited with before fighting him, and what kind of attacking options you actually have at your disposal. As shown in the video, the combo of Burn and Poison absolutely melts the Yellow King, and if you inflict both on the first turn, the fight will be over at the end of the second, well before he can do anything. Luckily, if you're in a bad way and lack the tools to defeat him, you can simply kneel to him and get Ending C-II instead. A win's a win, right?
|
|
#
?
Jan 21, 2024 15:00
|
|
|
We officially have our winner for the Dungeon Nights protagonist poll, everyone's favorite emaciated occult enthusiast Enki! But a protagonist alone, a dating sim does not make, so next we'll be running polls to determine who our plucky protagonist will be pursuing! I'll be throwing up two polls later tonight, each containing 4 date options, and I will run a third poll on Wednesday with the highest scoring date options from the previous polls. Let's make this a moist and terrifying prom to remember!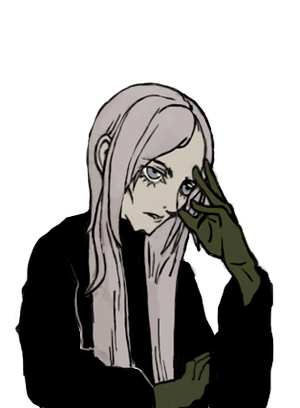
|
|
#
?
Jan 21, 2024 16:33
|
|
|
Polling for who we will go after in Dungeon Nights mode has commenced! Once you select your protagonist, you have a choice of 8 lovely people to pursue. In order,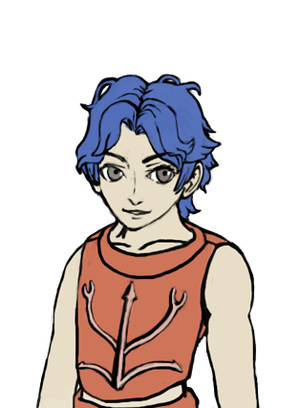 The dashing but lewd and flirtatious Cahara 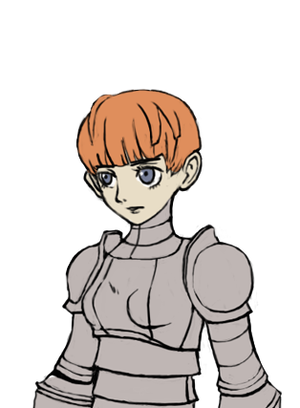 The outwardly strong but emotionally frail D'arce 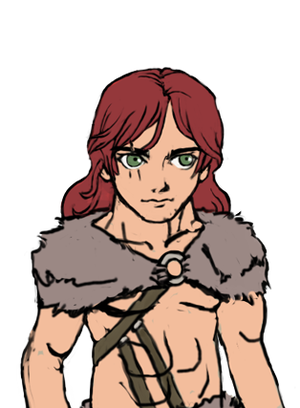 The all around Man's man, Ragnvaldr 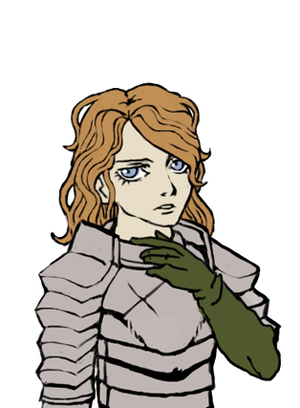 The charismatic yet aloof Le'garde 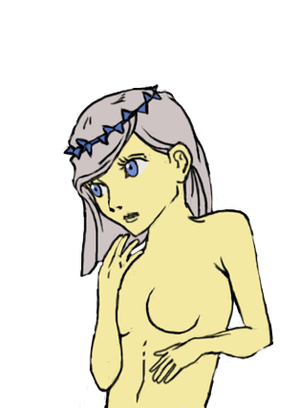 The endlessly energetic Nilvan 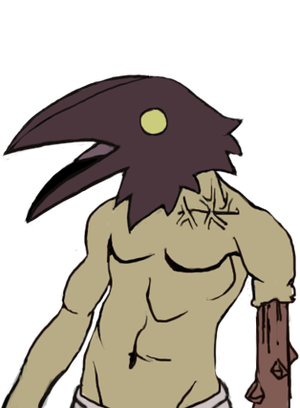 The too cool for school and athletic Crow Mauler 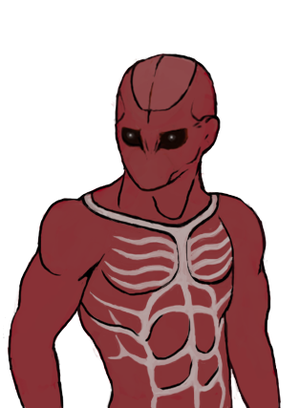 The strongly silent yet oh so rugged Tormented One  And the sex offender, Pocketcat I will be running two polls to collect votes for all these characters. Once Wednesday rolls around, I will delete the polls and run a new one with the highest scoring candidates in the running. This poll will close on Sunday. As always, any ties will be decided with a coin flip. Vote at the below links now! https://www.youtube.com/post/UgkxU_6G4X_W8-wDq61-yb5rYDNLsEUeBxgY https://www.youtube.com/post/UgkxGtX3xZsYrXktcVgNVkrWCxAZMXpaInVJ
|
|
#
?
Jan 21, 2024 20:47
|
|
|
Enki actually blasted a leg off of Le'garde. And as you said, leg damage doesn't affect the non-protagonist so... eh.
|
|
#
?
Jan 21, 2024 21:30
|
|
|
Keldulas posted:Enki actually blasted a leg off of Le'garde. And as you said, leg damage doesn't affect the non-protagonist so... eh. My reading comprehension coming in strong as usual. That text flashes by so quickly in such a small portion of the screen, whenever I see a limb get lobbed off I just assume arm.
|
|
#
?
Jan 21, 2024 21:43
|
|
|
It's rather weird to me that Nas'hrah doesn't have a fire based combat spell considering how often he just resorts to it on the map. They couldn't give him Combustion or Pyromancy Trick....? It's also rather amusing to me that you don't get him as a party member in the void for a very sensible reason. He KNOWS it's a terrible plan to engage with the new god business. I love how that's another factor that communicates how just much of a trap it is, really. It really does amuse me how bad Le'garde's plan is. The game keeps endlessly showing the sheer number of ways things could've went wrong for him.
|
|
#
?
Jan 21, 2024 23:26
|
|
|
Nas�hrah does have Pyromancy Trick, it�s just a pretty terrible spell so I never use it. Because Nas�hrah isn�t immune to passive mind loss in the overworld, I usually default to Greater Hurting with him to get the most bang relative to mind spent. I pull out Black Orb when I need the extra hits to fish for headshots moreso than the higher damage if all hits connect. My best guess is that Le'garde was so confident in his prophesized status, he genuinely believed that fate would take his side and everything would work out how he hopes. In most playthroughs, it's safe to say his confidence was misplaced. As we'll see in future playthroughs Le'garde's role in the greater scheme of things has already been fulfilled, and it's someone else who has a profound destiny ahead of them. Le'garde is ultimately irrelevant, as reflected in the fact you never even need to confirm his status and most Endings happen independent of whatever happens to him. CullenDaGaDee fucked around with this message at 00:12 on Jan 22, 2024 |
|
#
?
Jan 21, 2024 23:37
|
|
|
https://www.youtube.com/watch?v=W6LC2HkFVLM Part 9 is out! We begin our third playthrough and begin working towards Ending B. This go around we're Enki... sort of. Enki is pretty bad so I figured this run would be as good a chance as any to show off just what happens when you Show Love to an appropriate (relatively speaking) party member at a ritual circle. Ending B requires that we cut the three organs to access the alternate final area, which does involve slaying 3 of the 4 New Gods, but Francois can be ignored entirely. To best demonstrate the bulk of changes on Terror & Starvation, we will be properly facing off against the New Gods we have to fight. This video is mostly setting ourselves up for clearing the task ahead of us. We'll need to secure equipment in the next video, but otherwise we will quickly get to work annihilating the required New Gods. I'm not going to go super in depth on all the changes we saw for Terror & Starvation in the notes for this post, as I'd like to make a dedicated mechanics post about the difficulty settings in the near future. Unique Equipment Available Sergal Spear: The de facto ultimate weapon in the game, with a tremendous +120 attack power. Not only does it hit for around 600 damage on average, few things in the game can withstand a critical hit from it. The price of 4 arms can be tricky to fulfill, but as shown in the video there are easy ways to obtain those with no real loss. Probably the next best alternative for getting this weapon is sawing off the arms of two characters you were planning to form a Marriage with anyway. If you can obtain the Sergal Spear, you probably should. It is a two handed weapon, so be extra mindful of your arms if you want to use it! Extra Notes -Enki actually does have some pretty interesting options at his disposal should you forgo Dash. In particular, starting with Necromancy and a Soul Stone if you pick the relevant options can be a fantastic way for getting him started on his preferred playstyle. Since we're playing on Terror & Starvation however, we simply cannot afford to sacrifice the speed Dash gives us. -It bears reiterating, the Hounds will always follow you into the Entrance Hall, regardless of if you hear the barks incoming before hand or not. If you travel through the Level 2 Basement and enter the Entrance Hall from the Inner Hall, you can avoid this event. That is luck based for every character other than Cahara, however, due to the random chance of getting the locked door layout for the basement. -I'll be real, I flatly hate the Torch mechanic. There's a very finite number of guaranteed torches in the game, and getting extras is wholly dependent on loot RNG. While I've never had a run fail due to running out of torches, I have cut it very close. Since torches only burn for about 3 minutes of real time, it is extremely difficult to complete the game if you don't start with Dash. I won't say it's impossible, but I have to imagine any run that starts without Dash needs to make getting it through any means necessary a top priority. While the game is still technically playable without torches, the ambient light is so low to non-existent in many areas of the game that it is tantamount to playing it with your eyes closed. -Not every enemy gets HP buffs in T&S, but it's safe to assume any enemy that can deal limb damage or other nasty maladies does. Pretty much the only character who can reliably take down guards without taking damage at the start is Ragnvaldr if he starts with the Axe. -If you want to recruit Ragnvaldr, be sure to do so before entering the Ancient City! For both him and recruit Enki, terrible fates befall them once you enter deep enough into Ma'habre on Terror & Starvation mode. -I didn't draw attention to this in the video because torches force me to move quickly, but Buckman will always meet up with Ser Seymor regardless of whether or not you talked to either of them once you kill Trortur. Amusingly, it's possible to enter the Inner Hall from the Blood Pit, kill Trortur, and then immediately turn around and venture back to the Level 3 Basement where Buckman will greet you as if you did talk to him even if you've never even seen him. -From a practicality stand point, you should always take the Silver Coins from Buckman. The Ring of Wraiths he gives for completing his quest is available way too late and it only modestly useful regardless. -Counter Magic can interrupt the Yellow Mages dance to prevent Hurting, though this is pretty pointless since you can accomplish the same thing by just destroying a single leg. On the topic of Yellow Mages, don't even bother with going for the Locust Swarm arm, it has 300 HP and 40% physical evasion on T&S and Hard mode, making destroying it a crapshoot. Just take out the legs and go for a head shot since they also have 900 torso HP on this mode. -Even if you come back with the Stone Crown, stealing the Cube of The Depths makes the Cavedwellers without it makes them permanently hostile. It's generally not practical to put off getting the Cube before you have the Crown, so make sure you do any shopping you want to before hand. -I did not intend specifically to pick up Blood Sacrifice in this video, but I might not get another chance so I figured why not? Had I know I'd get an Empty Scroll for it in this video, I likely would have picked God of The Depths for Enki's maxed affinity. -Due to their copious amounts of resistances and low maintenance, it's not too terrible an idea to pick up at least one skeleton for a normal team. They're negligibly weaker on offense compared to a controllable character, and just as capable of soaking up damage. -Ghouls on the other hand are trash and should largely be gotten for their sacrificial uses. It's worth noting that since they can't actually equip anything, they are unaffected entirely by losing arms. The most practical purpose of them in battle is as pre-deployed meat shields. Blood Golem takes a turn to set up, Ghouls do not. The fact that they need to be fed makes it really undesirable to keep them around longer than you need them for. -Walking over one of those bear traps in the Tomb of The Gods is essentially a run ender, forcing a save reload on T&S and a complete restart on Hard Mode. You move way too slow crawling around to finish the game before you run out of torches. -Since Enki is primed to pick up Ghouls very quickly, and the Marriage of the Flesh eliminates all his weaknesses, there's basically no reason not to form a Marriage with him unless you're going for his S Ending, which forbids the use of Marriage. I'll be going more in depth on the Marriage when I write a dedicated character post for them. -I meant to mention this in the video, if you do form an Abominable Marriage, it does have the interesting perk of making you immune to detection by Guards. Apparently you're so deformed they recognize you as kin at that point. -Since the Sergal Spear is a two handed weapon, being a Marriage is the only reason I elected to get it. Both Enki and Skeletons are unable to use it, and our final party slot will be a Nas'hrah, who is also unable to use it. -You get some serviceable items from looting Jeanne's body, so once again it's best to abandon a member of Buckman's crew to their fate. -I'll probably mention this in the next video, but may as well say it here now. Now that we've entered the Ancient City, Crow Mauler has been despawned. You'll occasionally hear his siren, but he won't enter the map. You can still fight him if you fail the coin toss for using his bed, but otherwise we can no longer encounter him and he's completely unavailable on Hard Mode where you can't save at all. This is most likely a bug rather than a feature.
|
|
#
?
Jan 22, 2024 01:19
|
|
|
Turns out Le'Garde is an rear end in a top hat. Who woulda thunk.
|
|
#
?
Jan 22, 2024 03:54
|
|
|
Don't think I've seen it mentioned on any page yet: The character of Trortur - a former heroic soldier, who was tortured by the enemy, and in turn became a pathetic torturer himself - seems to be heavily inspired by the character of Inquisitor Sand dan Gloka from Joe Abercrombie's fantasy books.
|
|
#
?
Jan 22, 2024 08:21
|
|


|
Trortur's voice. Was done so appropriately in the videos. That in hindsight I remember the game as being fully voiced for dialogues. Some of the voices are done at audiobook levels of good. And I do appreciate that effort. I watched the Fear and Hunger 2 videos. And one of the early questions was along the lines of "I don't know if I'll keep voicing the dialogue" And I went "Nooo please keep doing it! Then I remembered that the video in question is almost a year old. And all dialogue did remain voiced.
|
|
#
?
Jan 22, 2024 10:11
|
|
|
I think I can be pretty cheesy and over the top, but I appreciate the kind words toward it. I mostly opt to read the dialogue and text in text heavy games for the benefit of those who like long videos as background noise.
|
|
#
?
Jan 22, 2024 13:05
|
|
|

|
| # ? May 4, 2024 19:30 |
|
|
I watch videos while on my treadmill, so the text is too small to read comfortably while jogging. The reading makes all the difference for me.
|
|
#
?
Jan 22, 2024 14:16
|
|